الوسم: Triple-A Games

  • Mastering Bardock in Dragon Ball: Sparking Zero Guide

    Mastering Bardock in Dragon Ball: Sparking Zero Guide

    Goku is arguably the most recognizable figure in the Dragon Ball franchise. Throughout the series, he has faced numerous adversaries, often in overwhelming situations, and has attained remarkable power. Yet, it’s essential to remember the person who initially changed the course of his life—his father, Bardock.

    In Dragon Ball: Sparking Zero, Bardock stands out as a fast and moderately strong character with impressive combo potential. This guide will explore Bardock’s abilities in detail, including his skills, special moves, and combo techniques, offering strategies to help you dominate with him in battles.

    Bardock

    Combos

    Move Name

    Input

    Description

    Knock Back Blast

    Melee Button + Ki Button

    Releases a delayed blast that pushes the opponent away.

    Gut Punch

    2x Melee Button + Ki Button

    A swift strike that briefly stuns the opponent, preventing counterattacks.

    Spin Kick

    3x Melee Button + Ki Button

    Forces the enemy to spin away, making it harder to defend against subsequent attacks.

    Bicycle Kick

    4x Melee Button + Ki Button

    Unleashes a rapid series of kicks that deliver moderate damage.

    Skills and Special Moves

    Move Name

    Input

    Cost

    Description

    Shockwave Of Rebellion

    R2/RT + Up on the D-Pad

    4 Skill Points

    Generates a shockwave that interrupts the opponent’s melee moves and knocks them back, refilling Ki Gauges and activating Sparking Mode instantly.

    Saiyan Spirit

    R2/RT + Left on the D-Pad

    3 Skill Points

    Boosts all damage for a limited time upon activation.

    Riot Blaster

    R2/RT + Melee Button

    3 Ki Gauges

    Fires a powerful beam that deals moderate damage and can track the opponent.

    Final Revenger

    R2/RT + Ki Button

    3 Ki Gauges

    Rushes toward the opponent for a solid damage hit upon activation.

    Final Spirit Canon

    R2/RT + Perception Button

    Sparking Gauge

    Charges and releases a powerful beam dealing significant damage to the opponent.

    Bardock in Versus and Online Matches


    Though Bardock may not pack as much power or deal as much damage as many other characters in the game, he should not be underestimated. His strength lies in his ability to maintain pressure on opponents with flashy combos and low-cost special moves. Despite the high costs of some of his skills, they can greatly boost his damage potential.

    To maximize your damage and keep your opponents guessing, combine your melee attacks with the combos mentioned above while incorporating some quick vanishes.

    One of Bardock’s standout abilities is the Shockwave Of Rebellion, which serves as both a combo breaker and a tool to trigger his Sparking Mode. Using this ability can help you escape enemy combos safely and turn the fight in your favor. However, be cautious as it consumes a significant number of your Skill Points, which can leave you vulnerable if used at the wrong time.

    Consider using Shockwave Of Rebellion as a bait technique by provoking the opponent into a rash offensive before countering their moves.

    Bardock also boasts a variety of special moves, such as the Riot Blaster, a beam attack that can track opponents, and the Final Revenger, a straightforward dash attack. His ultimate move, the Final Spirit Canon, launches a devastating beam that inflicts heavy damage.

    To maximize damage from the Final Spirit Canon, activate the Saiyan Spirit skill first, then unleash a flurry of attacks on your opponent. Follow this up quickly with the Final Revenger and end with the Final Spirit Canon right after.

    Further enhance the damage of the Final Spirit Canon by tapping the R2/RT button during its startup phase.

  • Locating Spy Notes in Treviso: A Guide for Dragon Age Players

    Locating Spy Notes in Treviso: A Guide for Dragon Age Players

    The Antivan Crows are committed to defending Treviso from various dangers in Dragon Age: The Veilguard, but they have their flaws. Unfortunately, it appears that some individuals have chosen to betray the Antivan Crows and the city itself by allying with the Venatori.

    Treviso is already grappling with the presence of the gods and the Antaam in the city, so the addition of blood mage cultists is the last thing they need. It falls to you to assist the Antivan Crows in uncovering the identities of those collaborating with the Venatori and their motivations.

    How to Discover the Spy’s Information


    Fast travel to the Cantori Diamond in Treviso. Interact with the scroll on the round table beside the circular red couch marked with a quest icon and read it to initiate the quest.

    Once outside, cross the zipline to the Crow’s Road Rooftops, and proceed through the open doorway where you will encounter several Venatori and a level 25 Blight Cyst required for the Gate of Deep Sorrow quest.


    Player Rook, Davrin, and Lucanis standing near a note on some wooden debris in Dragon Age: The Veilguard.

    Defeat the three Venatori and search for a readable note on some wooden debris located near where the Venatori were initially standing.

    Return to the Cantori Diamond and speak with Chance, the man standing to the left of the catwalk, to uncover more details about the note.

    How to Locate the Dead Drops

    Next, fast travel to the beacon at the entrance of the Drowned District. Here, you will need to investigate three specific locations, all conveniently found near the Drowned District beacon:

    • The first location can be found in a room to the east, where the note sits on a round table in the corner.
    • The second location is situated in a building near the docks. Access it by moving up the stairs to the west, then going through the door in the southwest corner. The note is on a rug on the balcony, surrounded by pillows.
    • The third location is in the same building as the second note. Here, climb the ladder blocked by wood at the end of the hall, and you’ll find the note on a table to your left.

    Return to Chance at the Cantori Diamond one last time to finalize the quest. As a reward, you’ll receive some experience points, 200 Gold, five Fade-Touched Crystals, and 100 Reputation with the Antivan Crows.

  • Tracking Companion Approval Status in Dragon Age: The Veilguard

    Tracking Companion Approval Status in Dragon Age: The Veilguard

    For many players, the bond with companions is as significant as the combat or main storyline in BioWare’s games. In Dragon Age: The Veilguard, you have the choice of seven companions for your party. You can also engage in romantic relationships with any of them, and your approval ratings and relationship status play a crucial role in how you advance with each character.

    Your relationship level not only determines your romantic options with a companion but also influences the gear they can use and their effectiveness in battles. Therefore, it’s important to enhance your relationship as much and as fast as possible.

    How to Check Relationship Level and Status

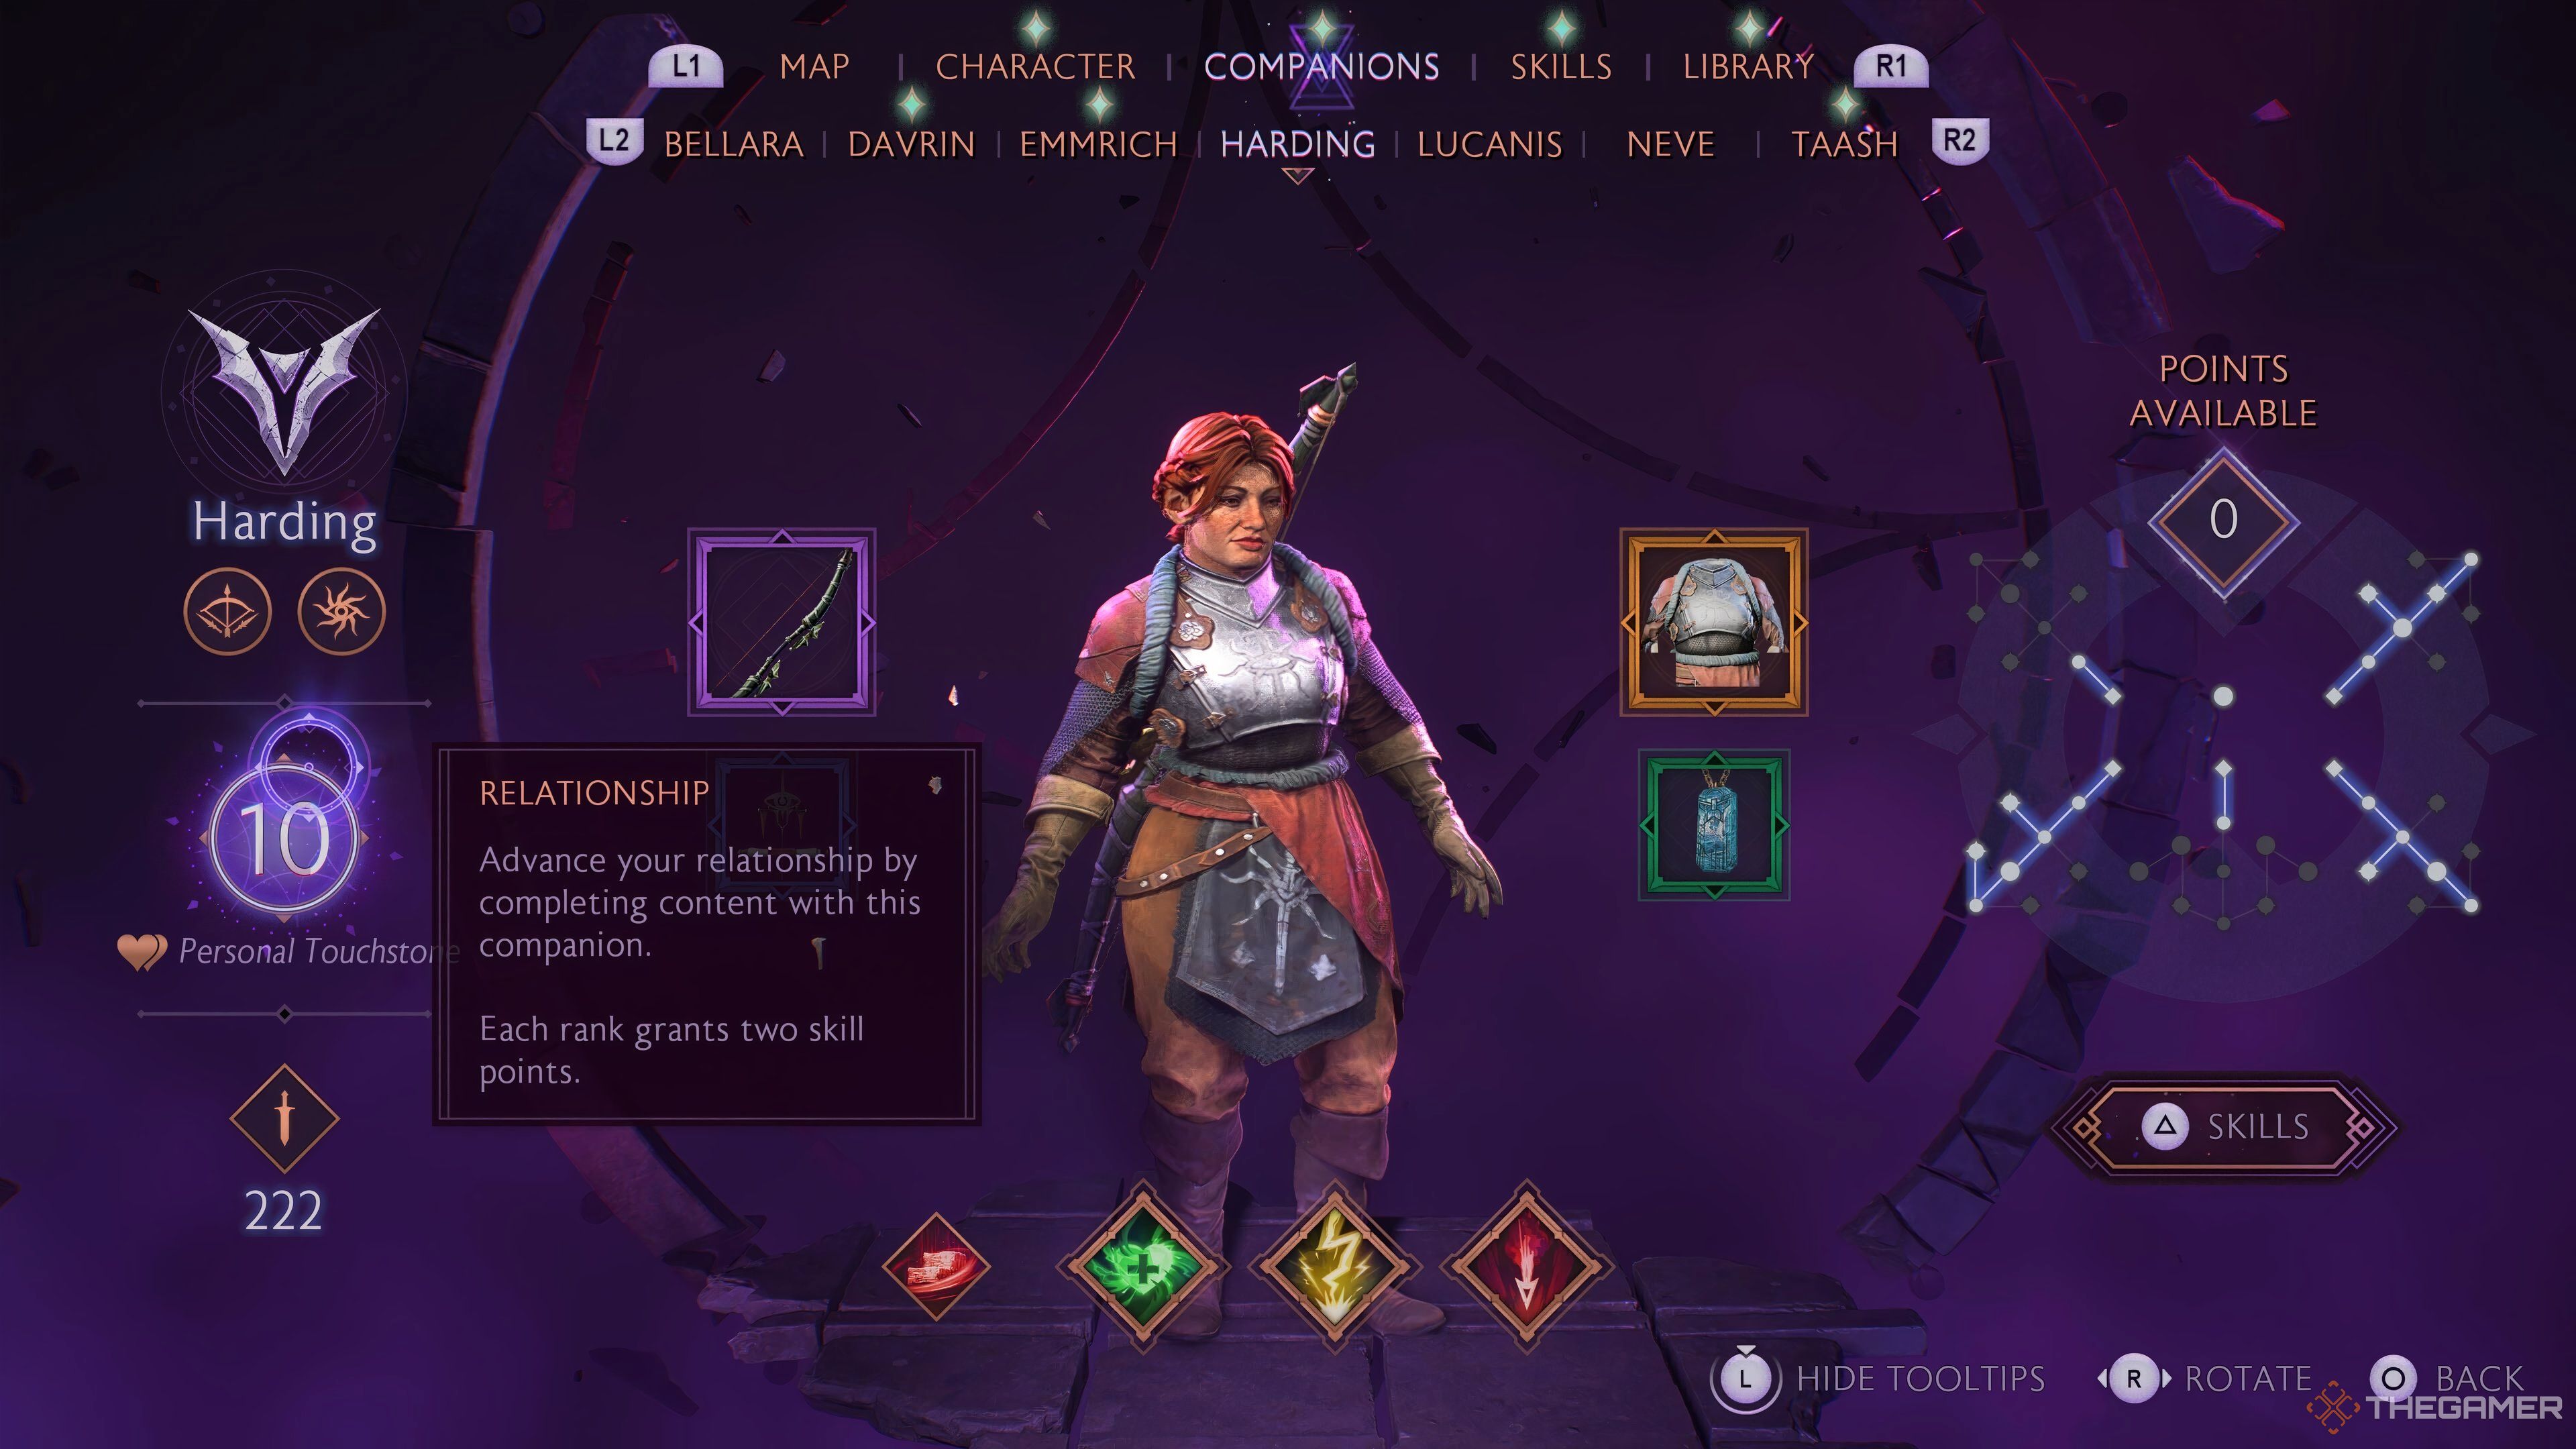
    To see your relationship status, go to the map screen and navigate to the Companions tab. From there, you can select any companion to view your relationship level with them.

    On the left side of the companion’s screen, you will see a number within a circle. This represents your relationship level, and the surrounding circle indicates your progress towards the next level.

    To make progress and fill in that circle, complete side quests for the character, engage positively in team conversations, and include them in your party during quests.

    What Is the Maximum Relationship Level?

    Harding's companion screen in Dragon Age: The Veilguard showing max relationship level of 10.

    You can achieve a maximum relationship level of ten with any companion.

    Reaching level ten requires significant effort, so if you want to maximize a character’s relationship, it’s best to keep them in your party as much as possible.

    While all characters follow the same 1-10 level progression, the names given to each level differ based on the companion’s backstory.

    Understanding the Hero of The Veilguard

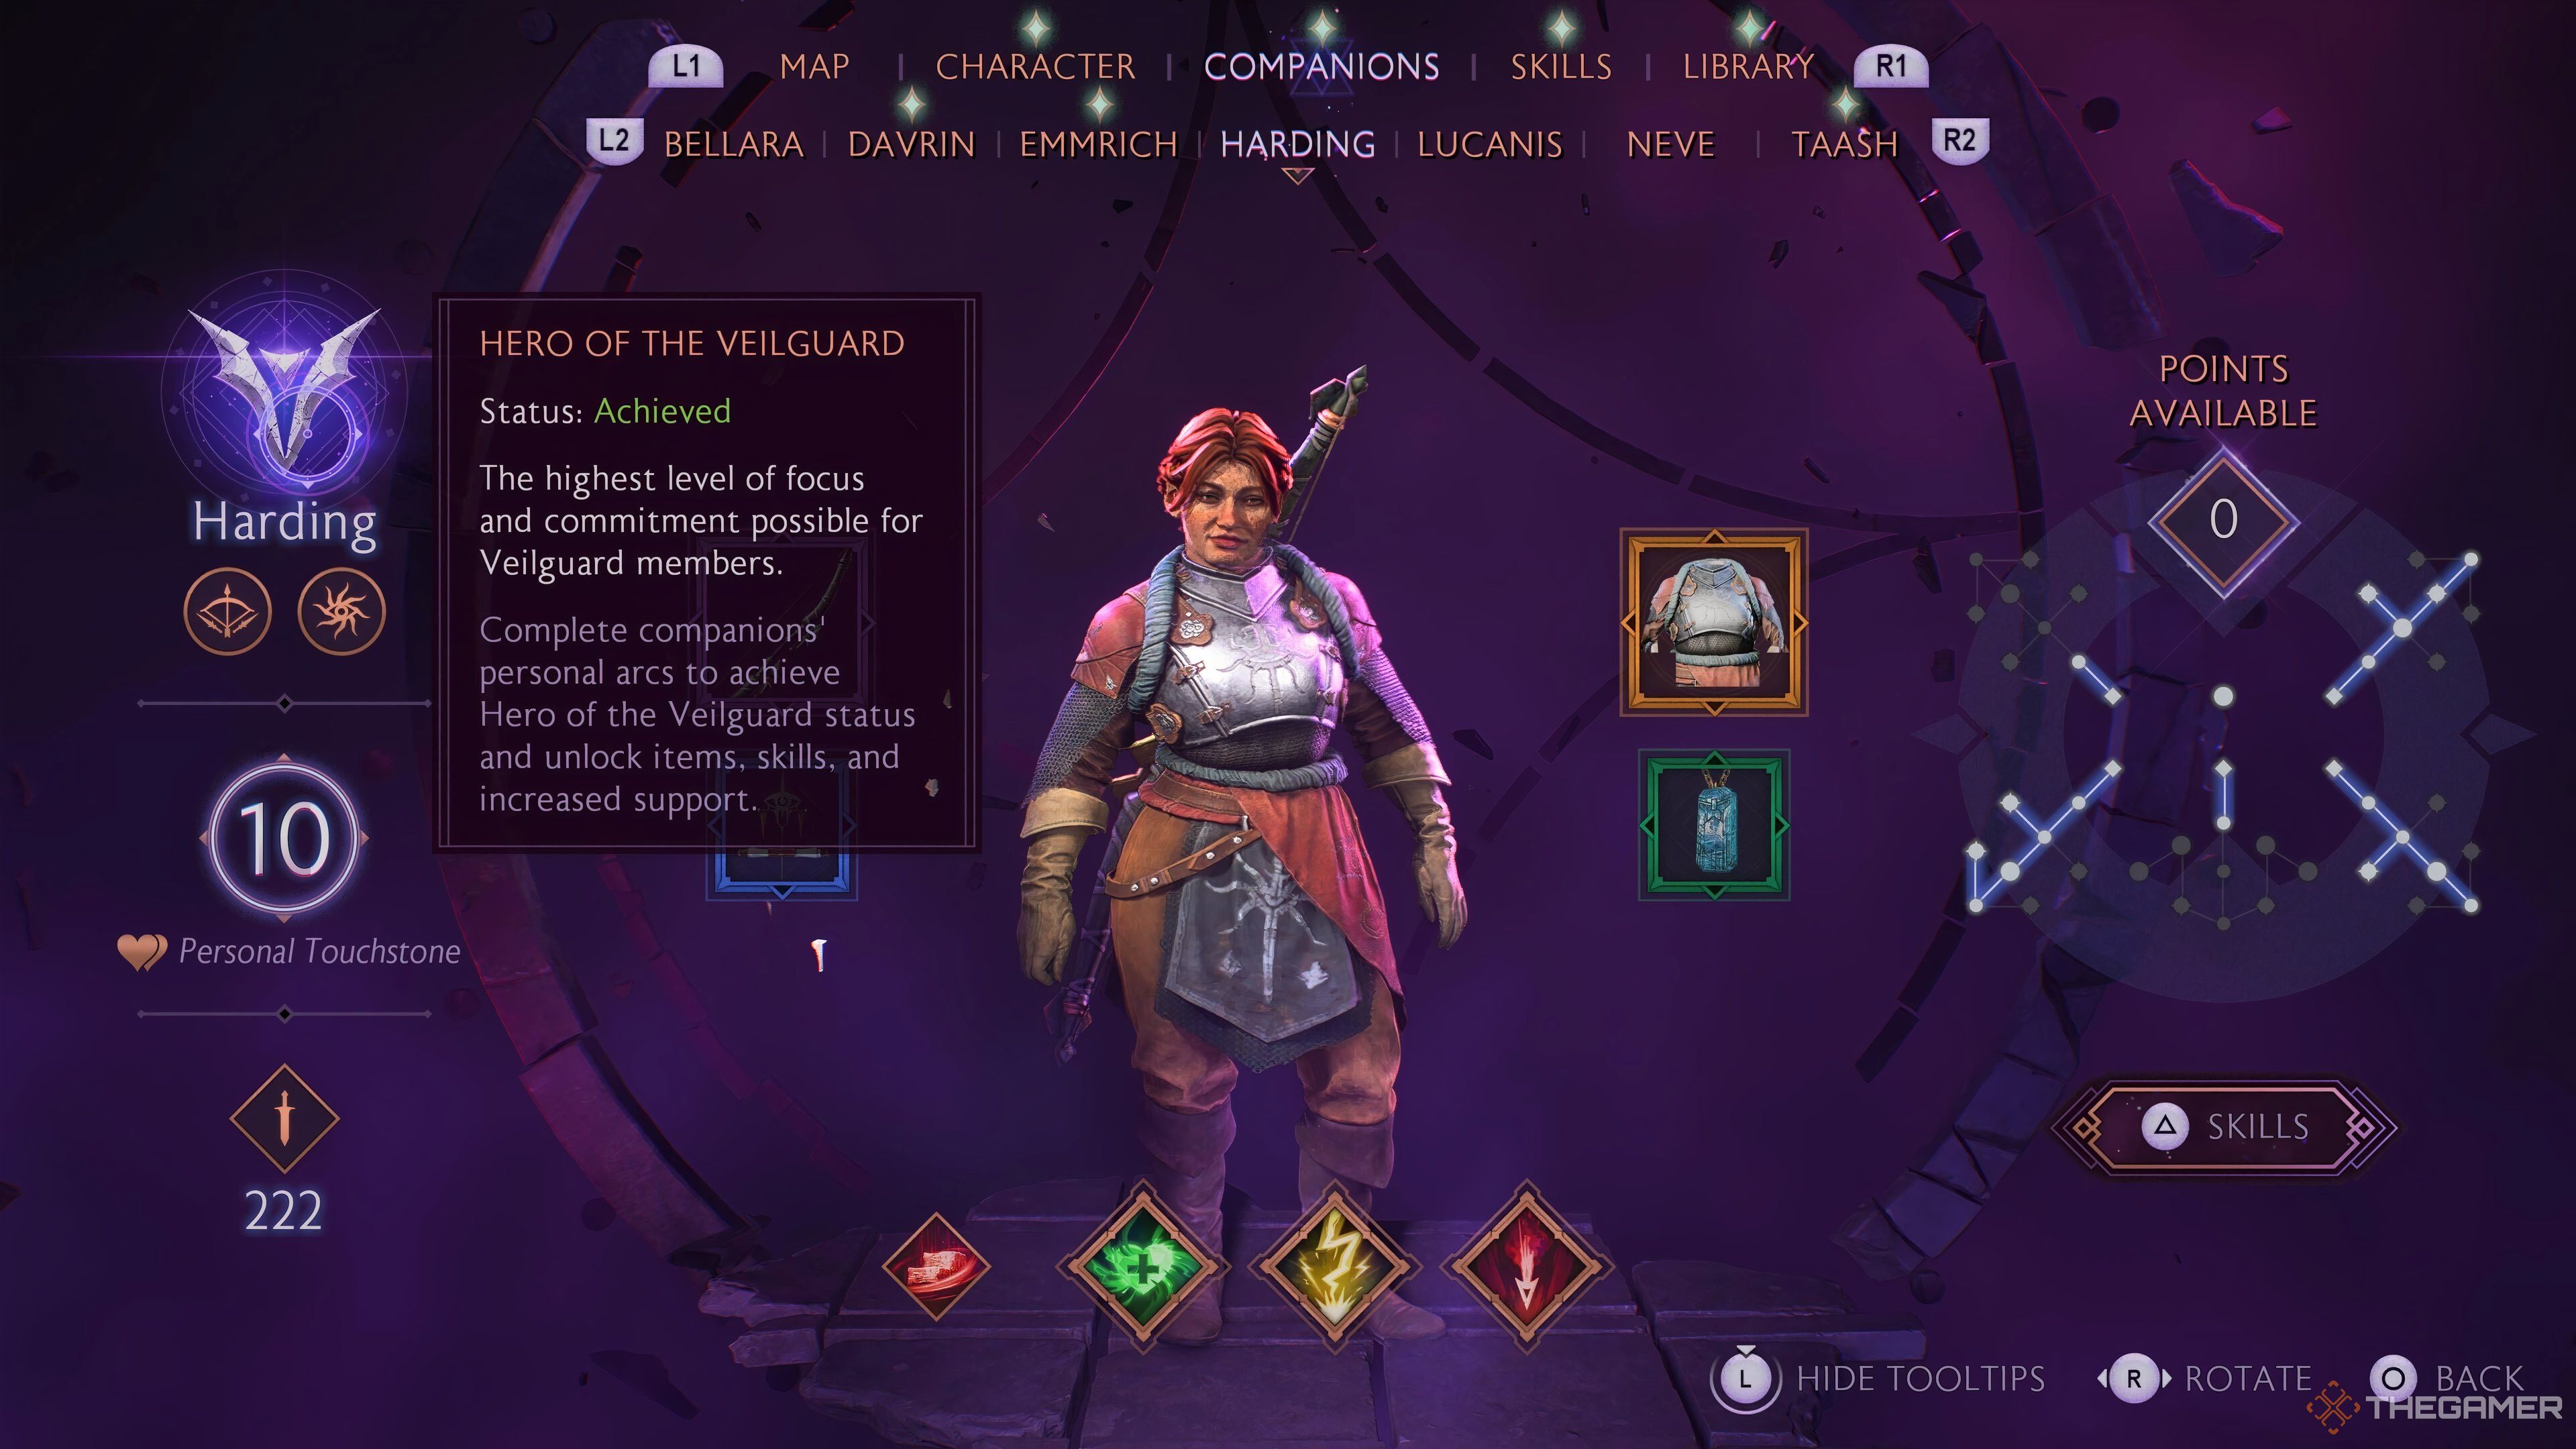
    Hero of the Veilguard status in Dragon Age: The Veilguard.

    Before reaching the maximum relationship level, there is an additional tier known as the “Hero of The Veilguard.” Described as “the Highest Level of focus and commitment possible for Veilguard members,” this status appears on the companion screen.

    This status is essential at the game’s conclusion; it impacts the crucial decisions you make, unlocks legendary equipment for that character, and grants access to new abilities.

    To achieve the Hero of The Veilguard status, you must complete the character’s personal side quests. Once obtained, a small icon will be displayed next to the companion when you select your party prior to a quest.

  • Conquer Elgar’nan in Dragon Age: The Veilguard Tips

    Conquer Elgar’nan in Dragon Age: The Veilguard Tips

    The Dread Wolf Rises serves as the final quest in Dragon Age: The Veilguard, marking a pivotal moment where there’s no turning back. The quest kicks off and concludes with a significant choice, featuring a challenging boss fight in between, so be prepared to give it your all.

    Before you set off, be sure to chat with Isabela. She’s offering items from either the Antivan Crows or Shadow Dragons—whichever faction you didn’t assist—allowing you to gather some essential supplies. We recommend bringing Taash and Emmrich into the final battle since Elgar’nan is vulnerable to Necrotic damage but resists Electric attacks. Also, you’ll encounter Darkspawn that are weak against Fire along the way. But first, you must make a choice.

    Who Should You Send To Help The Factions?

    This choice is relatively straightforward compared to some previous decisions. The optimal candidates for helping are Harding or Davrin, depending on who has made it this far.

    As long as your companion is a Hero of the Veilguard or the factions have a solid strength (at least two stars in each faction except Crows/Dragons), your chosen character will survive until the game’s conclusion but will be unavailable for selection during that time. If you’ve kept all but one character alive through earlier quests, you’ll unlock The Ones That Last Trophy/Achievement upon completing this quest.

    How To Defeat Elgar’nan

    You’ll need to fight your way through a large number of Darkspawn before confronting Elgar’nan, a scenario you’ve likely faced before. As usual, focus on eliminating the Emissaries and Blighters first, then push through this linear combat scenario. Eventually, you’ll face Elgar’nan himself.

    Elgar’nan boasts a massive health bar and frequently moves or teleports, but he remains in the same arena, so utilizing Emmrich or Lucanis for Necrotic damage and triggering Detonations is crucial for defeating him. Just be aware of these key attacks:

    • Crackling Electricity: When the ground around Elgar’nan turns red, he’ll summon lightning. Dodge away and use a ranged attack from outside the danger zone.
    • Summon Lightning: Immediately after, he’ll call down bolts in smaller red circles. Use your abilities and keep moving to dodge them.
    • Aspect of Elgar’nan: These ghostly forms are weak but can deal significant damage. Move in and attack them quickly with melee strikes.
    • Sword Attacks: When Elgar’nan hovers backward, he’s about to swing his sword. Dodge backward repeatedly to evade the hit.
    • Energy Balls: These ranged attacks can be either parried or avoided when you see the aim line glowing. Make your way towards him for a close attack while dodging these strikes.

    Don’t forget to use the Ultimate Salvation of Felassan if Morrigan provided it to you after her quests.

    Elgar’nan’s Second Phase

    Once Elgar’nan’s second phase begins, you won’t have your companions to assist. The damage you can deal to him during this time will be minimal, so just focus on dodging his attacks until the cutscene triggers. After that, you’ll face him again with your companions back at your side.

    During this second phase, Elgar’nan’s elemental weaknesses change. He will resist Fire now but will be vulnerable to Cold, and he gains a few new attacks, including:

    • Slam Attack: A combination of crackling electricity and his sword move. Dodge away when he jumps.
    • Ring of Fire: When red circles surround the arena, rush to the center and perform a melee or heavy attack on Elgar’nan.
    • Sword Attack: Similar to before, but this time the sword is ignited with fire.
    • Fireballs: Unlike the previous lightning attack, these bombs now travel in a line, making them easier to dodge but more powerful.

    Should You Fight Or Trick Solas?

    While the first choice was somewhat straightforward, this one is even simpler—it truly doesn’t matter. If you opt to fight Solas, rest assured that you won’t actually have a battle with him; the choice only changes how the game concludes emotionally.

    Having Mythal’s Essence from either defeating her or convincing her after viewing all memories of Fen’Harel affords you the best ending. Solas will agree to bind himself to the Veil, resulting in a happy resolution.

    If you choose to trick Solas, he’ll realize too late, congratulating you on your cleverness as he finds himself trapped in the Veil. This offers a happier resolution compared to direct conflict, but the material outcome is unchanged.

    Opting to fight Solas results in an absence of a boss fight; instead, events unfold in a cutscene where he is forcibly bound to the Veil. Regardless of the approach, the ultimate outcome remains the same: the Veil gets sealed, the gods are thwarted, a celebratory gathering ensues, and so forth—but Solas will remain frustrated and unchanged in his perspective.

    How much impact your choices may have on potential sequels remains uncertain, as Solas views things quite differently based on your decisions. However, for now, regardless of your choice, Solas loses, the Veilguard triumphs, and soon after, the credits will roll.

  • Conquer Entarus The Rekindled in Dragon Age: The Veilguard

    Conquer Entarus The Rekindled in Dragon Age: The Veilguard

    The Gate of Faded Glories challenges you to confront a Champion in Dragon Age: The Veilguard. Defeating this Champion is essential for thoroughly exploring the Crossroads. After battling the unsightly Blighted Cyst lurking in the Arlathan Forest region, you will encounter Entarus the Rekindled.

    Since Entarus the Rekindled is Vulnerable to Fire yet Resistant to Necrotic damage, we recommend bringing along Taash or Davrin and either Neve or Bellara to trigger some Detonations. With their help, you’ll quickly collect the Champion Essence.

    How to Defeat Entarus The Rekindled

    Be aware that the area around the Blighted Cyst is typically guarded by Darkspawn, which will match your current level, while Entarus remains a static level 25. If you wait until later in the game, you might face tougher foes like level 45 Greater Hurlock Blighters, so it’s wise to handle this sooner rather than later.

    Eliminate these enemies before you engage the Cyst.

    At the start of the fight, Entarus is slow to emerge from the Cyst, appearing somewhat dazed. Take advantage of this moment to unleash some heavy attacks on its Blight Armor. Once the armor is down, unleash a Fire Ability using either Taash or Davrin, and then activate Detonation with Neve or Bellara.

    Keep an eye on Entarus’ mace — when it swings back, you’ll need to dodge. Also, be alert for when the ground around Entarus starts glowing red or a red stripe appears — this indicates an incoming high-damage, unblockable attack.

    Entarus will also charge at you, so remember to dodge as necessary. The blue lights above Entarus’ head represent its spell attacks, which will launch once all five are filled (they recharge with time).

    These attacks resemble those from the Venatori and Shades, presenting an opening for you to dodge in and strike Entarus while it’s vulnerable.

    What Rewards Do You Get from the Gate Of Faded Glories?

    Gate Of Faded Glories rewards in Dragon Age The Veilguard

    In addition to securing the Champion Essence, you’ll receive several rewards from the Gate of Faded Glories. While playing as a Rogue, I found an upgrade for the All-Mother’s Copse Amulet stored in a chest where Entarus was defeated, along with four Etheric Remnants, four Pale Ores, 50 Grey Warden Strength points, and 67 gold.

    Although the Champion Essence is the primary objective, make sure to collect it before leaving the area. This will unlock the Gate of Faded Glories in the Crossroads.

  • Conquering Tyrannos: Your Guide to Success in Farmagia

    Conquering Tyrannos: Your Guide to Success in Farmagia

    If you love dinosaurs, you’re in for a treat with the boss fight against Tyrannos in Farmagia. This T-Rex is not just massive; its attacks are just as ferocious. Stay alert because one lapse could lead to a swift defeat!

    In this battle, prioritize your offensive Battle Buddies. Equipping Fairy Skills that enhance their attack power is crucial for taking Tyrannos down swiftly. Additionally, some strong United Forms will be valuable as you navigate through the Ancient Glen Maze.


    When tackling the Ancient Glen Maze, it’s best to use Close-Range and Long-Range Attackers. Aim to deploy a minimum of 15 Fangs and Arkies. While this setup is sufficient, consider including Formation Buddies like Turnies for extra assistance during the boss fight. Some recommended Fairy Skills to enhance your Buddies are listed below.

    Fairy Skill

    Description

    Infighting

    Your Fangs will inflict more damage when they’re close to the boss.

    Anger of All

    This skill boosts the attack of your remaining Buddies based on how many have fallen during the tough fight.

    Blitz Charge

    Utilizing Unite Blitz attacks will significantly damage Tyrannos, making this skill a valuable asset.

    Wild Vision

    After activating a Unite Blitz, your critical hit rate increases, which will happen frequently in this battle.

    Fang of Sirius

    This skill causes your critical hits to deal even more damage to opponents.

    Enhance your Research Buddies using the seeds you collect during your maze explorations. By now, you’ll likely have unlocked some United Forms: use Wind Arkie for Arkies, Misti Pengi for Fangs, and Rock Golem for Turnies.

    How To Beat Tyrannos


    The player is defeating Tyrannos in Farmagia.

    Tyrannos appears to be a fearsome opponent that can catch you off guard if you’re not ready to block its powerful strikes. Remain focused and don’t underestimate it as its health dwindles. Your main goal should be to quickly reduce the KO Gauge to finish the fight with either a Legion Attack or Fusion.

    Watch out for its head charge attack, which you can block using Perfect Guard. It often combines this with follow-up strikes, so remain vigilant. The moment you see a white flash, it means the boss is about to leap at you, so prepare to block accordingly.

    If you prefer a defensive strategy, rely on your Arkies more. However, when you feel it’s appropriate, don’t hesitate to deploy Fangs and Turnies for additional support.

    Position your formation buddies to attack from the sides or strike the boss’s legs. Be cautious, as Tyrannos may retaliate by stomping the ground twice. Stay alert for these sudden movements to execute a perfect guard when needed.

    While the battle may seem manageable at first, prepare for a twist when Tyrannos’s HP drops low. It will glow ominously red and unleash a laser beam from its mouth. This powerful attack covers a vast area, so it’s not wise to simply run away; instead, use a Unite Counter to defend yourself.

  • Discover Tarot Card Spots in The Sims 4: Life & Death

    Discover Tarot Card Spots in The Sims 4: Life & Death

    The world of Ravenwood in The Sims 4: Life & Death is filled with eerie events. If you’ve settled into one of the pre-designed homes there, you’ve likely seen the starter tarot deck situated in your living room.

    This tarot deck comprises 26 cards. While you can perform basic readings with the cards you have, an entire community in Ravenwood is on a quest to piece together the fabled tarot deck scattered throughout the area. By venturing around and aiding some of the town’s most renowned residents, you’ll discover new tarot cards along your journey.

    This guide to the tarot cards in The Sims 4: Life & Death is continuously evolving. Check back often for updates as we unlock new cards while diving deeper into the expansion pack.

    How Do Tarot Cards Work in The Sims 4: Life & Death?


    The tarot deck serves as a new collection in The Sims 4, and collecting these cards can be quite a task. You’ll acquire them through various means as you explore the expansion. Expect to gather cards from different avenues, including side quests, unique interactions, and more. Completing the collection of 26 tarot cards will take some effort!

    You can keep track of which tarot cards you have collected by clicking the diamond icon at the top of your Sim’s inventory to access the Household Collections menu.

    Before you begin collecting cards, you’ll first need to take on a quest from the Order of Lenore, a quirky group seeking to reunite the legendary tarot cards rumored to be dispersed throughout Ravenwood. To initiate this search in The Sims 4: Life & Death, investigate the mysterious tome statues located in various neighborhoods of Ravenwood.

    • In Mourningvale, you can find the tome just outside the Town Hall near the bell tower.
    • In Crow’s Crossing, look for it south of town, nestled among the ruins near where the river widens if you venture further into the bog from the area hosting the Ravenwood Family Day festival.

    Strength tarot card in The Sims 4 Life and Death overlaid on top of Esther Gomes' house.

    Upon investigating one of these tomes, you’ll receive a prompt welcoming you to the quest of reuniting the legendary tarot card deck. This prompt will name four Sims you’ll need to become familiar with as you strive to complete your tarot card collection.

    How to Find Tarot Cards

    Once you’ve embarked on these quests, there are several ways to collect tarot cards. The goal is to engage in as many activities as possible added in the expansion. There’s plenty to discover!

    Initially, the main method of obtaining the cards is by accepting tasks from the Sims named in the tarot notification. After being introduced, you can invite them over or meet them somewhere for your next assignment. These Sims belong to the Order of Lenore, which includes:

    • Ekade Aether: A widowed father residing at the Aether household in Whispering Glen.
    • Esther Gomez: A ghost host, best found at her home in Mourningvale by the bell tower.
    • Zelmira Gomez: A teen fascinated with death who offers tarot readings at the Thinned Festiveil by the Guardian Tree every Wednesday.
    • Nyon Spectre: The person in charge of collections at many of the Ravenwood festivals, with a family history in The Sims 2 that connects him to his role as the group’s Grim Enthusiast.

    When interacting with these Sims, you can ask about tarot cards for helpful hints on the collection. Additionally, it’s possible to take on quests from these Sims via the Activities panel in the Friendly interactions menu, leading to tarot cards as rewards. Each of the four Sims offers two quests, meaning you can secure a significant part of your tarot deck from them.

    Once you accept a quest, its details will be visible in the Work panel of your Sim’s info, just below their career information and schedule. Hover over each task to get hints on how to complete it. Be prepared for some unusual requests.

    As for the remaining tarot cards, you can find them by exploring the new features introduced in the pack. Life & Death is packed with content, and the developers want you to experience everything! Tarot cards can be discovered at festivals, by interacting with new objects or landmarks, talking to crows, and much more.

    If you see the tarot card symbol in an item’s interaction menu, that’s usually a good sign! Click on it—you may acquire a new card or at least gather information on how to find one. Often, your Sim will be asked to Use Intuition to uncover new tarot cards.

    How to Get Every Tarot Card

    Below, we’ve compiled information on acquiring each tarot card in The Sims 4: Life & Death expansion pack. This includes details on the Sims you must interact with to start each quest, what needs to be done, and which tarot card you’ll receive upon completing each task.

    If you’re missing any cards, hovering over them in the Household Collections tab will provide a hint, usually in cryptic wording. We’ve simplified the information in the table provided below.

    All Tarot Card Locations in The Sims 4: Life & Death

    Tarot Card

    How to Get

    Quest Details

    The Fool

    “Grim Beginnings” quest from Nyon Specter.

    • Meet the Grim Reaper.
    • Present the gnome Nyon gave you from your inventory.
    • Report back to Nyon.

    The Magician

    “Petal for Your Thoughts” quest from Zelmira Gomez.

    The High Spellcaster

    Interact with the Tarot Tome for the first time.

    You automatically receive this card upon learning about the Order of Lenore’s mission to reunite the tarot deck.

    The Empress

    TBD

    TBD

    The Emperor

    “All the Small Things” quest from Ekade Aether.

    • Find frogs in the fountain at Ravenwood Family Day.
    • Purchase any toy from Build/Buy and add it to your Sim’s inventory.
    • Deliver the toy to Ekade.

    The Advocate

    “Macabre Mysteries” quest from Nyon Specter

    • Visit the graves of the Specter family near the crypt outside of their home in Crow’s Crossing.
    • Purchase four souls from Waylon Warez, the Mysterious Merchant.
    • Return the four souls to Nyon.

    The Lovers

    “Unfinished Boo-siness” quest from Ekade Aether.

    • Meet a ghost.
    • Ask three different ghosts about their unfinished business at Afterlife Anonymous.
    • Report back to Ekade.

    The Chariot

    TBD

    TBD

    Strength

    “Essence-tials” quest from Esther Gomes.

    • Become a temporary ghost at the Baleful Bog.
    • Acquire ghost essence by performing mastery while temporarily a ghost.
    • Report back to Esther.

    The Hermit

    TBD

    TBD

    Wheel of Fortune

    Rigger Mortis’ gravestone.

    Use Intuition on Rigger Mortis’ gravestone in the Specter family plot outside their home in Crow’s Crossing. You might come across this during the “Macabre Mysteries” quest for Nyon Specter.

    Justice

    The Guardian Tree

    Use Intuition when interacting with the Guardian Tree, located within the ruins in Mourningvale.

    Suspension

    Ichabod Specter’s gravestone.

    Use Intuition on Ichabod Specter’s gravestone in the Specter family plot outside their home in Crow’s Crossing. This might occur during the “Macabre Mysteries” quest for Nyon Specter.

    Death

    TBD

    TBD

    Temperance

    The specter at the bell tower.

    Head to the bell tower in Mourningvale and ring the bell. A small blue specter will appear and provide comfort for negative feelings. If your Sim is in a bad mood, seeking comfort will yield this card.

    Evil

    The Well

    Find the well south of the Old Ravenwood Estate in Crow’s Crossing, near the water amidst the trees. You can also make wishes for Simoleons here.

    The Tower

    TBD

    TBD

    The Star

    The Guardian Tree

    Use Intuition with the Guardian Tree, located within the ruins in Mourningvale.

    The Moon

    TBD

    TBD

    The Sun

    “We All Fall Down” quest from Zelmira Gomez.

    • Meet a ghost.
    • Purchase a memorial item from Build/Buy and dedicate it to a ghost.
    • Take a photo of the memorial using your Sim’s phone.
    • Show the photo to Zelmira.

    Judgment

    “Cake Baked Lies” quest from Esther Gomes.

    • Meet the cowplant known as Percival the Patient just outside of Esther’s house in Mourningvale.
    • Bake a cake using any oven.
    • Cut a slice from the cake.
    • Deliver that slice to Esther.

    The World

    Grim Ascendant Crow

    Acquire this card by bringing the crow into your home and interacting with it for the first time.

    Coins

    TBD

    TBD

    Cups

    TBD

    TBD

    Swords

    TBD

    TBD

    Wands

    TBD

    TBD

    The card names have been slightly modified from the original tarot deck, and the cards in The Sims 4 showcase numerous familiar characters from the game franchise. If you find a particular card’s design appealing, you can purchase the Ravenwood’s Pride Tarot Print as a wall decoration in the Build/Buy menu—feel free to display any of the 26 tarot cards from The Sims 4: Life & Death!

  • All Festival Venues in The Sims 4: A Journey Through Life & Death

    All Festival Venues in The Sims 4: A Journey Through Life & Death

    If you’ve been diving into the expansion pack The Sims 4: Life and Death, you’re probably aware that Ravenwood is bursting with festivals and community gatherings that showcase both the intriguing elements of the pack and the stunning new environment.

    In Ravenwood, there are five exciting festivals and events taking place every week, ensuring plenty of fun as you explore this mystical and slightly creepy town. With unique vendors, complimentary snacks, and opportunities to mingle with friendly ghosts, these events are not to be missed!

    All Events in Ravenwood

    Afterlife Anonymous

    Has your Sim recently suffered an emotional loss? Are they feeling empathetic and want to support others? Perhaps you’re a ghost seeking comfort? Then Afterlife Anonymous is the perfect gathering for you. This event occurs Monday, Wednesday, and Friday from 6 PM to 11 PM, and Tuesday and Thursday from 10 AM to 4 PM. It’s a fantastic opportunity to listen to the stories of others and then share your own at the podium.

    To join, simply travel to Club Eternity in the Mourningvale neighborhood of Ravenwood. The Ruins are visible on the map, but you can’t travel directly to them—head over to Club Eternity first as it’s the closest location! Here, you’ll find the atmosphere resembles a real-life support group, complete with light refreshments and an open environment for sharing grief. You’ll also find many ghosts attending, so if you’re on the lookout for a spectral companion, this is your chance!

    Crow’s Crossing Celebration of Life

    Located just outside the Town Hall in the Crow’s Crossing neighborhood, the Crow’s Crossing Celebration of Life takes place Tuesdays, Thursdays, and Sundays from 11 AM to 5 PM.

    When you arrive at the Crow’s Crossing park, look for a funeral setup by the fountains, situated far from the playground. If your Sim has been affected by the loss of someone, this is an opportunity to honor their memory.

    Try Before You Die Casket Sale

    On Mondays, Wednesdays, and Fridays, from 11 AM to 5 PM, the center of Crow’s Crossing heats up with activity for the Try Before You Die Casket Sale. Visit the circular space near the Town Hall to check out different coffin options ahead of time.

    You can chat with the vendor, who is dressed in classic undertaker attire, possibly landing a discount on your future casket. Feel free to explore various styles; after all, your choice is permanent!

    Casket Sale

    Moon Revelry

    Once the moon is high in the sky, venture out to the Ancestor Face Cliff for the Moon Revelry celebration. This event takes place from 7:20 PM to 1:20 AM.

    To find the lot, go to the Hay Hill Landing residential area in the Whispering Glen neighborhood and head towards the river, passing by the farmhouses. The Moon Revelry is all about celebrating the lunar cycle, with festivities including naked dancing around a bonfire. Grab some refreshments, but don’t forget to make time for a nighttime swim in the nearby waters afterward!

    Moon Revelry

    Each Festival in Ravenwood

    Thinned Festiveil

    Every Wednesday from 10 AM to 6 AM, return to Club Eternity for the Thinned Festiveil. This event revolves around the Guardian Tree, a large mystical tree with a ghostly side quest. Participate in this event to appease the Guardian Tree by offering gifts and communicating with a nearby ghost to uncover the reasons for its sorrow.

    While you’re there, you’ll also encounter one of the Grimterns. This character can provide insights into pursuing a career as a Reaper, a thrilling new addition to the Life & Death expansion. Feeling adventurous? Give their game of chance a try!

    Don’t forget to stop by the Tarot reader for a free reading, which grants your Sim a unique wishlist based on the card drawn, enhancing their gaming experience!

    Thinned Festiveil

    Ravenwood Family Day

    If you’re spending a Saturday with family, make sure to check out Ravenwood Family Day, happening from 12 PM to 8 PM in the Crow’s Crossing neighborhood.

    As the children enjoy the playground with glowing specters or search for frogs in the pond, parents can speak with an Inheritance Lawyer who helps organize wills, memorial arrangements, and assign belongings.

    Lastly, don’t miss the chance to chat with the Crow Handler about acquiring your very own pet crow. If you’re intrigued, ask Waylon Warez, the Mysterious Merchant, to learn more about bringing a crow home!

    With so many engaging activities centered around life, death, and everything in between, Ravenwood offers endless fun for your Sims. Explore the offerings and enjoy all that this enchanting world has to offer!

  • Exploring Farmagia: Key Stats and Parameters Explained

    Exploring Farmagia: Key Stats and Parameters Explained

    Quick Links

    The training of your Battle Buddies is crucial for success in Farmagia. By enhancing your stats, you improve your Buddies’ abilities, allowing them to endure longer during their journeys through the Mazes. Additionally, some United Forms may require specific stat levels to equip.

    It’s essential to recognize that each Battle Buddy has stat preferences that align with their abilities in combat. Focusing on enhancing the wrong stats could lead to wasted resources and hinder your effectiveness in battles.

    All Stats Explained In Farmagia

    During your training sessions, focus on several stats to boost your Battle Buddies’ Parameters. As you train them, they will advance to become significantly stronger.

    Stats Parameters Increased
    Endurance Attack and HP
    Attack Attack
    Defense Defense and KO Stamina
    Teamwork Defense and KO Attack
    Meditation HP and Critical Rate

    Improving these stats is vital during your explorations in the Mazes. To determine which Parameters to prioritize, it’s important to understand how they function during battles.

    Parameters Description
    Attack Enhances your hits, Unite Blitz, Fusion, and all types of attacks.
    HP Your Battle Buddy’s health decreases when they’re KO’d, so monitor it closely.
    Defense Boosting defense helps protect your Battle Buddy from losing all HP when knocked out.
    KO Attack A critical stat that decreases an opponent’s KO Gauge, allowing for more Blitz attacks.
    KO Stamina Increases the difficulty for enemies to knock out your Battle Buddies.
    Critical Rate Elevates the chances of landing critical hits on enemies.

    Which Stats To Level Up First

    Choosing the right stats for your Battle Buddies can greatly impact their performance. Prioritize certain stats based on the strengths of your Buddy type.

    Stats Suitable Buddy Types
    Endurance Close-Range Attacker, Support, Formation
    Attack Close-Range Attacker, Long-Range Attacker
    Defense Support, Formation, Close-Range Attacker
    Teamwork Formation, Close-Range Attacker
    Meditation Support, Formation, Long-Range Attacker, Close-Range Attacker

    The Endurance stat is essential for Close-Range Attackers and Formation-types since it helps them withstand more damage, which is vital when fighting up close. Long-Range Attackers, however, don’t need this stat as they engage from a distance. Both Close-Range and Long-Range Attackers benefit from boosting the Attack stat.

    Leveling up the Defense stat is equally beneficial for Close-Range and Formation Buddies. Your Support Buddies can significantly aid in battle by inflicting status effects on enemies, so ensure they have high HP and Defense through investments in the Defense, Endurance, and Meditation stats.

    If your goal is to reduce an enemy’s KO gauge more quickly, consider boosting Teamwork, which is particularly helpful for your Formation and Close-Range Attackers, with some perks for Long-Range Attackers as well. Lastly, the Meditation stat is a great option for increasing HP and Critical Rate, making it valuable for all Buddy types.

  • Complete Guide to All Synthesis Spell Tomes in Romancing Saga 2

    Complete Guide to All Synthesis Spell Tomes in Romancing Saga 2

    Quick Links

    Overview of Magic in Romancing Saga 2: The Revenge of the Seven

    Romancing Saga 2: The Revenge of the Seven presents players with six distinct schools of magic, each linked to an element. As you immerse yourself in various magic types, you’ll progressively unlock new spells. Among these, you’ll discover a special category called synthesis spells.

    Unlike standard magical abilities, synthesis spells are obtained through unique magical tomes found in hidden treasure chests scattered across the world. These spells vary widely, serving as powerful offensive options and some of the game’s top-tier defensive maneuvers. Notably, there’s a spell designed to heal every member of your party, enhancing your team’s survivability during battles.

    All Synthesis Spell Tome Locations

    Below, you’ll find an extensive list of each spell book, the spells they unlock, and where to locate them. Typically, you can expect to find one tome in every area that features enemies. If you’re exploring a dungeon, the tomes are usually found near the boss encounter.

    Important Healing Spell Reference

    If you’re on the lookout for a spell that heals your entire party, search for the Restoration spell found in the Book of Light & Wind III. It’s also wise to prioritize acquiring the Light Wall from the Book of Light & Earth II and the Fire Wall from the Book of Fire & Earth I.

    Book Name Spell Location Directions
    Book of Light & Water I Diamond Dust Nazelle Strait Located in a chest by the exit of Nazelle Strait.
    Book of Light & Water II Prism Light Salamat South of the save point, climb a massive fallen tree to the upper area where the chest is found.
    Book of Light & Wind I Faerie Glow Toba After acquiring the Swallow’s Nest, find this chest on your way back to the entrance.
    Book of Light & Wind II Solar Wind Melu Desert Found in the western part of Melu Desert.
    Book of Light & Wind III Restoration Gelid Ruins Obtain this book after defeating the Giant at the end of the Gelid Ruins.
    Book of Light & Fire I Saint Fire Cape Chalier Near the end of the dungeon, shimmy across a ledge to find the chest.
    Book of Light & Fire II Crimson Fire Nival Ruins Access this chest after defeating the dragon in the Nival Ruins’ basement.
    Book of Light & Fire III Flashfire Castle Hakuro Located in the Grand Tower 2F of Castle Hakuro.
    Book of Light & Earth I Arc Thunder Messina Mine Located in the second part of the mines. Complete this quest before progressing too far.
    Book of Light & Earth II Light Wall Avalon Gardens Required completion of Avalon Gardens during the early game. As generations pass, it will upgrade enough to unlock a previously unreachable chest.
    Book of Fire & Earth I Fire Wall The Steppe Near the center of the map, beside a set of ladders.
    Book of Fire & Earth II Heat Hand The Steppe In the southeast room of the second floor of the Landship Fortress.
    Book of Fire & Wind I Heatwave Imperial University Found on the second floor, above where Mr. S is located.
    Book of Fire & Wind II Firestorm Torrid Ruins This is your reward for defeating the boss of the Torrid Ruins.
    Book of Water & Wind I Cyclone Squeeze Gemstone Mine The chest with this tome is in the northeast corner of the map in the first section of the mine.
    Book of Water & Wind II Call Lightning Floating Castle Found in the 1F section of the Floating Castle.
    Book of Water & Earth I Elixir Sunken Tower In the area where the ground crumbles, you will drop down into the Sunken Tower 2F to find the chest.
    Book of Water & Earth II Dragon Pulse Wandering Lake Ruins Located in a room just before facing Noel.

    All Dark Elemental Synthesis Spell Tome Locations

    Each type of magic is accessible from the start, except for Dark Magic. You can gather the tomes containing these spells, but you’ll need to fulfill a specific quest to utilize them.

    Choose Wisely About Class and Magic

    Deciding whether to recruit the Salamander class or utilize Dark Magic is crucial. The Salamander class offers a unique ability that grants immunity to fire, making your choice important.

    Book Name Spell Location Directions
    Book of Dark & Fire I Hellfire Eastern Subterrane Located in a cavern near the center.
    Book of Dark & Fire II Ghost Light Witch’s Sanctum Found in the cavern south of the witch’s cottage.
    Book of Dark & Earth I Sand Storm Savannah In the northeast corner, near a destroyed town.
    Book of Dark & Earth II Wraith Form Seer’s Citadel Secret Room Solve the puzzle in the Seer’s Citadel to obtain this book.
    Book of Dark & Earth III Landslide Minstrel’s Cave Complete the lengthy quest to access this tome.
    Book of Dark & Wind I Dark Sphere Teretuva Tower Found in Corridor 3-4 F.
    Book of Dark & Wind II Vortex Castle Chonto Locate in the Tertiary Outworks 1F.
    Book of Dark & Water I Poisonous Blow Termite Den Located just before facing the Termite Queen.
    Book of Dark & Water II Ill Storm Eirunep Tower Found in the Eirunep Tower 2F section.
    Book of Dark & Water III Rain of Death Sunken Ship Obtained after defeating the Ghost Pirate Garon.

    Prepare to explore and gather these powerful tomes to harness the magic that can turn the tide of battle in your favor!

  • Complete Guide to Heart Pieces in Zelda: Echoes of Wisdom

    Complete Guide to Heart Pieces in Zelda: Echoes of Wisdom

    The Legend of Zelda: Echoes of Wisdom allows players to step into the role of Zelda for the first time, while also featuring familiar items and mechanics from previous titles in the series. One notable item is the Heart Container, which boosts your overall health points (HP).

    These containers can be obtained by defeating bosses in various dungeons, and many can be found hidden throughout the game world. With numerous Heart Containers available, this guide will help you locate every single one in The Legend of Zelda: Echoes of Wisdom.

    We will categorize the Heart Containers based on map regions to make finding their precise locations easier.

    Gerudo Desert

    Location

    Description

    Far southwest corner of the map

    Located beneath a sand pile (use a Wind Cannon to clear the sand)

    North of Gerudo Town in a cave

    This cave features a 2D platform segment, with the heart positioned at the far right

    Tent in the Oasis

    Gather 70 mangos with Ultimate Seeds

    North of the Oasis

    The platform here requires stacking echoes to access. Watch out for quicksand!

    North of the beach (east of the Oasis)

    Complete the Wild Sandstorms challenge

    Southern end of the beach

    There’s a rock extending south from here; use floating echoes (like beds) to leap over the water and reach it

    Beach Cave (eastern section of the beach)

    This 2D platform area has the heart positioned near the bottom (right of a rock wall)

    Suthorn Forest and Prairie

    An image of Suthorn areas with Heart Containers marked.

    Location

    Description

    Suthorn Village Shop

    Purchase for 80 Rupees (this can only be done once)

    Central Suthorn Prairie

    Located at a square formation made of pillars; the central pillar surrounded by water has a heart on top

    Suthorn Forest Cave (just south of Suthorn Ruins)

    This cave contains a 2D platform section with the heart situated on a ledge to the right of a ladder

    Faron Wetlands

    An image of the Faron Wetlands with Heart Containers marked.

    Location

    Description

    Western Faron Wetlands Cave (slightly north of the heart pond)

    This area features an underwater maze; near the Needleflies, you can find a ladder leading to a ledge with the heart

    Cave South of Scrubton (south of the town at a waterfall)

    This cave has cliff passages; navigate to the right side of the room to bridge over to the heart

    South of Scrubton (slightly southeast in Faron Wetlands)

    Complete the Cotton-Candy Hunt

    Deku Lockup quest (part of the game when captured by the Deku Scrubs)

    The heart rests on top of a totem pole in a room with a door hidden behind a decorative shrub

    Jabul Waters

    An image of the Jabul Waters with Heart Containers marked.

    Location

    Description

    Pirate Ship

    Earned by defeating the miniboss here (this is unavoidable as the goal is to defeat the miniboss)

    North of Pirate Ship

    There’s a cave with Hydrozol; obtain the echo and use it to extinguish the torches in the final room to earn the heart

    Far southeastern corner of Zora Cove

    The heart lies at the bottom of the sea floor, but you must first break a cracked stone using a Bombfish

    Jabu-Jabu’s Den

    A heart can be found on top of the pillar on the right side of the exterior

    Very top of Jabul Waters map

    Hidden under a waterfall (this is easy to spot, and no echoes are needed)

    Eastern Hyrule Field and Hyrule Castle

    An image of Hyrule field east areas with Heart Containers marked.

    Location

    Description

    Inside the Eastern Temple

    Finish Let’s Play A Game

    Northeastern edge of Castle Town

    This location is outside the wall; simply jump down from the top of the wall

    Southwest corner of Castle Town (an NPC is here)

    Complete An Out-There Zol (for this quest, you need to bring various Zol enemies to the NPC)

    Western Hyrule Field

    An image of Hyrule field west areas with Heart Containers marked.

    Location

    Description

    Ruins with pillars just west of Hyrule Castle

    Stack echoes to reach the heart on top of a pillar

    Round forest clearing with a tree stump in center (southwest of castle)

    Use the trampoline to jump onto the stump and collect the heart

    Hyrule Ranch

    Win the Flag Race Medium Course in under 20 seconds

    East of Karkariko Village in a Cave (southern edge of the Eternal Forest)

    This area features a 2D platform segment, and you will need to start outside the cave to access the heart.

    Slightly northeast of the windmill in Karkariko Village

    Win the Acorn game!

    Slumber Dojo in Karkariko Village

    Complete 2 challenges in the Slumber Dojo

    Slumber Dojo in Karkariko Village

    Complete 11 challenges in the Slumber Dojo

    Round lake to the west of Hyrule Field

    A tall rock formation sits at the center of this lake with the heart on top

    West of Karkariko Village (a giant boulder is here)

    Use the Bind ability to move the boulder and reveal the heart

    Upper northwest corner of Hyrule Field (in a cave south of the Waypoint here)

    From the cave opening, head above to a patch of dirt: use the Holmill echo to burrow down and gain entry

    Directly northwest of Waypoint along the edge of the area

    The heart will be visible on a ledge; stack echoes and create a bridge to reach it

    Hebra Mountain

    An image of Hebra Mountain with Heart Containers marked.

    Location

    Description

    Conde’s House

    Complete Snowball Magic

    Pillar at the southern edge of the frozen lake (northwest from Conde’s House)

    The top of the pillar has ice that needs to be melted with any echo that generates fire.

    Near the center (narrowest) part of the frozen lake, on a ledge

    The heart is on this ledge, and you can easily stack echoes to get there

    Western side of the top rim (appears jagged with brown patches on the map)

    The heart rests on a pillar in the northwest corner here

    Eldin Volcano

    An image of Eldin Volcano with Heart Containers marked.

    Location

    Description

    Lava Lake east of Lizalfos Burrow

    The heart is exposed on an island in this area

    Cave north of Lizalfos Burrow and Lava Lake

    Complete A Mountainous Mystery

    Narrow rocky shelf west of Lava Lake (and Lizalfos Burrow)

    Simply stack echoes to access this area

  • Essential Tips and Tricks for Newcomers to Farmagia

    Essential Tips and Tricks for Newcomers to Farmagia

    Farmagia is a unique blend of monster-taming and farming gameplay that offers a variety of engaging activities. To excel in combat, it’s essential to focus on the development and well-being of your Buddies living on your ranch.

    Your resource management in the early stages of the game is critical to navigating through the Mazes. Since you’ll start with limited materials, efficient usage and strategic planning will significantly impact your progress.

    Manage Your Farm Space

    At the beginning of the game, you’ll have a small, disordered plot to cultivate your Buddies, which can complicate your efforts, especially if some Buddies require more space. It’s crucial to reserve large areas for growing bigger Buddies.

    Weeds can clutter your farm space and hinder your ability to grow Buddies, so be sure to clear them out.

    We suggest you use the remaining space for growing smaller Buddies around obstacles. As you earn research points, you can expand your farm area and eliminate barriers.

    Keep Your Battle Buddies Motivated

    Battle Buddies menu displayed in Farmagia.

    Training your Battle Buddies to enhance their stats is vital, but too much training can lead to demotivation. It’s important to monitor their moods to ensure that training remains effective.

    A good meal can cheer them up, so consider cooking or purchasing food at the Magic Shop. Remember, different Buddies have unique preferences.

    Gather cooking ingredients that may drop while you explore the Mazes.

    Maximize Research Buddy Growth

    Research notes menu shown in Farmagia.

    Growing your Research Buddies is crucial gameplay. While they don’t stay on the battlefield like Battle Buddies, you can deploy them in Unite Blitz attacks for significant damage. Acquire powerful ones like Hippogriff, Forest Harpy, and Gigas early on.

    Cultivating Research Buddies will earn you Research points to spend in your Research Notes.

    The more you battle, the more Research Buddy seeds you can grow. Instead of trying to diversify, focus on cultivating one type of Research Buddy at a time. Aim to harvest three of them simultaneously to unlock their contribution in Unite Blitz.

    Plan Farming Based on Your FP

    Player tilling the land in Farmagia.

    Every tool usage on your farm consumes FP, which limits your actions. To replenish FP, explore the Mazes. If you run out of FP completely, you won’t be able to tend to your growing Buddies for a while.

    Should you have Battle Buddies planted but lack FP to water them, they won’t ripen in time for your next exploration. Some Buddies can take longer to mature, which may disrupt your plans without proper FP management. Thus, avoid planting excess crops until you have increased your maximum FP in the Research Notes.

    Bond With Elemental Shrine Guardians

    Gnomia in the shrine in Farmagia.

    Bonding with Elemental Spirits may take time, but it enhances your Fusion capabilities and damage output. You need to build your relationship with them, represented by hearts, and each milestone unlocks further bonuses.

    To strengthen your connection with the Spirits, complete the challenges they present and bring them their favorite gifts to strengthen your rapport.

    Get gifts from the Magic Shop.

    Decide Formations According to Maze Conditions

    Battle Formation displayed in Farmagia.

    Your choice of formations is crucial and can greatly influence your success in navigating Mazes. Choosing the most effective formation is your initial and vital step, as it determines your party leader, United Forms, and the number of Battle Buddies you deploy.

    If the maze recommends Close Attacker Buddies, ensure you have ample Fangs in your setup. For more Support-type Battle Buddies, utilize Chica as the Party Leader to apply debuffs on foes.

    Train A Specific Buddy for Restricted Quests

    Training menu open for Arkie in Farmagia.

    Restricted quests can be quite challenging, but they yield significant rewards. You’ll be limited to specific Buddies based on each quest’s requirements, so ensure you train them thoroughly to conquer the enemies needed to complete the quest.

    Deploying a considerable number of these Buddies in the Maze is also important. We suggest growing many of them to keep on your ranch for when they are needed in battle.

    Craft Instead of Buying Items

    Magic Shop offers crafting and purchasing items in Farmagia.

    Items at the Magic Shop can be quite pricey, so you’ll quickly deplete your limited Magia resources. To save resources, we recommend that you craft as much as you can. Instead of buying meals for your Buddies, try cooking them yourself.

    As you take on opponents in the Mazes, you’ll collect plenty of ingredients as drops. You can even craft the Fertilizer that your Buddies need to thrive on your farm.

  • Locating Dareth Amidst Slow Poison in Dragon Age: The Veilguard

    Locating Dareth Amidst Slow Poison in Dragon Age: The Veilguard

    The city of Treviso is facing serious challenges in Dragon Age: The Veilguard. Beyond the usual class inequalities, the situation has worsened with the Qunari military, referred to as the Antaam, occupying the town and asserting control.

    The Antivan Crows are determined to fight back against the Antaam and reclaim their city, but it won’t be a quick task. This effort will require strategic planning and a cohesive approach to liberate Treviso. The first step involves confronting The Butcher’s surrounding forces.

    How To Find Dareth


    A Slow Poison becomes available once you save Lucanis during the story quest, Sea of Blood. You’ll find a rolled scroll with a quest marker in the Library section of the Lighthouse.

    Defeating groups of Antaam in Treviso will strengthen your bond with Lucanis, so make sure to bring him along to eliminate them if you’re considering romancing him.

    Use the Crossroads or Fast Travel back to Treviso. Once there, speak to Teia and Viagro, who will inform you that your next task involves assisting their scout, Dareth, in the Drowned District.

    During this conversation, you can also gather additional information about The Butcher, the Gods, the Crows, and the occupation itself.


    Teia asking player Rook for help to free Treviso in exchange for assistance in Dragon Age: The Veilguard.

    After speaking with them, exit the Crow’s headquarters through the stairs on the merchant’s right, then proceed towards your target, crossing the zipline to a new area.

    On the left side of the path, there is a zipline that gets you to an area with a battle against three Venatori and a Blight Cyst guarding Desmal, Bloodbound to Elgar’nan, whom you’ll need to defeat for the Gate Of Deep Sorrows quest.

    Once you arrive on the other side, sneak along the ledge above the statue that was previously blocked, collect the chest in the locked room, then go through the wooden gate with the Crow’s symbol on the right.

    On this return trip, you’ll have the chance to explore more areas. If you take the eastern path past the Grande Market beacon, two routes will open up: one leading north to Heart and Central and the other continuing east towards the Drowned District.

    The zone around Heart and Central is rich with loot, including chests—two of which offer Unique items as a special reward—and various skirmishes against the Antaam, plus a Fen’Harel Altar in the Dellamorte Estates region.


    Player Rook running across a wooden bridge towards a large building in the Drowned District in Dragon Age: The Veilguard.

    Once in the Drowned District, activate the first beacon and then head down towards the docks where Dareth is located. As you approach the large building on your right, prepare to engage in a battle against three Antaam: two with cannons and one equipped with a sword and shield.

    Defeat them, then rescue Jacobus, and use Fast Travel back to the Grande Market beacon. From there, head east through the wooden gates and north across the bridge, or go directly to the Heart and Central beacon if you’ve already found it.

    At the Heart and Central beacon, climb the nearby lattice wall and follow the purple Crow marks on the walls up to the rooftop building, then interact with the note on the desk.


    Player Rook standing next to a desk holding Daleth's contract in Dragon Age: The Veilguard.

    Use the ziplines nearby or Fast Travel back to the Crow’s Road Rooftops beacon, then go through the door to your left. Defeat the Antaam you encounter, and continue along the path across the rooftops to the Garrison.

    As you navigate through the building, you’ll face more regular Antaam, culminating in a boss encounter when you jump over the balcony onto the first floor.

    How To Beat The Qamekmaster


    Rook, Bellara, and Lucanis battling the blighted Qamekmaster in Dragon Age: The Veilguard.

    While the Qamekmaster is sizeable, he is not armored, so you only need to drain his health to defeat him.

    He is resistant to Lightning but vulnerable to Necrotic

    • A series of close-range melee swipes and slams.
    • A leaping strike that leaves an explosive sigil on impact after a few seconds.
    • A charging attack.
    • A blood explosion area attack.

    You can also unleash your Ultimate attack for significant damage on any class, which can greatly shorten the fight.

    Combine companion abilities like Lucanis’ Debilitate and Bellara’s Fade Bolts to trigger status effects and cause chain reactions, all while evading his strikes to take down the blighted Qamekmaster swiftly.

    How To Complete A Slow Poison


    Player Rook talking to Teia during A Slow Poison in Dragon Age: The Veilguard.

    After defeating him, destroy the three poison pots in the room, read the note on the desk, and grab the chest from the adjacent room before heading back to Teia and Viagro at the Crow’s Sanctum.

    During your conversation with Teia regarding your reward, responding that you won’t abandon your allies will boost your bond with Lucanis.

    Upon completing this quest, you will receive some experience, 250 reputation points with the Antivan Crows, and an improvement in the bonds of the two companions you traveled with.

  • Ultimate Guide to the Undertaker Career in The Sims 4: Life & Beyond

    Ultimate Guide to the Undertaker Career in The Sims 4: Life & Beyond

    Are you someone who feels a calling to care for the living? If so, a career as an Undertaker in The Sims 4: Life & Death could be your perfect fit. While many Sims engage with supernatural elements to assist Grim in collecting souls, your Sim is dedicated to ensuring the departed find peace.

    No matter which career path you choose, physical skills are crucial. If your Sim is athletic and has interests in gardening, creativity, logic, and good interpersonal skills, they could excel in the Undertaker profession—especially given the nature of funerals that the role involves.

    Overview of the Undertaker Career

    Unlike the more interactive Grim Reaper career included in the Life and Death expansion, the Undertaker career is a rabbit hole job, meaning your Sim will leave for work and come home at the end of their shift, with their schedule changing as they get promoted. In the early stages, your Sim may have unpredictable hours, so be prepared for them to head back to work shortly after returning home.

    Although the career operates as a rabbit hole, you can expect frequent career pop-ups, more so than in many other similar careers. These events often tap into your Sim’s Thanatology skill and a curiosity about death. The choices your Sim makes can lead to intriguing discoveries and lore as they advance in their career.

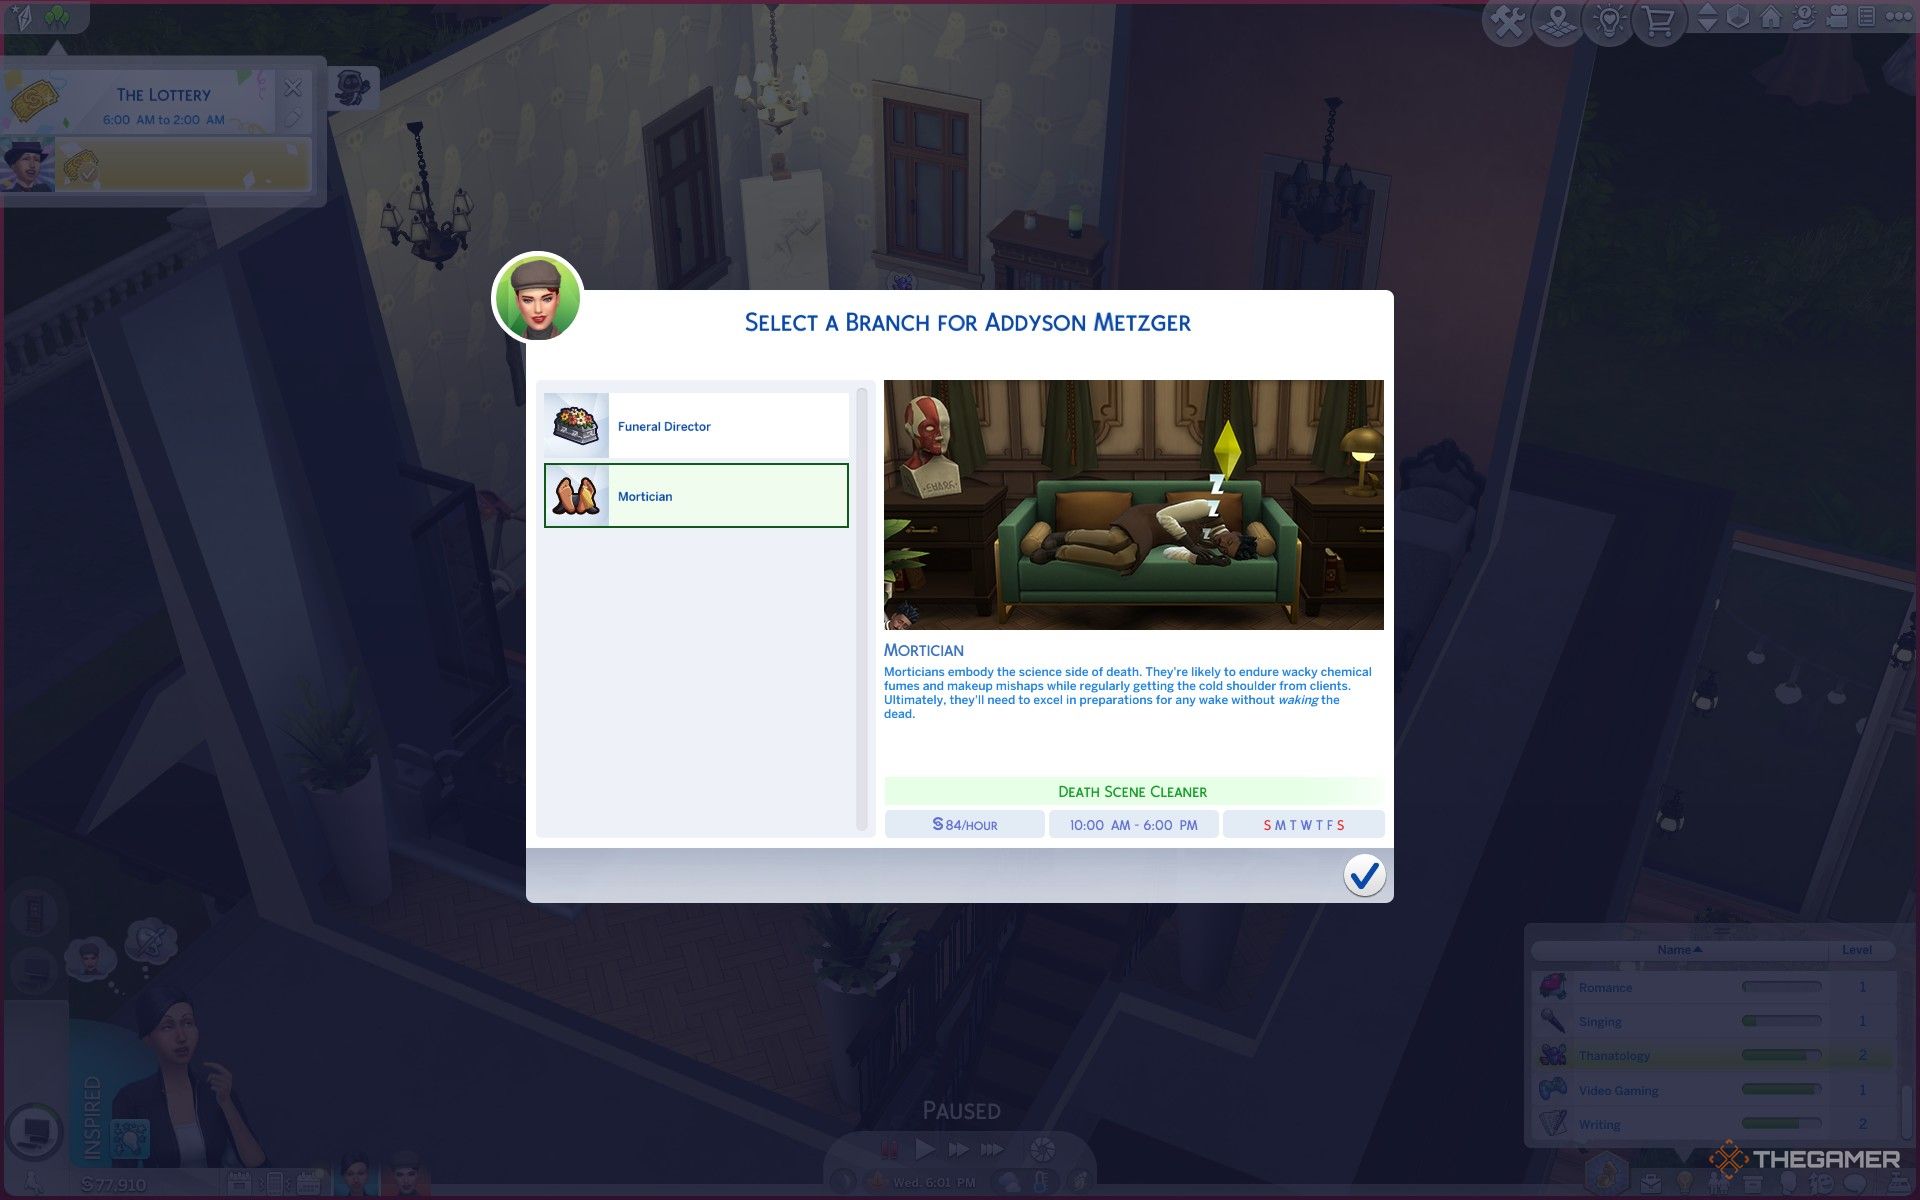
    Upon reaching level five, you’ll have the option to select between two tracks: Funeral Director, ideal for those who wish to engage with the living and create memorable tributes, or Mortician, for those who prefer working directly with the deceased and exploring the scientific aspects of death.

    A Sim writing at the computer with a treadmill in the background in her Undertaker career outfit in The Sims 4 Life and Death.

    Key Skills and Ideal Traits

    To kickstart your journey in the Undertaker career, focusing on skills like Charisma, Fitness, and Gardening is essential. You’ll need to achieve level 2 in Charisma, level 5 in Fitness, and level 4 in Gardening before you can choose a specialty at rank five, so when creating your Sim, consider traits that support these abilities.

    As your career progresses, start working on your Sim’s Thanatology skill, introduced in the Life & Death expansion, which deals with exploring death and corpse handling. Choose traits that make your Sim comfortable with topics surrounding mortality.

    Depending on which track you choose, different traits will be necessary. Funeral Directors should enhance their Charisma skill to manage emotional funeral planning, while Morticians will benefit from focusing on Painting for perfect makeup application on the deceased and Logic for a deeper understanding of death.

    A Sim at the gym with one of the Island Living Sims in The Sims 4.

    Choosing traits that complement your Sim’s career path can enhance their performance. Here are some beneficial traits:

    • Active: Boosts the Fitness skill, especially for athletic Sims.
    • Creative: Helpful for Morticians focusing on Painting.
    • Traits that make social interactions easier are crucial for Funeral Directors.
    • Loves the Outdoors: This helps with the gardening tasks required.
    • Macabre: A fitting trait considering the profession’s nature and themes.

    Maintaining your Sim’s fitness is vital for their success in this career, especially since there are challenges that involve the Grim Reaper that can benefit from these skills and traits.

    Career Levels in the Undertaker Career

    Selecting the Mortician branch in the Undertaker career in The Sims 4 Life and Death.

    The following tables outline each level in the Undertaker career, including what you can expect in terms of working hours, pay, and promotion requirements. The career starts as a general role and narrows down when you reach rank five.

    Levels 1-4 of the General Undertaker Career

    Level

    Hours

    Rates

    Promotion Requirements

    Grave Digger (1)

    Monday, Wednesday-Saturday, 8AM-4PM

    §22/hour


    §176/day

    Work Out.

    Body Guard (2)

    Monday-Friday, 9PM-5AM

    §36/hour


    §288/day

    Plant Something.


    Reach Level 3 in the Fitness skill.

    Grave Keeper (3)

    Monday-Friday, 9AM-5PM

    §54/hour


    §432/day

    Have Deep Conversations.


    Reach Level 4 in the Fitness skill.


    Reach Level 2 in the Gardening skill.

    Removal Service Staff (4)

    Tuesday-Saturday, 10AM-6PM

    §65/hour


    §455/day

    Work Out.


    Reach Level 2 in the Charisma skill.


    Reach Level 5 in the Fitness skill.

    A funeral director consoling a mourner in The Sims 4 Life and Death.

    Levels 5-10: Funeral Director Career Track

    Level

    Hours

    Rates

    Promotion Requirements

    Administrative Assistant (5)

    Monday-Friday, 10AM-5PM

    §76/hour


    §532/day

    Write Obituaries.


    Reach Level 3 in the Charisma skill.


    Reach Level 6 in the Fitness skill.

    Grief Counselor (6)

    Wednesday-Sunday, 9AM-5PM

    §126/hour


    §532/day

    Plant Something.


    Reach Level 4 in the Charisma skill.


    Reach Level 7 in the Fitness career.

    Burial Consultant (7)

    Tuesday-Saturday, 9AM-5PM

    §165/hour


    §1,320/day

    Plant Something.


    Reach Level 5 in the Charisma skill.


    Reach Level 3 in the Gardening skill.

    Services Manager (8)

    Thursday-Monday, 9AM-5PM

    §203/hour


    §1,624/day

    Write Obituaries.


    Reach Level 6 in the Charisma skill.


    Reach Level 4 in the Gardening skill.

    Assistant Director (9)

    Tuesday-Saturday, 10AM-5PM

    §290/hour


    §2,030/day

    Plant Something.


    Reach Level 8 in the Charisma skill.


    Reach Level 4 in the Thanatology skill.

    Funeral Director (10)

    Friday-Monday, 11AM-5PM

    §440/hour


    §2,640/day

    Discuss End of Life Services

    A Sim talking to Ekade Aesther at the cemetery in The Sims 4 Life and Death.

    Levels 5-10: Mortician Career Track

    Level

    Hours

    Rates

    Promotion Requirements

    Death Scene Cleaner (5)

    Monday-Friday, 10AM-6PM

    §84/hour


    §672/day

    Read.


    Reach Level 2 in the Painting skill.


    Reach Level 6 in the Fitness skill.

    Microbial Researcher (6)

    Monday-Friday, 9AM-5PM

    §108/hour


    §864/day

    Earn Certifications on the Computer.


    Reach Level 2 in the Logic skill.


    Reach Level 2 in the Thanatology skill.

    Cremation Specialist (7)

    Sunday, Tuesday-Friday, 9AM-5PM

    §156/hour


    §1,248/day

    Read.


    Reach Level 7 in the Fitness skill.


    Reach Level 2 in the Painting skill.

    Embalmer (8)

    Tuesday-Saturday, 8AM-4PM

    §210/hour


    §1,680/day

    Read Thanatology Theories.


    Reach Level 3 in the Logic skill.


    Reach Level 4 in the Painting skill.

    Mortuary Assistant (9)

    Saturday-Thursday, 9AM-4PM

    §288/hour


    §2,016/day

    Earn Certifications on the Computer.


    Reach Level 5 in the Painting skill.


    Reach Level 4 in the Thanatology skill.

    Mortician (10)

    Thursday-Sunday, 9AM-3PM

    §435/hour


    §2,610/day

    Read Thanatology Theories.

    Rewards and Items in the Undertaker Career

    A Funeral Director Sim descending the stairs in one of the houses in Ravenwood in The Sims 4 Life and Death.

    Advancing through the Undertaker career unlocks an array of new CAS items, decorative pieces, and intriguing social interactions to enrich your Sims’ experiences.

    Unlockable Rewards in the Undertaker Career

    Level

    Reward

    General Undertaker Career

    1

    N/A

    2

    New CAS Items

    3

    Gossip About the Dead (Social)

    4

    Plague Mask (Accessory)

    Funeral Director Track

    5

    N/A

    6

    N/A

    7

    Discuss End of Life Services (Social)

    8

    N/A

    9

    N/A

    10

    • Corpus Commendations (Wall Decoration)
    • Contemplate Existence (Social)
    • New CAS Items

    Mortician Track

    5

    N/A

    6

    N/A

    7

    Discuss End of Life Services (Social)

    8

    N/A

    9

    Contemplate Existence (Social)

    10

    • Murphy Membrane (Statue Decor)
    • New CAS Items

    Overall, the Funeral Director career offers slightly better pay than the Mortician path, but only by §30. Thus, it’s wise to choose an Undertaker career in The Sims 4: Life & Death based on your Sim’s specific interests and hobbies.

  • Understanding Bucket Lists in The Sims 4: Life & Death Features

    Understanding Bucket Lists in The Sims 4: Life & Death Features

    The Soul’s Journey part of The Sims 4: Life & Death expansion pack offers a lot to explore. But to get started, your Sim should create a bucket list to set clear goals for themselves. This list reflects different aspects of their identity and provides meaningful life objectives.

    This feature operates independently from the Aspiration system but draws inspiration from it. The bucket list adds a fun layer to The Sims 4: Life & Death, enhancing your Sims’ experiences. Good luck with these new life goals!

    How To Start A Bucket List

    Your Sim can begin their bucket list in the Life & Death expansion as soon as possible, providing them with ample time to pursue these specific goals. Initially, when a Sim is created or born, their bucket list will be empty, with four slots labeled as “Undiscovered Goals.” As they live their lives, they must unlock goals to actively pursue them.

    These goals add depth to the Soul’s Journey feature, enriching your Sims’ narratives and enabling them to navigate their world with purpose.

    If you prefer a more relaxed approach, your Sim will naturally discover bucket list items as they go about their daily activities, which typically align with their skills, aspirations, traits, and preferences.

    Sims Can Manually Add Up To Four Goals

    If you’d like more control over your Sim’s bucket list, you can manually establish goals by having them interact with a computer or a physical journal. Simply go to the Bucket List section of either item, where you can create or restart your list.

    A Sim writing a bucket list at a table in The Sims 4 Life and Death.

    computer
    on any lot or interact with a notebook in the game. Within the pie menu, look for options related to your Sim’s bucket list to see how you can shape it.

    Bucket list goals come from eight categories. While you can select a category for each goal, you typically can’t choose specific tasks—those are generated based on the selected category. For instance, if you choose a travel-related category, a family-based goal won’t randomly appear. You can maintain up to four goals at any time.

    The more expansion packs you have in play, the greater the variety of goals available. Each pack introduces unique challenges prompting your Sim to explore new aspects of the game. No need to worry; your Sim won’t be assigned any goals linked to packs that aren’t installed.

    If you want your Sim to have a goal without a specific preference, have them simply “Write Goal” on the bucket list menu. This allows them to choose from categories that suit their personality and life direction.

    A Sim with a journal and quill at a computer writing a bucket list in The Sims 4 Life and Death.

    Deciding whether to maintain a focused category for your Sim’s bucket list or mix various categories is up to you, but the bucket list in The Sims 4: Life & Death greatly enriches the game, enhancing the satisfaction of your Sims’ lives.

    Once a goal is added to your Sim’s bucket list, you can hover over it above their Aspiration menu to get intriguing details about the goal and the steps needed to achieve it.

    Perfect Goals Allow You To Choose A Bucket List Goal Manually

    Creating a perfect bucket list goal is no easy task, but if your Sim fulfills specific pack requirements, they can add Perfect Goals to their list. This allows for manual selection of adesired goal. To qualify, they need to meet one of these conditions:

    • Sims with the Chased by Death trait can write Perfect Goals whenever they have empty slots.
    • They’ve attended the Afterlife Anonymous meetings, which helps them confront the topic of death and pursue specific goals.
    • They’ve witnessed another Sim’s death recently, giving them a moodlet regarding the event.

    Perfect Goals can provide significant satisfaction for completing tasks your Sim is already inclined to do, so be sure to review your options when choosing one.

    The success Perfect Wish bucket list goal in The Sims 4 Life and Death.

    All Sims 4 Bucket List Categories

    Category

    Explanation

    Examples of Possible Goals

    “I Wanna Get Busy!”

    These goals are intimate in nature, specifying locations for Woohoo. The availability increases with the number of packs installed.

    • Woohoo in a bush.
    • Woohoo in a hot spring.
    • Woohoo in a dumpster.

    “I Wanna Party!”

    These goals focus on various social gatherings, urging your Sim to host the best parties.

    • Throw a Gold Star dinner party.
    • Throw a Gold Star house party.
    • Throw a Gold Star ranch party.

    “I Want Adventure!”

    These goals focus on extreme activities or locations. If it’s thrilling in real life, it’s likely on your Sim’s list.

    • Climb Mt. Komorebi.
    • Ride in a spaceship.
    • Befriend a non-human Sim.

    “I Want Success!”

    These goals often require your Sim to achieve a high skill level or accomplish something significant that sets them apart from other Sims.

    • Become a celebrity.
    • Make charitable donations.
    • Earn a university degree.

    “I Want a Great Family!”

    These goals enhance your relationships with family, focusing on building strong familial connections.

    • Get married.
    • Have a child.
    • Express pride in a child.

    “I Want to Create!”

    These goals involve artistic pursuits and typically aim for a high level of proficiency.

    • Paint a masterpiece.
    • Max out the Gardening skill.
    • Upload an Excellent video.

    “I Want to Travel”

    These goals focus on exploring specific neighborhoods and spending time in various locations.

    • Spend a full day in San Myshuno.
    • Spend a full day in Willow Creek.
    • Spend a full day in Copperdale.

    “I Want… Something Else?”

    These goals encompass miscellaneous tasks that don’t fall into the other categories.

    • Read at the library for an hour.
    • Craft 30 items.
    • Create five masterpieces in any medium.

    If your Sim has goals you don’t wish to pursue, you have the option to restart their bucket list. Simply choose “Scrap Bucket List” from the menu on any computer. Keep in mind, however, that this resets all goals, so be cautious if you only want to remove one.

    After selecting a goal, track your progress via the Aspiration menu. Here, you can monitor your Sim’s Soul’s Journey, with the first part of it having to be completed while they are alive. Completing goals will fill up the progress bar, and the more goals accomplished, the greater your Sim’s satisfaction!

    Advancing your Sim’s bucket list is a crucial aspect of completing the Soul’s Journey—a series of objectives that span your Sim’s life and beyond. Remember to tackle as many bucket list goals as possible in The Sims 4: Life & Death while they are alive, as goals become unfinished just like any left behind task if the Sim passes away!

  • To Rush or Tame Safi in Life Is Strange: Double Exposure?

    To Rush or Tame Safi in Life Is Strange: Double Exposure?

    In the fourth chapter of Life is Strange: Double Exposure, the story intensifies. Max discovers Safi’s shapeshifting abilities as they join forces to reveal Lucas as a fraud who steals others’ work. In a dramatic moment, Safi confronts Yasmin at gunpoint, blaming her for Maya Okada’s death. While the story has had its twists and turns, this is where the tension truly escalates.

    When you see Safi confronting Yasmin, you face a crucial decision: should you charge at Safi or try to reason with her? This choice has its significance, and we’ll explore the implications below.

    Should You Charge at Safi or Try to Reason with Her?

    If you decide to forcefully intervene with Safi, the gun goes off, grazing Yasmin’s shoulder.

    Max pushing Safi aside as she holds a gun with a warning about consequences

    On the other hand, if you choose to talk Safi down, Yasmin still gets shot. In this case, Safi exclaims, “This gun was the only option I ever truly had,” and in a surge of emotional turmoil, she unintentionally shifts shape and fires at Yasmin’s shoulder.

    Max looking out a photo in Life is Strange Double Exposure

    In either scenario, Safi’s abilities spin out of control, and the chapter concludes with Max gazing at a photo in an attempt to rewind events. Ultimately, Yasmin is left shot and bleeding. At first glance, Max’s choice may appear unimportant, but…

    …to grasp the true impact of this decision, we need to reveal some details from the game’s conclusion.

    Aside from how Yasmin was shot, this choice also influences whether she will resign as the president of Caledon University by the end of the game. In the playthrough where we attempted to talk Safi down, Yasmin informed Max that the college board had pressured her to step down. Conversely, in the scenario where we rushed Safi, Yasmin was still facing a difficult board but resolved to stand her ground.

    Additionally, there is a possibility for Yasmin to remain president. This option may be connected to whether you confront Yasmin about her falsehood regarding Safi and Maya in chapter three.

  • Conquering Elliot: A Guide to Shadows of the Damned Remastered

    Conquering Elliot: A Guide to Shadows of the Damned Remastered

    Quick Links


    As you stroll across a bridge in a volcanic landscape in Shadows of the Damned: Hella Remastered, you encounter Elliot once more. He’ll be hurling insults your way, but not for long, as he quickly transforms into a massive bird, signaling the start of a boss battle.

    In his beast form, Elliot uses his wings to zip from one side to the other while launching projectiles at you. Here are some key strategies and weapon recommendations to help you through this fight.

    How to Defeat Elliot Thomas (Beast Form) – First Phase

    Initially, the weak spot you’ll want to target is the large red sphere on Elliot’s belly. It’s hard to miss. The best weapons for this phase are your Hotboner (handgun) or the Teethgrinder (submachine gun), as the Skullfest (shotgun) isn’t effective from the distance at which Elliot typically fights.

    Watch for when Elliot starts inhaling deeply; after a three-second count, roll to either side to avoid his long tongue, which strikes in a straight line.

    Note: While he can use this tongue attack multiple times in a row, he needs to charge it first, which gives you a moment to react. Elliot may also take a step back before coming closer.

    Elliot also attacks with big red crystals. These will fall to the ground and are not aimed at you, but it’s best to destroy them fast, as they contain Darkness and can spread if left unchecked. Keep an eye out for ammo boxes around, as they will respawn after use, ensuring you never run out during a fight.

    After inflicting enough damage to his belly, Elliot will briefly stop flying and prepare for the second phase.

    How to Defeat Elliot Thomas (Beast Form) – Second Phase

    In this phase, Elliot’s weak points shift to the bases of both wings. He’ll maintain more distance in this round, but you can still effectively hit him with your handgun. When he comes closer, switch to your Teethgrinder for quicker damage output.

    Elliot introduces a couple of new moves. He’ll summon a swarm of small birds that fly toward the projector area. Use your submachine gun to take them out before they obscure your view. Additionally, he will lift a large boulder from the lava below and launch it at you. To avoid this, sidestep just in time.

    Remember, Elliot will still use his attacks from the first phase, so stay on your toes.

    As you inflict enough damage to one wing, it will break. Repeat the process with the other wing. Once both are down, Elliot will disappear momentarily and reappear on the bridge in front of you.

    Now, shoot under his belly where there’s an orange glow using a Light Shot. This will reveal his weak point, which you need to target until it’s destroyed to win the battle.

    Beware of Elliot’s quick jump behind you; he’ll use this to surprise Garcia and attack with his claws.

    Once defeated, you’ll earn Elliot’s Blue Gem, granting you access to the next chapter, where you’ll get a new weapon.