الوسم: secrets

  • All 23 Intel Locations in 007 First Light: Completing & Solving Guide

    All 23 Intel Locations in 007 First Light: Completing & Solving Guide

    007 First Light is now available, so you should gear up with your silenced pistol, put on your laser watch, and get ready to take down enemies in exotic locations. This game follows the early years of James Bond, where you’ll face off against a mysterious enemy worldwide.

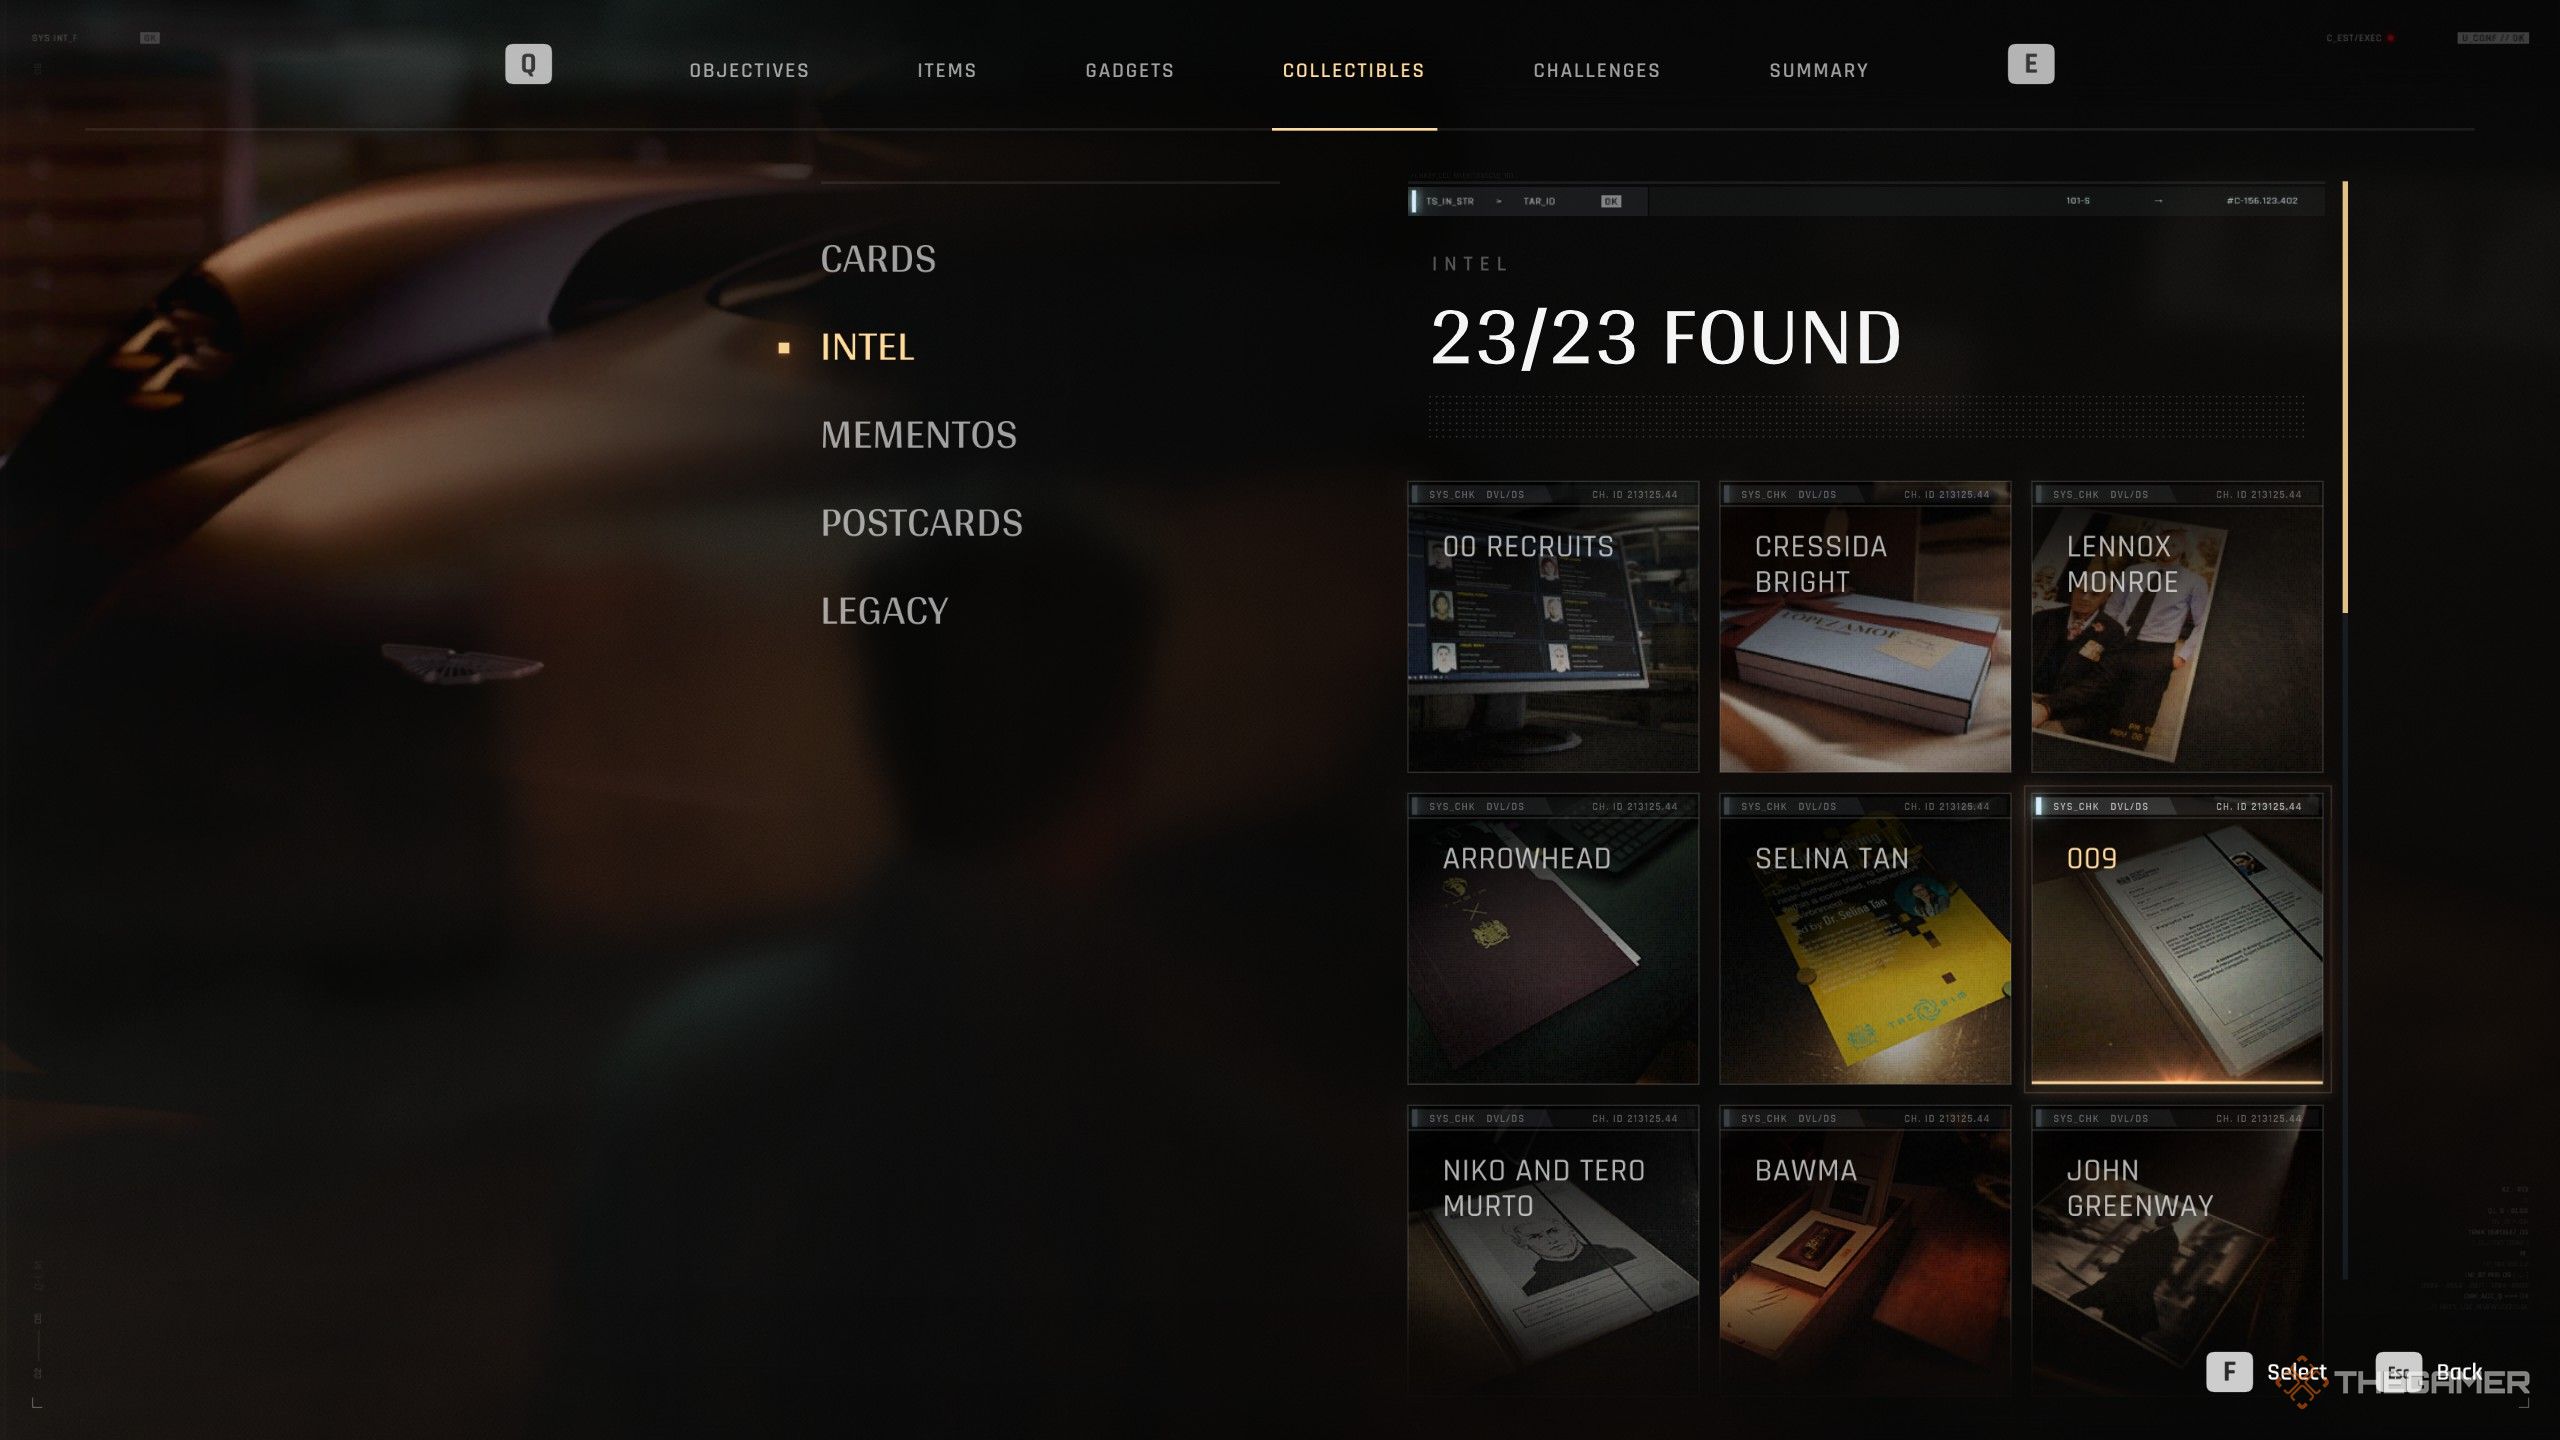
    During your journey, you’ll find many collectibles, including playing cards and references from previous Bond films. One of the key collectibles are the MI6 Intelligence Files, which reveal important details about the characters you meet. Below is a complete guide to help you find all 23 MI6 Files in the game.

    All MI6 Intel Locations

    When collecting MI6 Files in 007 First Light, note that they won’t be physically picked up when you interact with them. Instead, they will be marked as collected in your menu without disappearing from the environment. These files don’t have a distinct appearance, so they can look like a computer screen, a folder, or even an unusual object like a giant wooden spoon. It’s best to interact with everything you see to ensure you don’t miss any.

    Here is a detailed list of each MI6 File, which mission it belongs to, and a helpful image for locating it:

    Heart of the Matter — 00 Recruits
    First, play through the “Heart of the Matter” chapter until you can explore Q-Branch. After speaking with Q, go to the central podium and locate a computer terminal to the left of the SUV, on a desk behind the initial Q interaction. Interact with this computer to unlock the 00 Recruits file.

    Image:
    Location of MI6 file in Q-Branch
    Note: Interacting with the file logs it as obtained but doesn’t remove it physically.

    Heart of the Matter — Selina Tan
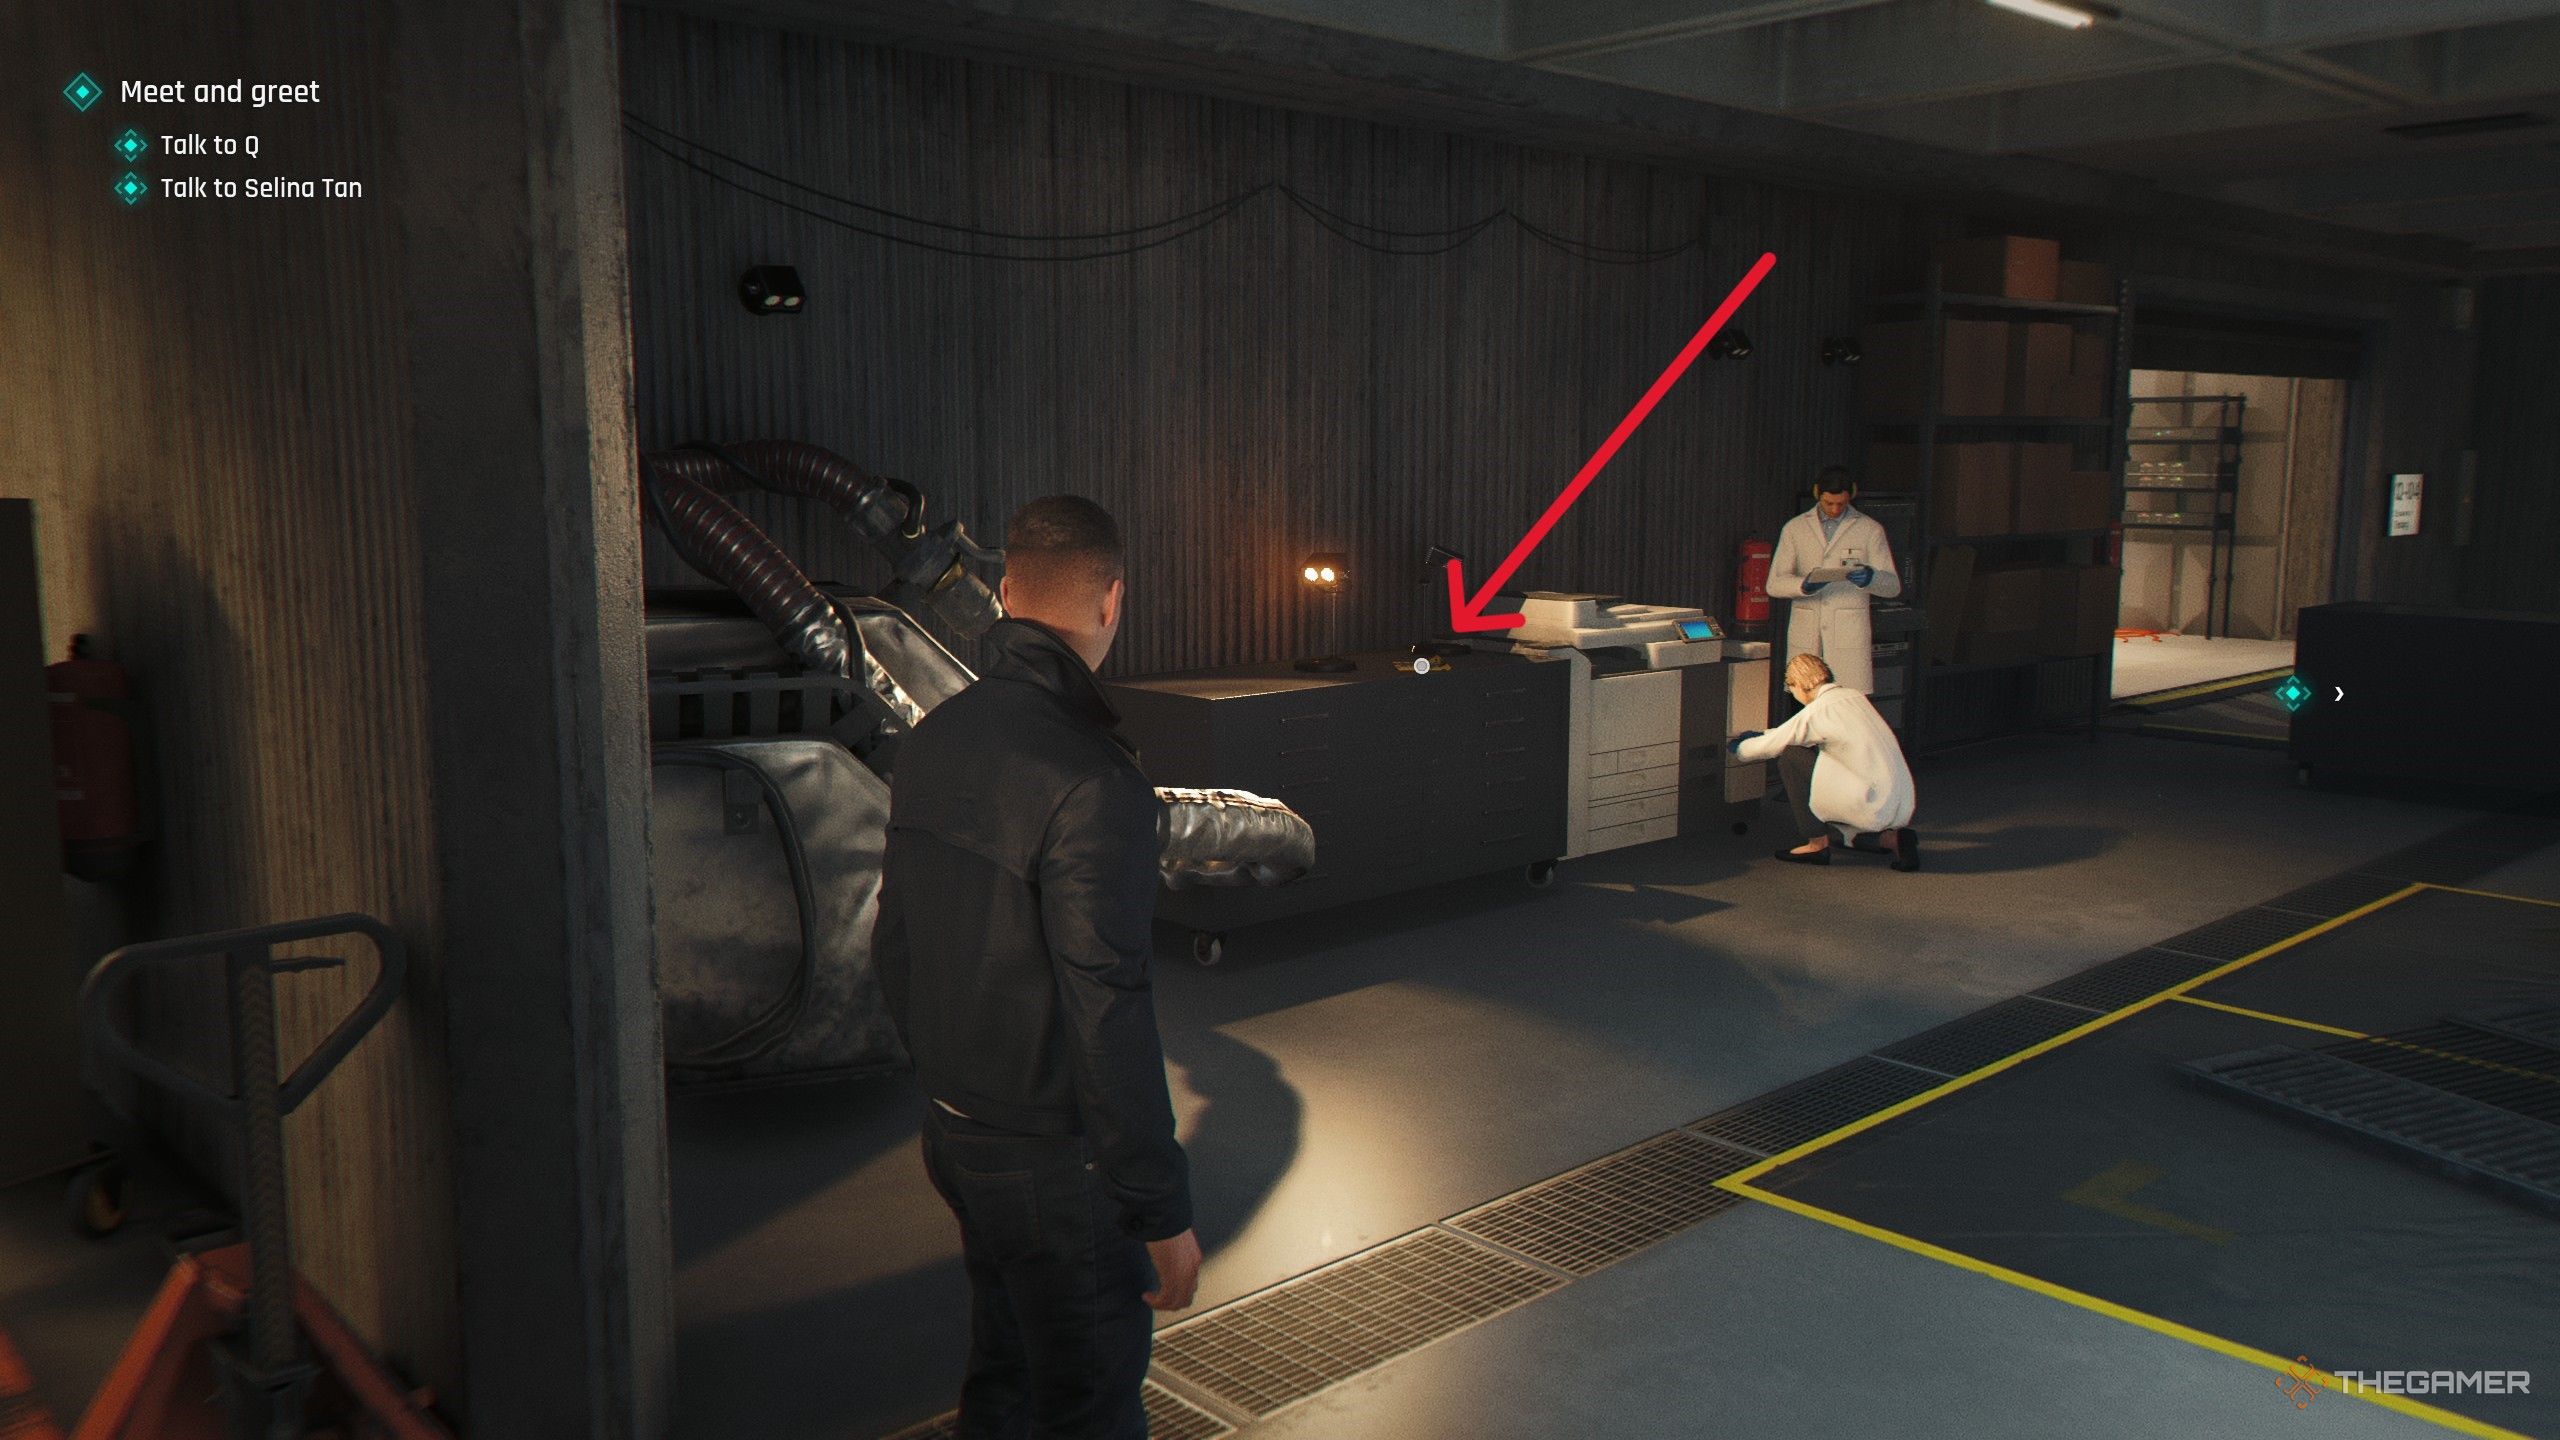
    While exploring the Q-Branch, head to the back right corner of the room. Behind the SUV in the box, find a small table mounted along the wall. Interact with the yellow paper there, which is Selina Tan’s file, and add it to your collection.

    Image:
    Location of Selina Tan’s file

    A New Home — Lennox Monroe
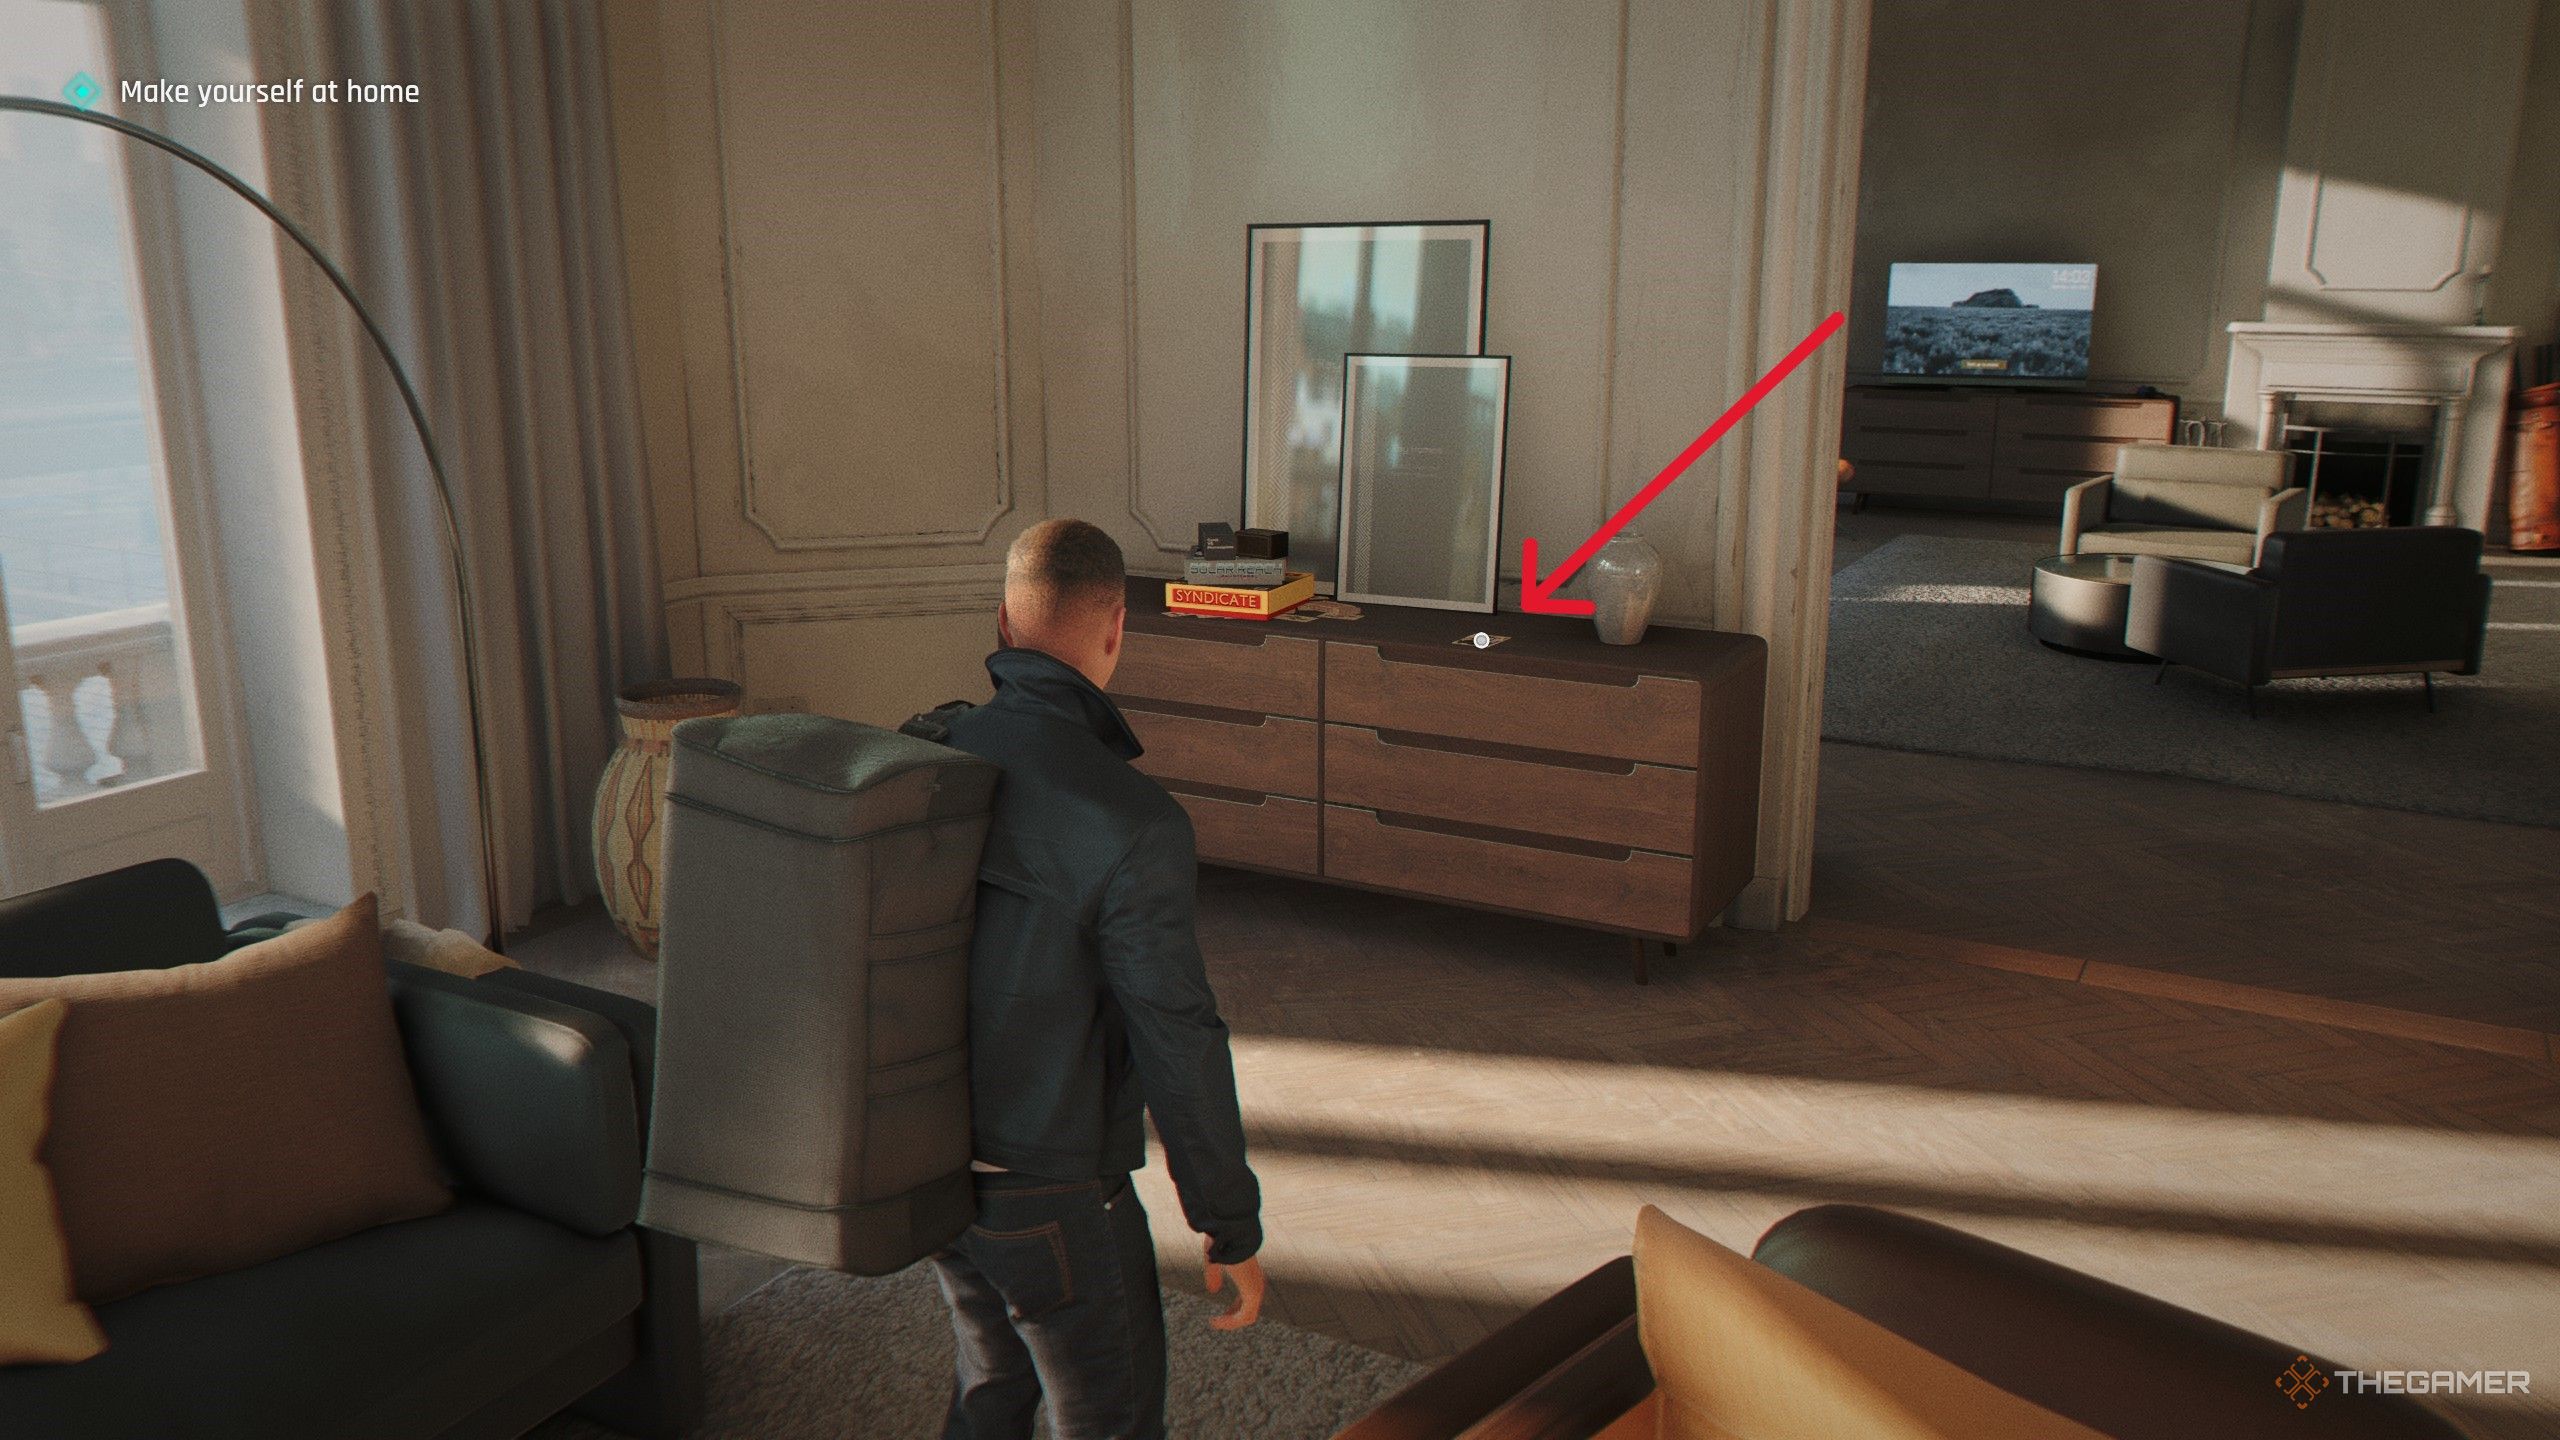
    In the “A New Home” chapter, after arriving at your penthouse in London, move through the space to the living room. On a dresser near the door, there’s a family photo of Lennox Monroe. Flip the photo to add it to your MI6 Files.

    Image:
    Location of Lennox Monroe’s file

    A New Home — Cressida Bright
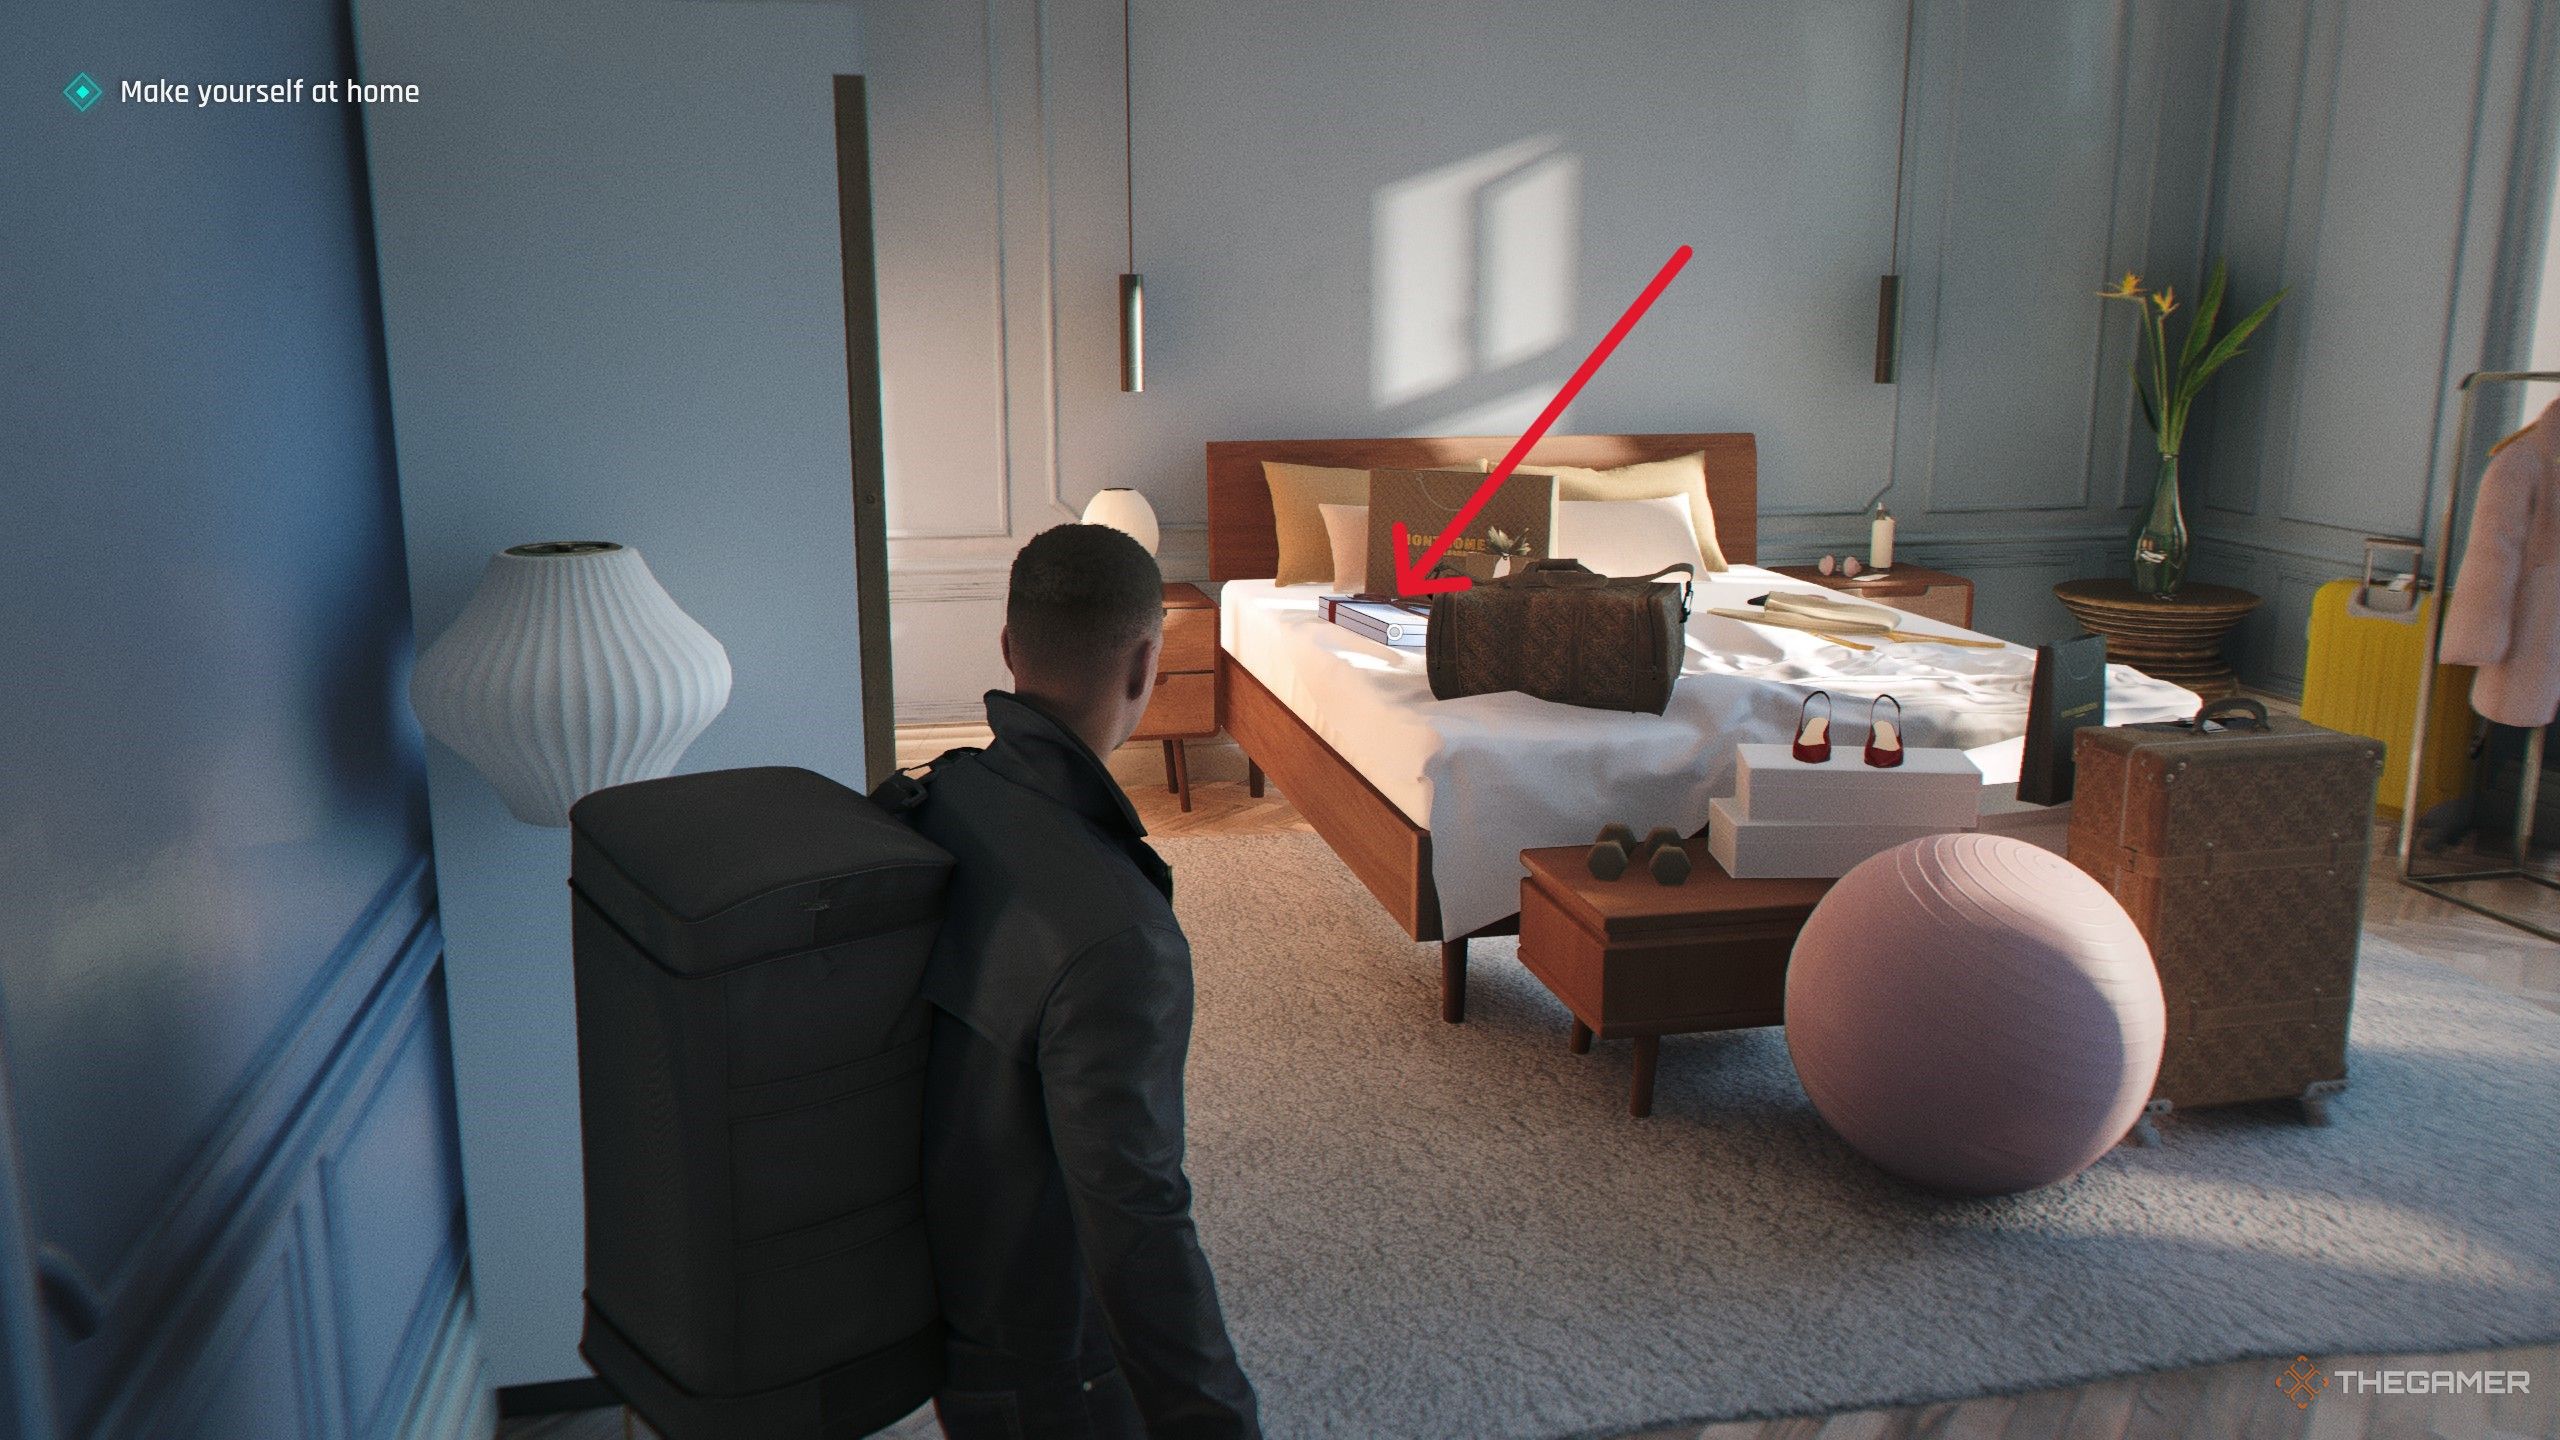
    Inside the penthouse, go down the main hall and enter Cressida’s room through the second door on the right. She has a present box on her bed. Interact with the box to acquire her MI6 file.

    Image:
    Location of Cressida Bright’s file

    The Past Never Dies — Niko and Tero Murto
    During your third visit to Q-Branch and the Operations floor, after speaking to Q and receiving gadgets, go to the back of the floor. On a desk along the wall, there’s a file about the twins you fought at the hotel. Interact to collect it.

    Image:
    Location of Niko and Tero Murto’s file

    The Past Never Dies — John Greenway
    Once on 009’s boat in “The Past Never Dies,” enter the backroom. Inside, on a table, find a photo of John Greenway. Interact with it to add the file to your MI6 collection.

    Image:
    Layout in the boat

    Uninvited — James Bond
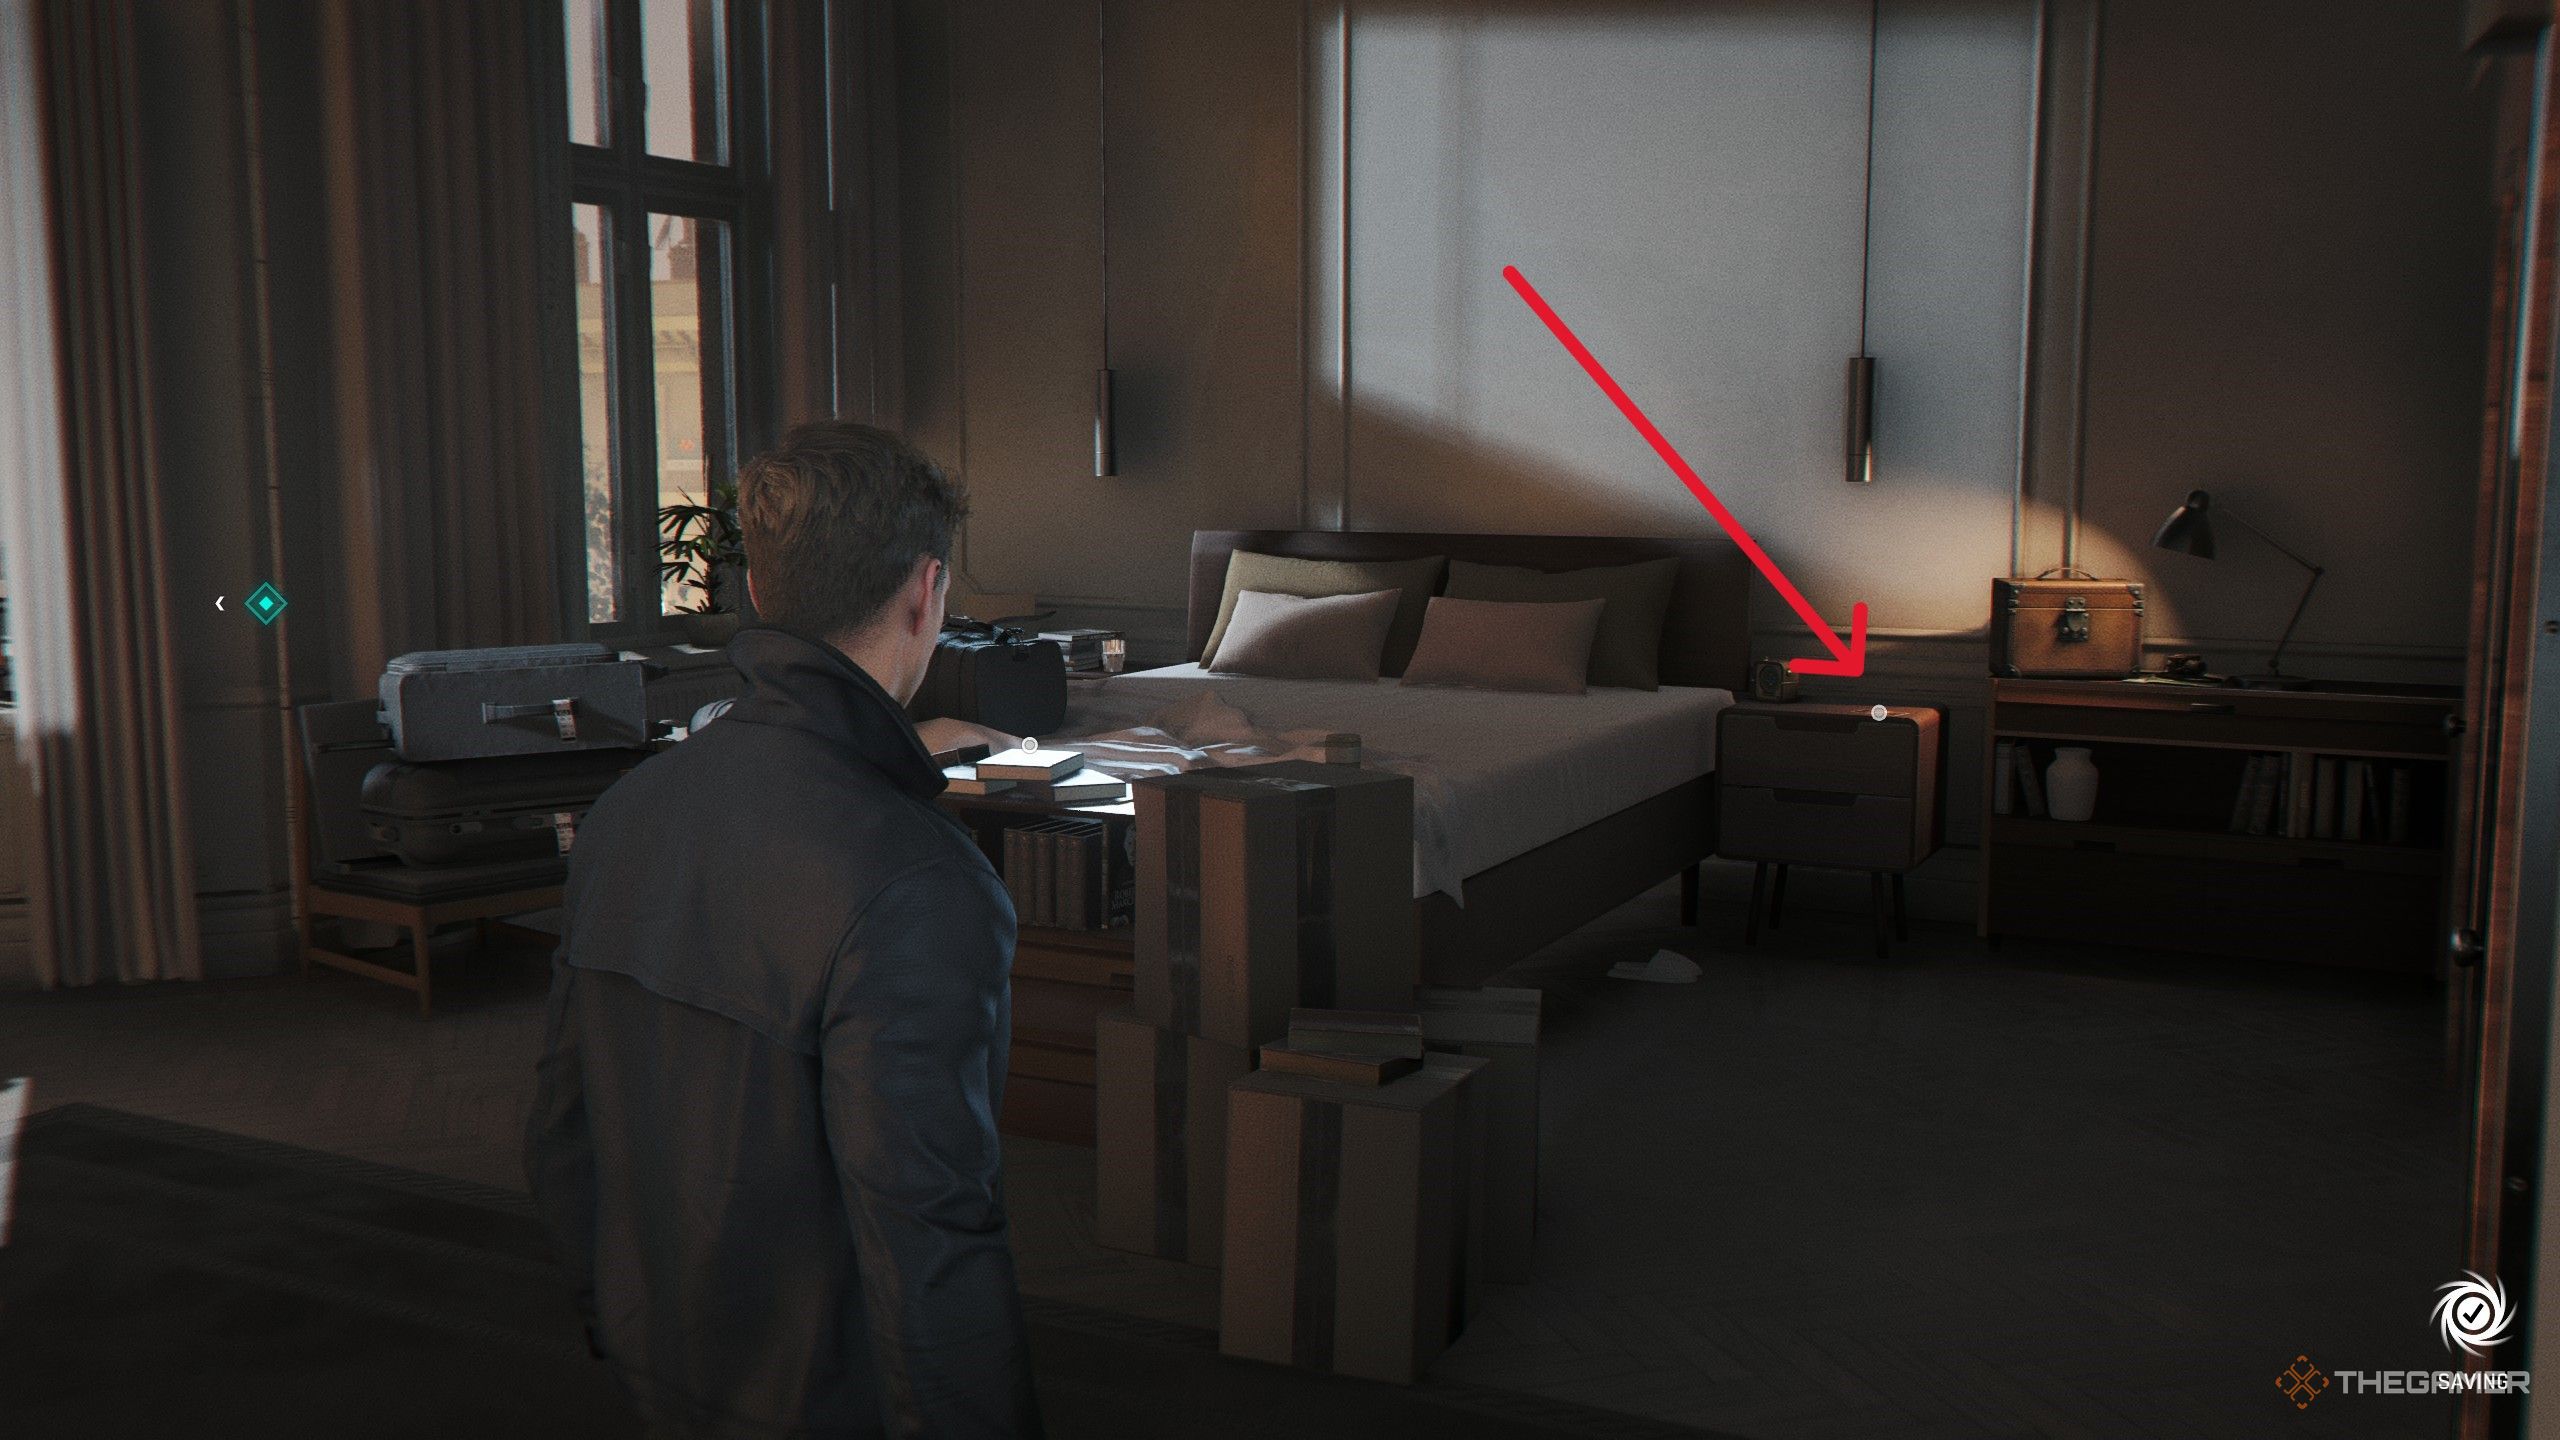
    Back at Bond’s penthouse, go to his bedroom and interact with the photo on the nightstand. This will unlock the James Bond MI6 File.

    Image:
    Location in Bond’s bedroom

    Uninvited — Webb Industries
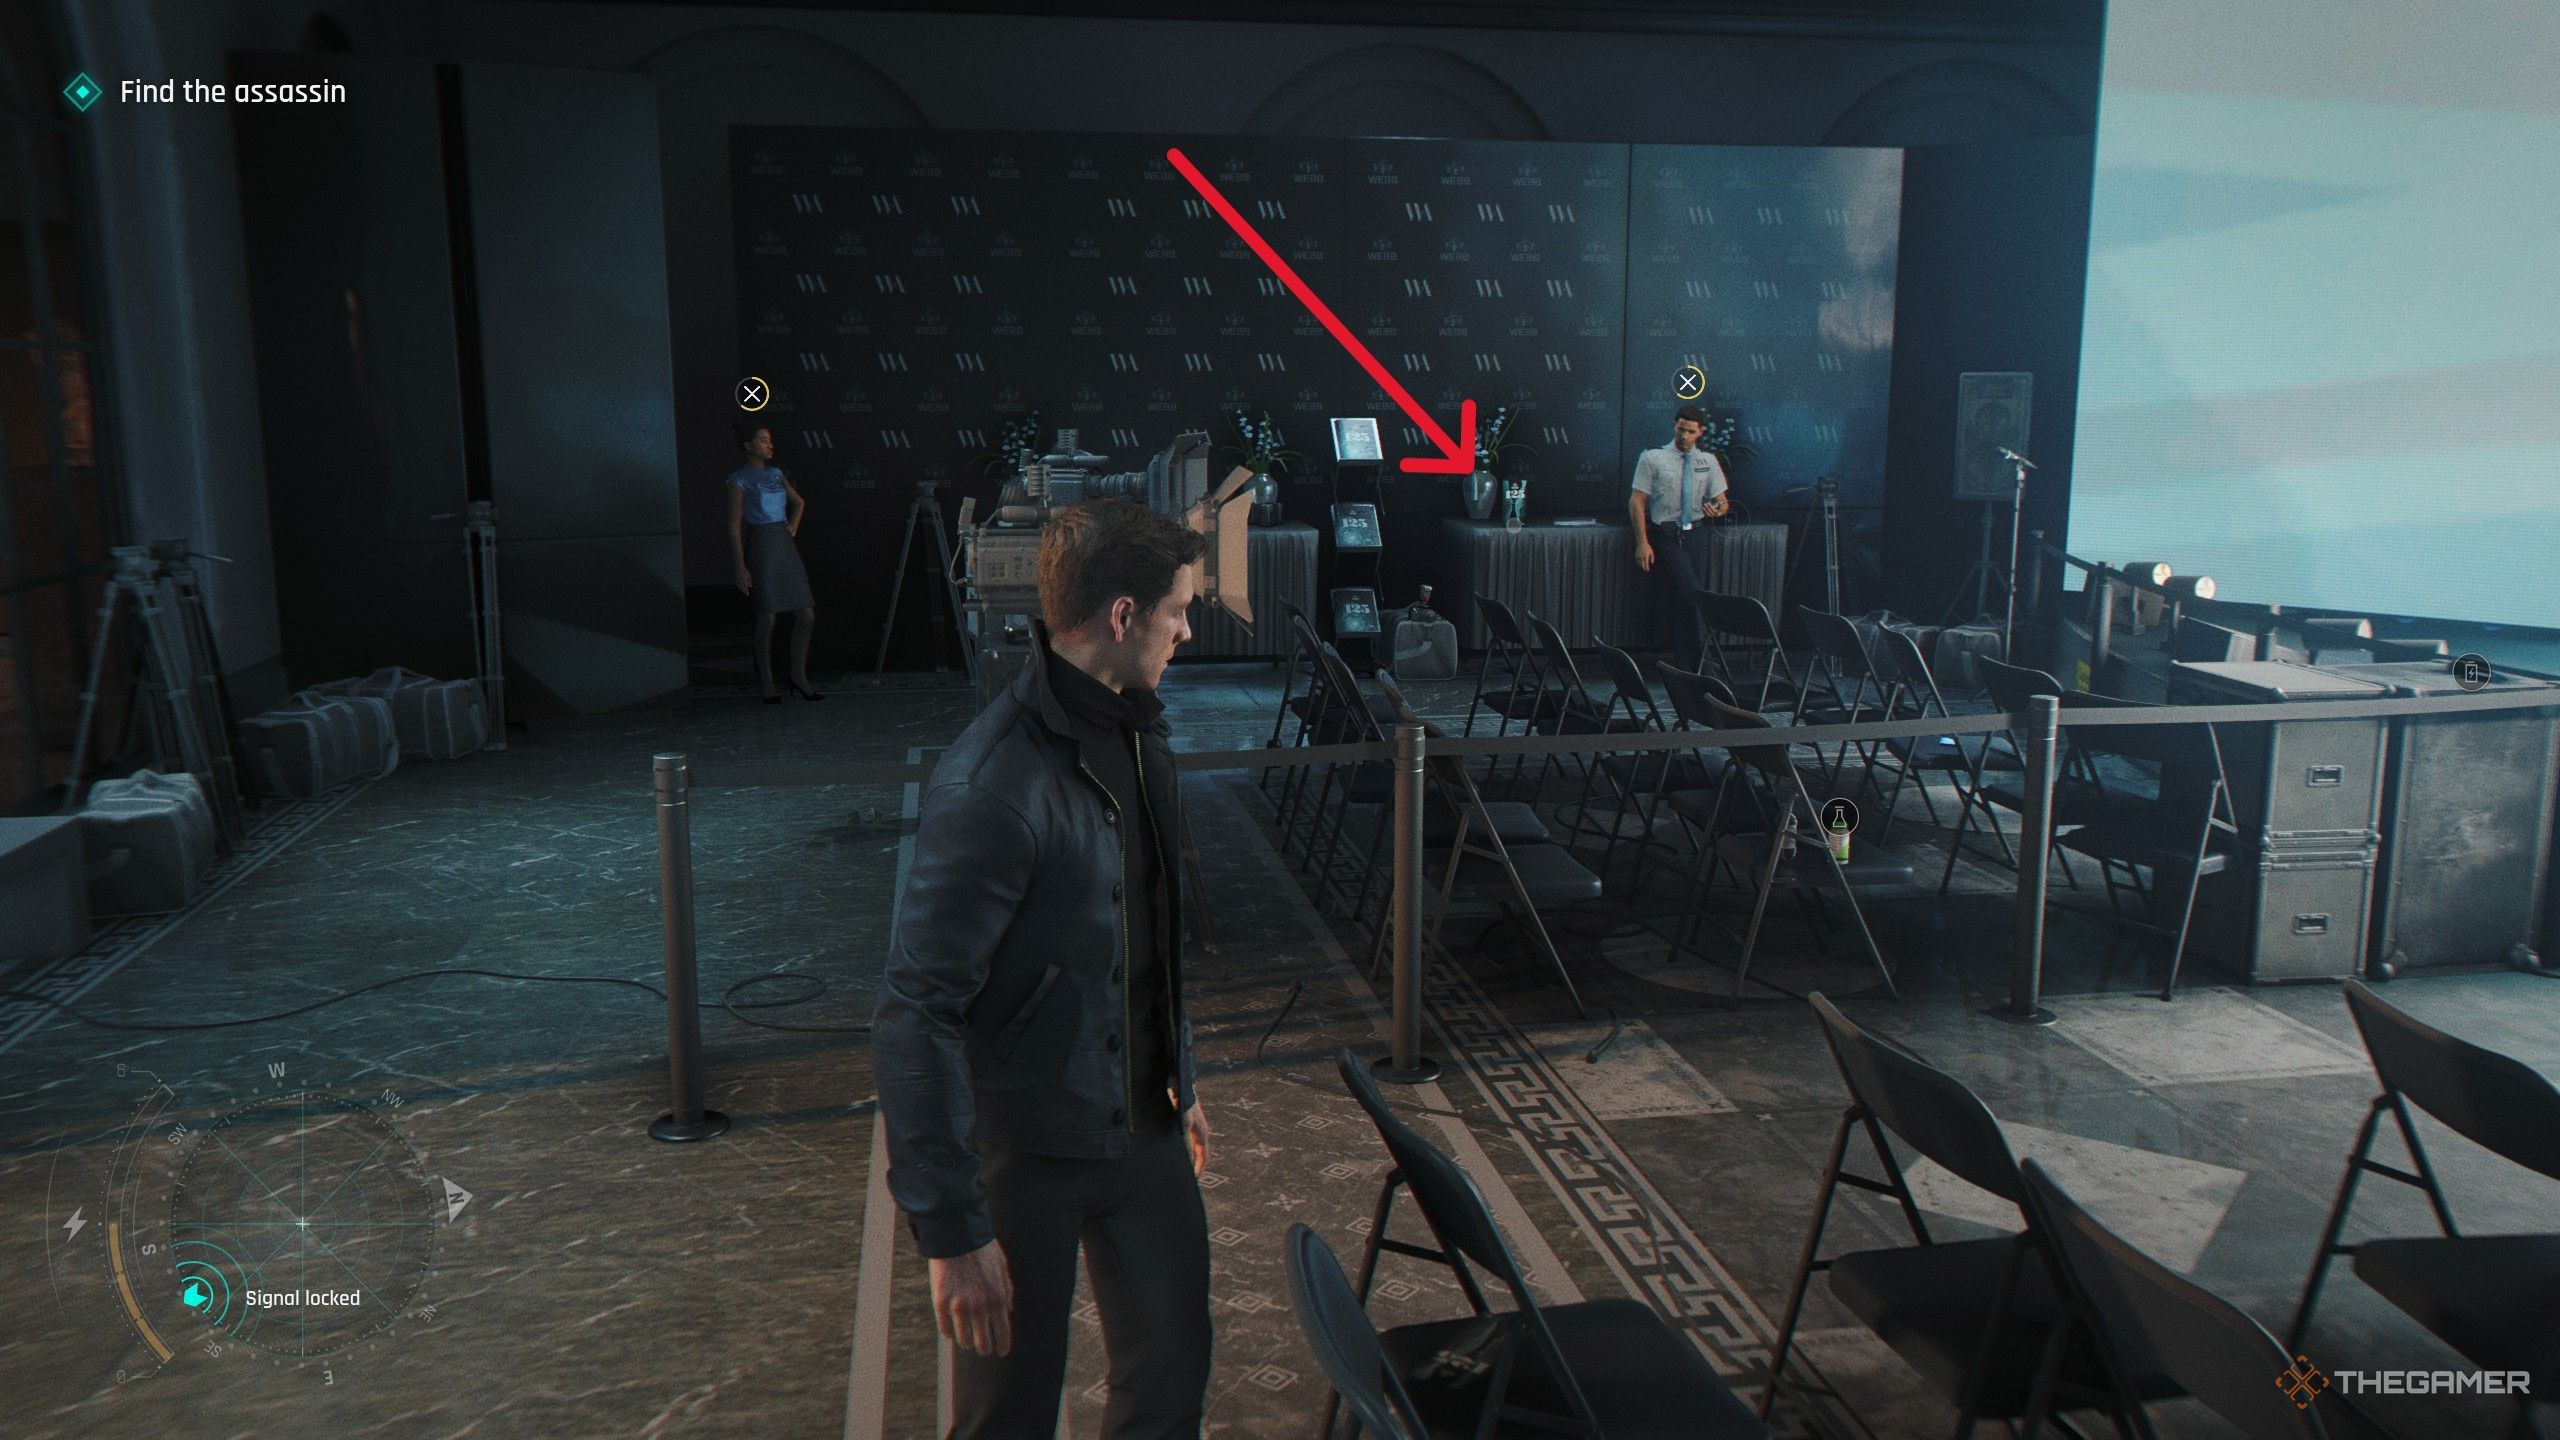
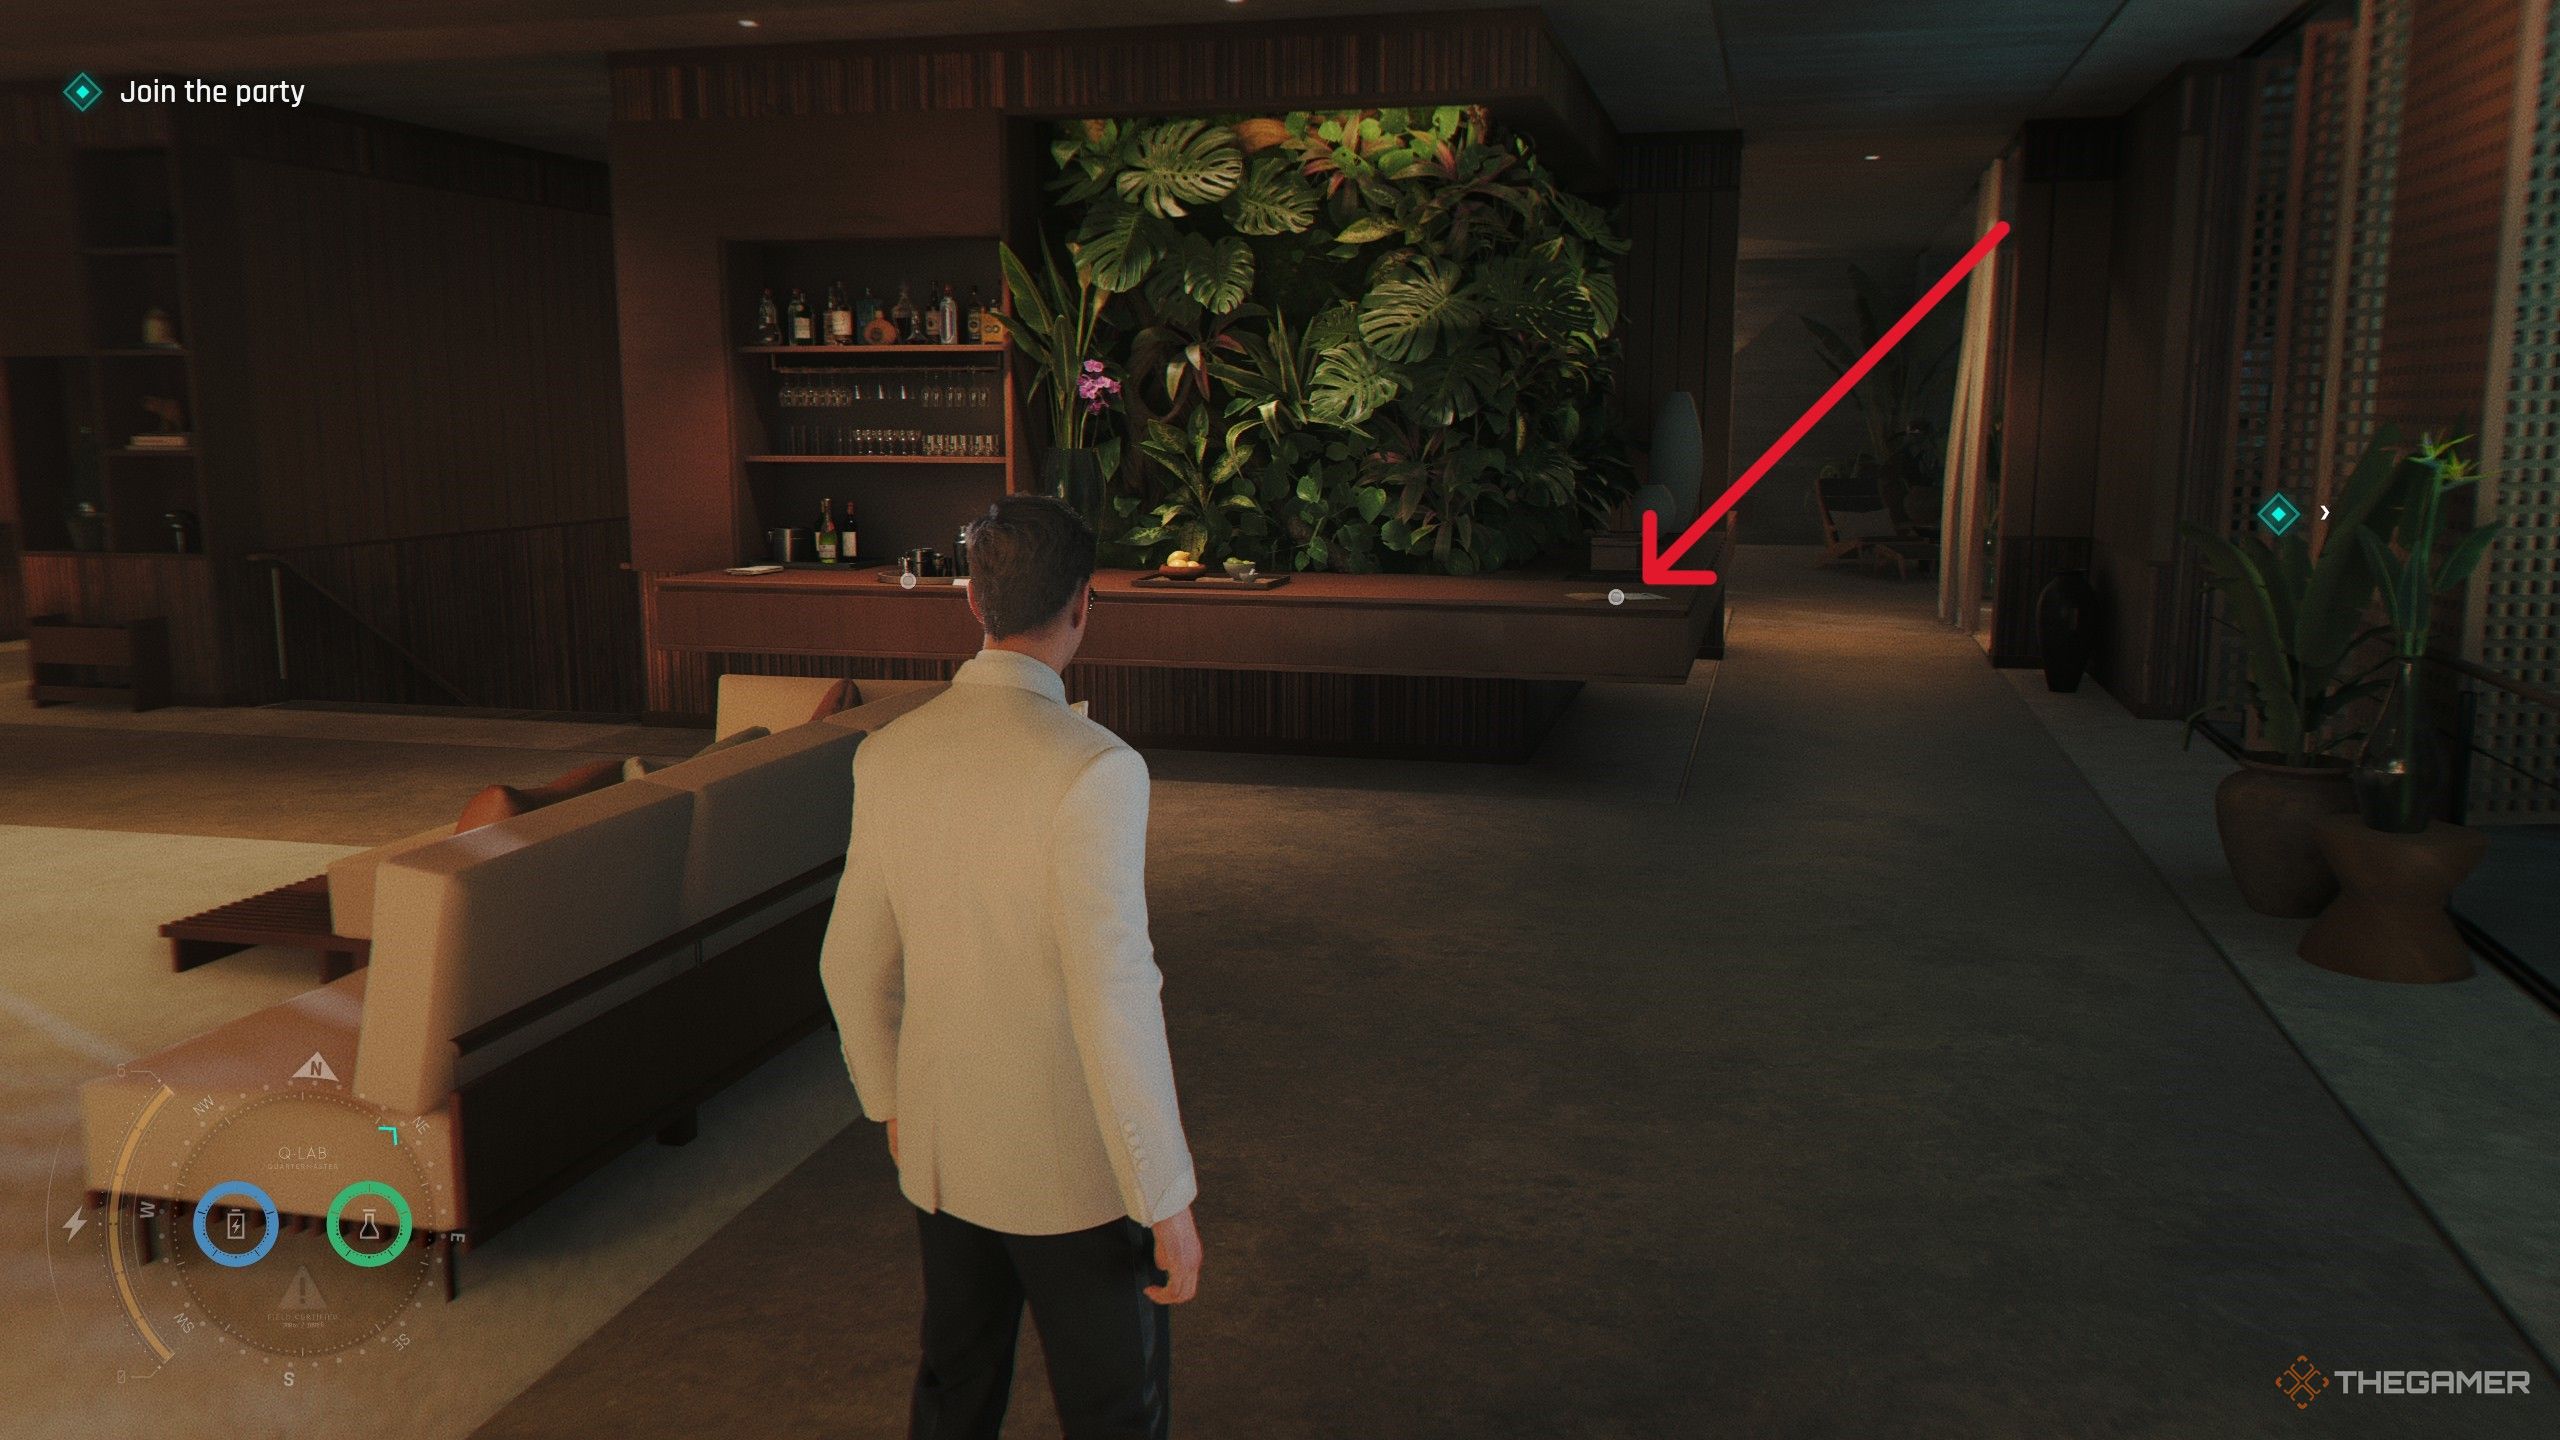
    During the infiltration of the gala, after stealing the invite, enter the main room with a large bar. Go left into a room with empty chairs and a stage. Distract the guard at the entrance, then use the Bluff mechanic inside to stealthily grab the Webb Industries flyer from the table.

    Image:
    Interior of the gala

    Uninvited — Stephen Bright
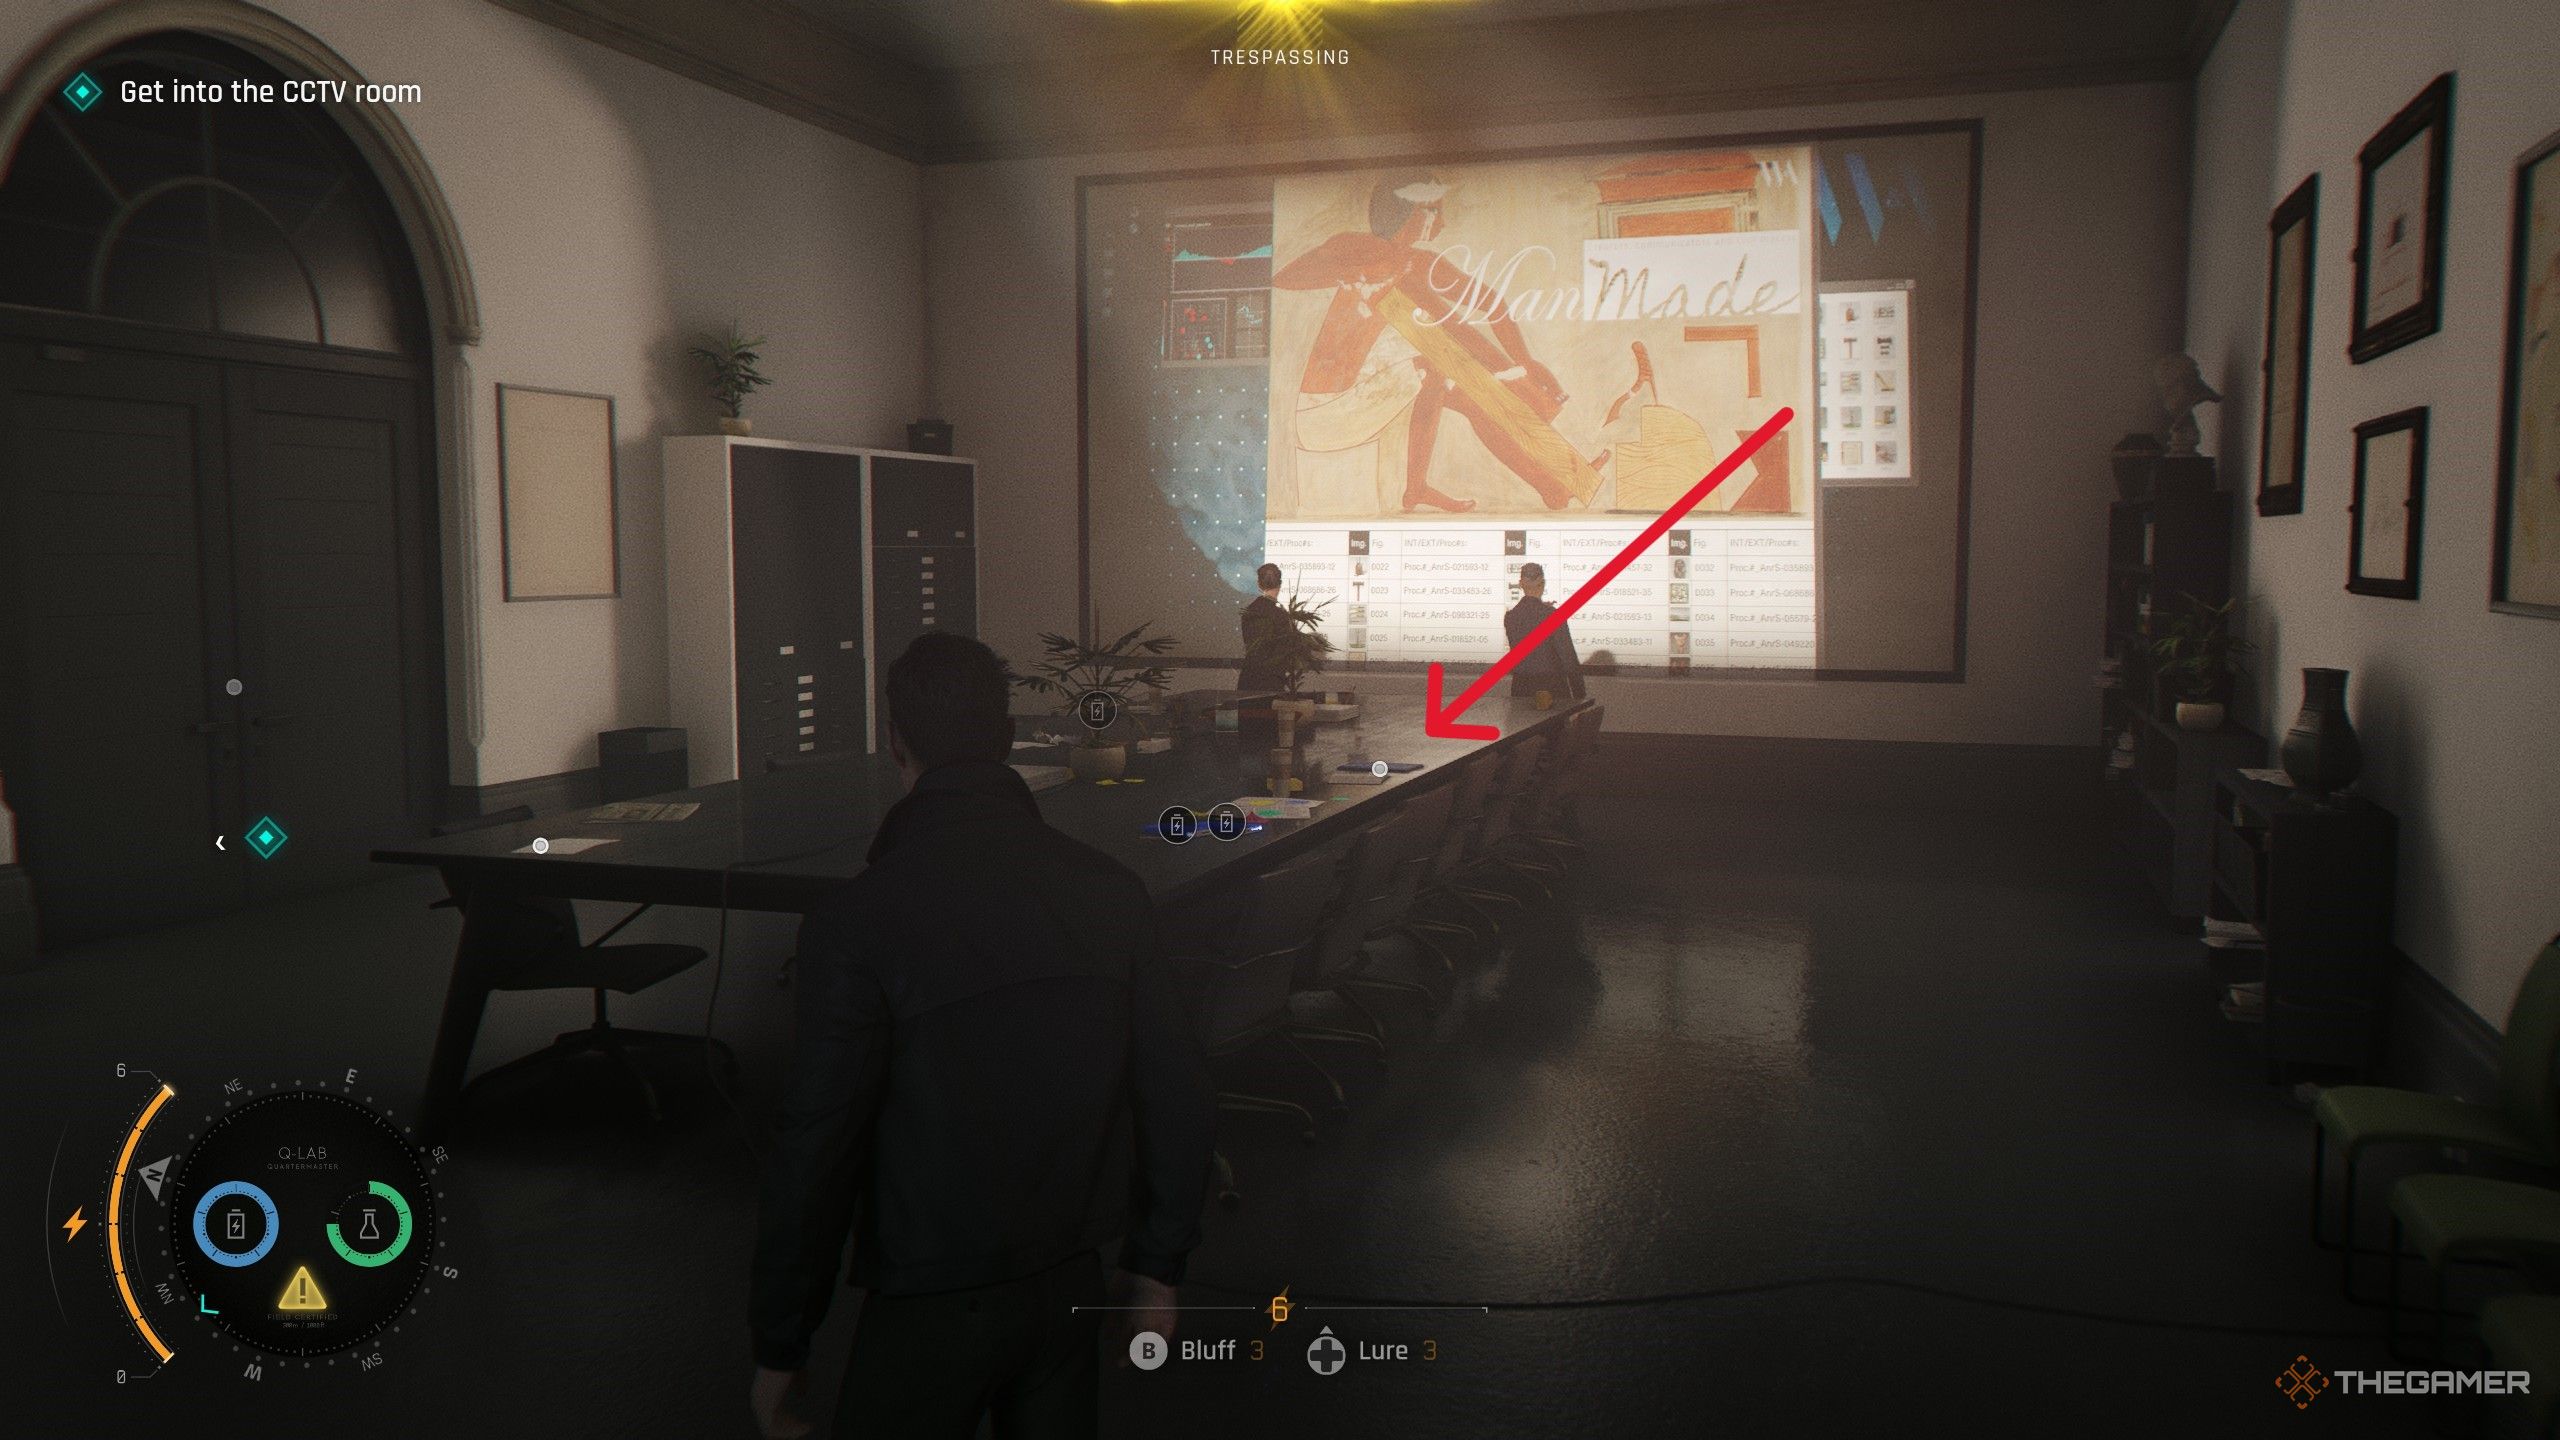
    Inside the security room on the second floor, take the second door on the right into a conference room occupied by guards. Bond can convince them he belongs there, after which on the table in the center you’ll find Stephen Bright’s file.

    Image:
    Security room scene

    Going Old School — Q
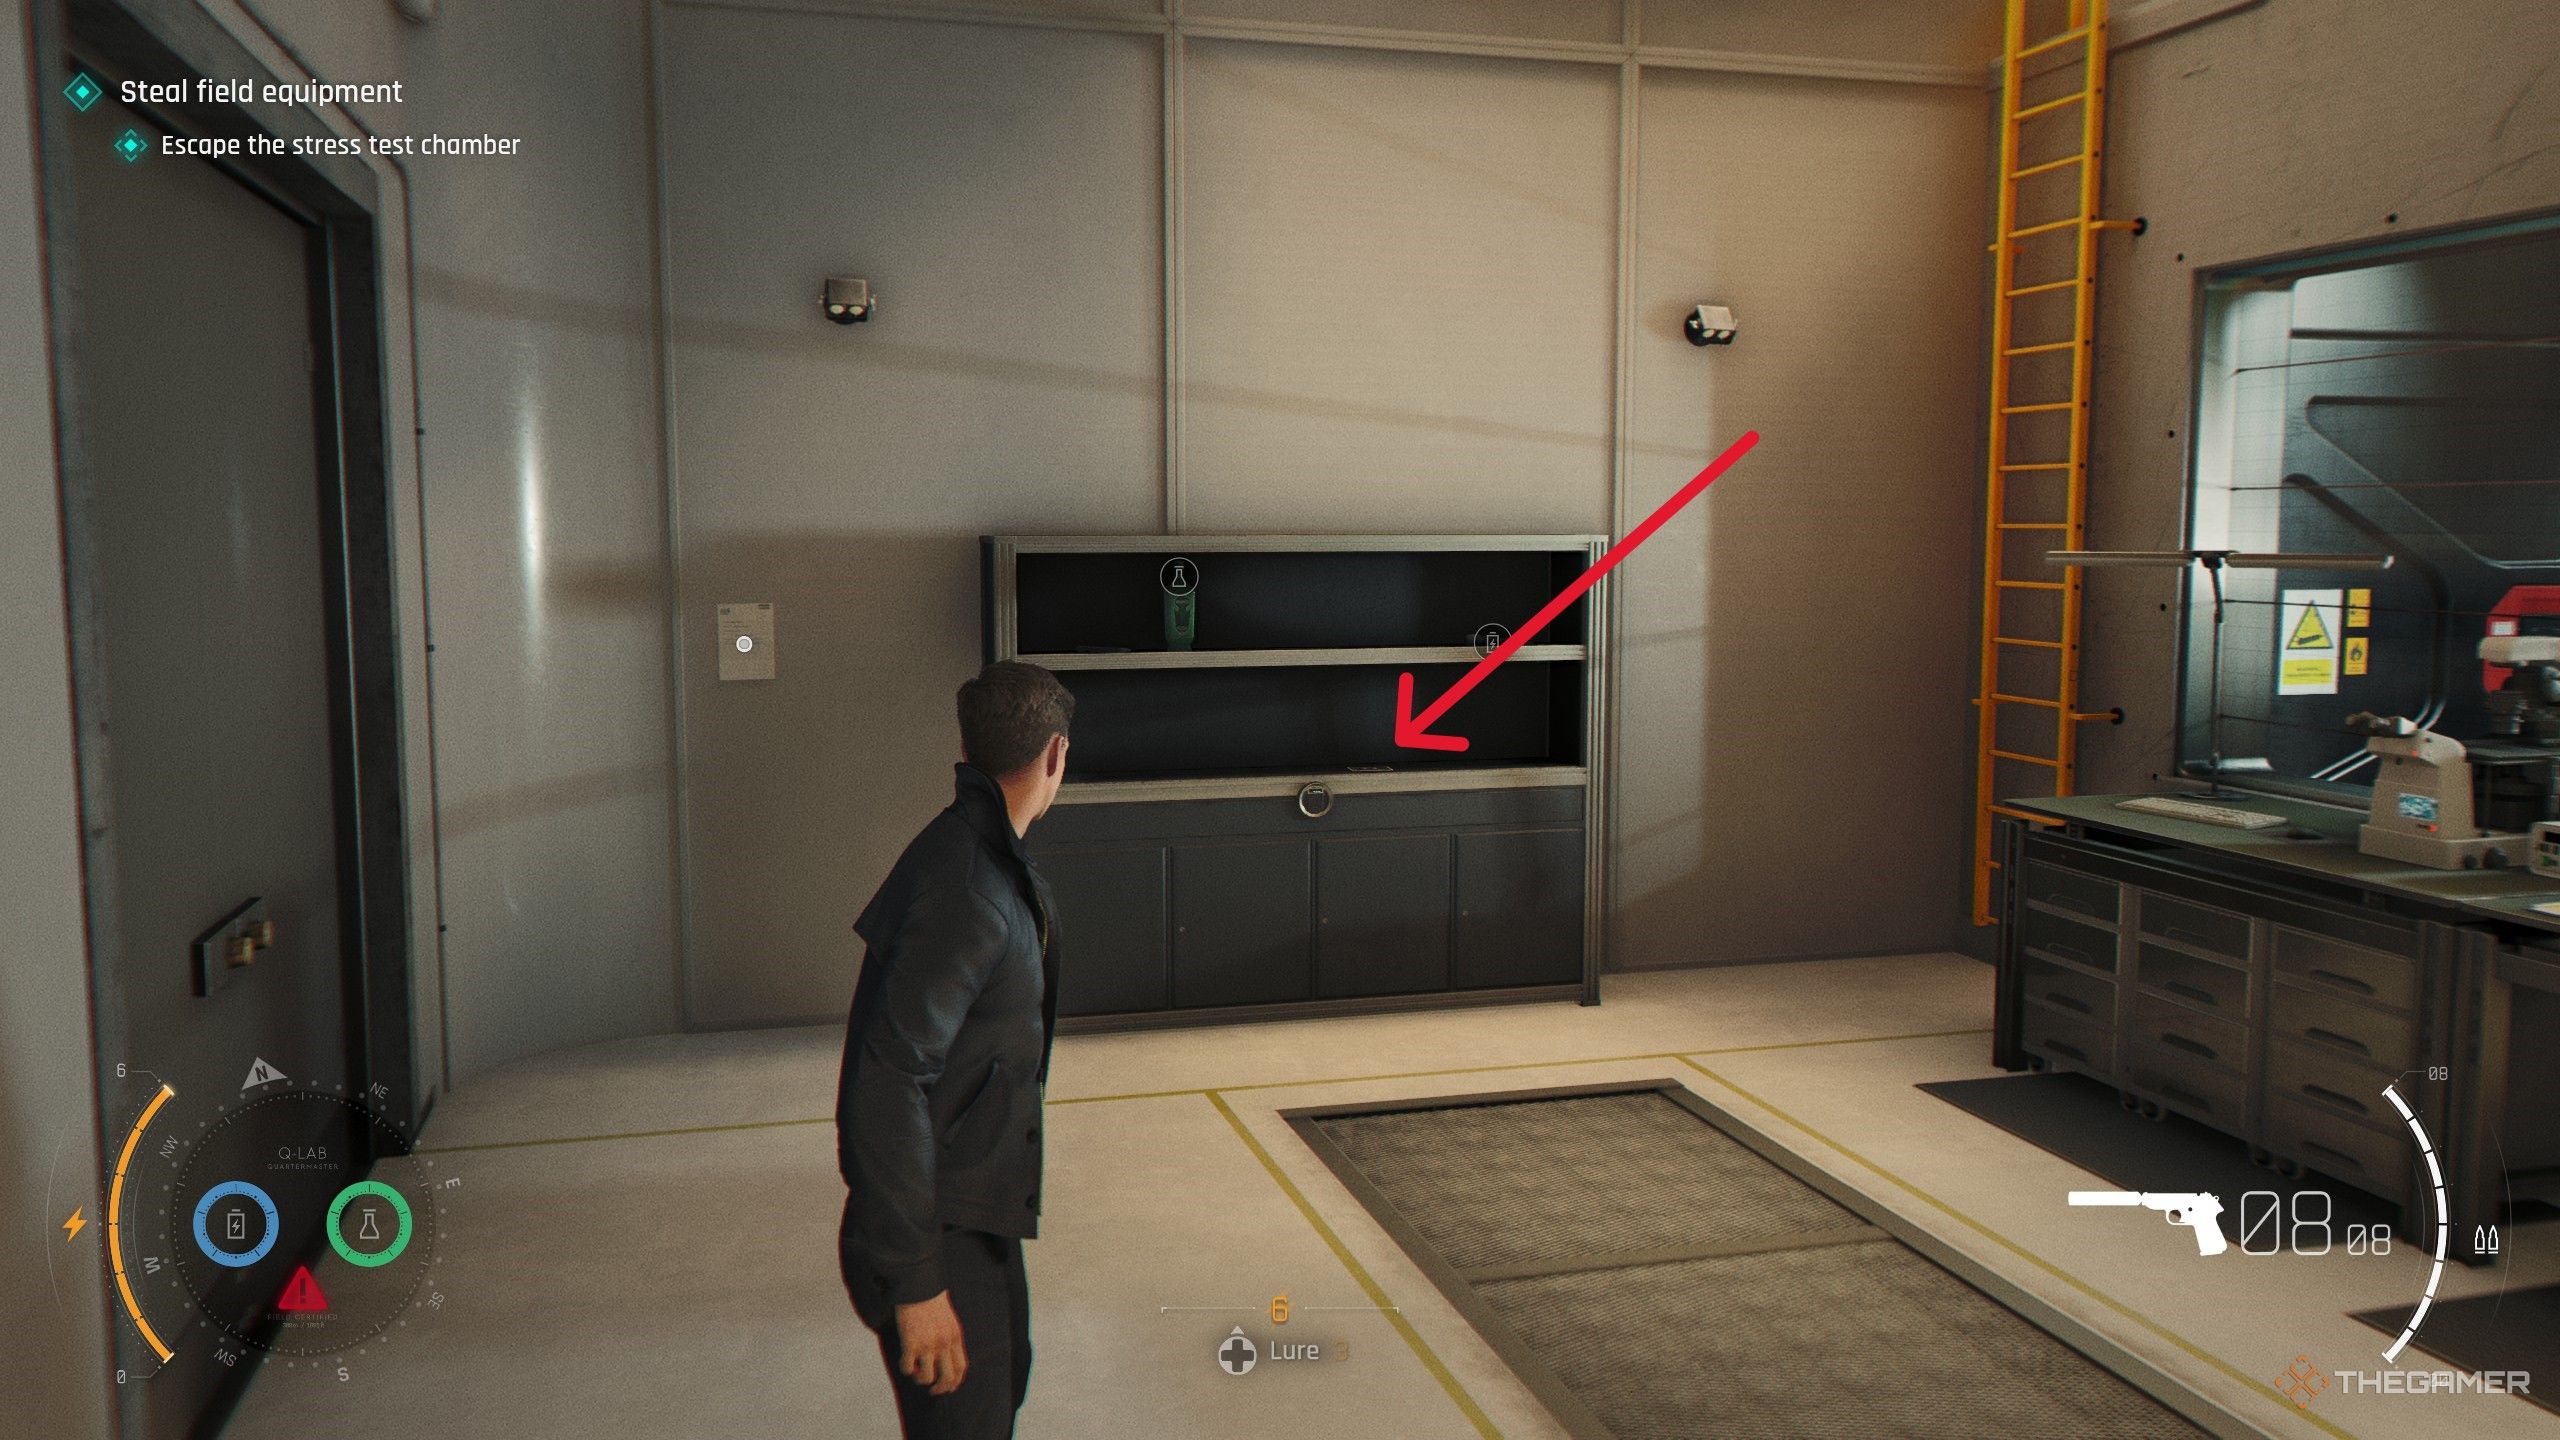
    Near the start of “Going Old School,” visit Q-Branch. To the right of the car being repaired, interact with the driving gloves on a workbench. Picking them up will reveal the Q MI6 File.

    Image:
    Q-Branch workshop

    Time to Die — Theresa Lorca
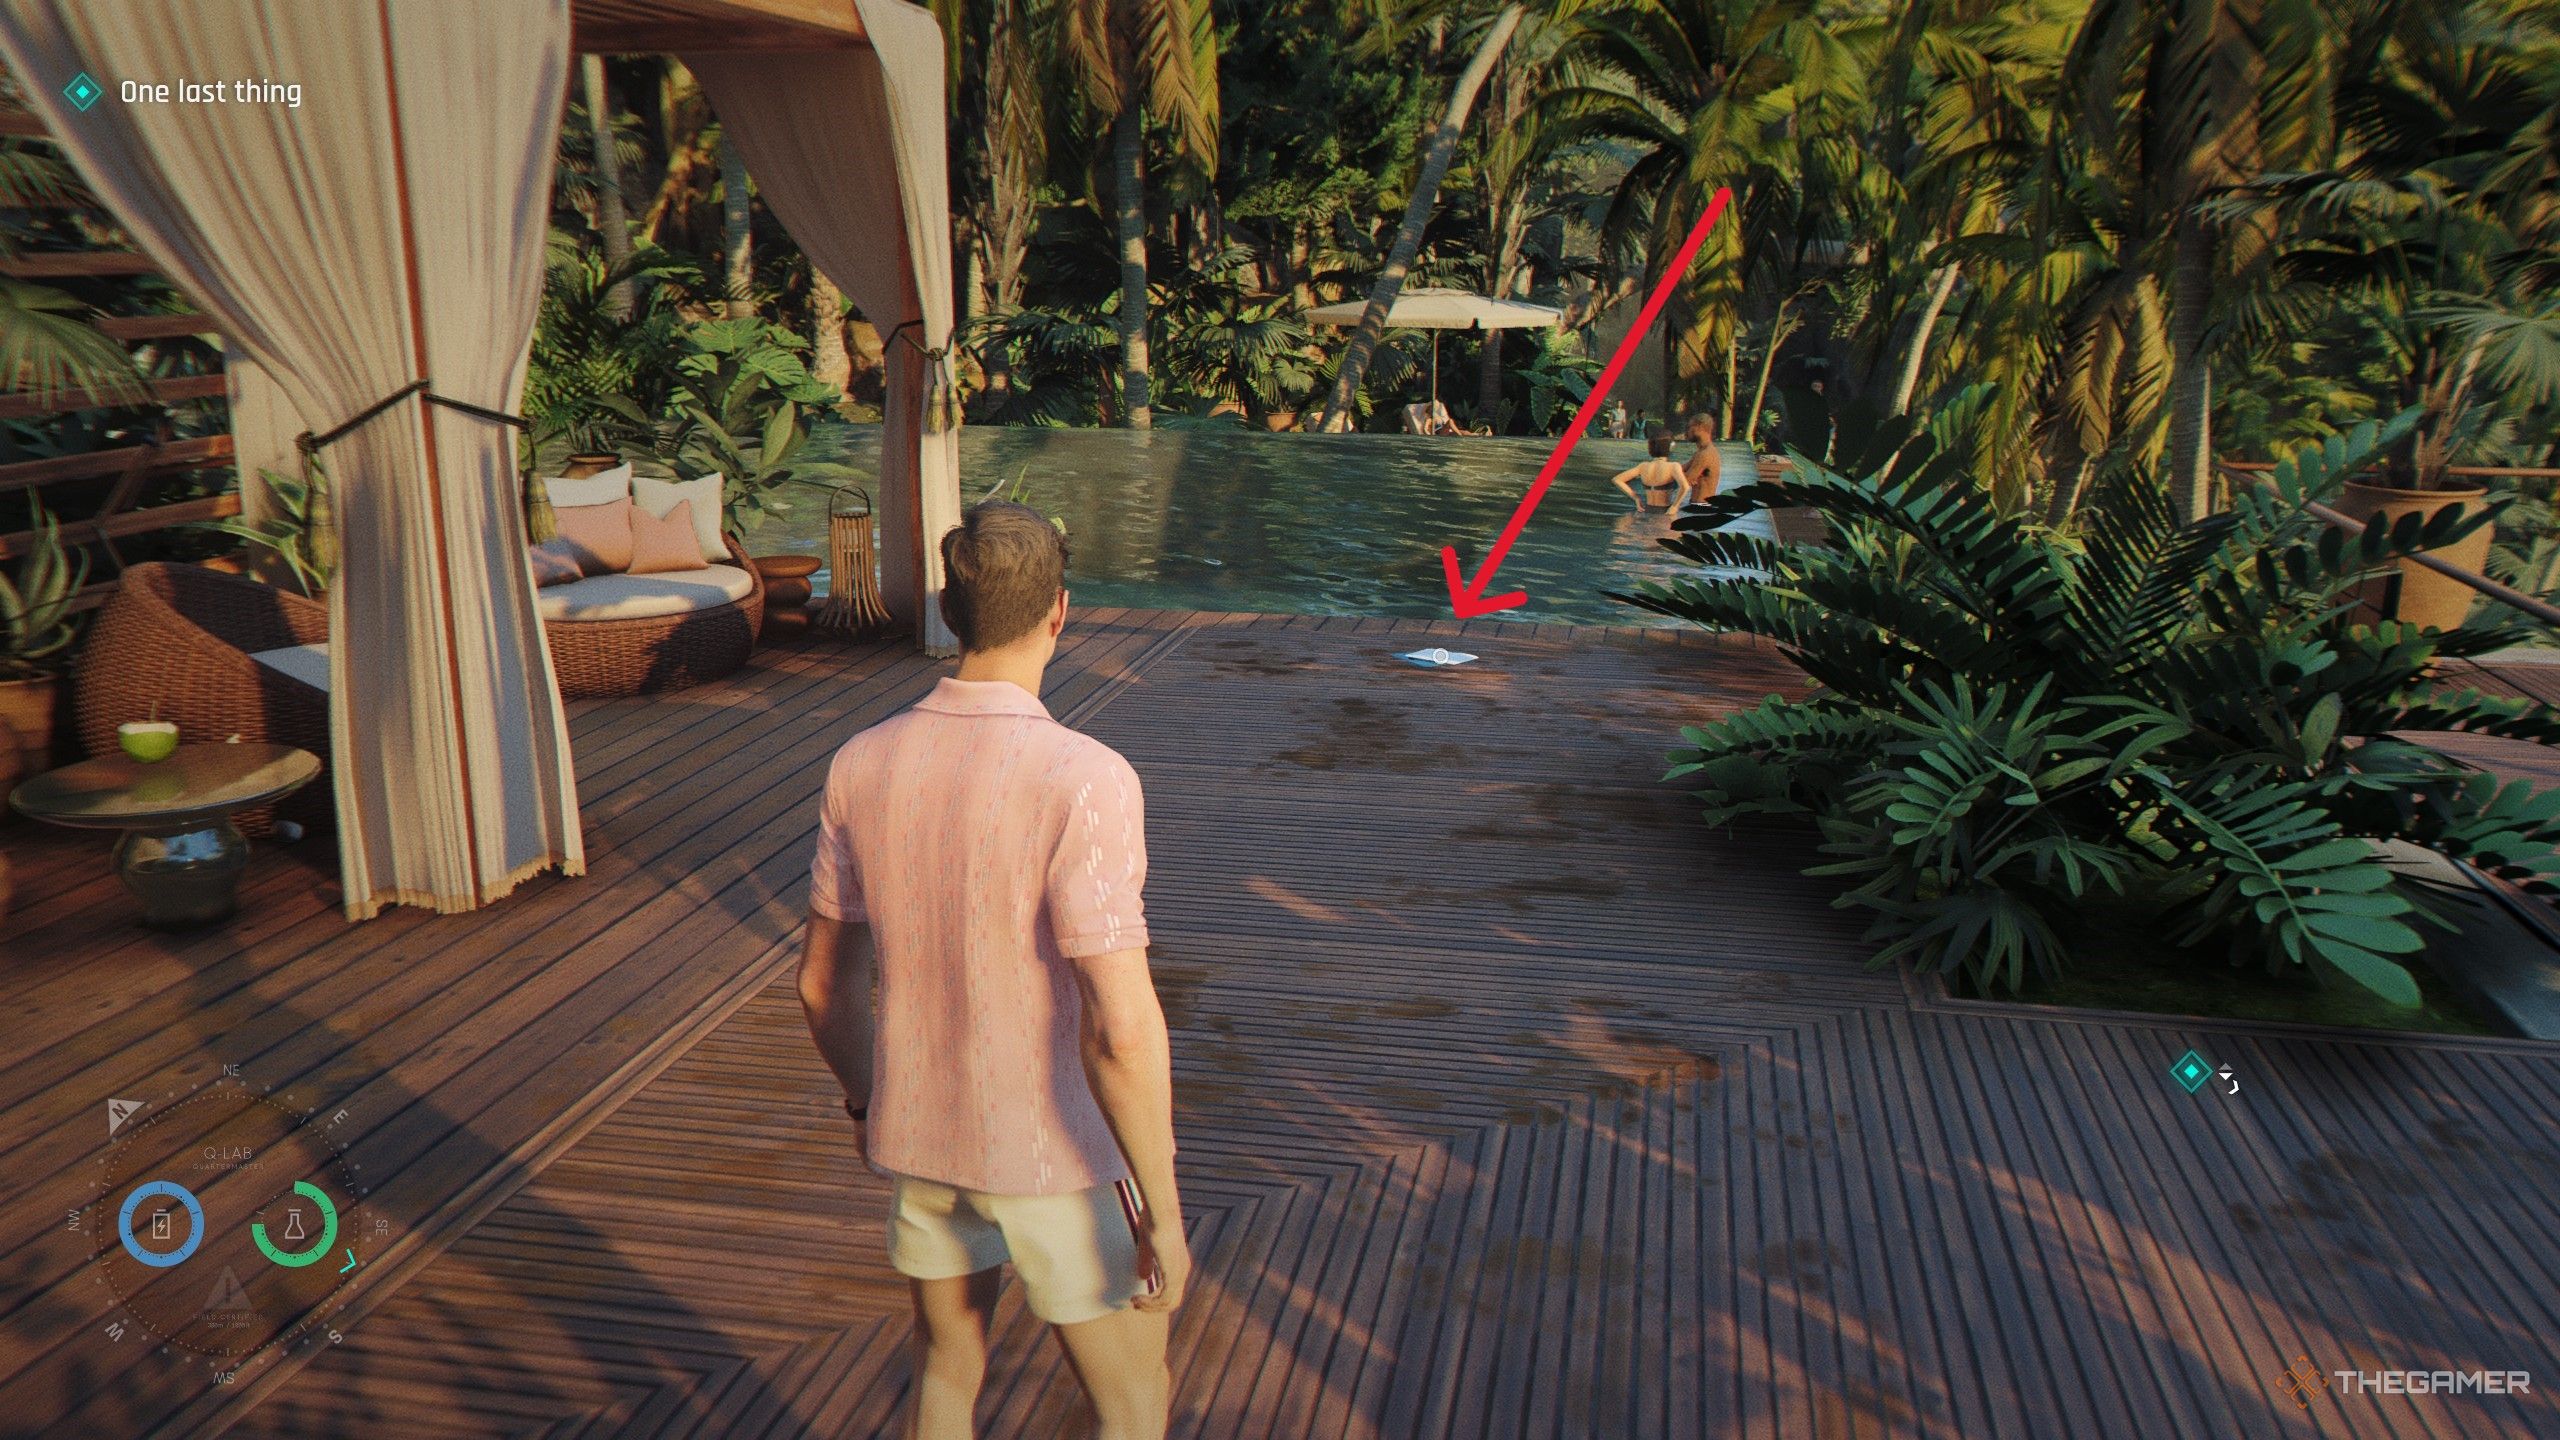
    In the “Time to Die” mission, after meeting Lorca to plant a tracker, go to the Serenity Space. The MI6 File is on the ground in front of the loungers, near Lorca herself.

    Image:
    Scene with Lorca

    Time to Die — Caliban
    Post-mini-game where Bond helps put on his bowtie, go into the living room and interact with the file sitting on the desk to unlock this intel.

    Image:
    Living room scene

    Wave of the Future — M
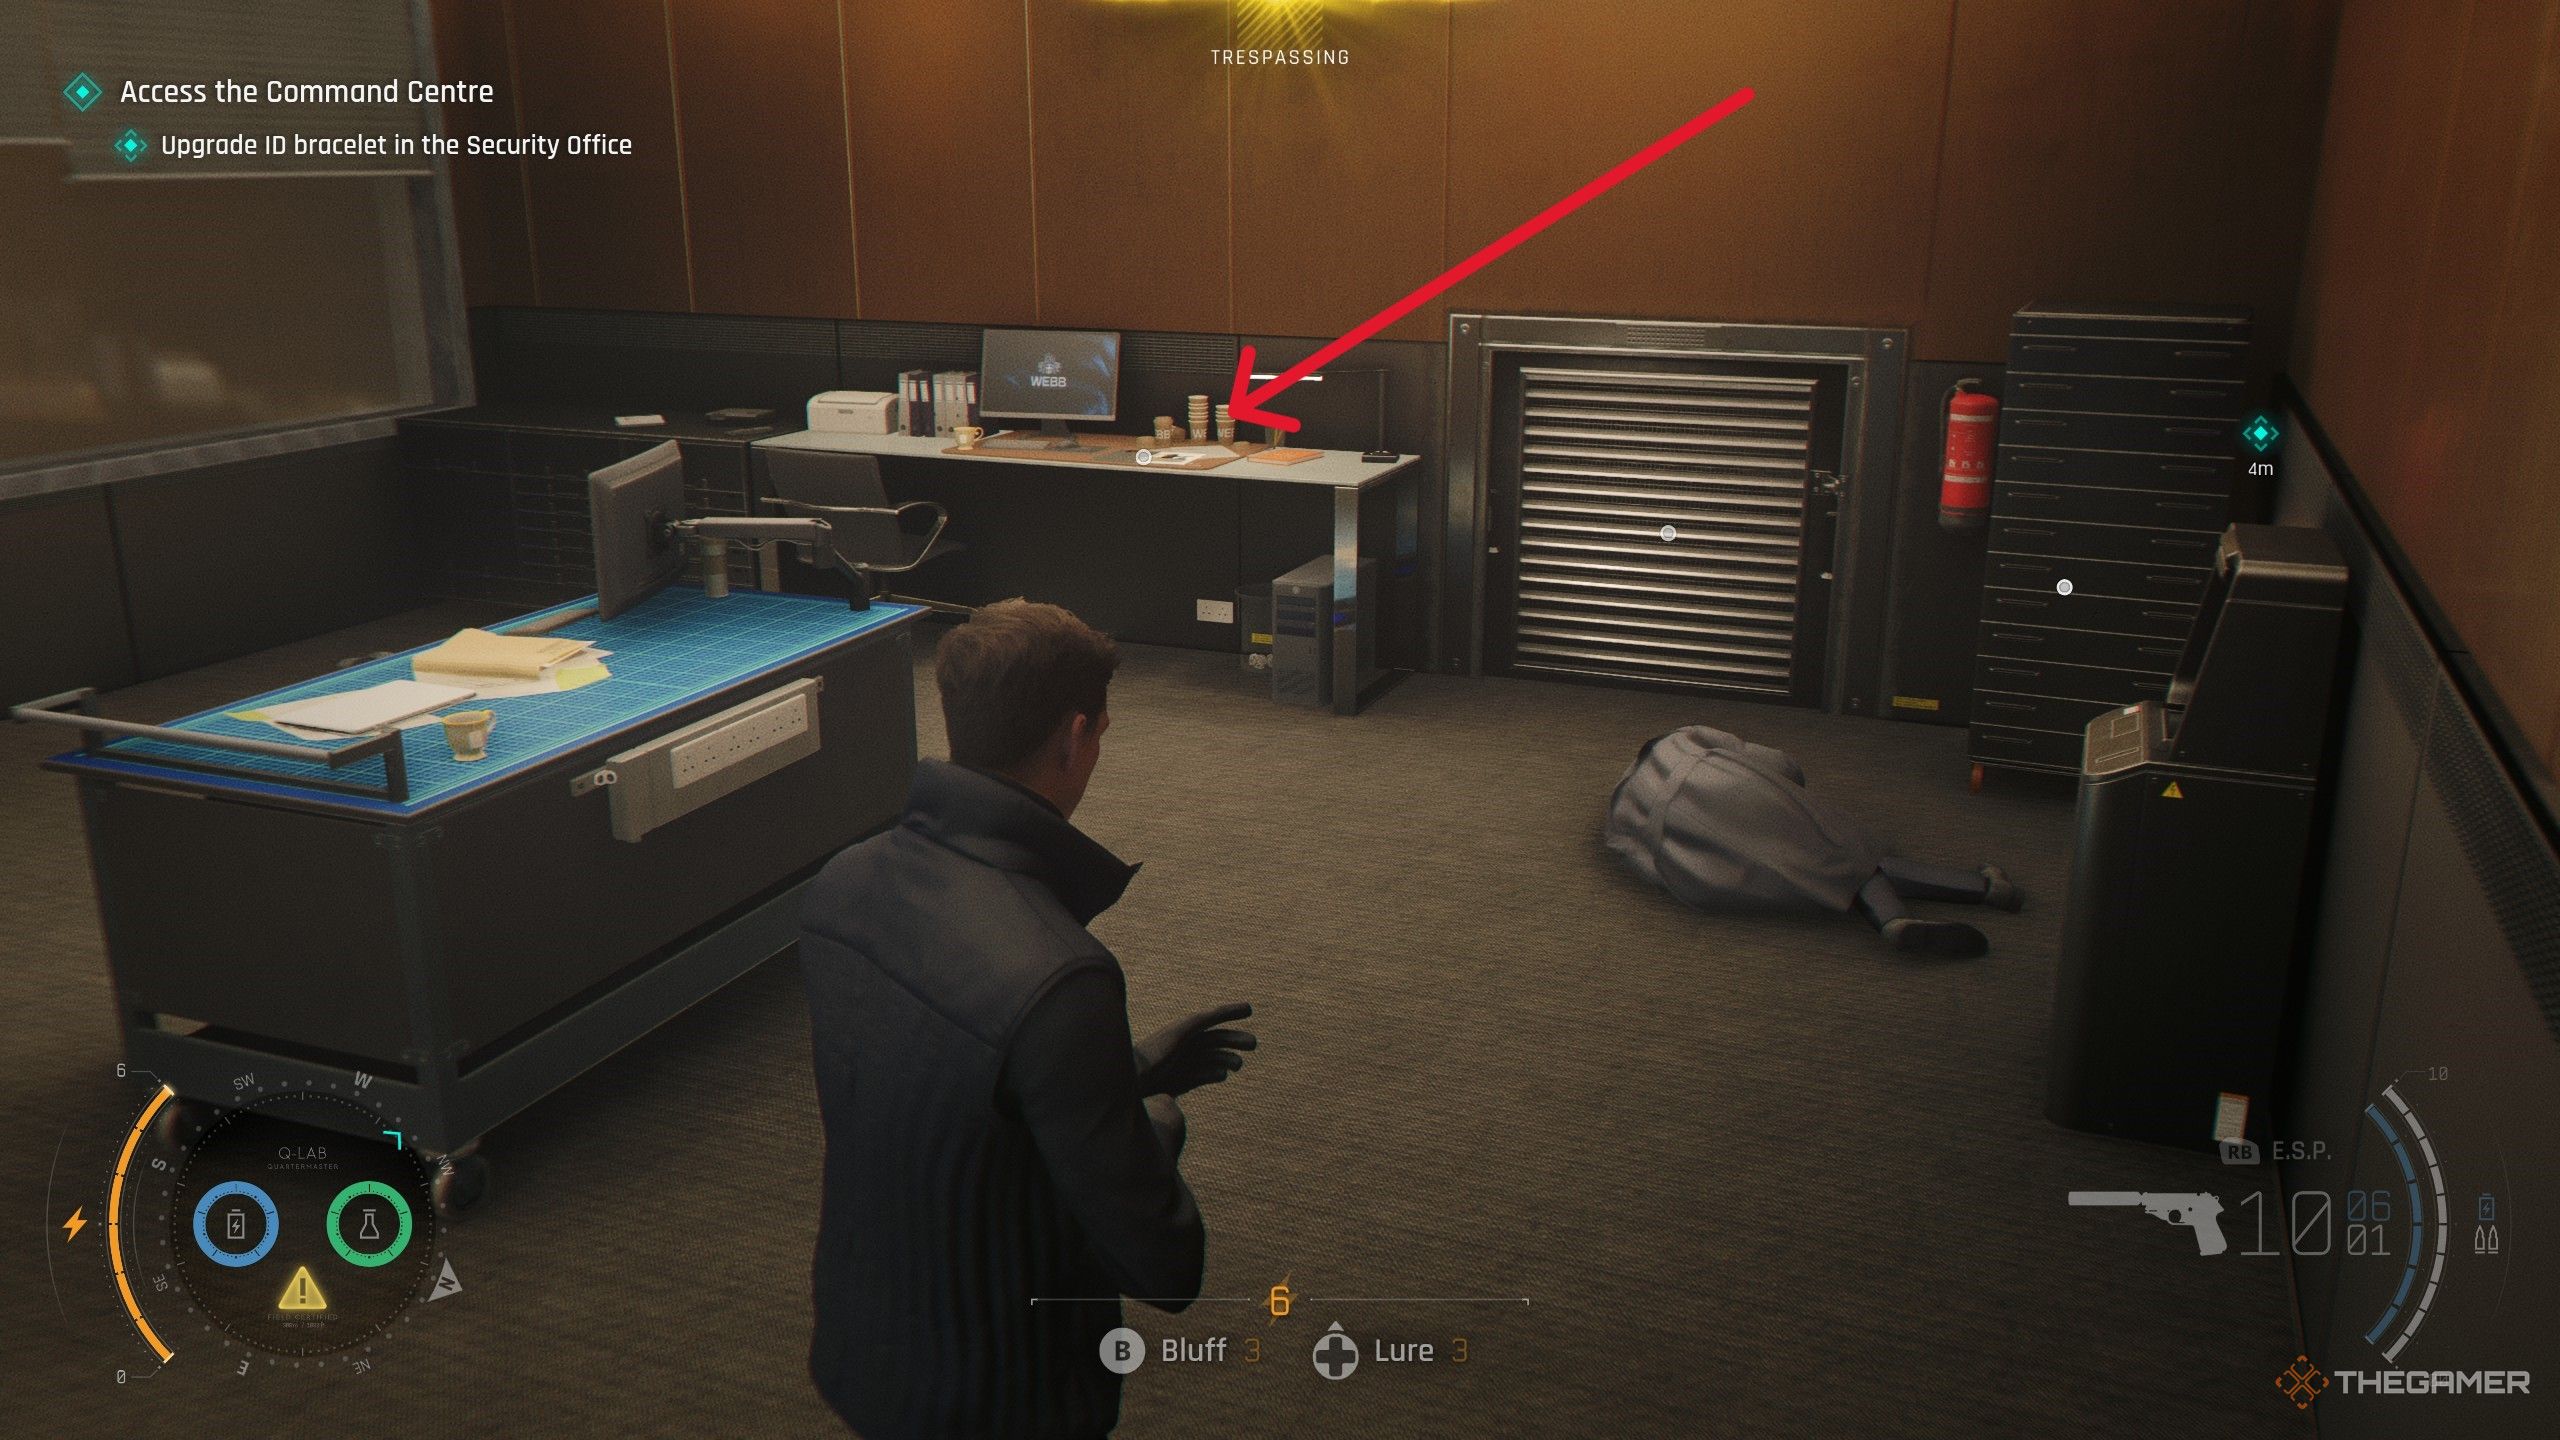
    During the “Wave of the Future” mission, when upgrading your ID bracelet, enter the security room to find M’s profile sitting on a desk nearby.

    Image:
    Security room

    Wave of the Future — Sir Nicholas Webb
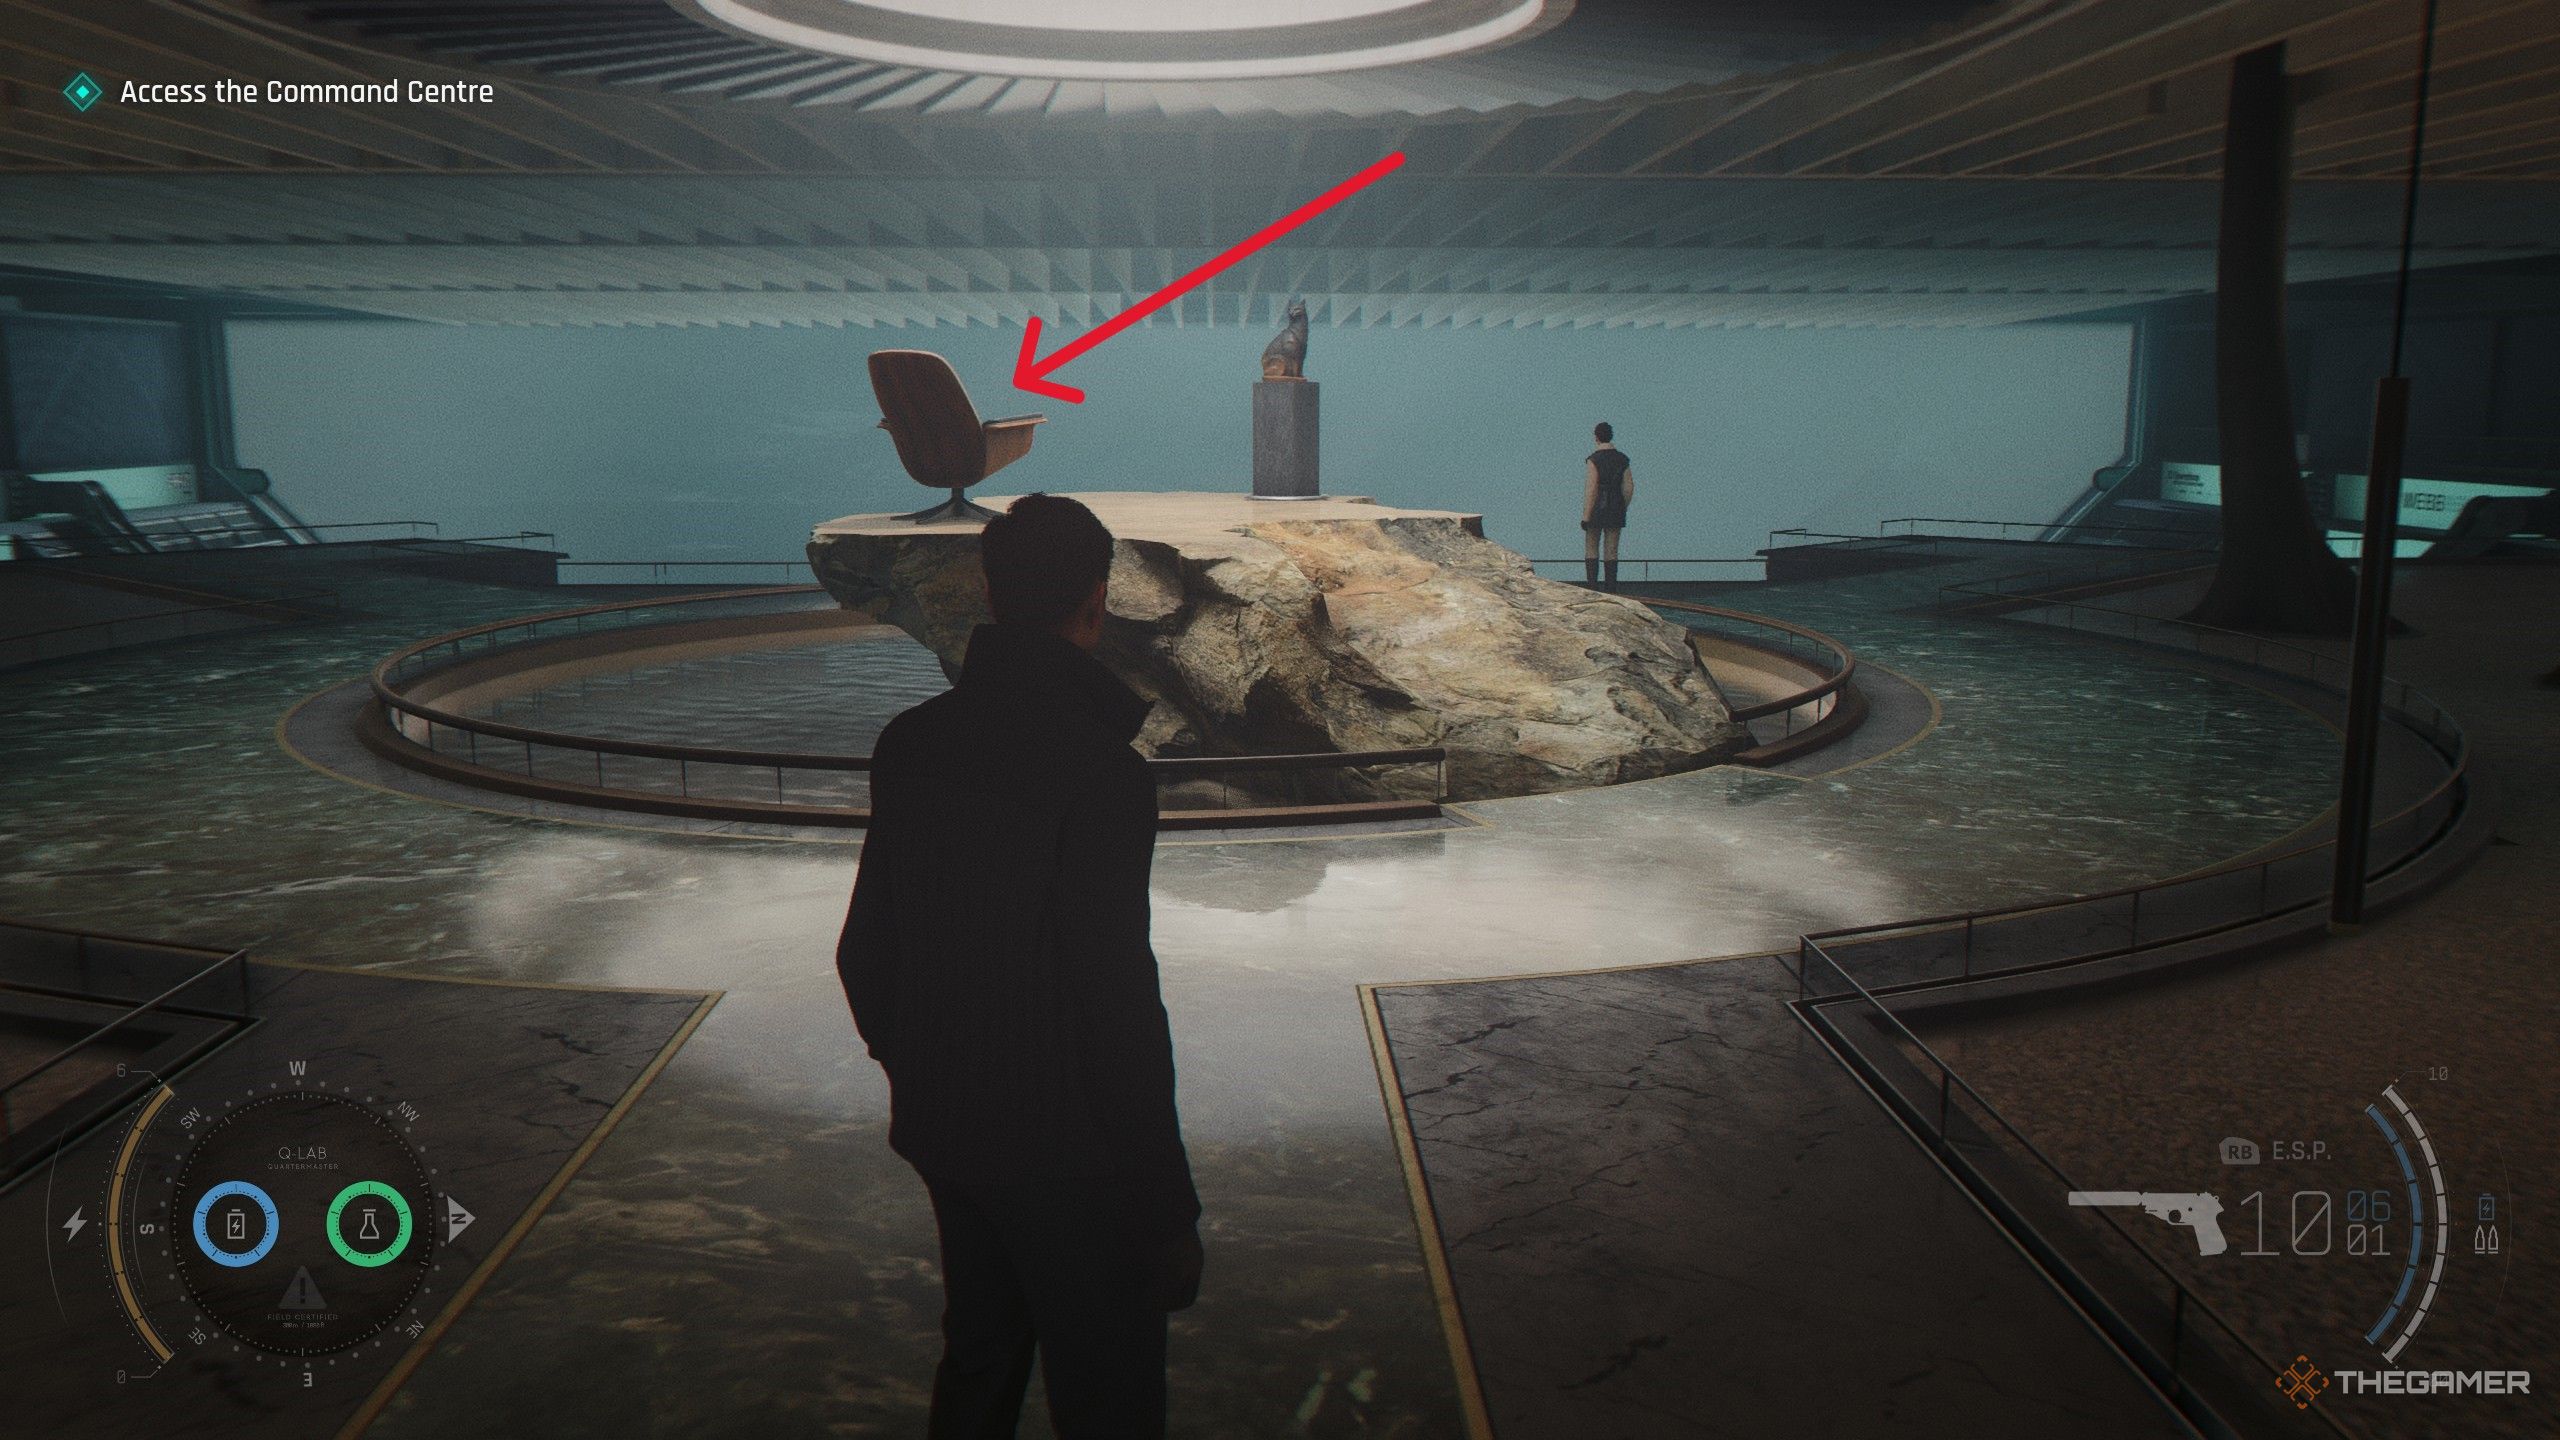
    After upgrading your bracelet, follow Isola to an area with a chair and a cat statue. Near the chair, find the profile of Sir Nicholas Webb on a nearby rock.

    Image:
    Nearby area

    Wave of the Future — Eve Moneypenny
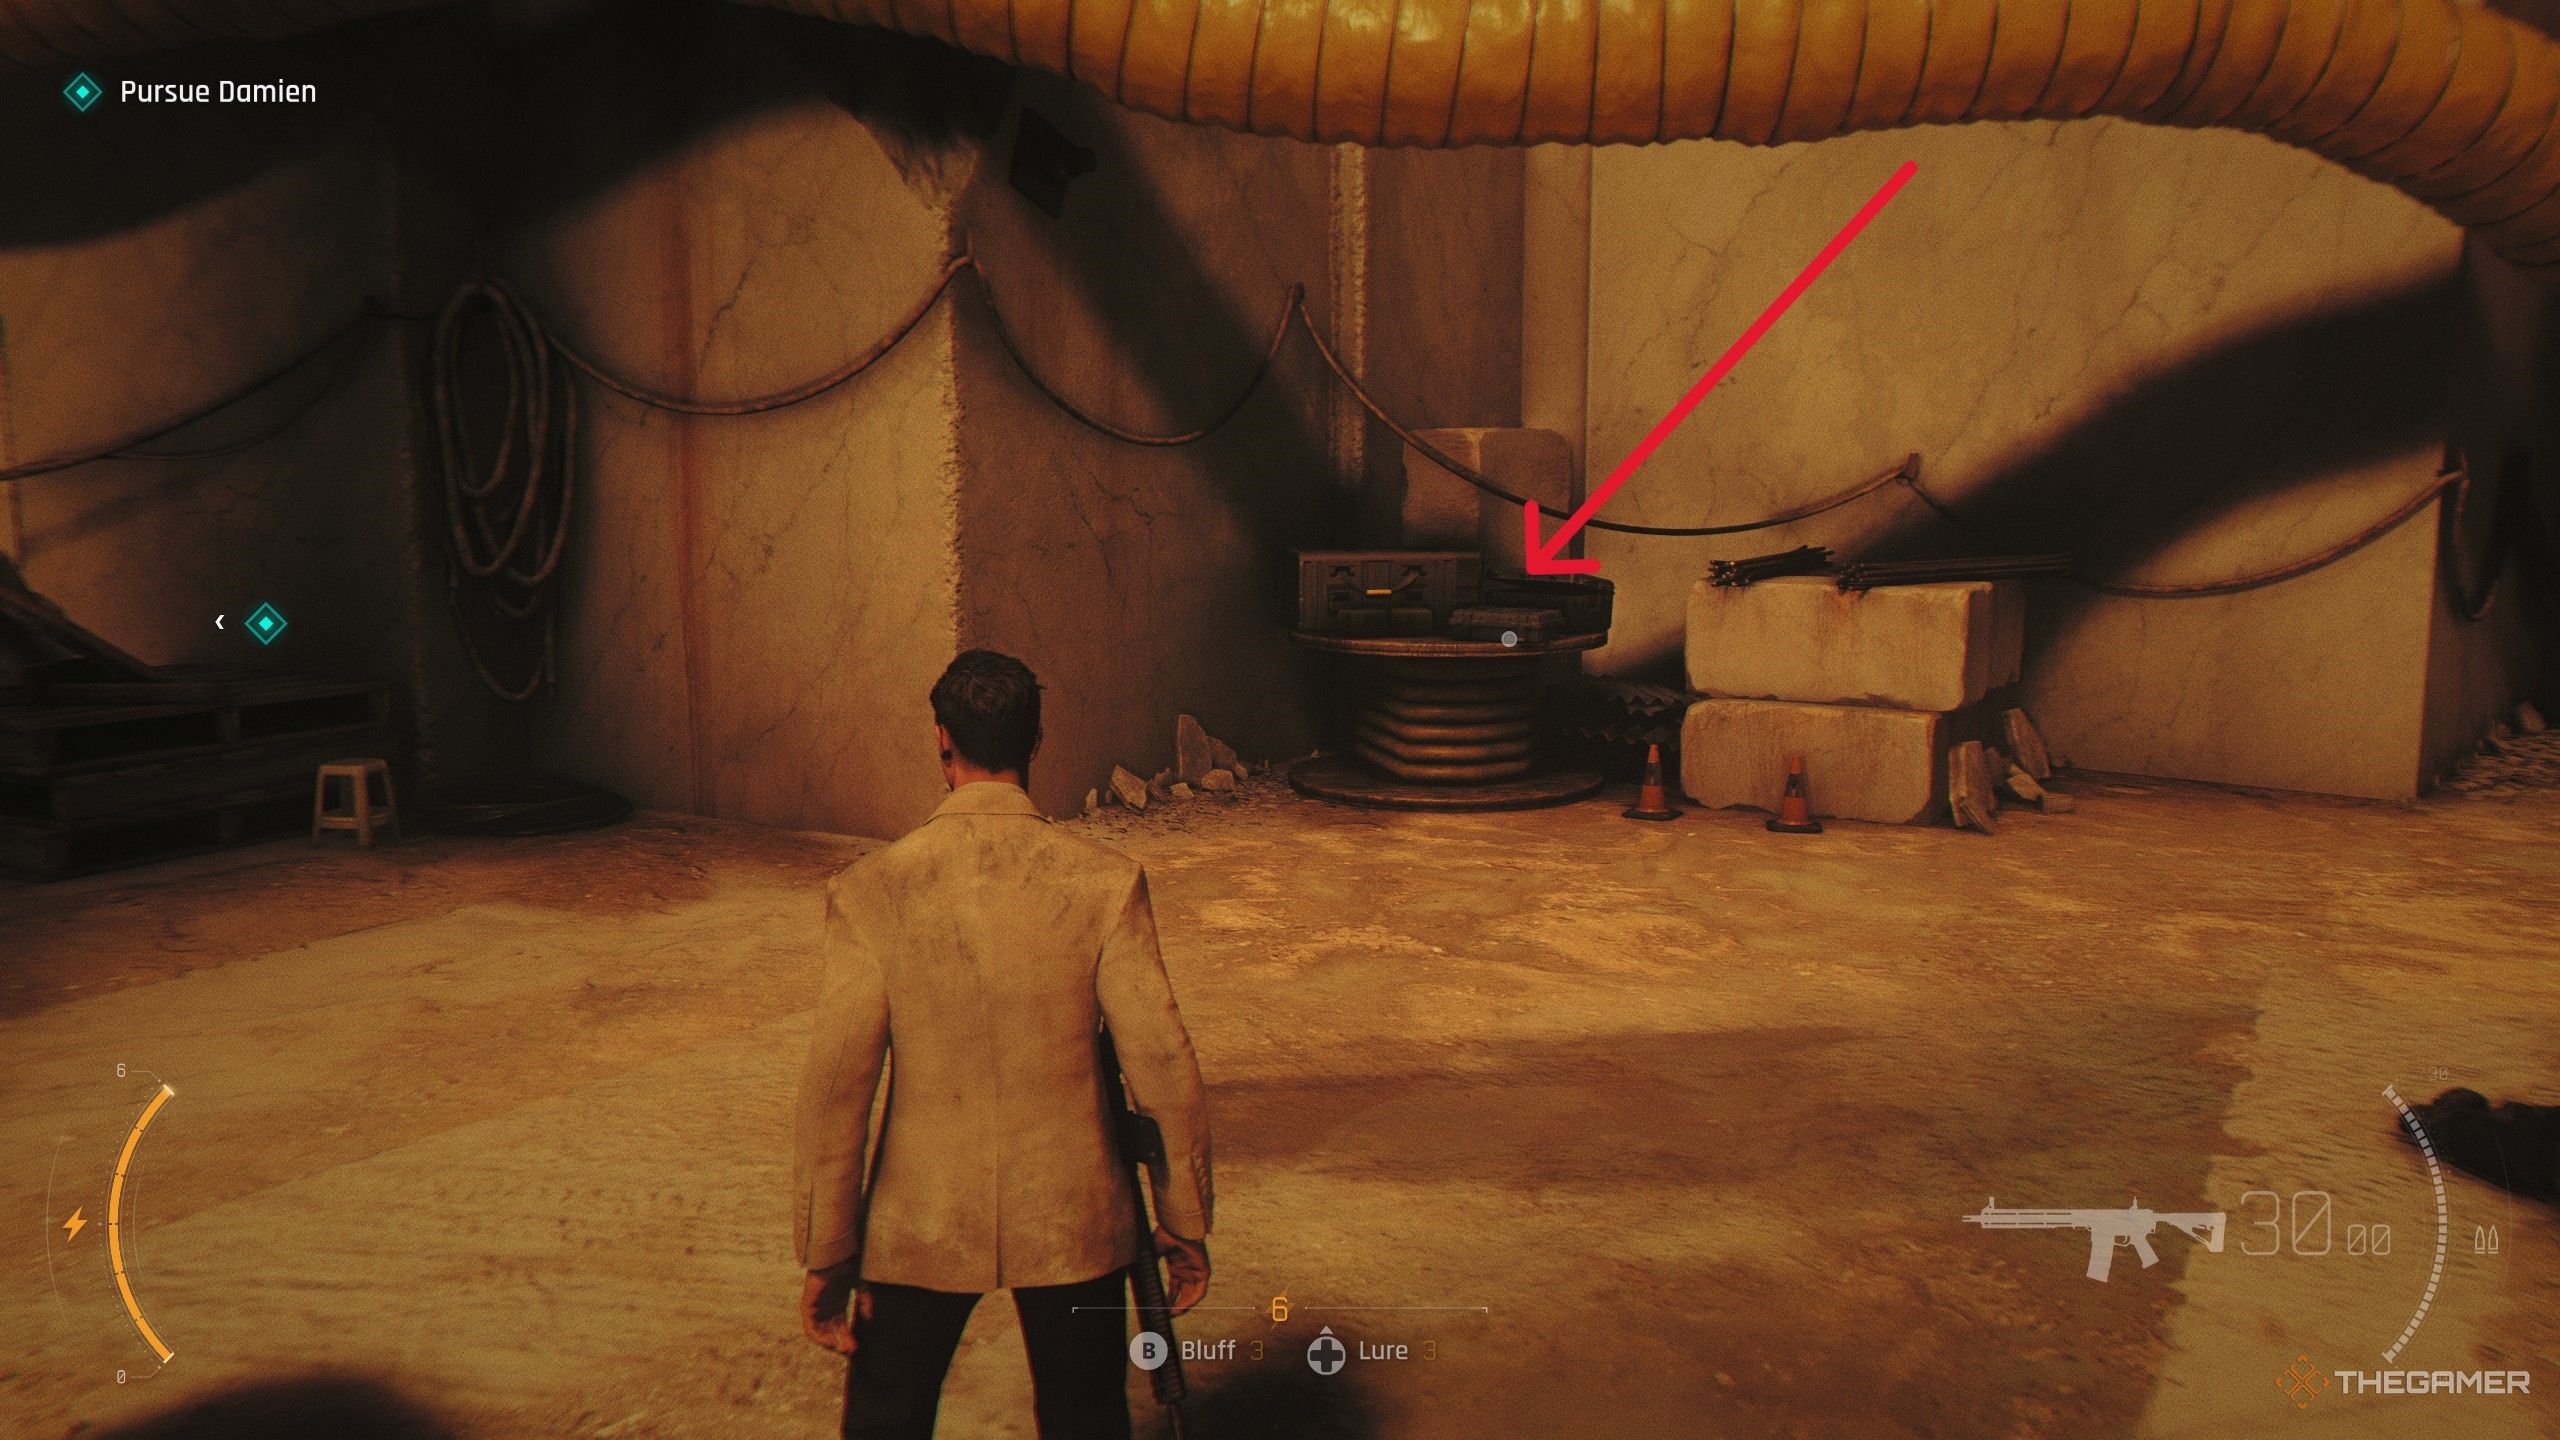
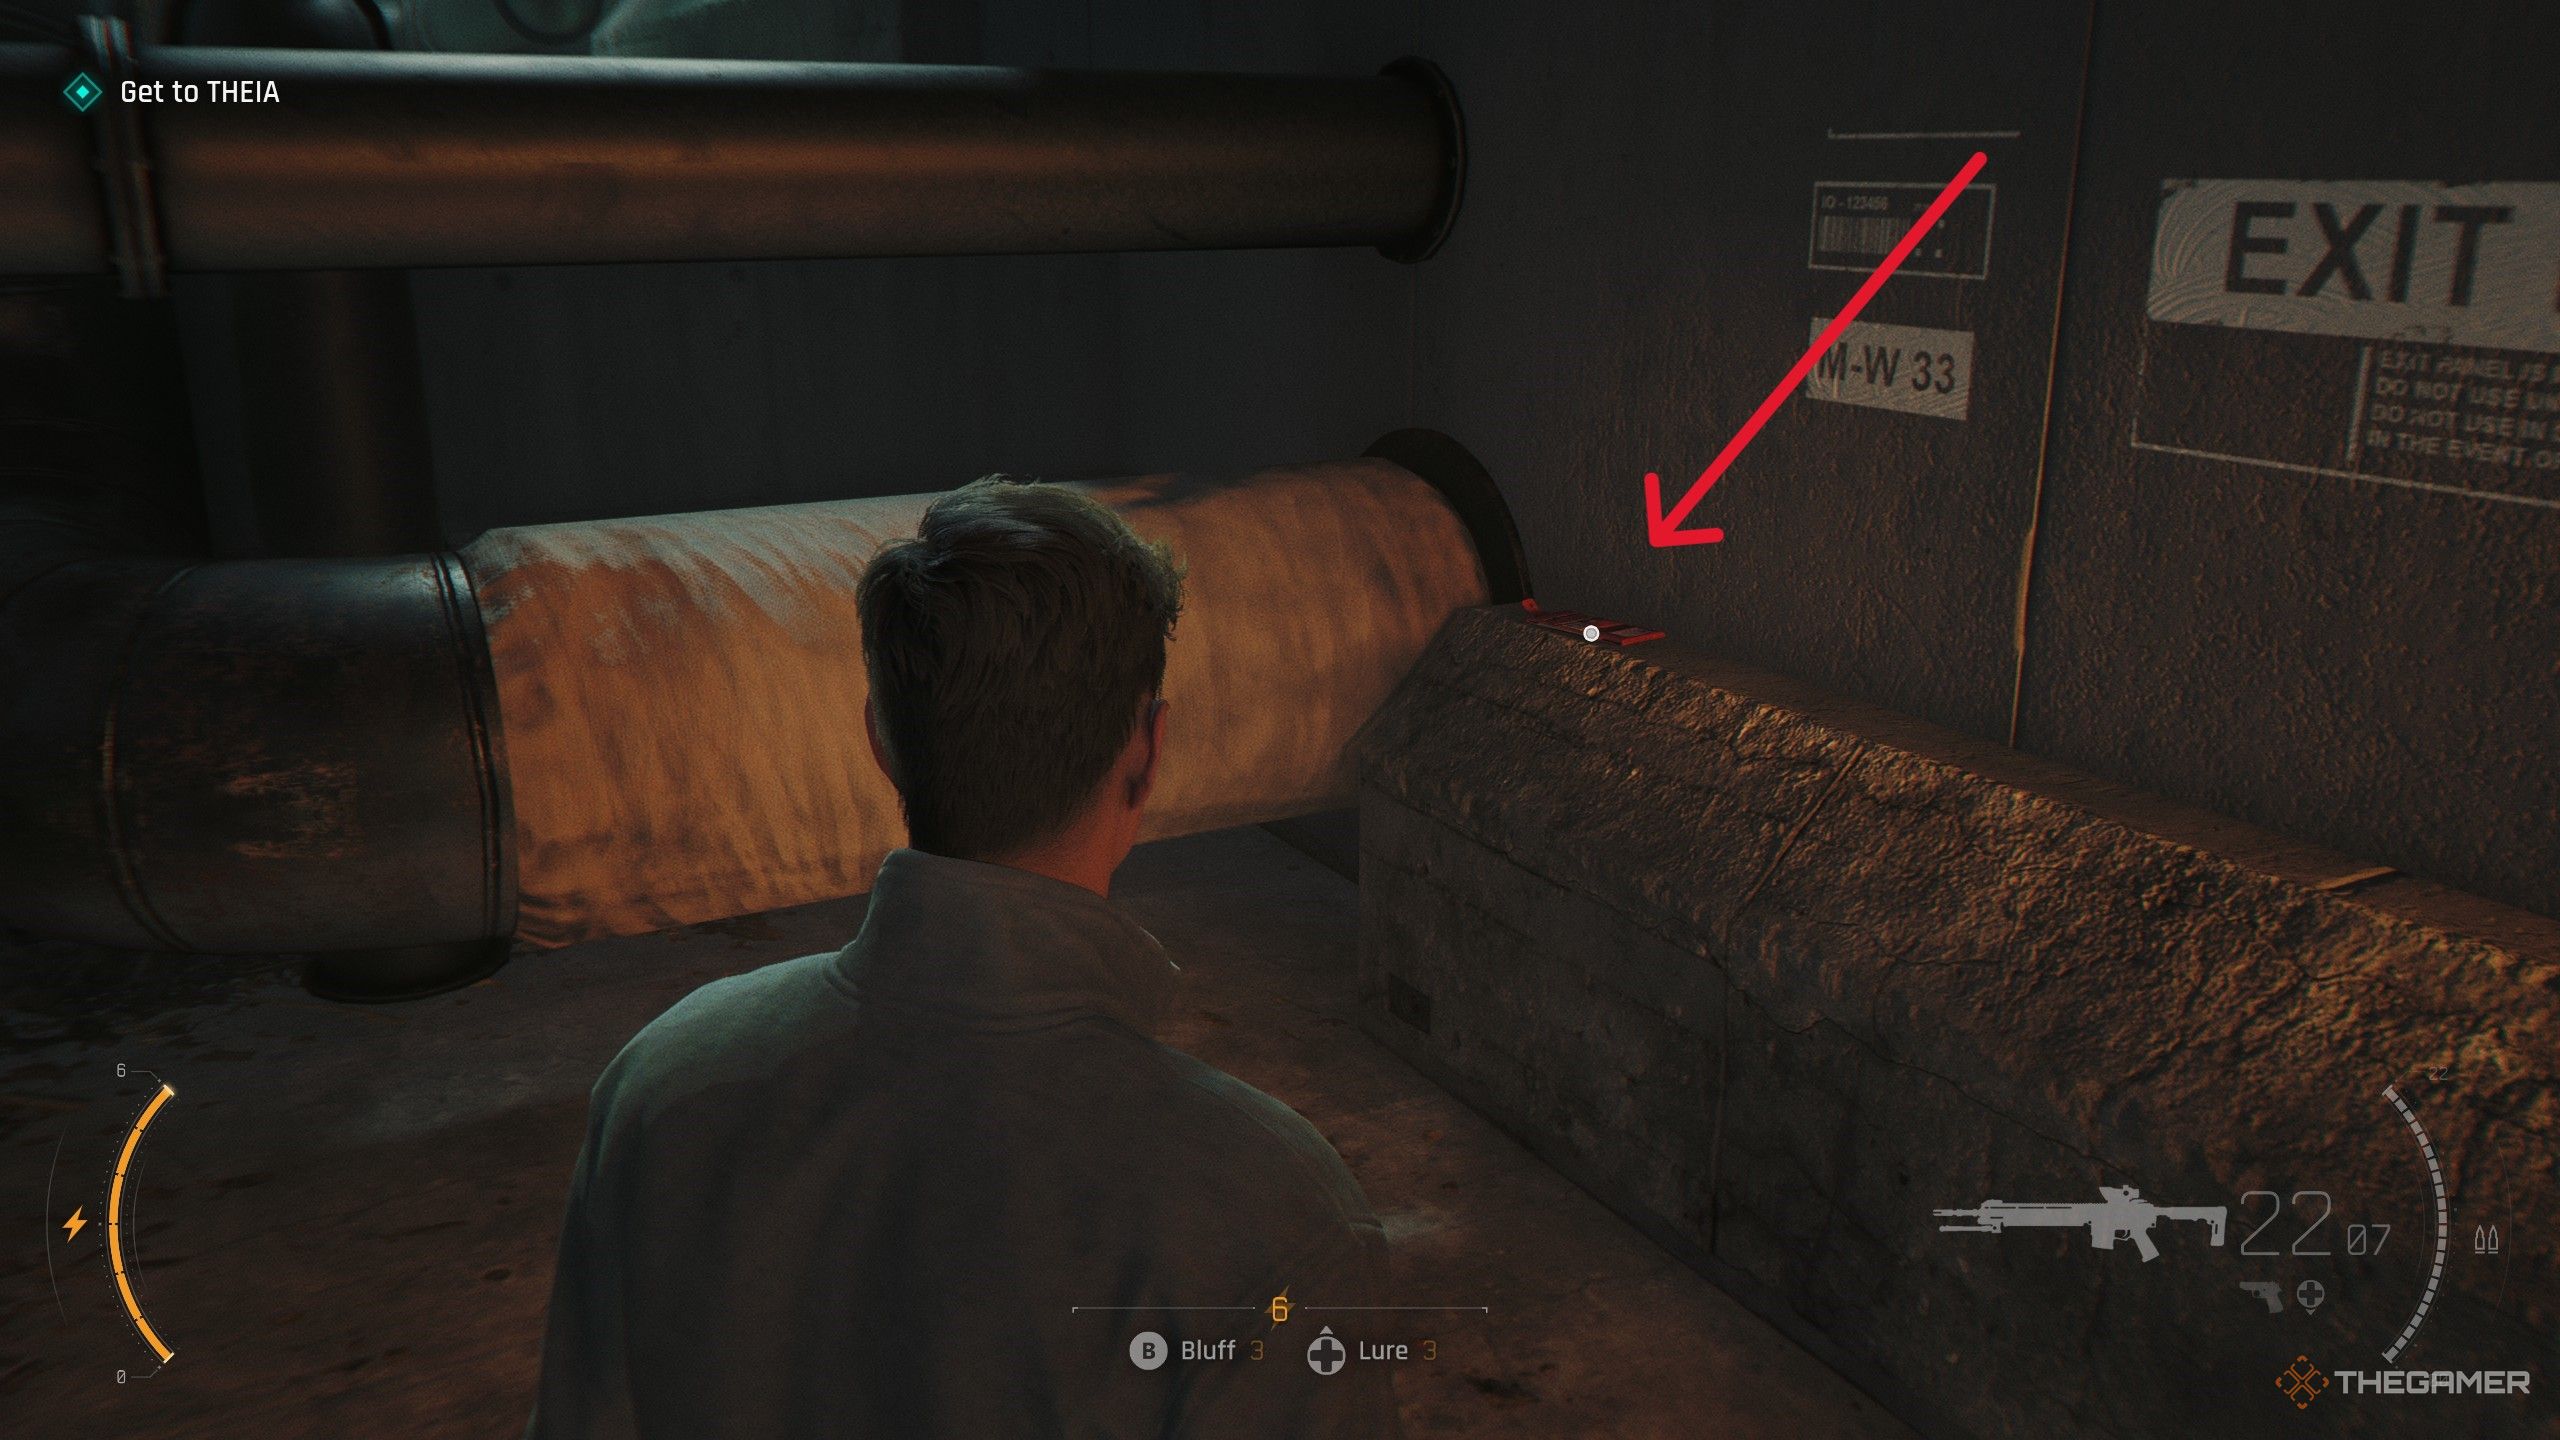
    During the “For England” mission, after fighting outside Moneypenny’s office, enter the tunnels. In the maintenance area, her MI6 File is on the ground in the section with the pipes.

    Image:
    Maintenance tunnel

    Wave of the Future — Riptide
    Once reunited with Greenway after the sniper section, before moving on, find a black case on a bundle of cables. Interact with it to obtain the Riptide file.

    Image:
    Scene with cables

    Wave of the Future — Rhys Beckett
    After speaking with Q and entering the furnace room with the armored vehicle, look on the left wall for a locked cabinet. Use the four-digit code 4397, corresponding to the license plate number, then open it and interact with the photo inside.

    Image:
    Furnace room detail

    Wave of the Future — Sir Nicholas Webb (again)
    Right after upgrading your ID bracelet, follow Isola to a spot with a chair and statue. Nearby, find the profile of Sir Nicholas Webb sitting on a rock.

    Image:
    Location of Webb’s profile

    Wave of the Future — Eve Moneypenny (again)
    In the “For England” mission, after fighting outside her office, proceed into the maintenance tunnels. Her MI6 File is in a room with pipes, on the ground.

    Image:
    Scene with pipes

    Wave of the Future — Caliban
    Next, in the same mission, after upgrading your ID bracelet, go into the security room. Look on a desk near the vent for M’s profile.

    Image:
    Security room scene

    Wave of the Future — Time to Die — Eve Moneypenny
    During the final mission, once in her office, interact with her wallet located near some pipes to uncover her MI6 File.

    Image:
    Her wallet scene


    Always interact with anything that looks unusual or out of place in the environment to ensure you collect all MI6 files. These files provide a deeper look into the characters and story, enriching your gaming experience.

  • How To Complete All Shy Guy Discoveries in Yoshi and the Mysterious Book

    How To Complete All Shy Guy Discoveries in Yoshi and the Mysterious Book

    In Yoshi and the Mysterious Book, most creatures you encounter are completely new and add to the game’s unique feel. However, there are a few familiar characters mixed in.

    Most creatures you meet are simple and have limited behaviors, but the Shy Guys stand out because they are intelligent and can act independently. This makes exploring their discoveries quite interesting.

    Where Is Shy Guy Initially Met?

    You first meet Shy Guys in the Settled Valley Chapter. They are one of the initial creatures you encounter there, and this level shows most of their discoveries.
    Because of how they behave, you won’t often meet Shy Guys in later levels, as they tend to be tied to specific habitats within each level.

    Every Shy Guy Discovery

    Most discoveries related to Shy Guys are found in the first level where you see them. Here are all the discoveries you can make:

    Discovery How To Find
    Masks Aren’t Easily Munched Try to eat a Shy Guy.
    Caught One Shy Guy Pick up a Shy Guy running away in their initial level.
    Shy Guy Hidden In The Flowers Find the hidden Shy Guy in the flowers during the first level.
    Played Catch! While holding a Shy Guy, throw them to another Shy Guy to play catch.
    Caught Many Fellows Catch at least four Shy Guys in their first level.
    The Shy Guy Stores Food Here In the first level, give a food item (like an apple or spicy pepper) to a Shy Guy and follow them back to their base.
    Found A Hidden Creature There are four hidden creatures in the initial Shy Guys level; finding any of them unlocks this discovery.
    Found A Smiley Flower After returning the Shy Guys to the square, follow the one looking for a Smiley Flower to find and give it to them.
    The Secret Abode Of The Shy Guy! Find the secret area by crouching and walking through a small opening at the bottom of the level’s right side.
    Found All Hidden Creatures! Locate the Crayzee Dayzee, Peckadee, Plumbrella, and Snurfboard by following Shy Guys’ whims — not necessary to return them, just find them.
    Accommodated The Shy Guy’s Request After they return to the square, fulfill their requests, indicated by symbols above their heads.
    Shy Guy Hidden In The Mud Pound the ground in their house to reveal a hidden Shy Guy.
    Caught Every Shy Guy! Find all Shy Guys in the level to complete it.
    Found All Tokens! Discover all hidden Tokens, often concealed inside trees or under tables in houses. Crouch to access hidden spots.
    Skilled At Playing Music Too! Find the instrument in the level and give it to a Shy Guy for them to start playing music.
    They Collect Bunchabee Hives too! Throw a Shy Guy at a Bunchabee Hive to have them pick it up.
    Grabbed The Pitchfork! On the main house, find the pitchfork, then throw a Shy Guy at it.
    Piked With Pitchfork! Hit a Shy Guy holding a pitchfork into an apple to poke them.

    Once you’ve completed all of these, you’ll have uncovered all the Shy Guy discoveries available in the game!

  • How To Complete Every Billeau Discovery in Yoshi and The Mysterious Book

    How To Complete Every Billeau Discovery in Yoshi and The Mysterious Book

    There are many creatures to encounter in Yoshi and the Mysterious Book, with each chapter revealing more of these strange and wonderful beings. One of the most unusual is Billeau.

    Billeau appears as a toxic cloud of gas. Many of their discoveries involve ways to choke out other creatures. They also move in a very interesting manner, and here’s how to unlock all of their discoveries.

    Where Is Billeau Initially Met?

    You first meet Billeau after completing the game’s credits and unlocking the second half of the chapters. They are specifically found in Chapter Seven, Underground, as one of the last creatures you encounter there.

    Although they have a unique function, they also appear in later chapters. However, most of their discoveries can only be unlocked during their initial stage.

    Every Billeau Discovery

    Billeau has several discoveries associated with them, but nothing overly complicated. Here are all of them and how to unlock each:

    Discovery How To Get
    Cloudy, Bitter, Best Coughed Back Up Try to eat Billeau.
    Dense Gas Makes For Buoyant Bounding Jump into Billeau and float around.
    Gas Follows A Trail! Leap into and out of Billeau to make the gas follow you for a while.
    Doesn’t Like Water Try to lead Billeau towards a body of water.
    Enjoys Spaces That Fit Its Size Bring Billeau into a room that fits them perfectly, like the square cave early in the level.
    Springhopper Group Engulfed Fly Billeau into each Springhopper you see to turn them purple.
    Doesn’t Like Sunlight Take Billeau to the surface. They will refuse to go further.
    Drayzee Dayzee Engulfed Fly Billeau into a Crayzee Dayzee.
    Billeau Gas Is Flammable! Drag Billeau’s gas cloud into a flame to cause it to explode in a chain reaction.
    Scattered The Fallen Leaves Fly through patches of grass to wilt it and spread the leaves around.
    Blew Up A Rock Use Billeau’s gas trail to cause a nearby rock to explode.
    Blew Up The Distant Rock Trigger a chain explosion further away from Billeau’s main body or fire source.
    Engulfed The Golden Butterfly Fly into the Golden Butterfly to turn it purple.
    Golden Bug Engulfed Fly into the Golden Bug to turn it purple.
    Made It Through The Narrow Path Drag Billeau’s gas through a winding passage below the campfire.
    Not Good To Breathe! Stay in narrow passages where Billeau’s gases linger.
    Bunchabee Swarm Engulfed Fly into a swarm of Bunchabee on the surface and turn them purple to pacify them.
    Engulfed Many Types Of Creatures Fly into all creatures in the level to turn them purple—necessary to complete the level.

    You can also use your tokens to unlock extra hints and predictions, giving you more guidance on achieving each discovery with Billeau.

  • Top 5 Strixhaven Lorehold Cards for Completing and Solving MTG Secrets

    Top 5 Strixhaven Lorehold Cards for Completing and Solving MTG Secrets

    If you enjoy decks in Magic: The Gathering that repeatedly interact with the graveyard, Lorehold might be the college for you at Strixhaven. With the return of the Flashback mechanic, there are many ways to give cards a second shot to influence the game.

    We’ve highlighted some of the top Lorehold cards from Secrets of Strixhaven so far, based on how they could impact Standard or Commander decks.

    Honorable Mentions

    These cards aren’t in the top five yet, but they could become very important once the set releases and the meta shifts:

    • Flashback
    • Borrowed Knowledge
    • Colossus of the Blood Age
    • Kirol, History Buff
    • Ark of Hunger

    5. Aziza, Mage Tower Captain

    For Standard and Commander

    This legendary Djinn sorcerer costs just one white and one red mana. At first glance, it’s a 2/2 legendary creature with no special abilities. However, its ability is quite useful: whenever you cast an instant or sorcery spell, you may tap three untapped creatures you control to choose new targets for that spell.

    In a way, Aziza acts like a powerful Storm effect, especially useful in clutch situations where you want to double up on spells, even if it means tapping some creatures.


    4. Restoration Seminar

    For Standard and Commander

    This spell costs seven mana, which might seem high at first. The key is understanding the added value: it returns a nonland permanent from your graveyard to the battlefield — a creature, artifact, or enchantment.

    What truly makes this card powerful is the Paradigm mechanic from Strixhaven, allowing you to cast a free copy of the spell at the start of each first main phase for the rest of the game if the initial cast was successful. These additional copies can still be countered but don’t cost mana. Despite the initial cost, successfully resolving this spell can be a game-changer.


    3. Emeritus of Conflict

    For Standard and Commander

    While this card fits well in Prismari decks too, Emeritus of Conflict features first strike—a common trait among Lorehold and Boros creatures. It’s a 2/2 for only two mana and can cast Lightning Bolt for just one mana using the prepare mechanic, dealing three damage to any target.

    To use the prepare ability on Emeritus of Conflict, you need to cast three spells in a turn. It doesn’t enter prepared, which limits its power slightly but keeps it balanced. This card can be very useful in both Prismari and Lorehold decks, showcasing the versatility of the Strixhaven college system, as long as mono-color cards aren’t hampered by restrictive keywords.


    2. Antiquities On The Loose

    For Standard and Commander

    This three-mana sorcery screams Lorehold’s theme. If cast normally or via Flashback, it’s bound to annoy your opponent. It creates two 2/2 spirit tokens, and if cast from anywhere other than your hand (like through Flashback), it puts a +1/+1 counter on every spirit you control, including tokens and non-tokens.

    While the Flashback cost is increased to six mana, it’s worth it if you have spirits on the board and are close to ending the game. Finding ways to reduce its mana cost or trigger additional copies (such as with Aziza) can boost your board presence. Just be cautious if your opponent runs board wipes.


    1. Lorehold, The Historian

    For Standard and Commander

    This legendary 5/5 flying dragon is nothing to overlook. Its true strength lies in its secondary abilities. For five mana, it’s a fair cost for a powerful creature, especially if you can keep it on the battlefield longer.

    Lorehold, The Historian grants each instant and sorcery in your hand “Miracle 2,” meaning you can cast one for just two mana if it’s the first card drawn that turn. Additionally, it allows you to discard a card during each opponent’s upkeep for a chance to draw again, potentially setting up more Miracle plays.

    This card is expected to see more use in Standard initially, as its mana cost is high for Commander, but it’s excellent for mid-to-late game swing plays that can turn the tide of battle.

  • Strixhaven MTG Arena Bundles: Completing and Solving Secrets to Buy

    Strixhaven MTG Arena Bundles: Completing and Solving Secrets to Buy

    If you like playing Magic: The Gathering online, especially through MTG Arena, you’ll want to know how to make the most of the Secrets of Strixhaven set release. There are two bundles available, each designed for different types of play: Standard or Limited.

    No matter if you prefer building 60-card decks for ranked matches or enjoy drafting with a pick-and-pass style, there’s a Secrets of Strixhaven MTG Arena bundle for you.

    Play Bundle — $49.99

    The Play bundle is mainly aimed at limited play and doesn’t include packs to open. Instead, it offers the following:

    • Four draft tokens
    • Two sealed tokens
    • 20 Play-In Points
    • A Professor Dellian Fel card
    • A Dellian Fel card style
    • Dellian Fel card sleeves
    • Abigail as a companion

    This bundle is available for pre-order now on MTG Arena. It’s a good deal, especially if you’re skilled at drafting. With four draft tokens, you can turn them into 8,800 Arena gems and 24 Secrets of Strixhaven card packs. To do this, you’ll need to win seven games before losing three on each of your four drafts.

    Pack Bundle — $49.99

    The Pack bundle is designed for players who love deck building and want to stay current with the Standard format. It includes:

    • 45 Secrets of Strixhaven packs
    • Five mythic Packs
    • Five Golden packs
    • A Ral Zarek, Guest Lecturer card
    • A Ral Zarek card style
    • Ral Zarek card sleeves

    If you’re looking to get quick wildcards, this bundle is the best option. With 55 packs in total, you’re likely to earn lots of rare wildcards, and possibly mythic wildcards too, depending on luck.

    Both bundles are separate, so you can buy either one or both without any overlap. Whether you prefer limited or constructed play, grabbing both packages gives you a complete experience. That’s why the planewalker cards and cosmetics are divided between the two options.
  • Strixhaven Lorehold Spirit Commander Deck List & Completing Upgrades

    Strixhaven Lorehold Spirit Commander Deck List & Completing Upgrades

    Five new Commander pre-constructed decks are arriving in Secrets of Strixhaven, and we’re here to break down each one so you can decide which fits your play style best.

    If your strategy involves graveyard recursion, token creation, or if you have a soft spot for Lorehold College, the Lorehold Spirit deck is an excellent choice. We’ll also look at possible upgrades, especially from the white and red mana pools.

    Lorehold Spirit Deck List

    Much about the full deck list is currently unknown, unlike the Prismari Artistry deck which leaked earlier. More details are expected during spoiler season.

    Here’s what we know so far about the deck’s key cards:

    Card Name Card Type Cost
    Quintorius, History Chaser Planeswalker 1 Red, 1 White + 2 Colorless
    Arcane Signet Artifact 2 Colorless
    Sol Ring Artifact 2 Colorless
    Talisman of Conviction Artifact 2 Colorless

    Full deck details are anticipated in late March or early April.

    Commander Breakdown

    The Commander for this deck is Quintorius, History Chaser, which is a planewalker, not a legendary creature—a rare choice for Commander decks that can work if explicitly specified. Planeswalkers as Commanders are uncommon but powerful when used correctly.

    Quintorius’s abilities clearly define the deck’s focus: whenever cards leave your graveyard, you get to create a 3/2 white and red spirit token. Its +1 ability allows you to discard a card, draw two, and mill one, helping to fill your graveyard and draw more cards to interact with it. The -4 grants all your spirit tokens vigilance and double strike, making them more formidable in combat.

    Deck Theme & Strategy

    From the packaging and the Commander, the deck centers around two main themes: casting cards from the graveyard and generating spirit tokens. Mechanics like flashback, unearth, dredge, or delve are likely included, as they all involve interacting with your graveyard. While most focus on creature cards, non-creature cards that leave your graveyard can also be part of the strategy, especially creature cards that can return to the battlefield repeatedly, creating recurring threats for opponents.

    Enhancing your spirits and creatures with spells or enchantments to boost their power is also expected, making your tokens even more menacing alongside your graveyard recursion.

    Upgrades

    We can’t specify which cards will be removed until the full deck list is available, but we can suggest existing Commander-legal cards that would complement this deck.

    Some promising options include:

    • Sacred Fire: This flashback spell deals two damage to any target and restores two life. Its initial cost is low, making it good for early removal of small creatures. Its flashback cost is six mana, but it can also help when your life is low by dealing damage and creating a spirit token if Quintorius is on the battlefield.

    • Quintorius, Field Historian: A legendary creature that shares the same ability as Quintorius, creating a spirit token whenever you leave cards from your graveyard. Having both on the battlefield means you’ll consistently generate two spirits each time you interact with your graveyard, and it also boosts spirits’ power by +1/+0.

    • Firemane Angel: A 4/3 flying, first strike creature that gains you one life at the start of each upkeep if it’s on the battlefield or in your graveyard. Recasting it from the graveyard costs ten mana but can be done during your upkeep, providing a way to activate Quintorius’s talent repeatedly. Accumulating life over time can be a useful buffer.

    • Rally The Peasants: An instant that gives all creatures +2/0 until end of turn, ideal for boosting your spirits’ attack power. It has a flashback cost similar to its original, allowing you to cast it twice, maximizing its value during the match.

    The deck will likely revolve around mechanics that involve cards leaving your graveyard, with creature cards that can repeatedly return to play being particularly disruptive for opponents. Expect numerous ways to enhance your spirits and creatures, either through instant spells or enchantments, to strengthen your tokens and overall board presence.

  • Where to Find the Mysterious Woman in Caer Mar Solving in Solasta 2

    Where to Find the Mysterious Woman in Caer Mar Solving in Solasta 2

    In Solasta 2, there are many quests for you to complete as you work on your holy mission. From the shores of Caer Mar to distant parts of Solasta, there’s always something for the Colwall Clan to do. We’ll help you finish these tasks quickly.

    Soon after your journey starts, you’ll get the chance to do an escort mission. Here’s what you need to know about who you’re protecting and where she’s headed so you can keep her safe. Let’s see how you can ensure Jebfa gets home safely.

    Where To Find Jebfa

    While exploring Caer Mar, you’ll encounter a crime scene. A Siklas woman was murdered here, and a halfling runs away in a rush when she sees the body. Your group will talk about this and suggest you chase after her, but where did she go?

    You’ll find her just around the corner, northwest of the crime spot. Talk to her to hear her worries and why she was more shaken than others passing by. She asks if you’ll escort her to her camp beyond the border, and you have a choice to make.

    You can agree right away and negotiate a reward, or tell her to come back later. She’ll remain here, waiting. When you finally decide to help, you’ll gain a positive relationship with the Ka’Umm Alliance.

    Jebfa will temporarily join your party, but note that in early access, if she dies, it’s game over.

    Where To Find The Tamesh Camp

    Once you agree to escort Jebfa, leave the city and head east toward the border. Then move northeast to the marker marking Tamesh camp.

    On your way, Jebfa will stop you and inform your party that they’re being followed. You’ll have a moment to prepare before a group of thugs and a sandlion try to ambush you.

    A good strategy is to sneak around the cliffside to gain the high ground, which offers a tactical advantage. Use your best ranged attacks to weaken the enemies from a distance before they get close. After defeating them, loot the bodies and talk with Jebfa about the artifacts she gathered from the Siklas.

    If you’ve spoken with Kito back in town, you can mention Jebfa’s bracelet to him so he can inform the Siklas’ family about the murder.

    After the fight and discussions, head to the Tamesh camp. The quest ends there as Jebfa reunites with her loved ones. You’re free to speak with others at the camp, but there’s nothing more to do about the artifacts.

  • Which Strixhaven MTG Products Help You Complete and Solve Your Deck?

    Which Strixhaven MTG Products Help You Complete and Solve Your Deck?

    The second set of Magic: The Gathering’s 2026 releases is almost here, and for the third time in a row, a new product is hitting the market. First came Draft Night in Lorwyn Eclipsed, then Turtle Team-Up in TMNT, and now there’s the Codex Bundle.

    This themed bundle is selling out quickly at many stores, and it’s easy to see why. It offers great value. Here’s a summary of what it includes and other available products to help you decide.

    When is the Secrets of Strixhaven release date?
    The worldwide release date for Secrets of Strixhaven is April 24, 2026. All products will be available for purchase then, including pre-orders from online shops. Pre-release events start a week earlier, on April 17, 2026. Check with your local game store for event details. The MTG Arena release is expected around April 21, 2026, but this hasn’t been confirmed.

    What Secrets of Strixhaven products are available?
    There will be at least 17 different products released around the prerelease and launch date. Most of these are five new College-themed Commander decks and prerelease packs, which form the core of the offerings. The most exciting new product is the Codex Bundle, which is specially themed and shows how much creativity can go into designing new products.

    The products and their prices are approximately:
    – Collector Booster Box: $324
    – Play Booster Box: $165
    – Commander Decks: $50 each
    – Themed Standard Decks: $24 each
    – Prerelease Pack: price varies by store
    – Draft Night Box: $90
    – Bundle: $58
    – Codex Bundle: $90
    (Note: Prices for some items like prerelease packs vary by retailer, and the bundle prices are approximate retail values.)

    Collector Booster Box
    This box, or individual packs, is the best option if you want to pull the rarest cards in Secrets of Strixhaven. Most of the highly valuable cards are exclusive to Collector Booster packs, which can’t be found in other products.

    For investors, the Collector Booster box is an ideal short-term money-maker because these boxes are rarely reprinted after the initial release, leading to high resale values. If the set becomes very popular and some cards are worth a lot, their value can increase over time.

    Play Booster Box
    The basic product is a pack containing 14 cards, including possible cards from The List and guest artist cards. An art card may also be included but doesn’t count as part of the 14 playable cards. These packs are legal in Limited formats but may include guest cards that are banned in Standard.

    Play Boosters are great for drafting and building a collection of playable cards, especially commons and uncommons. For rarer cards, buying singles is usually a better choice.

    Codex Bundle
    This new product was teased earlier in the year and is now official. Each Codex Bundle includes:
    – Two Collector Booster Packs
    – Six Play Booster Packs
    – 20 Foil Land cards
    – An oversized Spindown Die
    – Two borderless foil promo cards (out of a possible six)

    Retailing at around $90, the value of this bundle is impressive. However, it quickly sold out and now fetches over $190 on sites like TCGPlayer because it can’t be found at retail prices anymore.

    Prerelease Pack
    Coming back this year, these packs are available in five variants—one for each College. Check with local stores for pricing and availability. Each pack contains:
    – Five Play Boosters
    – One Seeded Booster (matching your chosen college)
    – An oversized Spindown Die
    – One unstamped promo card

    Commander Decks
    Five brand-new Commander decks are launching, one for each College. These decks cost about $50 each, which is a good deal. Many retailers, including online stores like Amazon, offer a bundle with all five decks. For detailed info on each deck, refer to the upcoming Commander deck guide once the cards are released.

    Themed Standard Decks
    Two themed 60-card standard decks will be available for around $24 each. They are excellent for newcomers, providing a simple way to start playing without building decks from scratch. The decks are balanced enough for casual and beginner play but may not be powerful enough for serious competition.

    Bundle
    The bundle includes nine Play Boosters, 30 lands (15 foil and 15 non-foil), a promo card, a storage box, a Spindown die, and two reference cards. It’s perfect for players who want the fun of opening packs without the cost of a full booster box—great for drafting or starting a collection.

    Draft Night Box
    This returns with the same format as in Lorwyn Eclipsed and TMNT. It’s designed for up to four players, providing everything needed for a draft night, including a bonus Collector Booster pack for the top player. Each box contains 12 Play Boosters, 90 lands, 10 double-sided tokens, and a Collector Booster.

    This product helps assemble a fun drafting experience while offering a great value, making it ideal for casual game nights.

  • How to Complete All Endings and Solve Secrets in Star Trek: Voyager

    How to Complete All Endings and Solve Secrets in Star Trek: Voyager

    Playing Star Trek: Voyager – Across the Unknown lets you see how your choices can influence the story in the Delta Quadrant. Every decision you make as captain has consequences that affect what happens later. Making good choices can help you safely return your crew home, while reckless decisions might prolong your journey away from Earth.

    How to Unlock All Endings

    This game offers nearly nine different endings, depending on the choices you make. You can stick close to the show’s storyline or take a risk that leads to a different conclusion. Here’s a guide to help you achieve each one:

    1. Stick To The Prime Directive

    Use the Caretaker’s array to head back home.
    How to get it: The first opportunity appears in sector 1. Instead of helping the Ocampa by destroying the array, choose the option to return to Earth, leaving the Ocampa to face the Kazon alone.

    2. The Starfleet Way

    Complete sector 12 without any Borg structures on your ship.
    How to get it: Remove all Borg architecture from your ship early on, or avoid using Borg tech from the start.

    3. Canon

    Return to Earth with all key crew members: Tom Paris, Harry Kim, Chakotay, Tuvok, B’Elanna Torres, The Doctor, Seven of Nine, and Icheb.
    How to get it: Ensure all these crew members stay alive and on board throughout the journey. It can be tough if you lose someone early or choose to keep Tuvix alive.

    4. Home, Hub, and Holdfast

    Take control of the Transwarp Hub with the Borg’s help and fly home.
    How to get it: Ally with Ralik in sector 11, don’t destroy the hub initially, enter it, then change your mind by retreating and taking control of the hub.

    5. The Calm Before The Storm

    Fail to destroy the Transwarp Hub and get sent home by Admiral Janeway.
    How to get it: Ally with Ralik, engage the cube, and at the end, choose to surrender and let the autopilot take you through the aperture.

    6. Welcome Home, Voyager

    Destroy the Transwarp Hub and bring Voyager back to Earth.
    How to get it: Ally with Ralik, attack the cube, refuse to take over the hub, and select the option to condemn the hub, ending with Voyager’s safe return.

    7. Was It Worth It?

    Return to Earth without destroying the Transwarp Hub.
    How to get it: Either ally with Ralik or not, then engage the cube, enter the aperture, and choose to fight the Queen and go home.

    8. The Long Road Continues

    Find another way home without risking entering the Borg nebula, even if it takes more than 16 years.
    How to get it: Make the choices: “The captain alone decides: We will find another way home,” followed by “Do not enter the nebula. Voyager will find another way.”

    9. For The Greater Good

    Sacrifice Ralik to the Borg Queen to delay your return and spend 16 more years in the Delta Quadrant.
    How to get it: Agree to sacrifice Ralik, then head into the nebula, destroy the hub, and select the option to drop the pathogen, sacrificing Ralik to develop the virus that prolongs your journey.

    Note: To replay the final sector and unlock all endings, remember that the “For The Greater Good” ending must be loaded from sector 11, not sector 12.

  • Where to Find All of Dr. Gurgula’s Hidden Transmissions in High on Life 2

    Where to Find All of Dr. Gurgula’s Hidden Transmissions in High on Life 2

    High On Life 2 features several callbacks, hidden Easter eggs, and characters from the first game, especially some notable Gatlians. There’s also a secret achievement or trophy called “Dr. Gurgula Will Return,” which involves discovering three hidden transmissions from Dr. Gurgula spread throughout the game. Two of these transmissions are tucked away during bounty missions, making it easy to overlook them, so missing any of these clues means you might not unlock the achievement unless you start a new game.

    To get the “Dr. Gurgula Will Return” achievement without missing anything, you’ll need to find all three transmissions in one playthrough. The locations are:

    1. Wyoming, during the “Rescue Your Dad From The Cult” mission.
    2. Pinkline Harbor, during the “Kill Scientist Professor Berkel” mission.
    3. Northern Circuit Arcadia, which can be visited anytime, even after finishing the game.

    The first two transmissions are tied to specific missions and are easy to miss. The third transmission requires solving a clever puzzle involving Sheath.

    First Transmission – Rescue Your Dad From The Cult
    You find this halfway through the mission, back in the cult’s main building after freeing your dad. After fighting your way through enemies and reaching a mini-boss with a large red health bar, defeat the mini-boss but don’t leave through the broken window yet. Instead, turn around and look for a vent in the corner of the room on the left side. Jump onto the nearby bookshelf and use it as a platform to reach the vent, which leads you into a secret room. Inside, activate Dr. Gurgula’s transmission to unlock this message.

    Second Transmission – Kill Scientist Professor Berkel
    This one appears during the mission at Pinkline Harbor when you’re investigating Gessie. Proceed through the initial part of the mission until you reach the research area. Cross the tent on the far side, adjacent to Gessie’s head. You’ll activate a generator on the left just after entering. Follow the green wire on the ground to a hidden tent closer to Gessie. Enter this tent and activate the transmission.

    Third Transmission – Circuit Arcadia, Anytime
    This transmission can be accessed any time, even after completing the game, but involves a more complex puzzle. Head to the northern area of Circuit Arcadia where a vehicle is pushed against a wall. Use Travis and Jan’s Trick Shot ability to elevate the vehicle, creating a pathway into the building. Inside, solve a Lugblob puzzle: use Gus to flip panels and access hidden electrical parts. Grab and place Lugblobs strategically, tethering them to power coils and wires following the puzzle’s steps. Successfully completing this puzzle reveals the final Dr. Gurgula transmission.

    Once you’ve interacted with all three transmissions, you’ll earn the “Dr. Gurgula Will Return” achievement. If you miss any of the first two transmissions, you’ll need to start a new game to collect them all and unlock the trophy.

  • Completing All Warring States Hot Springs in Nioh 3: A Complete Guide

    Completing All Warring States Hot Springs in Nioh 3: A Complete Guide

    The Nioh series features classics like the charming Kodama and Scampusses, but one of my personal favorites has always been the Hot Springs scattered throughout the levels. Luckily, they’re returning in Nioh 3.

    As in the earlier games, Hot Springs are helpful for progressing through the longer sections of the game. They are also collectible items you can find across all three major time periods.

    What Are Hot Springs and How to Find Them

    Hot Springs are optional collectibles hidden in the open-world areas of Nioh 3. When you find one, you can let Takechiyo take a quick bath to restore some health and gain a temporary recovery buff. This buff can be a real lifesaver when facing tough bosses, so it’s worth hunting for them in most big areas.

    You can easily spot Hot Springs because they feature red Kodama bathing inside and emit a green glow. They’re often well-hidden, tucked away behind moving walls called Nurikabe, which you can reveal by emoting at them with R1 and the touchpad. Some Hot Springs might also require completing specific objectives to access.

    Important Note: Certain Hot Springs are locked behind specific missions, meaning you may need to replay levels via Battle Scrolls to find all of them. We’ll point out which ones are mission-locked as we go.


    Every Tokaido Hot Spring

    Tokaido has just one Hot Spring, located at the southernmost point inside the enemy base near Cape Cavern Shrine. Enter the cave, defeat the enemies inside, and you’ll find the Hot Spring toward the back of the base.


    Every Maisaka Hot Spring

    Maisaka features two Hot Springs:

    • First Hot Spring: Easy to find. Head to the Maisaka Post Shrine, then go forward toward the enemy base. Defeat the enemies here, open the gate at the back of the base, and you’ll reveal the Hot Spring.

    • Second Hot Spring: Hidden in the Haunting Caves. Start from the Rimstone Pool Shrine, go forward, then instead of turning right like usual, drop down to the left. Crawl through the small gap to reach the Hot Spring.


    Every Mikatagahara Hot Spring

    Mikatagahara has two Hot Springs:

    • First Hot Spring: Located in Saigagake, easiest to get to from the Rear Approach Shrine. When you arrive, head to the right where there’s a small hut. Emote at the Nurikabe wall to make it disappear and reveal the Hot Spring. This may require doing it during the “A Tiger’s Cause” mission if the wall isn’t normally visible.

    • Second Hot Spring: Hidden in the Crucible level, within the level called “A Fiery Invasion.” Reach the Hoda Slope Shrine, go up and turn right toward the path to the Hot Spring, which is behind a locked door that you’ll need to clear enemies to unlock.


    Every Lake Hamana Hot Spring

    Lake Hamana’s only Hot Spring is inside the castle itself, near the Main Keep Shrine. Enter the castle, then explore the houses to find a locked door. Defeating enemies and completing the Lesser Crucible will give you access to open it.


    Every Iinoya Hot Spring

    Iinoya has a single Hot Spring, located in Ryotan Temple. Start at the Living Quarters Shrine, then go outside into the garden. Emote at the Nurikabe wall with R1 and the touchpad to make it vanish, revealing the Hot Spring.


    Every Futamata Road Hot Spring

    Futamata Road has one Hot Spring, located before the Juji Fortress (East) Shrine. Head up the stairs to find a locked door on the left; go up another set of stairs, then go left to find a hole in the wall that leads to the Hot Spring.


    The Final Hot Spring in Futamata

    The last Hot Spring is at Futamata Castle, the region’s end point. At the Defensive Gate Shrine, look to the right to see a hole in the wall showing the Hot Spring below. Head down the stairs and hug the left wall to find an invisible path leading to the Hot Spring.

  • Where to Find Every Golden Blood Bead in Code Vein 2: A Guide to Completing and Solving

    Where to Find Every Golden Blood Bead in Code Vein 2: A Guide to Completing and Solving

    In Code Vein 2, like most similar games, dying can be harsh. There’s a risk of losing your hard-earned Haze, which is used for leveling up, if you’re not careful. That means healing during fights is crucial.

    Healing here replaces the concept of Regeneration. As your character levels up, you’ll want to strengthen your Regeneration ability too. Doing this requires finding some rare Golden Blood Beads, which are hidden throughout the game.

    ### What Are Golden Blood Beads?

    Golden Blood Beads are items that upgrade your Regeneration power. They work alongside Golden Nectar—that’s used to add more charges to your Regeneration. The Blood Beads, however, make each use restore more HP.

    Unlike Nectar, Blood Beads don’t show up on your map. They’re much rarer and more noticeable when you find them since they aren’t marked. You’ll need to keep a close eye on your surroundings or follow guides to find them all.

    You can upgrade your Regeneration up to level 13, with each level requiring one Golden Blood Bead. That totals 12 Beads to locate.

    ### Where to Find Every Golden Blood Bead

    There are 12 Golden Blood Beads spread across every region in the game. One of these can only be obtained after finishing the first ending, so don’t worry if you haven’t collected it by the final scene.

    All of these Beads are found in Towers of Regeneration, which look almost identical everywhere. Most are outdoors, but some are tucked away inside dungeons or hidden areas.

    #### MagMell Island

    There’s just one Tower here, located on the east side of the island, south of the main area. It towers over the water, so be careful to avoid falling in.

    #### Sunken City

    In the Sunken City, you’ll find three Towers:

    – One is in the far east, overlooking the water.
    – Another is north of the Refugee Village, accessible via the Mountain Underground Facility.
    – The last is northeast of the Sunken Pylon, reachable by gliding from the building north of it that has a helpful ramp.

    #### Undead Forest

    The Undead Forest holds three more Towers:

    – Above the winding road north of Dam Lakeside, south of Mountain Hamlet.
    – Below the Amusement Park, north of the Abandoned Farm, accessible through a pathway in the Riverport Watch Fort.
    – At the bottom of the drained lake in the Village Beneath The Dam, in an area that’s submerged in the current game time but accessible during free exploration.

    #### Corroded Scar

    In Corroded Scar, there are two Towers:

    – Near the Miners’ Rest Stop, easily reached via the main road.
    – Located below the Old Mill, accessed by traveling through the Riverport Watch Fort.

    #### Insula Carcere

    Inside the prison, there’s only one Tower. After reaching the Upper Prison area, descend the stairs heading west to find the Tower.

    #### Sealed Grounds

    This area contains two Towers:

    – One is in Luna Rapacis, on top of the Sealing Grounds. Reach it by dropping down from the southeast path after entering the Luna Rapacis.
    – The other appears after completing the first ending and returning to the Sealing Grounds in the past. This one is accessed by traveling through the Luna Rapacis via a path that leads down after activating a lever, using a motorcycle.

    All Beads are located in Towers of Regeneration, which generally look the same, making most easy to find around outdoor regions, with some inside dungeons. Every Golden Blood Bead can be found without missing any, including the one only obtainable after the first ending.

  • Where to Complete All Abandoned Bases in StarRupture

    Where to Complete All Abandoned Bases in StarRupture

    There are several abandoned bases scattered across the StarRupture map, many of which contain resources and blueprints vital for your progress. During normal exploration, you’ll likely come across these locations. However, if you’re searching for a specific blueprint, it’s helpful to know exactly where to go.

    Most abandoned bases are nearby, but one in particular is hard to reach and dangerous to explore before a rupture wave occurs. Here’s a complete guide to all the abandoned bases you can find.


    All Abandoned Base Locations in StarRupture

    There are 11 blueprints hidden inside these bases, each one stored in chests. These bases also supply valuable resources like War Bonds, food and drinks, ammo, ELMs, and research items that can be traded for Data Points.

    Use the map above to visit each base yourself, or check the walkthrough below if you’re looking for a specific blueprint.


    Important Tip: Abandoned bases will be filled with enemy creatures, so it’s best to explore them after a rupture wave to avoid being overwhelmed.


    Selenian Mining Base ‘Purple Haze’

    The easiest base to access is near your starting point, southwest of the ship where you arrived. Inside, you’ll find the Tubes Blueprint and the Rotor Blueprint. To reach the blueprints, jump onto the top floor of the tallest building from a large rock behind it, where the blueprints are stored in a chest.


    Griffiths Research Outpost ‘Lemon Souls’

    Located north of your starting area, this site has a couple of connected buildings. Head to the south side of the area where two buildings meet, climb to the top floor of one, and find a chest with the Stator Blueprint.


    Claywood Research Center ‘Grey Owl’

    To the northeast of your initial base, this base is shrouded in a blue mist that damages your shield. Climb to the top of the tower to find a chest near the railing containing the Stabilizer Blueprint.


    Griffiths Research Outpost ‘Mythic Cry’

    On the west side of the outpost, enter the locked building through the roof. Inside, you’ll find a chest with the Synthetic Silicon Blueprint.


    Selenian Research Outpost ‘Starry Night’

    In a canyon west of the large crashed ship, this small base is hidden from view. Inside one of the lower buildings, there’s a chest with the Electronics Blueprint.


    Clever Robotics Research Outpost ‘Spored Rock’

    Located furthest east, beyond sulfur fields and in the blue spore zones that drain shields, this outpost has a tower with a railing on top. Climb up to find a chest containing the Chemical Blueprint.


    Clever Robotics and FHS Research Base ‘Redleaf’

    North of the first base, in an area with several Griffiths buildings, head to the southern part where two structures are connected. Climb to the top floor of one of these buildings to find the Red Keycard in a chest, which grants access to locked doors.


    Redleaf Abandoned Base (Most Complex)

    This base requires finding four keycards to access the locked space containing blueprints. The first keycard, the red one, is inside a partially ruined building in the center. Inside, climb upstairs to find it next to a dead body.

    The second keycard, with a red trim, is in a northern building. Unlock the door to find it inside.
    The third is upstairs on a table in one of the buildings connected by a walkway to the south.
    The fourth is in a building on the far side of the base, again upstairs on a table after unlocking the door.

    Use these keycards at the terminal in the main building’s top floor to open the vault. Inside, you’ll find blueprints for the Electromagnetic Coil, Hardening Agent, Valve, and Turbine.

  • Where to Find All Secrets in Crime Scene Cleaner and Completing Challenges

    Where to Find All Secrets in Crime Scene Cleaner and Completing Challenges

    In Crime Scene Cleaner, you take on the role of Kovalsky, a mafia cleaner who ends up in this line of work against his will. His main goal is to pay for his daughter’s hospital bills. The game features various crime scenes, and as you move through different levels, you’ll clean up more locations, including art galleries and party houses.

    If you’re a perfectionist and want more than just cleaning, you can look for hidden spots in each scene. In normal mode, these include cash stashes, while in Nightmare Mode, you can discover creepy music boxes.

    Where to Find All the Secrets in Bad Call – Normal Mode

    • First Secret: Exit your car and enter the building with the light in front. Go up the second set of stairs, look for a window with ‘Secrets Nearby’ written in front of it. Step outside and along the ledge to the left; you’ll see a red flower-patterned cloth on a box. Approach it to find the secret.

    • Second Secret: Enter the building with the light. Take the stairs to the top floor, approach Apartment 23’s door. Facing the door, turn right and drop the box from your hand onto the shelf to the right to get the key. Enter the apartment, go into the right room, break the window’s planks with your fists, and step outside. Head to the elevator across the area, activate it by pressing the green button, descend to the lower floor, break the window’s planks again, and enter inside—here lies the secret.

    • Third Secret: After entering Apartment 23, go right into the room and exit through the window. Lower the nearby ladder for quick access. Continue straight toward the red flower-patterned tablecloth. Turn right and find a gate with iron bars. Backtrack, stand in front of the ladder, turn right to find a key on a box between the wired sections, use it to open the gate. Repeat this process to navigate through the building’s locked gates, eventually using a ladder to reach the top and descend the fire escape, revealing the hidden apartment with a key beside a statue. Use this key to open the final gate and discover the secret.

    Where to Find All the Secrets in Trial By Blood – Normal Mode

    • First Secret: As the mission begins, turn left into the Men’s Locker Room. Exit into the Relaxation Zone, locate a room with neon pink lights and a tanning machine. Find the keycard W024 on the table. Use it to open the corridor door on the left, then open locker 24 to find the M034 keycard. With M034, open locker 34 for a VIP card. Return to the Relaxation Zone, hack the hidden door with the keypad, and use the VIP card to access a secret area in the pool room.

    • Second Secret: From the VIP zone, take the pink W018 keycard to unlock locker 18 in the Women’s Restroom, revealing another hidden secret.

    Secrets in Toxic Love – Normal Mode

    • Find a hidden compartment behind a vertical frame-shaped painting between two lamps. Complete a mini hacking game to unlock a safe containing the secret.

    Secrets in Short Circuit – Normal Mode

    • Up the stairs, turn left to interact with a hanging lamp revealing a hidden compartment. On the upper floor, find a key on a round table. Return downstairs, open the living room’s double doors, enter the kitchen, and find a secret in a hidden space.

    Secrets in Italian Job – Normal Mode

    • Exit your car into the pizzeria, go through the wooden door on the left to find a trapdoor on the floor. Use a key from a drawer to open a gambling room beneath. Alternatively, access the back alley, use furniture to climb into a hidden concert area, and find a secret room with a music disk.

    Secrets in Affair With Dead – Normal Mode

    • Outside, in the villa’s garden, turn right and use the double wooden doors with the fuse box to drain the bloody pool and find the Workshop key. Inside, follow staircases and move through basement passages to locate secret items such as the Crane Keycard and other hidden compartments, unlocking various areas and revealing secrets.

    Secret Disks Locations

    • Nightmare Mode unlocks after completing the main game, with levels like Bad Call, Trial By Blood, and others hiding special music disks. These are often found in hidden rooms, secret spaces, or by completing specific actions like taking photos at important points, hacking terminals, or moving objects around.

    • Examples include finding disks in a locked attic via a Polaroid camera, exploring art rooms for color-matching puzzles, or navigating secret ventilation shafts. Many disks require solving puzzles, hacking mini-games, or exploring overlooked areas to locate.

    • Specific disks are tied to levels like Modern Art, Friendly Fire, or Call In Dead, each hidden in unique spots like tiled rooms, behind secret panels, or within ventilation systems, often requiring careful exploration and item use to uncover.

    Nightmare Mode presents a darker, more complex challenge, with additional secret locations and disks that demand thorough searching, object manipulation, and puzzle-solving to find.

  • How to Achieve All Mistveil Forest Cures in Where Winds Meet by Completing and Solving

    How to Achieve All Mistveil Forest Cures in Where Winds Meet by Completing and Solving

    The Mistveil Forest in Kaifeng, located in Where Winds Meet, is shrouded in an eerie fog. Spending even a second in this fog will expose you to a deadly toxin with no known cure.

    Fortunately, during the Ephemeral Blight Encounter quest, you’ll find a way to cure the toxin, uncover the secrets of the forest, and eventually access the Ghost Master World Boss. Here’s a step-by-step guide to completing this quest.

    How To Start The Ephemeral Blight

    Enter Mistveil Forest and trigger the Encounter. Follow the quest marker to proceed. Before reaching your destination, you’ll be affected by Dawn-to-Dusk Venomous Mist and will faint. After regaining consciousness, you can start the mission.

    The Ephemeral Blight Walkthrough

    Initially, talk to Zhai Xu to learn about the situation and gather clues. To distract him, use Meridian Touch on the wind chime outside his window, then collect the two clues when he leaves. Afterward, chat with him again, leave his house, and read the Thousand-Wish Amendment in your bag. This document reveals that the venom can be cured if you collect antidotes from two factions within the forest: Hollow Abode and Aureate Pavilion.

    Hollow Abode

    The Hollow Abode is on the western edge of the forest and is also a Skill Theft spot for the Soulshade Umbrella, which makes you invisible when nearby. To find the cure note, enter the second-floor window of the main building and go down the stairs to the right. The note is on the table at the end of the stairs.

    Aureate Pavilion

    Located in the northeast part of the map, east of the North Mistveil Forest Boundary Stone, this outpost is easy to identify. Fight off the enemies here, then find the cure note in the main house, on a table to the left as you enter.

    Return to Wishing Cove

    With all three antidotes — from Hollow Abode, Aureate Pavilion, and Wishing Cove — return and present them to Zhai Xu along with the borrowed manuscript. Wait two days, then visit his house to read the letter he left. Follow him to the shack near the North Mistveil Forest Boundary Stone and talk to him again. He’ll give you a prototype cure for the toxin, allowing you to venture deeper into the forest. While exploring, stand near fires to lessen the toxin’s effect.

    Continue along the trail of braziers to confront a group of Aureate Pavilion guards and defeat them.

    Sun Buqi’s Lair

    After dealing with the guards, proceed further and shoot fire arrows at the Dawn-to-Dusk Blossoms to destroy them, opening the tunnel into Sun Buqi’s lair. Inside, explore the area and examine four spots. Use fire arrows to eliminate three Blossoms, causing Sleeping Puppets to fall from the trees. Defeat these puppets and investigate the Silver Needle Folding Fan.

    Follow the mysterious figure into the hidden lair. Be prepared for an ambush upon entry—dodge attacks and continue to destroy two Blossoms, then fight a group of Sleeping Puppets. Afterward, eliminate three more Blossoms and reach the clearing. Collect Sun Buqi’s notes from the left table to piece together what happened.

    Clues and Puzzle Solving

    The clues reveal that the forest was poisoned by a cold toxin called Dawn-to-Dusk Toxin, which turns people into Sleeping Puppets. The toxin originated from a hidden lair, formed when spirits and dreams were suppressed during a flood and sinkhole. Disciples from all three factions became affected, and the Puppets carry a Silver Needle Medicinal gourd. Once the halves of the pendant with the Crane Holding Lingzhi motif are reunited, the relationship is restored.

    Final Steps

    Return the pendant piece to the Sleeping Puppet, destroy the remaining Blossoms, then go back to Zhai Xu with the collected notes. Submit everything, and the quest will be complete. Afterward, you’ll be able to explore the Mistveil Forest freely without fear of the deadly toxin.

  • How to Find the Vaultkeeper’s Melody and Solve in Hollow Knight: Silksong

    How to Find the Vaultkeeper’s Melody and Solve in Hollow Knight: Silksong

    Music plays a major role in Hollow Knight: Silksong. To progress and make it to the top of the Citadel, you need to obtain the Vaultkeeper’s Melody, one of three keys essential for advancement.

    While the Conductor might have required strength and the Architect some thinking, the Vaultkeeper test your curiosity. You’ll explore hidden and distant parts of the Citadel’s most secret areas looking for an item only one living bug in Pharloom remembers.

    How to Start the Vaultkeeper’s Melody Quest

    Once you arrive in the Citadel, the quest begins. At the top, you’ll face the Cogwork Dancers. Defeating them unlocks the exits into the Cogwork Core. Before proceeding, interact with the mechanical device nearby, which will speak to you and ask you to find the melodies needed to open the path to the Cradle. After accepting the quest, head down into the Cogwork Core and Whispering Vaults to begin your search.

    Note: The Whispering Vaults can only be accessed from the side of the exits leading to Bilewater, Underworks, and Songclave—they only open from that side.

    How to Find the Vaultkeeper’s Melody

    Inside the Whispering Vaults, your main goal is to go as far right as possible until you reach a tall vertical chamber where you can descend. You’ll need to push some boxes by hitting them with your Needle and watch out for powerful enemies along the way.

    Before hitting your first major stop, take a detour through the third exit on the right (or second if it’s your first visit). In that room, you’ll find a bench and Vaultkeeper Cardinius. The Vaultkeeper can listen to your psalm cylinders—collectible items you should gather—and will be important later. Remember this location.

    From the bench, go to the third exit on the left side of the chamber to fight your next boss: Trobbio. This fight takes place in a room marked “The Stage” on your map. The battle is straightforward but flashy. Keep these tips in mind:

    • Use a crest like Reaper, Wanderer, or Witch to pogo off Trobbio’s Tornado.
    • Don’t dash recklessly; walking often works better than sprinting.
    • Stay patient and keep steady movement.
    • Use floor traps and quick-fire projectiles to your advantage.

    After defeating Trobbio, you can continue to the right and down the entrance you originally used to arrive. This leads to an elevator taking you down into the Underworks. At the bottom, pull the lever to go up again, then step off the elevator. Be careful of spikes beneath the elevator station—use your Drifter’s Cloak to glide past the spikes safely and prepare to dash over the next set.

    Next, navigate northeast through the chamber you enter. Beware of enemies and spikes; opening a shortcut in the top left corner can help if things get tricky. Keep heading north-northeast until you re-enter the Whispering Vaults from below. In this room, rest at the bench near the entrance—there are no mobs or bosses, so it’ll be a good point to prepare.

    From there, continue through the vaults until you reach a chamber where you’ll find the Sacred Cylinder on the ground to the left of a bench. You can’t use it right away; instead, return to the central Whispering Vaults bench and talk to the Vaultkeeper. Make sure you choose the dialogue option to play the cylinder. Using your Needolin, memorize the third and most secret melody which is essential for your progress.

  • How to Achieve Every Trophy and Completing in Hades 2

    How to Achieve Every Trophy and Completing in Hades 2

    There are 50 different achievements and trophies you can earn while playing. Most are unlocked naturally as you progress through the game, but some will require extra effort or specific actions. While not all reward you with things beyond the satisfaction of completion, crossing off each item from your list can be very fulfilling.

    Some achievements are straightforward and will happen automatically, but if you want to make sure you don’t miss any or need help understanding certain tasks, this guide breaks down each category and provides tips for easier completion.

    ### Prophecies
    | Name | Requirement | Tips or Notes |
    |——–|————–|————–|
    | Silk and Spitefulness | Complete Arachne and Athena’s prophecy. | Equip the Gorgon Amulet when talking to Arachne. |
    | Unfinished Business | Finish Odysseus’s quest at Scylla, Polyphemus, and Circe. | Use the Knuckle Bones keepsake during conversations. |
    | Voice and Vanity | Finish Echo and Narcissus’s quest. | No specific requirements. |
    | Haunted by the Past | Restore Dora’s memories. | Visit Prometheus multiple times; no need to defeat. |
    | Hand of the Fates | Complete 60 minor prophecies. | N/A. |
    | Soundest Sleepers | Wake Hypnos. | Reach the game’s epilogue to get the last ingredient. |

    ### Arcana
    | Name | Requirement | Tips or Notes |
    |——–|————–|————–|
    | Breadth of Knowledge | Unlock all Arcana cards. | N/A. |
    | Unassailable Insight | Fully upgrade all Arcana cards. | N/A. |
    | Mind for Magick | Collect 30 Grasp at the Altar of Ashes. | N/A. |
    | Arcana of the Ages | Win a run using every Arcana card against Tartarus and Chronos. | N/A. |

    ### Weapons
    | Name | Requirement | Tips or Notes |
    |——–|————–|————–|
    | The Arms of the Night | Unlock all weapons. | N/A. |
    | The Unseen Sentinel | Unlock all weapon aspects. | N/A. |
    | Sword of the Night | Defeat Typhon with all weapon types. | N/A. |
    | Bearing Dark Gifts | Complete one run with every weapon aspect. | N/A. |

    ### Character Relations
    | Name | Requirement | Tips or Notes |
    |——–|————–|————–|
    | Close Comrades | Max bonds with 10 allies. | N/A. |
    | Catch of the Night | Take an ally fishing. | N/A. |
    | Fair Fight | Earn 1,000 gold in Nemesis competitions. | N/A. |
    | Sentimental Value | Collect every Keepsake. | Three are unlockable after the epilogue. |
    | Ambrosia for Two | Share Ambrosia with an ally at the Taverna. | Best with Eris and Odysseus. |
    | Soothing Soak | Take an ally to the Hot Springs. | N/A. |

    ### Familiars and Fish
    | Name | Requirement | Tips or Notes |
    |——–|————–|————–|
    | Animal Whisperer | Recruit all Familiars. | N/A. |
    | Unfamiliar Forms | Change each Animal Familiar’s form. | N/A. |
    | Beast Master | Fully upgrade every Animal Familiar. | N/A. |
    | Familiar Confidant | Talk to Frinos five times after a run. | N/A. |
    | Denizens of the Depths | Fish for 20 different types of fish. | Take Toula on fishing runs for guaranteed success. |

    ### Miscellaneous Crossroads
    | Name | Requirement | Tips or Notes |
    |——–|————–|————–|
    | Giving Back | Earn 10,000 Kudos. | Sell gemstones and materials. |
    | So Mote It Be | Cast 50 Incantations at the cauldron. | N/A. |

    ### Unique Combat Requirements
    | Name | Requirement | Tips or Notes |
    |——–|————–|————–|
    | Natural Talent | Defeat Hecate with no Arcana active. | Best at Rank II with a stable weapon aspect. |
    | Breaking Up the Band | Use Selene’s Night Bloom to raise a Siren. | Use during the second fight phase to defeat the drummer. |
    | Dressed to Kill | Finish Chronos with an unbroken Arachne outfit. | Use Heavy Metal build with Hephaestus. |
    | Sheep’s Clothing | Defeat a witch while polymorphed. | Use Night Bloom before transforming, and let your summon finish the witch. |

    ### Chaos Trials
    | Name | Requirement | Tips or Notes |
    |——–|————–|————–|
    | Improbable Outcomes | Complete two Chaos trials in a row. | Pray during the process. |
    | Chaos in Hell | Complete the Great Chaos Below trial. | N/A. |
    | Infinite Possibility | Win 20 Chaos trials. | N/A. |
    | Born to Win | Fully equip Chaos’s keepsake and finish a full run. | Upgrade the keepsake’s rank before starting. |

    ### Night’s Champion and Oath of the Unseen
    | Name | Requirement | Tips or Notes |
    |——–|————–|————–|
    | Mercy, Night’s Executioner | Complete a Tartarus and Mt. Olympus run with eight Fear. | Set a time constraint for two Fear and choose comfortably. |
    | Behold Night’s Champion | Complete with 16 Fear. | Use Unrivaled Fights for maximum Fear; pick your strongest options. |
    | Unraveled Prowess | Unlock all Unraveled fights. | Do not use Fear during your first attempts. |

    ### Story Progression (+ Bonus Fight)
    | Name | Requirement | Tips or Notes |
    |——–|————–|————–|
    | Witch of the Woods | Clear Erebus and defeat Hecate. | N/A. |
    | Witch of the Depths | Clear Oceanus, defeat Scylla, and the Sirens. | N/A. |
    | Witch of the Plains | Clear the Fields of Mourning and defeat Cerberus. | N/A. |
    | Witch of the Abyss | Complete a Tartarus run by defeating Chronos. | N/A. |
    | Witch of the Outskirts | Clear the City of Ephyra and defeat Polyphemus. | N/A. |
    | Witch of the Waters | Clear Thessaly’s Rift and defeat Eris. | N/A. |
    | Witch of the Mountains | Clear Mt. Olympus and defeat Prometheus. | N/A. |
    | Witch of the Clouds | Complete Mt. Olympus by defeating Typhon. | N/A. |
    | Golden Age | Finish main story and reach credits. | N/A. |
    | Death to Chronos | Reach the game’s epilogue. | N/A. |
    | Elysian Glory | Use the Infernal Contract at the epilogue and defeat the boss. | Look for the contract in Charon’s shop during cycles. |
    | Goddess of Nightmares | Gather all other achievements. | N/A.