الوسم: Infinity Nikki

  • Whim Tangram Puzzle Guide for Infinity Nikki

    Whim Tangram Puzzle Guide for Infinity Nikki

    During the New Bloom Festival, the Whim Tangram puzzles offer players of Infinity Nikki the opportunity to assist Qiao He in exchange for various rewards. Qiao He, an NPC from White Jade, is positioned on a stunning ship moored at Florawish. By completing one of their Whim Tangram puzzles, you’ll earn valuable prizes. This popular game from the Linlang Empire is available for a short period, making it a must-try for loyal Infinity Nikki players.

    When you take on these fun challenges, you can relax on the ship instead of searching for Lamp Fish in Infinity Nikki. To solve each Whim Tangram puzzle, you’ll need to rotate several wooden blocks until they fill the image shown. Each of the three puzzles increases in difficulty, so following the specific solutions provided below will save you the hassle of trial and error.

    How To Solve Whim Tangram Puzzle 1

    Create A Boat

    To solve the first Whim Tangram challenge in Infinity Nikki, begin by completing the boat image. Start by focusing on the two largest triangular pieces and rotating them to fit into the sail at the top, as illustrated in the first image above. Next, rotate the red triangle so it slots into the hull on the left, alongside the adjacent slanted green rectangle. Finally, place the dark blue rectangle next to it without any rotation.

    The puzzle is nearly complete. All that’s left is to position the yellow square and the light blue triangle to complete the boat. Qiao He will congratulate you on finishing your first Whim Tangram and reward you with 50 Diamonds, 45 Shining Particles, three Flower Lanterns, and 30,000 Bling. You can use that Bling to craft the Chic Elegance Outfit.

    How To Solve Whim Tangram Puzzle 2

    Complete The Character In The Robe

    In the second Whim Tangram puzzle of Infinity Nikki, you will encounter more challenging outlines resembling a person in a loose, long-sleeved robe. To start off, position the square piece where the head goes. Next, rotate the light blue triangle beneath the square to represent the neck. As you proceed, it may get a bit tricky, but there’s no need to rush. Place the large purple triangular piece to form the arm and the robe’s body.

    The red triangle fits perfectly as the baggy sleeve of the robe. For the remaining spaces, the brown triangle should easily slot in at the bottom left. The final step involves placing a dark blue triangle in the bottom left position, followed by the slanted green rectangle. Once again, Qiao He will be impressed and reward you with 50 Diamonds for gacha pulls using Infinity Nikki‘s Resonance system, along with 45 Shining Particles, three Flower Lanterns, and another 30,000 Bling.

    How To Solve Whim Tangram Puzzle 3

    Assemble A Flower

    The third Whim Tangram puzzle in Infinity Nikki may require some experimentation to fill in the flower-shaped outline, as it could be easy to overlook the need to rotate the yellow square into a diamond for the top section. On the opposite side, attach the green slanted rectangle at the base to form the flower stem. Move the brown rectangle to the far left above the stem, then rotate the purple piece to fit on the opposite side.

    As you approach the conclusion, position the two blue triangles into the flower’s inner points as depicted in the image above. The last piece involves rotating the red triangle so its longest side faces upwards, allowing it to fit perfectly in the center. Once you complete the third Whim Tangram puzzle, you will again earn 50 Diamonds, 45 Shining Particles, three Flower Lanterns, and 30,000 Bling for your achievement in the New Bloom Festival event.

    The final Whim Tangram puzzle, #4, will unlock in Infinity Nikki on January 30, 2025. We anticipate that this last puzzle will offer similar rewards as the previous three.

  • Complete Guide to All Blastpollen Spots in Infinity Nikki

    Complete Guide to All Blastpollen Spots in Infinity Nikki

    In Infinity Nikki, you’ll find a wide variety of materials, but not all of them are equally accessible. Some materials can be gathered only by exploring different areas at certain times, while others require specific weather conditions, like rain, to appear. The most elusive materials are available only once a day!

    The 1.2 update introduced a new area called the Firework Isles, where you can discover a special material called Blastpollen. Here’s how to find it and utilize it in Miraland so that Nikki and Momo can continue their journey for the Miracle Outfits.

    Where to Find Blastpollen on the Firework Isles

    The Firework Isles are home to stunning purple flowers that hold the key to collecting Blastpollen. However, these flowers only bloom under two specific conditions, similar to the Sizzblooms found in Wishfield.

    First, the flowers blossom at night, allowing you to gather their valuable pollen. Additionally, you can collect them when the weather is cloudy. Since you can’t control the weather in the game, your best strategy is to adjust the time and wait for nightfall to search for them.

    All Blastpollen Locations on the Firework Isles

    Blastpollen is plentiful across the Firework Isles, with over 80 flowers available to collect each day, from Sparkheart Island to the Flaming Forest and other regions. Look for a purple glow under the right conditions or stroll along the shorelines where these flowers thrive.

    Many of the flowers grow in groups of two or three, and you can trace their locations on your map to ensure you find every one. Below is a summary of the number of Blastpollen blooms found on each isle:

    Isle Name

    Blastpollen Spots

    Sparkheart Island

    25

    Flaming Forest

    22

    Relic Isles

    4

    Crescent Moon Ruins

    20

    Songbreeze Highland

    18

    How to Craft Fireworks with Blastpollen

    Once you’ve collected some Blastpollen, you can use it to craft fireworks that will light up the skies of the isles. You’ll need a fair amount to create various types of fireworks, which you can then arrange for spectacular nighttime displays.

    After gathering your materials, head to the Fireworks Crafting Station located on Sparkheart Island, just south of the Firework Voyage shop, to put everything together.

  • Unlock the Fireworks Outfit in Infinity Nikki: A Quick Guide

    Unlock the Fireworks Outfit in Infinity Nikki: A Quick Guide

    As you advance in Infinity Nikki, you’ll unlock various ability outfits. One of the highlights of your journey will be Fireworks Isles, where you can craft the Fiery Glow outfit. This stylish outfit allows you to launch stunning fireworks into the night sky.

    While enjoying the fireworks is a great way to experience the island’s festive vibe, they also play a crucial part in completing the main story quest. You’ll find that fireworks can help you take down challenging foes like The Dark Bouquet with flair.

    How to Create the Fiery Glow Outfit

    To start crafting the Fiery Glow outfit, you need to reach Fireworks Isles and complete Chapter 1 of the Exclusive Quest “The Wonderful Journey.” This quest will guide you to the Fireworks Training: Step One quest, where you’ll learn that fireworks can defeat the Balloon of Darkness, as noted by Scintillada.

    The Faewish Sprite, Scintillada, will provide you with the outfit’s sketch. You’ll need to gather materials from The Hearts Of Infinity Nodes, and this doesn’t require any Whimstars. However, you will need to pay 10,000 Blings.

    Here’s what you need to collect:

    • 2 Hare Powder
    • 5 Daisy
    • 2 Blastpollen
    • 300 Threads of Purity
    • 60,000 Blings

    Hare Powder and Daisy are early-game resources found in Wishfield. You can collect Blastpollen during clear nights on Fireworks Isles.

    Outfit Pieces

    The Fiery Glow outfit features a cool design that works well for themed Styling Contests. It consists of nine distinct pieces, allowing you to mix and match with other outfits for unique styles.

    Piece Name

    Type

    Cool Score

    Gleaming Night

    Hair

    2,183

    Remarkable Ideas

    Bottoms

    1,780

    Flawless Code

    Top

    1,767

    Miracle Opening

    Headwear

    521

    Distant Landing

    Face Decorations

    527

    Luminous Eye

    Gloves

    540

    Meticulous Survey

    Shoes

    1,061

    Vertical Musings

    Socks

    695

    Firework Emblem

    Chokers

    527

    How to Use the Fireworks Ability Outfit

    The reloading menu in a fireworks launcher is displayed.

    Once you’ve equipped the outfit, you can launch fireworks by reloading them at designated spots found throughout Fireworks Isles.

    The launching menu allows you to organize the fireworks in the order you want them to be fired. You can also adjust the Firework Delay settings to decide how long to wait before launching them, and set the number of Loop Rounds to repeat the firework sequence.

    To acquire fireworks, craft them at a crafting table in town. You can get sketches for fireworks at Vita’s shop or as quest rewards.

    Having the outfit is essential for completing additional story quests in Fireworks Isles; you will need to launch fireworks to unlock features. It’s also crucial for defeating The Dark Bouquet boss encountered later in the storyline.

  • A Guide to Catching Lampfish Effortlessly

    A Guide to Catching Lampfish Effortlessly

    In the world of Infinity Nikki, there are numerous elusive creatures that players need to hunt down to gather essential crafting materials, and the Lamp Fish is one such elusive critter. This vibrant fish is only located in a specific type of environment within Papergames’ widely loved free-to-play RPG, which might be a mystery to many players until they discover the right spot. Additionally, depending on your exact search area, it may take several attempts before you find one. Fortunately, once you catch your first one, obtaining more becomes significantly easier.

    While locating the Lamp Fish isn’t as complex as tracking down the Astral Swan and its feathers, the fish can be somewhat scattered. However, if you’re aiming to craft a unique outfit that requires this creature, the effort will definitely pay off. Securing the Lamp Fish will give you the materials needed to add a chic item to your wardrobe, allowing you to excel in various Style Challenges against tougher NPC opponents.

    Where to Find Lamp Fish

    In Cave Waters

    The Lamp Fish can exclusively be found in the waters of cave areas such as the caverns near Florawish and Wishing Woods, specifically at the entrance to the Well of Fortune around Fortune Falls, as seen in the images provided above. As Florawish is the initial major region in the game, you can easily navigate there by fast traveling from the Secret Base Warp Spire and heading towards the waterfall. When you arrive, veer left at the waterfall into the cavern, traverse the large pipe tunnel, head left again, and drop down to the lower watery area.

    This location is also where you kick off the main story mission, “Power Outage Rescue“, making it a familiar starting point in your adventure. Follow the circular platforms and pipe bridges until you start seeing splashing fish. It’s at this moment that you can begin your quest to catch a Lamp Fish for your collection. This is undoubtedly the easiest spot to try your luck, and once you snag your first one, the game will provide you with the means to catch multiple others, depending on how many you need.

    How to Catch Lamp Fish

    Normal Fishing Technique

    Upon reaching the waters near the Well of Fortune entrance, you can catch a Lamp Fish in Infinity Nikki by using your Rippling Serenity Ability Outfit equipped, just like you would for any other fish in the game. Be aware of the Hairpin Loach that might grab your line first, but you should be able to catch a Lamp Fish after a few tries. If this is your first catch, it will be added to your creature collection in the “Collections” tab.

    Creatures and their crafting materials in Infinity Nikki respawn daily at 4 AM. Be sure to return to these same locations if you’re trying to collect enough Lamp Fish to unlock Precise Tracking.

    Once you have caught at least 2 kg of Lamp Fish, you’ll be able to access the “Lamp Fish” entry in your collection, allowing you to continue fishing for more until you accumulate the 60 kg needed to unlock Precise Tracking. Keep in mind that since Lamp Fish are exclusively found in cave waters, your map tracker may initially direct you above ground, so be prepared to explore and locate hidden entrances to find the right spots.

    Utilizing Lamp Fish

    A Fashionable New Addition

    After you have at least 2 kg of Lamp Fish in Infinity Nikki, you will possess a key material necessary for crafting the item: Well-Organized, a three-star top that offers a decent Sexy stat and is as high-level as the Memory’s Stardust earrings. You can find the sketch for this craft located in a chest within an open hut at the top cliff of Ripple Estate 2F in the Abandoned District, as shown in the image above. This sketch also requires several other crafting materials.

    To craft Well-Organized, you will need 10 Bedrock Crystals, 6,400 Bling, a 2 kg Kerchief Fish, and 64 Threads of Purity. Gather these materials together, and you’ll be able to create an eye-catching item for your wardrobe. By keeping an eye out for caves with fishable waters, you’ll be able to collect as many Lamp Fish as you desire during your Infinity Nikki adventure.

  • Complete Guide to Carnival of Fireworks Rewards in Infinity Nikki

    Complete Guide to Carnival of Fireworks Rewards in Infinity Nikki

    When Nikki steps into Miraland for the first time, she’s greeted by a vibrant atmosphere and a lively celebration that is just getting started. In Infinity Nikki, you’ll have the chance to dive deep into this imaginative realm as a Stylist, filled with endless opportunities for exploration and enjoyment.

    The Firework Isles are buzzing with activities, whether you’d prefer watching dazzling fireworks or enjoying a thrilling ride on one of their unique attractions. To make the most of your experience in this festive area and gather an array of rewards, here’s a comprehensive guide. Don’t miss out on the excitement!

    Glowing Fireworks Rewards

    It’s essential to remember that while many features will remain, some time-limited events are part of the Carnival of Fireworks. Be aware of which events will conclude as the season wraps up.

    Getting Started with the Celebration

    To join in on the festivities, you must first progress through the main storyline until you can access this area. Once you’ve completed the Wish Gathering quest, you can reach out to Mayor Grace to start your new adventure.

    She will guide you to the Firework Isles, where you can see the sky light up with spectacular bursts of color! You’ll also partner with Marques Jr. and Opera on a quest-filled journey across the islands, where you’ll earn various rewards like diamonds, Resonite Crystals, and Glitter Bubbles as you complete objectives and interact with the locals.

    Fireworks Styling Challenges

    Discuss exciting new Styling Challenges with Joya at the Firework Isles. She has created ten fresh rounds based on the rich history of the Isles, so come equipped with an impressive wardrobe. Each meeting with Joya will present you with a new task – achieving a perfect score will allow you to claim rewards, with each challenge becoming progressively more difficult.

    Drifting Whim Rewards

    You will need to gather Whim Balloons scattered throughout the Isles. While there are 56 balloons total, you only need to collect 32 to unlock all rewards. Here are the milestones and the corresponding prizes you can earn:

    Objective Rewards
    Collect 4 Whim Balloons 90 Diamonds, 120 Glitter Bubbles: Elegant, 30,000 Blings
    Collect 8 Whim Balloons 90 Diamonds, 45 Shining Particles, 30,000 Blings
    Collect 12 Whim Balloons 70 Diamonds, 120 Glitter Bubbles: Sweet, 30,000 Blings
    Collect 16 Whim Balloons 70 Diamonds, 45 Shining Particles, 30,000 Blings
    Collect 20 Whim Balloons 70 Diamonds, 120 Glitter Bubbles: Elegant, 30,000 Blings
    Collect 24 Whim Balloons 70 Diamonds, 45 Shining Particles, 30,000 Blings
    Collect 28 Whim Balloons 90 Diamonds, 120 Glitter Bubbles: Sweet, 30,000 Blings, Carnival of Fireworks Profile Card
    Collect 32 Whim Balloons 70 Diamonds, 45 Shining Particles, 30,000 Blings

    As you navigate through the Firework Isles, keep an eye out for balloons resembling Whimstars. Momo will assist in locating them, so lock on when you receive a pop-up alerting you to a nearby Whim Balloon!

    Fireworks Fiesta Rewards

    Once you’ve completed the Go to the Firework Isles and the A Night of Fireworks quests, it’s time to engage in new minigames at the Firework Isles. These challenges require you to dash toward the finish line while Whimtech fireworks fall from above, adding an extra layer of excitement.

    Gearing up for this will allow you to earn precious diamonds for use in the game. To kick things off, head to the Fireworks Fiesta area on Sparkheart Island, enter the Sizzle & Spark Center, and chat with Eddy to begin your challenges.

    Carnival of Fireworks Highlights

    Aside from the special events and minigames, the new area in Wishfield features several long-term attractions. Whether you want to join the festivities or simply capture some great photos, the Firework Isles offer a wealth of entertainment.

    Fireworks Dance Party

    To find the Fireworks Dance Party, head west of the Sizzle & Spark Center, where there’s a lively bonfire and plenty of dancers. A character named Aria will teach Nikki some fun dance moves. This is a chance to perform them in front of your friends, and you’ll be joined by another Nikki at random during your dance!

    Not only can you capture wonderful moments by using the record feature, but you can also share those videos with others in Miraland.

    Fireworks Coaster Experience

    Experience the thrill of the fireworks coaster, a lavish horse-drawn carriage ride that takes you soaring through the air amidst dazzling fireworks. Invite a friend for a more enjoyable experience, or go solo if you prefer.

    During your ride, you can pose for pictures and enjoy the scenic views without spending any in-game currency—it’s entirely free!

    Fireworks Voyage Shop

    Visit Alma at the Sizzle & Spark Center to purchase limited-time portable fireworks. Here’s a quick look at what’s available for you to buy:

    Firework Name Cost
    Portable Firework: Falling Stars 100 Blings
    Portable Firework: Radiant Path 100 Blings
    Portable Firework: Blushbunny 150 Blings
    Portable Firework: Cushion Squirrel 150 Blings
    Portable Firework: Foodie Bee 150 Blings
    Portable Firework: Surprise 200 Blings

    Whirl-A-Pony Attraction

    For a fun, leisurely ride, visit the Whirl-A-Pony ride located east of the Sizzle & Spark Center. Operator Carosel will help you get on this delightful attraction, which is also free!

    Fireworks’ Gift Rewards

    Lastly, during this festive season, log in daily to claim a Revelation Crystal for a full week. On certain days, you might even receive two crystals! Make sure to collect these rewards to boost your chances with festival banners.

    Additionally, join in on a web event rhythm game for even more rewards. You can attempt this five times each day, so aim for those high scores!

    Enjoy exploring and celebrating at the Firework Isles!

  • Comprehensive Guide to All Sky Monarch Locations in Infinity Nikki

    Comprehensive Guide to All Sky Monarch Locations in Infinity Nikki

    In Infinity Nikki, there are countless charming creatures and birds waiting for you to discover. You can build a friendship with them by grooming them, which in turn increases their trust in you. Among these enchanting beings is the rare Sky Monarch, a spectacular bird that you won’t see often while exploring.

    Sky Monarchs can be found near their concealed nests. Although they won’t offer you any crafting materials, they will reward your kindness with a delightful ride through different regions of Wishfield. Taking time to visit them all provides a unique aerial perspective of the landscape.

    All Sky Monarch Locations in Infinity Nikki

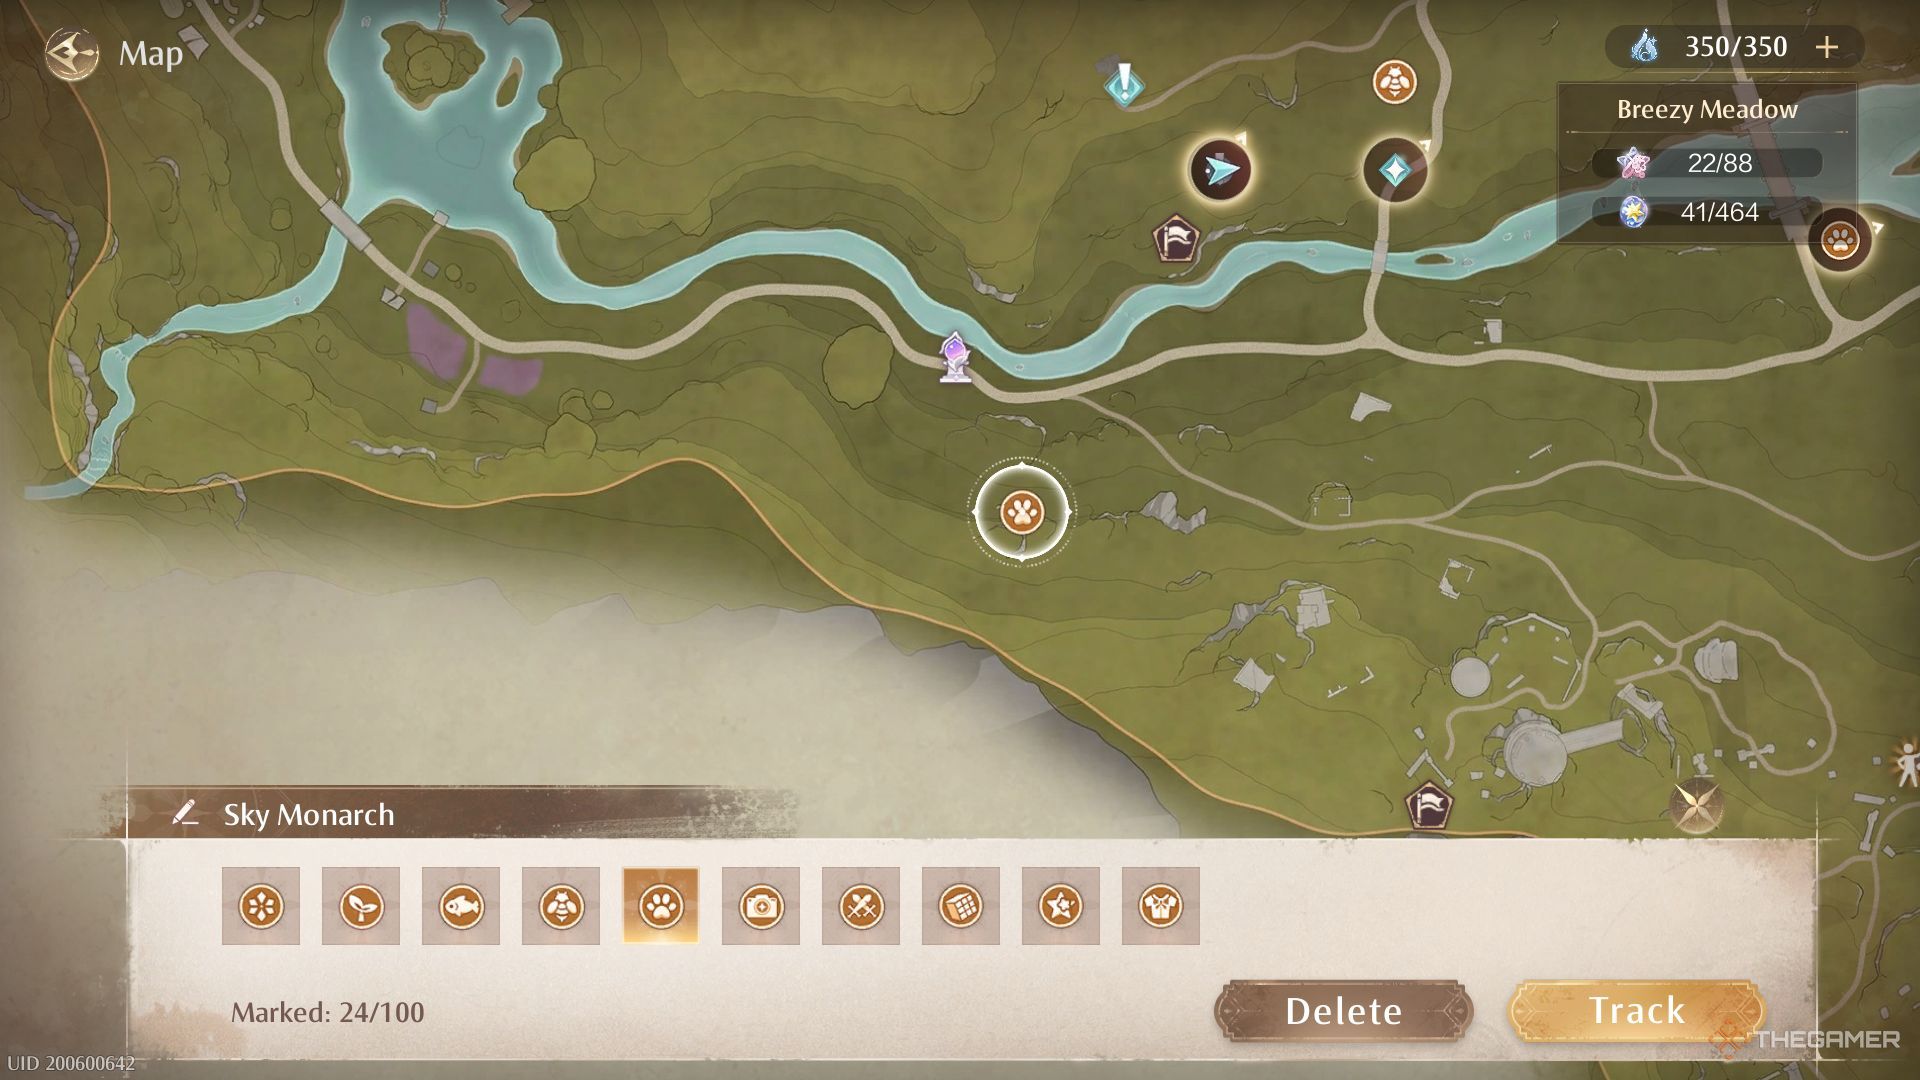
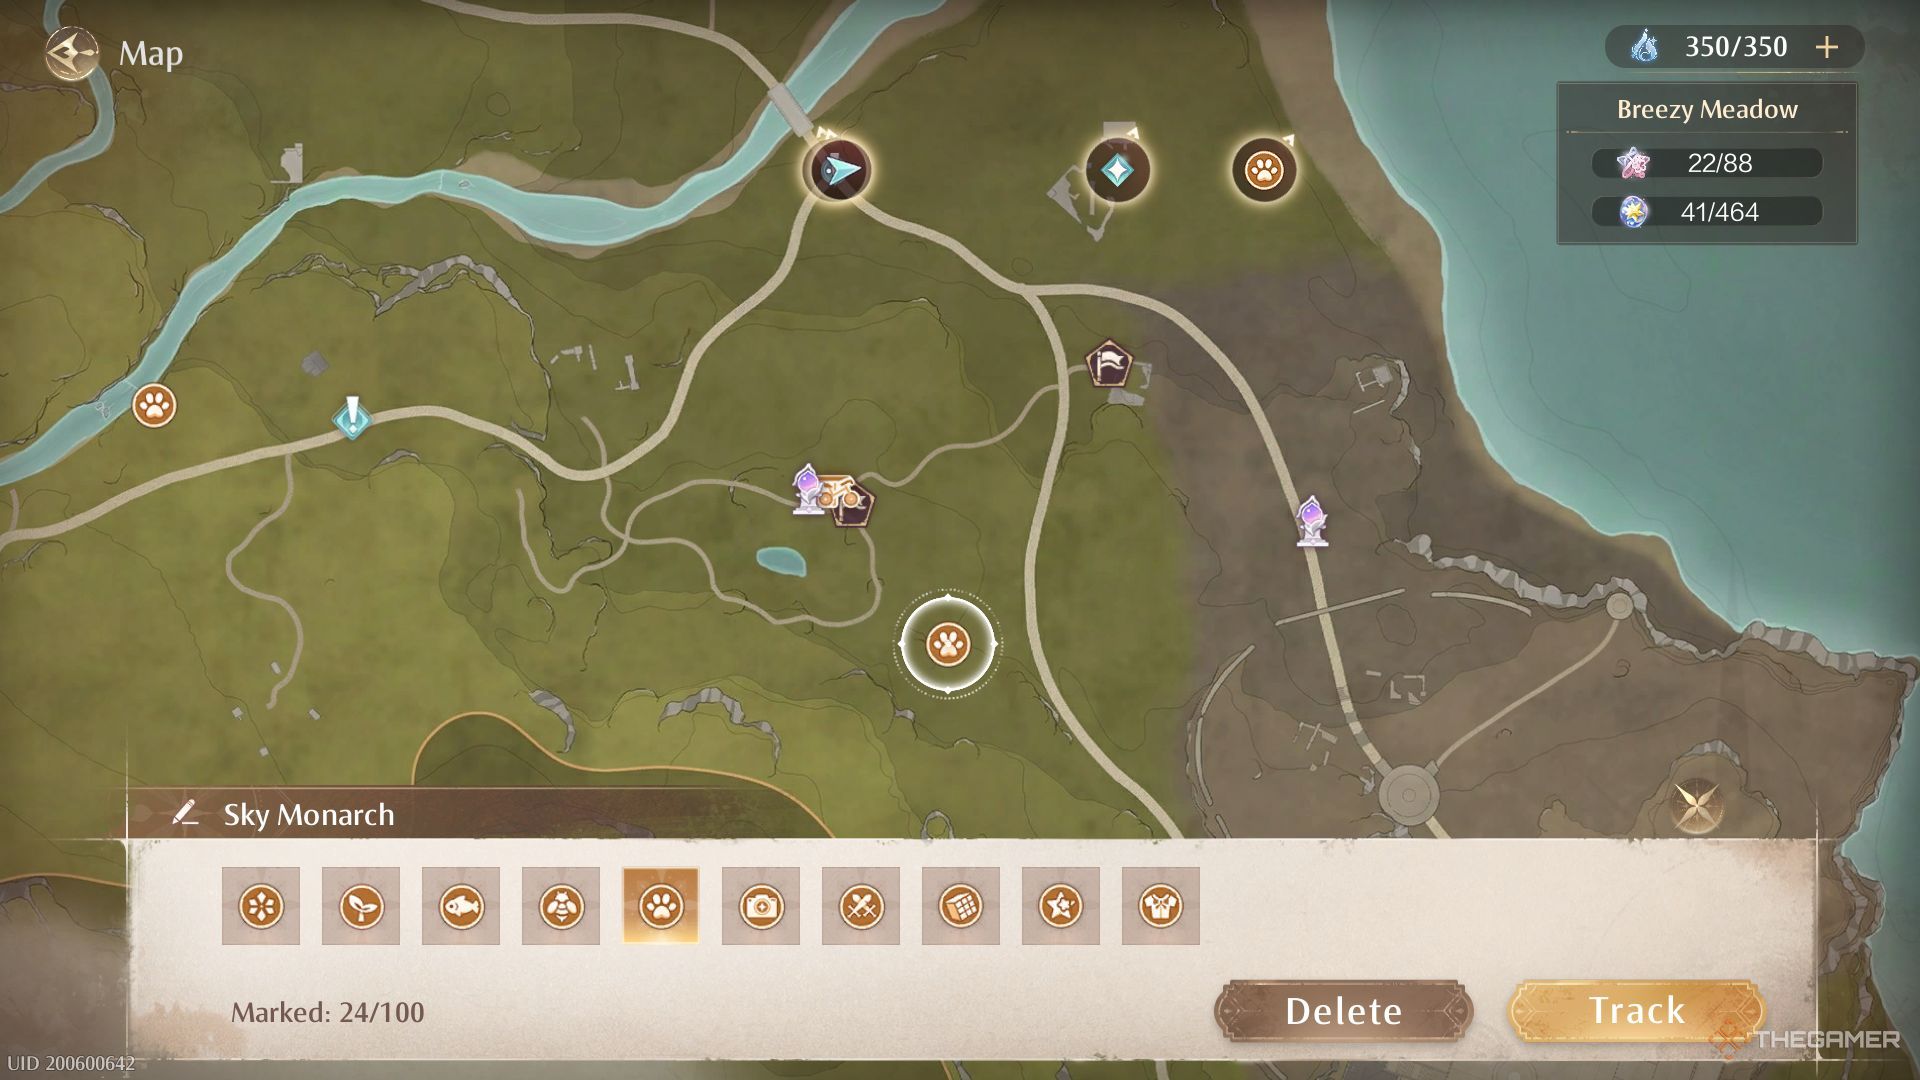
    Primarily, Sky Monarchs inhabit Breezy Meadows, but you can also spot one near the entrance to Stoneville and in the lower Florawish area. In total, you can find six of them throughout Wishfield.

    Region

    Warp Spire

    Map

    How to Find

    Florawish

    Wish Pass Office

    From the Warp Spire, use your Floating Outfit to head east. Keep moving straight and then climb the cliff when you’re near the beach to locate the Monarch.

    Stoneville

    Stoneville Entrance

    Sky Monarch Location in Stoneville Entrance

    Go southeast from the Warp Spire and climb the cliffs as you proceed. You’ll find the Sky Monarch’s nest if you continue going upwards.

    Breezy Meadows

    Lakeside Hill Lane

    Sky Monarch Location in Lakeside Hill Lane

    Make a sharp turn to the south from the Warp Spire. Keep moving in that direction, and you’ll see the bird below a stone cliff.

    Breezy Meadows

    Relic Hill

    Sky Monarch Location in Relic Hill

    This Sky Monarch is found across the river. To get there quickly, you can teleport to the Relic Hill Warp Spire and head southeast till you cross through the two water forks.

    Breezy Meadows

    Meadow Activity Support Center

    Sky Monarch Location in Meadow Activity Support Center

    After teleporting to the Warp Spire, head northwest in a straight line. You should eventually come across the Sky Monarch’s nest on a hill.

    Breezy Meadows

    Heartcraft Kingdom Outpost

    Sky Monarch Location in Heartcraft Kingdom Outpost

    Move north from the Warp Spire, and then head right to get to the area between the castle and the cliffs. Proceed along the edge of the cliffs and jump to continue in a straight line. The nest is situated near another cliff.

    How to Ride the Sky Monarch

    In order for the Sky Monarch to allow you to ride it, you first need to build trust by grooming it while wearing your Animal Grooming outfit. The bird may become frightened if you rush towards it, so make sure to approach slowly.

    If the Sky Monarch isn’t present at any of the nests, just wait a little while for it to return. You might also want to explore other locations during that time.

    Once the Sky Monarch feels comfortable after a good grooming, you will be prompted to leap onto its back. After that, it will take you soaring through the skies while you enjoy the stunning views of Breezy Meadows.

    Be careful not to move while on the bird’s back, or you will fall off.

  • How To Capture Heartfelt Thoughts in Infinity Nikki

    How To Capture Heartfelt Thoughts in Infinity Nikki


    In the world of Infinity Nikki, many materials can be elusive and hard to track down. While certain items, like Floof Yarn, are readily available, others, such as Dawn Fluff, can be acquired only once daily, making them trickier to find.

    Difficulty

    Easy


    Duration

    5 minutes

    Prerequisites

    • Finish Chapter 7 of the main narrative

    Heartfelt Thoughts, as well as the more frequently found Calm Thoughts, can be a bit tricky to spot at first if you aren’t familiar with where to search. These items are crucial for evolving some of your 5-star outfits. Here’s how you can find them in Infinity Nikki.

    Where to Locate Heartfelt Thoughts in Infinity Nikki

    Similar to Calm Thoughts, which is utilized for evolving 4-star outfits, Heartfelt Thoughts can only be gathered through a specific Realm Challenge. This challenge becomes available once you complete Chapter 7 of the main quest.

    Step 1: Use any Warp Spire to enter the Realm of Breakthrough. You can access this challenge only if you have completed Chapter 7 and progressed to Chapter 8 of the main storyline.

    InFold Games

    Step 2: Choose Phantom Trial: Wish Master Chigda and face off against the boss. To receive your rewards, you must defeat the boss again, but remember that this challenge can only be attempted once a week.

    Phantom Trial in Realm of Breakthrough from Infinity Nikki.
    InFold Games

    Step 3: After completing the trial, you will randomly receive Heartfelt Thoughts, along with Calm Thoughts and even Eurekas. Take these items to the Evolution menu accessible via your Pear-Pal.

    Heartfelt and Calm Thoughts rewards in Infinity Nikki.
    InFold Games

    Step 4: Select a 5-star outfit and check if you have enough Heartfelt Thoughts to evolve it. Evolving outfits provides new color variations. Heartfelt Thoughts are also necessary for the evolution of Miracle Outfits such as Wishful Aurosa and Silvergale's Aria. For 4-star outfits, you will need Calm Thoughts, which are more frequently rewarded in the Realm of Breakthrough.

    Evolving a 4-star outfit in Infinity Nikki.
    InFold Games

    How to Acquire Heartshine in Infinity Nikki

    Certain 5-star outfits require Heartshine for their evolution, which must be obtained through a different method compared to Heartfelt and Calm Thoughts.

    Step 1: Access the Resonance menu from your Pear-Pal and navigate to the Distant Sea banner, which remains available year-round. Click on the box icon on the right labeled Deep Echoes.

    Red arrow pointing to Deep Echoes in Infinity Nikki.
    InFold Games

    Step 2: After a certain number of draws from the Distant Sea banner, you can receive Heartshine. You must pull a minimum of 715 times from this banner to collect a total of eight Heartshine. Your first Heartshine will be awarded after 185 pulls.

    Heartshine in Infinity Nikki.
    InFold Games
  • Guide to “Left for Home, Right for Wishes” Quest in Infinity Nikki

    Guide to “Left for Home, Right for Wishes” Quest in Infinity Nikki

    In Miraland, there’s so much to discover alongside Nikki and Momo, with countless fashion items to collect in Infinity Nikki. Every outfit holds its own unique history, but not every piece is available for purchase or can be found easily. Some require you to complete specific quests, and we have a straightforward guide to help you through them.

    To earn the School Days outfit, you’ll need to finish a series of quests. When you kick off the first quest, you’ll be set on the path to obtaining the entire outfit for Nikki. We’ll assist you at every turn!

    How to Start the Left for Home, Right for Wishes Quest


    To kick off this quest, you’ll need to talk to Akka at the Breezy Meadow, specifically at the sheep farm located west of the Meadow Activity Support Center. Akka needs assistance finishing the lyrics to a song he’s been working on.

    If you’re having trouble locating Akka, try checking near the riverbank!

    Akka needs help with three verses, and the answers are provided below:

    Verse 1

    The sheep go “baa” as they sleep in the hay.

    Verse 2

    Pearl Wings chasing the sun across the sky.

    Verse 3

    A Ruffin pokes its head from the water below.

    After providing the answers, your next step will be heading to the Meadow Activity Support Center to speak with Simone. You’ll need to fetch a drink for Akka. When you return to the cottage, you’ll find that Akka isn’t there.

    Check with others to learn of his whereabouts, and you’ll meet Akka’s father, Old John, who suggests you search by the river since Akka tends to go there when he’s feeling down.

    Look near the small bridge leading to Stoneville!

    Upon arrival, you’ll notice Akka conversing with a Faewish Sprite named Gurubo! Make sure to give him the drink and comfort Akka to finish the quest and receive your first Sheet Music Fragment.

    Even though this quest concludes here, there’s still much more to accomplish before completing the entire questline. You’ll need to find additional music sheet fragments, which involves a bit more exploring and investigating in the Stonewoods area.

    The music sheet fragment will guide you toward the Abandoned District and the Wisteriasols located there!

    When you’re ready, head over to Barrel Home located on top of the Ripple Wine Cellar stonetree. Talk to Granny Lefty, a Piecey with a big white wig. She may have memory issues, but this will lead to several quests aimed at finding the lost music sheets.

    Unlocking the School Days Outfit

    School Days outfit collection screen.

    Here’s a table detailing each item in the outfit and the quest that unlocks it!

    First, you must complete the main quest Come on! Market of Mirth! to access this questline.

    Quest Name School Days Rewards
    She Doesn’t Believe She’ll Grow Up Bittersweet Memory


    Socks

    Pink & Blue


    Bottoms

    Seeds of the Past Have Sprouted Fearless Wanderer


    Shoes

    Anonymous of Great Adventurer? To the Future


    Backpieces

    A Love Letter to Earth Back to School


    Hairstyle

    At Least Plant One Flower Unfading Blooms


    Hair Accessories

    Ballade of Homeland’s Final Page Joyful Forever


    Tops

    Good news! You won’t have to craft the outfit items yourself; you will receive them directly as rewards.

    Once you have all the outfit pieces, you can upgrade them to enhance their stats. See below for the stats of each item:

    Outfit Piece Name Wardrobe Category Elegant Fresh Sweet Sexy Cool
    Back to School Hairstyle 33 (D) 165 (C) 325 (A) 46 (D) 32 (D)
    Joyful Forever Tops 39 (D) 129 (C) 260 (A) 30 (D) 42 (D)
    Pink & Blue Bottoms 39 (D) 129 (C) 255 (A) 39 (D) 38 (D)
    Bittersweet Memory Socks 19 (D) 51 (C) 98 (A) 18 (D) 15 (D)
    Fearless Wanderer Shoes 25 (D) 80 (C) 159 (A) 16 (D) 21 (D)
    Unfading Bloom Hair Accessories 13 (D) 38 (C) 81 (A) 9 (D) 9 (D)
    To the Future Backpieces 13 (D) 38 (C) 76 (A) 11 (D) 12 (D)
    Total Outfit Score 181 630 1,254 169 169
  • Every Kindled Inspiration Outfit in Infinity Nikki

    Every Kindled Inspiration Outfit in Infinity Nikki

    As you journey through Miraland in Infinity Nikki, you will meet numerous stylists seeking Nikki and Momo’s creative touch to help them discover the ideal outfits to meet their desires. They are in search of the unique inspiration that can only come from Nikki’s vast collection of clothes!

    Fortunately, we have gathered all the stylists who need assistance, allowing you to showcase your stylish ideas and earn rewards in the process. Whether it’s a chic pair of shoes or a fully styled ensemble, here’s a guide to the Kindled Inspiration quests and tips on how to finish them. The people of Miraland will be grateful for your help!

    All Florawish Kindled Inspiration Quests

    Within Florawish, several stylists are eager for fresh ideas. Luckily, Nikki and Momo are there to lend a hand. There are three Kindled Inspiration quests available, and each one is detailed below, along with the specific clothing item needed for completion.

    Map Quest Name Clothing Item Sketch Reward
    Kindled Inspiration: Yesteryear’s She Paper Crane’s Flight
    Dresses
    Nostalgic Blossom Sketch
    Quest 2 Kindled Inspiration: Blossom Walk Floral Stroll Sandals
    Shoes
    Breeze-Kissed Blooms Sketch
    Quest 3 Kindled Inspiration: Camouflage Wishful Pact Skirt
    Bottoms
    Starlit Night Sketch

    All Breezy Meadow Kindled Inspiration Quests

    The Breezy Meadow is a vast area within Wishfield, characterized by rolling landscapes and ample space. In this region, there are five Kindled Inspiration quests, stretching from the northern edges to the borders of the Heartcraft Kingdom. Here’s a list of each quest’s location and the clothing item required:

    Map Quest Name Clothing Item Sketch Reward
    Quest 4 Kindled Inspiration: Natural Design Woolfruit Growth
    Outerwear
    Hundred Daisies Sketch
    Quest 5 Kindled Inspiration: Fortune’s Favor Little Luck Socks
    Socks
    Lucky Knot Sketch
    Quest 6 Kindled Inspiration: Deft Exuberance Swift Leap
    Bottoms
    Gentle Sunshine Sketch
    Quest 7 Kindled Inspiration: Warm Protection Midnight Moon Gloves
    Gloves
    Crimson Snowstorm Sketch
    Quest 8 Kindled Inspiration: Animal Traces Mark of Life
    Tops
    Peace with Birds Sketch

    All Stonewoods Kindled Inspiration Quests

    The Stonewoods area includes Stoneville and the Abandoned District. Each of these locations hosts two Kindled Inspiration quests, for a total of four. Find below the quest details along with their respective requirements:

    Map Quest Name Clothing Item Sketch Reward
    Quest 9 Kindled Inspiration: Transformation Any hairstyle with a Simple label. Quick Ponytail Sketch
    Quest 10 Kindled Inspiration: Goodnight Signal Three pieces of comfy homewear:
    Dreamland Marathon Top,
    Late Slumber Bottoms,
    One More Minute Slippers.
    Heavy Eyelids Sketch
    Quest 11 Kindled Inspiration: Perfect Pair Any dress with a Pastoral label. Natural Color Sketch
    Quest 12 Kindled Inspiration: Fragrant Reward Purple Thoughts
    Handheld
    Surprise Invitation Sketch

    All Wishing Woods Kindled Inspiration Quests

    The enchanting Wishing Woods are filled with curiosity, and the Faewish Sprites here could use some creative insight. They require an external perspective for styling guidance to create their new sketches, and Nikki is the perfect candidate to help them out.

    Only three Kindled Inspiration quests are found in the Wishing Woods, detailed below:

    Map Quest Name Clothing Item Sketch Reward
    Quest 13 Kindled Inspiration: Weave Fantasy Any two items with the Fantasy label. Bottle of Truth Sketch
    Quest 14 Kindled Inspiration: Glimpse of Sunset Glimpse of Sunset
    Eyewear
    Infinite Hope Sketch
    Quest 15 Kindled Inspiration: Super Waterproof Azure Ripples
    Headwear
    Gathering Drops Sketch

    Embarking on these quests will not only test your outfit creativity but also allow you to make a significant impact in Miraland. Good luck, and have fun styling!

  • How to Get Dawn Fluff in Infinity Nikki: A Step-by-Step Guide

    How to Get Dawn Fluff in Infinity Nikki: A Step-by-Step Guide

    In Infinity Nikki, there is a diverse range of materials to gather, from basic crafting items to the coveted Miracle Outfits like Wishful Aurosa or Silvergale's Aria. Among these is Dawn Fluff, a rare ingredient that can only be farmed once a day.

    Difficulty

    Moderate


    Duration

    5 minutes

    What You Need

    • Unlock the Wishing Woods

    Dawn Fluff is vital for crafting exquisite clothing items, but the game doesn’t reveal where to locate it. Not only do you need to unlock a later stage area, but you'll also need a delicate touch when attempting to gather this material. Here’s a detailed guide to help you obtain Dawn Fluff in Infinity Nikki.

    Where to find the Dawn Fox in Infinity Nikki

    You can harvest Dawn Fluff only once per day from the Dawn Fox. There is a single Dawn Fox in the expansive realm of Miraland, and its location may require some exploration.

    Step 1: Begin in the Wishing Woods, and teleport to the Desperation Orb Warehouse Warp Spire, which can be found in the northeastern part of the area.

    InFold Games

    Step 2: Follow the trail southeast until you reach a luminous grove featuring a tree with golden foliage. The Dawn Fox should either be nearby the tree or resting inside its cave.

    Golden tree of the Dawn Fox in Infinity Nikki.
    InFold Games

    How to collect Dawn Fluff from the Dawn Fox

    To collect Dawn Fluff, you can't just rush up to the Dawn Fox; you'll need to be stealthy to ensure it doesn’t flee.

    Step 1: Equip the Shrinking ability outfit called Starlet Burst to reduce your character's size. Then, maneuver Momo close to the fox. If the Dawn Fox has retreated into its cave, wait a few moments outside to allow it to feel safe enough to venture out.

    Shrinking outfit featured in Infinity Nikki.
    InFold Games

    Step 2: Once you’re close enough, switch to your Animal Grooming outfit, Bye-Bye Dust, and swiftly interact with the Dawn Fox by right-clicking. This will initiate the grooming process, allowing you to collect one piece of Dawn Fluff. If the fox becomes startled and runs away, revert to the Shrinking outfit and try again.

    Grooming the Dawn Fox in Infinity Nikki.
    InFold Games

    Keep in mind that you cannot fast-forward in-game time to gather additional Dawn Fluff; it follows real-time mechanics. To find out when you can groom the fox again, access your collections book via the map and locate Dawn Fluff. You will see a countdown indicator that specifies 'Refreshes after' with the remaining time displayed next to it.

  • Complete Guide to Finding All Scarlet Dream Sketches

    Complete Guide to Finding All Scarlet Dream Sketches

    In Infinity Nikki, there are countless clothing items hidden throughout Miraland. Each piece has its own unique background, and Nikki can collect them all to complete her wardrobe. One such outfit is the Scarlet Dream set, but you’ll need to earn each piece.

    Don’t worry! We’ve located all the necessary sketches for you, along with the materials required to assemble this outfit. This guide provides everything you’ll need to know to create this fashionable ensemble!

    Where to Find the Scarlet Dream Sketches

    The Scarlet Dream outfit consists of six unique pieces. Each sketch is hidden inside its own chest scattered across the land. All six are found within the Wishing Woods, which you’ll only access by advancing in the main storyline and crafting the Shrinking Ability Outfit.

    Be aware that some chests are defended by esselings, so prepare to battle!

    Here are the locations of all the sketches:

    Map Sketch Location
    Map location for the Scarlet Dream sketch 5.

    Gentle Curves Found north of the Wish Celebration Center in the woods.
    Map location for the Scarlet Dream sketch 1.

    Elegant Burgundy Use the Wishcraft Lab warp spire, then head northeast to find this chest behind one of the buildings.
    Map location for the Scarlet Dream sketch 6.

    Elegant Steps Outside the Swordsmith Ruins, check one of the ruined buildings for this chest. Be wary of squirrel guardians!
    Map location for the Scarlet Dream sketch 2.

    Binary Beads From the Shoal Slope warp spire, head west to the cliffs near the waterfall to find this chest surrounded by flowers.
    Map location for the Scarlet Dream sketch 3.

    Red Essence At the base of the Grand Millewish Tree, locate this chest among the rocks to the east.
    Map location for the Scarlet Dream sketch 4.

    Bringing Flowers Just south from the Flower Valley warp spire, this chest can be found among rocks by the waterfall.

    How to Get the Scarlet Dream Outfit

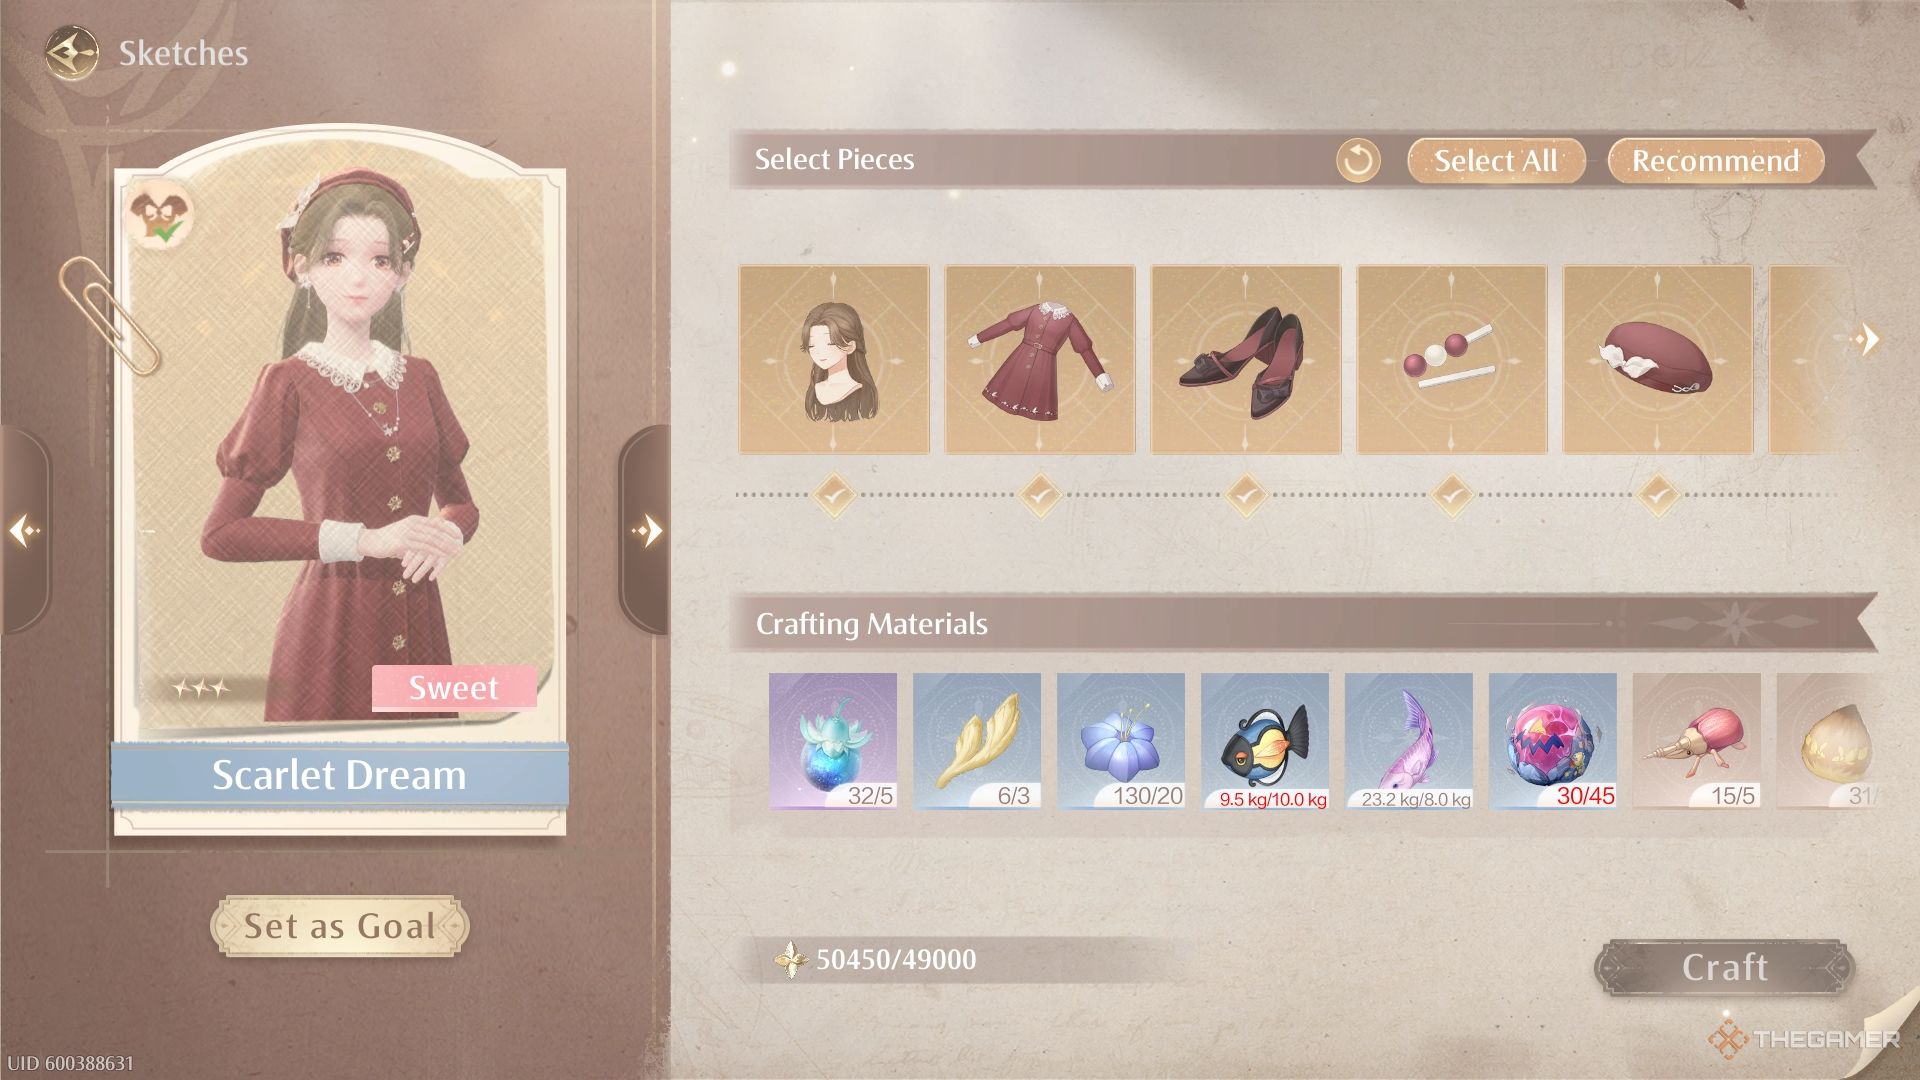
    Crafting the Scarlet Dreams outfit from the sketches menu, including a list of required materials.

    After collecting the sketches, it’s time to craft the outfit. To properly document it in the compendium, we recommend crafting each piece simultaneously. This will also unlock the ability to wear the entire set from your wardrobe. Below is the list of materials you need to craft the Scarlet Dream outfit:

    Material Name Amount

    Sol Fruit

    5

    Crown Fluff

    3

    Glimmergrass

    20

    Lampfish

    10.0kg

    Palettetail

    8.0kg

    Bedrock Crystal: Tumble

    45

    Mani Beetle

    5

    Wreath Fluff

    10

    Combelly

    14.0kg

    Buttoncone

    10

    Pin Hopper

    5

    Threads of Purity

    784

    Blings

    49,000

    Crafting the outfit allows you to wear it throughout Miraland, and it’s also eligible for use in Styling Contests. Each piece contributes to various stats to help boost your score, detailed below:

    Outfit Piece Name Wardrobe Category Elegant Fresh Sweet Sexy Cool

    Gentle Curves

    Hairstyle

    31 (D)

    45 (D)

    318 (A)

    155 (C)

    51 (D)

    Elegant Burgundy

    Dresses

    55 (D)

    68 (D)

    513 (A)

    267 (C)

    97 (D)

    Elegant Steps

    Shoes

    29 (D)

    14 (D)

    160 (A)

    78 (C)

    19 (D)

    Binary Beads

    Hair Accessories

    8 (D)

    10 (D)

    80 (A)

    41 (C)

    11 (D)

    Red Essence

    Headwear

    10 (D)

    14 (D)

    76 (A)

    37 (C)

    14 (D)

    Bringing Flowers

    Earrings

    14 (D)

    13 (D)

    73 (A)

    38 (C)

    13 (D)

    Total Outfit Score

    147

    164

    1,220

    616

    205

    You can further enhance these scores by upgrading the outfit!

  • Complete List of All Infinity Nikki 1.2 Livestream Codes

    Complete List of All Infinity Nikki 1.2 Livestream Codes

    The recent livestream for Infinity Nikki version 1.2 introduced a variety of exciting new features for Firework Season, along with a special reward code as a thank-you to the viewers. This code can be used in-game and typically provides items like Bling, Diamonds, and Shiny Bubbles, which can enhance your gameplay experience. It’s important to note that these livestream codes generally expire quickly, so be sure to redeem them as soon as possible to enjoy these exclusive rewards.

    During the stream, it was announced that Firework Season is set to launch right after Shooting Star Season concludes on January 23. This upcoming season will introduce new activities, Ability Outfits, and more. An update will roll out to incorporate these fresh elements into the game, allowing players to dive into the Lunar New Year celebration in Infinity Nikki once the maintenance period is over. In the meantime, don’t forget to take advantage of the available reward codes.

    All 1.2 Livestream Redeem Codes

    One Code for EN-Server Players

    For players on the English-speaking servers of Infinity Nikki, a new redeem code was shared post-livestream in the official Discord. While the codes revealed during the livestream are specific to CN servers, this one is tailored for EN players. The code and its associated reward, along with its expiration date, are detailed below:

    Code Reward
    HEARTFELTGIFTS Revelation Crystal x 10

    In addition to this code, more rewards are expected to become available with the upcoming update. Keep an eye on official Infinity Nikki channels for announcements. Meanwhile, make sure to complete any remaining quests related to Lucky Fishing Day, Pink Ribbon Eel, and Shooting Star Season, as they will no longer be accessible when Firework Season begins. Don’t forget that limited-time events and login bonuses will also come to an end.

    How to Redeem Codes

    In-Game Redemption Only

    Unlike many other games, Infinity Nikki requires players to redeem codes directly within the game, not through any external website. To redeem a code, open your Pear-Pal, navigate to "Settings," then "Other," and scroll down to the bottom. There, you’ll find an "Apply" button next to "Redeem Code." Click that to enter any codes you haven’t yet used.

    After entering the code, the rewards will be sent to your Mailbox shortly after. However, keep in mind that these rewards have a shelf life of 30 days, so claim them before the time runs out. Codes are a vital element in gacha games like Infinity Nikki, so make sure to utilize these free resources to enhance your gaming experience.

  • Mastering Every Risky Photography Quest: Your Ultimate Guide

    Mastering Every Risky Photography Quest: Your Ultimate Guide

    Infinity Nikki offers a plethora of quests, ranging from simple tasks to thrilling challenges, with the Risky Photography quests falling into the more straightforward category. While these may seem like less demanding activities, they still yield rewarding benefits. The game features 15 Risky Photography quests assigned to three distinct NPCs, and tackling them will unlock additional quests, keeping you engaged for a while. Fortunately, the quests aren’t overly difficult.

    In each Risky Photography quest, you’ll need to capture images of specific Esselings requested by the NPCs. Generally, Esselings will become aggressive if you approach them too closely, but there’s no need to worry. You can utilize the camera from a distance, and as long as the golden focus frame appears, your shot will count. You won’t need any special camera enhancements for these quests, although you can always take artistic liberties to snap a glamor shot of your favorite Esseling if you want. Regardless of your artistic approach, completing the quests ensures you will receive your rewards.

    Unlocking and Completing All Risky Photography Quests

    To begin your adventure in Risky Photography, you’ll first need to meet Syfdent, found at the ground level near the Dream Warehouse outside Florawish. He’ll initially ask you to photograph a nearby Sad Sack, which is easy to find and photograph using Momo’s Camera. After you capture the shot, return to Syfdent to claim your reward. The rest of the Risky Photography quests follow a similar format and can be found in various locations as detailed below:

    Number NPC Location Target
    2 Syfdent On the bridge south of the Meadow Activity Support Center A Greedy Pouch, typically found near the bridge.
    3 Styfdent Relic Hill ruins, by the Relic Hill Warp Spire A Jelly Pouch, located inside the ruins.
    4 Syfdent South of the Memorial Mountains, in a secret gazebo Photograph Octopacks shooting orbs at you, so be cautious of your health while capturing the moment.
    5 Syfdent Bridge northwest of the Meadow Wharf Warp Spire A Sankious can be found on the lake shore; capture a shot of it jumping by agitating it first.
    6 Syfdent Abandoned Fanatic Wisher Camp Warp Spire, by the lake Capture a Sssack losing its target at night by hiding and shooting as the "?" appears above its head.
    7 Syfdent Florawish Stylists Guild Use a Warp Spire to enter the Realm of the Dark and face any Bouldy challenge, capturing a picture during the encounter.

    Once you’ve completed all of Syfdent’s tasks, you’ll unlock four more quests from Alfred, located in Stoneville and the Abandoned District. Head to the northern side of Stoneville to start Alfred’s quests as follows:

    Number NPC Location Target
    8 Alfred On the bridge southwest of the Dye Workshop in Stoneville Take a photo of a Bitey Bag in the rain. Use "Run, Pear-Pal!" to change the weather.
    9 Alfred On the Stonetree northeast of the Dye Workshop Capture a Hard Sack that is looking at you. Get its attention to ensure you get your shot.
    10 Alfred On the Stonetree south of the Besides the Golden Fields Warp Spire Photograh an Octopack shooting orbs at dusk; you’ll need to skip time to accomplish this.
    11 Alfred Near the Stonecrown Peak Warp Spire Get a shot of Caged Greed spinning and chasing an enemy. Approach to aggro then snap the photo as you move away.

    After wrapping up all of Alfred’s requests, Mamoda’s Risky Photography quests will become available in the Wishing Woods. Here are her quests:

    Number NPC Location Target
    12 Mamoda At the farm northeast of Timis’s Beauty Lab Warp Spire Capture a sleeping Trick-O-Bag without waking it.
    13 Mamoda Northeast of the Grand Tree, near the Desperation Orb Warehouse Warp Spire You’ll need two Trap Sharks in the same frame for this shot. Avoid getting too close.
    14 Mamoda Southwest of the Grand Tree near Swordsmith Ruins Warp Spire Capture a stunned Harsh Sssack by baiting it near a Windaze Bloom, then attacking the Bloom.
    15 Mamoda The Grand Miliwish Tree Photograph Chigda summoning vines during your battle. Wait for the right moment to get the shot.

    As you progress through the Risky Photography quests, they become increasingly challenging. However, by the end, you’ll hone your skills as a wildlife photographer. Be mindful of your health while shooting, but taking a break away from combat will allow you to recover. Always return to the NPC after completing a quest to collect your rewards.

    Rewards for All Risky Photography Quests

    Each Risky Photography quest grants the same set of rewards upon completion. After submitting your photos, you’ll receive 10 Diamonds and three Upgrade Packs. These packs can enhance features in Momo’s camera, such as new poses, lighting effects, and settings, allowing you to create stunning visuals that highlight the beautiful outfits characteristic of the Nikki series.

    After finishing all 15 Risky Photography quests in Infinity Nikki, consider diving into some late-game content or post-story missions. You can try crafting the new Silvergale’s Aria outfit or participate in the Shooting Star Season event. With ongoing and upcoming events in Miraland, there’s always something engaging to explore while you await the next update.

  • Shaping the Stardust of Memories

    Shaping the Stardust of Memories

    The Star-Wished Kisses event in Infinity Nikki is a new opportunity for players to unlock exclusive rewards. However, crafting Memory’s Stardust can be tricky if you’re not sure where to begin. Unlike other objectives in the game that lead straight to Lucky Star Shells, this particular task lacks clear instructions in the Starry Lake section of the event page. Fortunately, completing this mission won’t require an overwhelming time commitment.

    This challenge isn’t as daunting as some others in Infinity Nikki, such as figuring out how to obtain the Chic Elegance Outfit or locating all the Greedy Pouch spots. The Star-Wished Kisses event is an excellent chance to enhance your collection with unique items. Just remember to finish the objective before the event concludes on January 23, 2025, so you don’t miss out.

    How to Obtain Memory’s Stardust in Infinity Nikki

    Participate in the Event Campaign

    To craft Memory’s Stardust in Infinity Nikki, start by completing the "Truth and Celebration" mission within the Star-Kissed Wishes event’s limited-time campaign. This mission wraps up a small questline where Nikki and Momo prepare the residents of Florawish for the Wish Festival. After kicking off the event, you’ll need to tackle a few additional missions first.

    Playing through all three missions will only take about 25 to 30 minutes if you speed through conversations with NPCs. Specifically, you need to go through the quests titled "Good Decor, Bad Decor" and "Save the Wishing Nebula!" before finishing with "Truth and Celebration." These quests involve a straightforward series of interactions at various checkpoints, making it a manageable task. Once you complete these, you’ll receive the sketch for Memory’s Stardust, allowing you to craft it yourself.

    Crafting Memory’s Stardust

    Gather Materials

    After you have the Memory’s Stardust sketch in Infinity Nikki, you can access the "Rare Pieces" tab in the "Sketch" menu to start crafting. Like other outfits in the game, assembling Memory’s Stardust requires a collection of specific materials. You’ll need:

    • 3 Florapom Essence
    • 1 Bibcoon Furball Essence
    • 5 Bedrock Crystal: Plummet
    • 20 Starlit Plum
    • 40 Thread of Purity

    Depending on your play style, you may already have many of these materials on hand from your adventures. If not, you can easily find any missing items by checking the "Collections" menu. Ensure you complete "Truth and Celebration" before the Star-Wished Kisses event ends, and you’ll have the freedom to craft Memory’s Stardust whenever you’re ready in Infinity Nikki.

  • Unlocking the Choo-Choo Train: Your Guide to a Fun Ride!

    Unlocking the Choo-Choo Train: Your Guide to a Fun Ride!

    Infinity Nikki presents daily tasks known as Daily Wishes, allowing you to earn extra Diamonds on top of what you gain from redeeming active codes with other currencies. These Daily Wishes often involve various activities, like gathering plants or entering Challenge Realms. However, one task that can pop up may leave you scratching your head: riding the Choo-Choo Train.

    Your journey with the train begins in Chapter 5 of the main storyline, where you interact with the Pieceys. In this chapter, you encounter broken train components before reaching a functioning train. This leads to a challenge where you navigate obstacles to the engine car, only to find out you need to detach that car to free the rest of the train. After this sequence, discovering how to find and ride the train might not be straightforward.

    How to Locate the Choo-Choo Train

    Return to the Abandoned District

    To take a ride on the train, you’ll need to complete the train segment in Chapter 5 first. If you haven’t reached that stage yet, keep progressing through the main quests until you finish the repair sequence that starts with the quest titled “Ghost Train.” Once you finish that, visit the Choo-Choo Station Old Platform Warp Spire and talk to Blooming Flora, who can be found slightly west of the spire. This is where you’ll hop on the train after it’s repaired and ready for a ride.

    How to Unlock & Ride the Choo-Choo Train

    Complete “Home on the Rails”

    Blooming Flora initiates the “Home on the Rails” quest, which must be done to ride the train again. The first step of this quest is to gather parts at the repair station. Fortunately, you can use the Choo-Choo Station Repair Station Warp Spire to find the items you need to the south of the spire, inside the building by the tracks. When you arrive, Tippy will challenge you to prove you’re there for Flora, so respond to his questions with the following answers:

    • Back
    • Giovanni
    • Velvi and Raggy

    Once you convince Tippy, he will provide you with the necessary parts, and then you can go back to Flora. While she handles the repairs, she asks you to speak to Ol’ Fannypacky, who will be the train’s driver when it’s fixed. You’ll find Ol’ Fannypacky right next to the Choo-Choo Station Shipping Center Warp Spire.

    However, Ol’ Fannypacky is currently passed out, and you’ll need to assist Boldly-Going Nana in waking him up by supplying her with three Flight Fruits and two Wisteriasols. This combination will create a remedy to revive him. You can find both items scattered around the Abandoned District; Flight Fruits grow on trees, and Wisteriasols can typically be found on cliff edges. You may even have some Wisteriasols from gathering materials for the Wishful Aurosa Miracle Outfit.

    However, this alone won’t revive Ol’ Fannypacky. You’ll also need to follow him to the water and use Purifying Orbs to splash him. This will solve the problem, allowing you to return to Flora, who rewards you with a special hat that enables you to ride the train for free indefinitely. Now, you can ride the train by visiting the platform and jumping into the passenger car for a delightful sightseeing adventure.

    If you find the train isn’t showing up at the station, try logging out and back into the game. It may also seem like the train isn’t moving at first, but after a brief pause once you enter the passenger car, the train will start its journey. This delay likely gives players a moment to change their minds about the ride without having to warp out.

    Now, you’re all set to complete the train ride Daily Wish whenever it appears, or you can enjoy a leisurely trip on the train to take in the stunning scenery of the Abandoned District. After your rides, you may collect some extra Diamonds from your wishes and be ready to continue your quest for outfits like the Silvergale’s Aria Miracle Outfit. Here’s hoping that the next big update brings even more exciting adventures like the Choo-Choo Train and Astral Swan rides to Infinity Nikki.

  • Unlock the Stunning Day Outfit: A Complete Guide

    Unlock the Stunning Day Outfit: A Complete Guide

    In Infinity Nikki, you’ll discover a variety of unique outfits. Your styling abilities will be put to the test as you compete with other stylists, and success will earn you new sketches to enhance your collection.

    The Breezy Meadow, one of Miraland’s largest regions, features vast wheat fields that extend from Florawish to Stoneville. It’s a treasure trove of crafting materials and divine sketches that capture the essence of this golden landscape. Let’s dive into how to find and create the Beautiful Day outfit for Nikki.

    How to Obtain the Beautiful Day Sketches


    To create this charming outfit inspired by the Breezy Meadow, you first need to collect all the sketches. Unlike other sketches found in chests throughout the game, these designs can only be acquired by defeating competing stylists in the Breezy Meadow.

    Here’s a list of all the outfit components, including their individual stats, so you know what to expect from this ensemble.

    Since you earn the sketches by defeating factions in the Breezy Meadow, we’ve noted which stylist drops each sketch.

    Outfit Piece Name

    Wardrobe Category

    Elegant

    Fresh

    Sweet

    Sexy

    Cool

    Faction Member

    Corridor of Time

    Hairstyle

    327 (A)

    51 (D)

    157 (C)

    34 (D)

    32 (D)

    Rangers


    Anraki (Average)

    Classroom Hours

    Tops

    260 (A)

    30 (D)

    132 (C)

    44 (D)

    34 (D)

    Great Meadow


    Fatiqua (Average)

    Immersive Study

    Bottoms

    256 (A)

    46 (D)

    133 (C)

    38 (D)

    27 (D)

    Green Masks


    Cantore (Average)

    Midday Nap

    Socks

    104 (A)

    15 (D)

    51 (C)

    16 (D)

    14 (D)

    Green Masks


    Jacques (Average)

    Heartfelt Tribute

    Shoes

    156 (A)

    29 (D)

    76 (C)

    16 (D)

    23 (D)

    Rangers


    Rene (Average)

    Morning Greetings

    Hair Accessories

    76 (A)

    13 (D)

    36 (C)

    12 (D)

    12 (D)

    Great Meadows


    Pepsa (Average)

    Total Outfit Score

    1,179

    184

    585

    160

    142

    How to Create the Beautiful Day Outfit


    Nikki standing on a dirt path in the Beautiful Day outfit with a smile.

    After you’ve gathered the sketches you need, you can craft the outfit from the Stylish Outfits section of your sketch menu through Pear-Pal. Here’s a list of all the materials you’ll need to create the outfit:

    Material Name

    Amount

    Blossom Beetle

    2

    Florapom

    2

    Gogglebug

    2

    Grasspom

    5

    Hare Powder Essence

    2

    Longstocking Wool

    2

    Pin Hopper

    3

    Pony Curls

    1

    Quillfin

    3

    Sizpollen

    5

    Stallion Locks

    3

    Whisker Fish

    6

    Threads of Purity

    112

    Bedrock Crystal: Command

    8

    Blings

    9,000

    Keep in mind that this outfit can only be crafted once. Although it’s a three-star ensemble, it offers a stylish look to showcase your personal style in Miraland!

  • Unlocking the Starwish Echoes Outfit in Infinity Nikki

    Unlocking the Starwish Echoes Outfit in Infinity Nikki

    As you journey through Miraland with Nikki and Momo in Infinity Nikki, you’ll encounter a range of vibrant and enchanting locations. From the Florawish fields to the Stellar Fishing Grounds in the Abandoned District, every area offers its own charm. Choosing the right outfit for each setting can be tricky, but you have plenty of choices available.

    To get the outfit inspired by the Wishing Woods, you’ll need to put in some effort to show just how much you’ve explored the wilderness of Miraland. We’ll guide you through the steps to obtain the sketches and turn them into reality for Nikki, enhancing her skills as a Stylist!

    How To Unlock The Starwish Echoes Sketches

    To unlock these sketches, gather hundreds of Dews of Inspiration. Kilo the Cadenceborn will give you sketches for each level you complete from 17 to 24.

    These sketches will ultimately contribute to creating the Starwish Echoes outfit, inspired by the Wishing Woods. You’ll get to craft an ethereal dress and accessories that reflect the Faewish Sprites in their home environment.

    You will also unlock a sketch for a matching cloak for Momo!

    The main feature of this outfit is its “Sexy” attribute, and we’ve outlined the stats of each piece below:

    Outfit Piece Name

    Wardrobe Category

    Elegant

    Fresh

    Sweet

    Sexy

    Cool

    Eternal Hope

    Hairstyle

    61(D)

    204(B)

    61(D)

    432(S)

    52(D)

    Wishwoven Threads

    Dresses

    100(D)

    357(B)

    101(D)

    666(S)

    124(D)

    Tomorrow’s Wish

    Socks

    17(D)

    70(B)

    19(D)

    148(S)

    16(D)

    Tomorrow’s Dream

    Shoes

    31(D)

    108(B)

    20(D)

    222(S)

    24(D)

    Wishing Star

    Headwear

    15(D)

    54(B)

    15(D)

    104(S)

    10(D)

    Wishing Heart

    Earrings

    11(D)

    55(B)

    11(D)

    112(S)

    14(D)

    Circling Thoughts

    Bracelets

    13(D)

    56(B)

    16(D)

    107(S)

    10(D)

    Total Outfit Score

    248

    904

    934

    1,791

    250

    This outfit can be crafted twice, allowing you to evolve it and unlock a different color variation that maintains the original stats.

    How To Craft The Starwish Echoes Outfit

    Crafting menu showing every sketch for the Starwish Echoes outfit and the materials required to make it.

    Once you’ve gathered all the sketches, you can start crafting the outfit. While you can create each piece individually, it might be more efficient to tackle everything at once. Below is a list of all the materials you need to gather from the Wishing Woods to complete this stylish outfit!

    Be sure to pin the sketches as your goal so you can easily track the materials you still need!

    Material Name

    Amount

    Sol Fruit

    30

    Dawn Fluff

    2

    Ruffin

    12.0kg

    Maskwing

    5

    Crown Fluff

    3

    Glimmergrass

    10

    Palettetail

    8.0kg

    Bedrock Crystal: Plummet

    150

    Mani Beetle

    5

    Wreath Fluff

    8

    Combelly

    5.0kg

    Hooded Feather

    8

    Crowned Feather

    5

    Brusher

    15.0kg

    Bowtie Fluff

    5

    Threads of Purity

    550

    Blings

    44,000