Tag: Earn

  • Completing a Three-Star Win in Mario Kart’s Grand Prix & Knockout

    Completing a Three-Star Win in Mario Kart’s Grand Prix & Knockout

    Mario Kart World brings a fresh yet nostalgic twist to the beloved series, featuring a massive roster of 24 characters racing through intricate tracks. Mastering items, knowing the courses, and taking risks is crucial if you want to snag that top spot. Plus, there’s the exciting new Knockout Tour mode to keep things even more entertaining.

    If you’re aiming for three stars in every Grand Prix Cup and Knockout Tour, prepare for a real challenge. However, with the new jump mechanic, you’ll discover fantastic shortcuts and pathways that can give you the edge you need to finish first!

    How to Earn Three Stars in Grand Prix Mode

    Grand Prix mode in Mario Kart World features eight Cups, each with four tracks, totaling 32 unique tracks to race on. Your main objective is to finish at the top of the leaderboard to claim the Cup.

    For an added layer of challenge, you can earn Stars for each Cup based on how often you finish in first place. You can earn a maximum of three Stars in each Cup, which might initially seem tough but becomes manageable once you get familiar with the tracks.

    Achieving Three Stars requires finishing in first place in all four courses. If you drop to lower placements in even one track, you’ll have to restart the whole Cup to meet your goal. Learn more about the Star system below!

    Winning Three Stars at 150cc automatically gives you Three Stars for both 50cc and 100cc classes, saving you time from having to complete each class separately. This also applies to Gold, Silver, and Bronze trophies, so if you’re aiming for Gold, focus on Stars as well!

    How Stars Work in Grand Prix Mode

    Stars

    Points

    Requirement

    ⭐⭐⭐

    60 Points

    Finish first in all four courses in a Cup.

    ⭐⭐

    57 to 59 Points

    Finish first in at least three courses and second or third in one.

    54 to 56 Points

    Finish first in at least two courses and second in two; or finish first three times and place fourth or fifth once.

    How Points Work in Grand Prix Mode

    As shown above, Stars are awarded based on the points you accumulate in the Cup, depending on your placement in each race. If you’re aiming for three Stars, your placement is crucial—you need to finish first in all four courses. The table below explains the point system further!

    Placement

    Points

    Placement

    Points

    1st Place

    15 Points

    13th Place

    5 Points

    2nd Place

    12 Points

    14th Place

    5 Points

    3rd Place

    10 Points

    15th Place

    5 Points

    4th Place

    9 Points

    16th Place

    4 Points

    5th Place

    9 Points

    17th Place

    4 Points

    6th Place

    8 Points

    18th Place

    4 Points

    7th Place

    8 Points

    19th Place

    3 Points

    8th Place

    7 Points

    20th Place

    3 Points

    9th Place

    7 Points

    21st Place

    3 Points

    10th Place

    6 Points

    22nd Place

    2 Points

    11th Place

    6 Points

    23rd Place

    2 Points

    12th Place

    6 Points

    24th Place

    1 Point

    How to Earn Three Stars in Knockout Tour Mode

    A screenshot showcasing all but two of the eight Knockout Tour Rallies being completed with three stars at 150cc in Mario Kart World.

    Now that you’ve conquered all the Grand Prix Cups and scored Three Stars in each, it’s time to dive into the new Knockout Tour mode, where you’ll race through eight different Rallies, each featuring six courses, culminating in a grand total of 48 courses.

    To earn Three Stars in Knockout Tour, you need to place first in all six courses within a Rally. This task is significantly tougher than in Grand Prix mode, requiring your utmost effort and skill.

    Unlike Grand Prix mode, there’s no point system here. Your Stars are determined by how many courses you finish first in, with the last course serving as the final checkpoint. If you don’t win everything, you’ll receive no Stars, so keep that in mind!

    Just like in Grand Prix mode, achieving Three Stars at 150cc will grant you Three Stars for both 50cc and 100cc classes retroactively. So it’s worth going for Three Stars if you want that achievement across all classes. However, don’t put too much pressure on yourself to jump into 150cc if you’re not ready; you can always come back later!

    How Stars Work in Knockout Tour Mode

    Stars

    Requirement

    ⭐⭐⭐

    Finish first in all six courses in a Rally.

    ⭐⭐

    Place first in at least four courses in a Rally while winning overall.

    Finish first in at least two courses in a Rally while also winning.

    Gold Rally Trophy (No Stars)

    Win the Rally without finishing first until the last checkpoint.

    Silver Rally Trophy (No Stars)

    Finish in second place in a Rally.

    Bronze Rally Trophy (No Stars)

    Finish in third place in a Rally.

    No Rally Trophy (Checkmark)

    Finish anywhere from 4th to 20th place in a Rally.

    Knockout Tour Three-Star Tips

    Touring Rosalina in first place on the final course in Knockout Tour, with a crown on her head, indicating her placement in Mario Kart World.

    Knockout Tour is arguably the toughest mode in the entire series. Blue Shells can be deployed even when only four racers are left, making for a truly challenging experience.

    The key to success is to establish a solid lead early and keep it. While that seems straightforward, it can be easier said than done. It’s also important to save Mushrooms, Super Horns, Super Stars, and food items whenever you can to counter any incoming Blue Shells.

    To excel, we suggest looking for shortcuts and unique strategies for each track. Mastering wall rides and rail grinds can significantly boost your performance. While these techniques may require practice, they can be especially rewarding since many shortcuts are well-hidden!

    Focus on speed as your primary stat, followed by acceleration, as you can improve handling through track familiarity. Once you’ve chosen your character and Kart, getting three stars in every Rally should become a manageable task—hopefully!

  • Completing the Trophy of Trophies in Blue Prince: A Guide to Solving

    Completing the Trophy of Trophies in Blue Prince: A Guide to Solving

    In the gaming world, earning trophies and achievements is a common challenge, and Blue Prince follows suit. However, what makes this game unique is that you actually receive a trophy that you can display in your home’s Trophy Room.

    Achieving these rewards in Blue Prince can be quite challenging, primarily because you’re often dependent on a random generator when drafting your rooms. Despite the difficulty, each achievement is worthwhile, showcasing your dedication to the game.

    How To Unlock Every Trophy/Achievement


    Acquiring many of these trophies and achievements demands countless hours of gameplay, but the joy of earning a trophy for solving 40 dartboard puzzles or crafting every device makes it all worthwhile.

    Below, we present a comprehensive list of trophies available in the game along with helpful tips on how to unlock them.

    Trophy/Achievement

    Description

    Guide

    Inheritance Trophy

    Reach Room 46.

    This is your main objective, which will trigger the credit roll. However, it’s just the beginning, and this might be the first trophy you’ll earn.

    Full House Trophy

    Fill each available slot in your house with a drafted room.

    Ensure no space on the blueprint remains empty while drafting. You can effectively use Dead End Rooms to fill any gaps.

    Bullseye Trophy

    Solve 40 Dartboard Puzzles.

    The dartboard puzzle in the Billiard Room can be quite challenging, but succeeding will earn you a trophy after solving a total of 40 puzzles. Keep in mind that with each solved puzzle, the difficulty rises the next time you draft that room.

    A Logical Trophy

    Win 40 Parlor Games.

    This puzzle can be tricky, as guessing which box holds the gems is often necessary. If you get the chance to upgrade the room permanently, choose two keys instead of one to improve your chances.

    Trophy of Invention

    Fabricate all 8 Workshop Contraptions.

    There are eight contraptions available to craft in the Workshop, and obtaining this trophy requires you to build them all.

    Trophy of Drafting

    Win the Drafting Strategy Sweepstakes.

    To unlock this trophy, draft 20 Dead End Rooms in one day. Here are some strategies:

    • Use the Tomb as your outer room.
    • Activate the Draxus the Dead constellation for more Dead End rooms.
    • Consider drafting the Furnace.

    Trophy 8

    Resolve the enigma of Room 8 at Rank 8.

    Room 8 is more elusive than Room 46. Unlock it by solving the Gallery Puzzle, then proceed inside to tackle another puzzle that grants you a new trophy upon solution.

    Trophy of Wealth

    Purchase every item in the Showroom.

    The Showroom offers unique items that assist you in the game. Once you’ve bought every item at least once, this trophy will be awarded.

    Explorer’s Trophy

    Complete the Mount Holly Directory.

    This trophy can be earned by exploring and drafting every room and area available in the game.

    Dare Bird Trophy

    Reach Room 46 in Dare Mode.

    In the Mount Holly Gift Shop, buy the Swim Bird Plushie for 110 coins to unlock Dare Mode. To play in Dare Mode, start a new game on a different save file, completing daily dares for the trophy.

    Cursed Trophy

    Reach Room 46 in Curse Mode.

    Draft the Bookshop (available only when the Library is in your house), buy “The Curse of Black Bridge” for 40 gold to unlock Curse Mode. As in Dare Mode, you’ll need a new game on a different save file.

    Day One Trophy

    Reach Room 46 in one day.

    This trophy can only be earned in a new game file – if you reach Room 46 on your first day, you’ll unlock this trophy.

    Trophy of Speed

    Reach Room 46 in under an hour.

    If you’re up for a challenge, try to reach Room 46 in less than an hour!

    Trophy of Sigils

    Unlock all 8 Realm Sigils.

    This requires completion of the Sanctum Rooms, with one sigil designated for each realm.

    Ace the Classroom Final Exam

    Pass the Classroom Final Exam with flying colors.

    This exam can be surprisingly tough. Be sure to read any extra materials you find, especially on geography and history. Achieving a perfect score of 100% will earn you this trophy.

    Trophy of Trophies

    Complete the Trophy Case.

    This final trophy is awarded once you’ve unlocked all achievements and filled your Trophy Case in the Trophy Room, confirming your mastery over all trophies.

  • Completing Your Way to Free Desert Bloom Tokens in Oasis Riches

    Completing Your Way to Free Desert Bloom Tokens in Oasis Riches

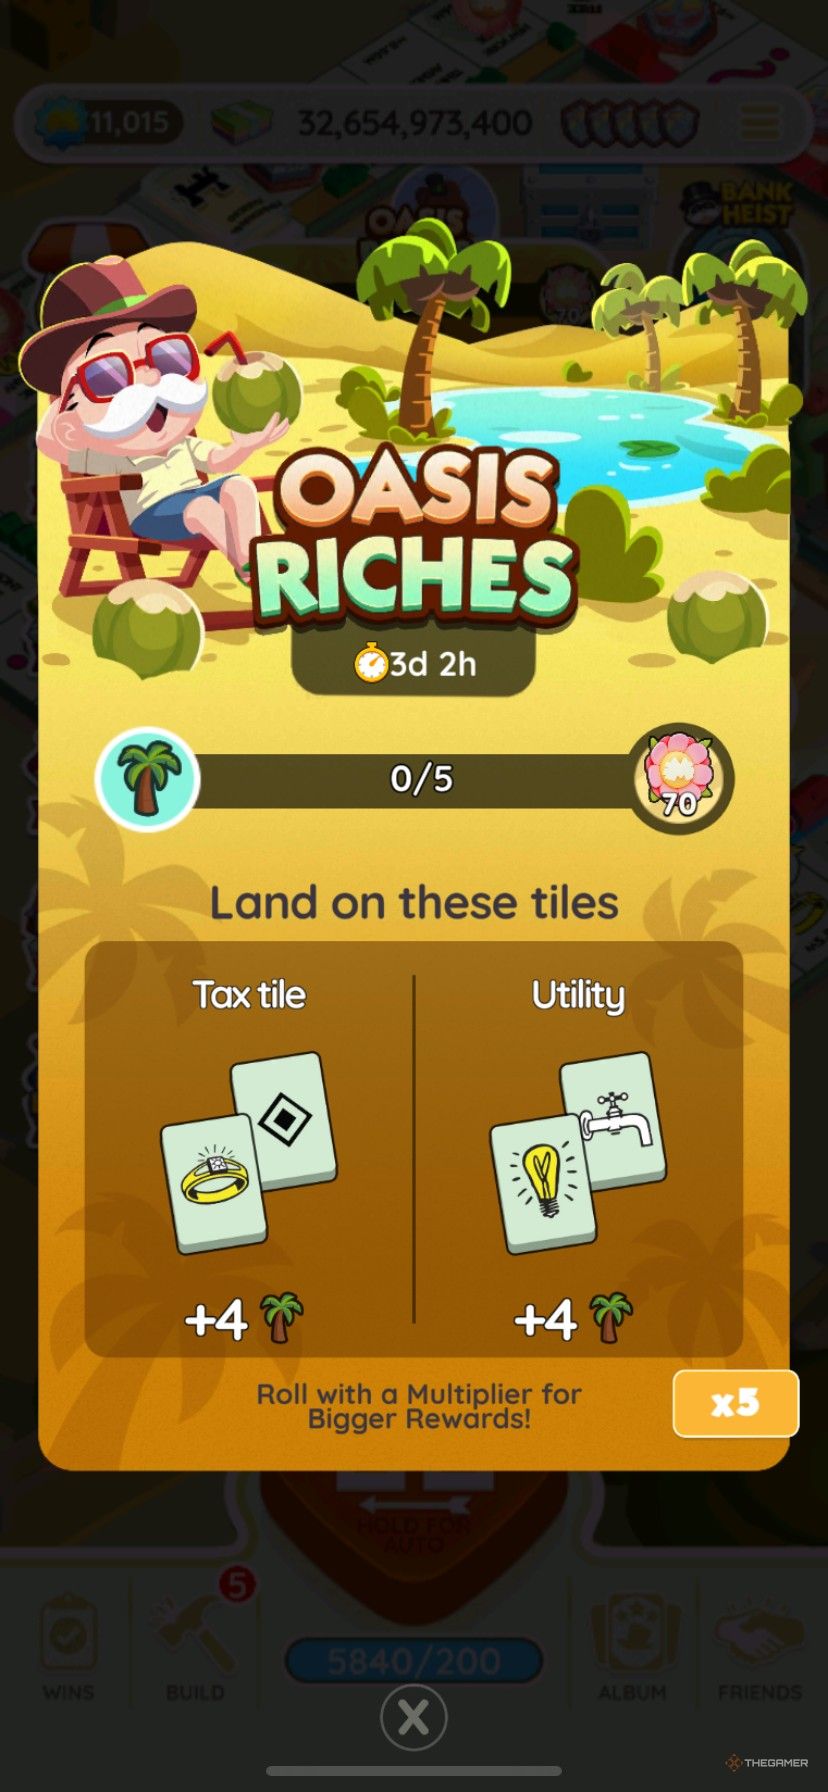
    If you and your team are still busy hitting the final goals during the partnership event this weekend in Monopoly Go, you can also look forward to the Oasis Riches event. This event runs from 1 PM EST on March 29 until 4 PM EST on April 1, giving you a chance to earn some extra tokens.

    The timing of the Oasis Riches event coincides with the partner event, and reaching a total of 62 event milestones will earn you over 3,400 free Desert Bloom Partners tokens. Plus, you’ll accumulate more than 17,000 dice rolls while you work through the milestones in Oasis Riches.

    How To Earn Rewards In Oasis Riches

    If you’re aiming to take part in the second center banner event that runs alongside the Desert Bloom Partners event for additional tokens, focus on landing on specific, harder-to-reach tiles, which earn you four points each:

    • Income and Luxury Tax may take some of your hard-earned cash, but they will reward you with Oasis Riches points.
    • Likewise, Water Works and Electric Company—the utilities on your Monopoly Go board—also grant points for the event.

    Since there’s only one tile on each side of your Monopoly Go board that provides Oasis Riches event points, consider boosting your dice roll multiplier if you think you will land on one of these spots. The four points from the event will get multiplied by your dice roll before adding to your Oasis Riches point total, so it could be worthwhile to take the risk if you have enough dice to make it worth it.

    The main rewards you can earn during the Oasis Riches event in Monopoly Go are focused on free Desert Bloom Partners tokens. Out of the 62 milestones in the event, 14 grants more than 3,400 free tokens, with the final payout occurring at milestone 53. Additionally, you’ll receive some sticker packs, a few flash event triggers, and over 17,000 free dice rolls as you progress.

    Every Oasis Riches Reward And Milestone In Monopoly Go (March 29-April 1)


    Milestone Points Required Oasis Riches Rewards
    1 5 70 Desert Bloom Partners Tokens
    2 10 25 Free Dice Rolls
    3 15 Cash Reward
    4 25 Green Sticker Pack
    5 50 50 Free Dice Rolls

    Your cash rewards for the Oasis Riches event, marked as “Cash Reward” in the table, are relative to your current net worth. You can increase this worth by upgrading buildings on your Monopoly Go boards as you progress. Keep in mind that the cost to upgrade will rise as your net worth increases, which is a fair trade-off to generate income.

  • Earn Lizard Tokens and Free Dice Rolls in Desert Bloom Partners

    Earn Lizard Tokens and Free Dice Rolls in Desert Bloom Partners

    Get ready for an exciting partner event this weekend in Monopoly Go as we wrap up March with lots of fun, collaboration, and hopefully some great prizes. Team up with four other players to accumulate rewards from March 27 at 1 PM EST to April 1 at 4 PM EST.

    As you progress alongside your four Desert Bloom Partners, you will unlock milestone rewards. If you complete all four builds, you will be rewarded with an abundance of prizes! The top prize includes a charming new board token and your choice between a Swap Pack or a Wild Sticker.

    How to Play Desert Bloom Partners


    Collect Flower Tokens While Teaming Up

    Before you can join the Desert Bloom Partners event, you need to earn free Desert Bloom Partners Tokens by participating in other activities in Monopoly Go. Here’s how you can do that:

    • Compete in the daily leaderboard tournaments. Not only will you earn tokens from milestone rewards, but the top players will receive a payout in tokens when the tournament concludes.
    • Complete tasks in the center banner tournaments. These appear below your cash total on the main screen and, while not refreshed as frequently as the daily tournaments, offer more rewards—62 milestones in total!
    • Collect your free items from the in-game store every eight hours. You’ll typically receive free dice rolls but may also get cash, sticker packs, or a steady supply of Desert Bloom Partners tokens.
    • Accomplish your daily quick win goals during tournaments. These goals reset daily at 9 AM EST and involve simple tasks, providing a handful of Desert Bloom tokens to assist you.
    • Receive tokens from partners when they land on the “Partner” tile during their spins. You will send some tokens to them when you land on this tile as well.
    • Land on special properties displaying the flower token icon on the board. These typically grant you one token, but the amount increases depending on your dice roll multiplier.

    While gathering these tokens, you’ll need to select four other players to team up with during the event. Each partnership operates independently, but completing all four builds will earn you a grand prize.


    Earning 200 free dice rolls from Desert Bloom Partners milestone rewards in Monopoly Go.

    Since you don’t want to handle everything by yourself, it’s a good idea to partner up with more active friends during these events in Monopoly Go. Remember, you cannot un-partner once you’ve confirmed an invitation, so be thoughtful in your selection!

    Spin the Roulette Wheels for Rewards

    After forming your partnerships, you can start rolling for points in Desert Bloom Partners by accessing the event screen, selecting a partner to boost their score, choosing a multiplier, and spinning a roulette wheel. The point values on the wheel increase as you raise your multiplier.

    While most wedges are fairly average, watch for some exciting options. Pink wedges deliver moderate points, but the real treat lies within the sparkly golden panels, which yield significantly higher points. Additionally, keep an eye out for the tiles that send tokens to your partners while contributing to your score.

    As you and your partners collaborate to build your project, you will receive five milestone rewards for each partnership for reaching set point goals. While every partnership shares the same five milestones to aim for, extra rewards are a plus!


    Landing on a golden panel in Desert Bloom Partners in Monopoly Go.

    If you successfully complete all four partnerships, you will receive a grand prize. This includes 5,000 free dice, a board token shaped like a cute lizard, and your choice of either a Wild Sticker or a Sticker Swap Pack, a valuable asset for completing the current sticker album season.

    Rewards in Desert Bloom Partners (March 27 – April 1)

    Milestone

    Points Required

    Desert Bloom Partners Prizes

    Per Partnership

    1

    2,500

    2

    8,500 (+6,000)

    3

    21,500 (+13,000)

    • 200-300 Free Dice Rolls
    • Cash Boost, 10 Minutes
    • Cash Reward

    4

    48,000 (+26,500)

    • 300-500 Free Dice Rolls
    • Yellow Sticker Pack
    • Mega Heist, 20 Minutes

    5

    80,000 (+32,000)

    • 400-600 Free Dice Rolls
    • Blue Sticker Pack
    • Builder’s Bash, 30 Minutes
    • Cash Reward

    Grand Prize

    • Lizard Board Token
    • Wild Sticker or Sticker Swap Pack
    • 5,000 Free Dice Rolls

    As always, the cash rewards you earn for each milestone depend on your current net worth. To maximize your earnings, focus on developing your properties on the Monopoly Go board, and watch your wealth grow. Remember, it takes effort and investment to see the returns!

  • Unlocking the Champion Title in Destiny 2: A Complete Guide

    Unlocking the Champion Title in Destiny 2: A Complete Guide

    Destiny 2’s Season of Defiance is concluding with the Guardian Games, an annual spring competition where the three character classes battle to prove which is superior. In addition to new playlist activities, players can earn fresh weapons and this year’s Champ title. If you’re seeking an achievable title to add to your collection, the Champ title is definitely worth considering.

    For players willing to engage in Guardian Games activities, acquiring the Champ title is one of the easiest challenges in Destiny 2. All you need to do is participate in Guardian Games playlist activities, collect Crests, and deposit medals to unlock this unique title.

    Updated March 12, 2025: The Champ title has received some new challenges this year, which include completing Rushdown boss rushes. This guide has been refreshed to include these new challenges, along with the specific requirements for each Triumph.

    In It To Win It

    Complete a Medallion from the activities, then bank it at the podium in the Tower to receive rewards and class points.

    This Triumph is likely already complete for most players, as it requires you to simply bank a Medallion. This step is part of the introductory quest for Guardian Games, so everyone will complete this task.

    Medallion Triumphs

    Bank Medallions at the podium in the Tower, with higher-rank Medallions providing more points.

    There are four Triumphs focused on banking Medallions during the Guardian Games event:

    • Bronze: Bank medals worth 100 points.
    • Silver: Bank medals worth 200 points.
    • Gold: Bank medals worth 300 points.
    • Platinum: Bank medals worth 400 points.

    Regardless of their names, all medals contribute progress towards these Triumphs. While Bronze medals provide the least points, Platinum medals offer the most. It’s advisable to farm Platinum Cards from Eva Levante to expedite this process. Neptune Contender Cards are particularly efficient. Complete a card, earn medals through the Guardian Games playlists, then deposit all your medals at the Tower podium until you reach 400 points. Keep in mind that points are bound to your account, allowing you to switch characters if needed.

    In The Cards

    Completing Contender Cards and Platinum Cards acquired from Eva Levante counts towards your progress.

    Contender Cards are special bounties you can buy during the Guardian Games event. These cards require you to finish specific activities, often involving kills with particular elemental weapons or abilities. You need to complete 15 Contender Cards to finish this Triumph.

    One of the easiest cards to complete is the Trials of Osiris card, as participation in the Guardian Games: Supremacy playlist contributes progress. PvE players can also choose to complete seasonal activity cards or Diamond Cards if they’re playing with a well-coordinated clan.

    Boss Breaker

    Defeat bosses in the Rushdown playlist.

    For this Triumph, you need to take down bosses in the Rushdown playlist. Note that practice mode does not count; only the ranked games do. Because this is a boss rush format, you’ll accumulate plenty of progress with each Rushdown clear. Make sure to bring a strong loadout and a high DPS weapon, and you should finish this quickly.

    Elements Of Victory

    Defeat enemies using elemental abilities or weapons.

    Pull Some Strings requires that you take down enemies with any elemental damage type during Guardian Games. Any non-Kinetic kills will help progress this Triumph, even those achieved outside of Guardian Games playlists. By utilizing an elemental Primary weapon or an ability-based build, this challenge should resolve itself.

    Ability builds tend to excel in PvE content, so consider checking out build guides to optimize your effectiveness.

    Good Games

    Defeat targets in Supremacy or Guardian Games playlists.

    To meet the criteria for Good Games, you must eliminate 800 enemies within the Guardian Games PvE playlist or Supremacy matches. It’s highly recommended to farm Guardian Games Nightfalls for this task. A weapon with good crowd control like Trinity Ghoul, or any gun featuring Voltshot, can make this process more efficient.

    Class Pride

    Finish Supremacy or Guardian Games playlist activities through special matchmaking.

    Class Pride should complete itself as long as you’ve participated in the event. This requires you to complete ten Supremacy matches or Guardian Games Nightfalls. All relevant playlists can be found in the Tower map within your Director. We find that Supremacy matches tend to be quicker, but choose whatever playlist you enjoy. You’ll need to play in both at some point to earn this title.

    Friendly Rivalry

    Complete matches in Crucible, Gambit, or Supremacy.

    To progress in Friendly Rivalry, you need to finish six Crucible, Gambit, or Supremacy matches during the Guardian Games event. Winning isn’t necessary for progress. Since you’ll also need to earn points in Supremacy for another title’s Triumph, we suggest focusing your efforts there.

    Worlds Championship Tour

    Complete activities in locations like Blind Well, Altars of Sorrow, Empire Hunts, Wellspring, Partition, and Terminal Overload.

    This challenge asks you to perform activities linked to specific destinations. Pretty much any exclusive activity tied to a location will count for credit. We recommend farming Altars of Sorrow or Terminal Overload, as these are conducted in patrol spaces and allow more players to join and assist you.

    For skilled players, consider equipping a Strand subclass and speedrunning Empire Hunts on Europa. Although these tasks resemble Strikes, they tend to be slightly shorter. Bring a strong loadout to defeat the boss quickly, and you should be able to finish this Triumph across just a few runs.

    Circuit Training

    Complete Dares of Eternity, Vanguard Ops playlist activities, or Defiant Battlegrounds.

    The API for this challenge indicates you need to finish a whopping 1,200 playlist matches, but it’s significantly less required for in-game progress. Circuit Training entails completing Dares of Eternity, Vanguard Ops, or Defiant Battlegrounds matches. Since Guardian Games playlists also count, we recommend farming the Guardian Games PvE playlist, including both Recreational and Competitive modes.

    Noble Expert

    Achieve ten completions in Rushdown at any level of difficulty.

    To meet Noble Expert, you must finish ten Rushdown runs, either on Normal or Expert; Practice mode won’t count. To receive full credit, you need to clear the activity, which means defeating five bosses consecutively. Equip a strong boss DPS weapon to ensure efficient clears.

    Crest Collector

    Collect enemy crests in Supremacy matches for points.

    You need to pick up 50 enemy crests in the Supremacy playlist to complete this Triumph. Remember, allied crests do not contribute, so focus on grabbing enemy (red) crests. If you prioritize collecting crests during matches, you should accomplish this goal within two to three rounds.

  • Maximize Your Earnings at The Gift Stop in Two Point Museum

    Maximize Your Earnings at The Gift Stop in Two Point Museum

    Creating a gift shop is one of the first tasks you’ll want to undertake in Two Point Museum. It serves as a vital revenue stream from the start, particularly during tougher campaign levels, and your visitors will appreciate having it.

    While it’s easy to set up a basic shop with minimal items and a single staff member, you’ll soon notice that guests will be eager for a wider selection and a more spacious environment to shop in. Failing to provide this will limit your earnings and reduce your museum’s appeal. Here’s how to elevate your gift shop from drab to fabulous.

    Understanding Gift Shops

    A gift shop is an essential part of any museum as it generates consistent income, particularly in the early stages when visitor numbers and donations are still low. Moreover, a well-stocked shop boosts your museum’s overall rating and enhances guest satisfaction.

    Guests can purchase one of six merchandise types, which you can price at your discretion. The options include Trinkets, Plushies, Posters, Onesies, Books, and Toys. Each item represents a unique type of merchandise, and you can choose its theme from the same six categories used for exhibits.

    Staffing Your Gift Shop

    Your gift shop will only require staff members called Assistants. At a minimum, it should contain one entrance, one Checkout Counter, and one Trinket Stand. Here are some key points to keep in mind:

    • The shop must be at least four by three tiles in size.
    • Building it will cost a minimum of $7,500, covering construction and the essential items.
    • While guests typically won’t litter in a gift shop, you may lose points if you don’t provide a Trash Bin.

    Tip: It’s beneficial for Assistants to have skills in Customer Service, Guest Happiness, and Aerodynamics, as these can improve checkout efficiency and merchandise restocking.

    To maximize your shop’s appeal, stock a diverse range of merchandise that aligns with the themes of your exhibits.

    Enhancing Your Gift Shop

    There are various strategies to improve the functionality and profitability of your gift shop, many of which involve changing the products sold and expanding the shop’s size. You can also personalize the flooring and wall designs through the Room Customization option in the shop’s settings.

    Just like every other room, your gift shop has a Room Rating of up to five, which you can enhance by adding more merchandise, placing Trash Bins, and incorporating decorations that fit the shop’s theme.

    Increasing Room Capacity

    One straightforward way to increase your gift shop’s effectiveness is by boosting its capacity. A smaller room can accommodate fewer guests, limiting sales opportunities. To expand the shop, select the Edit Room option from the information menu.

    Room capacity is determined by the number of tiles; every two tiles added increases capacity by one. While there’s no maximum size, aiming for 16 to 25 capacity is ideal for large museums.

    More space allows for additional Assistants to be assigned, though each must have their own Checkout Counter to process sales. Assistants can still help with restocking if they are not given a Checkout Counter.

    Adjusting Merchandise Selection

    A great way to enhance your gift shop includes evaluating and changing the available merchandise. Different guest types have varying preferences; for instance, professors tend to favor Bookcases and Poster Stands over other items.

    You can discover what types of merchandise guests prefer by consulting the Guests section of your Sticker Book.

    Given that each Campaign has an overarching theme, tailor your gift shop to fit the types of guests frequenting your museum, which can significantly boost profits.

    Here’s a quick overview of guest types and their favored merchandise:

    Guest Type Most Preferred Merchandise
    Standard Guest Toy Stand, Bookcase, Poster Stand
    Supernatural Enthusiast Trinket Stand, Bookcase
    Science Enthusiast Toy Stand
    Goth Toy Stand, Bookcase, Poster Stand
    Frogborne Toy Stand, Bookcase, Poster Stand
    Cheese-Monger Toy Stand, Bookcase, Poster Stand
    Space Enthusiast Toy Stand, Bookcase, Poster Stand
    Space Gibbon Toy Stand, Plushie Stand, Onesie Stand
    Marine Life Enthusiast Poster Stand, Plushie Stand
    Botany Enthusiast Poster Stand
    Wetlantean Toy Stand, Bookcase, Poster Stand
    Yeti Poster Stand
    Professor Bookcase, Poster Stand
    Tourist Trinket Stand, Bookcase
    Children Onesie Stand, Toy Stand
    Clown Poster Stand, Plushie Stand
    Caveman Poster Stand, Plushie Stand
    Vampire Poster Stand, Plushie Stand

    Crafting a Multi-Theme Gift Shop

    Depending on your campaign level and the size of your museum, having a single theme for merchandise may not suffice. If your exhibits encompass both Prehistory and Marine themes, for instance, a one-theme shop could limit profits by failing to attract a diverse guest base.

    Once you have at least two themes in your museum, expand your gift shop and assess which types of guests you are attracting. You can use the Sticker Book to check their preferences and then adjust your merchandise selection accordingly.

    If you’re organizing specific themes in separate areas of the museum, consider setting up multiple gift shops, each dedicated to one theme, allowing for more specialized inventory and staff.

    Through careful planning and attention to your guests’ preferences, your gift shop can become a thriving hub in your museum, enhancing both visitor experience and your revenue stream.

  • Maximize Rewards in Love and Deepspace’s Abyssal Splendor Event

    Maximize Rewards in Love and Deepspace’s Abyssal Splendor Event

    Love and Deepspace: Exploring Charon’s Mysteries

    In "Love and Deepspace," players will delve into the intriguing area of Charon within the N109 universe. Your main quest focuses on locating a mysterious cursed stone that Sylus wishes to acquire, raising questions about the stone’s true nature and its significance to Sylus.

    The event titled Abyssal Splendor presents an adventure packed with multiple investigative phases throughout Charon, with Sylus serving as both your protector and somewhat reluctant guide. During this event, players have the chance to collect unique event memories and put Sylus’s new combat companion, Sylus: Abysm Sovereign, through its paces.

    Event Details

    The Abyssal Splendor event is limited to a specific time frame, running from December 02 to 4:59 December 16. It’s essential to remember that items and rewards will only be available during this period.

    Getting Started with the Event

    To kick off your experience in Abyssal Splendor, simply head over to the events tab, and the event’s prologue will begin upon your entry.

    The Abyssal Splendor event also coincides with Where Drakeshadows Fall, a limited-time Wish Pool. Each section of the event allows you to gain rewards and memories that enhance Sylus’s ongoing narrative arc.

    How to Progress through Gem Hunting

    A significant component of the event involves completing Gem Hunting stages, structured like previous investigations in "Island Secrets" and "Chansia Journey." These stages consist of brief textual exchanges paired with story-board-style visuals.

    Players will navigate through two sets of Gem Hunting stages: Charon: East and Charon: West, each featuring twelve exploration locations.

    Important Note: You will need Tracking Bands to participate in any investigative phase.

    Acquiring Tracking Bands

    You can obtain Tracking Bands, which act as currency for unlocking investigation levels. To access all stages of the event, you’ll need a total of 24 Tracking Bands, each costing one band to unlock.

    How to Earn Tracking Bands:

    Tracking Bands can be earned through milestones in the Event Tasks section. For every several hundred Encrypted Keycards you collect, you’ll gain one Tracking Band. With diligence, you can secure multiple bands within a few days, particularly by consistently completing event tasks.

    Unlocking Story Stages

    The event features three story stages. The initial stage is part of the prologue you experience when entering the event. To unlock the subsequent stages, you need to complete all investigations in Charon: East and Charon: West.

    Investigative Locations in Charon

    Each section—Charon: East and Charon: West—holds twelve investigation locations, each requiring one Tracking Band. The stages typically alternate between visual images and short dialogues. Completing all investigations in Charon: East triggers chapter two of the event story, along with a comic-style collage summarizing your findings.

    Rewards and Shop Mechanics

    Alongside the investigations, players can accomplish various Event Tasks, which include drawing memories from the event pool and daily logins. As you complete these tasks, you’ll gather Encrypted Keycards for purchases in the Deal Shop, where valuable resources and event-exclusive items await.

    Current and Upcoming Events

    During the Abyssal Splendor event, the Wish Pool, Where Drakeshadows Fall, will be available, allowing players to draw Sylus’s myth memories from December 02 through December 16. It’s crucial to pull at least one copy of both myth memories to fully engage with Sylus’s new storyline.

    After the Abyssal Splendor features wrap up, there’s a new World Underneath Story titled Mischief, focusing on the adventures of twins Luke and Kieran. This can be explored from the main story menu’s World Underneath Tab.

    In summary, the Abyssal Splendor event in "Love and Deepspace" presents an exciting opportunity to explore rich narratives, uncover mysteries, and interact with new gameplay mechanics.

  • Quick Ways to Earn Magla in Farmagia

    Quick Ways to Earn Magla in Farmagia

    Quick Links

    Like many role-playing games, Farmagia features a unique currency called Magia. You’ll need it to purchase fertilizers that enhance the growth of your Buddies on the farm. Magia is also essential if you plan to craft or buy treats for your pals, as this keeps them enthusiastic during training, resulting in better outcomes.

    There are several easy ways to earn Magia in the game. Just keep in mind a few strategies while navigating Mazes or enjoying casual gameplay. Be sure to accept quests before going out to do any tasks; this will help you gather extra cash.

    How to Complete Magia Challenges

    While exploring the Mazes, you’ll notice several Magia Challenges on your screen’s right side. By completing these tasks, you’ll earn additional Magia. These challenges are generally straightforward, especially if you’ve developed your combat skills within the game. Finishing all the Magia challenges can earn you approximately 2,000 Magia.

    Some tasks might involve executing a Perfect Guard or using a Fusion Summon. At times, you may need to assist your KO’d Battle Buddies or defeat enough enemies to unlock Fairy Dens.

    Selling items at the magic shop in Farmagia.

    Exploring the Mazes is quite rewarding as you will collect numerous monster drops and raw materials. These can be utilized to craft useful resources, and you can sell surplus items for quick Magia.

    Defeating stronger monsters yields better drops, and you can also gather items by bonding with Elementals at the Shrines. Make sure to open Item Vines while exploring for additional crafting materials and items.

    Completing Quests

    The Turnie Harvest request guide displayed in the quest menu.

    Once you unlock the Shuffling Sheep, you can begin undertaking various quests that provide substantial rewards. You will not only accrue a large amount of Magia but also gather rare and valuable items.

    Keep an eye out for Restricted Quests that require you to use only the Buddies specified in the quest. While these can be tough to complete, the rewards are well worth it. Completing a restricted quest will net you at least 10,000 Magia.

    Defeat Strange Creatures

    A strange creature has appeared in Farmagia.

    Occasionally, you may encounter Strange Creatures while navigating the Mazes. It’s crucial to defeat them quickly since doing so rewards you with valuable items and Magia.

    If a strange creature drops a seed, you can grow it at your farm. This will not only grant you extra Magia but also additional materials.

    Growing Buddies

    The protagonist has grown some Turnies at the farm.

    Defeating monsters in the Mazes will yield Research Buddy seeds. Harvesting them on your farm provides a significant amount of Magia and Research Points. Some larger Buddies can yield around 10,000 Magia once fully grown.

    Harvesting your surplus Battle Buddies also grants you a substantial amount of Magia.

    Enhancing your farm with research notes allows you to create a larger plot for growing your Buddies. Consequently, the harvest from these larger spaces can yield significant rewards. If you cultivate a rich produce, you could earn around 2,000 to 3,000 Magia from collectively reaping your Buddies.