الوسم: Baldur's Gate 3

  • Baldur’s Gate 3: Solving the Abandoned Cistern Sluice Puzzle

    Baldur’s Gate 3: Solving the Abandoned Cistern Sluice Puzzle

    The Abandoned Cistern Puzzle might easily slip under the radar in Baldur’s Gate 3, but those following the adventures of Jaheira and Minsc are likely to stumble upon it. If you’ve encountered the Stone Lord in the Counting House, you’ll recognize the moist, shadowy parts of the Lower City where this puzzle is located. Completing it is necessary for progressing certain companion questlines, making it essential to tackle at some stage in your journey.

    Jaheira and Minsc are characters from earlier Baldur’s Gate titles, and their questline is a nod to long-time fans of the series. To kick things off, be sure to recruit Jaheira during Act 2, as her presence adds a unique touch to your adventure and opens the door to what many consider the ultimate conclusion of the sluice-gate puzzle quest.

    How to Begin the Abandoned Cistern Puzzle

    Head Down Into the Lower City Sewers

    To start the Abandoned Cistern Puzzle, you need to follow Minsc as he leads you into the sewers after confronting him at the Counting House. This quest is connected to Jaheira as you and your party delve into the mystery of the Stone Lord in Baldur’s Gate. Expect tougher battles during this segment as it takes place in Act 3, unlike the earlier quests.

    Related

    One Baldur’s Gate 3 Plot Hole Prevents Minsc And Jaheira From Being Gods

    Minsc and Jaheira aren’t as powerful as they should be in Baldur’s Gate 3. Here’s why, and what it would look like if the game took a different route.

    After you’ve faced the Stone Lord at the Counting House and have been tasked with recovering the lost treasures from the vault, you should investigate the vault. If you succeed in an Investigation check, a party member may mention the city’s sewers. You can access the sewers through any of the following entrances:

    • The Thieves Guildhall: By agreeing to assist Nine-Fingers, you can enter the sewers from here.
    • Danthelon’s Dancing Axe: If you aided the Harpers in the basement (which is necessary to recruit Minsc), you can access the sewers from their hideout.
    • The Manhole Cover: Located just south of the Janneth Estate, you’ll find a manhole cover that leads to the sewers.

    Regardless of your chosen entrance, you need to navigate to the northwestern area of the sewers, dealing with any Bhallists or other foes that block your path. After clearing this area, you’ll arrive in a chamber featuring two large valves and a massive locked door. To progress, you’ll need to adjust the valves to balance the water’s temperature and pressure to unlock the door.

    Discovering the Note for Sanitation Workers

    Find Your Key Clue for the Puzzle

    Beside the Temperature Valve, there’s a note attached to the machine. This note clarifies that the water temperature and pressure must be at “optimal” levels for the gate to open. Until both parameters are at their optimal points simultaneously, that large round door will stay shut.

    Characters with a strong Perception skill can easily spot the Note to the Sanitation Workers, so ensure someone in your party has a high score in this skill to catch the hint without missing it.

    Timing is critical in this puzzle, as the levels controlled by each valve shift over time. The note stipulates that the valves need to reach optimal levels, not merely the highest settings, making it challenging to get both the pressure and temperature just right at the same time. Position your party members so they won’t obstruct your efforts (unless you’re going solo with a unique character build), and prepare to act swiftly.

    How to Solve the Sluice-Gate Puzzle in the Abandoned Cistern

    Increase the Temperature to Its Ideal Point
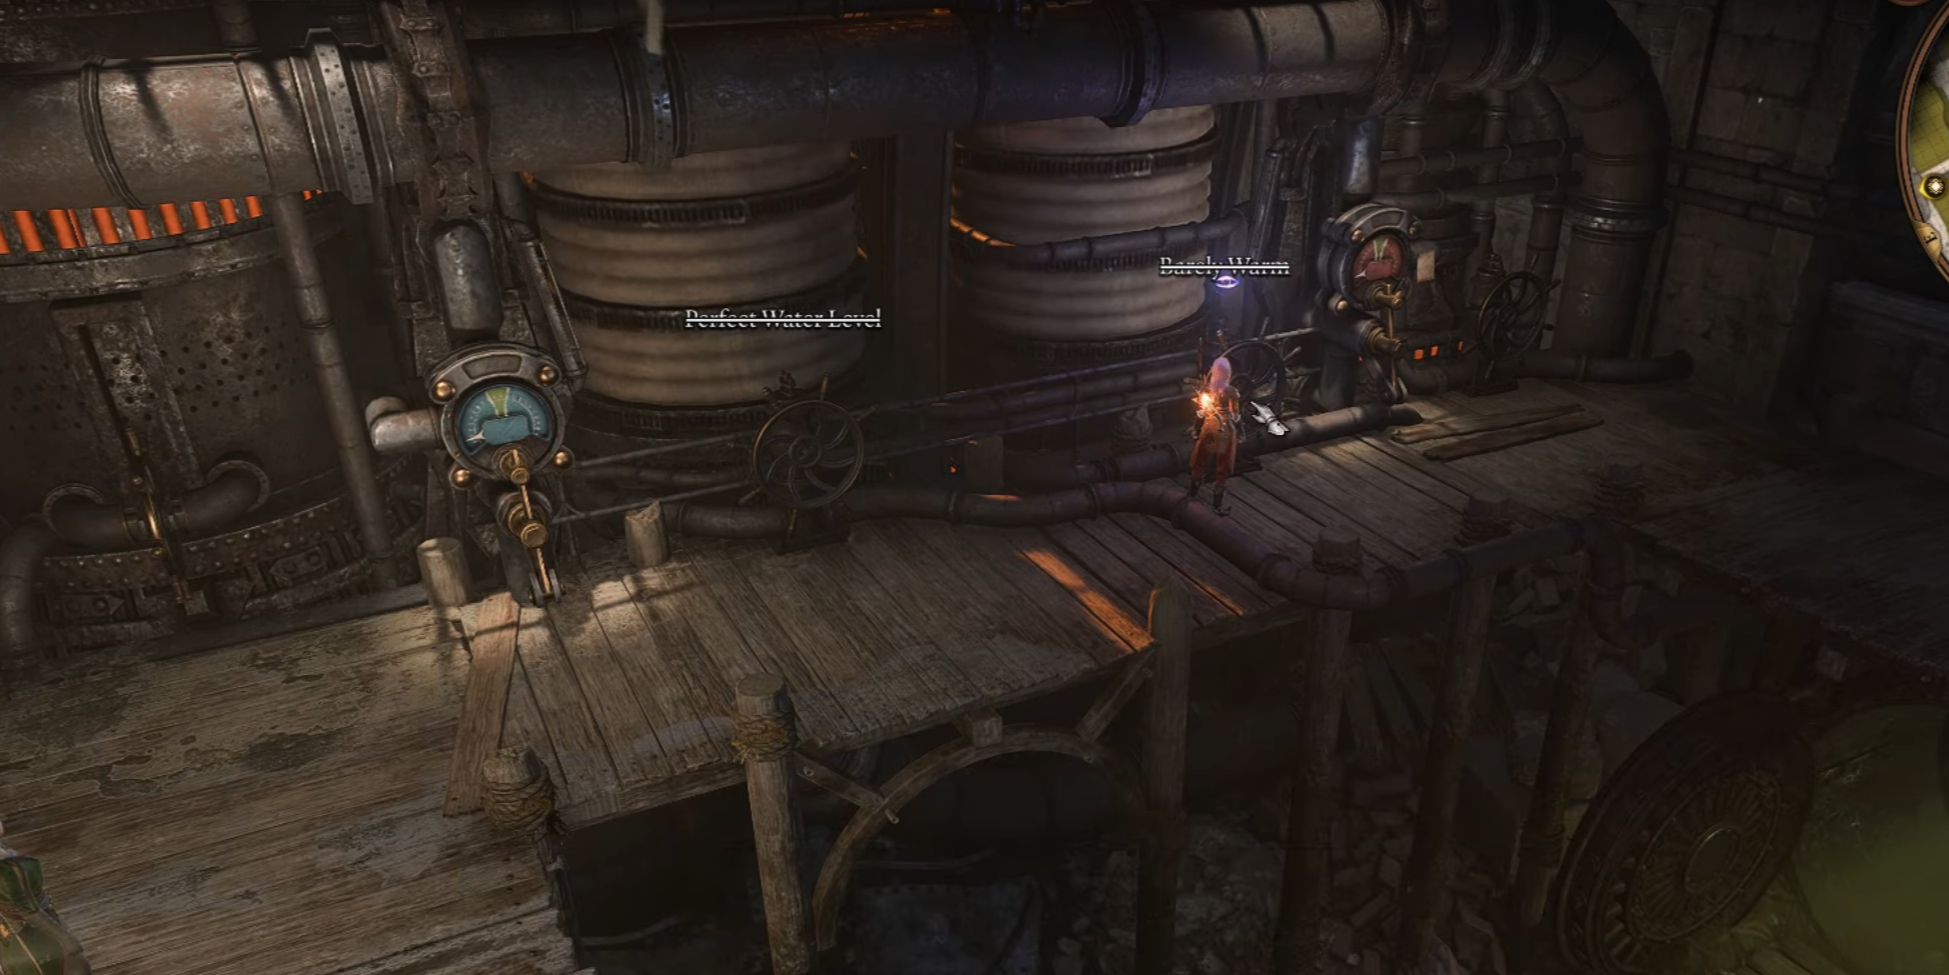
    Perfect solution to sluice gate puzzle in baldur's gate 3

    By interacting with each valve, you’ll see a status update at the top of your screen showing that the “X level is rising.” Next to this, you’ll also see the current status of the water’s temperature or pressure. Start with the temperature valve, adjust it, and wait until it indicates “Perfectly Warm” at the top of the screen, then turn it off. Quickly do the same for the pressure valve until both registers show that they are optimal.

    Once a valve is turned off, its corresponding level will gradually decrease. This means you’ll need to be quick to ensure both valves are at perfect levels at the same time. If your first attempt doesn’t succeed, wait for the valves to reset and give it another shot!

    After accomplishing this, the gate of the Abandoned Cistern will unlock, allowing you to move forward and face the Stone Lord. Don’t forget to bring Jaheira into your party if you want to recruit Minsc in Baldur’s Gate 3 and advance both of their story arcs.

    Related

    The Most Confusing Companion Stats In Baldur’s Gate 3

    The companion ability scores in Baldur’s Gate 3 are balanced for gameplay, yet some choices are strange, leaving characters with unfitting stats.

    Crossing the gate that was previously sealed off will trigger a cutscene leading to a battle, so ensure your party is well-rested and prepared for action. The true identity of the Stone Lord might surprise you, influencing how you engage in the ensuing combat. Ironically, solving the Sluice Gate puzzle in Baldur’s Gate 3 raises more questions than it answers.

  • All Potential Outcomes for Wyll

    All Potential Outcomes for Wyll

    Quick Links


    Baldur’s Gate 3 stands out for its vast range of possibilities and outcomes, with every decision significantly influencing the storyline and its final resolution. This impact extends to your companions, whose fates will also be impacted by your choices during your journey, potentially leading them to veer far from their original intentions.

    Take Wyll, the Blade of Frontiers, as a prime example. Tasked initially with the mission of eliminating a particular "demon," Wyll’s life could change drastically depending on the player’s decisions. If you choose to include him as your companion, the consequences for the earnest Warlock can vary widely.

    Lost In The Grove

    As a character who detests violence, Wyll will leave your party if you decide to assault the Emerald Grove with Minthara. While he may attempt to alert the Grove about the impending attack, he remains with the group if you manage to persuade him that it’s a trap for the Goblins.

    Should you betray the Tieflings with Wyll still in your party, he will become hostile, forcing you into a confrontation with him. If he’s with you at your camp during the attack, he will depart during the Goblin celebration afterward.

    Moreover, if Wyll was never recruited, his body can be discovered after the battle if you choose to side with the Goblins. Conversely, if you side with the Tieflings but did not recruit him, he won’t appear in the later Acts once you proceed to Act 2.

    An Early Visit To Hell

    In Act 2, Mizora requests your assistance in rescuing one of Zariel’s servants from the grasp of the Absolute. This servant turns out to be Mizora herself, trapped within an Illithid pod. You will encounter her in the Mindflayer’s Colony located beneath Moonrise Towers.

    If you choose to abandon Mizora or kill her, Wyll will be condemned to Avernus for eternity as a Lemure, a tormented creature resulting from the breach of a pact clause by failing in his duties. This occurs even if Wyll wasn’t to blame for his patron’s condemnation, so consider the implications if you genuinely care about him.

    Duke Ravengard

    After completing Wyll’s character quest (The Blade of Frontiers) by triumphing over the dragon Ansur in Act 3, Wyll has the opportunity to follow in his father’s footsteps and become the next Duke of Baldur’s Gate. You can encourage him to set aside swordplay for politics, allowing him to assume the Dukedom once the Netherbrain is dealt with.

    It’s noteworthy that saving his father isn’t necessary to reach this outcome. You’ll have the chance to meet the new Duke during Withers’ epilogue party. The decisions you made throughout the game will shape Wyll’s personal journey and achievements. For instance, he may joke about his horns being a hassle if he ends up becoming a demon.

    The Blade Of Avernus Rises

    If Wyll evolves into a demon and completes his quest but is not encouraged to embrace the Dukedom, he will take on the title of Blade of Avernus. Upon accepting this new identity, he will pursue and hunt demons directly in Avernus. He is then expected to be summoned to Withers’ party six months later.

    If you romance him, you can join him in this new journey, and both of you will be called for the epilogue later, where he’ll enthusiastically recount his adventures and victories against his foes. If you fought together in Hell, he’ll reminisce about those encounters.

    The outcomes can differ significantly based on your choices. If his father remains alive, he will express pride in his son, and surprisingly, Mizora will be supportive of his pursuits. However, if their pact breaks, Wyll will consider Mizora his next target, seeking her out to eliminate her completely. His Warlock powers will be lost, and he’ll become a Ranger instead.

    This ending presents a unique alternative: after defeating the Netherbrain and if Wyll has transformed into the Blade of Avernus, he may offer to return to Avernus with Karlach, aiming to shield her from Zariel.

    The Adventures Of The Blade Of Frontiers

    If you complete Wyll’s quest without transforming him into a demon and decide against making him a Duke, he retains his original title. This applies whether you finish his quest or leave it incomplete.

    This conclusion bears a resemblance to the Blade of Avernus path, with the primary distinctions resting upon the kinds of monsters he takes down, such as giants and dragons rather than demons. Consequently, the possibility of the duo-ending with Karlach doesn’t exist, as he has no reasons to venture into Avernus.

    The relationships he has with his father and Mizora remain relatively consistent, with minor alterations reflecting his circumstances. Wyll essentially remains unchanged from his initial self, so while the ending isn’t poor, it doesn’t rank among the best. At least he continues to live with a sense of fulfillment.

  • Impact of Shadowheart Saving Her Parents in BG3

    Impact of Shadowheart Saving Her Parents in BG3

    Your adventure in the world of Faerûn while playing Baldur’s Gate 3 doesn’t have to be a solo journey. You have the option to gather companions along the way, each with their own unique backstories to discover. One of these companions is Shadowheart, a half-elf cleric who adds a rich layer to your quest.

    When you first encounter Shadowheart, she is reserved and her background is cloaked in secrecy. As you progress alongside her, her narrative gradually unfolds, influenced by your decisions, leading to different possible outcomes for her character.

    Every Possible Ending for Shadowheart

    While following Shadowheart’s storyline, the choices you make can significantly alter her fate. Depending on your decisions, her story can lead to one of several distinct conclusions.

    Spoiler Alert! Prepare yourself for potential spoilers regarding Shadowheart’s various endings as you read on.

    Shadowheart Becomes the Mother Superior

    If Shadowheart decides to kill the Nightsong, she will embrace her role as a Dark Justiciar and remain loyal to her goddess, Shar. This choice leads her to become the Mother Superior, a position once held by Viconia DeVir.

    If you are in a romantic relationship with her, Shadowheart will end the relationship out of loyalty to Shar. As Mother Superior, she will reside in the House of Grief, where her devotion will flourish.

    Shadowheart Continues the Life of an Adventurer

    Conversely, if Shadowheart opts not to kill the Nightsong, she effectively rejects Shar’s control and uncovers her lost memories. This decision will bring a significant shift in her personality and appearance.

    Upon visiting the House of Grief, you must confront the Mother Superior, Viconia DeVir. With her defeat, Shadowheart will finally reconnect with her long-lost parents.

    Next, she faces a difficult choice imposed by Shar: save her parents or rid herself of Shar’s curse. Your guidance will play a role in her decision-making. If you encourage her to break free from Shar’s influence, unfortunately, it means her parents will meet their end.

    In this scenario, Shadowheart will achieve freedom from Shar’s control, fulfilling her parents’ wishes. Subsequently, she will embrace a new life as an adventurer, wholeheartedly fighting against the followers of Shar.

    Shadowheart Lives a Quiet Life in the Country

    In an alternate ending, if Shadowheart spares the Nightsong but decides to live with Shar’s curse to save her parents, she will enjoy a tranquil, fulfilling life alongside them after the final showdown.

    In this scenario, she will settle in a peaceful country farmstead, cherished by the loving environment she lost in her youth.

    If you have developed a romantic bond with Shadowheart, you will have the opportunity to join her in this quiet life. However, while she finds solace, Shar’s curse will still linger, though it will not weigh as heavily on her as it once did.

  • Unlocking All Minthara Endings in BG3: A Complete Guide

    Unlocking All Minthara Endings in BG3: A Complete Guide

    Quick Links

    Baldur’s Gate 3 features a vibrant assortment of companions, each with unique storylines that can end in various ways based on players’ decisions—ranging from heartwarming to deeply unsettling. It’s a classic case of "I can change them/I can make them worse," all happening within the confines of a wild adventuring group.

    Nightwarden Minthara

    Minthara, known as Nightwarden, stands out as one of the few non-Origin companions. Initially, she serves as an adversary, but players have the opportunity to recruit her and potentially have her by their side during the final battle. However, her journey toward Baldur’s Gate is fraught with peril, presenting multiple chances for her untimely end.

    Killed at the Goblin Camp

    After consulting with Zevlor and the druids in the Grove about their goblin issues, you’ll receive the quest "Defeat the Goblins." This entails taking down three leaders: Priestess Gut, Dror Ragzlin, and Nightwarden Minthara. In this scenario, Minthara can meet her most frequent demise—either being pushed into a conveniently placed chasm or being killed, leaving behind the most stylish camp gear until Act 3.

    To see Minthara again in the game, players must either knock her unconscious rather than kill her or choose to bypass the "Defeat the Goblins" quest entirely.

    Fight at the Grove

    Alternatively, instead of battling the goblins at their camp, players can lure them to the Grove and initiate a confrontation there. This tactic offers the advantage of having allies, as the players and tieflings together can outnumber the goblins, though it can also occur as part of the "Save the Goblin Sazza" quest.

    Choosing this route presents a different challenge, placing players in a defensive role rather than an aggressive one. Here, only Minthara will assault the Grove, and defeating her and her forces ensures quest progress.

    Important Note: Minthara cannot be spared during this encounter, leading to her guaranteed death.

    Opting for this strategy may simplify the encounter but complicates the pursuit of the "Leave No One Behind" achievement.

    Lover’s Embrace

    This particular ending is exclusive to players who choose the Dark Urge Origin character. The Dark Urge is a distinctive origin choice—fully customizable in appearance and class but burdened by amnesia and an unsettling desire for violence.

    If you select the Dark Urge and embark on the "Raid the Grove" quest, fighting alongside Minthara and the goblins, you may find yourself offered the chance to spend the night with her afterward. Should you accept, the ensuing dialogue may lead to the Dark Urge contemplating the act of snapping Minthara’s neck, leading to her immediate demise.

    Abandoned in Moonrise Towers

    Should players have spared Minthara in Act 1, she will reappear in Act 2 during the events in Moonrise Towers, facing a trial for her failure to acquire the Mysterious Artifact. Despite the dialogue choices, she will ultimately be taken away for torture, triggering the quest "Decide Minthara’s Fate."

    Following Minthara and her captors into the dungeon offers players the option to allow her torturers to erase her mind completely. This does not kill her but transforms her into a mindless servant of the Absolute, rendering her unrecruitable. Ignoring the quest entirely will lead to Minthara’s death as well.

    Companion Minthara

    If Minthara survives the various threats posed throughout the game, she will go back to the Underdark after the Netherbrain encounter to reclaim her position in House Baenre. If you engage in a romantic relationship with her, you will have the option to join her. If you did not romance her, she will reappear at Withers’ epilogue gathering, having started her rebellion.

    On the other hand, should you undergo ceremorphosis before the final battle, Minthara will surprisingly embrace this change and remain loyal to you.

    Embracing The Urge

    Confronting the Netherbrain allows you to choose whether to let your illithid ally finish it off or betray them and become the Absolute instead. If playing as the Dark Urge, both Minthara and your darker instincts will push you toward the latter path.

    If you betray the illithid and seize power as the Absolute, the fates of your party members—including Minthara—will be decided by your choices, with her survival hinging on whether she was romanced.

    Become Absolute

    Adventurers can slip into malevolence without Bhaal’s influence—just listen to Minthara tell you that you deserve to rule. If you choose betrayal, you can opt to either rule alongside her or force her to kneel, condemning her to the same grim fate as your other companions. A non-romanced Minthara will share the fate of the rest—either death or servitude.

    With varying outcomes contingent on your choices, Minthara’s journey throughout Baldur’s Gate 3 is one marked by complexity and intrigue, making her a pivotal character in this richly woven narrative.

  • Saving Duke Ravengard and Wyll’s Soul in Baldur’s Gate 3

    Saving Duke Ravengard and Wyll’s Soul in Baldur’s Gate 3

    Baldur’s Gate 3 presents players with challenging moral dilemmas, particularly one involving Wyll Ravengard in the third act. Here, Wyll’s patron, Mizora, offers a harsh choice: he can break free from their pact, but this freedom comes at a steep price—his father’s life is at stake. Alternatively, Mizora promises to assist Wyll in rescuing his father if he surrenders his soul to her permanently.

    This situation places Wyll in a heartbreaking position. His dread of his connection to a devilish entity clashes with his deep love for his father. Ultimately, it falls upon the player to guide Wyll through this tough decision. Interestingly, there is a route to ensure both Wyll’s soul and his father’s life are preserved, though it calls for specific choices and savvy gameplay.

    Choose Wyll’s Freedom When Mizora Offers It

    Helping Wyll Escape His Patron’s Pact

    Despite the immediate temptation, the best decision is to accept Wyll’s freedom when offered by Mizora. This choice frees him from his cruel patron, allowing a fresh start at the cost of his father’s safety. It’s an atypical response for Wyll, and even Mizora seems surprised by his decision.

    However, it’s important to note that Duke Ravengard won’t perish the moment Wyll makes this choice. Mizora isn’t the captor; that role belongs to Gortash, who has imprisoned Ravengard in an underwater facility known as the Iron Throne. Mizora won’t lend any aid at this stage, but players can explore and potentially rescue Ravengard on their own after opting for Wyll’s liberation.

    Talk Down Florrick During Her Confrontation

    Players will likely face another challenge: Councillor Florrick, who believes Wyll has killed his father. This confrontation only occurs if Florrick is alive and has been freed from Wyrm’s Rock. In this scenario, she challenges the party in the lower city, demanding justice for the Duke. Players must persuade Florrick that Mizora is deceiving her; failing to do so could lead to a deadly conflict.

    Move Quickly Through the Iron Throne

    Once the confrontation is settled, the next step is reaching the Iron Throne. The quickest approach is to initiate the quest “Avenge the Drowned” at Umberlee’s temple, which involves searching for a submarine that was involved in a fatal accident. Completing this quest will direct players to Flymm Cargo, which hides a passage to an underwater dock featuring the submarine needed to access the Iron Throne.

    Players will then need to convince Redhammer in Baldur’s Gate 3 to transport them to the prison. Gortash may threaten to demolish the place, urging players to proceed and attempt a time-sensitive rescue of those trapped inside. Key prisoners include the Gondian gnomes, the mind flayer Omeluum, and Duke Ulder Ravengard himself.

    Time and Teleportation are Key

    Players have a limited number of turns to free inmates from the Iron Throne and escape before they’re submerged. To maximize their chances, a range of spells and items are essential. Casting Longstrider on the team beforehand, as well as Haste, Misty Step, and Dimension Door, will enhance movement. Equipping items like the Boots of Speed and Haste Helm can further aid the mission.

    The number of turns varies by difficulty level, ranging from 5 to 8. Using temporary enhancements, such as speed potions, can be highly beneficial.

    To save all potential rescues, summons can help engage the Sahuagin guards, freeing player characters to dash. Locate Ravengard in the right-side middle cell, activate the lever to unlock it, and escort him out. Yet, the danger is not over—Mizora will appear to fulfill her pact, sending forth explosive spiders to target the Duke.

    The Final Escape

    Here, the Dimension Door spell proves invaluable. With Ravengard incapacitated, he must be teleported to safety by another party member. After dealing with the spiders, players must escort the Duke back to the submarine for his safe passage. He will later appear at the players’ camp to speak with Wyll, much to Mizora’s annoyance. Players can take pride in having outsmarted a devil at her own game.

  • Serene Steps to Acquire the Druid Idol

    Serene Steps to Acquire the Druid Idol

    A significant portion of Baldur’s Gate 3‘s first act revolves around the Emerald Grove, a sanctuary for druids now facing peril. Goblins are attempting to breach the area, and a group of Tiefling refugees is seeking refuge, which is escalating tensions among the residents. Kagha, the grove’s leader, has decided to perform a magical ritual known as the Rite of Thorns to isolate the grove from outside threats. This ritual requires a special artifact: the Idol of Silvanus, which players can locate at the heart of the grove.

    For players aiming to prevent the Rite of Thorns and protect the Tieflings from being expelled, acquiring this idol early on becomes a critical mission. However, stealing it poses challenges, and doing so without inciting violence is even trickier. Fortunately, there are ways to secure the Idol of Silvanus while maintaining harmony in the grove. Successfully stealing the idol might also grant players the chance to help someone in need.

    What Guards the Idol of Silvanus?

    How Stringent is the Druid’s Security?

    The Idol of Silvanus may seem accessible, but it is surprisingly well-protected, even though it’s located in an open area. When players arrive in the grove, the idol is actively used in the Rite of Thorns, surrounded by several druids closely monitoring it. Diverting all these druids’ attention at once proves nearly impossible. If any druid spots a player attempting to snatch the idol, they will intervene immediately.

    Many players might think of using magic to become invisible, employing spells like fog cloud, darkness, or even invisibility. However, these tactics prove ineffective with the idol. Area-of-effect spells that obscure the vision of NPCs dissipate near the idol, while attempts to remain invisible or stealthy often fail once players approach the artifact. Even if they succeeded, this approach would create chaos within the grove.

    Preventing Conflict in the Druid’s Grove

    Prevent Druids from Blaming the Tieflings

    The primary challenge of stealing the idol lies not in the act itself but in its consequences. If players successfully take the idol, the druids will promptly accuse the Tiefling refugees. This triggers a confrontation in the grove, risking the lives of many characters on both sides and jeopardizing several quests during the first act. To avert this situation, timing the idol theft with a specific moment in the first act’s storyline becomes crucial.

    Avoid defeating goblins before stealing the idol; doing so will alter the status of the Tieflings and cause the idol to be removed from its location.

    Players must investigate Kagha before attempting to take the idol and complete her questline to alleviate some tension within the grove. Kagha collaborates with a faction of druids looking to dominate the grove, and uncovering her intentions enables players to confront her.

    This confrontation leads to a battle with Kagha and the shadow druids hiding in the grove. The outcome can either result in Kagha’s defeat or in swaying her to join the players’ side. Once this happens, the Rite of Thorns ceases, reducing animosity between the Tieflings and druids, meaning the druids will no longer hold the Tieflings responsible if the idol goes missing.

    Related

    BG3: One Act 1 Decision Is The Most Disturbing Way To Deal With Emerald Grove

    It’s easy for the Emerald Grove situation in Baldur’s Gate 3 to end in violence, but one specific method has the most horrific results.

    Interestingly, many druids stationed around the idol may vacate their posts, leading to decreased vigilance during the theft. A clever method for hijacking the idol with minimal consequences involves having a character steal it in broad daylight and subsequently being caught by the druids. They will briefly knock out the characters and place them in a makeshift jail cell. However, as long as the idol remains in the character’s inventory upon being knocked out, it won’t be returned to its original spot. Instead, it will end up in the locked evidence chest, which stands completely unguarded.

    Where to Deliver the Idol After Theft

    A Tiefling Who Will Pay Handsomely for the Magic Item

    The Idol of Silvanus in the Sacred Pool of Emerald Grove in Baldur’s Gate 3.
    Custom Image by Katarina Cimbaljevic 

    Once players have procured the idol, they can escape the jail cell and unlock the evidence chest to acquire the Idol of Silvanus without anyone suspecting a thing. They can then choose to keep the idol or take it to a Tiefling who has a vested interest in it. This Tiefling is Mol, the leader of a group of child bandits hidden in a cave within the grove. Mol intends to sell the idol in Baldur’s Gate to help her gang of kids make their mark in the city as fledgling thieves.

    Handing the idol to Mol does not impact her relationship with the party, aside from altering a few dialogues in Act One. She can still be recruited as an ally in Act Three regardless.

    Transferring the idol to Mol is more than just a generous act; she will reward players with a valuable Ring of Protection, a significant boon in BG3’s early stages that proves much more advantageous than the magic properties of the Idol of Silvanus. However, it is vital to initiate the quest with Mol before disrupting the Rite of Thorns, as Baldur’s Gate 3 may encounter bugs that prevent players from giving it to her afterward. In any case, this strategy stands as a reliable method to halt the druid’s ritual, retrieve the idol peacefully, and receive a reward for the effort.

  • Solving the Chamber of Justice Puzzle in Baldur’s Gate 3

    Solving the Chamber of Justice Puzzle in Baldur’s Gate 3

    Exploring the Chamber of Justice in Baldur’s Gate 3

    In Act 3 of Baldur’s Gate 3, whispers suggest that a mighty dragon guardian awaits beneath the Lower City, accessible only by solving intricate puzzles such as those found in the Chamber of Justice. This chamber presents one of multiple trials within the Wyrmway that ultimately leads to the discovery of the dragon Ansur. The moral puzzle here challenges your sense of honor and ethics.

    Location of the Chamber

    The Chamber of Justice is situated to the left of Ansur’s Gate in the Wyrmway, located beneath the Lower City. Engaging with puzzles in this area is crucial, starting with the Legend of Ansur book puzzle to gain entry to the dragon’s lair. While the immediate threat of combat is minimal, it’s advisable to watch for traps that may spring at any moment.

    How to Eliminate the Darkness Spell

    Illuminating the Chamber

    Upon your entry into the Chamber, you’ll notice that a Darkness spell shrouds a statue at the center of the room. Surrounding the walls are three paintings that narrate the tale of a thief apprehended for stealing apples. The statue prompts you to determine the punishment for the thief, which tests your understanding of justice and fairness given the crime at hand.

    Before assessing the punishment, you first need to dispel the Darkness. Spells like Remove Curse or Dispel Magic can effectively eliminate the shadows covering the statue. These spells are crucial tools in Baldur’s Gate 3, and it’s likely that either you or one of your allies has one ready for immediate use.

    If spells are not readily available, consider acquiring a Scroll of Remove Curse instead of expending a precious spell slot. Fast-traveling via Waypoints will help you reach various vendors who may have the scroll you need. You’ll find plenty of Gold and loot in the Wyrmway to fund your purchases.

    Completing the Chamber of Justice Puzzle

    Administering Fair Judgment

    Once the Darkness is dispelled, you’ll encounter three new paintings offering differing interpretations of the thief’s punishment. Initially, these items may have been interactive, but without removing the magical barrier, their significance was lost. You must place one of the three paintings into the Empty Niche to express your judgment regarding the thief’s actions.

    When Wyll is in your party, he can offer insight on what punishment is appropriate for the thief’s offense. This connection to the city is especially beneficial as you navigate subsequent trials in the Wyrmway.

    Unlike other puzzles, this one requires you to take a neutral stance in the fate of the thief, akin to a judge. The narrative reveals that the thief acted out of good intentions despite breaking the law. Therefore, "The Cell" is the appropriate punishment, as it strikes a balance—being strict enough to acknowledge wrongdoing without being excessively harsh.

    Choosing any other option will provoke a skirmish with a group of foes. Although they shouldn’t pose a significant challenge to a well-equipped party, it’s wise to conserve your resources for the upcoming challenges in Ansur’s sanctum. It may be best to avoid any unnecessary battles, particularly if your companions are already sustaining injuries.

    After Solving the Puzzle

    Progressing to New Trials

    Successfully navigating the trial will unlock part of the gates leading to Ansur’s domain. However, you must also tackle the puzzles in the Chambers of Insight, Strategy, and Courage before reaching the city’s guardian with your team. Each Chamber presents its unique set of challenges, similar to the one found in the Chamber of Justice.

    Here’s a brief overview of what to expect in the remaining Chambers:

    Chamber Description How to Solve
    Chamber of Insight Identify and eliminate the traitor among spirits. Capture floating books in this Chamber and read their contents to uncover the traitor’s identity.
    Chamber of Strategy Defeat the Black King in two moves on a chessboard. Maneuver the White Queen close to the Black King until they’re trapped, or eliminate the Black King directly using lightning spells.
    Chamber of Courage Survive a wave of enemy attacks. Utilize potions, healing spells, or immobilization tactics to withstand four rounds of combat.

    Successfully completing all these puzzles will guide you to Ansur’s resting location beneath the city, filled with treasure and opportunities, including rewards connected to a related side quest. The powerful items you discover will serve you well against the formidable challenges that await in Act 3, like the infamous House of Hope.

    Be sure to rest before entering Ansur’s sanctuary, as your party may need recuperation after facing the trials of each Chamber. Those who conquer the Chamber of Justice puzzle will be well on their way to uncovering a stunning revelation about Baldur’s Gate’s history.

  • Baldur’s Gate 3 Mayrina Locket: How to Save Mayrina and Get Her Locket

    Baldur’s Gate 3 Mayrina Locket: How to Save Mayrina and Get Her Locket

    Learn how to save Mayrina from Ethel the hag and get Mayrina locket in Baldur’s Gate 3. Find out the different ways to complete this quest and their outcomes.

    Baldur’s Gate 3 is a role-playing video game that allows players to explore a vast and rich world, interact with various characters, and make choices that affect the story. One of the side quests that players can encounter in the game is Save Mayrina, which involves rescuing a woman named Mayrina from a hag named Ethel.

    In this article, we will explain how to complete this quest, what are the possible outcomes, and how to get Mayrina’s locket, a story item that has no apparent use in the game.

    How to Start the Save Mayrina Quest

    The Save Mayrina quest can be started in the Sunlit Wetlands region, which is located in the southwestern part of the map. There, you will find two brothers, Benryn and Glut, who are looking for their sister Mayrina. They will tell you that she went to see Ethel, a witch who lives in a nearby tea house, to get help with her pregnancy. They will ask you to help them find her and bring her back.

    You can agree to help them or refuse. If you agree, they will give you a key to Ethel’s tea house and tell you to meet them there. If you refuse, they will go on their own and you can follow them later.

    How to Enter Ethel’s Lair

    To enter Ethel’s lair, you need to go to the tea house and use the key that the brothers gave you or pick the lock. Inside, you will find Ethel and Mayrina. Ethel will greet you and offer you some tea. You can accept or decline her offer. If you accept, she will ask you some questions about yourself and your companions. If you decline, she will be offended and end the conversation.

    Baldur's Gate 3 ethel the hag

    You can also try to persuade Ethel to let Mayrina go or attack her directly. However, both options will fail and Ethel will cast a spell that teleports her and Mayrina to her lair below the tea house. You will then have to find another way to enter her lair.

    To do so, you need to examine the fireplace in the tea house. You will notice a hidden platform that can be lowered by pulling a lever on the wall. Once you lower the platform, you can enter a secret passage that leads to Ethel’s lair.

    How to Save Mayrina from Ethel

    Once you enter Ethel’s lair, you will have to face various enemies and traps along the way. You will also encounter some optional areas and secrets that you can explore or ignore. Eventually, you will reach Ethel’s chamber, where she is holding Mayrina captive.

    There are two ways to save Mayrina from Ethel:

    1. The first way is to kill Ethel in combat. This is the most straightforward way, but also the most difficult one. Ethel is a powerful enemy who can cast various spells and summon minions. She also has a lot of health and resistance to damage. You will need to use your best abilities and tactics to defeat her.
    2. The second way is to make a deal with Ethel. This is the easier way, but also the more risky one. Ethel will offer you a bargain: she will let Mayrina go if you give her something in return. She will ask for one of three things: your eye, your voice, or your baby (if you are pregnant). You can accept or reject her offer. If you accept, she will take what she asked for and let Mayrina go. If you reject, she will attack you.

    How to Get Mayrina’s Locket

    Mayrina’s locket is a story item that you can get from Mayrina after saving her from Ethel. It has no apparent use in the game, but it might have some significance in the future updates.

    To get Mayrina’s locket, you need to talk to her after rescuing her from Ethel. Depending on how you saved her, she will have different reactions:

    • If you killed Ethel in combat, she will be grateful and thank you for saving her life. She will also give you her locket as a token of appreciation.
    • If you made a deal with Ethel and gave up something in return, she will be angry and blame you for making a foolish choice. She will also refuse to give you her locket.
    • If you made a deal with Ethel and gave up your baby (if you are pregnant), she will be horrified and curse you for sacrificing your child. She will also attack you.
    • After getting or not getting Mayrina’s locket, she will leave with her husband Connor (who was turned into a zombie by Ethel) and head to Baldur’s Gate in search of a cure.

    The Save Mayrina quest is one of the many side quests that Baldur’s Gate 3 offers players. It involves rescuing a woman named Mayrina from a hag named Ethel and getting her locket, a story item that has no apparent use in the game.

    There are different ways to complete this quest, each with its own consequences and rewards. Whether you choose to fight Ethel, make a deal with her, or ignore the quest altogether, you will have an impact on the story and the world of Baldur’s Gate 3.

  • Will Baldur’s Gate 3 be on Xbox?

    Baldur’s Gate 3 is one of the year’s most anticipated role-playing games, and fans are keen to find out if they will be able to play it on their Xbox systems.

    The game, based on the Dungeons & Dragons tabletop format, has been in early access on PC since October 2020, with a full release date of August 3, 2023. But how about Xbox users? Will they be able to participate in the Forgotten Realms adventure?

    Yes, but not anytime soon, is the simple response.

    According to Larian Studios, the makers of Baldur’s Gate 3, they have been working on an Xbox version of the game for some time, but they have run into some technical difficulties that have caused it to be postponed.

    baldur's Gate 3 gameplay

    The split-screen co-op function, which works great on Xbox Series X but not on Xbox Series S, is one of the major difficulties. Larian cannot simply remove the split-screen option from the Series S edition since Microsoft demands that both versions of the game have the same functionality.

    “Our objective is absolutely to get it ready for this year, but we have come into some technical challenges – mainly with split-screen co-op,” a spokesperson for Larian Studios revealed in a Reddit post. We’re still working on an Xbox version of BG3, but we’re not ready to reveal it yet.”

    Baldur’s Gate 3 Xbox Release Date

    • 2024.

    This implies that Xbox users will have to wait until Larian overcomes these obstacles and delivers a seamless and pleasant experience on both the Series X and Series S consoles. The studio has not specified a release date or window for the Xbox version, however, it is possible that it may be some time in 2024.

    In terms of other systems, Baldur’s Gate 3 has been announced for the PlayStation 5 and will be released on September 6, 2023. However, there are no plans to release the game on the PS4, Xbox One, or Nintendo Switch since Larian feels these systems are insufficiently powerful to run the game without sacrificing its quality and performance.

    Baldur’s Gate 3 is a big and ambitious game that seeks to provide a true and immersive version of the Dungeons & Dragons 5th Edition rules. The game has a deep and branching plot, a diverse and configurable group of companions, a turn-based combat system, and an online multiplayer option for up to four players. In addition, the game has outstanding visuals, animations, and over 200 hours of theatrical sequences.

    Baldur’s Gate 3 is understandably difficult to convert to multiple platforms due to its high level of realism and intricacy. Larian Studios has indicated that they aim to ensure that every player, regardless of device, can experience the game to the fullest. As a result, rather of rushing out an inferior product, they are taking their time to polish and optimize the game for each platform.

    So, if you’re an Xbox fan who wants to play Baldur’s Gate 3, you’ll have to wait for Larian to provide further information regarding the Xbox version. In the interim, you may watch some of the game’s trailers and gameplay footage online, or read some of our guidelines and recommendations to be ready for the epic trip ahead. Baldur’s Gate 3 may not yet be available on Xbox, but it will be worth the wait.

    Will Baldur’s Gate 3 come on Xbox Game Pass?

    Baldur’s Gate 3 is not currently available on Xbox Game Pass and is unlikely to be added anytime soon. The game is still in early access on PC and has yet to be launched on Xbox platforms.