Tag: AC Shadows

  • Completing Every Kuji Kiri in AC Shadows: Before the Fall Guide

    Completing Every Kuji Kiri in AC Shadows: Before the Fall Guide

    The universe of Assassin’s Creed: Shadows is rich with collectibles and numerous engaging activities. One notable feature is Kuji-Kiri, a meditation challenge that allows Naoe to revisit her past, offering insights into her character and serving as the focal point of the side quest titled ‘Before the Fall.’

    ‘Before the Fall’ consists of four key segments: Shinobi Warfare, Mind and Body, A True Igan, and Traditions. This guide will provide information on how to successfully complete each of these missions and trigger the necessary flashbacks.

    How To Successfully Navigate Kuji-Kiri

    In Assassin’s Creed: Shadows, there are numerous Kuji-Kiri sessions to complete, but you’ll only need to finish four for the ‘Before the Fall’ quest. These sessions are essentially quick-time event sequences that enable Naoe to meditate. As you progress deeper into the meditation, the button prompts and timing cues will gradually fade away, making it a bit challenging at first.

    As you’d expect from a meditation task, focus is essential to keep your timing right. With a bit of practice, you’ll soon master these sequences. You can monitor your progress for the side quest via Naoe’s Objectives Board in the pause menu.

    Shinobi Warfare

    The first flashback of ‘Before the Fall’ can be activated by completing any Kuji-Kiri available on the map. A recommended starting point is the one located near the waterfalls next to the Hideout.

    Begin meditating there, complete the Kuji-Kiri, and you’ll be transported back to Iga in October 1579. Although Naoe is injured, her father Nagato asks her to locate Auntie Matsu.

    On your journey, you’ll find that Iga is under attack. After finding Matsu, she’ll provide Naoe with her first Katana to defend against the invaders. Following a conversation with the village chief, you will venture to the Nagano Pass, where you’ll need to stealthily navigate past enemies using the tall grass.

    You can only engage in these missions while playing as Naoe, not Yasuke.

    During a cutscene, Naoe will eliminate an enemy. Afterwards, you’ll need to take out two guards patrolling nearby. Wait until they separate before executing them one at a time. You will then confront an Oda Clan Brute in combat, where stealth is not an option.

    His attacks are formidable, so utilize Naoe’s agility to dodge, parry, and strike when his guard is down. Once defeated, a final cutscene will play featuring Naoe’s father and the village chief, after which you’ll return to the present to continue your adventure.

    Mind And Body

    The second flashback, ‘Mind and Body,’ can likewise be initiated by performing any Kuji-Kiri on the map. Complete this sequence to flash back to November 1579.

    After a discussion with your father, proceed to speak with Auntie Matsu, who sends you to retrieve a family heirloom from a shrine guarded by enemies. You can choose to stealthily eliminate them or confront them directly; both strategies work effectively in this scenario.

    The heirloom is situated inside the building on the far right of the shrine. If you’re having trouble locating it, look for a blue dot indicating the heirloom, which is within a gold-colored box. Once you obtain the heirloom, return it to Nagato and watch the cutscene to conclude this part of the quest.

    A True Igan

    Like the previous missions, initiating ‘A True Igan’ is as simple as performing any Kuji-Kiri. The third Kuji-Kiri location is typically found on the coastline to the west of Amagasaki. Complete this meditation to transport you to a later point in November 1579.

    This segment involves a stealth operation where the village chief instructs you to infiltrate Kunimiyama Fort and gather intelligence on the enemy’s strategies. You can assassinate enemies during this portion or opt for direct combat based on your approach.

    To accomplish this mission effectively, it’s best to stay hidden and leverage Naoe’s stealth skills while navigating rooftops.

    You need to eavesdrop on two pairs of guards in the camp. Make sure to use your grappling hook to scale high walls and difficult terrains. Listening to them will reveal a dead Igan fort leader at the top of the tower. After obtaining this information, head back to the village leader.

    To exit the Fort, move to the right side of the back corner, where you’ll find an opening to escape down a hill.

    Return to the village and report back to Sanayu. Once the cutscenes conclude, you will return to the present, ready to embark on the final flashback.

    Traditions

    The fourth and last flashback in ‘Before the Fall’ can also be activated from any Kuji-Kiri. The fourth Kuji-Kiri location is likely found north-east of Kyoto, on the eastern riverbank in the Hills of Meeting sub-region and within a temple complex.

    Complete the Kuji-Kiri meditation, and you’ll flash back to 1581, two years after the previous segments.

    Your first task will be to speak with Sandayu and follow him, as the village elders convene to devise a strategy against the impending invasion. Tensions rise, leading to a duel between Naoe and Fujita Juro. He should be easy to defeat; utilize your usual combat methods, and Naoe will handle him with ease. Afterwards, you’ll proceed to Hiyiyama Fort, which you can sneak into through openings in the walls.

    Your dialogue choices here don’t impact the mission’s outcome or the story overall, so feel free to choose what aligns best with Naoe’s character.

    Unexpectedly, your father, Nagato, arrives to assist, explaining how to find the plans for the attack. Listen in on a pair of Kogan Fighters, and again, utilize your grappling hook to navigate rooftops effectively.

    With the information gathered from the fighters, make your way to the south-east corner of the courtyard, where the plans are hidden behind some sliding doors. Look for a large piece of paper with a candle resting on it if you’re having trouble finding it.

    Collect the plans, completing the narrative arc of Naoe’s backstory. The end of ‘Traditions’ effectively marks the beginning of Naoe’s journey in the prologue of the game.

  • Completing Genzaburo in AC Shadows: A Solving Guide

    Completing Genzaburo in AC Shadows: A Solving Guide

    In Assassin’s Creed Shadows, players can engage with numerous organizations, including the Shinbakufu and a total of 15 other factions to target. One of these missions focuses on eliminating Genzaburo’s Soldiers, where your goal is to take out five specific enemies.

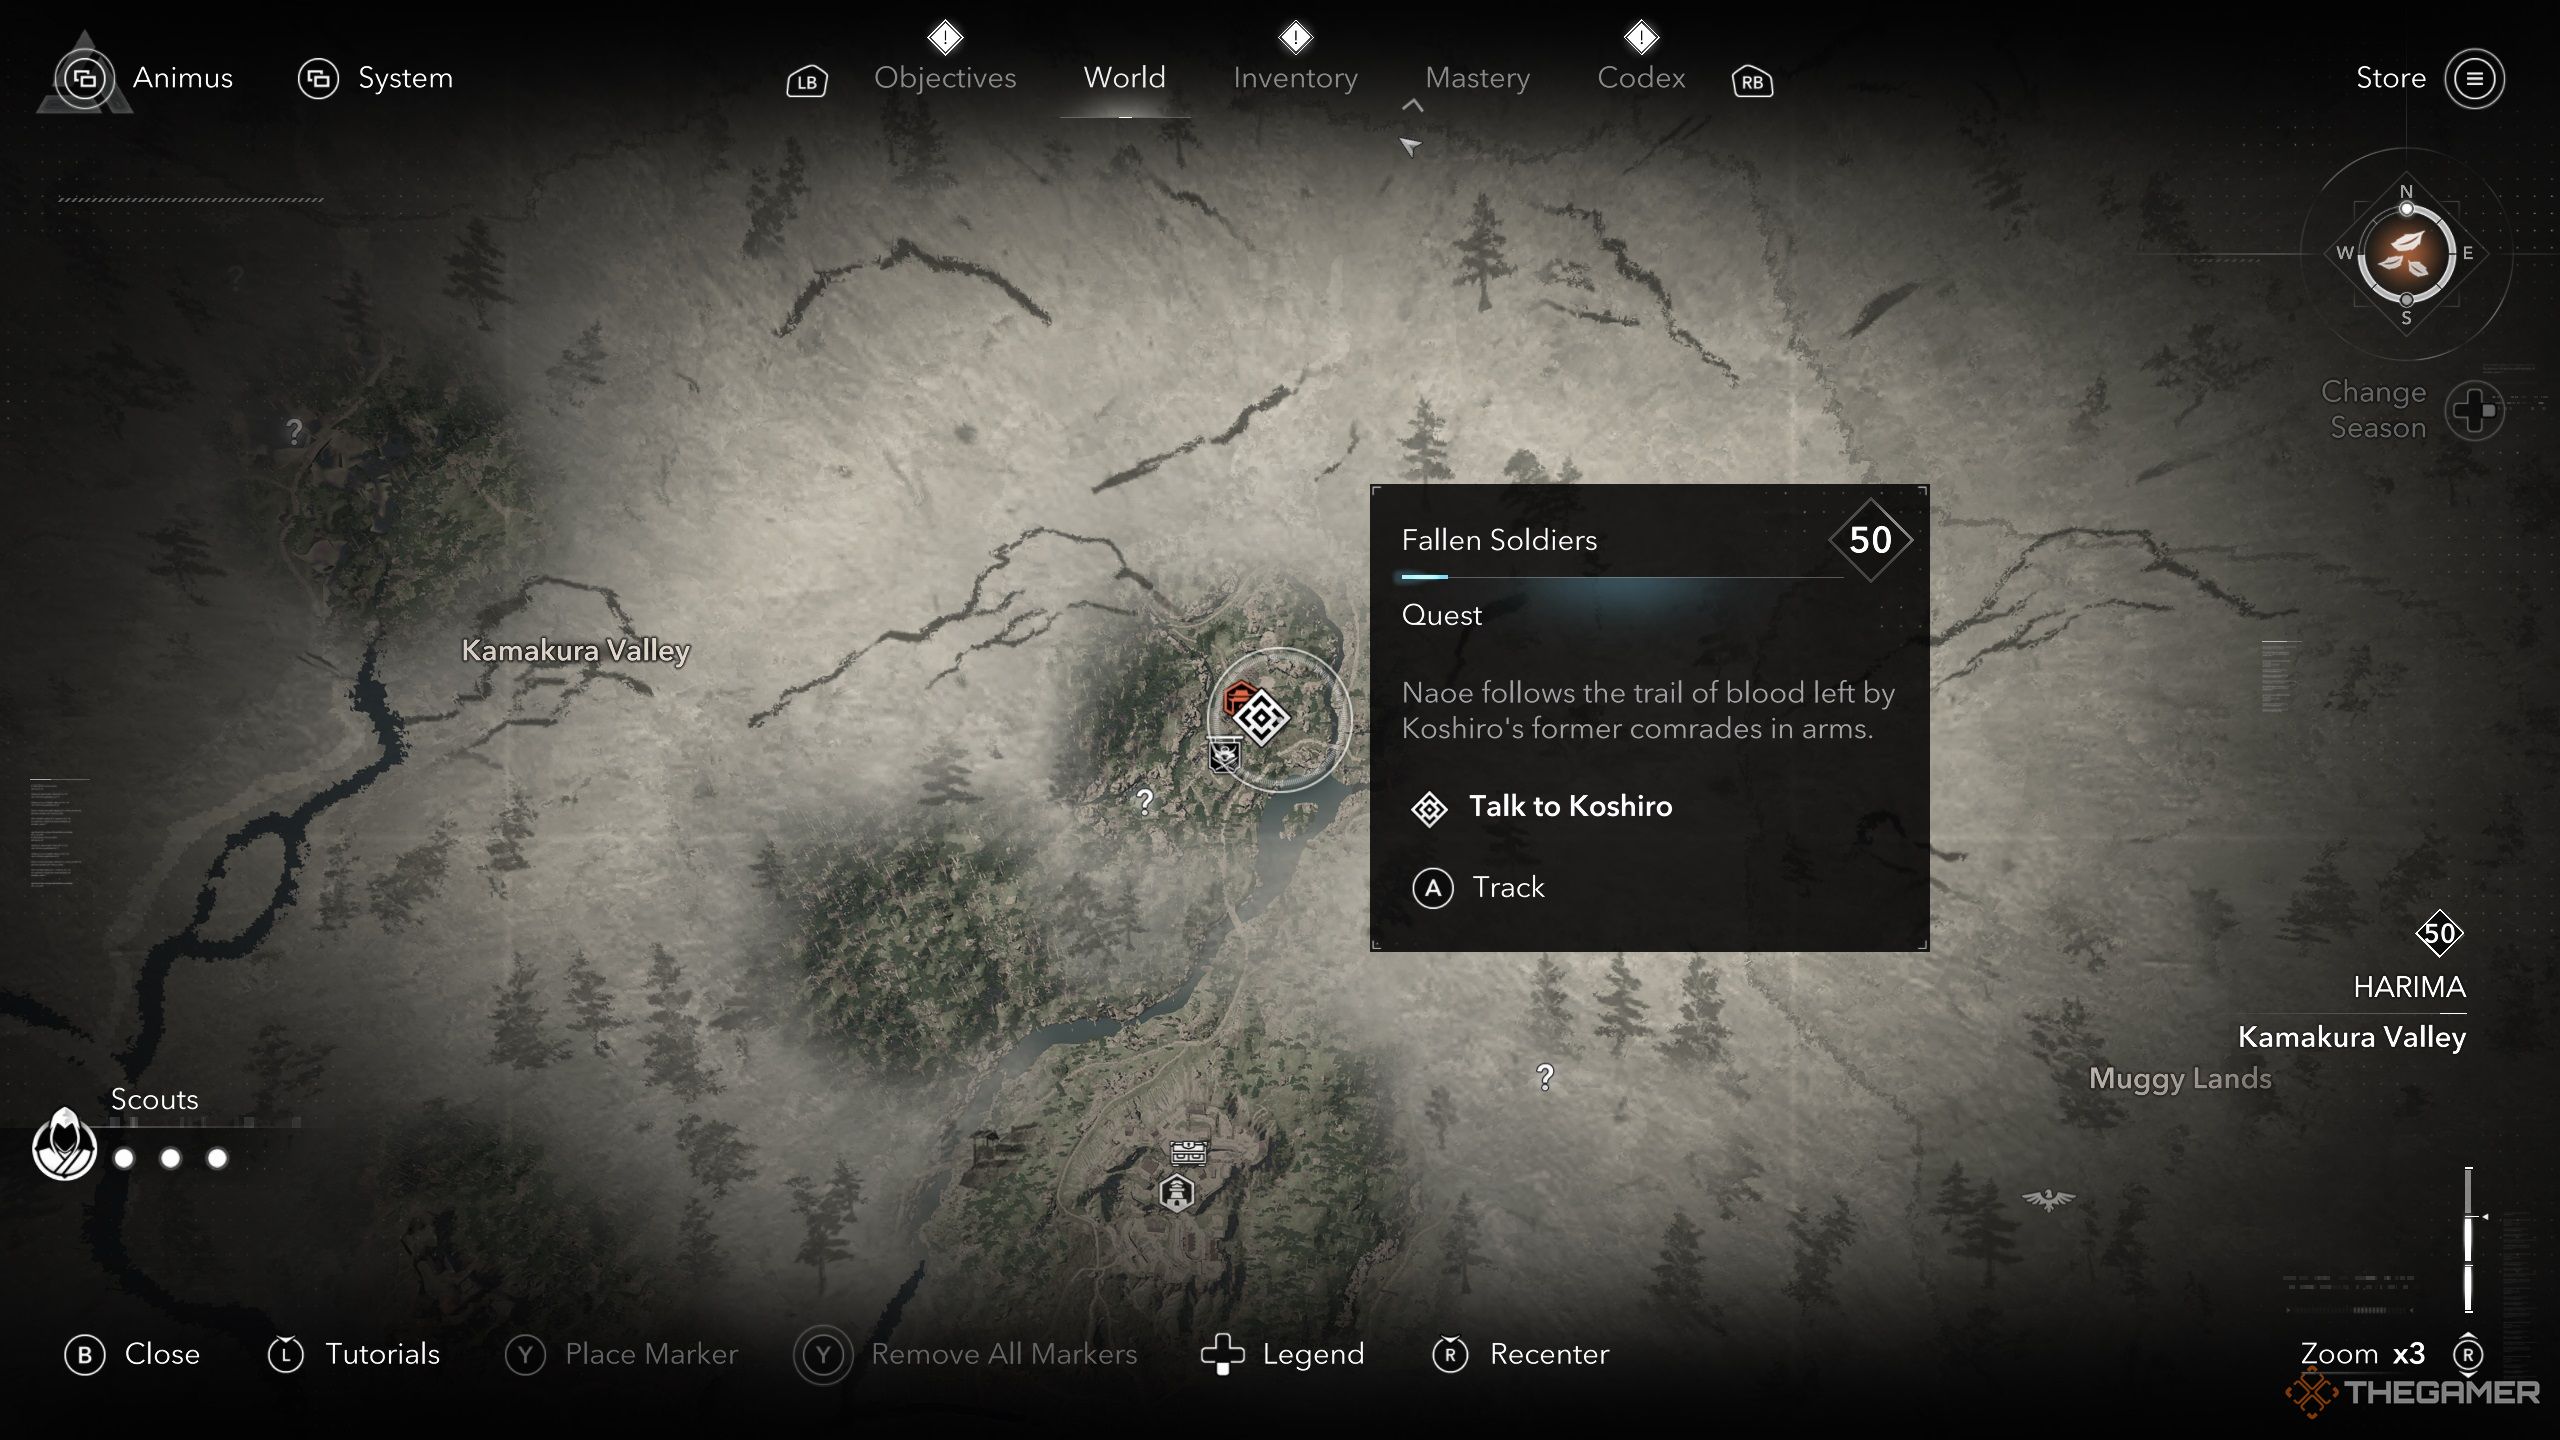
    To initiate this mission, speak with Koshiro, who can be found at the Kyokaiji Temple in the Harima region. He will assign you the task of tracking down his former comrades. This mission can be a challenge, as these soldiers are formidable foes. In this guide, we will help you locate and eliminate each target with ease.

    How to Start Genzaburo’s Soldiers

    Begin by talking to Koshiro at the Kyokaiji Temple in the Harima region. The mission will be labeled as Fallen Soldiers. After your conversation, five targets will appear in your objectives.

    Genzaburo’s Scout

    The first target is the Scout, located in Tamba, just south of the Silver Lands marker near Maruyama Shitsugen. He can be found alone, playing a flute. Approach him stealthily and take him out from behind.

    This enemy can be challenging to deal with, especially if he has the chance to alert his allies. If you don’t keep the pressure on, he may call for reinforcements, making the encounter more difficult.

    To effectively handle him, stay aggressive and eliminate him swiftly.

    Upon defeating the Scout, you will acquire Vigilant Grasp, an Epic Bow, along with a quest item.

    Genzaburo’s Swordsman

    Your next target is Genzaburo’s Swordsman, who can be found in the Harima region, northwest of Engyoji, on the bridge by Nagusano Falls. Approach him quietly from behind to perform an assassination.

    A successful sneak attack may remove about half of his health, but since he’s wearing armor, you will need to break it to inflict serious damage. Utilize your skills and charged attacks to shatter his defenses quickly. Ranged kunai shots aimed at his head can also be effective.

    Once you’ve defeated the swordsman, you will receive Inari’s Bounty, an Epic Long Katana, plus a quest item.

    Genzaburo’s Teppo Expert

    Before you can eliminate the Teppo Expert, you must first complete a preliminary task. Go to the murder scene in Hirama, which is west of Inariyama Garrison and south of Mount Kasagata. Here, climb up the watchtower and eavesdrop on the shrine maidens.

    Afterward, proceed to Kaya Shrine, located west of Mount Kasaata, to find the Teppo Expert. Approach from behind to carry out an assassination, but be quick. Surrounding soldiers will be alerted if you linger too long, complicating the fight.

    Your immediate goal should be to eliminate the Teppo Expert rapidly to avoid extra conflict. Upon successfully assassinating him, you will gain Wave of Wasps, a Legendary Teppo, and a quest item.

    Genzaburo’s Poisoner

    To find the Poisoner, you first need to track her down. Follow the map to the designated coordinates. Wait for the conversation among the children to conclude, then follow the one who runs off. Speak with him, and you will discover the entrance to Nishinomaru Garden.

    The Poisoner is situated inside the garden, playing a guitar. Assassinating her will be tricky due to the surrounding soldiers. However, navigating through the bushes may provide a suitable opportunity. Once you defeat her, you’ll receive The Poisoner’s Message, an Epic Bow, along with a quest item.

    Genzaburo

    Your final target is Genzaburo himself. Before attempting to take him down, you must have a conversation with Koshiro. This will update your objective to confront Genzaburo, who can be found northeast of Himeji at Zuinganji Temple.

    Keep in mind, this is not an assassination attempt; instead, you’ll need to engage in dialogue with Genzaburo, leading to a battle. Don’t underestimate him just because of his age; he will be one of the toughest adversaries you face.

    Be mindful of his dual ichimonji and dual sword attacks. Though these can be parried, you’ll have to react quickly to each one, as they form a sequence. Genzaburo may also launch some attacks that cannot be parried, but he often returns to the ichimonji move.

    After defeating him, a cutscene will play, and you will receive Tactician’s Steel, an Epic Long Katana, Archery Rage, and Outdoor Cosmetic items to conclude the quest.

  • Completing the Search for Pirates in AC Shadows’ High Seas Haymaker

    Completing the Search for Pirates in AC Shadows’ High Seas Haymaker

    Assassin’s Creed Shadows: A Guide to High Seas Haymaker

    In Assassin’s Creed Shadows, players can dive into numerous side quests that can keep you engaged for hours. Although the game generally offers guidance during missions, some tasks can get quite challenging. One such mission is the High Seas Haymaker.

    You can begin this quest at Obama in the Wasaka region. Once you initiate High Seas Haymaker, you’ll need to eliminate 100 pirates. Locating these pirates can be tricky and may take some time. In this guide, we’ll provide tips to help you finish this mission efficiently.

    How to Start High Seas Haymaker

    When you reach Obama in the Wasaka region, look for the marker for High Seas Haymaker on your map. After speaking with Niwa Toshikazu, you’ll receive your instructions to find and defeat the required number of pirates. Although this mission may seem daunting, we’ve compiled some effective strategies and locations to make the process smoother.

    How to Find the Pirates

    To streamline your progress, it’s beneficial to start The Pirate Alliance quest. During this mission, you’ll encounter two pirates with many subordinates, making it an excellent chance to boost your pirate count. First, board a boat and head west from the trading port, where you’ll come across several pirate ships.

    By defeating all the pirates in this area, you can quickly add 17 to your total. Remember to stay alert, as these pirates will shoot arrows, so use stealth to your advantage. Utilize your kunai effectively and try to aim for headshots.

    Tip: When approaching pirates on a ship, be discreet. Disembark before they notice you, and use kunai to eliminate two pirates on a smaller boat first.

    Afterward, proceed to the larger ship where you can take out the enemies more easily. With more cover available, you’re better positioned to deal with any remaining threats.

    Once you’ve handled the pirates on the open water, your next stop is Nairu’s Lair. Here, you’ll encounter a significant number of pirates, which will further contribute to your count—up to 50 more. However, be warned: if you alert the pirates, they may overwhelm you, making your survival more difficult.

    Warning: If you haven’t completed The Pirate Alliance Assassination quest yet, Lopo Cruz will be found at Nairu’s Lair. He is a formidable opponent, so if you’re not at a high enough level, it’s advisable to avoid this confrontation until you’re better prepared.

    Use stealth tactics to take down the pirates quietly. If you find that you can’t take them out due to level discrepancies, consider gaining some experience points (EXP) before continuing this mission; it will make things considerably easier.

    Next Steps: Maizuru’s Lair

    After clearing Nairu’s Lair, your next destination is Maizuru’s Lair. While you won’t find as many pirates here, you’ll still accumulate a count of over 60. This area may not have a plethora of pirate spawns, but there are strategies to complete your quest.

    Warning: Similar to before, if you haven’t finished The Pirate Alliance Assassination, Little Kappa will appear at Maizuru’s Lair. He is a tough adversary, so if you struggle with stealth, it’s best to avoid him.

    Continue west of the trading port and proceed past the locations where you previously eliminated pirates until you reach solid ground. Be sure to save your game and test a densynchronize by killing a citizen or simply allowing your character to die.

    Doing this will respawn the pirates on the boats, offering you a great opportunity to farm them for kills. You can repeat this process until reaching your goal. Be cautious, as these pirates are no pushovers, so ensure your character is sufficiently leveled. Consider tackling some palaces and castles like Njio Palace and Tsuruga Castle beforehand to level up your equipment and abilities.

    Final Steps: Reporting Back

    After you have dispatched 100 pirates, your objective will be updated. Head back to Niwa Toshikazu and provide him with an account of your efforts. He will reward you with gold (a crafting material) and 2,000 Mon, marking the completion of the quest.

    With these tips in hand, you’ll master the High Seas Haymaker quest and sail through this adventure with ease!

  • Completing AC Shadows: Solving Pirate Locations and Treasures

    Completing AC Shadows: Solving Pirate Locations and Treasures

    The core gameplay of Assassin’s Creed Shadows revolves around carrying out various assassinations. After you complete the prologue, you’ll need to hunt down a significant group known as Shinbakufu, along with several side factions that can be targeted through specific side quests at designated locations.

    One such side quest is the Pirate Alliance, which becomes available once you arrive in the Wakasa region. Completing this quest not only furthers the storyline but also rewards you with a unique key to unlock a legendary treasure chest somewhere on the map.

    How to Start the Pirate Alliance Quest


    If you haven’t begun the Pirate Alliance quest yet, you should go to the northernmost edge of the Wakasa region, specifically at a site known as Sotome Gate. Close to the beach, there’s a city called Tsuruga. To find the quest marker, head north past the bridge near the Tsuruga Tower viewpoint and look for a notice board.

    You can also initiate this quest by continuing with the main storyline where you’ll encounter a Biwa Master who will provide you with the quest. Alternatively, if you’re pursuing The Performer, you’ll come across a list of all the pirates, although their locations will already be marked if you start from the notice board.

    Where to Find Kage


    Assassin's Creed Shadows Kage location on the map.

    The first target you should pursue in this quest is Kage, who is believed to be located to the west of Obama port. When you zoom in 1x on your map, you’ll see Obama city slightly to the left of where Wakasa is indicated. Make your way to the western port, where you will find a boat at your disposal.

    Navigate this boat westward, passing the tip of a nearby island, and you will spot Kage’s ships in the open water. There are three ships present, and stealth may be challenging, so it’s advisable to take Yasuke with you to engage in combat with everyone, including Kage.

    Where to Find Lopo Cruz

    Lopo Cruz is another pirate you need to track down as part of the Pirate Alliance quest. He resides on a secluded island located to the north of Shattered Coast, specifically at the Nariu’s Lair along the western edge, situated between another island and the mainland. To reach him, you can begin from the western mainland or take a boat directly to the center of the area.

    If you start from the mainland, you’ll have to fight numerous pirates along the way. On the other hand, if you hop on a boat to the middle, you’ll easily come across Lopo Cruz, who is anchored on a small boat. You can board this vessel and take him out, concluding this segment of the quest.

    Where to Find Little Kappa


    Assassin's Creed Shadows Little Kappa location on the map.

    You can find Little Kappa in central Shattered Coast at a place called Maizuru’s Lair. Zoom into your map at 3x to locate this area just to the right of where “Coast” is indicated. Once there, you’ll need to eliminate a few guards before confronting Little Kappa, who has an impressive eight health bars. You can lure him out of the camp through the southern exit and sneak in. Use a Kunai to draw him out and then take him out with an explosive barrel when he gets close.

    Where to Find Sen and What to Do With Him


    Assassin's Creed Shadows Sen location on the map.

    After taking down the other three pirates, you’ll discover that Sen is located in Yura Fishing Village, which is near the sea at the northeastern part of Tamba. You can access it by navigating northwest then northeast through the river from the Fukuchiyama area in northern Tamba.

    Yura Fishing Village is calm and peaceful, making it easy to find Sen and interact with him. You will have the choice to either spare him or take his life. Regardless of your choice, the outcome and rewards will remain unchanged, as you won’t reference Sen to the quest-giver at the conclusion.

    However, choosing to spare Sen means you won’t receive the purple-tier weapon from this quest, but you will still get all other rewards.

    Given that you’re already in Wakasa, you likely have better legendary weapons and don’t require a purple-tier item.

    How to Continue the Pirate Alliance Quest


    Assassin's Creed Shadows the end of Takeda Motoaki assassination.

    After you defeat all four pirates in the Pirate Alliance quest, the objective menu will simply prompt you to progress through the storyline without granting rewards. To move forward with this quest, you’ll need to complete a couple of tasks:

    • Conclude the questline to recruit Oni-Yuri, which begins in the same location as the Pirate Alliance quest and is titled “Sweet Lies.”
    • Continue the main story in Wakasa until you achieve the assassination of The Fox, also known as The Performer or Takeda Motoaki. During this, you’ll also eliminate another pirate named Samemaru with Yasuke.

    Once you finish both of these tasks and take out the other pirates mentioned above, you can return to the Biwa Master at Saifukuji Temple located on the northwestern edge of Wakasa to complete the quest and collect your rewards.

    Where to Use the Key

    Upon completion of the Pirate Alliance quest by speaking with the Biwa Master, you’ll receive a special key capable of opening a specific chest on the map. This chest can be found on the western side of the Shattered Coast area, where a river runs between two islands and makes a slight northern turn.

    The quickest route to reach this location is to return to Yura Fishing Village and board one of the boats available. Navigate to the middle of the two large islands until you reach the gap. As you approach the northern part of this river, another Biwa player will be waiting for you.

    The NPC will depart as soon as you arrive, but you can find the chest located inside the cave behind him.

    Venture into the cave and dive into the water, where you can swim underneath the spikes. On the other side, you’ll find a legendary chest containing a legendary trinket for Yasuke, which is part of the quest reward.

  • Completing the Chest Challenge in AC Shadows’ Path of Wisdom

    Completing the Chest Challenge in AC Shadows’ Path of Wisdom

    If you’re diving into Assassin’s Creed Shadows, you’ll discover that the main storyline will keep you engaged for many days. But don’t be surprised if you find yourself immersed in a variety of side quests that can significantly extend your game time.

    One captivating side quest is the Path of Wisdom, found in one of the game’s later regions. This particular path features a unique layout that can be a bit tricky, but with the right guidance, you can effortlessly obtain the final chest and additional rewards.

    Locating the Path of Wisdom

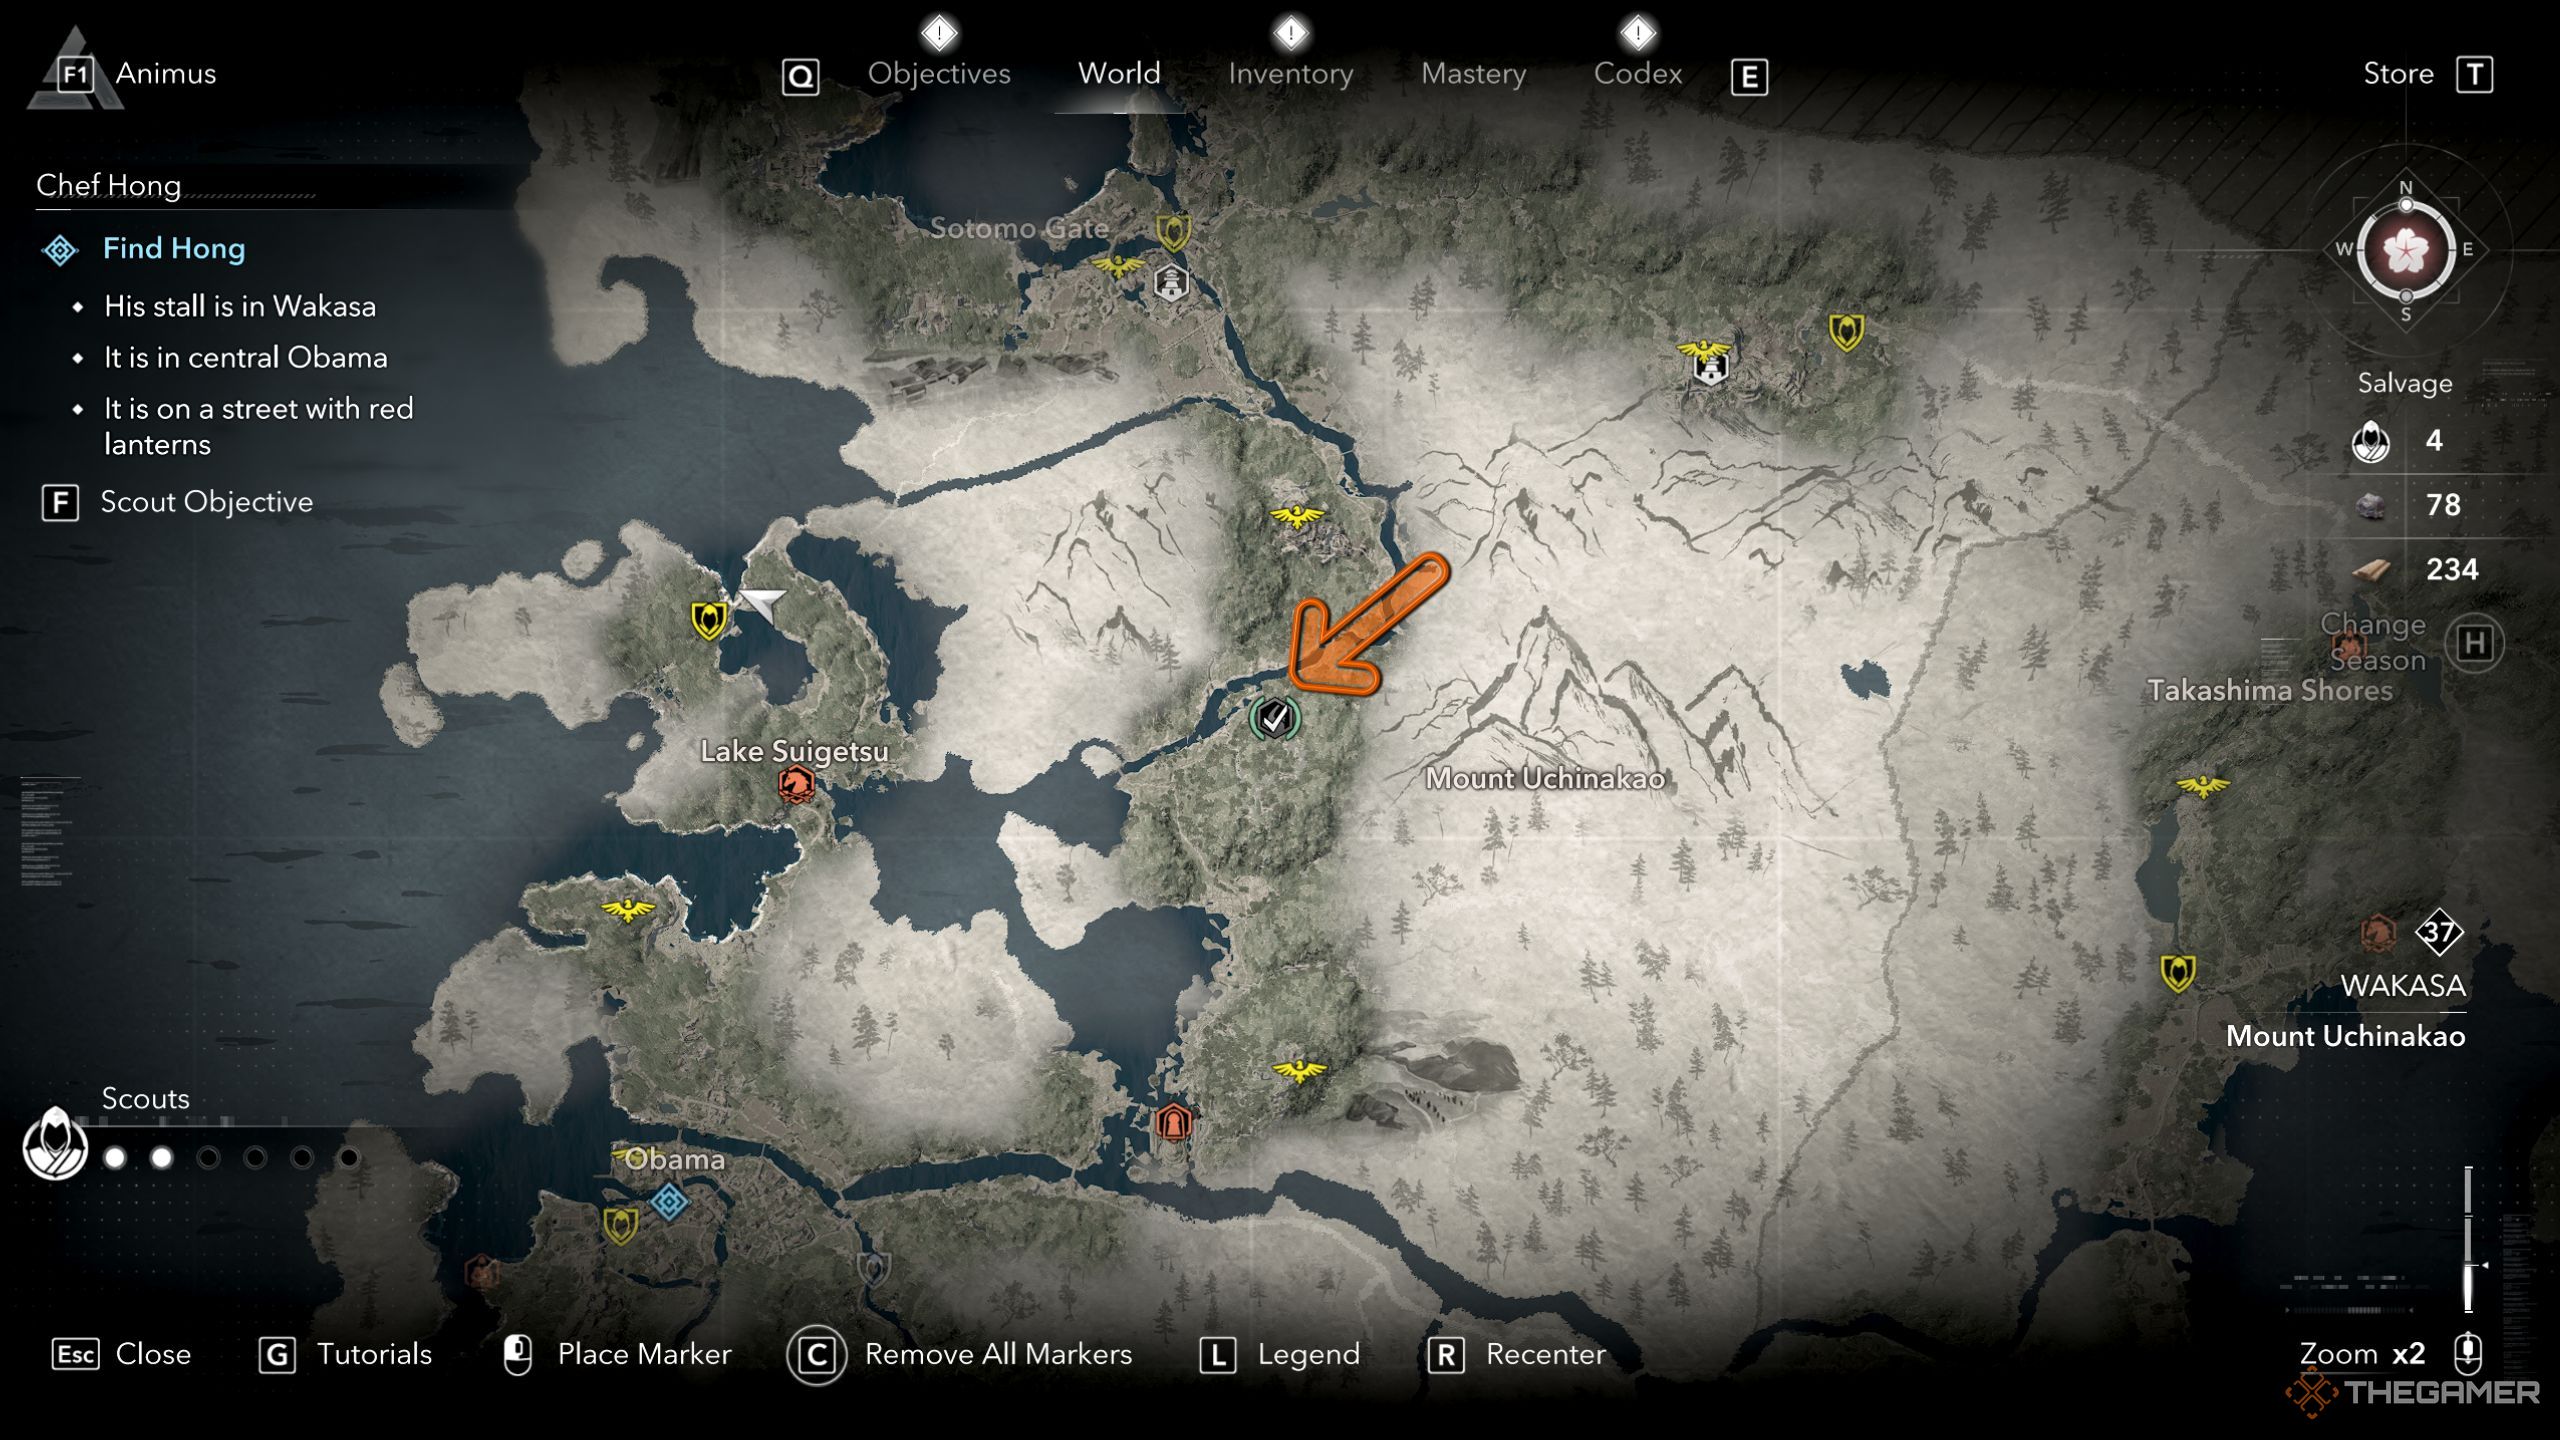
    Head toward the northwest of the map, where you’ll encounter the expansive province of Wakasa. The Path of Wisdom can be tracked down in this region by searching for Mount Uchinakao on the map. Look towards the northern end of the mainland, specifically to the east.

    This hidden pathway can be found adjacent to the river, northwest of the “Mount Uchinakao” label when zooming in at 2x. To access it, travel directly south from the Hikidan-jo Ruins viewpoint located to the north.

    Navigating the Path of Wisdom

    Upon reaching the Path of Wisdom marker on the map, you’ll spot a tree adorned with yellow platforms. Your journey begins as you start climbing these platforms. Ascend to the top of the tree, then grapple towards the stairs ahead. From this point, jump onto the steps to your right and climb the yellow wall in front of you.

    Atop this wall, you’ll need to make your way to the right, following the yellow markings. Continue ascending until you reach a wooden platform, where you can grapple over to a cave on the opposite side. Inside, start climbing the wall at the far end while heading left.

    When you reach the ledge on the left at the top, turn left to find another climbable wall. From there, scale the tree and grapple several times across the cliff. Do a bit more parkour, and you’ll arrive at the chest on your left.

    Rewards for Completing the Path of Wisdom

    Once you open the chest near the water at the end of this quest, you will obtain Tamakichi’s Gear, a purple-tier armor set for Naoe, which can be equipped from your inventory. However, it’s likely that you’ve acquired better legendary armor before reaching this point. Additionally, you’ll earn one Knowledge Point and 1,000 EXP.

  • Unlocking the Chest in Path of Silence in AC Shadows

    Unlocking the Chest in Path of Silence in AC Shadows

    After spending some time in Assassin’s Creed Shadows, it’s clear that following the game’s recommended routes is the best way to navigate from one area to another. If you attempt to shortcut through the mountains, it’s very easy to become disoriented. However, there are sections where the guiding white line won’t appear, making exploration trickier.

    These elusive routes are known as hidden trails, and you can discover numerous ones scattered across the map. One particularly tricky trail is the Path of Silence, where it’s easy to lose your way if you aren’t attentive to your environment.

    Locating the Path of Silence

    To find the Path of Silence, begin by heading to the Tamba province, located north of Harima and west of Yamashiro. You’ll notice the Tamba Highlands on the eastern part of this province.

    By zooming in on the map at 2x, the path can be located just below where “Tamba” is labeled on the map. To access it, head slightly west from Green Fields Kakurega, then travel straight south past the Ruins of Kumoryuji Temple’s fast-travel point.

    Completing the Path of Silence

    Once you arrive at the Path of Silence, you’ll spot a yellow ribbon tied to a tree on one side, with a shrine on the opposite side. Start by climbing the wall to the right of the shrine marked with yellow. Upon reaching the top, take the stairs on your right and then jump through the gap to your right.

    Proceed through this gap to find a small area where Naoe can crawl. After crawling through, climb the wall on the right again and maneuver through the rope. On the other side, slide down into the shallow water and leap up onto the wall marked with yellow in front of you.

    Next, you’ll reach a broken bridge. Here, grapple across to the other side, navigate through a small gap in the wall, jump up another wall, and then drop down into the water. After landing, go on land to your left, climb up the wall, and pass through another crawl space.

    You’ll then perform some parkour across a tree branch in the center. Use the rope to reach the top of the small island in the water before grappling to the opposite side.

    Assassins Creed Shadows Path of Silence walkthrough part five.

    Ascend another wall, and the rest of the path is relatively simple: just jump across some tree branches and grapple once more. Afterward, you’ll go up a few stairs to find a chest waiting for you at the end.

    Rewards from the Path of Silence

    Assassins Creed Shadows Path of Silence final chest.

    At the end of the Path of Silence, you can claim a rare chest containing the Hibiki’s Hood, a purple-tier headgear for Naoe. Additionally, you will earn 1,000 XP and one Knowledge Point, which can be used to unlock improved abilities across all skill trees for both characters.

  • Discovering All Iron Hand Guild Targets in AC Shadows

    Discovering All Iron Hand Guild Targets in AC Shadows

    As you progress through the main storyline of Assassin’s Creed: Shadows, you’ll encounter several non-player characters (NPCs) that will assist you in your quest to locate the Shinbakufu. One notable NPC is Imai Sokun. After completing the assassination mission involving him, you can return to Imai to receive a side quest.

    This side quest is known as the Iron Hand Guild quest. In it, Imai will request that you gather information about the Iron Hand from local merchants and eliminate his competition. However, to successfully complete this mission, you’ll need to find certain locations first.

    What Should You Do With The Merchants?


    Upon completing the Golden Teppo assassination and returning to Imai for the side quest, he will specifically ask you to spare the merchants and focus only on eliminating the Iron Hand. This allows him to gain their loyalty. However, following this direction is not mandatory for quest completion.

    Whether you decide to spare or eliminate the merchants, the rewards for completing the quest remain unchanged. Nonetheless, Imai will express greater satisfaction if you choose to keep the merchants alive, and he will have different responses depending on your choices.

    You only need to take one alternative approach to spare the merchants, which we will describe in their locations below.

    Where To Find All Merchants


    Assassin's Creed Shadows circle of Iron Hand Guild Assassinations.

    If you check the Iron Hand Guild section in your objective menu, you’ll notice four merchants located at the bottom of the circle, while the Iron Hand is at the top. You won’t be able to find the Iron Hand until you gather clues from all four merchants, whether by sparing or eliminating them.

    Here’s where you can find each merchant:

    Merchant Kanta

    To find Merchant Kanta, enter the Omi region from the south. Move towards the left side of the river, where you’ll come across the Mouth of Seta area. Just north of there, you will find a settlement. The Otsu Upper District is located in this settlement, and you can activate observer mode to locate the merchant.

    Kanta will be sitting in his home. You can choose to eliminate him from behind or capture him and then knock him out to spare him. Completing this step will fulfill this portion of the quest.

    Merchant Ginroku


    Assassin's Creed Shadows Merchant Ginroku location on the map.

    Merchant Ginroku can be located in the northwestern part of the Tamba province. Specifically, he is situated on the southwestern side of the city, right above where Mizuyu Bay is labeled on the map. He is exposed, so you can either take him out or spare him in the same manner as Kanta.

    Merchant Tamao

    To meet Merchant Tamao, head to the eastern side of the Honnoji Temple in the central part of Kyoko. Nearby, you will find the Honpoji Temple; to the left of this temple, Tamao is inside a building that cannot be entered. To lure him out, break a few jars placed in front of the building’s entrance. Be cautious, as he will notice you when he steps outside. If you want to spare him, approach him stealthily from behind and repeat the process of grabbing and knocking him out.

    Merchant Kin-No-Suke

    For Merchant Kin-no-suke, you need to take a slightly different route if you wish to spare him. First, go to the Kata area located in the northeast of where Onyu Pass is marked on your map. Here, you’ll find a letter guarded by a few bandits along the shore to the north of Kata. Defeat them to retrieve the letter, then head northwest to Obama City to locate the merchant. He will be situated just to the right of the Obama label on your map while zoomed in 3x. When you speak to him, share the letter you acquired from the bandits.

    Kin-no-suke will then lead you to a different area. In this new location, go into a nearby warehouse to uncover another clue about the Iron Hand and complete this segment of the quest.

    Where To Find The Iron Hand

    After collecting clues from all four merchants, you can determine the Iron Hand’s position in the Fukuchiyama castle located in the northern Tamba province. You can either fast travel to this castle or make your way to its southern entrance if you haven’t visited it yet.

    The Iron Hand is situated within a group of buildings southwest of the viewpoint and is heavily guarded by fully armored foes. Your best strategy is to take out these enemies one by one without being detected. However, if you choose to engage them directly, be sure to deactivate the alarm bell first.

    This will prevent your character from becoming a wanted individual in the area.

    You can also attract the attention of the enemies and then hide, which may help you isolate the Iron Hand and eliminate him. Once you’ve taken him down, return to Imai to receive 5,000 EXP, a piece of Gold, and a Fujin’s Tempest trinket.

  • Complete Guide to Locating Kata Points in AC Shadows

    Complete Guide to Locating Kata Points in AC Shadows

    As you navigate the expansive map of Assassin’s Creed Shadow’s, you’ll often find yourself sidetracked by various side quests and activities. This makes the map feel vibrant and engaging, and one of the standout side activities is Kata, which has numerous benefits.

    By completing Kata challenges, you earn Knowledge Points and experience (EXP), and you also unlock various weapon combinations for your character, Yasuke. Once you gain access to Yasuke in the main storyline, these Kata activities become available, and below is a guide to all their locations.

    Izumi Settsu Kata Locations

    Izumi Settsu contains several Kata locations; however, you won’t be able to find them during your initial exploration since Yasuke won’t be unlocked. Once Yasuke is available, these locations will be visible on your map and include:

    1 The first Kata can be found just above Sakai city in the western Osaka area, on a small secluded island located to the left.
    2 To find the second Kata in Izumi Settsu, head to the northeastern border, where you’ll see it highlighted above Yawata Plains.

    Yamashiro Kata Locations

    Kata locations in Yamashiro

    You will unlock Yasuke in this region, where you can also locate two more Kata points:

    1 Upon entering Yamashiro from the south, head northward to find the Shoryuji Castle alongside some islands in the water to its right. This Kata is located on those islands.
    2 To discover the second Kata, make your way to the northwestern boundary of Yamashiro, just above the Arashiyama region. You will find the Kata nestled between some mountains near the edge.

    Omi Kata Locations

    Kata location in Omi

    Omi is the third area you’ll explore in the main story, and it appears quite vast despite being partially covered by water. To locate the Kata here, you’ll need to travel from the south while the Kata is situated in the north.

    As you venture northward, look for the Goshiki Outlands and Shiotsu areas. Between these two locations, you will find a small pond, with the Kata located on its eastern side.

    Harima Kata Locations

    Kata locations in Harima

    Finding the Kata locations in Harima will be much easier compared to Omi. Here’s where you can find them:

    1 To locate the first Kata, enter Harima via the southern road from Izumi Settsu. You’ll reach Takasago Wetlands, which has several islands in the water. Look for this Kata on the southern end of the largest island.
    2 From the first Kata spot, follow the river northward until it forks. Take the right path and keep going east, then slightly north to reach the second Kata.

    Yamato Kata Locations

    Kata locations in Yamato

    The Yamato area is located on the southeastern side of Izumi Settsu, and here’s where to find the two Kata spots:

    1 For the first location, enter Yamato from the southeastern edge of Settsu and then proceed eastward. You’ll spot it in a pond amid the mountains.
    2 From the first Kata location, move directly south until you cross a river. The second Kata will be on the opposite bank.

    Iga Kata Locations

    Kata locations in Iga

    While Iga is the homeland of Naoe, it also has a couple of Kata locations:

    1 To find the first Kata, head up the mountain to the north of the Hijiyama marker on Iga’s map.
    2 From the first Kata spot, head southeast toward the river running through Iga, where you’ll see a smaller river heading east. Follow this river to find the second Kata.

    Tamba Kata Location

    Kata location in Tamba

    Tamba is situated north of Harima in Assassin’s Creed Shadows. Here are the Kata locations within this region:

    1 To find the first Kata, follow the river north of The Silver Lands, taking the right path when you reach a fork. The Kata will be located in the middle of this river path.
    2 Return to the forked river and take the left path. Continue north until you reach Yakami, then move directly west, where you’ll find the Kata on a mountain near a pond.

    Wakasa Kata Locations

    Kata locations in Wakasa

    Wakasa is an expansive region in the northwest part of the Assassin’s Creed Shadows map, with the Kata locations spread far apart:

    1 The first Kata is found by heading northeast from the Onyu Pass location on the map, amidst some islands surrounded by water.
    2 The second Kata is located on the northwestern edge of the map, just south of a secluded island at the top.

    Kii Kata Locations

    Kata locations in Kii

    Kii is the largest and southernmost region in the game. Here’s how to reach its Kata spots:

    1 For the first Kata location, travel south from the Kinokawa Valley river by following the river that ascends the mountain, finding it at the top.
    2 The second Kata is situated to the southeast of the map, just below where Kumano Sanzan is labeled. Look for a pond to the left where you can find it.

    No matter the platform, each Kata requires you to input button combinations in a specific order during execution.

    How Does Kata Work?

    Performing Kata in Assassin's Creed Shadows

    Each Kata teaches weapon combinations, and there’s no need to equip the weapons beforehand. Once you begin a Kata, the game will automatically equip the necessary weapon for Yasuke and prompt you with commands after a brief bow. The commands are organized into groups.

    Each group contains between three and seven commands, and if you make a mistake, you’ll need to restart that entire group. If you err on one of the initial commands, you can quickly reset the group using the button indicated on the bottom left of the screen.

    The combinations learned through Kata can be particularly beneficial during boss encounters in assassination missions, but they may not be as useful outside those situations.

    The commands during the Kata can consist of the following:

    • Pressing a button as it appears on screen.
    • Timing your button press as a circle closes in. You can hit the button as the circle reaches the highlighted area.
    • Holding down a button for a specified duration.

    Typically, the placement of buttons remains consistent across the screen. For instance, if you’re using a controller, the RB/R1 button will consistently be found in the top-right area, making it easier to determine which command you need to execute just by its position.