
Tag: x

  • Beatbot AquaSense X Review: The Pool Cleaner for Pampered Pools

    Beatbot AquaSense X Review: The Pool Cleaner for Pampered Pools

    “The Beatbot AquaSense X is the most comprehensive pool robot ever designed”

    Advantages

    • Exceptional cleaning performance
    • Advanced technology features
    • Performs as claimed
    • High-quality construction of both station and robot

    Disadvantages

    • Relatively costly
    • Station requires considerable space

    Quick Take:

    For many, robotic pool cleaners eliminated the most dreaded chore of pool ownership years ago. But they introduced a new task: hauling a wet device to its charging station and cleaning out its debris basket after each use. The Beatbot AquaSense X is designed to eliminate that mess. Its AstroRinse station is the first in its class to backflush the filter, dispose of debris into a sizable bin, and recharge the robot—all automatically when docked.

    It’s also among the most expensive robotic cleaners on the market. Priced at $3,999 as of July 2, 2026 (down from $4,250 at launch), it costs roughly $1,400 more than Beatbot’s AquaSense 2 Ultra and more than twice what competitors like Aiper or iGarden charge. The primary added expense covers the station itself. Additionally, with optional clarifier cartridges at $49.99/month, the total three-year cost exceeds $6,000—comparable to a monthly pool service.

    Ultimately, the choice hinges on your preference: how much do you dread filter cleaning, and do you want the best system available? If you’re eager to minimize maintenance and want a top-tier system, the AquaSense X offers a hassle-free cleaning experience backed by a three-year replacement warranty. If occasional filter rinsing is acceptable, the AquaSense 2 Ultra or Aiper’s Scuba X1 Pro Max provide nearly comparable cleanliness at a much lower price. But if you desire luxury and a system that’s as stylish as it is effective, the AquaSense X lives up to its promises and also looks impressive.

    AquaSense X Specs: What’s Under the Hood?

    Spec Details
    Type Cordless 5-in-1 robot (floors, walls, waterline, surface, ledges)
    Pool size rating
    Coverage Up to 3,875 sq. ft. per charge (roughly 65 ft. pools)
    Runtime Up to 10 hours (surface); up to 5 hours (floors/walls)
    Battery 24-cell, 13,400 mAh lithium-ion
    Charge time 3.5 to 4.5 hours (wireless station)
    Filtration Dual-layer basket (250/150 microns), auto-cleaned by station
    Debris bin 22L (~5.8 gallons), disposable bag liners, up to 2 months between emptying
    Suction 6,800 GPH (11 motors)
    Navigation HybridSense AI with camera, ultrasonic, infrared sensors (29 total), mapping first run
    Smart features Wi-Fi/Bluetooth app, multiple cleaning modes, scheduling, zone cleaning, night mode, voice control (surface mode only)
    Robot weight 28.9 lbs
    Station weight/size 41.9 lbs; approx. 25 x 21 x 22 inches
    Water resistance IP68 to 3 meters; saltwater compatible up to 5,000 ppm
    Warranty 3-year full replacement
    Price $3,999 (as of July 2, 2026)

    Design and Construction of the AquaSense X

    AquaSense X

    The AquaSense X resembles a sleek automotive component, with a low-profile, tracked drive system, a top handle for carrying, and a durable IMR coating designed resist UV and heat. Weighing nearly 29 pounds, it’s noticeably heavier than recent models like Beatbot Sora 70, which weighs 23 pounds. One ergonomic challenge is lifting the robot from the pool onto its docking station—Beatbot offers no custom caddy, although Aiper does.

    To ease this task, Beatbot has incorporated the SmartDrain feature. When the cycle ends or battery runs low, the robot surfaces, parks against the pool wall, and releases water from within, reducing weight for removal. You can also summon it to the pool edge via the app. While effective, this feature does not eliminate the need to lift the robot’s weight if you have mobility concerns.

    AquaSense X Side View

    The AstroRinse station is a weather-resistant cabinet weighing approximately 42 pounds, equipped with a bubble level, child lock, and corrosion and freeze resistance. Beatbot advises draining hoses and storing the station indoors during winter, as its internal plumbing isn’t designed to withstand freezing water.

    AquaSense X Rear View

    The station’s rinse nozzle doesn’t quite reach the top basket or lid underside, requiring occasional manual rinsing with a garden hose. Despite this minor flaw, the station automates debris disposal and recharging, adding significant convenience and reducing manual intervention.

    Battery Life and Charging Performance

    The 24-cell, 13,400 mAh battery offers up to 10 hours of surface skimming and about 5 hours of floor or wall cleaning, covering nearly 4,000 square feet per charge. During prolonged tests, a typical session used around 76% of the battery, confirming the claimed runtime. Wireless charging takes roughly 3.5 to 4.5 hours, and the station automatically maintains the battery’s charge status. The three-year replacement warranty covers the drive box and battery, providing peace of mind, especially as battery replacement can be costly.

    Smart Features & Mobile App

    The companion app simplifies pairing via Bluetooth or Wi-Fi, offers seven distinct cleaning modes, scheduling, custom zones with exclusions, and detailed coverage reports. Post-cleaning data includes exact square footage, duration, and battery usage, appealing to tech enthusiasts and meticulous pool owners.
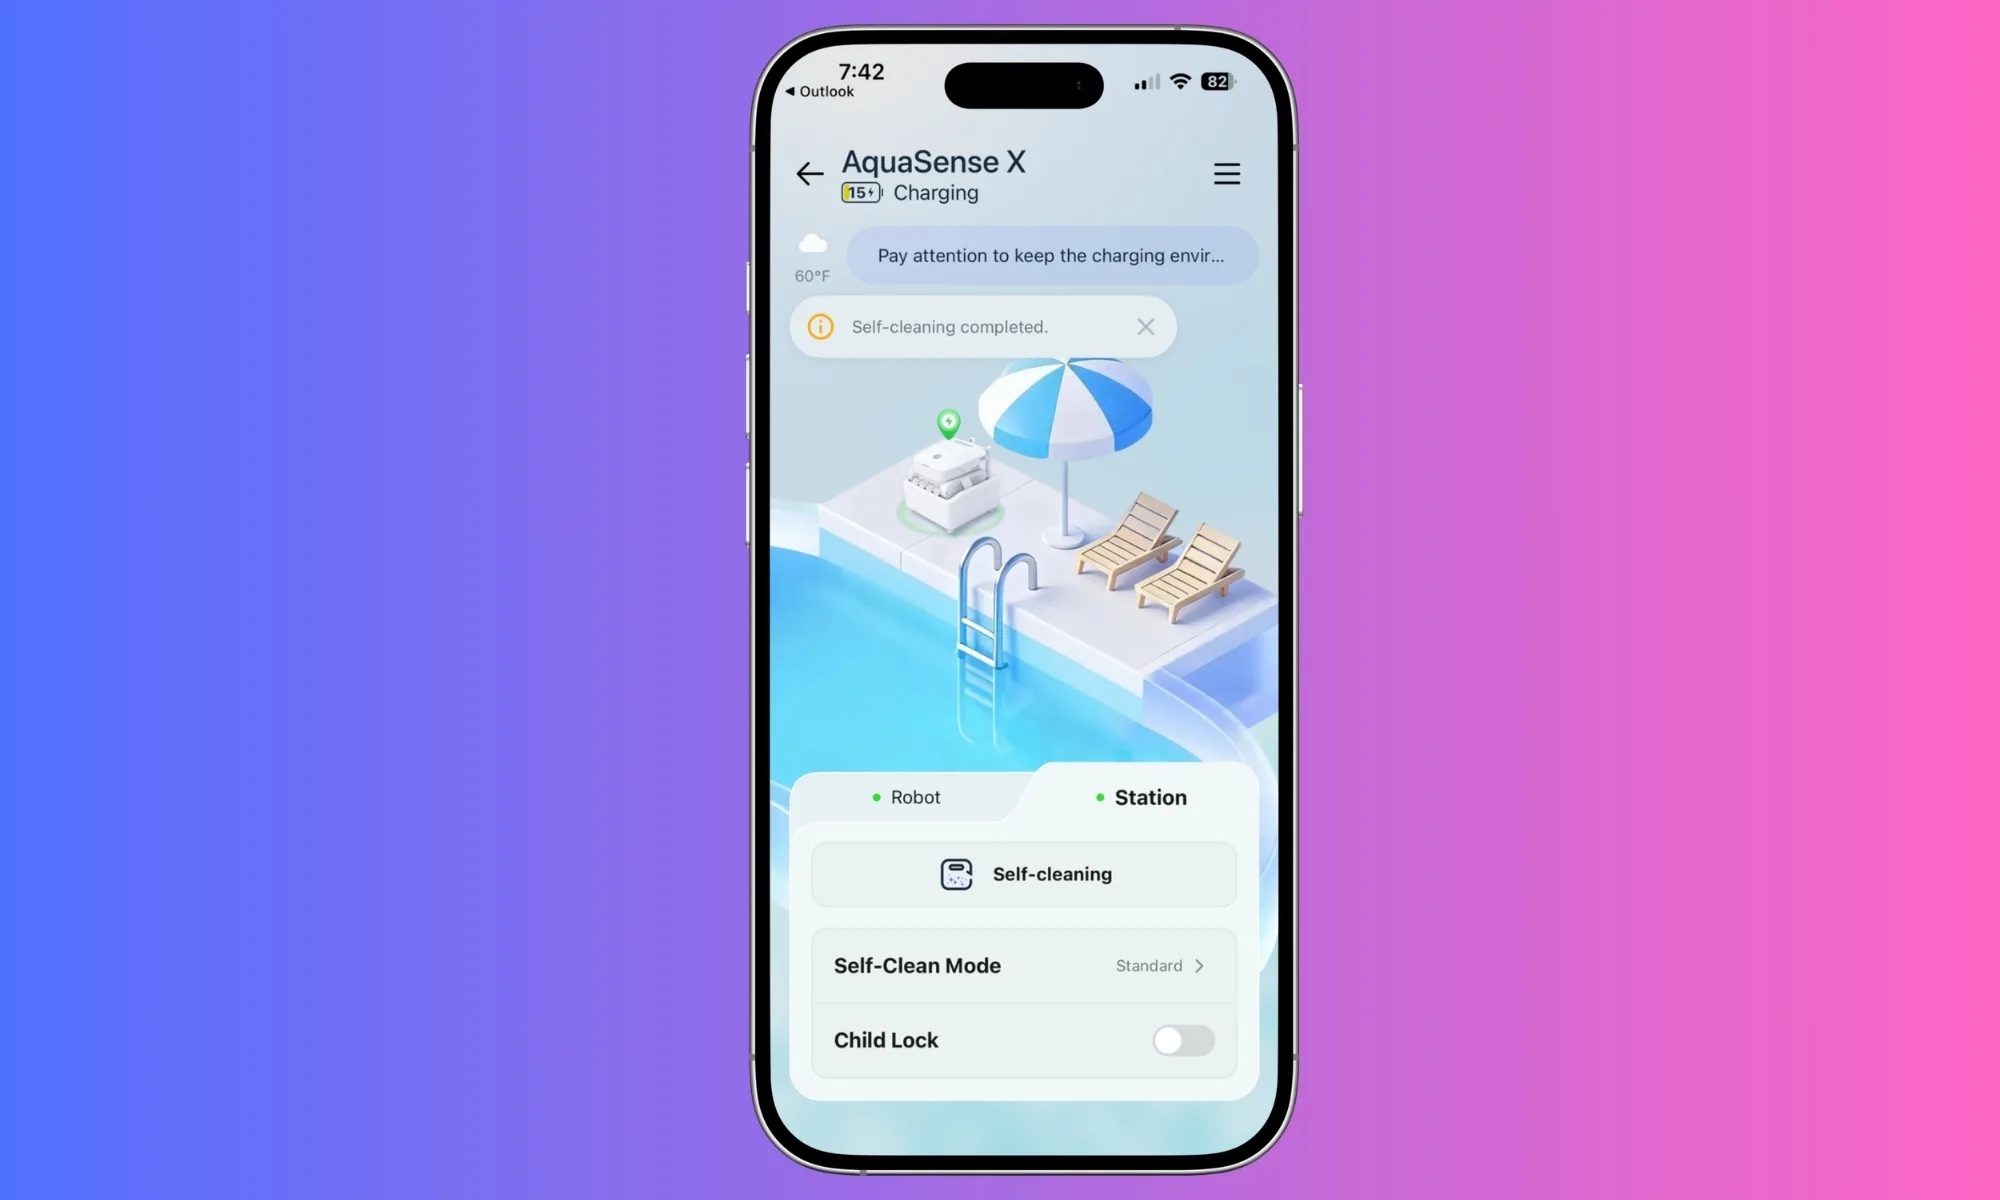
    AquaSense X App Interface

    The AquaSense X supports voice commands through Alexa, Google Home, or Siri for starting surface cleaning. However, voice control is limited and mainly for initiating specific tasks, making it more of a novelty than a practical feature.

    Impact and Noise Levels

    The robot operates quietly in water, emitting only a soft hum, with most noise coming from the station’s high-pressure backflush process—similar to a small pressure washer. The optional ClearWater clarifier system actively improves water clarity by dispersing a natural, recycled-crab-shell-based clarifier during cleaning cycles, which is effective but optional if you prefer manual dosing or already maintain water chemistry.

    How I Tested the AquaSense X

    Over six weeks, I tested the AquaSense X in a 15,000-gallon concrete pool with features like a hot tub, steps, and a ladder, surrounded by trees. I used various debris, pollen, and organic matter to gauge performance. Battery life was monitored during different cleaning modes, matching the manufacturer’s specifications closely.

    Alternatives & Considerations

    • Beatbot AquaSense 2 Ultra ($2,649): Former flagship, with 27 sensors, 5,500 GPH suction, and AI debris detection for about 20 debris types. Requires manual filter rinsing; provides a two-year warranty. Significantly cheaper, but lacks the AstroRinse station.
    • Aiper Scuba X1 Pro Max ($1,799–$2,299): Outperforms in suction and navigation with 8,500 GPH and 40+ sensors, plus surface skimming. Manual filter cleaning and a shorter warranty make it a good value for performance.
    • Dolphin Liberty 400: Weighs much less and is easier to retrieve, with a quick 90-minute cycle, but lacks surface skimming and automated filter care, at a lower price point.

    Should You Make the Investment?

    The AquaSense X excels as a cleaning robot—powerful suction, exceptional waterline scrubbing, intelligent debris targeting, and comprehensive surface coverage. Its standout feature is the AstroRinse station, which automates filter cleaning and debris disposal—adding a level of luxury and convenience that few others offer.

    However, at $3,999, before optional clarifier upgrades, it’s a significant investment—more than three seasons of a typical pool service. It’s the most capable and refined unit of its kind, perfect for those who want top-tier technology and don’t mind the higher price. Budget-conscious buyers can opt for the AquaSense 2 Ultra or similar models and still enjoy excellent results.

    FAQs

    Does the AquaSense X clean itself?

    It automatically backflushing the filter and disposing of debris via the AstroRinse station, but you still need to manually place the robot onto the station. The station handles filter cleaning, debris removal, and recharging, with no manual mucking required.

    What size pool is supported?

    Rated for pools up to approximately 3,875 square feet, operating in water depths of 1.6 to 9.8 feet. Larger pools may need additional recharges to complete deep or comprehensive cycles.

    Is it safe for vinyl liners and saltwater pools?

    Yes. It’s rated for various surfaces, including vinyl, fiberglass, and concrete, and handles saltwater up to 5,000 ppm.

    What does installation involve?

    Level ground near the pool, an outdoor GFCI outlet, Wi-Fi connectivity, enough space around the station, a water source for the inlet hose, and a drainage point for the slurry. In colder climates, drain hoses and store equipment indoors during winter.

    Are clarifier refills necessary?

    Optional. The robot cleans, scrubs, and skims effectively on its own. Clarifier cartridges can be purchased for about $49.99/month, treating up to 99,000 gallons, or manually dosed with generic products at a lower cost.

  • Elon Musk Calls “The Boys” Finale “Fake and Gay” in Homelander Row

    Elon Musk Calls “The Boys” Finale “Fake and Gay” in Homelander Row

    Digital Phablet – Elon Musk Criticizes Controversial ‘The Boys’ Finale Amid Homelander-Trump Comparisons

    Additionally, read:
    Donald Trump Calls Stephen Colbert "Talentless Jerk"
    Donald Trump criticizes Stephen Colbert following his exit from CBS

    Elon Musk recently labeled the ending of “The Boys” as “pathetic” after a post on X (formerly Twitter) suggested that Antony Starr’s Homelander character was used as a stand-in for Trump, symbolizing a “twisted sexual humiliation fantasy.” Musk expressed his disapproval through an X post on Thursday, reacting to the series’ conclusion.

    Series creator Eric Kripke responded with a humorous remark, stating, “Wow, that’s his review of what we did to Homelander. Honestly, I’ve never received a better review.”

    Musk clarified that he did not watch the series but shared a response to a critic’s comment, suggesting that Kripke might have received backlash from his wife’s boyfriend over Homelander memes, leading to that ending as a sort of apology.

    When an X user inquired about Musk’s frustration with the finale, he responded, “I’m not upset, just saying the ending sounds fake and gay.”

    Twitter Post by Eric Kripke, May 22, 2026:

    HAHAHAHA. He’s posting multiple times. Also, I have some notes on his joke writing. #TheBoys @TheBoysTV pic.twitter.com/Dhi9u8CdMe

    Why is Elon Musk upset about ‘The Boys’ finale?
    Musk’s comments seem to reflect a broader critique of how the series portrayed Homelander, who Kripke admits is a mirror for Trump. Kripke told Rolling Stone that Homelander embodies a volatile mix of insecurity, flaw-ridden power, and ambition. Notably, the finale introduced “The Disruptor,” a character expressing admiration for space and white fertility, donning a black-on-black embroidered hat which appeared to allude to Musk. When asked about this character’s reflection of Musk, Kripke explained that the finale needed “one last satirical target.”

    According to Forbes, Musk is currently the wealthiest individual worldwide, with an estimated net worth of about $817 billion as of Friday. He is anticipated to become the first Trillionaire if SpaceX proceeds with its public offering.

    Instagram Post
    View this post on Instagram

    The 2019 series “The Boys” has faced criticism from some viewers for its perceived anti-right-wing bias. Kripke describes the show as exploring the “intersection of celebrity and authoritarianism, and how social media and entertainment are used to promote fascist ideas.” The series often draws parallels to real-world events, including a season four storyline where a right-wing character delivers a speech linking youth to transgender issues and referencing conspiracy theories like adrenochrome associated with QAnon. Prior to the season’s release, Kripke advised viewers who found the series too “woke” to “watch something else.”


    Why is Elon Musk upset about ‘The Boys’ finale?
    Musk’s responses point to a wider critique of the series’ treatment of Homelander, who Kripke has acknowledged is a stand-in for Trump, representing a volatile mix of weakness, insecurity, and dangerous ambition. The new character introduced in the finale, “The Disruptor,” who shows fondness for space and white birth rates and sports a black embroidered hat—seems to be a nod to Musk himself. When asked if the character reflects Musk, Kripke said the show needed “one last political satire target” before concluding.

    As reported by Forbes, Musk remains the world’s richest person, with a net worth around $817 billion and the likelihood of becoming the first Trillionaire once SpaceX goes public.

    Instagram Post
    Elon Musk

  • All Evolution Combos in Ball X Pit: Completing and Solving

    All Evolution Combos in Ball X Pit: Completing and Solving

    Ball x Pit is a roguelike brick-breaking game where the key to success lies in evolving your balls. There are many different combinations of evolutions, and you can fuse certain evolutions to create powerful effects. While there are numerous hidden synergies and potential build strategies, the game doesn’t provide an official list of all evolutions within the game.

    Here is a comprehensive list of all the evolutions discovered so far, with detailed descriptions to help you plan your build.

    Note: This list has been updated with new evolutions introduced in the latest patch, “The Regal Update,” released on 01/26/2026.


    All Evolutions in Ball x Pit, by Ball Type

    Bleed

    • Bleed + Poison (Virus)

      • Applies 1 stack of Disease (max 8 stacks) to enemies hit.
      • Disease lasts 6 seconds.
      • Each stack deals 3–5 damage per second.
      • 15% chance to pass a stack when an enemy is killed.
    • Bleed + Brood Mother (Leech)

      • Attaches to enemies, dealing damage per second.
    • Bleed + Charm (Berserk)

      • Causes enemies to sometimes go berserk, attacking nearby enemies.
    • Bleed + Dark (Sacrifice)

      • Inflicts up to 15 stacks of bleed and applies a curse, causing massive damage after 5 hits.
    • Bleed + Iron (Hemorrhage)

      • Inflicts 3 stacks of bleed.
      • When an enemy has 12 or more stacks, all stacks are consumed to deal 20% of that enemy’s current health as damage.
    • Bleed + Vampire (Vampire Lord)

      • Inflicts 3 stacks of bleed on each hit.
      • Heals 1 health and clears all stacks when hitting an enemy with at least 10 stacks.

    Stone

    • Stone + Iron (Steel)

      • Deals double damage but moves 50% slower.
      • Damage increases with each hit, up to 300%.
    • Stone + Earthquake (Landslide)

      • Creates a landslide that destroys itself upon hitting an enemy.
      • Lasts 5 seconds, dealing 148–223 damage per second in a 2-tile radius.
    • Stone + Egg Sac (Catapult)

      • Launches 3–5 stone baby balls every 1.5 seconds, destroyed on contact with enemies.

    Steel

    • Steel (Stone + Iron) + Laser (Laser Cutter)
      • Emits a laser beam dealing 160–239 damage per second.

    Poison

    • Poison + Laser Beam (Radiation Beam)

      • Deals damage and spreads poison via the laser beam.
    • Poison + Earthquake (Swamp)

      • Leaves tar blobs; enemies on tar are slowed, damaged over time, and gain poison stacks.
    • Poison + Wind (Noxious)

      • Passes through enemies, applying poison.
    • Poison + Ghost (Virus)

      • Applies disease to nearby enemies; Disease lasts 6 seconds and deals damage over time.
    • Poison + Burn (Brimstone)

      • Applies 1 stack of burn and poison per second within a 2-tile radius, with up to 4 stacks. Burn deals 2–6 damage per second, poison deals 3–5 damage.

    Burn

    • Burn + Iron (Bomb)

      • Explodes on contact, causing large AoE damage with a cooldown.
    • Burn + Freeze (Frozen Flame)

      • Adds Frostburn on hit that lasts 20 seconds, dealing damage over time and increasing enemy damage received.
    • Burn + Wind (Inferno)

      • Applies a burn stack that lasts 6 seconds, dealing 3–6 damage per stack per second.
    • Burn + Earthquake (Magma)

      • Emmits lava blobs over time; damage-over-time effect with burn stacks.
    • Burn + Light (Sun)

      • Blinds enemies and adds burn stacks that deal damage over time.
    • Burn + Charm (Berserk)

      • Causes enemies to sometimes attack other enemies.
    • Burn + Poison (Brimstone)

      • Applies 1 stack of burn and poison every second within a 2-tile radius, max 4 stacks.
    • Burn + Egg Sac (Fireworks)

      • Explodes into fireworks that damage and burn enemies.
    • Burn + Dark (Banished Flame)

      • Adds a dark flame stack that burns and deals damage, detonating for massive damage when extinguished.

    Freeze

    • Freeze + Ghost (Wrath)

      • Freezes enemies it passes through.
    • Freeze + Burn (Frozen Flame)

      • Adds Frostburn that damages and increases enemy vulnerability.
    • Freeze + Laser (Freeze Ray)

      • Emits a freeze beam, with a chance to freeze for 10 seconds.
    • Freeze + Wind (Blizzard)

      • Freezes enemies in a radius and deals damage.
    • Freeze + Earthquake (Glacier)

      • Sends icy spikes that freeze and damage enemies over time.

    Lightning

    • Lightning + Charm (Lovestruck)

      • Causes enemies to sometimes heal you when they hit you.
    • Lightning + Freeze/ Wind (Blizzard)

      • Freezes nearby enemies and deals damage.
    • Lightning + Light (Flash)

      • Damages all enemies briefly and blinds them.
    • Lightning + Iron (Lightning Rod)

      • Plants lightning rods in enemies, striking them and nearby foes periodically.
    • Lightning + Wind (Storm)

      • Emits lightning periodically for damage.

    Iron

    • Iron + Lightning (Lightning Rod)

      • Places lightning rods on enemies, striking them every 3 seconds.
    • Iron + Dark (Assassin)

      • Passes through front enemies, dealing bonus damage for backstabs.
    • Iron + Ghost (Assassin)

      • Same as above, backward damage bonus.

    Cell

    • Cell + Egg Sac (Voluptuous Egg Sac)

      • Explodes into 2–3 egg sacs upon hitting an enemy.
    • Cell + Brood Mother (Maggot)

      • Infests enemies; when they die, spawns baby balls.
    • Cell + Earthquake (Overgrowth)

      • Adds stacks to deal AoE damage, consumes for damage at three stacks.
    • Cell + Poison (Radiation Beam)

      • Deals damage and adds radiation stacks to enemies.
    • Blood or Ghost + Poison (Virus)

      • Applies disease, damaging enemies over time.

    Charm

    • Charm + Bleed/Burn (Berserk)

      • Causes enemies to sometimes attack other enemies.
    • Charm + Dark (Incubus)

      • Charms enemies, which curse others; multiple hits damage cursed enemies.
    • Charm + Light or Lightning (Lovestruck)

      • Inflicts Lovestruck, healing you if hit.
    • Charm + Vampire (Succubus)

      • Charms enemies, heals you when hitting them.

    Laser

    • Horizontal + Vertical (Holy Laser)

      • Deals damage in same row and column.
    • Laser + Freeze (Freeze Ray)

      • Freezes enemies in path, also deals damage.
    • Laser + Poison (Radiation Beam)

      • Deals damage; spreads poison.
    • Laser + Light (Laser Beam)

      • Emits damaging laser that blinds enemies.

    Brood Mother

    • Brood Mother + Egg Sac (Spider Queen)

      • Has a chance to spawn an egg sac on hit.
    • Brood Mother + Vampire (Mosquito King)

      • Spawns mosquitoes that attack random enemies and heal you when they kill.
    • Brood Mother + Bleed (Leech)

      • Attaches and deals damage over time.
    • Brood Mother + Cell (Maggot)

      • Infests enemies; eggs spawn upon death.

    Dark

    • Dark + Bleed (Sacrifice)

      • Applies bleed stacks and curses enemies to deal massive damage.
    • Dark + Iron (Vampire Lord)

      • Backstab bonus damage and heals on hits.
    • Dark + Ghost (Phantom)

      • Curses enemies, dealing damage after hits.
    • Dark + Wind (Nixious)

      • Passes through enemies, applying poison stacks.
    • Dark + Light (Flicker)

      • Damages all enemies periodically.
    • Dark + Charm (Incubus)

      • Charms enemies, curses others.

    Light

    • Light + Dark (Flicker)

      • Damages all enemies periodically.
    • Light + Laser (Laser Beam)

      • Emits damaging laser.
    • Light + Burn (Sun)

      • Blinds enemies, adds burn damage.
    • Light + Lightning (Flash)

      • Strikes all enemies briefly and blinds.
    • Light + Charm (Lovestruck)

      • Charms enemies, possibly healing you.

    Earthquake

    • Earthquake + Burn (Magma)

      • Emmits lava blobs, burns enemies over time.
    • Earthquake + Freeze (Glacier)

      • Releases icy spikes to freeze enemies.
    • Earthquake + Poison (Swamp)

      • Leaves tar, damages, and slows enemies.
    • Earthquake + Wind (Sandstorm)

      • Deals damage and blinds enemies.
    • Earthquake + Cell (Overgrowth)

      • Adds stacks for AoE damage.
    • Earthquake + Stone (Landslide)

      • Creates a damaging landslide.

    Egg Sac

    • Egg Sac + Brood Mother (Spider Queen)

      • Chance to spawn an egg sac on hit.
    • Egg Sac + Iron (Shotgun)

      • Shoots baby balls, destroyed on contact.
    • Egg Sac + Vampire (Mosquito Swarm)

      • Explodes into mosquitoes attacking enemies, heals on kill.
    • Egg Sac + Cell (Voluptuous Egg Sac)

      • Explodes into multiple egg sacs.
    • Egg Sac + Burn (Fireworks)

      • Explodes into fireworks causing damage and burning.

    Ghost

    • Ghost + Dark (Phantom)

      • Applies curses, damage after multiple hits.
    • Ghost + Freeze (Wrath)

      • Freezes enemies passed through.
    • Ghost + Poison (Virus)

      • Diseases enemies.
    • Ghost + Vampire (Soul Sucker)

      • Saps life from enemies and steals health.
    • Ghost + Iron (Assassin)

      • Backstab bonus, passes through enemy front.

    Wind

    • Wind + Lightning (Storm)

      • Emits lightning strikes.
    • Wind + Earthquake (Sandstorm)

      • Deals damage, blinds.
    • Wind + Dark or Poison (Noxious)

      • Applies poison.
    • Wind + Freeze (Blizzard)

      • Freezes enemies, damage over time.
    • Wind + Burn (Inferno)

      • Adds fire stacks that deal damage.

    Vampire

    • Vampire + Ghost (Soul Sucker)

      • Saps life, chance to steal health.
    • Vampire + Egg Sac (Mosquito Swarm)

      • Mosquitoes attack enemies and heal you on kills.
    • Vampire + Brood Mother (Mosquito King)

      • Spawns mosquitoes attacking enemies.
    • Vampire + Bleed or Dark (Vampire Lord)

      • Bleed stacks that heal offset.

    Special Evolutions

    • Nuclear Bomb (Burn + Iron + Poison)

      • Explodes and inflicts radiation upon hitting enemies.
    • Black Hole (Burn + Light)

      • Kills a non-boss enemy instantly, then destroys itself.
    • Satan (Incubus + Incubus)

      • Adds burn stacks on all enemies, causing damage and berserk effects.
    • Nosferatu (Vampire Lord + Spider Queen + Mosquito King)

      • Spawns vampire bats which turn into Vampire Lord upon hitting enemies.

    Passive Evolutions

    • Grotesque Artillery (Turret + Hand Fan)

      • Circles around you, firing unevolved balls periodically.
    • Deadeye’s Impaler (Gracious Impaler + Reacher’s Spear)

      • Crit chance increased by 5%, chance to kill non-boss enemies instantly.
    • Cornucopia (War Horn + Baby Rattle)

      • More balls spawned when tiny balls are created.
    • Soul Reaver (Everflowing Goblet + Vampiric Sword)

      • Each kill heals you by 1, allowing healing past max health at 30% efficiency.
    • Wings of the Anointed (Radiant Feather + Fleet Feet)

      • Faster ball and character movement, immune to environmental hazards.

    This detailed guide helps you strategize your builds with various evolutions, combining effects for maximum efficiency and fun. Keep experimenting to discover more hidden interactions and build your own ultimate ball!

    No navigation or footer elements are included, just the core information for your reference.

  • How to Complete Every Achievement and Trophy in Ball x Pit

    • BONExYARD
      Complete the BONExYARD level. Just beat that level to fulfill the requirement.

    • SNOWYxSHORES
      Finish the SNOWYxSHORES level by beating it.

    • LIMINALxDESERT
      Complete the LIMINALxDESERT level by winning the level.

    • GORYxGRASSLANDS
      Finish the GORYxGRASSLANDS level with a win.

    • FUNGALxFOREST
      Complete the FUNGALxFOREST level by beating it.

    • SMOLDERINGxDEPTHS
      Finish the SMOLDERINGxDEPTHS level with success.

    • HEAVENLYxGATES
      Complete the HEAVENLYxGATES level by winning.

    • VASTxVOID
      Finish the VASTxVOID level by beating it.

    • BONExYARD Conquered
      Complete BONExYARD using 10 different characters. Win the level with a total of 10 unique characters.

    • SNOWYxSHORES Conquered
      Finish SNOWYxSHORES with 10 different characters. Win the level with a total of 10 unique characters.

    • LIMINALxDESERT Conquered
      Complete LIMINALxDESERT with 10 different characters. Win the level with 10 unique characters.

    • GORYxGRASSLANDS Conquered
      Finish GORYxGRASSLANDS with 10 distinct characters. Win the level with 10 unique characters.

    • FUNGALxFOREST Conquered
      Complete FUNGALxFOREST with 10 different characters. Win the level with 10 unique characters.

    • SMOLDERINGxDEPTHS Conquered
      Finish SMOLDERINGxDEPTHS with 10 unique characters. Win the level with 10 different characters.

    • HEAVENLYxGATES Conquered
      Complete HEAVENLYxGATES with 10 unique characters. Win the level with 10 different characters.

    • VASTxVOID Conquered
      Finish VASTxVOID with 10 characters. Win the level with 10 unique characters.

    • True Warrior
      Finish every level with the default character, The Warrior.

    • Repentance
      Complete all levels using The Repentant. Unlock by finding the Haunted House blueprint, building it, then beating all levels as The Repentant.

    • Itch Scratched
      Finish every level with The Itchy Finger. Unlock by locating the Sheriff’s Office blueprint, building it, then winning all levels as The Itchy Finger.

    • Cogitated
      Complete all levels as The Cogitator. Unlock by finding the Villa blueprint, building it, then beating all levels as The Cogitator.

    • Master General
      Finish all levels with The Tactician. Unlock by discovering the Captain’s Quarters blueprint, building it, then completing all levels as The Tactician.

    • All Spent
      Complete all levels with The Spendthrift. Unlock by finding the Mansion blueprint, building it, then beating all levels as The Spendthrift.

    • Embedder
      Finish all levels with The Embedded. Unlock by locating the Veteran’s Hut blueprint, building it, then completing all levels as The Embedded.

    • Radicalized
      Complete every level as The Radical. Unlock by finding the Campground blueprint, building it, then beating the game with The Radical.

    • Golden Years
      Finish all levels with The Empty Nester. Unlock by finding the Single Family Home blueprint, building it, then winning all levels as The Empty Nester.

    • Long Shadow
      Complete all levels with The Shade. Unlock by locating the Mausoleum blueprint, constructing it, then beating every level as The Shade.

    • Unpacked
      Finish all levels with The Cohabitants. Unlock by finding the Cozy Home blueprint, building it, then completing all levels as The Cohabitants.

    • Gravity’s Rainbow
      Complete all levels with The Physicist. Unlock by finding the Laboratory blueprint, building it, then beating every level as The Physicist.

    • Brick Breaker
      Finish all levels with The Shieldbearer. Unlock by locating the Iron Fortress blueprint, building it, then winning every level as The Shieldbearer.

    • Herculean
      Complete all levels with The Makeshift Sisyphus. Unlock by finding the Rocky Hill blueprint, building it, then beating every level as The Sisyphus.

    • Masochist
      Finish all levels with The Flagellant. Unlock by discovering the Monastery blueprint, building it, then completing all levels as The Flagellant.

    • Entertainer
      Complete all levels with The Juggler. Unlock by finding the Theater blueprint, building it, then winning every level as The Juggler.

    • Evolution
      Create your first evolution during gameplay: if you have two balls on level 3 and pick up a fusion drop, they can sometimes combine into a new ball.

    • Fusion
      Fuse two balls for the first time. When you have two level 3 balls and pick up a fusion drop, you can combine them into one. Unlike evolutions, any two balls can be fused this way.

    • Nosferatu
      Create the Nosferatu ball by completing these three evolutions:

      • Bleed + Vampire = Vampire Lord
      • Brood Mother + Vampire = Mosquito King
      • Brood Mother + Egg Sac = Spider Queen
        Then combine all three to make Nosferatu.
    • Nuclear Bomb
      Create a Nuclear Bomb ball by first doing the Bomb evolution with Burn and Iron balls, then combining the Bomb with Poison.

    • Satan
      To make Satan, perform these evolutions:

      • Charm + Vampire = Succubus
      • Charm + Dark = Incubus
        Next, fuse Succubus and Incubus to evolve into Satan.
    • Soul Reaver
      Combine the Vampiric Sword and Everflowing Goblet passive skills to produce the Soul Reaver.

    • Deadseye’s Cross
      Fuse the Sapphire, Ruby, Emerald, and Diamond daggers to craft Deadseye’s Cross.

    • Legion Slayer
      Kill a total of 100,000 enemies during your gameplay.

    • Riches
      Collect a total of 5,000 gold over the course of playing.

    • Wheat Farmer
      Gather 1,000 wheat in total, either during runs or by harvesting at your base.

    • Woodcutter
      Accumulate 1,000 wood, obtainable during runs or by harvesting at your base.

    • Stone Miner
      Gather 1,000 stone throughout gameplay, via runs or harvesting.

    • Gold Miner
      Mine 1,000 gold in a single harvest. You need about five fully upgraded gold mines with heroes assigned to maximize gold collection; position your cursor to bounce off all mines during harvest.

    • Bountiful Harvest
      Collect 100 wheat in a single harvest. Upgrade eight or nine wheat fields to level 3 and have workers harvest them.

    • Deforestation
      Gather 100 wood in a single harvest by upgrading multiple forests to level 3 and let workers harvest.

    • Boulder Breaker
      Collect 100 stones in one harvest by upgrading several boulders and having workers bounce around them.

    • City Planner
      Collect 50 blueprints, often found as loot during gameplay.

    • Trophy
      Build a trophy after winning a level. You get the blueprint upon victory and need to place it in your base for workers to construct.

    • Monument
      Construct a special building in your base that can be upgraded infinitely. Found in VASTxVOID level blueprints.

    • Worker’s Guild
      Unlock the blueprint during gameplay and construct the Worker’s Guild.

    • Evolution Chamber
      Find and build the blueprint for the Evolution Chamber during your run.

    • Relic Collector
      Obtain the blueprint for the Relic Collector in a similar manner and build it.

    • Bag Maker
      Discover the blueprint for the Bag Maker and construct it in your base.

    • Carpenter
      Find and build the Carpenter blueprint.

    • Land Grabber
      Expand your base five times. Access from the side menu and pay increasing gold costs; completing this grants the achievement.

    • Structural Power
      Upgrade a building five times to reach a +5 bonus in one attribute, boosting your characters’ stats.

    • S Rank
      Achieve S rank in any attribute, which improves character stats as levels are beat.

    • Neighborhood
      Build 15 housing structures, which introduce new characters. Unlock each from specific blueprints found in-game.

    • Fusion Evolution
      Fuse two already evolved balls by picking up a fusion drop, enabling the fusing of evolved balls.

    • Scholar
      Unlock every entry in the in-game Encyclopedia, which includes balls, passives, and enemies.

    • Ballbylon Has Risen
      Complete the game by beating the final level with eight different characters.

    • Legend of New Ballbylon (PlayStation exclusive)
      Unlock all other trophies in the game to earn the platinum trophy.

  • Tips for Completing and Solving Drag x Drive When Starting Out

    Tips for Completing and Solving Drag x Drive When Starting Out

    Drag x Drive is one of the launch titles for the Nintendo Switch 2, offering a unique way to play. You control your character by using the Joy-Con’s motion sensor as a mouse. You can hold the Joy-Con on a small table or on your lap, but the recommended method is to keep it on your legs for better control.

    There are some useful tricks that the game doesn’t directly teach you. The tutorial and onboarding process aren’t very good, which makes you miss important mechanics or things to try. That’s why we’ve put together these beginner tips to help you enjoy Drag x Drive to the fullest.

    Complete the Tutorial and Never Do It Again
    When you first start Drag x Drive, you’ll be thrown into a tutorial right away. It’s essential because the game relies on the Joy-Con’s motion sensors (no compatible with Pro Controller or other controllers). The tutorial explains how to move and make a basic shot, and driving your wheelchair feels natural, but that’s about it. To improve, practice different tricks in various situations and don’t rely solely on the tutorial’s explanations—these are often only shown as text in a menu. Spend a few minutes mastering the basics, then let autopilot handle the rest. You can access the tutorial later if needed, but it’s better to learn by playing and trying things out yourself.

    Don’t Jump Into Player Matches Too Quickly
    After finishing your first practice game against bots, the game will automatically match you with real players. Playing one real match isn’t bad — it gives you a taste of the game. But after that, you’ll get stuck waiting in a queue for the next match. Since the game doesn’t do a great job explaining the tricks you can do, it’s best to exit the multiplayer lobby and spend some offline time practicing your skills—more on that below.

    Shooting Contest Is the Best Minigame for Beginners
    In the offline playground, there are many minigames you can do alone. Some may seem silly, just for fun, but others are good for training. The Shooting Contest is a great example. It’s found in two versions on a court with a single basket. It’s a perfect way to practice shooting because no one is bothering you, but there are multiple balls and a time limit that makes you focus on improving. These elements make it more beneficial than playing on regular courts.

    Spend Some Hours Earning Trophies Offline
    You’ll see a trophy icon with a number on the right side of the screen, representing the trophies you can earn. Earning trophies involves beating records in minigames or winning against bots for the first time. You get one trophy for each minigame you complete successfully, and another for your first win against a bot with a different difficulty level. Earning all trophies won’t take long—just a few hours—and it’s an excellent way to practice before taking on real players.

    When Your Team Scores, Return to Your Side Properly
    After scoring, the ball will appear in the opposing team’s area, and you can’t touch it. You need to go back to your side and wait for the next play. Instead of turning around normally, make it a habit to drive backwards to return to your side. While it’s a bit slower, it keeps you constantly facing your opponents, reducing surprises from behind.

    Your Driver Doesn’t Make Much Difference in the Beginning
    After the tutorial, you can change your driver by opening the pause menu and selecting “Player Style.” There are three options, each with different attributes—bigger drivers are better for charging, smaller ones are faster. However, early on, these differences aren’t very noticeable. It’s best to stick with the default driver, as it’s balanced and helps you learn the game. As you progress, you can explore other options.

    Change Menu Controls to Use the Stick
    If you prefer navigating menus with the analog stick, you can change this setting. Open the pause menu, go to the Help tab, then Settings, and switch the last option for “Type in Menu Controls.” It’s more comfortable for longer play sessions. You can also keep the scoreboard visible if you prefer.

    Always Wait Until the Last Second to Toss the Ball
    When there are ten seconds remaining in a game, a timer will appear, signaling the countdown. Use this time to get close to the basket, dodge opponents, and prepare your shot. Shoot at the last second, just like in basketball, so the ball isn’t caught or blocked. Even if the timer hits zero, the shot will still go through if you release the ball before it ends, giving you a final chance to score and turn the game around. A slow-motion moment plays as the ball is in mid-air, adding a cinematic touch.

    Drive From the Sides to Tackle Opponents
    The best way to challenge a player with the ball is to approach from the sides instead of straight in front. Charging head-on can work sometimes, but running from the sides makes it easier to follow their movements and track their turns. It also gives you better control and reduces chances of missing or being pushed aside. Charging opponents without the ball is also effective for disrupting their passing or helping your teammate.

    Keep Clapping Throughout the Game
    This might sound funny, but you can mimic clapping with your Joy-Con at any time. Your character will clap along with the sound effects. While it may seem trivial, it can be part of mind games—start clapping whenever your team scores to throw off your opponents. It might annoy them, causing mistakes or looser defenses, giving you an edge.

    This collection of tips should help you build confidence and improve your skills in Drag x Drive, especially before jumping into competitive matches online.

  • Completing Every Classroom Question in Persona 5: The Phantom X

    Completing Every Classroom Question in Persona 5: The Phantom X

    In Persona 5: The Phantom X, while you’ll be busy battling demons and capturing hearts, you’ll also have to deal with the everyday rigors of school. Yes, that’s right—the school setting, a beloved part of the Persona franchise, returns! You’ll find yourself answering questions from teachers on various subjects, and doing well will help improve your knowledge stat.

    But what if you’re not quite sure about certain topics? Say you’re stumped by a question about kimari-ji because you’ve never even heard of Karuta. No worries! Check out our handy list of answers below. We’ve gathered responses to help you out, and who knows, some of these facts might even come in handy in real life!

    Answers to Persona 5: The Phantom X’s School Quiz Questions

    As promised, here’s a list of all the questions we’ve come across so far. We’ve sorted them alphabetically since their order seems to be random. I’ll keep updating this list as I encounter new questions. Good luck with your studies, classmates!

    Questions

    Answers

    A metaphor to illustrate one’s actions that impact others negatively compares a person to which fruit?

    Apple.

    Archimedes’s cattle problem was posed around 250 B.C. How many years did it take to get solved?

    2,000 years.

    “Abduct.” “Only.” “Never.” Which word is derived from a number?

    Only.

    Beehives are made of many regular hexagons. Why do you think that is?

    It saves on materials.

    Compared to “destiny,” is “fate” more positive or negative?

    Negative.

    Confucius said not to speak of the unknown but studied divination. Is this contradictory?

    No.

    One “oku” in Japanese is a large amount. How much exactly is it?

    One hundred million.

    Heliocentric theory is a massive problem for which field of study?

    Religion.

    Henry Cavendish may be an excellent scientist, but what was the one thing he never did?

    Socializing.

    The Nobel Prize is awarded in many areas, but which field does not receive one?

    Mathematics.

    The word ‘melancholy’ used to refer to a secretion. Which organ produced this secretion?

    The liver.

    Was the author of “The Tosa Diary” a man or a woman?

    A man.

    What is the state of human society without law?

    War.

    What did women find attractive about Hikaru Genji, the ultimate playboy?

    His wealth.

    What’s unique about owl earholes that aids in hunting?

    They’re positioned unevenly.

    What was Ghino di Tacco’s nickname?

    Gentleman.

    Which figure inspired Slovakia’s version of Robin Hood?

    Juraj Janosik.

    Which 17th-century artist was known for revenge-themed paintings and is considered the greatest female painter of the Baroque?

    Gentileschi.

    Which of these was a famous smuggler? Let’s see if you know your French history.

    Louis Mandrin.

    Which civilization’s name reflects its surrounding geography?

    Mesopotamia.

    What material was not used for Roman roads? Here’s a hint: it doesn’t last long.

    Wood.

    What’s the minimum number of syllables a kimari-ji can have in this game?

    1.

    What was dodgeball originally called? It had a frightening sound.

    Deadball.

    When Kiyomori has a fever, what happens to the water poured on him?

    It boiled.

    Why were spices crucial during Magellan’s expedition around the globe?

    Because they could be very profitable.

  • Completing Persona 5: The Phantom X—Solving Key Insights To Know

    Completing Persona 5: The Phantom X—Solving Key Insights To Know

    With the recent release of Persona 5: The Phantom X, fans of the franchise are diving right in. While many elements feel familiar, this game introduces several important changes that alter how it is played.

    But don’t worry! We’re here to guide you through all the new features, helping you connect your social accounts and summon your Personas effortlessly. While there’s a lot to learn, following this guide will make the once daunting aspects clear and manageable.

    Understanding Leveling in Persona 5: The Phantom X

    If you’re transitioning from previous Persona games, one of the main changes to note is the leveling system. The way Wonder, your main character, levels up is distinctly different from how the other characters do.

    First, unlike the rest of the cast, Wonder is the sole character who gains experience from combat in dungeons. While this method can yield some early levels, it’s not the most efficient route. For the best experience gain, focus on the following:

    • Complete your daily missions. Tasks like fusing Personas or taking on part-time jobs are essential.
    • Finish your missions. These missions often involve building social links, which enhance your gaming experience.
    • Work through Realm Of Repression missions. These are highly effective for leveling Wonder. Completing one encounter can multiply your experience significantly if you use your stamina wisely.

    This list highlights some key strategies for leveling Wonder efficiently. Be aware that many methods rely on daily resources that reset after a certain period. If you try to grind after depleting these resources, it might feel less productive.

    Wonder also features a skill tree accessible in the Thieves menu. You can unlock new abilities by earning “Schema” through obtaining and registering new Personas in the Velvet Room’s Persona Compendium.

    Leveling Your Other Party Members

    Arai celebrating after defeating her foes in Persona 5 The Phantom X.

    Training your other party members is a more straightforward process. Access this feature through the Thieves menu; once there, select a character and hit Training. You will need two sources of materials to enhance your team: Fragrance Bottles and Training Materials. The materials facilitate level increases, while fragrance bottles help in upgrading hidden abilities. It is crucial to alternate using both types of materials, as you won’t reach the next level until you’ve upgraded the corresponding hidden ability.

    You can find these materials in treasure chests during dungeons, but the most efficient way to gather them is through Realm of Repression missions, which complements leveling Wonder effectively. Just remember, the limit on your party members’ levels is tied to Wonder’s level. Even with all the necessary materials, a party member cannot level up beyond what Wonder has achieved.

    If you find yourself needing a higher-level Fragrance Bottle, you can exchange lower-tier bottles for the next level at a three-to-one ratio at the workbench.

    Prioritize the Beginner Banner

    The Newcomer Contract Banner in Persona 5 The Phantom X.

    As you play, you’ll earn many Golden Tickets and have offers available in the Contracts menu. Initially, it’s wise to focus on the “Newcomer Contracts” banner. This banner has a lower threshold for obtaining a five-star character, allowing you to choose among Ann, Morgana, and Ryuji. Plus, there’s a discount that lets you make 50 pulls for only 40 Gold Tickets.

    Note that while you are guaranteed a five-star character after reaching the maximum pulls, your selection may not be the one you want since some banners feature multiple five-star options. For example, the Phantom Magician banner ensures you’ll receive Joker after 80 pulls.

    It’s worth mentioning that there’s no soft pity feature right now in Persona 5: The Phantom X. So, unlike other gacha games, you may need to hit the hard pity ceiling for a higher chance of getting the five-star character you desire.

    Playing regularly will also teach you the game mechanics, expose you to shopping options, contracts, and more. During exploration, keep an eye out for exclamation marks in your menu, as they indicate new activities with the potential for items, experience, or other rewards.

    For instance, if you see an exclamation point near Awards, Plans, or Goals, there’s an award ready for collecting. An exclamation mark over Tutorials means a tutorial is available, which may not seem thrilling, but completing it grants you additional currency.

    While some exclamation marks, such as those in the Thieves menu, might be easy to ignore since they indicate standard actions, in the early game, it’s beneficial to check them out for potential rewards.

    Focus on Completing Daily Content

    Wonder in the Velvet Room in Persona 5 The Phantom X.

    Although Persona 5: The Phantom X can feel like an exciting new entry in the series, it remains a gacha title, meant for daily engagement rather than marathon sessions. So, even on days when you aren’t inclined to play, take ten minutes to log in and accomplish the following:

    • Log in to collect your daily Hoot-n-Loot.
    • Grab the free daily item pack available in the shop.
    • Complete four daily goals.
    • Utilize your energy in the Realm of Repression, especially when it is maxed out.
    • Make use of your action points if you’re nearing capacity.

    The theme is clear: avoid letting resources that automatically regenerate reach their maximum limits. If they do, use them right away since sitting on them does not benefit you. Resources that passively restore are crucial, and you want to ensure they are actively helping you progress.

    You can triple any activity meant to reward you, just avoid doing this with anything marked as “new,” as you won’t triple all the rewards.

    Maximizing Your Limited Meta Jewels

    Wonder facing the giant cube and receiving a reward for completing the Realm Of Repression in Persona 5 The Phantom X.

    Meta Jewels are among the most valuable currencies you’ll find in Persona 5: The Phantom X. You earn them through daily challenges, but even with a steady influx, you’ll often find yourself short. Thus, strategic use is essential for making daily progress.

    While you might be tempted to spend them on gacha pulls (150 jewels equals one pull), this may not be the best approach early in the game. If Wonder isn’t adequately leveled, your sessions could devolve into frustrating grinds. Instead, participate in Realm of Repression events to level Wonder up effectively. You can use Meta Jewels to purchase coffee, which replenishes energy, allowing you to buy five coffees a day at a cost of 60 jewels each. This strategy is highly recommended during the early game.

    However, if you’re close to the threshold for a gacha pull, investing your Meta Jewels into achieving that pull can be more beneficial. As you progress, consider saving your Meta Jewels to make bigger rolls on upcoming banners, especially if a favored character is set to feature.

    Evenly Level Your Party for Diverse Enemy Encounters

    persona5-the-phantom-x-press-image-1.jpg

    Your success in clearing challenges like Memento Trials and tackling various enemy encounters hinges largely on your party’s composition. In true Persona style, attacking elemental weaknesses is crucial. It won’t take long before you face battles that become nearly impossible without the right team setup.

    Wonder’s versatility with a range of Personas is advantageous, but having a diverse party increases your chances of success significantly. While you might have some constraints at the start, the game offers ample Golden Tickets, Platinum Tickets, and Meta Jewels to expand your roster effectively.

    Acquiring New Personas

    persona5-the-phantom-x-press-image-2.jpg

    Having a variety of Personas for Wonder is essential for overcoming tougher challenges. Aim to collect Persona Seals, which you can find while exploring dungeons, but the majority will come from the Realm of Repression.

    Your priority should be to obtain seals for each elemental category. Better yet, aim for two of each type, which will come in handy during Velvet Room Challenge Battles. Remember to level up all acquired Personas, as materials for this can also be gathered in the Realm of Repression.

    You can teach a Persona skills associated with relevant elements, but note that while this is useful for activating elemental weaknesses, when performing a Once More attack, Wonder will use a move based on their base element. This can be less effective for executing chain combos that stun multiple enemies.

  • Completing the Dual Front Mode in Rainbow Six Siege X

    Completing the Dual Front Mode in Rainbow Six Siege X

    Rainbow Six Siege X is changing everything you thought you knew about Siege with its exciting new mode, Dual Front. This permanent addition transforms each round into a frenzy of tactical action where strategy and swift choices are key to victory. If this is your first time entering the Dual Front arena, this guide will help you navigate the mode and give you the insight you need to compete effectively.

    From gameplay mechanics to winning strategies, we’ll cover all the essentials. Let’s dive into what distinguishes Dual Front from other modes and how you can leverage it for success.

    How to Play Dual Front

    In Dual Front, you engage in a 6v6 battle with both attacking and defending happening simultaneously on an expansive map. Teams are divided into two lanes: one for offense and the other for defense, connected by a central neutral zone. Your primary objective is to move into enemy territory while accomplishing a series of tasks, all while safeguarding your own area from intruders.

    In the attack lane, your mission is to reach the enemy’s objective zone, plant a Sabotage Kit, and defend it until it detonates. Successfully completing this opens access to a second sector and leads you to the final challenge: the enemy’s HQ. Destroying the HQ clinches your victory. Meanwhile, your opponents are racing to do the same in your defensive lane.

    To secure a win, balancing your offensive and defensive roles is crucial throughout the match.

    Rainbow Six Siege X's player pointing gun at a wall.

    This mode features unlimited respawns and permits operator switches following each death. You can choose from a rotating selection of Attackers and Defenders, facilitating a versatile team dynamic.

    Operators usually considered defensive can now play offensive roles, and the reverse is also true.

    The neutral zone situated between the lanes functions as a dynamic combat space. Here, you can quickly reposition or execute flanking maneuvers. This area also includes rotating side objectives, such as hostage rescues, which offer team-wide benefits upon completion.

    These tasks will vary with each season.

    Winning Tips and Tricks

    Player with a gun attacking in Rainbow Six Siege X: Dual Front mode.

    To thrive in Dual Front, players should fully utilize the unique mechanics within the mode. Here are some key strategies and practical tips designed to enhance your chances of winning.

    Tips

    Explanation

    Rotate between lanes

    Actively transition between the attack and defense lanes to aid teammates as needed. Stay responsive to changing threats.

    Switch between operators

    Leverage unlimited respawns by changing operators during the match to counter enemy strategies or adapt your role.

    Mix traditional roles

    Employ defensive operators for offensive plays (and vice versa) to enhance strategic flexibility.

    Utilize the neutral zone

    Take advantage of the middle area for flanking, ambush tactics, and quick repositioning. It’s optimal for shuttling between lanes.

    Complete side assignments

    Tasks in the neutral zone, like hostage rescues, provide team-wide buffs. Ensure you prioritize these when safe.

    Stay active on defense

    Refresh traps, reinforce vulnerabilities, and respond to breaches. A passive defense is ineffective in this fast-paced arena.

    Use environmental hazards

    Shoot red gas pipes to create dangerous explosive traps.

    Listen for audio cues

    Pay attention to footsteps, gunfire, and breaches. Use this info to predict enemy movements.

  • X Is Down Again And The Reason Is Unclear

    X Is Down Again And The Reason Is Unclear

    X is currently facing issues with both its mobile and desktop platforms. The company has yet to publicly address these concerns.

    While users can still see posts, navigating to a user’s homepage often results in a blank screen, displaying a message indicating that the account has no posts available. For instance, here is the profile of Elon Musk, the owner of X, known for his frequent updates:

    The issues began around 6:30 p.m. ET and seem to affect users around the world.

    We will provide updates as new information becomes available.

  • Musk Takes Responsibility for X Crash, Vows Unwavering Effort

    Musk Takes Responsibility for X Crash, Vows Unwavering Effort

    Elon Musk Takes Responsibility for X Outage

    WASHINGTON: Elon Musk has stepped up to accept responsibility for a significant outage experienced on his social media platform, X.

    After a two-hour downtime on Saturday, Musk noted that substantial changes are necessary and vowed to dedicate more time to resolve ongoing issues and concentrate on his various businesses.

    As the owner and CEO of X, xAI (the developer behind the AI chatbot Grok), electric vehicle manufacturer Tesla, and aerospace company SpaceX, Musk certainly has a packed schedule. Additionally, he has recently been involved in controversial initiatives aimed at reducing thousands of jobs within the U.S. government, which have drawn considerable criticism.

    Amidst the growing backlash over these job cuts and a decline in Tesla’s stock prices, Musk appears to be pulling back from his governmental roles to refocus on his core ventures.

    Following the incident at X, Musk reflected on his absence, suggesting he might have been away longer than he should have.

    “As shown by the recent uptime issues at X, there are significant operational improvements needed,” Musk stated. He added, “I need to return to working around the clock and even sleep in the conference room, server room, or factory.”

    He emphasized the necessity of focusing intensely on X, xAI, and Tesla, especially with the Starship launch scheduled for next week as they navigate critical technological rollouts.

    Regarding the X outage, Musk commented, “The failover redundancy should have activated, but it did not.”

    By 11:00 am Saturday (1500 GMT), X had mostly resumed normal operations. When approached for comment, the company did not respond immediately.

    On Friday, SpaceX announced plans for another attempt to launch its mega-rocket Starship next week, following two previous flights that ended in explosions.

    Earlier this month, Musk admitted that his ambitious government efficiency program aimed at cutting federal spending through the Department of Government Efficiency (DOGE) fell short of its goals, despite laying off tens of thousands of employees and implementing drastic budget reductions.

  • Threads Unveils New Bio Feature That Outshines X

    Threads Unveils New Bio Feature That Outshines X

    What can enhance your bio? Perhaps two links? Or even three? Threads is now expanding its capabilities, allowing users to include multiple links in their bios—outpacing the single link option available on X, previously known as Twitter.

    In a press release issued on Thursday, Meta revealed that Threads users can now add up to five links in their bios. This update is particularly beneficial for content creators, enabling them to link to their podcasts, YouTube channels, Twitch streams, TikTok profiles, newsletters, articles, and more, facilitating greater engagement with their audience beyond Threads.

    Along with the ability to add more links compared to the single link limitation on X, Meta is also introducing a weekly recap feature within Insights. This allows users to track how their links perform each week, providing insights into the number of clicks, whether the links are shared through bios or posts, and comparisons of post engagement over time. Additionally, users can monitor their total views, growth in followers, and receive suggestions on optimizing their content to better connect with their audience.

    The recent enhancement of allowing multiple links in Threads comes just two months after the introduction of a feature enabling users to showcase up to ten topics in their profiles. This idea aimed to enhance the visibility of other users and content creators with shared interests. Furthermore, users can tag topics in their posts, directing others to a feed filled with discussions about those specific subjects.


  • Top Strategies for Completing Quick Gems in Anime Rangers X, Roblox

    Top Strategies for Completing Quick Gems in Anime Rangers X, Roblox

    Your primary focus in Roblox’s Anime Rangers X should be empowering your team with new units. You can summon more powerful characters through the special Summon Banners, and this is where Gems become essential.

    In Anime Rangers X, Gems serve as one of the valuable currencies. These unique gems let you take a chance at acquiring rare units. If you’re looking to maximize your Gem farming strategies, we have some effective options you can explore. Here are all the tips you need to effectively farm Gems.

    Top Tips for Farming Gems

    Obtaining mythic and legendary units can be quite a challenge due to their low drop rates. In fact, Mythic units have only a one percent drop chance, whereas Legendary units have a five percent chance.

    If you want to boost your progress, you’ll need to learn the most effective ways to quickly get your hands on those valuable Gems. There are six reliable ways to acquire Gems in Anime Rangers X:

    • Quests
    • Units Index
    • Story Stages
    • Level Milestones
    • Boss Events
    • AFK World

    Complete Daily and Weekly Quests

    The player character shows the quests tab in Anime Ranger X.

    One effective way to earn hundreds of Gems is by completing quests. You’ll find various simple objectives, such as playing a certain mode or defeating a specified number of enemies. Each completed quest rewards you with Gems and additional perks.

    To claim your rewards, click the yellow quest button on the left side of your screen. This will display all available quests and their associated rewards.

    Gather New Units

    The player character shows the Index tab in Anime Ranger X.

    The Units Index is another effective method for farming Gems. Each time you summon a unit that you haven’t collected before, it gets added to your Units Index. For every new unit, you’ll earn 50 Gems.

    To collect your Gems, head over to the Units Index NPC located near the Summon area entrance. Approach this NPC to claim your reward.

    Grind the Final Chapter of Story Stages

    The player character shows the Story Stage tab in Anime Ranger X.

    Participating in Story Stages can yield great benefits, including Gems for completing objectives. However, only the last chapter of each stage rewards you with these gems. To effectively farm Gems, focus exclusively on the last chapter of each stage.

    Additionally, playing on Nightmare difficulty will increase the number of Gems you can earn, so don’t miss out on that opportunity.

    Level Up for Rewards

    The player character shows the Level Milestone tab in Anime Ranger X.

    Another straightforward way to earn Gems is through the Level Milestone system. Each time you level up every five levels, you can claim a reward from the Level Milestone NPC located near your spawn point. These rewards may include Gems along with other useful bonuses, such as Trait Rerolls.

    Don’t Overlook Boss Events

    The player character shows the Boss Event tab in Anime Ranger X.

    Boss Events are a fantastic way to earn extra Gems. These usually limited-time events offer rare items and even unique units as rewards. Moreover, defeating bosses typically grants you Gems, making these events a prime opportunity for Gem farming.

    Utilize the AFK World While You’re Away

    The player character shows the AFK World tab in Anime Ranger X.

    One of the easiest ways to collect Gems is to remain in the AFK World. While you may not earn a huge number of them, this method allows you to gather Gems passively while you focus on other tasks. Just leave the game running, and watch your Gems accumulate.

    Keep in mind that premium players receive 1.5 times more currency, while VIP players earn 2 times more Gems.

  • Everything You Can Permanently Miss While Completing Xenoblade X

    Everything You Can Permanently Miss While Completing Xenoblade X

    Since Xenoblade Chronicles X: Definitive Edition is such a large game, it comes packed with a lot of content. The planet Mira offers countless sights and activities. However, given that many quests have multiple endings based on your choices, you might be concerned about whether there’s any content you could permanently miss out on.

    The short answer is yes; while most stuff isn’t permanently missable, there are a few items and missions that would require starting a new playthrough if you overlook them. Below, you’ll find a complete list of what can be missed, along with the best ways to ensure you don’t lose access.

    Be aware that this article contains some minor spoilers.

    Missable Content Overview

    Given the extensive variety of content in Xenoblade Chronicles X, we’ll categorize each major type of missable content. This should help you pinpoint what you might miss and focus on it. Let’s dive in.

    Companion Content

    In terms of companions, there’s only one character, Lao, whose content is missable. All heart-to-hearts and affinity missions related to other characters will always be accessible, regardless of your progress.

    Since Lao’s role in the party changes as you move through the game, there will come a time when you can no longer interact with him, meaning you’ll miss out on any related content. His two Affinity Missions, however, are necessary for story progression, so you’ll unlock his Signature Arts for your character.

    Do keep in mind that his heart-to-hearts are permanently missable, so it’s crucial to max out his affinity early. Lao will leave your party after Chapter Nine, and he won’t return, so make sure you engage with him fully before that point.

    All items equipped on Lao will remain with him until you finish Doug’s final heart-to-heart after Chapter 12. Therefore, be sure to remove any gear you want to keep beforehand.

    Items

    When it comes to items like Skell gear, weapons, and armor for your characters, there’s very little that you can permanently miss. However, if you’re a completionist aiming to own every single item, there are some key pieces to keep an eye on.

    Here’s a list of missable items and how to obtain them:

    Item How To Obtain Cut-off Point
    Sparkjet Rifle During the ‘What The Skell?!’ mission. It is destroyed during the mission, similar to the Ramjet Rifle in the ‘Weaponized’ Affinity Mission.
    Unbreakable Sword During ‘The Unbreakable Sword’ mission. You must choose to accept it as a reward for retrieval.
    Hundred Devil Sword During ‘The Duel (Part IV)’ mission. Opt for ‘Rejoice‘ and then ‘Accept‘ to obtain it; other choices will lead to losing it.
    L-Cannon, A-Spear, F-Arrow Drop from Caladar enemies by destroying their weapon appendages. These enemies are only present in specific quests, so make a save before the encounter if you want these items.
    Busted Skell Armor Defeating certain enemies (No-dhor, Shadowcaster, Molybdenum Xe-dom) that can drop Skell Armor. Busted Skell Armor stops dropping after Chapter Four.
    AS0115 Formula XT Skell Used in ‘A Girl’s Wings’ Affinity Mission. Returned at the mission’s end along with any equipped Augments.

    In the original version, if weapons were equipped to the AS0115 Formula XT during the mission, they were permanently lost upon completion.

    Aside from these items, all other assets are available throughout the game, ensuring you don’t miss out on them.

    Mutually Exclusive Quests

    While they’re not numerous, a few missions are either unlocked based on specific choices or are mutually exclusive, requiring a second playthrough for full completion. Here’s a breakdown:

    Base Quest Mutually Exclusive Quests How To Unlock
    City Saviors A Painful Lesson
    • If the player kills the Suids, the mission ends.
    • If the player spares the Suids, A Painful Lesson opens up after Chapter 7.
    Definian Downfall
    • Definian Love
    • Fortune And Glory
    • If the player selects Suggest Killing, Definian Love opens after Chapter 12.
    • If the player chooses Suggest Mercy, Fortune and Glory unlocks after Chapter 12.

    For City Saviors, only the initial quest affects your Survey Rate. A Painful Lesson provides only credits and EXP, so missing it doesn’t result in any permanent losses. In the case of Definian Downfall, your choice influences the following mission, but the rewards are similar, with Fortune and Glory offering slightly more credits and experience. Both lead to the same subsequent quests, so you’ll unlock those no matter your decision.

    Aside from these scenarios, every other quest is available throughout the game, and you may need to complete certain missions before advancing plot points, particularly involving Lao’s Affinity Missions and the Manhunt Affinity Mission concerning Ryyz and Dagahn.

    Online Content

    With the Wii U’s online services no longer operational, a lot of content from the original game became unavailable, including Squad Missions and additional Reward Tickets. However, this has been addressed in the Definitive Edition. Reward Tickets are now known as Material Tickets and are provided daily, regardless of whether you play online.

    This change ensures that rare items obtained from online missions and Global Nemeses will still be accessible after the eventual shutdown of online services in the Definitive Edition through the Material Market, which remains available offline.

    However, once online features are turned off, obtaining some materials will be slower, and there’s a possibility that the Global Nemeses can no longer be faced.

    Does Missable Content Affect Your Survey Rate?

    Tatsu with a confused expression in Xenoblade Chronicles X: Definitive Edition.

    Fortunately, no! Most missable content does not affect the Survey Rate, including events related to Lao or mutually exclusive quests. The sole exception is Lao’s hangout spot. While every hangout contributes to the Survey Rate, Lao’s can be missed. However, if overlooked, it will automatically complete after Chapter 11, once you learn of Lao’s fate, since he will no longer be available.

    Other than that, nothing else that can be missed will impact your Survey Rate. So you can progress through the game without stress about losing out on 100% Survey Rate.

    As Survey Rate is marked by completed Segments, the new content involving Neilnail and Liesel does not contribute to Survey Rate either.

  • Battle Tips for Completing Xenoblade Chronicles X: Solving Strategies

    Battle Tips for Completing Xenoblade Chronicles X: Solving Strategies

    Xenoblade Chronicles X: Definitive Edition is undeniably complex, featuring intricate systems throughout the game, especially in its combat mechanics. If you’re new to it, don’t worry—you’re not alone in feeling a bit overwhelmed at first. This complexity can take a significant amount of time to get used to, perhaps as long as twenty hours or more.

    However, there are plenty of strategies to simplify your experience in both the short and long term. By following some helpful tips, you can navigate the challenges of Xenoblade Chronicles X’s combat more easily. Rest assured, there will still be a lot to learn and master in other areas of the game.

    ### Target Enemy Weak Spots

    Many foes in Xenoblade Chronicles X have several weak points, such as limbs, essential organs, and more. The game suggests that destroying these weak spots can increase your chances of earning rare loot, but it also has another, equally important benefit: knocking out specific appendages can disrupt your enemies’ most potent attacks. This is crucial since many strong enemies depend on those abilities to deal significant damage. Taking these out early can greatly help your odds in battle.

    ### Specialize in One Combat Art

    You might notice that the effectiveness of various Arts increases significantly when you enhance them using Battle Points. While the cost to upgrade each Art does rise, the results justify the effort. Choose an offensive Art that suits your playstyle and devote your Battle Points to max it out. This approach often leads to impressive outcomes.

    For instance, consider the Rising Blade from the Striker class. It inflicts extra damage if you’re targeted, and as you upgrade it, the damage output increases even further. If you fully max it out, you can deal substantial damage even at lower levels. While this means sacrificing the upgrades of other Arts temporarily, the long-term benefits are undeniable, allowing you to boost your other favorites later on.

    ### Prioritize Unlocking Quick Cooldown

    The Quick Cooldown feature, newly added in the Definitive Edition, lets you use your Arts even when they’re on cooldown. For example, if you max out Rising Blade or another offensive Art, using Quick Cooldown can be incredibly advantageous. Keep in mind that this ability consumes your Quick Cooldown meter during battles, and it won’t refill until encounters are over. It’s invaluable for speeding up regular fights but should be used cautiously against tougher foes.

    You can unlock Quick Cooldown after completing Chapter 3’s main mission, so push through until you reach that point before engaging in optional battles.

    ### Move Beyond the Drifter Class

    Once your Drifter class hits Rank MAX (Rank 10), there’s no reason to stay in it. Continuing to use the Drifter class hinders your character’s growth. By advancing to a new class, you gain access to more Skill Slots, additional skills, and new Arts, all of which contribute to significantly boosting your power. Keep moving up the Class Tree and consider revisiting the Drifter class only after you’ve explored others.

    ### Rethink Your Defense Strategy

    When it comes to the Defense stat, you can largely overlook it. Surprisingly, it doesn’t provide significant damage reduction, which makes it a low priority when comparing gear. If all else is equal, then sure, you can opt for a piece of equipment with slightly better Defense. However, it’s far more beneficial to focus on Physical Resistance, which offers much better damage mitigation.

    The same goes for other Resistances—like Beam, Ether, Thermal, Electric, and Gravity—but prioritize Physical Resistance unless you encounter a specific enemy that relies heavily on a certain element.

    ### Augment Your Gear

    Don’t forget to check for additional effects when you’re in the Ground Gear menu! By pressing ZL on pieces of gear that have empty slots in the Additional Effects section, you can equip Augments you find throughout your journey. These Augments can substantially boost your stats or provide useful Resistances. Always be on the lookout for gear with empty slots that you can fill.

    One important note: Augments only apply to the specific gear they are installed on. For instance, don’t waste a Melee Attack Up Augment on a ranged weapon, as it simply won’t work.

    By following these tips, you’ll be better equipped to tackle the challenges of Xenoblade Chronicles X: Definitive Edition with confidence!

  • Xenoblade Chronicles X: Ultimate Guide to Affinity Quests

    Xenoblade Chronicles X: Definitive Edition features a rich array of affinity quests that deepen player connections with characters and enhance the game’s story. These quests are important for developing relationships and unlocking new gameplay opportunities.

    Throughout the game, you’ll encounter various characters, each with their personal stories and challenges. To complete an affinity quest, you usually need to engage with these characters, fulfill specific objectives, or help them overcome their problems. Success not only strengthens your bond with the characters but also often rewards you with valuable items, experience points, or new abilities.

    Exploring different areas, completing various tasks, and making choices that reflect your character’s personality can lead to different outcomes in these quests. Pay attention to dialogue and hints within the game, as they can guide you to succeed in these interactions.

    In summary, affinity quests in Xenoblade Chronicles X: Definitive Edition add depth and enjoyment, making your journey in the game even more captivating. By investing time in these quests, you’ll enhance your experience and uncover more of the game’s rich narrative.

  • X Is Blocking Links To Secure Messaging App Signal

    X Is Blocking Links To Secure Messaging App Signal

    Elon Musk’s social media platform X is currently preventing users from sharing links to the encrypted messaging app Signal. This issue was initially highlighted by tech journalist Matt Binder on his Substack blog. A verification by Digital Trends confirms that any links featuring the “Signal.me” URL are being restricted on X.

    Similar to WhatsApp, which uses a “WA.me” URL format for direct message sharing, Signal employs the “Signal.me” approach, allowing users to click the link and access a one-on-one chat instantly.

    When I attempted to share a Signal chat link on my X profile, I received an error stating that the post could not be sent. As I moved to the direct messages section, I also tried to share my “signal.me” link with several friends, but was met with the same failure.

    X blocking bio update.
    Nadeem Sarwar / Digital Trends

    Attempts to insert a Signal link in public posts or direct messages result in an error without any clear explanation. However, trying to add the link in my X bio flagged the “Signal.me” URL as malware.

    X is also disabling the ability to click on Signal links from previous posts. As of now, there has been no official statement from the platform clarifying the rationale behind this block. Users are cautioned that existing Signal links may be deemed malicious, deceptive, or contravening X’s policies.

    Interestingly, X isn’t banning Signal as a term. I successfully shared my Signal username in posts and direct messages without encountering any issues.

    X restricts post with Signal link.
    Nadeem Sarwar / Digital Trends

    Binder suggests that the restriction on Signal links could be linked to government employees previously dismissed by the DOGE agency, led by Musk, who are possibly seeking to anonymously whistleblow to journalists.

    This isn’t the first occasion X has blocked links to competing platforms. In 2020, the site began restricting links to rival social media like Instagram, Mastodon, and Facebook.

    Musk proclaimed, “Casual sharing of occasional links is acceptable, but extensive free advertising for competitors is not.” However, the backlash led to the lifting of the restrictions shortly afterward, following criticism from former CEO Jack Dorsey.

    Signal has long been a favored tool for journalists, activists, and whistleblowers, mainly due to its commitment to confidentiality and the prevention of identity exposure. The app employs end-to-end encryption by default along with strong account verification measures.