Tag: Wilds

  • All Confirmed Wilds Unknown Disney Lorcana Products for Completing and Solving

    All Confirmed Wilds Unknown Disney Lorcana Products for Completing and Solving

    Winterspell is now behind us, and we’re moving quickly toward the upcoming Disney Lorcana set, Wilds Unknown. Although there isn’t much detail about the story yet, a short teaser on the set’s website and some card previews have already sparked our excitement.

    We’ll take a closer look at the confirmed products that will be released with the set as they’re announced, especially since prerelease packs are finally arriving and seem to offer good value.

    Wilds Unknown is scheduled to be released on May 15, 2026. The prerelease event will happen a week earlier, on May 8, 2026.

    Confirmed Wilds Unknown Products

    Prerelease Pack

    Prerelease packs are finally arriving in Lorcana after being announced last November. They will be available one week before the full product launch. Ravensburger has confirmed these packs will only be available in English.

    Each prerelease pack will cost $39.99 and will include:

    • Six booster packs
    • One of six different promo cards
    • A cardboard deck box
    • Four themed dice
    • A special item unique to the set
    • A rules sheet

    These packs are meant to enhance your pre-launch event experience, allowing you to play sealed or pack rush games without needing to buy full booster boxes early. This also helps your local game store, which won’t have to open entire booster boxes prematurely.

    Prelaunch begins a week before the official release, when these packs will become available.

    Booster Box

    The classic booster box for Lorcana will contain 24 booster packs. The estimated retail price for a box is $143.76, based on previous launches. Keep in mind, individual booster packs are priced at $5.99 each, so the box price reflects the cost of buying 24 packs.

    Stores and online sellers can set their own prices, which may be higher or lower than this suggested retail price. Preorders and special bundles can sometimes offer better deals, and leftover stock from older sets might be available at discounted prices if you shop smart.

    The prerelease will also make it easier for players to enjoy sealed and pack rush games, as stores won’t need to open full booster boxes early. Plus, players will get some bonus items to justify the entry fee.

    Illumineer’s Trove

    The last confirmed product for Wilds Unknown is the Illumineer’s Trove, which is Lorcana’s version of a booster bundle. It includes:

    • Eight booster packs
    • A card storage box
    • Two deck boxes
    • Fifteen damage counters
    • A player guide

    While contents may change for future sets, previous releases have included these items, so it’s likely Wilds Unknown’s Trove will follow suit.

    This product is priced at $49.99 and offers great value. Typically, eight booster packs cost around $40, so the $10 difference covers storage, deck boxes, and damage counters. It’s a convenient way to store cards and get a good chunk of booster packs all in one package.

  • Completing the Windward Wilds Monster Hunter Wilds Trials in FFXIV

    Completing the Windward Wilds Monster Hunter Wilds Trials in FFXIV

    The Monster Hunter Wilds collaboration event has been added to Final Fantasy 14 with the release of Patch 7.35, and it will be a permanent addition, just like the previous Monster Hunter crossover. This update introduces the Windward Wilds trial, along with its Extreme version, and offers many rewards for players to earn.

    There are various items to collect, including mounts, minions, armor, weapons, housing items, and more. There’s likely something for everyone. To access this new content, players need to complete the quest titled “The White Wanderer.”

    The White Wanderer Side Quest Walkthrough

    Begin by speaking with the Dawn Hunt Tracker in Tuliyollal at coordinates (X:13.3, Y:13.1). Note that you need to be level 100 and have completed the main scenario quest “Dawntrail” to start this quest.

    Next, teleport to Hhusatahwi in Shaaloani and interact with the destination marker at (X:28.3, Y:30.2). After a cutscene, talk to the Stray Felyne at (X:29.8, Y:29.2) and escort him along a designated path, marked by monster tracks at (X:31.0, Y:26.2), (X:28.4, Y:25.9), and (X:29.5, Y:22.2).

    After the cutscene, interact with the Secret to climb aboard and prepare for a ride. Following another cutscene, speak with the Stray Felyne at (X:17.1, Y:6.3) and agree to set up camp. In the camp, talk again with the Felyne at (X:5.8, Y:5.9), then back at (X:5.8, Y:5.9) after a short scene. This completes the quest, unlocking access to the Windward Wilds trial.

    Prerequisites and Rewards:

    You must have an item level of 725 or higher to undertake the trial. Defeating the Guardian Arkveld grants a Veldian Weapon Coffer (IL745). Be sure to interact with the Guardian Arkveld to collect two Guardian Scales, which is easy to overlook.

    Return to the Dawn Hunt Tracker in Tuliyollal to finish the quest and receive rewards, including:

    • 5,000 gil
    • Seikret Horn (Mount)
    • Outdoor Hunter’s Grill (Furnishing)
    • Hunter’s Camp Chair (Furnishing)
    • Guardian Hunter achievement

    Unlocking The Windward Wilds (Extreme)

    After completing “The White Wanderer,” visit the Wandering Minstrel in Tuliyollal at (X:11.2, Y:14.7). Choose the option labeled “Guardian Arkveld. [The Windward Wilds (Extreme)]” to unlock the Extreme version of the trial.

    The Extreme trial offers rewards like Veldian Weapon Coffers, Guardian Scales (from the Guardian Arkveld’s body), and Guardian Arkveld Certificates.

    Exchanging Guardian Scales & Certificates

    Use Guardian Scales and Certificates at the local smithy in Tuliyollal (X:13.3, Y:13.1) to upgrade your Veldian weapons. Scales can also be exchanged for various items and permits, including mounts, minions, orchestrion rolls, and furnishings. Upgrading to an Augmented Veldian weapon requires exchanging your existing weapon along with Guardian Arkveld Certificates.

  • Completing the Fleeting Bubbles Challenge in Monster Hunter Wilds

    Completing the Fleeting Bubbles Challenge in Monster Hunter Wilds

    Monster Hunter Wilds is sticking to its post-launch updates with Title Update 2, which introduces new event and challenge quests, including the arena challenge quest called Fleeting Bubbles. In this quest, you’ll face off against a Mizutsune in the arena with a set gear loadout.

    Your reward for completing the quest depends on how quickly you finish it. You’ll earn Mizutsune-themed pendants to customize your weapon. Below, we’ll cover everything you need to know about this quest, such as its availability, loadout options, and what the pendant rewards look like.

    Fleeting Bubbles Challenge Quest Guide

    Quest Availability

    • Start date: July 8, 2025 at 8:00 PM ET
    • End date: July 22, 2025 at 7:59 PM ET

    Quest Details

    In the Fleeting Bubbles quest, you will hunt a Mizutsune in the arena using a fixed loadout chosen from three different options. Your rank is determined by how quickly you take down the monster, and your rewards will vary based on your performance.

    Here’s what you can choose for each loadout:

    Set A

    Set B

    Set C

    Weapons

    Sword and Shield – Hana no Nagoriwo I


    Switch Axe – Axelion Blade I

    Dual Blades – Chthonian Kusarigamas II


    Gunlance – Ajara Gunpike II

    Hammer – Rompo Wrecker II


    Light Bowgun – Felling Fulgur I

    Armor

    G. Ebony Helm beta


    Ajarakan Mail beta


    Mizutsune Braces beta


    G. Ebony Coil beta


    Mizutsune Greaves beta


    Exploiter Charm I


    Rocksteady Mantle

    Rathalos Helm alpha


    G. Doshaguma Mail beta


    Xu Wu Vambraces alpha


    Rathalos Coil alpha


    Xu Wu Greaves beta


    Friendship Charm IV


    Evasion Mantle

    Commission Helm alpha


    Rathain Mail alpha


    Rathain Vambraces beta


    Blango Coil beta


    Blango Greaves beta


    Mighty Charm I


    Mending Mantle

    Items

    Potion x10


    Mega Potion x10


    Ration x10


    Max Potion x10


    Shock Trap x1


    Nulberry x10

    Potion x10


    Mega Potion x10


    Ration x10


    Well-done Steak x5


    Max Potion x2


    Demondrug x5


    Adamant Seed x10


    Nulberry x10


    Cleanser x10


    Whetfish x5

    Potion x10


    Mega Potion x10


    Ration x10


    Max Potion x2


    Demon Powder x3


    Mega Barrel Bomb x2


    Nulberry x10


    Cleanser x10


    Poison Knife x5


    Thunderbug Capacitor x5


    Normal Ammo


    Pierce Ammo


    Spread Ammo


    Paralysis Ammo x12


    Thunder Ammo x60

    If you don’t consider skill, Set B is the top choice for finishing this quest in less than four and a half minutes because of the powerful Gunlance. However, if you’re not comfortable using the Gunlance, one of the other sets might suit you better, especially if you prefer the Sword and Shield or Hammer.

    It’s achievable to secure an A-Rank with any of these three sets, so experiment with the one you find most familiar until you succeed. As the name suggests, these quests are designed to be challenging, so don’t be discouraged if it takes a few attempts to get it right.

    Quest Rewards

    Your rewards will vary based on how quickly you complete the quest:

    • A Rank 4’30”00 – Mizutsune: Mark of Mastery pendant
    • B Rank 8’00″00 – Mizutsune: Mark of Bravery pendant
    • C Rank 50’00″00 – Mizutsune: Mark of Contest pendant

    Rewards will be handed out about one to two weeks after the event ends, so you can expect them around late July to early August.

  • Completing the Inferno Laid Bare Quest in Monster Hunter Wilds

    Completing the Inferno Laid Bare Quest in Monster Hunter Wilds

    Monster Hunter Wilds has introduced new event quests with the latest Title Update 2. One notable quest, An Inferno Laid Bare, requires you to hunt a Nu Udra to earn a stylish necklace, perfect for Hunters wanting a bare-chested look.

    You can also gather Necklace Tickets from this quest, which can be used to create an adorable Felyne Bell Collar for your Palico companion. If you’re curious about how to kick off this event quest, its duration, or the fresh rewards on offer, you’re in the right place. Below, you’ll find all the essential details.

    An Inferno Laid Bare Event Quest Guide

    Quest Availability

    • Start date: July 8, 2025 at 8:00 PM ET
    • End date: July 22, 2025 at 7:59 PM ET

    Quest Details

    An Inferno Laid Bare is an event quest available to players with a minimum Hunter Rank of 31. The quest involves hunting a Nu Udra in the Oilwell Basin and follows standard quest conditions, with no unusual weather, monster size variations, or altered durations.

    By now, you’re likely familiar with the Nu Udra and its attack patterns. Utilize your previous encounters to sharpen your strategy for this hunt. Equip weapons with Water element to take advantage of the monster’s vulnerabilities, and make use of Focus mode to speed up your hunt.

    Quest Rewards

    This quest offers standard Nu Udra material drops, along with the exclusive Necklace Ticket. This ticket can be used to craft two unique items: the Pinion Necklace α and the Felyne Bell Collar α.

    Pinion Necklace α Materials

    Necklace Ticket x3


    Nu Udra Hide+ x5


    Nu Udra Tentacle+ x2


    Nu Udra Oilmucus+ x3

    Felyne Bell Collar α Materials

    Necklace Ticket x1


    Nu Udra Spike+ x2

  • Completing the Challenge of Seregios in Monster Hunter Wilds

    While Lagiacrus takes the spotlight in Title Update 2, it’s not the only creature making its debut in Monster Hunter Wilds. Seregios, a flying wyvern first seen in 4 Ultimate, brings an unexpected twist with its body covered in ejectable scales that can unleash surprise ranged attacks on players.

    Before you can start gathering parts from this beast, you’ll need to take it down during the “Clear With a Chance of Sandstorm” quest. Fortunately, aside from a brief introduction, the mission itself is pretty straightforward. Here are some effective strategies to conquer this new foe.

    Starting the Quest

    To kick things off, head over to Kunafa Village. Once you’re there, have a chat with Neby, who will share that some of her friends have ventured out despite warnings of a “strange monster” lurking nearby. You’ll team up with Alma to investigate, and after locating the children, a Seregios will swoop in, initiating the battle!

    Recommended Gear for Battling Seregios

    The most effective element against Seregios is Thunder, so gear up with a weapon from the Rey Dau or Guardian Fulgur trees. If you’ve gathered enough materials, Lagiacrus gear is also a solid choice. Focus your attacks on its legs and head, as these areas are particularly vulnerable to elemental damage.

    Many of Seregios’s attacks cause Bleeding, so prepare accordingly. The Guardian Ebony Alpha armor set offers the Bleeding Resistance Lv3 skill, which completely negates this status effect—making it highly suitable for this hunt.

    Interestingly, the Seregios Alpha armor set offers similar benefits but comes with significantly better defense.

    Engaging Seregios

    Seregios boasts a moveset typical of flying wyverns. Expect dives and claw attacks that are easy to read and limited in range, making them avoidable with the right timing. If you approach from behind, be mindful of its tail attacks, but you can dodge them by moving closer to its body.

    A particularly tricky move is its aerial claw swipe. The creature will hover briefly and then swing its claws (and tail) in a circular motion. Because of the wide radius of this attack, dodging sideways isn’t advisable; instead, moving backward is the safer option and keeps you in sight of Seregios.

    Be aware that these strikes can also cause Bleeding! Items like Well-Done Steak, Astera Jerky, and Sushifish Scale are useful for quickly eliminating this ailment.

    As you frustrate Seregios, it will flare its scales, appearing more menacing and spiky. Expect it to increase its aerial swipe attacks, but keep an eye out for the scales it launches from its head and tail. Dodging sideways is your best option to avoid these blasts.

    You can actually pick up these scales and fire them from your slinger to deal damage over time.

    The secret to winning this fight lies in respecting Seregios’s aerial agility and reach. Sometimes, the best strategy is to wait until it returns to the ground before re-engaging. Remember, patience is a virtue!

    Once you’ve defeated Seregios, you’ll unlock a short cutscene where the children reconcile with a village elder, marking the end of the quest.

    Seregios – Drops and Materials

    Seregios is considered an endgame monster and only appears in high-rank quests. When you slay or capture it, you’ll collect the following materials:

    High Rank Drops

    Seregios Carver

    Seregios Scraper

    Seregios Slavescale

    Seregios Airblade

    Seregios Breacher

    Seregios Impaler

    Seregios Certificate S

    Seregios Dissenter

  • Completing High Rank Zoh Shia in Monster Hunter Wilds

    The final challenge in Monster Hunter Wilds is Zoh Shia, a gigantic creature adorned with crystals that draws energy from the Dragontorch. Unlike other significant monsters in the game, once you defeat it in the main storyline, you can’t face it again, which means there are no armor or weapon rewards to grind for afterward.

    This changes with Title Update 1, which introduces an extra quest titled A First Cry. This new quest features High Rank Zoh Shia, offering a chance to take it down once more. Defeating this beast will grant you access to fresh materials that can be used to craft armor and weapons inspired by Zoh Shia.

    Talk to Werner

    Your quest starts when you talk to Werner in Suja. He’ll let you know that Zoh Shia is still on the loose, and it’s your mission to investigate the situation by returning to the Dragontorch.

    Alma will encourage you to prepare yourself before heading out, so you will have time to equip the necessary armor and items. Don’t forget to prepare a meal, as High Rank Zoh Shia poses a greater challenge than its Low Rank form, so you’ll want to have the best advantage possible.

    When you’re set to embark, speak to Alma, and you’ll be transported to the boss fight.

    Zoh Shia Boss Fight

    The encounter against High Rank Zoh Shia will feel familiar if you faced the final boss. Remember to dodge its area attacks, which are typically well-telegraphed through its movements and the markings left on the ground. It has a weakness to the Dragon element, so make sure to equip weaponry that utilizes this attribute.

    During the fight, Zoh Shia will spawn Wylkrystals, which it will aim at to deal damage. You can neutralize these crystals by shooting them with elemental Slinger ammo found around the arena before they are targeted.

    After you defeat the monster, you’ll see another cutscene where Erik reveals that Zoh Shia can self-revive through a process similar to asexual reproduction, hinting that you’ll likely encounter it again. The quest then concludes, and you’ll receive your Guild Points and progress in your Hunter Rank.

    You have now unlocked High Rank Zoh Shia hunts. However, as of Title Update 1, there are no additional optional quests available for easier farming. You can keep an eye out for Zoh Shia investigations whenever they appear in the Ruins of Wyveria.

    Zoh Shia High Rank Drops

    High Rank Drops

    Zoh Shia Stakeclaw

    Blackember Mass

    Zoh Shia Crystalhorn

    Zoh Shia Crystaltail

    Guardian Blood+

    Zoh Shia Crystalscale

    Zoh Shia Layershell

    Zoh Shia Certificate S

    Faux Whitegleam Orb

  • Finding Brute Bones Locations in Monster Hunter Wilds

    Finding Brute Bones Locations in Monster Hunter Wilds

    Monster Hunter Wilds: Acquiring and Using Brute Bone

    In Monster Hunter Wilds, players can gather a wide range of materials from defeated monsters. These materials can be used for various crafting purposes, though there are specific conditions to meet in order to collect them.

    One such material is the Brute Bone. This item is mainly obtainable from defeated monsters in Low Rank, becoming more challenging to acquire as you advance to High Rank. Here’s how you can obtain Brute Bone no matter your progress in the main storyline.

    How to Obtain Brute Bone

    The Brute Bone can be carved from a Conga, a smaller monster that often accompanies the Congalala in the Scarlet Forest. If you’re still in the Low Rank and haven’t completed the main story, the only way to acquire this item is by carving a Conga.

    For hunters who are at High Rank, you can take on the optional Low-Rank quest titled "Tussle in Pink." This quest requires you to hunt a Congalala, but while doing so, you’ll encounter several Conga nearby. You can defeat these smaller monsters without needing to focus on hunting the Congalala, thus allowing you to carve them for Brute Bone.

    Tip: If you’re at High Rank, remember that Conga drops Colossal Bone instead of Brute Bone, so be sure to engage in a Low-Rank optional quest to get the item you need.

    Tussle in Pink Quest

    After you defeat the Conga and gather the Brute Bone, you can speak with Alma to withdraw from the quest, allowing you to skip the fight with the Congalala.

    How to Utilize Brute Bone

    The Brute Bone is primarily used for crafting specific Talismans, including the Speed Heal Charm and the Glutton’s Charm. Additionally, you’ll need this item to create the Doshaguma Greaves, part of the Low-Rank Doshaguma Armor Set.

    Crafting with Brute Bone

    With these strategies in hand, you’ll be well on your way to collecting and utilizing Brute Bone effectively in your adventures through Monster Hunter Wilds. Happy hunting!

  • Farming Monster Fluid in Monster Hunter: Wilds Made Easy

    Farming Monster Fluid in Monster Hunter: Wilds Made Easy

    In Monster Hunter Wilds, most crafting supplies will generally point you in the right direction for where to find them, but this isn’t the case with Monster Fluid. To make matters worse, you might not encounter this resource at all due to the limited information available about it.

    Despite its scarcity, there are specific locations that can help increase your chances of finding it. If you’re looking to gather Monster Fluid quickly and consistently, this guide will provide you with some useful insights.

    How To Acquire Monster Fluid

    Only certain creatures drop Monster Fluid, similar to Guardian Secret Feathers. The monsters you target can influence the likelihood of obtaining this resource.

    Monsters that are more likely to yield Monster Fluid include Nerscylla Hatchlings. These can typically be found in the Iceshard Cliffs, making them relatively easy to locate.

    Keep in mind that Monster Fluid is categorized as a Low Rank resource, which means you might not find it while in High Rank. If you need it while in High Rank, you can return to Alma’s Quest Counter and take on an Optional Quest in the Iceshard Cliffs.

    Once you’re in the Iceshard Cliffs, check Areas 2 and 4. These spots have a good number of Nerscylla Hatchlings. There are also some that may appear in other areas, such as Area 3, so explore around this region thoroughly.


    Additionally, you can place a waypoint on the hatchling as they’ll appear on your map.

    While Nerscylla Hatchlings are the most reliable source, other monsters can drop Monster Fluid too, albeit with a lower chance. These include:

    • Lala Barina found in the Scarlet Forest.
    • Bulaqchi in the Windward Plains.
    • Comaqchi in the Iceshard Cliffs.
    • Vespoid which can appear in the Scarlet Forest, Oilwell Basin, and Iceshard Cliffs.

    How To Farm Monster Fluid


    Monster Hunter Wilds Lala Barina ready to attack the player with Palico nearby.

    Even though you can defeat Nerscylla Hatchlings and the other monsters without much problem, you’ll still need to wait for them to respawn if you’re collecting materials.

    Keep in mind that there’s a chance these monsters might not drop Monster Fluid despite a high drop rate.

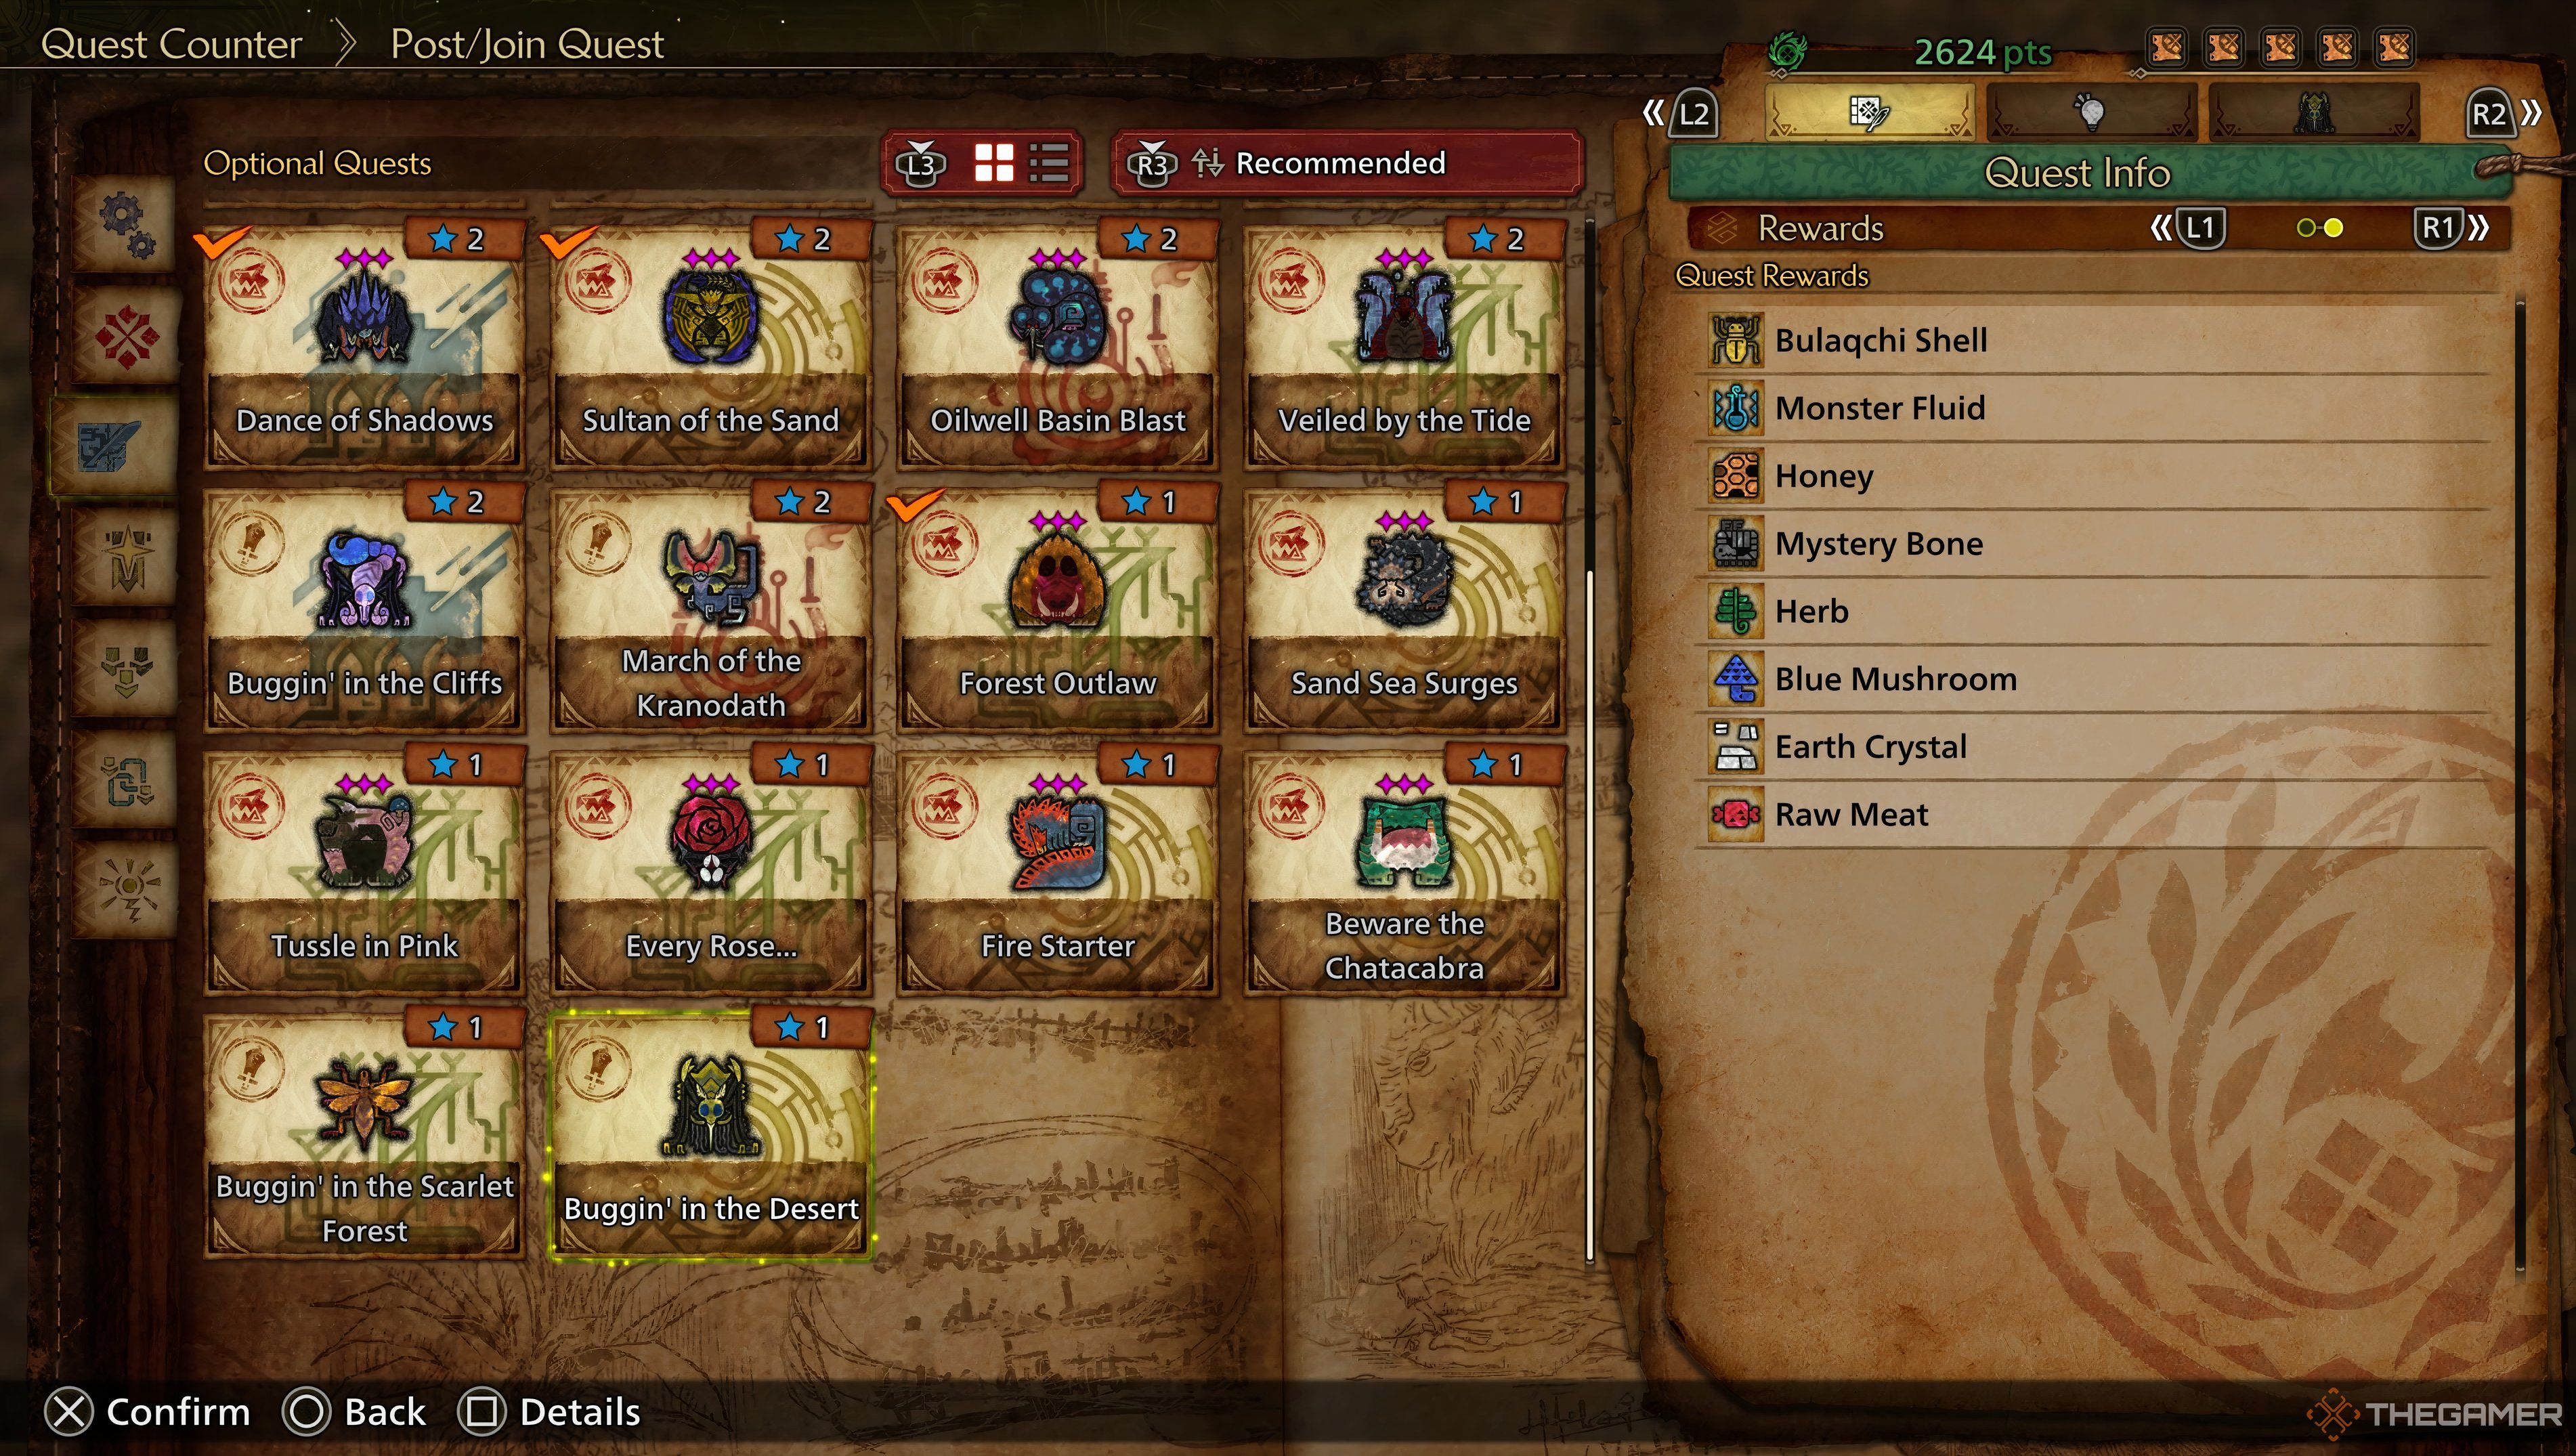
    If your goal is to stockpile Monster Fluid in a short period, consider tackling some Optional Quests. There are several quests available that may be a more efficient way to gather Monster Fluid.

    When you go to Alma’s Quest Counter, navigate to the Optional Quest tab and look for these quests:

    • Buggin’ in the Desert
    • Buggin’ in the Scarlet Forest
    • Every Rose…
    • Buggin’ in the Cliffs

    Monster Hunter Wilds Optional Quest page displayed with Buggin' Out selected.

    Most of these quests should already be available to you as they are located in the starting areas of Monster Hunter Wilds.

    In the quest Buggin’ in the Desert, you can potentially acquire more Monster Fluid in addition to what is given as a reward.

    Your task is to eliminate 12 Bulaqchi. However, avoid killing all of them; leave some alive since they will respawn if not all are defeated.

    By not exterminating all the Bulaqchi, they eventually turn into Rotten Carcasses after a short wait. When you return and carve them, each one should provide one Monster Fluid.

    Typically, the wait time is just a few minutes. You need to remain in the same area as the monsters during this time, ensuring that not all of them are dead.

    You can apply this technique with other monsters found in different quests to achieve similar results. So, when you find yourself short on Monster Fluid, feel free to return and repeat the steps outlined above.

  • Locating and Using Mature Wyveria Lantern in Monster Hunter Wilds

    Locating and Using Mature Wyveria Lantern in Monster Hunter Wilds

    Monster Hunter Wilds features a variety of unique items that come in different forms. These items mainly serve as trade goods once you reach the High Ranks, offering a chance for some rare rewards. However, their scarcity makes them quite challenging to find, particularly if you’re unsure of the best places and times to look.

    The Mature Wyveria Lantern is one such rare item that can be quite tricky to locate. Fortunately, there are several strategies you can employ to find this item, and knowing these will make your quest much simpler.

    How to Obtain the Mature Wyveria Lantern


    Unlike many other rare items, the Mature Wyveria Lantern isn’t tied to specific events. You can acquire it from the Mysterious Fruit nodes located within the Ruins of Wyveria.

    Specifically, you’ll find several of these Mysterious Fruit nodes in Areas 5 and 6 of the Ruins of Wyveria. Setting up a Pop-Up Camp in Area 6 allows you to quickly teleport to it, and there are two Mysterious Fruit nodes right nearby, with more in close proximity.

    For convenience, you can open the map and filter for the Mysterious Fruit nodes, marking them as waypoints. This lets you auto-travel to them using your Seikret, easing your journey to collect the Mature Wyveria Lantern.


    The image shows that the Hunter has obtained the Mature Wyveria Lantern in Monster Hunter Wilds.

    Most times, you’ll score the standard Wyveria Lantern; however, there is a small chance to obtain the Mature Wyveria Lantern as well. It’s a smart strategy to keep checking all the Mysterious Fruit nodes while hunting for this unique item.

    Additionally, there’s a slight chance you can get the Mature Wyveria Lantern from Rysher’s Material Retrieval. Rysher can be found in the Sild village within the Ruins of Wyveria, usually sitting outside Tasheen’s home.

    To access Rysher’s Material Retrieval services, you must complete the Astonishing Adaptability Side Quest.

    How to Use the Mature Wyveria Lantern


    The image shows Ren's Local Trading menu in Monster Hunter Wilds.

    After collecting a few Mature Wyveria Lanterns, you can visit Ren in the Sild village, located in the Ruins of Wyveria. The Mature Wyveria Lantern can be used to trade with Ren. If you want to avoid traveling all the way back to the Ruins, you can also access Ren’s local trading options by speaking to Nata in any Base Camp.

    You can exchange the Mature Wyveria Lantern for various items, including Guardian Seikret Feathers, Sild Garlic, and other resources sourced from Guardian monsters like Guardian Pelt+ or Guardian Blood.

  • How to Obtain Fine Antimite and Antimite Mass in Monster Hunter Wilds

    How to Obtain Fine Antimite and Antimite Mass in Monster Hunter Wilds

    Monster Hunter Wilds contains several unique items that are hard to come by but can be exchanged for exclusive rewards after you’ve reached the High Ranks and completed the main storyline. Typically, these items can only be acquired under specific conditions.

    The Antimite is one such item, with two rarer variations: Fine Antimite and Antimite Mass. Collecting these two variations is significantly more challenging than gathering regular Antimite, but with the right approach, you can gather enough to meet your demands.

    Where to Locate Fine Antimite and Antimite Mass

    You can find regular Antimite at any Hopper Crystal Ore node throughout the game world. However, to collect Fine Antimite and Antimite Mass, you’ll need to wait for the Giant Hopper Crystal Emergence event to occur in the Oilwell Basin area.

    To collect Antimite Mass, search for the Giant Hopper Crystal nodes that appear during the Giant Hopper Crystal Emergence event. You can recognize these nodes by a blue question mark icon on the map, and they are mostly found in Area 14 of the Oilwell Basin.

    If you’re finding it hard to trigger the Giant Hopper Crystal Emergence event, try resting in the tent multiple times until it appears in the Environment Forecast. Resting resets the environment but costs 300 Guild Points each time.

    Collecting Antimite Mass is straightforward from the Giant Hopper Crystal nodes that spawn during the event. You can spot the shiny nodes easily while navigating the area.

    On the other hand, obtaining Fine Antimite is more complex. While it can be gathered from regular Hopper Crystal Ore nodes during the Giant Hopper Crystal Emergence event, the probability of finding it is quite low.

    The Hopper Crystal Ore nodes that offer Fine Antimite sparkle, making them easy to identify from a distance.

    You can generally find a majority of Hopper Crystal Ore nodes in Area 11 and Area 14 within the Oilwell Basin. An effective strategy is to set up a Pop-Up Camp in Area 9, allowing for quick access to Area 11, which has three Hopper Crystal Ore nodes nearby.

    How to Utilize Fine Antimite and Antimite Mass

    Fine Antimite and Antimite Mass can be exchanged with Dogard in the Azuz village located in the Oilwell Basin area. Trading these items can yield rewards such as Azuz Tanned Leather or cooking ingredients like Turbid Shrimp. Occasionally, Dogard may also offer rare monster items in exchange for these coveted Antimite variations, including the Nu Udra Cerebrospinal Fluid, a rare item found by damaging open wounds on a Nu Udra or as a reward for successfully hunting one.

    You can conveniently access Dogard’s trading options through Nata at any base camp, which can save you the effort of locating him in Azuz.

  • Discovering the Timeless Wylk Gem in Monster Hunter Wilds

    Discovering the Timeless Wylk Gem in Monster Hunter Wilds

    Monster Hunter Wilds places a stronger focus on storytelling compared to earlier entries in the franchise, crafting a world filled with rich lore that unfolds as you play. However, this does not take away from the game’s main attraction—hunting a variety of monsters and collecting an abundance of materials.

    Many of these rare items are intricately woven into the fabric of the game world, revealing how it operates. One such item is the Time-honed Wylk Gem, which requires a keen understanding of the weather patterns to fully appreciate how this world functions. Let’s explore how to obtain and utilize this gem.

    How to Obtain the Time-honed Wylk Gem

    The Time-honed Wylk Gem can be discovered in several locations, including the Windward Plains, Oilwell Basin, and Ruins of Wyveria. You’ll find Wylky Gemstone gathering points scattered throughout these areas, but the Time-honed Wylk Gems come from a different source.

    These gems are specifically found at a Wylky Crystal Outcropping, which only appears during a Wylky Crystal Outcropping Emergence. This event can occur in both the Inclemency and Fallow regions, but you might not see it at all during the Plenty phase. Be prepared to rest at your tent in any of these areas until this event triggers.

    Note: The Origin Wylk Gem, located in the Ruins of Wyveria, has no connection to the Time-honed Wylk Gem.

    Once the emergence occurs, you can adjust your map to show only gathering points or create a waypoint directly on the map related to the event. It’s wise to equip the Geologist skill beforehand to increase your chances of collecting multiple gems from a single Wylky Crystal Outcropping.

    Uses for the Time-honed Wylk Gem

    After you’ve collected some Time-honed Wylk Gems, the next step is finding how to use them. Like many rare materials, the Time-honed Wylk Gem can only be traded. Despite its availability across three different regions, you can only utilize it in the Oilwell Basin.

    The traders in the Oilwell Basin are eager to exchange your Time-honed Wylk Gems for other rare items. These can include treasures such as Nu Udra Oilmucus+ and Azuz Tanned Leather, among others. Since the folks in Azuz rely on Wylk for their fires, it makes sense they would be interested in acquiring as many Time-honed Wylk Gems as you can provide.

  • Where to Locate the Giant Goldscale Vase in Monster Hunter Wilds

    Where to Locate the Giant Goldscale Vase in Monster Hunter Wilds

    In Monster Hunter Wilds, there is a wide array of collectibles to discover. From monster materials and fish scales to berries and a seemingly endless variety of endemic life, the options are plentiful. Additionally, each region features unique items that can only be found in specific locations using various methods.

    One such item is the Large Goldenscale Vase. This rare treasure only appears under specific conditions, so you will need a bit of luck to find it. Here’s where to look for it and what to do with it once you have it.

    How to Obtain the Large Goldenscale Vase

    The Large Goldenscale Vase is exclusive to the Iceshard Cliffs region. It belongs to the same category as the Wyvernscale and Dragonscale Vases, but it’s significantly rarer. While the latter can be found at regular Ancient Relic gathering spots, the Large Goldenscale Vase can only be collected from Remarkable Relic gathering locations.

    This unique item only shows up during the Plenty weather condition when a Remarkable Relic Emergence event is taking place. This event is random, so your best bet is to wait in your tent at the Iceshard Cliffs until it occurs. Make sure to set the weather to Plenty each time you log in. The game typically notifies you when the event is happening, but you can also verify it by checking the Environment Overview tab on your map.

    You can also monitor whether the event will happen within the next hour. If it’s not imminent, take a break until it starts or get closer to the time it’s expected.

    When the event is active, Remarkable Relics will appear as gathering points on your map. You can adjust your map filters to only display Gathering Points and scroll to locate the Remarkable Relic. Alternatively, you can find their positions by selecting the Remarkable Relic Emergence event directly on your map.

    What to Do with the Large Goldenscale Vase


    After you’ve gathered some Large Goldenscale Vases, you can utilize them back in Suja. Visit Sekka and trade these vases for various rare items, including the elusive Scarred Scale and monster materials from creatures like Jin Dahaad.

    Keep in mind that Large Goldenscale Vases don’t have any use other than trading and selling. The items you can get in exchange are worthwhile, so make sure to activate a Gathering Boost in the Iceshard Cliffs to double the rewards for your trades. You don’t want your efforts to go to waste!

  • Gathering Guardian Seikret Feathers in Monster Hunter Wilds

    Gathering Guardian Seikret Feathers in Monster Hunter Wilds

    In Monster Hunter Wilds, Guardian Seikret Feathers are essential. They play a crucial role in crafting equipment that will make the game’s later stages easier to navigate. Once you know where to find them, obtaining these feathers is quite simple. Since the feathers come from only one creature, farming them can be less time-consuming.

    However, some players might be unsure about where to find these feathers or how to acquire them, especially in High Rank mode. If you’re struggling to farm for Guardian Seikret Feathers or have no idea where to look, this guide will walk you through the necessary steps.

    How to Obtain Guardian Seikret Feathers

    The key to collecting these feathers is hunting Guardian Seikrets. This particular creature is a more aggressive version of the Seikret mounts found in the game. Thankfully, due to their smaller size, similar to Baunons and Harpios, they can be easily defeated, and they often appear in groups.

    Your journey to find Guardian Seikrets begins when you reach Chapter 3 and access the Ruins of Wyveria. This area serves as the last region you’ll unlock before diving into the endgame content.

    Once you’re in the Ruins of Wyveria, direct yourself toward Areas 9 or 10. These locations are known to have a high concentration of Guardian Seikrets. You might also have some luck in Area 8.

    If they aren’t showing up in those areas, simply check your map, where they will appear as distinct icons. Once you’ve located them, set a waypoint to guide you there easily.

    For a faster way to gather these feathers, you can embark on an Optional Quest. Speak to Alma at the Base Camp and choose the “Spread Those Wings” quest. This task requires you to hunt down six Guardian Seikrets. Completing this quest guarantees that you will receive feathers as a reward.

    When hunting and carving Guardian Seikrets out in the wilderness, the drop rate for feathers is not guaranteed. To improve your chances, you can repeatedly tackle the Optional Quest at Alma’s Quest Counter.

    Additionally, taking down Guardian Seikrets will also yield Tough Guardian Bone, which can be beneficial.

    How to Obtain Guardian Seikret Feathers+

    After you progress past the Low Rank section of Monster Hunter Wilds and reach the endgame, you’ll be able to find Guardian Seikret Feathers+. Once you hit Chapter 4 and finish the game’s credits, return to the Ruins of Wyveria and hunt the Guardian Seikrets in the same areas mentioned previously. You should begin to notice Guardian Seikret Feathers+ becoming available.

    Keep in mind that it might take a bit of time for the feathers to drop, as Guardian Seikrets don’t guarantee

    Moreover, if you are in High Rank and need regular Guardian Seikret Feathers, you can still obtain them. Just visit Alma at the Base Camp and select the “Spread Those Wings” Optional Quest. Follow the quest instructions to eliminate six Guardian Seikrets, and you will receive the standard feathers as a reward.

  • Discovering Great Hornflies in Monster Hunter Wilds

    In Monster Hunter Wilds, there’s a vast array of items to collect, whether they come from monsters or are found throughout the landscape. With so many different items, it can be easy to lose track of what you have. Plus, some materials are hard to come by, adding an element of chance to your hunting endeavors.

    The Great Hornfly is one such item. Although it may appear to be among the more commonly encountered rare items, finding it can still be quite challenging. Here’s where to locate it and what you’ll need for the hunt.

    How to Obtain Great Hornfly

    The Great Hornfly, similar to other materials like Sinister Cloth, requires a bit more effort than simply picking it up. To obtain it, you’ll need a mix of luck and knowledge on where to search.

    You can only find Great Hornflies by trading with the inhabitants of the Wudwud Hideout. One option is Gawdygog, who trades the item, but be prepared to part with a steep ten Ancient Wyvern Coins if they happen to have it in stock.

    A more favorable option is Musharpeye, who offers various trades for Great Hornflies, including items like Scarlet Ambers and Sparkly Treasures, as well as their rarer forms. Not only are these offers more plentiful, but they also require items that are easier to gather.

    Don’t forget to activate a Gathering Boost before trading, as it could double the items you receive!

    What to Do with Great Hornfly

    Once you’ve managed to trade for these impressive insects, you can put them to good use. Great Hornflies, like other rare materials, are used to craft new armor sets. In fact, they unlock two distinct armors for your Hunter: the Butterfly and King Beetle sets.

    Here are the skills that come with each armor set:

    • Butterfly – Constitution, Evade Window, Evade Extender, Recovery Up, and Recovery Speed.
    • King Beetle – Heroics, Foray, Flayer, Poison Resistance, Paralysis Resistance, and Sleep Resistance.

    Each armor piece requires one Great Hornfly, meaning you’ll need five Great Hornflies for a single armor set and a total of 20 if you want to craft both sets. That’s quite a few Great Hornflies, which means plenty of trading with the Wudwuds!

  • Mastering Fluffy Dealings in Monster Hunter Wilds

    Mastering Fluffy Dealings in Monster Hunter Wilds

    Monster Hunter Wilds offers various side quests as you progress toward the High Ranks. While many of these quests involve hunting specific monsters, some will require you to collect particular items.

    One such side quest is called Make Fluffy Dealings. For this quest, you need to deliver a Vibrant Pelt+ to a cheerful Wudwud named Plumpeach, who can be found in the Scarlet Forest. Although gathering a Vibrant Pelt+ can be tricky, having some tips can make it a lot simpler.

    Starting the Make Fluffy Dealings Side Quest


    You will receive the Make Fluffy Dealings side quest from Plumpeach, the leader of the Wudwuds, after you’ve achieved High Rank status. You can find Plumpeach inside the Wudwud Hideout in the Scarlet Forest, and he will be dressed in pink Congalala fur.

    Plumpeach will request that you bring him a Vibrant Pelt+. To obtain this item, you’ll need to hunt a Congalala. Once you have collected the pelt, head back to Plumpeach to complete the quest.

    How to Obtain a Vibrant Pelt+

    The image shows the Vibrant Pelt+ details from the Field Register menu in Monster Hunter Wilds.

    First, you’ll need to locate a Congalala in the Scarlet Forest or complete an optional quest that involves hunting a High Rank Congalala. While battling the monster, focus your attacks on its head, as breaking its head guarantees a Vibrant Pelt+ drop.

    You can also acquire a Vibrant Pelt+ by inflicting damage on its other wounds, but breaking its head is the most reliable method. After you’ve successfully obtained the item, return to Plumpeach in the Wudwud Hideout in the Scarlet Forest area.

    Rewards for Completing the Make Fluffy Dealings Side Quest

    The image shows the rewards for completing the Make Fluffy Dealings Side Quest in Monster Hunter Wilds.

    Upon delivering the Vibrant Pelt+ to Plumpeach, you will successfully complete the quest and receive a Delishroom and three Truffle Du Conga as your rewards. Additionally, after finishing the side quest, Plumpeach will be able to assist you in gathering more materials.

  • Crafting and Upgrading Talismans in Monster Hunter: Wilds Guide

    Crafting and Upgrading Talismans in Monster Hunter: Wilds Guide

    Monster Hunter Wilds offers a fantastic selection of weapons and gear for players to choose from. In addition to these items, Hunters can also equip talismans that provide useful passive bonuses, which can significantly influence the outcome of a battle.

    Using talismans effectively can greatly enhance your gameplay. As you progress into High Rank, you’ll find that these talismans can be your lifesaver in challenging scenarios. Here’s a guide on how to craft and upgrade talismans.

    How to Craft a Talisman

    You can create or improve a Talisman by speaking with Gemma and selecting the Forge/Upgrade Talisman option in the menu. If you don’t see this option after speaking with her, you’ll need to progress further in the main storyline.

    The image shows that the Hunter is crafting a Fury Charm Talisman in Monster Hunter Wilds.

    Crafting a Talisman requires various materials, typically gathered from defeated monsters. Unlike creating armor, each Talisman often needs items from multiple monsters, so be sure to check what materials you need for a specific Talisman before you embark on your quest.

    How to Upgrade a Talisman

    The image shows that the Hunter is upgrading a Talisman in Monster Hunter Wilds.

    Each Talisman can be enhanced up to three times. Upgrading increases the effectiveness of the skill it grants to the Hunter. Typically, you will need to gather items of a higher rarity for upgrades. You can view the available upgrades by selecting the upgrade list in Gemma’s Talisman menu.

    Even if you haven’t upgraded your Talisman, you can still take advantage of its skill by combining it with gear or decorations that offer the same benefit. This way, you can boost the skill level without needing to upgrade the Talisman.

    If the Talisman you wish to upgrade isn’t listed, it’s time to focus on collecting higher rarity items. Once you’ve gathered the necessary resources, the Talisman will appear in the upgrade list.

  • How to Mount Monsters in Monster Hunter Wilds: A Complete Guide

    How to Mount Monsters in Monster Hunter Wilds: A Complete Guide

    If you’ve seen any trailers for Monster Hunter Wilds, you’re likely aware that you can mount your prey to deal significant damage. Like other mechanics in the game, such as Power Clashes and Offset Attacks, the mounting system is not thoroughly explained. Many players could spend hours without realizing the essential techniques to effectively execute this move. This oversight is unfortunate, not only because it’s a strategic advantage for swiftly defeating monsters, but also because it’s simply thrilling to do. There are various intricacies involved in mounting fierce creatures, so we’ll provide you with all the necessary details on how to successfully achieve it and what actions to take while riding atop a monster.

    How to mount monsters

    Capcom

    Even if you check the hidden tutorial screen in Monster Hunter Wilds for instructions on mounting a monster, it lacks clarity on how the mechanic actually works. The primary concept involves executing aerial assaults on a monster, but simply doing that isn’t enough to guarantee a successful mount. The challenge lies in activating a hidden gauge specific to each creature, which fills up with every jump attack. Once this gauge is full, your next aerial attack will automatically mount the monster.

    Different weapons allow for various types of airborne attacks, with only a few having jumping capabilities as part of their move set. If your weapon is unable to execute jumping attacks, you can always use your dismount attack from your Seikret. Otherwise, you’ll have to locate raised terrain from which to leap onto the monster, which can be a difficult task.

    Once you successfully board a monster, your controls will change. You’ll be able to perform a weapon attack, a quick knife strike, a heavy knife attack, brace yourself, and maneuver across different areas of the monster’s body. A sound strategy often involves executing an initial weapon attack and then relocating as the creature attempts to shake you off. Be mindful that your stamina will eventually deplete, resulting in your dismount, so inflict as much damage as you can while you’re still hanging on.