Tag: vault

  • How to Earn Vault Rewards in DDV by Completing and Solving

    How to Earn Vault Rewards in DDV by Completing and Solving

    Every two months, Disney Dreamlight Valley updates the game with new content, including decorations and new tasks. This time, the Elements of Nature Star Path follows Pocahontas’s arrival and encourages players to appreciate and respect the natural world, just in time for Earth Day.

    During this season, you can unlock new rewards and outfits, and you’ll also have the chance to earn rewards from previous Star Paths for the first time since the game launched. Check out our guide below to learn what’s available and grab these rewards before they disappear.

    Elements of Nature Star Path Rewards

    The event runs from April 8, 2026, to June 1, 2026. Players can participate in the Elements of Nature Star Path and earn special, limited-time rewards. There are two options: a free bundle and a premium bundle.

    Everyone can play for free, but not all rewards are available without the premium option. The premium bundle costs 2,500 Moonstones (or 3,300 if you want an extra 100 tokens added to your account). It unlocks three additional duties at once and grants access to the full list of rewards, which includes items like topiaries, costumes, textures, and decorations.

    If you’re planning to complete the entire Star Path, we recommend getting the premium bundle with extra tokens, because it will give you back most of your Moonstones. If you’re unsure, you can start with the free path and upgrade later.

    Star Path Page Standard Rewards and Costs Premium Rewards and Costs
    Page One Willow Tree, Bambi Deer Costume Tail, 100 tokens Bambi Topiary, Hermit Garden Turtle, 50 tokens
    Page Two Water Design Motif, Nature’s Protector Boots, 25 tokens Nature’s Protector’s Pauldron, Elements of Nature Photo Frame, 90 tokens
    Page Three Dinosaur Egg, Crystalline Alcove, Flaming Leaf Motif Crystal Cavern Texture and Wall, 30 tokens
    Page Four Lava Design Motif, Volcanic Rocks, Lava Creek Lava Flow Helmet and Bodysuit, 350 tokens
    Page Five Purple Perfect Petals Dress, Lens Flare Motif, 400 tokens Golden and normal Petals Dresses
    Page Six Dandelion Tuft Umbrella, Flower Crown, 70 tokens Blossom Tree Critter Home, Flower Crown Nala Style, 100 tokens

    Bonus Rewards (Premium Only)

    Bonus rewards include items like Thumper Topiary, Spring Glider, Lava Trails, and large Flower Vaults. These can only be unlocked after claiming all the other rewards from previous pages. They are worth the wait as they include free house skins and decor fitting for natural themes.

    Elements of Nature Star Path Duties

    To earn tokens, you need to complete various duties. These duties include tasks like harvesting, crafting, giving gifts, fishing, and exploring. You can do standard duties right from the start at your own pace and routine duties weekly.

    Standard Duties (Available at the start)

    These tasks are designed to be completed gradually. Examples include:

    • Remove Night Thorns: 10 tokens
    • Harvest Zucchini or Ginger: 5-10 tokens
    • Practice mining or craft items: 10 tokens
    • Gift villagers or give items: 10 tokens
    • Cook meals, catch fish, or gather materials: 5-20 tokens

    Many duties involve gathering ingredients, crafting, or interacting with villagers. Some require several in-game days, especially routine duties and special tasks like fishing in Dazzle Beach or mining gems.

    Routine Duties and Vault Rewards

    Weekly routine duties add new challenges, and completing all duties for a week unlocks vault rewards—recolored items from older Star Paths. To claim these vaults, you need to complete all tasks for each week before the event ends. These duties may take multiple days to complete but reward more tokens and special recolored items like flowers or paths.

    Sample weekly duties include:

    • Giving villagers their favorite gifts
    • Buying seeds from different areas
    • Completing specific fishing or gathering tasks
    • Interacting with characters like Mickey or Scrooge
    • Mining gems or harvesting fruits

    Completing these duties not only grants tokens but also provides unique recolored items and decorations to enhance your world.

  • Solving the Vault of Vengeance Abyss Puzzle in Crimson Desert

    Solving the Vault of Vengeance Abyss Puzzle in Crimson Desert

    There are many puzzles in Crimson Desert that you need to solve to earn skill points, unlock fast travel spots, or get strong gear. While some puzzles are scattered across the world, the most challenging ones are on the floating islands in the Abyss.

    One of these is the Vault of Vengeance. It uses a laser security system similar to the one from Resident Evil 4, with lots of lasers that you must avoid or deactivate. Completing this puzzle can be tricky because it requires a special skill that’s optional and easy to overlook.

    Vault of Vengeance Puzzle Solution

    When you arrive on the island, your first step is to open the vault. To do that, look to your left and pick up the square Abyss Core floating near some bushes. Place it on the square pedestal in front of the main gate and let it hover there. Repeat this process with the Abyss Core on the right side and its corresponding pedestal. Once both cores are in place, the gate will lower, letting you approach it. To open the door, draw your bow and use the Focused Shot skill to shoot two arrows at the yellow buttons at the same time. If you haven’t unlocked this skill yet, go to the Skills menu and find the Focused Shot in the green Spirit tree. You need to use one Abyss Artifact to unlock this skill, which is necessary to solve this puzzle.

    If you have the Focused Shot skill, aim and shoot both of the circular yellow switches on either side of the door. Draw your bow, hold down both sticks, mark both switches with your Right Bumper, then release the Left Trigger to fire your arrows and open the door. Once inside, use Nature’s Grasp to lift the door and enter the central vault.

    Inside, you’ll see a large set of laser beams that can harm you if touched. To deactivate them, look at the back left and right corners of the room for four yellow switches. Use Focused Shot to mark and hit all four switches at once. It can be a bit tough to tell if they are correctly marked, so try a few times to ensure you hit each one precisely and disable the laser grid. After the lasers are turned off, you can grab the Golden Sword at the center, which will lower the platform into the lower part of the vault. Make sure to loot the area around the sword before descending, as there are many chests and valuable items you can sell to vendors. Collect anything that isn’t nailed down to make good money.

    When you go down to the lower level, you’ll find a corridor filled with laser beams in different patterns. There are two ways to get through: the first is to carefully and slowly walk through the moving laser grid, looking for gaps where you can crouch and avoid the beams. Keep in mind, more lasers turn on as you go further down, so don’t rush blindly—it’s easy to get hit.

    The second option is to run straight through and absorb the damage. If you have some food, you can take the hits, as lasers usually won’t kill you unless your health is already low. This method isn’t as neat, but it works if you prefer a quicker route.

    At the end of the hallway, use the Axiom Force to place the square Abyss Core into its slot and then activate it with Force Push. If you have the Forced Current skill in the Spirit tree, using it can make this step much easier.

    Next, take the elevator to the top level. There, you’ll see two rectangular Abyss Cores beside a large circular switch. Push each core into their respective sockets using Force Push or Forced Current. Doing this will activate the central switch; press it with one final Force Push to complete the circuit.

    On the raised platform in front, there will be an Abyss Artifact on the right and a chest containing an Abyss Core on the left. This marks the end of the puzzle. However, you can keep exploring the islands by passing through the triangular gate to summon more platforms and find additional secrets.

  • How to Open the Bank Vault in Ready or Not: Completing for Solving Boiling Point

    How to Open the Bank Vault in Ready or Not: Completing for Solving Boiling Point

    If you thought the amusement park in No Good Deed was an easy mission, get ready for a high-stakes bank job that can go very wrong in Ready or Not. All Gods Burn will show you what happens when many civilians don’t know how to stay out of the way.

    Besides the main objectives, you’ll have the chance to report some planted C4 devices in different areas, find a suspicious laptop containing intel, and even open the bank’s vault, which holds a surprise. Here’s what you need to know about All Gods Burn in Ready or Not: Boiling Point.


    This guide assumes you are playing on Standard difficulty in quick play.

    All Gods Burn Mission Objectives

    The main goals are to bring order to chaos and save all civilians. You’ll encounter between 13 and 16 suspects and civilians throughout the mission.

    Many civilians might be armed with knives, but they aren’t very dangerous—they tend to distract you more than harm. Try to neutralize them with F instead of shooting.

    Two secondary objectives are particularly important: report a suspicious laptop and report four C4 bombs. Additionally, there is an underground method to open the bank’s vault.


    All Gods Burn Points of Interest

    Here is a detailed map breakdown of the third floor of the bank, with markers for potential civilian locations, hostile suspects, and interactable objects or soft objectives. If images aren’t visible, the key points are listed below.

    First Floor

    • Main Room: The large central area after entry, filled with civilians and suspects. Be cautious; most suspects are unarmed or only have knives. Some suspects can be subdued by shouting (F).

    • Behind Reception: The room behind the front desk, where you’ll find the first C4 on a wall, along with hostile suspects.

    • Left Room After Bomb: A space containing at least one civilian.

    • Last Left Room Before Kitchen: Usually hosts the suspect who has a keycard.

    • Second Room on Left (Keycard Area): Likely contains the guard with the keycard. It’s on the far side of the leftmost room before the stairs.

    • Stairs to Second Floor: The room with hostiles and a room just open enough to find a briefcase with a keycard.

    • Right Room Off Main Hall: Often holds a small safe.

    • Second Floor: Enter the first large room after the stairs; C4 can be found on the pillars here. Also, suspect and civilian activity is common. Other side rooms might contain suspects or civilians.

    • Meeting Room: Contains the soft objective laptop, usually on the large table. Interact with it to progress.

    • Vault Access Room: In the upstairs area, there’s a room with a whiteboard displaying a password—interact with it.

    • Server Room: Proceed through the main office and small adjoining room to find a monitor on a desk to interact with.

    • Meeting Room (Downstairs): Interact with a notebook on the large table for clues.

    • Basement: First area after the stairs, often with a hostile nearby and C4 on a pillar.

    • Main Basement Area: The central hall is full of suspects and civilians; be prepared for significant resistance.

    • Side Rooms in Basement: These may contain suspects or civilians as well.

    • Elevator: The last C4 is always inside, which you can access after clearing the floor.


    How to Open the Bank Vault

    It’s recommended to secure the entire level by neutralizing all suspects and civilians before attempting the vault. To open it, find the guard with the keycard—commonly in an electrical room after the kitchen on the ground floor, or near the metal detector or stairs.

    Interact with the fallen guard’s body to obtain the keycard. Then, locate a safe—usually in a corner of a room on the right side of the main hall—and open it to access a document.

    Next, ascend the stairs, turn left, and enter the server room. Interact with the whiteboard displaying the password.

    Exit that room, go right into the main office area, and then enter a smaller room where a monitor is turned on. Interact with the screen to find additional clues.

    Finally, move into the meeting room with the large table. Interact with the notebook on the right side for further details.

    When ready, go down the stairs, turn left, and access a smaller room through an open door. The vault keypad is in this room. Interact with it to open the vault, where you’ll find a tied-up man and a ringing cellphone in his mouth. Interact with the phone to complete your objective and earn a trophy.

  • How to Complete the Lighthouse Vault in Fortnite Chapter 7 Season 2

    How to Complete the Lighthouse Vault in Fortnite Chapter 7 Season 2

    At Squibbly’s Point Lighthouse, near the new POI Squibbly Shores in Fortnite Chapter 7, Season 2, there’s a secret vault filled with loot that needs a keycard to open. Find the keycard first to access the rare treasures inside.

    The only way to get into the vault is by fishing for the keycard, so be ready to put in some effort. Here’s what you need to know about locating the keycard and the hidden vault at Squibbly’s Point Lighthouse in Fortnite Chapter 7, Season 2.

    How to Open the Lighthouse Vault

    If you go to Squibbly’s Point Lighthouse, you’ll see a secret vault inside, near the lighthouse machinery. When you approach it, it will tell you that a keycard is needed to open the door. Luckily, the keycard can be found nearby.

    To find the lighthouse keycard, look for a blue fishing spot. It looks similar to a regular fishing spot but shines with a blue color and has a faint rainbow effect over it. You can spot it from above while gliding over the water around Squibbly’s Point Lighthouse.

    How to Fish for the Keycard

    Grab a fishing rod from the barrels around the area—there’s one on each pier and near the water’s edge on the eastern side. Throw your hook into the special blue fishing spot and wait for the indicator to show that something has bitten. Reel in to see if you’ve caught the keycard.

    Important Tip: If you miss the first bite, you might reel in a chest of loot instead of the keycard, so try again.

    Once you get the keycard, head back to the lighthouse. Inside, interact with the vault to use the keycard and unlock it. This will reward you with top-tier loot, including two rare or better weapons, a lot of gold, ammunition, and health items.

    More vault locations will be added later in the season, with one planned for the Ice King. Keep an eye out for those upcoming spots.

  • How To Increase Your Vault Size in Marathon by Completing and Solving

    How To Increase Your Vault Size in Marathon by Completing and Solving

    Marathon has arrived, showcasing Bungie’s impressive art style and visuals. It pairs these qualities with some of the most intense and frightening encounters in the genre. As expected in an extraction shooter, the goal is to gather rare and powerful loot, but your carrying capacity is limited. You can only hold so much until you expand your Vault Size, which lets you carry many more items than before.

    Expanding your Vault Size isn’t easy. Reaching the maximum size requires a lot of Credits, XP, and resources, so you’ll need to grind for these. The effort is worth it, as you’ll see how quickly your Vault fills up after a few successful runs into the challenging world of Tau Ceti IV.

    How To Expand Your Vault Size

    To expand your Vault, you need to grind and gather resources. You start with just 160 slots, but with effort, you can increase this. The first available Faction for upgrades is CyberAcme. From the start, you can aim for their upgrades to boost your Vault space. The early upgrades don’t require too many resources, but as you progress, the costs and requirements increase, needing more Credits and a high Faction Reputation.

    You must reach specific Faction Ranks with CyberAcme before you can unlock each upgrade, and you’ll need the right amount of Credits and other resources to purchase them. Here’s a quick look at each Vault Size upgrade, what you need to unlock it, and the resources involved:

    All Vault Size Upgrades

    Upgrade Requirements
    Expansion One CyberAcme Rank 3, 2,500 Credits, 12 Unstable Diodes
    Expansion Two CyberAcme Rank 7, 4,000 Credits, 22 Unstable Diodes, 12 Unstable Gunmetal
    Expansion Three CyberAcme Rank 12, 5,000 Credits, 27 Unstable Diodes, 15 Unstable Gunmetal
    Expansion Four CyberAcme Rank 18, 7,000 Credits, 30 Unstable Diodes, 18 Unstable Gunmetal
    Expansion Five CyberAcme Rank 28, 10,000 Credits, 50 Unstable Diodes, 30 Unstable Gunmetal

    Unstable Diodes are mostly found in the Perimeter zone’s North and South Relay areas. Unstable Gunmetal is common in the Station region of the Perimeter zone and also in the Maintenance area of the Dire Marsh zone. While these resources can be traded for other items via the Armory, it’s better to save them for Vault expansions.

    How To Level Up The CyberAcme Faction

    One effective way to increase your faction reputation is to focus on leveling up CyAc. While collecting Credits, Unstable Diodes, and Unstable Gunmetal involves grinding runs and extracting with these items, actively working on leveling the faction can speed up the process.

    It’s recommended to use CyAc Sponsored Kits whenever possible. Running with these kits and successfully extracting will give you lots of reputation points. Completing Faction Contracts for CyAc also helps a lot since most contracts only require you to finish specific objectives, not necessarily a successful run.

    Carrying out many contracts and running with Sponsored Kits will help you rack up reputation faster. Playing solo is often easier for tackling contracts, allowing you to proceed at your own pace and focus on your tasks without distractions.

    While upgrading CyAc, it’s wise to also unlock and level other factions. They offer strong upgrades that can improve your chances of success and streamline your runs. Don’t overdo it with the same contracts, and take breaks to build your character and gear for a more balanced approach.

  • Where to Find the Seed Vault in the Research Building in Arc Raiders

    Where to Find the Seed Vault in the Research Building in Arc Raiders

    When playing Arc Raiders and starting raids on the upper level, you might find yourself rushing in with a basic loadout just to complete a quest. Most of these quests ask you to reach specific locations, and if you go in with your customized gear, you risk losing everything in the process.

    One such quest is “Root Of The Matter,” which you can get from Celeste after completing several other missions. For this quest, you need to find a specific seed vault in the Buried City map. Here’s a simple guide on how to do that easily.

    Where To Find The Research Building

    When you accept the Root Of The Matter quest from Celeste, she’ll direct you to the Research building. You can locate this building on the Buried City map, which becomes available after completing a few raids. Once there, you’ll see two buildings near the center of the map—one yellow and one red. The yellow building is the Research building you need to find. It’s straightforward to reach once you spawn into the map.

    Where To Find The Seed Vault

    The best way to enter the Research building for this quest is from the south side, where you can walk through some broken windows. If you come in through other entrances, you can go down to the bottom floor using the stairs on the south side.

    After entering through the south or descending to the lower level, head down the hallway inside. The seed vault is inside the first room on your left—it’s a yellow container, so it’s easy to spot once you’re inside.

    What To Do Once Inside

    After interacting with the seed vault, you need to pick up the seeds that drop onto the ground. If you have a safe pocket, store the seeds there to prevent losing them if you get knocked out. You’ll need to deliver these seeds to Celeste to complete the quest.

  • How to Complete the Carcadia Burns Vault Guardian in Borderlands 4

    How to Complete the Carcadia Burns Vault Guardian in Borderlands 4

    Vault hunting remains illegal in Borderlands 4, but most players just ignore the rules when the chance to loot Vaults and gain treasures is so tempting. A new Vault has appeared in the dry region of Carcadia Burns. Whether it’s your first or final Vault, you’ll need to overcome various challenges inside to claim your reward.

    Access to the Vault isn’t free. You must first gather three Vault Key Fragments. To do that, capture the three Silos spread across the region, which reveal the general locations of the fragments on the map. The Silos are:

    • Rustical Hurl, located in the middle of Carcadia Burns.
    • Site Unseen, in the west.
    • Judgement’s Lapse, in the north.

    Silos are special facilities controlled by the Order. They are claimed much like Safehouses, but without the need to find a datapad. Once captured, they act as fast travel points and reveal key locations on your map. After capturing each Silo, head to the indicated area and follow the on-screen indicator in the upper-right corner of your screen to locate the Vault Key Fragments. The closer you get, the more bars fill the indicator, and it emits noise and vibrations.

    Vault Key Fragment One is located in the Lopside region, at the Rustical Hurl Silo in a canyon northeast of the Makeshift Chalet Safehouse. From there, maneuver around the rocks to find the fragment on the roof of small buildings at the western edge of the area.

    Vault Key Fragment Two is in the Tonnage Peel region, near Site Unseen on a cliff at the western edge of the map, close to The Lowrise Safehouse. Access it by following the road south to Wreck of the Last Great Hope. Enter the tunnel beneath the site, which is filled with Creep and nests, and grapple off the red-lit alcove to find the fragment attached to a rock in the cave.

    Vault Key Fragment Three is in the Ruined Sumplands, in mountains northwest of Carcadia, near The Marrow Narrows. From Judgement’s Lapse, head west then north, crossing the land bridge, and go northeast to the area near The Gunkworks. The fragment is in an alcove among gray stones and yellow gems by the riverbank.

    Once all three fragments are collected, the Vault door appears on your map, located roughly in the center of the region. Search for it using the indicator, which vibrates and makes noise as you approach. The Vault is straightforward to find there, near Moxxi’s Bottoms Up! — just head south from the bar, jump onto the road below, and follow it east to the raised bridge. If you haven’t lowered it during the main mission, you can still jump onto the mechanisms and glide over. The Vault door will appear at the water’s edge as you get close.

    Interact with the altar at the door to start the challenge named “Primordial Vault: Carcadia Burns,” then enter the Vault. Inside, you’ll face three combat arenas with checkpoints in between and a final boss fight against the Vault’s Guardian.

    The first challenge involves fighting the Seneschal Order, an upgraded version of enemies from the Order, who are slightly tougher but attack with similar moves. In each arena, you’ll also confront a miniboss with unique abilities:

    • First miniboss: Stochastix, a judge-like Warden capable of spawning minor enemies and the Fabricator Witness.
    • Second miniboss: Crushing Depth, a heavily armored Hammerhead often accompanied by dangerous variants like Warheads.
    • Final miniboss: The Chisel, a powerful Domination Engine with an Ordonite Shield and aggressive leaping attacks. To damage it, shoot the purple-red crystals on its body to release Vile Ordonite Orbs, then destroy them to break the shield.

    During battles, Radix shifts through three modes: Regular, Drill, and Thunderstorm, each with different attack patterns. Regular Mode includes spinning rocks, lightning strikes, metal fling attacks, and shock waves. Drill Mode involves jumping and tunneling underground, sending shock energy waves, and planting shock mines. Thunderstorm Mode unleashes widespread lightning strikes and increased aggression.

    Radix always starts in Regular Mode. Dodge its rocks and energy waves, aiming at its face and legs for critical hits. Jump over energy waves or glide to avoid them. When Radix hits 60% on its shield, it switches to Drill Mode, making it more aggressive—destroy shock mines and use weapons with elemental damage (like Incendiary, Radioactive, or Corrosive) to whittle down its health. When its shield drops to 20%, Radix unleashes a massive energy wave, then reverts to Regular Mode until its shield is depleted. It then swaps to Drill Mode again at 50% health, and this cycle repeats, with Radix alternating modes every 30% loss in shield or health.

    In Thunderstorm Mode, Radix becomes extremely dangerous, unleashing lightning strikes and dealing pure Shock damage. Stay close or just outside the arena’s middle ring to avoid lightning, and clear lingering Shock Mines and Pangolins that may still attack. Destroy shock mines proactively, especially when Radix transitions out of Drill Mode, to prevent devastating chain explosions.

    As Radix nears 20% health, it switches back to Regular Mode, and once defeated, a rift appears. Interact with it to grapple into the final area or to exit the Vault. The victory rewards include an upgraded Glide Pack for reduced stamina use, along with two Red Chests, experience, money, Eridium, and a rare or epic sniper rifle. Completing the side mission unlocks the “Nothing Left To Guard” achievement if the other Guardians, Inceptus and Origo, have also been defeated. Afterward, you can grapple into the next rift to leave or restart the fight with Radix at Moxxi’s Big Encore.

  • Where to Find All Vault Key Fragments in Borderlands 4 for Completing and Solving

    In Borderlands 4, you assume the role of a Vault Hunter, and when you’re not fighting The Timekeeper and his army of Order enemies, you’ll be treasure hunting for vaults.

    There are three vaults hidden across Kairos, each in a different region. To open them, you need to gather three specific key fragments. Finding these fragments and defeating the Primordial Bosses inside each vault grants you permanent upgrades for your Glide Pack, making them worth pursuing right from the moment you arrive at The Fadefields.

    ### All Vault Key Fragments in The Fadefields

    | Photo | Location | Description |
    |——–|———-|————–|
    | ![Image Placeholder] | Coastal Bonescape | Head southwest of The Fadefields to the Stillshore point. Under the tower, on a crate marked ’32,’ you’ll find a vault key fragment. |
    | ![Image Placeholder] | The Howl | Northeast of The Launchpad and west of Horace’s Oversight, inside a cave, atop a stone obelisk, lies the second fragment. |
    | ![Image Placeholder] | Idolator’s Noose | At Rosemary’s Reserve, northeast of Idolator’s Noose, find a vent on the wall that can be pulled with your grappling hook, revealing a hidden area. Near the circular grate inside, you’ll see a hand extending out holding the last fragment. |

    ### The Arch Of Inceptus Vault Location

    This vault is situated south of the Synthetic Nave and north of The Killing Floors within The Fadefields. Completing the vault increases the regen rate of your Glide Pack.

    ### All Vault Key Fragments in The Terminus Range

    | Photo | Location | Description |
    |——–|———-|————–|
    | ![Image Placeholder] | Cuspid Climb | Located west of Lambent Mines, inside a cave atop a cliff above Whistler’s Maw, the first fragment is hidden. |
    | ![Image Placeholder] | The Low Leys | At The Pit, northwest of The Thirst Scrap, on a ledge above the road, you’ll find the second fragment beside golden orbs. |
    | ![Image Placeholder] | Windspear | Inside The Vestal Garrison on the southern border between Windspear and The Low Leys, on top of a crate, is the final fragment. |

    ### The Vault Of Origo Location

    Found within The Low Leys, east of Belton’s Bore, this vault is inside the mountain accessible via a cave on the east side. The easiest way to get there is by marking the Auger Shrine and following the Echo-4 trail. Completing this vault reduces the delay before your Glide Pack starts regenerating.

    ### All Vault Key Fragments in Carcadia Burn

    | Photo | Location | Description |
    |——–|———-|————–|
    | ![Image Placeholder] | Ruined Sumplands | Northeast near Hull’s Hampbasket, beside water on a cliff surrounded by golden orbs, is the first fragment. |
    | ![Image Placeholder] | Makeshift Chalet | South of the chalet, a gas station has the second fragment sitting on a long table on the roof after grappling up. |
    | ![Image Placeholder] | Tonnage Peel | At the wreck of The Last Great Hope, crawl under the wreckage through a floor vent to find the third fragment on a stone obelisk. |

    ### The Vault Of Radix Location

    This vault is east of the propaganda speaker in Stopflow Bowels, within the Grindstone of the Worthy region. Completing it reduces your Glide Pack cost by 50%. After defeating all three Primordial Bosses, you’ll earn the Nothing Left To Guard Trophy or Achievement.

  • Essential Tips for Completing and Solving in Borderlands 4

    Essential Tips for Completing and Solving in Borderlands 4

    Unlike previous entries in the series, Borderlands 4 is an open-world game. When you arrive from the oppressive prison complex onto the shores of Clap-Trap’s paradise (which is basically hell), it can feel overwhelming at first.

    But don’t worry too much. This is still a classic Borderlands game—focused on shooting everything that moves until you’re a loot-fueled machine with a treasure chest full of shiny weapons. To help you get started and adjust to the main changes, here are some important tips.

    Don’t Explore Until You Get Your First Vehicle
    It might be tempting to start wandering around right away, but it’s better to stick with the main story until you finish the “Down and Outbound” mission. This quest rewards you with your first Faction Town and a digistruct vehicle. You can summon this vehicle anytime by pressing right on the D-pad or pressing X on a keyboard—no Catch-A-Ride stations needed on Kairos.

    Having a vehicle makes traveling much easier. It can even glide over water, so it’s worth unlocking before you start exploring on foot, which can be exhausting without it.

    Your Repkit Has More Uses Than Just Healing
    Borderlands 4 introduces the Repkit, a stim that you inject yourself with for a quick health boost. But it’s not just for healing. You can find different Repkits that come with extra perks. For example, some increase reload speed or have more charges, making them more useful beyond just healing. Keep an eye out for these upgrades—they can work well with your build and add new layers of strategy.

    Grenades Now Have a Cooldown
    Grenades are no longer unlimited. Instead, they have been replaced by “Ordnances,” which include grenades, throwing knives, and heavy weapons like the Fermionic Monsoon shown above. You don’t need to loot ammo to refill them anymore; they now have a cooldown timer after each use.

    You Can Fish for Free Guns Using Your Grappling Hook
    Borderlands 4 isn’t a relaxing game, but you can go fishing in Kairos. There are spots around the map where you’ll see splashes in the water. Using your grappling hook, you can pull in junk and weapons from these spots. It’s a handy way to find gear between fights, and you can sell what you catch at vending machines for quick cash.

    The Minimap Isn’t Enabled by Default
    The game’s compass helps keep track of objectives, but in tight spaces filled with enemies, it can be hard to see where everyone is. Luckily, there’s still a radar, but it’s off by default. To turn it on, go to the options menu, select the “Gameplay” tab, and at the bottom, toggle “Radar Display” to ‘On’. You’ll then see both the compass and a radar for better situational awareness.

    Boss Rematches Offer Better Loot
    Another new feature in Borderlands 4 is the ability to rematch bosses at Moxxi’s Big Encore machines. For a small fee, you can reset story bosses, side quest bosses, and world activity bosses to earn more XP and better loot.

    You can also queue for boss rematches from the main menu via the matchmaking options. Additionally, if you want to replay specific quests, you can do so from the “Replay” tab in the Missions menu—useful if you missed any optional objectives.

    Upgrade Your Backpack As Soon As Possible
    Many utilities—like cosmetics—are now managed through the player menu. The SDU, for example, can be accessed anytime, without visiting a vendor. From this menu, you can upgrade your weapon ammo capacity, inventory limit, bank storage, and how much of your lost loot is saved, using tokens earned through collectibles and challenges.

    Starting ammo is already quite high, so investing tokens into your backpack early is a good idea. This prevents constantly sorting through your inventory during the early part of the game.

    The Hover Pack Lets You Dodge
    Early in the game, you get a hover pack that does what it sounds like. Unbeknownst to many, you can also use it to dodge. On PC, press shift plus a direction key. On consoles, tap B or Circle while moving sideways, forward, or backward. Mastering this movement expands your traversal options and helps you avoid damage, making fights easier and survival possible longer.

    Respeccing Is Cheap and Easy, So Do It Early
    If your current build isn’t fun, you don’t have to restart the game. Respeccing is unlocked after completing the “Down and Outbound” mission and costs just enough cash to be affordable early on. Use this feature to tweak your skills and abilities until you find a playstyle that suits you. When you do, focus on finding loot that complements your chosen build.

  • How To Open Every Vault in Hell Is Us: Completing and Solving

    How To Open Every Vault in Hell Is Us: Completing and Solving

    In Hell Is Us, exploration is key, and you need to find your way around on your own. This isn’t just about completing your current objective—there are many historical items scattered throughout that reveal more about Hadea’s past and help you understand why the country is the way it is today.

    One of the main places where history is stored is the Vaults of Forbidden Knowledge. These are sealed rooms containing valuable loot and important historical documents. To access them, you’ll need to find the right password. The passwords are always related to a combination of the eight emotions featured in the game. Inside each vault, you’ll find unique items, including Amine Prisms, new weapons, lore objects, and most often, Glyphs and Relics.

    There are six Vaults in total across the game. Sometimes, you’ll see their locked entrances early on before you have the means to open them. Unless you look up their passwords below, you’ll have to work to unlock them through your research.

    Unlike other locked doors, Vaults don’t require solving complex puzzles. They are tied to your research progress. Many collected items are Research Items, which you can give to Tania at the APC to learn their historical importance. As you research more, Tania will eventually tell you the approximate location and password for each Vault.

    You’ll receive the Vaults in a specific order, based on your story progress and how many Research Items you’ve gathered. To naturally get access to every Vault, you’ll need to find all Research Items. If you already know the password, however, you can access the Vaults in any order at any time.

    There are six Vaults positioned around Hadea. Most are easy to locate, especially with Tania’s directions, since they use symbols for emotions. Here’s what each symbol looks like:

    • Rage: a vertical symbol with smaller horizontal lines.
    • Terror: a hollow rectangle with a snake-like shape inside.
    • Grief: a curved line with teardrops hanging from it.
    • Ecstasy: a circle topped with a star shape.
    • Loathing: a large U-shape with diagonal lines at the bottom.
    • Vigilance: an eye with a diagonal line through it.
    • Admiration: the shape of the number 8.
    • Amazement: a wide-open eye shape.

    Here’s where to find each Vault and their passwords:

    Vault of the Copse – Senedra Forest
    Located at the hilltop near a small OMSIF camp, close to the Caddell Treasure Hunt site. Hidden in a small cave among the trees.
    Password options: Terror, Admiration, Rage, Amazement

    Vault of the Knoll – Vyssa Hills
    Found behind a waterfall in the early parts of the area, accessible by reaching the higher ground and dropping into a hidden cave at the water’s edge.
    Password options: Admiration, Amazement, Ecstasy, Rage

    Vault of the Mere – Lake Cynon
    Hidden along a quiet water path after dropping from the overlook where your vehicle is parked. Follow the water’s edge to find the cave at the end of this secret route.
    Password options: Vigilance, Grief, Loathing, Ecstasy

    Vault of the Prairie – Jeljin
    Located in a tunnel beneath the chapel, accessed from a fenced dig site nearby. The entrance is straightforward and not very secretive.
    Password options: Grief, Loathing, Ecstasy, Terror

    Vault of the Beck – Marastan
    Situated in the ruins of the Raveta estate, across a small bridge at the back of the site. You’ll find the cave entrance there, outside the main city.
    Password options: Amazement, Vigilance, Admiration, Loathing

    Vault of the Mire – Acasa Marshes
    The last vault requires you to unlock the gate at the northeastern OMSIF Outpost using the code 151991. Inside, find the cave at the back of the area, accessible through a ruined gate marked with the Blue Mantle of Sorrow. The password for the vault door is: Rage, Ecstasy, Terror, Grief.

    Once you’ve accessed all these locations, you’ve uncovered every Vault of Forbidden Knowledge in the game.

  • Completing the Whispering Swamp Vault in RuneScape: Dragonwilds

    Completing the Whispering Swamp Vault in RuneScape: Dragonwilds

    Runescape: Dragonwilds Guide: Whispering Swamp Vault

    In Runescape: Dragonwilds, players can discover vaults that contain materials necessary for creating fast-travel portals. Clearing these vaults and gathering all the cores is essential, but be warned: they can be maze-like and filled with formidable foes that you’ll need to defeat.

    One such challenging vault is the Whispering Swamp Vault, but the effort is worthwhile. This guide will help you navigate the vault and locate its cores and treasures.

    Note: As Runescape: Dragonwilds is currently in early access, content may be subject to change. We will update this information as necessary.


    How to Clear the Whispering Swamp Vault

    The Whispering Swamp Vault is located in the northeastern part of the area, just south of the Fractured Plains border. Once inside, prepare to fend off a couple of giant rats. Quickly dispatch them and press forward.

    1. Ascend the Stairs: As soon as you enter, head up the stairs, take a left, and continue upwards.

    First Vault Core Location

    From here, turn right and then navigate to the left. You’ll encounter traps on your right that you must cross. Watch for them to glow before they activate. After crossing these traps, take a left into a room filled with Vault Guardians.

    Defeating these guardians can be tricky, so focus on damage output and parry the larger ones to make the fight easier.

    Tip: Eliminate the long-range attackers first; they can cause continuous damage while you deal with the close-range foes.

    Once you’ve cleared them, return to the room to collect the first Vault Core and open the nearby chest.

    Second Vault Core Location

    Next, head left again, where you’ll find more traps. Tread carefully and pass through them one at a time before taking another right and crossing even more traps.

    Once you make it through, enter the next room where additional guardians await. However, before engaging, cast the windstep spell and jump over the wall to your left. This will allow you to go downstairs and loot the chest there.

    Afterward, go back up the stairs and take aim at the sentinel with your bow. Move swiftly to avoid its attacks. The guardians will come towards you but won’t be able to leap across, giving you an advantage to defeat them.

    Look out for another guardian nearby. Hit it from a distance first, then switch to your melee weapon and shield once it’s close. Use your shield to block its strikes and deal damage in return before grabbing the chest located ahead.

    Third Vault Core Location

    Next, move back through the traps and continue straight before taking a right again. Get through another set of traps and confront yet another guardian. Use your bow from a distance to lure it into the traps. As it approaches, switch to your melee weapon and shield.

    Once defeated, inspect the room on your right and take the contents of the chest before heading towards the stairs visible in the center of the area.

    Descend into the next room and prepare for another guardian waiting for you. Draw it close to the traps while engaging in combat. Be cautious as another guardian may rush in. Use the traps and your strategy to defeat them before ascending the stairs again.

    Tip: Use your shield during attacks to create opportunities for counterattacks.


    Final Steps

    After the battles, advance to find a lever. Use it, and then enter the next room, where you will encounter additional giant rats and a Rat King. Attack the Rat King with your bow, depleting at least 40% of its health from a distance before switching to your melee weapon for the final assault.

    Once the Rat King and the rats are taken down, collect the Vault Core located right in front. Behind it, you’ll find another chest to loot.

    When you’re done, make your way back out of the vault, having successfully completed your mission!

    Happy adventuring in Runescape: Dragonwilds!

  • How to Open the Liberty Falls Vault in Call of Duty: Black Ops 6

    How to Open the Liberty Falls Vault in Call of Duty: Black Ops 6

    In the Zombies mode of Call of Duty, Easter eggs and hidden secrets are just as vital as the undead themselves. With the release of Call of Duty: Black Ops 6, the mode has returned to its classic form, offering a plethora of fresh secrets to uncover. One prominent feature on the Liberty Falls map is the enormous bank vault, which is easy to spot but challenging to access. The combination to unlock the vault is out there, but it won’t be given to you straightforwardly. If you and your teammates aim to unveil the mystery of this vault, we’ll guide you on how to get inside before the zombies close in on you.

    How to Access the Liberty Falls Vault

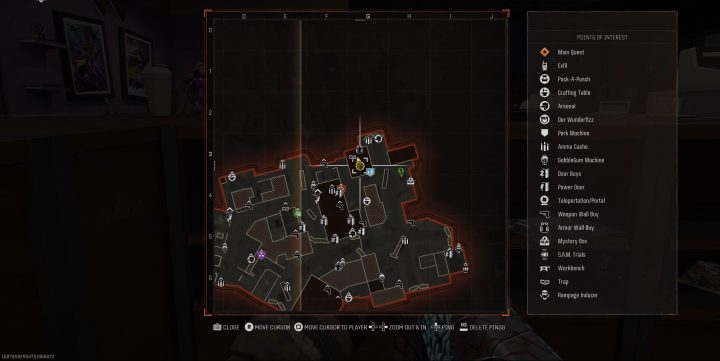
    The vault sits conveniently in the center of the map within the bank, luring players with promises of treasures inside. To get inside, you’ll need to gather the combination from various notes scattered throughout the map. Keep in mind that these codes are randomly generated with each gameplay, meaning you’ll have to search for clues each time you want access. While obtaining a Vault Key isn’t necessary for entry, it’s highly beneficial to acquire one beforehand to maximize your rewards once inside. These keys can be obtained by defeating Mangler zombies.

    Don’t forget to write down the numbers you discover, as the game won’t save them for you.

    Step 1: The first number is conveniently located near the bank vault. Check the right side of the bank desk for a sticky note placed under a lamp.

    Activision

    Step 2: Next, make your way to Olly’s Cosmetics located at the upper right corner of the map. Crouch behind the counter by the cash register to find the note attached to the back wall of the lower shelves.

    The Liberty Falls map in Black Ops 6.
    Activision

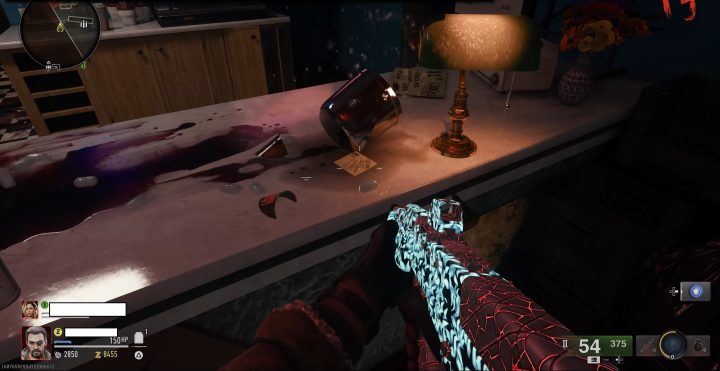
    Step 3: The final code piece resides in the Liberty Lanes bowling alley situated at the bottom of the map. Go to the snack bar and shoot the ice bucket filled with beers sitting on the counter. A sticky note containing the code is hidden underneath it.

    A post-it note on a counter in Black Ops 6.
    Activision

    Step 4: Return to the vault and enter the numbers in the same order you found them: from the bank desk, to Olly’s Cosmetics, and finally the bowling alley.

    Once the vault is open, you’ll have a limited window to grab your loot before you’re expelled. Although you won’t face any immediate threats from the zombies inside, time is of the essence. Use your Vault Keys to unlock as many safe deposit boxes as you can and collect the random loot within them.