الوسم: turn off

  • How To Turn Safe Mode On And Off On Android (And When To Use It)

    How To Turn Safe Mode On And Off On Android (And When To Use It)

    Safe Mode is a highly valuable troubleshooting feature on Android devices. It temporarily disables all third-party applications, allowing you to pinpoint whether a problem—such as crashes, sluggishness, or unusual behavior—is caused by an app or the system itself. This mode helps you troubleshoot issues without deleting data or performing a factory reset. Typically, if your device functions normally in Safe Mode, a recently installed app is likely causing the glitches.

    It’s equally important to know how to exit Safe Mode, as many users can become stuck, mistakenly believing their device is broken when the solution is usually straightforward. Below are simple methods to enable and disable Safe Mode on your Android device.

    How to Enable Safe Mode on Android

    There are two common ways to activate Safe Mode, and the most straightforward involves the device’s power menu.

    Method 1: Using the Power Menu

    1. Swipe down twice from the top of your screen to access the quick settings panel, then tap the power icon to open the power menu.

    2. Tap and hold the “Power off” option. A prompt will appear asking if you want to reboot into Safe Mode.

    3. Confirm by tapping “OK.” Your device will restart and boot into Safe Mode, with a “Safe Mode” label displayed at the bottom of the screen.

    Method 2: Using Hardware Buttons

    If the first method doesn’t work, try this:

    1. Turn off your device by selecting “Power off” from the power menu.

    2. Press and hold the power button to turn on your device.

    3. When the Google logo appears, release the power button and then press and hold the volume down button.

    4. Continue holding the volume down button until the device finishes booting. If successful, you will see the Safe Mode label at the bottom.

    How to Exit Safe Mode

    Exiting Safe Mode is generally simple:

    1. Swipe down twice from the top to open the quick settings menu.

    2. Tap the Power icon, then select “Restart” or “Reboot.” Your device will boot up normally, and Safe Mode should be disabled.

    In some cases, a notification may appear that allows you to exit Safe Mode directly—simply tap it to restart normally.

    Troubleshooting When Your Phone Gets Stuck in Safe Mode

    If your device refuses to exit Safe Mode, consider these steps:

    • Restart your device again.

    • Check that no buttons, especially the volume down key, are stuck.

    • Remove any recently installed apps that might be causing conflicts.

    • Ensure your device’s system software is up to date.

    • As a last resort, perform a factory reset (note this will erase all data).

    Why Safe Mode Matters

    Safe Mode is a powerful, straightforward tool for diagnosing issues on Android devices. It helps determine if problematic behaviors are due to third-party applications or deeper system problems. If your device operates normally in Safe Mode but not otherwise, a recently added app is likely responsible. Conversely, if issues persist, the root cause may be a system bug or hardware fault.

    While you may not use Safe Mode frequently, understanding how to activate and exit it can save time and minimize frustration when troubleshooting device problems.

  • How To Turn Off Google Assistant On Any Device

    How To Turn Off Google Assistant On Any Device

    While Google Assistant is a helpful tool to have around, there are times when you might prefer it to stay quiet. Whether it’s accidentally responding to commands when you’re not talking to it or being triggered by voices from your TV, some users find it better to turn off the feature altogether. You can disable Google Assistant completely on your smartphone or restrict its functions to better control how it interacts with your smart devices.

    Here’s how to turn off Google Assistant on your phone and manage its settings effectively:

    Disabling Google Assistant on Your Smartphone

    Depending on your device and software, there are a few ways to disable Google Assistant. Generally, the process involves:

    1. Opening the Google app on your phone.
    2. Tapping your profile picture at the top right to access the options menu.
    3. Selecting Settings.
    4. Tapping Google Assistant.
    5. Going to the General menu and toggling off Google Assistant.

    If these steps don’t work for your device, you can also go directly into your phone’s main Settings menu:

    • Find and select Assistants or Apps & Notifications.
    • Tap on Assistant.
    • Turn off or disable Google Assistant from there.

    Managing Smart Home Devices Linked to Google Assistant

    Since many devices support Google Assistant integration, you might want to review or change which devices are connected. Here’s a simple way to check and modify those settings:

    1. Open the Google Home app.
    2. Tap Settings.
    3. Select Google Assistant.
    4. Tap Manage all Assistant settings.
    5. Choose Devices to see all connected gadgets.

    From this menu, you can add, remove, or change permissions for your smart devices, giving you better control over your connected home.

    Adjusting Google Assistant’s Voice Trigger Settings

    If Google Assistant responds to your voice when you’re not actively issuing commands, you can customize its trigger preferences. For example, on certain phones like Samsung Galaxy models, you can:

    • Navigate to Settings > Apps.
    • Tap the three dots at the top-right corner and select Default Apps.
    • Tap Device Assistance App or Assist App.
    • Access Voice Match settings via the gear icon.
    • Here, you can toggle off Access with Voice Match, or customize when and how Assistant listens for commands.

    This way, you can prevent unintended activations, especially in environments where privacy or frequent interruptions are a concern.


    Here’s a visual guide on turning off Google Assistant:

    Insert image of device menus showing how to disable Assistant.

    By following these steps, you can tailor your experience with Google Assistant to better suit your preferences, whether that means turning it off completely or limiting its responsiveness to certain triggers.

  • How Do I Turn Off Bitchat App Notifications?

    How Do I Turn Off Bitchat App Notifications?

    In today’s digital world, receiving constant notifications can feel overwhelming. If you’re using the Bitchat app and find its notifications disruptive, you can easily turn them off. Below, you’ll find a step-by-step guide to silence these alerts and regain some peace of mind.

    Understanding Bitchat App Notifications

    Before diving into the settings, it’s important to grasp what notifications Bitchat sends. These alerts usually include:

    • Message Alerts: Notifications for new messages.
    • Group Activity: Updates about group chats and mentions.
    • Friend Requests: Alerts for new friend requests or connections.

    Disabling these notifications can streamline your experience and help minimize distractions.

    Steps to Turn Off Bitchat App Notifications

    On Mobile Devices

    For iOS Users

    1. Open Settings: Access your device’s settings by tapping the settings icon.
    2. Scroll to Notifications: Find and select the ‘Notifications’ option.
    3. Locate Bitchat: Scroll through the list of apps and select Bitchat.
    4. Disable Notifications:

      • Toggle off the switch next to “Allow Notifications.”
      • Alternatively, you can customize which types of notifications you want to silence.

    For Android Users

    1. Open Settings: Similar to iOS, start by opening your device’s settings.
    2. Tap on Apps: Locate the ‘Apps’ or ‘Applications’ section.
    3. Find Bitchat: Scroll down until you find the Bitchat app.
    4. Notification Settings:

      • Select ‘Notifications.’
      • You can either toggle off notifications entirely or adjust specific notification types depending on your preferences.

    On Desktop

    If you’re using the Bitchat app on your computer:

    1. Access the App Settings:

      • Open the Bitchat application.
      • Click on your profile icon or the settings gear.

    2. Navigate to Notifications:

      • Look for the ‘Notifications’ section in the settings menu.

    3. Turn Off Notifications:

      • Uncheck any boxes related to notifications you’d like to disable.
      • Consider adjusting sound settings if sounds become bothersome.

    Customizing Notification Preferences

    Instead of turning off notifications completely, you may prefer to customize them. Here’s how:

    Prioritizing Important Alerts

    • Mute Specific Chats: For individual chats, you can often mute notifications without disabling them for the entire app.
    • Customize Alert Tones: If you want some alerts but not all, set unique tones for different conversations.

    Using Do Not Disturb Mode

    For times when you need total focus, consider using the “Do Not Disturb” feature on your device:

    • iOS: Go to Settings > Focus > Do Not Disturb.
    • Android: Go to Settings > Sound > Do Not Disturb.

    This feature allows you to block all notifications for a certain period while still receiving essential calls or messages.

    Final Touches

    After adjusting your notification settings, it’s a good practice to:

    • Monitor Your Experience: Keep an eye on how these changes affect your use of the app.
    • Revisit Settings as Needed: Feel free to revert or modify settings based on your evolving needs.

    By following these steps, you can effectively manage your Bitchat app notifications, ensuring a more tailored and distraction-free experience.

  • How to Turn Off PS5 Menu Music: A Step-by-Step Guide

    How to Turn Off PS5 Menu Music: A Step-by-Step Guide

    The PS5’s home screen features a variety of helpful widgets, key information, and a neatly arranged row of your games. However, it also comes with background music that may be either calming or annoying, depending on your preferences. The good news is that you can easily switch this music on or off at any time. Whether you’ve just got your hands on a new PS5 or simply want a quieter experience, here’s how to disable the menu music on your console.

    Digital Trends

    How to disable the PS5 menu music

    To turn off the PS5’s menu music, simply follow these steps:

    Step 1: Open the Settings by selecting the gear icon located in the upper right corner of the main menu.

    Step 2: Choose Sound from the menu options.

    Step 3: Select Audio Output.

    Step 4: Scroll down until you reach the General section.

    Step 5: Find Home Screen Music and toggle it off to stop the music.

  • How to Turn Off Damage Numbers in Avowed: A Complete Guide

    How to Turn Off Damage Numbers in Avowed: A Complete Guide

    In many RPGs, a common way to illustrate your character’s strength is through visible damage figures that appear with each attack. Avowed implements this for all your actions, meaning you might find yourself surrounded by a flurry of numbers as you progress through the game. While these figures can occasionally provide useful information, they can also become overwhelming, especially in a third-person view, where additional distractions can take away from the immersive experience. Fortunately, the game gives you the option to disable these displays, allowing for a more focused gameplay experience. Here’s a quick guide on how to turn off that feature.

    Obsidian

    Turning Off Damage Numbers

    By default, damage numbers are activated, appearing every time an enemy is hit. This occurs whether the damage comes from a physical strike, a skill, or a status effect like igniting. If you’re looking to minimize visual clutter, here’s how to turn them off:

    Step 1: Pause the game and navigate to Settings.

    Step 2: Select the UI tab.

    Step 3: Scroll to the HUD Setting section and locate Damage Numbers.

    Step 4: Switch the setting from On to Off.

    You can always re-enable the damage numbers if desired through the same menu. However, turning them off allows for a more streamlined experience without missing any crucial gameplay elements.

  • iOS 18 Feature Shares Photos With Apple How To Disable

    iOS 18 Feature Shares Photos With Apple How To Disable

    A newly introduced feature by Apple significantly enhances visual search capabilities but also brings up privacy issues, according to developer Jeff Johnson.

    With the release of iOS 18 and macOS 15, Apple rolled out Enhanced Visual Search (EVS) in the Photos app. This innovation builds on their existing Visual Look Up (VLU) feature, enabling devices to recognize landmarks and notable locations within images. As a result, users can provide prompts such as “Show me photos from the beach” or “Show me pictures of sunsets,” making the visual search experience even more user-friendly.

    Introduced with iOS 15, VLU requires the transmission of “limited” data to Apple servers. Johnson discovered two documents related to EVS that indicate the new feature may necessitate sending even more information to Apple than its predecessor.

    On this issue, Johnson expresses dissatisfaction, stating, “Naturally, this user has not consented to enhance my on-device experiences by contacting Cupertino [Apple’s headquarters in California]. This decision was made silently by Apple without my approval.”

    Johnson also notes that the details about the new feature and its data requirements have not received much attention from tech media. Furthermore, he claims that Apple has largely overlooked this topic in its communications.

    This assertion seems unfounded as several discussions have emerged regarding the new features of the Photos app in iOS 18, including the updated search capabilities. For instance, Digital Trends highlighted this in their iOS 18 overview, and some writers voiced critiques about specific changes made to the Photos app in this update.

    In contrast to Johnson’s claim, Apple does address EVS in two online documents regarding privacy. One is a user-facing “Photos & Privacy” document, while the other is a research-focused document.

    The user document states:

    “Enhanced Visual Search in Photos allows you to search for images using notable landmarks or points of interest. Your device matches locations in your photos with a global index maintained on our servers. We implement homomorphic encryption and differential privacy, alongside an OHTTP relay that conceals your IP address, ensuring Apple does not access the contents of your photos.”

    Isn’t this evidence that EVS has been discussed by both Apple and the media?

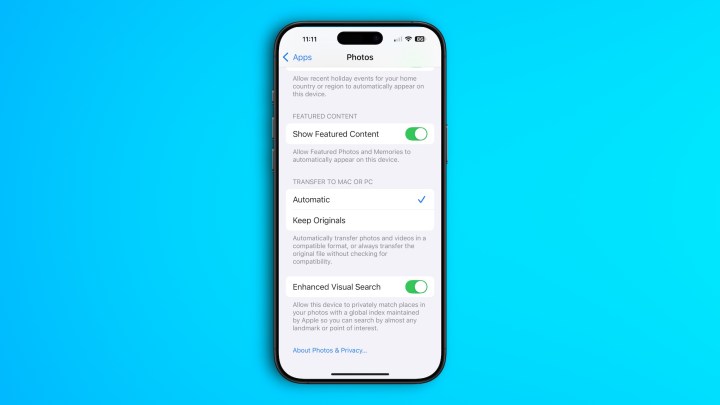
    Step to disable Enhanced Visual Search on iPhone on iOS 18.
    Bryan M. Wolfe / Digital Trends

    Additionally, Apple makes it straightforward to disable this feature on both iPhones and Macs. On an iPhone, navigate to Settings > Apps > Photos and scroll to the bottom to toggle off EVS. On a Mac, open Photos and go to Settings > General, then scroll down to disable EVS.

    Apple also provides a message on both devices stating: “Enable this device to privately match locations in your photos with a global index maintained by Apple, allowing you to search for nearly any landmark or point of interest.”

    While I understand Johnson’s concerns regarding EVS, particularly the default activation of the feature, I believe it will likely not trouble most users. The data transmitted to Apple is encrypted, and as the company claims, the method of uploading is designed to safeguard the privacy of your images, ensuring that your personal information remains inaccessible.