Tag: Three

  • Where to Find All Three Children During WuWa’s Hidden Childhood Quest

    Where to Find All Three Children During WuWa’s Hidden Childhood Quest

    Whenever a new region is added in Wuthering Waves, it usually comes with optional quests besides the main storyline where you meet all the playable characters. These side quests can be longer exploration tasks or smaller, simpler quests marked with a blue indicator.

    One of these smaller quests is called Hidden Childhood. You find it by approaching a group of kids talking to each other. During this quest, your goal is to locate three children hiding in specific spots within a circular area. It may be tricky if you don’t think creatively or look carefully.

    How to Get the Hidden Childhood Quest
    To unlock the Hidden Childhood quest, you first need to reach the Lahai-Roi region, which is the third main area in the game. You can do this by starting the first part of chapter three. After beginning this quest, you’ll arrive in Lahai-Roi, but you can keep progressing until you reach the Startorch Academy.

    Once at the academy, explore the map and go to the Resonance Nexus located at the bottom right of the campus. Activating this Nexus reveals the Spacetrek Observatory. Just above the observatory, there’s a chest icon on the map, showing a cluster of loot nearby.

    Note: You might need to complete a few exploration side quests nearby before the Hidden Childhood quest becomes available.

    Get close to this chest icon, and a blue icon indicating the Hidden Childhood quest will appear nearby. You can start the quest by talking to a group of children at that marker.

    Where to Find All the Children
    After you begin the quest dialogue, the three kids will hide in different places. You can find them by following these clues:

    • The first child is on the balcony of a gray, vertical building in the area. You can see this building if you zoom in on the map.
    • The second child is near the river on the right side of this building. When you approach, you’ll notice a rhino enemy surrounded by NPCs pointing at it—approach this area to find the child.
    • The third kid is north of the second location, hiding near some rocks marked with purple symbols.

    After you find all three children, finish the conversation to complete the quest. You’ll receive rewards like Shell Credits and materials needed for upgrades.

  • Top Stats for a Scion of the Three Rogue in D&D: Completing and Solving

    Top Stats for a Scion of the Three Rogue in D&D: Completing and Solving

    The Son of the Three Rogues is one of the most aggressive and combat-oriented subclasses available for rogues in Dungeons & Dragons. Found in the Forgotten Realms Player’s Guide, this subclass draws dark strength from the Dead Three—Bane, Bhaal, and Myrkul—turning you into a relentless, bloodthirsty hunter on the battlefield.

    Unlike traditional rogues who focus on stealth and careful positioning, the Son of the Three thrives in the chaos of close combat. They teleport between fallen enemies and deal devastating damage to wounded opponents. If you want to play a rogue that feels more like a horror movie slasher than a sneaky thief, this subclass is a good fit.

    Son of the Three Subclass Overview

    The Son of the Three gets its power from three evil gods of the Forgotten Realms—Bane, Bhaal, and Myrkul. Your character can be a devoted cultist pledged to these dark deities, or you could be cursed with their power against your will, similar to the Dark Urge in Baldur’s Gate 3.

    In Baldur’s Gate, underground cults to Bane (tyranny), Bhaal (murder), and Myrkul (death) often employ agents of this subclass. Outside the city, ruthless thieves’ guilds like the Shadow Thieves of Amn and Xanathar’s Guild might hire a Son of the Three for especially violent contracts.

    Here’s a summary of the subclass’s features:

    Feature Level Details
    Bloodthirst 3rd Deals extra damage to bloodied enemies with your Sneak Attacks, equal to half your rogue level. Additionally, it grants a reaction that lets you teleport up to 30 feet when an enemy you can see drops to zero health, allowing a melee attack afterward. You can use this reaction a number of times equal to your Intelligence modifier, resetting after a long rest.
    Dread Allegiance 3rd At each long rest, you choose one of the three gods to gain a resistance and an ability until your next rest. Choices include:
    • Bane: Psychic resistance and the Minor Illusion cantrip
    • Bhaal: Poison resistance and the Blade Ward cantrip
    • Myrkul: Necrotic resistance and the Chill Touch cantrip |
      | Strike Fear | 9th | Gains the Terrify ability: make a Wisdom saving throw against a target; on failure, the target becomes frightened for 1 minute, and you have advantage on attack rolls against it. |
      | Aura of Malevolence | 13th | Creates an aura that deals damage equal to your Intelligence modifier to enemies within 10 feet at the start of your turn, ignoring resistances. |
      | Dread Incarnate | 17th | Gains:
    • Murderous Intent: treat any 1 or 2 on Sneak Attack dice as 3
    • Battle Tyrant: advantage on attack rolls against frightened enemies |

    Best Ability Scores for a Son of the Three Rogue

    This subclass requires unusual focus on Intelligence along with Dexterity. Dexterity remains your main ability—affecting attack rolls with finesse weapons, your Armor Class, initiative, and key skills like Stealth and Acrobatics. It’s recommended to raise Dexterity to 20 by level 8 or 12.

    However, Intelligence plays a unique role: it determines how many times you can use Bloodthirst per long rest, and at level 13, it influences the damage of your Aura of Malevolence. Aim for at least 14-16 Intelligence. An Intelligence of 16 grants three Bloodthirst uses per rest and a +3 damage bonus for your aura, which is very beneficial. If you want to fully commit to this subclass’s thematic, boosting Intelligence to 18 is worth considering, though it may require sacrificing elsewhere.

    Constitution is important too, since your aggressive playstyle puts you in melee often, and your teleportation encourages diving into the thick of battle. Aim for at least 14 Constitution, with 16 being optimal in tougher campaigns.

    Wisdom, Charisma, and Strength are less vital. Wisdom affects Perception and Insight but can be proficiency-based. Charisma influences social skills but is less relevant for a violent, intimidation-focused character. Strength is mostly useless since you rely on finesse weapons.

    Best Species for a Son of the Three Rogue

    Several races complement this aggressive, intelligence-focused playstyle:

    Species Details
    Human Humans are versatile and reliable. They can quickly boost both Dexterity and Intelligence with their flexible ability score increases. Their extra skill proficiency, thanks to the Human Adaptability trait, makes them excellent for maximizing rogue skills and versatility.
    High Elf Their natural bonuses to Dexterity and Intelligence match well with your main stats. The bonus cantrip adds magical utility, and Darkvision helps in darkness or shadowy environments.
    Tiefling Their innate connection to dark forces mirrors the theme of the Dead Three. They gain resistance to fire damage, which is unique compared to your other resistances, and many variants boost Intelligence. The Thaumaturgy cantrip enhances intimidation.
    Shadar-kai These elves from the Shadowfell are perfect thematically. Their Blessing of the Raven Queen allows teleportation and damage resistance, which synergizes well with Bloodthirst teleportation. Natural necrotic resistance is a thematic bonus, fitting for a servant of death.

    Best Backgrounds for a Son of the Three Rogue

    Backgrounds provide skills, tools, and story hooks that can flesh out your character’s history:

    Background Details
    Soldier Offers proficiency in Athletics and Intimidation, and knowledge of land vehicles. While Athletics isn’t typical for rogues, it can be useful for grappling or jumping. Intimidation plays into your fearsome presence, especially combined with Strike Fear and Aura of Malevolence. Your military rank can be flavorfully aligned with authority earned through intimidation or violence.
    Sage Highlights your focus on Intelligence. Grants proficiency in Arcana and History, fitting for a scholar or dark knowledge seeker. The Researcher feature offers clues to locate forbidden knowledge about the Dead Three, supporting roleplay possibilities of delving into dark lore or gaining power through forbidden study.
    Criminal The most straightforward choice, offering proficiency in Sleight of Hand and Stealth—essential rogue skills. The Criminal Contact feature gives connections to the underworld, suitable for dealings with cults or criminal guilds tied to the Dead Three, especially in Baldur’s Gate.

    This setup emphasizes a playable character that is both deadly and thematically linked to dark gods, with a focus on combat dynamism, strategic teleportation, and dark lore.

  • Getting to Act Three in Hollow Knight: Silksong – Solving Tips

    Getting to Act Three in Hollow Knight: Silksong – Solving Tips

    There are three Acts in Hollow Knight: Silksong, and if you want to experience all of them, you’ll have quite a bit of work ahead. While the first two acts are necessary for any complete playthrough, Act Three is completely optional. It’s also the most challenging and intriguing, making it worth the effort.

    To unlock it, you need to become the main problem-solver of Pharloom. Exploring the world is essential, and helping the citizens along your journey is expected. Your quick and casual run through Silksong will be influenced by the choices and interactions with everyone from Bone Bottom to Mt. Atla. Your reward for this effort will be accessing the depths of darkness itself.

    How to Start Silk and Soul

    Silk and Soul is the required quest to make Act Three accessible. There’s often a lot of confusion about what needs to be done to unlock this hidden quest because of its lengthy list of prerequisites.

    Contrary to common belief, you don’t have to complete every single quest in Pharloom to begin. The following quests are what you need to unlock Silk and Soul:

    Quest Name Requirement
    The Lost Fleas Find 5 fleas and report back to Mooshka.
    Flexible Spines Obtain the Drifter’s Cloak.
    Bone Bottom Repairs & Lifesaving Bridge Fully upgrade Bone Bottom.
    The Threadspun Town Save the residents of Bellhart.
    Restoration of Bellhart & Bellhart’s Glory Fully upgrade Bellhart and get the Bellhome Key.
    Building Up The Songclave & Strengthening The Songclave Fully upgrade the Songclave.
    Crawbug Clearing Build the scarecraw on Halfway Home.
    Balm For The Wounded Save Sherma from Whiteward.
    Trail’s End Find Shakra’s master.
    The Threefold Memory Learn all three melodies and play them at Cogwork Core.

    Once these quests are completed, there are additional requirements you must meet before the quest appears:

    1. Climb Mt. Atla to get the Faydown Cloak (double jump).
    2. Move the fleas to the Pale Lake by gathering at least 22 fleas.
    3. Defeat the second Lace fight.

    Note: To reach Lace, you need to finish The Threefold Memory first.

    After completing these tasks, there’s one more crucial step: you must acquire 17 wish points. You can earn one point for each wish you pick up from the wish board or half a point for each courier quest you finish. If you haven’t unlocked the courier service yet, complete My Missing Courier and My Missing Brother to earn two additional points, which also allows farming rosaries and points.

    The quests listed previously don’t count toward your total wish points.

    Once all of these requirements are met, you can talk to the Caretaker at the First Shrine (the Songclave). He will be making a lot of noise to get your attention if he has the quest available. If not, ensure you’ve completed all the required steps, gotten the Bellhome Key, finished merchant quests for Bellhart and Songclave, checked all wish boards, and visited the Wormways to talk to the Alchemist for a point. Also, check in with the fleas — they may need dialogue progression to move.

    How to Complete Silk and Song

    Before starting the quest, you need four items:

    • Maiden’s Soul
    • Hermit’s Soul
    • Seeker’s Soul
    • Snare Setter

    You might already have two of these. Here’s how to find each, starting with those close together in the same region:

    Maiden’s Soul and Snare Setter

    The Maiden’s Soul is straightforward: it’s given for free by the Chapel Maid, who you first meet in Pharloom. Return to Bone Bottom, go left across the shortcut to Moss Grove, and find her inside the far left door, near the lower entrance to the Ruined Chapel. Talk to her to receive it.

    The Snare Setter is nearby. From the Chapel Maid, head directly to the Moss Grove pit, then fall and turn right immediately. Your goal is the Weavenest Atla chamber at the bottom right of Moss Grove. Use Needolin to unlock the chamber if needed, then activate the elevator on the far right, ride down, and climb the first left path. In the next room, use Double-Jump to reach a hidden area above, where the Snare Setter sits on a table to the right.

    Hermit’s Soul

    The Hermit’s Soul is given by the Bell Hermit, which you find in Bellhart. Return there and find a hidden path beneath the first ledge in Bellway Station. Down from there, talk to the Hermit for the soul.

    Seeker’s Soul

    The Seeker’s Soul is obtained by venturing into Bilewater, which requires completing Sinner’s Road or exploiting a specific glitch with the Voltvessel. Use this to break through the wall if necessary. The fight with Groal in Bilewater is very tough, but defeating him is essential to earn the Seeker’s Soul, which is located in a building just left of his arena.

    Entering Act Three

    After collecting all items, challenge Grand Mother Silk—her fight is tough. Use strategies like embracing Maggots, finding the hidden bench, and deploying traps. Defeating her grants you the Seeker’s Soul, located in the building to her left.

    To access Act Three, you need to speak with the Caretaker at the top of the Citadel after turning in the quest items. At this point, ensure you’ve completed all prior steps, received the Bellhome Key, finished merchant quests, checked wish boards, and earned enough wish points.

    Once the quest is handed in, you’ll face a final challenge: challenge Grand Mother Silk. You have the option to bind her or use your Needolin to continue into Act Three. A cutscene will trigger, showing the Abyss unleashing chaos over Pharloom. Despite the credits appearing, you are still headed into Act Three.

    After the credits, reload your save, and you’ll see your game covered in Abyss goo. Spam the start button to re-enter your game until it clears. Once done, you’ll get a message announcing your entry into Act Three. Good luck. Keep Needle close — the Abyss is dangerous.

  • How to Complete All Three Missile Components for Gigi in Borderlands 4

    How to Complete All Three Missile Components for Gigi in Borderlands 4

    Everyone has something they want to do, feel they need to do, or a goal they want to reach. For Gigi, a unique character in Borderlands 4, her goal is to find out if she can explode — to see if she’s more than just a dud.

    Don’t worry too much about Gigi at first. She’s actually a sentient missile computer. Things went wrong a while ago, and unlike other missiles, she didn’t explode. She’s looking for a friend and some guidance. Luckily, a Vault Hunter drops into Kairos who can understand her and help her achieve her goal.

    How to Start the “Ready to Blow” Mission

    This side mission begins by interacting with an Echo Log on the counter inside the store area in The Launchpad faction town. Completing this gives you access to the safe house and your first Digistruct vehicle, which makes traveling much easier. To unlock it, finish the “Down And Outbound” quest.

    After listening to Gigi’s message, travel all the way to the southeastern side of Kairos, specifically to the Idolator’s Noose region, then to a small town southeast of the Watershed Gate.

    In the middle of this town, you’ll find Gigi, a missile computer inside a broken missile. You can talk to her to start progressing in the quest. Head up the stairs to the shop on the hill and speak with Scrapper Orts to get the missile launch system — the first part Gigi needs.

    How to Find the Missile Components

    Take the broken wooden bridge southwest and use your Grapple on nearby points along the walls for a shortcut. Use your Grapple to rip the door off a vent nearby — inside, you’ll find the first missile component.

    Next, grapple up to the next ridge where much of the wreckage is. Defeat the Manglers that attack you. The second component is on the back of a huge engine; press the highlighted button on the console below it, and the component will drop onto the ground.

    The third component is in the wreckage area but further up the nearby ledge and around the corner. When approaching the debris, several Manglers will spawn, including a Badass Mangler. Defeating this enemy is essential, as he will drop the last missile part.

    How to Build Gigi’s New Missile

    Return to Gigi and speak with her again. Pick her up and head north toward the Deep Seven Silo near the town. Bring her to the ridge to the left of it, where you’ll find a large tree trunk next to some ammo crates and a console to place Gigi.

    Be aware that the area might be filled with Order enemies or Manglers unless you recently cleared it out. You can put Gigi down to fight and then pick her up again without losing progress.

    Place the launch system on the table against the tree trunk, and use the three missile components to assemble the missile on the circular platform. Then, put Gigi into the empty part of the missile.

    As soon as you activate the launch sequence, the Order forces will attack. They’ll come in waves, with the first three waves including at least one Badass Armature. The remaining enemies will be regular Order foes like Wardens, Witnesses, and Engines.

    Once all enemies are defeated, launch the missile to complete the mission. As a reward for helping Gigi, you’ll earn experience points, 2,000 cash, an Uncommon or Epic shield, some Eridium, and the Taste Munitions style for your Vault Hunter and Echo.

  • Rocket Ship Password for Chapter Three of No Sleep for Kaname: Completing and Solving

    Rocket Ship Password for Chapter Three of No Sleep for Kaname: Completing and Solving

    Isekai Elevator Trap and Escape Room Challenge

    In the third chapter of No Sleep for Kaname Date, your group accidentally completes a ritual that traps Ota in an isekai elevator. To save him, you need to work as Iris and Moma to free him before it’s too late.

    Solving the Entry Code to the Rocket Ship

    You must figure out the code to unlock the rocket ship on Iris’s level. Then, identify which Iris is real when you take control of Moma in this part of the escape room. Use the clues on Iris’s level to help solve the puzzle.

    How To Enter The Rocket Ship

    After placing the buttons in the correct slots on the elevator, the trap completes — the elevator transports Ota to another world. You accidentally completed the code by pressing all the buttons.

    To prevent this, head to a locked rocket ship in the back corner of Iris’s level, near the sky screen used earlier to study constellations. The ship requires a six-letter code to unlock.

    Go to the green planet display on Iris’s floor. There, you’ll see a tiny hole at the top. You have a needle from earlier, used during a record-playing scene, so remember that you also used a paper cup and needle to play a record just before this. Use this method again.

    However, Iris has the needle, and Moma has a paper cup left from removing a sticker earlier in the chapter. Moma is on a different floor, so you’ll need to be creative in sending the cup to Iris.

    Sending the Cup to Iris

    Iris using the cup and string on the planet puzzle to open the rocket ship in No Sleep for Kaname Date.

    Remember the item exchanges between Ota and Iris during the green warp portal scene. Red portals send items between certain locations: red sends to green, blue to red. Moma’s floor has a blue portal, while Iris’s has a red portal. As Moma, throw the cup into the blue portal to send it down to Iris.

    As Iris now has the cup, use your inventory’s combine mode to combine the cup and needle. Then, go to the green planet display and interact with the top of the case. You can now lower the needle into the display to listen to a broadcast from the planet.

    The broadcast reveals the rocket ship code: MUNDUS. Return to the locked ship as Iris, enter this code, and get inside the rocket.

    Determining Which Iris Is Real

    After Iris boards the rocket, it moves to another level, where you switch control to Moma. He witnesses five rocket ships with images of Iris on their doors descend from above, among the moons where you previously shot a lizard moon in the eye.

    Moma’s goal is to shoot the fake Iris ships to save the real one. To start, you should get behind the gun and aim at the sky. Identify and shoot down the obvious fakes: the leftmost ship, the middle, and the rightmost one.

    The second and fourth Iris images look identical. To find out which is the real Iris, switch control back to Iris and examine the ship closely.

    Look out the window of Iris’s ship. You will see the lizard moon to Iris’s right. Using this, and knowing what the real Iris can see, shoot down the rightmost Iris.

    However, leaving the last ship alive causes a new puzzle involving the Third Eye. Iris mentions seeing a “beautiful moon,” but since you previously shot the eye on the lizard moon, you realize Iris isn’t in that ship either. Shoot the remaining ship to finalize the puzzle.

  • Three Major Reveals From Alien: Earth Trailer

    Three Major Reveals From Alien: Earth Trailer

    Finally, FX has unveiled the official trailer for Alien: Earth. This eagerly awaited series, created by Noah Hawley, serves as a prequel set two years prior to the iconic events of the 1979 film Alien. The new footage offers key insights into the characters and narrative.

    Synthetic Bodies for Human Consciousness

    The Alien franchise has long featured androids, with memorable portrayals by Ian Holm as Ash and Michael Fassbender as David in Prometheus. The Alien: Earth trailer introduces the concept of hybrids—humanoid robots endowed with human consciousness. Wendy, portrayed by Sydney Chandler, is the first hybrid prototype.

    A young girl’s consciousness is transferred into this synthetic body, thanks to Boy Kavalier (Samuel Blenkin), the CEO of Prodigy Corporation.

    Five Corporations Rule Earth

    Fans of the series will instantly recognize Weyland-Yutani, the corporation responsible for many of the time’s technological advancements. This tech giant continuously jeopardizes human lives with xenomorphs due to its relentless quest for profit.

    In 2120, Weyland-Yutani is one of five corporations that govern Earth, alongside Prodigy, Lynch, Dynamic, and Threshold. Humans now share their world with cyborgs—individuals with both biological and mechanical components—and synthetics, which are AI-driven humanoid robots. Thanks to Wendy, hybrids also enter the mix.

    Multiple Creatures Cause Chaos

    The iconic xenomorph remains the dreaded creature of the Alien franchise, responsible for widespread devastation over the years. One xenomorph alone can wreak havoc, but the Weyland-Yutani spacecraft that crashed in Prodigy City brought along more than a single invasive species.

    As one character notes, “This ship collected five different life forms from the darkest corners of the universe—monsters … predatory.”

    Wendy, along with a team of soldiers, is tasked with exploring the ship, uncovering threats that could be the planet’s greatest peril.

    The cast of Alien: Earth includes Timothy Olyphant, Alex Lawther, Essie Davis, Adarsh Gourav, Kit Young, David Rysdahl, Babou Ceesay, Jonathan Ajayi, Erana Jame, Lily Newmark, Diêm Camille, Adrian Edmondson, Moe Bar-El, and Sandra Yi Sencindiver.

    Bringing this project to life is Emmy-winning creator Noah Hawley, while original Alien director Ridley Scott serves as an executive producer.

    Alien: Earth is set to debut on FX on August 12 and will also be available for streaming on Hulu and Disney+.

  • Pakistani Mother and Three Children Tragically Die in London Fire

    Pakistani Mother and Three Children Tragically Die in London Fire

    Police are present at the Great Chart Golf & Leisure Country Club, UK. — Reuters/File

    The Metropolitan Police announced that a 41-year-old man has been arrested on suspicion of murder following a tragic house fire in Brent, northwest London, that claimed the lives of a mother and her three children.

    Emergency services were dispatched around 1:20 AM on Saturday to Tillett Close in Stonebridge, where they discovered the victims—a 43-year-old woman, a 15-year-old girl, and two boys aged eight and four—reported the BBC.

    The fire completely destroyed two three-story terraced homes. According to the Metropolitan Police, a woman in her 70s and a teenage girl—both related to the deceased—were hospitalized. Their current medical conditions have not been revealed.

    Local MP Dawn Butler expressed her heartbreak over the deadly fire on social media, stating her “thoughts and prayers are with the family and friends affected by this heartbreaking tragedy.”

    Superintendent Steve Allen later confirmed that the deceased woman was indeed the mother of the three children.

    Approximately 70 firefighters and eight fire engines from various stations, including Wembley, Park Royal, and Willesden, responded to the blaze, which was reported by neighbors.

    ‘A Heartbreaking Incident’

    A neighbor, who noted the family moved to the UK from Pakistan over 20 years ago, shared with the BBC that she heard glass breaking and screams before discovering the neighboring building on fire.

    Mohamed Labidi, a 38-year-old teacher living on Tillett Close, expressed his grief, saying he can hardly bring himself to look at the house now.

    He told the PA news agency that he knew the family well and described them as “very good people,” adding, “We used to socialize together.”

    Another neighbor described her shock at the destruction caused by the fire, saying she felt “stunned by the devastation.”

    A local resident who wished to remain anonymous commented, “This is an extremely distressing time for both us and the neighborhood.”

    The London Fire Brigade (LFB) reported that a woman and a child were rescued from the second floor of one property using breathing apparatus and received immediate emergency medical assistance.

  • Tornadoes Tear Through Three States, Leaving Over 25 Dead

    Aerial view of houses damaged by a tornado in St. Louis, Missouri, USA, May 17, 2025. — Reuters
    Aerial view of houses damaged by a tornado in St. Louis, Missouri, USA, May 17, 2025. — Reuters

    Over 25 lives have been lost following severe storms and tornadoes impacting parts of Kentucky, Missouri, and Virginia. Numerous homes were devastated, trees uprooted, and nearly 200,000 residents were left without electricity.

    Locals are working to navigate the aftermath of the destruction.

    Kentucky Governor Andy Beshear announced on social media that at least 18 fatalities occurred during the storms on Friday night. Meanwhile, Missouri officials reported an additional seven deaths in their state.

    Reports indicate that two individuals were killed by falling trees in Virginia.

    In London, Kentucky, 38-year-old Jamie Burns, who lives in a trailer with her husband and son, took refuge in her sister’s basement as the storm obliterated around 100 to 200 houses in the vicinity.

    “It’s unbelievable. Things that have been here for over 30 years are just gone,” Burns recounted during a phone conversation with AFP, her voice trembling.

    “It’s shocking. You look at one spot, and it’s completely flattened, like it was never there.”

    Drone images released by local outlets revealed shocking scenes in London, with homes turned to rubble and tree trunks standing stripped of their branches.

    Governor Beshear noted that more than 100,000 people in Kentucky are without power, prompting five counties to declare states of emergency.

    The eastern region of Kentucky, historically linked to coal mining, is among the nation’s most economically challenged areas.

    “Many residents live in manufactured homes that are not equipped to withstand tornadoes,” Burns stated.

    ‘One of the most devastating storms’

    In Missouri, five individuals were killed in the major city of St. Louis, with authorities labeling this as one of the most destructive storms in the city’s history, and two more deaths were reported in Scott County, according to a statement from the State Highway Patrol.

    Approximately 80,000 people found themselves without power, and three emergency shelters were set up locally. Forecasts predict further severe weather on Sunday night and Monday.

    When asked by a reporter if this was the most severe storm to hit St. Louis, Mayor Cara Spencer responded, “I would characterize this as one of the worst storms — absolutely. The destruction is incredibly heartbreaking.”

    The mayor reported that 38 people were injured and about 5,000 buildings suffered damage.

    In one St. Louis neighborhood, a church was significantly damaged, as seen in CBS footage, with rescue workers tending to victims in the area Saturday morning.

    “It’s tragic to see such destruction inflicted on our residents and our church,” said Derrick Perkins, a pastor at Centennial Christian Church, expressing deep sorrow. “Our hearts are shattered.”

    Bruce Madison, who also serves at the church, remarked on the community’s resilience amidst the tragedy. “Right now, all we can do is pray for everyone involved.”

    Despite having prior warnings about the severe weather— Governor Beshear had declared a state of emergency on Friday—the rising death toll may lead to concerns regarding potential staffing shortages in the National Weather Service due to budget cuts made during the Trump administration.

    It is estimated that around 500 of the 4,200 National Weather Service employees have either been laid off or opted for early retirement this year, according to The Washington Post.

    Last year, the United States experienced its second-highest number of tornadoes on record, with nearly 1,800, according to the National Oceanic and Atmospheric Administration (NOAA), second only to 2004.

  • Chapter Three Guide: The Church’s Corruption in Stone of Madness

    Chapter Three Guide: The Church’s Corruption in Stone of Madness

    In the last chapter of The Stone of Madness, Brother Guillermo revealed that the Inquisitor was performing horrible experiments on individuals—surgically altering their brains while searching for the Stone of Madness. Outraged by these cruel actions, the group resolved to put an end to these appalling practices.

    This led you to the monastery’s Wine Cellar, where the group systematically destroyed the tables used for these heinous experiments to foil the Inquisitor’s plans. Just as you were about to rejoice in your victory, Sister Elvira brought alarming news: the Abbot has been poisoned. In this chapter, let’s determine whether you can eradicate this corruption for good.

    Accessing the Library

    Your primary goal in this chapter is to enter the Library. Start your journey in the Cloister area. In the northeast corner of the Cloister, you will find a room with a green door that you need to open. This room is situated to the right of the one where Brother Guillermo inspected the mirror in the initial chapter.

    To avoid detection by the monks, have Alfredo don the priest robes. Then, use the other door in the area to access the Library. Upon entering the Library, you’ll encounter a doctor dressed in green. Typically, this area is off-limits, but staying close to the doctor will activate the ‘Protection of the Doctor’ effect, turning it into a safe zone.

    This means you need to stay near the doctor while completing your task. If Alfredo is wearing the priest robes, you can wander freely without relying on the doctor’s protection.

    Finding the First Large Volume

    On the first floor, your objective is to shatter the mirror. Utilize Leonora for this task. Wait until the doctor is on the first floor, then quickly break the mirror and hide Leonora. Use Alfredo to retrieve the key hidden behind the shattered glass. This key will grant access to the chapel area on the west side of the Library, near the staircase leading to the second floor.

    You’ll also discover a cellar door in this location, making future visits easier. Next, take down the guard who patrols near the stairs to the second floor. Either knock him out or eliminate him using Leonora, and then drag his body to the small section with red curtains. Open the iron-barred door adjacent to the stairs, then deal with the guard behind those bars.

    Descend the ladder, and without attracting the soldier’s attention, activate the switch. This will create two shortcuts leading to the soldier’s room: one from the cellar door area and another from the main Library hall. Lastly, read the volume found in the soldier’s room to advance your objective.

    Locating the Second Large Volume

    To find the second volume, exit the Library’s first floor. Look up near the armed guard outside to identify a spot where you can throw a rope. Climb up using the rope, and then use a lockpick or crowbar to open the balcony door above. Next, have Alfredo ascend to the second floor via the rope.

    For added safety, make sure Alfredo is dressed in the priest robes while you explore the upper level.


    You can also access the second floor from within the Library by moving a large wooden crate on the first floor with Eduardo, though this method carries more risk.

    Once on the second floor, read the volume found in the southernmost part. Use the switch here to create a bridge that acts as a shortcut to the opposite side of the second floor. After this, you won’t have any tasks pending except to advance to the next day. For the following day, your first task will involve gathering several materials, which include:

    • Two Mandrakes
    • Two Gold Teeth
    • Five Medicines

    Obtaining Two Gold Teeth


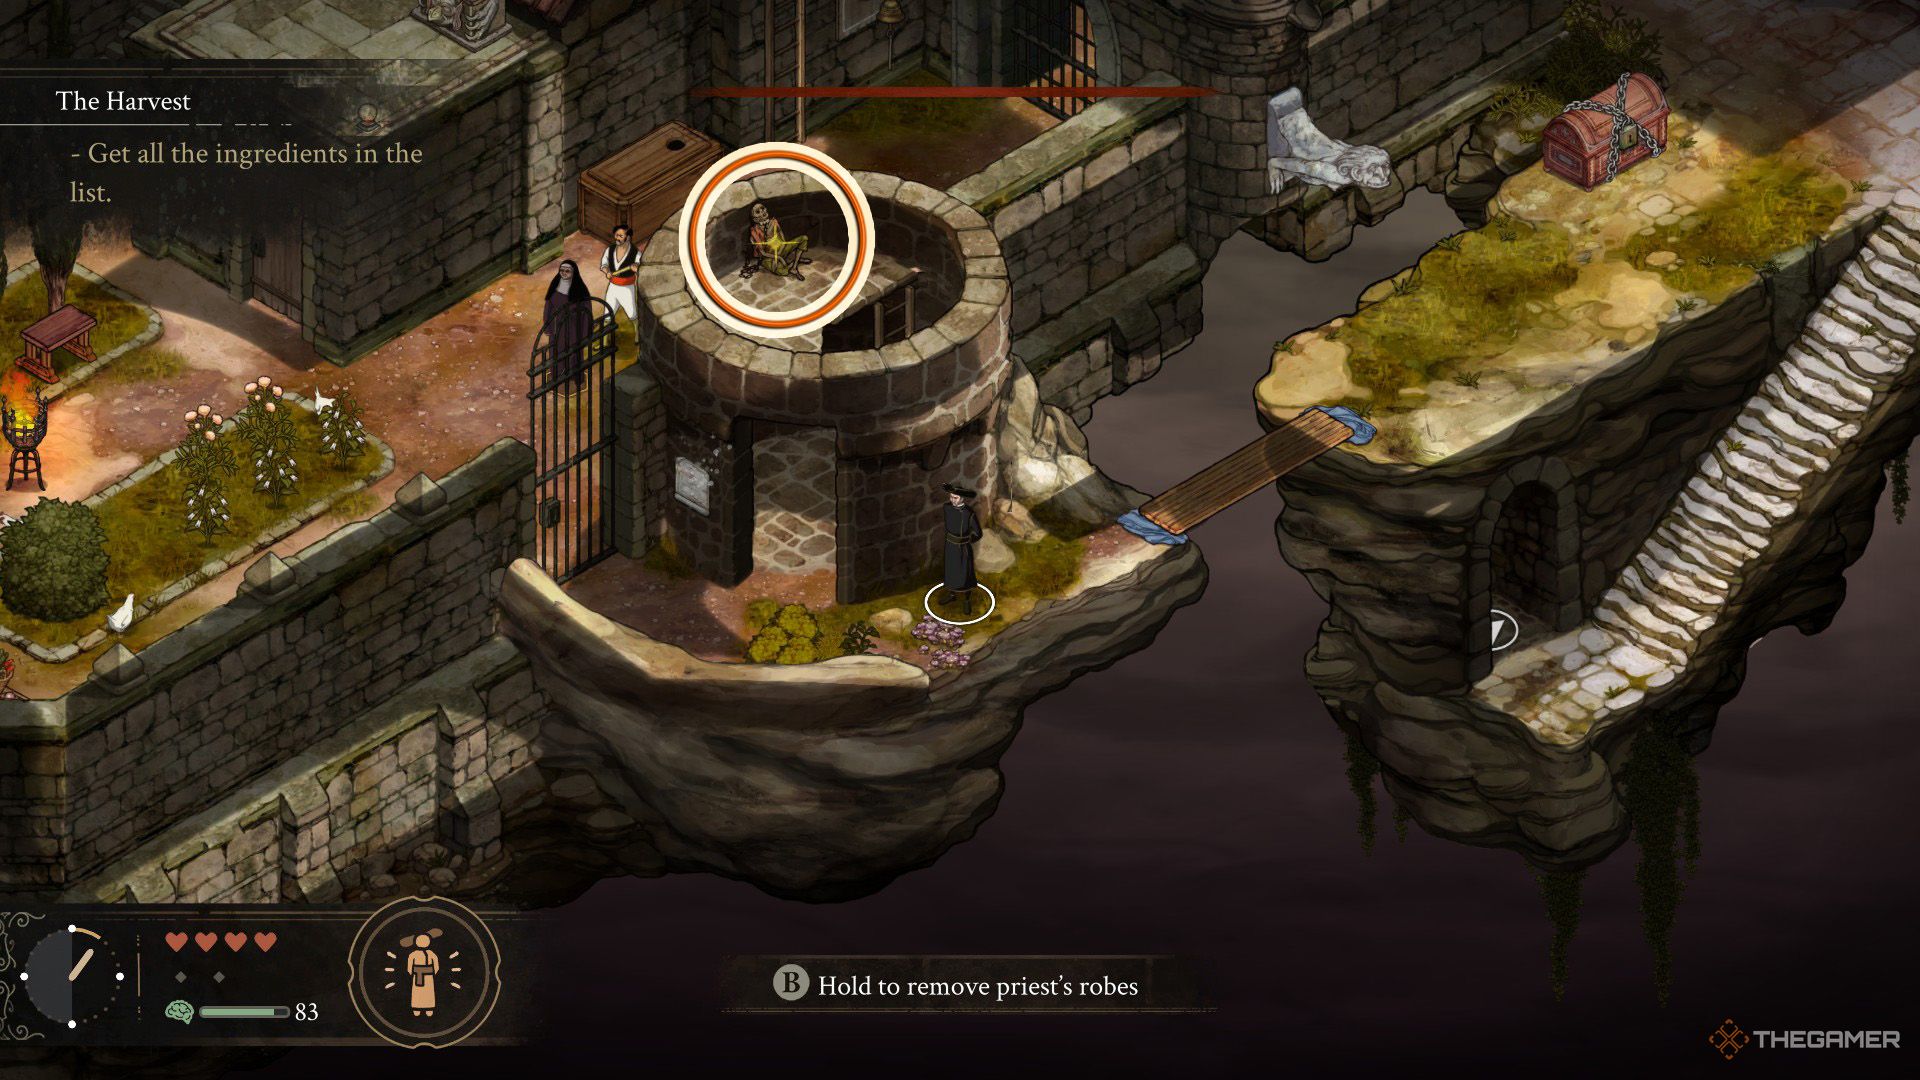
    An orange circle shows the location of the first gold tooth in The Stone Of Madness

    The first Gold Tooth can be found in the Nuns’ Garden, just east of the Laundry area. Here, you’ll notice a corpse at the top of the tower near the barn where you previously saw Brother Guillermo. However, the Nuns’ Garden presents challenges since Mother Superior is actively patrolling the area.

    To avoid detection, enter the Nuns’ Garden from the Wine Cellar (Latrines). This way, you can access the upper level of the tower without being seen and find the first Gold Tooth.

    The second Gold Tooth is situated in the area above the Wine Cellar, just south of where the guard is stationed. You’ll notice an iron gate there, which triggers a cutscene. Have Amelia sneak through the iron bars to activate the switch that opens the gate.

    After that, bring Eduardo to this area and push the wooden crate towards the hanging cage that contains a skeleton. If any inmates obstruct your path, use Leonora to knock them out with a plank and drag them away.

    Collecting Two Mandrakes

    To find the first Mandrake, head over to the Cloister and descend the right staircase in the southern section. There, you will see a statue of a woman holding a vase on her head. Use Eduardo to move the statue to the opposite side of the room.

    It would be wise to subdue or eliminate the nearby guard to make this process easier.

    Once the statue is repositioned, use Leonora to throw a rope to the higher section nearby. Climb up and examine the vase atop the statue’s head to collect the first Mandrake.

    The second Mandrake can be found near the entrance of the Wine Cellar, where you will also meet the Doctor. As you approach, a cutscene will reveal the Mandrake’s position. While near the Doctor, you are still under his protection. Your first task is to eliminate the two guards around him. Then, have Eduardo move the large crate southward.

    Once it’s in place, get Agnes to climb onto the crate. Since the guards may interrupt your plans, it’s advisable to deal with them first. After Agnes is on the crate, push it over the spikes and use a sickle to gather the Mandrake. If you lack a sickle, Panecillo, situated near the Nuns’ Garden, will provide you with one for free.

    Also, to craft five Medicines, use Agnes’ Witches Cauldron skill at night. After you’ve gathered all your materials, wait for nightfall to proceed.

    How to Access the Laboratory and Create the Medicine

    The next day, start by talking to the Doctor located on the second floor of the Cloister. He’s situated in the room near the red-carpeted area, but you’ll need to unlock the door with either Eduardo or Leonora. Be careful of the Inquisitor and the armed guard on patrol during this operation. When you enter the room, ensure Alfredo is in his priest robes.

    The Doctor will instruct you to find the laboratory keys, which are hidden in the Cloister’s garden. Check the weeds near the locked chest to locate the key. After that, head to the library, where chickens will have taken over the place. Go up the stairs by the cellar door and take out the guard there.

    Speak with Tia del Nido; she will divulge the laboratory’s location in exchange for an egg. She’ll also inform you that the secret door to the laboratory can only be unlocked using the Inquisitor’s ring, which one of her chickens has swallowed.

    To retrieve the Inquisitor’s Ring, throw a rope with Leonora to the area above the cellar door inside the library, and then climb up with Amelia. Crawl through the gap to reach the space above Tia del Nido. Proceed carefully and use Amelia’s Pickpocketing skill to steal the ring from the chicken.

    Reaching the laboratory is simple. Go to the entrance of the Wine Cellar and head south to find it. A cutscene will reveal its location once you’re within the Wine Cellar. Just be careful of Mother Superior, who will be close to the entrance. The easiest way to distract her is to have Amelia throw chocolate, giving you the opportunity to slip into the laboratory.

    Enter the laboratory with either Alfredo or Agnes. Be cautious of the guard inside, and create the medicine without being caught.

    How to Administer Medicine to the Abbot

    Your next task is to deliver the medicine to the Abbot, who is located in the red-carpeted area on the second floor of the Cloister. You can use Eduardo to place a plank as a shortcut to reach this area. Alternatively, bring Leonora to the room across from the red carpet, where the prisoners and the doctor were previously met. Eliminate the guard in this area.

    Wait for the Inquisitor to move out of the way from the red carpet, and then unlock the iron-barred door leading to that area. Quickly enter the Abbot’s room and administer the medicine. This will provide him some relief, and he will outline the next steps in the strategy to stop the Inquisitor. With this, the chapter comes to a close.

  • Three New Nothing Phones Coming In 2025 Here’s What We Know

    Three New Nothing Phones Coming In 2025 Here’s What We Know

    Nothing has confirmed its plans to introduce the Nothing Phone 3 in 2025. Additionally, there’s speculation about the potential launch of several new models next year. According to insider Yogesh Brar, the company is currently in the development phase for three new Nothing smartphones, all of which are anticipated to debut in the first half of 2025.

    What exactly can we expect from these upcoming devices? Back in June, Nothing’s co-founder and CEO, Carl Pei, announced the forthcoming Nothing Phone 3, following the launch of the Nothing Phone 2 in 2023. At that time, Pei emphasized that the new device would revolutionize our interactions and perceptions of mobile technology.

    One of the key features of the upcoming phones will be the “hub,” an AI-driven interface that offers quick access to essential functionalities like weather updates, social media, calendar events, and messages. Below this streamlined interface, users will encounter a variety of “dynamic and context-aware” widgets. For example, it could automatically showcase a QR code for your boarding pass or concert ticket when there’s relevant information in your calendar.

    A person holding the Nothing Phone 2.
    Andy Boxall / Digital Trends

    There may also be a budget-friendly option in the form of the Nothing Phone 3a. This model is expected to retain many of the flagship’s features but with some notable restrictions, allowing Nothing to offer it at a more accessible price point.

    What can we predict about the third model? Earlier rumors hinted that it could be a professional version, possibly titled the Nothing Phone 3 Pro. However, Brar suggests that this may not be the final name. Instead, he believes the third variant might come with distinct internal components when compared to the standard model, though it remains unclear if these specs will be an upgrade or a downgrade.

    We have long admired the devices produced by Nothing and are eager to see what the company unveils next year. The Nothing Phone 2 continues to be one of our top Android smartphones, but due to its age, it has slipped from our overall favorites list. Regardless, we always look forward to reviewing and using these innovative phones.