الوسم: storage

  • How to Increase Inventory Space in Hytale by Completing and Solving

    How to Increase Inventory Space in Hytale by Completing and Solving

    In Hytale, you’ll come across various resources like sticks, iron, and carrots, all of which occupy spots in your inventory. Besides these, your inventory also holds weapons, tools, torches, and other items, so it can fill up quickly.

    You can create storage boxes to hold some items, but they aren’t very large, which means your inventory can still become overcrowded. Luckily, the game allows you to expand your carrying capacity by using backpacks. Here’s what you need to know about making and upgrading backpacks.

    How to Craft and Upgrade Your Backpack

    To craft a backpack, you first need a workbench. But this isn’t just any workbench — you’ll have to upgrade your workbench to Tier Two before you can start making backpacks.

    You can upgrade your workbench from its menu using these resources:

    • 30 Copper Ingots: Mine copper ore from caves, then smelt it in a furnace to get the ingots.
    • 20 Iron Ingots: Find iron ore underground, smelt it in a furnace like copper.
    • 20 Linen Scraps: These can be gathered by defeating enemies like Trocks, Skeletons, and Goblins — basically any mob wearing clothes.

    Once your workbench is at Tier Two, you can craft your backpack from the Tinkering tab, requiring the following:

    • 8 Iron Ingots: Mined and smelted from iron ore.
    • 16 Medium Leather: Obtain medium hides from animals like wolves and process them at the Tanning Rack to turn into leather.

    You can further upgrade your backpack by upgrading the workbench to Tier Three, which unlocks Backpack Upgrade 1. This upgrade needs:

    • 40 cindercloth scraps
    • 24 heavy leather
    • 8 cobalt ingots

    Later, you can unlock Backpack Upgrade 2 by collecting 100 memories at the Forgotten Temple — although this will take some time. Both upgrades increase the number of slots in your backpack, giving you more space to carry items.

    How to Equip Your Backpack

    Many players might think just crafting the backpack automatically adds more inventory space, but there’s a couple of extra steps.

    First, place the backpack in your hotbar to equip it. Right now, it will appear as a piece of paper in your hand. To fully equip it, simply right-click on it — similar to eating food. This action effectively equips the backpack, even if your inventory size doesn’t immediately change.

    Next, open your inventory. Look at the left side next to your character’s icon; you’ll see a picture of a backpack. Click on it to open a new row of inventory slots where you can store additional items.

    By following these steps, you’ll significantly increase how much you can carry and manage your resources more efficiently.

  • How to Complete Challenges for Extra Storage in StarRupture

    How to Complete Challenges for Extra Storage in StarRupture

    Exploring the constantly regenerating lands of Arcadia-7 in StarRupture can be challenging but rewarding, as there are many minerals and resources to collect. Your inventory will quickly fill up, so you’ll need to expand it to gather more resources as you explore further.

    StarRupture offers several storage options, including extra slots in your character’s inventory, personal storage in each habitat, and large storage depots for managing large quantities of items across connected buildings. Here’s what you should know about increasing storage in the game.

    How to Unlock and Increase Storage in StarRupture

    Initially, your character has 24 inventory slots. Each slot can carry hundreds of units of resources or items, depending on what they are. For example:

    • Ammo: 300 units per slot
    • Ore: 100 units per slot
    • Basic Building Materials: 1,000 units per slot

    This capacity is sufficient early on, but as you venture further, you’ll need more space. It’s a good idea to pick up everything on your travels because each item has its use, and you often need hundreds of resources. You’ll soon realize how quickly your inventory fills up.

    Since the planet is prone to rupture wave attacks that cause destruction and can kill you if you’re not careful, exploration can be dangerous. Carrying essential items is important in case you’re caught outside during a wave. The only protection during these events is your Habitat, protected by a Base Core. For long explorations, bring enough resources to quickly build a Base Core and Habitat with an airlock for safety, requiring:

    • Base Core: 1 Meteorite Heart
    • Habitat: 20 Basic Building Materials
    • Airlock: 10 Basic Building Materials

    When you start, your character’s inventory includes 24 slots, with two occupied by Basic Building Materials and Meteorite Hearts, leaving only a few for resources like ammo, food, and minerals.

    You can increase your inventory slots by accepting contracts from the Selenian Corporation. Completing a level 3 contract grants 8 additional slots. Further upgrades are available through contracts with other companies:

    • Future Health Solutions at level 7
    • Griffits Blue Corporation at level 8
    • Moon Energy Corporation at level 11

    After unlocking each upgrade, you will have a total of 56 inventory slots, enough to handle a long trek, gather flora and minerals, or find Blueprints and War Bonds from fallen enemies.

    As you mine, refine, and craft, you’ll need storage at your base. There are personal storage units for excess items and storage depots for storing surplus during refining and crafting processes.

    All Storage Types

    There are four types of storage:

    1. Personal Storage – Unlocked with a level 2 contract from Clever Robotics, with a larger upgrade at level 9. These are placed inside your Habitat, offering 18 slots initially, expandable to 42. Each slot can hold a different amount of resources (e.g., 100 units of ore or 1,000 building materials).

    2. Storage Depots – Located outside your base, these are used to distribute resources to connected buildings. Unlock with a level 3 contract from Clever Robotics, initially holding 400 units of one item, and upgradable to 1,600 units at level 8.

    3. Multistorage – Stores large quantities of different items in one place, holding up to 2,500 units of each. Available after completing a level 12 contract with Clever Robotics.

    4. Expandable Storage – Similar to Multistorage but can be expanded further, with each expansion holding 1,600 units of various items. This requires more power, so additional power units must be added. Unlock at level 13 with Clever Robotics.

    To optimize space, it’s recommended to place all Personal Storage units on walls within your habitats.

  • Completing Your Inventory Storage in Squirreled Away: A Guide to Solving

    In Squirreled Away, you’ll scamper through the trees and forage in the local park for supplies. This is all part of being a squirrel, but having a plan is key. Throughout the park, there are various caches for you to stock up with nuts, fruits, and other essentials for emergencies.

    While you won’t need to retrieve these items later, storing them has its perks. We’ll guide you in locating these fun caches and filling them with tasty treats, allowing you to expand your inventory and carry more items on your journeys.

    Sunrise Isle Cache Location

    Your first cache discovery happens when you chat with Mike the squirrel on Sunrise Isle. He explains that you will be stashing different food items in special spots around the forest.

    The cache is located in the tree behind him and requires you to gather three acorns, three pebbles, and three strawberries. All of these items can be found in the vicinity, and once you’ve got what you need, just interact with the cache to fill it up.

    Make sure to have the items in your inventory before you try to deposit them!

    Once the cache is filled, you’ll receive a boost in your inventory size. This allows you to carry an additional full load of items, making your foraging trips more efficient.

    The Forest Nook Cache Location

    In the Forest Nook, the cache is located to the far west of the park, perched on a hillside overlooking the water. To complete this cache, you will need:

    • Three Acorns. You can find acorns scattered in the vibrant green trees around the park.
    • Three Shroom Chunks. These can be harvested from brown mushrooms found near the ruins to the west.
    • Three Almonds. You can gather almonds from the orange trees located above the doghouse and cannons on the eastern edge of the park.

    Fountain Springs Cache Location

    The vibrant Fountain Springs hold their cache on the upper level of the area. Head towards the pond near the columns, then take a left into the trees. Next to a lamppost, you’ll find a tree where the cache is hidden.

    This cache has the following material requirements:

    • Three Acorns. Look for them nestled among the branches of nearby trees.
    • Three Lavender. You can pick lavender from gardens in the area, especially on the lower level near the map.
    • Three Walnuts. These can also be found in trees, particularly around the tulip garden. Remember, you’ll need a pickaxe to crack them open after they fall.

    Greenleaf Shade Location

    At the furthest point in Greenleaf Shade, just past the vending machines, you’ll discover the next cache. Here, you need to climb the tree near Lotta Land and deposit three of each nut into the cache.

    For this, collect three acorns, three walnuts, and three almonds around the park. Thankfully, you can gather these relatively easily to help boost your inventory space.

    Check the bird feeders for extra nuts to save some traveling!

    Ascended Garden Cache Location

    The final cache is located in the Ascended Gardens, right next to the tea house. Make your way to the cliff with the view of the gardens, then climb the tree to uncover the stash.

    This cache needs you to find three acorns, three herbs, and three almonds to fill it. As mentioned before, the nuts are available from various trees. The herbs can be found underfoot in the Ascended Gardens among large leafy plants.

    Once all the caches are filled, you’ll achieve maximum inventory capacity, allowing you to collect even more materials to build your dream squirrel mansion!

  • Secret Method To Free Up 7GB Storage On Your iPhone

    Secret Method To Free Up 7GB Storage On Your iPhone

    If your iOS device continually runs low on storage, you can reclaim up to 7GB simply by turning off Apple Intelligence. The latest updates—iOS 18.3, iPadOS 18.3, and macOS Sequoia 15.3—enabled this feature by default, but it’s not mandatory. If you prefer to free up that space, you can easily disable it.

    On average, Apple Intelligence uses about 7GB of storage across all supported devices. The substantial storage requirement comes from the fact that these features operate directly on the device rather than relying on cloud processing. This approach enhances security but also consumes valuable memory. It’s important to note that this is a 7GB storage requirement for each individual device, as reported by MacRumors.

    Moreover, as Apple develops its AI capabilities further, the storage requirement is likely to increase. The next iOS iteration is set to launch in April, promising expanded AI functionalities, which may demand even more storage space.

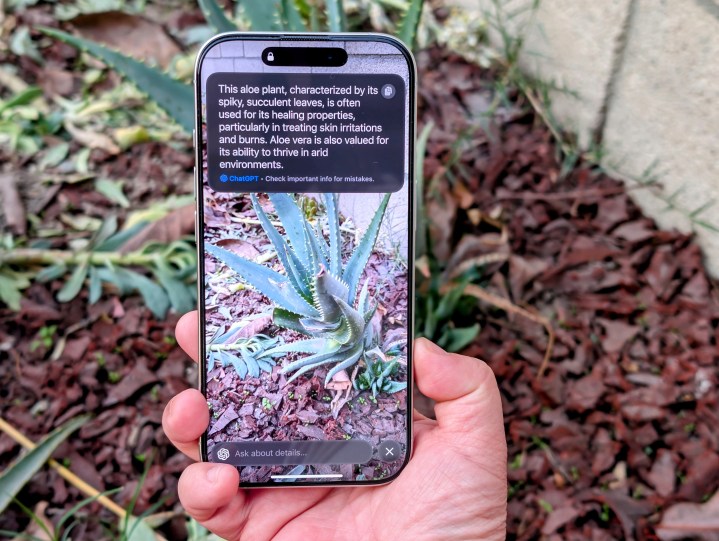
    Using Visual Intelligence on an iPhone 16 Pro showing ChatGPT answer.
    Visual Intelligence on iPhones utilizes the camera to analyze the surrounding environment.
    Christine Romero-Chan / Digital Trends

    Be aware that this process is only applicable if you’re using a compatible iPhone, and the existing data on your device will influence how much space becomes available. Our tests indicated that releasing this storage was quicker when the device was nearing full capacity, whereas devices with more free space took longer to show the changes.

    While Apple Intelligence boasts a variety of useful features, it may not be everyone’s cup of tea. If you regularly find yourself deleting apps to make room for new ones, consider turning off these features to gain extra storage.

    Want to try it out? Navigate to Settings > General > iPhone Storage > iOS to check how much space Apple Intelligence occupies. Then head to Settings > Apple Intelligence & Siri > Apple Intelligence and flip the toggle to Off.

    That’s all it takes! The freed-up 7GB should be sufficient to install most applications, aside from larger games and complex productivity tools.

  • Unlocking Palworld’s Biggest Storage Chest: A Guide

    Unlocking Palworld’s Biggest Storage Chest: A Guide

    Palworld is an adventure-packed survival-crafting game where players encounter numerous creatures known as Pals. As you advance, you’ll have the opportunity to construct bases, weapons, and various useful tools. However, gathering materials for these creations can be cumbersome, especially when it comes to managing your inventory space.

    The game includes chests and various storage options that allow you to store items you don’t currently need, helping to declutter your inventory. With the Feybreak expansion, a new storage option has been introduced: the Advanced Chest, which surpasses previous storage solutions. Here’s how to craft one.

    Crafting the Advanced Chest

    You can access the Advanced Chest from the Technology menu once you’ve reached level 58. Before crafting it, you must unlock it using four Technology Points. After unlocking, you’ll need the following materials to create the Advanced Chest:

    • 20x Hexolite
    • 50x Carbon Fiber
    • 20x Nails

    To obtain Hexolite, refine hexolite quartz found on Feybreak Island. Carbon Fiber can be produced from charcoal, which you can typically gather from elevated areas like mountains, using a production assembly line. Similarly, you can manufacture nails at any production assembly line by using iron ore ingots.

    Keep in mind, the Advanced Chest is considerably larger than other storage units, so plan accordingly when crafting it.

    The Advanced Chest offers 54 inventory slots to hold your items, making it a valuable asset for storage. It boasts 15,000 health points, making it more durable than any other chest in the game. Like other chests, it comes with customizable settings that allow you to dictate the type of items your Pals can store within it.

  • How Many Pictures Will a 128GB SD Card Hold?

    How Many Pictures Will a 128GB SD Card Hold?

    When it comes to digital photography, one of the most common questions photographers and hobbyists ask is how much storage they need for their photos. A 128GB SD card is a popular choice for both amateur and professional photographers alike. In this article, we will explore the factors that determine how many pictures can fit on a 128GB SD card.

    Factors That Affect Storage Capacity

    Several factors can influence the number of images you can store on a 128GB SD card:

    1. Image Resolution

    The resolution of the images you take plays a critical role in determining storage capacity. Higher resolution images require more space. Here are common resolutions and their approximate file sizes:

    • 12 Megapixels: Around 3 MB per image
    • 16 Megapixels: Approximately 5 MB per image
    • 24 Megapixels: About 7 MB per image
    • 36 Megapixels: Roughly 10 MB per image

    2. File Format

    The type of file format you choose to save your images in also affects the size. Common formats include:

    • JPEG: Compressed format; usually takes up less space (1-5 MB per image depending on resolution).
    • RAW: Uncompressed format; generally larger files (about 20-40 MB per image depending on the camera).
    • TIFF: Large file format used for detailed images, often exceeding 30 MB.

    3. The Complexity of the Image

    The complexity of your images can also affect their file size. Images with lots of detail or vibrant colors may have larger file sizes compared to simpler compositions.

    Estimating Total Capacity

    To get a better idea of how many pictures can fit on a 128GB SD card, let’s break it down based on image resolution and format:

    JPEG Example

    • 12 Megapixels JPEG (3 MB each):

      • 128 GB = 128,000 MB
      • 128,000 MB ÷ 3 MB/image = Around 42,666 images

    • 16 Megapixels JPEG (5 MB each):

      • 128,000 MB ÷ 5 MB/image = Around 25,600 images

    • 24 Megapixels JPEG (7 MB each):

      • 128,000 MB ÷ 7 MB/image = Around 18,285 images

    RAW Example

    • 24 Megapixels RAW (30 MB each):

      • 128,000 MB ÷ 30 MB/image = Around 4,266 images

    • 36 Megapixels RAW (40 MB each):

      • 128,000 MB ÷ 40 MB/image = Around 3,200 images

    Practical Tips for Managing Storage

    To maximize your storage efficiency on a 128GB SD card, consider the following tips:

    • Use Image Compression: If you are shooting in RAW, consider shooting in JPEG or using compressed RAW formats to save space.

    • Plan Your Shooting Sessions: Determine the number of images you expect to take during a session and adjust your settings accordingly.

    • Regularly Transfer Files: Regularly move your photos to a computer or cloud storage to free up space on your SD card.

    • Keep Backups: Always have a backup plan for your photographs, whether it’s cloud storage or an external hard drive.

    By understanding how different factors influence storage capacity, photographers can make more informed decisions about their equipment and storage needs. A 128GB SD card can hold a substantial number of images, making it a versatile choice for anyone looking to capture and store their memories.

  • What is better 256GB SSD or 1TB?

    What is better 256GB SSD or 1TB?

    Understanding SSD Storage: 256GB vs. 1TB

    When it comes to purchasing a new laptop or desktop, the type of storage you choose is a critical decision. Solid State Drives (SSDs) have become a popular choice due to their speed and reliability. However, the size of the SSD can vary significantly. In this article, we’ll compare 256GB SSDs with 1TB (terabyte) SSDs to help you make an informed decision.

    Why Choose an SSD?

    Before delving into the size comparison, it’s essential to understand the advantages of SSDs over traditional hard drives (HDDs):

    • Speed: SSDs provide faster boot times and quick access to files and applications.
    • Durability: With no moving parts, SSDs are less prone to physical damage.
    • Energy Efficiency: SSDs consume less power, which can extend battery life for laptops.

    Comparing 256GB SSD to 1TB SSD

    When considering which SSD to purchase, storage size is a crucial factor. Here’s a closer look at the differences between a 256GB SSD and a 1TB SSD.

    Storage Capacity

    • 256GB SSD:

      • Suitable for basic tasks like web browsing, word processing, and streaming.
      • Ideal for users who primarily store documents and a few applications.
      • May require external storage for large files or media collections.

    • 1TB SSD:

      • Much more spacious, accommodating large files such as videos, images, and games.
      • A better choice for content creators, gamers, or anyone who needs significant storage space.
      • Reduces the need for additional external drives.

    Performance Considerations

    While SSDs are fast regardless of size, larger SSDs can sometimes offer better performance due to the increased number of memory chips used:

    • 256GB SSD:

      • May have slower write speeds when near capacity.
      • Adequate for casual users who do not create large files.

    • 1TB SSD:

      • Generally maintains speed even when fuller.
      • Often features better performance in data-intensive tasks, such as video editing.

    Cost Analysis

    • 256GB SSD:

      • More budget-friendly, making it a great option for students or those on a tight budget.
      • Can be found in many budget laptops.

    • 1TB SSD:

      • More expensive upfront but might be a better investment in the long run for users with higher storage needs.
      • Frequently found in mid-range to high-end laptops and desktops.

    Use Case Scenarios

    Identifying your needs can greatly influence your decision. Here are some use case scenarios for both storage options:

    When to Choose a 256GB SSD

    • Basic Usage: Great for casual users who perform simple tasks without needing extensive storage.
    • Portability: Ideal for lightweight devices where budget constraints are a concern.
    • OS and Essential Apps: Suitable for systems where the OS and a handful of essential applications need to be installed.

    When to Opt for a 1TB SSD

    • Creative Professionals: Perfect for video editors, photographers, and graphic designers who require ample storage for large files.
    • Gamers: Ideal for storing modern video games, which can take up significant space.
    • Frequent Downloaders: Beneficial for users who regularly download large files, such as movies or software.

    Summary of Key Differences

    Here’s a recap of the differences between the two options in bullet points:

    • Storage Size:

      • 256GB: Suitable for basic tasks, limited file storage.
      • 1TB: Ample space for large files and applications.

    • Performance:

      • 256GB: Fast but may slow when full.
      • 1TB: Maintains speed even with greater capacity usage.

    • Cost:

      • 256GB: More affordable, good for budget-conscious buyers.
      • 1TB: Higher cost but may save money on external storage options long-term.

    Ultimately, the choice between a 256GB SSD and a 1TB SSD comes down to your specific needs and budget. Consider how much storage you genuinely require and weigh that against the performance benefits and cost differences to choose the right SSD for your system.

  • How much meat can you fit in a 5 cubic foot freezer?

    How much meat can you fit in a 5 cubic foot freezer?

    When it comes to stocking up on meat, understanding how much you can store in your freezer is essential. If you’ve recently acquired or are considering a 5 cubic foot freezer, it’s helpful to visualize how much meat you can fit in that space. This article breaks down the capacity of a 5 cubic foot freezer and offers tips for maximizing storage.

    Understanding Freezer Capacity

    A 5 cubic foot freezer offers a certain amount of space, typically translating to around 140 to 175 pounds of meat, depending on the type and packaging. Here’s a quick guide:

    • Cubic Foot Measurement: 1 cubic foot typically holds about 35 pounds of solid food, including meat.
    • Weight Variations: Different types of meat have different weights. Ground meat is denser and packs more efficiently than whole cuts.

    Types of Meat and Their Approximate Storage Quantities

    When calculating how much meat you can store, consider the following common types and their average weights:

    1. Ground Meats

    • 1 pound packages: About 140 to 175 pounds can fit in the freezer.

    2. Whole Cuts

    • Chicken breasts, steaks, and roasts: These usually take up more space due to their shape.
    • Estimated Capacity: Approximately 100 to 120 pounds.

    3. Processed Meats

    • Sausages, deli meats, etc.: These can also vary widely.
    • Estimated Capacity: Around 80 to 120 pounds depending on packaging style.

    Tips for Maximizing Space

    Making the most of your freezer space involves careful organization and packaging. Here are some strategies to efficiently stock your freezer:

    • Use Flat Packaging: Flatten ground meats before freezing to save space.
    • Label Everything: Clear labels help you find what you need quickly and easily.
    • Utilize Bins and Baskets: Group similar items together to maximize vertical space.
    • Vacuum Seal: Removes air from packaging, allowing you to fit more neatly and extend shelf life.
    • Rotate Stock: Follow the first in, first out (FIFO) principle to maintain freshness.

    Calculating Your Meat Needs

    If you’re unsure how much meat you’d like to store, consider your family’s consumption rates:

    • Average Consumption: A family of four typically consumes about 3 to 4 pounds of meat per week.
    • Annual Planning: For long-term storage, consider how much meat you’ll need annually and multiply by 52 weeks.

    Example Breakdown of Meat Storage

    For a quick visual, here’s how you could fill a 5 cubic foot freezer:

    • Mixed Meats:

      • 30 pounds of ground beef (15 packages)
      • 20 pounds of chicken breasts (8 packages)
      • 20 pounds of pork chops (10 packages)
      • 30 pounds of sausages (15 packages)
      • 45 pounds of roasts (3 whole roasts)

    This example totals 145 pounds and fits comfortably within the range of a 5 cubic foot freezer’s capacity.

    By understanding the nuances of freezer space and meat variety, you can effectively stock up without risking spoilage or overcrowding. Take the time to plan your meat storage, and you’ll have a well-organized freezer ready to support your culinary needs.

  • Maximize Trinket Storage in Trash Goblin: A Quick Guide

    Maximize Trinket Storage in Trash Goblin: A Quick Guide

    In the universe of Trash Goblin, you take on the role of a goblin merchant, trading interesting items with an array of characters, including other vendors, scholars, and golems. You’ll soon settle into a reliable routine involving tasks like chiseling, cleaning, addressing customer requests, upcycling, and resting, following a cycle of "collect, clean, serve, sleep, repeat."

    While this cycle may vary, the simplicity of it doesn’t mean there aren’t methods to streamline your tasks further and prevent scrambling for items. If you’re looking for ways to enhance your trinket shop, you’re in the right place.

    Trash Goblin is currently in Early Access on Steam, meaning that game mechanics and information might change in future updates.

    Invest in Storage for Your Trinkets

    As you cater to your customers’ demands, you’ll find yourself cleaning trinkets you may not actively need while you search for specific items. However, you don’t want to stop acquiring trinkets since this keeps the game progressing and allows you to build a stockpile for future requests. Yet, you have a limited space of just 18 Stash spots.

    When you start feeling cramped, it’s time to think about investing in shelves for your workbench area, available once you reach that stage in the game.

    You can also store trinkets on the workbench, which has the capacity for around seven to twelve items, depending on their size. Just keep in mind that they can sometimes obstruct your workspace.

    Around day nine, Asion will show you how to upgrade and decorate your shop, including adding Basic Shelves. These are affordable at 300 Gold, but each one only provides two storage slots. The Basic Table, which requires 500 Gold, offers more room, accommodating six to twelve trinkets, depending on their dimensions.

    Use Hover-Style Cleaning for Small Trinkets

    Cleaning smaller items can be tricky, as their colors or materials might blend in with the dirt you’re trying to remove, and zooming in isn’t an option. When you clean with the sponge, remember that the small white circle indicates the cleaning area, not the entire sponge.

    To tackle these small items effectively, switch to Hover cleaning. This method automatically removes dirt, making it easier to clean delicate pieces. Even if you don’t use this setting for the entire cleaning process, it will help you identify remaining dirty spots. This technique is especially useful for items like the Bent Nail Handle, where rust can closely resemble dirt.

    Clear the Inner Cruft First

    As you explore, you’ll encounter various types of cruft blocks. Some, like the yellow ones, are easy to break, while others, resembling obsidian, require targeting specific weak spots. When you clean, focus on any breakable cruft located near the trinket first. Hitting these can trigger a chain reaction that clears surrounding cruft, saving you from excessive manual labor.

    Don’t Rush Upgrades When They Appear

    When tool upgrades become available on day nine, you might feel pressured to buy them, especially since they aren’t too expensive. However, you may not need them right away. This is particularly true for the Medium Workbench upgrade, which, while costing 5,000 Gold, mainly provides extra space you can also gain through cheaper shelf options.

    Aimon will provide your upcycler’s first upgrade for free, and you’ll have several days before customers request items that require these upgrades, typically appearing around days 30 to 35. This gives you ample time to save up Gold for necessary upgrades and shop decorations without feeling rushed.

    Upcycle Excess Trinkets To Save Space

    If you’re saving Gold for tool or workbench upgrades instead of trinket storage, consider upcycling any attachable trinkets, like the Hairpin and Hairpin Tassel. This process converts two occupied Stash spots into one, which can significantly reduce clutter while you hunt for specific items.

    Additionally, you can revert attached trinkets back into separate pieces without any penalty, as long as you have at least one time chunk available. Retaining these pre-attached items can save you time later if a customer requests them, especially if you recognize the request from previous experiences.

    In summary, optimizing your workflow in Trash Goblin ensures that your trinket shop runs efficiently and effectively. Take advantage of storage options, cleaning techniques, and smart upgrades to keep your shop thriving!