الوسم: stone

  • How to Find the Right Stones for the Stone Circle in Masters of Albion

    How to Find the Right Stones for the Stone Circle in Masters of Albion

    One of the first quests you’ll get in Masters of Albion is helping a hermit named Jon Bovi build a stone circle. Once finished, the circle can be played like a musical instrument to produce melodies. This task is a fun way to show your godlike abilities to lift and place large stones, and it also highlights how interactive the game world is.

    The instructions for this quest are not very clear, so it can be confusing or even frustrating at times. There are some tricky parts where you might think you’re heading in the wrong direction. Here, though, we’ll explain everything you need to know to complete the quest successfully.


    How to Complete the Stone Circle

    When you start this quest, you’ll see a circle of spots around Jon Bovi. These spots are where the stones need to go to form the circle.

    The challenge is that each spot requires a very specific stone. There are eight spots, but more than eight stones around, so how do you know which stones go where?

    Tip: Search carefully for the stones you need. They can be hidden or look like ordinary rocks until you pick them up.

    Once you find a stone, click once on it to place it in a spot—don’t hold your click, or you’ll pick it back up. When you set the stone down correctly, it will wobble, make a noise, and send out visible wave-like patterns. If the stone is in the right spot, the noise will be clear and the wave will be straight. If it’s in the wrong place, the sound will be discordant and the waves wavy.

    You should try placing each stone in every open spot you’ll see. Test different stones until you find the right match. Some stones won’t fit in any of the spots, so you can ignore or dispose of those. Essentially, it’s a process of trial and error—testing stones in spots until everything fits perfectly.

    Once the entire circle is assembled correctly, click on the tent in the center to finish the quest.

  • How to Defeat the Stone Giant in Crimson Desert Through Completing and Solving

    How to Defeat the Stone Giant in Crimson Desert Through Completing and Solving

    During your Faction Quest for House Felix, you’ll face another tough boss in Crimson Desert. This time, you need to take down the Stone Giant, known as Cubewalker Lithus, to free the Southern Quarry from the Bleed Bandits and complete Count Felix’s mission.

    Keep reading to learn how to find Lithus’s weak spots and the best strategies for defeating this boss easily. Players using bows and arrows may find this fight more straightforward, while melee combat can be more difficult.

    How to Defeat Cubewalker Lithus & Liberate Southern Quarry

    The quest starts at the Southern Quarry in Hernand, which is located east of Unicorn Cliff, just southeast of the Nas River.

    Once you arrive, you’ll see three areas that need clearing to drive out the Bleed Bandits completely:

    1. Infirmary
    2. Barracks
    3. Training Ground

    Clear out the bandits around these zones carefully. Watch out for barrels marked with a large X; these can explode and cause significant damage if you’re nearby, so avoid standing next to them.

    After thinning out the enemies, you’ll see Lithus waiting in the center of the quarry. When you reach the marked area (indicated by an orange cloud on your minimap), Lithus will appear.

    Be aware of Lithus’s attack moves:

    • It starts with a powerful slam using its massive right fist.
    • It will shoot stone pieces at you in a ranged attack.
    • The boss can disassemble into a whirlwind, dealing damage before reassembling and attacking again.

    A key moment is when Lithus’s head glows red — this indicates you need to use Axiom Force to pull its head out, making it vulnerable to your attacks. A good tactic is to do this from a higher vantage point, such as near the crane close to Lithus.

    Once you dislodge its head, attack until you can land multiple hits, then dodge to avoid counterattacks. After breaking Lithus’s defenses, it will be easier to keep damaging it until it falls.

    The best way to fight Lithus is with a bow and arrow. To make your shots more effective, bring skills like:

    • Evasive Shot (Stamina tree)
    • Focused Shot (Spirit tree)
    • Marksmanship (Stamina tree)

    If you’ve farmed Infinite Arrows gear, you can spam Explosive Arrows to quicken the process, making the fight even easier.

    Dodge Lithus’s attacks until you can dislodge its head, then unleash a storm of damage. Once defeated, you’ll receive the Abyss Artifact.

    Finish clearing the rest of the Southern Quarry to liberate it and complete Count Felix’s quest for the Stone Giant.

    Rewards for Defeating the Stone Giant

    After victory, return to Count Felix to claim your reward. You’ll receive:

    • Miner’s Lantern Hat (which helps detect nearby ore deposits)
    • 2 Bloodstone
    • 3 Epidote

    This victory not only advances your story but also provides useful items that can assist in your ongoing adventures.

  • How to Get Greninjite Mega Stone by Completing Ranked Battles in Pokémon Legends: Z-A Season 1

    How to Get Greninjite Mega Stone by Completing Ranked Battles in Pokémon Legends: Z-A Season 1

    Ranked Battles Season One are happening now in Pokémon Legends: Z-A. Players who manage to climb the ranks will receive various rewards, including the Greninjite Mega Stone, which allows your Greninja to Mega Evolve.

    Season one is only available for a limited time and has specific rules for building your battle teams. Here’s a quick overview of everything you need to know, including all the rewards you can earn.

    Season One Overview

    Season one runs from October 16, 2025, at 6:00 a.m. UTC until November 5, 2025, at 5:59 a.m. UTC.

    Which Pokémon Can You Use?

    You can use any Pokémon listed in the Lumiose Pokédex numbers 001 through 227, including regional forms. However, you can only include one of each species in your team of three. Any Pokémon, at any level, is allowed, but all Pokémon will be set to level 50 during battles.

    Pokémon can hold items before the match starts, but you can’t use more than one of the same held item during the competition.

    How Long Does Each Battle Last?

    Each ranked battle lasts for three minutes, and four players compete against each other. Players earn points based on how many of their opponent’s Pokémon they defeat and other actions. A detailed breakdown of scoring can be found in the Link Play guide, which also explains the basics of ranked matches.

    All Season One Rewards

    The main prize for reaching Rank K is the Greninjite Mega Stone. There are additional rewards for higher ranks, which include various items like Sport Balls, Bottle Caps, Nuggets, Seeds of Mastery, and more. The following is a summary of rewards based on ranking:

    • Rank A:

      • 3 Sport Balls
      • 1 Gold Bottle Cap
      • 3 Bottle Caps
      • 3 Seeds of Mastery
      • 1 Big Nugget
    • Ranks B to E:

      • 2 Sport Balls
      • 1 Gold Bottle Cap
      • 2 Bottle Caps
      • 2 Seeds of Mastery
      • 2 Nuggets
    • Ranks F to K:

      • 1 Bottle Cap
      • 1 Seed of Mastery
      • 2 Nuggets
    • Rank K:

      • No specific reward listed
    • Ranks L to R:

      • 1 Seed of Mastery
      • 1 Nugget
    • Ranks S to Y:

      • No detailed rewards are listed

    Note: The Greninjite Mega Stone is a special reward given to players who reach Rank K. However, Game Freak has confirmed that this Mega Stone will be available again in future seasons. You can only hold one of each Mega Stone, so if you already have a Greninjite, you won’t be able to get another.

    Any Pokémon Mega Evolved with Mega Stones earned from ranked battles don’t count towards your Mega Evolution Pokédex completion.

  • Completing the Quest: Solving the Great Welkynd Stone in Miscarcand

    Completing the Quest: Solving the Great Welkynd Stone in Miscarcand

    In the initial part of the main narrative of The Elder Scrolls 4: Oblivion Remastered, Martin Septim frequently sends you on quests to retrieve items. Most of these tasks are straightforward, but some dungeons can be tricky to navigate.

    Martin refers to Miscarcand as a perilous location. Legend has it that no one has returned from its depths, likely because many have lost their way inside. Miscarcand is said to house the Great Welkynd Stone, which you must locate upon reaching these Ayleid ruins.

    Starting the Miscarcand Quest

    You can begin the Miscarcand quest after you finish the Blood of the Divine quest. Martin will tell you he needs one last item to open the portal to Camoran’s Paradise by deciphering the Mysterium Xarxes. This item is the Great Welkynd Stone.

    Martin mentions that most Great Welkynd Stones have been taken by others, but it’s rumored that one still rests in Miscarcand. He cautions that no one has returned from these Ayleid ruins alive, so exercise extreme caution during your journey.

    Miscarcand Quest Guide

    To find Miscarcand, head west of Skingrad. Getting there is simple; just follow the map marker from Skingrad. Outside the ruins, you’ll encounter a few goblins, which you can defeat before ascending the staircase to the entrance of Miscarcand.

    Once inside, you’ll see a mix of goblin corpses and live creatures that require your combat skills. Prepare yourself for battles against multiple skeletons and zombies as well.

    After some exploration, you’ll reach a room where you can either jump down to the right or proceed straight through the door ahead. If you leap down, you’ll find yourself back in the same room adjacent to the door in front of you.

    Continuing forward, you’ll find a door that opens to your left and an iron Ayleid gate to your right. The Ayleid gate is locked, so you’ll need to enter through the regular door on the left.

    This door leads you downstairs onto a bridge within a grand hall. If you move forward across the bridge, you will arrive at another iron Ayleid gate that features a hole.

    Typically, there’s a button to open the doors situated next to the gates, but that’s not the case in Miscarcand.

    Unlocking the Iron Ayleid Gates

    Jump down from the bridge into the grand hall. You can either head west towards the hall manually or use the clairvoyance spell to reveal the path leading upward. Doing so will put you in a room with several goblins inside.

    Defeat the goblins to find the first switch for unlocking all the gates. After activating the switch and heading upstairs, you’ll find yourself back near the entrance, next to a door that leads to the bridge.

    Return to the bridge and head straight towards the Miscarcand Sel Vanua gate. The iron Ayleid gate that previously blocked your path will now be open, allowing you to proceed.

    Miscarcand Sel Vanua

    Upon entering this new area, you’ll witness many goblins and skeletons engaged in battle. Turn immediately to your left towards the eastern wall to find another switch for unlocking doors. You may notice that this switch doesn’t open any doors right away; follow the path south in this room to find another gate leading downwards.

    If you miss the switch here, you’ll encounter the locked gates later on, requiring you to backtrack to press the switch.

    You will enter another grand hall filled with goblins and skeletons fighting below. There’s no need to jump down here. Keep moving forward until you come across another gate, leading down a dead-end with a switch on your left. This switch will open another gate in this area.

    Step back and navigate to the passage on your right. Head north, and you’ll come across a narrow pathway with two headless zombies. Defeat them to access the door to Miscarcand Morimath.

    In Miscarcand, there are three block switches. If you miss any, you’ll likely run into a locked iron Ayleid gate. If any gate remains closed even after activating the three switches, you’ll need to go around to the other side and press the switch just in front of the gate.

    Miscarcand Morimath

    As you move downstairs, you’ll come across a crossroads filled with zombies. You can either go left or head down the stairs to the right. First, take the left path. Here, you’ll notice a greenish glow from the lanterns, indicating you’re on the right track, and soon you’ll find the Great Welkynd Stone ahead.

    Upon taking the Great Welkynd Stone, stairs will emerge, opening the way to the lower floor and allowing enemies to enter. Retrieving the stone will also awaken the King of Miscarcand, a lich you will need to defeat, standing behind you.

    Once you’ve vanquished the King of Miscarcand, you can loot the Miscarcand Key from his body. Behind him is a new chamber containing an Ayleid Cask. If you step on the switch in this room, it will unlock a hidden path to an easier exit.

    The switch opens two secret paths; one to your right and the other to your left. The chamber to the right has several Ayleid chests, but the left path is your best option.

    As soon as you take the Great Welkynd Stone, every gate in this area will lock with high difficulty.

    Exiting Miscarcand

    If you’ve taken the hidden route from the King of Miscarcand’s chamber, you can use his key to open the gate ahead. Alternatively, you can jump to the bottom floor and unlock each maximum difficulty gate with lockpicks to exit through the path you entered, though this route is significantly longer.

    Using the Miscarcand Key will lead you through to the first level of these ruins. At the end of the path, you’ll see there’s no way to continue, but there’s a switch on the ground. Stepping on it will reveal a hidden path leading you straight out.

    Upon returning to Martin with the Great Welkynd Stone, you will complete the Miscarcand quest. Martin will then inform you that another item is needed to open the portal, and this will bring even greater challenges than everything you’ve encountered so far.

  • Chapter Four Guide: The Gate of Saint Jerome in Stone of Madness

    Chapter Four Guide: The Gate of Saint Jerome in Stone of Madness

    In the last chapter of The Stone of Madness campaign, The Gate of Saint Jerome, you encountered Shadow and learned about her tragic history. After Mother Superior found out about her love, Shadow was locked away in a cell with her infant until she passed away.

    You said goodbye to Shadow by either killing Mother Superior or giving her baby’s toy. In return, she handed you the emblem. However, it was damaged, and now you must find a great fire to fix it. This chapter marks the start of your quest for that fire. If you’re ready, the final part of the campaign lies ahead.

    How to Repair the Emblem

    Your first task in this chapter is to repair the emblem given to you by Shadow. To do this, you’ll need a strong fire. There are two potential fire sources: the central fire in The Cells or the kitchen oven in the Refectory. If you choose the fire in The Cells, a cutscene will trigger when you approach it, revealing that the fire has extinguished and an inmate is trapped there.

    First, talk to the Doctor about the situation. To free the inmate, use Alfredo’s Investigate skill to follow the tracks next to the jailed inmate. The tracks will lead you to a first-floor cell in the north, ending near a mirror. Interact with these tracks to unlock the barred door where the inmate is held.


    Once the inmate is free, press the button again to close the door. Next, go up to the second floor of the western section of The Cells and activate the switch. This will reignite the fire that the inmate was previously held near.

    Finally, activate the fire area, then hand over the emblem to either Eduardo or Agnes, and interact with the fire to finish your objective and trigger a cutscene.

    Alternatively, you can utilize the oven in the Refectory. However, to do this, you first need to secure a key from the friar working in The Great Wall area.

    Where to Find Three Moonshine Barrels

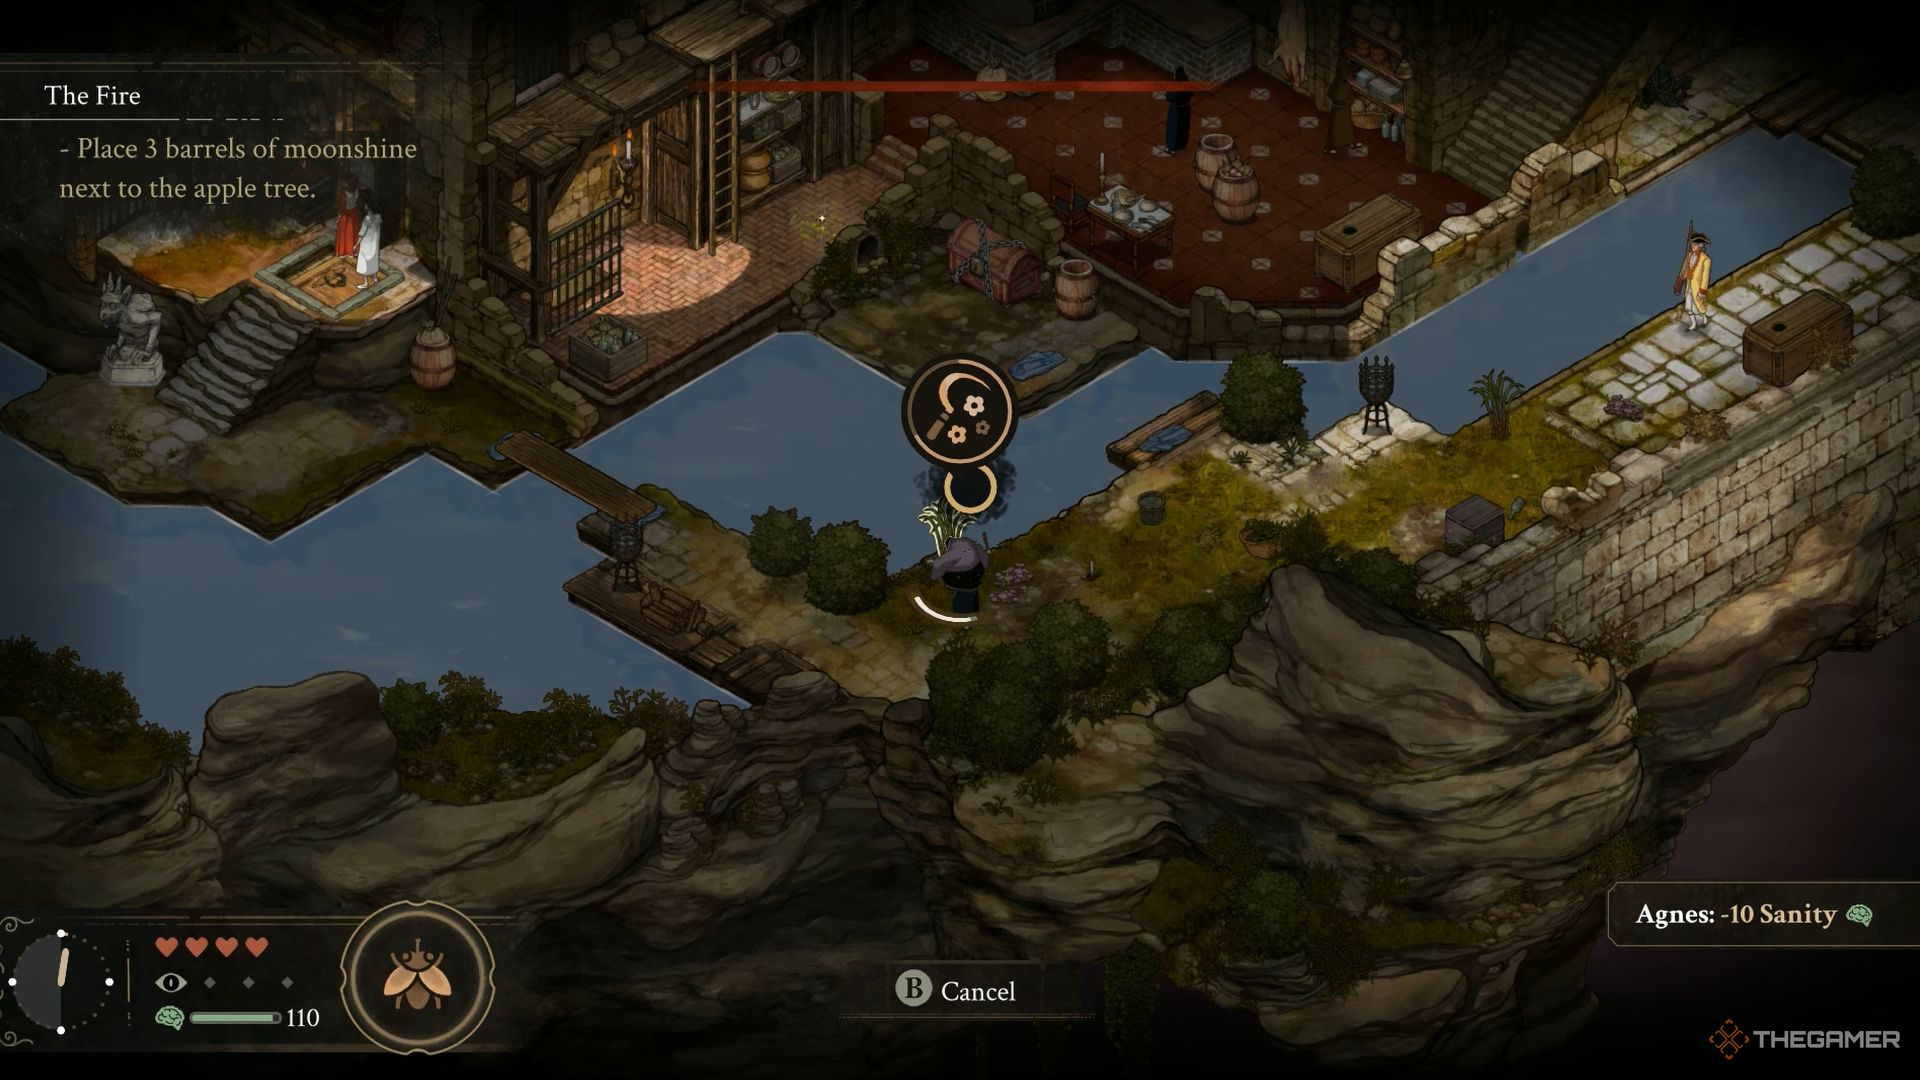
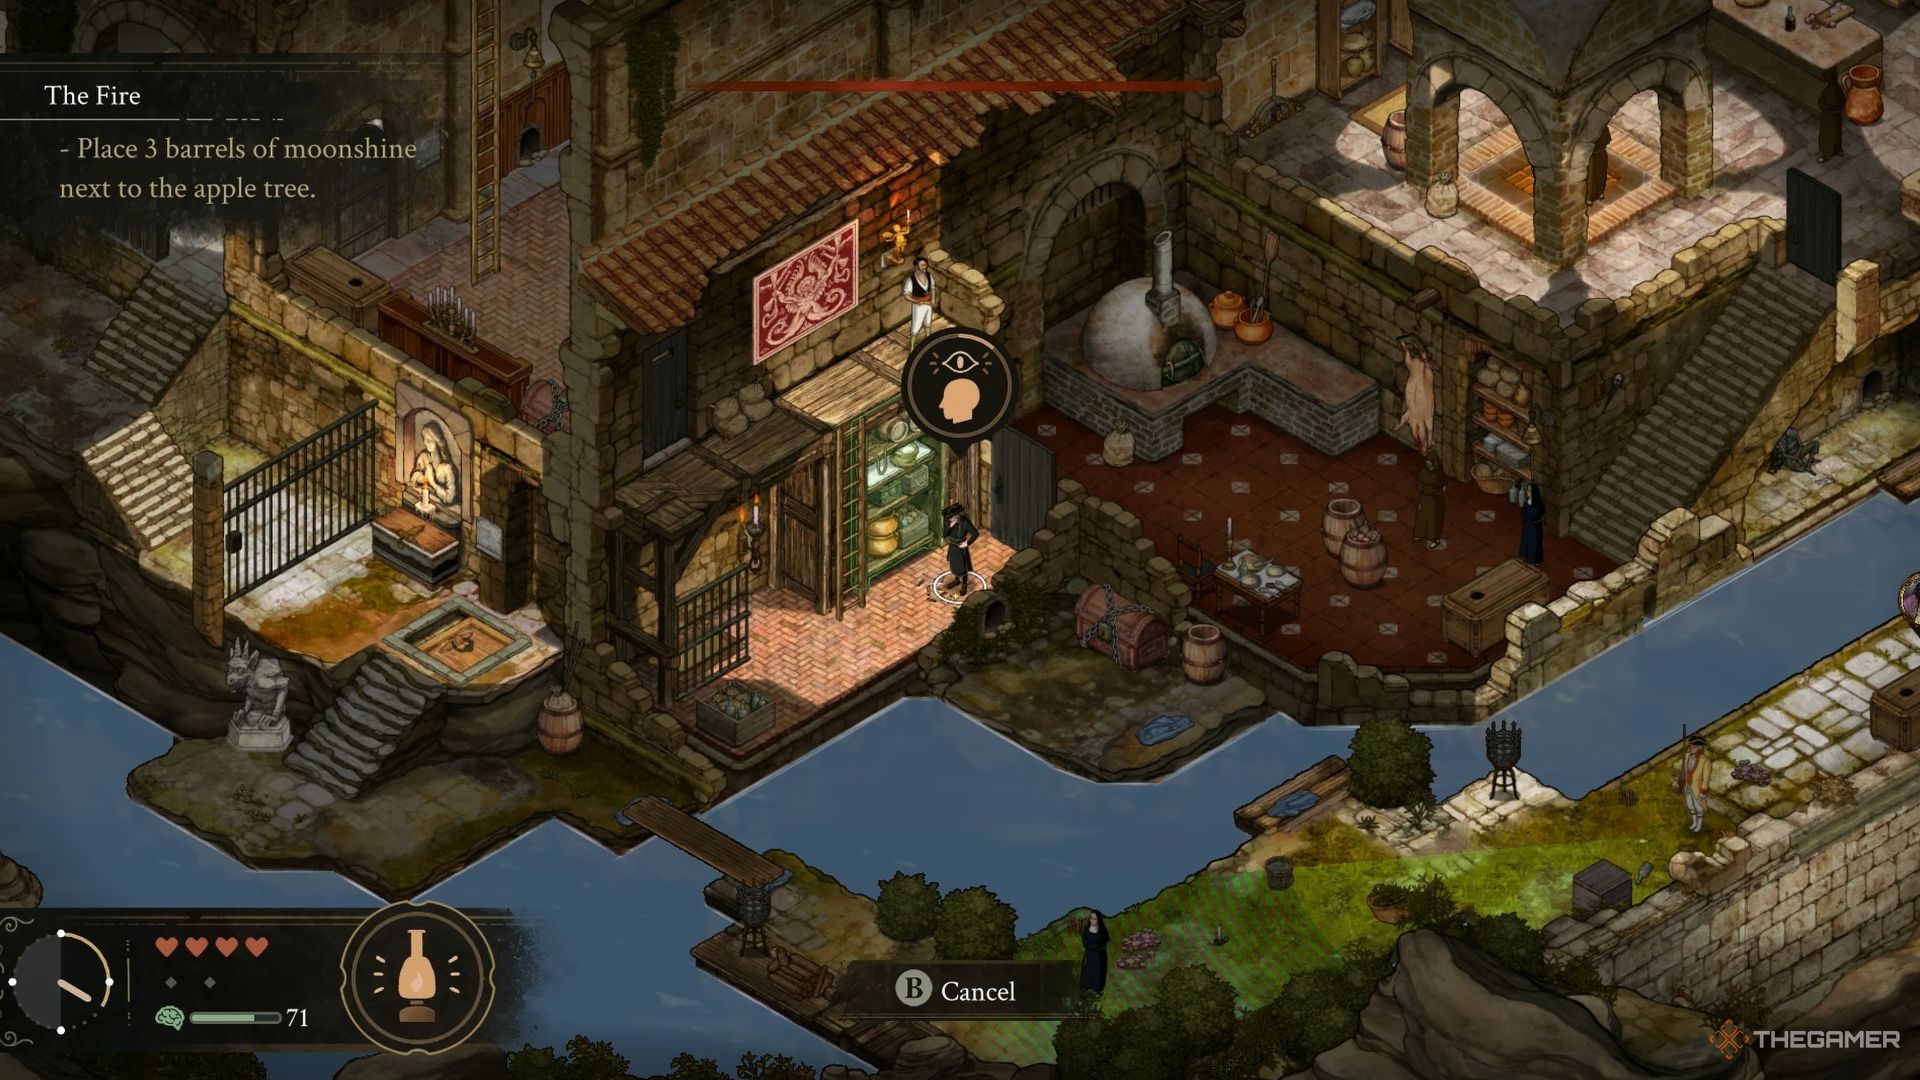
    Your next goal is to create a distraction for your escape by lighting the large apple tree in The Great Wall area. To accomplish this, you need to collect three Moonshine Barrels and bring them to the apple tree. You can either hunt for barrels or gather sugar cane to make moonshine.

    You can craft Moonshine Barrels at night in your cell using Agnes’s Witches Cauldron skill combined with the sugar canes you’ve collected.


    Agnes collects sugar canes next to the river in The Stone of Madness.

    To gather sugar cane, look for it near the river east of the Refectory. There are two sugar canes here—use Agnes to collect them while avoiding the Nun and the soldier. After that, go to the Shed cellar door in The Great Wall, descend the stairs, and find two more sugar canes near the river.

    Across the river, you’ll see another sugar cane, but Eduardo will need to place a plank across the water to reach it. You can also find sugar cane in The Cells’ Apothecary area, specifically in the room on the west side with vases.


    Alfredo investigates the tracks next to the river in The Stone of Madness.

    One Moonshine Barrel is located in the Pianist’s room, and another can be found in the Refectory’s kitchen. To locate the one in the kitchen, employ Alfredo’s Investigate skill to follow the tracks on the lower floor. They will lead you to a hidden barrel behind a wall crack.

    Once you gather all three Moonshine Barrels at the apple tree, your mission will be complete.

    How to Rescue Alfredo

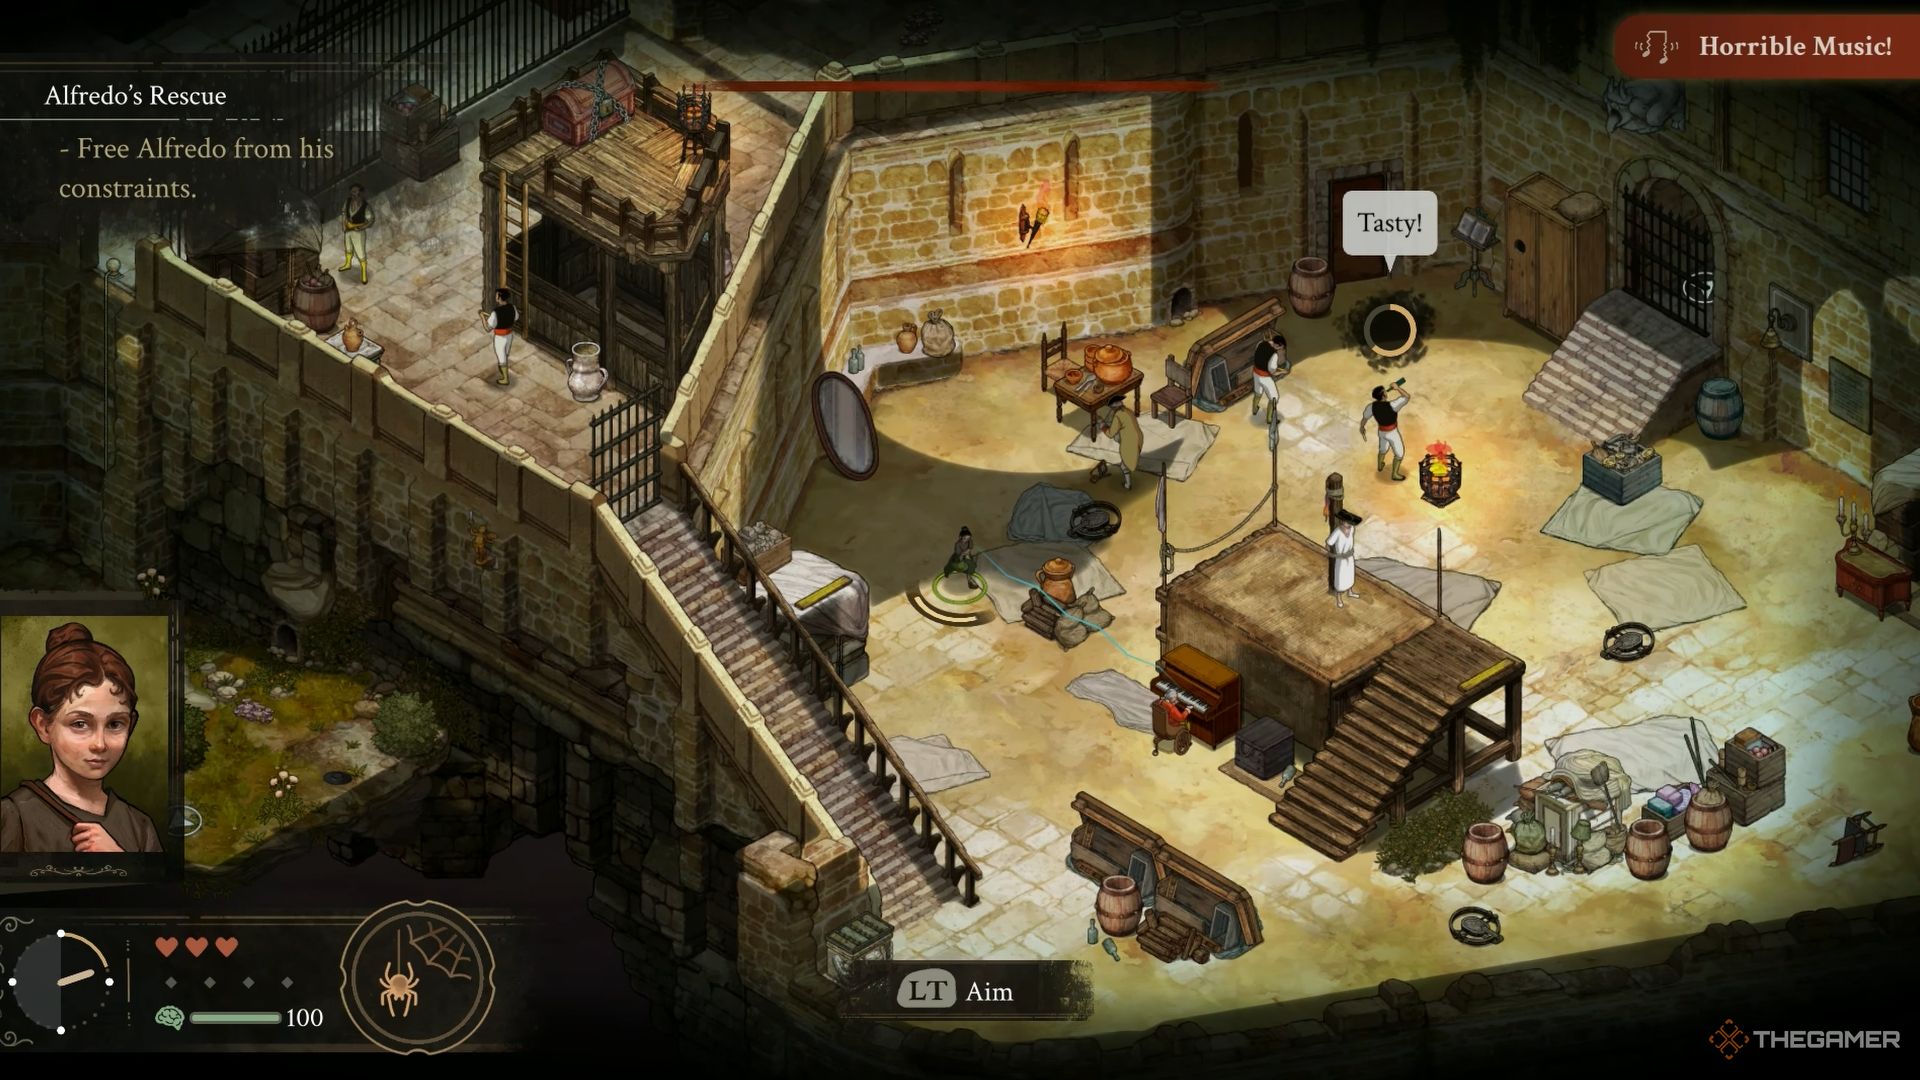
    While attempting to ignite the fire, Alfredo was captured, and your current mission is to rescue him. He’s imprisoned in the Inmate Courtyard, where a cutscene plays when you arrive.

    First, buy the Silver Key from Panecillo for 50 coins. You can find him near the stairs in the northern section of The Cells.

    Next, ascend the stairs and unlock the large wooden door to gain easy access to Mother Superior’s office.

    Alternatively, you can skip getting the key from Panecillo by starting from the cellar door in the Old Storeroom. This method lets you reach Alfredo directly without needing the key.


    Guards capture Alfredo inside the inmate courtyard area in The Stone of Madness.

    In the garden outside Mother Superior’s office, look for a place to tie a rope. Lower Amelia down using the rope, then help her navigate through the hole to Alfredo’s location. Use shadows and barrels strategically to guide Amelia towards Alfredo.

    A guard will periodically patrol the wooden platform where Alfredo is being held. Hide behind the barrel near the bear trap when the guard moves down. Use Sleeping Chocolate to put regular guards to sleep and distract the soldier with a Mousetrap. While they’re occupied, free Alfredo. Once you rescue him, this task will be accomplished.

    How to Escape the Monastery

    Your ultimate mission is to escape the monastery. To do this, all three characters must exit through the large gate at The Great Wall. First, eliminate the guard positioned at the top of the stairs with Leonora. Next, take care of the armed soldier and the other guard near the metal gates—if you can, use Agnes’ Goetia skill to eliminate them.

    Once the patrolling guards are dealt with, climb the ledges on the wall using Leonora and take down the soldier posted there. After interacting with the switch on the wall, guide Leonora and Agnes to the gate. Finally, escort Alfredo, disguised as a priest, to the gate without alerting Mother Superior.

    Alternatively, access the gate via the area where you previously interacted with Shadow. For this, have Eduardo break the planks in the dark passage, then use the switch inside to lift the bars. This will allow you to guide each character to the gate one by one.

  • Chapter Three Guide: The Church’s Corruption in Stone of Madness

    Chapter Three Guide: The Church’s Corruption in Stone of Madness

    In the last chapter of The Stone of Madness, Brother Guillermo revealed that the Inquisitor was performing horrible experiments on individuals—surgically altering their brains while searching for the Stone of Madness. Outraged by these cruel actions, the group resolved to put an end to these appalling practices.

    This led you to the monastery’s Wine Cellar, where the group systematically destroyed the tables used for these heinous experiments to foil the Inquisitor’s plans. Just as you were about to rejoice in your victory, Sister Elvira brought alarming news: the Abbot has been poisoned. In this chapter, let’s determine whether you can eradicate this corruption for good.

    Accessing the Library

    Your primary goal in this chapter is to enter the Library. Start your journey in the Cloister area. In the northeast corner of the Cloister, you will find a room with a green door that you need to open. This room is situated to the right of the one where Brother Guillermo inspected the mirror in the initial chapter.

    To avoid detection by the monks, have Alfredo don the priest robes. Then, use the other door in the area to access the Library. Upon entering the Library, you’ll encounter a doctor dressed in green. Typically, this area is off-limits, but staying close to the doctor will activate the ‘Protection of the Doctor’ effect, turning it into a safe zone.

    This means you need to stay near the doctor while completing your task. If Alfredo is wearing the priest robes, you can wander freely without relying on the doctor’s protection.

    Finding the First Large Volume

    On the first floor, your objective is to shatter the mirror. Utilize Leonora for this task. Wait until the doctor is on the first floor, then quickly break the mirror and hide Leonora. Use Alfredo to retrieve the key hidden behind the shattered glass. This key will grant access to the chapel area on the west side of the Library, near the staircase leading to the second floor.

    You’ll also discover a cellar door in this location, making future visits easier. Next, take down the guard who patrols near the stairs to the second floor. Either knock him out or eliminate him using Leonora, and then drag his body to the small section with red curtains. Open the iron-barred door adjacent to the stairs, then deal with the guard behind those bars.

    Descend the ladder, and without attracting the soldier’s attention, activate the switch. This will create two shortcuts leading to the soldier’s room: one from the cellar door area and another from the main Library hall. Lastly, read the volume found in the soldier’s room to advance your objective.

    Locating the Second Large Volume

    To find the second volume, exit the Library’s first floor. Look up near the armed guard outside to identify a spot where you can throw a rope. Climb up using the rope, and then use a lockpick or crowbar to open the balcony door above. Next, have Alfredo ascend to the second floor via the rope.

    For added safety, make sure Alfredo is dressed in the priest robes while you explore the upper level.


    You can also access the second floor from within the Library by moving a large wooden crate on the first floor with Eduardo, though this method carries more risk.

    Once on the second floor, read the volume found in the southernmost part. Use the switch here to create a bridge that acts as a shortcut to the opposite side of the second floor. After this, you won’t have any tasks pending except to advance to the next day. For the following day, your first task will involve gathering several materials, which include:

    • Two Mandrakes
    • Two Gold Teeth
    • Five Medicines

    Obtaining Two Gold Teeth


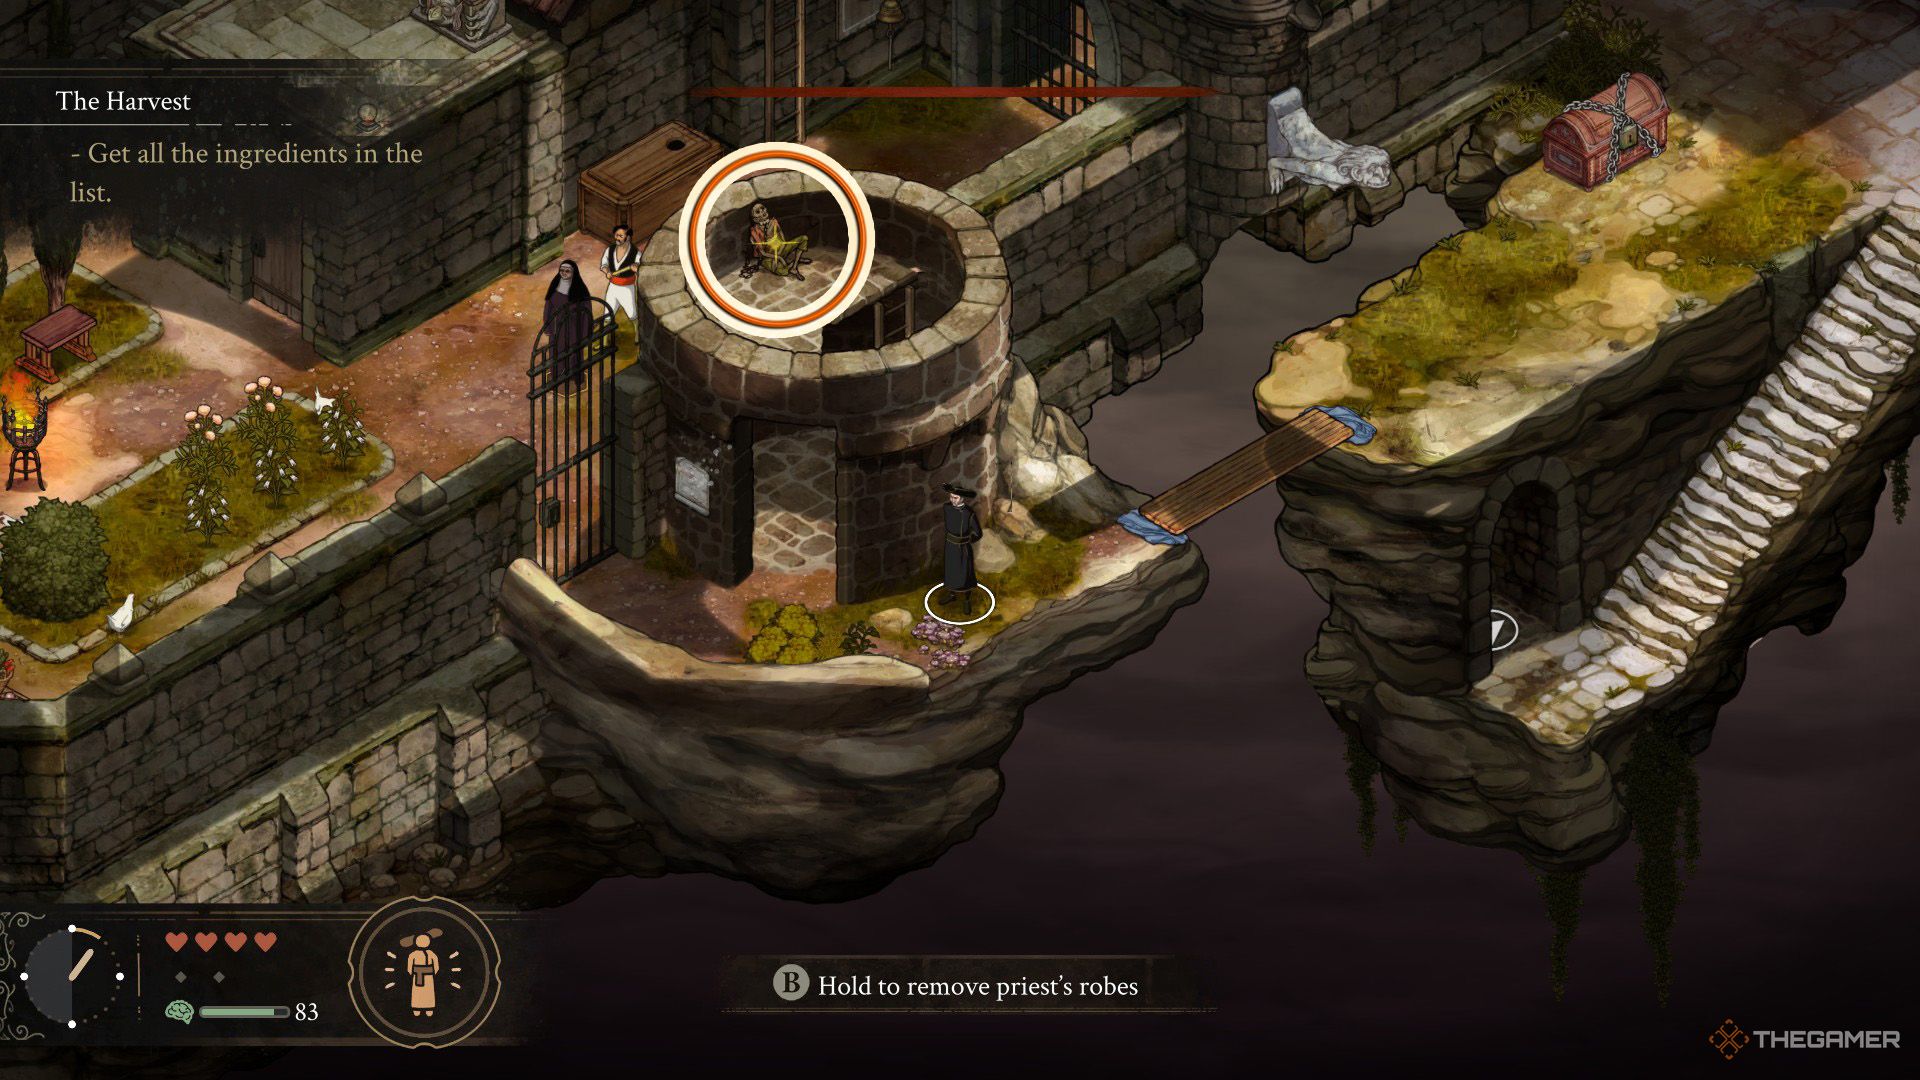
    An orange circle shows the location of the first gold tooth in The Stone Of Madness

    The first Gold Tooth can be found in the Nuns’ Garden, just east of the Laundry area. Here, you’ll notice a corpse at the top of the tower near the barn where you previously saw Brother Guillermo. However, the Nuns’ Garden presents challenges since Mother Superior is actively patrolling the area.

    To avoid detection, enter the Nuns’ Garden from the Wine Cellar (Latrines). This way, you can access the upper level of the tower without being seen and find the first Gold Tooth.

    The second Gold Tooth is situated in the area above the Wine Cellar, just south of where the guard is stationed. You’ll notice an iron gate there, which triggers a cutscene. Have Amelia sneak through the iron bars to activate the switch that opens the gate.

    After that, bring Eduardo to this area and push the wooden crate towards the hanging cage that contains a skeleton. If any inmates obstruct your path, use Leonora to knock them out with a plank and drag them away.

    Collecting Two Mandrakes

    To find the first Mandrake, head over to the Cloister and descend the right staircase in the southern section. There, you will see a statue of a woman holding a vase on her head. Use Eduardo to move the statue to the opposite side of the room.

    It would be wise to subdue or eliminate the nearby guard to make this process easier.

    Once the statue is repositioned, use Leonora to throw a rope to the higher section nearby. Climb up and examine the vase atop the statue’s head to collect the first Mandrake.

    The second Mandrake can be found near the entrance of the Wine Cellar, where you will also meet the Doctor. As you approach, a cutscene will reveal the Mandrake’s position. While near the Doctor, you are still under his protection. Your first task is to eliminate the two guards around him. Then, have Eduardo move the large crate southward.

    Once it’s in place, get Agnes to climb onto the crate. Since the guards may interrupt your plans, it’s advisable to deal with them first. After Agnes is on the crate, push it over the spikes and use a sickle to gather the Mandrake. If you lack a sickle, Panecillo, situated near the Nuns’ Garden, will provide you with one for free.

    Also, to craft five Medicines, use Agnes’ Witches Cauldron skill at night. After you’ve gathered all your materials, wait for nightfall to proceed.

    How to Access the Laboratory and Create the Medicine

    The next day, start by talking to the Doctor located on the second floor of the Cloister. He’s situated in the room near the red-carpeted area, but you’ll need to unlock the door with either Eduardo or Leonora. Be careful of the Inquisitor and the armed guard on patrol during this operation. When you enter the room, ensure Alfredo is in his priest robes.

    The Doctor will instruct you to find the laboratory keys, which are hidden in the Cloister’s garden. Check the weeds near the locked chest to locate the key. After that, head to the library, where chickens will have taken over the place. Go up the stairs by the cellar door and take out the guard there.

    Speak with Tia del Nido; she will divulge the laboratory’s location in exchange for an egg. She’ll also inform you that the secret door to the laboratory can only be unlocked using the Inquisitor’s ring, which one of her chickens has swallowed.

    To retrieve the Inquisitor’s Ring, throw a rope with Leonora to the area above the cellar door inside the library, and then climb up with Amelia. Crawl through the gap to reach the space above Tia del Nido. Proceed carefully and use Amelia’s Pickpocketing skill to steal the ring from the chicken.

    Reaching the laboratory is simple. Go to the entrance of the Wine Cellar and head south to find it. A cutscene will reveal its location once you’re within the Wine Cellar. Just be careful of Mother Superior, who will be close to the entrance. The easiest way to distract her is to have Amelia throw chocolate, giving you the opportunity to slip into the laboratory.

    Enter the laboratory with either Alfredo or Agnes. Be cautious of the guard inside, and create the medicine without being caught.

    How to Administer Medicine to the Abbot

    Your next task is to deliver the medicine to the Abbot, who is located in the red-carpeted area on the second floor of the Cloister. You can use Eduardo to place a plank as a shortcut to reach this area. Alternatively, bring Leonora to the room across from the red carpet, where the prisoners and the doctor were previously met. Eliminate the guard in this area.

    Wait for the Inquisitor to move out of the way from the red carpet, and then unlock the iron-barred door leading to that area. Quickly enter the Abbot’s room and administer the medicine. This will provide him some relief, and he will outline the next steps in the strategy to stop the Inquisitor. With this, the chapter comes to a close.

  • Conquer the Wrath of Stone in Dragon Age: The Veilguard

    Conquer the Wrath of Stone in Dragon Age: The Veilguard

    In Dragon Age: The Veilguard, each companion is fortunate to have an engaging set of side quests, allowing Rook to earn their loyalty as they prepare to battle the Evanuris. The voice actors for these cherished characters have done a fantastic job of bringing figures like Lace Harding to life, who grapples with an ancient power within her.

    One notable quest, titled The Heart Of The Titan, takes Rook and Harding into the Deep Roads, providing a refreshing shift from other companion missions that typically remain on the main maps. This action-packed adventure culminates in an epic showdown, awakening Harding’s ancient abilities.

    How To Locate The Lost Dwarves

    Your journey begins in Isana Negat in Anderfell, where you’ll assist Harding in searching for some missing dwarves, fully aware that a trap lies ahead.

    It’s best to bring along Emmrich or Davrin for this mission, with Emmrich being the recommended choice, as he can help you defeat the final boss in record time.

    Once you’ve chosen your companion for the journey with Harding, follow her to your marker and interact with her to proceed.

    As you progress, you’ll reach the Mine Entrance, where there are two resonance stones that Harding can manipulate to uncover the path to the Descent.

    Battle the Undead Warriors (vulnerable to Necrotic damage but resistant to Cold) in the Deep Grotto, then continue until you spot a glowing red rock inside the Flooded Chamber.

    Release the captive dwarf from this Lyrium rock to gather more information, then follow your marker out of the Lyrium Cavern and into the Ancient Mining Operation.

    Knock down the ladder and take the right path along the wall and across the bridge. In the next room, eliminate the Shades and free another dwarf trapped in red stone.

    Clear the next resonance stone, then venture further along the tracks to the Old Shafts, where you’ll encounter additional Shades and demons.

    Utilize Harding’s powers to raise a resonance stone and ascend to continue your quest, where you’ll free the third dwarf from the red stone.

    Proceed until you locate one last resonance stone that you can shift, revealing yet another moving stone.

    Drop into The Cavity, where you’ll face a Bursting Rage Demon (weak to Cold and resistant to Fire), and then free the final captive from their Lyrium prison: Stalgard.

    With gratitude from Stalgard, Harding is now ready to confront what lies ahead, so push through the Lyrium Seam and into The Heart.

    How To Conquer The Wrath Of The Stone

    As you enter, dodge falling rocks and take down the minor enemies that spawn, releasing the boss’s wrath upon you.

    The Wrath Of The Stone is a Fire Imbued foe who is particularly vulnerable to Necrotic damage while resisting Electricity, making Emmrich’s magical Necrotic attacks very effective.

    Note that Harding cannot join you for this battle, so it’ll just be you and your selected companion.

    Avoid the giant’s ground attacks, as they can stun and debilitate you with a series of hits.

    Upon defeating the Wrath Of The Stone, you’ll have to decide how Harding handles her rage – will she choose compassion or embrace her anger?

    This decision will influence the upgraded skills she receives afterward.

    What Rewards Do You Receive Upon Completing The Heart Of The Titan?

    After one final conversation, your adventure in The Heart Of The Titan concludes, granting you several rewards:

    • Strengthened connections with your companions
    • Upgraded armor for Harding: Inquisition Spotter
    • New skills for Harding (Compassion):
      • Inquisition Spotter
      • Heart Of The Titan

    These enhancements will significantly benefit Harding, boosting her armor to increase the likelihood of detonations disrupting enemies and extending that disruption chance to all nearby foes during an explosion.

    Take full advantage of the powerful combinations this armor offers.