الوسم: Statue

  • Completing the Lava Dragon Statue Challenge in Genshin Impact

    Completing the Lava Dragon Statue Challenge in Genshin Impact

    If you’re anxious about encounters with lava, dragons, or stone figures, facing the Lava Dragon Statue boss in Genshin Impact could be quite daunting. While it looks intimidating, this boss is actually among the simpler opponents you’ll encounter in the game. You can easily stun it thanks to its clear attack patterns and simple mechanics.

    Defeating the Lava Dragon Statue rewards players with the Sparkless Statue Core, which is a key ascension material for characters like Varesa. To successfully take down this geothermal creature, it’s beneficial to assemble a team with characters that can deal substantial Pyro damage.

    Finding the Lava Dragon Statue


    The Lava Dragon Statue is located in an underground area close to the entrance of the Atocpan region. To find it, head southwest of the Stadium of the Sacred Flame or northwest from the People of the Springs.

    How to Reach the Lava Dragon Statue

    To make your journey easier, you can click on the Lava Dragon Statue icon on the map to reveal its underground location. Then, set a marker at the entrance and begin your navigation.

    From the Teleport Waypoint, follow the main path leading to Atocpan. You’ll need to stay on this path until you spot your marker or a visible opening on the map.

    Varesa standing and looking at the opening to the Lava Dragon Statue's cave in Genshin Impact.

    Take a detour to the right side of the path, moving into the green area, where you’ll discover an entrance to the underground. Jump in, using your character’s Plunge Attack to avoid fall damage.

    Follow the only available path to reach both the underground Teleport Waypoint and the Lava Dragon Statue boss.

    How to Defeat the Lava Dragon Statue

    Genshin Impact, Chevreuse standing in front of the Lava Dragon Statue.

    The Lava Dragon Statue is relatively easy to defeat in Genshin Impact. It has limited strong attacks, and by keeping a safe distance, you’ll have ample time to dodge its moves.

    Its primary attacks involve launching its body at you in various patterns that are easy to anticipate and avoid. If you do take damage, it’s not severe, and having a reliable healer or shield character can help you sustain through the fight.

    The Lava Dragon Statue possesses two long-range attacks similar to those of the Pyro Regisvine, which are also simple to dodge.

    Genshin Impact, Chevreuse being hit by the Lava Dragon Statue.

    In its base state, the Lava Dragon Statue boasts a high 70% resistance to all elements and physical damage, making it quite durable.

    Although you typically want to avoid the same element a boss wields in Genshin Impact, the Lava Dragon Statue is an exception. You’ll need characters that excel in Pyro damage to take it down.

    While it’s possible to defeat the boss without charging its Fury Meter, doing so will stun it and reduce its resistances, allowing your characters to deal significantly more damage.

    Each time you deal Pyro damage or apply Pyro effects, you fill the boss’s Fury Meter. Once it fills for the first time, the boss transitions into its Molten Dragon state.

    Genshin Impact, Chevreuse standing in front of the Lava Dragon Statue. (1)

    In this Molten Dragon state, you receive a new Fury Meter to fill. If you deal Cryo or Hydro damage, that meter will decrease.

    You can take down the boss in this phase since its resistance is lower, but to achieve the full resistance reduction and the stun, you need to repeat this process.

    Once you’ve filled its Fury Meter twice, the boss will crash down and enter its Overburn state. During this state, it is more susceptible to damage, meaning you need to chip its health down to zero before it recovers.

    If the Lava Dragon Statue wakes up before you can finish it off, it will regain its 70% resistance, forcing you to start the Fury Meter process over again.

    Best Teams to Defeat the Lava Dragon Statue

    Genshin Impact, Mavuika looking down at the Lava Dragon Statue boss.

    As the Lava Dragon Statue forces you to concentrate on Pyro damage and discourages using Hydro and Cryo characters, the best team setups include Overloaded teams, Burning teams, or pure Pyro compositions.

    If you lack a fully developed team, pairing any Dendro character with a Pyro character like Amber creates a viable strategy that enables you to use Burning effects and frequent skills to stun the boss.

    The boss’s Fury Meter does not rely on the amount of damage dealt; it only counts the number of Pyro attacks. Therefore, you can utilize a level one character as long as they can frequently apply Pyro.

    Mavuika and Chevreuse

    Though Mavuika’s optimal teams often include Hydro or Cryo characters, the Chevreuse core stands out as an effective team to tackle the Lava Dragon Statue.

    Mavuika applies substantial Pyro while active and also as an off-field presence. Chevreuse complements her role with Pyro application through her skills and burst.

    Genshin Impact, Chevreuse aiming at the Lava Dragon Statue.

    The star of this setup is Bennett. His skills and burst can apply several Pyro instances, allowing the Fury Meter to fill quicker than with other characters.

    Additionally, Bennett’s passive ability enables him to use his skills more frequently while in Burst mode, allowing him to level up the Fury Meter even faster by using his Elemental Skill repeatedly.

    Mavuika from Genshin Impact defeating a stunned Lava Dragon Statue.

    Once the boss is stunned, it will have lowered resistance, allowing it to take increased damage compared to typical enemies. You can unleash your rotations, working to bring its health down rapidly.

    Burning Teams

    Certain elemental reactions can also contribute to filling the Lava Dragon Statue’s Fury Meter. The primary reaction to do this is Burning, which inflicts consistent Pyro damage.

    One of the most effective Burning team compositions includes Kinich, Emilie, Bennett, and Mavuika, although many other character combinations will also work.

    To start, use Kinich’s Burst, allowing you to quickly switch back to Bennett for longer Pyro application.

    Genshin Impact, Kinich fighting the Lava Dragon Statue boss.

    Utilize your off-field abilities and then swap to Kinich to apply Dendro and activate Burning. After completing a rotation, switch back to Bennett to consistently work on elevating the Fury Meter.

    When the boss is stunned, proceed with your usual damage rotation to finish it off quickly.

    Mono Pyro Teams

    Since the fight requires substantial Pyro application, Mono-Pyro teams excel at defeating the Lava Dragon Statue.

    Just keep attacking the boss until you trigger the Overburn status, leading to increased damage output.

    Mono Pyro teams tend to be the most efficient way to transition through the Lava Dragon Statue’s two states.

    Other Teams

    If you can’t build a dedicated team, simply pair a Dendro character with a quick-hitting Pyro unit to use Burning and deal with the resistances.

    Afterward, bring in your other characters to deal heavy damage before the boss can recover.

    You can still utilize teams that include Hydro or Cryo characters against the Lava Dragon Statue, but avoid switching to them or applying Elemental damage.

    Top Characters for Beating the Lava Dragon Statue

    Hu Tao, Bennett, Xiangling, and Mavuika standing in the party setup page in Genshin Impact.

    Even if you can’t form a complete team for this boss, certain characters can efficiently build the Fury Meter faster than others.

    Look for units with low internal cooldowns on their attacks or those that can inflict multiple instances of Pyro damage per hit.

    The Lava Dragon Statue’s meter fills up even if a Pyro attack doesn’t apply the element—however, attacks that do will fill it faster, which is why you want characters with rapid attacks or unique cooldown mechanics.

    Character

    Reason

    Bennett

    Both his Elemental Burst and Elemental Skill apply multiple units of Pyro. His C6 offers Pyro-infusion for even more damage.

    Xiangling

    Her Pyronado has no internal cooldown.

    Hu Tao

    Her Charged Attacks have no internal cooldown.

    Amber

    Her Elemental Burst applies Pyro damage quickly.

    Kinich

    Can apply a lot of Dendro while dealing damage.

    Nahida

    Can trigger Burning with her skills. Tri-Karma Purification can continuously refresh Burning from off-field.

    Emilie

    Can trigger Burning and enhance damage from the status effect.

    Any Pyro/Dendro Combo

    Can keep applying Burning to trigger ongoing Pyro damage.

    Drops from the Lava Dragon Statue

    The Sparkless Statue Core dropped by the Lava Dragon Statue in Genshin Impact.

    The Lava Dragon Statue drops the Sparkless Statue Core. As of version 5.5, only Varesa requires it for ascension.

    To ascend a character to level 90, you will need a total of 46 of these cores. If you are fighting at the maximum World Level, you will usually obtain three cores each time you defeat it.

    This means you will need to slay the Lava Dragon Statue 16 times to fully ascend a character.

  • Complete Guide to Amazon Statue Spots in Mythwrecked: Ambrosia Island

    Complete Guide to Amazon Statue Spots in Mythwrecked: Ambrosia Island

    After being shipwrecked on Ambrosia Island, you’ll find there’s a lot to navigate, especially when it comes to building friendships with the islanders. These unique characters represent ancient Greek gods who have forgotten their identities and powers. Your mission is to help them regain their memories and power.

    As you interact with these characters, you’ll meet strong personalities like Ares, who may require a little extra persuasion to trust you. Can you help calm him down and win his friendship? Follow our guide to connect with the god of war and restore the beauty of Ambrosia Island in Mythwrecked: Ambrosia Island!

    How To Unlock Ares


    To unlock Ares, go to the eastern door in the temple and use two seals to get through. You should already have these seals from other gods:

    Open the door to the orchard and talk to Ares. If he’s in his tent, take a seat on a nearby bench and wait for him. He tends to wake up and go to bed early.

    Ares Friendship Level One

    Before you can help Ares, you’ll need to get to know him by chatting. During your conversation, he will talk about the Amazon statues scattered around the island. He mentions that he took the gold weapons from them for safekeeping, but it’s now time to return them.

    Here’s where you come into play. While Ares tends to his orchard, you need to return the weapons to their rightful owners. Below is a list of the weapons and their corresponding statues:

    You’ll find the weapons around Ares’ camp on various weapon racks.

    Statue Name Weapon Location
    Myrina Golden Sword In the Cloud Atrium, down the ramp on the left.
    Hippolyta Golden Bow South of the temple entrance, before the lighthouse.
    Penthesilea Golden Axe Next to Athena’s tower.

    Once you have returned all the weapons, it’s time to find Ares’ missing mementos scattered across the island. Here’s a list of the three items you need to collect along with their locations:

    Memento Name Location
    Hero Toy Behind the yellow banner on the eastern half of the staircase leading to the Cloud Atrium.
    Cyclops Toy Under the wagon in Aphrodite’s Garden.
    Pegasus Toy East of the temple entrance, buried in a dim brazier.

    After collecting everything, you’ll reach friendship level one with Ares, allowing you to trade ambrosia fruit and visit him in his tent anytime.

    Ares Friendship Level Two

    Right after hitting level one, Ares will ask you to retrieve the golden weapons from his tent and return them to their respective statues. Head inside his tent and grab the weapons—don’t forget to take the seal from the desk!

    Here’s where to drop off each weapon:

    Statue Name Weapon Location
    Thalestris Golden Daggers In the center of the Cloud Atrium, between the entrance and Zeus and Hera’s dining area.
    Orithyia Golden Sling On the west end of Poseidon’s docks, up the stairs by the ladder.
    Otrera Golden Shield On the beach by the Underworld entrance.

    Once the weapons have been returned, search for more of Ares’ mementos. You’re now looking for trophies from his battles, listed below with their locations:

    Memento Name Location
    Golden Bull In the Cloud Atrium, just past the portal. Head south towards the stream.
    Sack of Jewels To the left of the Underworld entrance, buried in the sand.
    Marble Bust Trade 50 ambrosia fruits with Poseidon.

    Bring everything back to Ares to increase your friendship level to two. You’re getting closer to restoring Ares’ memories!

    Ares Friendship Level Three

    To fully strengthen your bond with Ares, you’ll need to complete one last task and find the final mementos of the God of War. This involves making an offering of ambrosia fruits at each of the statues.

    Statue Name Cost
    Myrina 20 Ambrosia Fruits
    Hippolyta 20 Ambrosia Fruits
    Penthesilea 20 Ambrosia Fruits
    Myrina 20 Ambrosia Fruits
    Hippolyta 20 Ambrosia Fruits
    Penthesilea 20 Ambrosia Fruits

    In total, that’s 120 ambrosia fruits to offer at all six statues. Next, you’ll need to find the last two mementos:

    Memento Name Location
    Shattered War Axe Behind a wind turbine on a secluded island, buried in a dirt mound surrounded by rocks.
    Harvest Sickle In Athena’s tower, on a bookshelf along the southwestern wall.

    Return the last mementos to Ares to restore his memories and solidify your friendship. In return, he’ll gift you his soulstone!

    What Can You Trade Ambrosia Fruit For With Ares?


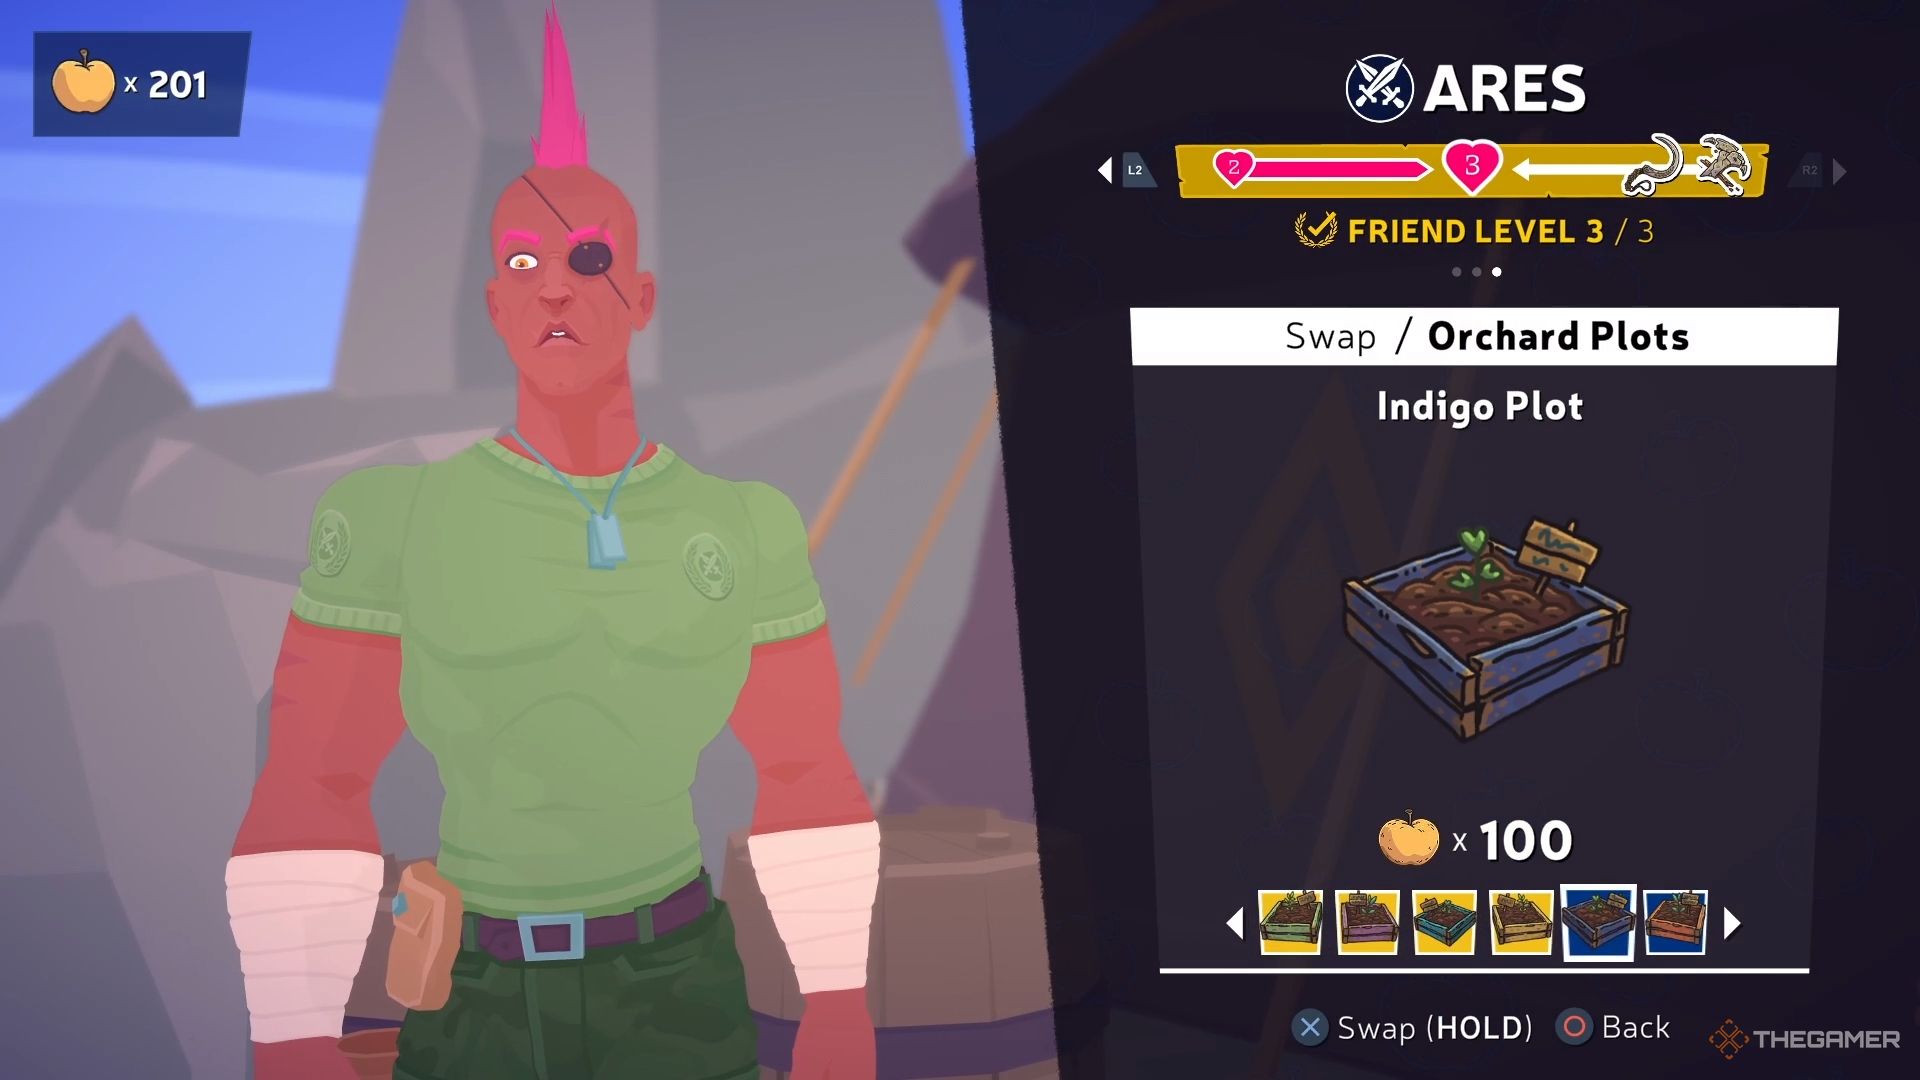
    Scrolling through Ares' orchard shop options.

    You can start trading ambrosia fruit with Ares once you reach friendship level one, although he won’t provide items right away. Instead, you’ll need to gain access to his orchard.

    There are six plots available for purchase, detailed below:

    Plot Name Cost
    Green Plot 100 Ambrosia Fruits
    Violet Plot 100 Ambrosia Fruits
    Blue Plot 100 Ambrosia Fruits
    Yellow Plot 100 Ambrosia Fruits
    Indigo Plot 100 Ambrosia Fruits
    Orange Plot 100 Ambrosia Fruits

    After unlocking a plot, you can plant one ambrosia fruit. Once a few days have passed, you can harvest 50 fruits from each plot you planted.

    This is the best way to farm ambrosia fruits, especially as you’ll need plenty later in the game.

  • Dragon Age: Veilguard – Solving the Lighthouse Statue Challenge

    Dragon Age: Veilguard – Solving the Lighthouse Statue Challenge

    After completing the prologue in Dragon Age: The Veilguard, you’ll gain access to the Lighthouse, which serves as your primary base of operations. This is the place where you’ll unwind after missions, interact with your companions, and tackle various puzzles including the statue puzzle, wisp puzzles, and the portal puzzle.

    To solve the statue puzzle, you need to locate and adjust three statues so that each pair is facing one another. Upon entering the Lighthouse, you’ll notice a locked door against the north wall. Examine the note nearby to initiate the puzzle in the courtyard that will grant you access to that door. After exiting to the outside area, your objective will be to maneuver six pairs of statues in the Lighthouse in Dragon Age: The Veilguard so they face each other.

    First Statue Pair Location

    dragon age veilguard lighthouse statue

    When you step into the open courtyard, go west toward the left side of the workshop building. When you reach the corner, take a right, and you’ll discover the first statue. Rotate this statue so it faces north towards its counterpart.


    Return to the main spawn area and head north up the stairs. You’ll find another set of stairs leading down to a dilapidated study; drop down to the right side of those stairs to locate the next statue. Adjust its lever so it faces its pair.

    Second Statue Pair Location

    dragon age veilguard lighthouse statue

    The next statue is located on the stairs of the library building. Turn its lever to face north, directing it toward the stairs.


    For its counterpart, go back down the stairs from where you came, heading straight north toward the Dining Hall area. Proceed up the stairs and veer to the right side of the building to discover the pair. Rotate this statue so it’s facing south directly toward its counterpart.

    Third Statue Pair Location

    dragon age veilguard lighthouse statue

    The third statue and its pair are quite easy to find as they are situated next to each other on the library stairs. To finish the lighthouse puzzle, rotate the first statue to the east and position the other to face it in Dragon Age: Veilguard. A wisp will emerge and fly into the Lighthouse, which you should follow to collect your rewards.

    Lighthouse Statue Puzzle Reward in Dragon Age: The Veilguard

    Upon solving the puzzle, you’ll unlock the music room in the library where you can find:

    • Memorial of a Duet Codex Entry
    • 20 Flawless Crystals
    • 400-600 Gold

    How to Open the Door in the Music Room?

    Once you’ve gathered the items, focus on the door located on the west side of the music room. It requires two wisps to unlock. One of the wisps is situated near the piano, so collect it using the interact button and place it in one of the door’s slots. This is the wisp you released from the statues after completing the puzzle. Then, the Caretaker will appear and provide a hint: Another helper waits between the facing gods.

    A note will be left behind echoing the same message. Make your way back to the statues near the library door to find another wisp. Collect it and return to the music room door, slot it into place, and unlock it to reveal a portal. Enter the portal, and you’ll be transported to a balcony above the library. Look for the device located to your left, approach it, and activate it to repair the Astrolabe in the library, which will also grant you a discount on upgrades for the Caretaker’s Workshop.