الوسم: settings

  • How To Get the Best Picture from Your Hisense TV: Adjust These Essential Settings

    How To Get the Best Picture from Your Hisense TV: Adjust These Essential Settings


    Hisense TVs, particularly the U7 series, provide exceptional value for your money straight out of the box. They look fantastic as is, but with a few adjustments to the picture settings, they can deliver an even more vibrant and colorful viewing experience.

    Many users often leave their TVs in the default settings after the initial setup, which is understandable. While the picture quality is generally good, minor tweaks can elevate it to an extraordinary level.

    Turn off these default settings

    Your first step is to disable a few default settings. You might have previously looked for Eco mode in the Power settings but couldn’t locate it. On a Hisense TV, this setting is labeled as Energy Saving.

    Image used with permission by copyright holder

    To turn it off, begin at the Home Screen. Press the Settings button on your remote, then navigate to Picture, followed by General, and finally Picture Mode. Ensure that Energy Saving is not selected.

    Image used with permission by copyright holder

    While you’re in the settings, select your desired Picture Mode. Options like Theater Day, Theater Night, or Filmmaker Mode tend to work best. The main difference between the two theater modes is brightness, which you can always adjust further.

    Image used with permission by copyright holder

    Next, turn off the Intelligent Scene feature. This function automatically adjusts settings based on the content you are viewing, so go back to the General menu, find Intelligent Scene, and toggle it off.

    While you’re in this menu, it’s advisable to disable Automatic Light Sensor. When activated, it can excessively darken the screen according to the ambient lighting in the room.

    hisense Intelligent Scene
    Image used with permission by copyright holder

    Lastly, deactivate the Content Type Auto Detection setting. This feature switches your TV into modes like Filmmaker or IMAX based on the content being played. Disabling it allows your TV to maintain the Picture Mode you have personally selected.

    Bigger, bolder brightness

    You can further enhance the brightness settings on your Hisense TV. Since you’ll likely be viewing both SDR (standard dynamic range) and HDR (high dynamic range) content, it’s beneficial to fine-tune brightness settings for both formats.

    To adjust the brightness for SDR content, start on the Home Screen. Press the Settings button, navigate to Picture, and then Brightness. From there, set the brightness level to your preference. This will apply to all SDR content.

    hisense brightness setting sdr
    Image used with permission by copyright holder

    For HDR, begin by playing content, whether it’s a show or a movie with HDR capabilities from a streaming platform, or select a video on YouTube (check out Eugene Belsky’s channel for great options). If you find the HDR image a bit dark, it’s likely defaulting to HDR Energy Saving mode. To rectify this, press the Settings button, go to Picture, then General, followed by Picture Mode. From there, you can set it to HDR Theater, Filmmaker Mode, or another setting that you prefer.

    hisense hdr theater
    Image used with permission by copyright holder

    For optimal brightness in HDR, revisit the Brightness settings and enable Local Dimming. This feature enhances overall contrast by adjusting backlight brightness, ultimately making bright areas even more vivid.

    hisense hdr brightness
    Image used with permission by copyright holder

    If you want the best HDR picture possible, set the Local Dimming to High and increase brightness to 100 — as long as it remains comfortable for your viewing experience.

    Smoother viewing, device connection

    When it comes to motion smoothing, your experience will greatly depend on your personal taste. You might notice it, or it might not bother you. If you do notice it, it can be hard to ignore.

    To adjust this setting, go to the Picture menu, find Clarity, and then select Motion Enhancement. You can turn this feature off or explore various presets, including a Custom setting that enables you to modify Judder Reduction and Blur Reduction. Experiment with different settings to find what you prefer.

    Additionally, there are settings to streamline your experience with the Hisense TV.

    If you use other devices like soundbars, Blu-ray players, or gaming consoles, consider configuring everything to be controlled through a single remote. To do this, press the Settings button, navigate to All Settings (the cogwheel icon in the top corner), then to Channels & Inputs, and finally Inputs. Ensure that HDMI Control is activated.

    Customize HDMI formats based on the devices connected to your inputs. In the Inputs menu, select HDMI Format to make your preferred choices. For gaming consoles that support high frame rates or 4K Blu-ray players, set the input to Enhanced Format.

    Implementing these adjustments to your picture quality will result in an enhanced viewing experience tailored to your specifications. If you'd like to explore further adjustments, you’ll now be more familiar with where the options are located and how to tweak them.

    If you're using a different brand of TV and aim to achieve similar adjustments, many modern TVs offer comparable features to Hisense. However, the settings might be labeled differently. Whether you have LG, Samsung, Sony, TCL, or Panasonic, there are guides available to help with those adjustments, too.

  • Copilot+ PC Exclusive Settings Previewed in Windows 11

    Copilot+ PC Exclusive Settings Previewed in Windows 11

    Microsoft is experimenting with an intriguing feature in the latest preview build of Windows 11 that enhances how users can interact with various applications through the Settings menu.

    This feature, labeled “Actions,” was initially concealed in the 26120.3576 build designed for the Dev Channel. After being discovered by tech enthusiasts, information about its functionality has been shared on multiple Windows forums. Currently, this feature supports apps like Photos and Paint, and when activated, it allows users to perform more advanced tasks within these applications.

    Actions Settings in Windows 11 preview build
    Windows Central

    To access these settings in the Windows 11 preview, go to Settings > Apps > Actions. Here, you’ll discover options for Photos, including features like Blur Background, Erase Objects, and Visual Search with Bing. In Paint, you can find the Remove Background option.

    These functionalities represent higher-level editing capabilities that are typically absent from standard Microsoft applications. It appears that the Actions settings are related to the Click To Do intelligent text actions feature, which Microsoft has referenced in the feature log for the Windows 11 preview.

    Windows Central has pointed out that Click To Do is meant exclusively for Copilot PCs, suggesting that the Actions feature may be similarly tied to future AI-enabled PCs. This Click To Do feature parallels the Actions settings but can be activated by highlighting text and right-clicking to show a drop-down menu on AMD and Intel-powered systems.

    Microsoft plans to unveil several Copilot+ features, commencing in May, which will include the significant Recall feature, as well as To Do and AI enhancements in Windows Search during the summer. Additional “proactive” Copilot functionalities are expected later in the year, as noted by the publication.

    While the Actions settings are not guaranteed to be rolled out as part of the public version, if they are, they could seamlessly incorporate some AI features akin to Click To Do within the operating system. Note that all these enhancements will necessitate Copilot+ PCs equipped with a Neural Processing Unit (NPU) capable of processing at least 40 TOPS.

    Although the current Windows 11 preview showcases only two applications, there’s significant potential for the integration of third-party apps into the Actions Settings, offering even more dynamic functionalities.

  • How To Get The Best Picture From Your Sony TV: Change These Essential Settings

    How To Get The Best Picture From Your Sony TV: Change These Essential Settings

    Many television manufacturers observe that most users leave their TVs at default settings. Once set up out of the box, they make no additional changes. What many do not realize is that a simple few minutes spent navigating through settings can vastly improve everything from brightness to image clarity.

    Here’s how to elevate the picture quality on your Sony TV.

    Disable These Default Settings

    Modern TVs typically come with an Eco mode enabled by default. If you bought your TV with the intent of enjoying an immersive viewing experience—after all, that’s why we invest in new televisions—you’re likely missing out on optimal brightness and performance with Eco Mode active.

    Digital TrendsTo turn off Eco Mode on your Sony TV: Press the Settings button on your remote, navigate to All Settings, then to System, and further to Power and Energy. From there, go to Energy Saver, where you’ll find “Adjust the brightness and panel control to reduce the TV’s power consumption.” This means the TV is likely dimming its brightness, which you don’t want. So, set it to Off.

    Sony TV Settings
    Digital Trends
    Digital Trends

    Many newer TVs feature optical sensors that can gauge room brightness as well as the color temperature of the light. The TV then automatically adjusts the picture settings based on these measurements, but its choices might not match your preferences.

    On a Sony TV, this adjustment is straightforward. Press the Settings button on your remote, choose Picture and Sound, then scroll down to Ambient Optimization Pro and turn it Off. If you're using a different brand, this option can usually be found under All Settings, within Display and Sound.

    Sony TV settings
    Digital Trends

    Now, these essential settings are under your control, not the TV’s.

    Enhance Brightness

    Picture Modes provide preset collections of settings, including contrast, sharpness, brightness, and color temperature. To select a Picture Mode on a Sony TV, start from the Home Screen, press the Settings button, navigate to Picture and Sound, then to Picture, and finally choose your desired Picture Mode. Alternatively, you can press the Quick Settings button (the wrench icon) on your remote to quickly access Picture Mode.

    Sony TV settings
    Digital Trends

    Modes like Cinema or Professional are great choices. The IMAX Enhanced Mode offers a warm and natural appearance. In contrast, if you prefer a cooler, more blue tone, try the Standard Mode. Be cautious with Vivid Mode, as it tends to excessively brighten images, resulting in harsh visuals.

    Sony TV settings
    Digital Trends

    You can also fine-tune your TV’s brightness settings. Some people prefer brighter settings for daytime viewing, while others might not need as much light at night. If your viewing habits vary, consider setting up two different brightness levels for two separate Picture Modes and switch between them as needed.

    Keep in mind that you’re likely to watch both SDR (standard dynamic range) and HDR (high dynamic range) content, so you’ll want to adjust the brightness settings for both types. Sony makes this user-friendly by clearly marking which range of brightness you’re adjusting.

    Sony TV settings
    Digital Trends

    To adjust brightness for SDR content: From the Home Screen, press the Settings button on your remote, select Picture and Sound, then Picture, and find Brightness. “SDR” will appear in parentheses, indicating that you're setting brightness for SDR content. You can also access this through the Quick Settings menu using the corresponding button on your remote and navigating to Brightness.

    Sony TV settings
    Digital Trends

    For HDR content, begin playback of an HDR program, such as a Netflix show or a YouTube video. Follow the same steps as for SDR. You'll notice "HDR" now appears in parentheses, indicating you're adjusting the brightness specific to HDR content.

    To brighten your Sony TV even more, within the Brightness menu, look for Peak Luminance, a setting that optimizes contrast. This feature is Sony’s version of local dimming.

    Sony TV settings
    Digital Trends

    Experiment with the Low, Medium, and High settings for Peak Luminance. This adjustment allows the TV to maximize the HDR picture quality by significantly brightening the brightest areas on screen, enhancing contrast and making highlights stand out. While Low will limit brightness, it may reduce blooming or halo effects around bright objects on dark backgrounds. Conversely, setting it to High will maximize brightness and is excellent for daytime viewing.

    Sony TV settings
    Digital Trends

    If you want to see sparkling waters or vibrant bright objects, setting Peak Luminance to High along with maximum brightness truly enhances HDR content to its fullest potential.

    Improve Motion and Connectivity

    When it comes to motion smoothing, opinions vary—some viewers enjoy it while others find it causes a strange or artificial effect, often referred to as the soap opera effect.

    You can modify motion smoothing on your Sony TV within the Picture settings. Select Settings, then Picture and Sound, choose Picture, scroll down to Motion, and choose Motionflow. Here, you can set motion smoothing to Auto, customize it, or disable it completely. Take some time to experiment—you may discover a preference you didn’t expect.

    Sony TVs also provide the ability to adjust settings specifically for cinematic content typically shot at 24 frames per second (fps) or for live broadcasts and sports, which often have higher frame rates.

    There are additional settings designed to enhance the usability of your TV with various external devices.

    Sony TV settings
    Digital Trends

    If you have additional devices like a soundbar, Blu-ray player, or gaming console and want to simplify control, navigate to the All Settings menu. From there, select Channels & Inputs, then External Inputs, and enable Bravia Sync Settings. Activating this will allow for unified power control, so you can turn everything on or off simultaneously if desired.

    Sony TV settings
    Digital Trends
    Sony TV settings
    Digital Trends
    Sony TV settings
    Digital Trends

    In the External Inputs menu, don’t forget to check the HDMI signal format settings. If you have a 4K Blu-ray player connected to these inputs, enable Enhanced Format to ensure that you receive the best 4K signal. For any gaming consoles or devices that support high 4K frame rates and VRR (variable refresh rate), use HDMI 3 or 4 configured to Enhanced Format 4K 120.

    Sony TV settings
    Digital Trends
    Sony TV settings
    Digital Trends

    The takeaway is this: while a new TV will provide a satisfactory experience with factory settings, taking some time to adjust its features can significantly enhance performance and picture quality.

    If you own a different brand of TV and want to make similar adjustments, most contemporary TVs share features comparable to those of Sony, though the terminology may differ, which can be somewhat confusing. If you're interested in instructions for LG, Samsung, Hisense, TCL, or Panasonic, we have guidance available for those brands as well.

  • Optimal Controller Settings for Maximum Performance in Avowed

    Optimal Controller Settings for Maximum Performance in Avowed

    In Avowed, the thrilling combat and expansive world require players to have precise controls. While those using a mouse and keyboard may have a seamless experience, controller players frequently encounter issues with the default settings, which can feel awkward, slow, and sometimes unresponsive. Specifically, Xbox users have reported problems like input delay and unexpected movements due to stick drift. If you enjoy gaming with a controller, whether on PC or Xbox, this guide is for you.

    In this guide, you’ll learn about typical controller problems in Avowed and how to optimize your settings to improve the overall experience. If you’re aiming for smoother gameplay, enhanced sensitivity, and to eliminate stick drift, let’s dive into the settings!

    Common Controller Problems

    The update 1.2.4 added new controller settings to help players customize their gameplay. Nonetheless, some issues still remain:

    Issue

    Description

    Inconsistent Camera Movement

    Sudden shifts between slow and fast speeds can disrupt aiming and navigation.

    Camera Acceleration Problems

    Moving the right stick rapidly can cause excessive acceleration, making precise aiming challenging on Xbox.

    Lack of Target Locking

    Unlike games like Dark Souls or TLoZ: Breath of the Wild, Avowed has a freeform combat system reminiscent of Skyrim, requiring manual aiming and lacking a target lock option, making it tough to land specific hits while changing targets.

    Clunky Shooting Controls

    Aiming with a bow or firearms without aim assist can be quite frustrating on a controller.

    Automatic Character Movement

    Stick drift can cause characters to move on their own, even when the controller is still.

    Fortunately, most of these issues can be resolved by tweaking the controller settings discussed below.

    Controller Layout


    Avowed controller layout settings.

    While Avowed officially supports the Xbox button layout, you can still use a PlayStation controller (PS4/PS5) if you’re on Steam. Below is the PlayStation button mapping next to the Xbox controls in case you prefer this configuration:

    Movement Controls

    Move

    LS (Alternate: RS)

    Look

    RS (Alternate: LS)

    Jump/Parkour

    A / ✖

    Crouch/Slide

    B / ⭘

    Sprint

    LS↓ (Alternate: RS↓)

    Actions

    Main Hand Action

    RT / R2

    Off Hand / Secondary Action

    LT / L2

    Interact

    X / ☐

    Swap Weapon Set

    Y / △

    Sheathe Weapons (Hold)

    Y / △

    Toggle Perspective (Hold)

    RS↓ (Alternate: LS↓)

    Abilities

    Ability Radial

    LB / L1

    Ability Slot 1

    ↑

    Ability Slot 2

    ↓

    Ability Slot 3

    →

    Ability Slot 4

    ←

    Throw Grenade

    RB / R1

    Controller Settings


    Avowed Controller settings menu, showcasing options like Look Sensitivity, Look Acceleration, and others.

    In this section, any settings labeled ‘Optional’ can be modified to fit your gaming style. However, for settings with specific recommendations, it’s advisable to adhere to them, as they provide a good mix of precision and responsiveness, and help reduce unintended character movement that can arise from stick drift.

    The recent patch 1.2.4 added two new settings to adjust camera acceleration, enabling you to customize movement control: Look Acceleration Strength and Look Acceleration Ramp-Up Time.

    The default settings are meant to work for general gameplay, but if you seek improved aiming responsiveness or smoother camera movement, adjusting these values might enhance your experience.

    Now, let’s look at the recommended adjustments for the optimal controller setup in Avowed:

    Setting

    Recommendation

    Description and Reason

    Controller Vibration

    Optional

    Turning off vibration can result in a more stable gaming experience, minimizing distractions and fatigue. Yet, keeping it active adds to the immersion, giving you tactile feedback from actions and interactions in the game.

    Controller Vibration Intensity

    Optional

    Invert Horizontal Look

    Optional

    Reverses the left and right movements of the camera.

    Invert Vertical Look

    Optional

    Reverses the up and down movements of the camera.

    Look Sensitivity X-Axis

    0.65

    Changes the speed of horizontal camera movements when using the right stick. Higher values allow for quicker turns, while lower values provide more control.

    Look Sensitivity Y-Axis

    0.65

    Affects the speed of vertical camera movements with the right stick. Raising it enables faster adjustments, while lowering it enhances aiming accuracy.

    Look Acceleration Strength

    1 (Default)

    Determines the amount of acceleration during camera rotation. Higher values facilitate quick turns, while lower values lend to a steadier aim.

    Look Acceleration Ramp-Up Time

    0.3 (Default)

    Controls the speed at which acceleration reaches its maximum. Lower values enhance responsiveness, while higher values smooth out the motion.

    LS Inner Dead Zone

    0.15 (Default)

    Adjusting Dead Zones can help address acceleration issues and stick drift.

    LS Outer Dead Zone

    0.1

    RS Inner Dead Zone

    0.07

    RS Outer Dead Zone

    0.1

    Controller Preset

    Optional

    Avowed offers two controller presets: Default and South Paw, with the South Paw setting swapping the functions of the left and right sticks.


    Currently, the game does not support custom button remapping for controllers. Therefore, if you’re asking, “Can I change the key bindings in Avowed?” the answer is no.

    Alternative Settings

    If the suggested settings above don’t work for you, consider these alternatives:

    Setting

    Recommendation

    Look Sensitivity X-Axis

    0.6

    Look Sensitivity Y-Axis

    0.6

    LS Inner Dead Zone

    0.15 (Default)

    LS Outer Dead Zone

    0.31

    RS Inner Dead Zone

    0.15 (Default)

    RS Outer Dead Zone

    0.31

    How to Enable Aim Assist


    Avowed menu displaying 'Aim Assist' toggled 'On'.

    In Avowed, there’s an Aim Assist feature for smoother targeting, particularly with ranged weapons like bows and guns. While some gamers enjoy manual aiming, others find the default controls cumbersome without help. Whether to enable or disable Aim Assist is entirely your choice based on what feels comfortable for you.

    To enable Aim Assist in Avowed:

    1. Open the Settings menu.
    2. Go to Game or Accessibility.
    3. Scroll down to find Aim Assist.
    4. Toggle Aim Assist ON.
    5. Adjust Aim Assist Magnetism to refine how much assistance is provided.
  • How To Get the Best Picture from Your Samsung TV: Change These Settings

    How To Get the Best Picture from Your Samsung TV: Change These Settings


    If you haven’t adjusted the settings on your new Samsung TV, it's likely not performing at its highest potential in terms of picture quality and viewing experience. Now is the time to rectify that.

    Over the years, many TV manufacturers have noted that the overwhelming majority of users don’t bother to explore even the most basic settings after purchasing a TV. Often, people set it up straight out of the box and leave it at that.

    We understand the excitement of diving into a new gadget, but a few simple adjustments can drastically enhance your viewing experience. By taking just a few minutes to modify some settings, you can significantly improve the picture quality and overall usability of your television.

    Here are seven crucial adjustments to consider for your Samsung TV to ensure you enjoy the best picture quality tailored to your preferences.

    Disable these default settings

    Most modern TVs come with an Eco mode enabled right out of the box. While being environmentally conscious is commendable, limiting your TV's brightness and contrast is not the best approach. Imagine buying a high-speed sports car but capping it to just 40 miles per hour!

    Chris Hagan / Digital Trends

    To disable this setting, use the Settings button on your remote, navigate to All Settings, go to General & Privacy, select Power and Energy Saving, and switch Energy Saving Solution to Off.

    Samsung TV Settings
    Chris Hagan / Digital Trends

    While you’re at it, turn off Brightness Optimization. Many televisions are equipped with sensors that adjust brightness based on the room's light levels. However, this feature can be unreliable. By deactivating it, you take control of the brightness and color temperature, especially in well-lit rooms.

    Adjust for optimal brightness

    Now that you’ve taken control of these important settings, it’s time to choose a picture mode. Open an app like YouTube, press the Settings button on your remote, and find Picture Mode. Modes like Cinema, Movie, or Filmmaker are excellent choices, while Standard is suitable if you prefer a cooler color temperature. Avoid Dynamic Mode, as it often results in an overly bright and harsh picture.

    Samsung TV Settings
    Chris Hagan / Digital Trends

    Next, determine your preferred brightness level. Some viewers enjoy a brighter display during the day, while others might find a more subdued brightness preferable at night. If you want to accommodate both, consider setting different brightness levels in multiple picture modes for switching based on the time of day.

    Keep in mind that you’ll be viewing both SDR (Standard Dynamic Range) and HDR (High Dynamic Range) content, so adjusting brightness for both formats is necessary on your Samsung TV.

    Samsung TV Settings
    Chris Hagan / Digital Trends

    For SDR content, adjust the brightness via the Settings quick menu. Go to Picture Setup, look for Brightness, and set it to your preference. You can also access All Settings, then Picture, and finally Expert settings for more options.

    Samsung TV Settings
    Chris Hagan / Digital Trends

    For HDR adjustments, play some HDR content—this could be a YouTube video featuring high-quality visuals, like those created by Eugene Belsky. Press the Settings button on your remote, head to Picture Setup, and adjust the brightness just like you did for SDR.

    Samsung TV Settings
    Chris Hagan / Digital Trends

    Another way to boost your TV’s brightness is through Local Dimming. Access this setting by pressing the Settings button on your remote, selecting All Settings, then Picture, followed by Expert Settings, and scroll to Local Dimming. Adjust this by experimenting with Low, Standard, or High settings. Choosing Low will yield less brightness but reduces blooming around bright objects on dark backgrounds. A Standard or High setting increases brightness—ideal for daytime watching. For vibrant highlights, keep this setting set to High.

    Samsung TV Settings
    Chris Hagan / Digital Trends

    Enhance motion and control

    Motion smoothing can be a divisive feature: some viewers appreciate it, while others believe it makes everything look artificial, leading to the so-called “soap opera effect.”

    Samsung TV Settings
    Chris Hagan / Digital Trends

    To adjust motion smoothing on your Samsung TV, go back into Expert Settings, navigate to Picture, and find Picture Clarity Settings. Here, you can either completely turn it off or fine-tune the effect by lowering both Blur Reduction and Judder Reduction settings. Feel free to test this out—you might find it beneficial for sports but prefer no smoothing for cinematic films. It ultimately depends on your viewing style.

    Samsung TV Settings
    Chris Hagan / Digital Trends

    Additionally, there are features to make using your Samsung TV more convenient.

    During the initial setup, you’re prompted to connect other devices, which allows your remote to control basic functions of those devices. If you skipped that step or want to connect a new device, you can adjust the HDMI CEC (Consumer Electronics Control) settings. On Samsung TVs, this is referred to as Anynet+ (HDMI-CEC).

    Samsung TV Settings
    Chris Hagan / Digital Trends

    To access it, press the Settings button on your remote, navigate to Connection, and then External Device Manager to toggle it on or off. When enabled, you can control your soundbar’s volume and navigate your gaming console’s main menu directly with the TV remote.

    Samsung TV Settings
    Chris Hagan / Digital Trends

    In summary, purchasing a new TV guarantees a good picture, but with some exploration in the settings, it can be even better. It’s definitely worth taking the time to uncover just how vibrant your TV’s visuals can be. Even if your television is older and you’ve never adjusted any settings, now is the perfect time to investigate ways to enhance your viewing experience with a few simple tweaks.

    If you own a different brand of TV and wish to make similar adjustments, many modern TVs offer comparable features to Samsung, albeit with different labels. If you're interested in configurations for LG, Sony, Hisense, TCL, or Panasonic, we have details available for those models as well.

  • Optimal Settings Guide for Stalker 2: Heart of Chornobyl

    Optimal Settings Guide for Stalker 2: Heart of Chornobyl

    Optimizing graphics settings for the best frames per second (FPS) is standard procedure when diving into new PC games, and Stalker 2: Heart of Chornobyl is no different. However, this game has specific quirks regarding optimization, making it essential to find the right balance based on your hardware and personal comfort level.

    After experimenting with various graphics options, we’ve compiled an almost optimal configuration suited for modern hardware. While you may need to make some adjustments for your unique setup, the recommendations below provide a solid foundation.

    Recommended Graphics Settings

    To achieve the best performance in Stalker 2, keep these guidelines in mind:

    • Limit Background Applications: Reduce tabs and applications running in the background. They can significantly hinder your game’s performance.
    • Avoid Alt-Tabbing: Exiting the game using Alt-Tab can lead to performance drops, which seems to be particularly true for Stalker 2.
    • Utilize AI Upscaling: If available, make use of upscaling technologies such as DLSS, FSR, or XeSS. These enhancements can improve both the look and performance of your game, provided your graphics card supports them.

    Performance Testing Details

    For our tests, all graphics settings started on Medium, with TAA as the chosen upscaling method, mainly because it’s compatible across different GPU brands. In our trials, DLSS often delivered better performance compared to FSR, although experiences may vary among different players.

    The testing was conducted in Zalissya, during a foggy and rainy day. Using an ultrawide resolution with an RTX 3080, we achieved an average of 40 FPS, and all game settings recommendations stem from this testing baseline.

    Individual Graphics Setting Impact

    Here’s how various settings influenced FPS during testing:

    Setting FPS Impact Optimal Setting
    Texture Quality Negligible Epic
    Hair 2-5 FPS drop Medium
    Object Details 1-3 FPS drop High
    Effects Quality 2-5 FPS drop Medium
    Materials 1-3 FPS drop High
    Post Processing 1-3 FPS drop Epic
    Antialiasing Negligible Epic
    Motion Blur Strength Negligible 0%
    Depth of Field Negligible Low
    Light Shafts Negligible Enabled
    Sharpness Negligible 20%
    DLSS Upscaling 10+ FPS improvement Balanced
    FSR Upscaling Not used due to issues Disabled
    Shading Quality 2-5 FPS drop Medium
    Global Illumination 2-5 FPS drop Medium
    Reflections 1-3 FPS drop High
    Shadow Quality 5-8 FPS drop Medium
    Clouds 1-3 FPS drop High
    Fog 2-5 FPS drop Medium
    Sky Negligible High
    Foliage Quality 1-3 FPS drop High
    Environmental Draw Distance 1-3 FPS drop High

    PC Specifications for Testing

    The specifications of the PC used for testing these settings are as follows, and your performance may differ based on your setup:

    • GPU: NVIDIA 3080 Founder’s Edition
    • CPU: Intel 13700K (stock settings, microcode updated)
    • RAM: 32 GB
    • OS: Windows 10
    • Monitor: Ultrawide at 12:5 resolution

    It’s important to note that resolution significantly affects performance. If you’re gaming at 1440p or any standard 16:9 ratio, you may be able to increase settings further. For those equipped with graphics cards from the NVIDIA 40 series or AMD’s 7800XT, you can potentially leverage Frame Generation for additional performance benefits.

    Conclusion

    Lower-end graphics cards, such as the 4070 and those below it, may have difficulty running the game at high settings, similar to the experience with a 3080. The power output of a graphics card will dictate its ability to handle intensive settings, regardless of the generation it belongs to.

    By following these tips and tweaking your settings according to your hardware, you’ll likely enhance your gameplay experience in Stalker 2: Heart of Chornobyl.

  • How To Turn Off Autoplay Previews and Episodes on Netflix

    How To Turn Off Autoplay Previews and Episodes on Netflix

    Derek Malcolm / Digital Trends

    Netflix is a leading streaming platform, but it can sometimes become a source of frustration. If the incessant autoplay previews or automatic episode plays are driving you crazy, there’s good news: you can easily disable these features.

    With just a couple of adjustments in your Netflix account settings, you can turn off autoplay previews and halt the automatic playing of the next episode.

    This means no more fumbling to mute the volume or rapidly skipping away from a title to avoid the preview. You’ll gain total control over what content plays and when. Additionally, you can stop episodes from continuing to play after you’ve fallen asleep, which can help conserve your data usage. It’s a simple process—let’s go over how to do it.

    Disabling Netflix’s Autoplay Previews

    Step 1: Begin by logging into your Netflix account from a web browser.

    Note: You can also do this on your mobile device; just make sure to use a browser instead of the Netflix app.

    Step 2: In the menu on the right side of the screen, click on Account.

    Here, you’ll find a variety of information about your account, including your profiles. You’ll need to manage the autoplay settings for each profile individually (some users may prefer to keep it). By default, your account will be selected.

    Scroll down and select Edit Settings, and then proceed to Playback Settings.

    Screenshot showing how to access Netflix settings on the web.
    Screenshot
    Bryan M. Wolfe / Digital Trends

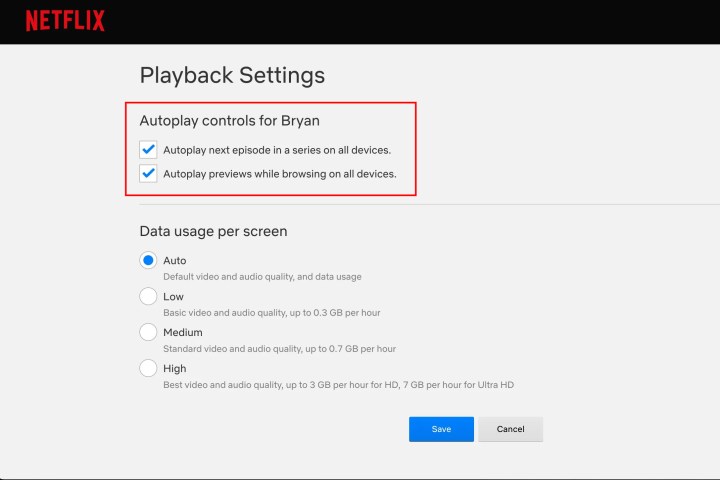
    Step 3: Uncheck both boxes under Autoplay controls for you. There will be one box for autoplay previews and another for the next episode. Disabling the second box will stop Netflix from playing previews of titles when you hover over them, eliminating the need to quickly mute or skip past them. Unchecking the first box will prevent Netflix from automatically proceeding to the next episode in a series. While binge-watching is a popular way to enjoy shows on Netflix, turning off this option will mean you have to take a more active role in your viewing experience.

    Netflix playback settings.
    Screengrab / Digital Trends

    Step 4: Finally, click on Save to confirm your choices. Log out of your account.

    Once you update your profile settings on one device, those changes will apply across all devices where you access Netflix.

    How to disable Netflix autoplay - Save button.
    Derek Malcolm/Digital Trends

    Netflix indicates that there might be a slight delay before the new settings take effect, but you can expedite the process by switching profiles and then switching back to reload your profile with the updated settings.

    If you find that you miss the autoplay features, it’s easy to return to your settings and re-enable them.

    These steps apply to all Netflix subscription plans.