الوسم: Rooms

  • How to Complete All Riddler Puzzle Rooms in Lego Batman: Legacy of the Dark Knight

    How to Complete All Riddler Puzzle Rooms in Lego Batman: Legacy of the Dark Knight

    In Lego Batman: Legacy Of The Dark Knight, The Riddler has set up puzzles all over Gotham, leaving behind puzzle boxes and puzzle rooms for you to solve. To unlock each Puzzle Box and earn big rewards, you need to test your puzzle-solving skills at every one.

    The Puzzle Rooms are larger versions of the individual Puzzle Boxes scattered around Gotham, so they definitely deserve their own spotlight. Here’s everything you need to know about solving each Riddler Puzzle Room in the game.


    All Riddler Puzzle Room Solutions

    images are included to help visualize the solutions.


    Tricorner Riddler Puzzle Room 1

    This room is filled with question marks and mirror puzzles. Start by finding the bear near the room and placing it on the correct plinth in front of the mirror.

    Next, go through to the following room, where you’ll see a mirror and three plinths. The reflections show a Top Hat, a Lamp, and a Candlestick. Move these objects so they match what you see in the mirror to solve the puzzle, then proceed.

    In the third room, there’s a Lamp, a Boombox on a table to the left, and a piano. Use the Lamp from the previous puzzle, turn the handle to lower the piano, and collect the Riddler Puzzle Box to continue.


    The Cauldron North Riddler Puzzle Room

    Inside this room, smash everything you see to leave only the items needed. Find the bust with a top hat and place it on the plinth by the televisions. Use Batman’s UV Vision to trace footsteps to a bookcase, then explode the bricks behind it using Spray Explosive. Inside, Catwoman can climb the wall, activate a lever to open a box, and Batman can use his grapple to remove a panel and find a handle.

    Take the handle upstairs, raise the chandelier, and grapple to a panel to enter the ventilation. Smash the object blocking the hatch, place the candlestick in the hatch, and press the button to go through. Head into the bedroom, use X-Ray Vision to find a cable, pull the lever, and move the boombox onto a plinth.

    Catwoman can cut the glass of a case with the purple and green lamp, then place the lamp on a table. Use the handle to open the door and retrieve the Puzzle Box.


    Old Gotham North Riddler Puzzle Room

    This room requires Catwoman. Smash everything to leave only the necessary parts, including bricks for rebuilding. Place the green bowler hat onto the Riddler figure, whip the pieces of a giant question mark to match the mirror, and whip around the bookcase to turn it. Enter the room through the vent, grapple the panel below the painting, and whip the reel to align the painting properly.

    Pick up the nearby wheel and place it on the bed frame. Turn the wheel to release a hook underneath, then apply Spray Explosive to the brick wall on the left. Use the hook with the bookcase to progress.

    Rearrange items with Talia, including smashing a statue and pulling a lever to reveal a mirror. Place the bust with the top hat in the small window and bring it into the next room.

    Inside, move the bear to the end of the office table, wait for the enemy to stand at the center, then blow him with a dart. Use the lever to move the mirror, let the bear reach its plinth, and place a green vase on the sill to reveal the Puzzle Box.


    East End Amusement Mile Riddler Puzzle Room

    Require Batman’s help. Smash everything to leave only what you need, build new objects from bricks, and manipulate items like the green bowler hat onto the Riddler figure’s head. Whip parts of the giant question mark to match the mirror, whip the bookcase, and enter through the vent.

    Use gadgets to manipulate the room—grapple down panels, turn handles to sync clocks, and move objects onto plinths. Solve the puzzle to reveal the Puzzle Box.


    Newtown Riddler Puzzle Room

    This room needs Talia. Smash all objects, rebuild, and then use her Ninja Dash to enter. In the room with the table, push a red button and pull a lever to reveal a mirror. Place the bust with the top hat into the small window, then bring it into the next room to set on a plinth.

    Use gadgets to open the hatch, place the green plate on it, and scan for a code to open the door. Complete the process to retrieve the final piece and finish the puzzle.


    Gotham Village Robinson Park Riddler Puzzle Room

    Requires Catwoman. Smash everything to leave only what’s needed, build a new item, and place a green bowler hat on the Riddler figure. Whip apart the question mark to match the mirror, whip the bookcase, and enter via the vent.

    Grapple panels, whip reels, and manipulate a wheel to release a hook. Use Spray Explosive on the brick wall and attach the hook to progress further.


    Old Gotham West Riddler Puzzle Room

    This room is best for Batgirl. Hack the mirror until the arrows and question marks turn green, place the candlestick on the kitchen counter, move the bust with the hat to the table, and then break the clock’s panel.

    Align the clock’s handle to match the mirror clock, then press the button to access the next area. Inside, move a bear onto a plinth, then navigate through to retrieve puzzle items.


    East End Riddler Puzzle Room

    Require Batgirl. Smash everything to leave the key objects, use gadgets to open passages, and manipulate objects to set the room in order. Place the necessary items on plinths, hack the hatch with a gadget, and finally, reveal the puzzle box.


    Summary of icons:

    • Question Marks mark the Riddler Puzzles on the map.
    • Puzzle Boxes are shown as a Puzzle Box icon.

    These solutions should help you confidently solve each Riddler Puzzle Room in Lego Batman: Legacy Of The Dark Knight and unlock all the hidden rewards.

  • Where to Find All Required Rooms for Completing Medical Merchandise in Arc Raiders

    Where to Find All Required Rooms for Completing Medical Merchandise in Arc Raiders

    While your main goal in Arc Raiders is to loot items and upgrade your equipment, you also have a side task of completing quests for different traders in Speranza. These quests make up most of your progress in the game. However, many of these quests can be frustrating because they require you to reach specific locations.

    One such quest is Medical Merchandise. It asks you to find three specific rooms or buildings on particular maps and search containers inside them. Once you know the routes to these rooms, getting there becomes much easier.

    Where to find the medical room in Dam Battlegrounds

    The first location for this quest is in the Research & Development building in Dam Battlegrounds, marked with a red boundary on the map’s lower middle area. Since this is a high-loot zone, expect to encounter many players. Luckily, if you follow the correct path, you won’t spend much time inside the building.

    Start by heading to the southern edge of the building, near the red boundary. Find the stairs that lead to the top floor through a back entrance. Take these stairs up and go into the first room you see at the top. Exit through the door on your right.

    Once you exit, turn left and go straight down the hallway. Be prepared for turrets and other enemies guarding the area, so be ready to fight. When you reach the hallway’s end, the medical room will be on your left. Search containers inside to complete this part of the quest.

    Where to find the hospital in Buried City

    This part is the easiest. The hospital is clearly visible on the Buried City map, marked with a red loot icon. Enter the building, which is easy to spot. Head upstairs and loot containers in any room. Loot three containers, and the quest step will be done.

    Where to find the exam room in Spaceport

    The last location is inside the Departure Building at Spaceport. It can be tricky because the exam room doesn’t look like an obvious medical room. To find it, enter the Departure Building through the main entrance. You’ll see a broken staircase leading up to the first floor.

    Once there, turn around and walk straight down the hallway, then turn right into another corridor. In the darker section of this hallway with a roof overhead, look for an open room ahead. Enter this room, then go into the room on the left—the exam room.

    The exam room is right next to a hospital room, making it easier to identify. Look for experiment benches with white chemical bottles in the center; that’s the key indicator. Once you locate it, you’ve found the final location for the Medical Merchandise quest.

  • Sonos Introduces Zones For Managing Rooms With Multiple Speakers

    Sonos Introduces Zones For Managing Rooms With Multiple Speakers

    Sonos has announced that the Era 100 Pro, their inaugural speaker specifically designed for the professional installation market, is now available for order and shipping. This innovative speaker utilizes an Ethernet cable for both power and connectivity and is sold exclusively in pairs through select Sonos partners that focus on professional setups. Pricing for the Era 100 Pro is determined by these partners, and Sonos has not disclosed any pricing guidelines. I have contacted a few professional installers to obtain an estimated price range.

    It’s important to note that the Era 100 Pro requires a powered Ethernet connection (PoE), which means it won’t operate on a standard wired home network without additional equipment.

    To coincide with the launch of the Era 100 Pro, designed for commercial environments such as restaurants where numerous speakers may be used in a single area, Sonos has also updated its app, introducing a feature called “zones.”

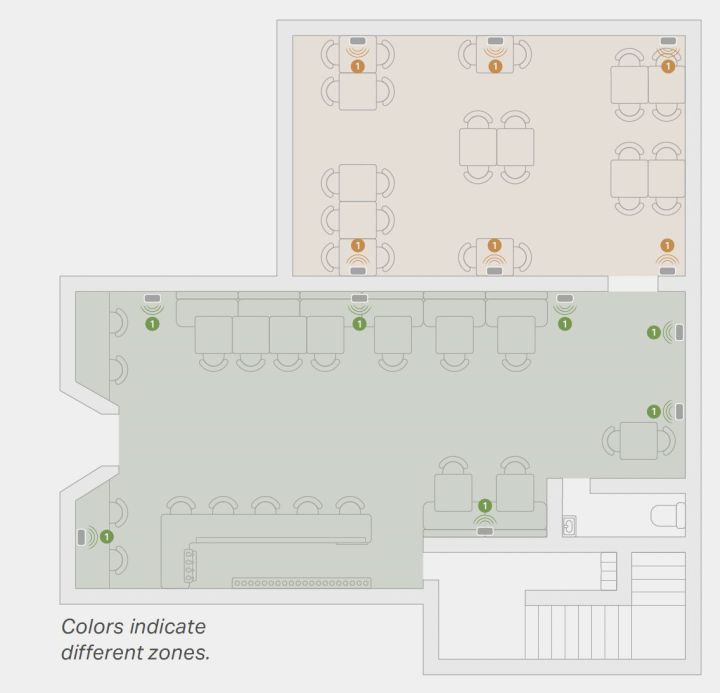
    A diagram of two zones of Sonos products in a commercial space.
    A diagram of two zones of Sonos products in a commercial space. Sonos

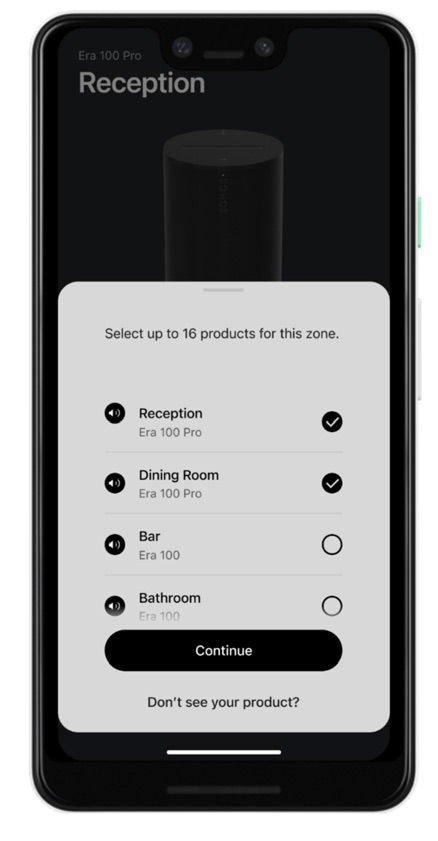
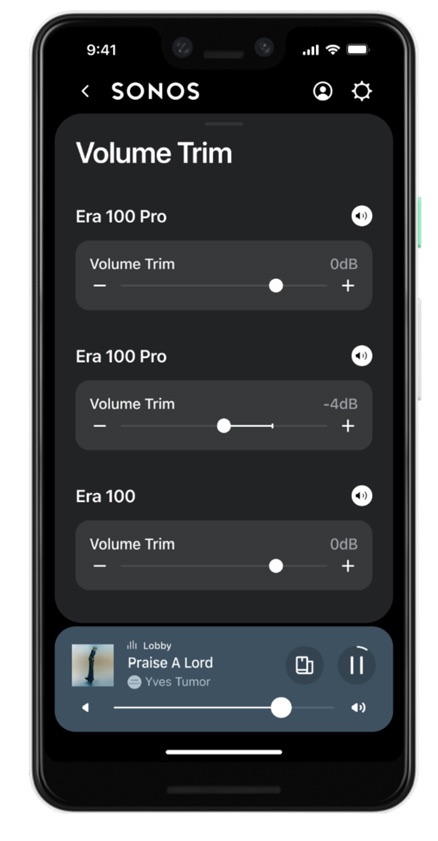
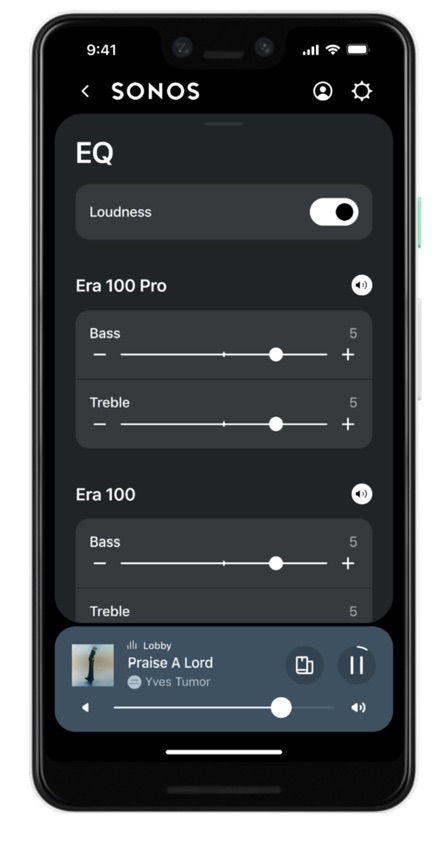
    The new zones feature resembles the existing Groups function, allowing users to add up to 16 compatible Sonos devices to create a “semi-permanent” grouping of speakers. All devices within a zone will play the same audio at the same volume level, unless the “volume trim” settings on individual speakers are adjusted to vary from the zone level. Additionally, users can fine-tune the EQ settings for each speaker individually.

    A key advantage of zones is their ability to combine with other zones or individual Sonos speakers. Since groups can’t be nested inside one another, this feature enables users to manage specific collections of speakers as a cohesive unit, allowing for easy reconfiguration without creating new groups each time.

    Users can add, modify, or remove zones through the Sonos app. There’s also a chime feature to help identify a specific speaker within a zone, which can be useful when the name alone isn’t sufficient to pinpoint its location.

    However, there are certain limitations for the zones feature. Unlike groups, it is only compatible with specific Sonos components, namely the Era 100 Pro, Era 100, Era 300, Sonos One SL, Sonos One (all models), and Sonos Five. Other components such as Sonos soundbars, portable speakers, headphones, and devices like the Port and Amp are not currently compatible with zones.

    Sonos emphasizes the importance of an Ethernet connection for every speaker within a zone. If that’s not feasible, it’s advisable to limit zones to a maximum of six Wi-Fi-connected devices for optimal performance.

    Alongside the Era 100 Pro and the zones update, the Sonos app has received a series of fixes and enhancements as the company works to address issues stemming from the problematic redesign launched in May 2024.

    Notable updates include:

    • New option to snooze alarms directly within the app
    • Changes to System Settings for easier access to key settings
    • Visibility of battery charge percentage in the System view
    • Upgrades to parental controls on iOS
  • 8 Best Humidifiers For Plants in [year] (Best for Indoor Plants)

    We bring you the best humidifiers for plants available in the market to care for your indoor plants.

    (المزيد…)