Tag: rogue

  • Top Team Composition for Solving in Deep Rock Galactic: Rogue Core

    Top Team Composition for Solving in Deep Rock Galactic: Rogue Core

    Deep Rock Galactic: Rogue Core features only five Reclaimers, which are the playable classes in the game. A typical team consists of four Reclaimers, so one class will always be absent from the lineup. It’s unclear if more classes will be added later, but currently, these are the options available.

    Among the five classes, I believe Falconer and Guardian are essential. Falconer delivers high damage with a drone hawk that attacks enemies and can also be used to revive allies from afar. Falconer is especially useful in clutch situations—if you’re the last one alive, you can quietly revive teammates while staying mobile. I enjoy using high-mobility builds, along with weapon upgrades focused on weak point damage, critical hits, and long-range damage.

    The Guardian is a sturdy tank class that focuses on health and armor enhancements, taunting enemies, and using abilities to boost armor regeneration. Its main role is to stay alive, deal damage through big explosions, and use the repel ability to keep enemies away from key locations like elevators. For upgrades, I prefer defensive improvements like extra armor, increased health, and bio booster upgrades that add bonus armor. For weapons, shotguns and grenade launchers work well, especially when geared toward defense.

    Retcon is an incredibly valuable support class. It can rewind time and revive the last dwarf standing if you take fatal damage, which can save many runs. Combining Retcon with Falconer for extra revives or Guardian to keep enemies at bay makes the team more resilient. I typically select defensive options such as extra armor, health, and health regeneration to stay alive long enough to make the most of Retcon’s abilities.

    Spotter offers useful team support by providing ammunition drops and enemy spotting through walls. The extra ammo is particularly helpful since the ammo supply in Rogue Core can be tight. Having a Spotter on your team means everyone has more bullets to handle the increasingly tough enemies.

    Overall, this team setup provides strong damage and revival capabilities with Falconer, solid defense with Guardian, crucial time-rewinding with Retcon, and additional ammunition support via Spotter.

  • Top Enhancements for Completing First in Deep Rock Galactic: Rogue Core

    Top Enhancements for Completing First in Deep Rock Galactic: Rogue Core

    Deep Rock Galactic: Rogue Core offers a range of upgrades scattered across a detailed skill tree that you unlock gradually by completing core runs. Your choices mainly depend on your preferred playstyle: do you want to focus on defense or offense?

    Unlocking all these upgrades and reaching their highest levels takes quite some time, as it requires significant progress. Once you’ve chosen a skill path, you can’t refund or change your decision, so pick carefully. Here are some of the top upgrades I recommend to give you an idea of what to aim for:

    Ammo Pouch I
    I went straight for Ammo Pouch I because ammo management can be frustrating in Rogue Core. You never seem to have enough. I tried carrying only one gun to maximize the 50% ammo bonus but still ran out too often. This upgrade gives an 8% increase in total ammo, which is helpful since you’ll want to explore this branch of the skill tree anyway.

    Resupplier I
    Continuing with the same theme of boosting ammunition supplies, I picked Resupplier I for the 5% bonus ammo when resupplying. Even a small percentage can make a difference during a swarm, giving you a slight edge in survival.

    Deadeye I
    This is where damage perks start to really matter. Deadeye provides a solid 10% boost to critical hit damage. On a run, this makes you more effective with your critical hits, so focusing on increasing crit chance from your radar (R.E.P.D.) and artifacts is a smart move.

    Bullseye I
    To complement the damage boost, I took Bullseye early to gain a 2% increase to critical hit chance. It may seem small, but stacking this with subsequent upgrades and the perks gained during a run can significantly enhance your crit potential over time.

    Battering Ram I
    Since armored enemies can be quite irritating—they absorb a lot of damage—I recommend using armor-shredding weapons and grabbing Battering Ram I, which boosts armor damage by 25%. This makes fighting armored foes much less frustrating.

    Ammo Pouch II
    As I was still annoyed by ammo limits, I picked Ammo Pouch II to add another 12% to your maximum ammo capacity. Combining this with Ammo Pouch I means more sustained firepower.

    Resupplier II
    Similarly, Resupplier II grants an additional 5% ammo bonus upon resupplying. Running Ammo Pouch I and II together, plus Resupplier I and II, stacks benefits for a sustained ammo supply throughout the mission.

    Sweet Tooth II
    I chose Sweet Tooth II primarily to access higher-tier upgrades, but it also provides extra healing from red sugar, the resource used to recover health. It’s particularly valuable on tougher difficulties.

    Deadeye II
    Upgrading Deadeye to level two boosts critical damage by an additional 15%, resulting in a total increase of 25%. This makes your crits devastating and is a key part of a damage-focused build.

    Bullseye II
    Finally, Bullseye II adds another 3% chance to land critical hits. Combined with Deadeye upgrades, these enhancements turn your character into a crit-focused powerhouse.

    Stacking these enhancements together creates a strong build, emphasizing critical hits and sustained damage, especially effective against armored enemies and in prolonged fights.

  • Which Rogue Subclass Should You Pick in Solasta 2: Completing or Solving?

    Which Rogue Subclass Should You Pick in Solasta 2: Completing or Solving?

    When assembling your starting team in Solasta 2, it’s crucial to diversify each member so your party can handle nearly any situation without trouble. However, figuring out how to level up each character as the story unfolds can be tricky. We’re here to help you understand the Rogue class better, so you can level them up smoothly and confidently.

    From initial stats to choosing a subclass, this guide covers everything you need to make your Rogue stealthy and effective in both combat and outdoor encounters. Since Rogues are vital team members, these tips will help you make them self-sufficient.

    Best Stats for the Rogue Class

    The starting stats matter a lot. Focus on Dexterity, Constitution, Strength, and Charisma as your main priorities. Wisdom and Intelligence are less important early on, but you can spread points between them as needed, as long as Dexterity and Constitution stay at the top of your list.

    Since Rogues work best as the shadows of the party, creating a character that can easily slip out of sight is a good idea. Some of the best build options to make that happen include choosing the right ancestry, background, and personality traits.

    Recommended Ancestry: Halflings are especially good because of their racial trait that allows them to go unnoticed by creatures that are larger than them. Humans are also versatile since they can adapt easily between classes, but halflings give that extra sneaky advantage for stealth and surprise attacks.

    Best Backgrounds:

    • Aristocrat
    • Artist
    • Lowlife
    • Spy

    Ideal Attributes and Ranges:
    | Attribute | Priority | Ideal Range |
    |————-|——————|—————-|
    | Strength | Medium | 10-12 |
    | Dexterity | High | 12-15 |
    | Constitution| High | 12-15 |
    | Wisdom | Low | 8-10 |
    | Intelligence| Low | 8-10 |
    | Charisma | Medium | 10-12 |

    Developing your Rogue with these priorities will make sure they’re quick, tough enough to stay alive, and capable of sneaky maneuvers.

    Building Your Rogue: Key Tips

    Your Rogue’s starting stats should emphasize Dexterity, Constitution, Strength, and Charisma. Wisdom and Intelligence can be secondary, but it’s best to focus on the main ones first, especially Dexterity and Constitution, to get the most out of stealth and survivability.

    Because Rogues excel at sneaking and avoiding detection, choosing an ancestry like halfling gives you an edge in stealth. The halfling’s racial feature that helps go unnoticed by larger enemies makes it easier to sneak past foes or set up a powerful sneak attack.

    Choosing a Subclass at Level 3

    At level three, Rogues can pick a subclass, which shapes their special abilities. There are two main options: one that favors melee combat and looting, and another focused on magic and stealth.

    Scavenger Subclass

    This subclass emphasizes melee skills aimed at triggering Sneak Attack advantages. It also leverages Surprise mechanics to catch enemies off guard for maximum damage—ideal for aggressive, close-up fighting. Outside of combat, the Haggler feature makes it easier to buy and sell goods at better prices, saving money for your party. The discount is even more significant if the merchant’s faction is friendly toward you.

    Shadowcaster Subclass

    If you prefer flexibility and a mix of magic and stealth, the Shadowcaster is the way to go. It allows your Rogue to cast spells—while still benefiting from Sneak Attack mechanics—greatly expanding your tactical options. Spells like Shadow Dagger offer flavor and utility, helping you deal damage or support your party without engaging directly in combat.

    Which Subclass Is Better?

    Overall, the Shadowcaster is considered the best choice for a Rogue. It combines strong melee and magical damage, along with sneak attack bonuses, making your character highly versatile. Its ability to cast spells enhances both offensive and defensive capabilities.

    The Scavenger subclass, while useful, falls behind in comparison to the Shadowcaster’s overall flexibility and power. Whether you’re new to the game or experienced, most players will appreciate the dynamic combat options a spell-casting Rogue provides.

  • How to Beat All Hyperspace Rogue Mega Evolutions and Solve in Pokémon Legends: Z-A

    How to Beat All Hyperspace Rogue Mega Evolutions and Solve in Pokémon Legends: Z-A

    The Mega Dimension DLC for Pokémon Legends: Z-A focuses on battling Rogue Mega Evolutions, similar to the main game. The key difference is that fights now happen in a Hyperspace Dimension, and you’ll need a Donut to prepare before starting the battles.

    Apart from the Donut requirement and a time limit, the fights are quite similar to those in the main game. You’ll face off in a large arena with a limited amount of time to defeat each Rogue Mega Pokémon. After winning, you’ll always have the chance to catch that Pokémon and receive its Mega Stone. Some battles may include multiple phases, increasing their difficulty.

    All Rogue Mega Evolutions encountered before the credits are considered part of the base DLC content, with Darkrai being the last. These battles are the only way to get their Mega Stones, and they are story-locked, meaning you need to complete them to progress and finish the DLC.

    A major challenge in these battles is the time limit. Collecting black orbs dropped when dealing damage can extend your overall time. It’s wise to prioritize Donuts that give the most extra time, especially if you’re not aiming for a specific recipe.

    ### Rogue Mega Absol Z

    This is a slower, more straightforward fight, serving as a return to Mega Battles. It’s only a bit above max level, so a single-star Donut should suffice if your Pokémon are properly powered. Absol Z has only one weakness—Fairy—so ensure you have Fairy types that can Mega Evolve for added damage and benefits. Watch out for Absol Z bouncing around and for its charge attack, which involves a quick leap forward. When at half health, its charge attack will be faster, requiring frequent dodging. After defeating it, you’ll be able to catch Absol and obtain Absolite Z.

    ### Rogue Mega Staraptor

    This battle is the second Rogue Mega Evolution. Its main threat is fireballs it launches, which are slow and easy to dodge. It will also sometimes dive straight at you, which is always in a line, so move to avoid it. Its charge move involves flying up and then swooping down with its claws, tracking your position, so keep rolling to evade. Once it drops to half health, the attack speeds up. Defeating Staraptor gives you the opportunity to catch it and obtain Staraptite.

    ### Rogue Mega Tatsugiri

    Tatsugiri is one of the trickier fights because it stays constantly moving, making attacks hard to land. It jumps and slams down, and occasionally fires water beams straight across the field—simple to dodge since they don’t track. Its charge attack involves launching small balls of Masago while flying, which increase in speed and precision after it drops below half health. It’s best to stay alert and avoid damage by dodging or pulling your Pokémon back if it attacks chaotically. Upon defeat, you can catch Tatsugiri and get Tatsugirinite.

    ### Rogue Mega Meowstic

    This fight is very frustrating due to a move that involves creating a psychic box with only one weak side. When it begins charging, look for the odd square in the box and have your Pokémon attack it to break the box. Standing outside the box allows damage to the outside as it charges, so get inside quickly. Once broken, the inside becomes an area where all outside points take damage. The box becomes harder to break after its health drops below half. Be prepared for energy balls and energy beams that can be slow but damaging if you’re caught unprepared. After beating it, you can catch Meowstic and obtain Meowticite.

    ### Rogue Mega Heatran

    Heatran is larger and moves much less than others, sitting mostly still during the fight. Its main threats are slow but powerful moves like energy balls and earthquakes. During charge-up, it spawns stationary fire twisters and then unleashes a major fire beam that tracks your position. When its health drops below half, it also releases magma balls that explode along with the twisters. Once defeated, you can catch Heatran and obtain Heatranite.

    ### Rogue Mega Darkrai

    This final boss fight features two stages: first against Darkrai and then against Mega Darkrai. The initial phase involves a fast-moving, highly mobile Darkrai that uses hazards on the ground and spams shadow orbs. It also charges a move involving scattering shadow orbs that leave damaging domes. After depleting its health, the fight continues against Mega Darkrai, which has more attacks, including an AOE meteor shower, a spinning move, and a new charge-up involving cloning itself and creating hazardous circles. The circle attacks are centered on the arena’s middle, so stay in the safe zone or dodge, and use rolling to avoid damage from energy balls. Once you topple Mega Darkrai, you’ll be able to catch it and get Darkranite.

    ### Post-Game Rogue Mega Evolutions

    After the credits, additional battles unlock, featuring some Pokémon in their Primal Reversions rather than Mega forms. These battles involve specific Donut recipes: you can face Groudon and Kyogre in any order, then Rayquaza, and finally Zeraora—which only appears after Rayquaza’s fight. Each fight requires its unique Donut.

    #### Rogue Primal Groudon

    A two-stage battle. First, you face Groudon, which slowly stomps and launches fireballs and fiery winds. After defeating it, you’ll face Primal Groudon, which changes types to Fire/Ground and uses larger, more dangerous attacks like lava eruptions, especially during its charge-up. Prepare to avoid large area attacks and use your Pokémon wisely. Defeating it grants you the Red Orb to trigger Primal Reversion.

    #### Rogue Primal Kyogre

    Similar, two-stage fight. First, Kyogre attacks with large beams and waves. Afterwards, Primal Kyogre, which is Water-type, uses stronger versions of those moves plus a charge move that shoots multiple streams of water. Dodging the water streams while avoiding hazards is key. Victory results in obtaining the Blue Orb for Primal Reversion.

    #### Rogue Mega Rayquaza

    This final post-game challenge involves a two-stage fight with Rayquaza and Mega Rayquaza. It needs the Delta Old-Fashioned Donut. Rayquaza primarily uses close-range attacks and occasionally spawns twisters and meteor showers. Mega Rayquaza features larger, more hazardous waves, including a powerful attack where it summons a gigantic twister and drops meteors that can be dodged with careful timing. The battle is challenging but manageable by staying mobile, avoiding hazards, and using your Pokémon’s moves efficiently. Defeating it allows you to catch Rayquaza, but no Mega Stone is obtained since Rayquaza Mega Evolves using ‘Dragon Ascent’.

    #### Rogue Mega Zeraora

    Zeraora is the last Rogue Mega Evolution, requiring the Plasma-Glazed Donut. The fight is one long, tough battle with only one health bar. Zeraora is extremely mobile and attacks with electric hazards, including running across the arena and firing energy balls. Its charge-up move causes it to leap into the center and fire electrical charges, then move to the arena edges to set off zigzag patterns of hazards—avoid taking damage by hiding or quickly moving. After depleting its health, you can catch Zeraora and obtain Zeraorite.

  • Top Stats for a Scion of the Three Rogue in D&D: Completing and Solving

    Top Stats for a Scion of the Three Rogue in D&D: Completing and Solving

    The Son of the Three Rogues is one of the most aggressive and combat-oriented subclasses available for rogues in Dungeons & Dragons. Found in the Forgotten Realms Player’s Guide, this subclass draws dark strength from the Dead Three—Bane, Bhaal, and Myrkul—turning you into a relentless, bloodthirsty hunter on the battlefield.

    Unlike traditional rogues who focus on stealth and careful positioning, the Son of the Three thrives in the chaos of close combat. They teleport between fallen enemies and deal devastating damage to wounded opponents. If you want to play a rogue that feels more like a horror movie slasher than a sneaky thief, this subclass is a good fit.

    Son of the Three Subclass Overview

    The Son of the Three gets its power from three evil gods of the Forgotten Realms—Bane, Bhaal, and Myrkul. Your character can be a devoted cultist pledged to these dark deities, or you could be cursed with their power against your will, similar to the Dark Urge in Baldur’s Gate 3.

    In Baldur’s Gate, underground cults to Bane (tyranny), Bhaal (murder), and Myrkul (death) often employ agents of this subclass. Outside the city, ruthless thieves’ guilds like the Shadow Thieves of Amn and Xanathar’s Guild might hire a Son of the Three for especially violent contracts.

    Here’s a summary of the subclass’s features:

    Feature Level Details
    Bloodthirst 3rd Deals extra damage to bloodied enemies with your Sneak Attacks, equal to half your rogue level. Additionally, it grants a reaction that lets you teleport up to 30 feet when an enemy you can see drops to zero health, allowing a melee attack afterward. You can use this reaction a number of times equal to your Intelligence modifier, resetting after a long rest.
    Dread Allegiance 3rd At each long rest, you choose one of the three gods to gain a resistance and an ability until your next rest. Choices include:
    • Bane: Psychic resistance and the Minor Illusion cantrip
    • Bhaal: Poison resistance and the Blade Ward cantrip
    • Myrkul: Necrotic resistance and the Chill Touch cantrip |
      | Strike Fear | 9th | Gains the Terrify ability: make a Wisdom saving throw against a target; on failure, the target becomes frightened for 1 minute, and you have advantage on attack rolls against it. |
      | Aura of Malevolence | 13th | Creates an aura that deals damage equal to your Intelligence modifier to enemies within 10 feet at the start of your turn, ignoring resistances. |
      | Dread Incarnate | 17th | Gains:
    • Murderous Intent: treat any 1 or 2 on Sneak Attack dice as 3
    • Battle Tyrant: advantage on attack rolls against frightened enemies |

    Best Ability Scores for a Son of the Three Rogue

    This subclass requires unusual focus on Intelligence along with Dexterity. Dexterity remains your main ability—affecting attack rolls with finesse weapons, your Armor Class, initiative, and key skills like Stealth and Acrobatics. It’s recommended to raise Dexterity to 20 by level 8 or 12.

    However, Intelligence plays a unique role: it determines how many times you can use Bloodthirst per long rest, and at level 13, it influences the damage of your Aura of Malevolence. Aim for at least 14-16 Intelligence. An Intelligence of 16 grants three Bloodthirst uses per rest and a +3 damage bonus for your aura, which is very beneficial. If you want to fully commit to this subclass’s thematic, boosting Intelligence to 18 is worth considering, though it may require sacrificing elsewhere.

    Constitution is important too, since your aggressive playstyle puts you in melee often, and your teleportation encourages diving into the thick of battle. Aim for at least 14 Constitution, with 16 being optimal in tougher campaigns.

    Wisdom, Charisma, and Strength are less vital. Wisdom affects Perception and Insight but can be proficiency-based. Charisma influences social skills but is less relevant for a violent, intimidation-focused character. Strength is mostly useless since you rely on finesse weapons.

    Best Species for a Son of the Three Rogue

    Several races complement this aggressive, intelligence-focused playstyle:

    Species Details
    Human Humans are versatile and reliable. They can quickly boost both Dexterity and Intelligence with their flexible ability score increases. Their extra skill proficiency, thanks to the Human Adaptability trait, makes them excellent for maximizing rogue skills and versatility.
    High Elf Their natural bonuses to Dexterity and Intelligence match well with your main stats. The bonus cantrip adds magical utility, and Darkvision helps in darkness or shadowy environments.
    Tiefling Their innate connection to dark forces mirrors the theme of the Dead Three. They gain resistance to fire damage, which is unique compared to your other resistances, and many variants boost Intelligence. The Thaumaturgy cantrip enhances intimidation.
    Shadar-kai These elves from the Shadowfell are perfect thematically. Their Blessing of the Raven Queen allows teleportation and damage resistance, which synergizes well with Bloodthirst teleportation. Natural necrotic resistance is a thematic bonus, fitting for a servant of death.

    Best Backgrounds for a Son of the Three Rogue

    Backgrounds provide skills, tools, and story hooks that can flesh out your character’s history:

    Background Details
    Soldier Offers proficiency in Athletics and Intimidation, and knowledge of land vehicles. While Athletics isn’t typical for rogues, it can be useful for grappling or jumping. Intimidation plays into your fearsome presence, especially combined with Strike Fear and Aura of Malevolence. Your military rank can be flavorfully aligned with authority earned through intimidation or violence.
    Sage Highlights your focus on Intelligence. Grants proficiency in Arcana and History, fitting for a scholar or dark knowledge seeker. The Researcher feature offers clues to locate forbidden knowledge about the Dead Three, supporting roleplay possibilities of delving into dark lore or gaining power through forbidden study.
    Criminal The most straightforward choice, offering proficiency in Sleight of Hand and Stealth—essential rogue skills. The Criminal Contact feature gives connections to the underworld, suitable for dealings with cults or criminal guilds tied to the Dead Three, especially in Baldur’s Gate.

    This setup emphasizes a playable character that is both deadly and thematically linked to dark gods, with a focus on combat dynamism, strategic teleportation, and dark lore.

  • Completing a Waxwork Rogue in DND: A Guide to Solving It

    Completing a Waxwork Rogue in DND: A Guide to Solving It

    The waxwork rogue in Obojima: Tales from the Tall Grass is a standout option in the fifth edition of Dungeons & Dragons, offering a unique and dynamic subclass. These rogues, animated by mysterious wax magic, go beyond traditional stealthiness; they are adaptable, cunning, and equipped with a range of intriguing abilities.

    With capabilities that allow them to shape wax and wield fire, waxwork rogues embody versatility and creativity. Whether you envision them as simple messengers or as elaborately themed spies, this guide will assist you in crafting a character that excels in combat while making a memorable impact at the gaming table.

    Highlights of the Waxwork Rogue

    The essence of a waxwork rogue lies in their Enchantments and Wick Points. By level three, you’ll have the opportunity to learn several Enchantments fueled by these points, which increase as you climb higher levels.

    Aside from Enchantments, which we’ll delve into later, this class also includes features focused on light production and enhanced Sneak Attacks:

    • At third level, you acquire the cantrips Dancing Lights and Produce Flame.
    • At ninth level, you can boost your Sneak Attack damage by adding a D6, drinking up to four Wick Points in the process.
    • At 17th level, you can create a unique candle (usable once per long rest) that grants immunity to fire damage and reduces the cost of Enchantments by one.

    Top Enchantments for Waxwork Rogues

    Upon reaching level three, you will select three Enchantments, with two more available at levels five, ten, and fifteen. You can replace old Enchantments when you gain new ones, and by level 13, some Enchantments get upgraded versions.

    If you don’t know any of the upgraded Enchantments by level 13, you can learn one for free. However, it may be smarter to replace an existing one for balance.

    Every Enchantment consumes a certain number of Wick Points, and the amount you have equals your rogue level. Similar to a monk’s resource management, these points refresh during short or long rests.

    Level Three Enchantments

    There’s a myriad of Enchantments available for waxwork rogues, making it crucial to assess your build and team dynamics before making selections. With only three Wick Points at this stage, some specific Enchantments really shine across various rogue builds.

    Delicacy is an excellent supportive Enchantment that takes care of your party’s food needs and allows members to heal a D6 as a bonus action. Priced at just one Point, it’s a perfect way to expend any leftover Wick Points during a short rest.

    Flooding Abundance may require setup but is a fantastic way to manipulate the battlefield, creating a 15-foot-wide area of difficult terrain for only two Wick Points. This area is flammable, providing a means to inflict area damage if needed.

    Lastly, Maker’s Mark serves as a straightforward offensive tool, particularly with weapons that have the Vex property. Weapons with this property grant advantage on your next hit, enabling you to deliver Sneak Attack damage without needing allies nearby.

    Level Five Enchantments

    By level five, waxwork rogues excel as crowd-control specialists through the Detonate Enchantment, which inflicts 2D6 fire damage and 2D8 thunder damage in a 20-foot area. While you could switch out Flooding Abundance for this option, combining both yields significant fire damage synergy.

    While Detonate costs three Wick Points, you can choose to spend additional points to amplify the fire damage.

    For players leaning towards support, Shielding Seal provides temporary hit points. Like Delicacy, it’s an effective use of leftover Wick Points, but you can only maintain one Seal at a time.

    Level Ten Enchantments

    At level ten, you’ll gain access to Consuming Flame, which acts as a specialized version of Counterspell. This Enchantment allows you to hold onto spells of level three or lower and cast them within 24 hours before the magic dissipates. This is also a great level to consider adding Wick Whip, which creates a flaming whip that deals 3D4 damage and allows you to use your Dexterity modifier for both attack and damage rolls.

    Level Fifteen Enchantments

    Your best Enchantments should already be in your arsenal by this point, with some receiving upgrades at level 13. You could explore additional unique options like Iron Seal for securing doors or items and Bocha Glue Wax for bonding items together.

    Best Species Options

    When constructing a character, it’s useful to pick a species that enhances sneaking abilities. Halflings excel at hiding, making them advantageous for rogues. For a thematic affinity with fire, tieflings with infernal legacy traits offer access to additional fire spells and resistance to fire damage, reducing risks if you accidentally trigger some explosive enchantments.

    Optimal Stat Placements

    Similar to regular rogues, waxwork rogues benefit greatly from a focus on Dexterity and Constitution. Choose between Wisdom or Charisma as a third priority to help with common saving throws against harmful effects you might encounter.

    Recommended Starting Equipment

    You won’t need to stress about maintaining a supply of wax to enact your Enchantments, but it’s wise to check with your Dungeon Master regarding any specific items, like parchments or signet rings, that might feature in your abilities.

    The basic rogue equipment will suffice, but keep in mind that waxwork rogues perform best in close quarters. Ranged options are helpful, but prioritize melee weapons for combat scenarios.

    Recommended Feats and Backgrounds

    When developing a 2024 class character, it’s important to select your background with care, as your stats derive from it. The Soldier background provides the necessary Dexterity and Constitution, while the Savage Attacker origin feat greatly enhances your combat damage.

    If you often employ melee strategies, consider the Charger feat, which allows you to dash further and deal more damage after charging, plus even push the target back if they are not significantly larger than you.

    Best Multiclassing Options

    Multiclassing as a waxwork rogue requires careful thought, especially since it may lead to the loss of valuable Wick Points. Seek options that don’t demand excessive commitment. For example, choosing the ranger class is ideal, as it grants access to Hunter’s Mark as early as level one, complementing all your standard damage operations.

  • Completing Rogue Exiles in Path of Exile II: How It Works

    Completing Rogue Exiles in Path of Exile II: How It Works

    Path of Exile 2: Dawn of the Hunt was launched on April 4, 2025, marking the beginning of the game’s first league by Grinding Gear Games. This league introduced a new class called Huntress, several new Ascendancies for existing classes, new support gems, and innovative gameplay mechanics for players to explore.

    In addition, the league featured a new element known as Rogue Exiles, which play a role in the endgame progression. If you’re curious about Rogue Exiles and their significance in the game, this guide will provide you with all the essential information.

    Understanding Rogue Exiles

    If you’ve played Path of Exile 2, you know the story revolves around an exile who escapes execution and fights against the evils plaguing the kingdom. You assume the role of a hero, using your abilities for good.

    However, there are also other exiles who exploit their powers for selfish purposes. These are the Rogue Exiles, who possess skills, abilities, unique items, and builds similar to yours, but contrary to your intentions, they are hostile and will attack you on sight.

    Each Rogue Exile stands out, with Grinding Gear Games introducing 12 different profiles in Dawn of the Hunt. These exiles are NPCs with AI that is significantly more sophisticated than that of regular enemies.

    The unique items equipped by the Rogue Exiles will be displayed beneath their health bar. This allows you the choice to engage or bypass them based on whether they possess gear that suits your playstyle. However, be aware that those with exceptional equipment can be notably harder to defeat.

    When you confront them, they employ advanced movement techniques along with dodging and rolling to evade your attacks, using smart strategies to deal damage. These Rogue Exiles possess builds just like you and any other player on the server, meaning they have access to similar abilities and items.

    Winning a battle against them means acquiring all the gear they are wearing, but if you fall in combat, they will escape with your potential loot.

    Fighting Rogue Exiles is the closest experience to PvP this game offers.

    Locating Rogue Exiles

    Maps in Path of Exile 2 endgame.

    Rogue Exiles can only be encountered in the endgame, once you’ve completed the campaign and transitioned to maps. You’ll need to progress through Act 1 to Act 3 and then revisit in Cruel Mode to unlock maps.

    There isn’t a specific guide for encountering them as they appear randomly while traversing maps. The best way to find Rogue Exiles is to thoroughly explore each corner of a map during the endgame grind and hope to come across them.

    Do Rogue Exiles Drop Fixed Items?

    Rogue Exile fight in Path of Exile 2.

    Yes, Rogue Exile drops are predetermined, with developers setting specific builds for these characters. They can drop standard Magic Gear or occasionally some very rare Unique items, but there’s no guarantee regarding what you will receive when they spawn.

    This concept isn’t new, as Rogue Exiles were also featured in the original Path of Exile, often reflecting the current meta that actual players used.

    It’s worth noting that the builds of Rogue Exiles will change with each new league release.

  • Unlocking Rogue, Warlock, & Sorcerer in Heroes of Hammerwatch 2

    Unlocking Rogue, Warlock, & Sorcerer in Heroes of Hammerwatch 2

    Quick Links


    In Heroes of Hammerwatch 2, players can choose from seven classes. Four of these are available right from the start, while the other three can be unlocked by completing specific tasks during gameplay. Once you level up your class to level 10 and upgrade to a Tier 3 Guild Hall, you can also unlock class Masteries.

    Customization opportunities are abundant in the game. By equipping various weapons, improving specific skills, and gaining new upgrades, you can further tailor your character’s setup. If you want to play as a Rogue, Warlock, or Sorcerer, you’ll need to follow the steps provided below to unlock them.


    How To Unlock The Rogue

    The Rogue can be located in the Dark Caves 2. Since the game features partially randomized levels, the Rogue’s exact location may vary with each run. However, you can always find them somewhere in Dark Caves 2 until you successfully unlock this class. The Dark Caves are accessible after completing Forest 1 and Forest 2.


    How To Unlock The Warlock

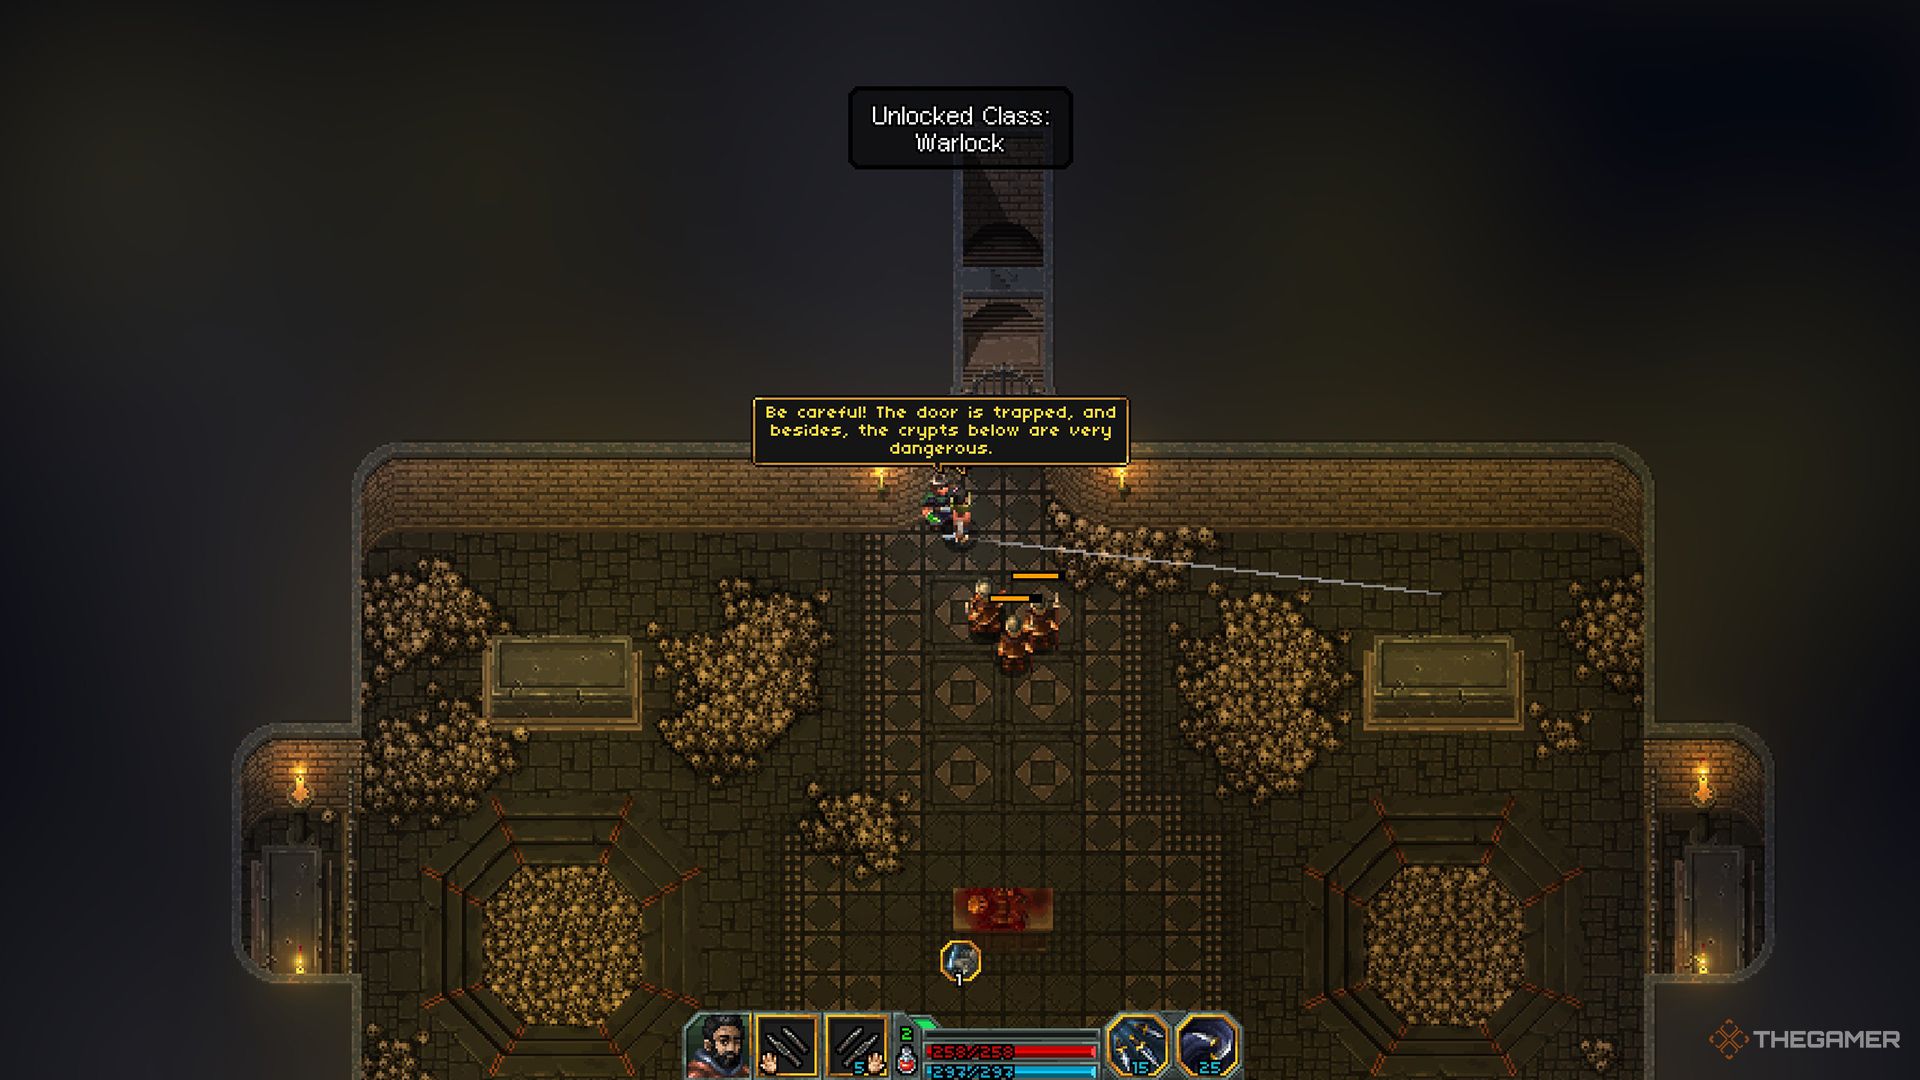
    To find the Warlock, head to the Temple. They will be positioned just outside the door that leads to the exit towards Crypt 1. You can access the Temple after finishing Forest 3, which comes after you leave the Dark Caves.

    Unlocking the Warlock


    How To Unlock The Sorcerer

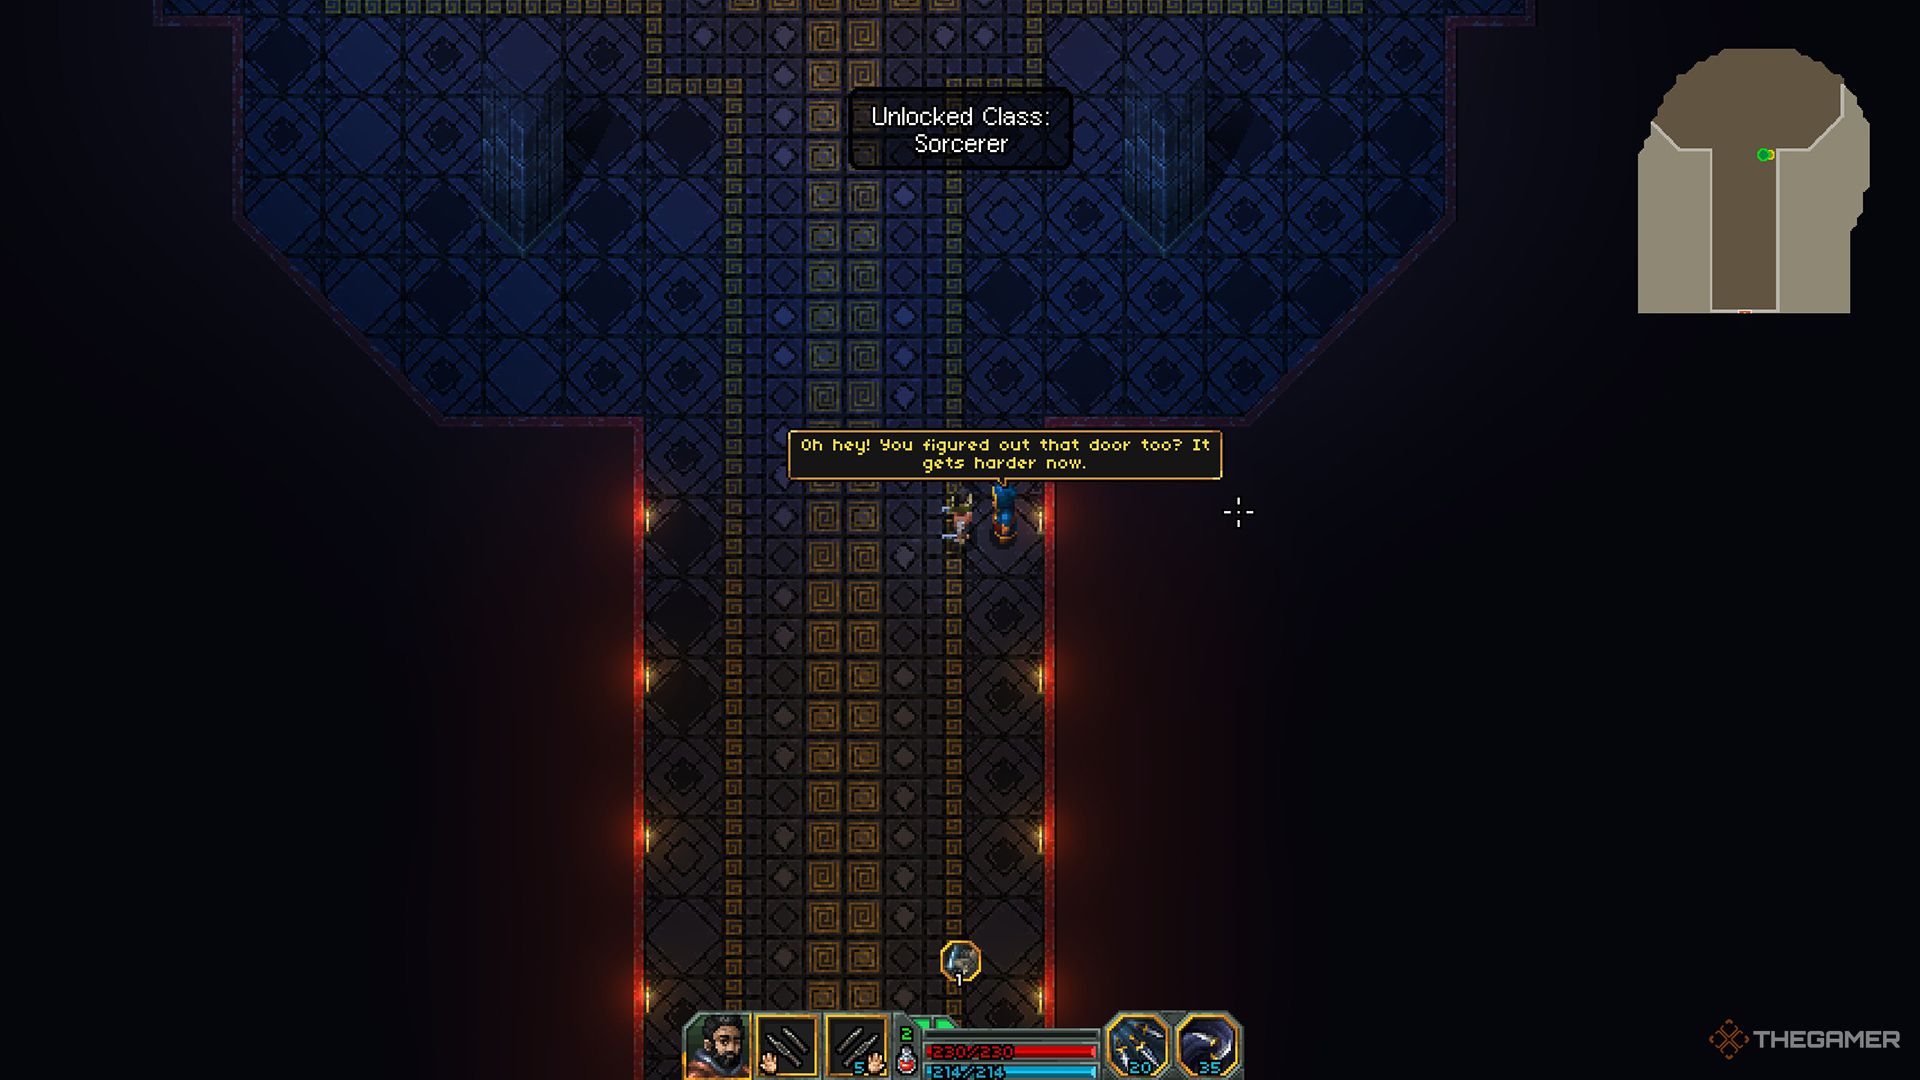
    First, you need to unlock the Architect, who is stationed in Crypt 1 within a spacious room filled with adversaries and ice turrets. Once you eliminate the enemies, interact with the Architect to bring them back to your town.

    Afterward, construct the Architect’s building for 25 stones and 25 magic crystals. Doing this will not only let you access the Architect’s services but also open the path to the Dark Citadel.

    On your next gameplay run, explore Forest 1 to find the entrance to the Dark Citadel, previously sealed. With the Architect now available, they will unlock the door for you. Once inside, you’ll encounter the Sorcerer right away. Speak with them to make this class accessible.

    Unlocking the Sorcerer


    Now you’re set to embark on your adventure with the newly unlocked classes!

  • Locating the Rogue Necromancer in Dragon Age: The Veilguard

    Locating the Rogue Necromancer in Dragon Age: The Veilguard

    If you’re in the mood for something eerie, Dragon Age: The Veilguard offers a variety of chilling quests, including the House of the Dead. Emmrich and his skeletal assistant, Manfred, are on a mission to locate a rogue necromancer hidden inside a vast haunted mansion, and they’ll need your assistance to confront the dangers lurking there.

    Venture into the haunted estate and enter the mansion to begin your quest, but don’t hesitate to explore outdoors first. There’s an optional boss you can face in a nearby mausoleum before heading inside. Just be prepared — once inside, you’ll encounter numerous spine-tingling skeletons waiting to give you a scare.

    Emmrich is a necessary companion for this quest, so you’ll have an open slot for another companion of your choice.

    How to Find the Rogue Necromancer

    For those eager to spend more time with Emmrich, the House of the Dead presents the perfect opportunity to enjoy a thrilling journey through a haunted mansion.

    Although this quest doesn’t focus on romance, you’ll get plenty of chances to appreciate Emmrich’s company as you both work to liberate trapped spirits while gearing up for an intense confrontation.

    Your adventure kicks off at Blackthorne Manor after a brief cutscene with Emmrich, as you step into the courtyard.

    Move toward and enter the mansion through the front door, then follow your marker to the Grand Foyer and head up the stairs on your right.


    Continue following your marker down the hallway to the Blackthorne Library, where your objective will update, indicating you need to look for signs of necromancer activity.

    Drop down and approach the door adorned with glowing green seals on either side.

    How to Open the Blackthorne Library Door

    Emmrich will suggest that you head southwest and northeast based on the direction the Hand of Glory points.

    From the door, take a left into the Abandoned Study.

    Follow the stairs up to the Northeast Wing until you reach the Master Bedroom, where you’ll encounter a tortured green skeleton.

    After some dialogue, you’ll face several Frenzied Shades (weak to Cold, resistant to Necrotic damage).

    Once you defeat them, Emmrich will release the trapped spirit in the room and urge you to find the others.

    Return to the Blackthorne Library and backtrack to the other side of the Grand Foyer to enter the doorway leading to the Upper Halls.

    Pass the Ruined Balcony and step into the Guest Room, where you’ll find a second tortured spirit for Emmrich to liberate.

    This time, you must defeat a gathering of Devouring Shades to assist Emmrich in freeing this spirit.

    Once this spirit is freed, head back to the Blackthorne Library, where you can unlock the previously sealed door to reveal a portal to The Fade.

    Inside The Fade, you will find a door that requires you to deliver a wisp to the receptacle next to the door to open it.

    Follow the concealed path on the right to the wisp, then place it in the receptacle to unlock the door.

    Proceed along the path and eliminate any Darkspawn you encounter, following your marker down a slope and up a ledge until you trigger a cutscene.

    At this point, you’ll meet Johanna Hezenkoss, the rogue necromancer and an acquaintance of Emmrich.

    Johanna will taunt you before vanishing, leaving you to deal with a swarm of enemies, including Despair Demons (weak to Fire and resistant to Cold damage).

    After defeating the enemies, try to free the final spirit with Emmrich.

    Unfortunately, Johanna has captured the spirit’s essence in a lantern before escaping, so you must leave The Fade and pursue Johanna Hezenkoss.

    How to Escape The Fade

    Follow the marker until you discover a candle nearby. Emmrich will comment on it and ask you to collect more candles to aid in escaping The Fade.

    Find a second candle held by a statue in the eastern part of the area, grab it, and take both candles to the marked pedestals.

    Emmrich will construct a bridge allowing you to reach the portal and escape The Fade.

    Confront Johanna

    Upon returning to the mansion, you’ll hear Johanna’s voice, yet she won’t be visible.

    Head straight to the Main Hall, following your marker, and enjoy the ensuing cutscene.

    After Johanna’s speech and her subsequent escape, you’ll have to fight Rampant Ego, a modified Pride Demon accompanied by a group of Lesser Pride Demons.

    Pride Demons and Rampant Ego are both weak to Necrotic damage and resistant to Electric damage.

    Be cautious not to get cornered, and prioritize targeting your enemies’ weaknesses to keep them at bay.

    Concentrate on Rampant Ego’s shield and prevent it from fully recharging.

    As soon as all the enemies are defeated, you’ll have time to explore the area and can chat with Emmrich when you’re ready.

    What Rewards Do You Get from House of the Dead?


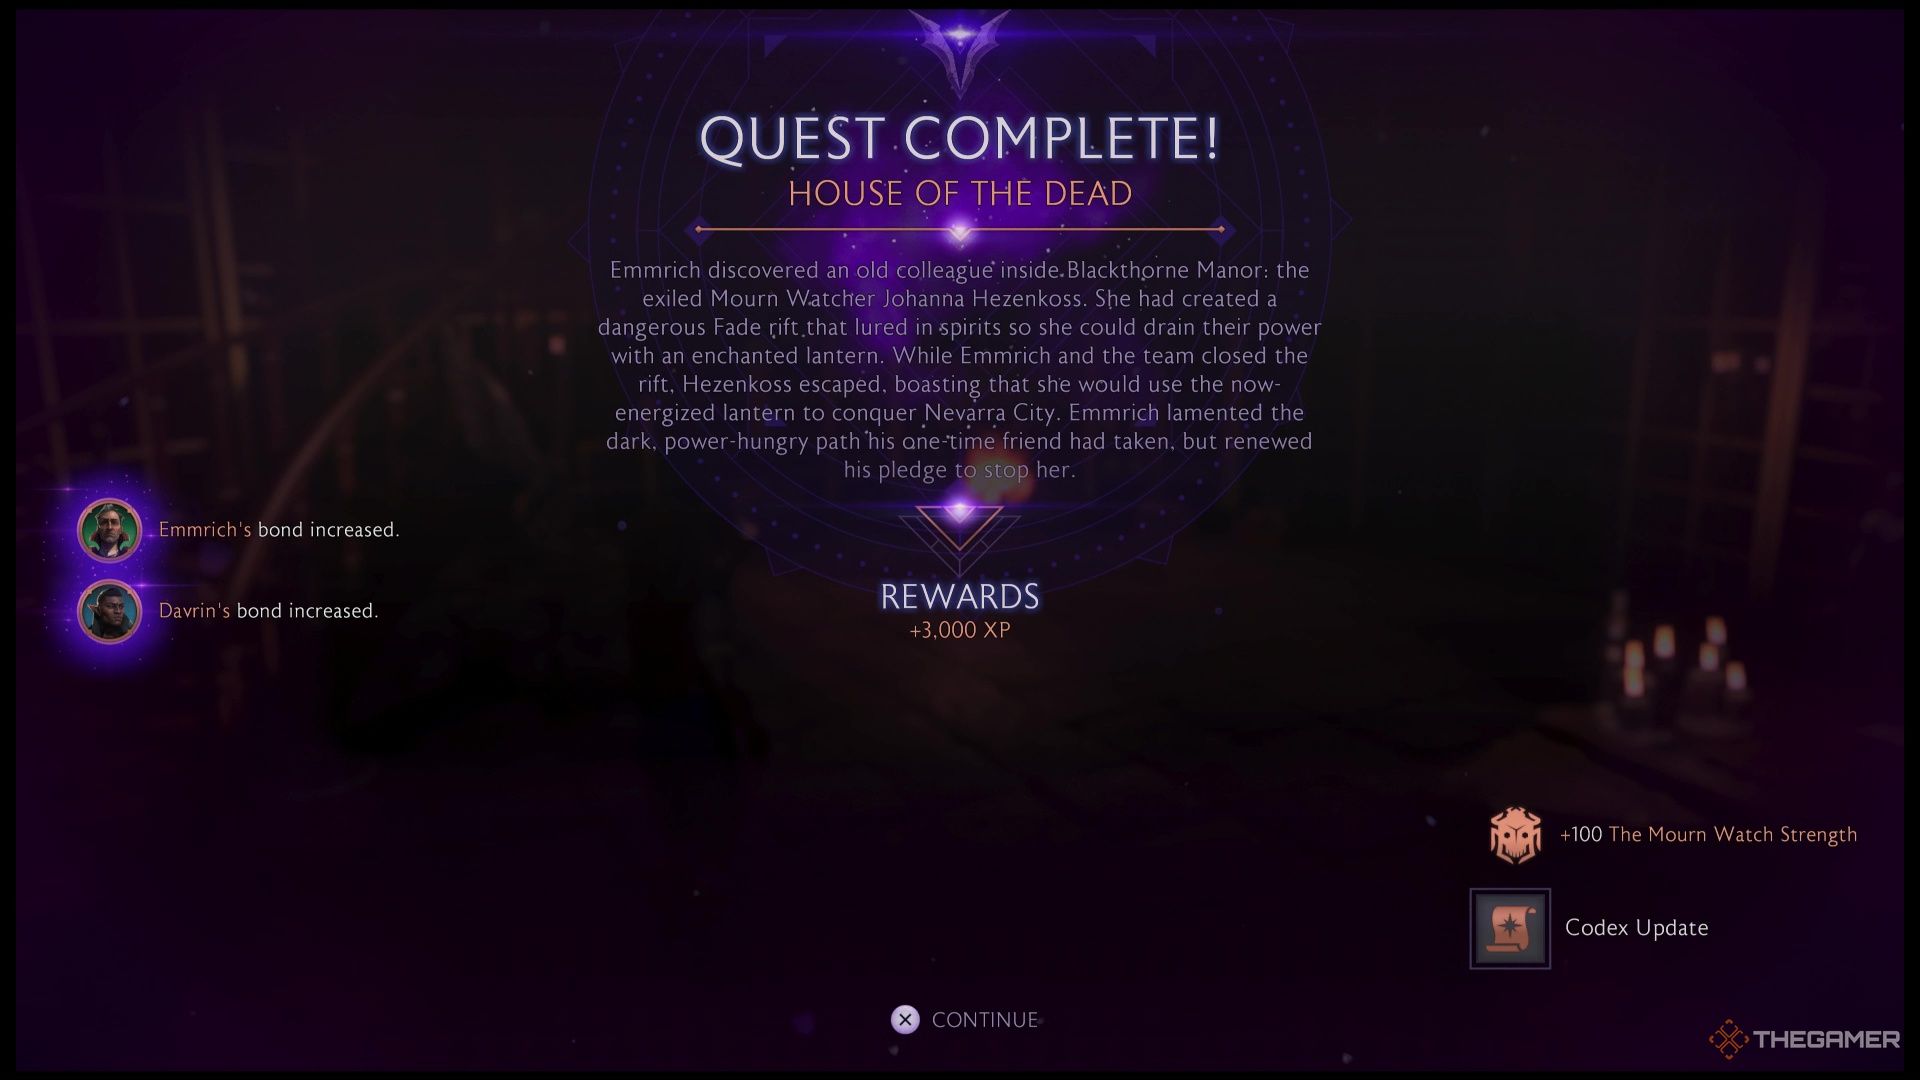
    The House Of The Dead Rewards In Dragon Age: The Veilguard.

    Once you’ve wrapped up your conversation with Emmrich, you will complete the House of the Dead quest and receive the following rewards:

    • 3,000 XP
    • Increased bonds with both companions who accompany you

    Use this quest to strengthen your relationship with your favorite companions alongside Emmrich, enhancing your connections in the game.