الوسم: quests

  • How to Complete All Fortnite Chapter 7, Season 2 Quests and Solving Tips

    How to Complete All Fortnite Chapter 7, Season 2 Quests and Solving Tips

    This season of Fortnite offers a fun way to level up and earn more rewards for your battle pass, with thousands of XP available. Each weekly quest gives you 20,000 XP, and completing several at once can earn you an additional 35,000 XP bonus.

    Starting from week one, the weekly quests will take you around the entire map. These quests introduce you to different gameplay features, characters, and more. Here’s everything you need to know to complete every Fortnite quest right now.

    All Quests in Fortnite Showdown

    This season, you’ll find daily quests that reward 1,000 XP each. Completing all stages of the Daily Bonus Goal card awards an extra 25,000 XP, and finishing a new card each day grants an additional 10,000 XP.

    There are also milestone quests that award 5,000 XP each. Many of these are passive and will be naturally completed as you play through the season.

    Weekly quests provide 20,000 XP each. When you finish four of these quests, you’ll earn an extra 35,000 XP. These quests tend to be more complex and may require some explanation.

    Week 1 Kickstart Quests

    This week’s quests include various tasks like visiting specific locations or interacting with objects around the map:

    • Visit 3 Zero Point Shards for The Foundation
      Find the giant purple crystals at Squiggly Shores, Frigid Fortress, and north of New Sanctuary. Jump into each shard to be rifted into the air, collecting three Zero Point crystals to use.

    • Power on a Holotable to help The Foundation connect to the Seven Secure Server
      Located between Ripped Tides and Humble Hills, New Sanctuary, Sandy Strip, and Wonkeland. Interact with the table to activate it.

    • Use the Jam Track player
      Open your emote wheel and choose any Jam Track to listen to while playing.

    • Land at Frigid Fortress, Dark Dominion, and New Sanctuary to assess weak points
      Visit each location—this can be done across different matches. Landing at Frigid Fortress and heading south or at New Sanctuary and heading north works well.

    • Use the Skyline Deployer three times
      Look for these mobility items in chests or on the floor. Each has three shots before going on cooldown.

    • Collect 25 items from chests to grab a present for The Foundation
      Regular gameplay should make this straightforward.

    • Headshot 5 enemy players
      Use scoped weapons like DMRs or sniper rifles, or use shotguns for close-range kills.

    • Collect 500 ammo
      Easily completed through playing.

    • Deal 250 damage to enemy players before the first Storm Phase closes
      Focus on busy areas such as Dark Dominion or Frigid Fortress to accomplish this over several matches.

    Milestone Quests

    Milestone quests have 20 stages, giving you plenty of opportunities to earn 5,000 XP with each completed milestone. There are six milestones to complete:

    • Thank The Bus Driver 10 times
    • Eliminate 25 players
    • Spend 500 Gold
    • Survive 25 Storm Phases
    • Deal 5,000 damage to opponents
    • Outlast 750 players
  • All Quests & How to Solve Them in Fortnite: Chapter 7, Season 1

    All Quests & How to Solve Them in Fortnite: Chapter 7, Season 1

    There are many new quests to complete in Fortnite Chapter 7, Season 1, and each one rewards you with a significant amount of bonus XP. Finish your quests and gather your XP to unlock your favorite skins in this season’s battle pass.

    The Weekly quests and The Bride quests introduce new items, weapons, and points of interest on the island. The Battle Bus Quests give you more insight into the Fortnite story. Additionally, there will be new Battle Pass quests that help you unlock fresh styles for your cosmetics.

    How to Complete All Weekly Quests

    Week 1

    • Travel 500 meters while flying in a Wingsuit. Jump, glide, or float over several matches if needed, but ensure you accumulate 500 meters of flight time.
    • Land in a named location three times from a Hot Air Balloon. Find a Hot Air Balloon on the mini-map, hop on, and stay until you arrive at a named location.
    • Travel 500 meters while boosting in a vehicle. Boost up hills or off cliffs across matches until you reach 500 meters of boost time.
    • Outlast 40 players without storm damage. Stay away from storm edges and monitor storm movements, as there are no more audio warnings.
    • Eliminate 3 opponents with the Iron Pump Shotgun or Grenades. These weapons can be found in chests, vending machines, or on the ground.
    • Travel 250 meters while sprinting with an assault rifle equipped. Make sure to have an AR in hand when running between locations.
    • Break 10 glass windows in towns or cities in one match.

    Week 2

    • Defeat 3 bosses by collecting their tokens. Use the map guide to locate bosses quickly.
    • Destroy 15 objects with explosions, such as fences, trees, or shelves, using grenades or other explosives.
    • Eliminate 5 opponents with Twin Hammer Shotguns—these can be NPCs or players.
    • Collect three different weapons at Painted Palms, ensuring they are not the same as those you just dropped.
    • Blow up a vehicle and then sprint away before it explodes.

    Week 3

    • Complete all quests for Cat Holloway in two parts; the first half in week 3, the rest in week 4.
    • Meet with Cat Holloway in Humble Hills to start her weapon practice.
    • Eliminate opponents using hired characters three times at Latte Landing, Battlewood Boulevard, Humble Hills, Bumpy Bay, or Painted Palms.
    • Search 15 ammo containers for Cat Holloway across matches.
    • Hit Shooting Gallery targets at Wonkeeland 15 times for a loot bonus.
    • Deal 500 damage to opponents while aiming down sights with sighted weapons.

    Week 4

    • Finish all Week 3 and 4 quests for Cat Holloway.
    • Collect 10 rare or better weapons for her (blue or purple).
    • Use a Self-Revive device while knocked out, which is easy in solos by getting downed in the storm after collecting one.
    • Mark healing items, including medkits, shields, bandages, and Self-Revive kits, for your squad.

    Week 5

    • Talk to two fans and sign autographs at TIPTOP Terrace, Lethal Labs, Classified Canyon, or Painted Palms.
    • Build or destroy five objects in ten seconds, achievable by smashing small items or quick building in build mode.
    • Hit opponents 10 times while hiding in a bush—can be one person repeatedly or multiple players.
    • Ride the Ferris wheel at Wonkeeland for fun and extra points.
    • Headshot an opponent with a sniper rifle in a single shot, easiest against NPCs.

    Week 6

    • Defeat five players after they become bosses by following their map markers.
    • Deal 200 damage to opponents within five seconds of using Stealth Splash.
    • Land at Painted Palms or Ripped Tides and interact with NPCs three times, possibly over multiple matches.
    • Scout three new locations for Kingston marked on your map, such as south of Clawsy Lodge or east of Classified Canyon.
    • Search 15 chests before the first storm closes for quick loot.

    Week 7

    • Destroy 100 objects in the Reboot Van while in a Duo or Squad game by driving around and hitting objects.
    • Travel 500 meters in a vehicle in one match.
    • Hire three new talent NPCs by visiting their marked locations.
    • Hit five opponents with a sniper shot.
    • Spread five newspapers about Kingston’s new movie—find these at designated locations and visit multiple spots.

    Week 8

    • Complete all quests for Carina to uncover her story.
    • Deal 250 damage while airborne, such as jumping or falling from high places.
    • Survive ten storm circles without taking damage by avoiding confrontation early on.
    • Emote near or as Human Bill for an extra style.
    • Eliminate a Henchman, whether following or summoned by a boss.

    Week 9

    • Hit opponents 50 times with a Holo Rush SMG, either repeatedly against the same target or different ones.
    • Destroy 25 objects at Tip Top Terrace, using vehicles or built structures.
    • Reboot a teammate or hit a player with a Reboot Van.
    • Deal 500 damage with epic or better weapons, especially from rare blue chests or bosses.

    Week 10

    • Help Jones by completing all his quests.
    • Eliminate five opponents with a Lock-On Assault Rifle, including NPC enemies.
    • Land in a hot air balloon from the bus for a quick and fun descent.
    • Purchase three items from vending machines, ensuring you have enough gold.
    • Use an Ascender or Zipline in two different matches, commonly found at Battlewood Boulevard.

    Week 11

    • Destroy 20 objects at the landing site in Classified Canyon to make room for new allies.
    • Deal 250 damage to opponents while under low gravity effects, like using special items or environmental effects.
    • Complete three job board quests at any named locations.
    • Hit opponents 10 times within ten seconds after landing in a Wingsuit, either one opponent repeatedly or multiple targets.

    How to Complete All Battle Bus Quests

    These quests involve assisting Dummy in rebuilding the Battle Bus, which typically transports players from spawn to the main map. Completing quests grants bonus XP, a Lil’ News Van emote, and shiny decals for your vehicle.
    Each quest rewards 10,000 XP, with six quests available initially and more released within the first week.

    • Destroy 35 objects while in a vehicle, either as driver or passenger, using any vehicle, preferably a 4×4.
    • Collect four Battle Bus wheels from Pump N’ Run gas stations, located east of Wonkeeland, south of Sandy Strip, west of Innoloop Labs, and east of Ripped Tides.
    • Hit an opponent from above in a hot air balloon, accumulating damage from NPCs or players.
    • Find and collect 20 Bus parts from loot containers like chests, supply drops, or ammo boxes.
    • Talk to Dummy at Ripped Tides about the broken Battle Bus.
    • Destroy three dumpsters outside buildings to gather custom Battle Bus parts.
    • Thank the Bus Driver by pressing the interact button while on the bus before landing.
    • Deal 100 damage to opponents from below, preferably from high ground, using weapons or environmental angles.
    • Travel 200 meters while airborne in a vehicle, boosting over cliffs for maximum distance.

    How to Complete All Bride Quests

    These quests revolve around The Bride NPC.

    • Visit six different named locations while seated in a vehicle, meaning you don’t need to drive, just stay onboard.
    • Obtain a Forsaken Vow Blade from a Rift and defeat Gogo and Yuki at that location.
    • Defeat ten opponents using the Forsaken Vow Blade, employing its slash and dash attacks against NPCs or players.
    • Hit six opponents with the Vengeance Dash ability.
    • Survive in the top 25 players across four matches.
    • Purchase a service from The Bride at her spot in Sandy Strip to complete her questline.

    How to Complete All Battle Pass Quests

    By completing Battle Pass quests, you unlock extra cosmetics for Carter Wu via Fortnite Reload and additional styles for Cat Holloway via Blitz Royale. Bonus rewards like the Dark Voyager (Reality Redacted) costume generally unlock around level 85 and are tied to Battle Royale quests.

    First, unlock all items in the Battle Pass character pages. Once done, the special quests for each mode will be available, allowing you to earn extra styles.

    Cat Holloway Blitz Royale Quests

    • Emote at six different named locations across three matches.
    • Collect three Mythic or Exotic weapons from defeated players, which may require compromising and third-party elimination.
    • Enter a Rift within ten seconds of hitting a player.
    • Keep items of four different rarities (gray, green, blue, purple, gold).
    • Deal 1,500 damage with a mythic or exotic weapon within 15 meters.
    • Headshot ten players with Epic or higher rarity weapons.
    • Achieve a Victory Royale to complete the set.

    Carter Wu Reload Quests

    • Hit three players within 15 meters after bursting through a door.
    • Eliminate two players within ten seconds of mantling.


    • Deal 500 damage to players while airborne or sliding.
    • Score ten headshots while aiming down sights.
    • Deal 2,000 damage with shotguns or SMGs over multiple matches.
    • Eliminate two opponents consecutively without reloading.
    • Place in the top ten without using Rebooting.
  • How to Complete All Heartopia Winter Frost Season Quests and Solve Them

    How to Complete All Heartopia Winter Frost Season Quests and Solve Them

    For the next six weeks, residents of Heartopia will enjoy new quests and rewards each week, with many adorable winter-themed items to unlock. While some Winter Frost Season tasks can be completed through daily activities, others are more specific.

    Finish all the quests during the Winter Frost Season to earn Fashionwave Points (which are called acorns) and unlock rewards in the Winter Frost Season pass. Here’s everything you need to know about completing the quests during this season.

    All Weekly Winter Frost Season Quests

    There are two types of quests during this period: weekly quests and Fashion Activity challenges, where players can earn Fashionwave Tokens.

    To access your Winter Frost Quests, claim your Fashionwave Points (acorns), and level up your reward pass, click on the snowman icon at the top right corner of the screen. There, you’ll find weekly challenges, Fashion Activity challenges, and your rewards.

    New quests are released every week during the Winter Frost Season, so make sure to log in often.

    Completing each quest grants small rewards. Additionally, for every 1, 3, 5, and 7 quests completed in a week, you earn extra Fashionwave Points:

    No. of Quests Completed Fashionwave Points Earned
    1 100
    2 125
    3 150
    5 300
    7 500

    Week 1 Quests

    One example includes making five baits using apples at a workbench, which rewards you with Chef’s Special Salad. Other quests involve catching insects (if you’ve unlocked the insect-hunting hobby), scanning birds (with the birdwatching hobby), completing puzzles purchased from Ka Ching, gathering rare timbers from large trees in your neighborhood, or shopping at various stores in the Winter Utopia area.

    Some specific tasks include:

    • Make 5 Bait: Craft five baits with apples at the workbench to earn a Chef’s Special Salad.
    • Catch 10 Insects: Available if you’ve unlocked the insect-catching hobby. Reward: Repair Kit.
    • Scan 10 Birds: If you’ve unlocked the birdwatching hobby. Reward: Repair Kit.
    • Complete a Puzzle: Buy puzzles from Ka Ching. Set it on a table or floor at home to complete. Reward: 2000 gold.
    • Collect 3 Rare Timbers: Chop large trees in neighborhoods like Suburban Lake. Reward: 3 dyes.
    • Purchase 10 items at Massimo’s Cooking Store: Located outside the ice rink in Winter Utopia. Reward: 3 frosting.
    • Buy 20 items at Blanc’s Gardening Store: Also in Winter Utopia, with helpful items like white radish seeds. Reward: 3 quality fertilizers.
    • Feed a Pet: Any cat or dog (yours or neighbors’) by clicking the bowl. Cats eat fish, dogs eat mushrooms. Rewards: cat food or dog food.
    • Perform Any Action: Any hobby activity or social emote. Reward: Rainbow Party Popper.
    • Pop 10 Bubbles: Can include pink bubbles, blue bubbles, or snowman bubbles. Reward: Chef’s Special Salad.

    More quests will be introduced weekly, so stay tuned for updates as the season progresses.

  • How to Solve the Gearin’ Up Event in Fallout 76

    How to Solve the Gearin’ Up Event in Fallout 76

    The Beastmaster needs your help to put armor on and train her tame Deathclaw in Fallout 76. When you complete this event, you’ll earn Caps, experience points (XP), plans, and other rewards. There are seven plans you can unlock, each with about a 14% chance to drop.

    To get all the possible rewards, you’ll need to complete this event multiple times. However, it’s challenging, especially for lower-level players. Here is what you need to know about finishing the Gearin’ Up event in Fallout 76.

    The Gearin’ Up event was introduced with the Burning Springs update and is now part of the public event rotation. It appears randomly on your HUD, usually on the hour. When it shows up, go to your map, open the World Activity section, and select Join Event.

    This event offers several crafting plans, each with an equal chance to drop. Plus, you’ll receive free items like Stimpaks and ammo. Rewards include:

    • Deathclaw Tamer Hat Plan
    • Deathclaw Tamer Outfit Plan
    • Egg Carrier Backpack Skin Plan
    • Jackson Junkyard Sign Plan
    • Mounted Armored Deathclaw Head Plan
    • Trash Cube Plan
    • Super Stimpike Weapon
    • 1,000 Caps
    • 1,000 XP
    • 2 Repair Kits
    • 2 Treasury Notes
    • Stimpaks or Super Stimpaks
    • 2 Legendary Mods
    • Rad-X or Rad-X Diluted
    • Ammo

    The event is of medium difficulty. It’s not suitable to do alone, especially if you’re a low level. It’s best for teams of four to six players who have powerful damage builds and enough healing to deal with tough enemies.


    Speak To The Beastmaster
    When you arrive at the scrapyard, talk to The Beastmaster to start the quest. She has more to say, but once you begin, a timer starts, so you need to move quickly to your next objective.


    You can keep returning to her for hints and to retry the event for more rewards.


    Collect Scrap and Place Them in the Forge
    Scrap barrels are scattered around the scrapyard. Your team needs to gather 40 barrels and deposit them into the forge within 4 minutes. Once collected, these barrels are in fixed positions, so after a few tries, you’ll get faster at finding them.

    While gathering, feral ghouls will attack, so it’s wise to have some players focus on combat and others handle the scrap collection.

    Scrapyard Machine
    To avoid confusion, start collecting scrap from the left side of the scrapyard entrance and move around the edges to the right, ensuring you gather every barrel available.


    Wait and Emote for the Deathclaw
    As the Deathclaw is being armored, you can perform emotes to encourage it—a fun optional task. You need to do this 20 times, so get your team involved while waiting for the next combat phase. Performing these emotes can also earn you bonus XP.


    Escort and Protect the Tamed Deathclaw
    Once fully armored and cheered on, the Deathclaw will emerge from its container. Your job is to escort it safely while fighting off the Rust Raiders and defending the beast. The attacks will become more intense with each wave, so be prepared and keep healing.

    Snallygasters
    After repelling the Raiders, a new threat appears: a pack of Snallygasters. These enemies attack for two minutes before the next wave. After defeating them, you’ll have 30 seconds to heal up and prepare for the final stand against the Legendary Deathclaw Matriarch. This last fight is tough but manageable with a team. Stay near the tame Deathclaw and protect it from the matriarch’s attacks. Positioning up high, like on scrap towers, is a good strategy. Once the matriarch falls, the tame Deathclaw returns to the scrapyard for some rest.

  • All Accolades, Quests, and Fame Rewards in Anno 117: Completing and Solving

    All Accolades, Quests, and Fame Rewards in Anno 117: Completing and Solving

    Fame acts like currency, similar to Denarii, allowing you to buy cosmetic upgrades for your cities. The Hall of Fame is one of the ways to unlock additional features in Anno 117: Pax Romana by spending Fame points earned through gameplay.

    You earn Fame by completing Accolades, which are grouped into sections of nine quests, each with a distinct theme. Each Accolade provides between 15 and 50 Fame points, with a total of 90 points awarded when all nine in a section are finished. Some Accolade tasks also count as Achievements, letting you complete both at the same time.

    To view your available Accolades and upcoming tasks, tap on your portrait at the top center of the screen. Here’s how the Fame points are distributed across different Accolades:

    Accolade Total Fame Points
    Visionary Architect 290
    Efficient Economist 275
    Farsighted Administrator 290
    Tactful Diplomat 290
    Ultimate Victor 325
    Keen Listener 290
    Steadfast Governor 290
    Insightful Sage 290
    Ninefold Annotator 275
    Loyal Roman 270
    Indomitable Celt 290

    The sum of all Fame points from these Accolades totals 3,175.

    There are two main tiers of Hall of Fame rewards: Latium and Albion. These correspond to the Roman and Celtic factions, respectively, and each tier offers rewards that cost between 15 and 75 Fame points to unlock. You can claim and spend your Fame points by selecting the Hall of Fame option from the main menu or clicking your governor portrait at the top of the screen.

    Latium Rewards (Roman faction):

    • Tier I includes items such as Neptune the god, a Lion statue ornament, the Sigil “In Vino Veritas,” research discovery “Shipboard Scorpiones,” Governor’s Flagship, goddess Ceres, a specialist named Merypath, and various skins and resource packs.
    • Tier II features options like the Eternal Fountain ornament, soundtrack “Familiars,” Villa and Flagship skins, and additional resources and specialists.
    • Tier III offers items such as the goddess Diana’s portrait, additional soundtracks, research discoveries, ornaments, skins, and resource packs.
    • Tier IV includes impressive column ornaments, statues, skins, sigils, specialists, and resource packs.
    • Tier V adds more soundtracks, flagship skins, specialists, and portraits.

    Albion Rewards (Celtic faction):

    • Tier I rewards feature the goddess Epona, a specialist named Merander, moss-covered building skins, Celtic idols, sigils, and resource packs.
    • Tier II offers ornaments, skins, sigils, specialists, and portraits with a Celtic theme.
    • Tier III includes Celtic sigils, ornaments, skins, characters, and resource packs.

    Rewards are obtained by spending the corresponding amount of Fame points, allowing you to customize your cities with a variety of decorative and functional enhancements.

  • How To Solve All Springfield Stories Quests in Fortnite: Chapter 6, The Simpsons

    How To Solve All Springfield Stories Quests in Fortnite: Chapter 6, The Simpsons

    This season of Fortnite features story quests inspired by The Simpsons, as your character investigates how the Fortnite island has transformed. Since last season’s chaotic event, the entire area has become a strange version of Springfield, spread across a small Fortnite map.

    Complete each Springfield Stories quest to uncover secrets and earn extra XP. You also get 30,000 bonus XP after finishing every three quests. Additionally, each repeatable quest grants 1,000 XP, making them an efficient way to level up during this limited season.

    Springfield Stories quests are divided into multiple parts, with Part 01 starting on November 1, 2025, at the beginning of the season. Here are the initial quests in this Fortnite Simpsons season:

    | Quest | Guide |
    |—|—|
    | Visit three different named locations | Land at any three named spots like Donut District, Springfield Slurpworks, and Town Square in one game. |
    | Destroy five signs changed by Homer | Find street signs with purple outlines in Springfield Town Square or Evergreen Terrace and destroy five. |
    | Emote near a boss to try to talk to them | Approach one of the three bosses—Evil Homer at the Courthouse, Witch Marge near Springfield Slurpworks, or Krusty the Clown at Kamp Krusty—and emote before they attack. |
    | Deal 250 damage to a boss | After emoting at a boss, use any weapon like an assault rifle or SMG to deal 250 damage. |
    | Convince Homer to give up the power | Visit Homer at the Power Plant and talk to him. |
    | Visit the Kwik-E-Mart and complete the delivery & visit the Town Hall to raise concerns | Head to Springfield Town Square to buy a Super Squishee at the Kwik-E-Mart, then run or drive through rings back to the Power Plant to complete the delivery. Go to Corruption Corners and destroy 25 objects at the Town Hall to prevent the cops from called. |
    | Enter the Simpsons’ House to search for answers | Find the Simpsons’ house on Evergreen Terrace and look for items marked by clues around the property. |
    | Confront Homer and report back to Hope | Drive in a vehicle from the Simpsons’ house to talk to Homer again at the Power Plant, then visit Hope at Donut District for the next step. |

    As you progress, you’ll unlock each part of the quest series and gather more story details while earning rewards.

  • How to Complete Yok Huy Allied Society Daily Quests in Final Fantasy XIV

    How to Complete Yok Huy Allied Society Daily Quests in Final Fantasy XIV

    The Yok Huy are a giant race in Final Fantasy 14. They used to rule the continent of Tural but now focus on more peaceful ways of life and handling death. As of Patch 7.35, players can unlock their Allied Society for Disciples of the Hand, which allows you to help the Yok Huy deal with snow spirits they’ve lived alongside for ages.

    Before you can start doing daily quests for the Yok Huy, you need to unlock their Allied Society. Here’s how to do that, including all the side quests you need to complete first.

    How to Unlock Yok Huy Daily Quests

    The Yok Huy are part of the Allied Society for Crafting Jobs, but all the prerequisite quests are handled by a combat job. There are two quest chains you must complete in Urqopacha, both beginning with an Aether Current quest you may have already finished. Below are all the quests and where you find the NPCs who give them.

    Quest Name NPC & Location
    The Flame Burns No More Murfurlur – Urqopacha (X:30.0, Y:33.5)
    Sparks of Joy Murfurlur – Urqopacha (X:30.0, Y:33.5)
    A Giant’s Footsteps Murfurlur – Urqopacha (X:30.0, Y:33.6)
    Resolve Reignited Murfurlur – Urqopacha (X:30.0, Y:33.5)
    A Crisis of Corruption Nopli – Urqopacha (X:29.1, Y:13.0)
    To Catch a Merchant Nopli – Urqopacha (X:29.1, Y:13.0)
    Finding Bait Nopli – Urqopacha (X:29.1, Y:13.0)
    Springing the Trap Nopli – Urqopacha (X:29.1, Y:13.0)
    Brains and Brawn Murfurlur – Urqopacha (X:30.0, Y:33.6)
    Frosty Neighbors Fahrafahr – Urqopacha (X:32.1, Y:34.3)

    The final quest, Frosty Neighbors, unlocks the Yok Huy Allied Society. To start it, you must have finished the final Dawntrail quest and be at least level 90 as a Disciple of the Hand.

    Once you complete Frosty Neighbors, you can do up to three Yok Huy Allied Society quests each day. Completing these quests grants reputation points and Yok Huy Wards, which can be exchanged for special rewards like the Vurgur the Loyal mount or a Wind-Up Yok Huy minion.

  • Completing All Quests and Rewards in Lego Fortnite Expeditions

    Lego Fortnite Expeditions is now part of the Fortnite world, bringing with it exciting new quests that players can tackle for exclusive rewards. Expeditions let players team up, choose a hero class, harness tools for super abilities, and check off missions on their list.

    If you’re looking to break away from Lego Fortnite Brick Life or Odyssey but still crave that Lego experience, here’s what you need to know about the Expedition quests and the rewards you can earn by completing them.

    Supernova Academy Quests and Rewards

    Supernova Academy Quests in Lego Fortnite Expeditions.

    In addition to gaining XP, you can earn a few bonus rewards by completing Supernova Academy quests.

    • Complete two quests to earn the Supernova Academy Star Decor Bundle.
    • Finish 16 quests to receive the Heroic Triumph Statue Decor Bundle.
    Quest Guide XP
    Supernova Academy
    Collect 21 Intel. Gain Intel by completing main objectives in missions. 30K
    Trade ten Essence for Items at a vendor. Essence drops from enemies during missions and can be traded with vendors at the Supernova Academy. 30K
    Complete a Mission with each Hero Class. You’ll need to finish three missions—one for each of the three Hero Classes. 30K
    Deal Damage with Dual Daggers, Hammer, and Plasma Pistols. Acquire new weapons by trading essence with vendors at Supernova Academy, then deal damage with each to satisfy this requirement. 30K
    In-Spired
    Land the final blow on a Spire. Ensure you score the killing blow on a Spire enemy to complete this task. 30K
    Recycle ten weapons. Recycle weapons from your inventory to fulfill this requirement ten times. 30K
    Gather 1,000 Essence. Defeating enemies will yield Essence, and you need a total of 1,000. 30K
    Dream Team
    Complete a mission as any Level 30 Hero Class. Level up a Hero Class to 30 and complete a mission to satisfy this quest. 30K
    Complete two missions. Finish any two Expedition missions. 30K
    Defeat ten Demon Guard enemies. Simply defeat ten Demon Guard enemies for this quest. 30K

    Dorm Decorations Quests and Rewards

    The Dorm Decoration Quests in Lego Fortnite Expeditions.

    The Dorm Decoration quests are fairly simple but can be time-consuming as they require you to level up all Hero Classes to 49.

    Quest Reward (Decor Bundle)
    Hunter
    Gain four Hunter levels. The Hunter Rookie Cup Decor
    Gain 14 Hunter levels. The Hunter Cadet Dartboard
    Gain 29 Hunter levels. The Hunter Specialist Display
    Gain 49 Hunter levels. The Hunter Hero Trophy
    Rift Ripper
    Gain four Rift Ripper levels. Rift Ripper Rookie Microscope
    Gain 14 Rift Ripper levels. Rift Ripper Cadet Statue
    Gain 29 Rift Ripper levels. Rift Ripper Hero Trophy*


    Note: This might be a telescope instead of a trophy, as it seems to have a name mix-up with the next reward.

    Gain 49 Rift Ripper levels. Rift Ripper Hero Trophy
    Shadow Caller
    Gain four Shadow Caller levels. Shadow Caller Rookie Candles
    Gain 14 Shadow Caller levels. Shadow Caller Specialist Specimen
    Gain 29 Shadow Caller levels. Shadow Caller Cadet Books
    Gain 49 Shadow Caller levels. Shadow Caller Hero Trophy
  • Completing Sine’s Romance Quests in Tainted Grail: Avalon’s Fall

    Completing Sine’s Romance Quests in Tainted Grail: Avalon’s Fall

    In the game Tainted Grail: The Fall of Avalon, saving the world from the Wyrd involves more than just piecing together King Arthur’s soul. If you choose, you can also explore romantic connections amid the chaos. Certain characters can offer companionship and a refreshing break from the dark upheaval surrounding the Menhirs.

    One character to consider is Sine. However, gaining her affection will require some effort. While it may not be the most traditional romance, there’s an opportunity to unwind in Cuanacht.

    Where to Find Sine

    Upon arriving in Cuanacht, you will notice the city’s devastation, now under the control of Kamelotian troops. Head to the western part of the city, where you’ll find Beor the blacksmith. Look for a small tent and stall in front of Erfyr’s shop, alongside a rather grumpy woman standing guard.

    This is Sine, and she isn’t one for small talk. If you’re in need of work, she has tasks for you. Complete them swiftly, and she’ll reward you handsomely. While it starts as a straightforward arrangement, deeper feelings may grow if you continue to engage with her.

    Sine’s Bounty Quests

    Sine has put up four bounties on the bulletin board in the craftsmen’s district of Cuanacht. Since she can’t trust the other recruits or townsfolk, it’s up to you to complete them. Here’s what she needs:

    Bounty

    Amount

    How to Complete

    Bear Claws

    5

    Bears roam the wilderness just outside the city and in the Horns of the South.

    Marrowghast Shell

    5

    Curlghasts are found in caves, particularly in the lower levels of the main city mines.

    Croakmaw Skin

    3

    These creatures can be located near Cuanacht’s shores and swamps.

    Wolf Pelts

    10

    Wolves are abundant in the wilderness, so they’re easy to track down.

    Completing these quests will not only win Sine’s favor but also earn you some gold for your efforts. It’s a beneficial arrangement!

    Through the Cracks Quest

    Next, ask Sine if there’s more you can do for her. She mentions that supplies have gone missing at night from the storeroom, and even the guard stationed to watch over them has disappeared. She requests you to investigate.

    Go to the storeroom at night, located just around the corner from Sine’s stall, behind Erfyr’s smithy. Inside, everything seems normal—except for the massive swirling portal on the floor to your right.

    Jump inside to find Percy, the missing guard. He has been trapped there since the night he was assigned to guard the supplies. He claims there’s no exit.

    Fortunately, with King Arthur’s powers, you can activate artifacts within this realm.

    As you navigate the town, you’ll need to battle Wyrdbeasts and some Fae. Follow the trail of dark vines and use the artifacts to open new paths.

    Eventually, after crossing a bridge, you’ll encounter Gaelric Tarian. Beyond him lies the portal to the real world, which you need to access. However, he is tied to this realm and has been trapped for ages. He longs for a quick death, so grant him that mercy.

    To dodge attacks, back into the area with the portal and keep moving in circles!

    Once you defeat Gaelic, jump through the portal and return to Sine with the good news. With the Wyrd disturbance resolved, she will be grateful for your help.

    Sepulchral Path Quest

    When you see Sine next, ask if she needs anything else. A recent fire has destroyed one of the warehouses, during which she discovered a secret trapdoor. Although Denholm advised her to forget it, Sine can’t let it go. She sends you to talk to a man named Filth in a ruined tower to the east.

    Enter his hideout and get the key to the underground city. In exchange, he requests that you retrieve a specific cube he left behind.

    Head to the trapdoor highlighted on your map, then open the chest in the corner to find the first of four necessary scrolls.

    Be sure to read the scrolls before the quest ends for extra lore, as they will be taken!

    Next, dive down the hole into a cavern filled with undead. Eliminate them as you navigate the ruins beneath Cuanacht, then proceed to a side chamber illuminated by candles.

    Unlock the chest behind the candles to recover the second scroll, then continue exploring the main area of the underground city, winding your way deeper.

    Don’t forget to grab Filth’s Cube as you press on!

    At the bottom of the ruins, you’ll face the Servant of the Rite. Defeat him, collect the rare items he holds, and proceed to the bloody altar for the final two scrolls.

    You can take a shortcut through a side tunnel to return to the upper floors of the ruins. Dive into the water and follow the stream to a door leading back to Cuanacht.

    Report your findings to Sine. Although she wishes she could have joined you, she appreciates your efforts. She then instructs you to deliver the scrolls to Denholm.

    Denholm will ask where you found them and who sent you, so it’s a good idea to cover for Sine if you want to pursue a romance.

    How to Spend the Night with Sine

    After you’ve finished all of Sine’s tasks, she’ll question why you keep visiting her. Her tone becomes playful, and you can flirt back. When she asks if you want something more, reply with, “And what if I do?”

    She’ll invite you to her tent after dark, located just behind her stall, which is easy to find. When the time comes, feel free to flirt further or get straight to the point.

    You’ll share an intimate moment with her and wake up alone the next morning. Duty calls, and Sine has to prepare for her tasks. If you try to discuss the previous night, she’ll clarify that she’s not seeking a regular relationship.

    It was a fun experience, but you both will move on.

  • Completing New Quests in Assassin’s Creed Shadows: A Tracking Guide

    Completing New Quests in Assassin’s Creed Shadows: A Tracking Guide

    The quest and narrative design in Assassin’s Creed Shadows is quite unique. Rather than following a completely straight path, you have some choices regarding the missions you choose next. However, this freedom can occasionally leave you uncertain about your next steps.

    To keep track of your quests, it’s essential to know how to navigate the game’s tracking system. This will help you find your way whether you’re diving into a new side quest or progressing through the main storyline. Once you grasp the tracking system, you’ll quickly become familiar with what to do as you continue playing.

    How To Track Quests


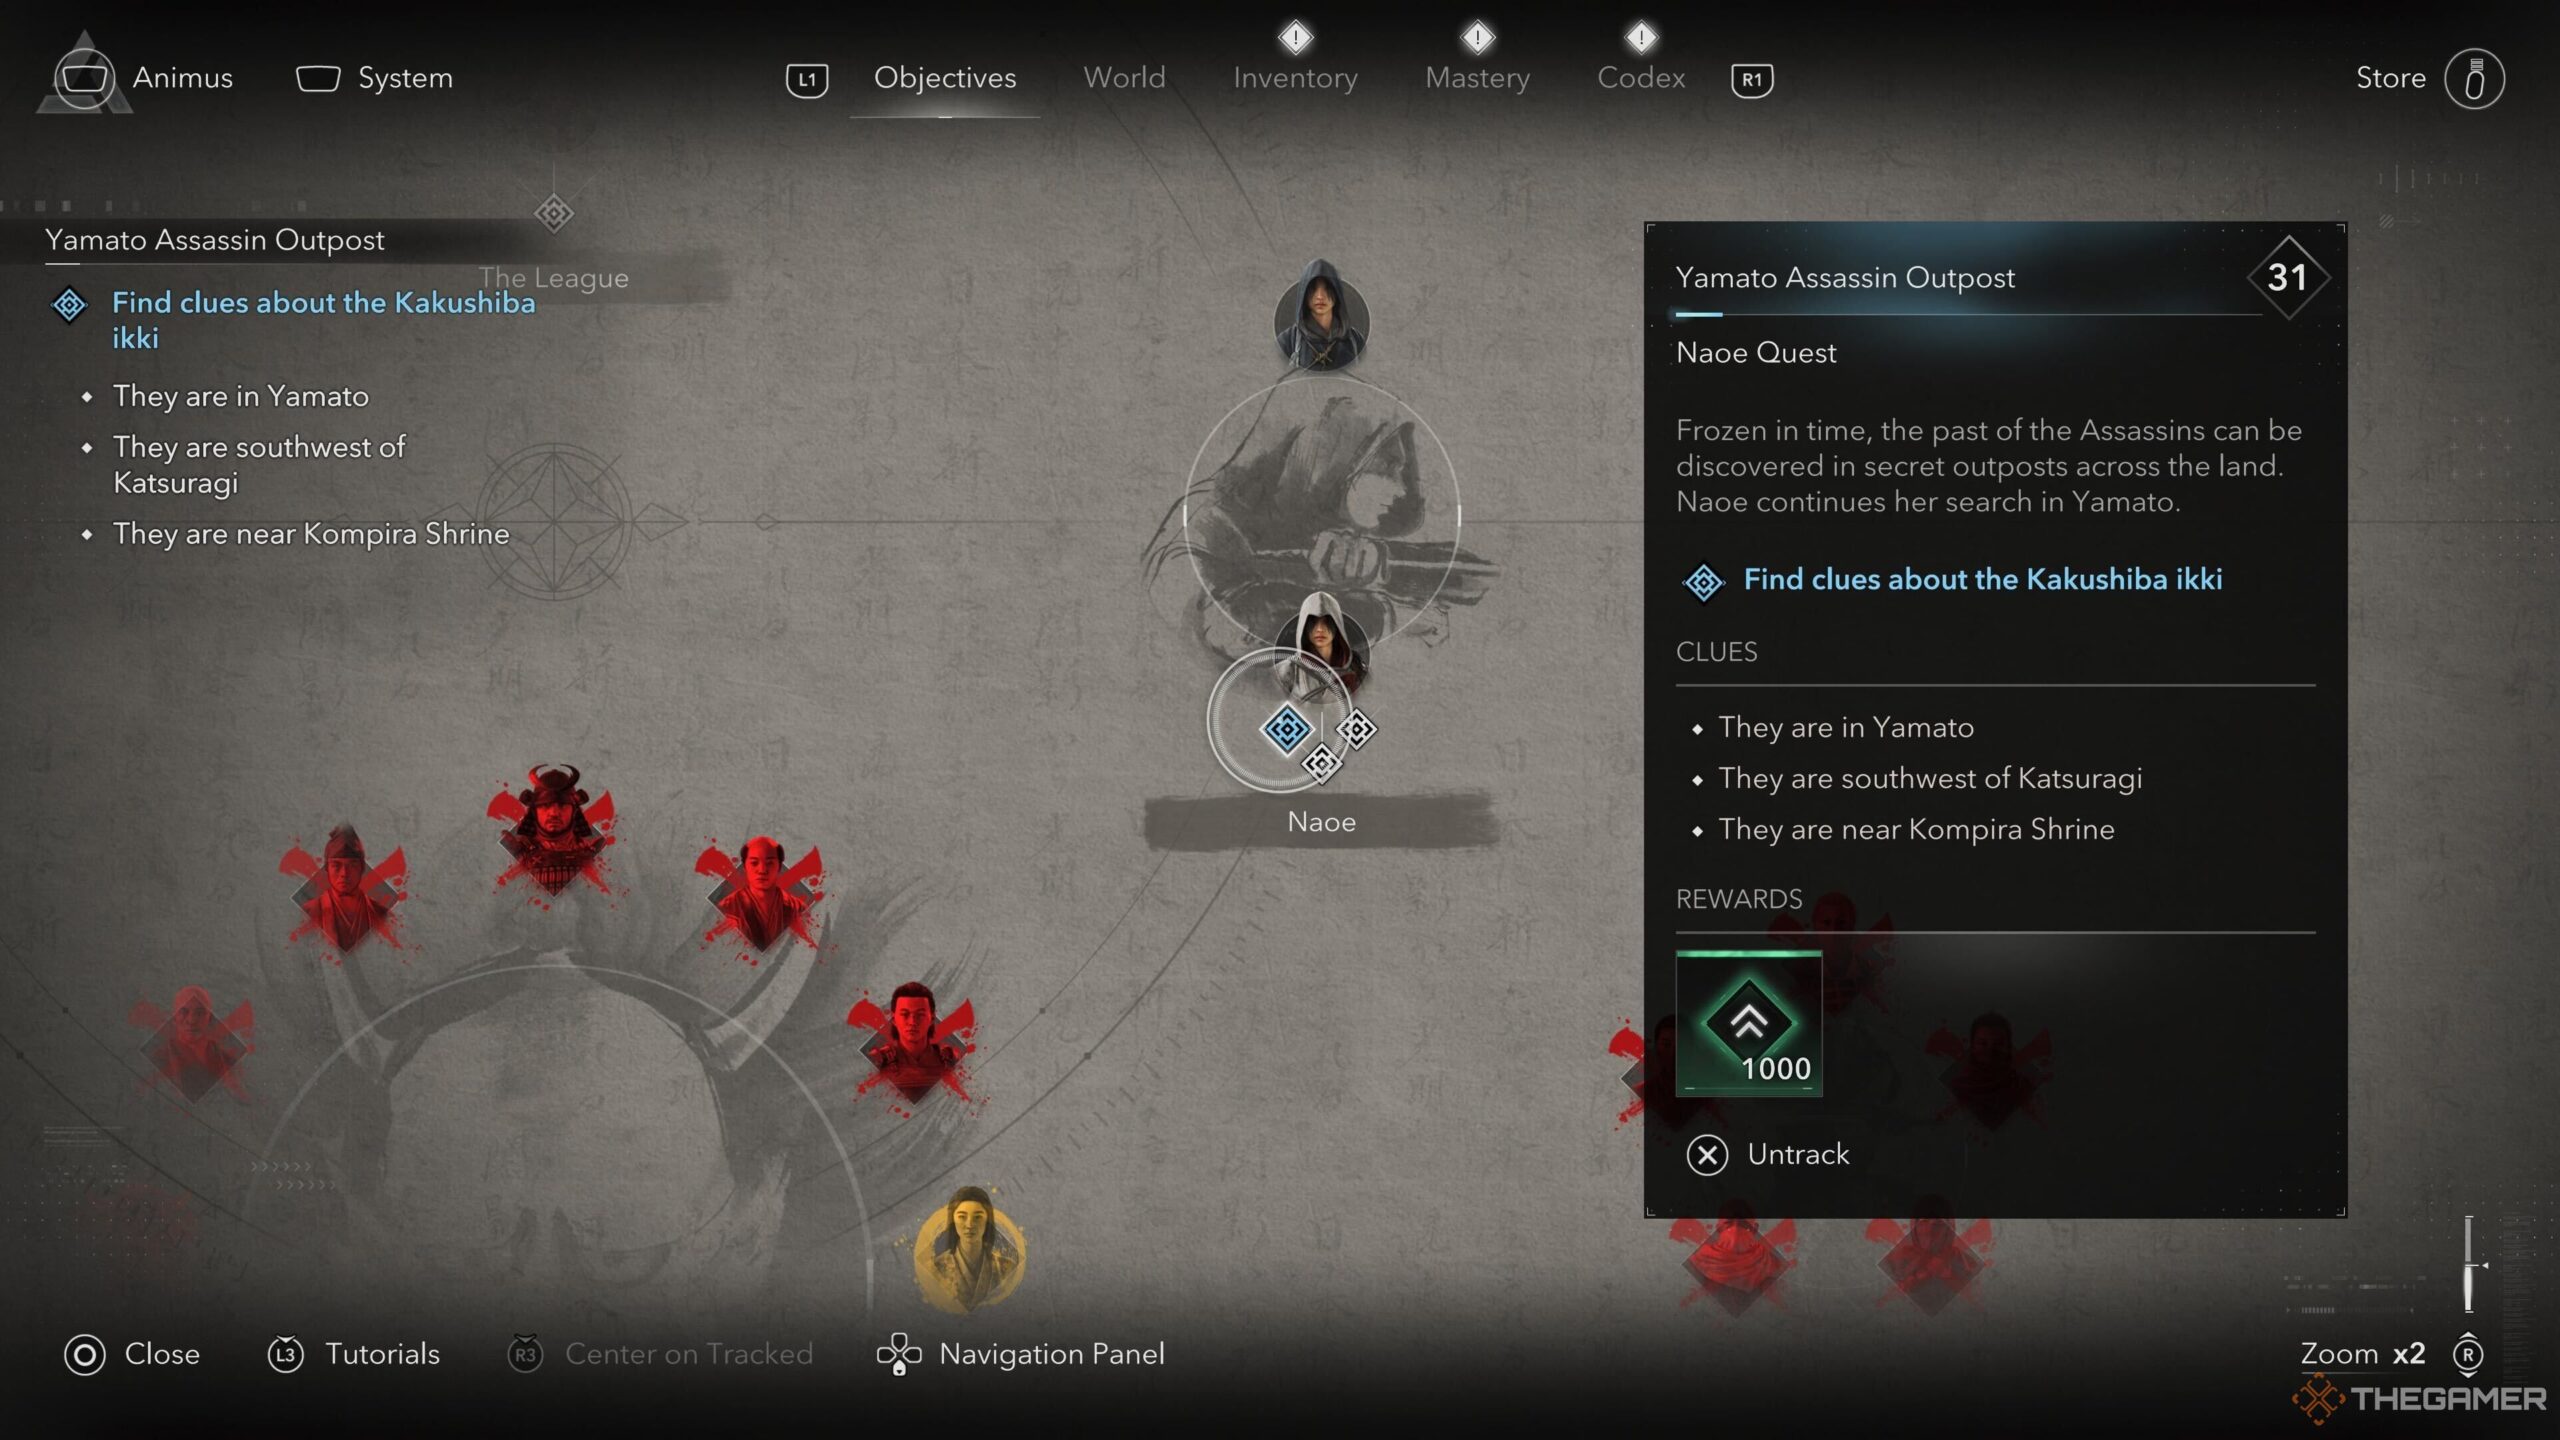
    To begin tracking a new quest, you’ll first want to pause the game and access the Objectives tab in the menu. This will bring up all the quests you’ve unlocked, organized by category. The main story quests will be located in the center of this array.

    Next, choose which quest you want to pursue by browsing through the groups and selecting one that interests you.

    Then, click the small diamond icon below the character representation of the quest. This icon will change to a light blue color, indicating that the quest is now being tracked. Once you return to the game, the objective or location clue will appear in the top left corner of your screen.

    There will be moments in the story when no quests are actively tracked. If you find yourself in this situation, simply follow the steps above to track a new quest.

    How To Add Waypoints


    A waypoint on the map in Assassin's Creed Shadows.

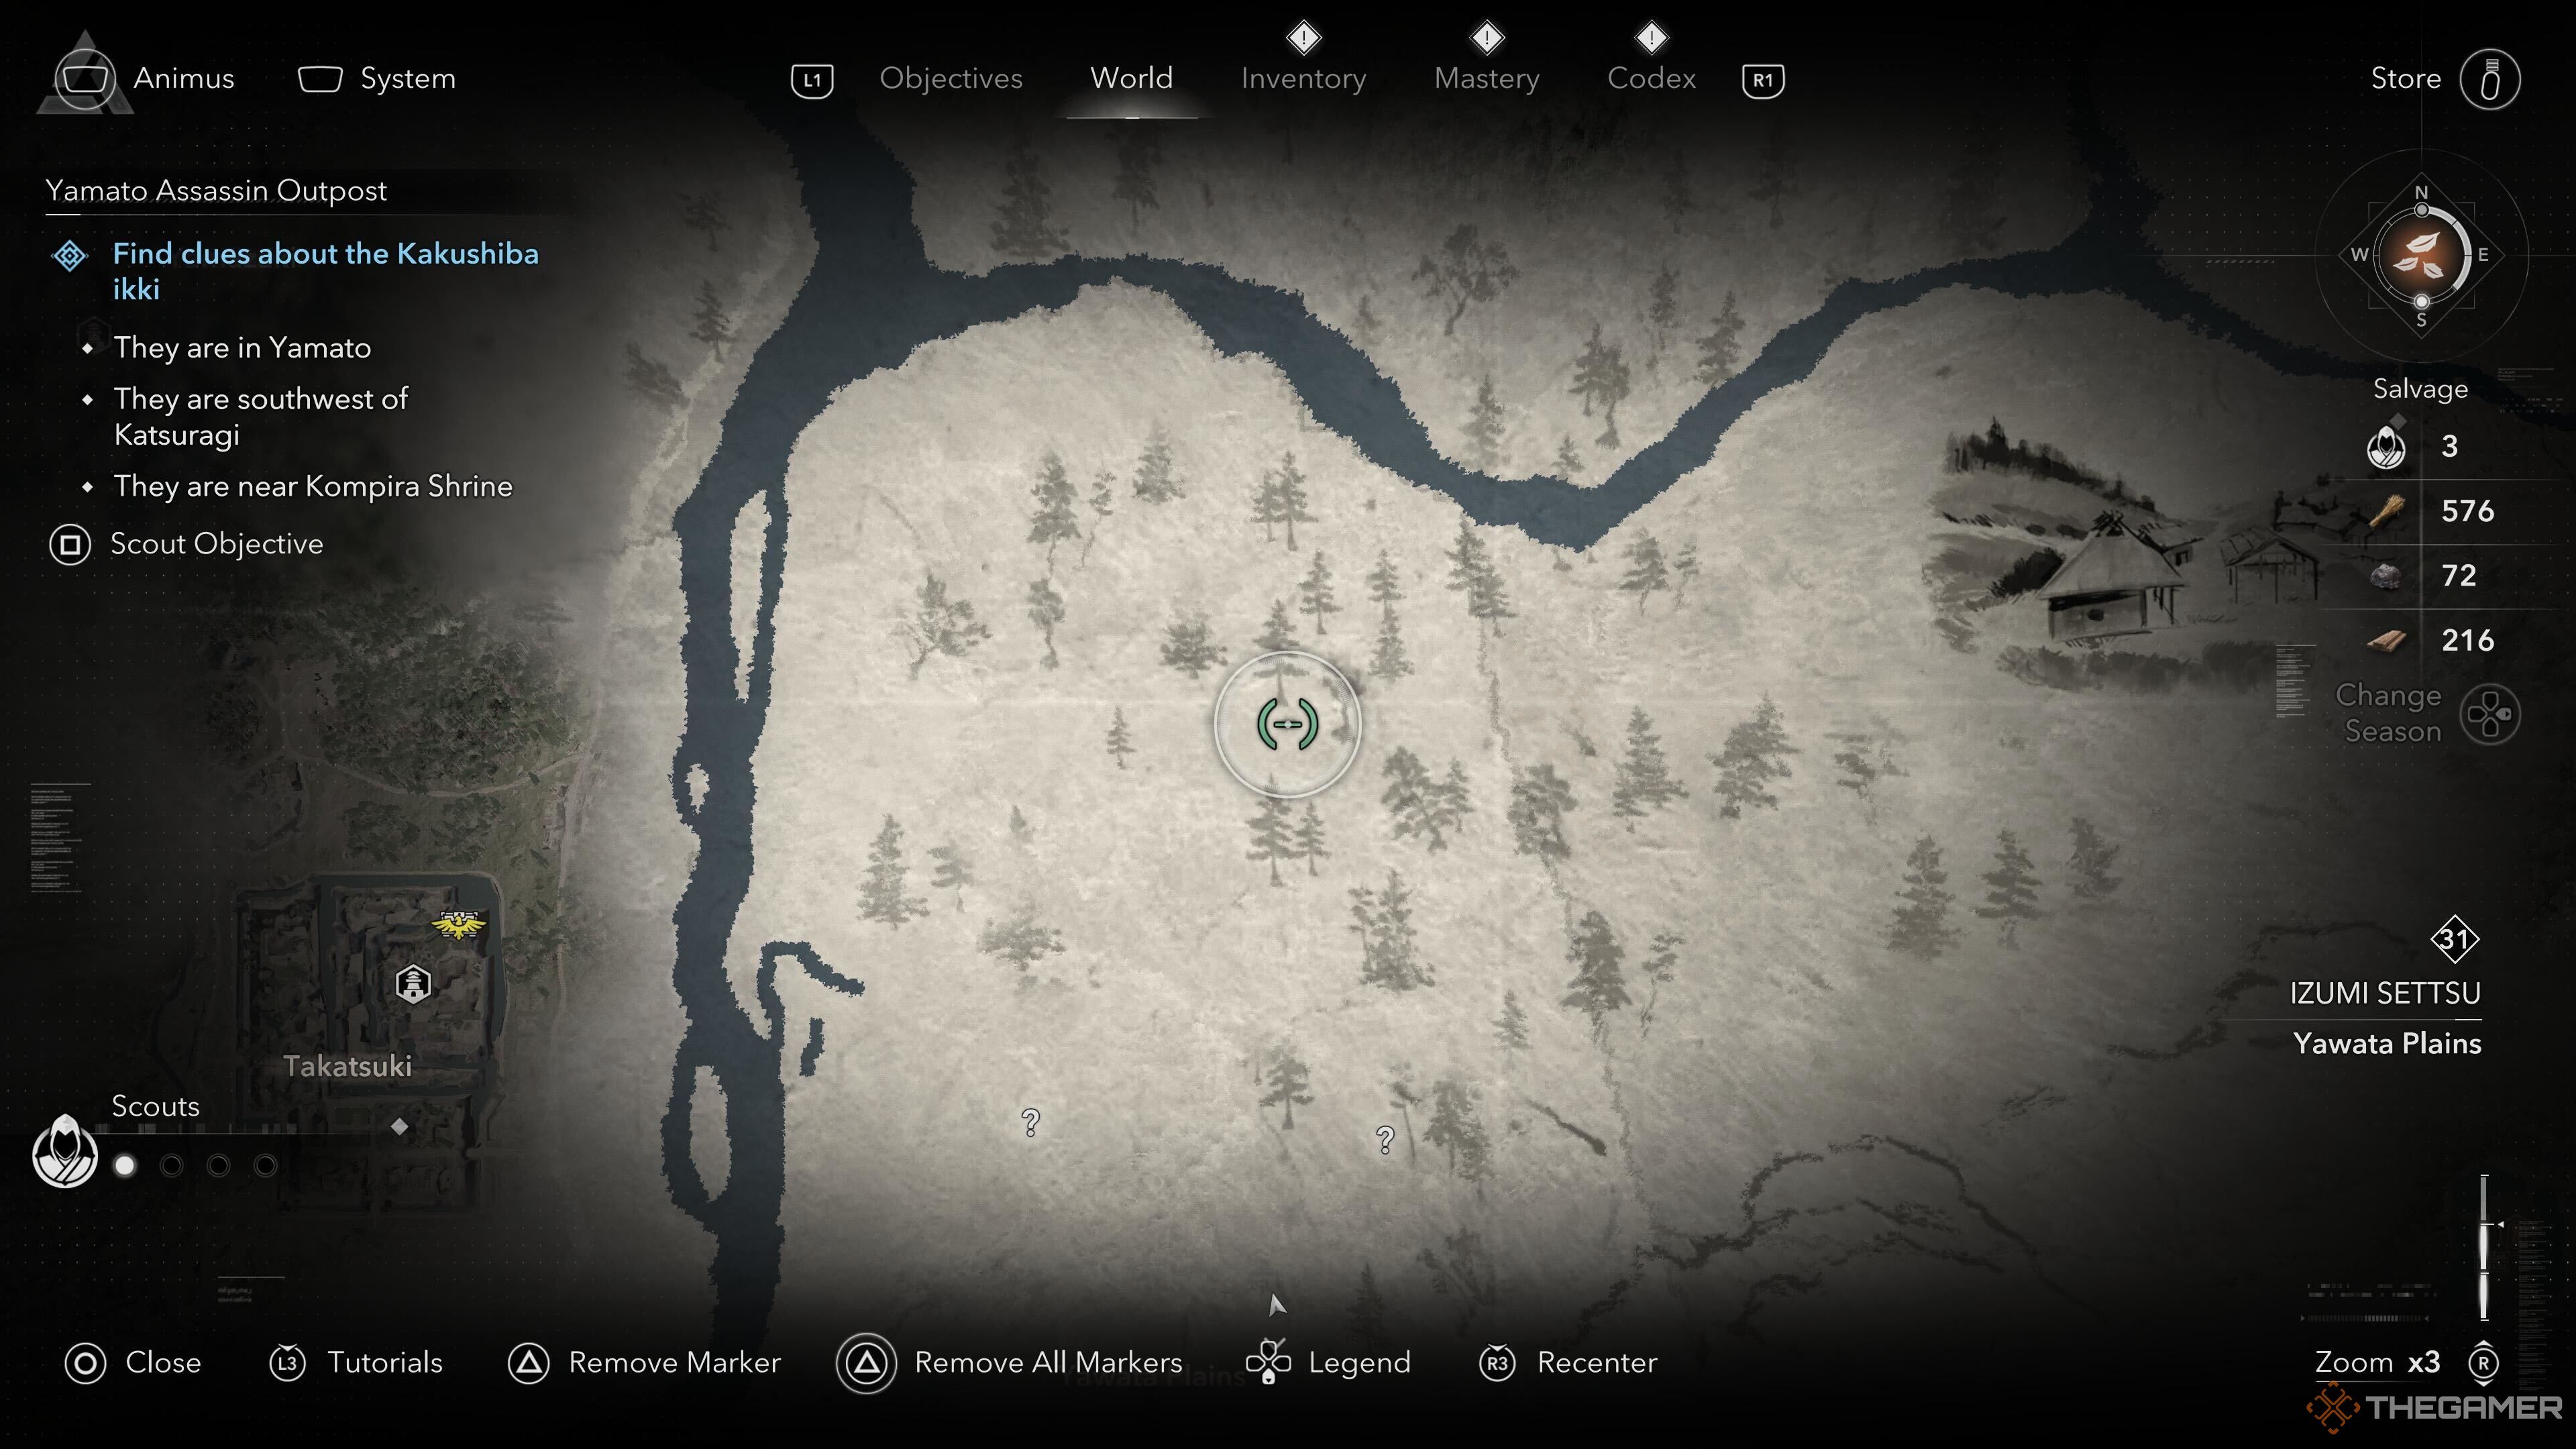
    If you’re looking for a specific location for a quest and don’t have one marked, you can set your own waypoint on the map. To do this, open the map screen.

    Next, move your cursor to the spot on the map where you want to go. Then, press triangle on PlayStation or Y on Xbox to drop a marker. This marker will appear on your compass at the top of the screen when you go back to the game.

    You have the option to add multiple waypoints whenever you like, each represented by a different color on the map and compass.

  • Xenoblade Chronicles X: Ultimate Guide to Affinity Quests

    Xenoblade Chronicles X: Definitive Edition features a rich array of affinity quests that deepen player connections with characters and enhance the game’s story. These quests are important for developing relationships and unlocking new gameplay opportunities.

    Throughout the game, you’ll encounter various characters, each with their personal stories and challenges. To complete an affinity quest, you usually need to engage with these characters, fulfill specific objectives, or help them overcome their problems. Success not only strengthens your bond with the characters but also often rewards you with valuable items, experience points, or new abilities.

    Exploring different areas, completing various tasks, and making choices that reflect your character’s personality can lead to different outcomes in these quests. Pay attention to dialogue and hints within the game, as they can guide you to succeed in these interactions.

    In summary, affinity quests in Xenoblade Chronicles X: Definitive Edition add depth and enjoyment, making your journey in the game even more captivating. By investing time in these quests, you’ll enhance your experience and uncover more of the game’s rich narrative.

  • Mastering the Getaway Quests in Fortnite: A Complete Guide

    Mastering the Getaway Quests in Fortnite: A Complete Guide

    Experience the thrill of the ultimate heist in Fortnite with The Getaway LTM—if you can navigate the chaos, that is. There are four safes brimming with jewels, but just accessing one is only the beginning of your difficulties. Once you grab the loot, every team on the map will be on your tail. Your only hope for escape? Reach a getaway van, and you’re in the clear.

    If you want to score even more points, take on the Drop One Quests, which provide numerous opportunities to earn XP while avoiding enemy fire. Whether you’re cracking safes, demolishing structures, or taking out competing thieves, every action matters. Are you ready to claim victory? Here’s what you need to know before you hit the road.

    We’ll refresh this weekly, so save this page!

    What Are The Drop One Quests?


    The Drop One quests will send you on a hunt for jewel carriers, task you with demolishing structures, and encourage you to deal damage at close range.

    Quest

    How To Complete

    Reward

    Down or eliminate a player carrying a Jewel

    Jewels can be found in the safes marked on your map. Head to one and take out a player who picks one up.

    30K XP

    Deal 250 damage to players within 20 meters

    Just aim for players at close range. Using shotguns may make this easier.

    30K XP

    Gain 200 shields or restore while carrying a Jewel

    Jewels will passively restore your health, so this should happen naturally while you carry one.

    30K XP

    Destroy 25 objects or structures

    Shoot at or use your pickaxe on various structures.

    30K XP

    Open five safes or supply drops

    The Jewel Supply Drops are shown on your map.

    30K XP

    Eliminate five players with Epic or better weapons

    Epic weapons are purple, while Legendary weapons are gold.

    30K XP

  • Locating Pavlena in Kingdom Come: Deliverance 2

    Locating Pavlena in Kingdom Come: Deliverance 2

    After Bozhena helps patch up Henry and Hans in Kingdom Come: Deliverance 2, it’s time to show some gratitude. Once you leave her hut and continue with the main story, you can return to her, particularly after you both find yourselves in dire straits as beggars unable to enter the castle.

    To repay Bozhena’s generosity, she will mention that her daughter, Pavlena, has gone missing. This will activate the side quest titled Bad Blood.

    Investigate to Find Out More About Pavlena

    Start your investigation by heading to Pavlena’s room. If your lockpicking skills are up to par, you could attempt to open the chest there; otherwise, fear not, as there will be plenty of clues to discover.

    Look for a cap sitting on a stool and then return to speak with Bozhena. After your conversation, make your way to Troskowitz to talk to either the Scribe or the Bailiff, both of whom will direct you to Woodcutter Dushka for further information.

    You might also want to chat with Innkeeper Betty, who can guide you to other potential contacts. However, your ultimate destination will be Dushka.

    Upon arriving at the location marked on your map, you may not find Woodcutter Dushka immediately, as he will be out searching for someone named Roman. You can follow his voice to locate him.

    You can get more information from Dushka if your skills have at least an 8-point proficiency, or you can convince him to give you some Groschen by claiming you might need it to pay off a guard. Avoid intimidating him, as that option is less likely to yield results.

    Dushka will provide insights about Pavlena’s connection to Roman and will willingly assist you in your search. Your next step is to investigate Roman’s house. Lockpick the front door and step inside.

    If you lack lockpicks or fail to open the door, you can find a ladder beside the building. Climbing up leads you to the kitchen, where you can uncover additional clues and potentially loot a chess if your lockpicking skills are sufficient.

    After concluding your investigation, you will realize that Pavlena was staying at Roman’s place. Armed with this newfound information, head back to Dushka, who will help you follow a lead near the stream.

    Searching for Clues Near the Stream

    Travel to the area indicated on your map, and once at the clearing Dushka mentioned, pay attention—you will notice blood on the ground. Follow the blood trail, leading you to a corpse. This is Roman’s body, and a pig may be nearby, feasting on it.

    Around a pig herder, you’ll learn about Straw, a farmhand who may have buried Roman. Once your conversation with the herder concludes, Straw’s position will be marked for you.

    Confronting Straw

    Straw will be hiding behind the barn, and when you confront him, be prepared for skill checks. Don’t use the dread check, as it could provoke him to attack. Instead, opt for speech or charisma to glean more information about Pavlena’s whereabouts.

    After obtaining the necessary intel, you can decide to either kill him or turn him in to the Bailiff. While killing him is quicker, it may harm your reputation in town. If you choose to turn him in, although he will still face the same fate, your reputation will benefit.

    Where to Find Pavlena

    After dealing with Straw, head to the coordinates shown on your map to locate Pavlena. As you approach, watch for a ladder between some rocks guarded by a dog that you can either circumvent or deal with.

    At the top, you will find Ota, who has taken Pavlena hostage. You face a choice: either allow her to perish or negotiate with Ota to secure her safety. Be cautious, as provoking him or mentioning Pavlena’s pregnancy can jeopardize the situation.

    If Pavlena dies, you’ll need to visit Bozhena to break the news, which will leave her heartbroken. She may then ask you to eliminate Jakesh, who has been troubling her. You can either proceed with the kill or try to reason with him.

    How to Save Pavlena

    The best approach is to rescue Pavlena by introducing yourself during the negotiation.

    Important: Do not take another step after seeing Pavlena, as this will cause Ota to kill her immediately.

    Once you identify yourself as Henry, inform Ota that Bozhena sent you and inquire about his motivations. Then, suggest you could put in a good word for him with Von Bergow, which may lead him to release Pavlena.

    However, upon her release, Pavlena may end up killing Ota. In this scenario, it’s advisable to side with Pavlena and escort her home, utilizing fast travel for efficiency.

    Should You Kill or Spare Jakesh?

    Regardless of whether Pavlena survives, Bozhena will request you to handle Jakesh upon your return. Refusing her will negatively impact your standing with her and conclude the quest.

    Accepting her request will mark Jakesh’s location on your map. If you choose to eliminate him, your reputation with Bozhena and Pavlena will soar, unlocking new dialogue options with Pavlena.

    However: If you kill Jakesh, you’ll lose favor in Troskowitz, and you could even end up arrested if spotted.

    Alternatively, if you spare him and persuade him to reconcile with Bozhena, both will return to Troskowitz. She might offer you half the money Jakesh gave her, and you can either accept it or ask her to save it for Pavlena to complete the quest.

    Note: You cannot romance Pavlena, so killing Jakesh merely yields a necklace given to her by Roman.

  • How to Complete All Forced Perspective Quests in Infinity Nikki

    How to Complete All Forced Perspective Quests in Infinity Nikki


    Within Infinity Nikki, players can explore a variety of puzzle challenges, including specific tasks like Kindled Inspiration and Risky Photography. Among these, the Forced Perspective challenges can be particularly tricky. These require players to capture images from designated viewpoints to create intriguing visual illusions.

    Difficulty

    Moderate


    Duration

    1 hour

    Requirements

    • The photography skill must be unlocked.

    There are numerous Forced Perspective challenges scattered throughout the expansive world of this gacha-style dress-up adventure. If you're having trouble capturing the required images for the Infinity Nikki Forced Perspective challenges, this guide will provide you with essential tips on how to frame your photos.

    InFold Games

    Forced Perspective: Caged Bird

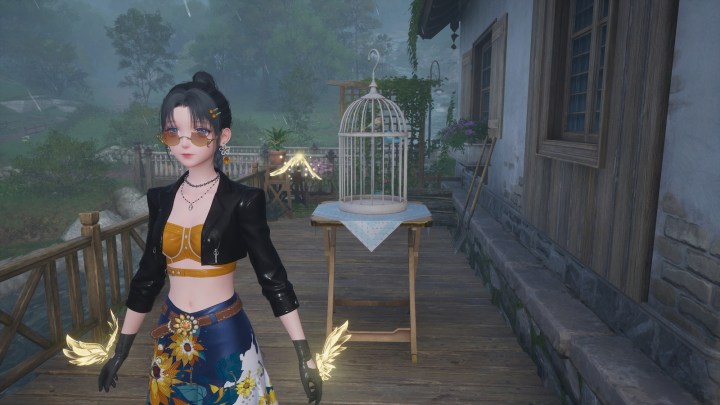
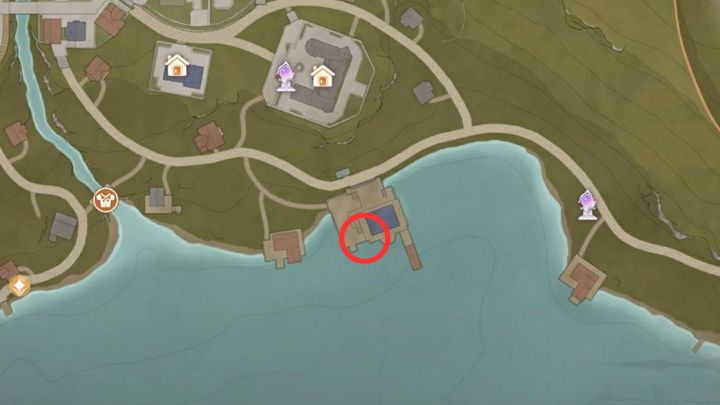
    Speak with Ginona located by the bridge in Florawish. She stands on the deck of her home and requests a photograph of a caged bird.

    The birdcage is positioned right behind Ginona, next to the bird that you need to use as part of the illusion in your shot.

    Forced Perspective Infinity Nikki bird in a cage photo.
    InFold Games
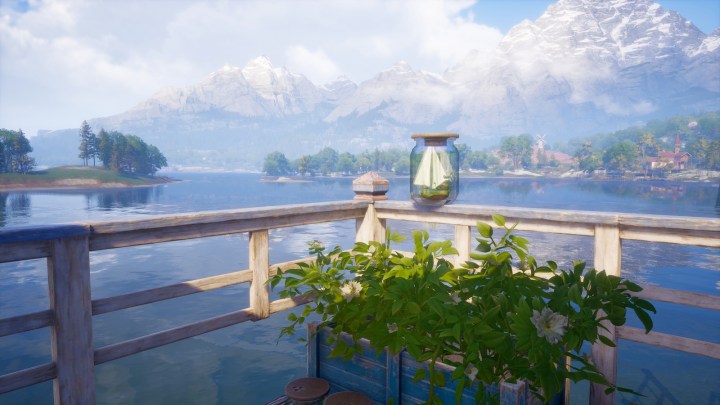
    Forced Perspective Infinity Nikki ship in a bottle quest location.
    InFold Games

    Forced Perspective: Ship in a Bottle

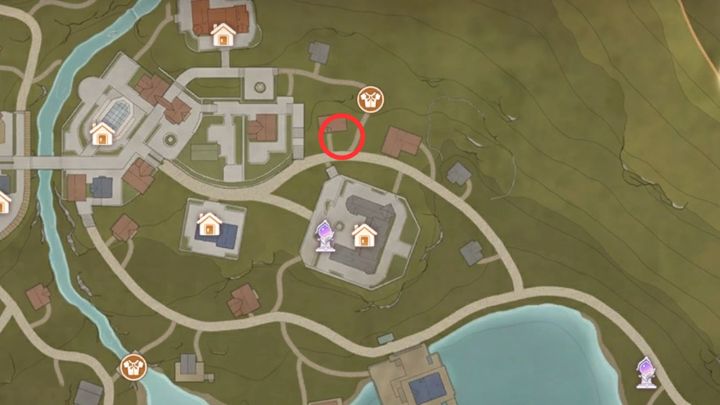
    You can find Toscani looking out over the water, just south of the Mayor's Residence Warp Spire. He is asking for a picture of a ship contained within a bottle.

    This shot can be tricky, so be sure to zoom in enough for the photo to clearly capture the ship inside the bottle.

    Forced Perspective Infinity Nikki ship in a bottle photo.
    InFold Games
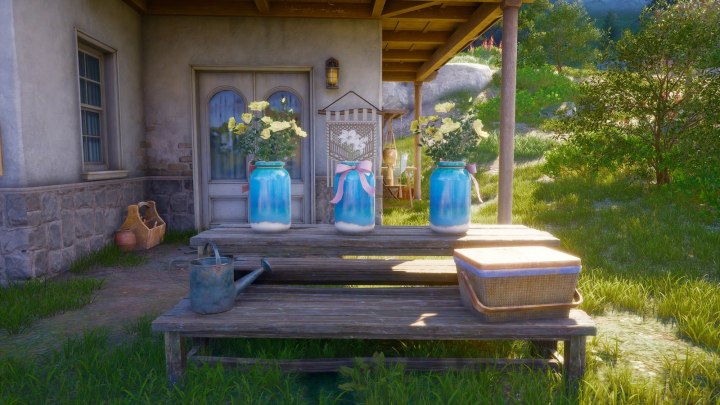
    Forced Perspective Infinity Nikki flowers in three vases quest location.
    InFold Games

    Forced Perspective: Flowers in Three Vases

    Toscani is now situated near the house to the north of the Mayor's Residence Warp Spire and seeks an image of three flower vases.

    Position yourself directly in front of the three blue vases and make it appear as though the middle vase contains white flowers.

    Forced Perspective Infinity Nikki flowers in three vases photo.
    InFold Games
    Forced Perspective Infinity Nikki capturing a thief quest location.
    InFold Games

    Forced Perspective: Capturing a Thief

    Converse with Toran, located by the statue near the Mayor's Residence. He requests a picture that conveys the appearance of a thief being captured.

    Behind Toran is a house with an iron fence. Locate the section featuring a thief illustration on the walls and photograph it with the iron bars positioned in front.

    Forced Perspective Infinity Nikki capturing a thief photo.
    InFold Games
    Forced Perspective Infinity Nikki long eared bunny quest location.
    InFold Games

    Forced Perspective: Long-Eared Bunny

    Qiara is at the Leisurely Anglers Florawish Branch and is searching for a photo of a long-eared bunny.

    Position the hanging life ring to represent the bunny's body, with the two oars behind acting as its ears for the photograph.

    Forced Perspective Infinity Nikki long eared bunny photo.
    InFold Games
    Forced Perspective Infinity Nikki catching a big fish quest location.
    InFold Games

    Forced Perspective: Catching a Big Fish

    Viliak is found at Meadow Wharf and wants a picture of you catching a large fish.

    To achieve the correct angle for this shot, hop into the small boat on the water, positioning the hook in front of the fish illustration.

    Forced Perspective Infinity Nikki catching a big fish photo.
    InFold Games
    Forced Perspective Infinity Nikki light up the bridge quest location.
    InFold Games

    Forced Perspective: Light up the Bridge Lamps

    At night, meet Tristan in front of the Breezy Meadow bridge. He seeks a photograph that showcases the bridge's lamps illuminated.

    Step back enough to include the lamp post in the shot, aligning the lamp's light with the hanging lights on the bridge.

    Forced Perspective Infinity Nikki light up the bridge photo.
    InFold Games
    Forced Perspective Infinity Nikki flying buntings quest location.
    InFold Games

    Forced Perspective: Flying Buntings

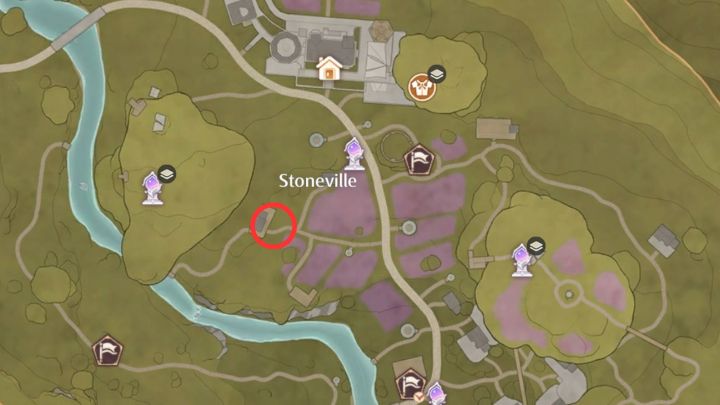
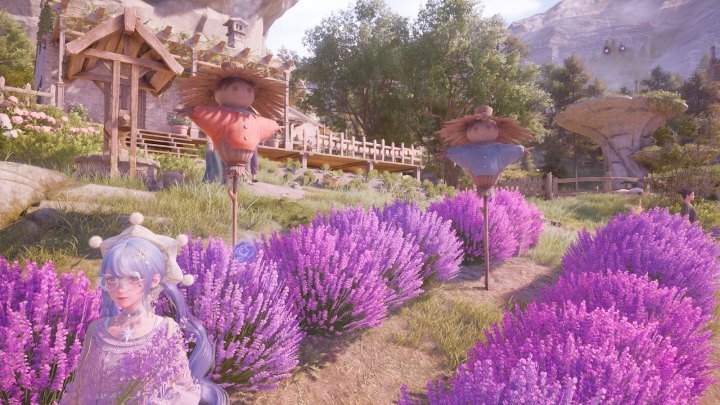
    Rico is located just southwest of the Lavenfringe Fields Warp Spire in Stoneville. He requests an image of two scarecrows with bunting.

    Frame your shot so that the red and blue scarecrow are positioned with the bunting in between and behind them.

    Forced Perspective Infinity Nikki flying buntings photo.
    InFold Games
    Forced Perspective Infinity Nikki thuddy snowman quest location.
    InFold Games

    Forced Perspective: Thuddy Snowman

    Speak with Sunkissed Stella located in the Abandoned District at Windrider Mill. She requests a photograph of a snowman.

    Nearby, you'll find two pumpkins that, when photographed together, will create the illusion of the snowman’s head and body.

    Forced Perspective Infinity Nikki thuddy snowman photo.
    InFold Games
    Forced Perspective Infinity Nikki happy bear quest location.
    InFold Games

    Forced Perspective: Happy Bear

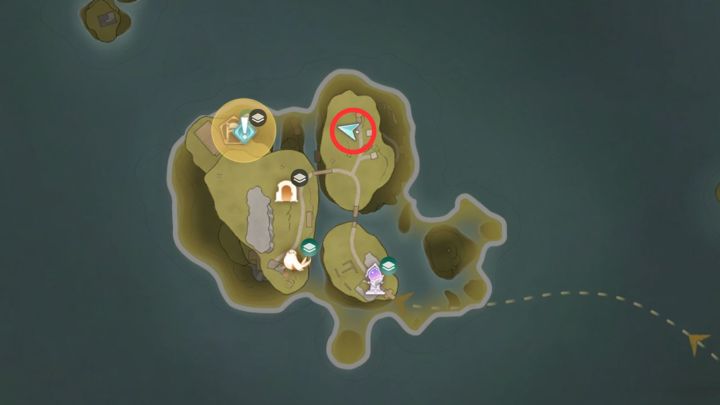
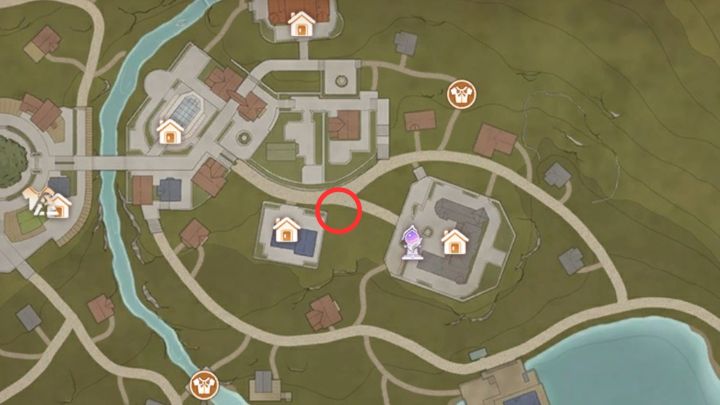
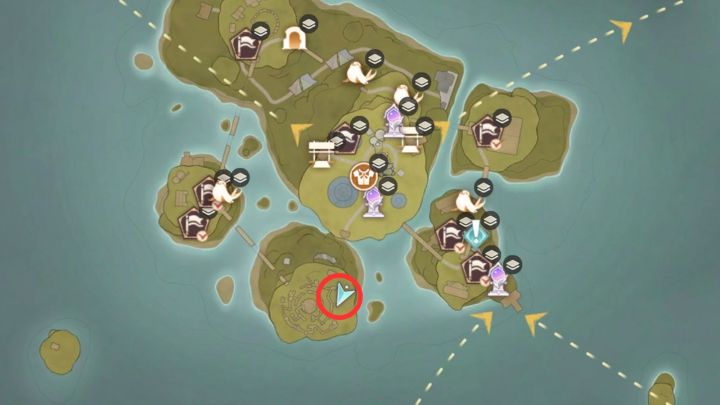
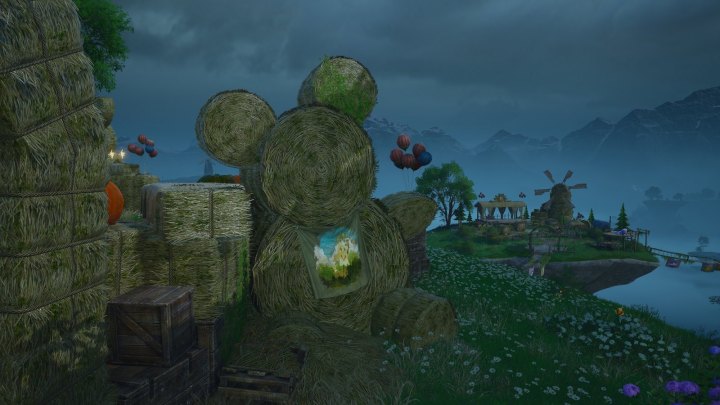
    Engage with Playful Pollie within the Handsome Lads Circus maze in the Abandoned District. She desires a photo of a bear holding balloons.

    Snap a picture of the hay bale bear situated near the entrance of the maze, ensuring it is shown holding the balloons.

    Forced Perspective Infinity Nikki happy bear photo.
    InFold Games
    Forced Perspective Infinity Nikki empty flowerpot quest location.
    InFold Games

    Forced Perspective: Empty Flowerpot

    Find Sopuda near the river northeast of the Wishcraft Lab in the Wishing Woods. She requests a shot of a flower pot filled with flowers.

    Position the flowering bush growing on the ground in front of the empty pot to create the visual effect required.

    Forced Perspective Infinity Nikki empty flowerpot photo.
    InFold Games
    Forced Perspective Infinity Nikki burning with anger quest location.
    InFold Games

    Forced Perspective: Burning with Anger

    Locate Turaida in the Grand Tree Residential Area of the Wishing Woods. He is in search of a photo depicting him in a furious state.

    Frame the shot so that the drawing of a blue flame is positioned right behind Turaida’s head to create the effect of burning with anger.

    Forced Perspective Infinity Nikki burning with anger photo.
    InFold Games
    Forced Perspective Infinity Nikki catching a waterfall quest location.
    InFold Games

    Forced Perspective: Catching a Waterfall

    Find Titibo in the northern region of the Wishing Woods, just south of the Workshop Waterwheel Warp Spire. He is looking for a photo of a barrel capturing a waterfall.

    Get in close to the barrel and frame the shot so it appears the waterfall from the west is flowing into it.

    Forced Perspective Infinity Nikki catching a waterfall photo.
    InFold Games


  • New Elder Scrolls Mod Adds Over 160 Quests to Morrowind

    New Elder Scrolls Mod Adds Over 160 Quests to Morrowind

    The highly anticipated Elder Scrolls VI is not expected to be released anytime soon, much to the dismay of fans eagerly awaiting its arrival. Even Avowed, which seems to be the next best thing to an Elder Scrolls title, won’t debut until mid-February. If you’re looking for something to enjoy in the meantime, a new mod for The Elder Scrolls III: Morrowind introduces a substantial amount of content that makes revisiting this 22-year-old classic worthwhile.

    Named Abecean Shores, this area is a part of the grand Project Cyrodiil, which remains unfinished. For those familiar with the name, you can likely surmise the setting: the shores of Cyrodiil, which serve as the backdrop for The Elder Scrolls IV: Oblivion. The mod developers have packed an astonishing amount of new content into Morrowind, including over 160 quests, as reported by PCGamesN.

    All of the familiar factions return, such as the Thieves Guild, Fighters Guild, and Mages Guild. Additionally, two new factions have been included: the Itinerant Priests and the Kingdom of Anvil.

    The nearly three-minute trailer showcases various aspects of the mod. It has been designed to integrate seamlessly with the original version of Morrowind, allowing players to travel back and forth between the new content and the base game at virtually any time or level. The entire tileset has been meticulously reconstructed, so while the mod acknowledges the game’s age, it noticeably surpasses the visuals of its initial release two decades ago.

    This mod can be downloaded from Nexus Mods, but it’s important to note that it isn’t entirely standalone; you’ll need a few additional mods installed to ensure everything operates smoothly.

    Abecean Shores is truly a showcase of artistic achievement and underscores the immense effort and commitment from its creators. It exemplifies the passion of a community dedicated to keeping this beloved series alive for current and future generations.

  • Discovering and Completing Quests in Ravenswatch

    Discovering and Completing Quests in Ravenswatch

    During each chapter of Ravenswatch, you have just 18 minutes to tackle as much as you can. The map is dotted with various icons, but with limited time, you’ll need to choose wisely which tasks to take on.

    One of the most rewarding activities you can engage in is completing quests for the locals. These quests offer valuable rewards and are often encountered early in the game. Although the game doesn’t provide much explanation about them, understanding how they work and the benefits they offer will help you decide if they’re worth your time compared to other options.

    How to Discover Quests

    When starting a session in Ravenswatch, you won’t find any tutorials on discovering quests, but they’re fairly easy to locate. Keep an eye on the mini-map located at the bottom right of the screen and look for an exclamation mark icon. Once you’ve spotted it, make your way to that location.

    If you can’t see an exclamation mark, try searching for Raven Eyes to unveil additional parts of the map. These will help make the quest icons visible to you.

    Once you arrive at the quest location, you’ll typically find an NPC who needs assistance. In some cases, however, the quest could involve a different task, like rescuing someone.

    Completing Quests

    The specifics of how to complete a quest can vary. Most quests involve fetching items, which can range from gathering about 15 pieces of wood to complete a task or another item type entirely.

    The location of the required materials will be marked on your mini-map, leading you to the right spot for collection. After you have gathered everything, return to the NPC to deliver the items. Be mindful of your time—if you take too long, the NPC may come under attack, and you’ll need to step in to protect them.

    Not all quests are purely about fetching. Some may require you to rescue an NPC by defeating multiple enemies, including a mini-boss. These missions are significantly more challenging, but the rewards tend to be greater. As before, you’ll need to complete these tasks quickly to prevent the NPC from getting harmed.

    Rewards for Quests

    Completing any quest will earn you some experience points (XP), but the real incentive lies in the choice of rewards. After finishing a quest, you will be offered a selection of three consumables to aid you further in your adventure.

    It’s important to note that the consumables available to you will always be of Legendary quality, ensuring they will be beneficial for your upcoming challenges. Choose whatever you feel will be the most helpful, and then continue your quest to bolster your skills before facing the chapter’s boss.

  • How to Complete Giant Stump Raccoon Quests in Stardew Valley: A Step-by-Step Guide

    How to Complete Giant Stump Raccoon Quests in Stardew Valley: A Step-by-Step Guide

    ConcernedApe

    Stardew Valley offers an extensive range of quests to explore while you cultivate your farm, fish, and delve into mines. Among these quests, the Giant Stump quests stand out, granting you access to unique content and items. Introduced in the 1.6 update, these quests hold significant value for players seeking to enhance their gameplay experience.

    Difficulty

    Hard


    Duration

    10 hours

    Requirements

    • The Greenhouse

    • A strong windstorm event

    Whether you’re a newcomer or a seasoned player, you might have overlooked the Giant Stump and Raccoon quests. However, tackling these tasks not only enriches your gameplay but unlocks a special shop filled with exclusive items. Here’s a guide to starting and completing the Giant Stump Raccoon quests in Stardew Valley.

    Starting the Giant Stump Quests

    Step 1: First, you need to unlock the greenhouse by finishing the Pantry bundle at the Community Center. At the beginning of the game, you will find a full-grown tree in Cindersnap Forest, and unlocking the greenhouse is essential for the next random event to occur.

    Dilapidated greenhouse in Stardew Valley.
    ConcernedApe

    Step 2: Wait for a night when you receive a message indicating that a powerful windstorm has swept through Pelican Town.

    Step 3: Travel south to Marnie’s Ranch in Cindersnap Forest and continue left until you encounter a large tree stump marked with a question mark.

    Map circling the Giant Stump location in Stardew Valley.
    ConcernedApe

    Step 4: To repair the Giant Stump, you must donate 100 Hardwood. You can gather Hardwood from Mahogany Trees, which are plentiful in the Secret Woods located west of Cindersnap Forest.

    Raccoon family in Giant Stump in Stardew Valley.
    ConcernedApe

    Completing the Raccoon Family Quests

    After one day, the Giant Stump will be restored, and you’ll notice a Raccoon nearby. You will need to fulfill eight different requests from this Raccoon to gain access to the exclusive shop.

    Step 1: First request: Collect five of any Crab Pot fish (Mussel, Clam, Periwinkle, Cockle, Crayfish, Snail, Oyster) and one random Smoked Fish (based on the season). In return, you’ll receive 25 seeds—either Carrot, Summer Squash, Broccoli, or Powdermelon (depending on the season).

    Raccoon request in Stardew Valley.
    ConcernedApe

    Step 2: Second request: Provide one random Dried Fruit (season-dependent) and one random Jelly (also based on the season). Your reward for this is the Raccoon Journal, which increases the chances of weeds yielding mixed seeds when harvested using a Scythe.

    Step 3: Third request: Offer one random Dried Mushroom and five different items such as Cave Carrots, White Algae, or any eggs. The reward for this is a Raccoon Hat.

    Step 4: Fourth request: Bring one random Pickle and one random Juice. You will receive five Fairy Dusts as a reward, which can be used on equipment like furnaces and kegs for instant crafting.

    Step 5: Fifth request: Deliver two of any of these items at random: 20 Bat Wings, 20 Bug Meat, four Coral, one Diamond, five Frozen Geodes, eight Geodes, three Ghostfish, three Magma Geodes, 10 Moss, one Rusty Spoon, two Sea Urchin, 99 Slime, three Topaz, or five Trash. Your reward will be a Jungle Tank, a decorative item for your home.

    Step 6: The sixth, seventh, and eighth requests will randomly repeat any of the first five requests. For these, expect rewards such as seven Fairy Dusts, one Book of Stars (which grants experience across all skills), or one Stardrop Tea.

    Step 7: Once you have completed all eight requests, you can return to the Giant Stump anytime to access the Raccoon wife’s shop. Instead of using gold to purchase items, you will trade other items instead.

    Raccoon Wife shop items in Stardew Valley.
    ConcernedApe

    Items Available in Raccoon Wife’s Shop

    • Raccoon Journal (costs 999 Fiber)
    • Mahogany Seed (costs 20 Coal)
    • Raccoon Hat (costs 10 Mixed Seeds)
    • Carrot Seeds (costs one Maple Seed)
    • Summer Squash Seeds (costs 15 Sap)
    • Broccoli Seeds (costs five Moss)
    • Powdermelon Seeds (costs two Pine Cones)
    • Mixed Seeds (costs one Cave Carrot)
    • Fairy Dust (costs one Mystic Syrup)
    • Jungle Tank (costs five Broken Glasses)
    • Golden Mystery Box (costs three Mystery Boxes)
    • Magic Rock Candy (costs 20 Golden Mystery Boxes)