الوسم: Prime

  • Completing the Tower Generator Puzzle in Metroid Prime 4: Beyond

    Completing the Tower Generator Puzzle in Metroid Prime 4: Beyond

    Playing a Metroid Prime game usually involves solving puzzles that make you stop and think about whether you’re using the right tools or if you need to find a new ability first. Metroid Prime 4: Beyond still has plenty of those moments, even in its more straightforward level design.

    You’ll visit Volt Forge multiple times during the game. The first time, you have to restore power to all of its generators. The forge is currently running on backup power, and it needs a lot of energy to start making Vi-O-La bikes again. But it’s not just a matter of flipping a switch; it’s more complicated than that.

    ### Activating the First Tower Generator

    Before moving on to any other tower in Volt Forge, you need to get the first tower’s power running. The journey involves careful navigation and battling Psy-bots along the way.

    At the bottom of the area, you’ll find Tower 1 Generator. It’s straightforward to start up. Your goal is to reach the generator at the end of the long structure in front of you. To get there, you first need to open the entrance so you can fit inside with the Morph Ball.

    On both sides of the entrance, there are anchors holding the passage closed. To open it, switch to Morph Ball, hop into the Bomb Slot, and drop a Psychic Bomb. Do the same on the other side. Once both are triggered, the tunnel into the generator will open.

    Tip: In Morph Ball mode, you can perform a jump called Spring Ball, which lets you jump directly into Bomb Slots and place Psychic Bombs in the air.

    Now, roll to the end of the tunnel and activate another Bomb Slot. This will power up the generator, causing shocks to run along its tunnel. You need to escape quickly—there are small alcoves along the tunnel that you can enter to avoid electric shocks as you leave.

    With the first generator online, you can now access Vi-O-La and head to Tower 2 to activate its generator.

    ### Activating the Second Tower Generator

    After heading to Tower 2 with Vi-O-La, descend back down to a room very similar to the first generator room. In the middle is a long tunnel leading to the generator, with anchors holding it closed on both sides.

    This time, the left anchor cannot be reached while in Morph Ball mode, though it has a Bomb Slot that needs activating. You should activate the Bomb Slot on the right first, then return to the left one later.

    Remember, if you hold the Psychic Bomb button in Morph Ball, you transform the psychic bomb into a Psychic Mote that you can pick up. Drop a Psychic Bomb, go into the Psychic Visor, then pick up the bomb. When ready, release it toward the Bomb Slot—it will fly in and explode, activating the door as if you dropped the bomb directly into the slot.

    Proceed to the end of the tunnel and place a Psychic Bomb in the Bomb Slot to activate the second generator. The tunnel will again be filled with electric shocks, which happen more frequently this time, so make sure to jump into alcoves to avoid getting shocked.

    Note: If you get shocked, you’ll be pushed a small distance backward. Brute-force methods may be less effective because of this, so timing and careful movement are better.

    After activating the second generator, you’ll be forced into a mini-boss fight against the MCU Flight Drone. The core of this fight is similar to other boss encounters: use the Control Beam to target and disable all three weak points at the same time. For more detailed strategies, check out the full boss guide.

  • How to Defeat All Enemy Types in Metroid Prime 4: Beyond and Solving

    How to Defeat All Enemy Types in Metroid Prime 4: Beyond and Solving

    In Metroid Prime 4: Beyond, you’ll encounter many enemies, both familiar and new, like the Dartwings and the disturbing Grievers. But as with earlier titles, enemies are more than just obstacles—they play a key role in shaping the game world.

    They also function as puzzles. Since the Metroid Prime series isn’t solely focused on shooting, defeating enemies isn’t all about style; it’s about finding the most effective ways to take them down. With a wide variety of enemies and equipment available to Samus, there are many different strategies to succeed.

    How Many Enemy Types Are There?

    Every area in the game features its own unique enemies, such as Fury Green’s Bristlewort or Flare Pool’s Leaping Spitters. Some enemies are shared across multiple regions, like the Maintenance Tanks and Grievers. The Grievers, for example, have regional and elemental variations that look slightly different but behave similarly.

    Some enemies act more like stage hazards than real threats, encouraging players to be cautious and observant rather than rushing through rooms to attack electrified enemies. Because of this, we’ve excluded these hazards from our count and focused only on enemies with distinct tactics. In total, there are 20 different enemy types. If you include all regional and elemental variants, the number increases significantly.

    Note: Bosses are not included in this list, as they require their own detailed strategies.

    How to Defeat Every Type of Enemy

    Like past Metroid Prime games, enemy encounters are tense battles mixed with mini puzzles. Each major enemy has a unique way to be defeated. Here are some tips for handling the main foes:

    Unless otherwise noted, all regional and elemental enemy variants are considered the same as their standard versions.

    Enemy How to Defeat Them
    Griever These are the common enemies you’ll see. They’re quick and hard to hit, so sometimes aiming freely helps land shots better than lock-on.
    Mauler Griever Found in the Great Mines. They spit acid and, in explosive variants, rush and detonate, summoning more Grievers. Freeze and destroy the explosive ones to stop explosions.
    Ghaspore Summon homing spores that can be shot down normally. Hit open spores with fire, or use missiles for destruction.
    Goura Ghaspore Found in the Great Mines. They summon unbreakable homing spores. To defeat them, shoot the spores back into the Goura Ghaspore to make both explode.
    Shren Small flying enemies that attack in swarms. Destroy their nests using missiles or Thunder Shots. Nests also spawn new Shren before burning out.
    Bristlewort Usually passive; they only attack when provoked by firing missiles at their back. Use missiles to hit their vulnerable spots.
    Snow Wolf Seen once upon entering Ice Belt. Quickly defeat with Fire Shots.
    Dartwing Hang from ceilings in groups; dart at Samus. Hit them with the Beam Cannon in just a couple of shots by locking on and firing rapidly.
    Leaping Spitter Found near Flare Pool’s lava. Freeze them or eliminate with Vi-O-La’s homing attack.
    Pyremite Also in Flare Pool, they rush in groups and try to explode. Freeze with Ice Shots and defeat to prevent detonation.
    Behemoth A one-time enemy at Flare Pool. Only damage by shooting its eyes.
    Maintenance Tank Common throughout the game. Lock onto their heads and aim slightly upward for extra damage—use Charged Shots.
    Lamorn Turret Weighs less; take out with a single Charged Shot. Stronger ones might need two. Use Thunder Shots to stun then finish with Psychic Lasso.
    Psy-bot Soldier Found mostly in Volt Forge. Use Thunder Shots for extra damage, or Ice Shots to make flying enemies fall and take big hits.
    Psy-bot Shield Dodge behind them while they charge. Once you have Psychic Lasso, pull the shield off.
    Psy-bot Shocker Slower enemies that unleash shockwaves constantly. Jump and attack with your best moves.
    Psy-bot Teleporter Teleports frequently and shoots powerful X attacks. Track with your radar, freeze with Ice Shots, and deal damage while they’re frozen.
    Psy-bot Gunner Summons orbs aiding their attacks. Take out the orbs first to slow them down, then go all out on the Gunner.
    Aeronaut Found in Sol Valley. They fly and drop damaging bombs. Use homing attacks with Vi-O-La to shoot them down, then slide to finish them off.
    Marauder Rollers that chase Samus across Sol Valley, often in groups. After being hit, you might outrun them, or use a sliding boost to defeat them quickly.

    Some enemies in the game don’t have attack patterns or pose much of a threat, so no specialized tactics are needed. These are mostly passive foes that don’t require complex strategies to defeat.

  • Where to Find All Psychic Powers and Solving Expansions in Metroid Prime 4

    Where to Find All Psychic Powers and Solving Expansions in Metroid Prime 4

    Instead of creating new tools from scratch, Metroid Prime 4: Beyond brings back many familiar items from previous games, just updated visually. One example is the Power Bombs, renamed Psychic Bombs for this version, which perform the same functions.

    Psychic Bombs are the most powerful tools you get near the end of the game. You can only carry one at a time, and they take a moment to detonate after you activate them, but they cover a large area, making them ideal for taking down groups of enemies or a single tough foe. Starting with only three, your initial stock is limited. Fortunately, you can find five additional expansions, allowing you to carry up to eight Psychic Bombs simultaneously.

    You can also throw Power Bombs as a Psychic mote, which makes it possible to hurl them at enemies more easily.

    There are a total of five Psychic Power Bomb Expansions, and each is located in a different spot—though two are in Sol Valley, with one being somewhat indirect. Once you understand their locations, finding them becomes easier.

    Psychic Power Bomb Expansion #1 – Great Mines
    After dropping to the lowest level of the Great Mines, you’ll see a small hole at the back of the room. You can enter it with the Morph Ball on your first visit, but you’ll need a Power Bomb to clear the crystals blocking the way. Wait until you’ve obtained Psychic Bombs, then come back. Roll to the tunnel’s end and drop a bomb to destroy the crystals and claim the expansion.

    Psychic Power Bomb Expansion #2 – Sol Valley
    This piece of Galactic Federation debris is situated at the top of a pile. To access it, climb to the very top of the debris and open the crate there. You can reach this early with some effort, but a Power Bomb is needed to open the crate, so make sure you have one before attempting.

    Psychic Power Bomb Expansion #3 – Flare Pool
    Located in the Lava Works area, this expansion requires some setup. First, break the blocks blocking the entrance using a Super Missile, then cross the lava using the Vi-O-La bridge. The door will then be open, but you’ll find lava in your path. Make your way deeper, then return and activate a nearby machine to turn off the lava flow through the Morph Ball exit. Use the Tether Node to propel yourself toward the expansion in the section now accessible.

    Psychic Power Bomb Expansion #4 – Fury Green
    This expansion is near the start of Fury Green. Instead of heading to the Cargo Launcher, go down the stairs in that area. In the Quiet Clearing, head to the corner to find a Lamorn statue. Destroy it with a Power Bomb to get the expansion.

    Psychic Power Bomb Expansion #5 – Tokabi
    The final expansion is the most unpredictable, as it involves finding Tokabi in Sol Valley. If you’ve collected Power Bombs, you’ve probably met him once when he provided the Teleporter Chip. Afterwards, he can appear up to three more times, offering different items. Traveling back and forth between areas and Sol Valley increases your chances of meeting him again. Once you locate him after an encounter, he will give you the final Power Bomb expansion—though this might take some time, so it’s best to check in with him regularly rather than waiting until the very end. If you’ve already unlocked the Sol Valley Scout Bot, his locations will be visible on your map, making it easier to track him down.

  • Where To Find Tokabi and All 6 Mech Parts in Metroid Prime 4: Beyond

    Where To Find Tokabi and All 6 Mech Parts in Metroid Prime 4: Beyond

    Metroid Prime 4: Beyond has been released, and now there’s a new dangerous planet for you to explore. While most of your time will be spent solving puzzles or defeating bosses, occasionally you’ll need to complete tasks in a central hub called Sol Valley.

    One of the main quests here begins after you find all five Teleporter Keys. Once you have them, you’ll discover that parts of a G.F. Mech are scattered around, and it’s your job to find each piece. This quest activates right after the fight with Varmis, when you’ll be told to visit Tokabi first and then gather the six hidden Mech Parts.

    Here’s where to find Tokabi, the six Mech Parts, and how to handle the mini-boss called the Behemoth at the end of this quest.


    Where to Find Tokabi in Sol Valley

    After defeating Varmis, MacKenzie will call to say you can’t move the Mech Part because a sand-crab swallowed it. He’ll suggest you find Tokabi, who is camping somewhere in the desert, but won’t give you a specific location.

    Luckily, Tokabi isn’t far and is easy to find if you know what to look for. Leave the sandpit where you fought Varmis and head south toward the Flare Pool. As you go, watch for a column of black smoke rising from rocks—that’s where Tokabi’s camp is. Once there, get off Vi-o-la and talk to Tokabi to start a cutscene, which ends with him giving you a Teleporter Chip.

    Return to MacKenzie afterward and speak with him to get six Teleporter Pods. These let you move the Mech Parts back to MacKenzie in Valley Green.

    Note: Tokabi appears three more times in Sol Valley. Visiting him is optional, but it will give you a Missile, a Shot, and a Power Bomb expansion. To see these, you’ll need to leave Sol Valley entirely between visits to reset his location.


    Tokabi Alternate Location 1 – Missile Expansion

    After delivering the Teleporter Chip, go south along the wall to the Volt Forge. You’ll see another black smoke column from rocks near this area. Approach Tokabi there to trigger a cutscene and receive a Missile Expansion.


    Tokabi Alternate Location 2 – Shot Expansion

    Once again, after returning the Teleporter Chip, head near the Volt Forge and approach the black smoke. Tokabi will move north near the Great Mines. Approach the debris nearby in G.F. Debris among the rubble to trigger another cutscene and earn a Shot Expansion.


    Tokabi Alternate Location 3 – Power Bomb Expansion

    The final Tokabi spot is just north of Fury Green. Make sure to leave Sol Valley and re-enter another area to reset his position. When you get close to Tokabi here, a cutscene will play, granting you the Power Bomb Expansion.


    Where to Find All 6 Mech Parts

    1. Mech Part 1

    Located southeast of the Fury Green entrance in a ruined facility with a crash truck. Defeat enemies nearby, then use the Psychic Lasso to pull the truck free from the wall. Interact with the remains to place the first Teleporter Pod.

    2. Mech Part 2

    Found at the northern edge of the Ice Belt. Jump on psychic platforms on the right, go inside, and walk past a large elevator. Use Psychic Grapple to ascend stairs, then back outside by a ledge—here you’ll find this mech part.

    3. Mech Part 3

    Located northeast of the Rings of Stone Shrine. Nearby debris features a big hole, Shren nests, and a mech arm. Use the Thunder Shot to electrify the arm and cause it to fall, then interact with it to retrieve the Mech Part.

    4. Mech Part 4

    In the G.F. Debris south of Chrono Tower, climb onto crates forming a staircase. On the roof, you’ll find this piece sitting there. Use a super missile on the boulders blocking your way, then go inside the nearby door, switch to Morph Ball, bomb rocks, and proceed through the lava-filled course to find this part.

    5. Mech Part 5

    Easiest to find near where you defeated Varmis. Approach the crate there to warp this piece away.

    6. Mech Part 6

    At the Lava Lake Bridge area, inside the Flare Pool. Cross the hill, then go back toward the entrance. Destroy the large rocks blocking your way with a Super Missile, then enter and roll through the Morph Ball tunnel while avoiding lava. Use grapple points at the end to disable the lava via a Boost Ball hologram, then proceed to the top of the rocks to scan the Mech Part.


    Final Mech Part in the Flare Pool

    This last piece is located in the Flare Pool, not Sol Valley. Head to the Lava Lake Bridge room, go down the hill on either side, then return. Fire a Super Missile at the boulders blocking the entrance to gain access, then bomb the rocks in Morph Ball mode to reveal a hole. Roll through the course, avoiding lava, and reach the ridge above your scan point.

    Once you see the Mech Part, destroy the surrounding enemies, then switch to Ice Shot. When the Behemoth mini-boss appears, it will launch fireballs from its mouth. Freeze its mouth with Ice Shot, then shoot the glowing eyes around its mouths. Repeat this to destroy all four eyes.

    After two eyes are destroyed, the Behemoth becomes more aggressive, charging with flaming shockwaves—look for it turning around and raising its backside before attacking. Focus on freezing its mouths when possible to avoid damage from the fireballs and keep shooting the eyes until all are down.

    Destroying all four eyes triggers a cutscene where the Behemoth collapses and knocks down the final Mech Part. Afterward, head back to Fury Green to continue the story.

  • How To Defeat The Hover Shuttle Transport Boss in Metroid Prime 4: Beyond

    How To Defeat The Hover Shuttle Transport Boss in Metroid Prime 4: Beyond

    Metroid Prime 4 Beyond is packed with bosses, both large and small, but the Hover Shuttle Transport is the first fight Samus Aran faces with her friends by her side. Unlike the typical final boss at the end of a dungeon, this battle happens right in the middle of the area.

    After making your way through the depths of Flare Pool with Duke and Armstrong, you’ll realize that Sylux knows you’re there and is determined to eliminate you and your allies. Drones aren’t enough for his plans, so he sends a massive spaceship to attack.

    Here’s how to defeat it and continue moving forward through the Flare Pool dungeon toward your main goal.

    ### How to Beat the Hover Shuttle Transport Boss

    After boarding what seems to be a shuttle heading back to the center of the dungeon, the shuttle will suddenly appear out of nowhere and start firing during a cutscene. Armstrong will punch it, causing your ship to crash and explode.

    Once control is restored, work your way through the facility, passing through a couple of doors until you reach a bridge connecting two parts of the Flare Pool complex. Be prepared to fight because the shuttle will swoop in aggressively.

    The shuttle immediately begins attacking as soon as it appears, destroying the door at the other end of the bridge to trap you out in the open. Quickly start firing rockets at its metal shell—regular gunfire won’t do much here.

    After destroying the door, the shuttle will release standard enemy drones onto the bridge. Take out these enemies first to avoid taking unnecessary damage. Armstrong and Duke will help handle the drones, but if they go down, make sure to revive them quickly.

    The shuttle will then begin destroying the pillars on both sides of the bridge, which normally serve as cover, leaving you exposed. The shuttle is in the open now, so start firing at it. It will shoot slow-moving homing missiles that can be dodged or shot down with normal cannon fire before switching to a purple laser that fires from underneath the ship. Use cover or strafe to avoid these attacks.

    Once the shuttle takes enough damage, sparks will appear on its chassis, and it will begin moving faster across the bridge. Keep firing rockets and dodging its attacks until you weaken it enough to finish the fight. Sylux will then blow a hole into a nearby area for Samus to morph into a ball and escape just as Sylux makes his getaway.

  • How to Defeat Varmis in Metroid Prime 4: Beyond and Solve the Challenge

    How to Defeat Varmis in Metroid Prime 4: Beyond and Solve the Challenge

    Surviving in Metroid Prime 4: Beyond can be challenging. From tiny bugs to other bounty hunters and mutated aliens, everything seems to be trying to destroy Samus Aran. Among the toughest enemies are the bosses found throughout various levels, including the main desert area called Sol Valley.

    One notable enemy is Varmis, a huge sand crustacean you need to chase on your sci-fi motorcycle, Vio-o-la. Here’s what you should know to take down Varmis and retrieve the mech part it has swallowed.

    ### How To Defeat Varmis

    During the fight, you’ll stay on your bike the entire time. Getting off won’t help because your usual weapons are ineffective against this boss. After chasing Varmis into a sandpit, it will charge straight at you with its mouth open. To dodge, steer left or right to gain speed so Varmis misses you. When it does, press the Left Trigger to brake and swing behind it before it escapes.

    The weak spot on Varmis is its tail. To damage it, you need to perform a Power Slide by pressing B, then holding B down while boosting. Sliding into the tail will cause some damage and make Varmis dive back into the sand.

    Use Vio-o-la’s cannon on Varmis’ tail while chasing it. This will slow it down, helping you catch up, and instantly refill your boost meter. If aiming at the tail is tough, try shooting it repeatedly to stun Varmis, giving you more time to aim and perform a Power Slide.

    When Varmis has about half its health remaining, it becomes much more aggressive. It won’t dive into the sand anymore and will jump around the arena, charging at you multiple times. It won’t shoot projectiles, so the best strategy is to avoid its massive body movements.

    ### Helpful Tips
    – Approaching Varmis from the sides allows you to jump off its body, which can help you escape attacks more easily.

    ### Tracking Varmis
    To find Varmis once it buries itself in the sand, look for the tall geyser of sand—it’ll jump out from there. Your radar, showing a red dot, can also help pinpoint its location.

    ### Finishing the Boss
    Continue shooting its tail to slow it down and ram into it with Power Slides until a cutscene triggers. When Varmis collapses with its mouth open, hop off Vio-o-la, transform into a Morph Ball, and roll into its throat. Once inside, plant a Power Bomb to blow it up from the inside and retrieve the mech part it swallowed.

    Now you’ve got the part and might be ready for a well-earned break.

  • How to Defeat the Omega Griever in Metroid Prime 4: Beyond & Completing

    How to Defeat the Omega Griever in Metroid Prime 4: Beyond & Completing

    Get ready, bounty hunters—Metroid Prime 4: Beyond is now available. Explore a dangerous alien world, uncover mysteries, and fight off numerous creatures that want to rip you apart. For newcomers to the Metroid Prime series, this world is especially tough.

    One of the most challenging enemies in the game is the Omega Griever. This boss is found deep inside the Great Mine. It can slow you down and inflict massive damage if you can’t dodge its many attacks. Here’s what you need to know to defeat it and secure the last Teleporter Key.

    How to Defeat the Omega Griever

    Before battling the Omega Griever, it’s important to understand its attack moves. Here’s a list of its main attacks:

    Attack Description
    Claw Swipes The boss swings its claws twice in front of it.
    Ground Pound It raises its arms and slams the ground, creating shockwaves. The number of shockwaves increases as its health drops.
    Acid Wave After recovering from a stun, it fires a wave of acid slime forward.
    Acid Balls While on the wall, it shoots up to five acid orbs at you.
    Tongue Grab It lunges its long tongue to catch you. If it gets a hold, it pulls you in, damaging you and moving you toward its mouth.
    Pounce It leaps across the arena trying to crush you. The more damage it takes, the more it pounces.
    Giant Acid Ball When at half health, it occasionally throws a huge ball of acid at you.
    Acid Beam When below 50% health, it fires a rotating, 360-degree acid beam.

    When the fight begins, the Omega Griever skitters around the wall, spitting acid balls. If hit, they cause significant damage and force you to mash the A button to escape. Since it shoots these quickly, a successful hit usually means taking full damage.

    Dodging and Attacking

    You want to keep dodging when it prepares to shoot the acid ball. After firing, it pauses for a few seconds—a perfect chance to shoot. Focus on its legs and arms, which are unarmored and vulnerable. Once enough damage is dealt, the boss reveals a glowing red weak spot on its stomach. Shooting this weak point knocks it down.

    The real fight starts once it’s on the ground. It will attack with claws, ground pounds, tongue grabs, and pounces. To avoid most attacks, stay on one side of the boss throughout the fight. This helps you keep targeting its legs and dodge many attacks. When it performs a ground pound, jump over it. As its health drops, it will unleash more shockwaves, so jump forward to clear both.

    Using Environment and Weak Spots

    Use elemental shots to damage the legs—they take quick, decent damage and are free of armor, especially if you’ve upgraded your Shot Expansions. When the boss hits around 50% health, it becomes vulnerable. It will stagger and stay in place facing downward. Switch to Morph Ball mode, roll under it, and drop bombs to damage it. Then, switch back to normal mode and shoot the exposed weak spot on its belly for big damage.

    Handling Summoned Enemies

    Once at about 30% health, it jumps back onto the wall and calls a wave of normal Grievers. Take them out quickly to avoid getting overwhelmed, especially from the Acid Ball attack. Using the Ice Shot helps freeze them in place, making it easier to handle.

    Repeat the process of attacking from the wall. The boss is most vulnerable right after its acid ball attack, so wait for that window to deal damage.

    Final Phase Strategies

    When the Omega Griever reaches a little under 50% health, it introduces its Acid Beam and Giant Acid Ball. Avoid the slow-moving Giant Acid Ball by dodging left or right. To escape the Acid Beam, turn into Morph Ball and roll slightly toward the boss—this will keep you out of the beam’s range.

    Eventually, the boss will collapse to the ground, tongue sticking out. Do NOT get close. It will grab you and deal a lot of damage. Instead, stay back and keep shooting its legs until it stands up again.

    Ending the Fight

    Defeating the Omega Griever grants you the Psychic Power Bomb ability and the final Teleporter Key. You’ve now toppled one of the toughest bosses in the game!

  • How to Defeat Sylux in Power Core: Completing & Solving in Metroid Prime 4

    How to Defeat Sylux in Power Core: Completing & Solving in Metroid Prime 4

    Metroid Prime 4: Beyond is out now, and it’s time to don the bounty hunter’s suit once more as you step into Samus Aran’s shoes. You’ll navigate through deserted facilities, constantly dodging danger as everything around you fights to take you down.

    This time, your main opponent is Sylux, a rival bounty hunter who pops up repeatedly throughout the game. Always looking for a chance to kill Samus, Sylux makes a surprise appearance for a one-on-one fight right after you acquire the Thunder Chip. Here’s how to handle this tough boss so you can come out on top with your new upgrade.

    How to Defeat Sylux

    In this second fight, Sylux will focus on overwhelming you with various attacks, but he’s more aggressive and faster this time. He’ll also boost his moves, making each attack more dangerous and harder to dodge.

    Key Attacks

    Attack Description
    Homing Missiles Sylux fires five homing missiles in groups from his body.
    Energy Wave He jumps into the air, then slams down, creating a large energy wave you can jump over. He might chain multiple slams, producing several waves.
    Melee Dash Sylux raises his arm and quickly dashes to your last position, swinging in a wide arc. His movement is unpredictable this time, and he may swing twice during the attack.
    Shooting He fires his cannon while running around, forcing you to stay alert.
    Electric Floor Sylux floats, charges his cannon with a large energy ball, then electrifies the ground and nearby grapple points as he moves around the arena.
    Energy Bombardment Flying in the air, Sylux rushes toward you while firing a rapid burst of energy bombs behind him.

    When the fight begins, focus on identifying all the Psychic Grapple points dotted around the room. These points form a ring, with two on adjacent walls you can hang onto. Spotting these early will be crucial, as you’ll need to quickly latch onto them later, with limited time to search during critical moments.

    Sylux’s attacks will now be faster and more intense. For example, his Energy Wave can now hit multiple times, with him slamming the ground and sometimes launching taller energy waves you will need to double jump over to avoid damage. Missiles remain your best weapon due to his erratic movement, which makes hitting him with your primary shots more difficult. Watch for the windows after he uses the tall Energy Wave—he’ll often kneel to recover, giving you a chance to land hits.

    Tips for the Boss Fight

    Your biggest threat is the Electric Floor move. Sylux will float, raise his arm, and gather energy, signaling he’s about to electrify the arena. As soon as sighted, stop what you’re doing and look for a grapple point nearby. swinging from grapples allows you to avoid damage and even shoot Sylux as he moves around.

    Be aware—Sylux can electrify the grapple point you’re on if he gets close, knocking you off and leaving you vulnerable. Keep your distance and stay mobile. Use the arena’s pillars to block his attacks and keep moving to dodge his rapid-fire missiles and energy waves.

    Drain Sylux’s health with your missiles, especially since his unpredictable movement makes melee or shot-based attacks less reliable. After he launches a tall Energy Wave, he’ll often fall to his knees, creating a perfect opening for damage.

    Final Notes

    Sylux will now combine attacks and push your mobility to the limit. The key to winning is staying constantly on the move, using cover, and attacking with missiles during his recovery windows. When you finally defeat him, you’ll reveal he’s controlled by another robot. Once he’s down, return to Mackenzie to claim the Thunder Shot upgrade and progress further.

  • How to Defeat Sylux in the Volt Forge: Completing Solving in Metroid Prime 4

    How to Defeat Sylux in the Volt Forge: Completing Solving in Metroid Prime 4

    With the release of Metroid Prime 4: Beyond, players control bounty hunter Samus Aran as she explores an alien world, battling hostile wildlife, aggressive robots, and some familiar enemies. Longtime fans of the series may recall Sylux, a rival bounty hunter who first appeared back in 2004. Now, players will face off against him again in a significant boss battle in the Volt Forge, right after defeating the Flight Drone MCU. Here’s what you need to know to beat Sylux and survive his attacks.

    How To Defeat Sylux

    Sylux is a very aggressive foe with quick, powerful attacks. His main moves include:

    Attack Description
    Homing Missiles Sylux spawns six missiles, firing them in sets of three that track your position.
    Energy Wave He leaps into the air and then slams down, creating a large energy wave you can jump over.
    Melee Dash Sylux raises his arm and quickly dashes toward your last location, slashing in an arc.
    Shooting He fires his cannon at you from both the ground and the air.
    Energy Tornado When he’s down to 75% health, Sylux shields himself with an energy tornado, reflecting projectiles. He spins rapidly, trying to crash into you.
    Energy Bombardment Sylux moves to the center and fires energy bombs in rings, with each wave expanding outward.

    In the start of the fight, Sylux will mix and match these attacks—using homing missiles, energy waves, melee dashes, or shooting at you. To counter:

    • Homing Missiles can be dodged by dashing to either side just before they hit or destroyed using your weapons.
    • Energy Wave can be avoided by jumping over it.
    • Melee Dashes are best sidestepped as Sylux rushes toward you.

    Focusing on avoiding damage and firing your weapons steadily is key, especially as you chip away at his health. When you do enough damage (around 75%), Sylux enters a second phase with new tactics.

    Second Phase: Psychic Bombs and Defensive Shield

    Once Sylux’s health drops below 75%, he will activate a shield that reflects projectiles. To disable it:

    • Scan his energy barrier, then transform into Morph Ball.
    • Move to any spot along the outer wall, then wait for Sylux to charge at you.
    • When he does, deploy three Psychic Bombs in a line and quickly move out of their way. If timed correctly, the bombs will detonate and hurt Sylux.

    Tip: Sylux’s movements can be unpredictable, so timing the bombs involves some trial and error. Try to coax him into hitting the wall, which makes his movement more predictable and easier to anticipate.

    Hitting Sylux After the Shield Breaks

    After taking enough damage with Psychic Bombs, Sylux will stop spinning and fall to his knees. Quickly exit Morph Ball and fire rockets into him. He’ll then recover, ascending to the center of the map.

    In the next phase, Sylux will either launch an Energy Wave or Energy Bombardment attack.

    • If he chooses Bombardment, this is your best chance to hurt him. His bombs at max range cannot reach you if you position yourself against the back wall. Keep firing rockets or missiles until he reaches about half health, then he’ll revert to Energy Tornado mode.

    • During the Energy Tornado, Sylux reflects projectiles with his shield and spins rapidly, attempting to hit you. Dodge his attacks until he slows down again.

    • Once out of tornado form, Sylux might add melee dash attacks to his arsenal, so stay alert and keep moving.

    Continue damaging Sylux until his health depletes completely, which triggers a cutscene. As a reward, you’ll earn an Energy Tank and can proceed further in the Volt Forge.

  • How to Defeat Carvex in Metroid Prime 4: Beyond Solving

    How to Defeat Carvex in Metroid Prime 4: Beyond Solving

    The wait is finally over—Metroid Prime 4: Beyond has been released. Players take on the role of Samus Aran once again, exploring another dangerous, alien world.

    As with earlier games in the Metroid Prime series, players will face various bosses, including a large plant called Carvex. Here’s what you need to know to defeat this boss and come out victorious.

    ### How to Defeat Carvex

    The fight with Carvex has two main parts: the vines and the plant’s body.

    When the battle starts, shoot the bulbous armored tip of the vine near the top with your Missiles. Once the armor is destroyed, target the gooey, weakened section underneath to cut the vine and expose Carvex’s shell.

    During this phase, the vine may attack in three ways:
    – It might slam down from above. Watch for it to tip back; if it does, dodge left or right quickly to avoid the strike.
    – The vine may hit the ground and stay there for a moment. In that case, it will spin around the arena, and you’ll need to jump over it.
    – The final attack involves the vine launching three floating seeds that home in on Samus. They are launched in groups of two. Destroying these seeds will give you energy and missile pickups needed for the fight.

    When the vine is cut, Carvex will open up, revealing a weak spot near its base. Now, you can fire at Carvex directly to gradually deplete its health. Throughout this phase, it will continually shoot spikes from the ground, so keep moving side to side while firing.

    Once Carvex loses about a quarter of its health, it goes back into a defensive mode and calls in two vines instead of one. These vines are tougher; their attacks, such as spinning, will now require you to dodge both at once. To make it easier, you need to destroy their armor first before severing them within about five seconds of each other. Focus on destroying their shells with Missiles, but don’t shoot the weak points until their armor is gone. Only then should you sever the vines to force Carvex to reopen.

    Repeat the process of attacking Carvex’s exposed weak spot until it drops to around half health. When that happens, Carvex will close up again.

    Next, the boss spawns three vines at once. The strategy remains the same but much tighter. First, remove their armor until they are vulnerable. Then, wait for the vines to slam down and jump to the back wall. During this slam, attack by shooting the flying vines. Carvex won’t replace the vines during this attack, giving you a brief window to take out all three at once. Even if you only manage to shoot one, you’ll have a couple of seconds to finish destroying the others before new ones appear.

    After eliminating all three vines, Carvex will open up mid-battle. Shoot it until only about a quarter of its health remains. At this stage, multiple vines will shoot out, blocking your view and becoming more aggressive—they will slam down if you enter their designated area. Repeat the previous vine-destruction tactics to sever all three vines. Once they’re gone, Carvex will fully open again.

    Pour everything into damaging Carvex during this final phase. When it hits the last quarter of health, it will take large swings with vines obscuring your sight, so stay in motion and keep shooting. Destroying the vines again will leave Carvex vulnerable for a final blast.

    Defeating Carvex rewards you with Psychic Bombs for your Morph Ball, a handy upgrade to finish the fight.

  • How to Complete Aberax in Metroid Prime 4: Beyond and Solve Its Puzzle

    How to Complete Aberax in Metroid Prime 4: Beyond and Solve Its Puzzle

    Metroid Prime 4: Beyond is packed with challenging bosses, and these alien monsters can really put your skills to the test. Unlike most Nintendo first-party games, you’ll need a good grasp of Samus Aran’s movement and fighting techniques to stay alive and win each battle.

    This is especially true when facing Aberax, the very first boss. This ugly bug-like alien works for Sylux and ambushes Samus on the planet Tanamaar while you’re helping the Galactic Federation. Although he’s easier than the other bosses on Viewros, Aberax is still a tough opponent. Here’s how to defeat him.

    How to Defeat Aberax

    The fight starts with Aberax shooting a barrage of yellow plasma shots from his dual shoulder cannons. These shots don’t do much damage, and dodging them is simple—just lock on and strafe to the sides.

    Weak Points

    After the initial salvo, Aberax uses yellow shields on his arms to protect green glowing weak spots across his upper body. To hit him effectively, you’ll need to destroy these shields first. Focus on damaging the shields, which aren’t easy to hit — you’ll need to constantly aim precisely using free aim mode to land your shots. Once the shields are down, you can start chipping away at his health. Destroying all shields only takes a few shots, and then you can attack his exposed belly to deal significant damage.

    Aberax will continually reposition his shields as you attack, so switch between weak points often to keep up the pressure.

    Strategy

    In the early phase, Aberax fires glowing green orbs that you can shoot to earn extra rockets and health pickups. These are easy to dodge, but grabbing the pickups can be tricky at times. Once you reveal his stomach weak point, he’ll start using new attacks:

    • A fast beam emanating from his belly.
    • An area-of-effect jump attack that you must dodge by either jumping or activating Morph Ball mode.

    Keep strafing and attacking his weak spot with shots and rockets. Before draining a quarter of his health, Aberax will spawn three more Metroids within his body. Focus on damaging the weak point quickly—shoot a few shots, then send a rocket or two to maximize damage. Once his health is reduced, he’ll enter the second phase, spawning more weak points.

    Second and Third Phases

    Aberax will start a large area attack, which requires jumping at the right moment to avoid. Missing these dodges can mean instant death, so timing is critical. During these phases, he will also send out a quicker, more varied attack pattern, and you’ll need to keep dodging, firing at his weak points, and collecting any ammo or health orbs on the field.

    In the final stage, you’ll need to destroy four separate weak points while avoiding a faster flow of attacks. The core approach remains the same: dodge carefully, maintain pressure, and collect pickups whenever possible. Holding down the fire button helps gather nearby health or ammo pickups automatically, which is a big help in tougher difficulties.

    Aberax also occasionally throws up golden barriers over his weak points that can be destroyed with standard shots or rockets. Doing so gives you extra ammo or health orbs, aiding your fight.

    During the last phase, Aberax will occasionally grab Samus. To escape, mash the ‘A’ button repeatedly until you break free, then resume attacking. He also develops a habit of grabbing during this phase, so always be ready to mash to free yourself.

    Eventually, if you survive long enough, Aberax will fall. The fight ends just as Sylux bursts in, attempting to steal the ancient Lamorn artifact.

  • Completing Metroid Prime 4: Studio to Tackle Metroid Prime 5 Next

    Completing Metroid Prime 4: Studio to Tackle Metroid Prime 5 Next

    Metroid Prime 4: Beyond is still set to release later this year, and we might get a specific date during a rumored Nintendo Direct event coming up this month. There’s also speculation about what Retro Studios might focus on next.

    Retro has mostly worked on Donkey Kong and Metroid Prime since it started, with a short break for a Mario Kart game on the Nintendo DS. With a new Metroid Prime game on the way, many fans are curious if Retro will develop another 2D Donkey Kong, especially since the character has gained popularity due to the recent Bananza game.

    Metroid Prime 4 Beyond Studio Will Reportedly Start Metroid Prime 5 After Launch

    Unfortunately for Donkey Kong fans, it seems that Retro will not be shifting to that franchise. According to insider Reece “Kiwi Talkz” Reilly, those hoping for a new Donkey Kong game after Metroid Prime 4: Beyond are mistaken. Reilly suggests it’s “unlikely Retro returns to Donkey Kong again.”

    Reilly believes Retro’s skill in making Metroid Prime games is precisely why they won’t switch to a different franchise after Metroid Prime 4: Beyond. They even claim Retro could start working on Metroid Prime 5 right away after the release. However, Reilly doesn’t think Retro will be just known as “the Metroid Prime studio,” hinting they might explore a new game concept after Metroid Prime 5.

    As with any claims from insiders, it’s good to take this information with caution. It makes sense that Retro is a unique Nintendo studio, and Nintendo probably wants them to create distinctive games instead of a Donkey Kong title that many other developers could also handle. This is disappointing for 2D Donkey Kong fans, but as Bananza has shown, there are plenty of other developers who can create great Donkey Kong games.

  • Completing the Ultimate Daikyu Prime Build in Warframe

    Completing the Ultimate Daikyu Prime Build in Warframe

    Warframe offers a wide range of characters, planets to explore, and missions to complete. To unlock more secrets of the Sol System, you’ll need a robust arsenal. That’s why you can craft and refine various weapons, including guns, swords, and bows.

    One of the standout bows in the game is the Daikyu. This bow excels as a standalone weapon for sniping enemies, and it has an impressive synergy with the Nikana sword family through a specific Amalgam mod. Here’s everything you need to know about it.

    How to Get All Variants of Daikyu

    You can find the blueprint for the standard Daikyu by researching it in the Tenno Lab within your dojo. After the research is completed, you can craft the weapon using the following materials:

    Daikyu Research Requirements

    3 Neurodes

    500 Salvage

    300 Polymer Bundle

    50 Rubedo

    Credit Cost: 5,000

    Build Time: 72 Hours

    Daikyu Crafting Requirements

    1 Neurodes

    1 Forma

    300 Rubedo

    1,200 Salvage

    Credit Cost: 20,000

    Build Time: 12 Hours

    Crafting the Daikyu Prime

    You can obtain the Daikyu Prime by opening Void Relics in Void Fissure Missions. Along with the weapon blueprint, you’ll need four components (grip, string, lower limb, and upper limb). Each piece drops from the following relics:

    • Blueprint: Lith Q2 (Common)
    • Grip: Neo D10 (Rare)
    • String: Axi V12 (Common)
    • Lower Limb: Lith A8 (Uncommon)
    • Upper Limb: Meso P16 (Uncommon)

    You can trade all four parts with other players, making it generally easier to obtain the Daikyu Prime compared to its non-Prime version. Crafting the Daikyu Prime will require the following materials:

    Daikyu Prime Crafting Requirements

    1 Daikyu Prime Grip

    2 Daikyu Prime Strings

    1 Daikyu Prime Lower Limb

    1 Daikyu Prime Upper Limb

    Credit Cost: 15,000

    Build Time: 12 Hours

    Daikyu Stats and Features

    Daikyu Stats

    Daikyu Stats

    Damage (Projectile)

    • 210 Impact Damage
    • 280 Puncture Damage
    • 210 Slash Damage

    Total Damage

    700

    Multishot

    1

    Fire Rate

    1

    Critical Chance

    34%

    Critical Multiplier

    2.0x

    Status / Projectile

    46%

    Misc.

    Weapon Type

    Bow

    Trigger Type

    Charge

    Accuracy

    Very High

    Magazine

    1

    Reload Speed

    0.6 Seconds

    MR Requirement

    Mastery Rank 10

    The Daikyu is a highly precise bow capable of dealing three types of physical damage. It boasts a solid Critical Chance base percentage and a high Status Chance percentage, which allows you to enhance it with elemental damage as well. With a minimal charge time, you can easily take out enemies one by one.

    Daikyu Prime Stats

    Daikyu Prime Stats

    Damage (Projectile)

    • 225 Impact Damage
    • 300 Puncture Damage
    • 225 Slash Damage

    Total Damage

    750

    Multishot

    1

    Fire Rate

    1

    Critical Chance

    40%

    Critical Multiplier

    2.4x

    Status / Projectile

    50%

    Misc.

    Weapon Type

    Bow

    Trigger Type

    Charge

    Accuracy

    Very High

    Magazine

    1

    Reload Speed

    0.6 Seconds

    MR Requirement

    Mastery Rank 15

    The Daikyu Prime enhances every aspect compared to its predecessor, from base damage to Critical Chance percentages and Critical Damage Multipliers. It’s a straightforward choice for your collection.

    Daikyu Builds

    Headshot/Melee Synergy Build

    Forma

    6, or 8 if using the base Daikyu version.

    Variant

    Daikyu Prime/Daikyu

    Arcane – Primary Merciless

    On Kill:

    • +30% Damage for 4s. Stacks up to 12x.
    • +30% Reload Speed

    Exilus Mod – Terminal Velocity

    +60% Projectile Speed

    Mod #1 – Amalgam Daikyu Target Acquired

    • +75% to Headshot Multiplier
    • +3% Life Steal on Nikanas
    • 60% chance to recover used arrows

    Mod #2 – Galvanized Chamber

    • +80% Multishot
    • On Kill: +30% Multishot for 20 Seconds. Stacks up to 5x.

    Mod #3 – Amalgam Serration

    • +155% Damage
    • +25% Sprint Speed

    Mod #4 – Vile Acceleration

    • +90% Fire Rate (x2 for Bows)
    • -15% Damage

    Mod #5 – Vital Sense

    +120% Critical Damage

    Mod #6 – Critical Delay

    • +200% Critical Chance
    • -20% Fire Rate (x2 for Bows)

    Mod #7 – Hammer Shot

    • +60% Critical Damage
    • +80% Status Chance

    Mod #8 – Any Bane Mod

    +x1.3/1.55 Damage to your chosen faction.

    This build focuses on maximizing the Daikyu’s potential both as an independent weapon and as part of a more extensive setup. The Amalgam Daikyu Target Acquired mod allows you to regain health with every hit from your Nikana, greatly enhancing your survivability. This build improves Critical Chance and Critical Damage Multiplier, ensuring you can consistently land high-damage shots while remaining viable in tougher missions.

  • Completing the Search for All Stellaris Prime Orange Goo in Savage Planet

    Completing the Search for All Stellaris Prime Orange Goo in Savage Planet

    In Revenge of the Savage Planet, you wake up after spending 100 years in cryosleep, floating through space until you land on the planet Stellaris Prime. It’s a stunning yet wild world, and your mission is to make it more livable for humans. That was the plan—until you got laid off. Now, it’s up to you to figure out a way back home and seek revenge on the corporation that messed up your life.

    While you’re on this adventure, why not enjoy yourself and get as strong as possible? A century in cryosleep has left your body in rough shape. Fortunately, Stellaris Prime is packed with Orange Goo, which you can consume to boost your strength. Here’s everything you need to know about it.

    What Does Orange Goo Do?

    As you indulge in Orange Goo, it’s important to understand what it actually does. Although the game doesn’t give a clear explanation, you can be sure it only makes you stronger—no downsides at all! That’s why it’s found all over this star system. The more you consume, the more your Health and Stamina will improve.

    However, don’t expect your Health and Stamina to grow with every single Orange Goo you munch on. Instead, each one increases the amount you need for the next upgrade. For example, eat one, and the next upgrade will require two, then three, and so on until you reach the maximum. Time to get munching!

    You can’t find an excess of Orange Goo, so to max out your Health and Stamina, you’ll need to gather every last one.

    Orange Goo Locations on Stellaris Prime

    Every planet in the game has some Orange Goo, but Stellaris Prime has the most. Other planets have a total of 24 pieces each, while Stellaris Prime boasts a whopping 31 pieces of Orange Goo. You’ll be returning here again and again to gather all the goo.

    Some images may indicate other areas, but they refer to the region marked in white on the map.

    Pfyzzich Beach – Four Orange Goo

    You’ll find four pieces of Orange Goo across Pfyzzich Beach. Here’s where to locate them:

    • The first goo is near the 3D printer on the beach, but you’ll need a blaster to break the crystals around it.
    • The second piece is hanging from the wall next to a large pillar in the west.
    • The third goo is located just after you jump across a gap before climbing up the hollow tree trunk.
    • The last piece is found before entering the large swamp of Nu Florida.

    Slarragon Forest – 14 Orange Goo

    Slarragon Forest contains the highest number of Orange Goo in the game, with 14 total pieces. Here’s how to find them:

    • The first piece is on top of a pillar. A Gelatinous Blob jump pad is below it.
    • The second is on a mushroom extending from a large rock formation.
    • The next one can be found on a small rock in the water—easy to reach.
    • One goo is situated on a rock in the center of this area. Just watch out for the strong winds as you approach.
    • This piece is on top of a large pillar east of the teleporter. You’ll need the water hose to grow some mushrooms.
    • Find the next goo inside a cave, which opens by feeding Kiwi Slugs to a living tree.
    • There’s one hidden behind a cracked wall. Grab a Bombegranate from a nearby mushroom to break it.
    • This goo is in an area filled with electrified Ferrous Goo. You can either jump over it, or use the Water Hose to wash it away.
    • Find the next piece in an underpass covered in webs, which requires Lava Goo to clear.
    • The goo is located just outside Spiderling’s Grotto. Burn the webs with Lava Goo to access it.
    • There’s a piece underwater that requires the Underwater Scooter to reach.
    • Another goo is on top of a large pillar surrounded by water. You can either glide from the east or use the free grapple to get there.
    • This next piece can be reached in different ways, either with Grapple Points or by having a triple jump, or again, using the free grapple.
    • The final piece is accessed by collecting nearby Blight Bombs and clearing out the Amber to reveal multiple grapple points leading to it.

    Chuggler’s Swamp – Seven Orange Goo

    There are seven pieces of Orange Goo in Chuggler’s Swamp. Here’s where to find them:

    • At the top of the tree where you receive the Lasso Whip, you’ll find an Orange Goo hidden beneath some blobs.
    • This goo hangs above the toxic gas from a rock overhead. You can reach it by jumping from the mushroom below.
    • The next piece is located on one of the large mushrooms, surrounded by spikes. Just jump off from the Grind Rail to reach it.
    • This piece is hidden behind a cracked wall; you will need a plant with Bombegranates on a nearby mushroom.
    • Another goo is found in a cave to the east infested with Stinging Bloatus enemies.
    • The next piece can be found on the ground. You can hurry to grab it or wait for the Toxic Gas Filter.
    • The final goo is high up and reachable via a series of nearby Grind Rails.

    Cliffs of Abaddoon – Five Orange Goo

    There are five pieces of Orange Goo to locate in the Cliffs of Abaddoon. They are:

    • The first piece can be found on one of the mushrooms as you ascend the cliffs.
    • This goo is hidden in tall grass in the northern part of the area. You’ll need to whip away the blobs around it.
    • There are two pieces of Orange Goo here that you can release by feeding Kiwi Slugs to the tree.
    • This piece is found in a small cave, which you can enter by destroying the entrance with a crystal picked up with the Mag Fork.

    Spiderling’s Hollow – One Orange Goo

    Inside Spiderling’s Hollow, there’s only a single piece of Orange Goo. Here’s where to find it:

    • In the hollow, you’ll need to use Lava Goo to burn away the webs blocking the Orange Goo on the ceiling.

    Congratulations! You’ve now collected every single piece of Orange Goo on Stellaris Prime. If you’ve managed to find them all here, you’re likely equipped to track them down on the other planets as well!

  • Amazon Has AMD And Nvidia GPUs But Requires Prime Membership

    Amazon Has AMD And Nvidia GPUs But Requires Prime Membership

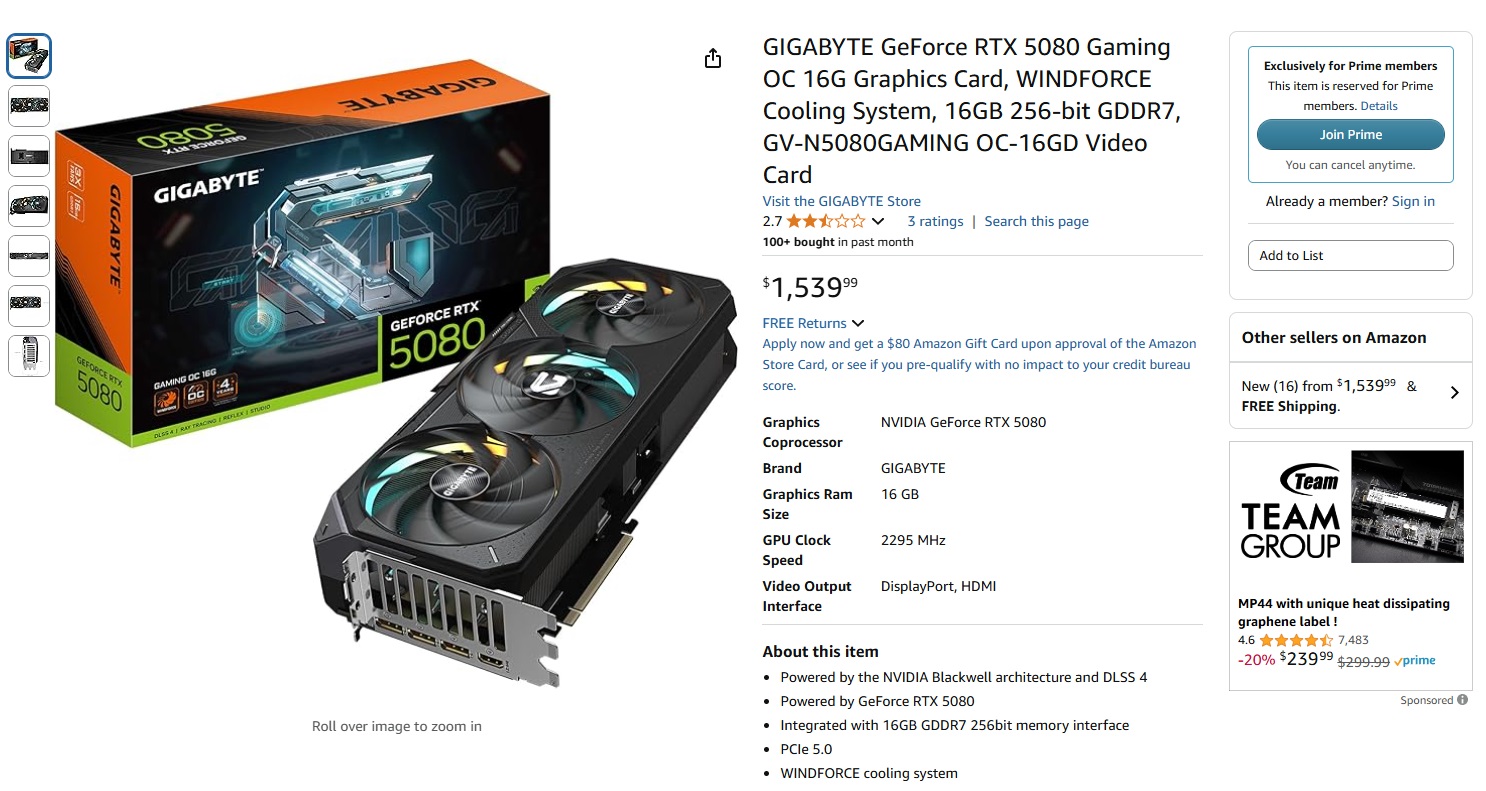
    Amazon seems to be taking steps to address the issue of GPU scalping by reserving a portion of its inventory of Nvidia RTX 5000 and AMD Radeon 9000 series graphics cards exclusively for Prime subscribers. As reported by Club386, certain high-end GPUs are only accessible to Prime members, which could help mitigate the effects of scalpers and resellers. Interestingly, Amazon has not officially categorized this initiative as an anti-scalping measure, leaving some room for conjecture regarding its underlying purpose.

    A range of Nvidia RTX 5000 series graphics cards, including the RTX 5080 and RTX 5070, are currently marked as “reserved for Prime members” on Amazon, meaning that non-Prime users cannot purchase them. The top-tier RTX 5090 is notably absent from this reservation, likely due to its steep price tag, while the RTX 40 series remains unaffected, potentially because of limited availability.

    In the same vein, several AMD Radeon 9000 series GPUs, such as the XFX Quicksilver Radeon RX 9070 OC and Sapphire Pulse Radeon RX 9070 XT, are similarly restricted to Prime members. However, these GPUs are currently being sold at inflated prices.

    Whether intentional or not, this strategy may deter individuals hoping to buy GPUs in bulk for resale at marked-up prices. Scalping has long plagued the GPU market, with high demand and limited supply often leading to exorbitant prices on secondary platforms. By requiring a Prime subscription, Amazon introduces a paywall that may discourage opportunistic sellers while giving genuine gamers and enthusiasts a better chance at purchase.

    This development could be beneficial for those frustrated by previous shortages, but it also raises concerns about accessibility. Critics argue that requiring a paid membership can place an extra burden on consumers who are already facing the high costs associated with new GPU technologies.

    Neither Nvidia nor AMD have publicly commented on Amazon’s apparent strategy, leaving questions about whether this is a collaborative effort or a standalone decision by the retailer. Additionally, it remains unclear if this policy will extend beyond initial launch periods or apply to future product releases.

    For now, those aiming to secure one of these next-generation GPUs might consider a Prime subscription as a potential advantage in their quest to make a purchase.

  • Best Things To Buy On Amazon Prime Shopping Day 2021

    Amazon Prime Shopping Day 2021 is now confirmed! On Sunday, Amazon announced that Prime Day 2021 will be taking place on the 13th of October and the 14th of October.

    (المزيد…)