Tag: outfit

  • Every Outfit and How to Complete Them in Pragmata

    Every Outfit and How to Complete Them in Pragmata

    Any game that emphasizes style often considers outfits as a key feature. In Pragmata, while fashion isn’t the ultimate goal, it still feels great to look good. Luckily, outfits are unlocked fairly early and continue to be available as you progress. There’s a good variety for both Diana and Hugh, and here’s how to unlock all of them.

    This guide contains spoilers for Pragmata.

    How to Unlock New Outfits

    Most outfits are obtained through the Bingo Board system. After finishing the Solar Power Plant Sector, you’ll meet Cabin and learn about the Bingo Board, which offers a range of mysterious prizes. Outfits are unlocked using Cabin Coins, which you can find throughout the game. There are multiple Bingo Boards, and each features at least one outfit.

    A few exceptions exist. Completing the game unlocks a special outfit, as does a post-game activity that grants outfits for both Hugh and Diana. Plus, outfits from the deluxe edition are available as well.

    Do Outfits Have Any Effects?

    Outfits are purely for looks—they don’t affect gameplay. Feel free to wear any outfit you like without worrying about how it impacts your experience. Hugh’s outfits tend to have more dramatic changes compared to Diana’s early gear, though her post-game outfits introduce more variation.

    Every Outfit and How to Unlock Them

    Hugh and Diana have the same number of outfits—nine in total, with additional options from the deluxe edition. Here’s how to unlock all of them in the base game:

    Hugh

    Outfit Name How To Unlock Image
    Delphi Suit Default
    Exolayer Trainee Bingo Board – Bottom Right Exolayer
    Legion Zero Associate Bingo Board – Blackout Legion Zero
    Shadow Walker Executive Bingo Board – Top row, left Shadow Walker
    Exolayer Type-B Associate Bingo Board – Bottom row, third right Exolayer Type-B
    Legion Zero Type-B Specialist Bingo Board – Blackout Legion Zero Type-B
    Star Lily Complete the game Star Lily
    Astro Classic Complete the game Astro Classic
    Heartbeat Executive Bingo Board – First reward Heartbeat
    Shadow Executor Executive Bingo Board – Middle row, right Shadow Executor

    Diana

    Outfit Name How To Unlock Image
    Cradle Jacket Default Cradle Jacket
    Lunar Aqua Trainee Bingo Board – Blackout Lunar Aqua
    Lunar Black Specialist Bingo Board – Second row, third right Lunar Black
    Pink Pop Complete the game Pink Pop
    Star Lily Executive Bingo Board – Blackout Star Lily
    Lunar White Director Bingo Board – Blackout Lunar White
    Lunar White Complete the game Lunar White
    Shadow Walker Executive Bingo Board – Top row, left Shadow Walker
    Heartbeat Executive Bingo Board – First reward Heartbeat

    With this, you can unlock and enjoy every outfit available in the game through regular play.

  • How the Tifa Outfit Completes Your Experience in FF7 Remake’s Solving

    How the Tifa Outfit Completes Your Experience in FF7 Remake’s Solving

    Early in Final Fantasy 7 Remake, Tifa asks Cloud to go out for the evening. She then suggests that Cloud choose her outfit for their “date.” You can pick from three options: “Something Mature,” “Something Sporty,” or “Something Exotic.” This choice doesn’t seem to have a big impact, and the date itself doesn’t happen because the team gets busy attacking Mako reactors.

    However, this decision does influence later events in a small way. Before making your choice, it’s helpful to know what each option results in so you can pick based on that information. Here’s what your decision affects and the outcome of each choice.

    Updated on February 20, 2025, by Seth Parmer:
    With Final Fantasy 7 Remake coming to the Nintendo Switch 2, we revisited this guide to add more details and ease-of-use tips, helping you see what’s needed to unlock this choice and what each dialogue option unlocks!


    What Does Tifa’s Outfit Choice Affect?

    During the third chapter of Final Fantasy 7 Remake, you will spend time with Tifa and Cloud in the Sector 7 Slums. If you complete all side quests in this chapter, you unlock the “Discover: Alone at Last” activity. During this, Tifa invites Cloud out and asks him to choose her outfit—this choice affects her look later in the game during the ninth chapter, when she disguises herself as a bride candidate for Don Corneo in Wall Market.

    This choice only changes Tifa’s appearance in that scene; it doesn’t impact the story or events. The options Cloud can select are:

    • Something Mature
    • Something Sporty
    • Something Exotic

    Each choice results in a very different appearance. They also bring some brief, unique lines during the scene and afterward, but these are subtle and don’t significantly influence gameplay or story, so there’s no need to worry about missing anything.


    Prerequisite Side Quests

    Before you can choose Tifa’s outfit, you must complete certain side quests in Chapter 3, Home Sweet Slum. These are called “Odd Jobs” and include:

    • Chadley’s Report
    • Rat Problem
    • Nuisance in the Factory
    • Lost Friends
    • On the Prowl
    • Just Flew in From the Graveyard

    Completing all six of these quests is necessary to unlock Tifa’s outfit choice. It’s worth taking your time to do everything in the Sector 7 area to ensure the option becomes available.


    All Dress Options for Tifa

    Once you’ve completed the prerequisites, you can see how each choice shapes Tifa’s appearance during the “Discover: Alone at Last” scene. Each dress not only looks different but can also alter some dialogue lines during the scene and possibly later.

    Here are the options:

    Choice Dress Description Image Preview
    Something Mature Elegant, sophisticated look
    Something Sporty Casual, activewear style Sporty Dress
    Something Exotic Unique, eye-catching outfit Exotic Dress

    How The Dress Choices Work

    Choosing one of these outfits results in a drastically different look for Tifa later in the game, especially during her disguise sequence in Wall Market. The dialogue lines are subtle but can be distinct during the scene and potentially affect some minor interactions afterward.

    To see all possible outfits and how they differ, you can refer to the images above. If you’re aiming for specific achievements or just want to experience all versions, selecting each outfit in different playthroughs is the way to go.

    In summary:

    • The option you choose influences Tifa’s appearance during her Wall Market disguise scene.
    • It does not change major story points or gameplay beyond appearance and minor dialogue variations.
    • Completing all related side quests in Chapter 3 is necessary to unlock this choice.

    This decision adds a layer of personalization and replayability, giving you different visual styles for Tifa based on your preferred choice.

  • Discover All School Outfit Bubbles for Completing and Solving in Heartopia

    Discover All School Outfit Bubbles for Completing and Solving in Heartopia

    Heartopia has a new surprise—a full school uniform outfit! You can unlock this stylish blue and white look by finding all ten clothing bubbles hidden around the map.

    If you collect all ten bubbles, you’ll get a complete outfit that includes a blue blazer, white pants, and accessories perfect for a nerd-chic style. If you like this look or just want some of the pieces for yourself, here are all the locations where you can find these school uniform outfit bubbles.

    ### All School Uniform Outfit Bubble Locations

    The Heartopia free school uniform outfit includes ten pieces, each hidden in a bubble somewhere on the map:

    – Color-Blocked Fedora
    – Lace Bow
    – Heart Ear Studs
    – Square Glasses
    – Academic Suit
    – Monocolor Suit Pants
    – Plaid Pleated Skirt
    – Simplistic Knee Socks
    – Monocolor Loafers
    – Color-Blocked Messenger Bag

    #### Monocolor Loafers Location

    The first bubble is in Central Square, above the whale fountain. Climb to the top of the fountain and jump from its nose to reach the bubble.

    #### Square Glasses Location

    Head over to Garden Street, where Blanc hangs out at the gardening supplies store. The bubble floats above a white umbrella outside the shop. Climb over the fence to the left, get on top of the umbrella, and jump to collect it.

    #### Plaid Pleated Skirt Location

    This bubble is at Crater Lake in the northwest. Climb the nearby cliffs, then run and jump down to land near the bubble. It might take a few tries, but with the right timing, you’ll get it.

    #### Lace Bow Location

    Go to the Windmill Flower Field. The bubble floats above a lamp post. Climb over the white fence next to it, jump on top of the post, and grab the bubble.

    #### Monocolor Suit Pants Location

    This bubble is above a white umbrella in the outcrop to the south. To reach it, stand on nearby chairs to gain height, then jump from the chairs to the umbrella, and finally to the bubble.

    #### Simplistic Knee Socks Location

    Visit the Jump Puzzle area just south of Forest Lake. The bubble is on the roof of a shelter here. Use the fencing around to climb higher and jump onto the roof.

    #### Academic Suit Location

    Go to Deer Tower near Forest Lake. Find the tent with camping gear and a string of stars on wooden poles. Climb onto the tent, then carefully walk across the stars to reach the bubble. You might need a few tries.

    #### Heart Ear Studs Location

    Travel west to Onsen Mountain Lake, where many palm trees grow. The bubble floats above a roof but isn’t accessible from the ground. Climb the cliffs nearby until you’re above the building, then jump down to grab it.

    #### Color-Blocked Fedora Location

    Head over to Suburban Lake, where the bubble is near a signpost. It’s easy to reach—just run and jump to collect it.

    #### Color-Blocked Messenger Bag Location

    Visit the Wharf and talk to Bill to start a fishing event. Get on Boat One, which is closest to the bubble. When the boat moves out to sea, jump in and grab the bubble.

    Most of these bubbles are straightforward to find, but the bubble at the fishing event requires completing the event, available after reaching DG Member level 7.

  • How To Complete Every Outfit in Shinobi: Art Of Vengeance Through Solving Challenges

    How To Complete Every Outfit in Shinobi: Art Of Vengeance Through Solving Challenges

    One of the most shocking things about Shinobi: Art of Vengeance is how many collectibles are hidden throughout each level. If you want to get the full 100% completion and discover all the secrets, Joe has quite a bit of work ahead of him.

    The most exciting hidden features are the alternative outfits for Joe Mushashi, who surprisingly has a large wardrobe. Unlocking these outfits isn’t easy, so here’s a guide on what you need for each one.

    Default Outfit
    The first outfit is the one Joe starts with, and you don’t need to do anything special to unlock it—it’s his iconic red and white ninja gear that he begins the game wearing.

    Ghost
    This outfit gives Joe a faded, colorless look. It’s only available if you buy the Deluxe Edition of the game and doesn’t seem to be obtainable in other ways. There’s a possibility it might become DLC later. Since Ghost is a bonus for the digital Deluxe Edition, it doesn’t count toward the seven main outfits, so don’t worry about it affecting your game completion percentage.

    Fire Raider
    Moving on to outfits that take a bit more effort, Fire Raider features a palette swap that makes Joe’s ninja suit predominantly red instead of white. To unlock this, find it as a secret item in the Lantern Festival level. Go to the Rooftops checkpoint, slide down to the next building, but instead of jumping forward, drop down and head left to find the chest containing this outfit.

    Sakura Slayer
    This is one of the more accessible outfits. It gives Joe a pink hue and can be purchased from the shop after making enough progress in the game. To unlock it, you need to gather Oboro Clan emblems and reach a point where you must pay 8,000 gold to buy it. Once you’ve collected enough emblems and gained access, it will be available in the shop for purchase.

    Silent Wasp
    A more challenging late-game outfit, the Yellow Hornet features Joe in a yellow and black ninja look akin to a hornet. To unlock it, go to the ENE Corp Laboratory level and reach the very end. After fixing all the elevators and activating the facility, head to the West Lab checkpoint. From there, go to the marked point on the map; inside the chest there, you’ll find the Yellow Hornet outfit.

    Blue Blur
    This costume pays homage to Sonic the Hedgehog by giving Joe a bright blue body suit with red accents. To find this outfit, go to Neo City and reach the far east of the East District. Use your air dash to access a tiny room in the corner of the map. Enter, roll under the gap, and you’ll find a chest with the Blue Blur outfit inside.

    Jungle Creeper
    This outfit resembles a Teenage Mutant Ninja Turtle, with an orange and green gi that looks like Mikey. To unlock it, you need to surrender all your Oboro Clan emblems to the shopkeeper. Doing so will unlock the Jungle Creeper outfit for purchase at a cost of 8,000 gold.

    Golden Shinobi
    As the final outfit, the Golden Shinobi turns Joe’s attire into a sparkly gold costume. To get this, you must collect all six Lab Keys and defeat the secret boss in the game. Once those challenges are completed, you’ll earn the right to wear the Golden Shinobi as a reward.

    The following two outfits are bonus content that aren’t required for completing the game fully. They are more for fun and extra customization.

    Sega Blue
    Inspired by Sega itself, this costume is available if you sign up for a Sega account by September 30 and link it to your game account. Doing so provides a code for this DLC outfit, adding a touch of Sega nostalgia to Joe’s wardrobe.

    Classic Arcade
    This is a pre-order bonus outfit that harks back to Joe’s original look in the first Shinobi. It resembles his classic arcade style and is only available if you pre-ordered the game, with no current known way to unlock it through other means.

  • How to Complete Benett’s New Outfit Quest in Genshin Impact

    How to Complete Benett’s New Outfit Quest in Genshin Impact

    Genshin Impact offers many areas to explore, secrets to discover, and foes to battle. But every so often, the Traveler can take a break and enjoy seasonal events. These events often feature mini-games that players can complete to earn valuable rewards.

    The Sunspray Summer Resort Event introduces several mini-games into the game. One of the most exciting parts of this event is a new outfit for Bennet, which players can get for free by participating in the mini-games. Here’s everything you need to know about the event.

    This ongoing event will release new challenges in its four main mini-games daily, so we’ll keep updating this guide as needed.

    How to Unlock the Sunspray Summer Resort Event

    To access this event, open the Letter in the Events menu, which will lead you to the new Easy Breeze Holiday Resort located on an island in Natlan. Before unlocking it, you need to meet these requirements:

    • Reach Adventure Rank 18 or higher.
    • Complete the Archon Quest Prologue: Act III “Song of the Dragon and Freedom.”
    • Finish the Archon Quest “Incandescent Ode of Resurrection.”

    How to Play

    During the event, you’ll play through four mini-games while progressing through the Sunspray Summer Resort storyline. These games reward Sunspray Spirit points, and completing them offers extra items as bonuses.

    With Flying (Graffiti) Colors

    In this challenge, control Ashas’ abilities to paint objects in a scene within a time limit, aiming for the highest possible score. You’ll encounter modifiers like special items and score multipliers along the way.

    Rewards for completing stages include:

    • 30 Primogems
    • 60 Sunspray Spirit
    • 3 Blazing Sacrificial Heart’s Hesitance
    • 30,000 Mora

    The stages are:

    • “Ethereal Hues Drift Between Clouds”
    • “The Secrets of Colorful Fruit”
    • “Molten Paint and the Forbidden Border”
    • “The Warpaint of Rainbow Missiles”

    Achieving higher scores grants more rewards, with a maximum of 4,000 points awarding extra items including a chance to get special outfits, such as Bennett’s outfit, and various primogems and Mora.

    Travels Are Fuller With Friends

    This mini-game features two Saurian companions, Kau Kau and Akamai, working together to reach the end of the course. Each character interacts differently with obstacles, and players must use their unique abilities to progress.

    Goals and rewards include:

    • Defeat all opponents
    • Collect Nanas Cakes
    • Rewards such as Primogems, Sunspray Spirit, and Mora

    This mini-game is divided into several journeys:

    • A Tale of Two Boxes
    • Of Doors and Duties
    • The Importance of Being Heavy
    • The Weight of Things to Come

    Strikers Through the Storm

    In this gameplay, use a paintball turret to eliminate waves of cardboard enemies. Enemies will attack back, so quick reflexes are essential to keep your HP intact.

    Objectives:

    • Defeat all opponents
    • Maintain a specific number of munitions and HP levels to meet different challenge thresholds
    • Rewards include Primogems, Sunspray Spirit, Hero’s Wit, and Mora

    A Feast for the Senses

    This mini-game combines rhythm game mechanics with traditional Genshin Impact combat. Defeat waves of enemies with specific tactics until a “Lightburst Shockwave Mode” activates, where you must play a rhythm to defeat more foes.

    Goals include:

    • Achieving certain score thresholds
    • Rewards include Primogems, Sunspray Spirit, Hero’s Wit, and various items depending on your score

    Sunspray Summer Resort Event Rewards

    Completing all mini-games and milestones earns Sunspray Spirit points. These points can be exchanged for various rewards, such as exclusive weapons, outfits, and other valuable items.

    Some of the rewards based on Spirit points include:

    • 300 Sunspray Spirit: Flame-Forged Insight Greatsword, Primogems, and other resources
    • 600 Sunspray Spirit: Additional Primogems and materials
    • 900 Sunspray Spirit: More Primogems and items
    • 1,200 Sunspray Spirit: Special gift boxes and outfit items like Bennett’s “Adventures in Blazing Hue”
    • 1,500 Sunspray Spirit: Crown of Insight, more Primogems, and Hero’s Wit

    By completing every mini-game and milestone, players gather Sunspray Spirit points to unlock these exclusive rewards.

  • Completing Ironeye’s Remembrance Outfit in Elden Ring Nightreign

    Completing Ironeye’s Remembrance Outfit in Elden Ring Nightreign

    Elden Ring Nightreign takes a distinct approach compared to the original Elden Ring game. While the original was celebrated for its vast world and the freedom it offered for exploration, Nightreign shifts the focus significantly towards enhancing the combat experience. Without a rich world to explore, how does this new setting captivate players?

    The answer lies in its unique, pre-designed characters. Each of these Nightfarers offers a different playstyle, each tied to a story about Remembrances that allows them to revisit forgotten moments from their past. One of the characters, Ironeye, arrives at the Roundtable Hold with a specific mission, some aspects of which have yet to unfold.

    What Is the Journal?

    Though there are many Nightfarers to choose from, the Roundtable can only accommodate so many stories. This is where the Journal comes in—a book situated near the garden area of the Roundtable Hold. The Journal features entries that relate to each character, revealing their narratives with every new entry.

    The Journal also serves as the access point for Remembrances, activated through the latest entry once they’re unlocked. Typically, each character has about eight Journal entries, though this number varies. For example, Executor has seven entries, while the Guardian boasts ten.

    A helpful tip: You can tell when most character’s Journal entries are finished by a sketch appearing on the final entry.

    Fortunately, you can check the Journal anytime while in the Roundtable Hold, no matter which character you’re playing. If you need to refresh your memory about one character’s journey, just take a look at the Journal.

    How to Unlock Memory Fragments

    Memory Fragments in Nightreign are a somewhat abstract idea. They aren’t items you can put in your inventory to unlock Journal entries or Remembrances. Instead, Memory Fragments unlock mostly at random and automatically advance the next Journal entry or Remembrance for the character you were using when you earned them.

    Finding these Memory Fragments can be tricky. While some methods for acquiring them are more likely, none are guaranteed. For instance, certain characters can obtain Memory Fragments by performing unique actions—like Executor managing several deflections. However, this is quite random and often unclear.

    Instead, it’s better to focus on more reliable methods. Generally, defeating Nightlords with a specific character will yield Memory Fragments, which also translates into more Remembrances. Each new Remembrance often requires greater progress than the last. For instance, you can usually unlock a character’s first Remembrance just by participating in an expedition, regardless of your success in the match. However, later Remembrances often necessitate defeating a Nightlord at the end of an expedition.

    Sometimes, obtaining a Memory Fragment will only unlock a new Journal entry and not a Remembrance. Other times, you might receive a single Memory Fragment that grants multiple Journal entries and Remembrances. More often, though, you’ll unlock a single Remembrance with each Memory Fragment.

    Ironeye’s Remembrances

    Most characters feature three Remembrances, but there are exceptions. For instance, the Guardian has four Remembrances, while Ironeye has only two, technically speaking. Ironeye has two active Remembrances that must be unlocked, plus a personal goal inferred from reading his Journal entries. Here’s what you need to know about his Remembrances and how to achieve his unique ending.

    Remembrance #1

    Ironeye’s first Remembrance sends him to Limveld in search of a letter held by a traitor from the Fellowship he belongs to. Here’s how to complete this task:

    1. Speak to the Priestess.
    2. Ask her all possible questions.
    3. Defeat the Condemned in Limveld.
    4. Return to the Priestess.

    The traitor appears as a Condemned who resembles Ironeye and wields a dagger that causes significant Blood Loss, along with the Swarm of Flies Incantation for ranged attacks. They can also mark you like the real Ironeye. Keeping your distance is key to avoiding excessive Blood Loss. Manual aiming can help if you position yourself higher up.

    Don’t hesitate to wait until the second day to confront the traitor, as they are quite formidable, but make sure you’re at least level three before engaging. After defeating the traitor, you’ll receive the Traitor’s Letter. Bring it back to the Priestess to complete the Remembrance and earn the Broken Sealing Wax Relic and Ironeye’s Chalice for Relic Rites.

    Remembrance #2

    In his second and final Remembrance, Ironeye must eliminate another traitor while uncovering dark truths about himself. Completing it involves:

    1. Speaking to the Priestess in the crypt.
    2. Eliminating the traitor.
    3. Traveling to Limveld to obtain an Edge of Order, which requires defeating the Darkdrift Knight.
    4. Taking out the traitor again.

    A crucial detail: You must be in the Realm of Remembrance when undertaking the Darkdrift Knight mission. You can’t do this with a different character and beating a Nightlord solo can be a tough challenge. As you cannot matchmake while in a Remembrance, consider teaming up with friends for assistance.

    The Darkdrift Knight, named Fulghor, is vulnerable to Lightning. Equip a weapon with this attribute before the fight. Generally, stay back and let your allies absorb most of the damage, as he’s a challenging opponent.

    Remembrance #3

    Ironeye’s last Remembrance works differently than the others because it’s not yet realized. Remembrances imply memories of past events, and since Ironeye’s third Remembrance hasn’t occurred yet, he needs to finish his mission—defeating the Night Aspect.

    To complete this final Remembrance, you have to take down the Night Aspect. Given that this doesn’t happen in the Realm of Remembrance, you can freely engage in matchmaking. As the game’s final boss, trying to defeat it solo might be tough, so gather a reliable team.

    While not strictly necessary, of course, consider equipping Ironeye’s Edge of Order Relic during the expedition, as it grants his bow a Holy attribute, to which the Night Aspect is susceptible. Upon defeating Heolstor, you’ll find yourself in a ruined version of the Roundtable Hold. An emaciated body awaits you there. Instead of placing the Nightlord’s Rune within the figure, choose to ‘Clench Dagger’, confirming your choice in the next prompt.

    This action will lead Ironeye to eliminate the figure, thereby completing his mission. After the credits roll, you’ll receive Ironeye’s Remembrance outfit, marking the conclusion of his journey.

    Note: Since Ironeye’s ending differs from the game’s default conclusion, you won’t earn a trophy or achievement for finishing the game this way.

  • Completing Revenant’s Remembrance Outfit in Elden Ring Nightreign

    Completing Revenant’s Remembrance Outfit in Elden Ring Nightreign

    In Elden Ring Nightreign, you step into the shoes of Nightfarers, distinct characters with their own abilities, ultimate skills, and backstories. These narratives unfold in the Journal located at the Roundtable Hold, where players can collect Memory Fragments to explore them in greater detail.

    There’s more than just reading your character’s diary entries; you can also activate Remembrances. These are interactive gameplay segments that take you back to pivotal moments in each Nightfarer’s history. Expect a variety of tasks as you embark on Expeditions to unique, themed areas, all of which lead to new gear you can customize at the Mirror.

    What Is The Journal?

    You’ll find the Journal at the Roundtable Hold right after completing the tutorial. It’s a large book sitting atop a cluttered desk to the left of the Lost Table of Grace. This tome holds the memories of every Nightfarer, even those you’re not currently playing.

    If you want to access the Journal quickly, you can fast travel to it on the map while you’re at the Roundtable Hold, immediately opening it.

    How To Unlock Memory Fragments

    To progress with a Nightfarer’s questline, you must unlock new pages in the Journal, which means collecting Memory Fragments. Unlike items like Relics that you carry in your inventory, Memory Fragments are gathered automatically as you play.

    The game doesn’t clearly explain how to obtain these fragments, and their acquisition often feels random. However, a reliable method is to defeat Nightlords using that specific character. For example, to further the Revenant’s quest, you’ll need to complete Expeditions while playing as her.

    Revenant’s Remembrances

    The Revenant has three Remembrances to unlock, and since she is a secret character, her storyline can be a bit more challenging to navigate. Nevertheless, it’s worth pursuing for the unique Relics that enhance her powers.

    Remembrance #1

    During her first objective, the Revenant must defeat a Nightlord. Here’s what you need to do:

    • Speak to the Duchess.
    • Talk to the Guardian.
    • Win against the Tricephalos or Darkdrift Knight in Expeditions.
    • Return to the Guardian with the Blade of Night fragment.
    • Complete the Remembrance.

    After finishing this Remembrance, you’ll receive the Small Makeup Brush, which boosts Rune acquisition for you and nearby allies, enhancing the Revenant’s abilities when fighting alongside summonable spirits.

    Remembrance #2

    In her second Remembrance, the narrative deepens as you enter a haunting, Bloodborne-inspired manor. Follow these steps:

    • Converse with the Duchess.
    • Tell her you’re "not afraid of the Night."
    • Speak to the Recluse.
    • Sit beside her on the bench.
    • Walk into the open room upon waking.
    • Move towards the Revenant.
    • Defeat a wave of enemies called the ‘Corrosion’.
    • Interact with the doll.
    • Conclude the Remembrance.

    Once you return to the Roundtable Hold, you’ll gain the Revenant’s Chalice, enabling you to use three types of Relics: blue, green, and a choice tier.

    Remembrance #3

    The final Remembrance revisits the essence of the Revenant’s story, showing the events of "that stormy night." It’s a poignant conclusion worth experiencing for the cutscene alone. Here’s what to do:

    • Speak to the Recluse.
    • Sit next to her on the bench.
    • Upon awakening, head back to the large room.
    • Overcome the Grafted Scion in a boss fight.
    • Watch the cutscene, then awaken on the bench beside the Recluse.
    • Engage with her and accept the option "Bury the Nightlord."

    This touching finale rewards you with the Revenant’s distinct Remembrance skin and the Old Portrait Relic. When equipped, this relic grants the following benefits:

    • [Revenant] Sacrifice your own HP to fully heal allies while activating Art.
    • [Revenant] Cause a ghostflame explosion when using Ultimate Art.
    • Earning kills fills up the Art gauge faster.
  • Transform Your Look in Love and Deepspace: A Guide

    Transform Your Look in Love and Deepspace: A Guide

    Here’s a rewritten version of your content in American English, ensuring it’s unique and clear without using overly complex language:

    One of the delightful aspects of Love And Deepspace is its interactive nature, where your character not only has a voice but can also be personalized. Right from the outset, you have the chance to customize your character’s name, voice, and appearance, enhancing your immersion in the game.

    However, adjusting your character’s look can become a bit tricky once the game is underway. You’ll first have to complete several tutorial sections before you can access customization options. Fortunately, we’ve compiled all the details you need to make changes to your character’s appearance.

    Updated on March 7, 2025, by Eva Csaki: This guide now includes all the new appearance options added in the version 3.0 update.

    How to Change Your Appearance

    Since dating simulations heavily depend on your ability to connect with the story and its characters, it’s understandable that you would want your player character to look like you. Thankfully, the creators of Love And Deepspace have provided multiple ways for you to customize your main character.

    You can pick your name and appearance at the start of the game during the Unicorns Training, but you’ll need to wait until you’ve completed a few tutorial stages before you can make further adjustments to your avatar.

    When you’re ready to modify your avatar, head to your character profile located at the top left corner of the Destiny Cafe interface. Here, you’ll find the profile others can view.

    Below your profile picture is an icon of a woman’s head; click on this icon to access the appearance change menu. You’ll be able to modify your skin tone, hairstyle (but not its color), facial features, makeup, and eye color here.

    However, keep in mind that you cannot change your hair color or gender within this menu. Moreover, the selection of hairstyles is limited.

    You’ll need to use Evol Appearance Reset tickets to request changes to your appearance. These can be purchased in the shop for 300 Diamonds. Occasionally, they can also be earned during events or as gifts from the developers.

    You can buy hairstyles and outfits for use in combat mode and the photo booth later in the game. There is even an option to preview what your character would look like with their hair styled up.

    To enable this feature, click on the icon that depicts a woman with an updo hairstyle. The toggle will indicate whether it’s on or off. When activated, your character will temporarily have a ponytail, letting you see how she looks without her hair down.

    Additionally, Kindled Memories will reflect your character’s current appearance or “skin.” This means that the look you selected when completing the Kindled Memory will persist in all future viewings of that memory.

    To update your character’s appearance in completed Kindled Memories, enter your Profile, then access the settings again. Scroll to the last tab marked ‘Custom.’ This section allows you to change your Login Screen, Login Music, and update your Kindled Memory skins.

    The final option in the Custom menu is to renew your memory skin. Open the ‘Renew’ tab to see how many Kindled Memories you’ve completed with your previous skin. Click Renew to update all of those memories to show your character’s current appearance.

    If you encounter any issues with your new appearance displaying in Kindled Memories, you can click the ‘Fix All’ button at the top of the Renew menu. This will resolve any display issues stemming from changes made after a Kindled Memory was completed.

    At times, you may come across events that allow you to temporarily alter your appearance or that of your love interests during Kindled Memories, like in the Illusio event, where you can select outfits and accessories for characters before entering the memory.

    How to Customize Your Profile

    When you access the appearance change screen from your profile page, you’ll notice several customization options within your profile.

    You can set a banner image, profile picture, profile frame, title, and nickname from this menu. You are also able to showcase your favorite memories and photos.

    You can earn new profile frames, titles, title bases, and images through events and storyline progress.

    How to Change Your Voice

    Since much of the gameplay includes playable cutscenes, your character will frequently have interactions with other characters and the storyline. Some parts of the story feel like visual novels, while others feature fully animated scenes with voiced dialogue.

    Your character will have a voice in many of these segments. During character creation at the start of the game, you will get to customize the tone of your voice. Once you unlock your profile, you can adjust your voice by using Diamonds.

    Changing your voice costs 100 Diamonds. If you’re having trouble collecting enough Diamonds for customization options, use this guide for tips on how to earn them.

    To proceed, click on the sound wave icon displayed on your profile page. Here, you can adjust the sliders to create a personalized character voice. Use the voice lines at the bottom of the screen to test your voice.

    However, it’s important to note that to save your final adjustments, you’ll need to spend Diamonds; that means changing your voice isn’t inexpensive. It’s wise to be completely sure before applying any changes.

    Sound distortion may happen if you set the sliders to extreme positions!

    How to Turn Off Custom Voiceovers

    If you find your character’s voice distracting, you can choose to disable it during cutscenes. To do so, go to the settings icon located at the bottom right of your profile screen.

    The first tab on this screen is the Voice tab. The last toggle option lets you activate or deactivate your character’s voice. Feel free to change this setting whenever you wish, as long as you’re not in the middle of a cutscene.

    Keep in mind that exiting a cutscene midway will not save your progress for when you return.

    Using Your Real Voice

    Every now and then, you might get the chance to use your real voice to engage with the characters. Events like Zayne’s birthday celebration allow you to submit your own voice lines, such as singing him a birthday song.

    To enable this feature, ensure that Love And Deepspace has permission to access your microphone in your device settings.

    You cannot use your real voice in the Main Story; it’s only available when prompted during certain events.

    How to Change Your Outfits

    While you cannot change your outfits for the Main Story unless the scene specifically allows for it, you can alter and collect outfits in the Photo Booth and during combat levels.

    The Photo Booth

    In the Photo Booth, you can customize your character’s outfits, hairstyles, and accessories if you’ve unlocked those items. You can also apply these changes to your selected companion.

    During Snapshot photoshoots, you have the ability to change the appearance of both the MC and your chosen love interest after selecting your photo compositions and backgrounds.

    You can adjust your character’s makeup, eyes, outfits, accessories, and hair, but not your skin tone or facial features. For your love interest, you can modify his hair (if you’ve unlocked alternative hairstyles, such as the mullet from Tomorrow’s Catch-22), outfit, and accessories.

    Once you’ve settled on your love interest’s outfit, you must lock in your choice by recommending the set to him. Otherwise, your changes won’t be saved, and his outfit will revert to its previous style.

    You can change accessories at any time during your snapshots. To simplify this process within the ten-second timer, consider marking any accessories you think you might use as favorites so they appear at the top of your accessory menu.

    The Glint Photobooth operates somewhat differently from Snapshot. Since it has no timer, you can change your outfits, poses, hairstyles, makeup, and accessories whenever you like between shots.

    However, you still cannot adjust your character’s skin color or facial features from this menu; you’ll need an Evol Appearance Reset ticket for that.

    In addition to changing outfits and looks, you can also alter your character’s poses. In Snapshot, poses are selected within the ten-second timer, while in Glint Photobooth, you can change poses at any time.

    Unlock poses through Affinity Level milestones, achievements, events, or purchase them from various Exchange shops. You can create your own poses by adjusting the position of your character in relation to your love interest. Additionally, you can change your character’s gaze.

    Some poses, like Duo or Active poses, can be modified for different effects. For example, poses with objects can allow you to swap the objects used. Duo poses can be separated, letting you choose one half of the pose rather than the entire two-character arrangement.

    If you design a pose or outfit that you love, you can save it as a Template for future use or share it with friends. If you admire someone else’s template and wish to use it, you can import it to your device.

    Keep in mind that all images must be approved before they can be saved to your player profile or any public space in the game.

    How to Get More Outfits

    Some items and accessories are only available by boosting your Affinity with characters, while others can be purchased in the shop menu using various in-game currencies.

    A few outfits are exclusive to being bought with Crystals—a currency that requires real money to acquire—while others can be purchased using Chocolates, Lunar Emblems, or event-specific currencies.

    If there’s a specific outfit that you don’t own but see in the Photo Studio or combat menu, click on the outfit to find out how to obtain it.

    Participating in events is one of the best ways to acquire free outfits and accessories since they don’t require any real money. Most Wish Pools also include outfit crates or outfit items as part of their rewards system.

    Pull rewards can be an excellent way to obtain limited-time outfits, although they can become expensive if you are low on Diamonds and use real currency for pulls.

    Additional outfits can be earned through achievement completions or combat milestones in events like Abyssal Chaos or the Deepspace Trials.

    Combat Outfits

    Combat outfits are solely visible during combat scenes. You can change these outfits right before entering a battle stage for both you and your companion.

    You’re free to change combat outfits each time you enter a battle stage with no penalties or currency costs, but you can’t alter your outfit or weapon once the stage has started.

    To acquire more combat outfits, you must purchase them in the shop. Some combat outfits are locked and can only be used when playing with their respective characters. For instance, you cannot use Sylus’s combat outfit during adjacent levels unless you are also playing with Sylus.

    Feel free to make any adjustments or request further changes!

  • Creating the Winter Flame Ensemble in Infinity Nikki

    Creating the Winter Flame Ensemble in Infinity Nikki

    If you’ve finished all the main quests in Infinity Nikki and are looking for more to do, consider collecting the hidden outfits throughout the game. The Winter Flame costume is a concealed set featuring seven pieces, with sketches located across different tasks, requiring you to traverse the entire map to gather everything you need.

    The Winter Flame outfit has a striking design that gives Nikki an air of military authority. Wearing it can boost your confidence in the game, allowing you to blend in with the soldiers at the border outpost.

    How To Obtain The Winter Flame Outfit

    To complete the Winter Flame outfit, you’ll need to finish various tasks.

    Most sketches can be unlocked in the Heart of Infinity. Purchase the gloves from Marques Boutique. The top is awarded after you finish the Kindled Inspiration: Warm Protection quest.

    Piece-Type Piece How To Acquire
    Hair Clearsky Moon Unlock the sketch node in Heart of Infinity. First, you need to craft the purification outfit.
    Tops Crimson Snowstorm You receive this sketch as a reward for completing the Kindled Inspiration: Warm Protection quest.
    Shoes Snowfall Boots Acquire the sketch for Summer Breeze Whim Fragrance to unlock the Snowfall Boots node.
    Bottoms Sleek Attire Unlock the node for Unbridled Growth Whim Fragrance to access Sleek Attire.
    Headwear Pristine Grace Obtain the Budding Tales Whim Fragrance sketch, then unlock the Pristine Grace node.
    Gloves Midnight Moon Purchase from Marques Boutique for 15,900 Blings.
    Earrings Blazing Scorch Unlock from the bottom right nodes in Heart of Infinity.

    You’ll require 2,000 combat insight to unlock all necessary nodes in the Heart of Infinity. You can earn this quickly by visiting the Realm of Nourishment. Complete Whim Fragrance quests to gather the materials needed to unlock the Fragrance nodes.

    Walkthrough for Kindled Inspiration: Warm Protection

    Before starting this quest, we suggest purchasing the Midnight Moon gloves and wearing them to avoid unnecessary backtracking later.

    Travel to the Heartcraft Kingdom outpost Warp Spire. Proceed directly to the small shack ahead. You’ll meet a man named Vendita, who is searching for inspiration. If he notices you wearing the gloves, you will finish the quest and receive the Crimson Snowstorm top along with 20 diamonds as a reward.

    How To Craft The Winterflame Outfit

    To craft the complete Winterflame outfit, you’ll need the following materials:

    • Bedrock Crystal: Energy x16
    • Thread of Purity x440
    • Tough Leather x20
    • Sunny Orchid x6
    • Brokenheart Patch x20
    • Hollow Knot x30
    • Tangled Ribbon x30
    • Blossom Beetle x1
    • Ambird Feather x1
  • Discover All Mermaid Outfit Pieces in Hello Kitty Island Adventure

    In Hello Kitty Island Adventure, there are numerous quests to tackle, ranging from straightforward fetch tasks to more involved storylines that guide you around the map. One notable quest involves finding objects in Comic Relief, which is assigned by Hangyodon.

    During your adventure in Comic Relief, you’ll be tasked with finding three parts of a Mermaid Outfit. This quest can be a bit challenging due to the area you need to cover. Fortunately, the locations of each piece are the same for every player. Here’s a guide to help you locate all parts of the Mermaid Outfit.

    For each piece, we’ve included a map and an image of the surrounding area.

    Purple Scale Mermaid Tail

    The Purple Scale Mermaid Tail can be found just to the east of the Comedy Club mailbox. When you look toward the Spooky Swamp, you’ll spot a lower wooden bridge that curves into the water, leading to a small patch of land that rises slightly. The tail sits on a small ledge in a vertical position, resembling the end of a fish’s tail.

    Teal Scale Mermaid Tiara

    The Teal Scale Mermaid Tiara is located between the Comedy Club and the larger section of the Cozy Islands. On the map, you should see three green circles, with the upper two appearing relatively close to each other.

    These circles mark underwater boulders with coral surrounding them. You can find the tiara at the bottom edge of the middle boulder, in the gap between the upper two and the lower boulder.

    Some players have reported finding the tiara before starting this quest. If that’s the case for you, keep it! Avoid using a Null unless you recall where you found it. If you already possess all the pieces, just wear them and speak to Hangyodon to avoid unnecessary searching.

    If you already have different versions of the outfit (like the Fall colors), make sure to wear the exact colors specified in this guide! Different colors may prevent Hangyodon from recognizing your progress.

    Teal Scale Mermaid Armor

    The Teal Scale Mermaid Armor is located to the southeast of the tiara’s position. Here, you will find cobblestone paths bordered by white edges. The armor rests in a large cobblestone ‘circle’. Additionally, there’s a fallen column situated on the upper side of this area.

    Once you’ve collected all three pieces, they will show up in Tuxedosam’s shop. This provides a handy way to buy the pieces if you venture to another player’s island. If they have already acquired all pieces and have one available in their shop, you can simply visit and purchase it.

  • Unlock the Fireworks Outfit in Infinity Nikki: A Quick Guide

    Unlock the Fireworks Outfit in Infinity Nikki: A Quick Guide

    As you advance in Infinity Nikki, you’ll unlock various ability outfits. One of the highlights of your journey will be Fireworks Isles, where you can craft the Fiery Glow outfit. This stylish outfit allows you to launch stunning fireworks into the night sky.

    While enjoying the fireworks is a great way to experience the island’s festive vibe, they also play a crucial part in completing the main story quest. You’ll find that fireworks can help you take down challenging foes like The Dark Bouquet with flair.

    How to Create the Fiery Glow Outfit

    To start crafting the Fiery Glow outfit, you need to reach Fireworks Isles and complete Chapter 1 of the Exclusive Quest “The Wonderful Journey.” This quest will guide you to the Fireworks Training: Step One quest, where you’ll learn that fireworks can defeat the Balloon of Darkness, as noted by Scintillada.

    The Faewish Sprite, Scintillada, will provide you with the outfit’s sketch. You’ll need to gather materials from The Hearts Of Infinity Nodes, and this doesn’t require any Whimstars. However, you will need to pay 10,000 Blings.

    Here’s what you need to collect:

    • 2 Hare Powder
    • 5 Daisy
    • 2 Blastpollen
    • 300 Threads of Purity
    • 60,000 Blings

    Hare Powder and Daisy are early-game resources found in Wishfield. You can collect Blastpollen during clear nights on Fireworks Isles.

    Outfit Pieces

    The Fiery Glow outfit features a cool design that works well for themed Styling Contests. It consists of nine distinct pieces, allowing you to mix and match with other outfits for unique styles.

    Piece Name

    Type

    Cool Score

    Gleaming Night

    Hair

    2,183

    Remarkable Ideas

    Bottoms

    1,780

    Flawless Code

    Top

    1,767

    Miracle Opening

    Headwear

    521

    Distant Landing

    Face Decorations

    527

    Luminous Eye

    Gloves

    540

    Meticulous Survey

    Shoes

    1,061

    Vertical Musings

    Socks

    695

    Firework Emblem

    Chokers

    527

    How to Use the Fireworks Ability Outfit

    The reloading menu in a fireworks launcher is displayed.

    Once you’ve equipped the outfit, you can launch fireworks by reloading them at designated spots found throughout Fireworks Isles.

    The launching menu allows you to organize the fireworks in the order you want them to be fired. You can also adjust the Firework Delay settings to decide how long to wait before launching them, and set the number of Loop Rounds to repeat the firework sequence.

    To acquire fireworks, craft them at a crafting table in town. You can get sketches for fireworks at Vita’s shop or as quest rewards.

    Having the outfit is essential for completing additional story quests in Fireworks Isles; you will need to launch fireworks to unlock features. It’s also crucial for defeating The Dark Bouquet boss encountered later in the storyline.

  • Unlock the Stunning Day Outfit: A Complete Guide

    Unlock the Stunning Day Outfit: A Complete Guide

    In Infinity Nikki, you’ll discover a variety of unique outfits. Your styling abilities will be put to the test as you compete with other stylists, and success will earn you new sketches to enhance your collection.

    The Breezy Meadow, one of Miraland’s largest regions, features vast wheat fields that extend from Florawish to Stoneville. It’s a treasure trove of crafting materials and divine sketches that capture the essence of this golden landscape. Let’s dive into how to find and create the Beautiful Day outfit for Nikki.

    How to Obtain the Beautiful Day Sketches


    To create this charming outfit inspired by the Breezy Meadow, you first need to collect all the sketches. Unlike other sketches found in chests throughout the game, these designs can only be acquired by defeating competing stylists in the Breezy Meadow.

    Here’s a list of all the outfit components, including their individual stats, so you know what to expect from this ensemble.

    Since you earn the sketches by defeating factions in the Breezy Meadow, we’ve noted which stylist drops each sketch.

    Outfit Piece Name

    Wardrobe Category

    Elegant

    Fresh

    Sweet

    Sexy

    Cool

    Faction Member

    Corridor of Time

    Hairstyle

    327 (A)

    51 (D)

    157 (C)

    34 (D)

    32 (D)

    Rangers


    Anraki (Average)

    Classroom Hours

    Tops

    260 (A)

    30 (D)

    132 (C)

    44 (D)

    34 (D)

    Great Meadow


    Fatiqua (Average)

    Immersive Study

    Bottoms

    256 (A)

    46 (D)

    133 (C)

    38 (D)

    27 (D)

    Green Masks


    Cantore (Average)

    Midday Nap

    Socks

    104 (A)

    15 (D)

    51 (C)

    16 (D)

    14 (D)

    Green Masks


    Jacques (Average)

    Heartfelt Tribute

    Shoes

    156 (A)

    29 (D)

    76 (C)

    16 (D)

    23 (D)

    Rangers


    Rene (Average)

    Morning Greetings

    Hair Accessories

    76 (A)

    13 (D)

    36 (C)

    12 (D)

    12 (D)

    Great Meadows


    Pepsa (Average)

    Total Outfit Score

    1,179

    184

    585

    160

    142

    How to Create the Beautiful Day Outfit


    Nikki standing on a dirt path in the Beautiful Day outfit with a smile.

    After you’ve gathered the sketches you need, you can craft the outfit from the Stylish Outfits section of your sketch menu through Pear-Pal. Here’s a list of all the materials you’ll need to create the outfit:

    Material Name

    Amount

    Blossom Beetle

    2

    Florapom

    2

    Gogglebug

    2

    Grasspom

    5

    Hare Powder Essence

    2

    Longstocking Wool

    2

    Pin Hopper

    3

    Pony Curls

    1

    Quillfin

    3

    Sizpollen

    5

    Stallion Locks

    3

    Whisker Fish

    6

    Threads of Purity

    112

    Bedrock Crystal: Command

    8

    Blings

    9,000

    Keep in mind that this outfit can only be crafted once. Although it’s a three-star ensemble, it offers a stylish look to showcase your personal style in Miraland!

  • Unlocking the Starwish Echoes Outfit in Infinity Nikki

    Unlocking the Starwish Echoes Outfit in Infinity Nikki

    As you journey through Miraland with Nikki and Momo in Infinity Nikki, you’ll encounter a range of vibrant and enchanting locations. From the Florawish fields to the Stellar Fishing Grounds in the Abandoned District, every area offers its own charm. Choosing the right outfit for each setting can be tricky, but you have plenty of choices available.

    To get the outfit inspired by the Wishing Woods, you’ll need to put in some effort to show just how much you’ve explored the wilderness of Miraland. We’ll guide you through the steps to obtain the sketches and turn them into reality for Nikki, enhancing her skills as a Stylist!

    How To Unlock The Starwish Echoes Sketches

    To unlock these sketches, gather hundreds of Dews of Inspiration. Kilo the Cadenceborn will give you sketches for each level you complete from 17 to 24.

    These sketches will ultimately contribute to creating the Starwish Echoes outfit, inspired by the Wishing Woods. You’ll get to craft an ethereal dress and accessories that reflect the Faewish Sprites in their home environment.

    You will also unlock a sketch for a matching cloak for Momo!

    The main feature of this outfit is its “Sexy” attribute, and we’ve outlined the stats of each piece below:

    Outfit Piece Name

    Wardrobe Category

    Elegant

    Fresh

    Sweet

    Sexy

    Cool

    Eternal Hope

    Hairstyle

    61(D)

    204(B)

    61(D)

    432(S)

    52(D)

    Wishwoven Threads

    Dresses

    100(D)

    357(B)

    101(D)

    666(S)

    124(D)

    Tomorrow’s Wish

    Socks

    17(D)

    70(B)

    19(D)

    148(S)

    16(D)

    Tomorrow’s Dream

    Shoes

    31(D)

    108(B)

    20(D)

    222(S)

    24(D)

    Wishing Star

    Headwear

    15(D)

    54(B)

    15(D)

    104(S)

    10(D)

    Wishing Heart

    Earrings

    11(D)

    55(B)

    11(D)

    112(S)

    14(D)

    Circling Thoughts

    Bracelets

    13(D)

    56(B)

    16(D)

    107(S)

    10(D)

    Total Outfit Score

    248

    904

    934

    1,791

    250

    This outfit can be crafted twice, allowing you to evolve it and unlock a different color variation that maintains the original stats.

    How To Craft The Starwish Echoes Outfit

    Crafting menu showing every sketch for the Starwish Echoes outfit and the materials required to make it.

    Once you’ve gathered all the sketches, you can start crafting the outfit. While you can create each piece individually, it might be more efficient to tackle everything at once. Below is a list of all the materials you need to gather from the Wishing Woods to complete this stylish outfit!

    Be sure to pin the sketches as your goal so you can easily track the materials you still need!

    Material Name

    Amount

    Sol Fruit

    30

    Dawn Fluff

    2

    Ruffin

    12.0kg

    Maskwing

    5

    Crown Fluff

    3

    Glimmergrass

    10

    Palettetail

    8.0kg

    Bedrock Crystal: Plummet

    150

    Mani Beetle

    5

    Wreath Fluff

    8

    Combelly

    5.0kg

    Hooded Feather

    8

    Crowned Feather

    5

    Brusher

    15.0kg

    Bowtie Fluff

    5

    Threads of Purity

    550

    Blings

    44,000

  • How to Craft the Miracle Silvergale’s Aria Outfit in Infinity Nikki

    How to Craft the Miracle Silvergale’s Aria Outfit in Infinity Nikki


    The 1.1 update for Infinity Nikki has been released, introducing players to the second Miracle Outfit that can be crafted. These outfits are the most challenging pieces to create in this gacha-inspired dress-up game. The new Silvergale's Aria outfit builds upon the earlier Wishful Aurosa outfit.

    Difficulty

    Hard


    Duration

    4 hours

    Requirements

    • Complete Chapter 8 and the Interlude: Call of Beginnings

    • Unlock the pieces of the Wishful Aurosa outfit (to access the quest)

    This beautiful outfit adds eight distinctive items to your already extensive wardrobe and can earn you significant points in style challenges. Crafted outfits often contain rare materials, so if you're looking for guidance on how to create the entire Silvergale's Aria Miracle outfit in Infinity Nikki, read on.

    Unlocking Silvergale's Aria

    Step 1: Advance through the main storyline until you finish Chapter 8.

    Step 2: Unlock all components of the Wishful Aurosa outfit within the Heart of Infinity, reaching the Aurosa Makeup. This will trigger the quest Interlude: Call of Beginnings.

    Step 3: To access the sketches for this Miracle outfit, you’ll first need to activate the following four nodes in the Heart of Infinity using these materials:

    • Collection Insight: 7,000
    • Animal Care Insight: 7,000
    • Fishing Insight: 7,000
    • Bug Catching Insight: 7,000
    • Whimstars: 8
    • Bling: 200,000

    Gathering Materials for Silvergale's Aria Miracle Outfit

    • x1 Silvergale's Feather: Complete Interlude: Call of Beginnings
    • x10 Silver Petals: Obtainable through Daily Wishes; collect one Silver Petal daily.
    • x430 Bedrock Crystal Hurl: Acquired by completing Phantom Trial: Bouldy (Hurl) in the Realm of the Dark, accessible via Warp Spire.
    • x1,200 Thread of Purity: Commonly gained from quests; also farmable in the Realm of Escalation.
    • x20 Sol Fruit Essence: Unlock the collection enhancement node for high-quality plants in the Wishing Woods; Sol Fruit grows on Chronos Trees there.
    • x10 Socko Essence: Unlock the bug-catching enhancement to gather essences in Florawish/Breezy Meadow; sneak up on Sockos to catch them using your bug net.
    • x2 Tulletail Essence: Unlock the fishing enhancement node for high-quality fish in the Abandoned District; Tulletails can be caught in Stonewoods.
    • x2 Astral Feather Essence: Unlock the animal grooming enhancement to gather essences from high-quality creatures in the Abandoned District; collect Astral Feathers from the Astral Swan found atop the stonetree at the Stellar Fishing Grounds.
    • x2 Dawn Fluff Essence: Unlock the animal grooming enhancement in the Wishing Woods; sneak up on the Dawn Fox near the Grand Tree using your shrinking outfit, then switch to your grooming outfit for the essence.
    • x30 Sunny Orchid: This flower can be found only during the daytime and when it's not raining, particularly around Florawish and Breezy Meadow.
    • xxkg Ruffin: Catch this fish in Florawish, Breezy Meadow, and Stoneville.
    • x30 Aromalily Essence: Unlock the collection enhancement for high-quality plants in Florawish; this flower grows on lily pads throughout Miraland.
    • x8 Floral Fleece Essence: Unlock the animal grooming enhancement for high-quality creatures in the Abandoned District/Stoneville; find Florasheep there.
    • x5 Crown Fluff Essence: Unlock the animal grooming enhancement in the Wishing Woods; Crowndeers provide this essence.
    • x10 Wisteriasol Essence: Unlock the collection enhancement for high-quality plants in the Abandoned District/Stoneville; Wisteriasol grows on vines around those locations.
    • x3 Palettetail Essence: Unlock the fishing enhancement for high-quality fish in the Wishing Woods; Palettail can be found in its waters.
    • x30 Sizzpollen: Gather this plant on clear nights throughout Miraland.
    • x12 Blossom Beetle: Found in the Breezy Meadow; sneak up to them to catch these bugs.
    • x30 Bunny Fluff: Groom Blushbunnies, which can be found all over Miraland.
    • 20kg Whiskerfish: Commonly found in Breezy Meadow waters.
    • 20kg Toque Fish: Found in Florawish waters.
    • x30 Hare Powder: This plant grows in the grasslands scattered across Miraland.
    • x30 Flight Fruit Essence: Unlock the collection enhancement to gather essences from high-quality plants in the Abandoned District; Flight Fruit is found on trees there.
    • x5 Handkerfin Essence: Unlock the fishing enhancement to collect essences from high-quality fish in Stoneville/Abandoned District; this fish resides in those waters.
    • x30 Gogglebug: These bugs can be found swimming around lily pads throughout Miraland.
    • x30 Floof Yarn: Groom Floofs that appear around Miraland.
    • x20 Shirtcat Fluff: Groom Shirtcats, which can be seen all over Miraland.
    • x30 Florascent Wool: Groom Florist Sheep that roam throughout Miraland.
  • How To Craft the Miracle Wishful Aurosa Outfit in Infinity Nikki

    How To Craft the Miracle Wishful Aurosa Outfit in Infinity Nikki

    Your primary objective in Infinity Nikki is to gather all the Miracle outfits, starting with the Wishful Aurosa. Crafting this stunning 5-star ensemble can be pricey and intricate, but it's achievable. You won't be able to complete the outfit until you progress through the main story until Chapter 8.

    Difficulty

    Hard


    Duration

    4 hours

    What You Need

    • Reach and complete Chapter 8

    As you progress through the main storyline, you'll gradually unlock different components of the outfit. It can be challenging to find the materials required for this ensemble as the game doesn't explicitly guide you on their locations. Fortunately, we're here to assist you in crafting the Miracle Wishful Aurosa outfit in Infinity Nikki.

    How to craft Vibrant Goldvines hair

    Required materials:

    • x1 Glimmering Scale
    • x10 Bedrock Crystal: Command
    • x3 Starlit Plum Essence
    • x3 Foodie Bee
    • x3 Floof Yarn
    • x200 Thread of Purity
    • x16,000 Bling

    Step 1: Acquire one Glimmering Scale by overcoming the Sovereign of Cool in a styling challenge. She is the final boss encountered in Florawish, after defeating the factions of Ebony Scissors, Golden Daisies, and Beyond the Basics.

    Once you've defeated stylists from these factions, you'll face the Sovereign of Cool. After your victory, speak with Dada to receive the Glimmering Scale.

    Step 2: You can gather 10 Bedrock Crystal: Command by participating in the Command Phantom Trial located in the Dark Realm, accessed through any Warp Spire.

    Step 3: To obtain Starlit Plum Essence, you'll need to collect Starlit Plums once you unlock the Plant Gathering upgrade in the Heart of Infinity, which costs 10,000 Bling and 1,000 Collection Insight.

    Collection Insight can be gradually earned by gathering plants throughout the open world, and you can also expedite the process in the Realm of Nourishment by exchanging materials for Insight.

    Step 4: The remaining materials are relatively straightforward to collect:

    • Foodie Bee: Track these bees using the collections menu on your map to catch them.
    • Floof Yarn: Gather this item by grooming Floofs.
    • Thread of Purity: Obtainable via various methods like completing quests, receiving rewards, or trading in the Realm of Blessings.
    • Bling: Collect Bling in the open world, earn it through quests, or gather it in the Realm of Blessings.

    How to craft Aurosa Bloom dress

    Required materials:

    • x1 Golden Fruit
    • x10 Bedrock Crystal: Command
    • x1 Aurosa in Bloom
    • x10 Sol Fruit
    • x10 Glimmergrass
    • x10 Lampbloom
    • x320 Thread of Purity
    • x25,600 Bling

    Step 1: Acquire Golden Fruit by defeating the Sovereign of Fresh in a styling challenge. She represents factions found in the Wishing Woods like Glam Squad, Time for Work, and Choir of Wishes.

    Defeat all stylists in those factions to confront the Sovereign of Fresh. After defeating her, talk to Dada to receive the Golden Fruit.

    Step 2: You can obtain 10 Bedrock Crystal: Command by participating in the Command Phantom Trial in the Dark Realm.

    Step 3: The only way to acquire Aurosa in Bloom is by completing Chapter 8 of the main campaign.

    Step 4: The remaining materials are easy to gather:

    • Sol Fruit: Grows on trees in the Wishing Woods during the daytime.
    • Glimmergrass: Found blooming in the Wishing Woods.
    • Lampbloom: Commonly found throughout Miraland.
    • Thread of Purity: Obtainable through many different means with quests, rewards, or trades in the Realm of Blessings.
    • Bling: Collect it from various sources in the open world, from quests, or within the Realm of Blessings.

    How to craft Aurosa Traces socks

    Required materials:

    • x1 Vine Dream
    • x10 Bedrock Crystal: Command
    • 5kg Handkerfin
    • 5kg Kerchief Fish
    • x3 Cushion Fluff
    • x96 Thread of Purity
    • x7,500 Bling

    Step 1: Acquire Vine Dream by defeating the Sovereign of Sexy in a styling challenge, associated with the challenges in Stoneville, which includes the factions Raging Rocks, Shifty Rags, and Rustic Frenzy.

    After defeating all stylists in these factions, you'll face off against the Sovereign of Sexy. Upon victory, talk to Dada to obtain Vine Dream.

    Step 2: You can gather 10 Bedrock Crystal: Command by engaging in the Command Phantom Trial in the Dark Realm.

    Step 3: Catch both the Handkerfin and Kerchief Fish in either Stoneville or the Abandoned District.

    Step 4: For the remaining materials:

    • Cushion Fluff: Groom a Cushion Squirrel, which can be found in various forests around Miraland.
    • Thread of Purity: Available through various activities and exchanges, rewards, and quests.
    • Bling: Earn it from quests, collect it in the open world, or gather it in the Realm of Blessings.

    How to craft Goldleaf Ascent shoes

    Required materials:

    • x10 Bedrock Crystal: Command
    • x5 Mani Beetle
    • x2 Maskwing
    • 3kg Palettetail
    • x96 Thread of Purity
    • x6,400 Bling

    Step 1: You can gather 10 Bedrock Crystal: Command by participating in the Command Phantom Trial in the Dark Realm.

    Step 2: Mani Beetles can be found on trees within the Wishing Woods, while Maskwings can be located beneath Sol Fruits after harvesting them. Sol Fruits also grow on trees in the Wishing Woods.

    Step 3: The rest of these materials are easy to find:

    • Palettetail: Catch this fish in the Wishing Woods.
    • Thread of Purity: Obtainable through a multitude of means, including quest completions and rewards.
    • Bling: Earn it from the open world, quest rewards, or within the Realm of Blessings.

    How to craft Golden Diadem headwear

    Required materials:

    • x1 Golden Dew
    • x10 Bedrock Crystal: Command
    • x8 Windbloom
    • x10 Pearl Wings
    • x5 Beretsant Feather
    • x80 Thread of Purity
    • x6,250 Bling

    Step 1: Acquire Golden Dew by defeating the Banshee Sovereign of Elegant in a styling challenge. These belong to factions in Breezy Meadows that include Green Masks, Great Meadows, and Rangers.

    Defeating all stylists from these factions will allow you to challenge the Banshee. After your victory, speak with Dada to receive a Golden Dew.

    Step 2: You can gather 10 Bedrock Crystal: Command by engaging in the Command Phantom Trial in the Dark Realm.

    Step 3: The other materials are relatively simple to collect:

    • Windbloom: Found growing around Stoneville and the Abandoned District.
    • Pearl Wings: Commonly caught butterflies throughout Miraland.
    • Beretsant Feather: Collected by grooming Beretsants found in the Abandoned District and Stoneville.
    • Thread of Purity: Obtainable through various means, including quests and rewards, and trading in the Realm of Blessings.
    • Bling: Collected from various quests, rewards, and in the open world or the Realm of Blessings.

    How to craft Golden Butterfly earrings

    Required materials:

    • x10 Bedrock Crystal: Command
    • x3 Sizzpollen Essence
    • x3 Bunny Fluff Essence
    • 5kg Whiskerfish
    • x80 Thread of Purity
    • x6,250 Bling

    Step 1: Gather 10 Bedrock Crystal: Command by participating in the Command Phantom Trial located in the Dark Realm.

    Step 2: For Sizzpollen and Bunny Fluff Essence, you must first unlock the Plant Gathering and Grooming upgrades within the Heart of Infinity, costing 10,000 Bling and 1,000 Collection/Animal Grooming Insight each.

    You can earn Collection Insight over time by gathering plants throughout the world and, similarly, gain Animal-Grooming Insight through grooming tasks. Quick gains can also be had in the Realm of Nourishment by trading materials for Insight.

    Step 3: The other materials are easier to acquire:

    • Whiskerfish: Catchable in Breezy Meadow.
    • Thread of Purity: Obtainable through various means like completing quests, earning rewards, or exchanging them in the Realm of Blessings.
    • Bling: Collect it throughout the open world, as rewards for quests, or from the Realm of Blessings.

    How to craft Goldbud Promise choker

    Required materials:

    • x10 Bedrock Crystal: Command
    • x5 Scarf Worm
    • x8 Suspenders Fluff
    • x10 Wisteriasol
    • x60 Thread of Purity
    • x4,000 Bling

    Step 1: You can farm 10 Bedrock Crystal: Command by participating in the Command Phantom Trial in the Dark Realm.

    Step 2: The remaining materials are simple to gather:

    • Scarf Worm: Found as they emerge from spots in the ground in Stoneville and the Abandoned District.
    • Suspenders Fluff: Collected by grooming Suspenders Weasels found in Stoneville and the Abandoned District.
    • Wisteriasol: Typically found on cliffs around the Abandoned District and Stoneville.
    • Thread of Purity: Obtainable in myriad ways, including quests and exchanges.
    • Bling: Gathered in the open world or rewarded through quests or tasks.

    How to craft Radiant Blossom gloves

    Required materials:

    • x10 Bedrock Crystal: Command
    • x3 Hooded Feather
    • x3 Cushion Fluff
    • x3 Wreath Fluff
    • x100 Thread of Purity
    • x8,000 Bling

    Step 1: You can gather 10 Bedrock Crystal: Command by partaking in the Command Phantom Trial in the Dark Realm.

    Step 2: The last materials are also fairly accessible:

    • Hooded Feather: Groom Hooded Owls seen in the Wishing Woods.
    • Cushion Fluff: Gathered by grooming Cushion Squirrels located throughout Miraland's forests.
    • Wreath Fluff: Collected from grooming Wreathdoe found in the Wishing Woods.
    • Thread of Purity: Available through various methods, including quest completions, rewards, or trading.
    • Bling: Collected from the open world, as rewards, or from the Realm of Blessings.
  • Mastering the Starlet Burst Outfit in Infinity Nikki

    In Infinity Nikki, you’ll find a huge collection of clothing items to gather. With everything from stunning accessories to breathtaking dresses, your wardrobe will grow to include styles that suit all tastes. Let your imagination run wild!

    Ability Outfits give Nikki special powers to explore Miraland more easily. One of the outfits you’ll discover late in the game is the Shrinking Outfit, which you’ll find as you enter Wishfield near the Wishing Woods. We’ll guide you on how to create and use it, allowing you to squeeze into tight spots and uncover new secrets alongside Nikki and Momo!

    How to Make the Starlet Burst Outfit

    To get this outfit, you’ll need to progress through the storyline until you reach the Wishing Woods after visiting Stoneville and the Abandoned District. During an interview to obtain a permit for the Wishing Woods, you’ll have to craft this outfit.

    This outfit is unique as it shrinks Nikki down to a smaller size, allowing her to squeeze through tight spaces made for Faewish Sprites. First, make sure to unlock the right node in the Heart of Infinity by using a Whimstar and 10,000 blings.

    Materials Needed to Craft the Starlet Burst Outfit

    Once you’ve unlocked all the necessary sketches, you can start crafting. It’s a good idea to create every piece at the same time so that you can start using the outfit right away.

    Here’s a list of materials you need to gather and where to find them:

    Material Name

    Amount

    Location

    Starlit Plum

    4

    Florawish


    Breezing Meadows


    Stoneville


    Abandoned District


    Wishing Woods

    Elastic Gel

    1

    Received from the Faewish Sprites after passing your permit interview.

    Lampbloom

    4

    Florawish


    Breezing Meadows


    Stoneville


    Abandoned District


    Wishing Woods

    Threads of Purity

    600

    From quest rewards


    Realm of Escalation

    Outfit Stats

    Once you’ve crafted the outfit, you can upgrade its individual pieces. Each component has specific stats to boost your performance in styling contests against the Sovereigns of Wishfield.

    Here’s a summary of all the pieces in the set along with their stats:

    Outfit Piece Name

    Wardrobe Category

    Elegant

    Fresh

    Sweet

    Sexy

    Cool

    Gemini Spiral

    Hairstyle

    49 (D)

    43 (D)

    355 (A)

    165 (C)

    47 (D)

    Tiny Star Wish

    Dresses

    53 (D)

    93 (D)

    576 (A)

    288 (C)

    90 (D)

    Gradient Sky

    Socks

    20 (D)

    17 (D)

    110 (A)

    56 (C)

    17 (D)

    Starry Steps

    Shoes

    20 (D)

    17 (D)

    179 (A)

    87 (C)

    27 (D)

    Subtle Gleam

    Hair Accessories

    11 (D)

    15 (D)

    83 (A)

    40 (C)

    16 (D)

    Starry Trampoline

    Headwear

    11 (D)

    11 (D)

    87 (A)

    42 (C)

    14 (D)

    Glittering Change

    Bracelets

    15 (D)

    14 (D)

    82 (A)

    42 (C)

    12 (D)

    Rising Star

    Chokers

    10 (D)

    16 (D)

    85 (A)

    45 (B)

    9 (D)

    Total Outfit Score

    189

    226

    1,557

    765

    232

    How to Use the Shrinking Outfit

    To activate the outfit’s ability, you must be in the Wishing Woods; otherwise, it will not work. Use the special ability command to shrink down and hitch a ride on Momo’s back.

    With Momo’s added weight, any pad or trampoline that Nikki uses will launch Momo even higher.

    While playing as Momo, you can move much quicker and fit into tighter areas. You can also climb the green and yellow braided poles to reach elevated spots with Momo.

    When this ability is active, you won’t be able to float or utilize Purification skills. Be sure to switch back when necessary!

    The Wishing Woods are tailored for small beings like the Faewish Sprites, making it ideal for Momo to explore. Be sure to search every corner to uncover as many treasures as possible, including Whimstars, Dews of Inspiration, and blings.

  • Create the Bubbly Voyage Look in Infinity Nikki!

    Create the Bubbly Voyage Look in Infinity Nikki!

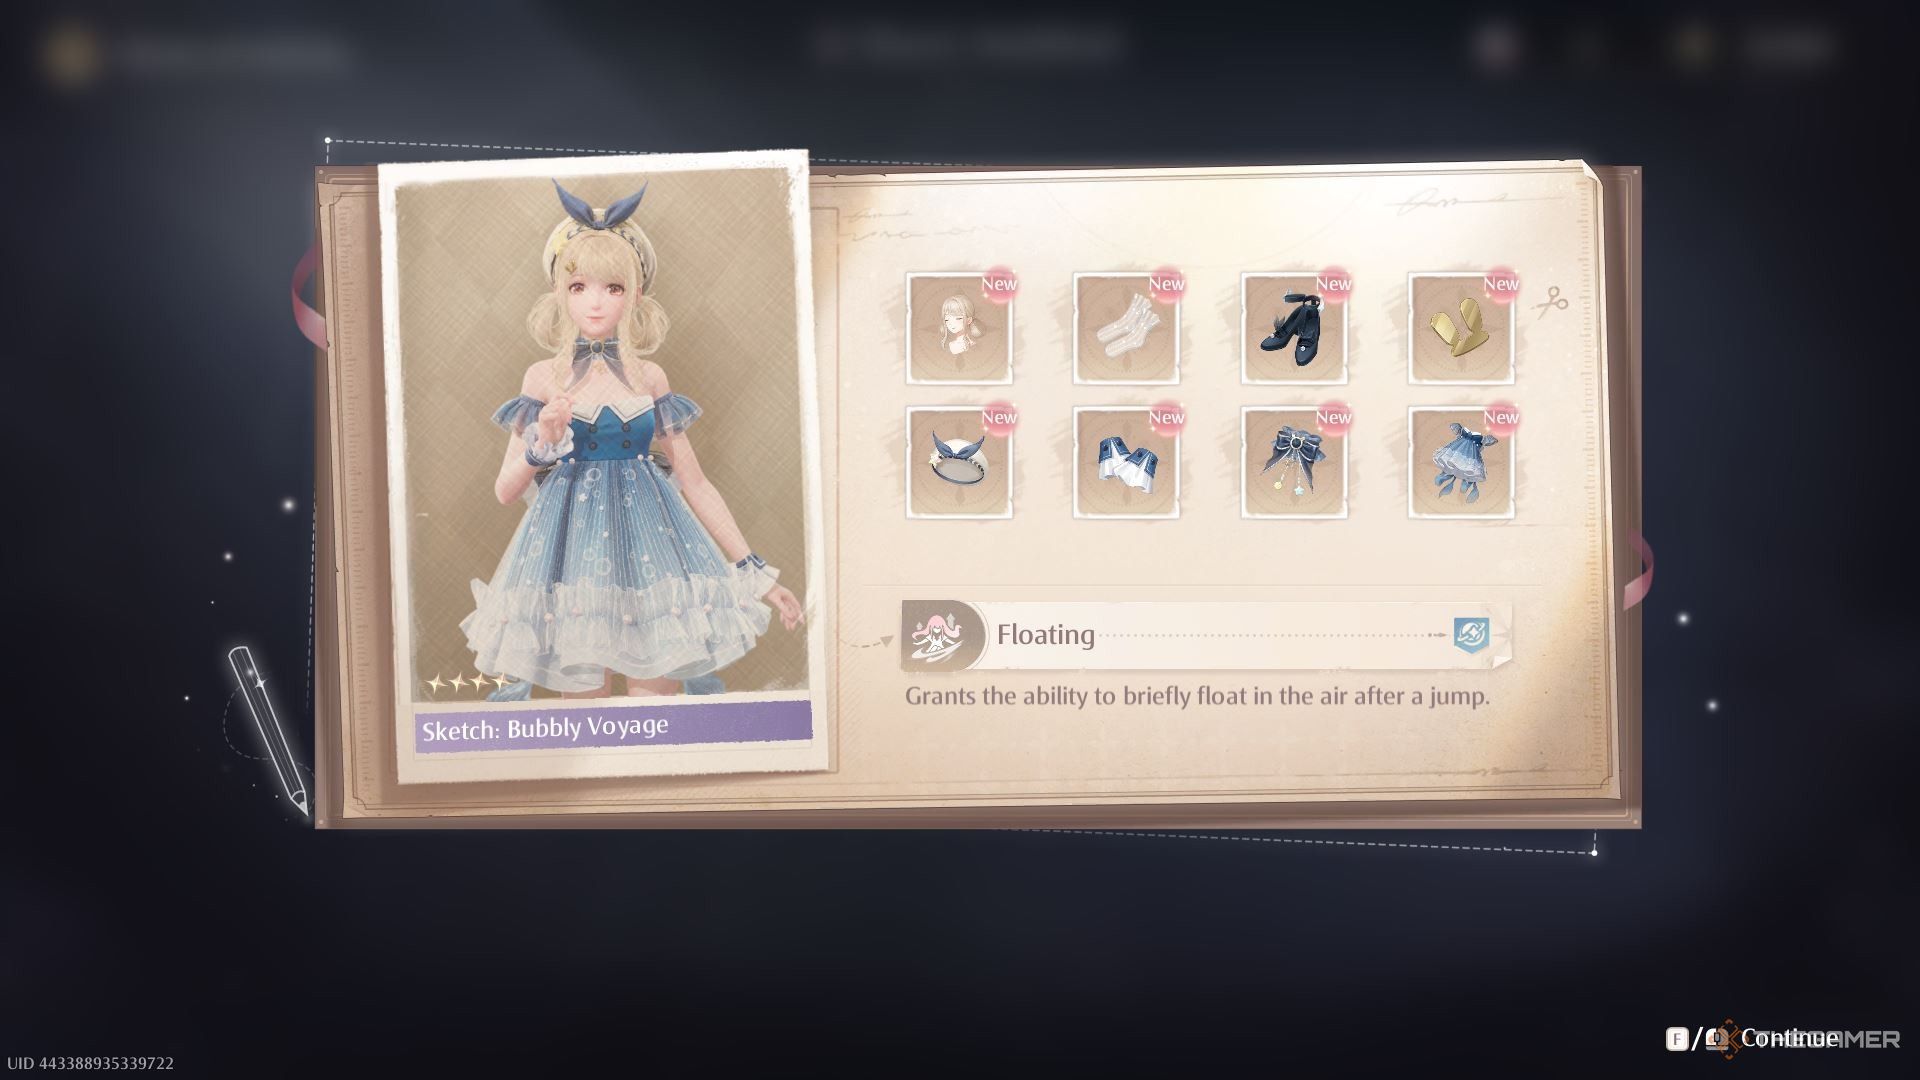
    Miraland is an expansive world waiting for you to discover as you play Infinity Nikki. However, to experience its stunning heights and vital areas, you’ll need the Floating Outfit! This beautiful blue dress lets Nikki float briefly after jumping, making it an essential tool to explore.

    Related

    Infinity Nikki: Beginner’s Tips

    Does anyone else feel like there’s a Whimstar around every corner?

    Mastering this ability is crucial for navigating the wonders of Miraland, where many stunning sights and higher locations await. The Floating Outfit is one of the first Miracle Outfits you’ll receive in Infinity Nikki and will be invaluable as you progress through the game.

    How to Obtain the Bubbly Voyage Sketch


    The sketch for the Bubbly Voyage outfit in Infinity Nikki.

    After completing the introduction, you’ve likely encountered most of the important Miracle Outfits Nikki can wear, each providing various abilities. After a transformative encounter with Ena the Curator, Nikki and Momo find themselves in Miraland, and soon after Nikki awakens, a dresser blocks her way out of the ruins.

    To get past it, you’ll need to navigate around. Face away from the bookshelf, and you’ll notice an opening draped with vines to the right of the door Nikki just entered. Something glimmers inside. Move towards the opening and clear the vines so Nikki can venture inside and collect her first Whimstar.

    Finding this Whimstar automatically gives Nikki the sketch for the Floating Outfit, known as the Bubbly Voyage sketch. To create the Bubbly Voyage outfit in Infinity Nikki, simply head to the Sketches section of Nikki’s inventory. The Floating Outfit acts as your introduction to crafting new outfits in the game.

    Locate the Bubbly Voyage sketch and then Select All components from the top menu on the following screen. Luckily, Momo has the necessary materials to create the dress, so confirm the crafting items and Quick Craft the dress when ready. This will unlock the Floating Outfit, which leans heavily into a Sweet aesthetic.

    All Parts of the Floating Outfit in Infinity Nikki

    Outfit Piece Name

    Wardrobe Category

    Elegant

    Fresh

    Sweet

    Sexy

    Cool

    Air Bubbles

    Hairstyle

    30 (D)

    179 (C)

    350 (A)

    53 (D)

    42 (D)

    Whispering Bubbles

    Dress

    79 (D)

    274 (C)

    547 (A)

    99 (D)

    102 (D)

    Transparency Trajectory

    Socks

    18 (D)

    56 (C)

    113 (A)

    14 (D)

    18 (D)

    Graceful Takeoff

    Shoes

    25 (D)

    87 (C)

    181 (S)

    21 (D)

    17 (D)

    Twinkling Reflections

    Hair Accessory

    10 (D)

    44 (C)

    84 (A)

    14 (D)

    14 (D)

    Sparkling Reverie

    Headwear

    13 (D)

    43 (C)

    83 (A)

    14 (D)

    12 (D)

    Gentle Touch

    Bracelets

    15 (D)

    43 (C)

    86 (A)

    10 (D)

    11 (D)

    Flowing Ripple

    Choker

    8 (D)

    44 (C)

    87 (A)

    11 (D)

    15 (D)

    Total Outfit Score

    205

    770

    1,531

    236

    231

    Once you acquire the Floating Outfit, you can wear the complete ensemble while exploring Miraland. Alternatively, you can mix and match individual pieces to create unique outfits for Nikki. The fashion possibilities are entirely up to you!