الوسم: Nordics

  • Upgrading and Refitting Your Ship in Ys X: Nordics

    Upgrading and Refitting Your Ship in Ys X: Nordics

    Ys X: Nordics invites you to navigate the seas aboard your ship, where you’ll face maritime combat, combat the undead, and discover islands in the Obelia Gulf. However, you start with the Sandras, a ship that is more of a relic than a reliable vessel.

    Fortunately, the game allows you to upgrade and modify your ship as you advance in the storyline, transforming it into a valuable ally for your adventures across the Obelia Gulf. At first, the enhancements might appear minor, but you’ll soon realize that even small changes can significantly boost the ship’s performance.

    How to Upgrade and Modify Your Ship


    To make adjustments to your ship, you’ll need to visit a shipwright. The first one you meet is Ulvar on Balta Island. During this initial encounter, Ulvar will perform essential repairs on the Sandras, allowing you to safely complete the rite of shield brotherhood.

    After completing this part, you can return to Ulvar, who will now help you upgrade and enhance your ship for a fee. You can also adorn your ship if you have the Sandras Pack DLC. Until you advance further in the story, Ulvar will be your only available shipwright.

    Once you save Cruz on Termina Island, he will join your crew. After reaching Chapter 4, Cruz becomes accessible on Sandras as a shipwright. At this point, you can access ship upgrades and modifications from anywhere on the open sea by heading to the common room table below decks.

    How to Unlock Additional Upgrades


    Proposal Lists and requirements for Major Refit I: Bilge Reinforcement in Ys X: Nordics.

    As you progress through the game, you’ll automatically unlock various ship upgrades. However, finding Carnac villagers is the best way to unlock additional upgrades.

    Each time you rescue a Carnac villager, a related upgrade will become available in the Shipwright Shop’s Upgrade/Refit menu. The upgrades you earn for rescuing villagers also correspond to their roles in your team. Remember, upgrading your ship will require gold and various materials.

    The most common material needed is Basic Craft Stock, so keep a good supply on hand whenever you want to upgrade. Some upgrades may additionally require materials like Celadon Clay or Aged Wood.

    One effective way to gather these materials is by participating in naval battles and collecting scattered items in the open sea.

    Certain blueprints and upgrades can only be unlocked by completing specific parts of the story or purchasing them from merchant ships. These blueprints might enable new types of ammunition upgrades, which can be bought multiple times to increase capacity.


    Mini Bolide Ammo +10 upgrade requiring significant materials in Ys X: Nordics.

    It’s important to only purchase capacity upgrades that you genuinely need. If you buy too many, you might deplete your resources for other more beneficial upgrades early in the game.

    A priority icon accompanies each upgrade request. The upgrades with higher priorities offer more benefits compared to those with lower priorities, but they will require more materials to unlock.

    How to Manage Your Ship’s Loadout


    Upgraded Ship Loadout in Ys X: Nordics.

    Your ship’s loadout consists of six slots. The first slot is designated for normal artillery. You can acquire various types of ammo for this slot by upgrading, but you can only select one at any given time.

    The standard ammo for the normal artillery deals moderate damage to enemy ships and breaks, while the Smasher Shot ammo inflicts significant break damage, but only moderate ship damage.

    The second slot allows you to choose your heavy attack ammo, with the default ammo often being the best option. The last four slots are reserved for special ammunition, which is limited in quantity, though capacity can be expanded by purchasing upgrades from the Shipwright’s Upgrade/Refit menu.


    Ship customizations in Ys X: Nordics.

    In the Loadout tab, you’ll see an adornments section where you can customize your ship with all the cosmetic upgrades from the Sandras DLC Pack. After setting your loadout, you’re ready to sail the seas, battling any wandering undead ships or reclaiming islands under the grip of Griegr.

  • Conquering Fishscale Island in Ys X: Nordics Explained

    Conquering Fishscale Island in Ys X: Nordics Explained

    Ys X: Nordics invites players to explore a variety of islands while freeing them from the grasp of the undead. Many of these islands are relatively small, often visited only once, so make sure to take full advantage of your exploration.

    Your journey will take you to Fishscale Island as part of the main storyline in Chapter 3. This island is one of the first you’ll encounter after leaving Balta Island aboard the Sandras as you embark on your adventure.

    How to Get to Fishscale Island

    Fishscale Island lies to the west of Balta Island. It’s easy to reach; if you decide to harness the wind, you can arrive quickly. However, if you choose to navigate the open waters, it may take some time, as your ship is likely still unmodified at this point.

    Upon nearing Fishscale Island, you’ll notice several rocks that the Sandras can target and destroy using artillery. Fortunately, you aren’t required to destroy these rocks to continue with the story. Simply get close enough to land on the island.

    Advancing the quest on Fishscale Island will temporarily block your ability to explore the open sea, so it’s advisable to complete any minor quests or tasks before you head there.

    Walkthrough for Fishscale Island

    Adol and Karja finding a note on a shipwreck on Fishscale Island.

    Once you disembark, you’ll quickly spot a shipwreck to your right. Approach it to interact, and Adol and Karja will find a note on the broken mast from someone who claims to be cursed and urges them to leave the island.

    Rather than turning back, Adol expresses his eagerness to investigate further. Moving away from the shipwreck, you’ll find a Hewnstone surrounded by a dark mist.

    Adol about to purify the Hewnstone on Fishscale Island.

    Approaching this Hewnstone triggers a sequence revealing that Adol might be able to purify it. Afterward, you must press and hold the interact button to complete the purification.

    Once purified, you can use it like any other Hewnstone, receiving the following items:

    • Mana Point (Adol)
    • Mana Point (Karja)
    • You can also refine new types of Mana Seeds.

    After using the Hewnstone, continue straight and follow the path of small Mana Crystals. You’ll find the path branching into two directions: one leading to the quest marker straight ahead and another to the right.

    Contents of a chest on Fishscale Island.

    If you take the path to the right, you’ll come across a large stone that a small trail of Mana Crystals leads up to. If you go around the stone, you’ll find a chest containing three Red Drops, useful for crafting Mana Seeds at a Hewnstone later.

    A humanoid Greigr wearing a tribal mask on Fishscale Island.

    Moving north from the chest will lead you to a gigantic Mana Crystal, which can be attacked for several Mana Crystals. After gathering resources, head straight towards the quest marker where you’ll face a large humanoid Griegr wearing what looks like a tribal mask.

    How to Defeat the Tribal Mask Griegr on Fishscale Island

    This encounter isn’t an official boss fight, but the Griegr you face here has an armored health bar and could pose a challenge, especially on higher difficulty settings. Fortunately, its attack patterns are manageable.

    Attacks

    Description

    How to Avoid

    Swipes

    The Griegr will attempt to slash at Adol and Karja with its claws.

    Performing a perfect parry stuns the Griegr; if not, blocking will mitigate some damage.

    Giant Hug Attack

    The enemy glows red and opens its arms wide to try to grab you.

    This attack is unblockable, so create space or attempt a perfect parry.

    Jumping Swipe

    The Griegr leaps into the air and performs a downward swipe upon landing.

    This attack is easy to anticipate and has a short range; holding the block button should suffice.

    Screech Attack

    The Griegr screeches at Adol and Karja, pushing them away while dealing damage.

    If you block, you’ll negate most of the impact from this attack.

    Glowing Screech

    When low on health, the Griegr’s face glows and it unleashes a screech, which pushes you back and replenishes its armor.

    There’s not much you can do except break its armor again.

    By consistently using Duo Skills and blocking your opponent’s moves, you’ll take down the Griegr in no time. Once defeated, Karja urges Adol to purify the creature just as he did for Dogi during the Rite of Shield Brotherhood.

    When Adol attempts to purify the Griegr, it’s revealed to be Joel, the father of Mirabel. Joel then agrees to join Adol and Karja on the Sandras.

    Grenn reveals to Joel that his daughter, Mirabel, was a victim of the Carnac Incident in Ys X: Nordics.

    Joel and the team discuss his arrival on the island, where he admits to not knowing about the devastation in Carnac. He was at sea on his fishing boat when it occurred. He also shares his encounter with Jord, a female Griegr, who transformed him.

    As Joel offers to join Adol and Karja’s crew, they are suddenly attacked by a fleet of Griegr led by a formidable undead named Odr. Following a cinematic sequence, you will face Odr in battle.

    Confronting Odr

    Odr, a humanoid Greigr, meets Adol and Karja during their first encounter on Fishscale Island in Ys X: Nordics.

    The boss battle against Odr can be quite demanding, but you’re not supposed to win at this point. You’ll quickly find that Odr exceeds the strength of any previous enemy, making even breaking his armor a formidable task.

    Getting too close to breaking his armor may trigger a charged attack from Odr that could finish you in one hit. Upon defeat, Odr will commend Karja’s skills and curse Adol to die in three months unless they defeat him first, challenging them to become strong enough to succeed before time runs out.

    Odr challenges Adol and Karja to become stronger and invite them to end his life in Ys X: Nordics.

    Afterward, Odr departs, and Karja faces a crucial choice. Deciding to navigate through the Tyrant to escape the pursuing Griegr fleet, the crew finds themselves on Termina Island, marking the next stage of their adventure.

  • Transforming Your Wardrobe in Ys X: Nordics

    Transforming Your Wardrobe in Ys X: Nordics

    Ys X: Nordics offers a wide range of costumes for its two lead characters, significantly enhancing their appearance. Early in the game, you’ll receive a complimentary outfit for Karja. Additional costumes can be unlocked as you progress, though many are tied to downloadable content (DLC).

    While these outfits don’t grant any gameplay advantages, many of them look fantastic. If you haven’t purchased DLC, don’t worry—you can still buy some outfits by moving along in the game’s storyline.

    How to Obtain Outfits


    The majority of outfits and accessories can be obtained through the DLC. If you have any DLC for costumes, follow these steps to access the DLC items in your inventory before you can equip them:

    1. Press the Main Menu button.
    2. Navigate to the Inventory section.
    3. Switch to the DLC tab.
    4. Select the desired DLC item to unlock the outfits and materials.

    How to Change Outfits


    This image displays a custom outfit for Adol in Ys X: Nordics.

    In addition to costumes, you can equip up to three different accessories for each character from the Cosmetics section. After you’ve unlocked the outfits, you can equip them by following these steps:

    1. From the Main Menu, go to the equipment section.
    2. Scroll down to find the Cosmetics section.
    3. Select the first option in the Cosmetics section to choose your desired outfit.
    4. Scroll down and select the other three options to pick the accessories you wish to equip for that character.

    Adol and Karja can wear different outfits and hairstyles, but all outfit accessories can be used by either character.

    How to Change the Ship’s Design


    This image illustrates a customized Sandras from Ys X: Nordics.

    Along with the characters’ outfits, you will also gain access to various cosmetic items for your ship, called Sandras, through the Sandras Pack DLC. Changing the ship’s appearance, however, requires a different process than changing character outfits.

    While you can modify your characters’ costumes anywhere, to update your ship, you must visit a shipwright such as Ulvar on Balta Island. Once you’re at a shipwright’s shop, follow these steps to change your ship’s look:

    1. Select the Check / Change Ship Loadout option from the shop menu.
    2. Switch to the Loadout tab.
    3. Scroll down to the Adornments section.
    4. Choose up to four cosmetic options for the Sandras from here.
  • Defeating Rollo and Lila in Ys X: Nordics攻略

    Defeating Rollo and Lila in Ys X: Nordics攻略

    Throughout your adventure in Ys X: Nordics, you’ll frequently come across the name Rollo, hinting at his role as the final boss. However, his true form and the unexpected ally who joins him for the showdown against Adol and Karja may take you by surprise.

    This encounter will not be your first time facing two bosses simultaneously, but it promises to be more challenging. To stand a chance at victory, you’ll want to be well-prepared.

    Rollo and Lila: First Phase Strategy

    In this phase, you won’t see a durability bar at the start, and it continues until you reduce their combined health to 20%. The shared health bar for Rollo and Lila is displayed at the top of the screen, and attacking either foe decreases their HP.

    During this phase, expect the following attacks:

    Attack Name Enemy Description
    Speed Attacks Lila Lila will remain at the edges of the battlefield, launching quick attacks, including spike-like projectiles and an arc-shaped wave. Keep moving to dodge these and counterattack for significant damage.
    Slash Attacks Rollo Rollo will start by swinging his axe, allowing for easy parries. After two swings, he will leap and slam his hammer into the ground.
    Red Attack Rollo Rollo will jump high and slam down, creating a larger area of effect (AoE) damage compared to his normal attacks.
    Wind Attack Rollo He will rise into the air, glowing with a green aura, and then charge downward while swinging his axe.
    Spin Attack Rollo If you’re too far away, he will charge up and come at you while spinning his axe.

    A pro tip: Frostbite is your ally during this fight as it significantly boosts your damage output.

    The first phase will keep you on your toes with its relentless attacks. Focus on building your revenge gauge and minimizing damage taken rather than constantly attacking, as this strategy will prove beneficial against Rollo and Lila.

    Rollo and Lila: Second Phase Strategy

    Once you lower their combined health to about 20%, a cutscene will show Rollo donning a mask while Lila gains shields, complicating your ability to target her. This transition introduces new attacks and enhances existing ones.

    Attack Name Enemy Description
    Blue Orb Lila Lila can create a large blue orb that will chase your active character. You can parry it for some revenge gauge.
    Constant Attacks Lila Lila will create airborne entities that launch projectiles at you, acting as an additional foe.
    Enhanced Red Attack Rollo After a normal red attack, he will follow up with a quick flurry of blue waves. Dodging this grants a cutscene that deals massive damage to him.
    Rollo’s Ship Rollo He can summon a ship that will move toward you after a brief delay. The best way to avoid this is to simply move out of the way.
    Grab Attack Rollo His arm may glow green before he dashes to grab you. If successful, he will lift you and perform a damaging slash.

    This phase serves as an introduction to the further challenges you will face, and it culminates once you remove their durability bar. Be vigilant, as this phase will throw frequent attacks your way.

    Rollo and Lila: Third Phase Strategy

    Once you deplete Rollo and Lila’s first durability bar, another cutscene will commence. They’ll regain their health and durability, marking the real battle’s beginning. Now, not only will the attacks get faster, but you will also encounter new moves:

    Attack Name Enemy Description
    Clone Attack Rollo Rollo summons up to four clones that will attack you one by one. It’s advisable to parry the first and dodge the rest as he may attack from his end.
    Lightning Strikes Lila While Rollo is preoccupied, Lila will place circles on the ground that can summon lightning strikes.
    Dual Attack Rollo and Lila After you remove their durability bar, they’ll prepare a giant orb that launches across the arena, causing lightning strikes to follow. Avoiding these is crucial for survival.
    Ground Wave Rollo Rollo will punch the ground, causing damage in a large triangular area in front of him.
    Whirlpool Attack Lila Lila generates a whirlpool that pulls you in, making you a target for their attacks.

    This is the longest and toughest phase as both bosses can execute multiple attacks simultaneously. The key here is to dodge as many attacks as possible while maximizing your damage to the main target. Stock up on healing and paralysis-removal items to enhance your chances in this demanding battle.

  • A Guide to Locating Every Puppet in Ys X: Nordics

    A Guide to Locating Every Puppet in Ys X: Nordics

    From the moment Adol arrives on Carnac in Ys X: Nordics, he hardly has a chance to catch his breath. As one of only two people capable of combating the relentless Griegr attacks, he quickly finds himself embroiled in chaos. Just when he tries to take a breather with his new friends, Carnac faces a raid, resulting in the disappearance of all the villagers.

    As you progress through the game, you discover that Jord has transformed every villager into a puppet, scattering them across the Obelia Gulf. Throughout your journey, you’ll encounter these villagers in various locations, and here’s how you can rescue them all.

    Finding All Villagers

    While exploring Carnac, you’ll have the chance to talk to each villager and understand their challenges. Once they’re kidnapped, it becomes your duty to save them—mostly one at a time. Below is a list of all the locations you’ll need to visit:

    Villager Name

    Location

    How To Free

    Dogi

    Lecto Island

    Dogi is the first villager you’ll automatically rescue during the main story after defeating the Ioi boss.

    Joel

    Fishscale Island

    The plot leads you here right after the trial on Lecto Island, where you’ll find Joel hiding away.

    Cruz

    Termina Island

    The third villager you’ll liberate occurs during the main storyline at the end of Termina Island, right after the Magna Diga boss fight.

    Mirabel

    Carnac

    After conquering Termina Island, head to Carnac, where you can rescue Mirabel after an intense battle.

    Momina

    Balta Island

    During your journey to Balta Island in response to the Griegr attack, you can save Momina near the end of the level.

    Ashley

    Ozmid Expanse – Occupied Island

    You’ll learn about recapturing islands once you reach Ozmid Expanse, and Ashley will be saved once you complete your first mission.

    Romes

    Anchor Island

    Another character tied to the main story, you’ll find Romes while exploring the outskirts of Anchor Island.

    Cohen

    Ozmid Expanse

    Located on a small boat near a blue question mark in this area, you can find Cohen.

    Father Cuthbert

    Breezy Isle

    To find this NPC, you’ll first need to reach another blue question mark in the Ozmid Expanse, which will trigger a side quest leading you to Breezy Isle.

    Rosa

    Haze Island

    You’ll arrive at this island during the main storyline and save Rosa at the end of the La Belladona boss encounter.

    Dr. Flair and Rafe

    Kalon Island

    Connected to the main storyline, you’ll find both NPCs battling the Griegr themselves.

    Rene

    Falun Island

    You’ll encounter Rene while liberating Ilmer Village.

    Mayor Clement and Dawson

    Raufos Island

    You’ll save them during your assault on Jord’s stronghold.

    Einar

    Outcast Isle

    Look for a green side quest marker when you arrive on this island; you’ll find Einar in a small cave there.

    Millette

    Sonnelia Basin – Southern Ruins

    Millette, a Griegr puppet, is located in the final room you’ll clear while reclaiming this island.

    Mandy

    Specular Bay

    While navigating the bay, you’ll spot a Griegr ship. Defeat the Griegr on board to save Mandy.

    Corinne

    Specular Bay – Northern Citadel

    Find the Griegr puppet in the last room during this island’s recovery mission.

    Fortune Teller Guila

    Eversummer Isle

    You can find her at the green marker right after landing on the island. Defeating the Griegr will allow her to join you on your ship.

    All Other Villagers

    Grotto Isle

    A side quest near Grotto Isle from Hugill culminates in a battle against several Griegr puppets. Defeating them will rescue all remaining villagers.

    Defeating Griegr Puppets

    Griegr puppets serve as unique enemies in Ys X: Nordics. While they aren’t classified as bosses, they’re formidable due to their high health and multiple durability levels. Once you deplete the initial durability bar and reduce their health by half, they will scream and regenerate a new durability bar to conquer.

    The most effective strategy to defeat these enemies is to use your Break abilities repeatedly, followed by quickly finishing them off. You can also dodge their attacks to increase your revenge gauge, which enhances your break and health damage. Be aware that the Griegr puppets encountered in the last quest on Grotto Isle are significantly tougher than the previous ones.

    The Importance of Saving Carnac Villagers

    Most villagers in Carnac can be saved through the main storyline, but a few require extra effort. Fortunately, saving these villagers isn’t purely for altruistic reasons. Each villager you rescue unlocks new features on your ship, including:

    • The ability to report Runestones to Father Cuthbert, earning you various rewards like Blessed Paper Scraps.
    • Unlocking a special area with the fortune teller, allowing you to use Crystal Shards to create random mana seeds, which can be more effective than regular crafting.
    • Saving Cohen enables you to convert excess fish into Basic Ingredients, facilitating trades with merchants.
    • Mandy opens a shop on your ship where you can upgrade your accessories freely.

    In addition to these benefits, every villager you rescue enhances one or more stats of your ship and provides you with an extra Recapture Skill.

  • Conquering Naglfar Nucleus in Ys X: Nordics – A Guide

    Conquering Naglfar Nucleus in Ys X: Nordics – A Guide

    As you dive into the story of Ys X: Nordics, you’ll encounter the three main antagonists early on, with Odr being the clear leader. He’ll challenge you to a duel at the beginning to demonstrate his strength and set you on a journey to enhance your own abilities to confront this formidable foe.

    Your chance to defeat him arrives after you board the Griegr warship and enter the primary generator room. Be prepared, as you won’t only be facing him; this encounter will be the toughest challenge you’ve faced so far in the game.

    Naglfar Nucleus Overview and Attack Patterns


    HP

    96,582

    STR

    446

    DEF

    488

    Looking at the stats, you can see how tough this encounter will be. This fight marks your first real boss battle after Logr, who had significantly less health. Along with its impressive stats, the Naglfar Nucleus fight involves two attackers: Odr and the Nucleus itself.

    Here’s what you need to anticipate during this battle:

    Attack Name

    Description

    Normal Slashes

    Odr will perform quick slash attacks after charging his hand briefly, delivering one or two swift slashes.

    Ground Stomps

    Odr has two types of stomps in this battle. One involves him raising his leg and then slamming it down. The other triggers at a distance, having a broader AoE and greater damage.

    Red Attack

    Odr will glow red while charging a giant orb above his head to throw at you. This is fairly easy to counter, making it excellent for raising your revenge gauge. He can also fly up and smash down after charging his hook.

    Speed Attack

    The Nucleus will charge up with a blue aura before unleashing a wide laser attack.

    Dark Orb

    If Odr begins charging a dark orb, it’s best to get away quickly, as he can attempt to grab your active character and inflict heavy damage.

    In addition to these attacks, the Nucleus can also perform close-range strikes while you attack it.

    How to Beat the Naglfar Nucleus

    This confrontation with the Naglfar Nucleus requires a solid strategy. Remember that while the Nucleus can reposition itself, it lacks mobility and tends to stay on one side of the battlefield. In contrast, Odr will be continually moving around to engage you.

    Your main objective is to deplete Odr’s durability bar, which will immobilize him briefly. Then, focus your attacks on the Nucleus until he recovers. Fortunately, the Nucleus doesn’t regenerate its health or durability at any point during the fight.

    You cannot eliminate Odr in this battle permanently; your only strategy is to keep immobilizing him.

    A quick strategy is to remain close to the Nucleus since Odr will pursue you, allowing you to utilize AoE attacks on both. However, you’ll need to be adept at dodging and countering, as the attacks from both foes can come at you relentlessly.

    Alternatively, you can maintain distance from the Nucleus and concentrate on defeating Odr first before shifting your focus to it. Whichever approach you take, ensure that you have abilities that deal significant Break damage as they are crucial for success in this battle.

  • Discover All Pikkard Locations in Ys X: Nordics

    Discover All Pikkard Locations in Ys X: Nordics

    If you’ve been enjoying Ys X: Nordics for a bit, you’re probably encountering a variety of collectibles scattered throughout the game. While main and side quests guide you to complete specific tasks, these collectibles encourage you to explore the game world instead.

    One such collectible is the Pikkard, which you’ll unlock a few hours into your journey. There are only six Pikkards to discover, but finding them early on can yield significant rewards.

    First Pikkard Location


    To start gathering Pikkards, you’ll need to advance in the story until you form a partnership with Karja and rescue the trapped villager on Termina Island. After completing this, feel free to roam the Carnac Waters and head towards the Inlet Isle, located in the lower right area of the map.

    When you reach the end of the Isle, you will encounter two more Carnac villagers, Lux and Sache. They will ask you to help save the Pikkard, leading Karja to set up a dedicated space for it on the ship. This initiates the Pikkard Adoption quest.

    Once you’ve acquired a Pikkard, you can interact with it after completing each part of the story for additional rewards.

    You can also access the basket in the cabin area to collect some Basic Ingredients.

    Silver Pikkard Location


    Ys X Nordics green mark in swampy water for Silver Pikkard in Termina Island.

    Once you embark on the Pikkard Adoption quest, your second Pikkard can be found in Carnac Waters. Check your sea map and head towards Termina Island, the same location where you obtained your Gullinboard and faced the Magna Diga boss.

    After arriving on Termina Island, navigate to the swampy waters that you couldn’t initially cross without your Gullinboard. Look for a green mark in the center of the water; approaching this mark will reveal the Silver Pikkard for you to collect.

    Speedy And Scaredy Pikkard Location


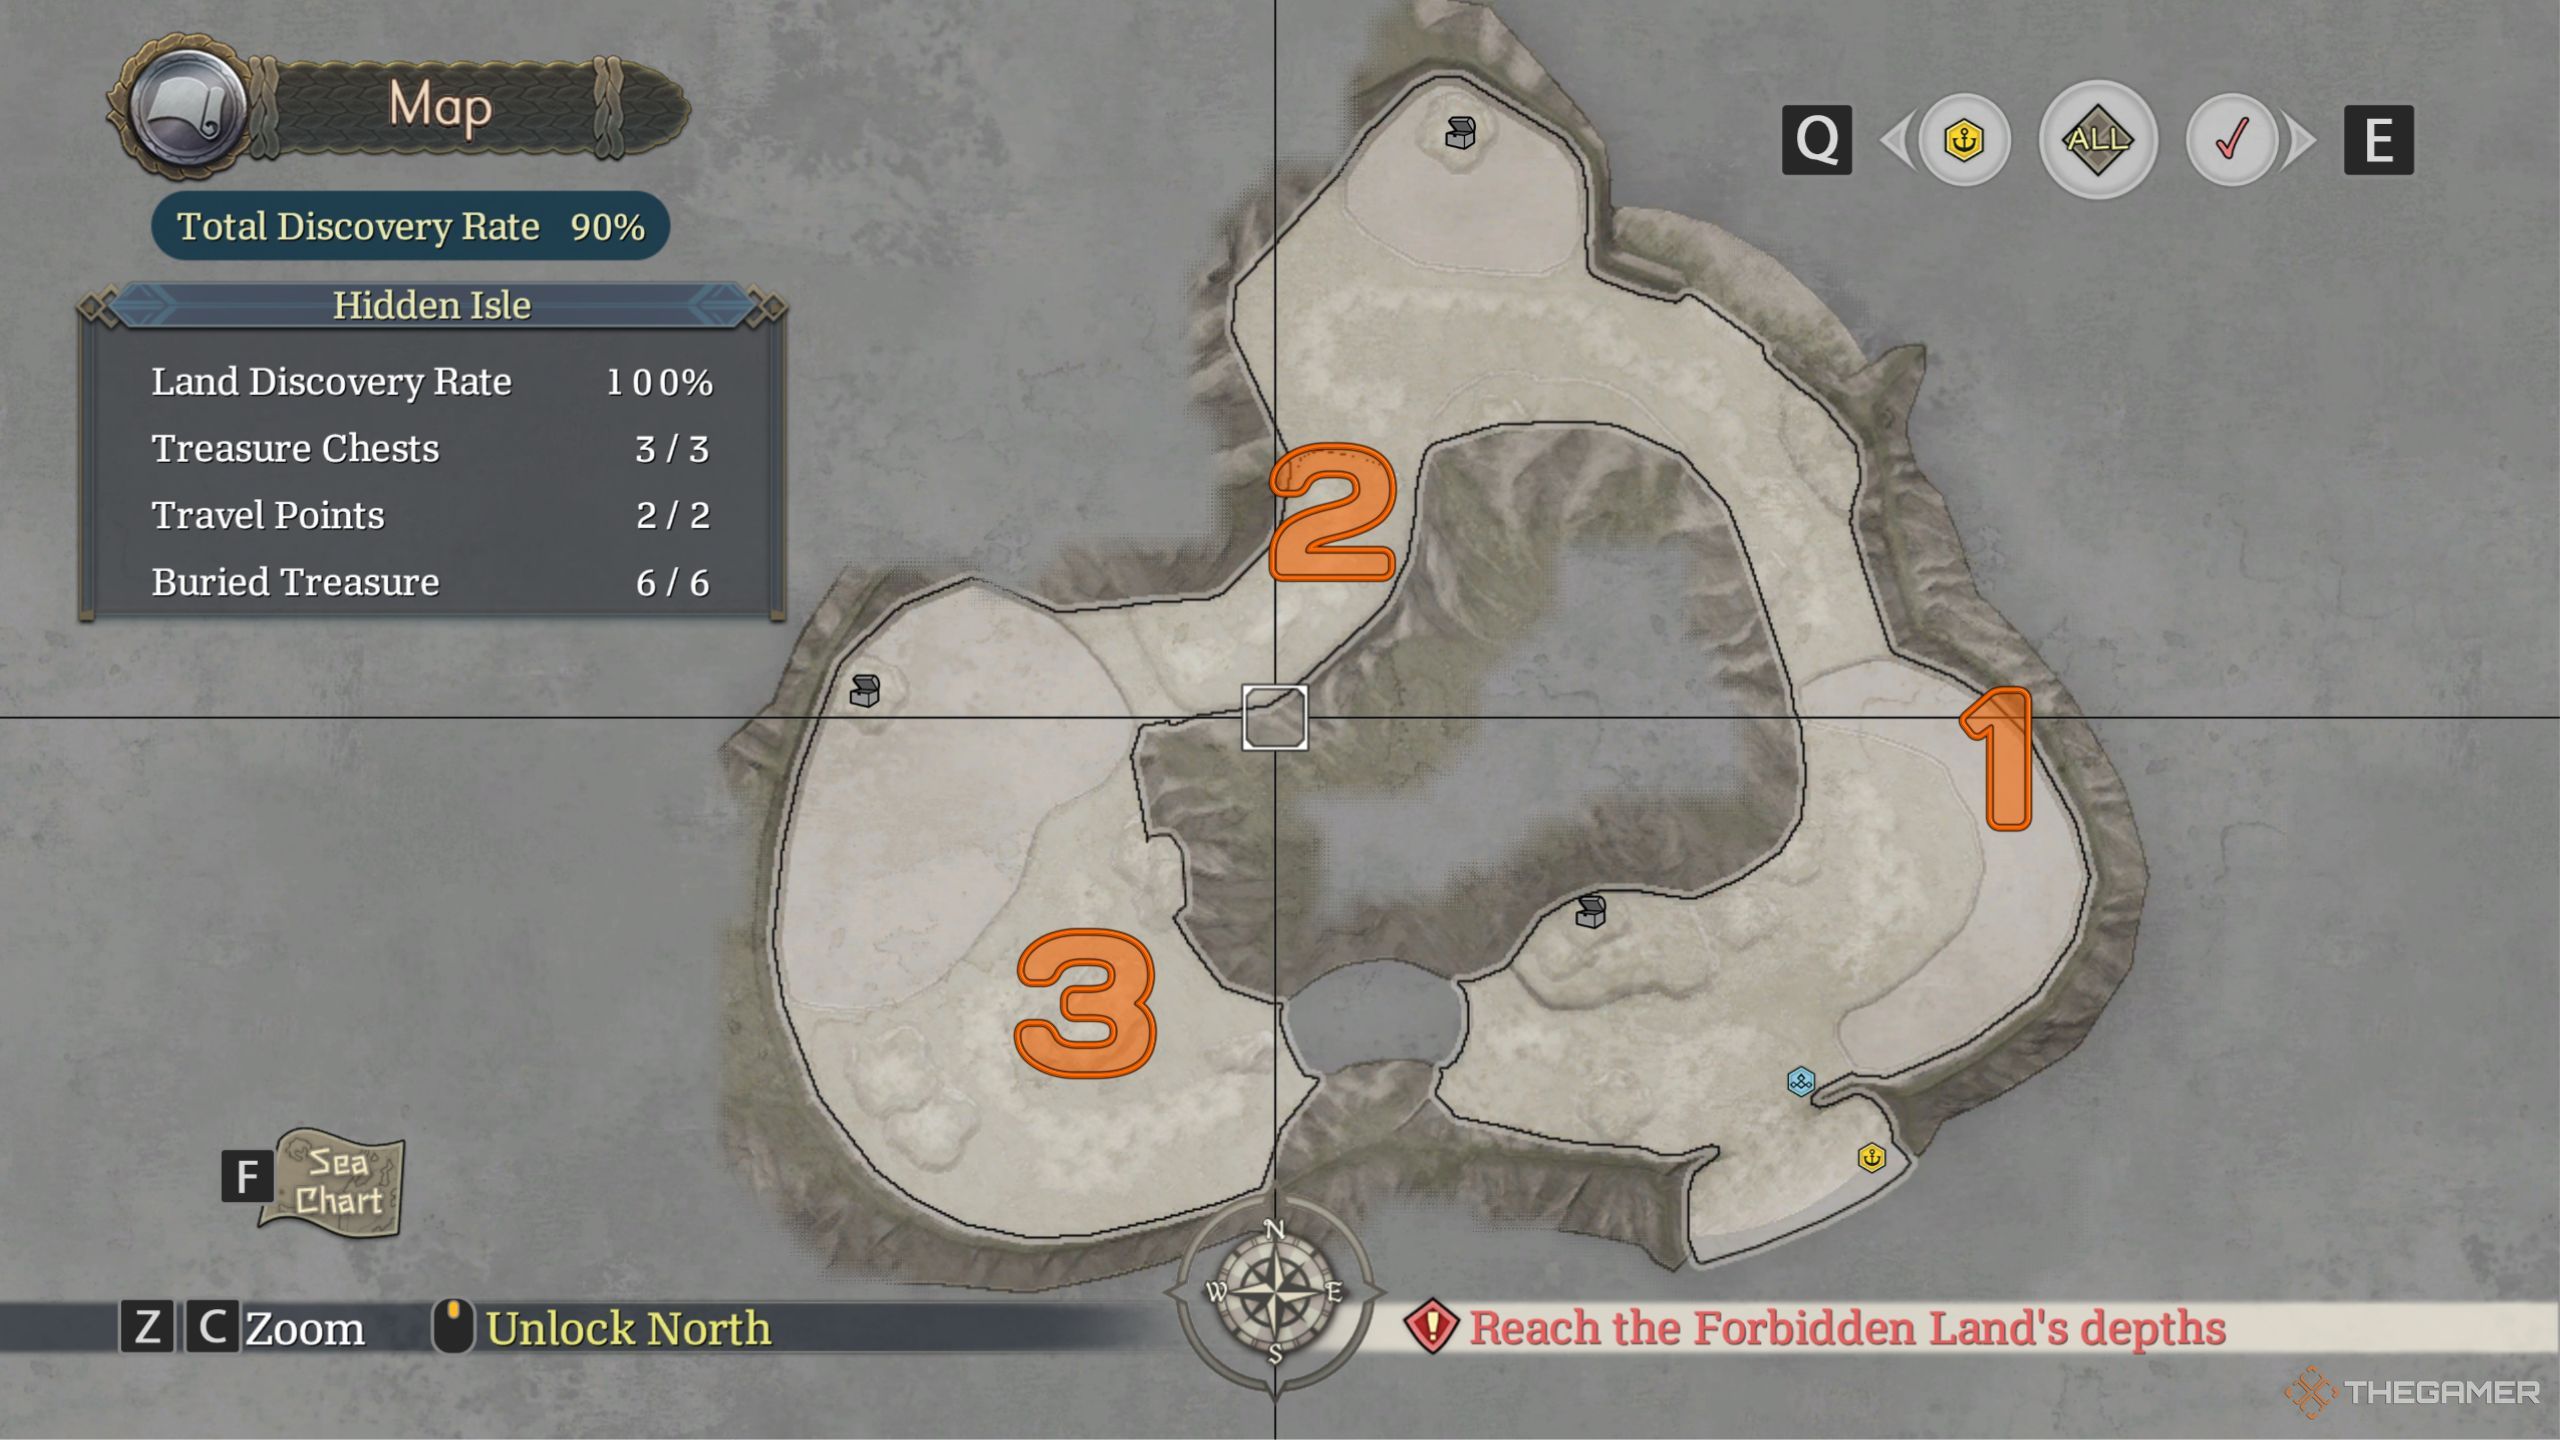
    Ys X Nordics speedy Pikkard locations on Hidden Isle.

    To find the next two Pikkards, keep progressing through the main storyline until you reach the Sonnelia Basin area. At this point, you’ll unlock the Mana Barrier ability, essential for accessing the Hidden Isle located in the southeast corner of the Ozmid Expanse.

    Upon entering the Isle, you’ll notice the Pikkard will try to escape. You need to catch it in three locations:

    1. On a boulder to your right after you cross a small river on the Isle.
    2. As you continue forward, it will be hiding in a flock of sheep.
    3. On top of a rock formation towards the end of the island.

    After finding it in these three spots, head back to the starting point of the Isle to locate it one last time before bringing it back to your ship.


    Ys X Nordics Scaredy Pikkard location on Sonnelia Basin's map.

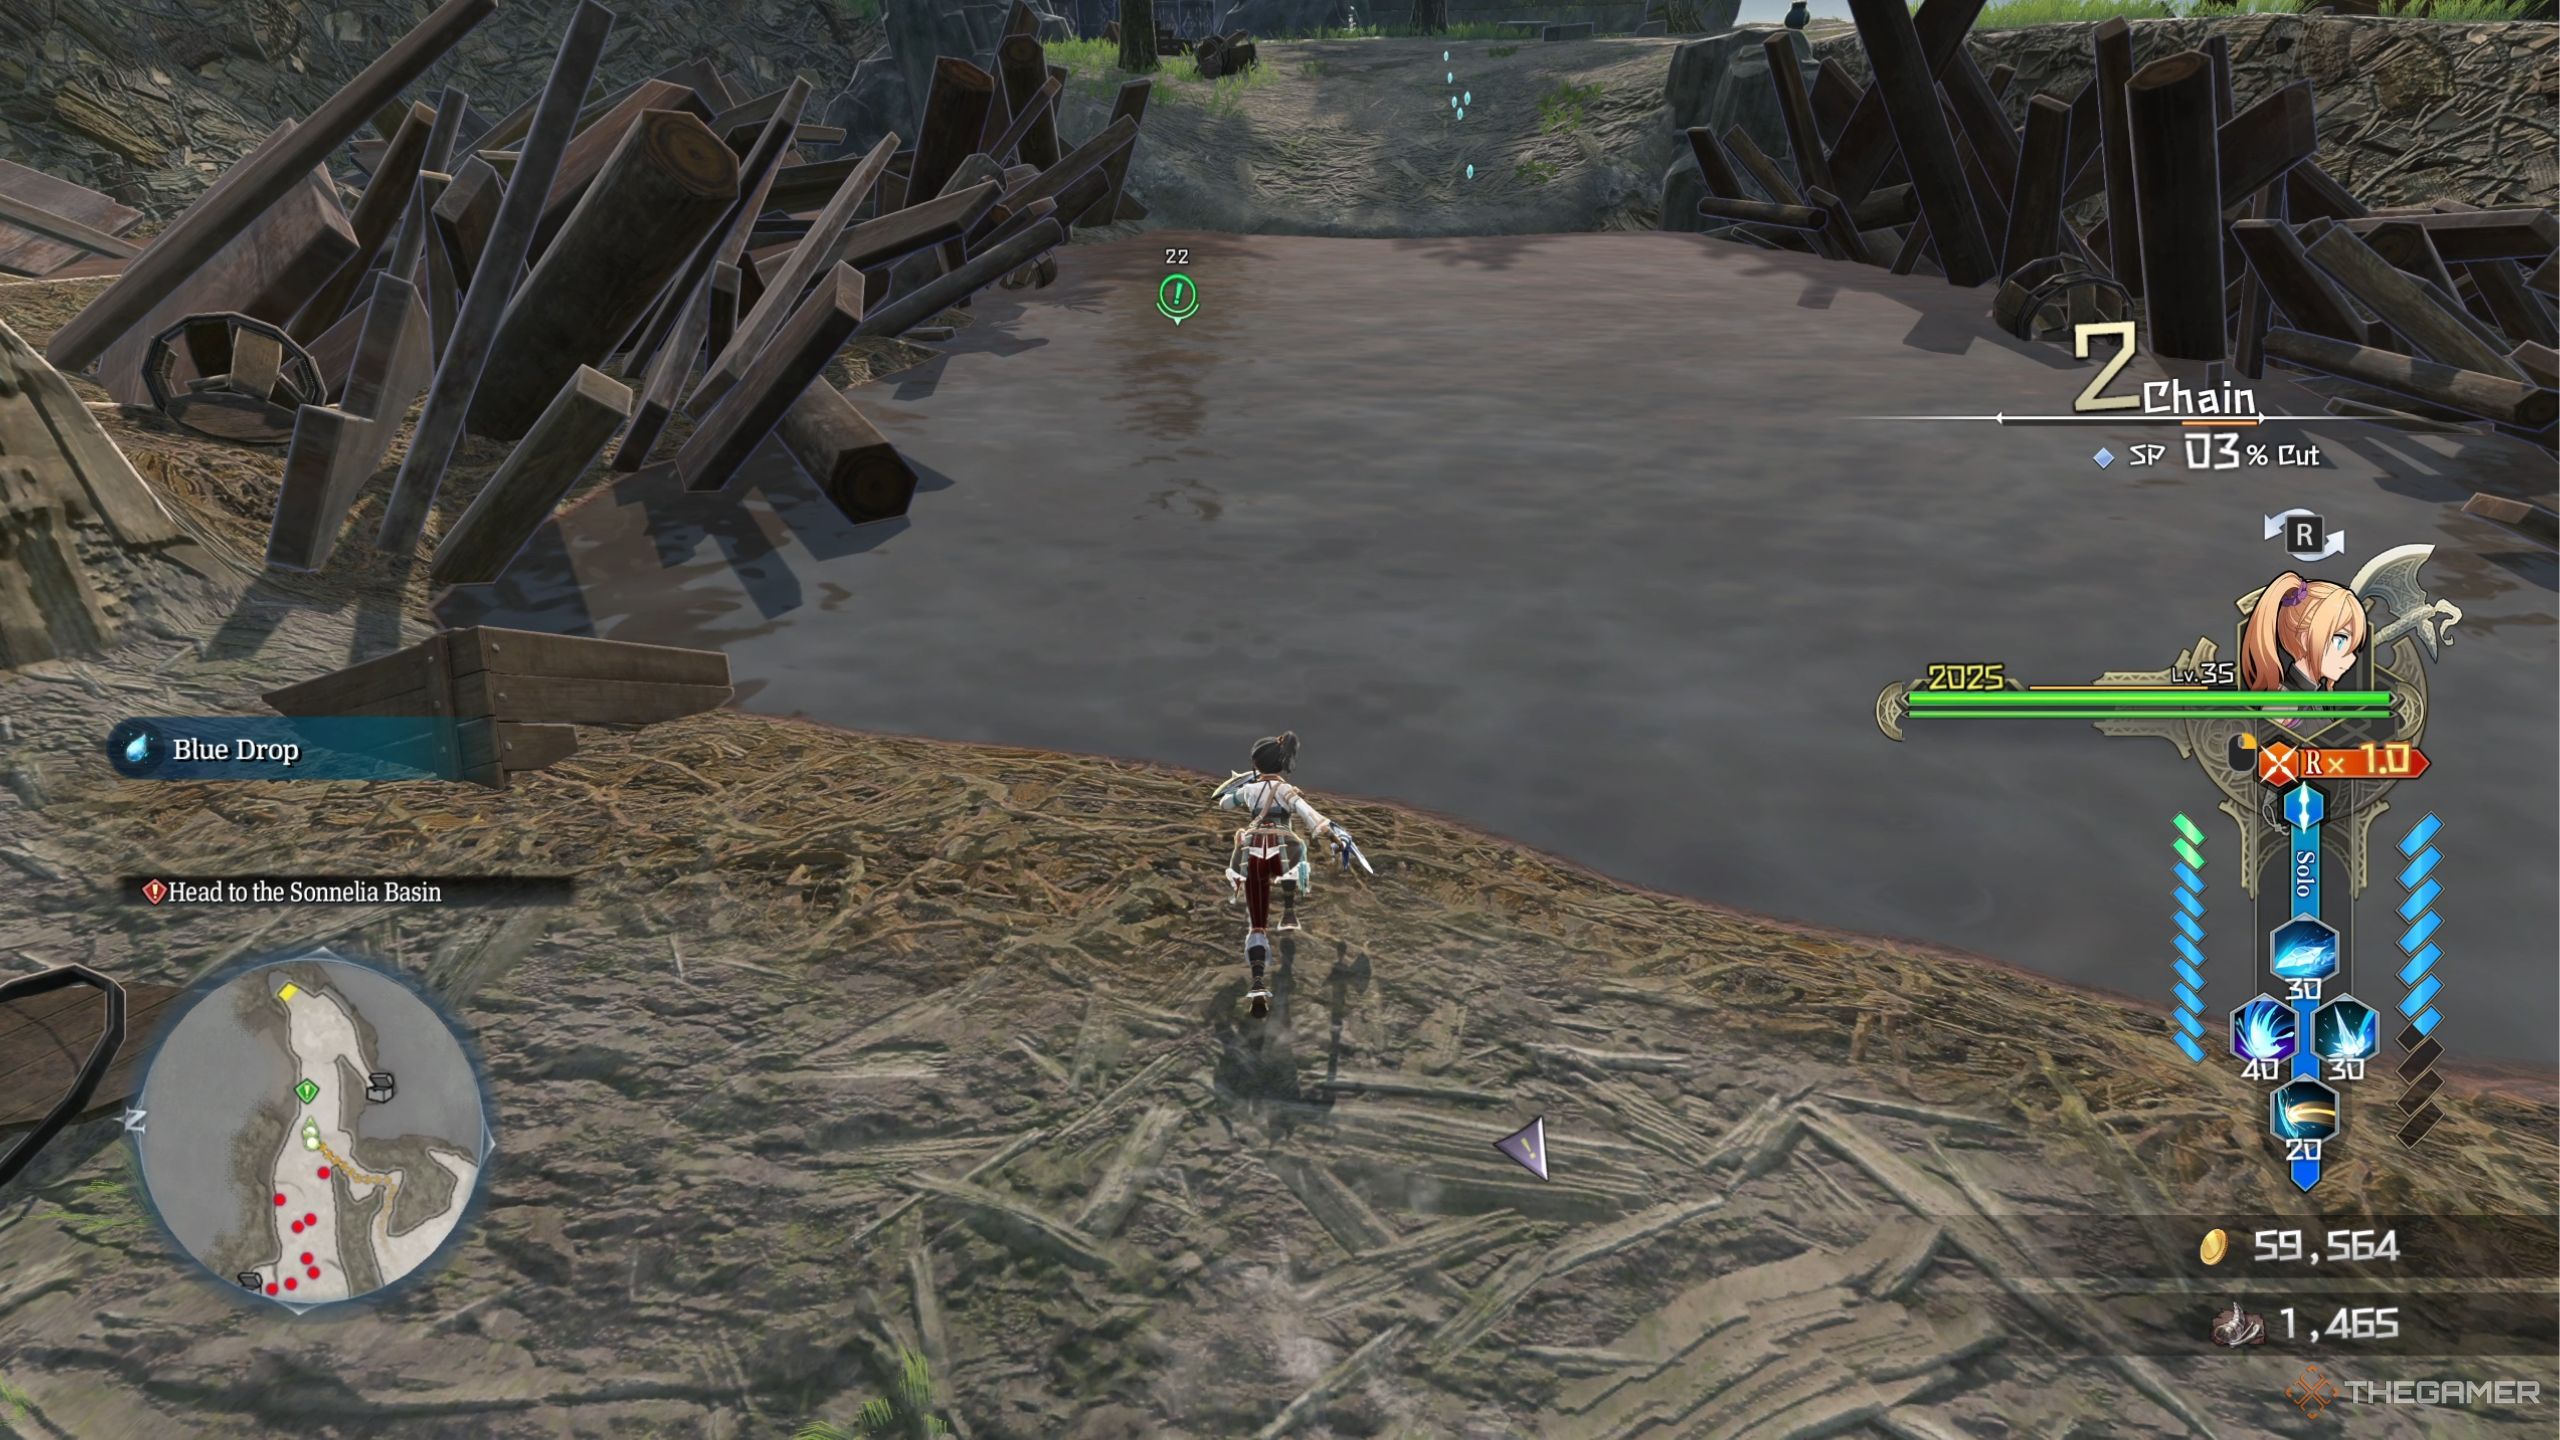
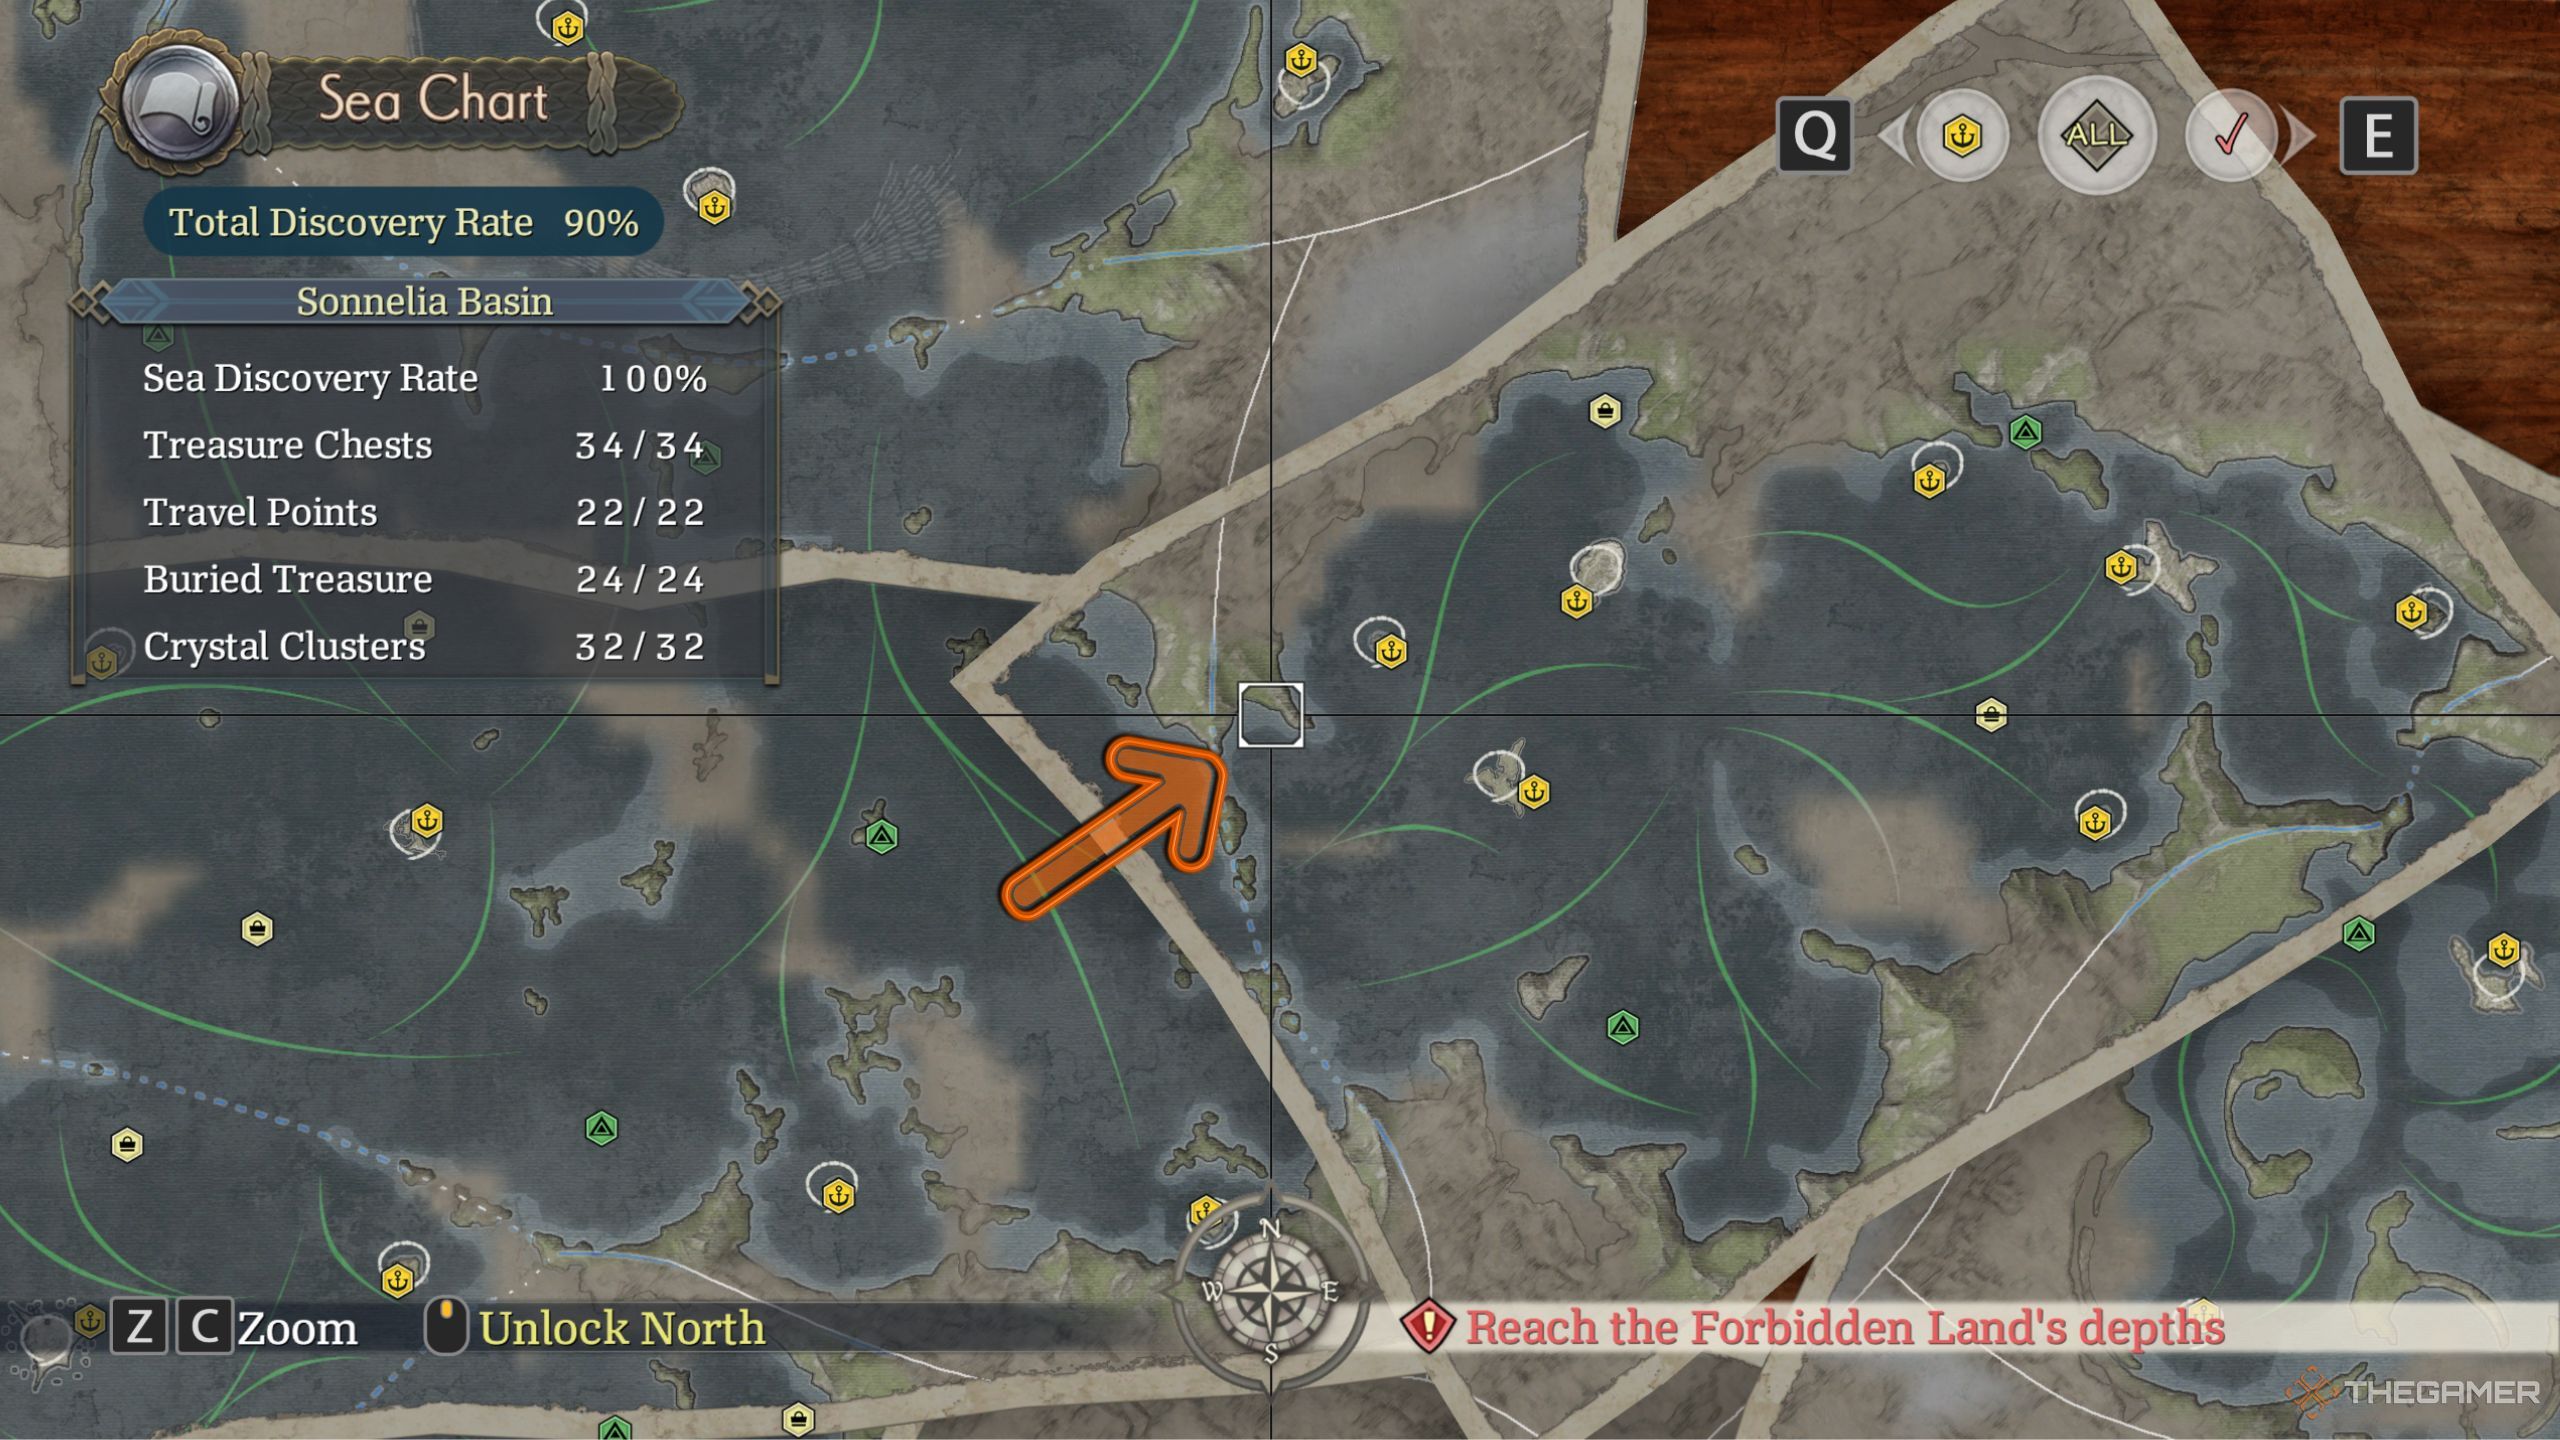
    After capturing the Speedy Pikkard, you can access the Sonnelia Basin through the Ozmid Expanse and head to the left edge of the area to find the Scaredy Pikkard stationed on a damaged ship.

    Scrappy And Septicolor Pikkard Location

    For your final two Pikkards, you will need to progress further in the story. You can find the Scrappy Pikkard during your journey through the Flumen Strait area, but you may need to come back later after making more progress.

    It’s located after you exit the Dvergr Coast island and travel through a narrow path. The Septicolor Pikkard can be discovered in the central region of the last area of Ys X: Nordics, known as Cicatrix.

  • All White Pikkard Spots on Sprout Atoll in Ys X: Nordics

    All White Pikkard Spots on Sprout Atoll in Ys X: Nordics

    In the game Ys X: Nordics, you’ll encounter various side quests as you explore, each with its own unique deadlines. These quests can involve tasks like gathering ingredients from specific areas or battling enemies. One such quest, called Pikkard Corral, becomes available after you visit a particular island.

    For this quest, you’ll need to locate five white Pikkards on the island to earn a special accessory. While the locations of these Pikkards are marked on your screen, some may pose a bit of a challenge to reach.

    Where to Find the Pikkard Corral Quest


    The Pikkard Corral quest is available later in the game, once you have access to the Specular Bay area. After completing the initial story island in this region, you can venture out to find Sprout Atoll, located on the lower left side of your map.

    To start the quest, approach this island and step onto it. There is a generous deadline for this task, allowing you to complete it at your convenience before finishing the game.

    Locations of All White Pikkards


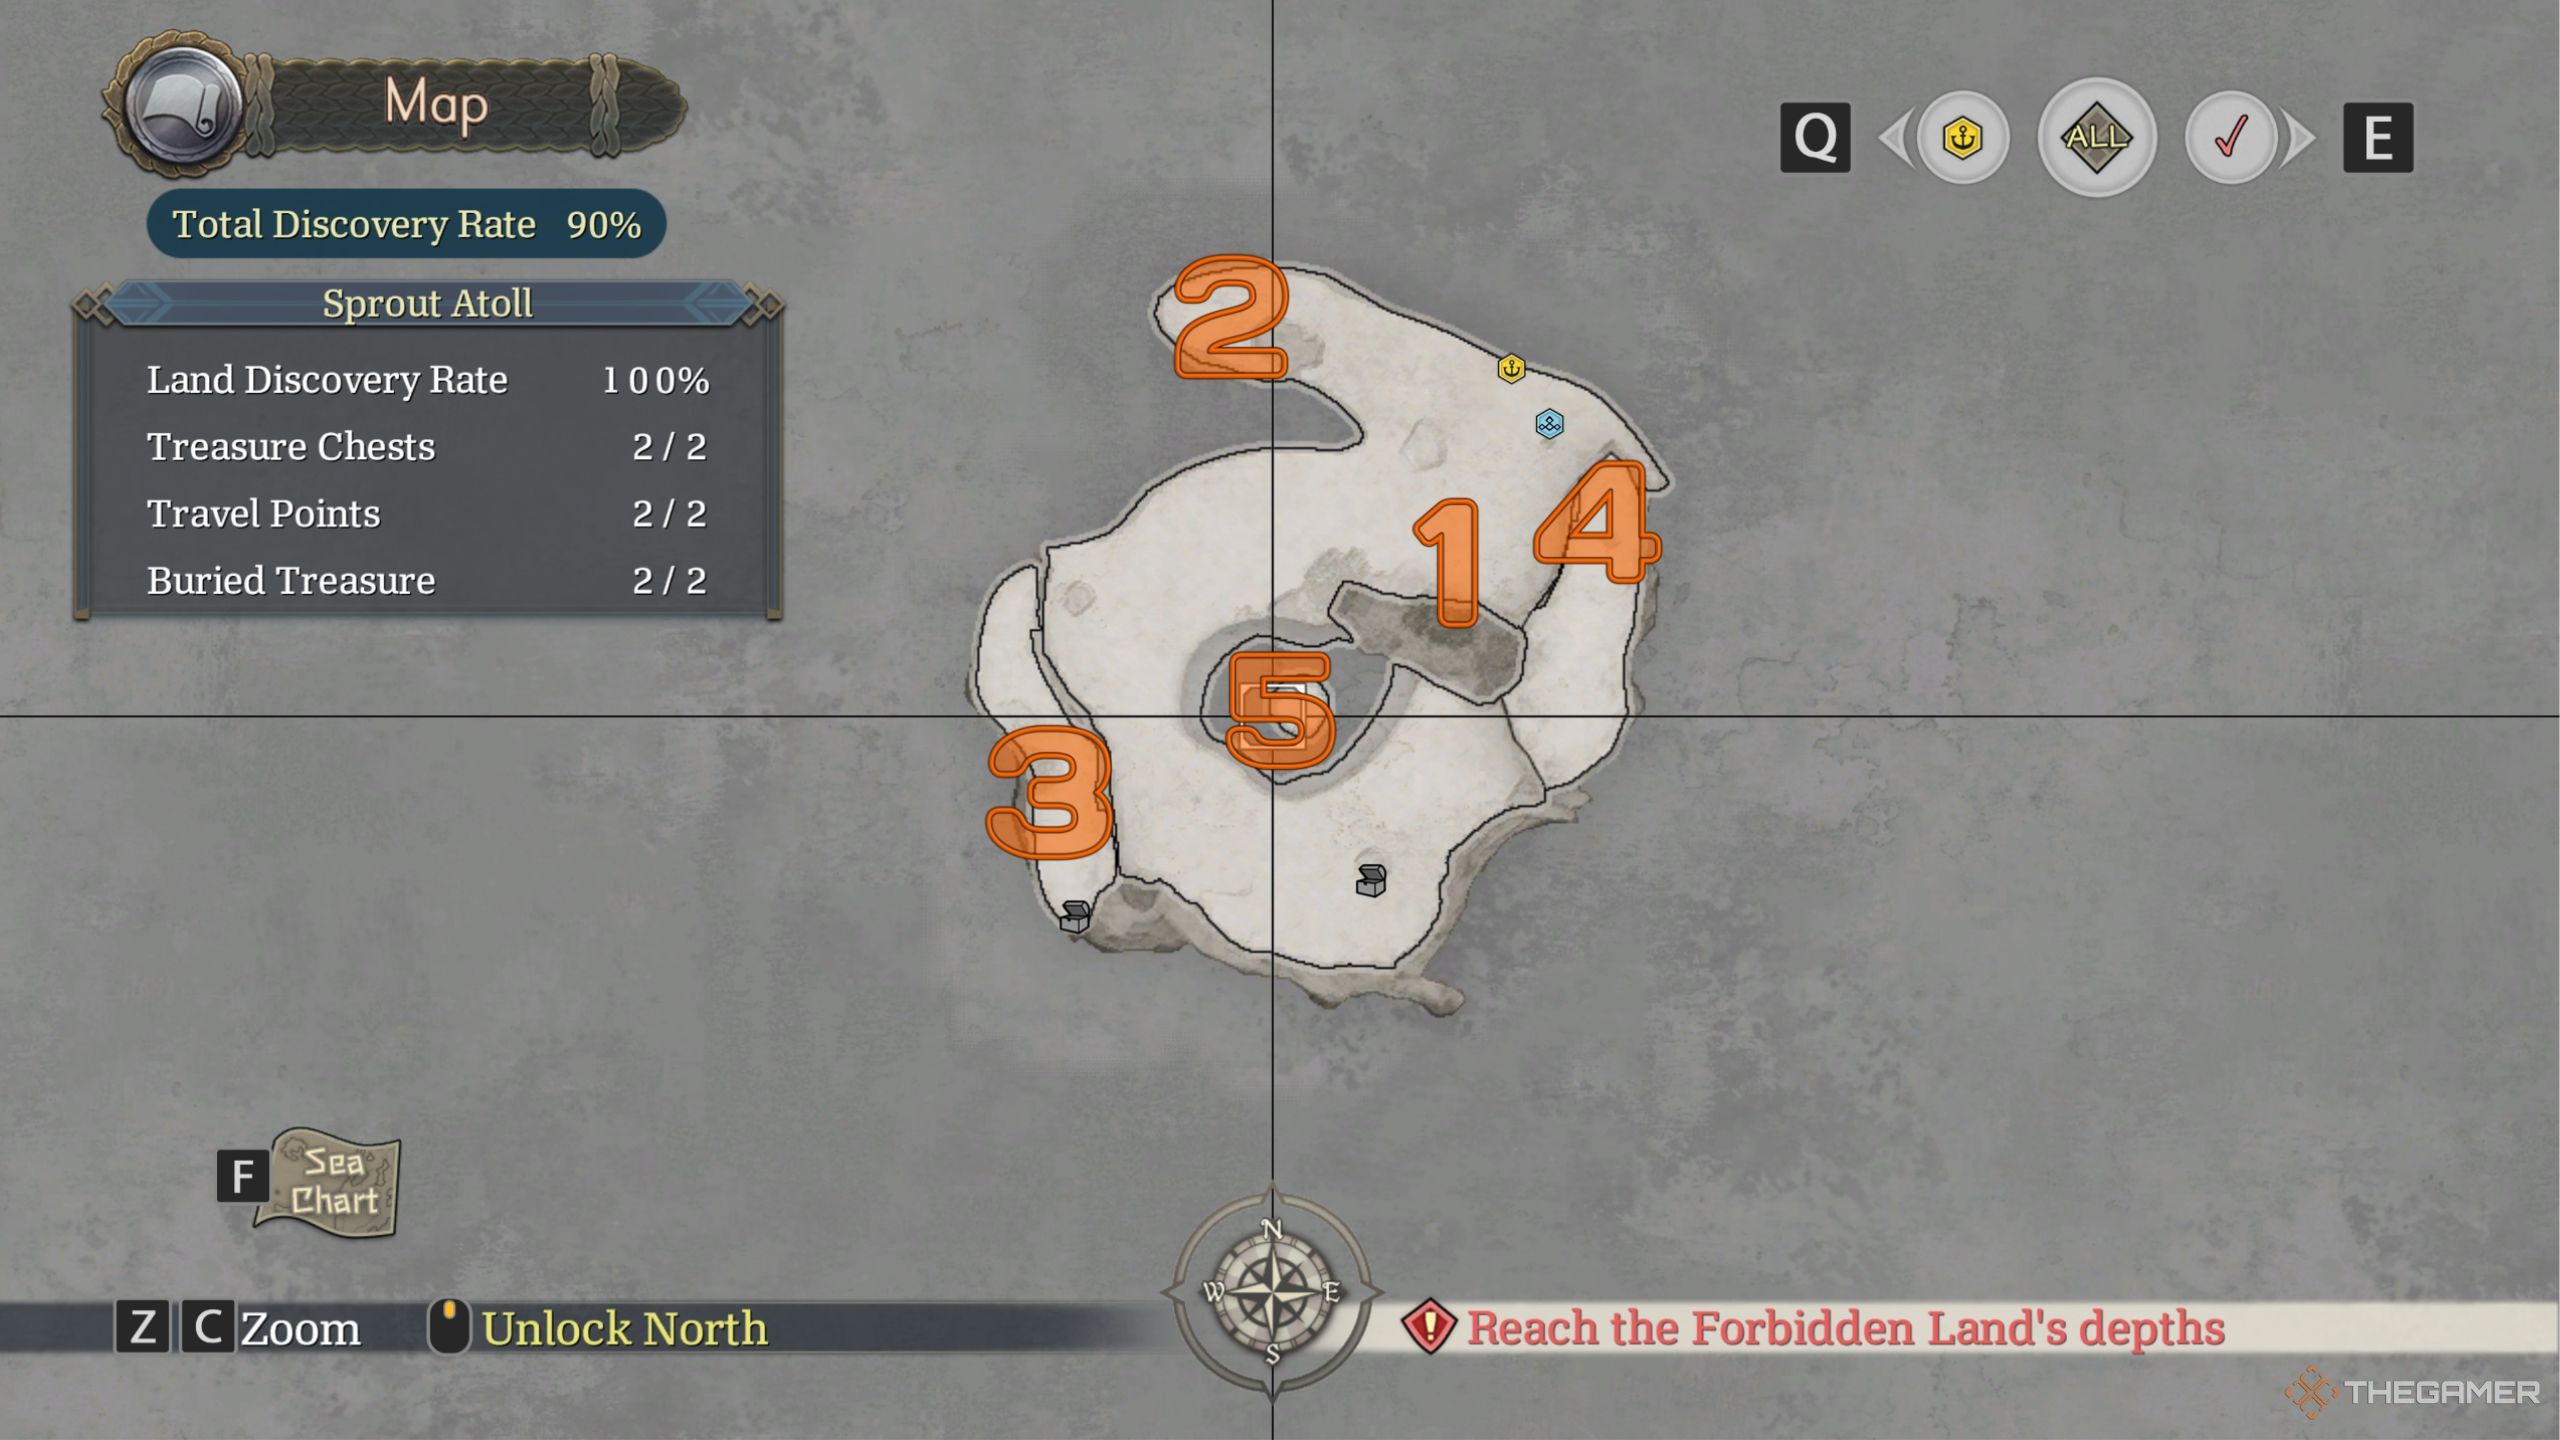
    Ys X Nordics All white pikkard locations on Sprout Atoll.

    To complete this quest, your goal is to find and collect five Pikkards, which will be shown on both your minimap and main screen. Here’s how to locate them:

    1

    The first Pikkard is directly in front of you after you finish your initial dialogue on the island. You can simply approach it and interact to collect the first one.

    2

    The second Pikkard is located in a hidden area on your right (top left on the island’s map). It’s nestled behind some rocks.

    3

    For the third Pikkard, you need to make your way to the upper left part of the island, using your mana string on a sword stuck in the ground to reach this area.

    4

    You can access the fourth Pikkard from the same part of land as the previous one, simply by using a boost.

    5

    The last Pikkard is found in the middle of the island. Head slightly upwards from a small platform with a little being. From this position, use your Gullinboard to leap at the right moment to land right on the Pikkard.

    Once you have collected all the Pikkards, the quest will conclude, and you will receive the Pikkaback Pikkard (White) accessory as a reward.

  • Mastering Logr: Tips to Triumph in Ys X: Nordics

    Mastering Logr: Tips to Triumph in Ys X: Nordics

    Quick Links

    As you advance through the main storyline of Ys X: Nordics and embark on your sea adventure with your shield sister, Karja, you’ll encounter a fascinating character named Logr. He is introduced as one of the three enemy generals, and his mission is to enhance the drama of this heroic tale.

    Logr provides one of the most intense battles in the entire game. You’ll face him at the conclusion of your journey in the Ruined Capital of Ribe, and he certainly won’t make it easy for you to prevail.

    Logr Overview and Attack Patterns

    When you reach the Ruined Capital of Ribe, you will have fought various bosses that test your skills. However, Logr Valkios presents a unique challenge, even if you are well-prepared—his health pool stands at a daunting 53,200 HP.

    Although his health is lower than that of Jord, another general you faced earlier, his strength and defense statistics are significantly higher, at 418 and 372, respectively. He launches a relentless series of attacks, and here’s what you can expect:

    Attack Name Description
    Sword Descend Logr raises his hands, summoning multiple swords to strike the battlefield. Yellow circles indicate their landing spots. You can try to parry them, but dodging is safer.
    Speed Attacks Logr can unleash a flurry of projectiles at lightning speed, either as orbs or arrows launched in an arc. These attacks are easy to dodge and provide great opportunities for counterattacks.
    Orb Attack Occasionally, Logr sends out a single orb that moves slowly toward your character. This attack is ideal for parrying, allowing you to build up your revenge gauge.
    Spin Attack Logr surrounds himself with rotating swords that expand outward. Look for green and yellow rays below him to anticipate this attack, which is also good for filling your revenge gauge if you parry successfully.
    Mist Attack Once you wear down Logr’s defenses, he enters a phase where he spawns clones. The best strategy is to grapple with each clone while dodging his ongoing speed attacks.
    Wall of Orbs Logr rises into the air and generates a series of blue orbs, especially when his health is low. The orbs will be arranged in a circle around you. Keep moving to dodge them, and prepare to parry when he descends for an attack.
    Purple Pools During certain attacks, like the Wall of Orbs, Logr will place purple rings on the ground. Avoid these, as they inflict heavy damage and hinder your ability to dodge his projectiles.

    How to Defeat Logr

    Given Logr’s diverse range of attacks, it’s clear that defeating him won’t be straightforward. You must be cautious and can’t just spam your attacks, as certain abilities—like the Wall of Orbs—require dodging skills. Getting hit by the orbs can lead to significant losses.

    To prepare, stock up on revival items. Despite the intimidating nature of his attacks, Logr does have a noticeable weakness: he has lengthy cooldown periods between attacks, especially when his defenses are up, and he doesn’t move around much during the fight.

    This stability allows you to utilize abilities that take longer to charge but can deliver a significant impact, since Logr won’t teleport away from your reach.

    Some of the most effective skills for this battle are Karja’s Frost Impact and the Double Smash Duo skill. When Logr initiates the Wall of Orbs attack, focus on evasion until the onslaught subsides; then you can counterattack. If you have enough firepower, you might even defeat him before he can launch that attack.

  • Mastering Your Skills: Defeating Jord in Ys X – Nordics

    Mastering Your Skills: Defeating Jord in Ys X – Nordics

    As soon as Adol arrives in Carnac during Ys X: Nordics, you will witness a sorrowful event as the Griegr raid the village, leading to the disappearance of all its residents. As you delve deeper into the narrative, it becomes clear that Jord has turned the villagers into her puppets, leading you on a journey to purify them as you explore new areas.

    After grasping the extent of Jord’s powers, your second encounter with her takes place at the conclusion of the Griegr Fort on Raufos Island. In this battle, she will not hold back, and you must be fully prepared to give it your all.

    Overview and Attack Patterns of Jord

    Although Jord Dorsen may appear smaller than some bosses you have faced previously, she is a formidable opponent with an impressive 53,533 HP. With stats of 282 STR and 280 DEF, she can quickly diminish the HP of your active character if you’re not careful to avoid her frequent attacks.

    Here are the types of attacks you can expect from her:

    Attack Name

    Description

    Ninja Attack

    This is one of Jord’s signature moves, where she shines her red sword for a moment, then vanishes only to reappear suddenly next to your active character, inflicting damage upon her return. Be prepared to press the parry button as soon as she disappears!

    Slash Attacks

    These are regular attacks she carries out during lulls in the battle using either a red or purple sword. They can easily be parried, but be cautious—being hit by her purple sword will inflict Poison on your character.

    Speed Attack

    Jord often executes fast attacks that are simple to dodge. You can time your counterattacks effectively during this period.

    Red Attack

    Jord may unleash a red attack if the battle drags on. This can be dodged easily, provided you keep a close watch on her movements.

    Area Denial

    When Jord’s durability bar is reduced, she will create an electric field that lasts a few seconds. Stepping into this field will quickly induce Paralysis.

    Defeating Jord Dorsen

    As one of the three major villains, Jord Dorsen will not be a pushover. However, you can implement strategies to gain an advantage. First and foremost, ensure you have health potions and remedies for Poison and Paralysis ready, in case you find yourself needing them.

    With your supplies in order, focus on acquiring quick skills. Since Jord takes a moment to charge her red sword attack, this presents you with a great opportunity to execute a small skill before you need to parry.

    At this stage, building up Adol for damage and Karja for Break is advised to maximize your effectiveness in this battle.

    Begin the fight with Karja, focusing on using skills that deal high Break damage, such as Frost Impact, assuming you’ve mastered this move beforehand. Once her durability is reduced, switch to Adol and unleash your most damaging abilities.

    It’s worth noting that if you can perfectly parry her normal slashes, Jord will stagger briefly, offering you a crucial window to land some attacks.

  • Complete Guide to Chest and Crystal Cluster Locations in Ys X: Nordics

    Complete Guide to Chest and Crystal Cluster Locations in Ys X: Nordics

    Exploring Ys X: Nordics – A Guide to Termina Island

    At first, Ys X: Nordics may feel a bit slow, but things will pick up when Carnac comes under attack. This event introduces you to a variety of characters, including several villains like Jord and Odr. Odr will engage you with his ship and lead you to the Tyrant, ultimately taking you to Termina Island.

    Termina Island is a vast area waiting to be explored if you want to repair your ship. You will encounter numerous enemies and face various puzzles throughout your journey.

    Overview of the Main Area on Termina Island

    The main surface of Termina Island consists of three sections. Each new area can be accessed through a cave system. The first challenge you will encounter involves fast-moving enemies that can dodge your attacks. To effectively battle these foes, trigger their dodge moves, then follow up with powerful attacks.

    Navigating through these areas is relatively straightforward. Here’s a quick guide on what to do:

    1. In the first area, head to the top left of the map to find the Gullinboard. Use this to return to the swampy river, which you can now cross to enter the first cave.
    2. Inside the cave, continue along the only visible path. Eventually, you’ll need to utilize the mana rail to traverse the beach area. A puppet will become visible as you use this rail, guiding you to the second cave.
    3. Proceed to the end of the area, where you’ll face off against the Magna Diga boss and conclude your storyline on Termina Island after purifying the puppet.

    Treasure Locations on Termina Island’s Main Area

    Here’s a list of treasure troves you can discover in the main area:

    Number Type Reward How To Get
    1 Crystal Cluster Crystal Shards As you advance, look to the right in a small hidden spot for this cluster.
    2 Crystal Cluster Crystal Shards Found on a small path leading downward into the island.
    3 Chest 3x Fishing Bait Located on your right near ruins while heading to the top left of the first area.
    4 Chest Gullinboard This is at the top left corner of the initial area, necessary to continue.
    5 Chest Gale Boots After crossing the swamp water with the Gullinboard, look for this chest on the right near a merchant tent.
    6 Crystal Cluster Crystal Shards You’ll find it on the right as you enter the second area of the surface.
    7 Chest 25x Basic Craft Stock While using the mana rail, jump halfway to get this chest on an island in the middle.
    8 Crystal Cluster Crystal Shards Visible in a corner to the right after using the mana rail further into the area.
    9 Crystal Cluster Crystal Shards Near the second cave entrance; use the cyan-colored boost to reach it.
    10 Chest Mead Head to the end of the optional area to find this red chest.
    11 Chest 3x Fishing Bait S Utilize the mana rail in the optional area, which will take you directly to this chest.
    12 Crystal Cluster Crystal Shards Located behind a pillar on the left in the third area.
    13 Chest Heartfire Tome Progressing in the third area, you’ll notice a path to the left containing this red chest.
    14 Crystal Cluster Crystal Shards Easily spotted as you move through the area.
    15 Chest 1000x Gold Look for this chest as you continue along the area.
    16 Buried Treasure 800x Gold Can be found through mana sensing at a designated location.
    17 Buried Treasure 5x Dark Drops Same process as above, located in the area.
    18 Buried Treasure Axe Star Accessible in the same manner as the others.
    19 Buried Treasure Empty Lunch Box Use mana sensing to locate this buried treasure.
    20 Buried Treasure 5x Fishing Bait S Can be found via the same mana sensing technique.
    21 Buried Treasure Lyre Star Look for this treasure using the same sensing method as above.

    Note: Buried treasures can only be collected after you unlock Mana Sense during your adventure.

    Adventure through Termina Island Cave One

    The first cave on Termina Island offers a straightforward experience, but be wary of deep water pools. Should you drown, your character respawns at the last land position, so it’s best to maneuver using the Gullinboard to cross them.

    At one point, you will encounter a fork in the path and should choose the right route. Here, use your board on the mana rail to surf across. In the next room, move to the left and climb up onto the higher platform. Here, you’ll need to interact with a broken pillar, which will create a straight mana rail leading through the cave.

    Treasure Locations in Termina Island Cave One

    Number Type Reward How To Get
    1 Chest 2x Antidote In a corner of the initial open room filled with enemies.
    2 Crystal Cluster Crystal Shards Located straight ahead when the path first branches in the cave.
    3 Chest Sword Seal+ Found when taking the straight path at the branch in the cave.
    4 Crystal Cluster Crystal Shards Near the broken pillar you will need to interact with.
    5 Chest Sea God’s Incense After fixing the mana rail, use it and then jump toward the left before reaching the red chest.
    6 Buried Treasure 5x Rainbow Drops Located toward the end of the cave on the left side.

    Termina Island Cave Two Exploration

    At the start of the second cave, your first task will be to jump between two mana rails. Continue deeper into the cave until you enter a large room filled with multiple mana rails. Take the right path and grapple over the gap at the end.

    Keep using your Gullinboard on various rails and boosters to reach the top of the area, allowing you to enter the last section of Termina Island’s surface.

    Treasure Locations in Termina Island Cave Two

    Number Type Reward How To Get
    1 Crystal Cluster Crystal Shards After the first mana rail, an optional path on your left leads to these items.
    2 Chest Chalice Seal+ Located along the optional path after the first mana rail.
    3 Crystal Cluster Crystal Shards Found right after the first grapple in the large room.
    4 Chest 3x Celadon Clay Automatically visible on a higher platform along your path.
    5 Chest Shield Seal+ Found further along your upward path in the cave.
    6 Crystal Cluster Crystal Shards Near the exit of the second cave, identifiable by a pressure plate.
    7 Chest Armament Blueprint: Fireball Activate the pressure plate to unlock the door and reach this chest using boosts.

    Navigating Termina Island requires skill and exploration, but your efforts in uncovering the treasures and facing enemies will enhance your adventure in Ys X: Nordics. Enjoy your journey!

  • Recapturing an Island in Ys X: Nordics – A Guide

    Recapturing an Island in Ys X: Nordics – A Guide

    The Ozmid Expanse is one of the key locations to explore in Ys X: Nordics, featuring a gameplay element known as Island Recapture. From this point on, you’ll frequently encounter islands surrounded by a pink shield, which you can recapture for various advantages.

    To start, your performance during the recapture will earn you valuable rewards. Recaptured islands can also be unlocked as travel points on your map. Additionally, once you free an island, Hugill gains the ability to highlight all nearby points of interest.

    Guide to Sea Recapture

    To begin recapturing an island, navigate closer to it when you spot it on the water. As you approach, a popup will appear, providing key details including:

    • Rewards for achieving a first clear and for each performance tier
    • Special crew abilities available during the recapture
    • The difficulty of the recapture and the number of waves you’ll encounter in each phase

    After reviewing this information, you can opt for a standard recapture or deploy a Blitz Beacon to skip a portion of it. However, it’s advisable to complete it normally, as skipping makes it nearly impossible to achieve an S-tier rating.

    If you use the beacon, the game will bypass the sea recapture and teleport you directly to the final area of the land recapture for the concluding battle.

    As the battle commences, multiple ships will appear around the island, protected by three barrier pillars. Your primary objective is to eliminate all three pillars in each wave. Once you destroy them in one wave, the next wave will immediately commence. It’s essential to keep an eye on the bottom left of your screen.

    This area displays various tasks that will boost your morale, indicated above your HP on the bottom right. Achieving new levels in morale will trigger one of your crew’s special abilities. This morale becomes crucial during the land portion of the recapture.

    While it’s easy to quickly destroy the pillars and conclude the sea recapture, it’s wise to take your time and work on completing your tasks.

    This strategy will not only boost your final score but also make the land battle much simpler.

    Upon defeating all turrets in each wave, the shield surrounding the island will drop, allowing Adol and Karja to move onto the land portion for the next stage of the recapture.

    Guide to Land Recapture


    Once you enter the land battle, a popup will display various buffs you’ve earned based on your morale level (up to level ten). These could include reductions in damage taken, increases in damage dealt, and even enhancements to your revenge gauge multiplier, among others.

    During the land battle, you need to progress through a series of rooms and defeat all enemies in each before advancing. Some rooms may have hidden mechanisms you’ll need to uncover using Mana Sense. After vanquishing the foe in the final room, the recapture will be complete.

    Your ultimate rewards will be based on your scores from both the sea and land capture phases, with the highest rewards given for achieving S tier.

    If you finish a recapture but don’t achieve the top tier, you can always try again through the planning room on the Sandras.

  • Complete Guide to Chest and Crystal Cluster Locations on Lecto Island in Ys X: Nordics

    Complete Guide to Chest and Crystal Cluster Locations on Lecto Island in Ys X: Nordics

    Ys X: Nordics is a game that starts off at a leisurely pace but gradually picks up as you dive deeper into the main story. Initially, players will find themselves wading through a fair amount of dialogue with limited combat, until they reach Balta Island. Here, you must complete a trial to unite Adol and Karja as shield brethren.

    To get started, you’ll venture to Lecto Island, which is the first significant island you’ll need to explore in its entirety. Along the way, be on the lookout for hidden treasures and crystal clusters as you traverse the landscape.

    Lecto Island: Main Area Overview

    As you approach Lecto Island, you’ll need to dock your ship at the back, since a Griegr ship occupies the front. After stepping off, move inland a little until you discover a spot to use a mana string to cross to the other side.

    Continue deeper into the island until you reach a fork in the path. Take the right route (left on the minimap) which leads to a higher platform. Here, you’ll find another mana string opportunity that allows you to enter a cave and advance the story.

    Tip: You’ll encounter several giant boars in this area. It’s wise to focus on dodging their attacks before attempting to strike back.

    Treasure Locations in the Main Area

    As you explore the main area of Lecto Island, you’ll uncover various treasures. Here’s a breakdown of what and where to find them:

    Number Type Reward How To Get
    1 Crystal Cluster Crystal Shards After using the mana string for the first time, look for it on a cliff to your right.
    2 Chest 10x Basic Ingredients This chest is visible on the minimap near the crystal cluster above.
    3 Chest 2x Stimulant Found on the northern edge before diverging into one of the paths.
    4 Chest Arion Charm After the second mana string, this chest is to your left and guarded by a boar.
    5 Crystal Cluster Crystal Shards Jump down to the small river in the lower area to find this cluster.
    6 Buried Treasure Gold Located in a small ditch at the area.
    7 Buried Treasure 3x Rainbow Drop Found after the path divides at the right edge.

    Note: You won’t find buried treasure right when you arrive; continue the story until you unlock the mana sense ability.

    Cavern of the Rite: Area Overview

    Upon entering the Cavern of the Rite, you’ll navigate through a series of rooms filled with traps and enemies. The initial rooms will feature pressure plates. You can sprint through these areas to avoid projectile traps.

    In the first room, timing your movements is essential to dodge boulders, while the next will challenge you with four enemies that you need to evade. After dodging, get close for a powerful attack.

    Eventually, you’ll need to use Karja’s mana burst to reach higher platforms. Clear all enemies in the following rooms and use Adol’s burst to break through thorn walls to proceed. You’ll eventually face a miniboss named Ziomander.

    Tip: Ziomander has substantial health, so focus on using your strongest skills to defeat it swiftly.

    As you progress, defeat a few Griegr in a larger room. Use the path on the right to climb higher and find a lever that opens the door ahead. Move past a room filled with more traps and enemies, using mana string to reach and defeat the Griegr.

    This will lead you to the final room where you can initiate the boss fight against Ioi, concluding your adventure on Lecto Island.

    Treasure Locations in the Cavern of the Rite

    While exploring the Cavern of the Rite, you’ll find several treasures. Here’s a list of what to look for:

    Number Type Reward How To Get
    1 Chest Armor Seal This chest is visible as you make your way through the cavern.
    2 Crystal Cluster Crystal Shards Found in the open upon entering the second room after the chest mentioned above.
    3 Crystal Cluster Crystal Shards Located in the center after you enter the large room in the cavern.
    4 Chest Breath Formula Use Karja’s burst near the broken platforms left as you enter the big room, then Adol’s burst to clear the blockage.
    5 Chest Warrior Bandana Found along the path while attempting to activate the lever in the big room.
    6 Buried Treasure Shield Star Located on the left path at the rear of the big room in the cavern.
    7 Crystal Cluster Crystal Shards Another cluster found in the center of the rooms as you explore.
    8 Chest 3x Cureleaf These two chests can be found on either side of the platform in the room following the big one.
    9 Chest Axe Seal
    10 Buried Treasure Black Strong-Arm Located towards the end of the cavern, accessible with mana sense.

    By following these tips and treasure maps, you’ll enhance your adventure in Ys X: Nordics while mastering the challenges throughout Lecto Island and the Cavern of the Rite. Enjoy your journey!

  • Defeating Magna Diga in Ys X: Nordics Made Easy

    Defeating Magna Diga in Ys X: Nordics Made Easy

    As you progress through the story, you’ll encounter various bosses, including the second major one you can defeat on Termina Island. This boss, known as Magna Diga, has its own unique mechanics that you’ll need to understand in order to stand a chance against it.

    Magna Diga Overview and Attack Pattern

    Your encounter with Magna Diga begins when you arrive on Termina Island after being pushed into the Tyrant by Oor. This location is a vast graveyard filled with the remnants of many ships that fell victim to treacherous water currents. As you explore the island’s caves and landscapes, you’ll eventually find yourself in a large sand pit.

    Upon entering this pit, Magna Diga will emerge. This boss boasts a hefty 39,100 HP and 142 DEF—making it tougher than any foe you’ve encountered before, excluding earlier unbeatable bosses. Even if you’ve focused on leveling up, your damage output may feel underwhelming, leading to a prolonged battle.

    Fortunately, Magna Diga does not have a durability gauge you must deplete to inflict damage on its HP.

    Here are the attacks you can expect during the fight:

    Attack Name Description
    Speed Attack This attack is initiated by the boss when it glows blue, usually right at the start of the fight. It’s advisable to dash at just the right moment to avoid this assault. Successfully dodging rewards you with a special animation that takes a portion of Magna Diga’s HP away.
    Burrow Attack This attack occurs when Magna Diga burrows under the sand, sucking in the surrounding area. If it manages to pull you in, be prepared for a powerful ground slam that inflicts heavy damage.
    Ground Slam While partly above ground, Magna Diga will launch into a ground slam, hitting the ground repeatedly with both its front and back. This attack is relatively easy to parry and will occur several times.
    Ground Spin At times, Magna Diga will surface and execute a spin attack. Although this move is easy to dodge, it can cause significant damage if you get hit.
    Area Denial Magna Diga can create area-denial effects by dropping wooden debris or generating brown patches on the ground. You’ll sustain damage if a wooden structure falls on you or if you step into a brown pool.

    How to Defeat Magna Diga

    Now that you’re familiar with Magna Diga’s attack patterns, let’s discuss strategies for taking it down. Essentially, there are two main approaches: the safe method and the risky method. In both cases, wait for the boss’s speed attack to chip away at its HP initially.

    For the safe method, retreat while Magna Diga is burrowed until it reemerges, then unleash all your powers to defeat it. Be sure to switch between your two characters to utilize both their SP effectively, as Adol typically inflicts more damage.

    Since the boss doesn’t feature a durability bar, it’s best to focus on using high-damage skills against it.

    If you prefer a riskier approach, allow the boss to suck you in while it’s burrowed, timing your parry with its subsequent attacks. While this method can be challenging, it increases your damage multipliers for dual skills, allowing you to defeat the boss more quickly.

    You can also time your parries during its spin attack and ground slam to maintain safety while still gaining those valuable multipliers. Once you successfully defeat Magna Diga, you’ll be rewarded with gold, experience points, and crystal shards.