الوسم: mystery

  • Venus’s Pale Clouds Conceal a Surprisingly Dark Secret

    Venus appears as a pale yellow planet in visible light, but ultraviolet images reveal a very different picture. These UV images display striking dark and bright patterns moving across the planet’s upper clouds. Scientists have been observing these patterns for nearly a century, yet they still haven’t identified the chemical responsible for creating them.

    This mysterious substance is referred to as the “unknown absorber” because it absorbs ultraviolet and blue light. Recently, an international research team has set new constraints on what this substance could be, indicating it might be an exceptionally strong light absorber.

    The study, published in Astrobiology, integrated observations of Venus with advanced computer models to estimate how much light the particles inside the planet’s clouds would absorb if they could be examined directly in a lab. Venus’s clouds are mainly composed of sulfuric acid droplets. While these clouds appear bright from space, this doesn’t necessarily mean the liquid inside them is similarly luminous.

    The researchers compare this to cigarette smoke: tiny particles in smoke scatter light, making it look white. But when those particles are aggregated, they form a darker, tar-like substance. Similarly, Venus’s cloud particles can scatter light efficiently, but their actual liquid contents might be surprisingly dark.

    Using their models—which account for the complex ways sunlight is scattered and absorbed by the clouds and atmosphere—the team translated space observations into measurable qualities that could be tested in laboratory settings. Their findings suggest that the unknown material must absorb light extremely effectively. Specifically, between wavelengths of 365 and 455 nanometers, its estimated absorption is about 1,278 per centimeter at 375 nanometers.

    This indicates that the substance must either be a particularly powerful absorber, be present at very high concentrations in the clouds, or both. Certain carbon-based molecules could potentially fit these criteria. For instance, highly efficient pigment-like molecules might need concentrations around 10 grams per liter. However, the researchers emphasize that this does not imply Venus contains chlorophyll or any biological pigments—“organic” in chemistry simply means carbon-based, not necessarily alive.

    Another challenge is that simple organic compounds exposed to concentrated sulfuric acid can transform into dark, tar-like mixtures that absorb light broadly, appearing brown or black. Yet, Venus’s absorber behaves differently, with its absorption sharply declining between 365 and 455 nanometers. If an organic compound is responsible, it might need to be a specific chemical that can withstand the harsh acid environment without breaking down into a tar-like form.

    These results don’t prove the presence of life on Venus or confirm the absorber is organic. Instead, they provide much clearer criteria for scientists to test potential candidates. Future missions equipped with advanced instruments could help directly identify the substance—searching for complex organics and fluorescence in cloud particles.

    By analyzing the clouds themselves, scientists hope to finally uncover the identity of Venus’s century-old ultraviolet mystery and gain deeper insights into the planet’s chemistry, shedding more light on our enigmatic neighbor.

  • Rıza Tamer’s Death Under Investigation Amidst Mystery

    Rıza Tamer’s Death Under Investigation Amidst Mystery

    Digital Phablet – Turkish singer Rıza Tamer passes away at age 42 after sudden illness.

    Also Read:
    Are Kerem Bürsin and Selin Yağcıoğlu still together?
    Image of Kerem Bürsin and Selin Yağcıoğlu

    Turkish singer Rıza Tamer, known for hits such as “Benden Sonra,” “Benim Yerime,” “Yan,” and “Adam Olmaz,” died on April 17 at the age of 42, according to Hurriyet.

    Reports from Turkey indicate that he was hospitalized after feeling unwell at his home in Bodrum. Despite efforts to save him, his life could not be saved.

    Photo of Rıza Tamer

    Preliminary investigations suggest that his condition deteriorated after taking prescribed medications. Authorities have launched an inquiry due to the suspicious circumstances surrounding his death. A post-mortem examination will determine the precise cause.

    Official statements have yet to be issued.

    Suspicious Circumstances Surrounding His Death

    The public prosecutor has opened an investigation into the suspicious aspects of Rıza Tamer’s passing. His body was transported to the Muğla Forensic Medicine Institute for an autopsy to establish the cause of death.

    Official Statement

    Following the news of his death, a statement was posted on his official social media page:
    “Rıza Tamer has passed away despite all efforts at the hospital. We extend our condolences to his family, relatives, and the cultural community. Funeral details will be shared shortly. We ask everyone to show compassion and respect during this sensitive time.”

    Who Was Rıza Tamer?

    Instagram post about Rıza Tamer

    Rıza Tamer gained national recognition when he finished third in the second season of Popstar Turkey in 2004, memorable for his interactions with jury member Deniz Seki. After the competition, he continued his music career. However, about three years ago, following an emotional crisis and divorce, he re-emerged into the public eye performing songs while sitting on the pavement in Antalya’s Kaleiçi district.

    His heartfelt song “Benden Sonra” (“After Me”) achieved widespread popularity, streaming millions of times on digital platforms. Through his lyrics, he shared his personal journey, saying, “I had given up, but after my divorce three years ago, I threw myself into performing on the streets due to heartbreak.”

    Instagram media of Rıza Tamer

    Rıza Tamer will be remembered for his strong presence in the Turkish music scene, his resilience, and his emotional storytelling through his songs.

  • Where to Find Every Newspaper in Mouse: P.I. for Completing and Solving

    Where to Find Every Newspaper in Mouse: P.I. for Completing and Solving

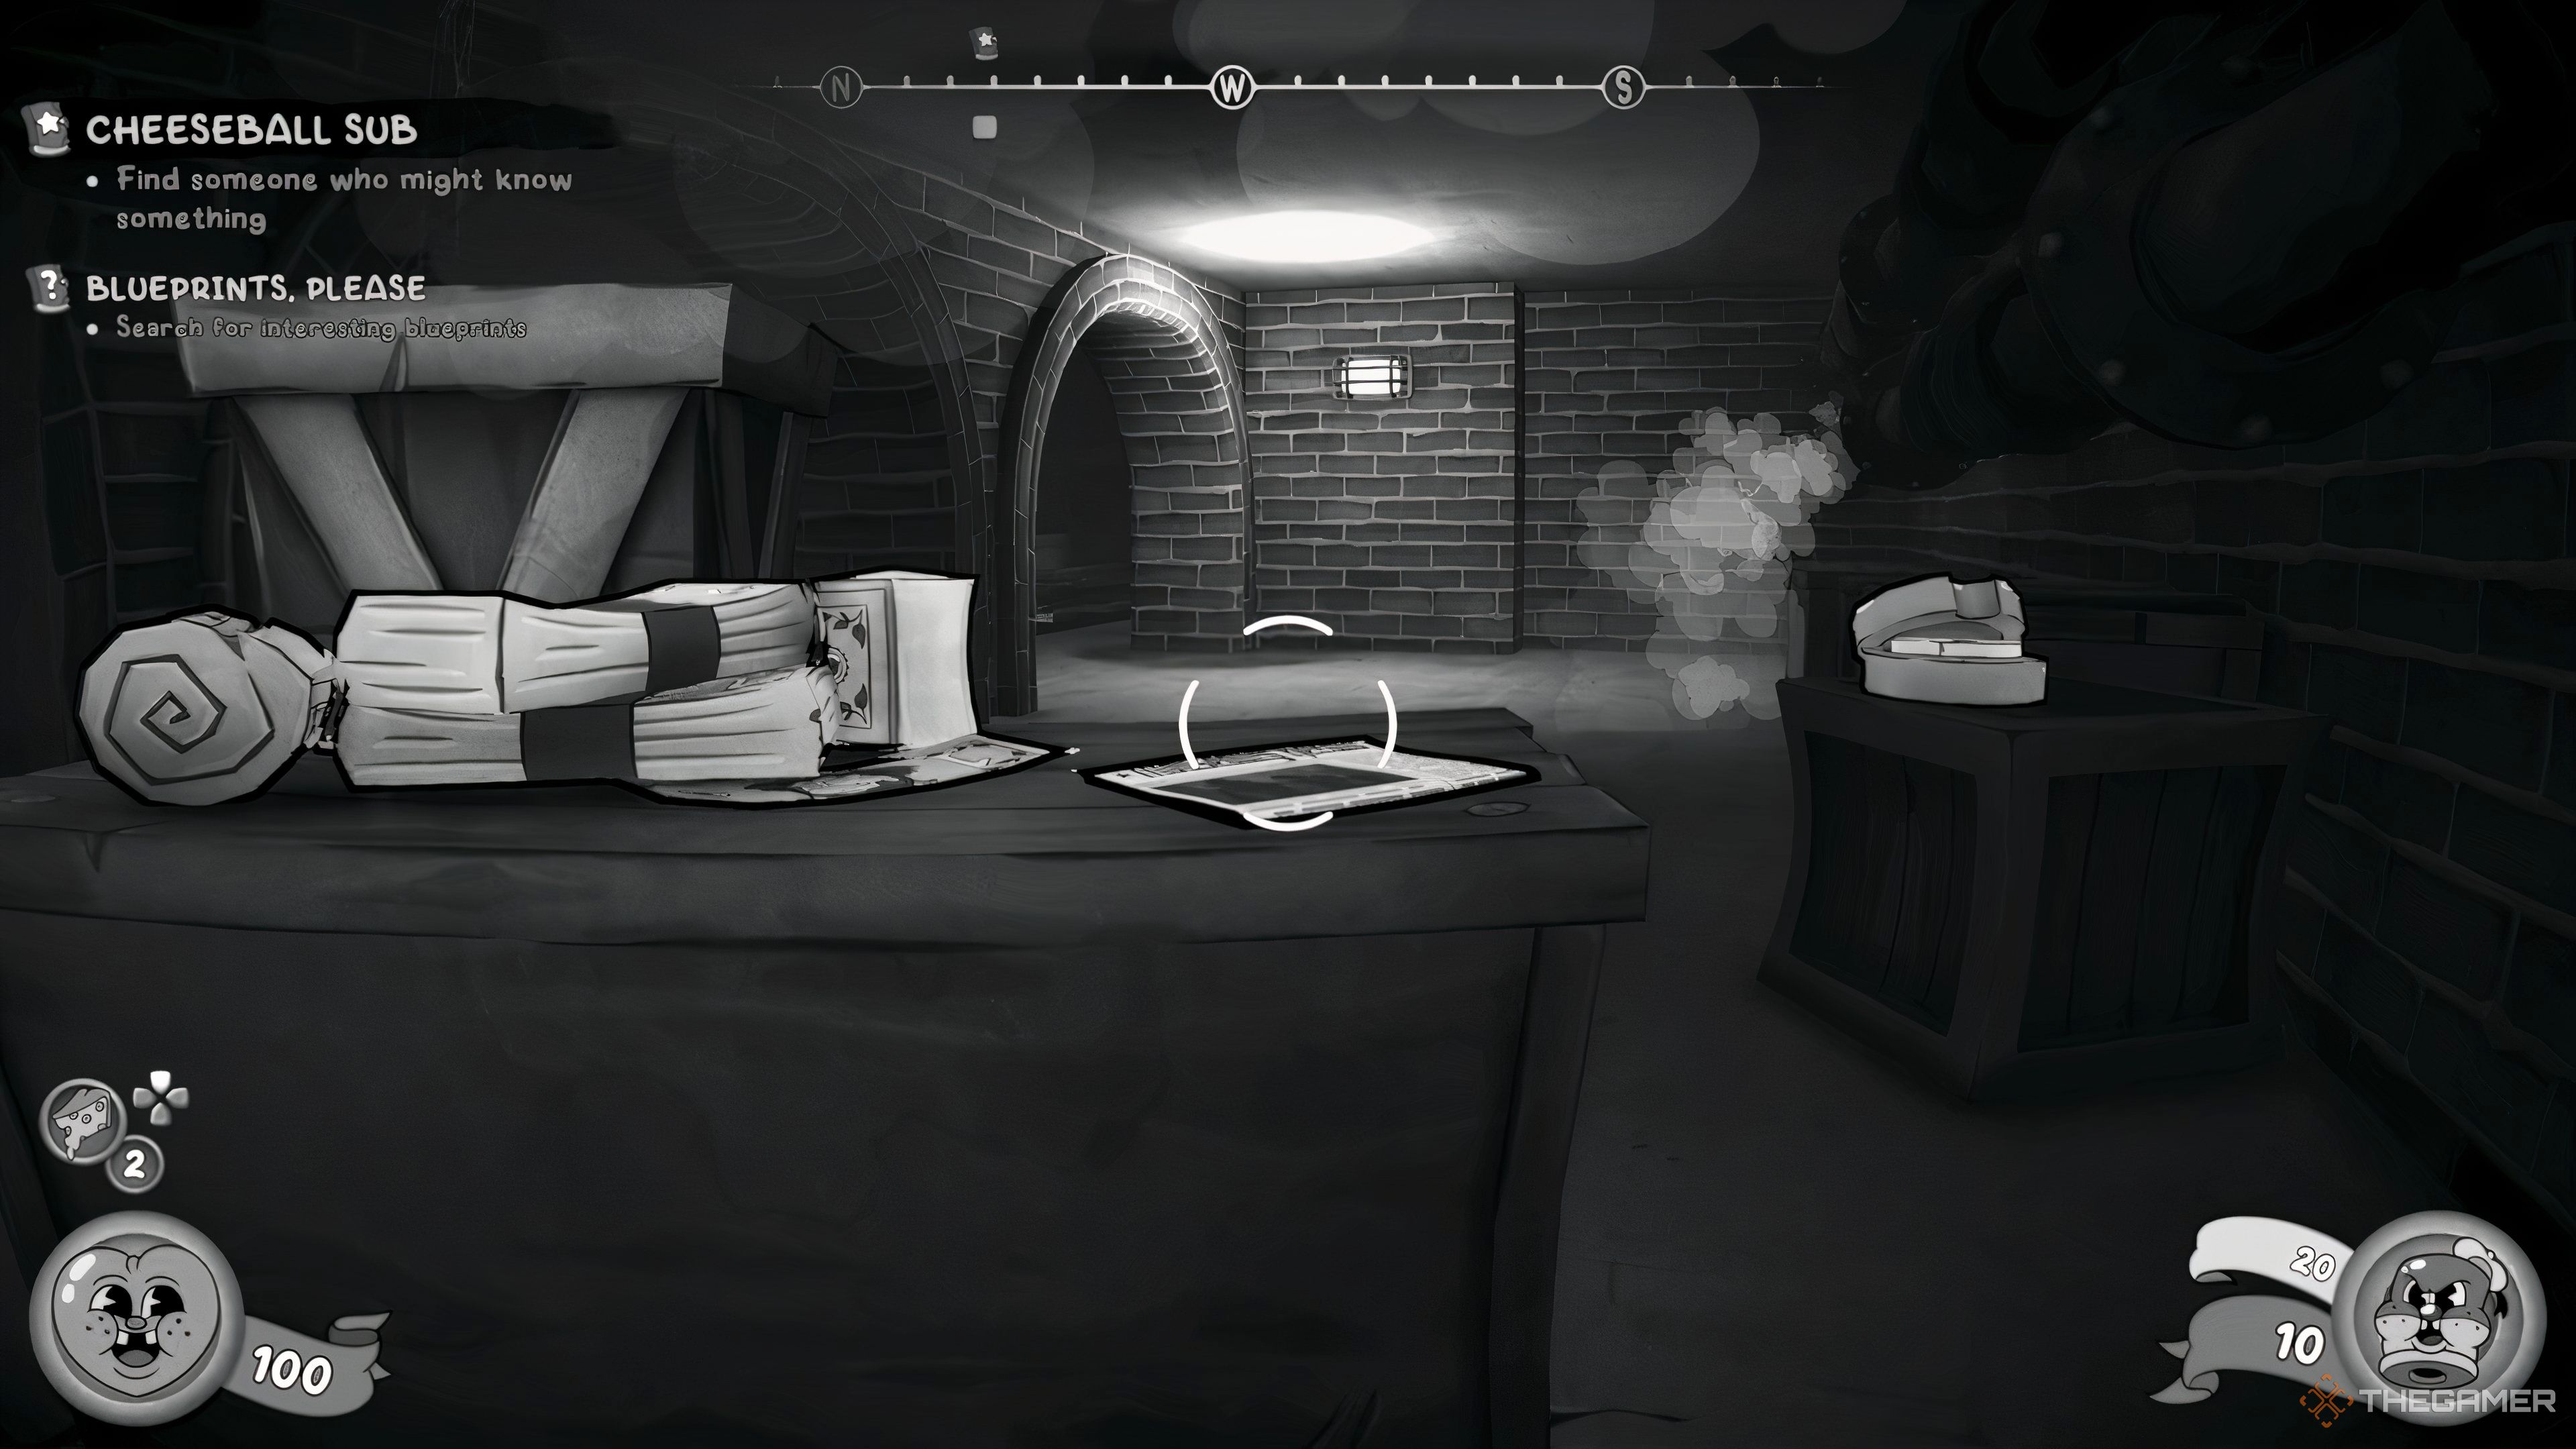
    There are many different collectibles to find in Mouse: P.I. For Hire, and one type is Newspapers. These look exactly as expected, each with a random headline and a brief story from Mouseburg’s world.

    There are 38 Newspapers in total, with around two to four usually found during each mission. If you miss any — except for those on the last mission — you can buy them at the shop near your P.I. Office. However, money is limited, so it’s best to locate as many newspapers as possible yourself and use the shop as a backup.

    All Newspaper Collectible Locations

    • During each mission, you’ll find several editions of the Mouseburg Herald. Some are in plain sight where you proceed with the story, but most are hidden off the main path and require exploration.

    The Vanishing Act

    Mouseburg Herald Edition and Location Photo Reference
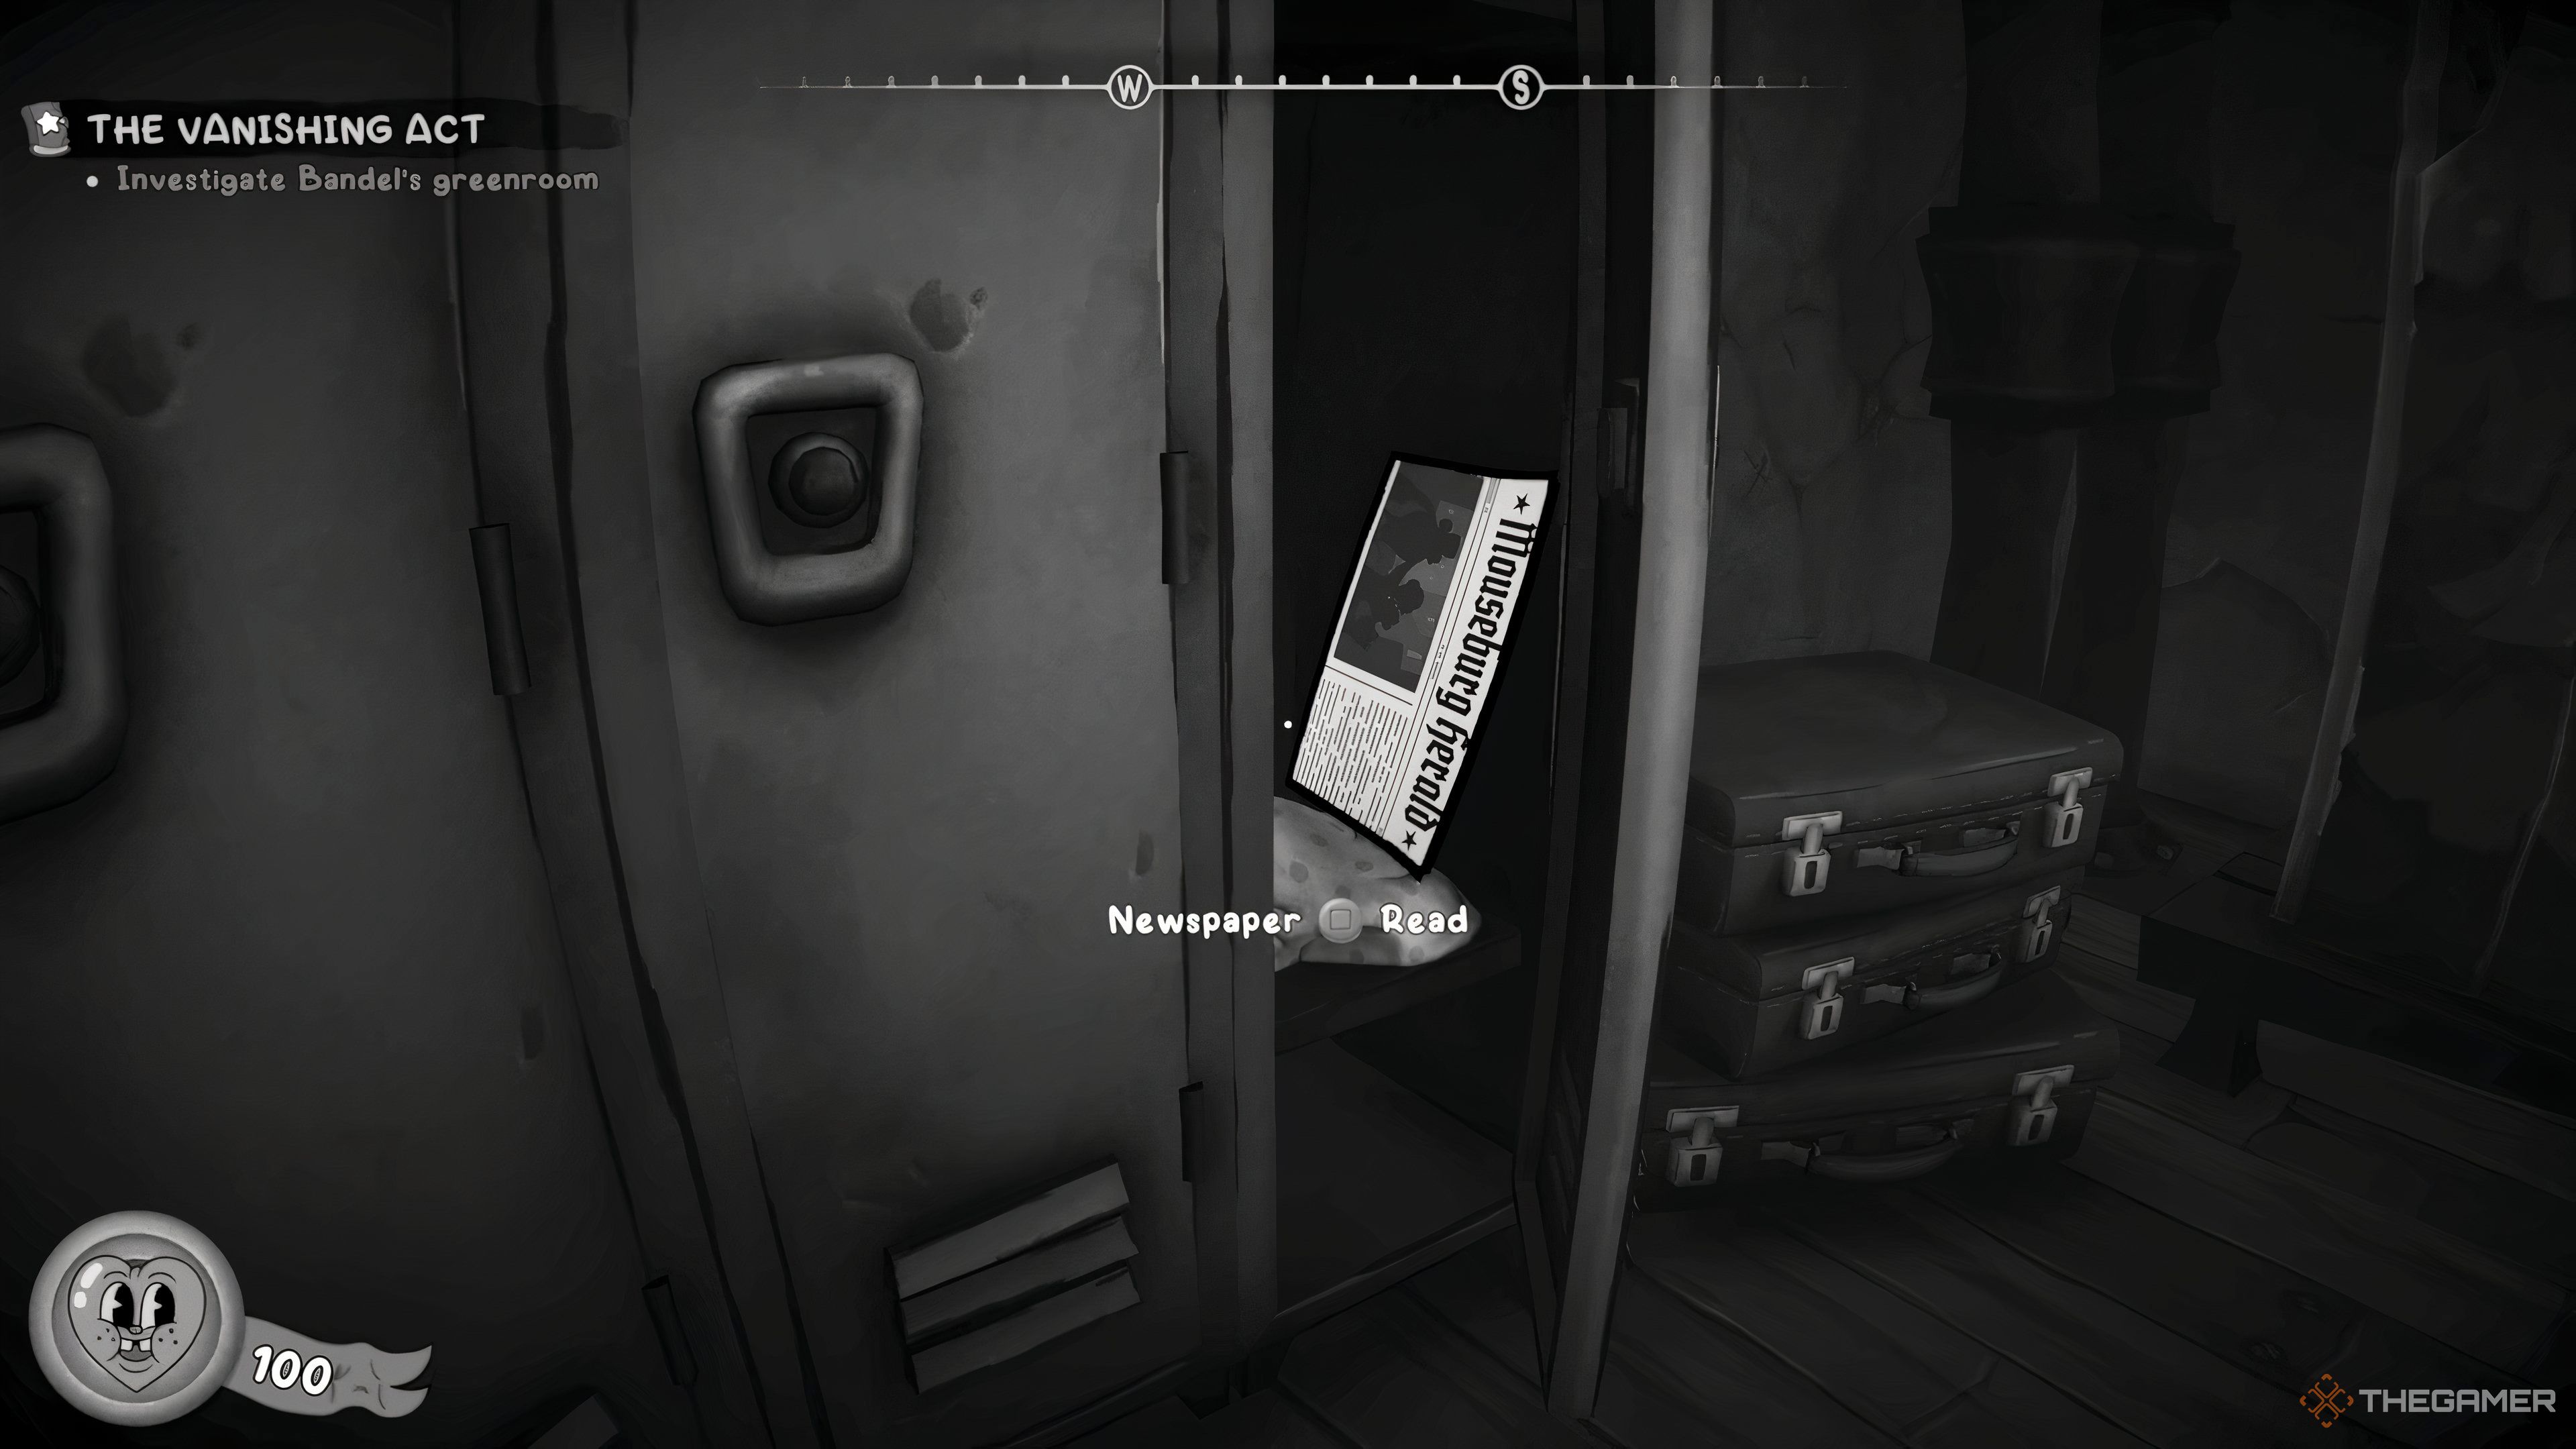
    No. 32186 “Small-Time Actress Found Dead” — In a locker to the right when entering the greenroom after showing Wanda’s ID. Image
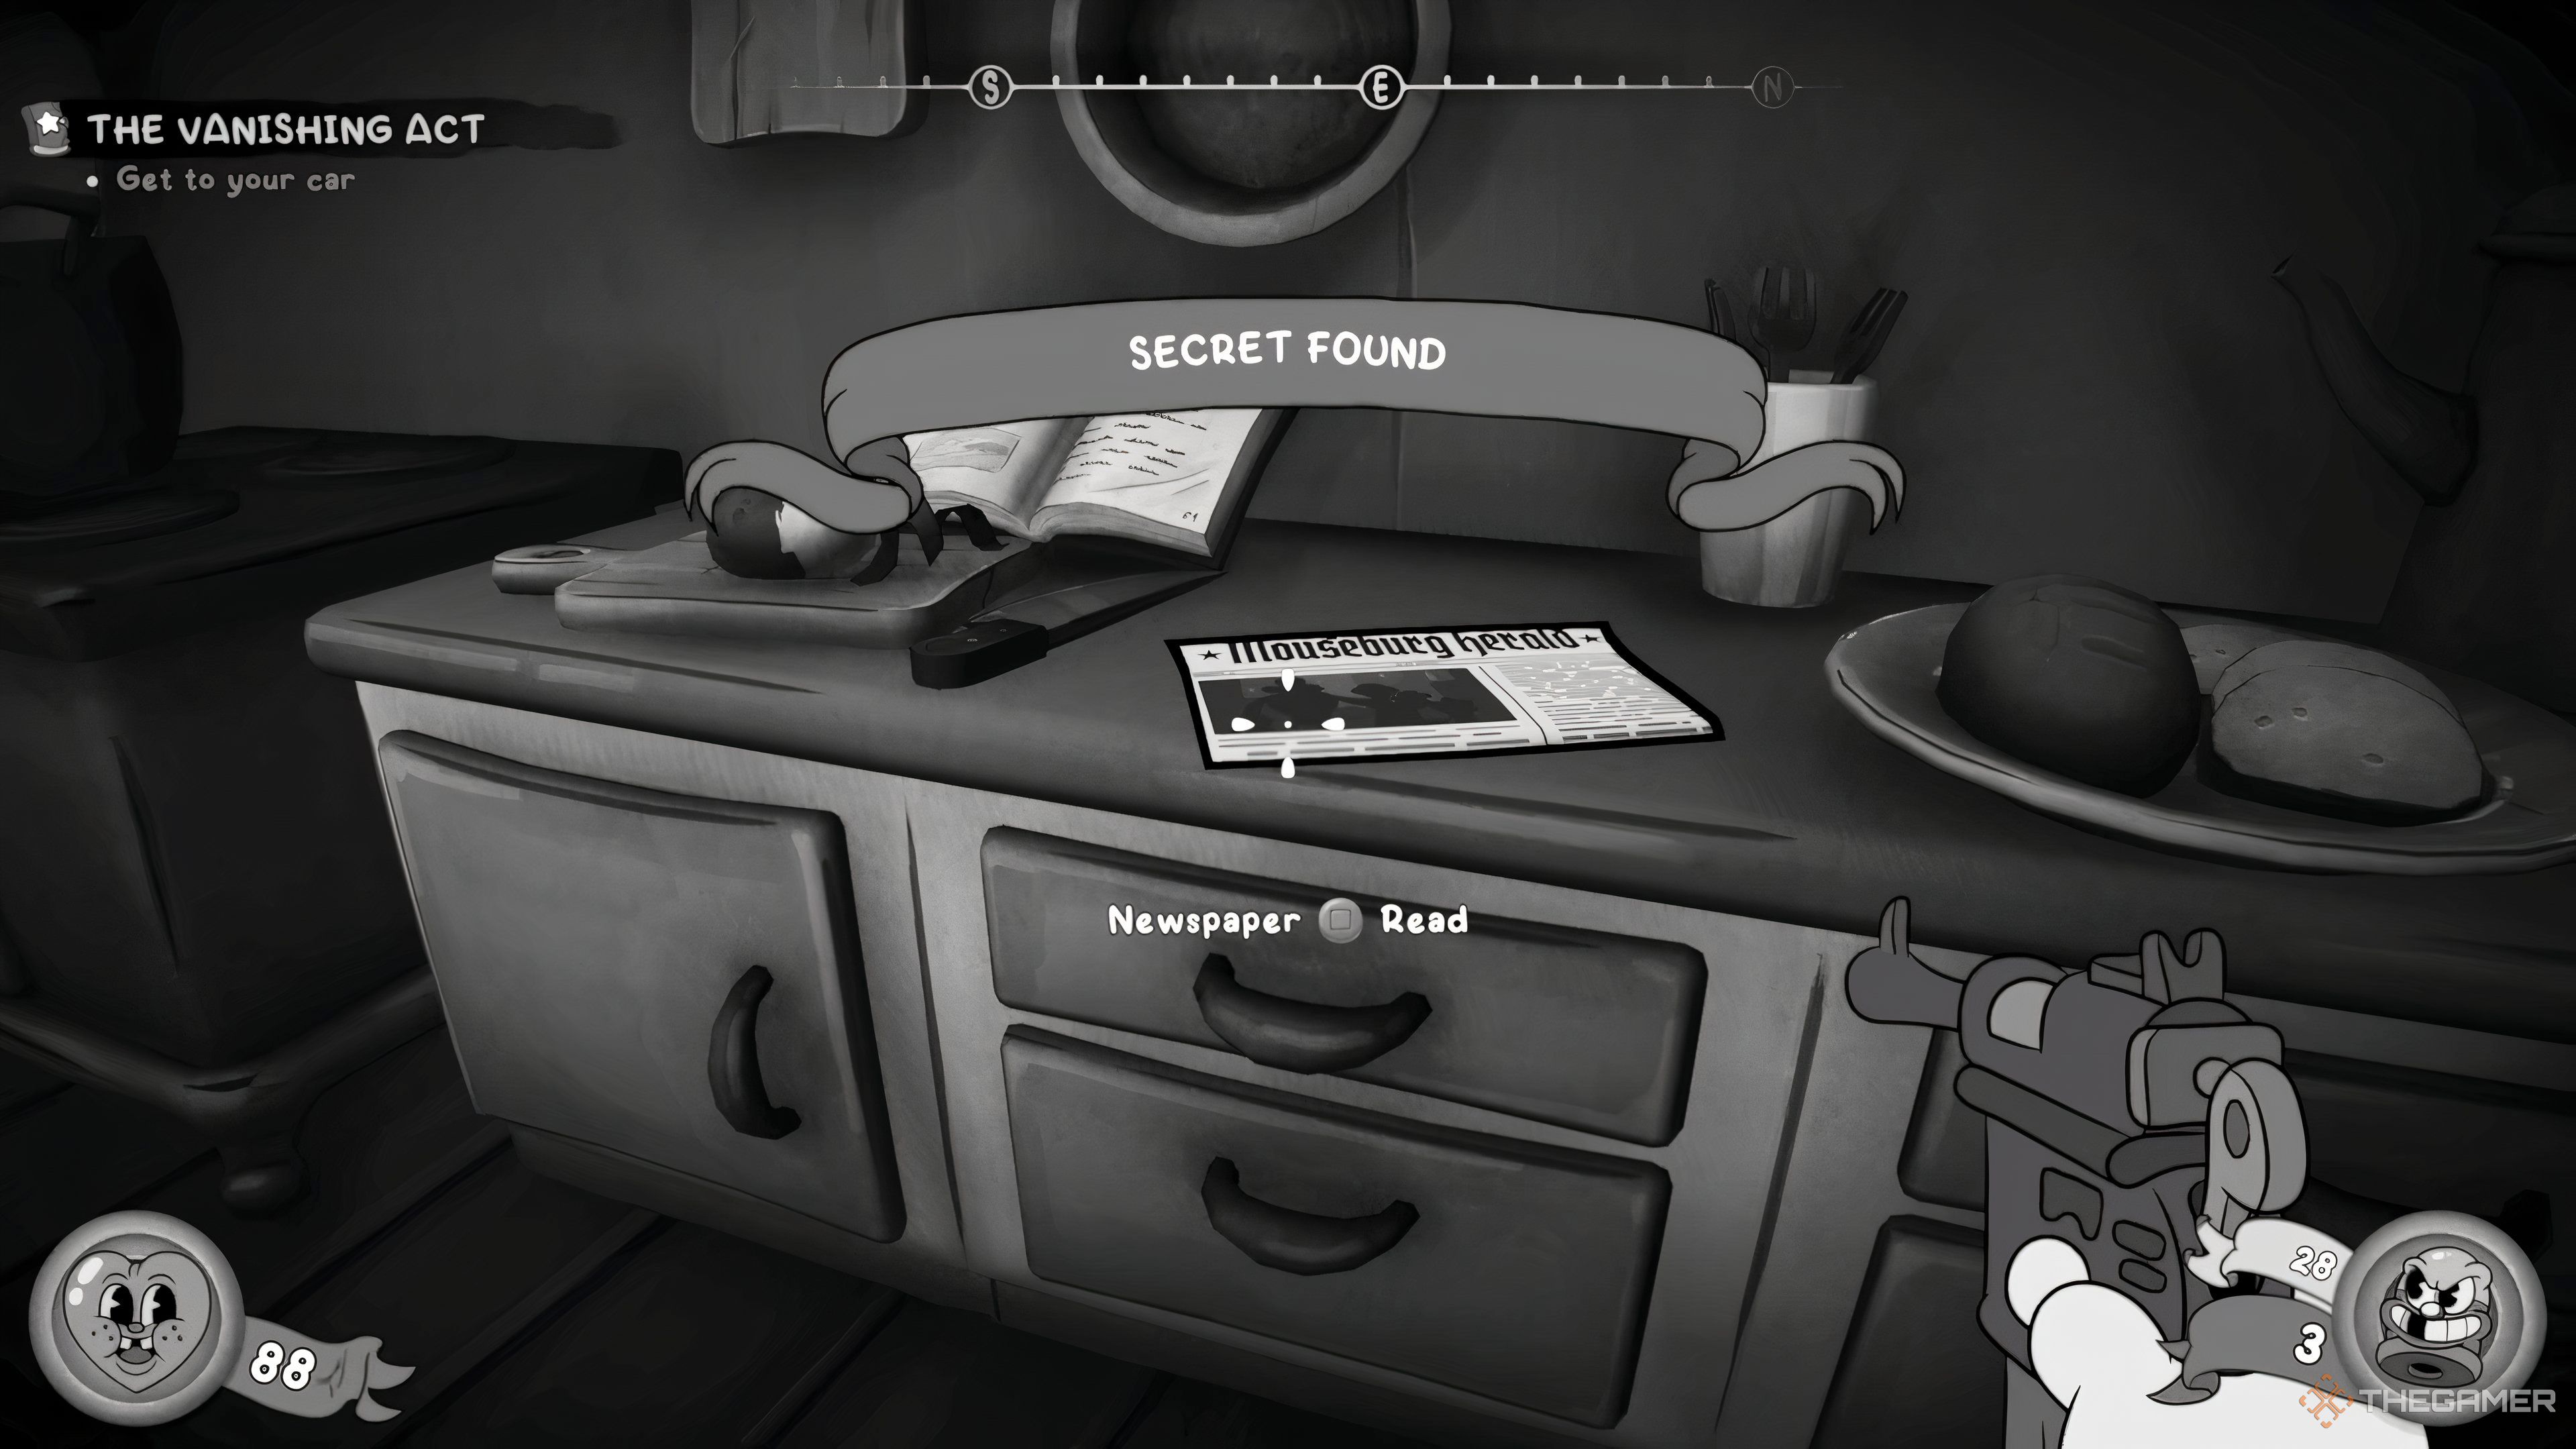
    No. 32138 “In The Wake Of A New Fad: Race To The Left” — Picked up from Betty’s kitchen after talking to her. Image

    Gumshoe In The Opera

    Mouseburg Herald Edition and Location Photo Reference
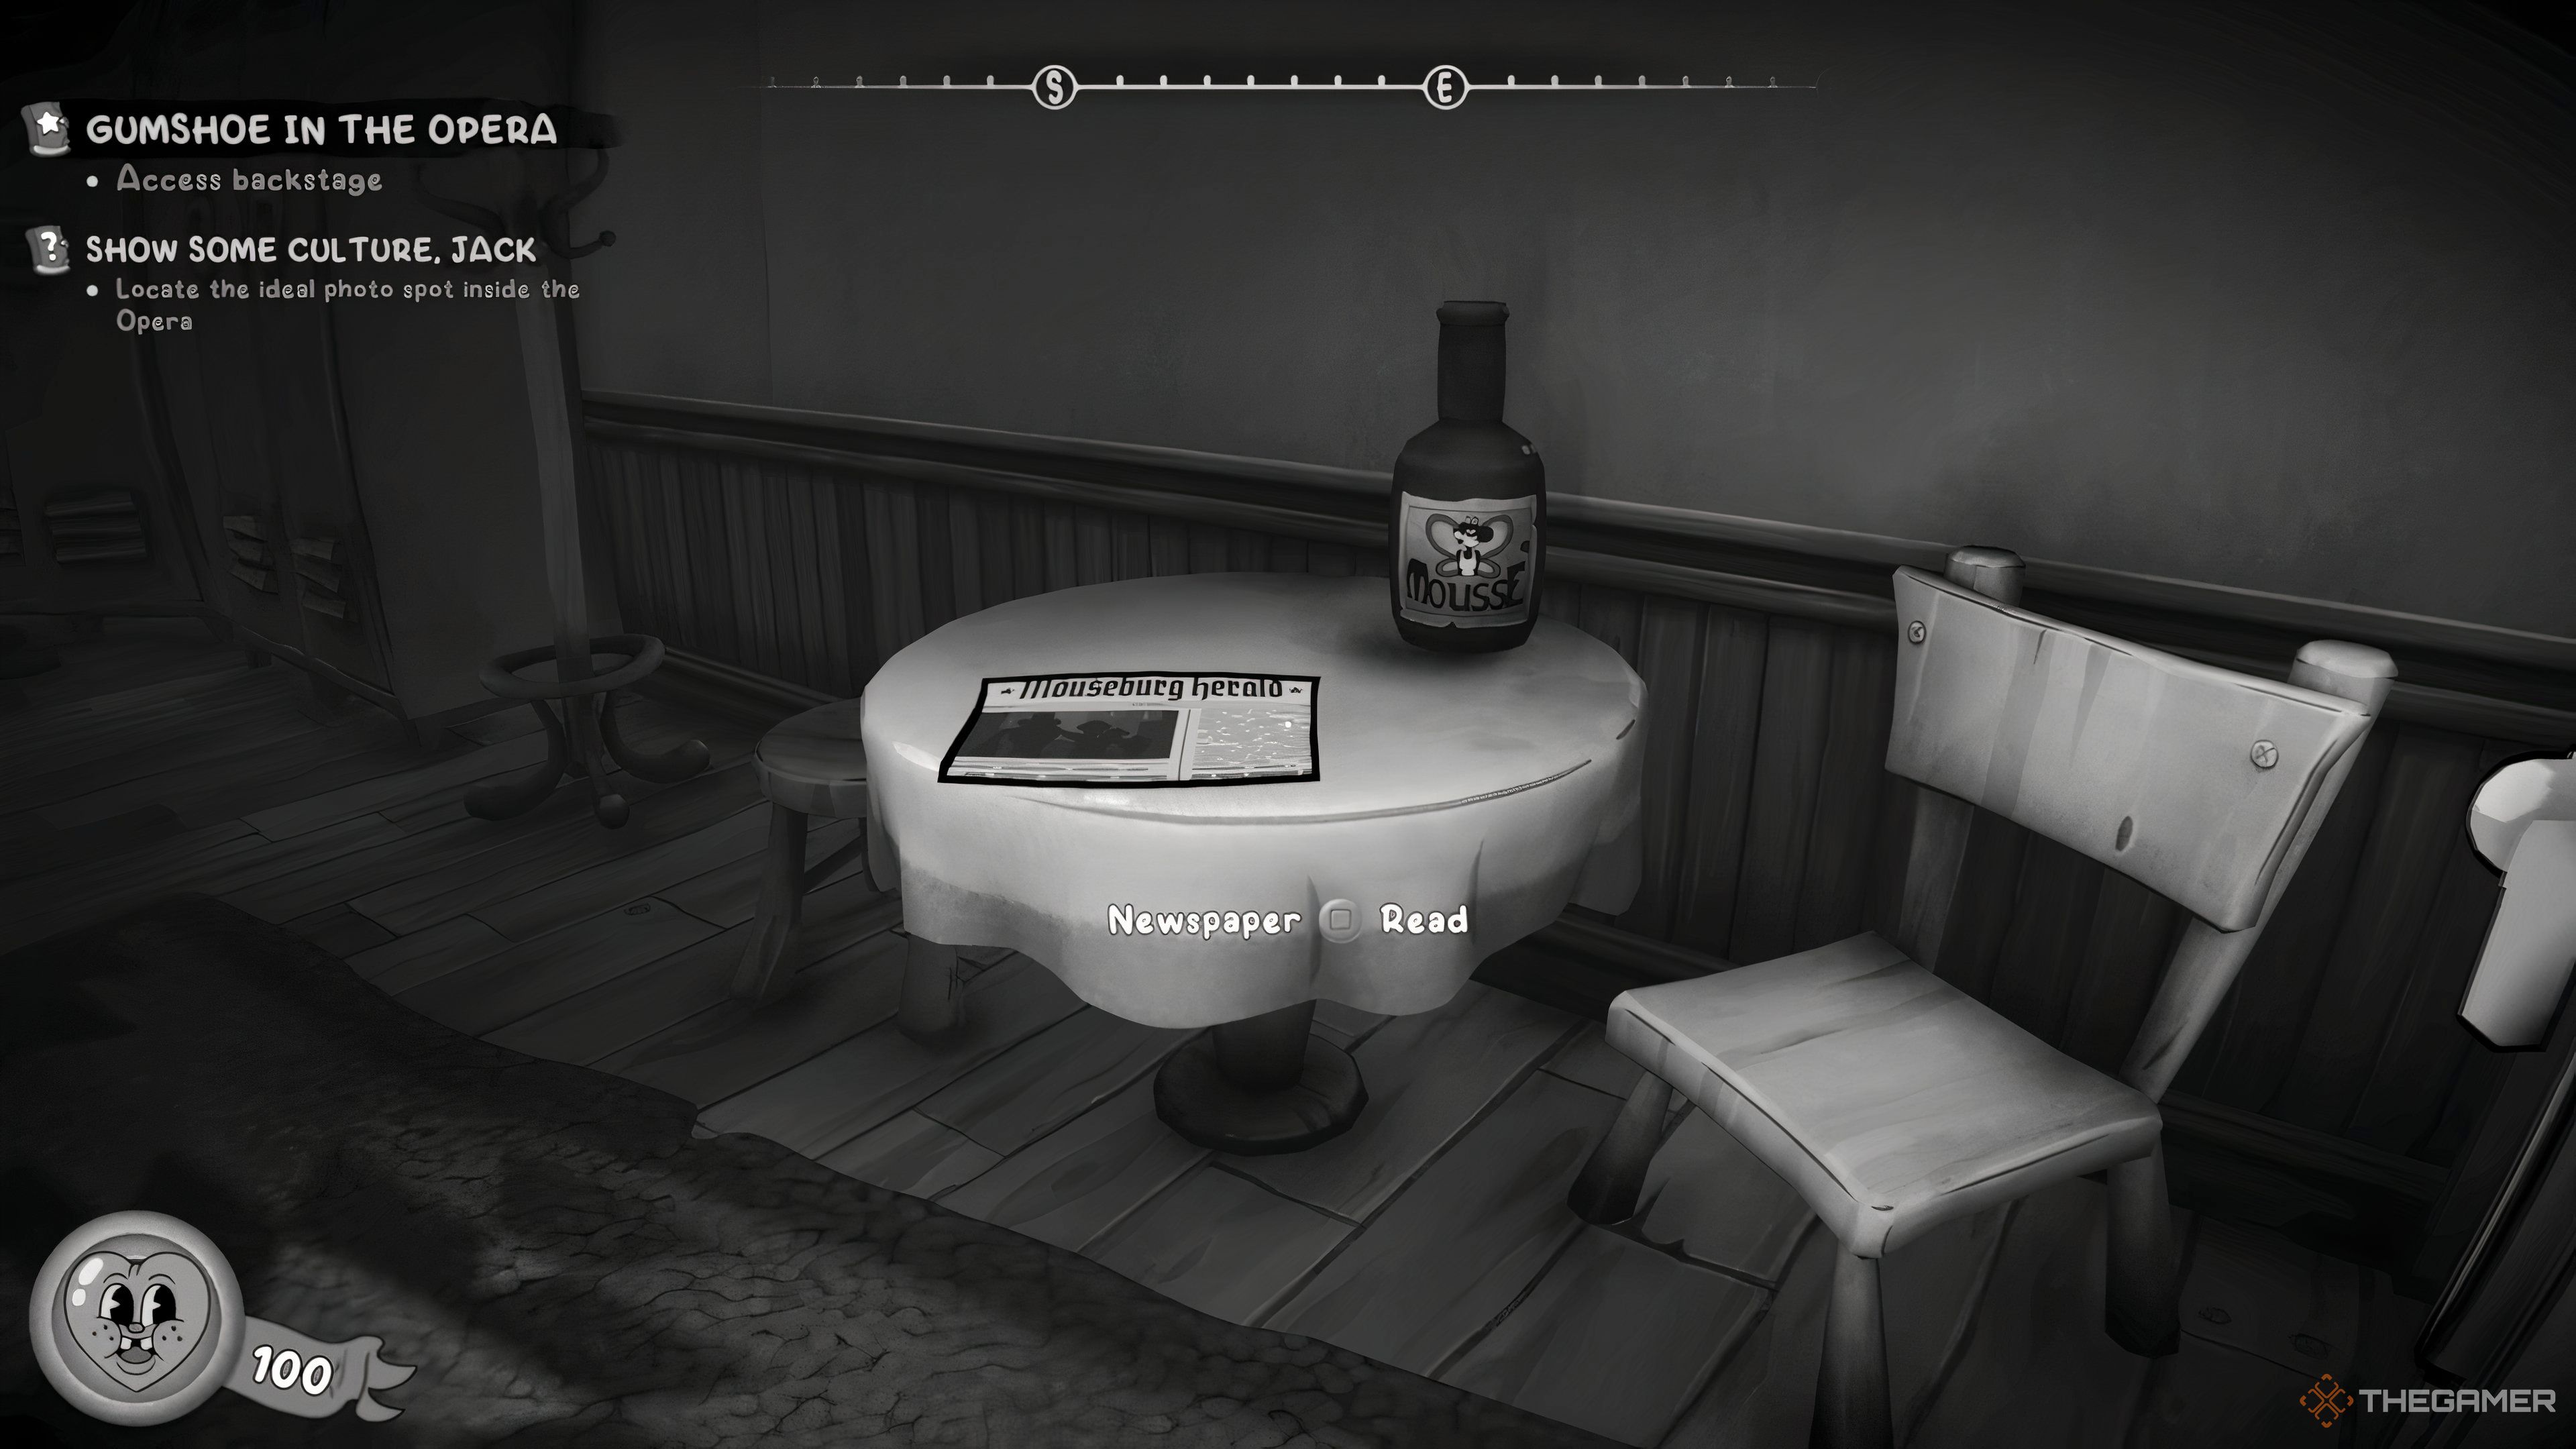
    No. 27611 “Dark Clouds Over Shrewthicket” — Found on a table upon entering the Opera building. Image
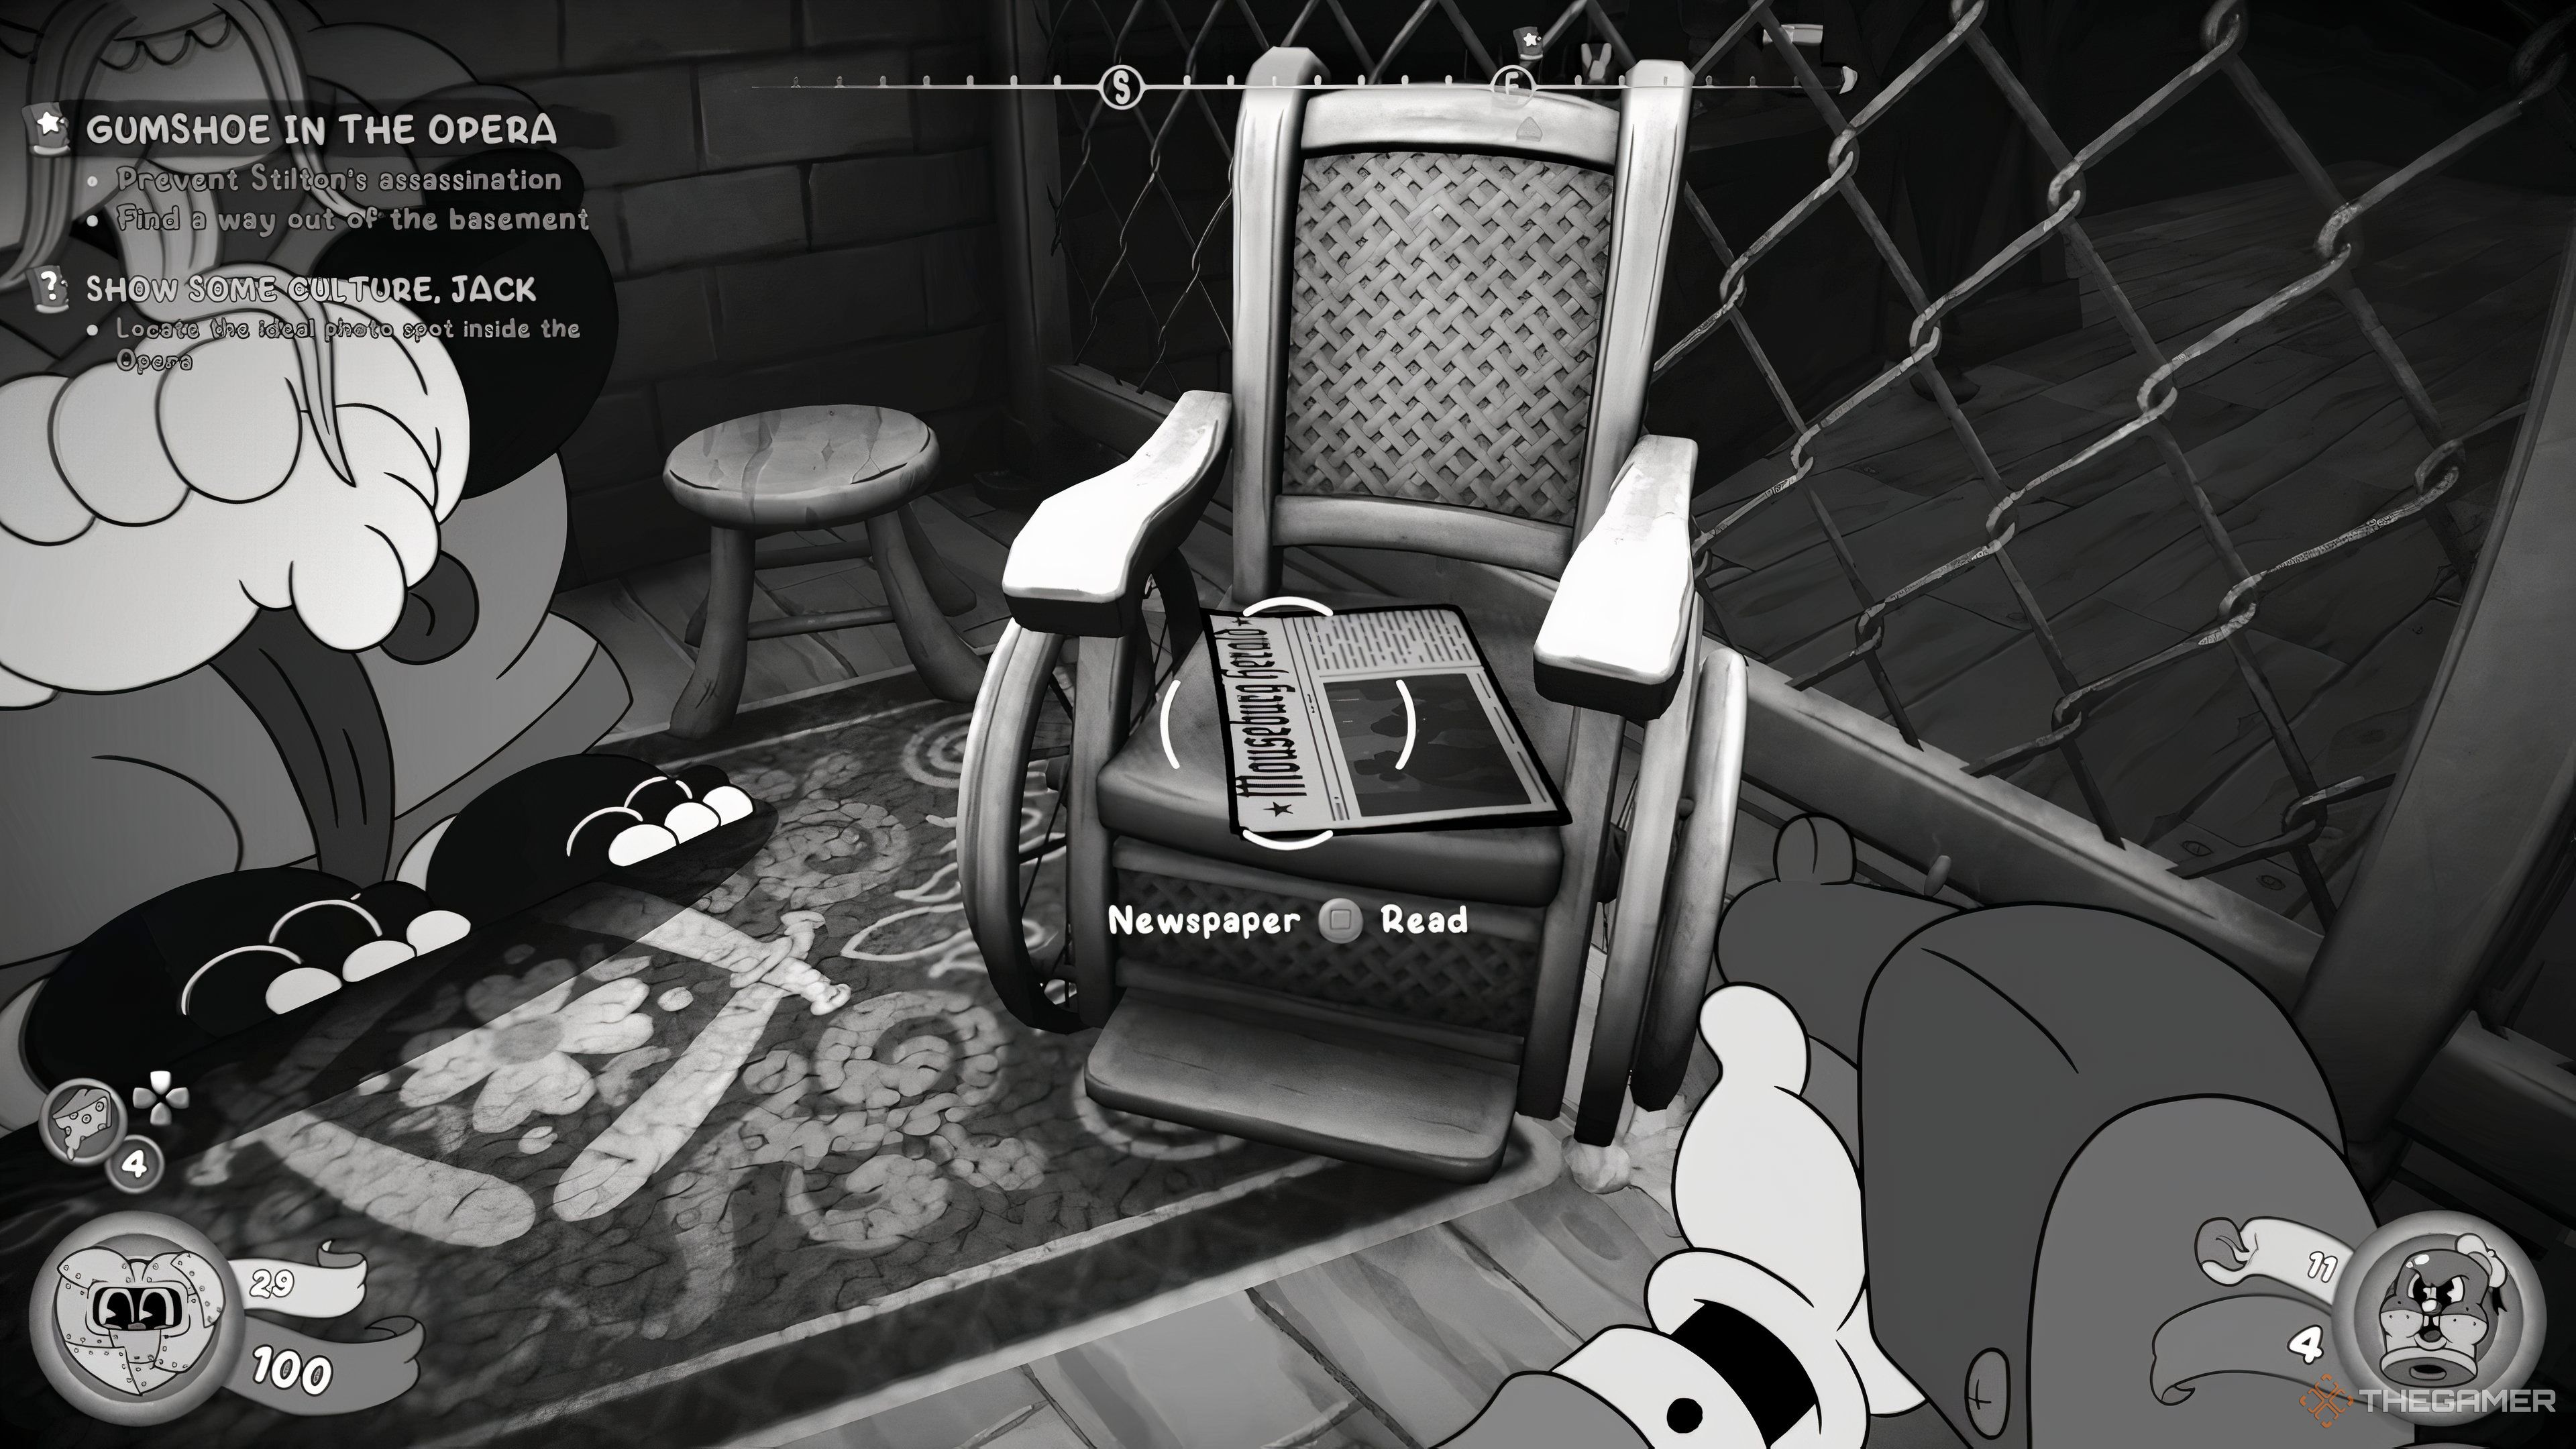
    No. 27611 “Mossman, or Mossdream?” — On a chair next to the stuntman after he teaches you Double Jump. Image

    Bandel’s Laboratory

    Mouseburg Herald Edition and Location Photo Reference
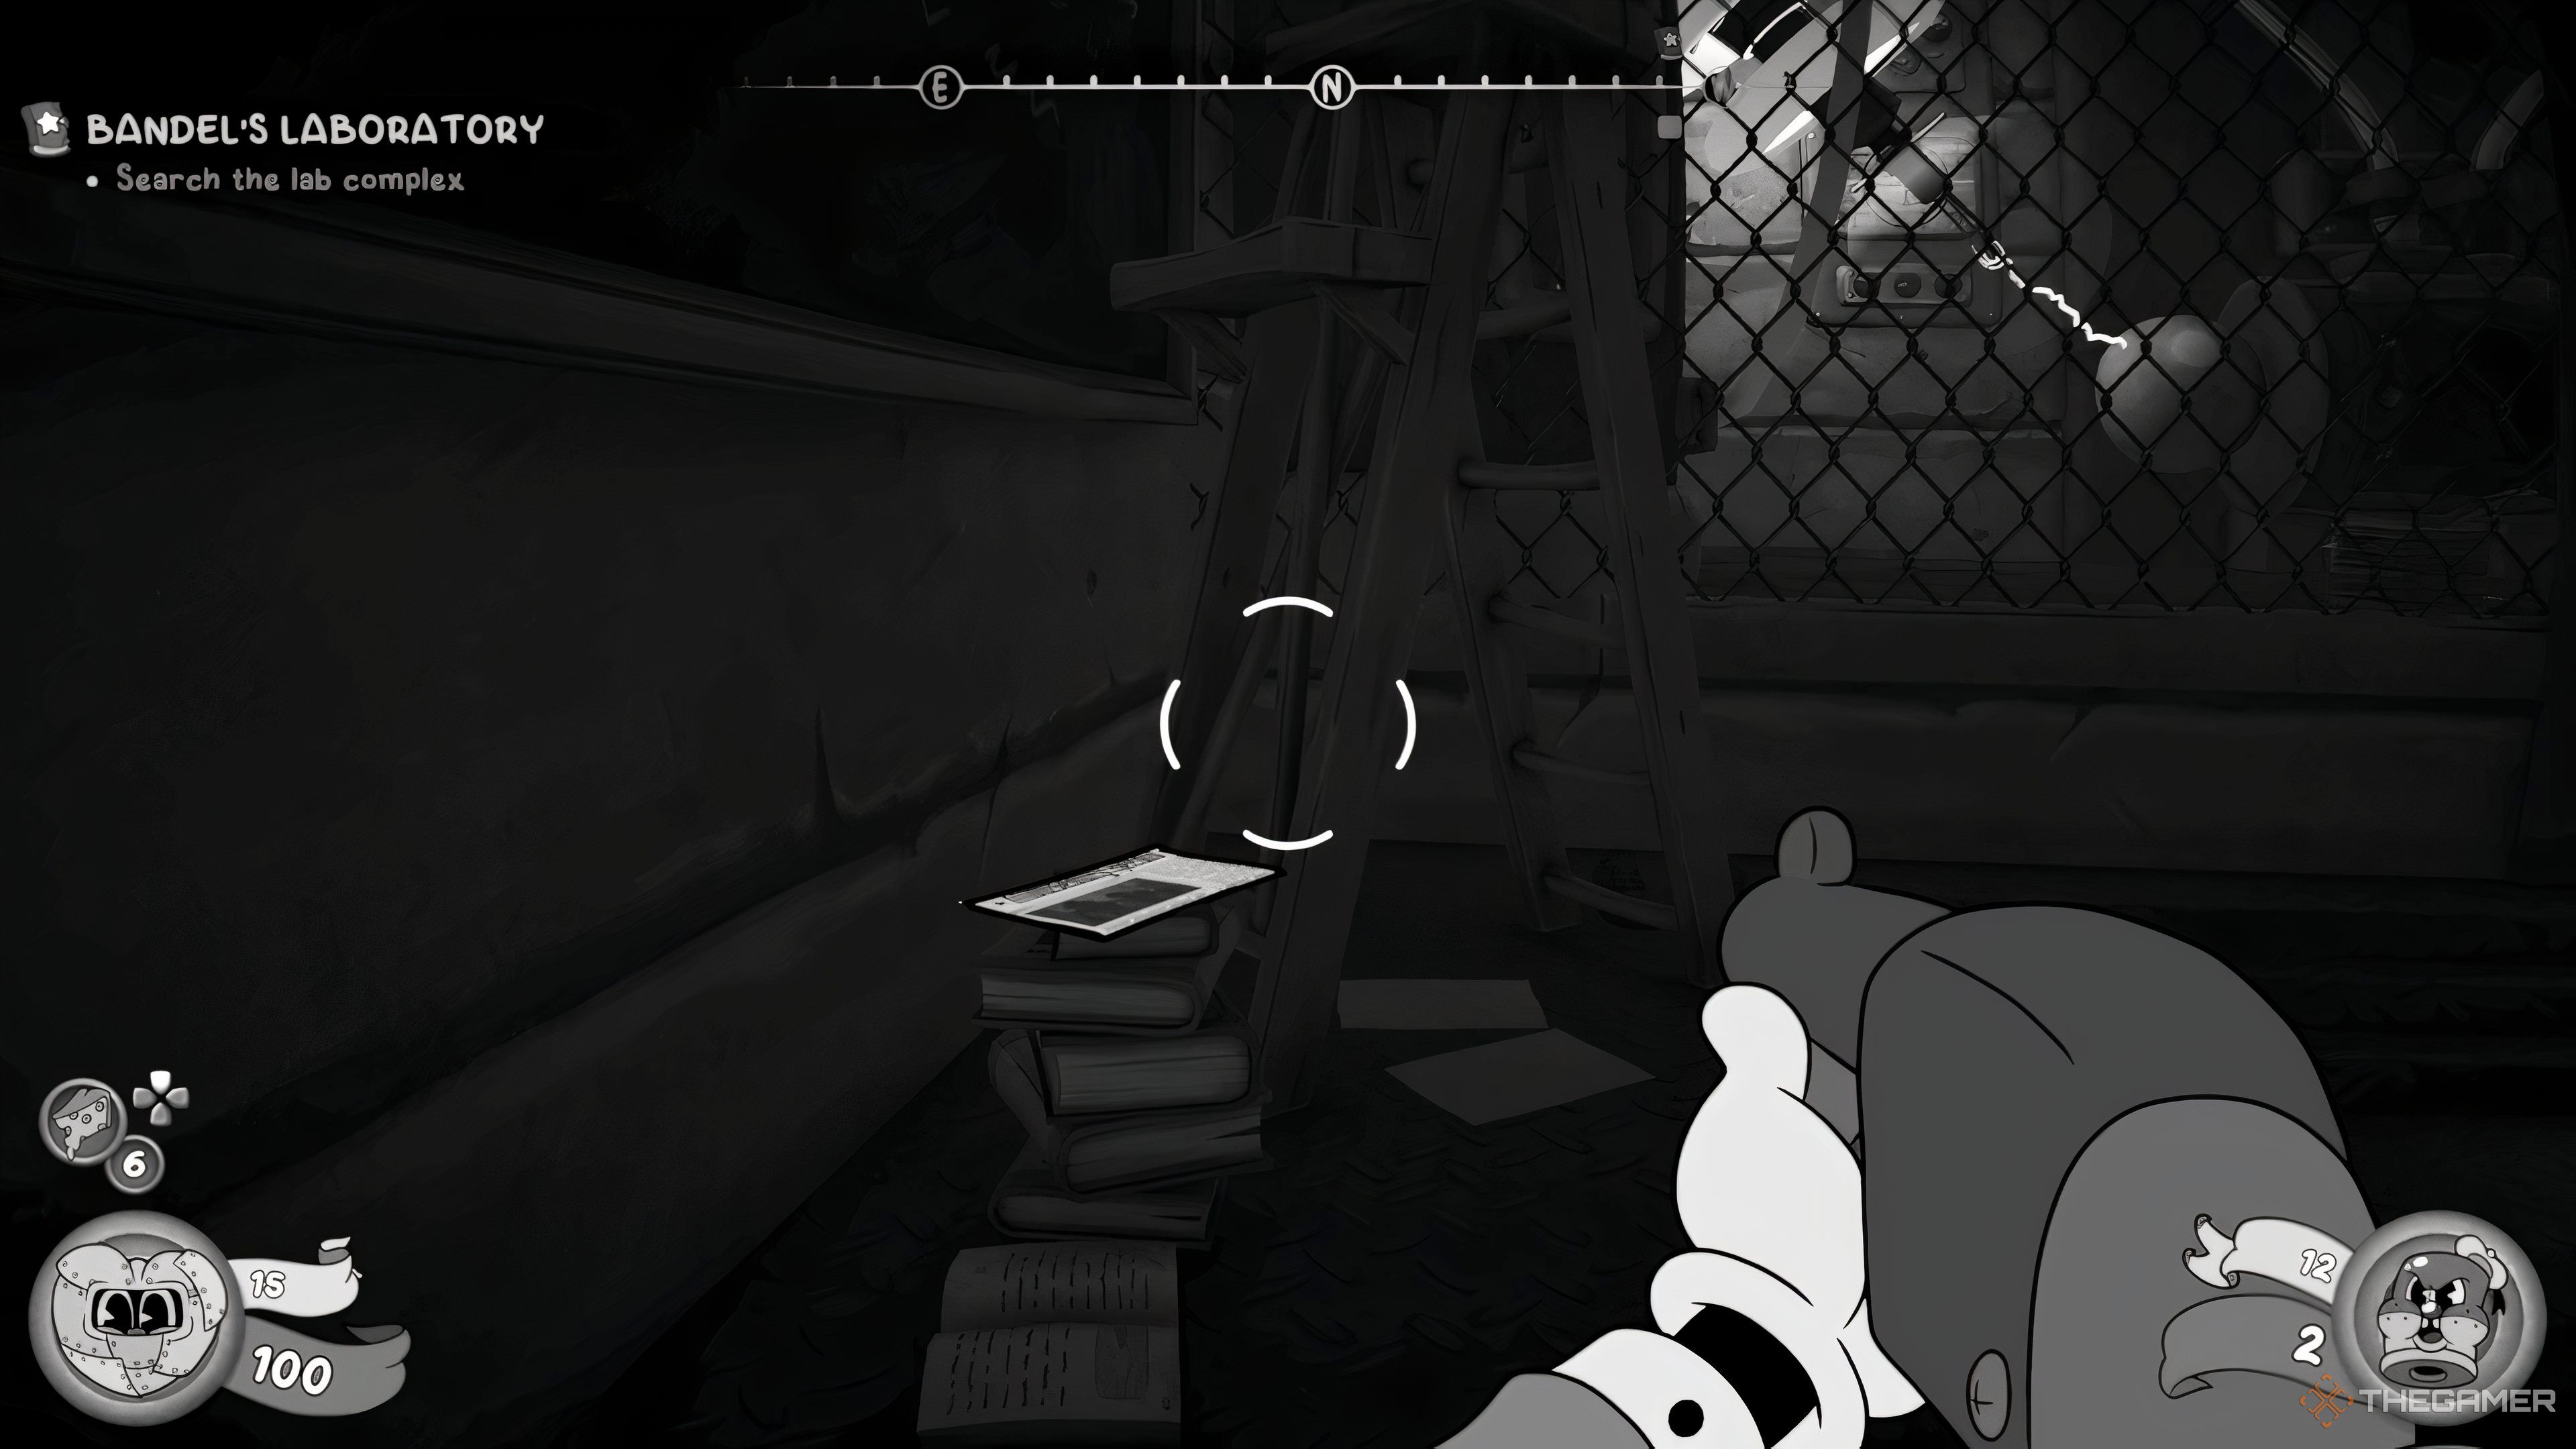
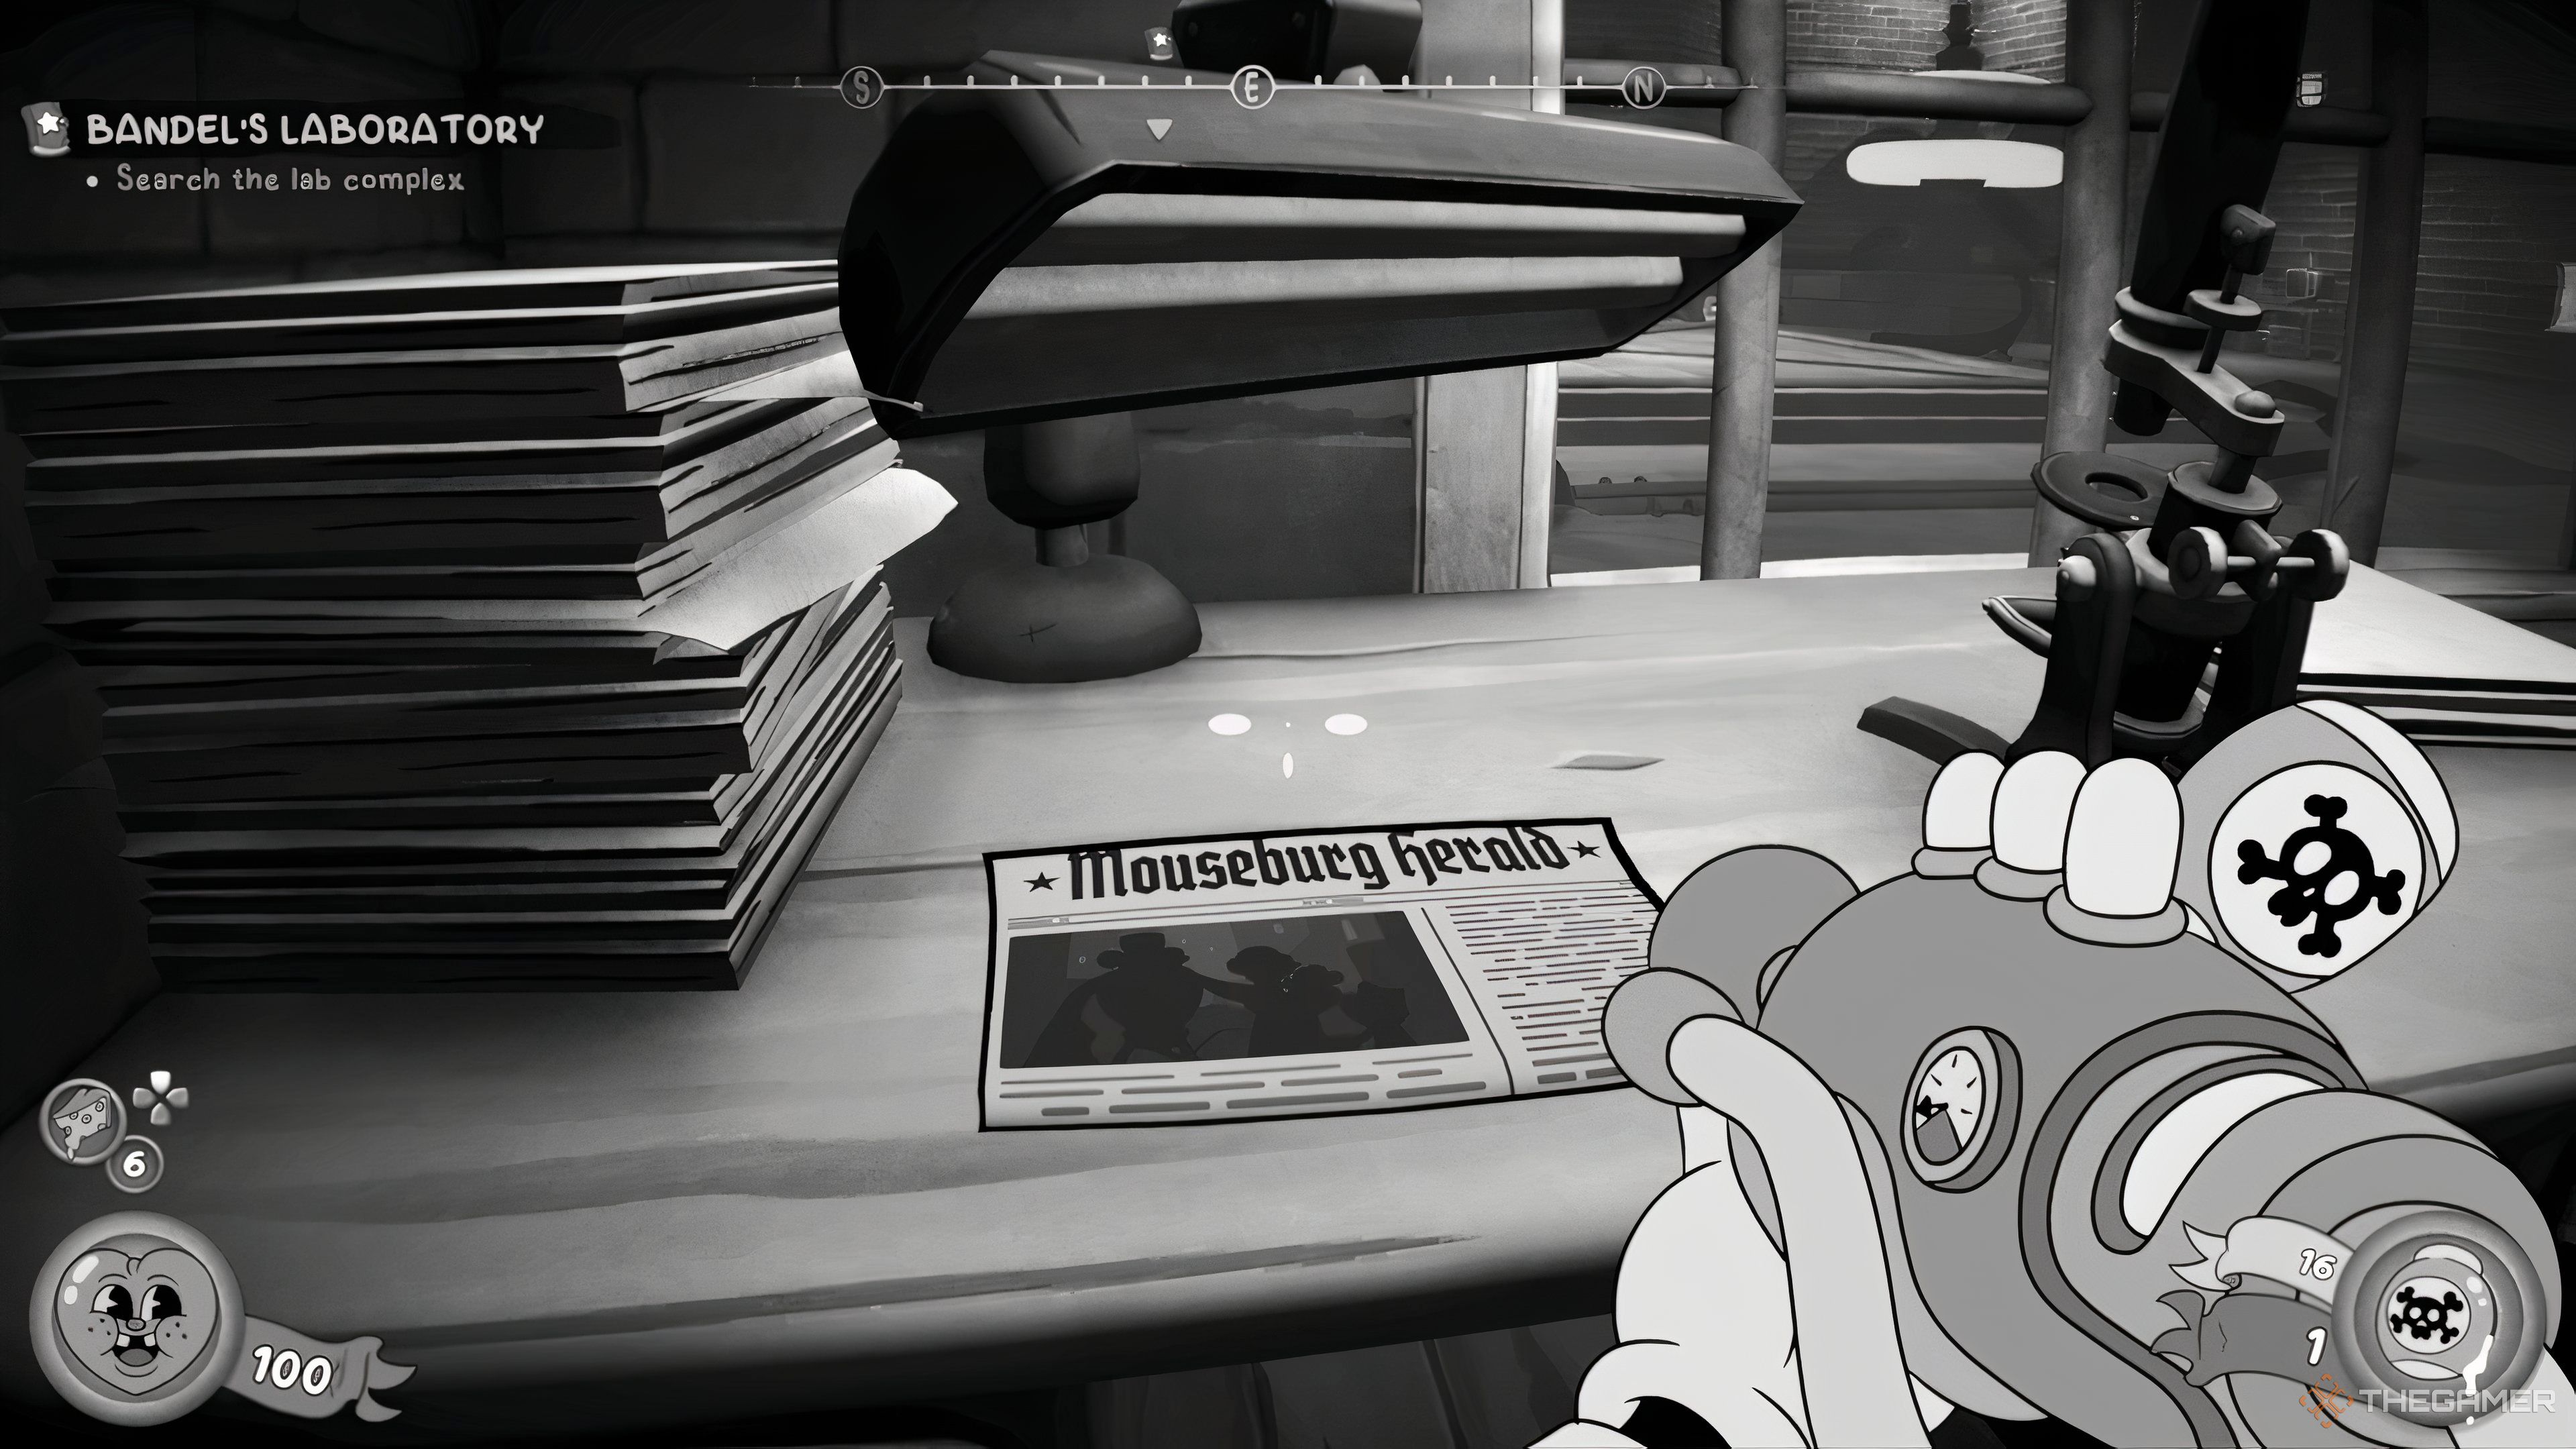
    No. 27752 “Smoke, Mirrors, and A Lot Of Fun” — In a room upstairs after defeating goons and in the same room where you get the Devarnisher. Image
    No. 27208 “The Future Is Now” — On a desk after defeating Betty, near Igorrr’s area. Image

    A Bit Of A Scene

    Mouseburg Herald Edition and Location Photo Reference
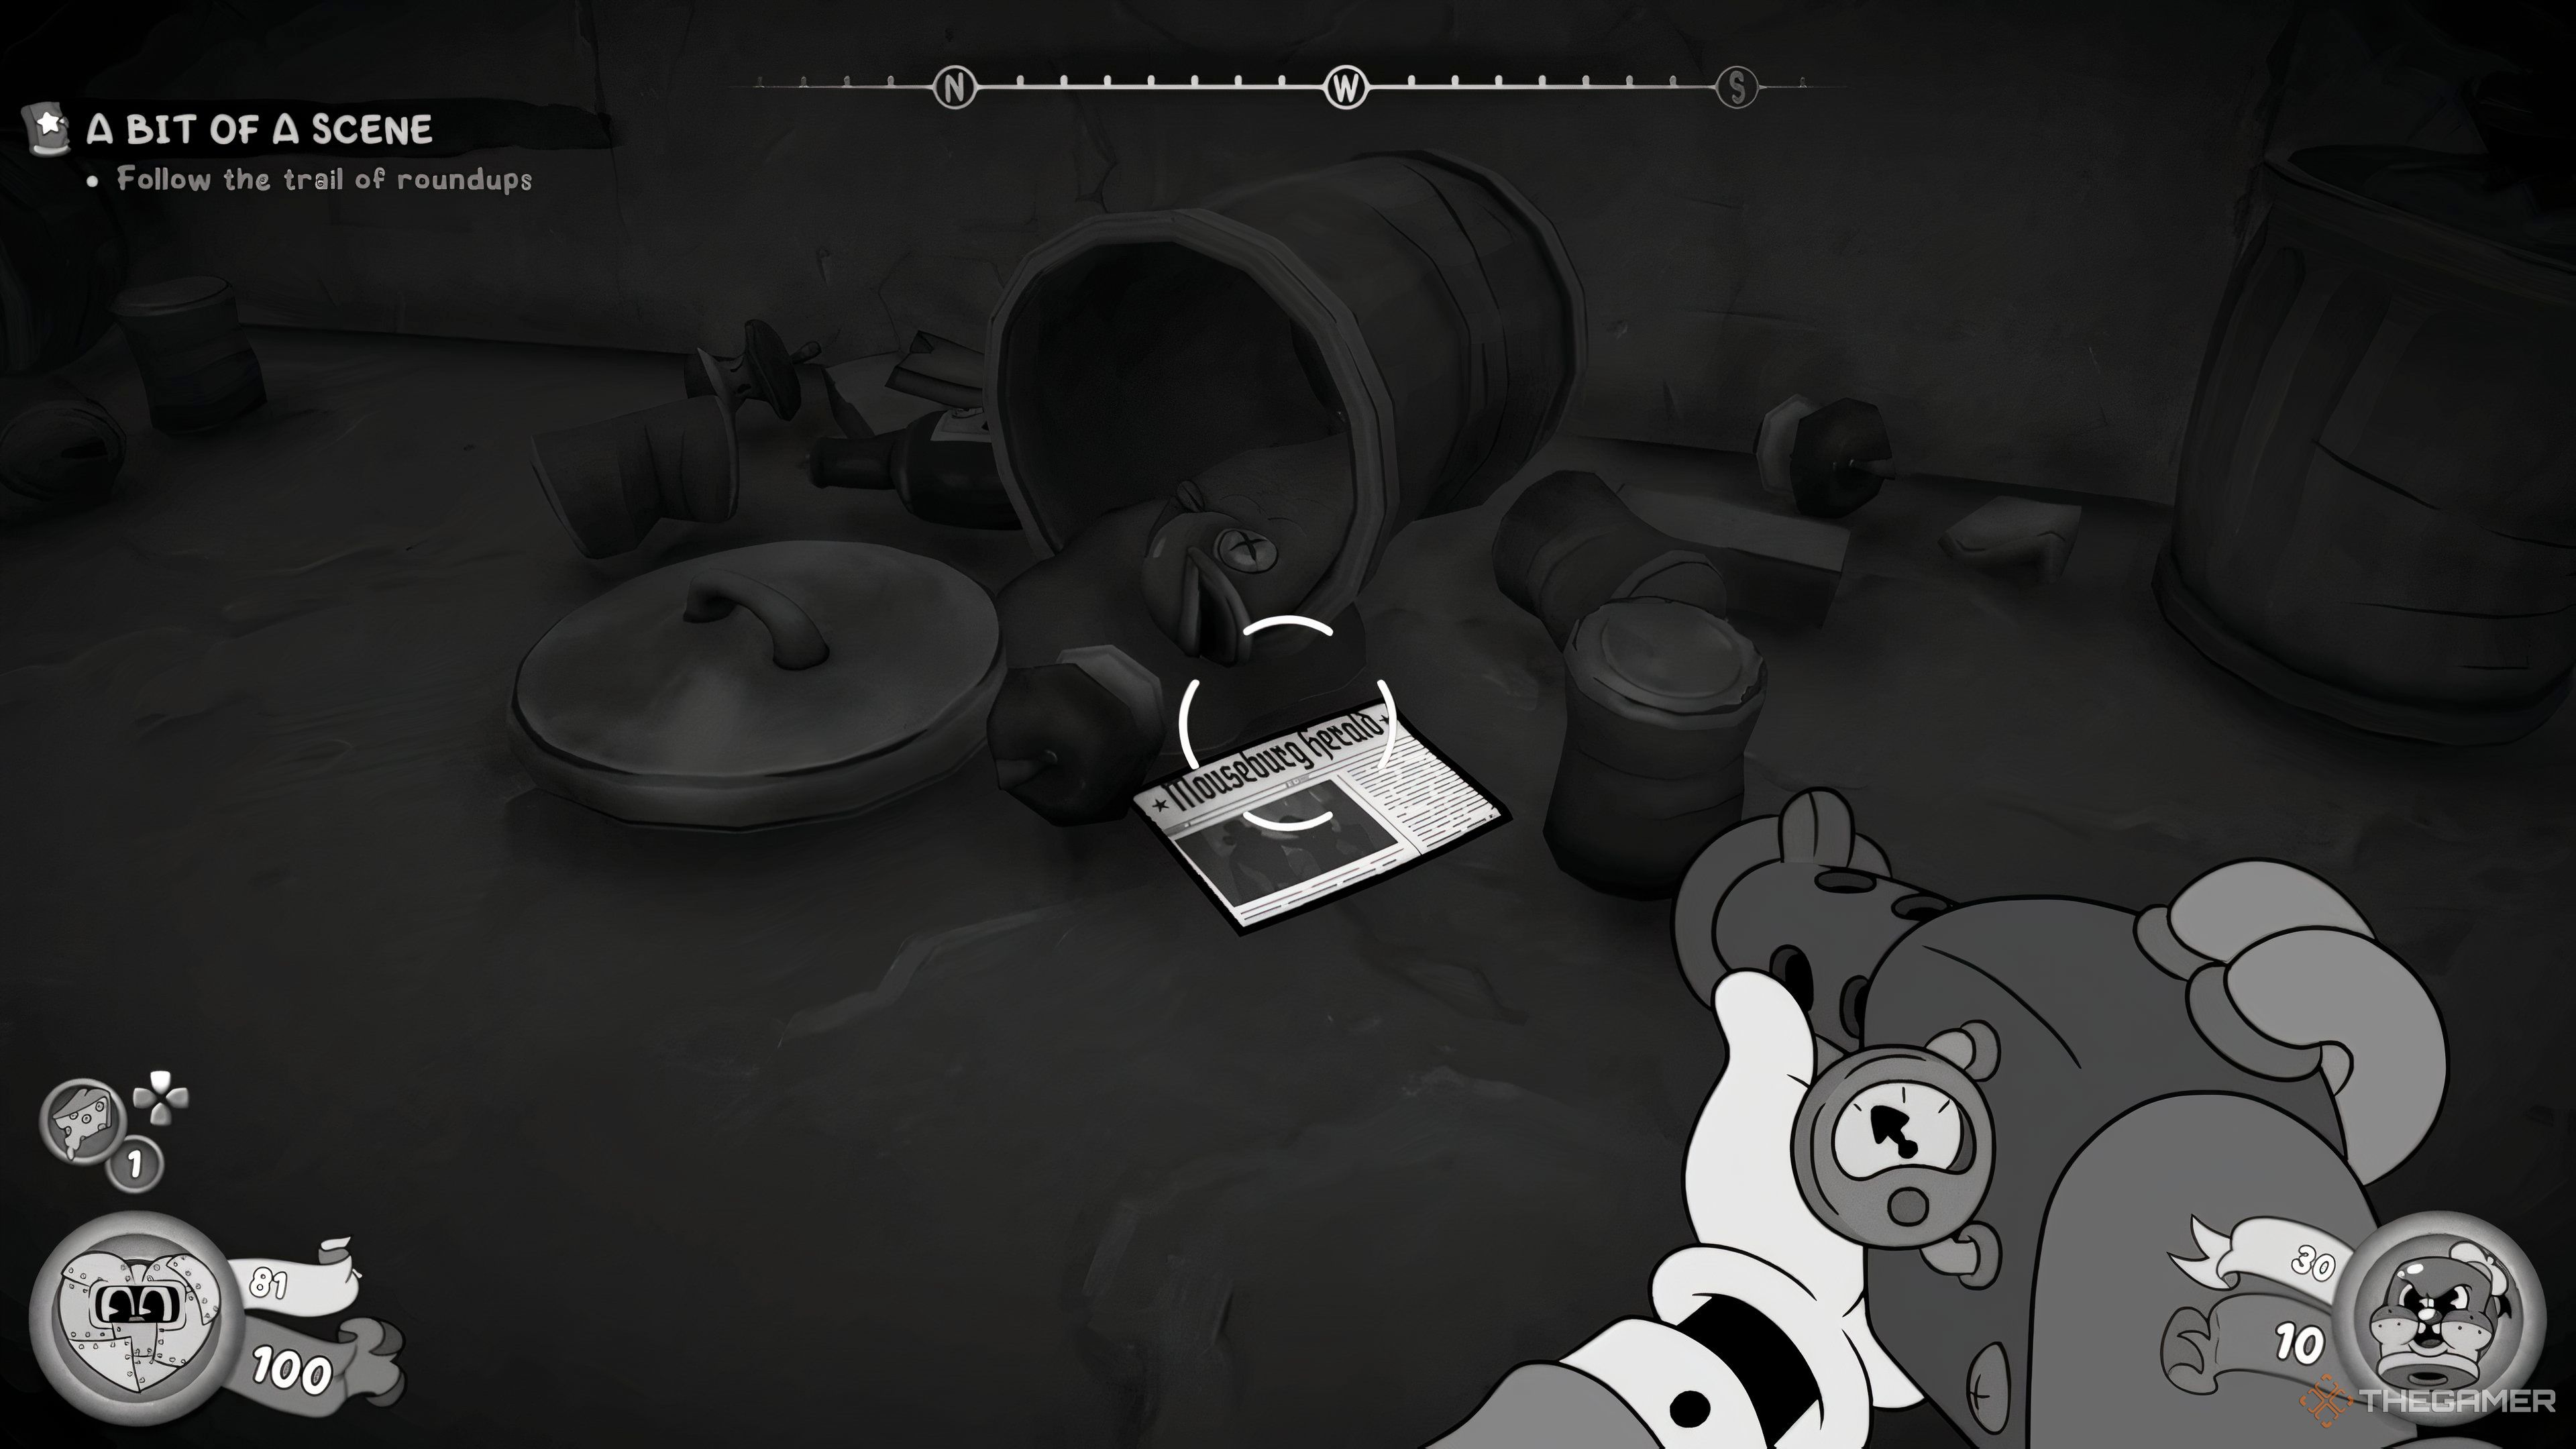
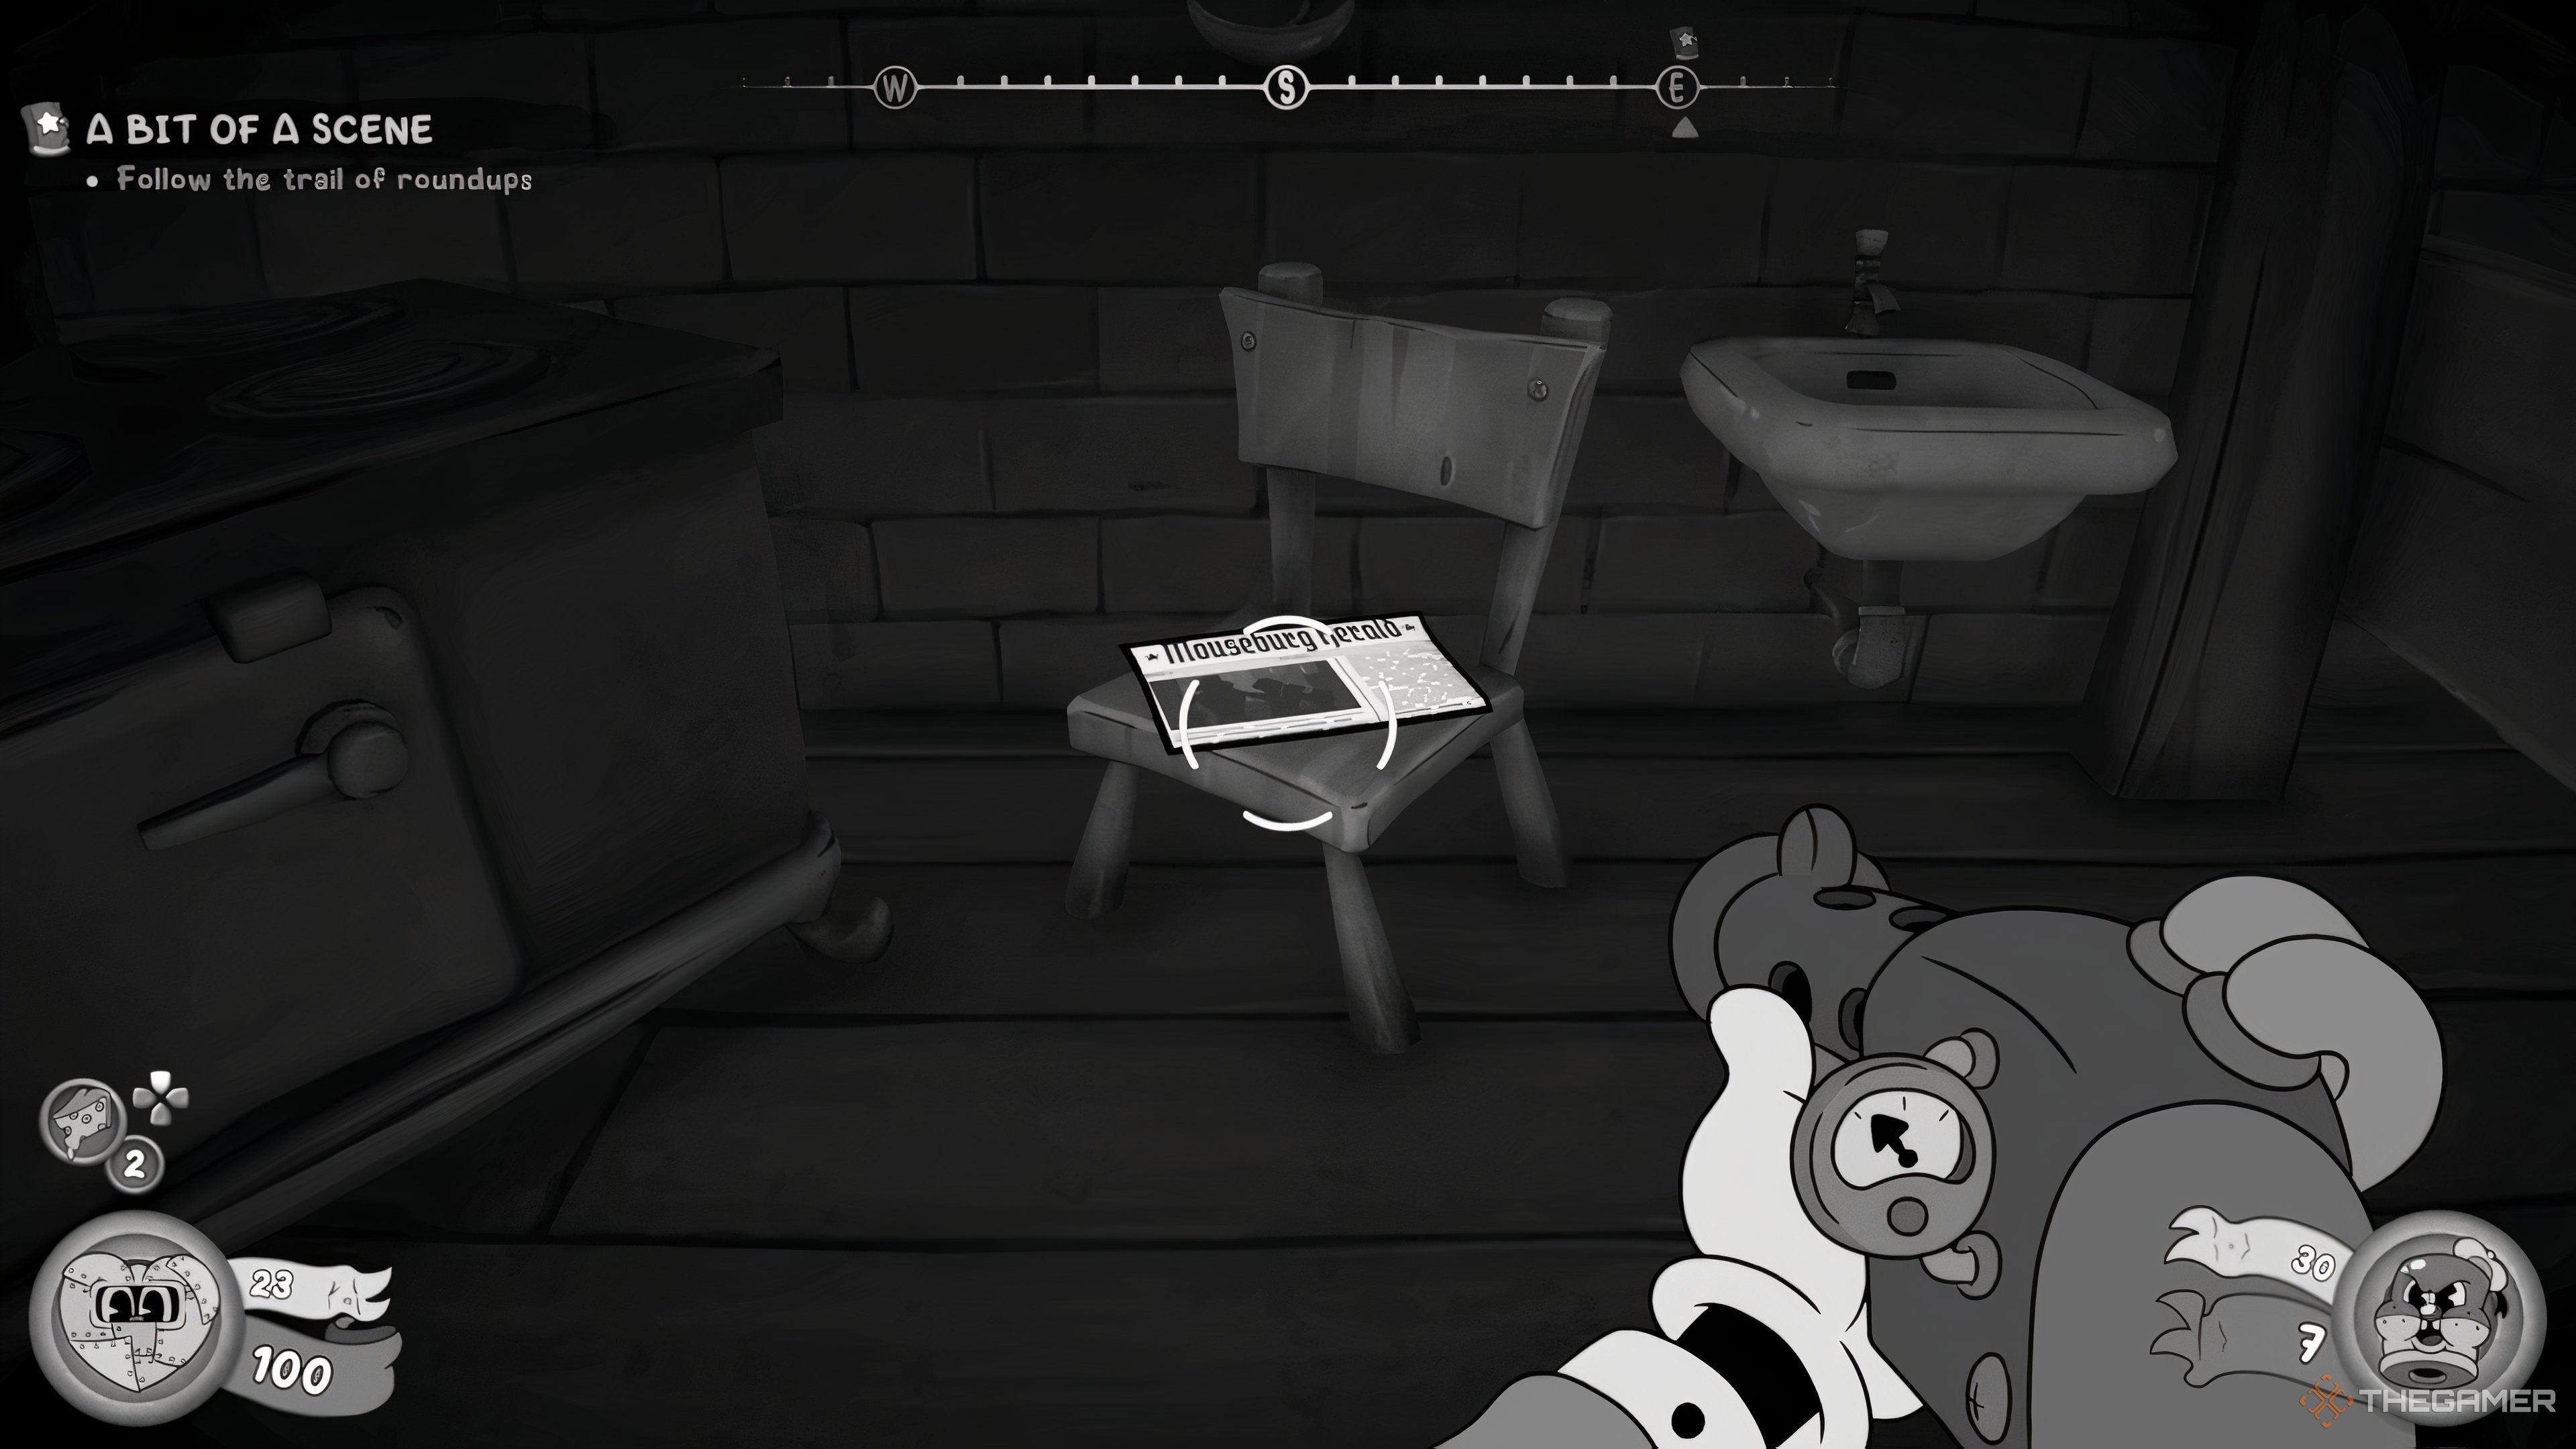
    No. 28196 “The End Of The Crime Families” — On ground behind some trash cans after the train shootout. Image
    No. 26087 “Worker Strikes In Effect” — In an apartment kitchen after jumping onto the balcony using a trampoline. Image

    Cheeseball Sub

    Mouseburg Herald Edition and Location Photo Reference
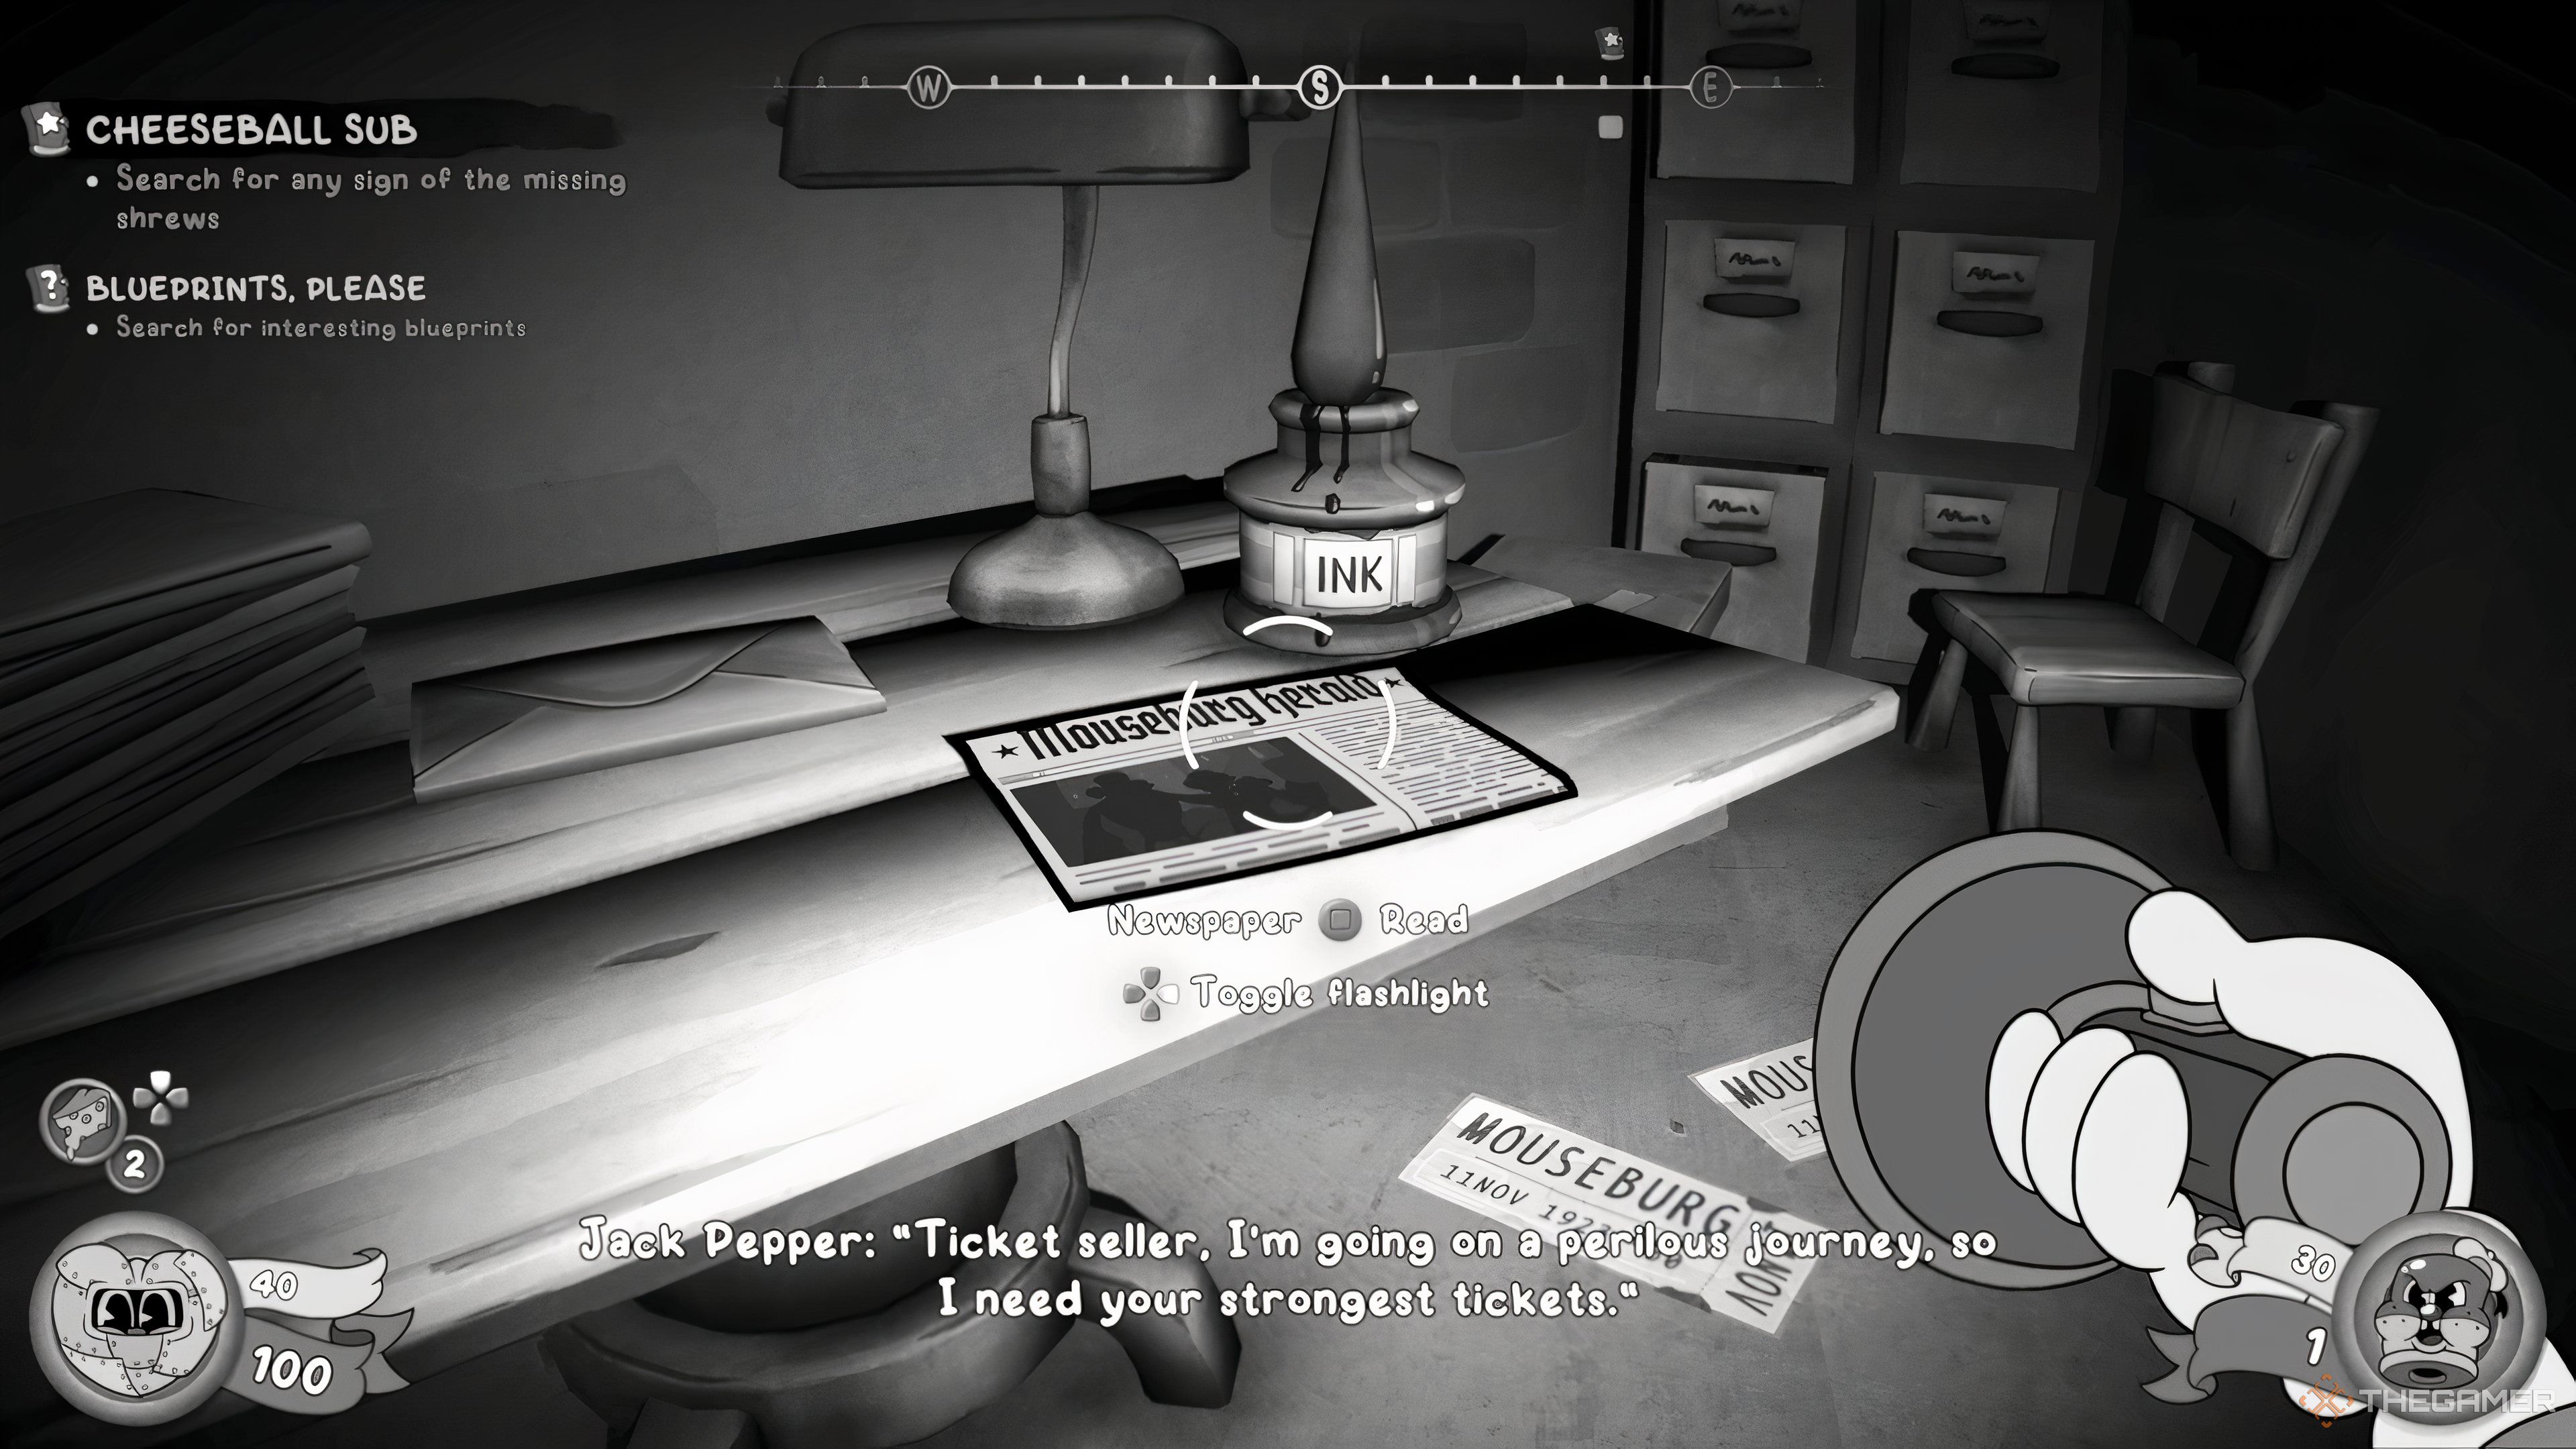
    No. 26002 “Boy Eats Bad Book” — Inside an office on a desk after defeating enemies near the subway tracks. Image
    No. 28593 “The Burdens Of Blue Betty” — In a small hidden area beneath crates in a room after defeating enemies with a large construction hole. Image

    Saltwater Cambozo

    Mouseburg Herald Edition and Location Photo Reference
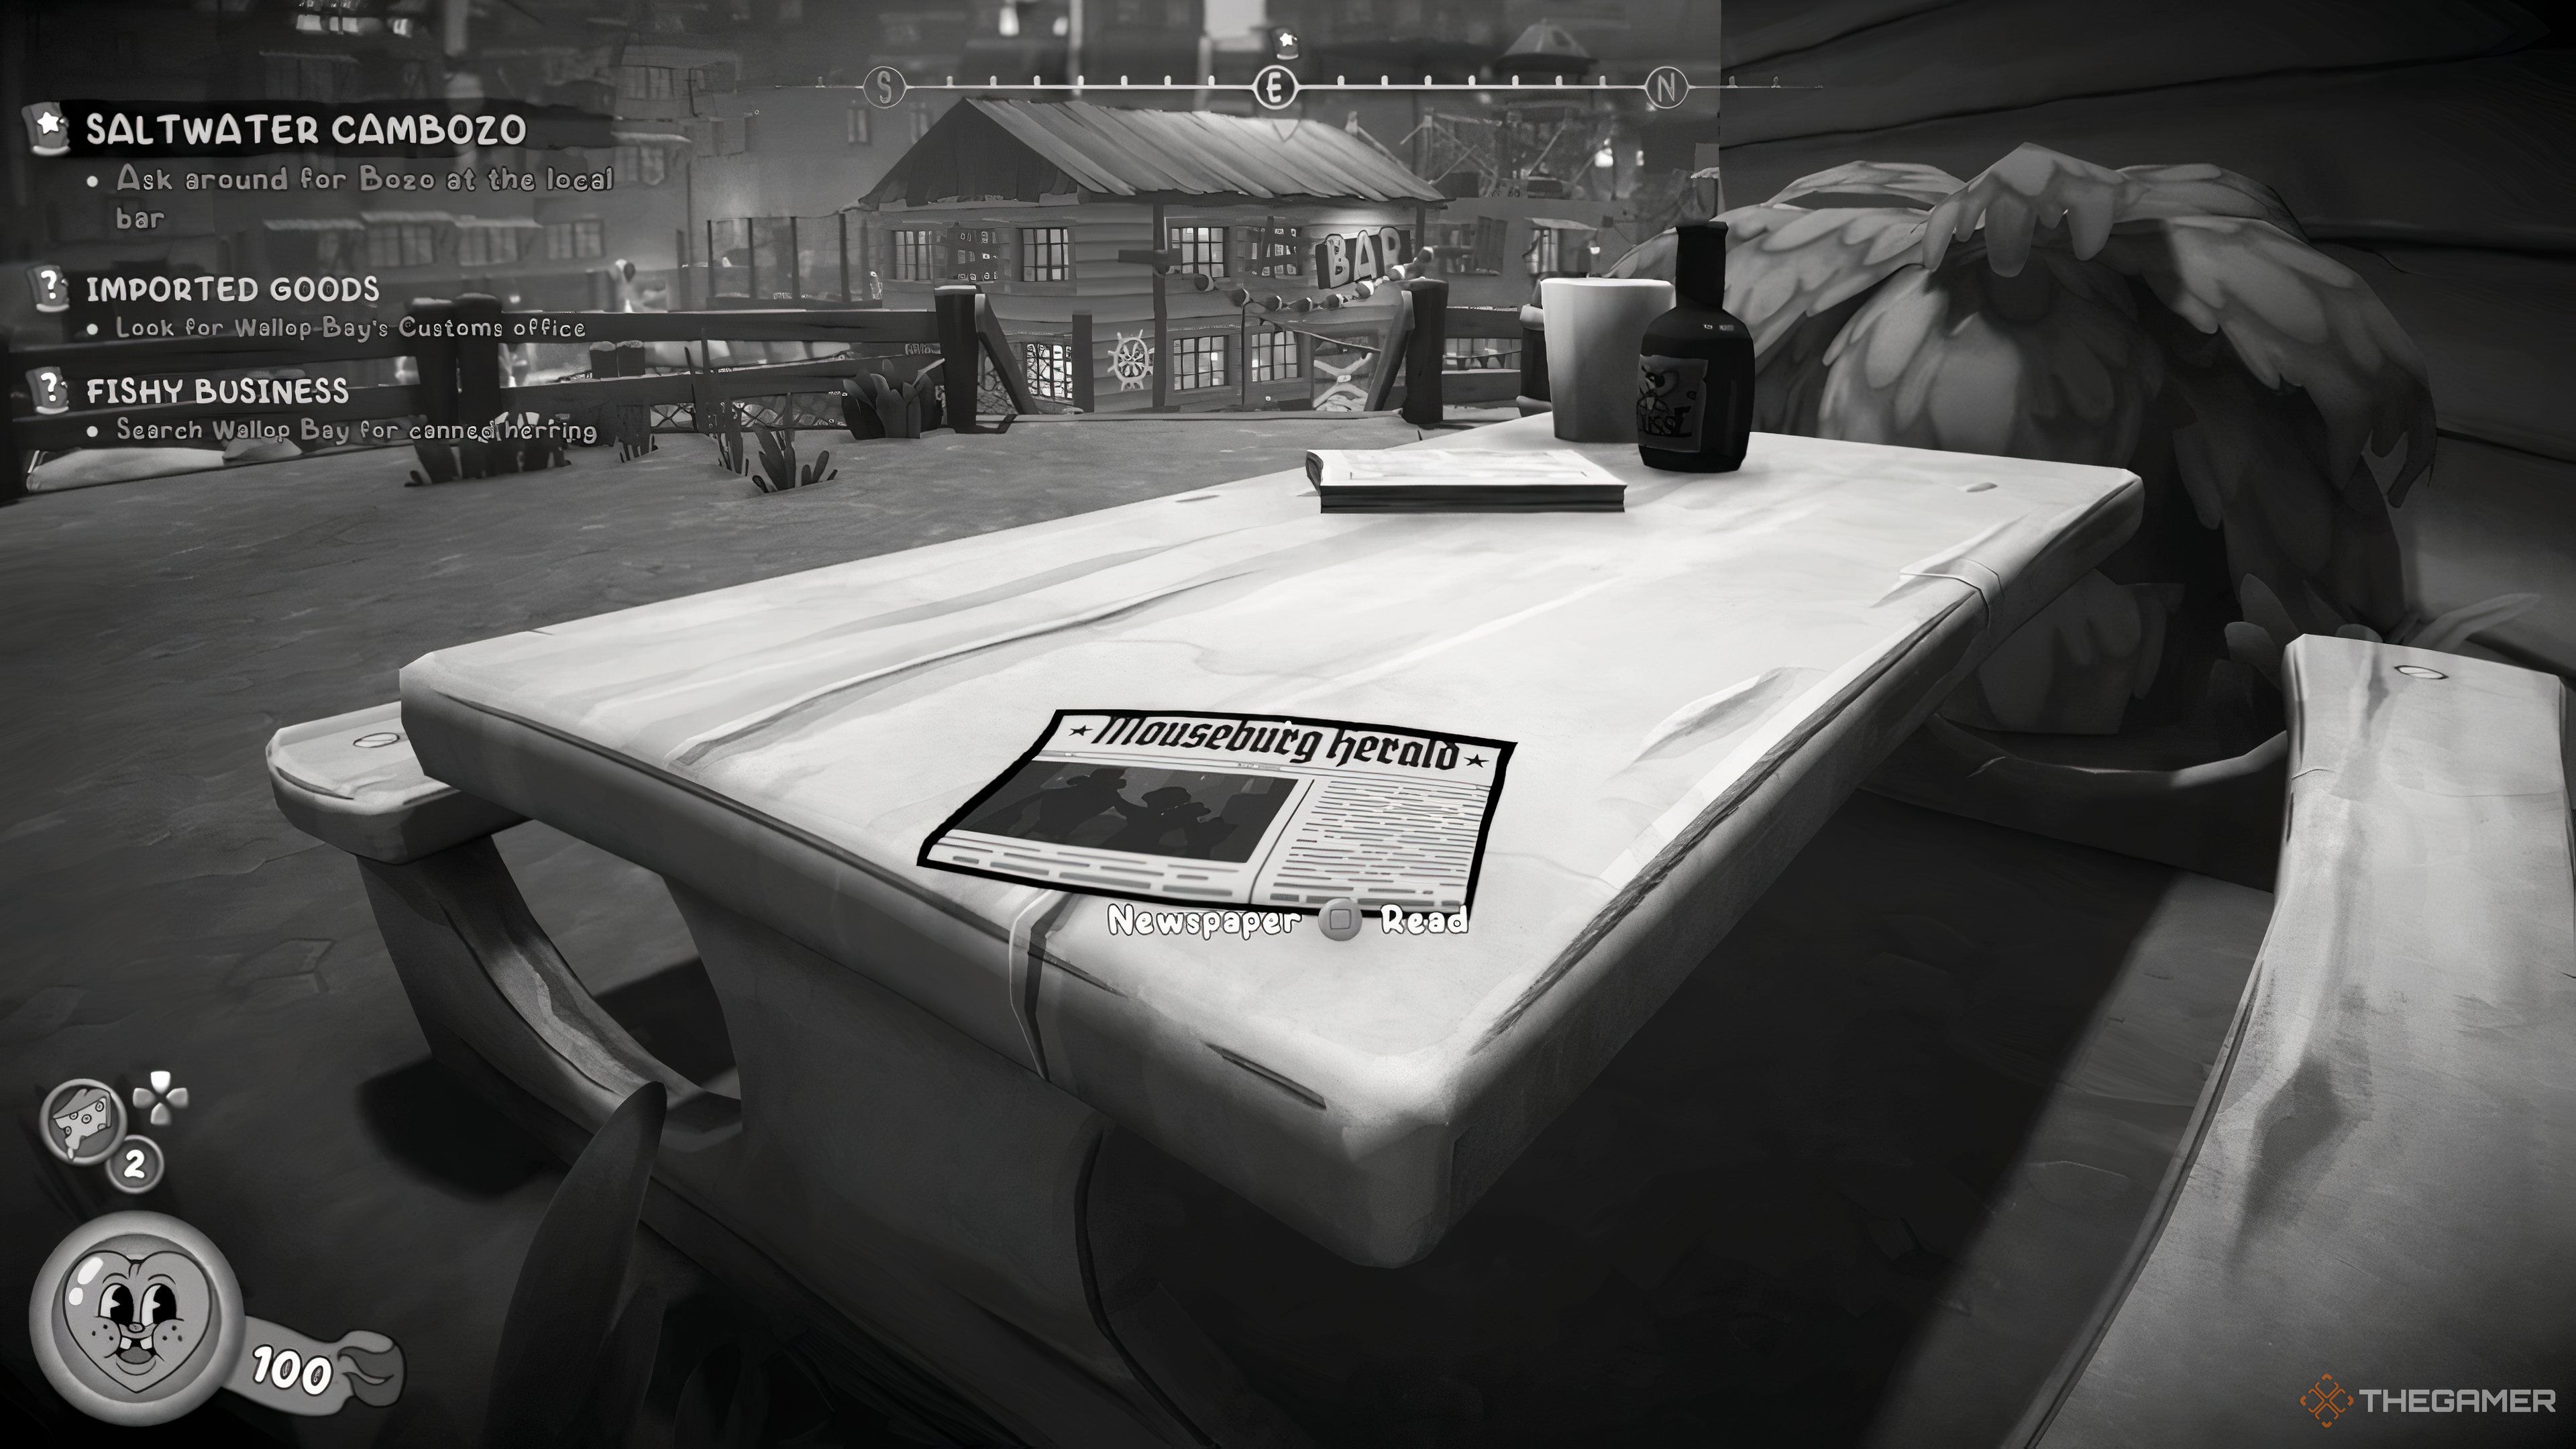
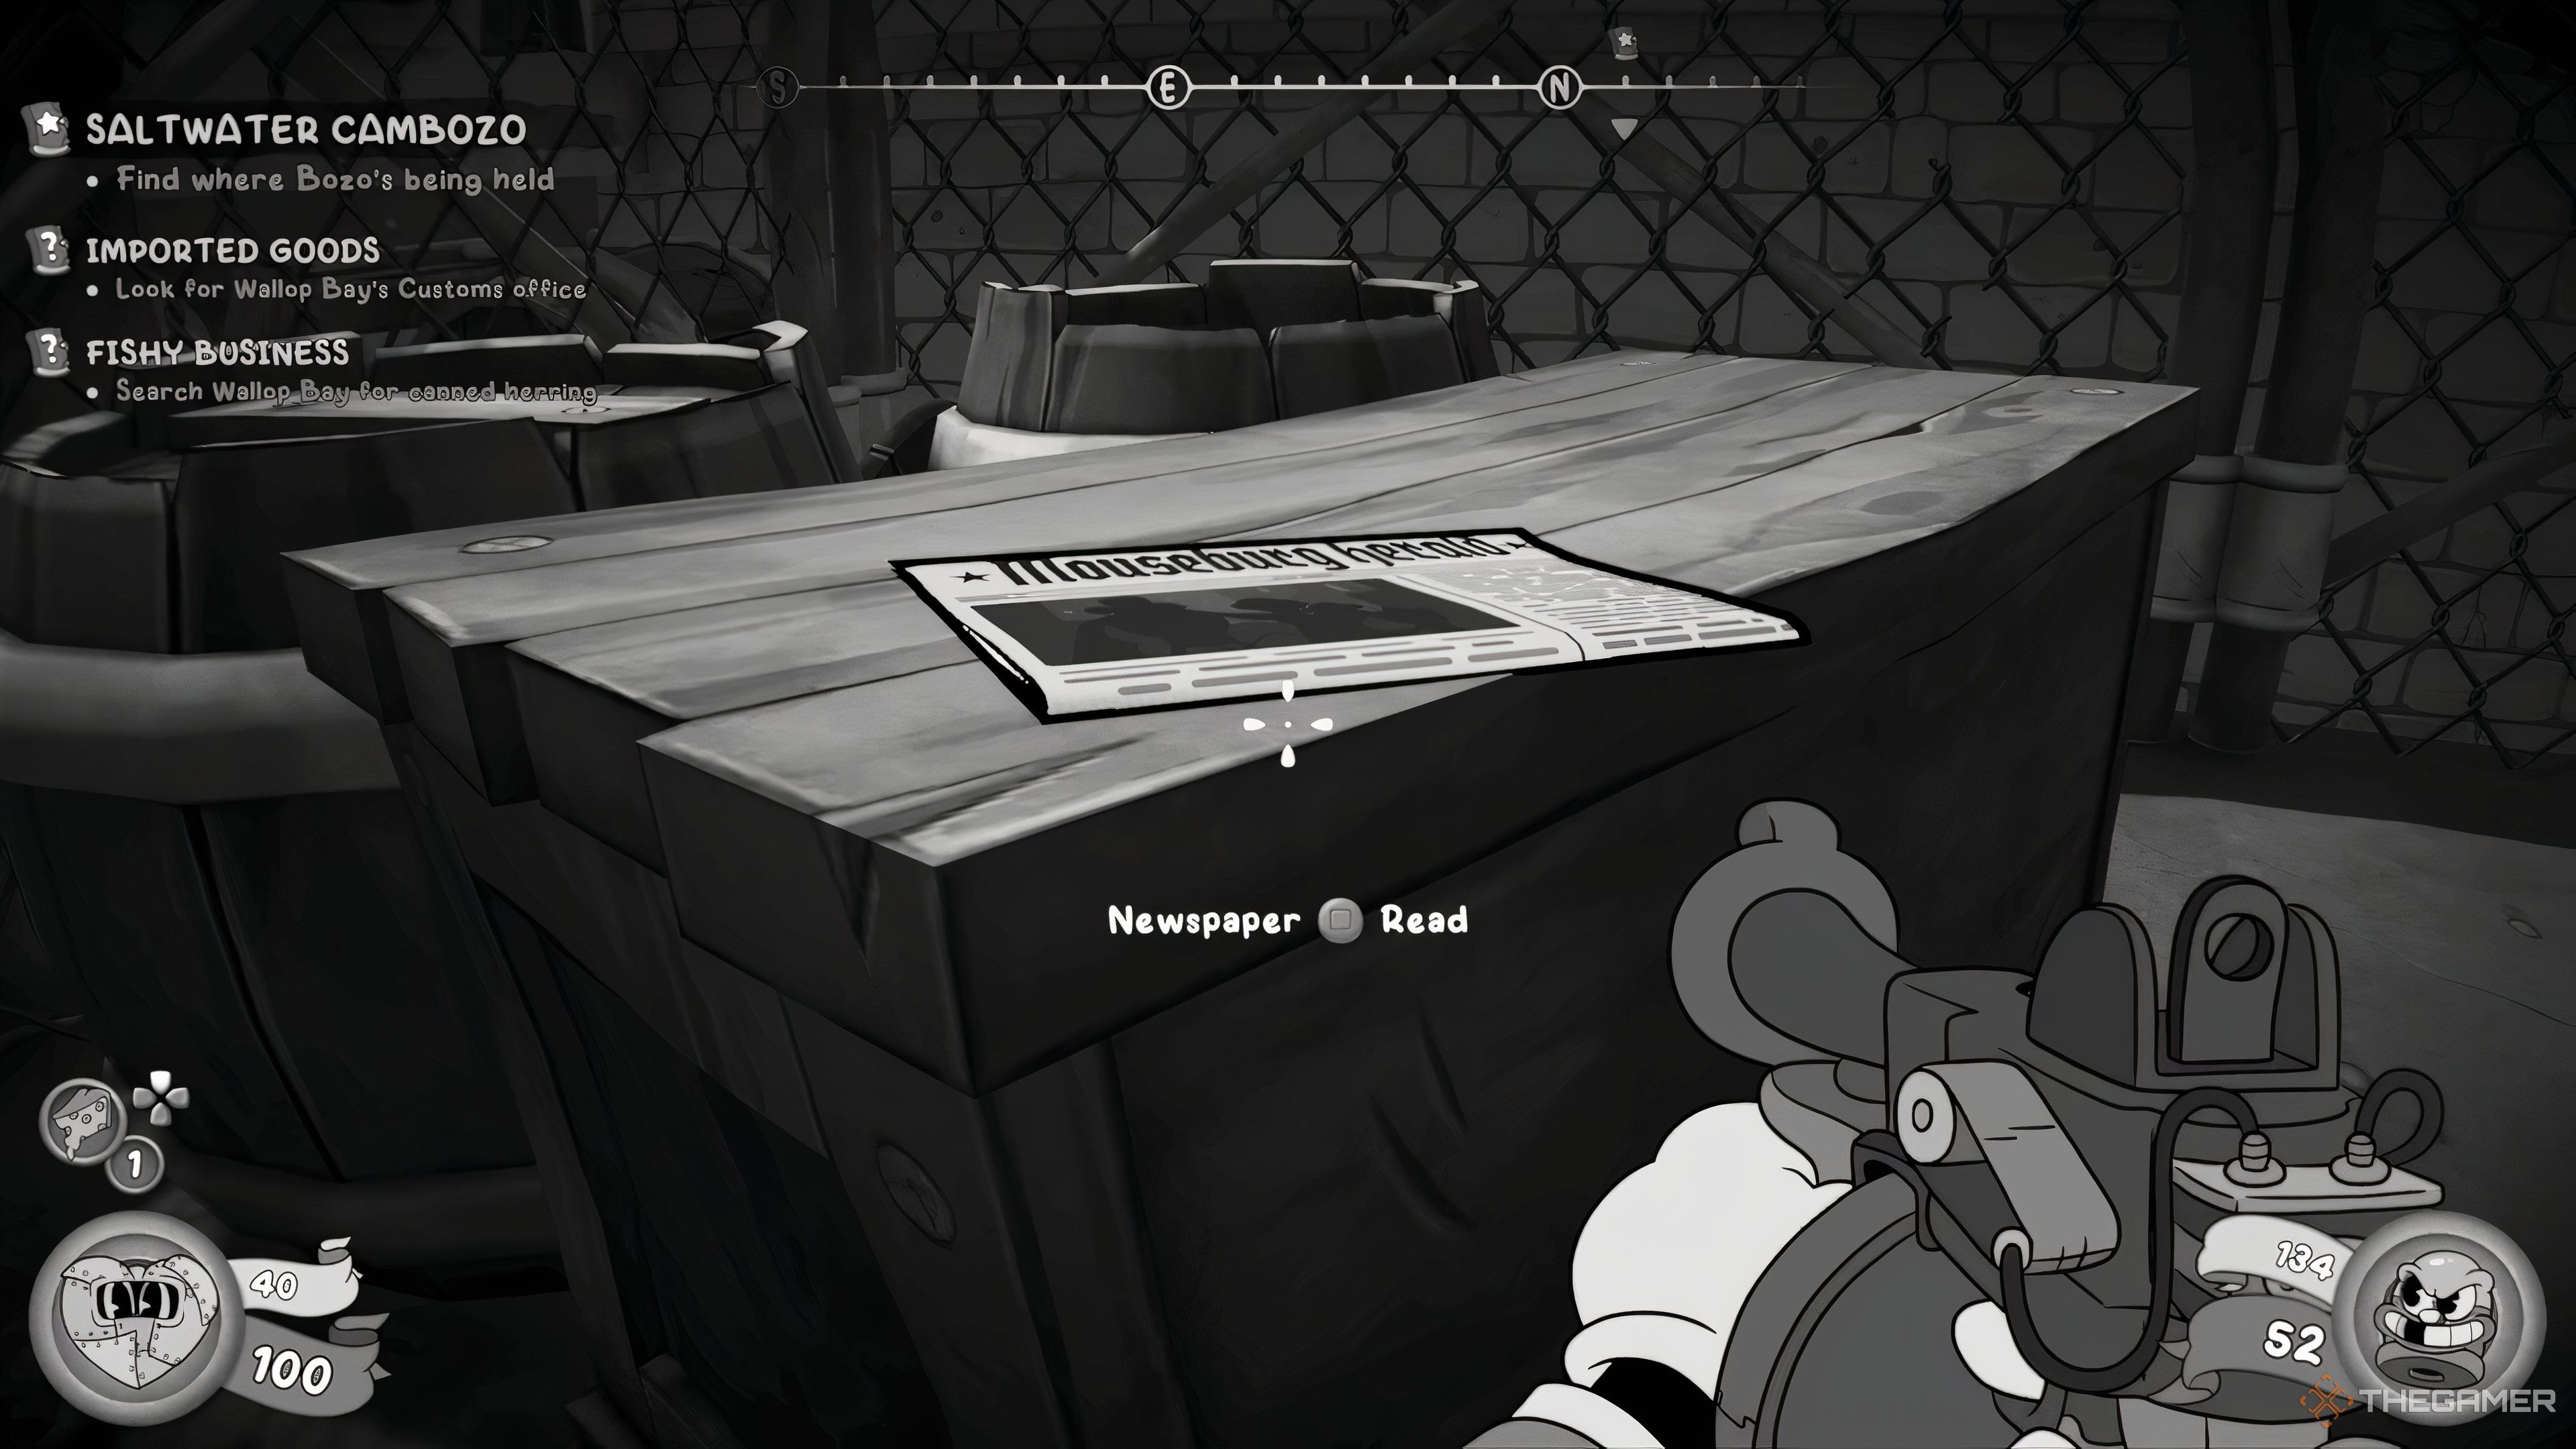
    No. 27774 “The Magnificent Cheesehead?” — On a picnic table near a hanging fish at the start of the mission. Be sure to kick the fish for an achievement! Image
    No. 26786 “Yet Another Mousessful Bust” — On a wooden crate on a platform accessible after using the grappling hook. Image
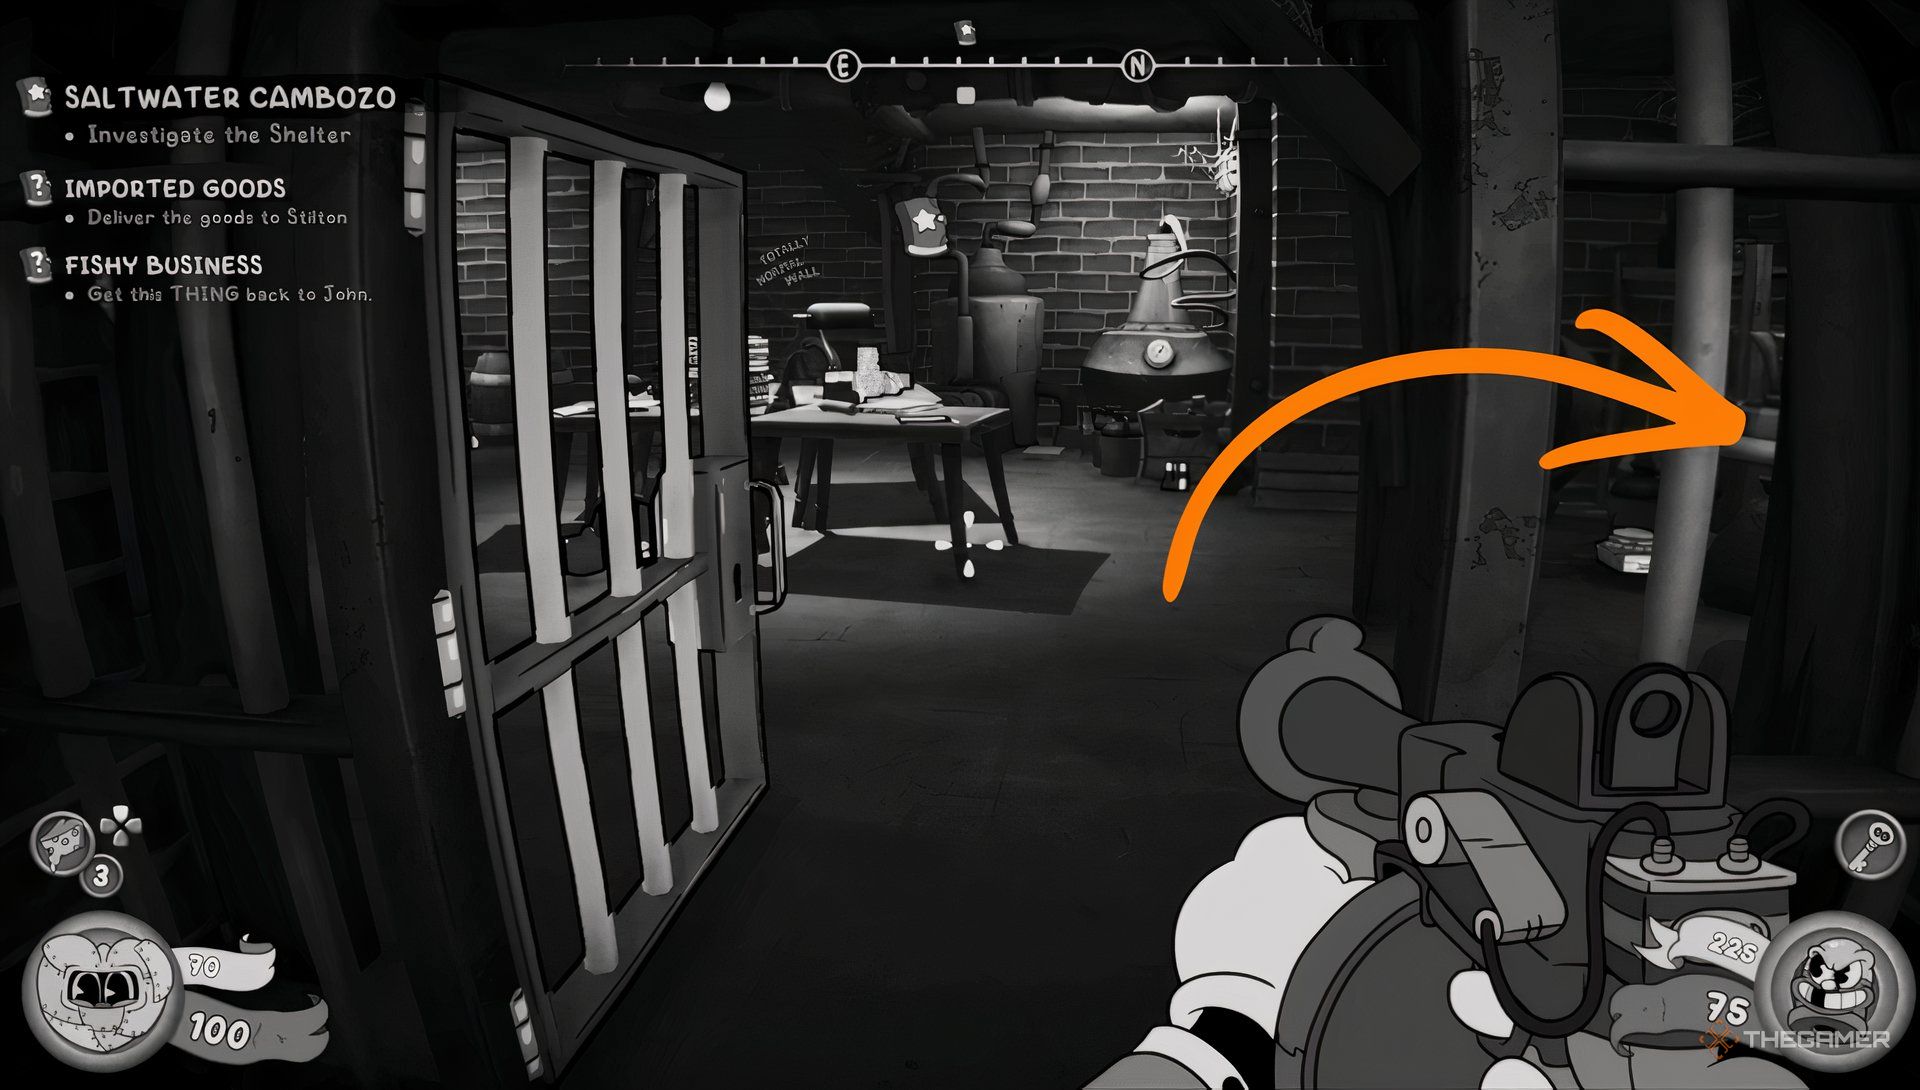
    No. 32212 “Ruckus, or Ruse: The Clergyrow Snatchings” — On a table in a room before proceeding through a breakable wall in the underground basement. Image

    “Once Upon A Time…” by Tinsel Bros.

    Mouseburg Herald Edition and Location Photo Reference
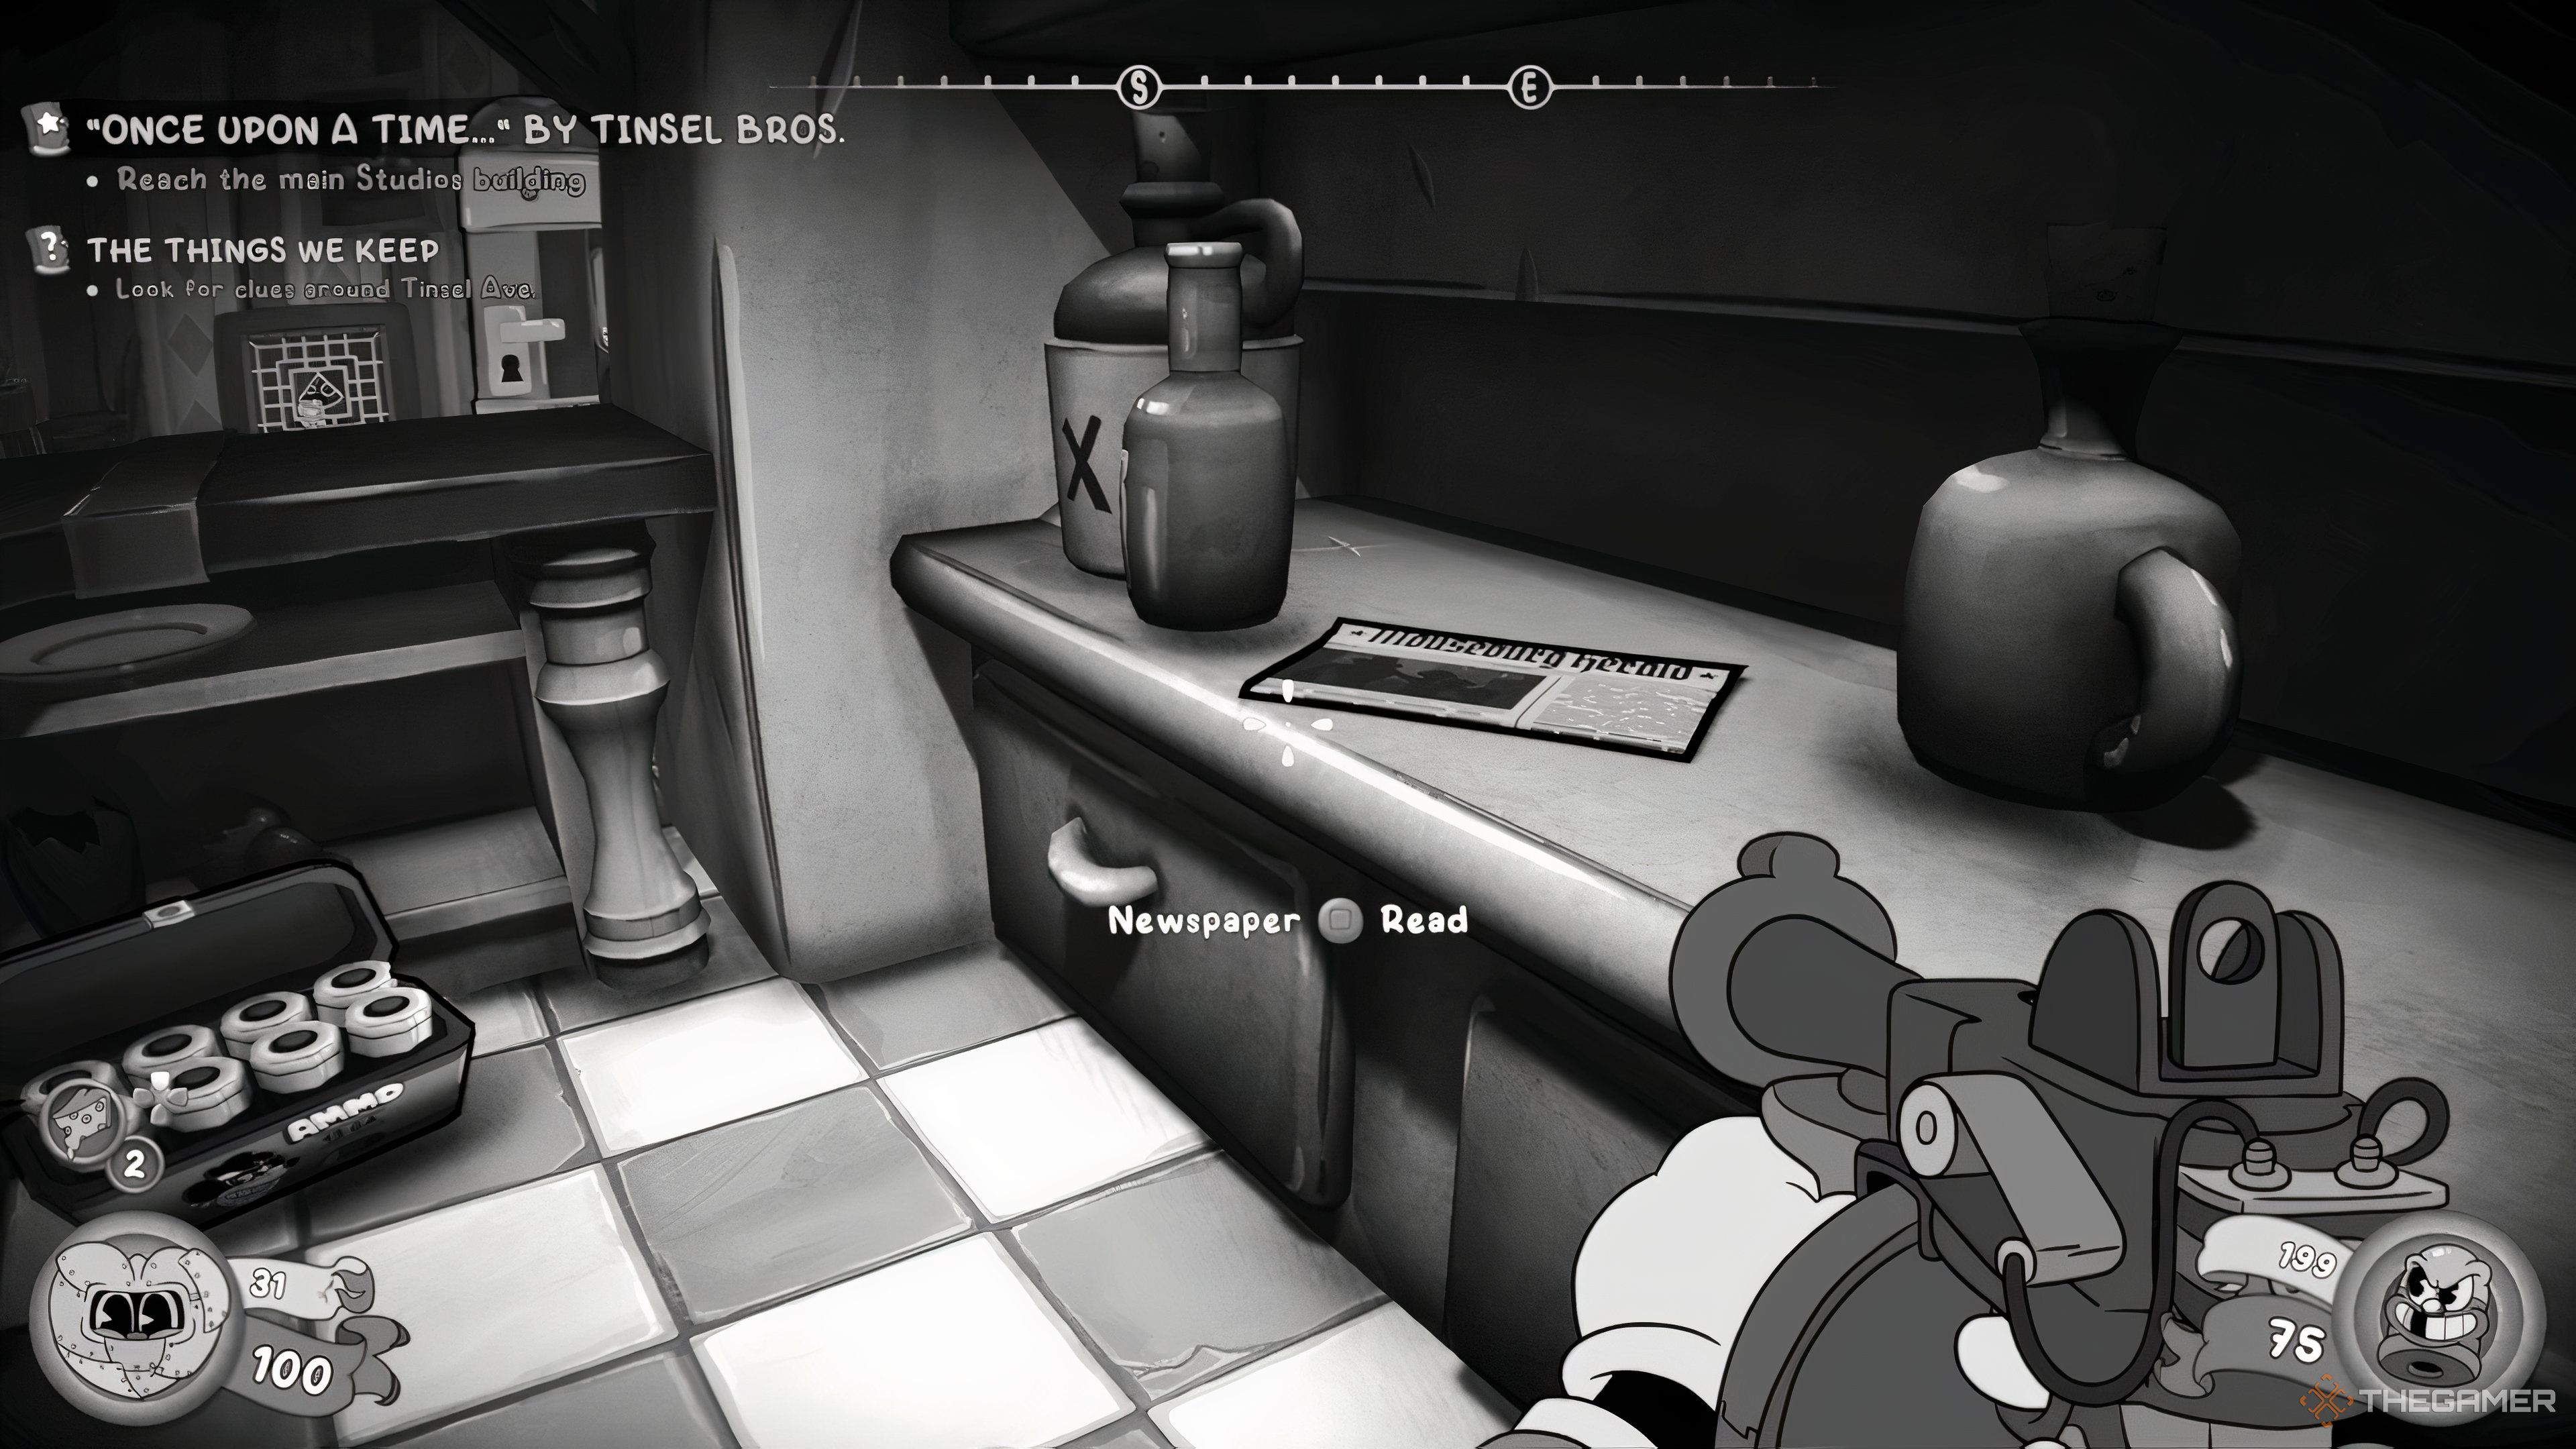
    No. 27790 “Mouseburg’s Puddle Scandal” — Inside a bar after clearing the street and unlocking it. Image
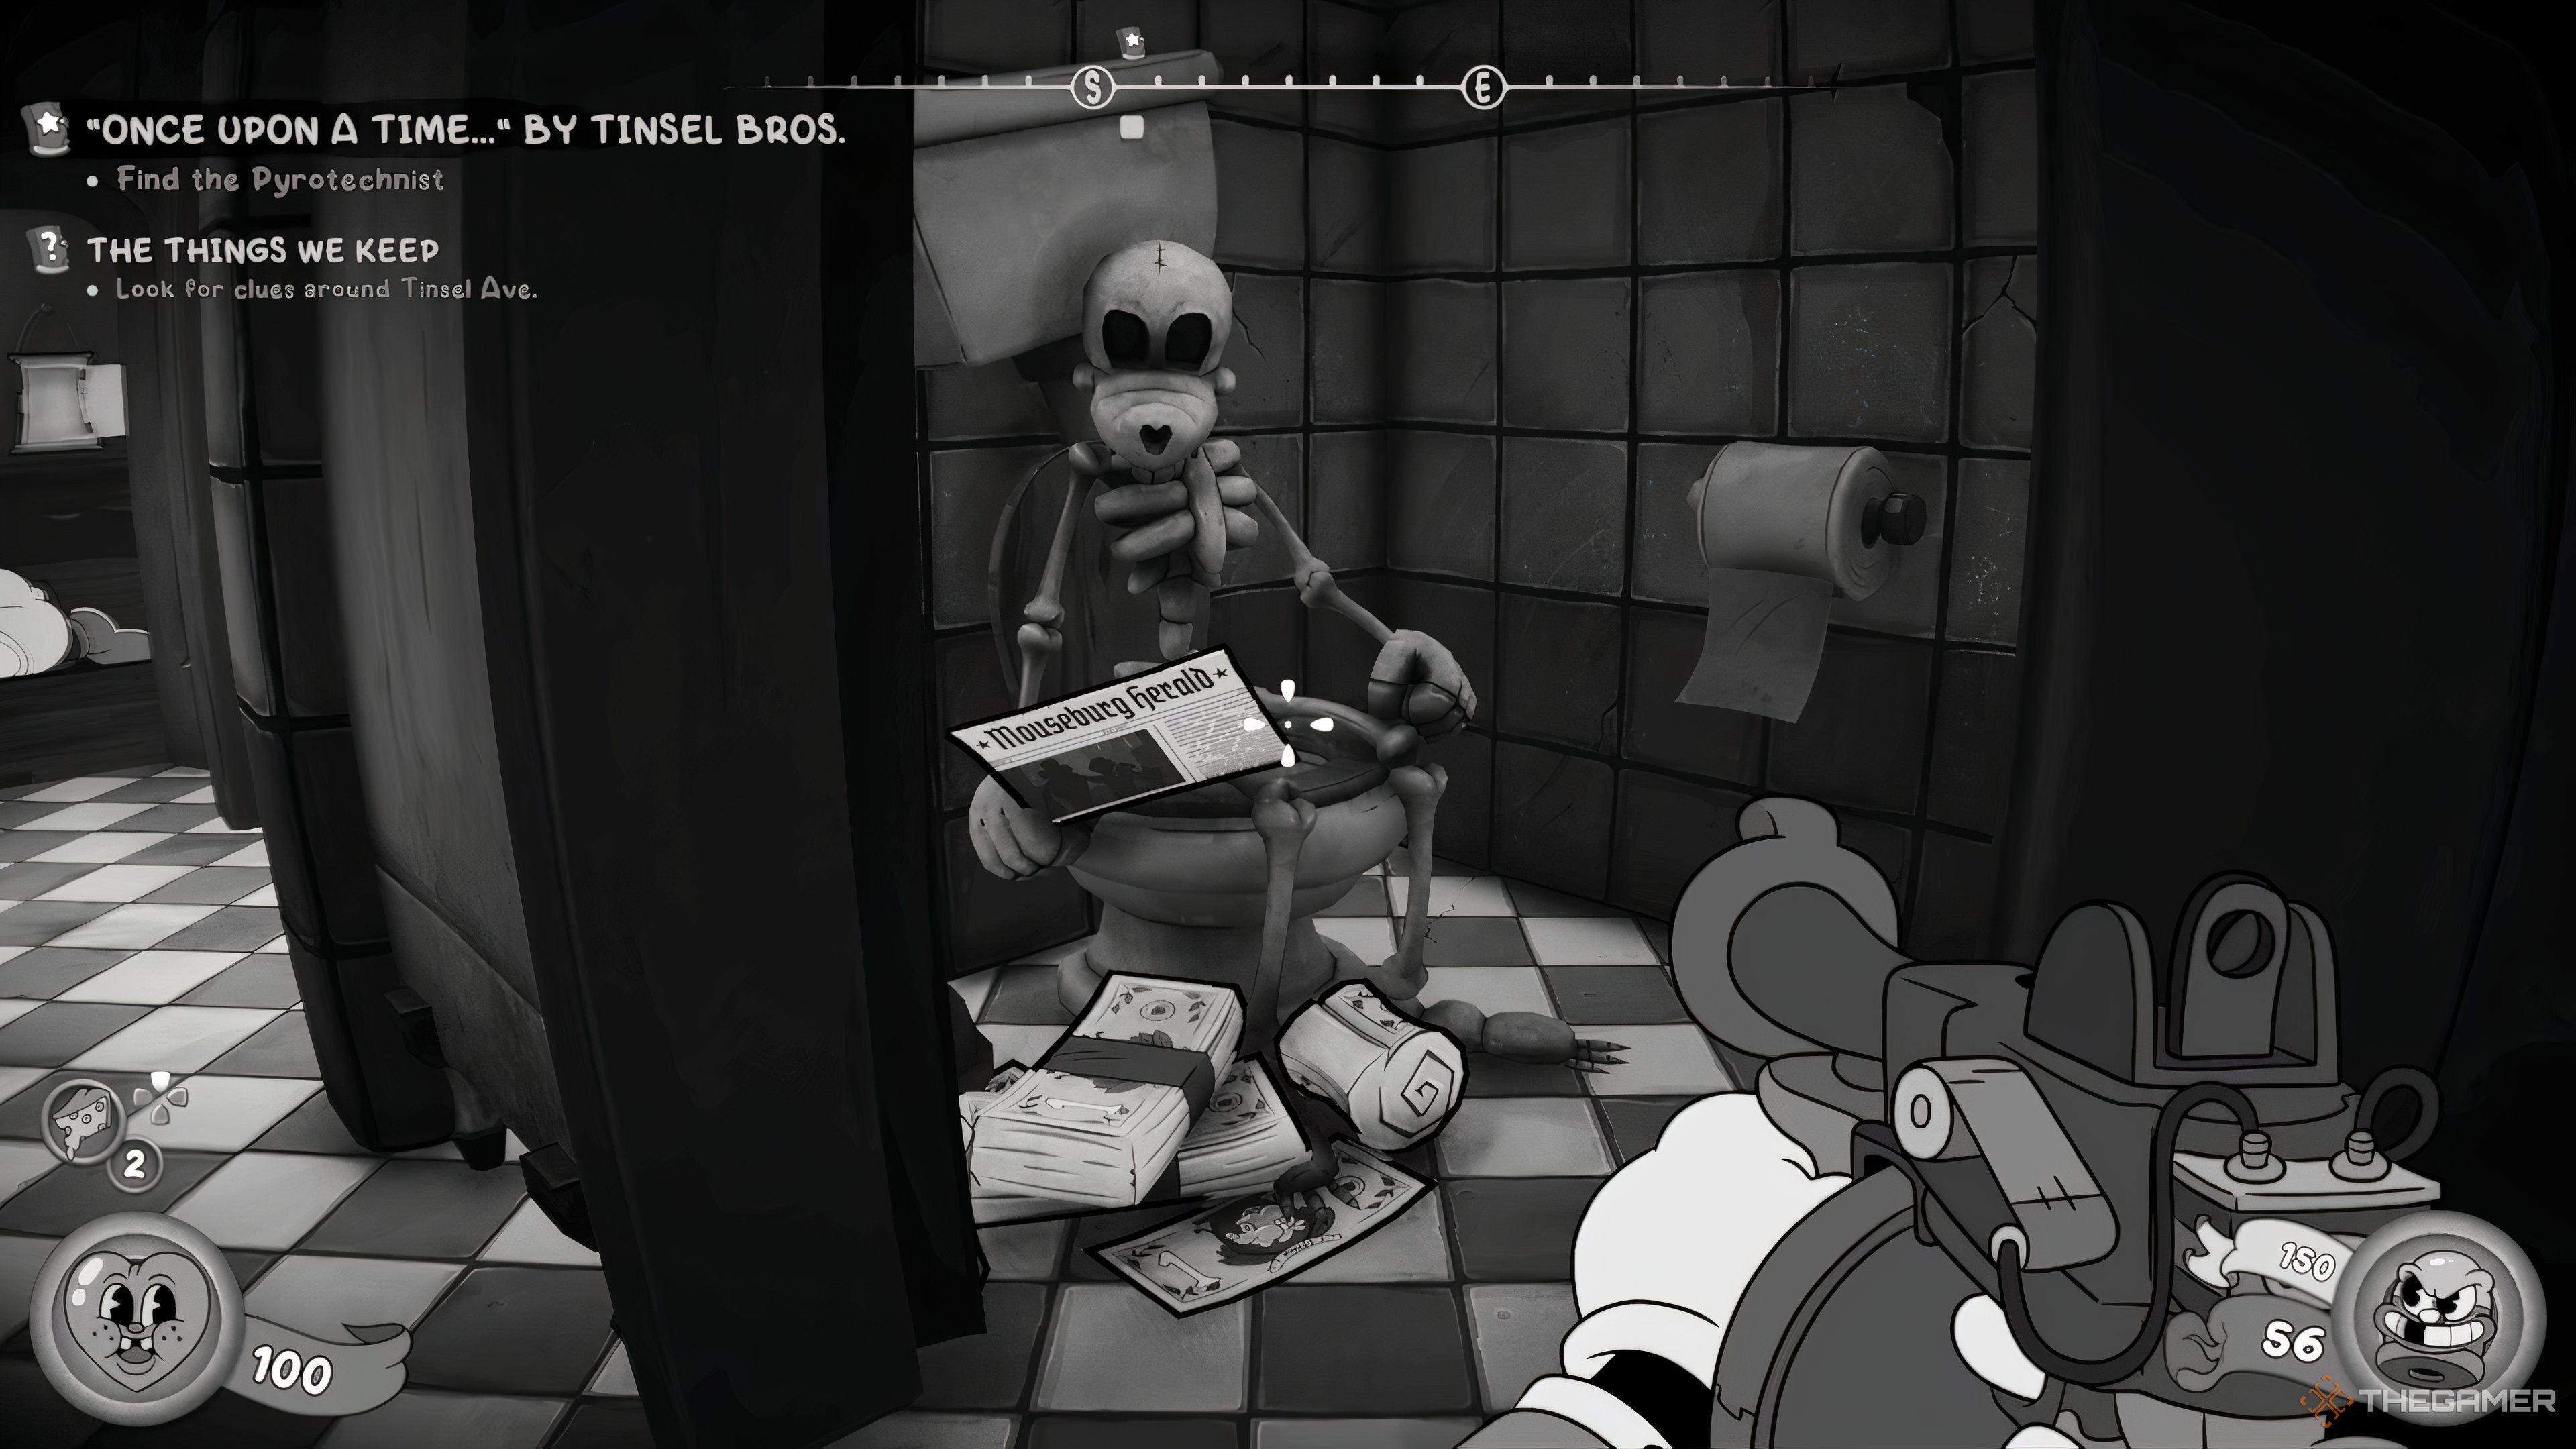
    No. 28800 “The Haunting of the Wensleydale Wraith” — Inside a bathroom on the skeleton’s lap after a shootout in a mansion whose paper has an error on its number. Image

    Damp Evidence

    Mouseburg Herald Edition and Location Photo Reference
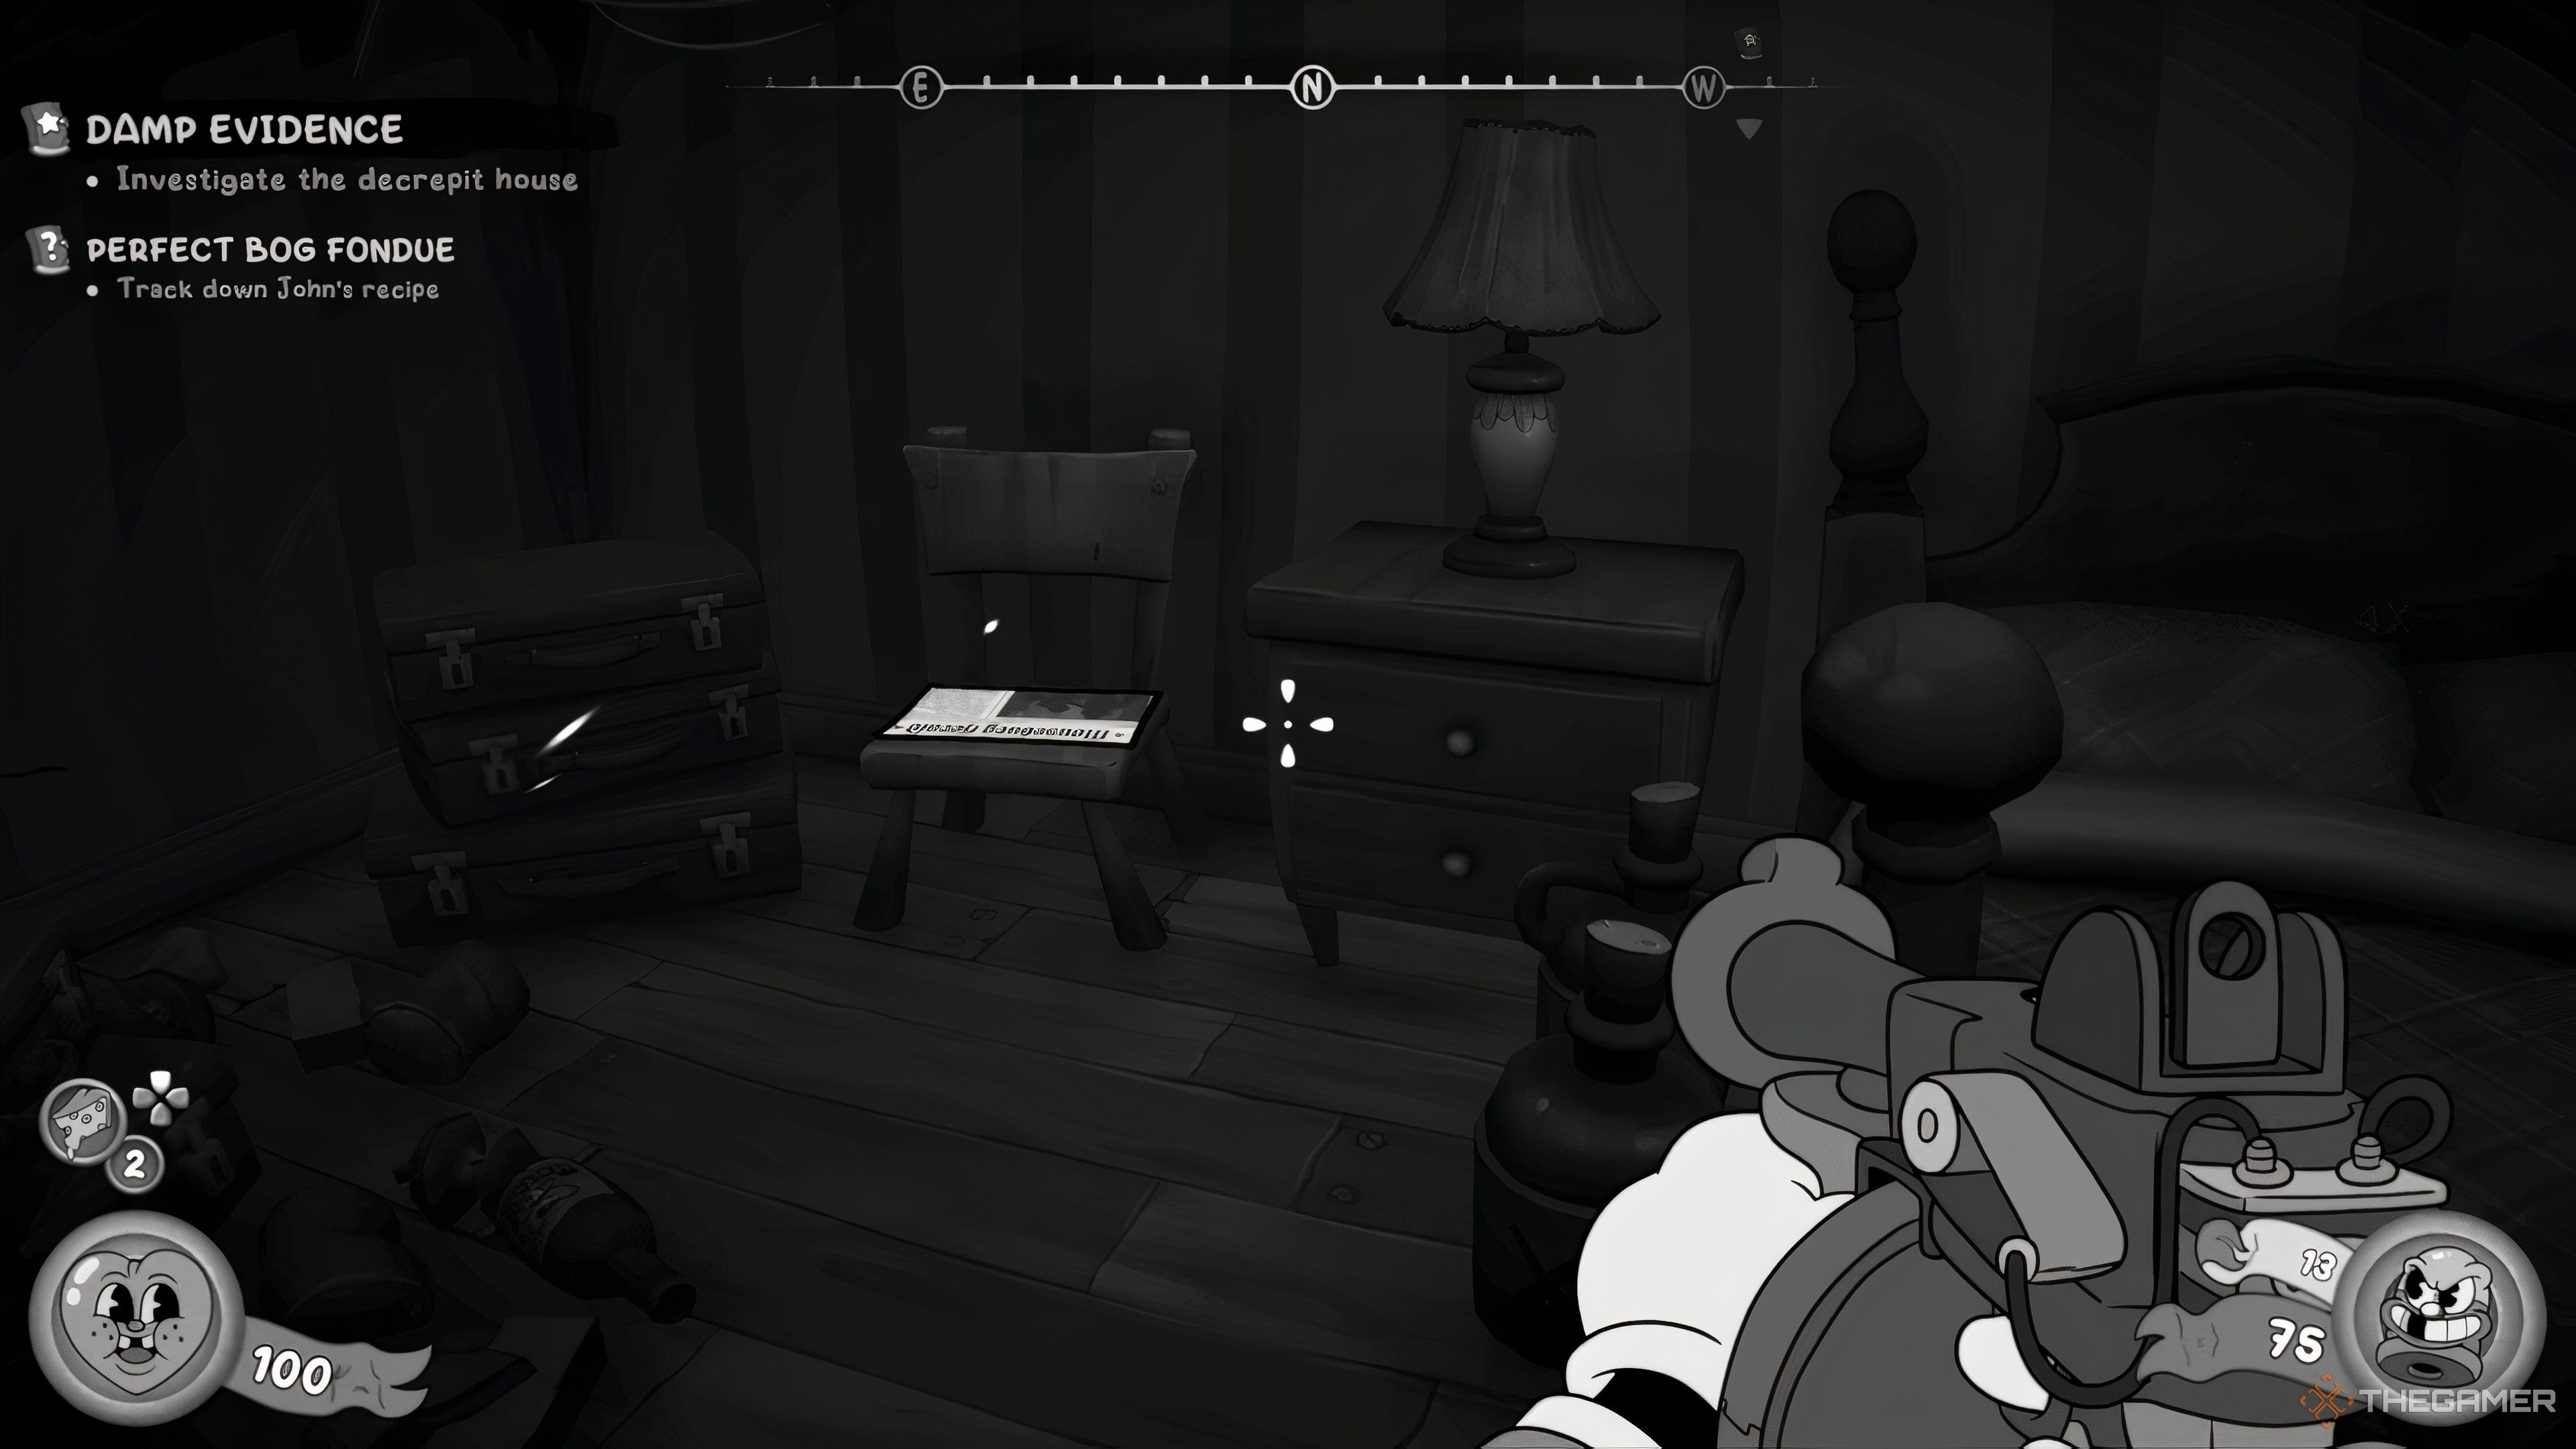
    No. 65488 “Mossman Lives” — In a bedroom of a house in the Far Wetlands after entering through a hallway. Image
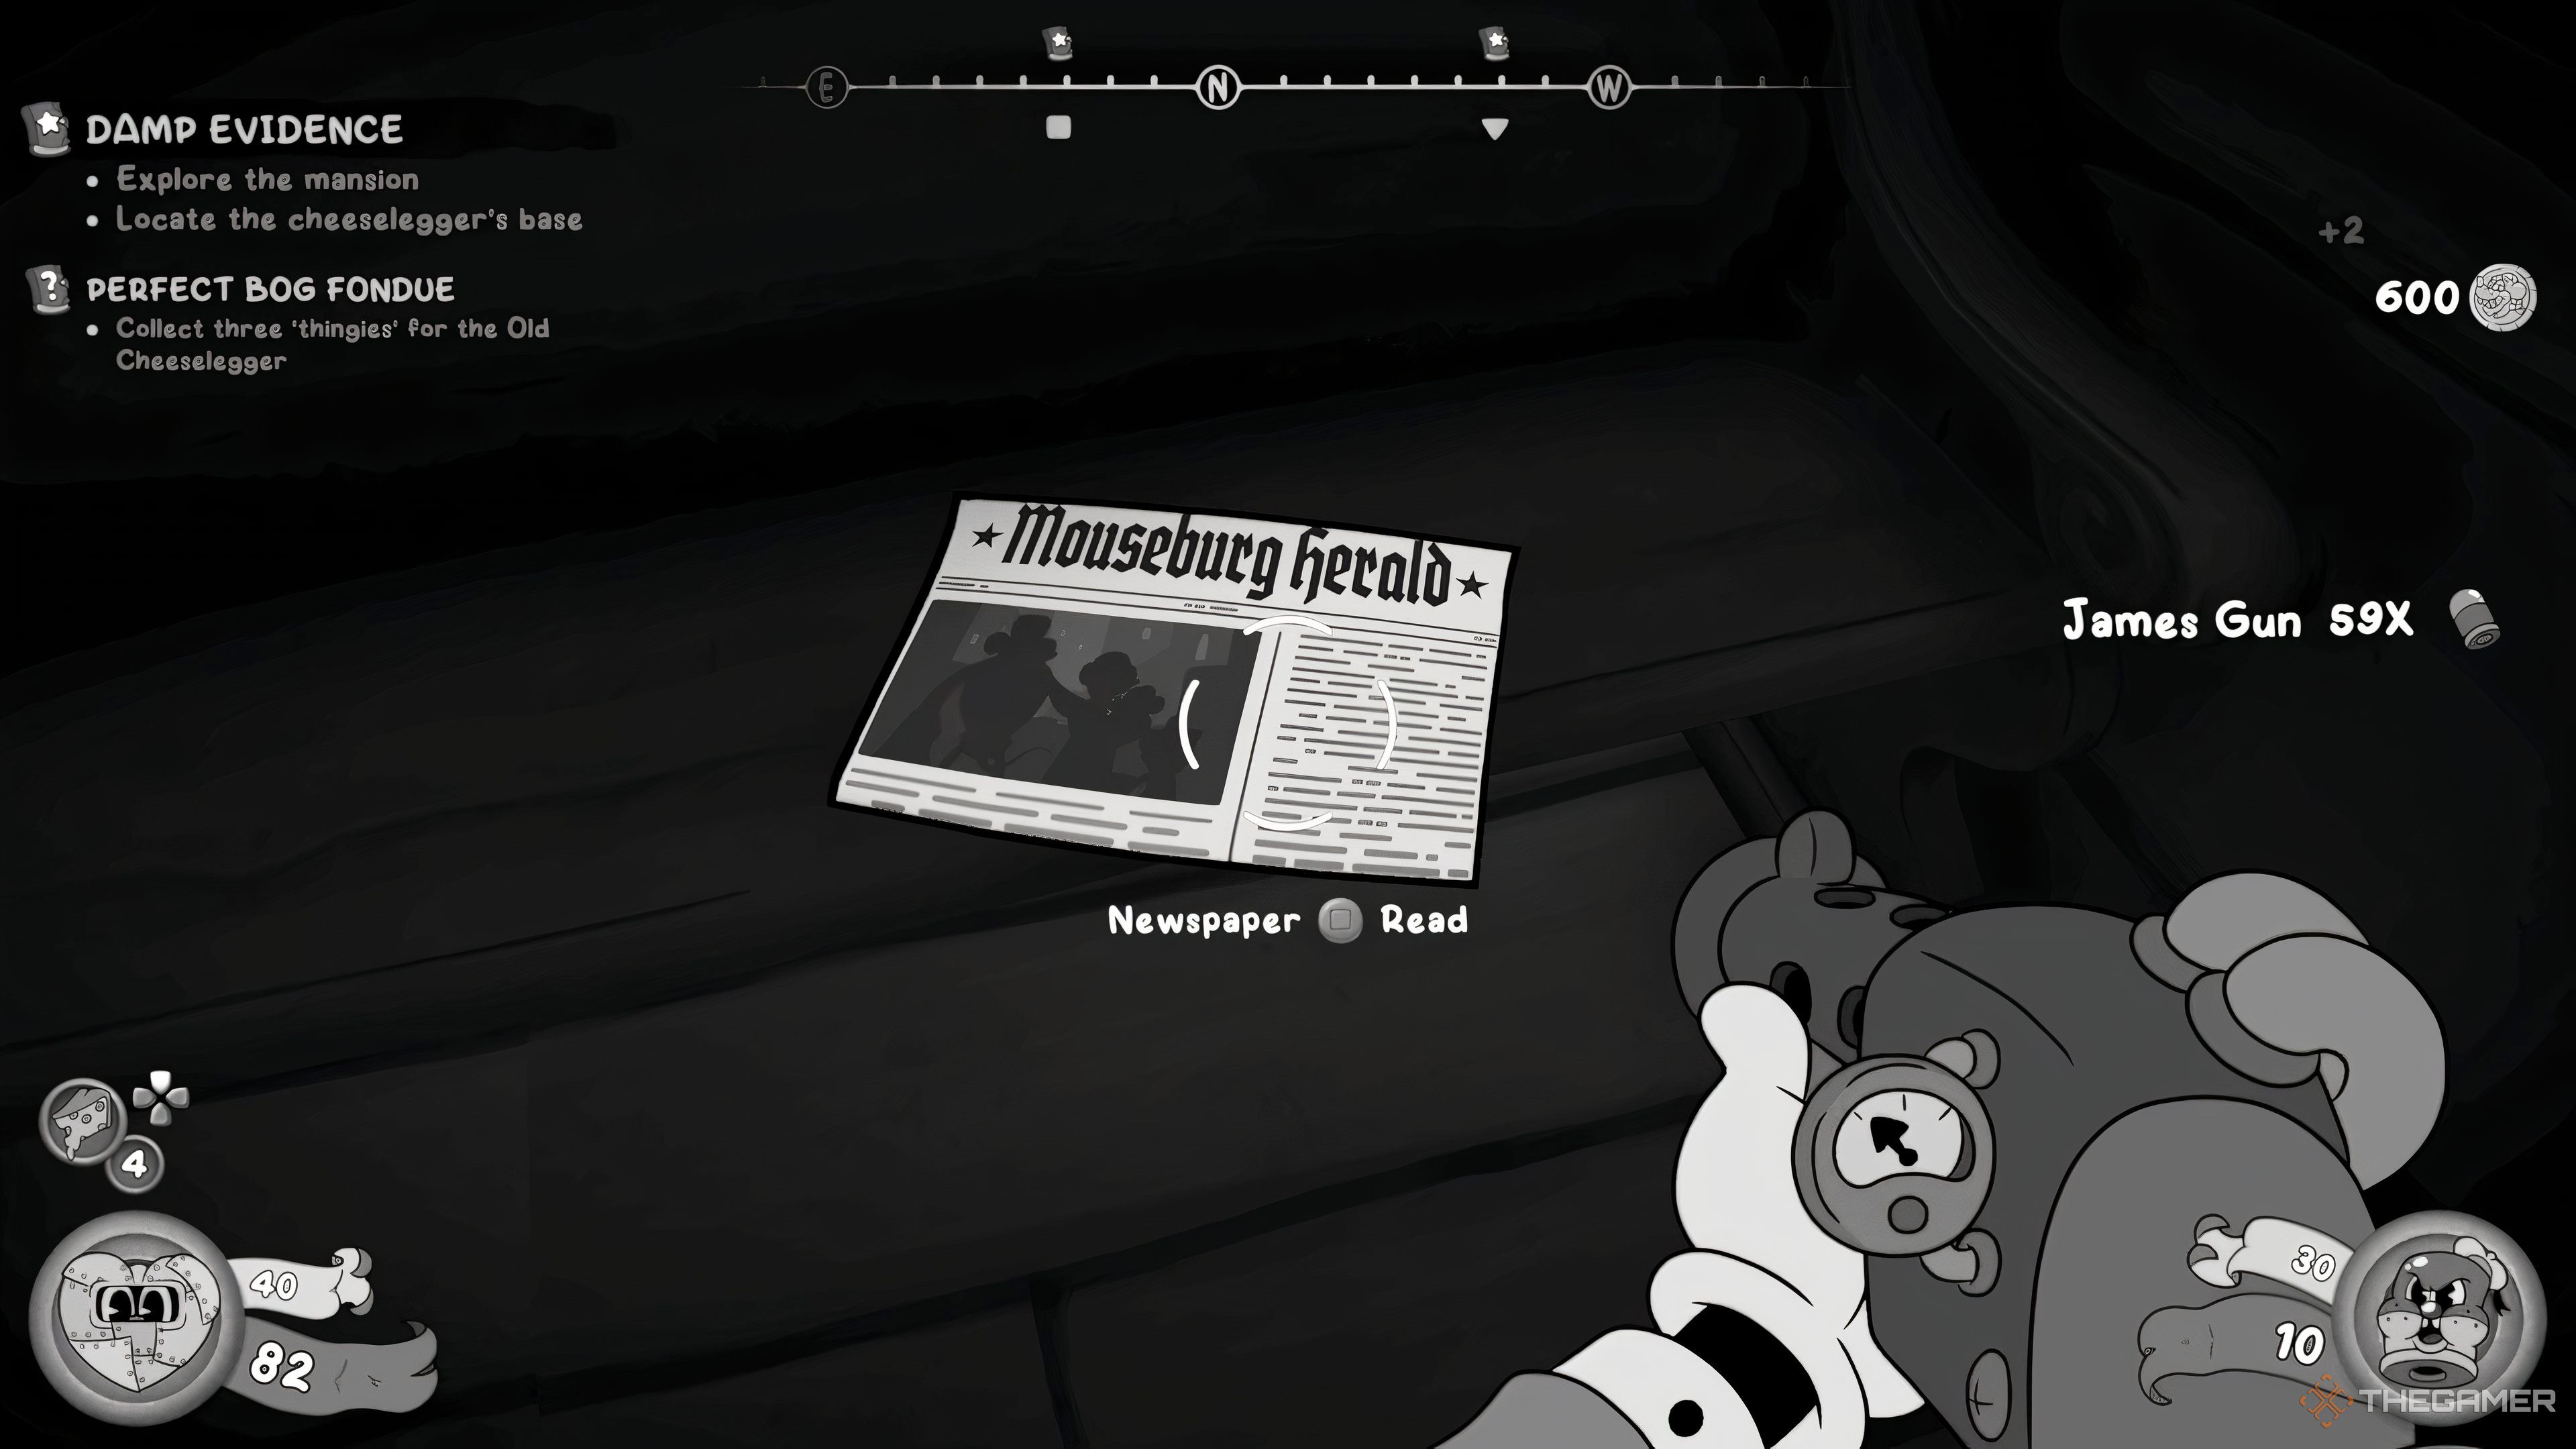
    No. 30355 “Paradise Moist” — On a bench outside a mansion after defeating enemies on the porch. Image

    Additional Locations

    • Near the start of the game, on a picnic table just after the big fish hanging in the waters.
    • Inside various rooms, often on desks, crates, or in hidden corners, typically after completing certain tasks or explorations.

    Many newspapers are tucked away now, but most can be found with a bit of extra exploration around the level, rewarding attentive players with glimpses into Mouseburg’s stories and lore.

  • What To Do With the Severed Hand and Marie’s Doll in Resident Evil Requiem

    What To Do With the Severed Hand and Marie’s Doll in Resident Evil Requiem

    Resident Evil Requiem is full of puzzles and hidden secrets that players can discover as they journey through the Rhodes Care Center. From puzzle boxes and ornate keys to collectible raccoon statues, there’s plenty to find. The most complicated and secretive puzzle has finally been cracked.

    To complete this final challenge, you’ll need to play through the game at least twice. During your quest, you’ll perform various odd tasks in the care center to unlock a hidden challenge that awards you 20,000 CP. Here’s how to solve the final puzzle and what to do with the severed hand and doll found next to Emily’s cell.

    How to Solve the Final Puzzle

    First, credit goes to Kyro and Rantsycancy, who figured out the solution through data mining. If you want to attempt it yourself, note that it can be done on any difficulty, but you’ll need at least two playthroughs.

    Wait by the Grinder in Processor

    Once you reach the basement, get through the area until you restore power to the conveyor belt leading to the meat processor. Follow the conveyor but do not drain its blood. Instead, wait and let it fill with corpses for at least 15 minutes – I recommend using a timer. After 15 minutes, drain the blood and head over to where the conveyor and grinder are.
    Trigger the zombie crushing process, but do not kill any zombies manually. Instead, shoot their legs to stagger them gently. They need to fall into the grinder naturally; your goal is to slow them enough so they reach the grinder. Make sure to save your game beforehand, as this step can be tricky if you’re low on supplies.

    Flush the Toilet Eight Times

    Continue through the underground tunnels until you return to the care center. Do not exit with Emily. Instead, go to the West Wing Restroom. Open the second stall and flush the toilet eight times in a row. Count aloud to ensure you don’t miss the step since there’s no sound cue indicating completion.

    Get Marie’s Doll in Gideon’s Lab

    Proceed through the underground sections until you reach the laboratory where you search for the helicopter key. After the cutscene with Gideon and fighting some zombies, blow up the room’s giant blood tank to flood the area. At the base of the stairs on your left, you’ll find Marie’s Doll lying on the ground—refer to the pictured location. Pick it up and keep it in your inventory. During your playthrough, store the doll in the item box so you won’t lose it.

    Complete Playthrough #1

    Finish the game normally. No extra steps are needed during this run.

    Start New Game Plus

    Load a new game with the save where you stored Marie’s Doll. Difficulty doesn’t matter; choose whatever you like.

    Obtain and Analyze the Severed Hand

    During the second playthrough, after escaping the underground lab and reaching the elevator with Emily, grab the Severed Hand from the ground once you regain control of Grace. Take Emily to the Guard Room and set her down on the sofa for now.

    Head to the Blood Lab in the East Wing and use the Blood Analyzer to examine the Severed Hand. Complete the DNA sequence by selecting the three nodes in the middle from left to right, turning them red. This unlocks a “Let’s Play” screen.

    Bring Emily to the Puzzle Box

    Return to the Guard Room, pick up Marie’s Doll from your inventory, and hold onto Emily. Take Emily to the East Wing’s Lead Researcher’s Office, where the puzzle box is located.

    Input the code sequence while holding Emily and with the doll in your inventory:
    Sun, Sun, Star, Sun, Moon, Star, Sun, Moon, Sun, Moon, Star, Moon

    If entered correctly, you’ll hear a sinister laugh and see a message that reads, “Let the sweet pair hear the voice.” Completing this challenge awards you 20,000 CP, which you can spend on upgrades or bonus items in the game.

  • Solving the Time Loop in Romeo Is a Dead Man’s Mental Asylum

    Solving the Time Loop in Romeo Is a Dead Man’s Mental Asylum

    “Romeo is a Dead Man” takes a dark turn into psychological horror when you arrive at St. Impius Asylum. You’re stuck in a repeating cycle that requires observation and precise timing. The three floors of the asylum feel more familiar each time you relive the same sequence, uncovering new goals and threats that push you closer to escaping.

    This isn’t just a simple exploration—it’s a tense puzzle where pausing tapes and avoiding a persistent monster become routine until you finally access the Advanced Research Lab. The repeating loop might feel confusing at first, but with some guidance, you’ll eventually succeed.


    Investigating The Asylum

    When you first step inside St. Impius, you’re met with a few cutscenes as you explore further. Once in the run-down section, begin exploring and getting your bearings. There are three floors to explore, and you’ll become increasingly familiar with each level over time.

    Your main goal is to reach the third floor and try to get into the Advanced Research Lab. However, attempting to do so resets your progress back to the entrance, confirming that this level operates as a loop you need to break.


    How To Escape The Loop

    The loop is straightforward: during each cycle, you need to complete one key task and then interact with the doors to the Research Lab to advance to the next stage. If you try to open the doors without completing your objectives, the loop resets without changing anything—it’s just a teleportation back to the ground floor.

    There are four stages to the loop:

    Loop 1

    Enter the laundry room and interact with the washing machine, then confront the dark figure in the doorway. Afterward, attempt to enter the Research Lab to reset the loop.

    Loop 2

    Watch the cutscene on the second floor, then stop the tape on the desk in the Group Therapy Room. Interact with the new dark figure, then proceed into the Assisted Wash Room on the same level.

    Loop 3

    Return to the Assisted Wash Room on the second floor (through the door you previously unlocked), stop the tape inside, and get to the third floor by passing through the shutter at the far end. Reset the loop there.

    Loop 4

    Go to the third floor and open Room N304. Inside, you must interact with a patient, adjusting sticks on-screen to match the photo. After fixing all three patients, head through the shutter at the end of the hallway to reset the loop.


    How To Reach The Boss

    Once you’ve completed four loops, you’ll finally be inside the Research Lab. Here, there’s a television—a sign that the real challenge begins in the digital space.

    The rest of this area is fairly straightforward: collect parts from televisions in subspace, unlock new screens, and navigate through the asylum while avoiding attacks by Rotters.


    Subspace Encounters and Enemies

    In subspace, you’ll face a new enemy called Flabs. They are immune to bullets as long as their flabby coating remains, so you’ll need to fight them up-close. Their weak points are at the backs of their necks, but they turn quickly, making targeting them tricky. They’re perfect for using Bloody Summer’s charge attack because they tend to be quite annoying.

    From here, your route leads directly to the Klista Gate, which takes you to the level’s boss: Fused Reanimated.

  • How to Find Solomon in Quarantine Zone: The Final Step to Solving

    How to Find Solomon in Quarantine Zone: The Final Step to Solving

    “Quarantine Zone: The Last Check” includes numerous smaller tasks known as directives, which reward players with $1,200 upon completion. Some of these directives are straightforward, but others can be confusing or easy to overlook if you’re not paying close attention to the symptoms chart.

    The Lazarus quest appears simple at first glance but can be challenging because it provides limited information. Finding the right survivor requires careful checking. Here’s what you need to know to locate Solomon and complete the Lazarus quest in the game.

    How to Find Solomon in Quarantine Zone

    The directives will reward you with $1,200 and vary from very easy to somewhat puzzling. Most need to be completed within a day, but some can be carried out over three days. Remember to check the noticeboard daily so you don’t miss any quests and can claim your rewards.

    While the directives might seem random, many players have noticed that this particular quest usually appears on day 7 of campaign mode. The Lazarus directive can be found posted on a noticeboard at the checkpoint, with the following message:

    From: Major
    LAZARUS
    “We have information on a man named Solomon who claims he’s survived three infections. Our records say he’s been dead for five years. If he shows up, send him straight to quarantine.”
    Duration: 1 day
    Goal: Send the target to quarantine
    Reward: $1,200

    The tricky part is that the only info about this person is that his name is Solomon, and he is male. This means every male survivor passing through the checkpoint must be checked thoroughly. You can identify him by examining the symptom chart and checking the box on the left.

    To complete the quest more quickly, note that the real Solomon will have no signs of infection. Survivors without symptoms like fever or rash are usually sent directly to the safe zone. Therefore, carefully review each survivor to avoid mistakenly sending Solomon there.

    If a survivor is male and healthy, verify his name. If it’s Solomon, send him to quarantine and finish your day. Keep in mind, Solomon may look different from player to player—you might find him with a red beard or with dark hair, as appearance varies.

    Once you send him to quarantine, the quest will close, and you’ll receive your reward. It’s a good idea to keep him in quarantine overnight just to be certain.

  • Where Winds Meet: Completing the Treasure Under the General’s Shrine

    Where Winds Meet: Completing the Treasure Under the General’s Shrine

    Exploring Qinghe in Where Winds Meet turns every day into an exciting adventure. You can walk across every part of the map, but there are also many hidden secrets underneath the surface. One of these secrets can be found beneath the General’s Shrine early in the game.

    We’ll help you find this hidden entrance and finish a missing chapter quest that rewards you with useful items for your journey. Be careful, as the path down is long and dark. Here’s everything you need to get started in Where Winds Meet.


    How to Begin the Echoes in the Shrine Lost Chapter Quest

    When you arrive at the General’s Shrine in Qinghe, you’ll see a young child and a dog rummaging through some debris near the entrance. If you jump and land on the debris, it will open a hidden tunnel.

    Once inside, there’s no way back to the surface. You will need to move forward and explore the underground area beneath the shrine. The area is pretty quiet, except for a few Tiger Fort bandits hiding around the corners.


    How to Defeat Zhang Lang and the Tiger Fort Bandits

    When you enter a large chamber, you’ll find several bandits from Tiger Fort along with a man named Zhang Lang, who appears to be the leader. The room is open and has archers and explosive barrels all around. Use your fire arrows to control the crowd and take out multiple enemies at once.

    Zhang Lang is a strong fighter who can attack quickly with several hits in a row. Keep your distance and try to lure him towards the explosive barrels. When he gets close, trigger an explosion to deal heavy damage. After defeating him, loot the area for treasure chests and items left behind by the defeated bandits.


    How to Reach the Top of the General’s Statue

    Your main goal is to find the treasure hidden under the shrine. To do this, investigate the large stone tablet on the left of the statue. It talks about showing respect to the general, and you’ll notice that the big statue is turned away from you.

    Proceed to the mats in the center of the room and bow to the statue three times. Doing this will make the statue turn around, revealing the hidden treasure behind it. The treasure is stored in a small box tucked behind the statue.

    Tip: Climb onto the statue and interact with it to unlock extra rewards!

    Once you’ve collected the treasure, head back upstairs. Push open the large doors and follow the pathway to return to the open world. Here, you’ll want to pay respects at another shrine dedicated to the same general — this completes the quest and earns you plenty of rewards and experience points.

  • Where to Find Oddman’s Final Resting Place in Borderlands 4 Completing and Solving

    Where to Find Oddman’s Final Resting Place in Borderlands 4 Completing and Solving

    Strange experiments and unusual events happening in Kairos in Borderlands 4 have caused rifts to become a major issue. Many people are trying to exploit or weaponize these rifts, often with negative consequences.

    A clear sign that something is wrong is when a corpse suddenly falls onto the road through a rift. While corpses are common around here, they don’t typically drop from the sky, even if someone is flying overhead. Your task is to investigate what’s going on and see if you can loot anything while you’re at it.

    How to Complete Exit Through The Rift Shop

    To earn the Rift Incompatible achievement or trophy, you need to finish the side quest called Exit Through The Rift Shop. This quest is unlocked after completing all main missions in the Fadefields.

    This side quest is unique because it can start from multiple locations, with one location being randomly selected for each character. The corpse that begins the quest can appear in these spots:

    • The crossroads west of the Watershed Gate in Fadefields.
    • The crossroads north of the Checkpoint Vermillion in the Terminus Range.
    • The crossroads south of the Deathrite Silo in the Low Leys region within Terminus Range.

    Once you find and interact with the corpse to accept the mission, listen to the call from Francis Oddman. Afterward, head back to the Deep Seven Silo in Fadefields.

    Enter the silo beneath the structure, where you’ll find Francis Oddman at the back. Speak to him, and he will direct you to an Order camp to gather some parts.

    Travel to The Launchpad, then proceed southeast to the Waterstop Point of Interest in the Coastal Boneyard. Expect plenty of enemies from the Order in the camp. Eliminating some of them beforehand can make gathering the items easier.

    You need three Hyperliminal Waveform Transducer Parts, which are inside large silver pipes. These pipes need to be punched to break the doors off and retrieve the parts:

    • One behind the roofed house in the middle of the camp, attached to the chain-link fence.
    • Another behind the largest house with graffiti on the back wall, near the broken Order ship.
    • And the last underneath the camp, accessible by jumping into the water near a submerged Order truck and climbing onto a small platform.

    Bring these three parts back to Francis at the Deep Seven Silo. Interact with the three marked machines to install the parts, then grapple through the rift to get into an Order facility.

    How to Rescue the Prisoners

    Fight through the Order enemies in the large rooms, mostly regular foes, along with some Rippers. Once everyone is defeated, grapple onto the catwalk above the red transparent walls, interact with the nearby console, and free the prisoners.

    Speak to three of them to get some key information. Then, head to the other side of the catwalk and grapple open the vent door. Follow the corridor inside, drop into the room filled with crates and a Red Chest, loot what you can, and shoot the lock off the second locker from the left to find the Enriched Eridium needed.

    After retrieving it, leave the room and bring the Enriched Eridium back to the Rift you entered through. Throw it into the Rift to reopen it.

    Grapple through once more, and you’ll find yourself outside the Deep Seven Silo. Now there’s a group of Order to fight. Once they’re defeated, go back inside to Francis’ lab and speak with him to reach a decision.

    Should You Punch or Shoot Francis?

    At this point, you have two options: punch Francis Oddman or shoot him. Shutting him down with violence will turn him into an enemy you can kill. To unlock the achievement or trophy, you must punch him.

    If you punch him, he will fall into the Rift behind him and be teleported away, leaving his body behind for you to find. Regardless of your choice, completing Exit Through The Rift Shop rewards you with experience points, cash, some Eridium, and a random item of uncommon, rare, or epic rarity.

    Where to Find Francis Oddman’s Body

    To get the Rift Incompatible achievement or trophy, you need to locate Francis Oddman’s body. First, teleport to The Nightcap Safehouse in the Windspear region of Terminus Range. If you don’t have that unlocked, head from Belton’s Bore, go north past Maker’s Pike Point, and find the frozen lake near the Umbral Foundry.

    Approach the frozen corpse stuck in the ice, and you’ll unlock the Rift Incompatible achievement. Before leaving, grab the Dead Bolt from behind a broken-down Order truck nearby.

    Note: If you shoot Francis, he will still be seen frozen near the Umbral Foundry, but you won’t get the achievement. It’s unclear whether this is intentional or a bug. Also, replaying the quest won’t grant the achievement if you’ve already shot him. To get it, you will need to start a new character or finish the game and choose the Ultimate Vault Hunter mode when creating a new one to access all side missions from the start.

  • All You Can Do at the Hokora in Silent Hill F: Completing & Solving

    All You Can Do at the Hokora in Silent Hill F: Completing & Solving

    Moving away from the quiet, touristy town of Silent Hill, Silent Hill f introduces us to the rural community of Ebisugaoka in Japan during the 1960s, shortly after the post-war economic boom has ended. This town sits on the border of modern progress and traditional customs, with many residents holding onto their religious beliefs and rejecting the advances of modern medicine and technology.

    This cultural clash is reflected in the gameplay, which heavily relies on local religious practices. Even basic actions like saving your game are performed at small shrines called Hokora. These shrines serve multiple functions beyond saving, and players should definitely take advantage of what they offer.

    What Is The Hokora?

    The Hokora is more than just a save point. It functions as your hub for managing your inventory, making offerings to increase Faith, and improving your abilities. When you visit a Hokora, you can save your progress, which is important for survival, especially on higher difficulty levels.

    Additionally, the Hokora lets you increase your Faith, expand your inventory slots, and make offerings that boost your stats. Given that autosaves are frequent, it’s recommended to visit a Hokora whenever possible—not just for saving but also to strengthen your character for upcoming battles.

    Functions of the Hokora

    The Hokora provides six main options most of the time, depending on the difficulty setting. Here are each of them and what they do:

    Record

    This is the most common and essential function, allowing you to save the game. You can create multiple save files, giving you the flexibility to return to earlier points if needed. The game also keeps around three autosave backups in case you forget to save manually.

    Enshrine

    This function is key to gaining Faith and managing your inventory. You can discard items and turn them into Faith points—rare items yield more Faith, especially those designed solely for enshrinement, like Antique Combs or Dried Carcasses, which don’t serve any other purpose.

    You can also enshrine food items such as Higashi or Inari Sushi, which grant Faith based on their rarity—more valuable items like Kudzu Tea give higher Faith. Note that modern healing items like Red Capsules, Bandages, or Toolkits can’t be enshrined, so it’s best to use or waste these items as soon as possible.

    Draw Omamori

    In the game, there are two types of Omamori—Regular and Unique. Unique Omamori can be found throughout the world, while Regular Omamori are obtained from the Hokora by using the Draw Omamori feature.

    This feature allows you to trade Faith for a random Omamori from the Hokora’s limited stock. All Hokora offer the same selection, but the Omamori you receive are completely random, and the cost increases by 100 Faith each time you draw one. The good news is that Omamori are kept across different playthroughs, giving you plenty of time to collect them all.

    Pray

    Using Pray upgrades your core stats: Health, Sanity, Stamina, and the number of Omamori slots you can equip. To improve a stat, you need Faith and Ema Plates, which you find in the world. Ema Plates are limited in each run but become more available in subsequent playthroughs, enabling you to boost all your stats eventually.

    Clear Mind

    This feature restores your maximum Sanity, which is used for various actions like Focusing and Offensive Attacks. Sanity naturally regenerates over time but can be lost quickly—using Focus Attacks or taking damage reduces the maximum Sanity. It can be restored either with items like Divine Water or Kudzu Tea or by visiting a Hokora with the Clear Mind function.

    On Story Action difficulty, maximum Sanity can only be lost from enemy attacks or psychological effects, and visiting a Hokora will automatically restore it for free.

    Change Costume

    The simplest of the options, this allows you to change Hinoka’s costume. The costumes adapt to the story’s progression, tearing at the same spots to maintain their visual integrity, so you don’t lose the aesthetic appeal of her original outfit.

    What Is Faith?

    Faith is a special currency used exclusively at the Hokora. You earn Faith by enshrining items, particularly dedicated ones like Shriveled Abura-age. The amount of Faith gained correlates with the rarity of the item; rare items give more Faith. You can also gain Faith from food items like Divine Water or Arare, with higher-value foods awarding more Faith.

    Faith can’t be lost directly; you gain it by enshrining items, and you spend it on upgrades, Omamori, or other services. Faith is retained between playthroughs, so you’re free to accumulate it over time without rushing.

    However, since items are limited, there’s a cap on the total Faith you can earn during a single game. Be sure to spend Faith wisely on upgrades and items you truly value, because you won’t be able to obtain everything in one run.

  • How to Complete the Mural Puzzle in Silent Hill F

    How to Complete the Mural Puzzle in Silent Hill F

    As the story of Silent Hill f unfolds, you sense Hinako’s grip on reality loosening, and the world around her begins to blur. The boundary between the Otherworld and real life feels so thin that the final sections in the Otherworld almost merge seamlessly into her hometown of Ebisugaoka. With her mental state breaking down, it’s only fitting that one of the toughest puzzles appears at this point.

    In your last full journey through the Otherworld, you face a mural puzzle with no map and only a few hints. This challenge is both visual and logical, which makes it easy to overthink the solution. We’re here to help you finish it.

    When Do You Encounter the Mural Puzzle?

    You will find yourself facing the mural during your final full visit to the Otherworld. This happens after the events at the Shimizu Residence, right after Hinako witnesses her parents’ fates. Here, she’s back with Fox Mas, who is disfigured, and she must solve one more puzzle to confront her own reality. When you first see the mural, there isn’t much you can do. It has nine holes scattered across it, but nothing can be manipulated at this stage. For now, examine the two scrolls on either side of the mural for clues on how to solve it.

    The scroll on Story mode reads: “The Black Bird wishes to take the White Bird. The White Bird wishes to resist. The Fox brings along his followers in triumph. He notices not the two birds in conflict.”

    On Hard mode, it says: “PUT THE WORDS HERE WHEN FOUND.”

    You’ll need to find the Black Bird, White Bird, and Fox to complete the puzzle, which requires some searching. Let’s begin.

    Gathering the Three Crests

    This section of the Otherworld has no map, so navigation is part of the challenge. You must find the correct door to progress, and there’s a trick: every crest must be found in order, and once you go through the wrong door, you’ll face enemies and need to try again. All crests are essential, and missing one means restarting from the last door you entered.

    Black Sparrow Crest

    Start in the central room with multiple Inari statues. Many have small drawers that can be opened to find items, but one particular statue can be examined more closely. When inspected, it reveals a bloody pierced area. Remove this weapon, and its eyes glow blue, pointing you toward the correct door. Inside, you’ll find items like the Ornate Scroll, Family Physician’s Log, and Omamori – Hound. Make sure to check for hidden walls using Focus to uncover any missed items. After obtaining the Black Sparrow Crest, find the Housemaid’s Note before returning through the door to the mural hall.

    White Sparrow Crest

    Next, in the Inari hall, there are more statues. Follow the same process: open drawers, find the one that can be examined, and remove the piercing weapon to make its eyes glow blue. Before proceeding, pick up another Ornate Scroll and the Housemaid’s Note. After entering the next door, repeat the process—check for hidden walls, pick up items, and find the Strict Mother’s Letter. Continue until you obtain the White Sparrow Crest, then head back to the mural hall.

    Fox Mask Crest

    Return to the Inari statues once more. This time, there are more statues than before. As before, look for the injured Inari statue, remove the piercing weapon, and follow the glowing eyes to find the correct door. There is an optional door marked with the Inari symbol, which can be accessed with the Brooch earlier given to you. Entering this door reveals special items like the Mandate of the Clan, an Ema Plate, and the Letter With A Pressed Flower. Returning to the main hall, go through the correct, now red, door, defeat enemies along the way, and at the end, you’ll have a cutscene with Junko before finally earning the Fox Mask Crest.

    Solving the Mural Puzzle

    With all three crests collected, you can now solve the mural. The process involves placing each crest in its proper position. The key is understanding where each belongs based on the clues. The locations to place them differ with difficulty level, and each provides different hints, increasing the challenge.

    On Story mode, three main facts help:

    – The Fox leads his followers and doesn’t see the birds fighting.
    – The White Bird wishes to resist.
    – The Black Bird aims to take the White Bird.

    Although the mural suggests nine holes, only one is part of the puzzle. The White and Black Birds are connected, but the Fox’s position narrows down options significantly. Observing the characters’ outfits and their roles helps. The fox at the front, wearing a hat and leading the procession, is identified as the Fox and is where the Fox Mask Crest belongs.

    Next, consider the scene where two foxes are facing each other on the far right. One in red is holding a lamp, and the other is pulling its string away. The White Sparrow should be placed inside the lamp, symbolizing a desire to set free and fly away. The Black Sparrow fits on the back of the other fox, which is trying to steal the lamp.

    After placing the crests correctly, the path forward opens, bringing you closer to the conclusion of Hinako’s story.

  • How to Complete The Hermit Mystery in Hell Is Us

    How to Complete The Hermit Mystery in Hell Is Us

    “Hell Is Us” offers vague guidance, encouraging players to figure things out on their own and explore the world of Hadea more deeply. You’ll need to learn about the complex events that led to the current civil war. Just like in real life, you’ll encounter many characters who believe they hold the truth about what’s really happening.

    While there are a few such characters, the first one you’ll meet is the Hermit. True to his name, he lives apart from society and draws extreme conclusions from seemingly disconnected clues. This makes unraveling the mystery all the more challenging and confusing.

    Starting the Hermit Mystery

    Let’s begin by finding the Hermit. Once you enter Acasa Marshes, you can locate him in the eastern part of the area. He’s just south of the tunnel where the ON vehicle crashed. Look for his small shack and start a conversation.

    He’ll talk about his big discoveries and claim he’s close to a breakthrough, especially concerning an odd monument south of him. But first, he needs more pictures. Right now, it’s too dangerous to get close to the monument. He wishes he had a better camera.

    Next to him, there will be a few photos he took of the Lymbic Entities around the marshes. Although these are interesting, they are not relevant at this point. For now, we need to help the Hermit, which involves progressing the story to Act Two. So, for now, just leave him alone.

    You can also find a newspaper behind his house that details some of his sightings and discoveries.

    Getting a Zoom Lens for the Hermit

    You don’t need to buy a new camera for the Hermit—just a better lens for his current one. To do that, you need to find the Zoom Lens, which is located in Talju. This requires you to reach Act Two, which involves placing the Keystone of Grief into its pedestal at the Lymbic Forge.

    When you’re in Talju, head toward City Hall and navigate around it to reach the main street. There, you’ll see the Photo Shop, which is in poor condition (partly burned down). The Zoom Lens is sitting in the window and is undamaged.

    If you pick up the map from the mechanic after arriving in Talju, the Photo Shop will be marked on it.

    Once you have the Zoom Lens, return to the Acasa Marshes and give it to the Hermit. He’ll be pleased, saying it’ll help him do better research. He asks you to check back later, when he should have more photos.

    You can leave and come back anytime since there’s no deadline for this mystery.

    Solving the Puzzle Near the Hermit

    When you return, the Hermit will have additional photos of the Lymbic Entities on his wall. However, these are red herrings. The real focus should be on the strange structure nearby, which has four symbols on it. This structure is the key to solving the monument puzzle just south of the Hermit.

    You might notice that one of the symbols from one of the photos is visible in the mountains next to his shack, though it’s very small. The upgraded zoom lens will have helped with that.

    Go to the monument, and locate the platform’s plinth that has a part connecting to its center. Use your compass to confirm it faces east—that’s the direction of the mountain structure with the symbol.

    Your task is to recreate the pattern of symbols from the mountain structure onto the four plinths at the monument. The east plinth corresponds to the tip of the mountain structure, so follow that pattern for the other plinths, ensuring that the symbols face inward toward the center.

    The symbol order is as follows:

    • East Plinth: Arrows pointing up and down.
    • North Plinth: Bow and arrow.
    • West Plinth: Ring with a gap at the top.
    • South Plinth: Claws.

    Position everything correctly, and you’ll hear a rumble. The platform will open, revealing a chest containing:

    • Five Steady Tuning Stones
    • Feed On Fear – Enhanced Terror Glyph
    • The Perfect Guard – Enhanced Neutral Glyph
    • Aarlon’s Last Stand Passive Relic

    That completes the Hermit Mystery. He won’t ask any questions—so the puzzle is solved!

  • Completing the Puzzle of the Soulless Army Secrets

    Completing the Puzzle of the Soulless Army Secrets

    In this chapter of **Raidou Remastered: The Mystery of the Soulless Army**, General Munakata has been overtaken by a powerful demon named Sukuna-Hikona. It’s now up to Raidou Kuzunoha XIV, along with a team of strong demons, to halt Munakata’s corrupt Super Soldier Project.

    Join Narumi in the basement of the Subterranean Shipyard to prepare for one of your toughest boss battles yet in **Raidou Remastered: The Mystery of the Soulless Army**. Make sure to gather as many strong shikigami as you can because you will need them!

    Sukuna-Hikona: Location and Affinities

    Sukuna-Hikona serves as the final boss in Episode Ten, titled **The Capital on Fire!** In this episode, you will infiltrate a new area of the **Subterranean Shipyard**, which was previously off-limits even after the boss fight with Munakata’s guards, Abihiko and Nagasunehiko, back in Episode Five.

    To reach the Shipyard, you’ll solve puzzles to navigate the far left side, previously inaccessible. You will need to find your way down to the bottom of the Shipyard while getting help from some disgruntled Ippon-Datara along the way.

    Once you arrive at **Shipyard B4**—after traversing stairs, ladders, and shipping containers—chat with Narumi before you head into the next stage for a cutscene. Don’t forget to save your game at the Dragon’s Fount and get ready at the Goumaden before you confront Sukuna-Hikona.

    The breakable items just before the stage with Munakata will provide essential stat boosts for the battle ahead. Sukuna-Hikona feels like a skill-check fight before the final act in **Raidou Remastered: The Mystery of the Soulless Army**.

    Sukuna-Hikona Affinities in Raidou Remastered: The Mystery of the Soulless Army

    Force Gun Pyro Cryo Electric Wind Death Mind Almighty
    Weak Null Weak Weak Weak – Null – –

    Recommended Demons to Fight Sukuna-Hikona

    Good news: Sukuna-Hikona is vulnerable to fire, ice, and electric magic, and he will take extra damage from Force moves. However, be prepared for a challenging encounter!

    One tricky aspect is that your demons may be largely inaccessible during this battle. Sukuna-Hikona can seal them, preventing any from being summoned until the fight ends. So, bring a diverse array of potent demons to exploit Sukuna-Hikona’s weaknesses. If you have high-level Fury Order demons with strong stats and effective Force moves, they will deal significant damage.

    Sukuna-Hikona crawling from Munakata's mouth in Raidou Remastered: The Mystery of the Soulless Army.

    Note that Sukuna-Hikona also uses electric and ice magic, so choose your demons wisely, considering their weaknesses. Look for Passive Skills that allow fusions to negate these disadvantages, ensuring you can maintain pressure on the boss.

    While you’re at the Goumaden fusing demons for the upcoming encounter with Sukuna-Hikona, consider stopping by Kounno-ya to stock up on healing items if you haven’t been collecting them. Healing will be necessary during this battle, as relying solely on Dia skills may not suffice.

    Strategies to Defeat Sukuna-Hikona

    Tokoyogami Sukuna-Hikona in Raidou Remastered: The Mystery of the Soulless Army.

    At the start of the fight, summon your strongest demons that can capitalize on Sukuna-Hikona’s weaknesses. If you haven’t configured Raidou’s Summoner Skills beforehand to utilize effective Force moves or Magnetize for MAG recovery, make those adjustments now.

    This boss fight represents a significant increase in difficulty compared to the previous encounters, so be sure you’ve spent some time training at the Training Hall.

    Stay Alert for Anakashiko

    One of the most dangerous moves in Sukuna-Hikona’s arsenal is **Anakashiko**. He will mimic using it initially to taunt you before executing it. This powerful punch requires you to dodge various directional attacks, as he can hit from almost anywhere on the field.

    Anakashiko delivers a **heavy almighty attack** that travels straight from Sukuna-Hikona. Almighty damage is nearly impossible to defend against, so your best option is to keep an eye out for the attack and evade it.

    A demon being sealed by Anakashiko in the Sukuna-Hikona battle in Raidou Remastered: The Mystery of the Soulless Army.

    Moreover, any demon hit by Anakashiko is banished from the confrontation, making it impossible to summon them for the rest of the battle. Even if the demon survives the attack, it remains inaccessible, adding another layer to the challenge. To avoid heavy damage, consider calling your demons back when you see Anakashiko coming your way.

    If Raidou is struck by Anakashiko, he won’t be banished like demons but will be incapacitated for a few seconds. During this time, you won’t have control over him, can’t attack, and cannot use items. This window can leave you vulnerable to attacks from Sukuna-Hikona and the additional threats he can summon.

    Beware of Other Hiruko

    As if managing your demons and avoiding Anakashiko isn’t challenging enough, Sukuna-Hikona also summons other Hiruko into battle. These enemies typically attack Raidou rather than your demons, creating additional chaos you’ll have to navigate.

    Keep an eye on Sukuna-Hikona’s movements and his powerful almighty attacks. It may be wise to let your demons handle the Hiruko while you focus on Sukuna-Hikona. Additionally, watch out for **Megido**, an area-of-effect attack that can deal heavy damage if you get too close.

  • Completing the Puzzle of the Soulless Army

    Completing the Puzzle of the Soulless Army

    The Cursed Detective

    "The Cursed Detective" stands out as an engaging episode in Raidou Remastered: The Mystery of the Soulless Army. In this chapter, Raidou Kuzunoha XIV takes on a significant curse from the deity at the Nameless Shrine, right after uncovering some fascinating secrets about Kaya Daidouji.

    Episode Six Overview

    While Episode Six is primarily composed of cutscenes, Episode Seven invites players back to Dark Fukugawa-cho. Here, you can delve into the game with your demons and face one of the most challenging boss encounters yet. Prepare to unveil another secret about Daidouji as you gear up to confront a supernatural curse.

    Recap of Episode Six

    Episode Six in Raidou Remastered: The Mystery of the Soulless Army is relatively brief, requiring minimal player interaction aside from traveling to cutscene locations. Much of the action revolves around cutscenes tied to Kaya’s return to the Narumi Detective Agency, leading to Raidou needing to visit Kounno-ya to pick up a package.

    After returning to the agency for more cutscenes, visit the Goumaden to chat with Victor about weapon upgrades beyond demon fusion requests. Your quest will then take you back to Satake at the bathhouse in Fukugawa-cho. From there, head over to the Amazing Science Lab to speak with the doctor, which prompts your team to talk to Tae at Shin-Sekai soda fountain in Ginza-cho. Conclude this chapter at the Ginza-cho construction site, where a cutscene will wrap things up.

    How to Break the Talisman

    After a series of cutscenes, your next objective is the Nameless Shrine, where you’ll meet the Herald of Yatagarasu. She reveals that a man behind the scenes is suffering from a severe curse, which Raidou must not only cure but also bear himself. You will accept the curse from the Herald, who will send you to retrieve the talisman responsible for it, located in Dark Fukugawa-cho.

    This section can be challenging, as you’ll be sent around while trying to achieve your goal. As Raidou moves through Dark Fukugawa-cho, he will take damage every few seconds due to the curse. Ensure you have healing items from Kounno-ya or a demon with healing abilities ready.

    Important Note

    While exploring, the damage from the curse doesn’t appear to continue during battles against demons. However, as you navigate the streets, you’ll hear an impact sound indicating health loss. This damage drain is more pronounced at higher difficulty levels.

    As you make your way through the familiar streets of Dark Fukugawa-cho, you’ll encounter two Utai-Gaikotsu who will taunt you before pushing you back to the carnival section of town. To trick them into revealing the talisman’s location, you’ll have to confront them multiple times, with each encounter resulting in yet another pushback.

    Strategy for the Utai-Gaikotsu Battle

    After frustrating the Utai-Gaikotsu, they will launch an attack, leading into a miniboss battle in Episode Seven. Keep in mind their immunity to death magic and the fact they heal from fire attacks. Be prepared with well-rounded physical attackers, as they are vulnerable to physical damage. Configure Raidou’s skills to maximize physical hits, outpacing standard sword moves.

    Beware of the Petra attack, which may petrify Raidou and his demons, immobilizing them for critical moments.

    Defeating the Utai-Gaikotsu

    After successfully defeating the Utai-Gaikotsu, you’ll need to move along the southern path of town towards the vacant lot to continue Episode Seven. As you progress, be alert for several Nethergates that you’ll need to clear.

    Each gate will present different challenges, so be prepared for attacks involving wind, gun, and electricity. While your demons will handle most battles efficiently, Raidou must personally tackle the Gun Nethergate using his pistol.

    Prepare for a tough showdown ahead as you face a shape-shifting demon that can switch affinities. It’s advisable to save your game and visit the Goumaden to stock up on demons that can deliver fire, ice, electric, and dark attacks; you’ll need all the power you can muster for the battle with Hitokotonushi!

  • Completing the Enigma of the Soulless Army

    Completing the Enigma of the Soulless Army

    In the tenth episode of Raidou Remastered: The Mystery of the Soulless Army, tensions are escalating as the Tai-Itsu satellite is launched, and Raidou must halt its destructive path toward the city. Prepare to return to the Subterranean Shipping Yard to face Munakata and his henchmen.

    In this episode, Raidou Kuzunoha XIV and Gouto delve deeper into the military’s classified section, aiming to sabotage the Super Soldier program. Get ready for intense boss battles against the demon orchestrating the scheme.

    How to Re-enter the Shipping Facility

    Previously, you ventured into the Subterranean Shipping Yard during Chapter Five, using Sadakichi’s passcode to access Cannon Number Four and rescue Kaya Daidouji. While there, you may have noticed a left area that was off-limits at the time, as the game kicked you out after Kaya’s rescue.

    Now, you’ll need to locate a back entrance. Gouto won’t let you pass through Cannon Number Four again, so your next stop is the Kasumi Glade. Get ready to summon Big Tarrasque and enter the Glade from the sea if you haven’t already unlocked fast travel via the express streetcar.

    At the beginning of the chapter, Raidou lands two orbs that must be placed in statues at Kasumi Glade. You’ll spot two large fish statues and pressure plates on the ground, all surrounding a central well.

    Start by placing the Shiomotsu Orb in the left statue. After some dialogue with Gouto, go ahead and put the Chigaeshi Orb in the statue on the right.

    The statue will get stuck during this process, so you’ll need a demon that knows Use Force to get it moving again. As you continue, Gouto will mention that an additional action is required. To proceed, stand on one of the ground plates, but beware: stepping off will reset the pressure.

    To solve the Kasumi Glade puzzle, have Raidou stand on one plate while sending a demon on a Solo Investigation. The demon can then navigate and stand on the second pressure plate. Once the puzzle is accomplished, prepare before descending into the well to re-enter the Shipyard.

    How to Explore the Shipping Yard

    Welcome back to the Subterranean Shipping Facility, where you previously saved Kaya Daidouji. You’ll find yourself on the top left level, surrounded by Ippon-Datara demons who provide hints or witty remarks. Keep note of what they say, as it may assist in future puzzles.

    While exploring can yield plenty of loot, be cautious of lurking demons. The Ippon-Datara won’t attack unless provoked, but other demons will still spawn normally in this area.

    You’ll locate several high-level demons positioned near the best loot, offering a great opportunity to collect top-tier Sword Alchemy materials. Bring your strongest demon along to accompany Raidou, as weaker ones can be auto-battled to save time.

    Your objective is to navigate down the southern side of the area, using shipping containers, ladders, and stairwells. There’s plenty of loot waiting on the northern edge, but for now, head down to the lowest level on the south side.

    Here, you’ll encounter a series of elemental Nethergates—specifically ice and wind. The final gate in the area is a red impenetrable spirit wall. Gouto reminds you that an Ippon-Datara you met earlier could dispel Nethergates for you.

    To proceed, speak with the Ippon-Datara by the stairs leading to the barrier for guidance.

    Negotiate with the Retired Ippon-Datara

    One of them will inform you that they have a friend capable of helping, but that this friend has retired. The Ippon-Datara you need is on the northern side. Ascend to the top level and navigate to the northern section of the second-lowest floor.

    The Ippon-Datara here will express its retirement and require some convincing before it agrees to assist you. After a successful negotiation, you’ll lead the Ippon-Datara back to the impenetrable gate, which it will destroy, allowing Raidou to proceed further into the puzzle.

    Reach Sukuna-Hikona

    Now that the path is clear, enter the new area and head toward Nanami, who awaits at the platform where you saved Kaya. Watch the cutscene with Narumi to uncover some unexpected secrets, and be sure to save at the nearby Dragon’s Fount, as you’re about to face one of the most demanding boss battles in the game.

    Before approaching the stage, break nearby items for incense, which can significantly boost Raidou’s stats before the confrontation. Bring demons with strong Strength stats to exploit the boss’s elemental weakness, as they also take damage from Force moves. A clever mix of demons and Raidou’s sword skills will be essential in this battle.

    As the cutscene unfolds with Narumi and Munakata, be prepared for Sukuna-Hikona to attack. Defeating this corrupted general is pivotal to prevent further chaos outside. After the challenging fight, exit the stage to the right side where you initially arrived, marking the end of this chapter.

  • Completing the Puzzle of the Soulless Army

    Completing the Puzzle of the Soulless Army

    After an intense boss battle in the previous episode, Raidou is ready to ascend the Waden One radio tower and dismantle it from within in Episode Eight of Raidou Remastered: The Mystery of the Soulless Army. However, this journey won’t be straightforward.

    Make sure to visit the Goumaden before heading to Sakuradayama. You’ll want to summon a demon that excels in time management during solo investigations. But get ready for several tough battles with powerful foes along the way.

    Getting to Waden One


    Episode Eight kicks off like usual, with Raidou leaving the Narumi Detective Agency. If you haven’t already, visit the Goumaden to register new or upgraded demons, and consider fusing them to create powerful shikigami. You might also want to upgrade your weapons using the Sword Alchemy technique! Finally, drop by Kounno-ya for healing items or sword materials if supplies are low.

    Before heading out, ensure you have a demon that can use the Read Mind ability in your lineup.

    To reach Sakuradayama, which contains the Waden One radio tower, take the express streetcar to Harumi-cho once you’re done in Tsukudo-cho. After arriving in Harumi-cho, navigate through town and exit through the south. This will lead you to the route toward the radio tower. Talk to the guard who’s been blocking your path since your arrival, and he will finally let you pass to Sakuradayama.

    Accessing the Tower

    Once you arrive at the base of the radio tower in Sakuradayama, there’s plenty to explore. You’ll find lots of loot hidden around smaller areas near the buildings and shrine. Speak with locals and read the soldiers’ minds to discover more about the situation while collecting shiny blue items scattered across the map. Finally, approach the soldier near the entrance of Waden One, located at the northern end of town.

    Gashadokuro reading a soldier's mind at Waden One in Raidou Remastered The Mystery of the Soulless Army.

    The soldier mentions that Munakata is currently visiting, and Gouto suggests sneaking in through the back entrance, entering the Dark Realm. Go to the Nameless Shrine in Shinoda to save your game and prepare any final adjustments. Then, consult the Herald of Yatagarasu, who will teleport you into Dark Sakuradayama for your next investigative phase in Raidou Remastered: The Mystery of the Soulless Army.

    Upon arrival, be ready for combat against several soldier enemies who will shoot at Raidou and his demons from a distance. You’ll encounter three soldiers armed with machine guns, so watch Raidou and your demons’ health closely as you engage. One soldier will mainly focus on close-range attacks while the others will continually move to target different characters. They are weak to electric magic, so it’s a good strategy to use Volt Order demons and utilize Volt Sigil for Raidou’s sword attacks.

    To tackle this fight, focus on eliminating one soldier at a time. You can direct your demons to distract the others, but taking them out individually will help minimize the damage Raidou takes while using close-range sword attacks. Once all soldiers have been defeated, save your progress and head to the next area to start your ascent up Waden One.

    Reaching the Top of the Radio Tower in Sakuradayama

    Gouto talking about the radio tower in Dark Sakuradayama in Raidou Remastered The Mystery of the Soulless Army.

    At this point, you are likely familiar with the puzzles you need to solve to advance the story in Raidou Remastered: The Mystery of the Soulless Army. The journey up the Waden One radio tower is no different, filled with demons you can battle for experience along the way. The main objective here is to complete platform puzzles to navigate the tower section by section.

    You’ll need to coordinate between Raidou and a demon for a Solo Investigation, as the moving platforms may only respond to specific characters when stepped on. Additionally, you will encounter blockades made of Hiruko that must be defeated before you can continue. These battles should be quick, so use multi-target attacks when possible.

    Hiruko blocking your path in Raidou Remastered The Mystery of the Soulless Army.

    The key to the puzzle sections is to use your demon to move platforms closer to Raidou and create a path that allows him to navigate around the tower. There are two climbing puzzles, complete with opportunities to find extra loot.

    While some items can be accessed by controlling Raidou, only demons can interact with the red crystals in the puzzles. They can also engage with the regular crystals available for Raidou. Having your demon explore during its Solo Investigation to collect loot like incense and revival items can be beneficial.

    Beware of one Hiruko leading you back down to a lower floor, so keep an eye out to avoid getting lost while navigating back to the correct puzzle section.

    Okiku-Mushi explaining the Waden One puzzle in Raidou Remastered The Mystery of the Soulless Army.

    Waden One: Lower and Middle Puzzle Solution

    Your first Hiruko puzzle is on the lower level of Waden One. To navigate this area, follow these steps:

    • As Raidou, take the left Hiruko and talk to the nearby demon for advice.
    • Summon a demon to perform a Solo Investigation and collect the red gems from the platform across from you, then return to Raidou.
    • As Raidou, step on the same Hiruko your demon just used; it will take you to the platform adjacent to the one with the gems.
    • From here, step onto the Hiruko and circle around the radio tower.
    Naga Raja while you're solving the Waden One puzzle in Raidou Remastered The Mystery of the Soulless Army.

    Continue onto the last Hiruko to ascend to Waden One: Mid, and proceed with the following steps:

    • Start a Solo Investigation as a demon and move to the platform with Naga Raja.
    • Use the Hiruko to the right of Naga Raja to access the platform with the treasure.
    • Ride back on the Hiruko next to the one you arrived on to return to Raidou.
    • As Raidou, utilize the platform you just used as a demon to reach Naga Raja, and then use the newly available platform to navigate around the tower.

    Once again, be sure to save your game before moving to the final section of the Waden One radio tower puzzle in Raidou Remastered.

    Rasputin at the top of Waden One in Raidou Remastered The Mystery of the Soulless Army.

    Waden One: Upper Puzzle Solution

    The final puzzle in Raidou Remastered is slightly more complex, involving some extensive backtracking with your demon. Use the following steps to navigate this section:

    • From the starting area, take the right platform to reach Thoth, then move past Thoth onto the next platform leading closer to the tower.
    • Perform a Solo Investigation and move one Hiruko forward toward Muu Shuwuu, taking the next Hiruko back down to Waden One: Mid.
    • As your demon, retrace your steps to the puzzle’s start using the right Hiruko to get back to Thoth.
    • Advance forward then left with this Hiruko to bring it to Raidou.

    At the end of this segment, you’ll discover a Dragon’s Fount and Nakisawame’s Tear, so make sure to heal and save as necessary, since a challenging battle against the status-ailment-inflicting demon Mishaguji is imminent.

  • Completing the Puzzle of the Soulless Army

    Completing the Puzzle of the Soulless Army

    Things are getting a bit strange in what seems like a new version of Tsukudo-cho, the main hub in Raidou Remastered: The Mystery of the Soulless Army. When a mysterious black cat shows up and takes you to a boy who resembles you but has a huge scar on his face, the timeline becomes even more confusing.

    In this episode of Raidou Remastered: The Mystery of the Soulless Army, Raidou Kuzunoha XIV finds himself in the Showa era and needs to return to Taisho 20. Get ready for another round of puzzles in the Dark Realm!

    Episode Nine Overview

    Follow the black cat that resembles Gouto-Doji through this unusually pristine version of Tsukudo-cho. Feel free to explore a bit on your way and uncover hidden treasures, but the main goal is to visit Tamonten Shrine to meet two versions of Raidou and Gouto from parallel worlds—Raidou and Raido—who look nearly identical except for the scar on Raido’s face.

    Raido will take you to the Herald of Yatagarasu at the Nameless Shrine in Shinoda, where she explains that you’ll need to solve three puzzles to piece together the Amatsu Kanagi, an artifact she claims will help return you to your world.

    The puzzles will lead you back into familiar towns from previous episodes of Raidou Remastered: The Mystery of the Soulless Army, but expect them to look a bit different this time and contain new items to gather. Don’t hesitate to explore a bit to stock up on goodies, as you’ll encounter new demons to capture and use for future fusions in the Goumaden while leveling up your character.

    You can tackle the three puzzles in any order, so just pick a neighborhood to begin. All three must be completed by the end of the episode, and Yatagarasu will call you back once you solve a puzzle, so make sure to explore before starting any boss battles in these neighborhoods. After retrieving all three pieces of the Amatsu Kanagi, you’ll witness a cutscene with Raidou and Raido at Uki-Gaeomi Bridge before Episode Nine wraps up.

    Dark Ginza-Cho Puzzle Solution

    Yoshitsune battling Muspell in Raidou Remastered The Mystery of the Soulless Army.

    The standard version of Dark Ginza-cho in Raidou Remastered: The Mystery of the Soulless Army held the first Red Cape battle earlier in the game, but this time, you’ll notice some changes. There are green walls that block your path, forcing you to navigate a more winding route through the city than before, where you could previously walk directly along the two main lanes in the northern part of town.

    Before venturing too far, head to the Dragon’s Fount to access the Goumaden and summon a demon with Use Force, as you’ll be doing some heavy lifting in this episode. It’s best to avoid those from the Frost Order!

    Once you have your demon in tow, head toward the northwest section of Dark Ginza-cho for your first miniboss encounter against a Pyro Muspell. Use Frost Order demons to take advantage of its ice weakness before moving on to the actual puzzle.

    Back near the construction site, notice that a city bus has crashed into the area under the temporary bridge. This puzzle may remind you of one from the second episode. You’ll need that demon with Use Force, so summon it and send a demon that can Use Force on a Solo Investigation after clearing part of the bus.

    Make sure this demon can hold its own, as a solo battle will start once you clear the puzzle. Send this demon through the red wall on the left, then navigate to move the bus again and use effective magic attacks to stun the boss while fighting as your demon. After the battle concludes, return to Raidou and go upstairs to the temporary overpass, getting ready for another fight for the next prism.

    Dark Harumi-Cho Puzzle Solution

    Upon first arriving in Dark Harumi-cho in Episode Nine of Raidou Remastered: The Mystery of the Soulless Army, you’ll spot a Shouten near the Dragon’s Fount at the main entrance. Talk to it and find out that several other Shouten are hiding around Dark Harumi-cho. This Shouten wants you to find and battle the others to earn Purifying Charms and demonstrate your combat skills.

    You can locate these Shouten:

    • In the northern part of town, just outside the ruins of the Catholic Church, between where you talked to the owners of Kounno-ya and Ryugu during the investigative chapter, and the Western Hospital at the east end of this path.
    • On the overlook bridge accessible from the ladder where you previously used Cool Down to create a frozen path to rescue one of the sailors.
    • Near the Navy HQ building, at another spot where you saved a sailor.
    • From the Navy HQ building, retrace your steps and continue south toward the Big Tarrasque port.

    After defeating all four sets of Shouten, head back to the one near the entrance of Dark Harumi-cho to activate another miniboss battle for this chapter and acquire the prism for Dark Harumi-cho.

    Dark Sakuradayama Puzzle Solution

    Just as you leave Dark Sakuradayama, the Herald of Yatagarasu sends you back to solve a puzzle at the shrine near Waden One’s base. In the real world, there were people wandering around and plenty of items to find, but in this version of Dark Sakuradayama, you must complete a light stone puzzle near the shrine.

    The catch is that the lights switch off if Raidou strays too far, so you’ll need to cleverly combine Raidou’s abilities with a demon on a Solo Investigation. The solution to the stone puzzle in Dark Sakuradayama is as follows:

    • As Raidou, approach the left set of stones. When you interact with the middle one, a barrier will trap you in a small space.
    • With the stones lit, switch to a demon for a Solo Investigation that can safely move away from Raidou to interact with the stones.
    • Interact with the stone closest to the shrine on the left side by Raidou.
    • Cross over to the right side of the screen and reach the other set of stones.
    • Interact with the middle stone on the right side.

    Once successful, you’ll summon a demon prepared for battle, triggering the miniboss fight against Omitsunu. It wields electric magic, so confront it with pure force to earn the prism for this area.

  • Completing the Mystery of the Soulless Army

    Completing the Mystery of the Soulless Army

    Climbing Waden One has been quite the journey, especially after exploring Sakuradayama and solving the Hikona puzzle to ascend the radio tower in Episode Eight of *Raidou Remastered: The Mystery of the Soulless Army*. But reaching the top is only the beginning, as taking down this radio tower won’t be simple.

    At the summit, you’ll face Rasputin and his demon, Mishaguji. This boss encounter will challenge your skills in dealing with status ailments like never before in the game.

    Location and Affinities of Mishaguji

    Your main objective in Episode Eight is to reach the top of Waden One. This requires solving puzzles both as Raidou Kuzunoha XIV and using demon companions in Solo Investigations, as they react differently to humans compared to their own kind. Mishaguji awaits you at the top of the radio tower, and as a Volt Order demon, expect a barrage of shocking attacks headed your way. Make sure to save your game at the Dragon’s Fount and visit Nakisawame for some healing before initiating the boss fight.

    Mishaguji Affinity Chart

    Force Gun Pyro Cryo Electric Wind Death Pagan Almighty
    – Null – Weak Null – Null – –

    Best Demons for the Mishaguji Boss Battle

    One of the main threats from Mishaguji is its ability to inflict status ailments on Raidou and his demons during the fight. Ideally, you’ll want to bring along some Skill Order demons that know Patra to help heal these ailments. Having demons skilled in restoring HP is also crucial!

    A key concern is that Mishaguji can Charm and control any demon you have in battle, making it essential to also bring powerful demons for offensive support, while being ready to heal Raidou with items when needed. The fight could easily turn into a three-against-one scenario until the Charm effect fades. Be mindful of your demons’ moves so you can steer clear of attacks while regaining control.

    When it comes to offense, Frost Order demons are your best bet due to their effective ice magic—this will take advantage of Mishaguji’s ice weakness. However, electric and death magic won’t work against it, so Volt and Pagan Order demons should be omitted from your party.

    Not only does your team need to manage status ailments, but Mishaguji also possesses a vast HP pool, making this as much a test of endurance as skill. Be sure to check the Devil Chart in Goumaden to select demons that can unleash your most powerful ice attacks effectively.

    Defeating Mishaguji

    It’s vital to know when to keep your distance during boss battles, especially since Mishaguji has several intense close-range moves that can deal significant damage. Relying on ranged attacks from your Summoner Skill list whenever possible will benefit you greatly.

    On top of that, Mishaguji uses multiple status ailments that can hinder both Raidou and his demons, often deploying these early on and introducing new ones midway through the fight. Its key status effects include:

    • Charm causes your team to fight for Mishaguji instead, putting you in a precarious position until the effect is lifted. Raidou will target his own demons, acting independently while affected.
    • Stun incapacitates Raidou and his demons for a set duration, leaving them vulnerable to Mishaguji’s powerful close-range attacks. You won’t be able to use Summoner Skills or access your inventory while Stunned.

    A clever strategy against Charmed demons is to let your MAG run out during this effect since they can’t assist you anyway. This prevents them from doing harm to Raidou or healing Mishaguji, unlike a demon who remains unaffected and can potentially heal him.

    While both status effects come with a limited range, it’s still crucial to maintain distance from Mishaguji whenever possible. Attack from the side to avoid its straight-line moves, especially since the Charm attack primarily targets anything in front of it. Keeping your distance allows you to dodge its more dangerous moves effectively.

    As the battle progresses, Mishaguji will unleash a powerful tail attack that can send Raidou and his demons flying across the field. You’ll want to dive to dodge this move to avoid taking damage and being thrown off balance. To increase your chances of success, ensure you have a demon capable of using Patra and several strong ice attacks on your team. While it’s tempting to ride out the status ailments, healing should be a priority as you chip away at Mishaguji’s HP, bringing this challenging boss fight to a close.