Tag: move

  • Where to Find the Move Relearner and Deleter in Pokémon FireRed & LeafGreen?

    Where to Find the Move Relearner and Deleter in Pokémon FireRed & LeafGreen?

    As you progress through the Kanto region in Pokémon FireRed & LeafGreen, your Pokémon will learn many new and stronger moves. Choosing the best four moves for your Pokémon, called a moveset, can be tough. While picking the right nature and training your Pokémon are important, selecting the right moves is the most crucial.

    If you don’t plan your Pokémon’s moves carefully, you’ll likely need to change them later. Unlike newer games, you can’t modify a Pokémon’s moves directly from the menu. Instead, you’ll need to visit a Move Relearner and a Move Deleter to make changes.

    ### Where To Find The Move Deleter

    The Move Deleter is located in Fuchsia City, which you reach on your way to your sixth Gym Badge. After giving a guard some tea, the roads are open, and you can explore the area to get there.

    Fly or ride your bike to the Pokémon Center in Fuchsia City. From there, look to the left of the building—on the right side, you’ll see a house. That is the Move Deleter’s house. Enter to speak with him to get started.

    The Move Deleter can erase any move from your Pokémon, including Hidden Moves (HMs). To do this, select a Pokémon, choose the move you want to forget, and he will delete it from their memory.

    ### Where To Find The Move Relearner

    The Move Relearner is found on Two Island, one of the Sevii Islands. After defeating Blaine at the Cinnabar Island Gym, Bill will appear and take you by boat to this area. You’ll gain access to several islands at this point, with more available after the postgame.

    On Two Island, head southeast from the Pokémon Center to find two houses. The house on the left is where the Move Relearner lives. Enter to speak with him. He will explain that you need to bring him specific rare items to help your Pokémon remember moves they forgot.

    You need to bring him either two Tiny Mushrooms or one Big Mushroom. These items can be farmed by catching Paras or Parasect, as they often hold these mushrooms. The Move Relearner is especially useful for teaching Pokémon moves they might have forgotten earlier, as Pokémon can overwrite their initial moves as they level up.

    This setup allows you to restore moves that your Pokémon might have lost before you caught them.

  • How to Completing and Solving Dinosaur Movements in Jurassic World Evolution

    How to Completing and Solving Dinosaur Movements in Jurassic World Evolution

    When your dinosaurs cause chaos or you need to transfer one from one enclosure to another, moving animals in Jurassic World Evolution 3 becomes very important.

    At the start of the game, you’ll learn how to tranquilize and move dinosaurs and reptiles. However, it’s easy to forget this information over time. Eventually, a few stegosauruses might break their fences, and you’ll need to stop them. Here’s everything you need to know about transporting dinosaurs in Jurassic World Evolution 3.

    How to Find and Tranquilize Escaped Dinosaurs

    There are several reasons you might need to tranquilize and move dinosaurs or reptiles:

    • Unhappy or uncomfortable dinosaurs may try to break fences and escape, putting park guests at risk.
    • Sick dinosaurs need to be safely transported to the Paleo-Medical Facility.
    • Aggressive or unwanted dinosaurs may need to be released into the wild if they cannot coexist with others.

    If fences break, guests and staff are in danger. It’s your job to keep everyone safe and get the animals back into their enclosures. Quick responses can mean the difference between a high park rating and distressed guests running for safety.

    Every park needs a Response Facility—it’s best to build one immediately. The Response Facility costs $100,000 and requires two power units to operate properly. To keep it running smoothly, build a Power Station nearby, connect it with Substations, and add a backup generator in case of power outages.

    The Response Facility provides Rangers to patrol enclosures and check on dinosaur health, and a Capture Team to tranquilize animals for transportation. You can control these vehicles manually or send them on patrol through security cameras and ranger posts.

    How to Set Up Security and Capture Operations

    Place Security Cameras around the park with a wide view of enclosures. Assign a Capture Team to each camera by clicking on it, so they can quickly spot and tranquilize dinosaurs without your help. This setup is crucial for quick response when dinosaurs escape or become sick.

    For larger parks, it’s recommended to build multiple Response Facilities to cover the entire area effectively with Capture and Ranger teams.

    Each enclosure should have a Ranger Post nearby, with its patrol radius covering most of the area. Assign Ranger teams to these posts to monitor dinosaur health, refill feeders, and respond quickly to emergencies. These posts can also have Capture Teams and Mobile Vet Units ready for immediate action.

    If an escaped dinosaur isn’t covered by a security camera or Ranger Post, you’ll need to manually send out a Capture Team. To do this, find the Response Facility, select the helicopter at the helipad, click Add Task, and choose the dinosaur. It’s easiest when the game is paused.

    The helicopter will fly to the animal, tranquilize it with a dart, and leave it sleeping on the ground, ready for transport.

    How to Transport a Tranquilized Dinosaur

    When a dinosaur or reptile has been tranquilized, you can move it back to its enclosure, to the Paleo-Medical Facility if it’s sick or injured, or reintroduce it into the wild. Use the Transport button located below the scenery, path, and power options on the left side of the screen. Select Transport, click on the tranquilized animal, and choose what’s needed.

    Rewilding is a good option for those dinosaurs that can’t stay in captivity because they often break out due to aggressive behavior.

    If the Ranger Team finds an animal is sick or injured, they need to scan it to determine what’s wrong. After diagnosis, send it to the medical facility for treatment. If the animal escaped because of a power outage or stress, you can transport it back to its enclosure and work on improving the environment to prevent future escapes.

  • Donald Trump May Pardon Diddy Amid Guilty Verdict Sparks Outrage

    Donald Trump May Pardon Diddy Amid Guilty Verdict Sparks Outrage

    Digital Phablet – Donald Trump is reportedly contemplating an extraordinary pardon for Sean “Diddy” Combs following his recent conviction.

    According to reports cited by Deadline, the former president is seriously considering granting Combs a full presidential pardon, which could potentially alter the outcome of his case before sentencing. Sources confirm that Trump and his legal team are evaluating the possibility of issuing a pardon to the owner of Bad Boy Records, potentially allowing him to avoid serving time. The final decision is expected by October 3. Recently, Combs was convicted on charges related to prostitution but was acquitted of more severe allegations such as sex trafficking and racketeering after an intense eight-week trial.

    Trump publicly mentioned the idea of a pardon during an Oval Office meeting approximately two months ago. Since then, plans have been put in motion to review Combs’ legal proceedings. Inside sources close to the Trump campaign indicate that this aligns with the president’s approach to reviewing cases of excessive criminalization or perceived legal overreach.

    Yesterday, attorney John Kouvos met with officials handling presidential pardons and privately stated, “Diddy’s case exemplifies Trump’s pattern of granting clemency to individuals he believes have been unjustly prosecuted or subjected to overly harsh criminal procedures.”

    It’s noteworthy that Combs has been incarcerated since September 2024 on highly controversial charges, including conspiracy and sex trafficking, with all bail requests denied due to concerns he might flee or interfere with witnesses.

    Official comments from Combs’ legal team, led by lawyers Mark Agnifilo and Teni Gerago, have not yet been made. Nonetheless, insiders suggest that the consideration of a pardon is part of a broader policy by Trump to re-examine cases associated with “overcriminalization,” especially those viewed as significant overreach by authorities.

    Images captured during meetings show Trump engaging with Filipino President Marcos, illustrating the ongoing high-profile political interactions.

  • Completing Base Building and Relocation in Dune: Awakening

    Completing Base Building and Relocation in Dune: Awakening

    In Dune: Awakening, one of the key decisions you’ll face is selecting a spot for your base. Once you’ve chosen a location, you’ll need to think about how to actually construct it, which can be quite a challenge, especially if you’re new to base-building games.

    The tutorial introduces you to a small base using four foundation tiles, but what comes next? This guide offers helpful tips for building your base and will also explain how to relocate it if your original choice no longer suits your needs.

    Choose a Relatively Flat Area for Construction

    You can place foundation tiles on rocky ground to create a flat surface, but it’s wise to select a spot that has some existing flat area. This choice will ease navigation and make expanding your base less complicated.

    If you find that your base is too small, don’t worry—relocating is possible. Just make sure your new location has ample space for a larger base.

    Position Your Base Close to Resources

    A player standing near plant fiber bushes in Dune Awakening.

    While it might seem appealing to be isolated from other players, it can leave you far from essential resources and scavenger camps. Water can be scarce early on, especially if you rely solely on Dew Flowers.

    We recommend setting up your first base in an area rich in resources. For example, if you find a spacious area near a cluster of Dew Flowers, consider placing your Sub-Fief Console there.

    Design Your Base Layout

    A player planning their base in Dune Awakening.

    In Dune: Awakening, you’ll have the opportunity to plan your base layout, which is a great feature. When you enter build mode, a simple click allows you to place an item blueprint. You can switch between different blueprints during this process as well.

    To actually construct an item, just hold down on the blueprint. This feature is particularly useful for testing layouts or optimizing space in your base.

    Ensure Accessibility to Your Base

    Driving a sandbike into a garage in Dune Awakening.

    After enhancing your base, you might step outside only to find you’re close to an impassable edge. Climbing a rock face might work temporarily, but it can become tedious.

    When designing your base, we recommend allocating space for a clear entry and exit. If you find yourself traversing around the base just to reach a certain spot, consider repositioning the entrance.

    Maintain Power for Your Base

    A player standing at the generator in Dune Awakening.

    Power is crucial in Dune: Awakening, so ensuring your base runs smoothly is essential. You’ll need the Fuel-Powered Generator and Fuel Cells to generate power for crafting stations and other functions.

    Fuel Cells can be easily found if you frequently explore. Remember to keep these stocked in your generator to maintain power for your crafting stations and to provide shields for your base.

    Control Access to Your Base

    You can choose to play solo or with others in Dune: Awakening. Whether it’s just a friend or a larger group, consider adjusting your base permissions via the Sub-Fief Console.

    This console allows you to specify who can enter your base. If you want to grant someone access but restrict their use of your items, you can manage permissions on a case-by-case basis.

    Don’t Overlook Storage Containers

    A player looking at a storage container in Dune Awakening.

    Your tutorial will guide you through using a storage container, which is a common feature in survival games. However, in Dune: Awakening, you’ll be able to craft items using what you’ve stored.

    We advise keeping valuable items in your storage. This way, if you die while exploring, your gear won’t be lost. If you need to craft something shortly after, you can use items from your storage container.

    You can further manage your storage by assigning containers and crafting stations to different circuits. This is particularly useful if you have multiple copies of the same station, as it allows each to focus on specific tasks.

    Moving Your Base

    A player looking at the option to abandon their base in Dune Awakening.

    If your current base location isn’t ideal, or if you’ve found a better spot, you can move your base, though it requires some effort. First, create the Solido Replicator, located in the first row of the Construction Research tab.

    Once you’ve crafted the replicator (using 20 Salvaged Metal), point it at your base to save its blueprint. After that, you’ll need to abandon your current base from the map by clicking on the Sub-Fief Console icon and selecting ‘Abandon Base.’

    Before you abandon the base (but after scanning it), you can destroy it to recoup some materials. This strategy prevents others from claiming it first.

    Now, you can find a new location and build your base with the saved blueprint. Using the Solido Replicator, you can create a new Sub-Fief Console. You will need the necessary resources on hand for construction, but the planning work is already complete.

  • Completing the Transfer of System Data from Switch 1 to Switch 2

    Completing the Transfer of System Data from Switch 1 to Switch 2

    If you’re planning to transition from your original Nintendo Switch to the new Nintendo Switch 2, you’ll want to take advantage of its System Transfer feature to smoothly move your games and data over. Here’s some useful information to get you started.

    The process is pretty straightforward, so you shouldn’t run into too many issues. That said, it’s good to be aware of potential challenges. We’ve gone through the steps, so here’s what you need to know to initiate a System Transfer to your Switch 2.

    Preparing Your Switch and Switch 2 for System Transfer

    Before you start, make sure both your Nintendo Switch and Nintendo Switch 2 are up to date with the latest firmware. You’ll also need to be logged into your Nintendo Account on both devices.

    Your new Switch 2 should be ready to go right out of the box, as it automatically installs updates the first time you connect to the internet. For your original Switch, check the System Settings menu for the option ‘System Transfer to Nintendo Switch 2.’ If you see it, you’re good to go; if not, you may need to perform a system update.

    Important: You need to choose the System Transfer option when setting up your Nintendo Switch 2 for the first time. If you miss this step, you can reset your Switch 2 to get the prompt again. Alternatively, you can convert your Switch games to Switch 2 ‘Virtual Cards’ when you re-download your games. Also, you can access cloud-saved data, but be aware that not all games support this feature, and you’ll need a Nintendo Switch Online subscription.

    Make sure both consoles are positioned close to each other, ideally side by side on a flat surface, for the best setup.

    Steps for the System Transfer

    The transfer process will typically take about ten minutes, but it might take longer if your internet connection isn’t stable or if many users are transferring their data at the same time, which is common right after a new console launch.

    Select the ‘System Transfer to Nintendo Switch 2’ option. You’ll see a notification that your save data for specific games will be fully transferred, meaning you won’t be able to access those save files on your original Switch afterward.

    And that’s it! The procedure is quite simple.

  • Completing the Art of Solving Building Moves in Hollywood Animal

    In Hollywood Animal, there’s a lot to tackle if you aspire to be the top film studio. Every decision you make contributes to your overall success, and there are countless choices to navigate as you start your filmmaking adventure.

    Fortunately, we’re here to assist you. The foundation of your studio lies in establishing the right frameworks and supporting your team. We’ll guide you through creating new facilities and ensuring they’re properly staffed in Hollywood Animal! Setting up your layout might take time, but it isn’t set in stone, and we’ll also show you how to rearrange things as needed.

    How to Create New Facilities

    To build a new facility, access the construction menu and explore the structures available for your studio. Construction that is already completed will be marked to prevent duplicate buildings.

    Constructing a new facility requires significant financial investment and time, so make sure you’re prepared to commit before selecting a spot. Facilities will initially need space, but there can be some overlap in the surrounding areas.

    Although structures can be relocated later, it can be a hassle.

    Each facility uses power and water, so monitor your resources to ensure a stable supply for your studio. Running out can lead to complications!

    Once a facility is built, any hiring needs will show up for you. Choose wisely to support your studio’s success.

    How to Accelerate Construction

    Don’t want to wait over 2,000 days for your new building? You can speed things up by investing a large amount of money. By injecting tens of thousands of dollars at the start, you can slightly boost construction speed.

    However, this will only minimally shorten the overall time, as it still takes a considerable time to complete new buildings and facilities.

    Projects can be canceled at any point, but keep in mind you’ll lose all progress and have to start from scratch.

    How to Relocate and Demolish Buildings

    If you wish to relocate a facility, you must first demolish the existing structure. You won’t keep any materials or progress from it, so make sure about your decision before proceeding.

    Afterward, you can reconstruct in a different location, but you will need to start from square one. It’s a tough reality, but at least the option to reorganize your studio is there for you and your team.

  • Mastering Furniture Movement in Supermarket Simulator

    Supermarket Simulator is an engaging and relaxing game where you take on the task of creating and managing your own grocery store. As you work toward success, you’ll encounter various challenges, one of which involves the interior design of your store. While it may seem straightforward at first, those who appreciate a well-organized space will want to master how to arrange and rotate furniture effectively.

    The game doesn’t really explain how to interact with interior items, which can be tricky, especially for newcomers. But don’t worry! We’re here to guide you through the process of moving your furniture.

    How to Rotate and Place Furniture

    Moving and rotating furniture in Supermarket Simulator isn’t too complicated, but there are some restrictions that might limit your actions. Let’s go over the essentials of how to interact with and move furniture.

    First, walk up to the item you wish to move or rotate. Hover your cursor over the furniture and click the left mouse button to enter editing mode. If done correctly, the item will turn translucent and green and start following your cursor. Now you can select the spot where you’d like to place it. When you’ve found the perfect location, click the left mouse button again to place the item and exit editing mode.

    To rotate the item, left-click to enter edit mode, then press the Q key to turn it left or the E key to turn it right. After making your adjustments, left-click once more to finalize the item’s position and exit editing mode.

    Now, let’s discuss the limitations you may encounter while trying to move furniture:

    • Only one item in the store: If you have just one shelf, you won’t be able to move it. Instead of entering edit mode when you click on it, you’ll see a notification saying “Can’t move the last Rack.” The only way to fix this is to purchase another item of furniture.
    • The shelf is occupied: If the shelf you want to move contains items for sale, it will also be immovable. To resolve this, simply wait until customers have bought all the products from that shelf.
  • How to Move Your Twitter/X Followers to Bluesky: A Step-by-Step Guide

    How to Move Your Twitter/X Followers to Bluesky: A Step-by-Step Guide


    Nadeem Sarwar / Digital Trends

    Bluesky’s user base has surged, now boasting over 20 million users in just a month. This dramatic rise mainly stems from individuals migrating from X (previously Twitter), largely influenced by Donald Trump’s re-election and a series of contentious modifications initiated by Elon Musk.

    If you’re contemplating leaving X, the concern of losing your connections may be a significant factor holding you back. Many users have nurtured relationships on the platform and understandably wish to retain them. For those in this situation, you might be curious about how to transfer your followers and the accounts you follow from Twitter to Bluesky without losing that connection. Fortunately, there’s an effective method for doing just that, regardless of whether you’ve already removed your X account or still have it active.

    One of the most efficient ways to transfer your X followers and follows to Bluesky is through the Sky Follower Bridge, a browser extension designed to help you identify which of your X followers and follows have made the switch to Bluesky and whether you’re still connected with them. If you haven’t deactivated your X account yet, you can easily use it to look up friends, colleagues, and others you are connected with. Those who have already deleted their X account and are within the 30-day window since deletion will need to reactivate it first to utilize this tool.

    How to transition your X follows to Bluesky using Sky Follower Bridge

    Sky Follower Bridge is compatible with Google Chrome, Microsoft Edge, and Firefox. To get started, visit the Chrome Web Store, Microsoft Edge Add-Ons Store, or Firefox Add-Ons Store, and add the extension to your browser.

    Step 1: Access your browser’s extension store, such as the Chrome Web Store, and download Sky Follower Bridge. Select Extensions and pin it for easy access.

    Sky Follower Bridge on the Chrome Web Store.

    Google Chrome

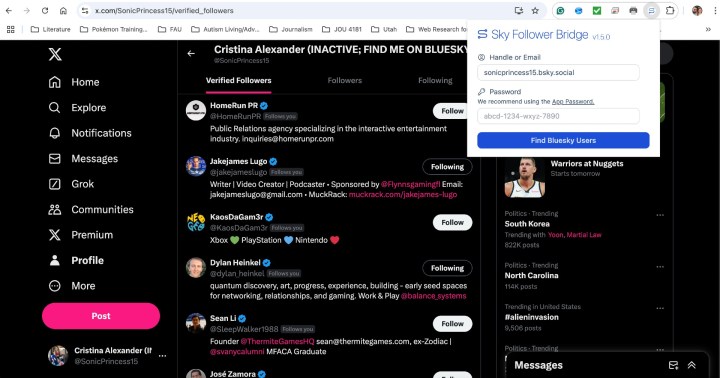
    Step 2: Click on the Followers or Following link on your Twitter profile. Once you see the options, select the Sky Follower Bridge extension, enter your Bluesky username, and select App password to obtain a password for proceeding.

    Sky Follower Bridge on Twitter Follower tab.

    Cristina Alexander / Digital Trends

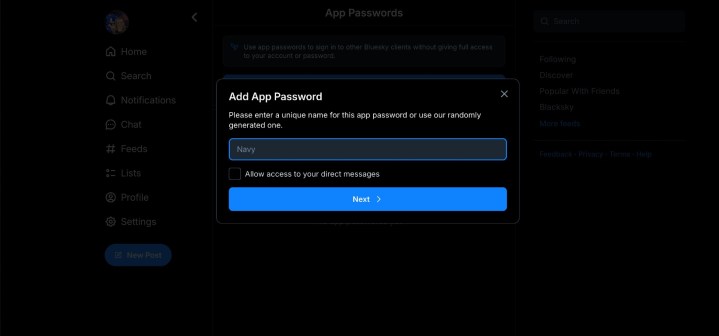
    Step 3: On the Bluesky App Password page, select Add app password. You can either create a unique password or use the one generated by Bluesky to proceed. Make sure to copy the password.

    Sky Follower Bridge App Password page.

    Cristina Alexander / Digital Trends

    Step 4: Paste the copied password into the appropriate field on Sky Follower Bridge and select Find Bluesky users. The tool will scan for Twitter users who have registered on Bluesky. The detected users may vary based on whether you’re on the Verified followers, Followers, or Following tabs. Once the scanning is complete, select View detected users.

    Sky Follower Bridge detecting Twitter users on Bluesky.

    Cristina Alexander / Digital Trends

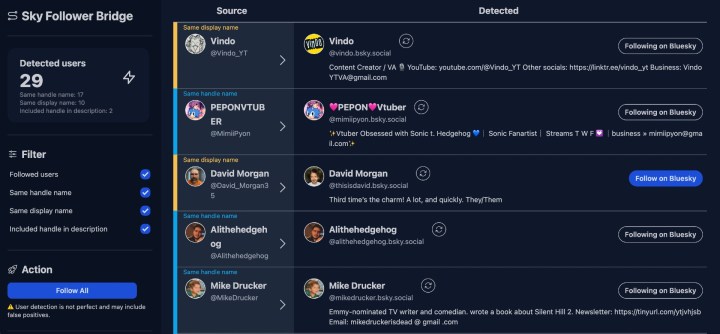
    Step 5: You will then see a list of Twitter users along with their corresponding Bluesky accounts. You have the option to follow these Bluesky accounts one by one or choose Follow all to connect with everyone simultaneously.

    Do note that Sky Follower Bridge’s user detection is not yet flawless; some Bluesky accounts may not correspond accurately to their X counterparts listed. Additionally, it may not recognize users who have different names or usernames or those who haven’t linked their Bluesky accounts on their X profiles.

    List of Bluesky users detected by Sky Follower Bridge.

    Cristina Alexander / Digital Trends

    As of now, the Sky Follower Bridge is the sole solution for efficiently moving your X followers and follows over to Bluesky. If you have already deactivated your X account, consider sharing your Bluesky username and page on other social media platforms, such as Instagram or TikTok, urging your followers to connect there. Alternatively, if you still have your X account, you could tweet your Bluesky information and set a deadline for followers to connect on Bluesky before you permanently delete your X account. You might also want to add your Bluesky username to your X bio as a temporary measure.

    It could be advantageous to have your Bluesky username mirror your X username, as this makes it easier for others to locate you on Bluesky and minimizes the likelihood of someone mistakenly following someone else with a similar name or an imposter.


  • Transferring Villagers in Sengoku Dynasty: A Step-by-Step Guide

    Transferring Villagers in Sengoku Dynasty: A Step-by-Step Guide

    Sengoku Dynasty is a survival crafting game where players build villages and gather refugees while liberating various areas to lay the groundwork for their dynasty. As your village’s population expands, it’s crucial to manage different production types effectively to ensure continued growth and prosperity.

    Eventually, you’ll need to establish additional villages and recruit more refugees to populate them. You can also move villagers from one of your existing villages to the new location.

    How to Move Villagers in Sengoku Dynasty

    As your population increases, their demands will also grow significantly. At this point, it’s wise to set up another village and balance the population between both locations. However, finding new refugees can be a challenge, especially if you’re trying to improve the satisfaction levels in your older village.

    If you’re struggling to locate new refugees, you can move villagers from your first village to the newly established one. This transfer will help lower the demand for resources, enhancing the satisfaction of your remaining villagers.

    To transfer villagers from one village to another, follow these steps:

    1. Open the Dynasty menu and navigate to the Population tab.
    2. Choose the villager you wish to move.
    3. Select the bed currently assigned to that villager.
    4. Pick the village where you want to assign the villager.
    5. Choose a new bed for the villager in the new village.

    Once you assign the villager to the new location, they will be automatically moved and will begin to take on tasks there. If you have established storage facilities in the new village, the residents will be able to access goods from your combined storage, eliminating the need to create new production setups to meet the villagers’ needs.

  • Guide to Relocating and Demolishing Items in Factorio

    Guide to Relocating and Demolishing Items in Factorio

    Factorio is a complex game centered around managing factories and constantly expanding your operation. As you grow your factory, you’ll be handling a greater volume of resources, which can become quite overwhelming. If you tend to hoard every item you come across, you may find yourself short on storage space later on.

    If you’ve ever tried to delete an item but found it tricky to do so, there’s good news. There is actually a method to delete items, although it might not be as simple as it sounds at first. Below is an explanation of how to move and delete items from your inventory.

    How To Move Items


    If you want to reposition an item you’ve placed, just pick it up and put it down in the new location. To do this, hold down right-click on the selected item to destroy it, which will return it to your inventory. You can then place it wherever you want.

    You can also rotate items you’ve already placed by hovering over them and pressing the R key. This is handy for quickly adjusting the direction of belts without needing to dismantle them.

    How To Delete Items


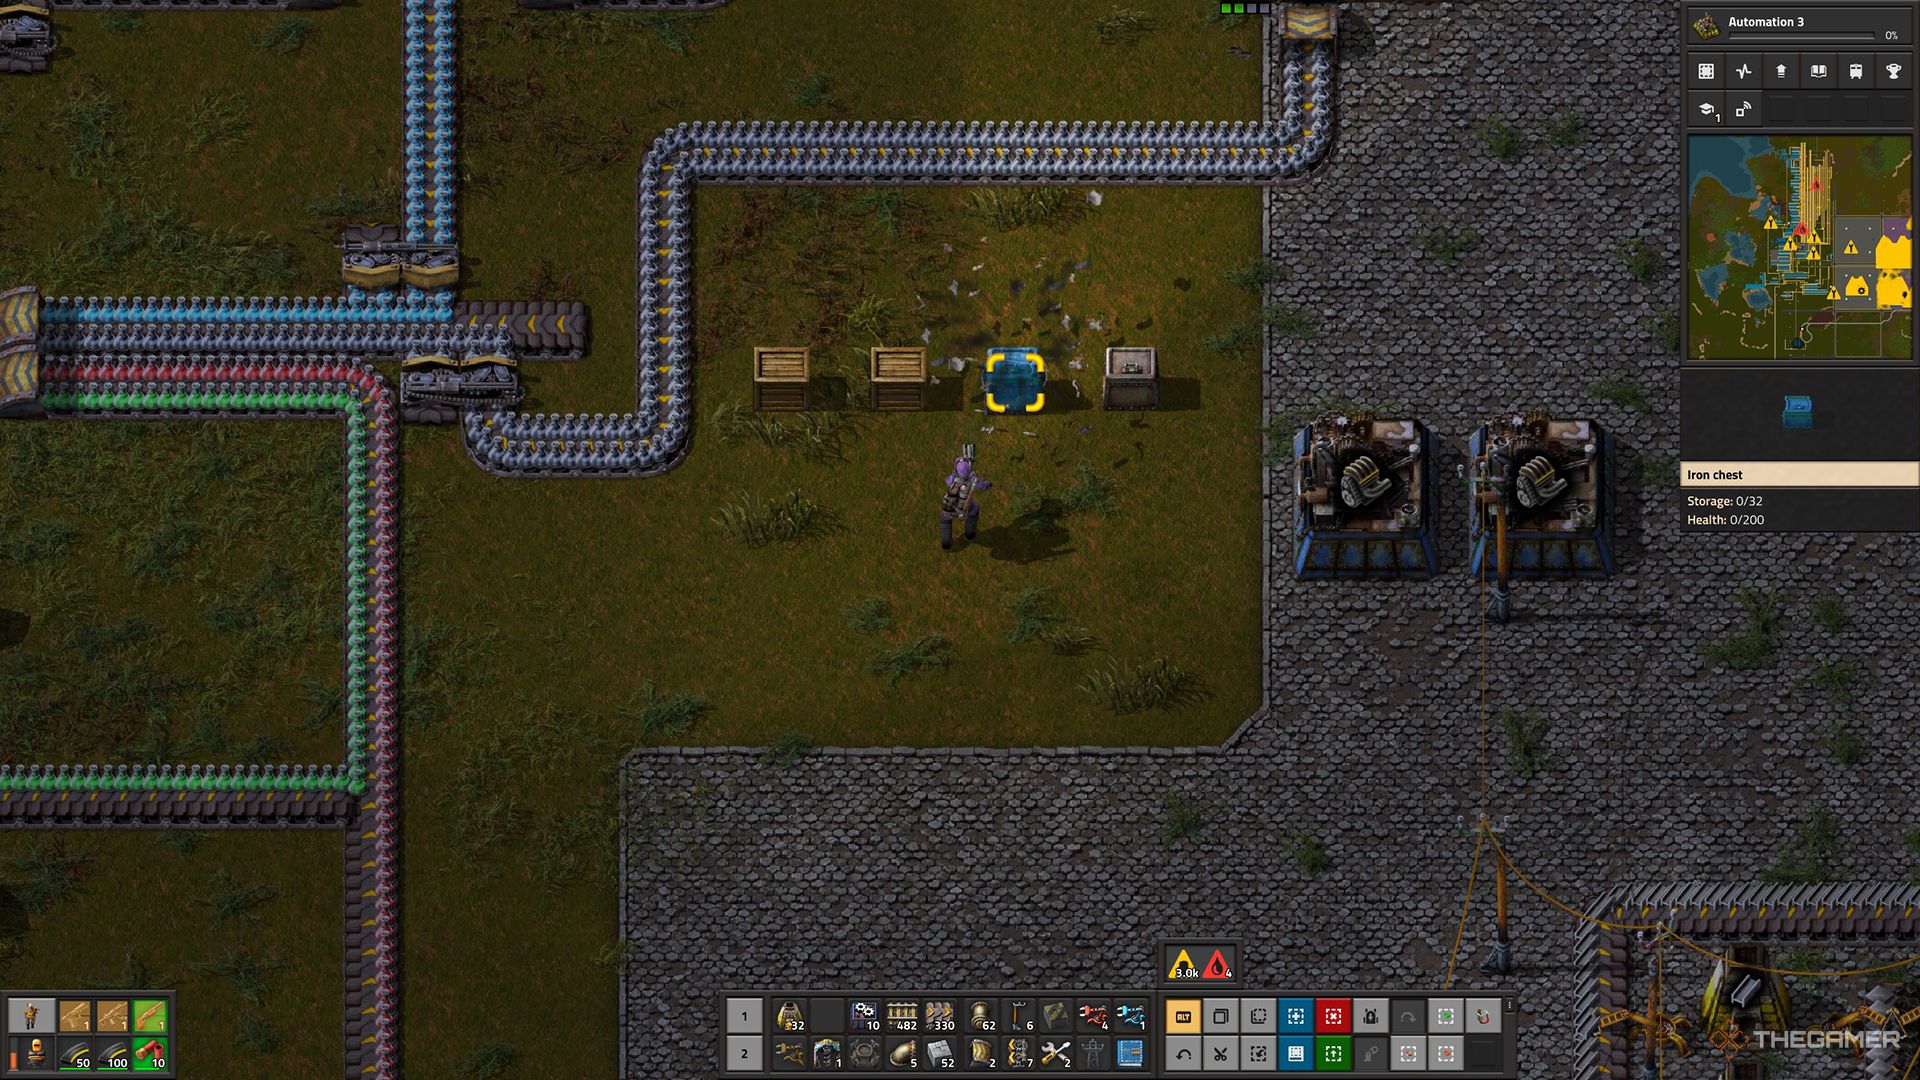
    The player destroying a chest using a gun to permanently delete items.

    To permanently remove an item or a stack of items, start by creating a storage chest from any material. Place it down and left-click to access its inventory, then move all the items you want to delete into it.

    Next, aim and shoot the storage chest to destroy it, which will permanently delete all items inside. Keep in mind this will also destroy the chest itself, so if you have many items to dispose of, you’ll need to craft several chests.

    Wooden chests have the least health, making them the easiest to destroy. However, feel free to use whichever type of chest you have available.