الوسم: mount

  • Where To Find The Raptor Mount in Crimson Desert: Completing & Solving

    Where To Find The Raptor Mount in Crimson Desert: Completing & Solving

    If you’ve been keeping up with the long list of updates for Crimson Desert, you probably noticed that Pearl Abyss has been adding many new mounts to tame in Pywel. One of the standout options is the Raptor, which is one of the coolest mounts in the game. However, these rare creatures aren’t roaming freely in many areas, so you’ll need to know where to find them.

    Here’s where to find a Raptor in Crimson Desert and how to tame one so you can summon it whenever you’d like.

    Before heading out to find the Raptor, make sure you bring some meat to feed your new mount. Marbled Meat is especially good because it increases the trust bonus. You can buy Marbled Meat at any Butcher shop in Pywel.

    Where to Find the Raptor

    To locate the Raptor mount in Crimson Desert, go southeast of Tashkalp to the Crimson Mountain Fortress. This fortress is blockaded, controlled by the Twilight Messengers faction. While this can be an obstacle, the guards have taken to riding some of the local wildlife to patrol, and Raptors are among their mounts.

    How to Tame the Raptor

    When you arrive at the Crimson Mountain Fortress near Tashkalp, you’ll notice guards riding on Raptors. To tame one, you need to knock the rider off first. Use your bow and arrow to shoot the guard and dismount him from the Raptor.

    Tip: Using an explosive arrow will make it easier to knock the guard off the Raptor’s back.

    Once the guard is thrown off, the Raptor will run away, so you’ll need to chase after it. Make sure you’re far enough away from the guards to focus on taming.

    How to Feed and Tame

    Once you’ve caught up to the Raptor, open your inventory and select Marbled Meat. While riding the Raptor, hold down the interaction button (A on Xbox or X on PlayStation) to feed it. This will steadily increase its trust. Continue feeding it until the trust level reaches 100%.

    Important: After raising its trust to 100%, an option will appear to register the Raptor as a special mount. Once registered, you can summon it anytime from your inventory under the Special Mounts tab.

  • How to Get a Kuku Bird Mount in Crimson Desert: Completing & Solving

    How to Get a Kuku Bird Mount in Crimson Desert: Completing & Solving

    Crimson Desert’s latest update brings a bunch of new features and fixes. There’s a new material extraction option at the Smithys and a claw machine you can try out. Plus, several new mounts are now available for players to ride across the game world.

    One of the most interesting and adorable mounts is the Kuku Bird. Similar to the Chocobo from Final Fantasy, it’s a big bird you can hatch and ride. Here’s what you need to know about how to get your own Kuku Bird and where to find its egg.

    Kuku Bird Egg Location

    Your first step is to find the egg. Head to the Bloodsteel Camp in the southern part of Demeniss. If you haven’t cleared this camp yet, you’ll need to fight off all the bandits occupying it. There are quite a few enemies here, so be prepared for a tough fight.

    These enemies tend to use bows, so expect lots of ranged attacks. It’s helpful to use explosive arrows if you have them—these can take out their towers and other structures easily. Inside the camp, you’ll find the bandit boss, Bradie Gu, who wields a large saw as a weapon. The fight is straightforward since his attacks are mostly slow to wind up, making them easy to dodge if you pay attention.

    Once you’ve defeated enough enemies to clear the camp, the top left corner will show a percentage bar. When this drops to zero, the camp is safe to explore. Go back to where you fought the boss and look at the right side of the makeshift throne. Just below the tower’s roof, you’ll notice part of the tower wall acting as a hidden door. Climb onto the tower, hold the Left Trigger to embed yourself into the wall, and use a Force Palm strike. This action will spin the wall open, revealing a secret room inside the tower. Here, you’ll find the Kuku Bird Egg and a book with information about different Kuku Birds.

    (Insert image of the camp and secret door here.)

    How to Hatch the Kuku Bird Egg

    Once you have the egg, hatching it is simple. Travel to the northern part of Demeniss, south of the Grey Rock Quarry. Climb a small mountain there until you reach a forest with a large circle of boulders. In the middle, you’ll see an empty Kuku Bird’s nest.

    Hold the Left Trigger to aim the egg and set it down in the nest. Wait about an in-game hour. When the egg turns a bright orange glow, approach it and select the “Hatch” option. This will spawn your new mount—the Leaping Kuku Bird—which will appear in your inventory as a special mount. You can summon and ride it anytime to help you explore the world.

    Kuku Bird Saddle Location

    If you want your Kuku Bird to look its best, you’ll need a saddle. You can buy a Kuku Bird Saddle for 28 Silver at the Saddlery located in Calphade, southwest of Pailune, just below the Calphade Training Field. Find the large stable outside and speak to the Saddlery merchant.

    After purchasing the saddle, go to your Special Mounts tab in the inventory. Hover over the Egg Helm and replace it with the saddle you bought. This change will remove the egg from the bird’s head and give it a proper saddle, making it look ready for riding at all times.

  • How to Completing the Moonlit Forest Luna Deer Mount and Solving in Starsand Island

    How to Completing the Moonlit Forest Luna Deer Mount and Solving in Starsand Island

    The Moonlit Forest is full of rare minerals and hidden treasure chests to find as you explore Starsand Island. You can’t skip this area because it provides many resources necessary for your progress. However, be careful of dangerous creatures that guard some parts!

    If you’re searching for specific ores or plants, or struggling to defeat the Ruin Guard, the guide below will help. It covers everything you need to know while wandering through the Moonlit Forest and eventually unlocking the rare Luna Deer mount.

    How to Unlock the Moonlit Forest

    The entrance to the Moonlit Forest is behind your first home on Starsand Island, but it’s initially blocked by a large, broken stone door with weak spots. To access it, you need to complete the Explorer Profession, which starts after talking to Zephyria. He will give you a blueprint and some ammo for a slingshot, which you can craft using 2 Softwood and 2 Fiber.

    Once you’ve crafted your slingshot, you can use it to break through the weak spots on the blocked door with ammo. After destroying these weak points, you can enter the forest. Before going in, you can gather Midnight Herb and Copper Ore from the area outside the entrance, along with the portal to the first section.

    Evernight Forest

    The first part of the Moonlit Forest is called Evernight Forest. Here, your first camp is set up. Rocks block one way, and large glowing mushrooms are on the right. Head toward these mushrooms, gathering resources along the way:

    • Fluorite
    • Tin
    • Copper
    • Quartz
    • Midnight Herb
    • Moondew Shroom
    • Mirthshroom
    • Twilight Succulent
    • Celeb Moth
    • Green Firefly

    Evernight Forest has various minerals, plants, and orange Gravecrystals. Break these crystals to release Gravestars, small spirits that will help unlock the gate further ahead.

    As you follow the Gravestar, repair the broken bridge using 15 Stone to proceed to the next area.

    Gate of Life

    At this gate, fix the Moonweaver with 5 Fluorite to activate the camp. The Gravestar will float toward the gate on the right, but you need to find two more Gravecrystals to fully unlock it. One is just outside the camp, to the right, and the other is on the grassy rocks past the large tree on the left. Break these crystals to let the spirits out.

    Beyond the gate, you’ll find more resources like Fluorite, Tin, Copper, Quartz, Midnight Herb, Moondew Shroom, Mirthshroom, Twilight Succulent, Red Firefly, Moonflower, and Celeb Moth. In the open space, a Runebird will attack—defeat it with your slingshot. You can also break the blockage here with your pickaxe to return to Evernight Forest.

    Use your Gravecrystal to release the spirit, then go back to the Gate of Life to continue. Another obstacle will block your path, which requires an Impulse Pickaxe. Craft it at the workbench with 10 Copper, 10 Fluorite, 5 Softwood, 5 Quartz, and 1 Pickaxe. If you haven’t unlocked the blueprint yet, buy it at the Starsand Town General Store.

    Dreamfall Garden

    Use a Bug Net to catch Luminwing Butterflies and activate the Dreamfall Garden camp with 5 Fluorite. This area offers new and familiar resources, including Copper, Fluorite, Quartz, Coal, Tin, Iron, Salt, Sunveil Shroom, Mirthshroom, Moondew Shroom, Moonflower, Twilight Succulent, and several Fireflies.

    Near the camp, explore the area by jumping across bubbles to access the chest behind a waterfall and a nearby treasure map. Head toward the large glowing mushroom along the path, where a fairy ring of Sleep Lilies awaits. Harvest all the Lilies to trigger a surprise. At the top, defeat a Luminfrog with your slingshot.

    Use your slingshot to destroy weak spots in the broken gate and proceed inside. Fight a Luminfrog there with a few shots; it will attack you by leaping, shooting lasers, and casting energy pulses. Use movement and aim carefully to avoid its attacks. Bring plenty of arrows, as it takes time to defeat with just pellets or stones.

    Crystalith Boss Fight

    Climb up further to find ore and plants, and a large door requiring two keys. The keys are hidden: one is in a chest by the waterfall, and the other is obtained from Zephyria after completing the Intermediate Explorer Certificate. Once you have both, unlock the door to face Crystalith, a large golem-like creature with an orange glowing abdomen.

    During the fight, watch for Crystalith trying to draw power from a crystal center—an opening to hit its weak spot for extra damage. The boss has two main attacks: throwing a boulder and smashing the ground to send tidal waves. Keep moving, avoid its attacks, and strike the glowing weak spot on its shell when vulnerable. After defeating Crystalith, loot the chest and proceed through the open gate.

    Crystalith Hideout

    This area contains another camp and resources like Fluorite, Gold, Tin, Copper, Quartz, Iron, and various plants, including Midnight Herb and Moondew Shroom. A large door here only opens with two keys—one you found earlier, the other from Zephyria.

    You will also encounter Glintortle, an adorable but dangerous giant turtle. It attacks with water waves, bubble shots, lasers, energy pulses, and area attacks that chase you. Avoid its attacks by observing patterns and staying distant. When it gets dazed after a heavy attack, target its top shell weak spot to deal double damage.

    Once defeated, a chest drops, and the area opens up. You need Water and Fire Arrows for the next section, so prepare accordingly by completing the Exploration Certificate quests.

    Harvest Yard

    This last part of the forest holds high-rarity ores like Oilstone, Flamecore, Diamond, and Primorite. Access here requires Water and Fire Arrows. Use a Fire Arrow to clear a blocked door, and activate a camp to avoid having to fight Glintortle repeatedly. Gather resources such as Oilstone, Flamecore, Diamond, and Primorite, and explore the area.

    Mural Valley

    Use an elevator to return to the top, where you find the Mural Valley camp. Nearby, break a Gravecrystal stuck in the cliffside to free a spirit. Three Gravecrystals are located in high spots around this area—destroy them to help the Gravestars to reveal a hidden chest beneath the first large mushroom. Open it to find loot.

    Azure Bay

    Travel to Azure Bay, which offers more ores like Primorite, Fluorite, Iron, Tin, and plants such as Twilight Succulents, Sleep Lilies, Hydrangea, and Fireflies. There’s a large door requiring two keys—one is in a chest by a waterfall, the other from Zephyria after completing specific quests. Unlock it with both keys to access the final boss.

    Final Boss: Ruin Guard

    The Ruin Guard is the toughest enemy, with four different attack moves: ore throws, spinning charges, laser beams, energy pulses, and area floral attacks. It’s assault is predictable: watch for signs before each attack. Keep your distance, aim carefully, and hit its weak spot on the top of its shell when it’s momentarily dazed for extra damage. Use plenty of arrows, as relying solely on simple projectiles will take a long time. When you defeat it, it will drop a chest and open the way forward.

  • How to Change Your Mount in Highguard by Completing & Solving

    How to Change Your Mount in Highguard by Completing & Solving

    While playing Highguard, you’ll quickly become very familiar with your mount because you’ll use it frequently. The maps in the game are vast, so you’ll need a mount to help you cross large distances, chase down or escape from enemies, and reach key items like the Shieldbreaker before the opposing team does.

    There are several ways to upgrade your mount, but at the start, you choose from a few basic options designed to help you navigate each map. So, what mounts are available, how do they function, and when can you get new ones? Here’s what you need to know about mounts in Highguard.

    How to Change Your Mount

    Before a match begins, you can select which mount you want to ride. To do this, go to the Collection menu and select the Mount submenu. From there, you can choose the Bear, Panther, or Horse. Select your preferred mount and press the Equip button. Once equipped, a checkmark will appear next to your choice. When the game starts and you summon your mount, it will be the one you’ve selected.

    How to Use Mounts

    Once inside a game, you’ll start by fortifying your base and customizing your gear. After that, you’ll have a few minutes of preparation before the Shieldbreaker becomes accessible.

    During this prep time, you should mount up. To do so, double tap the mount button, and your chosen mount will appear beneath you. You can command your mount to run by using the run command. If you wish to dismiss your mount, press the dismiss button located in the lower right corner of the screen.

    Your mount has a health bar and a cooldown timer. The icon in the bottom right shows how to summon your mount, dismiss it, and also displays its current health status. If your mount gets destroyed, a cooldown timer will appear over the icon, indicating how long you’ll need to wait before being able to summon a new one.

    Upgrading Mounts with Saddles

    During gameplay, you’ll find Saddles that enhance your mount’s abilities. Saddles increase both health and speed, and higher rarity Saddles provide better performance. However, higher-tier Saddles cost more and are harder to obtain. You can find Saddles in chests scattered across the map, trade for them using resources you gather from resource nodes, or purchase them from the loadout menu after respawning following a death.

    All Mounts and How to Unlock Them

    The game starts you off with three basic mounts: the Horse, Panther, and Bear. You can unlock additional mounts such as the Eldergryph by purchasing them with Highguard Gold, which is only obtainable through real-money transactions.

    All Horse Skins and How to Get Them

    The initial mounts include the default Horse, Panther, and Bear skins, available immediately. Additional skins can be unlocked or purchased:

    Skin Image Rarity How to Unlock
    Default Basic Available at game start.
    Blood Mare Blood Mare Legendary Purchase through the Red Regin Bundle.
    Bluebelle Bluebelle Legendary Buy in the Nightshade Bundle.
    Stormchaser Stormchaser Legendary Available in the Lightkeeper Bundle.
    Smokeshow Smokeshow Legendary Available in the Red Dragon Bundle.

    All Panther Skins and How to Unlock Them

    The core Panther skin is the default, unlocked at the start:

    Skin Image Rarity How to Unlock
    Default Default Panther Basic At game start.
    Highland Tiger Highland Tiger Legendary Twitch Drop: Watch a qualified stream for 2 hours.
    Snowclaw Snowclaw Legendary In the Cold Embrace Bundle.
    Blood Brother Blood Brother Legendary In the Beastlord Bundle.
    Grimalkin Grimalkin Legendary Last Rite Bundle.

    All Bear Skins and How to Unlock Them

    The initial Bear skin is available from the start:

    Skin Image Rarity How to Unlock
    Default Default Bear Basic At game start.
    Honeyduke Honeyduke Legendary Purchase the First Sight Bundle.
    Ursus Maximus Ursus Maximus Legendary Buy the Pit Fighters Bundle.
    Blood Moss Blood Moss Legendary Part of the Wildguard Bundle.

    All Eldergryph Skins and How to Unlock Them

    The Eldergryph is a special mount available for purchase with Highguard Gold, which requires real money:

    Skin Image Rarity How to Unlock
    Battle Shrike Battle Shrike Exotic Purchase the Eldergryph Bundle.
    Brownback Brownback Exotic Purchase the Eldergryph Bundle.
    Bluefeather Bluefeather Exotic Purchase the Eldergryph Bundle.
    Redtail Redtail Exotic Purchase the Eldergryph Bundle.

    This overview covers the available mounts, how to select and use them, upgrade options, and how to unlock special skins and mounts in Highguard.

  • How to Complete Every Mount and Solve in Fellowship

    How to Complete Every Mount and Solve in Fellowship

    Getting into the Fellowship is straightforward, as long as you’re committed to developing your character and working well with your team. With these goals in mind, you can take on any dungeon, earn loot, and keep improving your character’s setup. You can also earn and equip new mounts to move faster across maps.

    Not all mounts are available from the beginning; many are locked behind paywalls or other restrictions. Here’s a simple guide on how to unlock each mount so you can ride around dungeons in style. This information is helpful no matter which character you choose to play.

    ### How to Unlock Mounts

    To unlock your first mount, you need to complete just one dungeon. Use the quick match option to join a party and get a quick dungeon run. After finishing and claiming your loot, open the rewards menu from your Stronghold and redeem your new mount found in the bottom right corner of the rewards tree.

    As you progress, unlock more mounts through challenges or DLC packs. You can switch mounts at the stables in your Stronghold. Talk to Stable Boy Finley to see all available mounts, whether you’ve unlocked them or not. Keep in mind, each of your characters can have a different mount based on what you’ve achieved with them.

    Some mounts are shared across your account, meaning you can equip them on multiple characters.

    ### All Mounts and How to Get Them

    Here is a list of various mounts, how to unlock each, and their costs:

    | Name | Type | Rarity | Unlock Conditions | Cost |
    |——-|——–|———|———————-|——–|
    | Vidahlian Courser | Horse | Common | Complete one dungeon, then redeem from rewards | Free |
    | Alabaster Steed | Horse | Common | Purchase with Supplies in the Stronghold | 20 Supplies |
    | Palomino Runner | Horse | Common | Purchase with Supplies | 300 Gold |
    | Roan Stallion | Horse | Common | Purchase with Supplies | 27 Supplies |
    | Obsidian Charger | Horse | Common | Purchase with Supplies | 500 Gold |
    | Vidahlian Warhorse | Horse | Uncommon | Purchase with Supplies after achieving Dungeon Rating of 1,105 | 80 Supplies |
    | Elden Chillcharger | Horse | Uncommon | Unlock from Rewards after timing Cithrel’s Fall in the Contender League | Free |
    | Wyrdwood Warhorse | Horse | Uncommon | Purchase with Supplies after timing Cithrel’s Fall in the Contender League | 1,800 Gold |
    | Backhast | Horse | Uncommon | Purchase with Supplies | 1,200 Gold |
    | Woodpaw Grizzly | Bear | Uncommon | Purchase with Supplies | 40 Supplies |
    | Midnight Panther | Feline | Uncommon | Purchase with Supplies | 800 Gold |
    | Squeaks | Rat | Uncommon | Purchase with Supplies | 60 Supplies |
    | Alabaster Warhorse | Horse | Rare | Purchase with Supplies after reaching Dungeon Rating of 2,160 | 120 Supplies |
    | Bloodfang Matriarch | Feline | Rare | Unlock in Rewards by timing the Heart of Tuzari in the Adept League | Free |
    | Stormstruck Rat | Rat | Rare | Purchase with Supplies after timing the Heart of Tuzari in the Adept League | 8,000 Gold |
    | Palamino Warhorse | Horse | Epic | Purchase with Supplies after reaching Dungeon Rating of 3,320 | 160 Supplies |
    | Obsidian Warhorse | Horse | Epic | Purchase with Supplies after reaching Dungeon Rating of 4,585 | 230 Supplies |
    | Arcanist’s Warhorse | Horse | Epic | Purchase with Supplies in the Stronghold | 480 Supplies |
    | Raging Deathcharger | Horse | Epic | Purchase in Stronghold after Dungeon Rating of 6,735 in Paragon League | N/A |
    | Gilded Hoarder | Rat | Epic | Unlock from Rewards by timing the Wraithtide Vault | Free |
    | Cheesers | Rat | Epic | Purchase with Supplies | 15,000 Gold |
    | Wraithtide Huntress | Feline | Epic | Purchase after timing Wraithtide Vault in Champion League | 4,000 Gold |
    | Lunarscar Tiger | Feline | Epic | Purchase with Supplies | 10,000 Gold |
    | Corrupted Bloodfang | Feline | Epic | Purchase from Stronghold | N/A |
    | Drakheim Warbear | Bear | Epic | Unlock in Rewards by timing the Ransack of Drakheim | Free |
    | Ashpaw Companion | Bear | Epic | Purchase after Ransack of Drakheim in Paragon League | 2,500 Gold |
    | Woodpaw Warbear | Bear | Epic | Purchase with Supplies | 340 Supplies |
    | Nightveil Widow | Spider | Epic | Unlock after reaching Dungeon Rating of 10,155 in Paragon League | Free |
    | Guardian Ghostclaw | Bear | Champion | Unlock via Guardian’s Supporter Pack | DLC |
    | Vengeful Vermin | Rat | Champion | Unlock via Exile’s Supporter Pack | DLC |
    | Radiant Feline | Feline | Champion | Unlock via Wanderer’s Supporter Pack | DLC |
    | Ael’dethi Prowler | Feline | Champion | Unlocked during Steam Next Fest 2025 | Free |
    | Scryer’s Warhorse | Horse | Champion | Unlock through Twitch Drops after watching streams | Free |
    | Arcalian Steed | Horse | Champion | Link your email to your Arc account | Free |
    | Sir Bombastic | Rat | Legendary | Travel to the Stronghold | Free |

    Note: Sir Bombastic was previously available during beta by timing a dungeon at +15 difficulty and used to carry over from beta testing.

  • Completing the Legendary Mount Quest in Assassin’s Creed Shadows

    Completing the Legendary Mount Quest in Assassin’s Creed Shadows

    In Assassin’s Creed: Shadows, the vastness of Japan offers plenty of opportunities for exploration, and having a trusty mount can enhance your adventure. If you find yourself growing weary of your horse’s standard look, don’t worry—there are various mounts for you to discover throughout your journey.

    While you can encounter numerous regular mounts along the way, the Legendary Mount is somewhat hidden and located in an unexpected area. If you’re aiming to add a new mount to your collection, this guide will help you uncover the location of this legendary variant.

    How to Acquire the Namazu Mount


    As of now, there is only one Legendary Mount available in the game, known as the Namazu Mount. You can obtain it early in the game, but make sure to get past the prologue to unlock this opportunity.

    Additionally, if you have a Digital Deluxe or Collector’s Edition or are subscribed to Ubisoft+, you can also access the Sekiryu Beast.

    Keep in mind that Assassin’s Creed: Shadows is a game that receives frequent updates; more Legendary Mounts may be introduced in the future.

    Locating the Namazu Mount


    Okishima's location marked on the map in Assassin's Creed Shadows.

    Finding this mount is pretty straightforward once you know where to look. First, head to Okishima Island on Lake Biwa in Omi. Look northwest of Azuchi to find the largest land mass in the lake; that’s your destination.

    Once you arrive at Okishima, make your way to the western side of the island. You’ll encounter a couple of enemies near a bonfire there, along with a side mission just beyond them.

    After dispatching the enemies, dive into the water right in front of the bonfire. Underwater, turn back towards the island and swim to your left.

    As you navigate along the submerged edge of the island, keep an eye out for a cave entrance. You might need to dive deeper if it’s not immediately visible.

    The cave entrance can be easy to overlook since it’s located in deeper waters. Try visiting the island during the day or adjust the in-game brightness settings to help spot it better.

    When you locate the entrance, swim through it and follow the only available path. This will take you to the chest containing the Namazu Mount. After collecting it, swim back to the surface and you’ll be able to switch to your new mount freely.


    The mount selection menu highlighting the Namazu Mount in Assassin's Creed Shadows

    Lastly, keep in mind that this mount is purely for show. Equipping the Namazu Mount will not alter your gameplay experience.

  • How to Mount Monsters in Monster Hunter Wilds: A Complete Guide

    How to Mount Monsters in Monster Hunter Wilds: A Complete Guide

    If you’ve seen any trailers for Monster Hunter Wilds, you’re likely aware that you can mount your prey to deal significant damage. Like other mechanics in the game, such as Power Clashes and Offset Attacks, the mounting system is not thoroughly explained. Many players could spend hours without realizing the essential techniques to effectively execute this move. This oversight is unfortunate, not only because it’s a strategic advantage for swiftly defeating monsters, but also because it’s simply thrilling to do. There are various intricacies involved in mounting fierce creatures, so we’ll provide you with all the necessary details on how to successfully achieve it and what actions to take while riding atop a monster.

    How to mount monsters

    Capcom

    Even if you check the hidden tutorial screen in Monster Hunter Wilds for instructions on mounting a monster, it lacks clarity on how the mechanic actually works. The primary concept involves executing aerial assaults on a monster, but simply doing that isn’t enough to guarantee a successful mount. The challenge lies in activating a hidden gauge specific to each creature, which fills up with every jump attack. Once this gauge is full, your next aerial attack will automatically mount the monster.

    Different weapons allow for various types of airborne attacks, with only a few having jumping capabilities as part of their move set. If your weapon is unable to execute jumping attacks, you can always use your dismount attack from your Seikret. Otherwise, you’ll have to locate raised terrain from which to leap onto the monster, which can be a difficult task.

    Once you successfully board a monster, your controls will change. You’ll be able to perform a weapon attack, a quick knife strike, a heavy knife attack, brace yourself, and maneuver across different areas of the monster’s body. A sound strategy often involves executing an initial weapon attack and then relocating as the creature attempts to shake you off. Be mindful that your stamina will eventually deplete, resulting in your dismount, so inflict as much damage as you can while you’re still hanging on.

  • Quick Guide to Obtaining the Ashes of Al’Ar Mount in WoW

    Quick Guide to Obtaining the Ashes of Al’Ar Mount in WoW

    One of the legendary mounts in World of Warcraft, the Ashes of Al’ar, is both a long-standing and rare prize within the game. This phoenix mount was introduced in the first expansion, The Burning Crusade, and is an exceptionally rare drop from a specific raid boss in the expansion’s setting, Outland.

    Although the mount has been around for many years, its rarity and the reputation of its source mean that numerous players still haven’t had the chance to obtain it. Fortunately, the process is relatively simple, but it does require a bit of luck.

    Which Raid Boss Drops The Ashes Of Al’ar


    Situated at the edge of the Netherstorm area in Outland, the former draenei fortress known as Tempest Keep has come under the control of the deceitful blood elf prince Kael’thas Sunstrider and his followers, along with their demonic allies from the Burning Legion.

    Kael’thas Sunstrider, the master of this complex, is the boss that drops the Ashes of Al’ar when defeated. He stands as the final boss in Tempest Keep’s raid instance called The Eye.

    This raid, along with Kael’thas himself, can be completed solo by players wanting to take a chance in Retail World of Warcraft and Cataclysm Classic.

    Where Is The Eye?

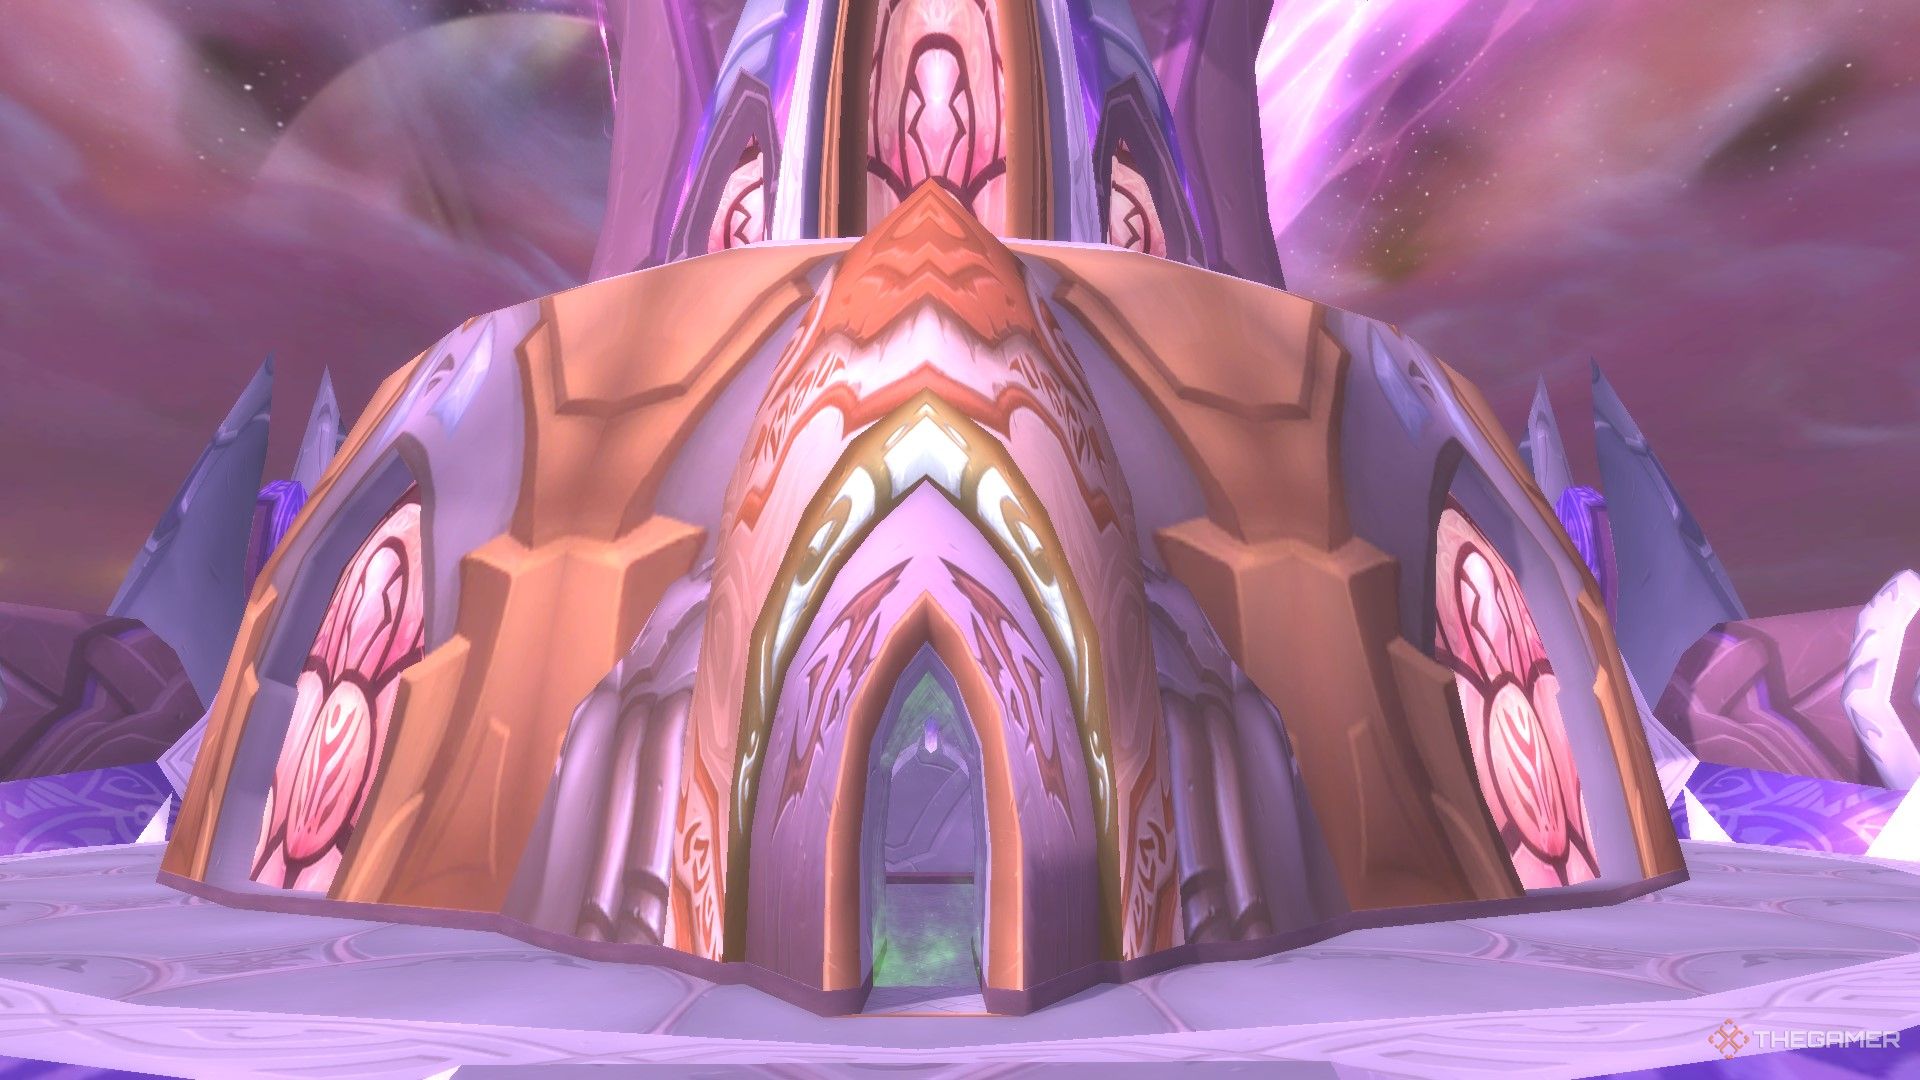
    The entrance to The Eye of Tempest Keep in Netherstorm.

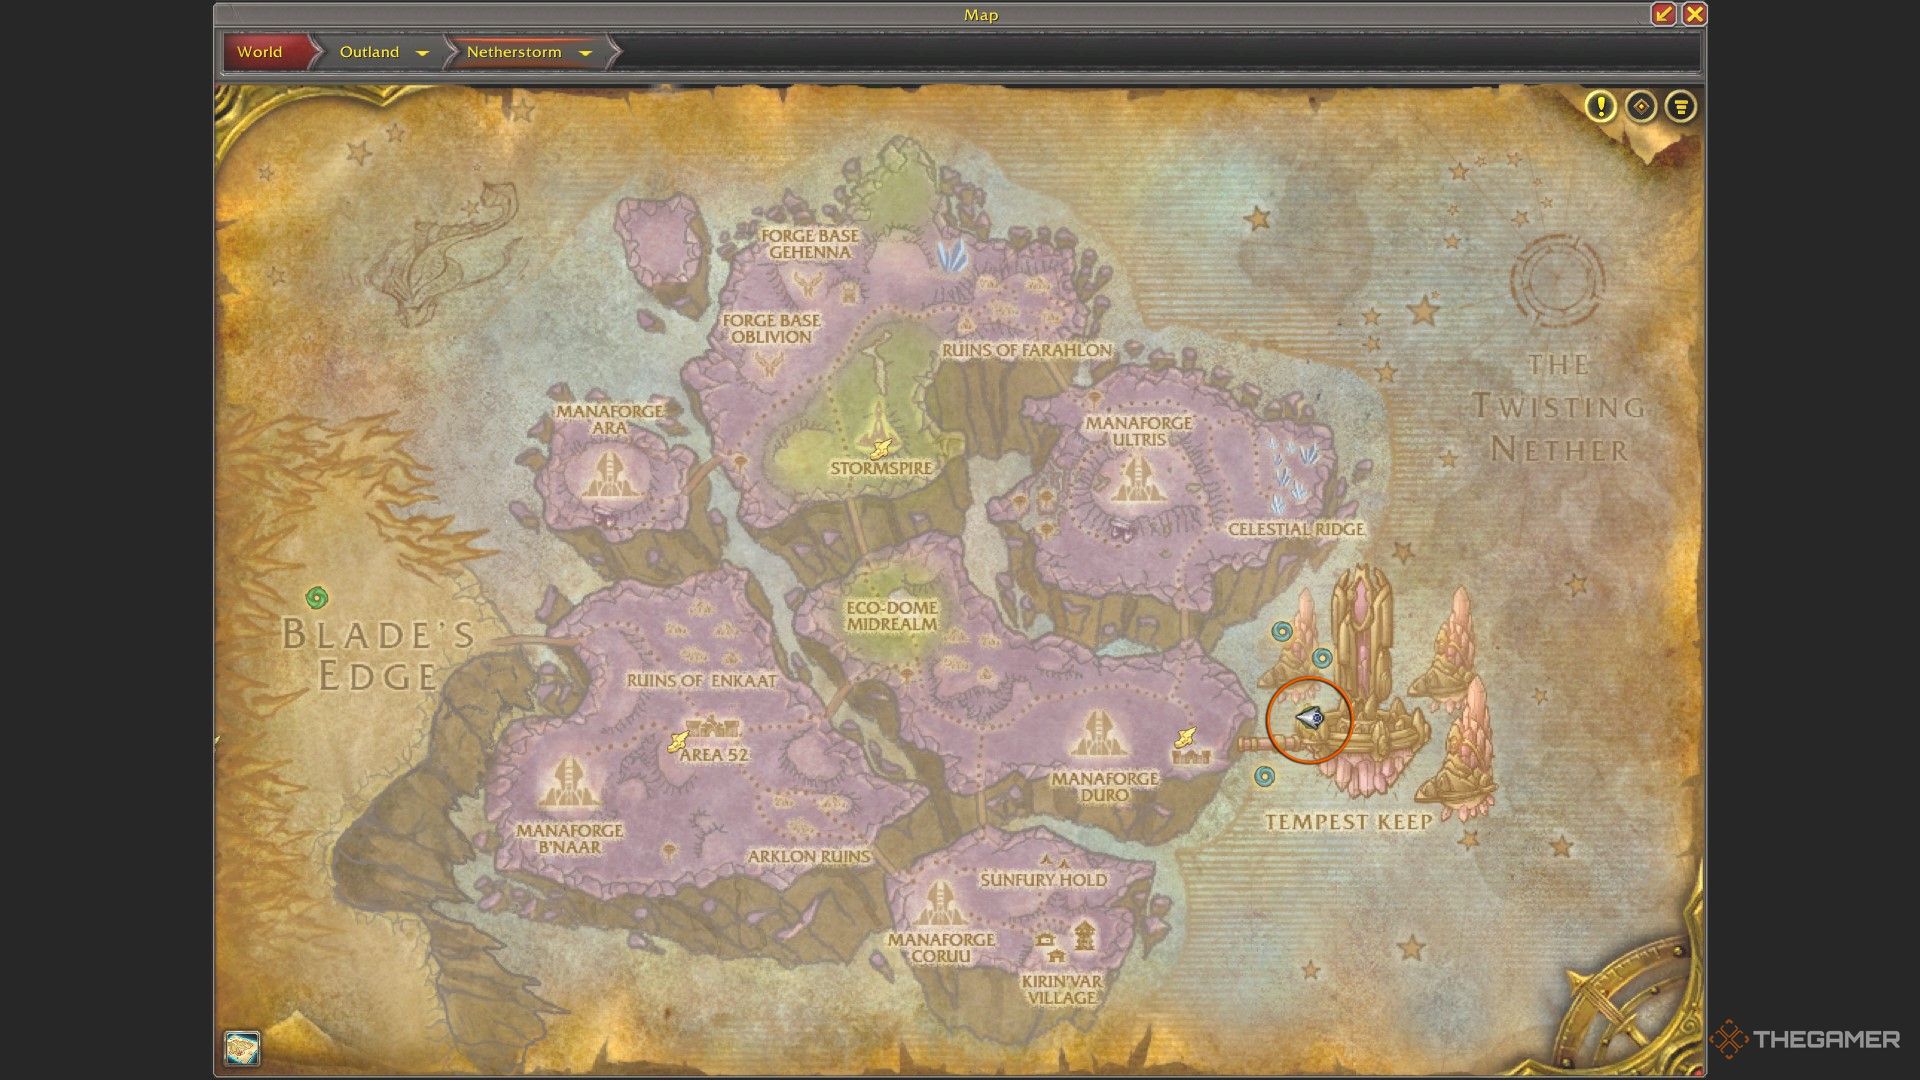
    The entire Tempest Keep complex is located on the eastern edge of Netherstorm, the northeastern zone of Outland.

    The Eye is the largest building in the Tempest Keep complex.

    Map of Netherstorm with the entrance to The Eye highlighted in orange.

    To reach The Eye and any other wings of Tempest Keep, you will need a flying mount.

  • Unlocking the Snowstreamer Mount in FFXIV: A Quick Guide

    Final Fantasy XIV has teamed up with Twitch for an exciting new campaign called Support-A-Streamer. Coinciding with the Starlight Celebration event, this initiative allows players to earn the Snowstreamer mount— a festive reimagining of the Snowman mount—by supporting FF14 streamers on Twitch.

    This event runs from now until December 31, 2024, at 6:59 AM PST (14:59 GMT). Make sure to join in before time runs out to snag your own charming snowman decked out in a purple scarf. Here’s everything you need to know.

    How to Obtain the Snowstreamer Mount

    To take part in this campaign, you’ll need a Twitch account. If you don’t have one yet, make sure to sign up.

    To claim your very own Snowstreamer mount, you must gift three Twitch subscriptions while watching a Final Fantasy XIV streamer (they must be a Twitch Partner or Affiliate) during the campaign period.

    Please note that any subscription purchases made outside the campaign timeframe will not be eligible for rewards.

    • If you’re unsure which streamer to support, simply search for ‘Final Fantasy XIV Online’ on Twitch to find current streamers playing the game.

      • Keep in mind that the streamer needs to be a Twitch Partner or Affiliate.
    • Purchase or gift three subscriptions of any tier to earn your reward. The least expensive option is three Tier One subscriptions, which will cost around $14.97.

      • There’s no requirement to purchase multiple subscriptions of the same tier or all at once. As long as you manage to give three subscriptions during relevant streams of Final Fantasy XIV, you’re all set.
    • After successfully completing all three purchases (or making one bulk purchase), you will receive a notification with your Snowstreamer code instantly.

    Keep in mind that subscriptions cannot be gifted anonymously if you want them to count towards this campaign.

    Anyone who buys or gifts subscriptions that meet the requirements can receive a code from Twitch, regardless of whether or not they have a Final Fantasy XIV account.

    How to Redeem Your Code and Claim Your Rewards

    How to Redeem Your Code on the Mog Station

    After you receive your code, log in to the Final Fantasy XIV Mog Station website using your Square Enix account. Navigate to ‘Enter Item Code’ and enter your Twitch code. If you have multiple characters, you will need to select which character should receive the rewards. You will then receive the Snowstreamer Bell and 50 Aetheryte Tickets associated with your code.

    Please remember that codes can only be redeemed on active Final Fantasy XIV accounts and cannot be used on Free Trial accounts.

    How to Claim Your Rewards

    Your rewards will be sent to your character via Moogle Mail in the game. Once they arrive, you can simply use the Snowstreamer Bell from your inventory to activate it right away.

    Occasionally, digital rewards may take some time to process, so don’t worry if they don’t show up immediately.

  • How Much Does It Cost to Mount a TV on the Wall?

    Mounting a television on the wall can drastically improve your viewing experience while also enhancing the aesthetic appeal of your room. However, many homeowners wonder about the costs involved in this process. This article breaks down the various factors affecting the price of wall-mounting a TV.

    Factors Influencing the Cost of Wall-Mounting a TV

    When considering the cost of mounting your TV, several aspects come into play:

    1. Type of Wall Mount

    The type of wall mount you choose significantly impacts the overall cost. Here are a few options:

    • Fixed Mounts: These are typically the most cost-effective option, ranging from $20 to $100.
    • Tilting Mounts: These allow for some degree of movement to reduce glare. Prices usually range from $30 to $150.
    • Full-Motion or Articulating Mounts: These provide the most flexibility, allowing you to adjust the TV’s position easily. Expect to pay anywhere from $100 to $300.

    2. Professional Installation vs. DIY

    Whether you decide to install the mount yourself or hire a professional will affect your final cost.

    • DIY Installation: If you feel comfortable with basic tools, you can save on labor costs. The primary expenses will be for the mount and any required tools or supplies (e.g., screws, wall anchors). The total could be as low as $50 to $200.
    • Professional Installation: If you prefer peace of mind or have limited DIY experience, hiring a professional is a good option. Costs for professional installation typically range from $100 to $300, depending on the complexity of the job.

    3. Additional Costs

    Keep these potential additional expenses in mind:

    • Cabling and Wiring: Hiding cables within the wall can enhance the appearance of your setup but may incur extra costs, ranging from $50 to $150.
    • Wall Type: Mounting on brick, concrete, or another hard surface can require specialized tools or anchors, increasing costs.
    • Television Size: Larger TVs might require more robust mounting solutions, which can also raise installation fees.

    Cost Breakdown: Average Pricing

    Here’s a general breakdown of expected costs for wall-mounting a TV:

    DIY Installation

    • Wall Mount: $20 – $300
    • Tools: $0 – $50
    • Total Cost: $20 – $350

    Professional Installation

    • Wall Mount: $20 – $300
    • Installation Service: $100 – $300
    • Cabling (if requested): $50 – $150
    • Total Cost: $170 – $750

    Tips for Lowering Costs

    If you’re looking to save money on your TV mounting project, consider these strategies:

    • Shop for Sales: Look for discounts on wall mounts at local electronics stores or online retailers.
    • Compare Installation Services: Different professionals may charge varying rates. Gathering multiple quotes can help you find the best price.
    • Understand Your Needs: Choose a wall mount that meets your viewing habits and space constraints, avoiding overpurchasing for features you won’t use.

    Choosing the Right Mount

    When selecting a wall mount, consider:

    • Compatibility: Ensure the mount is compatible with your TV’s size and weight.
    • Ease of installation: If you opt for DIY, look for mounts that come with clear instructions and all necessary parts.
    • Aesthetic Appeal: Some mounts offer sleek designs that blend well with your décor, while others may be bulkier.

    By assessing your needs and understanding the various costs involved, you can make an informed decision on how to mount your TV on the wall effectively, all while sticking to your budget.