If you own a smartphone, you may have experienced a rather eerie phenomenon: out of nowhere, you start seeing ads related to a topic you just casually mentioned. It’s a bit unnerving, isn’t it? How do these ads seem to know what you’ve been discussing?
Your smartphone might be the key player in this mystery. With its built-in microphone always on to capture your voice commands for virtual assistants, it raises the question: could these devices be secretly listening in on your conversations to target you with ads? Let’s dive into this and see if you can find out for yourself.
How to Check if Your Phone is Listening
To find out if your phone is picking up on your conversations, initiate a discussion about a unique subject that you haven’t previously searched for or talked about in its presence. Make sure this topic is something completely outside your usual interests.
Over the next couple of days, continue talking about this topic with your phone close by. Avoid making any searches about it on any device—your phone, tablet, or computer.
Feel free to delve deeper into specific aspects of your chosen topic. For instance, if you’re chatting about a potential trip to Spain, you might also discuss topics like learning the Spanish language or the best places to find authentic paella in Madrid.
During this time, keep your eyes peeled for any ads that come your way—whether on social media, websites, or even Smart TVs. If you notice an increase in ads related to the subject you talked about, it could suggest that your phone is indeed eavesdropping.
Steps to Take if You Suspect Your Phone is Listening
Before you consider drastic measures like covering your phone’s microphone or tossing it in water, there are some less extreme options to help mitigate potential eavesdropping.
Start by examining the permissions granted to the apps on your device. It’s possible that you unknowingly allowed an app to access the microphone. Go through the permissions set for each app, restricting access for those that don’t require it.
In your device’s settings, ensure that Google Assistant on Android or Siri on iOS is turned off to prevent them from listening in.
Sam Singleton
Next, consider clearing the voice history and disabling your digital assistant. While tools like Google, Siri, and Alexa can be handy, they might be unknowingly recording more than you’d like.
Only last year, reports surfaced regarding a third-party company named Cox Media Group (CMG) using “Active Listening” technology in partnership with major players like Amazon, Google, and Microsoft.
Although these companies have denied using such technology for spying purposes, the capabilities are certainly there, and it’s naïve to assume that companies wouldn’t leverage such tools to enhance advertising efforts—after all, ads are essential to their profit margins.
Moreover, while companies may play a significant role in eavesdropping, there’s always the risk of hackers exploiting vulnerabilities in your device to gain access to your microphone or camera. Make sure your phone’s operating system and apps are regularly updated to minimize these risks.
Implementing these measures will help restrict unauthorized access to your phone’s microphone. However, if you remain uncertain, an easy solution is simply to turn off your phone or leave it in another room when discussing sensitive topics. This way, you can be sure your phone isn’t listening.
If Your Phone Isn’t Listening, How Does It Know So Much?
While the idea of your phone continuously eavesdropping might be alarming, there are numerous other ways it could be gathering this information without you ever saying a word.
Each smartphone serves as a treasure trove of personal data that apps and services can tap into. These devices are essentially mini-computers equipped with a multitude of sensors, including gyroscopes and accelerometers. The information collected from these sensors can reveal an astonishing amount about our daily habits, preferences, and more.
Your phone tracks where you go, who you interact with, and even your lifestyle and health choices. This metadata is harvested by your device and shared with third parties, such as data brokers, who analyze and sell it, ultimately serving you tailored advertisements.
So even if you haven’t explicitly discussed or searched for that trip to Spain, your phone might have pieced together clues based on collected data. Perhaps your friends were looking at Spanish accommodations when they were around you, or maybe you recently started using an app to learn Spanish, or your shopping habits reveal your interest in Spanish cuisine.
All this data collected over time may explain the surprisingly relevant ads you’re encountering. While your phone might not be listening in, it could just be cleverly interpreting the myriad of information you unknowingly provide.
If you’re among the millions of smartphone users—and that likely includes nearly everyone reading this—you might have experienced a rather unsettling phenomenon: You engage in a casual conversation about a seemingly random topic, and soon after, relevant advertisements start to appear on your screen. It raises the question: How are these ads so attuned to your discussions?
The answer might lie within your device. Most smartphones are equipped with activated microphones to allow virtual assistants to respond to voice commands. This begs the question: Could these devices be covertly listening to your conversations to tailor ads specifically for you? Here’s a comprehensive look at this issue, along with a straightforward test you can perform to uncover the truth.
How to Verify if Your Phone is Listening
To determine whether your phone is picking up on your conversations, start by discussing a distinctive subject that you haven’t researched or talked about before, ensuring your phone is nearby. Choose something that doesn’t align with your usual interests or online searches.
For the next couple of days, continue vocalizing this topic while your phone remains within earshot. Importantly, refrain from searching for any information about this topic on any of your devices, not just your smartphone.
You might also delve into specific aspects related to your chosen subject. For instance, if your discussions revolve around a trip to Spain, you could also mention the nuances of learning Spanish or recommend the top spot for paella in Madrid.
During this observational period, stay alert for any ads that pop up online—whether on social media, websites, apps, or even on your smart television, if applicable. If you start encountering ads related to the topic you’ve been openly discussing, it’s a strong indication that your phone has indeed been eavesdropping.
Steps to Take If You Suspect Eavesdropping
Before you resort to covering your phone’s microphone or tossing it away, consider a few less extreme measures to potentially mitigate eavesdropping.
First, inspect the permissions granted to applications on your device. You may have unknowingly allowed an app access to your microphone. Review the permissions for each application and restrict those that don’t require access to your microphone, camera, or location.
Within your device’s settings, you can deactivate Google Assistant on Android or Siri on iOS to prevent them from listening in.
Sam Singleton
Additionally, consider clearing your voice history and disabling the digital assistant feature on your phone. While handy, tools like Google Assistant, Siri, and Alexa may be actively recording your every word without your explicit knowledge.
Recently, a report by 404 Media revealed that Cox Media Group (CMG), a third-party company, was collaborating with tech giants like Amazon, Google, and Microsoft on “Active Listening” technology.
While these companies have since asserted that they do not utilize this technology to spy on users, it raises concerns about the potential for such capabilities and the lengths companies might go to improve their advertising strategies.
Lastly, although large corporations are often the primary suspects for eavesdropping, hackers could exploit vulnerabilities in your device, gaining access to the microphone or camera. Stay safe by maintaining up-to-date software for your phone’s operating system and all installed applications.
By taking these preventative measures, you can limit unauthorized access to your phone’s microphone. However, if you remain uncertain, the simplest approach to ensure your privacy is to power off your device or leave it behind when discussing sensitive topics.
If Your Phone Isn’t Listening, How is it Gathering Data?
While the idea of your phone quietly monitoring your conversations can be alarming, there are numerous ways you may inadvertently share information without speaking a word.
Smartphones serve as treasure troves of personal data that apps can access. Packed with a variety of sensors—such as accelerometers, gyroscopes, and magnetometers—they can gather extensive information about your habits and preferences.
Your phone tracks your movements, social interactions, lifestyle choices, and even health-related data. All of this telemetry and metadata can be harvested by your device. Not to mention the substantial amount of information you have already shared with apps and through Google searches over time.
This collected information is sent to third parties like data brokers to be analyzed and sold, leading to the personalized ads you see so frequently.
Thus, even if you haven’t voiced or searched for details about your trip to Spain, your phone might connect the dots based on the data it has accumulated. Perhaps friends were nearby searching for Spanish accommodations, or you recently started learning Spanish on an app, or your shopping history shows an increase in purchasing ingredients commonly used in Spanish cuisine.
Any of this information could explain why the ads you encounter are so relevant. So while it’s certainly possible your phone is listening in, you may actually be revealing information through other means that lead to targeted advertising.
In today’s world, smartphones have largely taken over the roles of traditional devices like video cameras during vacations, portable music players, and storage for media such as WhatsApp files, audio stories, e-books, and documents.
To safeguard this valuable data, it’s crucial to regularly back it up, and your home Windows computer is a great option for that task. Home PCs often serve as substantial storage hubs, containing downloads, music libraries, and video archives. When it comes to transferring music, videos, or images between your smartphone and Windows PC, you have numerous methods at your disposal.
Classic and Fast: Data Transfer via USB Cable
The most straightforward and rapid way to connect your Android device to a Windows PC is through a USB cable, which also facilitates the fastest data transfer rates. Often, you can repurpose the charging cable for this connection. Follow these steps to get started:
Connect the USB cable to a port on your PC or laptop, then attach the other end to your smartphone or tablet.
A prompt may appear on your smartphone asking if you want to enable data transfer to the connected device (your Windows PC). Confirm this request. Newer devices often simplify this process, and a small notification might pop up in Windows asking how you want to use the connected device. Just choose the option to view it in Windows Explorer.
In a few moments, your mobile device will show up in the “Devices and Drives” section in Windows Explorer (see screenshot). Double-click it to navigate through its file structure, allowing you to manage files just like you would on a USB drive. You can also access the SD card of your Android device if applicable.
Upon connecting your smartphone via USB cable, it appears as a storage device under “This PC.”
Foundry
Troubleshooting: If the prompt doesn’t show up in step two and your smartphone isn’t recognized by Windows Explorer, try a different USB cable, plug it into another USB port on your PC, or restart your smartphone.
Still Having Connection Issues? This Troubleshooting Tip Might Help
If your smartphone shows up in Windows Explorer but opens an empty window, you’ll need to tweak another setting on your phone.
A small configuration can have a significant impact: On some smartphones, you must authorize data transfer first.
Foundry
Access your smartphone’s settings, then navigate to “USB Settings.” The search function can help you find this section easily. Under “Intended Use for USB Connection,” enable the top option: “File Transfer/Android Auto.” Your smartphone will now function as a mass storage device that you can access via Windows Explorer.
Some Android versions require you to select the correct transfer mode beforehand. Go to “Developer Options” and “USB Configuration” to find this setting. Choose “Media Transfer Protocol (MTP)” or, as a last resort, the “Picture Transfer Protocol (PTP).” The latter will allow your phone to connect to Windows as a digital camera.
Sometimes manual intervention is necessary: You can define the USB connection type in the developer options on your Android device.
Foundry
The Convenient Way: Data Transfer via Wi-Fi
If you want to forgo cables or don’t have one handy, Wi-Fi provides a great alternative. Various options are available; you can either utilize an Android file manager that supports Wi-Fi or FTP or install software designed specifically for file transfers.
Using Android File Managers for Data Transfer
Let’s start with file managers. There are numerous options in the Play Store, but we’ll highlight our top three:
Cx File Explorer: This powerful Android file explorer can transform your smartphone into an FTP server with ease. Under the “Network” section, you can enable the “Access from PC” feature. This will generate an IP address with a port number, username, and password. Enter the IP address displayed in your browser on the Windows PC to easily copy images, videos, and files back and forth.
The CX File Explorer makes data exchange between Android and Windows effortless.
Foundry
File Manager: This file manager allows access to NAS or file transfers via FTP. It’s free, integrates cloud storage, and is free from annoying pop-ups or ads. You can use it to access your smartphone’s storage directly from your PC.
Total Commander: Designed for experienced users, this classic file manager offers a densely packed interface that prioritizes functionality. While a few plugins need installation for data exchange, this process is simple and free. The app supports FTP/SFTP clients, web folders with WebDAV, and provides LAN access. Additional plugins allow for integration with cloud storage like Dropbox, Google Drive, or OneDrive.
Data Exchange with Windows Applications
While the Android file managers make data transfer easy, dedicated applications for seamless transfers between PC and smartphone can be even more user-friendly. Most of these tools require you to install a Windows program (often free for personal use) and download a corresponding Android app on your mobile device.
MyPhoneExplorer: This is an established and user-friendly solution for file sharing. Install the linked Windows client along with the free Android app to get started. Launch the app on your smartphone but set it aside; you’ll be able to operate it directly from your PC screen. Both devices should be on the same network. Typically, the Android app will automatically reconnect without needing to be manually launched after the initial setup.
Connections can be established via Wi-Fi or LAN. Using MyPhoneExplorer, you can view the file structure, formats, and sizes on your Windows PC, creating folders and exchanging files effortlessly. This tool also functions as a contact manager, calendar viewer, and message handler, offering Bluetooth and USB connection options while avoiding reliance on remote and potentially insecure cloud services—a boon for privacy advocates.
The MyPhoneExplorer interface is intuitive and efficient.
Foundry
AirDroid: AirDroid simplifies file management between mobile devices and your PC. Here, you also need to install a free Android app along with the related Windows program. AirDroid allows for not just file transfers but also remote control of rooted Android devices.
Unlike MyPhoneExplorer, AirDroid requires you to create a free account for usage. This versatile tool is available for iOS as well, letting you mirror device screens, control the camera remotely, send messages, or make calls directly from your PC. It also includes parental controls for monitoring children’s smartphone use, location tracking, and app usage controls.
Since Windows 10, Microsoft has provided an app for linking computers and smartphones.
Foundry
With the advent of Windows 10, Microsoft recognized the need for an app that allows users to connect their smartphones to Windows PCs. This free program, known as Smartphone Link, is often pre-installed, but you can also find it in the Microsoft Store if it isn’t.
To set it up, simply click the Windows icon and enter “Smartphone Link” in the search bar (make sure to include the hyphen!). Open the app and follow the prompts to install the corresponding Android app, which will be linked here for convenience. Once set up, scan the QR code displayed on the Windows app with the Android app to establish the connection. Grant the necessary permissions to allow access to your messages, contacts, and call history.
Utilizing Cloud Storage
If you frequently use multiple devices or are often on the go, sharing data via cloud storage is likely your best bet. This method allows you to access stored data from any device without the hassle of cables or complicated pairing processes.
Using cloud services is typically simple and free for smaller amounts of data. Major providers like Dropbox, OneDrive, and others offer free Android applications, many of which come pre-installed on smartphones.
While service options vary, the basic process remains consistent: Create a free account with your chosen provider and download the associated app for the devices you intend to use for data transfers. Log in, and you’re all set.
Box: A leader in the USA, Box offers a range of functions for German users, although some features are behind a paywall. Free users receive 10 GB of storage but face a maximum file size limit of 250 MB.
Download: Android | Windows
Microsoft OneDrive: Microsoft offers only 5 GB of free storage, less than competitors. However, its “online vault” for sensitive data is a notable feature, and paid plans are relatively affordable.
Download: Android | Windows
Google Drive: Known for its excellent search capabilities and rapid data transfer speeds, Google Drive offers 15 GB of free storage for users while enabling collaborative folder sharing.
Download: Android | Windows
Mega: Offering a generous 20 GB of storage for free, Mega ensures all files and messages are encrypted for maximum security, though transfer speeds may be throttled during peak times for free accounts.
Download: Android | Windows
Dropbox: Arguably the most recognizable cloud storage provider, Dropbox provides 2 GB of free storage, which isn’t enough for larger files. Subscription rates can be steep, though it excels in sharing and integrates well with Google and Microsoft services.
Download: Android | Windows
When All Else Fails: Transfer via Bluetooth
Data can also be exchanged between Windows and Android via Bluetooth, although the transfer speed is much slower.
Foundry
If you’re in urgent need of transferring files but lack access to a USB cable or Wi-Fi (like when you’re on a train), Bluetooth can be a feasible option.
That said, this method has its drawbacks: transfer speeds are relatively slow, and you can only send individual files rather than batches. Here’s how to proceed:
Enable Bluetooth on both devices. For Android, you can easily do this through the quick settings menu. On your PC, click the Windows icon, type “Bluetooth,” and select “Bluetooth and other device settings.” From there, ensure Bluetooth is turned on.
Check your smartphone for the Windows PC name in the list of paired devices. You may need to hold down or click the Bluetooth icon on the Android device to refresh the list. On the Windows PC, select “Add Bluetooth or other device” in the Bluetooth settings to find your smartphone.
Confirm the pairing request on both devices. A security PIN may be displayed for verification purposes.
Now, you can initiate file transfers from your smartphone to your PC using the standard “Send” or “Share” option, selecting Bluetooth as the transfer method and then choosing the connected Windows machine. However, this method is best for only a few small files due to slow data rates.
Transforming images into PDF format is an efficient solution for consolidating numerous images into a single PDF or for professionally storing a single image. The PDF format is incredibly adaptable, making it perfect for tasks like printing, sharing, or archiving, especially since it preserves image quality. In this guide, we will outline simple methods to convert JPG, PNG, and various other image types into PDFs.
How can I convert an image to PDF?
Both Windows and macOS come equipped with built-in features that allow you to convert images to PDF without the necessity of additional software installations.
Here’s how to do it using Windows tools:
Open the image you’d like to convert in Microsoft Edge.
In the menu, select “Print” and then choose “Save as PDF” or “Microsoft Print to PDF” as your printer option.
Click “Print” and choose where you want to save the PDF file.
The print function in the browser enables you to save images as PDFs.
And for macOS users, here’s how you do it:
On macOS, the quickest conversion method is through the context menu:
Right-click on the image file.
Select “Quick Actions” and then “Create PDF” from the dropdown options.
Alternatively, open the image with the Preview app and navigate to File > Export as PDF.
If you prefer to use other image editing software, you can easily convert JPGs or similar formats into PDFs. Free software options like GIMP or Paint.net work well for this purpose. The procedure typically involves:
Opening the desired image in the program.
Selecting File > Export as and choosing PDF as the format.
Saving the file to your preferred location.
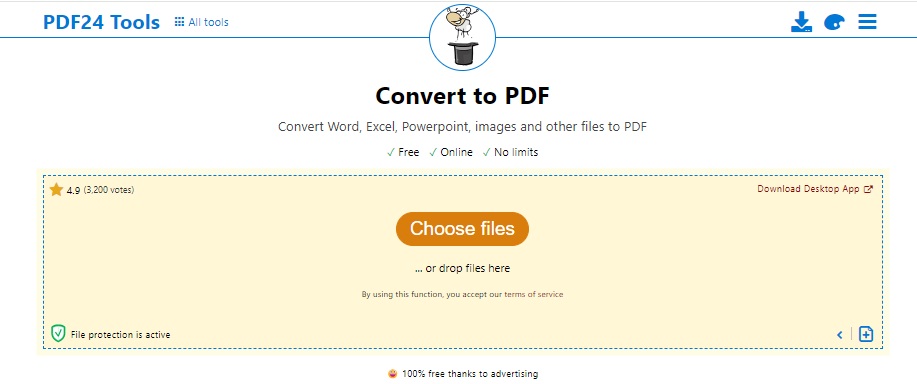
Additionally, online services such as Canva or Adobe Acrobat’s converter provide easy, lossless conversions for various image formats. Here’s a quick guide:
Visit the relevant website like Canva or PDF24.
Upload the image and select the desired output quality.
Export the file as a PDF.
Online converters like PDF24 provide a cost-free option for converting images to PDF.
Combining Multiple Images into a PDF
If you have several images that you’d like to save as one PDF document, online tools such as Canva or PDF24 can facilitate this as well. Here’s how:
Access the appropriate website or application.
Upload all the images you wish to include, arranging them as needed.
Save them as a single merged PDF file.
Note: When using Canva, it’s advisable to ensure that your images are of the same size format if you plan to edit them. For straightforward merging tasks, online converters are typically more efficient.
Can I Convert Images to PDF on My Mobile Phone?
Modern smartphones simplify image-to-PDF conversion. For Android devices, you can use the “Print” function similar to Windows. Select the desired image in your photo app, tap “Share,” and then select “Print.” Instead of a printer, choose “Save as PDF” or “Create PDF.”
On an iPhone, the process is analogous. Open the image in the Photos app, tap “Print,” and you can save it as a PDF instead of printing it, allowing for sharing or saving to iCloud.
Note: There are also several free applications available, such as “Image to PDF” for Android or “Photos to PDF Converter” for iOS, which offer similar functionality.
Reasons to Convert Images to PDF
PDF files present several advantages compared to image formats like JPG or PNG:
PDFs are excellent for printing due to maintaining the layout and image quality.
They are universally accepted and easily readable across multiple platforms.
PDF files can contain multiple pages, enabling the combination of several images into one document.
Unlike JPG formats, PDFs are not subject to compression, which enhances quality retention.
What Distinguishes PDF from JPG?
The most significant difference lies in their applications and compression techniques. JPGs are best for photos with lossy compression, while PDFs preserve original layouts, saving text, images, and graphics in high quality without loss. Thus, PDFs are commonly used for documents, reports, and presentations.
Which Image Formats Can I Transform into PDF?
Many popular image formats can be seamlessly transformed into PDFs, including:
JPG/JPEG
PNG
GIF
BMP
HEIC
WEBP
TIFF
Is Image to PDF Conversion Lossless?
Generally, the transfer from image to PDF is lossless, as PDFs act as replicas of the original files. Similar to vector graphics, image quality is preserved since no compression takes place, meaning that sharpness and detail remain intact during conversion to PDF.
Transforming images into vector graphics can be incredibly beneficial for tasks such as creating logos, illustrations, or print materials. Unlike traditional image formats like JPG or PNG, which can lose clarity when resized, vector graphics can be scaled infinitely without sacrificing quality or detail. Whether you aim to produce an SVG file or convert a PNG to SVG format, we’re here to guide you through the best methods for crafting an exceptional vector graphic.
Defining Vector Graphics
Vector graphics are distinct from pixel-based images; they rely on mathematical equations to illustrate lines, curves, and shapes. This unique structure permits scaling to any size while maintaining a crisp and clear appearance. In contrast to raster graphics, which lose detail and become blurry upon enlargement, vector graphics maintain their sharpness. Moreover, vector files often take up less space compared to raster formats. It’s worth noting, however, that intricate images and photographs can be more challenging to render as vectors.
Steps to Create Vector Graphics
Creating a vector graphic necessitates specialized software that can convert raster image data into vector paths. This process involves translating image information into lines and curves, allowing for distortion-free scaling. A variety of both free and professional software options are available for this purpose.
Unfortunately, Windows does not come equipped with native tools specifically designed for vector graphic creation or editing. While basic image editing can be conducted with tools such as Paint, these are limited to raster graphics.
Using Free Software for Image Conversion
Considered one of the top open-source vector graphic software, Inkscape excels in performance and can stand up against premium programs like Adobe Illustrator and Corel Draw. The conversion process is straightforward:
Open Inkscape and import the image you want to convert.
Select the image and navigate to Path > Trace Bitmap. Here, you can tweak various settings to enhance the outlines and details as desired.
After tracing, save the finished product in SVG format to create your scalable vector graphic.
Creating Vector Graphics on Mobile Devices
Yes, you can create vector graphics on your mobile phone! Applications like Adobe Illustrator Draw provide user-friendly interfaces for mobile users. Instructions for using this app can be found here. Other mobile options include Vector Ink and Inky.
If you wish to convert an image to SVG format, several free online tools can accomplish this efficiently. Notable among these are FreeConvert and Convertio, both of which allow you to perform conversions without installing any software. Here’s how the process typically goes:
Visit the conversion website.
Upload your image (like JPG or PNG).
Choose SVG as the desired output format.
Initiate the conversion and download your brand-new SVG file.
Identifying Vectorized Files
You can identify a vectorized file by its ability to be enlarged or reduced without any loss in quality. Open the file in a graphic editing program like Adobe Illustrator or Inkscape and zoom in. If you do not see any pixelation, then you are viewing a vector graphic. Additionally, vector files typically have extensions such as .svg, .eps, or .ai.
Contrast between pixelated image (left) and vector graphic (right, no pixelation).
Common Vector Graphic Formats
Vector graphics are primarily saved in the following formats:
SVG (Scalable Vector Graphics): A favored format for web development.
EPS (Encapsulated PostScript): Suited for high-quality printing.
AI (Adobe Illustrator): A proprietary format tied to Adobe software.
Converting JPG to Vector Graphics
To change a JPG file into a vector graphic, tools like Inkscape or web platforms such as JPG2SVG and Convertio can facilitate the process. These tools detect the lines and shapes within the image and will convert them into vector paths. You can further refine the outcome manually to ensure that all critical details are preserved.
Note: Canva also allows for image-to-SVG conversions, but a paid Pro account is necessary for this feature.
Converting PNG to Vector Graphics
Just like JPGs, PNG images can also be converted to SVG. Utilize programs like Inkscape or online converters such as PNG2SVG. This method is especially useful for logos or graphics with transparent backgrounds, as PNG supports transparency, which is retained in the resulting vector graphic.