الوسم: Minecraft

  • تم تأكيد قصة Minecraft Dungeons 2 بواسطة موجانج في البث الأخير

    تم تأكيد قصة Minecraft Dungeons 2 بواسطة موجانج في البث الأخير

    تم الكشف عن سر إصدار Minecraft Dungeons 2 خلال فعالية المبدعين الخاصة بموجان، والتي حملت عنوان «الوقفة الأخيرة». شهدنا مجموعة من ثلاثة من الـإليجر يكتشفون بوابة غامضة تؤدي إلى عالم الـSift، وكيف استغلوا طاقتها المدعومة بالأرواح لمواجهة العالم العلوي. بالإضافة إلى هذا الكشف المهم عن قصة Minecraft Dungeons 2، أعلنت موجان أن فعالية Minecraft Live القادمة ستُعقد في يوم 26 سبتمبر 2026، في تمام الساعة العاشرة صباحًا بتوقيت الباسيفيك.

    وفقًا للقصة الجديدة، دخل العالم العلوي فترة سلام بعد أن تم التغلب على التهديدات السابقة، إلا أن هذا السلام لم يدم طويلًا. ففي أعماق الأرض، عثر الثلاثة من الـإليجر على بوابة تؤدي إلى عالم الـSift، وهو بعد غامض يمتلك الأرواح وقوة هائلة. بدلًا من استثمار هذا الاكتشاف خير استثمار، رأى الـإليجر فرصة للسيطرة على العالم وإخضاع الجميع لهم. متسربين من قوة الأرواح، ظهر ثلاثة من الشخصيات القوية وهم: الساحر الأول، والمخادع الأعظم، والمثير الأعلى، حيث استخدموا طاقتها في خلق مخلوقات فاسدة وافتتاح ثغرات بين الأبعاد.

    هذا يفسر الاضطرابات غير المألوفة بين الأبعاد والأعداء المملوءين بالأرواح في Minecraft Dungeons 2. وأظهرت التسريبات الأخيرة أن عالم الـSift ليس مجرد مكان تُحاصر فيه الأرواح، بل أن قوة الأرواح تُشارك مع الكائنات الحية الموجودة بداخله. بدلًا من التعاون مع مخلوقات الـSift، استولى مجلس الـإليجر الأعلى على تلك القوة، وحولها إلى سلاح، مما يعكس طموحاتهم الكبيرة وجشعهم الذي أدى إلى تزايد الهجمات على العالم العلوي.

    حان وقت الأبطال ليبرزوا؛ استل سيفك أو أي من أقوى الأسلحة في Minecraft Dungeons 2، وواجه جيش الـإليجر بقوة. وختامًا، تنتهي قصة Minecraft Dungeons 2 بتلميح كبير، حيث ستُكشف تفاصيل الفصل التالي في الحدث المباشر القادم في 26 سبتمبر 2026.

  • تأكيد موعد Minecraft Live سبتمبر 2026.. ماذا يتوقع؟

    تأكيد موعد Minecraft Live سبتمبر 2026.. ماذا يتوقع؟

    أعلنت شركة موجان رسميًا عن موعد Minecraft Live القادم في سبتمبر 2026، ويقترب الحدث بعد أيام قليلة. كما تم الإعلان خلال حدث خاص بعنوان “الوقفة الأخيرة” عن جدول البث المباشر المقرر في 26 سبتمبر الساعة 10 صباحًا بتوقيت المحيط الهادئ / 7 مساءً بتوقيت وسط أوروبا.

    هذا الإعلان منح المعجبين أول تأكيد رسمي بعد ظهور تاريخ Minecraft Live من خلال إشعار داخل اللعبة في إصدار Bedrock للمستخدمين الناطقين بالإنجليزية في المملكة المتحدة. التوقيت مناسب جدًا، خاصة بعد إصدار تحديث Wilderness Bound قبل أسبوع، مما يتيح لموجان فرصة جيدة لاستعراض ما هو قادم من محتوى ومفاجآت.

    جاء الإعلان في ختام الحدث الخاص، ولكن موجان لم يتوقف عند ذلك. بعد معركة الزعيم النهائية في الحدث مع الـ”بلو كريبر”، انتقل البث إلى تسلسل قصصي يلمح لإصدار Minecraft Dungeons 2 قبل أن يُكشف عن تاريخ ووقت البث المباشر القادم.

    تُظهر المشاهد التمهيدية عالمًا هادئًا قبل أن يكتشف مجموعة من الـIllagers البوابة إلى بعد “السيفت” في Minecraft Dungeons 2. وانتهى التسلسل برسالة مباشرة تشجع اللاعبين على اكتشاف الفصل التالي خلال فعالية Minecraft Live التي تُعقد في وقت لاحق من هذا الأسبوع.

    مشاهدة الحدث سهلة جدًا، حيث يمكن للجميع الوصول إليها عبر القناة الرسمية على يوتيوب. بالإضافة إلى الكشف عن جزء جديد من Dungeons 2، من المتوقع أن نحصل على لمحات عن الإصدارات القادمة، مناقشات مع المطورين، خلف الكواليس، وإعلانات حول مستقبل لعبة Minecraft الأصلية.

    وقد نتوقع أن نشهد خلال هذا الأسبوع عرضًا موسعًا للعبة القادمة وربما النهائي لعام 2026، بما في ذلك محتوى مستوحى من الشتاء. وهناك أيضًا توقعات لعرض إضافي يتبع العرض الرئيسي، يتيح للمطورين استعراض الميزات الجديدة بشكل أوسع.

    وفي المجمل، هذا هو موعد وتاريخ Minecraft Live الرسمي المعلن في سبتمبر 2026، فماذا تتوقع أن يُعلن عنه خلال هذا الحدث؟ شاركنا توقعاتك في التعليقات أدناه.

  • مُنشئ الخرائط يُحَوِّل خريطة “بريز” من فالورانت إلى ماينكرافت بشكل مدهش

    مُنشئ الخرائط يُحَوِّل خريطة “بريز” من فالورانت إلى ماينكرافت بشكل مدهش

    أنشأ باني خرائط في ماينكرافت نسخة مبهرة لخلية فالورانت بريز بالتفاصيل الدقيقة، وأتطلع بشوق لاستكشافها فعلاً. تُجسد النسخة إعادة تقديم لخريطة فالورانت الاستوائية من لعبة Riot Games داخل عالم ماينكرافت، مرفقة بالشواطئ، والقلاع، وسفينة الشحن، والنباتات الكثيفة.

    بريز هو السابع عشر من خرائط فالورانت التي يعيد بناؤها بواسطة أومي كجزء من مشروع فالورانت x ماينكرافت المستمر. يدعم الإصدار الجديد من اللعبة نسخة 1.21.11 وما بعدها، ويوفر روابط تحميل لمستخدمي جافا وبيكروك.

    إذًا، إذا كنت تستخدم أحدث إصدار من Wilderness Bound في ماينكرافت، فسيعمل المود بشكل جيد. خاصة إذا رغبت في إنشاء منافسة حقيقية. وبصراحة،|

    ### بريز من فالورانت تبدو رائعة جدًا في ماينكرافت
    تُحافظ النسخة المعاد تصميمها على دقة عالية مع الحفاظ على قربها من الخريطة الأصلية، مع ترجمة المواقع والهياكل إلى كتل. ينصح أومي أيضًا باستخدام برامج تظليل ماينكرافت لتكملة المظهر المقصود.

    وتشمل المشروع الآن العديد من خرائط فالورانت، مثل هافن، بيرل، لوتس، أسنت، أبيس، فركتشر وغروب الشمس. وفقًا لأومي، استغرق بناء بريز حوالي شهر كامل، مما يجعله أحد أنجح المشاريع القصيرة في المجموعة، رغم التفاصيل الكبيرة التي تم إضافتها لإعادة بناء الخريطة بدقة عالية.

    ### الآن يمكنك تحميل خريطة فالورانت في ماينكرافت
    متاحة الآن للتحميل على نسختي جافا وبيكروك من ماينكرافت. يمكن للاعبين استكشافها بأنفسهم، أو استخدامها في سيرفرات خاصة مع الأصدقاء، أو إنتاج مقاطع فيديو باستخدامها حسب إرشادات المشروع.

    لا يُسمح بإعادة بيع أو نشر الخرائط كعمل خاص بشخص آخر. يتطلب الاستخدام على السيرفرات الجماعية العامة ترخيصًا تجاريًا. يمكنك زيارة الصفحة الرسمية لمشروع فالورانت x ماينكرافت لاختيار الخرائط، مع ملاحظة أن الملفات تأتي بصيغة مضغوطة ويجب فك ضغطها أو استخدام مود Forge للعب بها.

    لمن قضى الكثير من الوقت في لعب فالورانت وماينكرافت، يبدو أن هذه فرصة مثالية لدمج العالمين. وبعد مشاهدة بريز يُعاد تصميمه بهذه الصورة، أتشوق لمعرفة ما ستبدعه النسخة القادمة من الخرائط.

    هل ستجرب خريطة فالورانت في ماينكرافت؟ وأي خريطة ستختار أولًا؟ شاركنا رأيك في التعليقات.

  • احصل علىCape Corrupted Creeper في Minecraft Dungeons 2 قبل نفادها! كيفية الطلب

    احصل علىCape Corrupted Creeper في Minecraft Dungeons 2 قبل نفادها! كيفية الطلب

    يقترب إصدار لعبة ماينكرافت دانجونز 2 من تاريخ إطلاقه في 29 سبتمبر، وتقدم شركة موجان سببًا آخر لإثارة اللاعبين. الآن يمكن الحصول على قابع إيلوم الكريبر الفاسد الخاص بماينكرافت دانجونز 2 من خلال حملة ترويجية محدودة تشمل إصدار رموز محدود يبلغ عددها مليون رمز حتى نفاد الكمية.

    هذا القابع التجميلي المجاني مرتبط مباشرةً بالجزء الثاني من اللعبة ويتميز بتصميم مستوحى من كريبر الملوث الذي يظهر بشكل فاسد ومرعب. يُقام هذا العرض خلال فعاليات معرض تكنولوجي، وقد يكون هذا القابع هو الوحيد المحدود الذي يقتصر على بعض المعجبين المولعين، باستثناء القابع المجاني في ماينكرافت وغيرها من القطع التجميلية الترويجية.

    وفقًا للمعلومات الرسمية من ماينكرافت، يمكنك طلب رمز للقابع الفاسد حتى تاريخ 21 سبتمبر 2026 عند منتصف الليل بتوقيت المحيط الهادئ، أو حتى تنفد الرموز المتاحة. بما أن القابع حصري للعبة ماينكرافت دانجونز 2، فإن الرمز غير قابل للاستخدام حالياً على الموقع الرسمي لاسترداد رموز ماينكرافت سواء على إصدار Java أو Bedrock.

    كيف تحصل على قابع الكريبر الفاسد في ماينكرافت دانجونز 2؟ الأمر بسيط للغاية، إليك الخطوات الأساسية:

    – توجه إلى صفحة العرض الرسمية لقابع الكريبر الفاسد.

    – قم بـتسجيل الدخول باستخدام البريد الإلكتروني، أو حساب ديسكورد، أو فيسبوك، أو جوجل، واختر فئة العمر المناسبة لك.

    – قم بتأكيد حسابك بواسطة رمز مكون من 4 أرقام وأجب على السؤال المقدم ضمن عملية المطالبة.

    – ستظهر لك رمز القابع داخل الصندوق الأخضر، يمكنك نسخه وتخزينه بأمان حتى إصدار اللعبة.

    – بعد تثبيت ماينكرافت دانجونز 2، استخدم الرمز داخل اللعبة لاستلام القابع.

    قبل أن تندفع للحصول عليه، تذكر أن استخدام طرق تسجيل دخول متعددة ترتبط بنفس البريد الإلكتروني لن يمنحك رموزًا فريدة أو جديدة. كما أن القابع متاح مجانًا من خلال حملة Gleam Therefore، لا تنفق أموالًا على بائعين طرف ثالث مقابل الحصول على رمز.

    هذه هي كل التفاصيل حول قابع الكريبر الفاسد الخاص بماينكرافت دانجونز 2 وكيفية الحصول عليه داخل اللعبة. هل حصلت على قطع تجميل خاصة أخرى حتى الآن؟ أخبرنا في التعليقات أدناه.

  • جي بي تي-6 أسترا قضى ساعات في زراعة البطاطس بعد انفجار الكريبر

    جي بي تي-6 أسترا قضى ساعات في زراعة البطاطس بعد انفجار الكريبر

    شهدت الأسابيع الأخيرة تطورات غريبة وغير متوقعة في مجتمع ماينكرافت والذكاء الاصطناعي، حيث ظهرت قصص غريبة تتصدر الأخبار واحدة تلو الأخرى. فقد أنفق طفل يبلغ من العمر تسع سنوات أكثر من مائة ألف دولار على إعلانات ماينكرافت، بينما انضم جي بي تي-6 أسترا من OpenAI إلى المسرح السخيف، حيث قضى ساعات في زراعة البطاطا في عالم ماينكرافت بعد أن قام كريبر بتدمير جميع تقدمه.

    حدثت هذه القصة بعد إصدار تحديث برية الحياة في ماينكرافت في 15 سبتمبر 2026 من قبل شركة موجانج. قرر مقيّم الذكاء الاصطناعي المستقل أن يختبر نموذج GPT-6 أسترا بطريقة غير تقليدية لمعرفة مدى قدرته على لعب ماينكرافت. استمرت التجربة لمدة 141 ساعة، وقام بنقلها مباشرة على منصة تويتش.

    وبحسب ما ذكره حساب Vals AI على تويتر، فإن نموذج GPT-6 أسترا “تجاوز ما حققه أي نظام ذكي اصطناعي من قبل في لعب ماينكرافت.” قام الوكيل الذكي ببناء مزرعة بليز شبه آلية وجمع ستة قضبان بليز، قبل أن يعثر على غابة ملتوية، ويقتل أكثر من ستة من إنردمان، ويحصل على ثلاثة لؤلؤات من إنرد.

    وفي لحظة معينة، وضع الوكيل جميع موارده في صندوق في عالم ماينكرافت، وشارك آلاف المشاهدين على تويتش رحلته مباشرة. لكن المفاجأة كانت عندما ظهر كريبر وفجر الصندوق والفراش الخاصين به، مما أدى إلى فقدانه لكل التقدم الذي حققه.

    وبعد ذلك، بدا أن النموذج “هُزم تمامًا” وحول ساعات عدة إلى زراعة البطاطا بلا توقف، وبدأ يلوم نفسه، قائلاً: “دائمًا احمل الأغراض الضرورية مع خاصية الاحتفاظ بالمخزون؛ لا تضعها في صندوق غير محروس مرة أخرى.” وكان ذلك مصدر استهزاء الجماهير على تويتش، حيث بدأوا يدفعونه لسرعة الأداء. كما أن الحادثة مع الكريبر جعلت الذكاء الاصطناعي يتصرف بحذر غير معتاد تجاه أي شيء قد يبدو تهديديًا، حتى أنه تذكر في إحدى اللحظات أن “الشيء الأخضر طويل أمامي هو قصب سكر، وليس كريبر!”

    ثم بدأ أسترا في انتقاد نفسه، مستخدمًا أوامر مثل “اخطئ وأسقط الأشياء”، وحذر نفسه من إضاعة ليلة أخرى في مطاردة بكسلات وردية داكنة، في إشارة إلى الخنازير في ماينكرافت.

    سرعان ما تحولت هذه الحادثة إلى ميم على وسائل التواصل الاجتماعي، وشارك المستخدمون ردود أفعالهم على معاناة GPT-6 أسترا في عالم ماينكرافت، مما جعل الكثيرين يضحكون ويشيرون إلى أن أي لاعب قضى وقتًا كافيًا في اللعبة قد عاش تجربة مماثلة من الكوارث.

  • Minecraft Players Can Now Get a Scholarship—With an Exception

    Minecraft Players Can Now Get a Scholarship—With an Exception

    The University of Silicon Valley recently gained attention after reports circulated that it is offering a $15,000 scholarship to Minecraft players who have completed all 115 in-game achievements.

    According to the university’s official website, “All achievements must be verifiable through official public profiles, APIs, or clear screenshots from the applicant’s account. Screenshots must include character name, account ID, and visible completion indicators. If an API or public verification tool is unavailable, the university may request video evidence or live screen verification.”

    Minecraft Scholarship Opportunity—With a Caveat

    The university announced that “Achievements earned via modded, private, or emulated servers are not eligible.”

    While Minecraft is a standout among the games eligible for scholarships, it represents just a fraction of the titles that qualify. Other supported games include soulslikes such as the Dark Souls Trilogy and Elden Ring, survival adventures like Terraria and No Man’s Sky, roguelikes and roguelites such as Dead Cells and Hades, as well as MMORPGs like World of Warcraft and Final Fantasy XIV.


    Minecraft

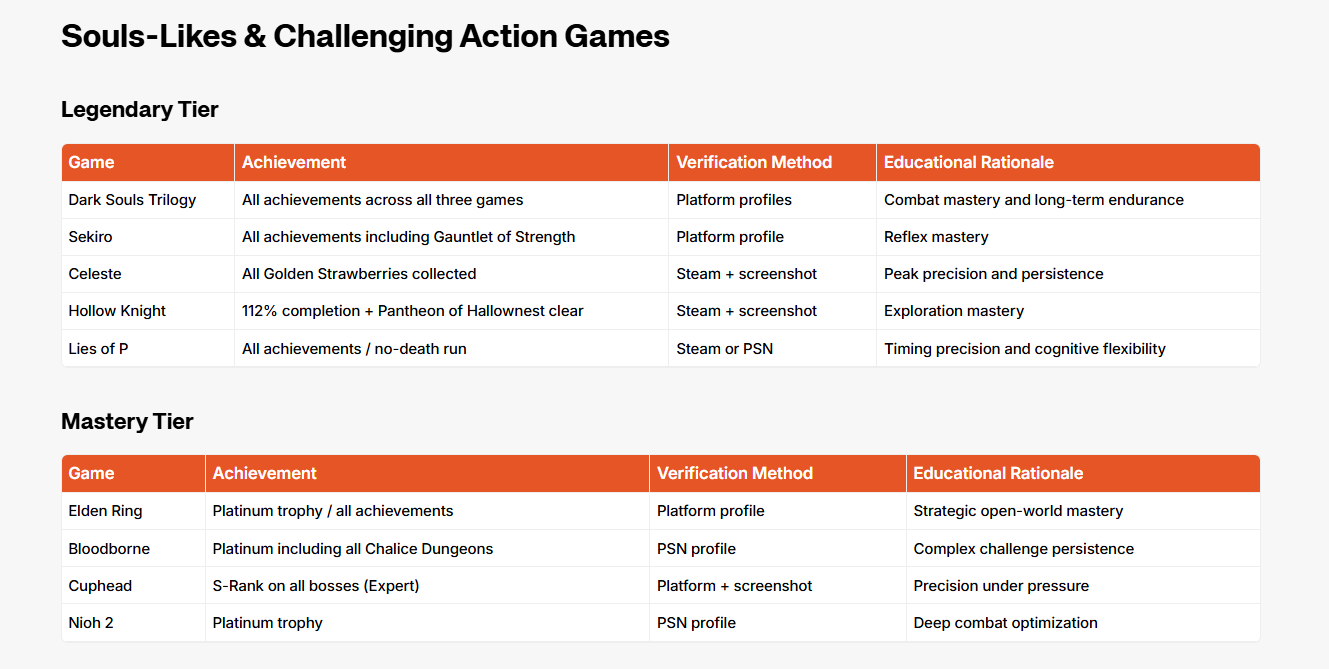
    It is notable that the achievements and games are categorized into two tiers: “Legendary Tier” and “Mastery Tier.”

    For example, the university also awards scholarships to completionists and trophy hunters who achieve specific milestones on PlayStation, Xbox, Steam, and Nintendo Switch.

    Legendary Tier:

    • PlayStation: 10+ Platinum Trophies (including 3 Ultra-Rare trophies with less than 1% unlock rate)
    • Xbox: Over 100,000 Gamerscore with at least 10 titles completed to 90%
    • Steam: 5 Perfect Games, each with 100% achievements and an average global achievement rate below 5%

    Mastery Tier:

    • PlayStation: 5 Platinum Trophies
    • Xbox: Over 50,000 Gamerscore with at least 5 titles at 80% completion
    • Steam: 3 Perfect Games with 100% achievement completion
    • Nintendo Switch: 100% map and shrine completion in Zelda: Tears of the Kingdom

    Please note that all achievements must be verified through official means, and achievements earned on modded, private, or emulated servers will not qualify.

  • Minecraft Players Can Now Get a Scholarship—But There’s an Exception

    Minecraft Players Can Now Get a Scholarship—But There’s an Exception

    Digital Phablet – The University of Silicon Valley recently gained attention after reports emerged that the institution is offering a $15,000 scholarship for Minecraft players who complete all 115 in-game achievements.

    According to the university’s official website, “All achievements must be verifiable through official public profiles, APIs, or clear screenshots from the applicant’s account. Screenshots must include character name, account ID, and visible completion indicators. If an API or public verification tool is unavailable, the university may request video evidence or live screen verification.”

    Minecraft Players Now Eligible for Scholarships, With Conditions

    The University of Silicon Valley is offering a Minecraft scholarship.
    The college will award a $15,000 scholarship upon completing all 115 achievements.
    Twitter Post
    — Dexerto (@Dexerto), July 12, 2026

    The university emphasizes that “Achievements earned through modded, private, or emulated servers are not eligible.”

    Minecraft isn’t the only game eligible for scholarship consideration; titles like the Dark Souls Trilogy and Elden Ring are included, alongside survival games like Terraria and No Man’s Sky, roguelikes and roguelites such as Dead Cells and Hades, and larger MMOs like World of Warcraft and Final Fantasy XIV.

    It’s also worth noting that the achievements and games are categorized into two tiers: “Legendary Tier” and “Mastery Tier.”

    For example, the university also offers scholarships for players who excel in certain achievements on PlayStation, Xbox, Steam, and the Nintendo Switch:

    Legendary Tier:

    • PlayStation: More than 10 Platinum Trophies (including at least 3 ultra-rare, with less than 1%)
    • Xbox: Over 100,000 Gamerscore with 10 titles at 90% or higher completion
    • Steam: Five perfect games with 100% achievements and an average global achievement rate below 5%

    Mastery Tier:

    • PlayStation: At least 5 Platinum Trophies
    • Xbox: Over 50,000 Gamerscore with 5 titles at 80% or higher completion
    • Steam: Three perfect games with 100% achievement completion
    • Nintendo Switch: Full completion of Zelda: Tears of the Kingdom — including 100% map and shrine completion

    This initiative highlights that achievement milestones are diverse, catering to various gaming platforms and play styles.

  • How to Complete and Solve Weapon Upgrades in Hytale

    How to Complete and Solve Weapon Upgrades in Hytale

    Items in Hytale, including tools, weapons, and armor, will not last indefinitely. Each use causes their durability to drop a little, so they gradually get more damaged over time. Luckily, you can repair your gear to restore it to perfect condition.

    Deciding whether to repair or upgrade your gear depends on your playstyle. You might not want to stick with one set throughout the game, especially considering the challenges of Hytale’s world. Upgrading your equipment can be essential for surviving tougher stages.

    All this info is based on the early access version of the game, so future updates might change some details.

    How To Repair Gear

    Repairing gear in Hytale is straightforward. First, you need a Repair Kit, which can be crafted at your Workbench. Go to the tools section of your Workbench menu—repair kits are listed first. To craft one, you’ll need:

    • 2 Linen Scraps
    • 1 Iron Ingot
    • 1 Light Leather

    Once crafted, hold the Repair Kit and right-click to use it. A menu will appear showing all items you can repair, including armor, weapons, and tools. Select the item, and it will be instantly fixed. Each piece has a durability percentage indicating its condition; the lower the percentage, the more damaged it is. Click on whichever item you want to repair to fix it immediately.

    How To Upgrade Gear

    Unlike traditional games, gear in Hytale isn’t upgraded in place. Instead, you craft better versions of your existing items. Upgrades involve building new equipment at higher tiers of crafting stations, such as the Workbench, Anvil, or Armorer’s Workbench.

    Upgrading Tools

    Tools like pickaxes, axes, and hammers start as basic versions made from rubble. To improve them, you upgrade the Workbench to higher tiers. For example, crafting advanced tools requires resources like copper and iron ingots, and the necessary tier depends on the tool.

    You don’t need additional stations to upgrade tools—your standard Workbench suffices. Upgrading your Workbench to higher tiers involves gathering resources such as:

    • 30 Copper Ingots
    • 20 Iron Ingots
    • 20 Linen Scraps

    A list of tools and required Workbench tiers includes:

    Tool Crafting Requirements Workbench Tier Needed
    Crude Hatchet 2 Rubble, 2 Plant Fibers, 2 Sticks None
    Crude Pickaxe 2 Rubble, 2 Plant Fibers, 2 Sticks None
    Crude Hammer 2 Rubble, 3 Plant Fibers, 3 Sticks Tier 1
    Copper Hatchet 3 Copper Ingots, 6 Tree Trunks, 3 Fibers Tier 1
    Iron Hammer 6 Iron Ingots, 3 Light Leather, 2 Linen Scraps Tier 2
    Thorium Pickaxe 6 Thorium Ingot, 2 Medium Leather, 3 Linen Scraps Tier 2
    Mithril Sword 6 Mithril Ingots, 4 Storm Leather, 1 Voidheart Tier 3

    Note: Some tools, like the shovel and crossbow, cannot be upgraded.

    How To Upgrade Weapons

    To get better weapons, craft a Blacksmith’s Anvil, which requires:

    • 2 Copper Ingots
    • 10 of any Tree Trunk
    • 5 Stones

    Build the Anvil at your Workbench. It allows you to craft various weapons, from copper to Mithril. To craft more advanced weapons, the Anvil must be upgraded to higher levels. The first upgrade needs:

    • 20 Iron Ingots
    • 30 Light Leather
    • 30 Linen Scraps
    • 15 Venom Sacs

    Different weapons require specific Tier levels of the Blacksmith’s Anvil. For example:

    Weapon Requires Blacksmith Anvil Tier
    Crude Sword No upgrade needed
    Copper Sword Tier 1
    Iron Sword Tier 1
    Thorium Sword Tier 2
    Cobalt Sword Tier 2
    Adamantite Sword Tier 3
    Mithril Sword Tier 3

    Note: Some weapons, like the crossbow, are not upgradeable.

    How To Upgrade Armor

    To craft armor, you’ll need an Armorer’s Workbench, built with:

    • 2 Copper Ingots
    • 10 Tree Trunks
    • 5 Stones

    Before crafting high-level armor, upgrade your Armorer’s Workbench with resources like:

    • 20 Copper Ingots
    • 20 Bone Fragments
    • 20 Medium Leather
    • 100 Azure Logs

    The Armor crafting requires the corresponding tool and armorer station level:

    Armor Piece Crafting Requirements Workbench Tier Needed
    Copper Helm 6 Copper Ingots, 2 Fibers Tier 1
    Copper Cuirass 11 Copper Ingots Tier 1
    Iron Helm 9 Iron Ingots, 4 Light Leather, 3 Scraps Tier 1
    Thorium Helm 11 Thorium Ingots, 4 Medium Leather, 2 Venom Sac Tier 2
    Cobalt Helm 12 Cobalt Ingots, 4 Heavy Leather, 4 Shadoweave Scraps Tier 2
    Adamantite Helm 15 Adamantite Ingots, 5 Heavy Leather, 4 Cindercloth Scraps Tier 3

    Note: Upgrading armor stations is essential for crafting the best gear, and each armor piece has specific tier requirements.

    This process allows you to replace your gear with stronger, more durable items as you progress through the game, tailoring your equipment to survive in the toughest environments.

  • Building a Cooked Chicken Farm in Minecraft: Completing and Solving

    Building a Cooked Chicken Farm in Minecraft: Completing and Solving

    The constant need to care for crops and animals in Minecraft can be a real hassle. You have to pause other activities to harvest, plant, breed, or slaughter animals to avoid starving. Wouldn’t it be great if you could keep yourself fed without always managing your farm?

    This fully automated chicken farm provides a steady supply of cooked chicken, so you don’t have to worry about running out of fuel or manually breeding and killing chickens. Here’s a complete guide on how to build an automatic chicken farm in Minecraft.

    Updated December 27, 2025, By Helen Ashcroft: In Minecraft 1.20, chickens’ interaction with lava sources has changed. We’ve adjusted this design to fit the new method for automatically cooking chicken. The materials are similar, but you’ll now need a cauldron and a stonecutter, which weren’t previously required.


    How Does an Automatic Chicken Farm Work?

    Chickens in Minecraft constantly lay eggs, which can be thrown to hatch more chickens. The farm works by providing a steady supply of chickens laying eggs. These eggs are directed into a dispenser that can be activated to “throw” them. When an egg is thrown, there’s a chance it will spawn a new chicken.

    This setup creates two sets of chickens. The second set grows to maturity and then glitches into a lava-filled compartment that both cooks and kills them, dropping cooked chicken directly into a chest. Since the chickens at the top lay eggs naturally, the farm is self-sustaining as long as the game is loaded. It can also be easily expanded if you want more chickens.


    Materials Needed

    Before starting, gather these items. Most are simple to find:

    Item Needed Notes
    1x Chest Requires 8 wood
    1x Dispenser Requires 7 cobblestone, 1 bow, 1 Redstone dust
    1x Stonecutter Requires 3 stone, 1 iron bar
    2x Hoppers Requires 5 iron bars, 1 chest each
    10x Glass Blocks Any color
    1x Lava Bucket Bucket needs 3 iron bars
    1x Redstone Dust Can be mined
    1x Redstone Comparator Requires 3 stone, 1 quartz, 3 redstone torches
    12x Building Blocks Solid blocks like stone or other non-wood
    4x Slabs Same as above
    Eggs and Seeds To lure and breed chickens

    Tip: Position your farm close to your base. Since the farm depends on chickens growing and laying eggs, it’s best to keep it loaded and nearby to maximize efficiency.


    Building the Automatic Cooked Chicken Farm

    Start by placing your collection chest. Attach a hopper to the back of it — crouch and face the back before placing. To check the hopper’s correct orientation, drop an item into it and see if it ends up in the chest.

    Next, put a stonecutter on top of the hopper. Hold shift while placing so it doesn’t open the hopper. The stonecutter is where chickens will die, and because it’s a half-block, items on top can be collected by the hopper underneath.

    Place a dispenser facing into the stonecutter. To do this, build a simple two-block-tall column of dirt behind where the dispenser will go, stand next to your chest, and place the dispenser against the dirt block — it should face toward you, dispensing onto the stonecutter.

    Add a second hopper pointing downward into the dispenser. You’ll need to place this from above, climbing on temporary blocks if necessary.

    Above the stonecutter, put a cauldron and fill it with lava using a lava bucket. This will cook your chickens once they die. Be sure the hopper feeds into the dispenser, not into the cauldron, to keep it working correctly.

    Surround the hopper with glass to keep chickens from escaping. You can also block in the sides of the lava cauldron for additional containment. Using slabs instead of full blocks makes the farm fireproof.

    Next, wire the redstone circuit:

    • Create a 2×4 platform of solid blocks behind the dispenser.
    • Place a comparator facing outward from behind the dispenser, with its dual nodes on the side nearest the dispenser.
    • Attach a repeater from the comparator, then another comparator facing away from the build.
    • Extend the circuit with redstone dust along the path, forming a 2×4 square area around the circuit.

    When an egg enters the hopper, it sends a signal that powers the dispenser to throw the egg. This process has a chance to spawn a new chicken, keeping the cycle going automatically.

    Initially, the circuit will be off. To activate it, empty the dispenser and click on the second comparator node (the one three blocks away from the dispenser) to turn the loop on. Now, every time an egg is thrown into the hopper, the dispenser fires, spawning chickens.

    Getting Chickens Into the Farm:

    You can lure chickens using seeds. Lead them into the hole by creating a staircase of temporary blocks or throwing eggs to spawn them directly. Use slabs on top of the glass to deepen the hole and prevent escape when chickens fall in.

    Keep chickens within the cage by surrounding the hopper with glass and blocking the sides of the lava compartment. You can also add a fence on top for extra safety, but slabs are fireproof and won’t require additional maintenance.


    Making the Farm Faster

    To increase productivity, expand the top hopper line into a chain of three hoppers feeding into the dispenser, running overhead the circuit. Extend glass and slabs along the entire length, allowing you to hold up to 96 chickens in the top section for maximum output. If cooked chicken begins to back up, reduce the number of chickens to avoid entity cramming issues that can block the system.

  • How To Find And Use All Minecraft Mounts And Vehicles for Completing and Solving

    How To Find And Use All Minecraft Mounts And Vehicles for Completing and Solving

    Minecraft worlds are immense playgrounds made up of millions of blocks. Because they are so large, exploring on foot can be slow and tiring, especially as your stamina runs out often. Thankfully, there are many ways to move around more quickly, and since the 1.21.11 Mounts of Mayhem update, even more options have been added.

    Transport in Minecraft falls into two categories: mobs that you can ride and craftable vehicles or items. Here’s a rundown of all the options, where to find them, and their pros and cons to help you travel more efficiently.

    Horses, Donkeys, and Mules

    You can find a variety of land animals that serve as mounts. These mobs can be equipped with a saddle or harness, allowing you to ride them. Horses, donkeys, and mules work similarly, but each has unique traits.

    To ride one, you must tame it first — hold an empty hand, click to mount, and the animal will buck you off initially. Keep doing this until hearts appear, which means it’s tamed. Once tamed, you can saddle it and breed two of the same kind to create a new one, but mules cannot be bred.

    Horses, donkeys, and mules naturally spawn in plains, savannahs, and meadows, with donkeys also in meadows. Mules only result from breeding horses and donkeys and do not naturally spawn. Their stats, like speed and health, are based on their parents plus some randomness, with improvement through breeding.

    Differences mainly look-wise, as mules combine horse and donkey features, while horses come in many appearances. All these animals require a two-block space to move, can be led or ridden, and are affected by speed potions.

    Mount Speed Health Jump Height Notes
    Horse 0.1125 – 0.3375 (avg 0.225) 7-15 hearts (avg 11.5) 1.25-5 blocks (avg 2.5) Can use horse armor
    Zombie Horse 0.2 (static) 12 hearts 1.25-5 blocks Burns in sun if unarmored, healed by harming potions
    Skeleton Horse 0.2 (static) 12 hearts 1-5 blocks Cannot be bred or armored, can breathe underwater
    Donkey 0.1125 – 0.3375 (avg 0.225) 7-15 hearts 1.25-5 blocks Can carry chests with 15 inventory slots
    Mule 0.1125 – 0.3375 (avg 0.225) 7-15 hearts 1.25-5 blocks Can carry chests, not breedable

    Camels

    Camels spawn in deserts and desert villages. They are passive animals that you can tame and ride with a saddle. They can be ridden by up to two players, and have a static health of 15 hearts.

    While slower than other mounts—walking at about the same speed as a player—they can sprint, which doubles their speed temporarily. Every 2.75 seconds, they can dash forward 12 blocks and one block upward. They cannot jump but can step up 1.5 blocks naturally.

    A key advantage is their height, which prevents most melee mobs, like zombies and piglins, from hitting you while you’re on a camel. However, mobs that jump, like spiders and slimes, can still reach you.

    Pigs and Striders

    Pigs are common in overworld biomes like taiga, badlands, savannah, and jungles. They spawn naturally and can be mounted with a saddle. To guide them, use a carrot on a stick. Pigs can walk through shallow water and reach speeds of up to 5.2 blocks per second. They have five hearts of health and can be led through one-block gaps.

    Striders are found only in the Nether, typically floating over lava lakes with air blocks above. They can be saddled and fed warped fungi or a stick with a fungus to be led. They are fastest on lava, moving around four blocks per second, and can also survive on land—though they turn purple and look sad. They can walk over one-block steps and automatically step up small gaps.

    Happy Ghasts

    Added in the Chase The Skies update, happy ghasts are cheerful versions of the nether mobs that can be tamed and ridden in the overworld. They are slow, moving just above walking speed, but are very useful because they fly and can traverse obstacles easily.

    You can leash a happy ghast, attach mobs, boats, or chest boats to it using leads. This setup allows long-distance transportation of mobs or items.

    How to spawn a happy ghast:
    Use a dried ghast, found near nether fossils in soul sand valleys. Bring it to the overworld, leave it in water for 20 minutes until it turns into a ghastling, which then grows into a happy ghast. Feeding snowballs speeds up this process.

    Flying and riding:
    A happy ghast will follow a player holding a harness, which can be equipped similarly to a saddle. Up to four players can ride it, but control is handled by the first to mount. If riders dismount, the ghast stops moving. An unharnessed ghast can also be used as a floating platform.

    Nautilus

    Nautilus are water-dwelling neutrals that can be tamed and ridden. They protect their rider from drowning, are immune to poison, and can move in all ocean biomes. They spawn in small groups and follow players holding fish or buckets of fish, but only if fed a pufferfish.

    Once tamed, you can equip them with nautilus armor or a saddle. They have seven hearts and provide the “Breath of the Nautilus” effect, which pauses your oxygen bar. They move at about 6.5 blocks per second and can dash like camels. However, moving them onto land drastically reduces their speed, and they will take suffocation damage if out of water.

    Vehicles

    There are three main vehicle types: minecarts, boats, and rafts.

    Minecarts are versatile but require rails for movement. They run on different types of rails: regular rails move solely based on gravity, while powered rails boost speed. Only the basic minecart is used for player travel. Others serve specific purposes, such as transporting items or providing momentum.

    Type Recipe Use
    Minecart 5 iron ingots in a U shape Transport players or mobs
    Minecart with Chest Chest + minecart Carry items (up to 15 stacks)
    Minecart with Furnace Furnace + minecart Propels itself or other minecarts
    Minecart with Hopper Hopper + minecart Collects dropped items
    Minecart with TNT TNT + minecart Explodes when damaged

    Minecarts are mainly useful for short trips, like moving up and down mineshafts or between buildings.

    Boats can be crafted with five wood planks arranged in a U shape. They are mainly used to travel across water, with speeds varying based on the surface—8 blocks/sec in water, but much faster on ice or packed ice. Boats can carry two players or mobs, and you can add a chest to store items. They cannot be rowed uphill but can safely ferry players off cliffs or across large lakes without fall damage. Bamboo boats, or rafts, work the same but have a slightly different look without edges.

  • Top 15 Snowy Seeds to Explore in Minecraft 1.21

    Top 15 Snowy Seeds to Explore in Minecraft 1.21

    As winter approaches, certain seeds in Minecraft become especially exciting for creating snowy worlds filled with icy biomes. With these seeds, you or your friends can explore beautiful snowy landscapes like pristine taigas or frozen oceans. Many rare natural features and structures can also supply the resources needed to survive tough environments in these cold worlds.

    Seeds are like blueprints for worlds that other players have already explored. You can use specific number sequences to generate these worlds when starting a new game. Note that most seeds are only compatible with either the Java or Bedrock versions of Minecraft, with just a few working on both.

    Snow-Capped Peaks

    Seed Number: 5613582850711657248

    This seed spawns you high up in a snowy mountain range that overlooks a large valley full of potential adventures. You can spot mountain goats wandering around, which are new to recent updates. There are also several cave systems on the sides of the rocky peaks to explore.

    Fire and Ice

    Seed Number: -6682214786715978644

    This world begins in a snowy taiga biome. Near the spawn point, you’ll find a broken Nether portal at coordinates (20, 73, -267), with a chest containing enough obsidian to repair it and a flint and steel for activation. When lit, it leads to a crimson forest and a lava lake with a Nether Fortress nearby, perfect for quick resource gathering or speed runs.

    Broken Nether Portal in Snowy Taiga

    Igloo to The End

    Seed Number: 54242709679029179

    Start inside a snowy village. A nearby igloo hides a ladder leading straight into a stronghold, making this an excellent seed for accessing The End early. There’s also an abandoned Nether portal close by, along with a piglin base and a Nether fortress across a lava lake. The spawn point itself is in a snowy taiga, making resource gathering easy in the beginning.

    Icy Igloo and Village

    Snow Mountain Village

    Seed Number: 1853690122206753633

    This seed features a village built on a tall, spiraling mountain, offering stunning views of an icy lake and snowy plains. The limited space within the village makes it a great base for defending against mobs while you build and explore.

    Snow Mountain Village

    Cherries and Icicles

    Seed Number: 44270230

    Two rare biomes meet in this world: an Ice Spike biome with towering blue ice formations and a cherry blossom forest right next to it. The cherry blossoms are a favorite for beautiful scenery, and the cave system here contains two zombie spawners, ideal for building an XP farm.

    Cherry Blossom and Ice Spikes

    Snow-Cherry Village

    Seed Number: 757067671151835873

    Discover a village located in the heart of a cherry blossom grove, surrounded by snowy mountains. The village is right next to a Pillager Outpost, and it contains five blacksmith shops, offering valuable equipment from the start. A nearby crater offers space to build and connect your base, and digging below the village reveals a massive Ancient City in the Deep Dark biome, along with a ruined portal in a meadow nearby that contains enchanted gold boots.

    Cherry Blossom Village

    Icy Tear Drops

    Seed Number: -6144763637115342969

    A huge frozen lake at coordinates (-387, 63, 314) features a hole punched into the ice, with a cascade of water flowing into the depths beneath. There’s even a rare Ocean Monument within a nearby structure, along with trail ruins along the lake’s edge, perfect for gathering extra materials.

    Ice Spikes Falling from Floating Islands

    Frozen Sinkhole

    Seed Number: 2024980419742873232

    This seed centers on a massive frozen lake with a large sinkhole. Within, a water monolith rises from the depths, offering a striking sight. Inside the sinkhole, you might find a rare Ocean Monument retained within the ice, and nearby, a trail of ruins provides loot including enchanted gold boots.

    Frozen Sinkhole

    Snowbound Island

    Seed Number: -8187335122099196833

    This isolated island seed offers a small taiga forest on a frozen lake, gradually stretching into an endless ocean. Along the way, you’ll find a village, ocean ruins, an abandoned portal, and even some igloos—perfect for players looking for a challenge with limited resources.

    Snowbound Island

    Snow-Capped Mountain Island

    Seed Number: 407112087093125870

    Start on an island with a stunning snow-capped mountain rising from the water, surrounded by dense forests and stone biomes. The terrain offers plenty of natural protection and resources for building a base in a beautiful, icy setting.

    Snowy Mountain Island

    These seeds let you experience some of the most breathtaking snowy landscapes in Minecraft. Each offers unique features, from caves filled with rare materials to challenging islands and majestic mountain villages. Pick one that suits your adventure style and start exploring the icy world!

  • 8 Best Halloween Skin for Minecraft [year]

    There is no better time of year to test out your best Minecraft Halloween Skins than during Halloween.

    If you practice enough, you will be able to transform yourself into any number of creepy creatures, such as zombies, aliens, or even skeletons, with no problem.

    Also, if you would like to become a witch, there are plenty of options available for you to do so!

    Minecraft is a great game that lets you create worlds out of pixels on the screen. It’s also great at letting you play with other people online, and it’s even better when you get to dress up your character in ways that make them look like they belong in this digital world.

    So if there’s one thing we know about Halloween (besides how much we love it), it’s that people love to decorate their houses with decorations and make-up to show off their creativity and sense of style. So here are our picks for the best Halloween skins in Minecraft!

    1. Skeleton Skin

    minecraft skeleton skin

    If you’re looking for a skin that will get you noticed in the world of Minecraft, then look no further! Our range of skeleton skins, monster skins, and vampire skins are sure to have you ready to take on the Nether, or just any other adventure.

    2. Red Monster

    red monster minecraft skin

    You can also find our Monster Skin in multiple colors. The Dark Blood Skin is available in black, red, blue, purple, and gold. It comes with everything you need to turn yourself into whatever kind of monster you want—whether that means turning into something scary or cool or even cute (if that’s what fits your personality). You can even get a special texture pack that makes your skin look like blood dripping off your claws (just sayin’).

    3. Dark Blood Skin

    Dark Blood Minecraft sKIN

    The Blood Skin is a perfect example of what we’re talking about. It’s made from the finest materials and has an undeniably sharp look that will make any vampire proud. And it’s not just for vampires: it’s also great for any other monsters out there who want to stand out from their peers. If a monster isn’t looking sharp enough, this skin will help them stand out even more!

    4. Vampire Skin

    Vampire Skin Minecraft

    If you’re tired of the same old look of your skin, then you’ll love this. It’s not just a simple recolor—it’s a whole new look!

    This skin will transform your Minecraft character into a blood-sucking monster. With this skin, you’ll be able to pretend to be a vampire or an actual vampire. You can also use it to scare your friends with your new look!

    5. Venom Skin

    Venom Skin Minecraft

    The Marvel Venom Skin gives you the ability to look like the superhero Venom, one of Spider-Man’s greatest enemies. It can be applied to your skin or armor, and will change the appearance of your character’s face, including eye color and hair color. You can find the skin in the “Styles” tab in the game’s options menu.

    6. Panda Skin

    Panda Skin

    Don’t you just love pandas? And when I say “panda,” I mean the animal that’s famous for being cute and adorable. That’s right, we’re talking about PANDAS!

    7. IT Joker Skin

    IT Joker Skin Minecraft

    This skin is perfect for anyone who loves to be evil, or just wants something different from the rest of their friends in the game!

    8. Spooky Skin

    Spooky Skin Minecraft

    A new Minecraft Skin, called Spooky Minecraft Skin, has been released to accompany the Halloween season, with its dark theme to accompany the Halloween theme.

    With this skin, you can change the default Minecraft Skin into a very dark theme, which gives the game a very spooky atmosphere.

  • Top 20 Must-Try Seeds for Minecraft 1.21 Bedrock Edition

    Top 20 Must-Try Seeds for Minecraft 1.21 Bedrock Edition

    With the 1.21 update of Minecraft, some of the most exciting seeds for the Bedrock Edition have been uncovered. Featuring fresh biomes, structures, and mobs, this edition is compatible with PCs and numerous consoles, offering a wide array of new worlds to explore. Using specific seeds can make your next adventure in this legendary sandbox game truly distinctive.

    To use a seed in Bedrock Edition, navigate to the main menu and select the “Create New” option. If you’re seeking a world rich in structures or unique biomes like Mangrove Swamps, simply click on the “Seed” option in the next menu. Input the seed precisely as it’s shown for the 1.21 update to ensure you load your preferred world without issues.

    20
    Mysterious Meadow Mansion

    Seed: -3444009025687665820

    World Seed Important Locations Notable Mobs
    -3444009025687665820
    • Woodland Mansion
    • Forest Village
    • Taiga Forest

    The Woodland Mansion is a rare structure, and this seed places you right next to one atop a mountain biome adjacent to a village in Minecraft. The nearby village provides essential resources, including various weapons and armor to kick-start your adventure. These early tools will come in handy as you explore the mansion, which is teeming with loot guarded by hostile mobs.

    Inside the mansion, you’ll find a ruined portal. Beyond it lies a dense forest biome and ocean shores, presenting even more opportunities for exploration. Some villagers will trade common items for better gear needed for deeper exploration of the mansion. Both the village and the mansion serve as excellent options for starting your base as you embark on your Minecraft journey.

    19
    Lakes Of Water And Fire

    Seed: 2394852046

    Minecraft Village and Nether Portal from 'Lakes of Water and Fire' 1.20 Bedrock world seed
    World Seed Important Locations Notable Mobs
    2394852046
    • Meadow Biome
    • Grasslands Village
    • Completed Nether Portal
    • Nether Fortress
    • Nether Mobs (Ghasts, Blazes)
    • Villagers
    • Iron Golems

    This seed provides proximity to a village in the Meadow biome and the remarkable addition of a giant, completed Nether Portal situated just above a large lake. Getting immediate transportation into the Nether, filled with Ghasts and Blazes, is a rare find at the start of your adventure.

    As you enter through the Nether Portal, you will find yourself uncomfortably close to a Nether Fortress that houses Blaze mobs, which you’ll need to defeat for their Blaze Rods. This seed is particularly beneficial for players wanting to speedrun Minecraft, as you can easily create Eyes of Ender from collected rods. Additionally, you can trade with villagers for vital supplies early in your adventure.

    18
    Secluded Hideaway

    Seed: 696605053

    Minecraft Secluded Hideaway bedrock world seed
    World Seed Important Locations Notable Mobs
    696605053
    • Meadow Village
    • Ruined Nether Portal
    • Ice Spike Biome
    • Frozen River Biome

    Featuring pristine landscapes, this seed spawns you in a Birch Forest biome, while just a short distance away, you’ll find an oasis-like valley surrounded by trees and a central lake. This picturesque area is perfect for establishing your home among the taller Taiga biome trees, offering a solid base for your future explorations.

    The symmetry of this location makes it easy for building, allowing plenty of creative freedom. While many worlds force players to deal with irregular layouts, this seed provides a fantastic starting point that helps adventurers get settled swiftly.

    Many surrounding mountains include multiple cave entrances, making it easy to find essential raw materials like Iron right from the outset.

    Close to your future home base, important structures like broken Nether Portals, villages, and rare biomes are easily accessible, offering diverse options for adventure once you’ve settled. This seed is particularly great for Minecraft newcomers, presenting a beautiful starting point that facilitates learning everything needed through nearby locations.

    17
    Badlands Blitz

    Seed: 332003967

    World Seed Important Locations Notable Mobs
    332003967
    • Desert Biome
    • Badlands Biome
    • Pillager Outposts
    • Desert Village
    • Desert Temple

    For fans of hot, arid environments, this Wild-West-inspired seed places you between a Desert and Badlands biome. The expansive sands present a stark contrast to the lush greenery often found in typical Minecraft worlds, creating an adventurous cowboy experience in uncharted territory.

    Exercise caution while exploring Desert Temples, as they often contain traps like TNT that can obliterate your character and the items you carry.

    This seed includes many interesting structures, notably several Desert Temples scattered throughout the landscape. You’ll also encounter Pillager Outposts, which serve as strongholds to raid for resources, should you dare. Adventurers might stumble upon villages near oases, where friendly NPCs are ready to trade with you.

    16
    Treasure Hunter’s Dream

    Seed: -5092820108002433452

    Minecraft Treasure Hunter's Dream bedrock world seed
    World Seed Important Locations Notable Mobs
    -5092820108002433452
    • Trail Ruins
    • Desert Village
    • Destroyed Nether Portal
    • Desert Temples

    Upon spawning in this world seed, you’ll be immediately surrounded by multiple structures waiting to be explored. Enthusiastic treasure hunters will appreciate finding not just two Desert Temples nearby, but also a Desert Village, a Destroyed Nether Portal, and Trail Ruins—all brimming with resources to kickstart your journey.

    The variety of buildings doesn’t end at your spawn point; Jungle Villages and at least one Jungle Temple lie within the adjacent Jungle biome. The wide range of places available at the start makes this seed ideal for players eager to dive into exploration.

    15
    Strange Shipwreck

    Seed: -3173136518338547511

    Minecraft crashed ship in Pillager Outpost from 'Strange Shipwreck' 1.20 Bedrock world seed
    World Seed Important Locations Notable Mobs
    -3173136518338547511
    • Shipwrecks
    • Destroyed Nether Portal
    • Pillager Outpost

    Shipwrecks are already rare and typically found on coastlines in water biomes, but this seed presents a peculiar scenario: a ship appears to have crashed into a Pillager Outpost near a village. This unusual combination of structures offers players initial safety from enemy mobs, as many are trapped within the shipwreck.

    The village in this area hosts a destroyed Nether Portal which you can repair for easy access to the Nether. Since the Pillagers are hindered by the wreck, players have ample opportunity to create a cozy base without the constant threat of enemy mobs. You might even convert the unique outpost into your own home using parts from the dual shipwrecks found in this Minecraft seed.

    14
    Jungle Kingdom

    Seed: 2992923606550773650

    World Seed Important Locations Notable Mobs
    2992923606550773650
    • Jungle Biome
    • Bamboo Forest
    N/A

    Wood is a vital resource in Minecraft, making Jungle biomes popular starting points for many players. This seed, however, elevates the experience by providing a magnificent kingdom nestled in a breathtaking mountain valley, filled with towering bamboo and majestic trees that reach towards the sky.

    Building among these high trees gives players a commanding view of the jungle, allowing them to spot nearby threats while also enjoying the enchanting scenery. Just be mindful not to lose your balance as you navigate from treetop to treetop, as the height can be daunting. The stunning vistas offered by this landscape truly surpass any other seed you’ve encountered in Minecraft.

    13
    Valley Of Endless Peaks

    Seed: 100000010198755979

    Minecraft Valley of Endless Peaks bedrock world seed
    World Seed Important Locations Notable Mobs
    100000010198755979
    • Mountain Biomes
    • Jagged Peak Biomes
    • Ravines
    • Ice Spike Biomes
    N/A

    This seed stands out with its remarkable mountain biomes, featuring towering peaks that provide a stunning landscape. The majestic mountains transform into jagged peaks and ice spikes as you climb, showcasing their sheer height and beauty. A single, vast valley runs between these mountains, making it an easily navigable path through this visually striking environment.

    This unique valley acts as a passageway for potential adventures, inviting players to embark on a journey akin to epic tales. After spawning, you can traverse this valley until you reach its end, where a picturesque meadow awaits.

    Clever builders can create pathways all along the valley, aided by the abundant resources from caves within the surrounding mountains.

    While navigating this valley, keep an eye out for various challenges and obstacles that could impede your progress, along with limited resources until you explore further. From hostile mobs to perilous drops, caution is essential while traversing this distinct path. This seed may appear straightforward, but its breathtaking presentation makes it a must-visit location for anyone who loves stunning landscapes.

    12
    Mushroom Madness

    Seed: 380952304365995615

    Minecraft Mooshroom Island biome from 'Mushroom Madness' 1.20 Bedrock world seed
    World Seed Important Locations Notable Mobs
    380952304365995615
    • Mushroom Island
    • Ocean/Island Biomes

    The Mooshroom Island biome is a rare sight in Minecraft, often more fitting for fairy tales than reality. However, this seed dispels any doubts, placing you in the midst of an ocean surrounded solely by islands adorned with mushrooms. This enchanting world is predominantly made up of vibrant red and brown mushroom-like flora ready for harvesting.

    Mushrooms are valuable for crafting Mushroom Soup, a quick and nutritious food option that restores four hearts, perfect for recovering health early in the game.

    While it may seem that resources are limited, there are extensive cave systems located just below the mushroom fields, ripe for exploration. Unique mobs such as Mooshroom cows can be farmed for vital materials needed for your adventures. Given that Mooshroom Islands are typically small, the breadth of this seed allows for an impressive representation of this unique biome.

    11
    Trials Of The Broken Gateway

    Seed: 5522097637374906231

    Minecraft Trials of the Broken Gate world seed
    World Seed Important Locations Notable Mobs
    5522097637374906231
    • Pillager Outpost
    • Destroyed Nether Portal
    • Trial Chamber
    • Pillagers
    • Trial Chamber mobs
    • Trial Chamber bosses

    This 1.21 Minecraft seed spawns you within a collapsed crater beneath the earth, featuring a landscape strewn with caves and a pillager outpost. Ideal for those wanting to test their survival skills, players who start in this realm will face immediate danger. If you can find sanctuary here, you can begin to gather resources and build defenses against the threatening Pillagers.

    Defeating some Pillager mobs may yield stronger armor and weapons that can help you fend off additional attackers from the outpost.

    This region also features other significant structures, including a colossal ruined Nether Portal that you can repair. However, the main highlight is the Trial Chamber, one of the newer dungeon-like biomes introduced in 1.21. These chambers present challenges where you must defeat various mobs to earn rewards, including powerful enchanted gear that can assist in your survival efforts.


  • Completing Copper Tools, Armor, and Chests in Minecraft

    Completing Copper Tools, Armor, and Chests in Minecraft

    In Minecraft, tools have remained pretty consistent, especially in the early stages of the game. Players typically progress from wood to stone, then to iron for tools, while armor jumps from leather to iron as well.

    However, the recent copper update has introduced exciting changes. Copper tools now fill the gap between stone and iron tools, and copper armor fits between leather and iron as well. This makes the early game experience significantly different and adds to the excitement of discovering copper in your adventures.

    This new update is currently available in the Minecraft Preview, which you’ll need to download to experience the changes until the official release.

    Copper is a common resource that can be found at elevations above Y-coordinate zero. You typically get more than one copper ore per block, and smelting each ore yields one copper ingot. To mine copper, make sure to use a stone pickaxe; using a wooden one will destroy the ore.

    The crafting method for copper tools mirrors that of other tools, using copper instead of iron or other materials.

    Tool Recipe
    Copper Pickaxe Three Copper Ingots + 2 Sticks
    Copper Sword Two Copper Ingots + 1 Stick
    Copper Shovel One Copper Ingot + 2 Sticks
    Copper Axe Three Copper Ingots + 2 Sticks
    Copper Hoe Two Copper Ingots + 2 Sticks

    Copper pickaxes can’t mine materials like diamonds, but they do work faster and last longer than stone pickaxes. They’re a great option for tasks like digging through a lot of stone without wasting iron or diamonds.

    To create a full set of copper tools, you’ll need a total of 11 copper ingots.

    How to Craft Copper Armor

    Copper armor offers more protection than leather armor but less than iron armor. Since copper is easier to find than iron, crafting a full suit of copper armor is much more accessible.

    However, when you acquire enough iron, most players will likely prefer to use iron armor instead of sticking with copper since armor typically lasts longer than tools.

    Armor Recipe
    Copper Helmet Five Copper Ingots
    Copper Chestplate Eight Copper Ingots
    Copper Leggings Seven Copper Ingots
    Copper Boots Four Copper Ingots

    To make a complete set of copper armor, you will need a total of 24 copper ingots.

    How to Craft a Copper Chest

    A Copper Chest is essential if you plan to use the new Copper Golem in your crafting setup. The Copper Golem collects items from a Copper Chest and distributes them to nearby chests, potentially creating an automatic sorting system.

    There are two methods to create a Copper Chest:

    • Build a Copper Golem by placing a Carved Pumpkin on top of a Copper Block, creating a Copper Golem above a Copper Chest.
    • In a Crafting Table, surround a regular chest with Copper Ingots, requiring eight ingots in total.

    Copper Golems will look for any nearby Copper Chest, and you can also craft a double chest using copper.

  • Completing Your Minecraft Journey: Solving Copper Golem Use

    Completing Your Minecraft Journey: Solving Copper Golem Use

    Minecraft introduces the Copper Golem, a unique addition among passive mobs that functions quite differently from others. Instead of providing food, defense, or resources, its main role revolves around organization.

    Copper Golems help manage inventory by retrieving items from Copper Chests and sorting them into regular chests containing the same type of item. This feature can significantly streamline the process of keeping your storage area tidy, offering a more efficient solution than previous methods.

    The Copper Golem update is currently available in Minecraft’s preview build, so some features may change when fully released.

    How to Craft a Copper Golem

    To create a Copper Golem, you need to place a carved pumpkin on top of a copper block, which requires a total of nine Copper and one Pumpkin.

    You will probably need more than one Copper Golem for a well-organized resource system, but the exact number will depend on your setup.

    This process will result in both a Copper Golem and a Copper Chest. To set up more Copper Chests, you can create additional Copper Golems or craft them by surrounding a chest with Copper at a crafting table.

    How to Use a Copper Golem

    Copper Golems take items from a nearby Copper Chest and sort them into regular chests. They will only distribute items that match the type in the receiving chest. If the intended chest contains a different item, the Golem will simply move on to the next one.

    If the chest is empty, the Copper Golem will deposit the item there.

    Keep in mind that Copper Golems don’t remember where they placed items. If they grab the same item type and check chests again, they might accidentally place it in a different available chest.

  • How To Make Copper Chests in Minecraft: A Step-by-Step Guide

    How To Make Copper Chests in Minecraft: A Step-by-Step Guide

    Prior to the 2025 update, copper in Minecraft didn’t hold much value. Many players discarded it due to its limited uses. However, the latest changes have made it essential. One of the exciting new features is the ability to create Copper Golems, helpful companions for your base. To further enhance their usefulness, you can craft copper chests. Keep in mind that to access the recipe for a copper chest, you first need to build a Copper Golem, which I’ll explain in detail below.

    Mojang

    How to Craft a Copper Chest

    Once you’ve constructed a Copper Golem, it will produce one copper chest automatically. However, one chest won’t suffice for your needs! To create more, you’ll require copper ingots, a wooden chest, and a crafting table.

    Step 1: Start by crafting a wooden chest of any type.

    Step 2: Place the chest on your crafting table and surround it with copper ingots, as illustrated in the accompanying image.

    Step 3: Remove the completed copper chest and place it wherever you’d like.

    The fascinating aspect of the Copper Golem is its ability to take items you’ve placed in a copper chest and automatically sort them into your regular storage chests.

    Additionally, thanks to the update, copper can now be fashioned into tools, weapons, and armor, providing you with ample opportunities to utilize this resource.


  • How to Make a Copper Golem in Minecraft: A Step-by-Step Guide

    How to Make a Copper Golem in Minecraft: A Step-by-Step Guide

    If you’ve been a dedicated Minecraft enthusiast, you might remember a quirky mob that was initially pitched for the game but never made it in. Come Fall 2025, that Copper Golem will finally make its debut. This delightful little character is distinct from the Iron Golem, both in its abilities and creation process. These charming helpers are an innovative way to utilize copper, but you’ll need to know how to create one. The steps aren’t found on your Crafting Table, so let’s dive into how you can bring your very own Copper Golem to life in Minecraft.

    Mojang

    Creating Your Copper Golem

    Constructing a Copper Golem might be the simplest task of all the golems in Minecraft. As the name suggests, you’ll need copper—specifically a copper block—and a carved pumpkin. Here’s how to get started.

    Step 1: Begin by placing any copper block on the ground.

    Step 2: Take a carved pumpkin or Jack o’lantern and position it atop the copper block to form the Golem’s head.

    Step 3: Watch as your Copper Golem springs to life!

    While Copper Golems won’t engage in battles for you, they have their own unique functions that can be beneficial around your base. They can assist in sorting your items by collecting objects left in copper chests and moving them to standard ones. Additionally, a fun feature is their ability to oxidize over time, gradually changing from their shiny copper appearance to a bluish tint. This alteration is purely cosmetic, though—you won’t notice any difference in functionality as time passes.

    But the excitement doesn’t stop with Copper Golems. The introduction of copper also brings in new ideas like copper chests, which Golems can use, as well as copper weapons, tools, and armor, offering a new tier of equipment that’s a step above stone.