الوسم: Mario & Luigi: Brothership

  • Mario & Luigi: Brothership – Discover Every Hidden Reef Spot

    Mario & Luigi: Brothership – Discover Every Hidden Reef Spot

    As you venture through the world of Mario & Luigi: Brothership, you’ll encounter Issa Rock, a curious young girl eager to learn. While exploring the islands, you’ll come across various side quests and secrets, but the Hidden Reefs can only be found in the open ocean. These Reefs are scattered across the waters of Concordia, so be prepared for a challenge in your quest to discover them all.

    Keep in mind that some Hidden Reefs won’t be accessible until later in the game, so don’t worry if you can’t find them right away. These Reefs often resemble rocky formations that look like creatures or enemies. To initiate this adventure, speak with Issa on Shipshape Island; she will provide you with all the information necessary to get started.

    All Hidden Reef Locations in Mario & Luigi: Brothership

    Begin Your Quest in the Lushgreen Sea

    After you’ve spoken to Issa, your quest can begin in the Lushgreen Sea. In this area, you’ll discover three Reefs: the Weeping Lion Reef, the Pensive Reef, and the Squiddish Reef. These are located in the southern part of the map and should be relatively straightforward to find. Be aware that some Reefs can only be accessed later in the game, so don’t hesitate to return to the search after completing Brothership.

    Reef

    How to Find

    Weeping Lion Reef

    This one can be found in the southwest corner of the area.

    Pensive Reef

    Take the lower eastern path to locate this reef.

    Squiddish Reef

    This final reef is located on your way to the Color-Full Sea to the south.

    When you discover each Reef, you’ll also get to hear a piece of Issa Rock’s poetry related to them. While this won’t influence gameplay, it adds a whimsical touch to an already quirky adventure, giving you a chance to enjoy some light-hearted fun. After uncovering all three Reefs in the Lushgreen Sea, set sail for the Color-Full Sea.

    Color-Full Sea Reef Locations
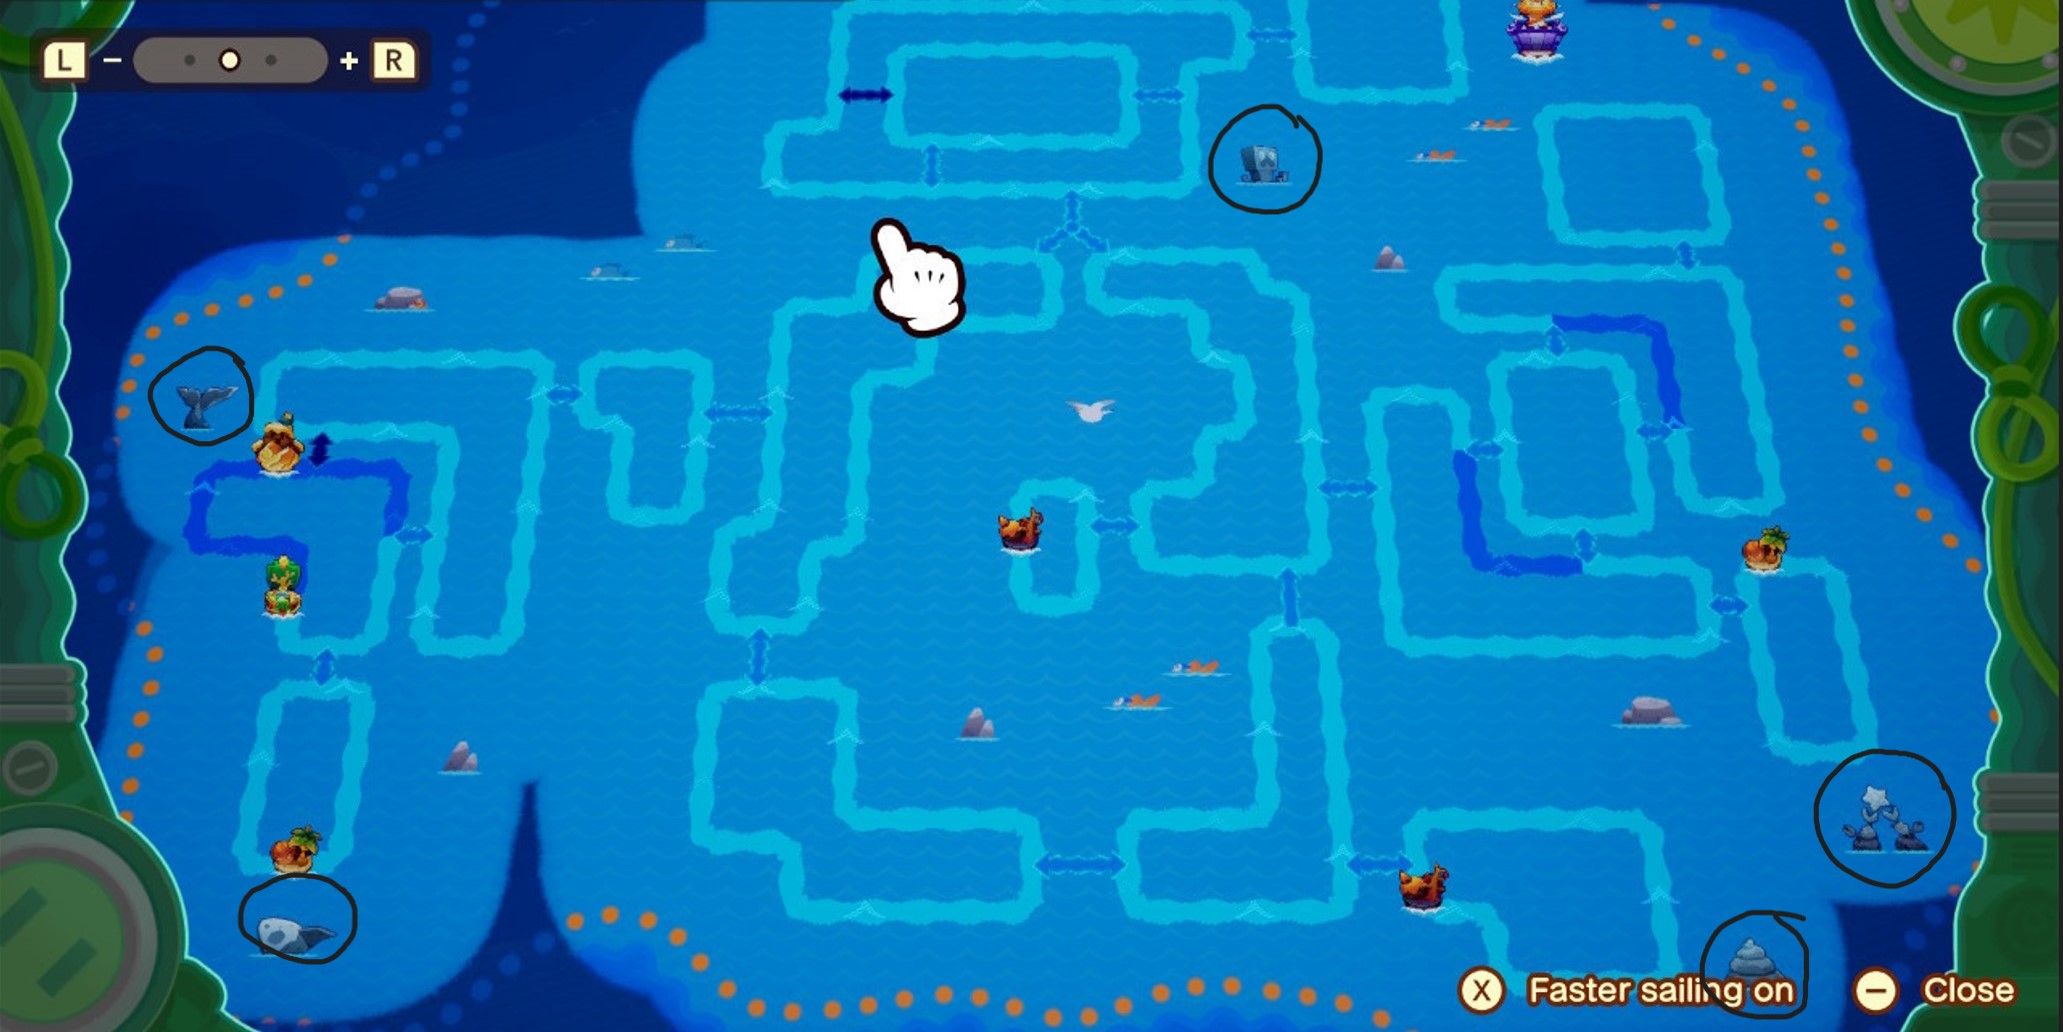
    Color-Full Sea in Mario and Luigi: Brothership

    The Color-Full Sea features five Reefs, which are scattered throughout the area. As you navigate this region, stay vigilant for these reefs:

    Reef

    How to Find

    Broque Reef

    Immediately as you enter the area, locate this reef in the center of the map.

    Just-A-Fluke Reef

    Find this reef on the western side of the map as you head toward the bottom left corner.

    Ominous Reef

    Continue south after collecting the Just-A-Fluke Reef to find this next location.

    Mysterious Swirled Reef

    This uniquely shaped reef can be found in the southeastern corner, rather notably odd in appearance.

    Eternal-Struggle Reef

    Lastly, the final reef in this area is also located in the southeastern corner.

    The Mysterious Swirled Reef adds a fresh perspective to Brothership, despite the playful humor throughout the game. You’ll encounter whimsical jokes and references like this one, although nothing is quite as…distinctive as this reef. The Brrrning Sea is your next destination, so make sure to grab a scarf before searching for the five reefs in that region.

    Brrrning Sea Reef Locations
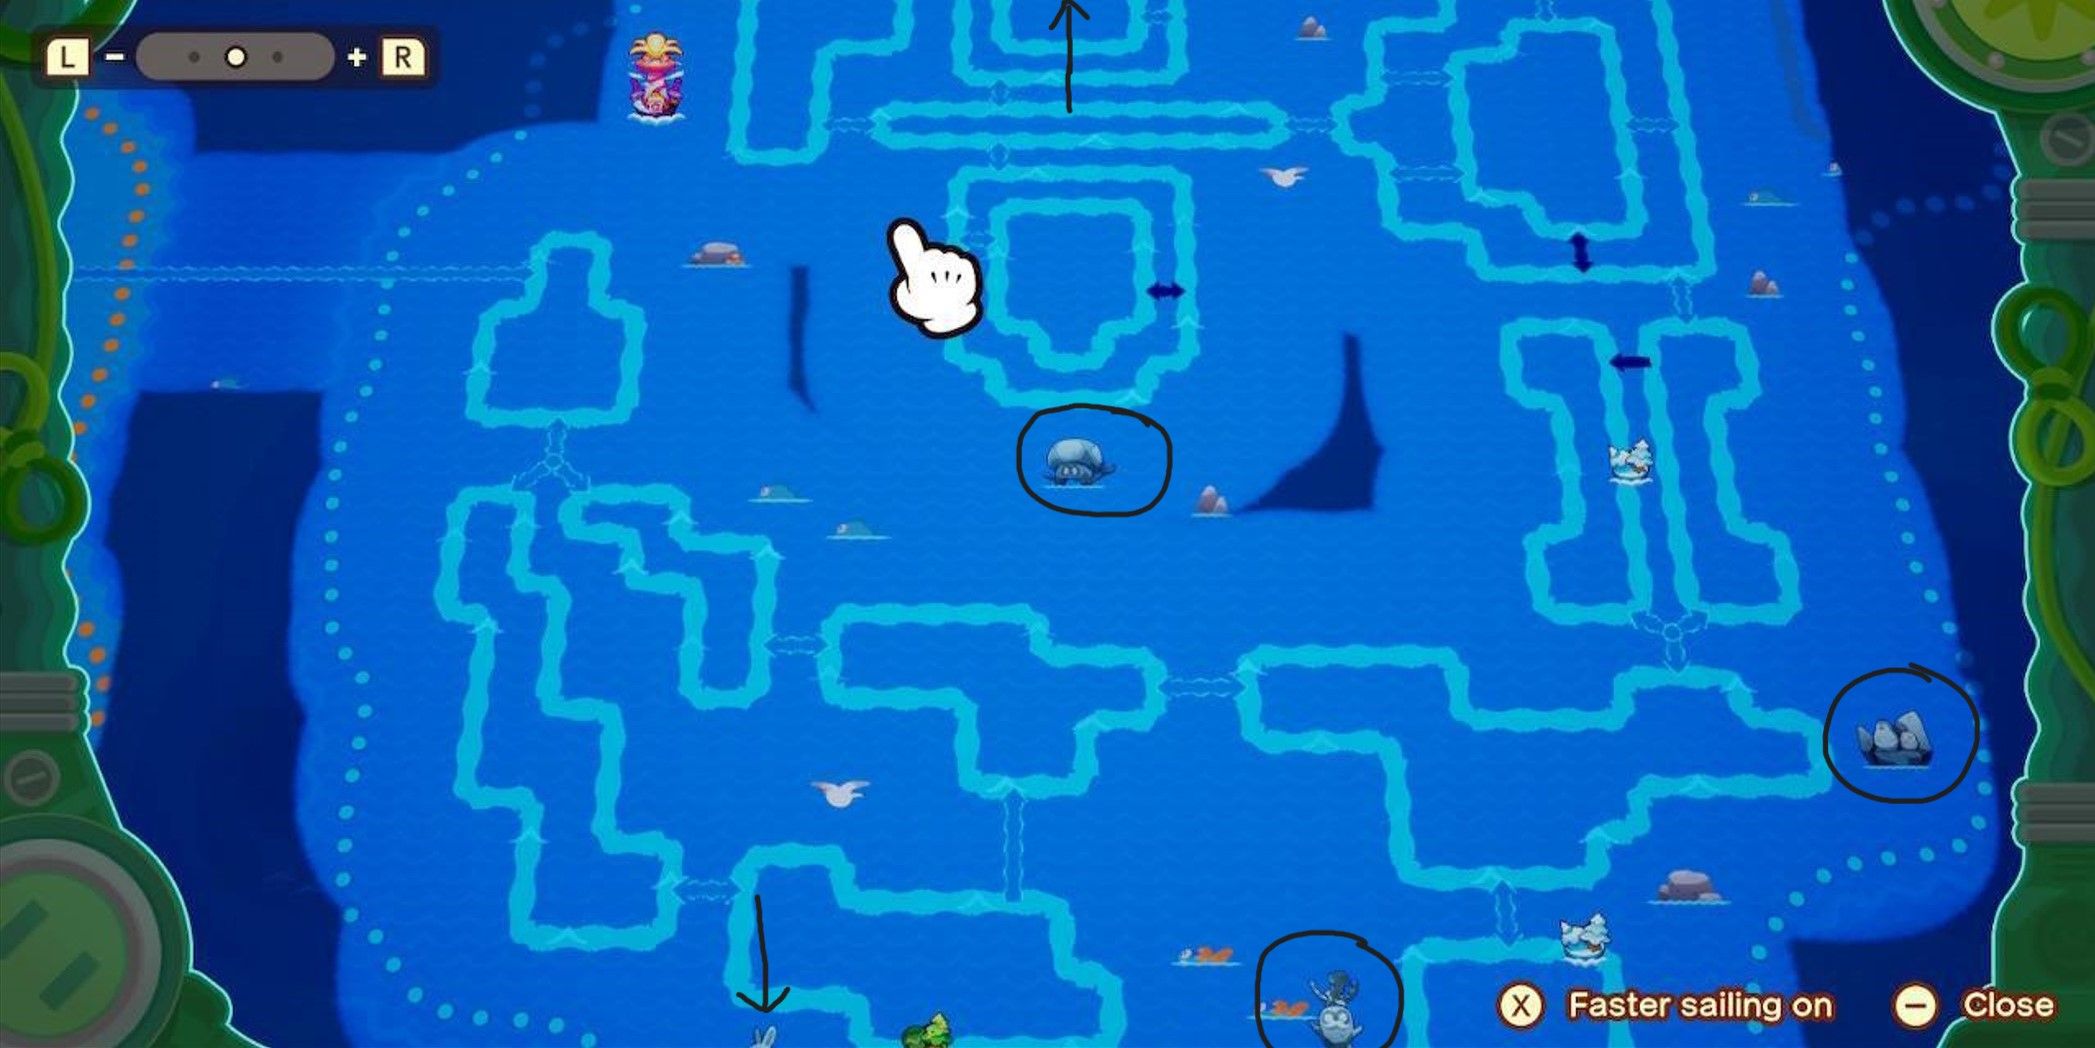
    Map of the Brrrning Sea in Mario and Luigi: Brothership

    To uncover the five Reefs in the Brrrning Sea, you’ll need to traverse the entire area. Here’s where to find each Reef:

    Reef

    How to Find

    Shower Reef

    This reef is located in the northernmost part of the Brrrning Sea, head north and slightly east from the area entrance to the Gulchrock Sea.

    Mushroob Reef

    Located in the central area of the map, you can find this reef by heading south from the Shower Reef.

    Racer’s Reef

    Move southwest to the lower edge of the region to locate the Racer’s Reef.

    Rooted Turnip Reef

    From Racer’s Reef, continue east along the southern Brrrning Sea edge. The Rooted Turnip Reef is situated in the middle.

    Feathered Friend Reef

    The final reef in the Brrrning Sea is positioned in the southeastern corner, just east of the Rooted Turnip Reef.

    After you’ve discovered the Feathered Friend Reef, make your way to the northwest corner to enter the Gulchrock Sea.

    To speed up your travel time while sailing, hold down the X button.

    Gulchrock Sea Reef Locations
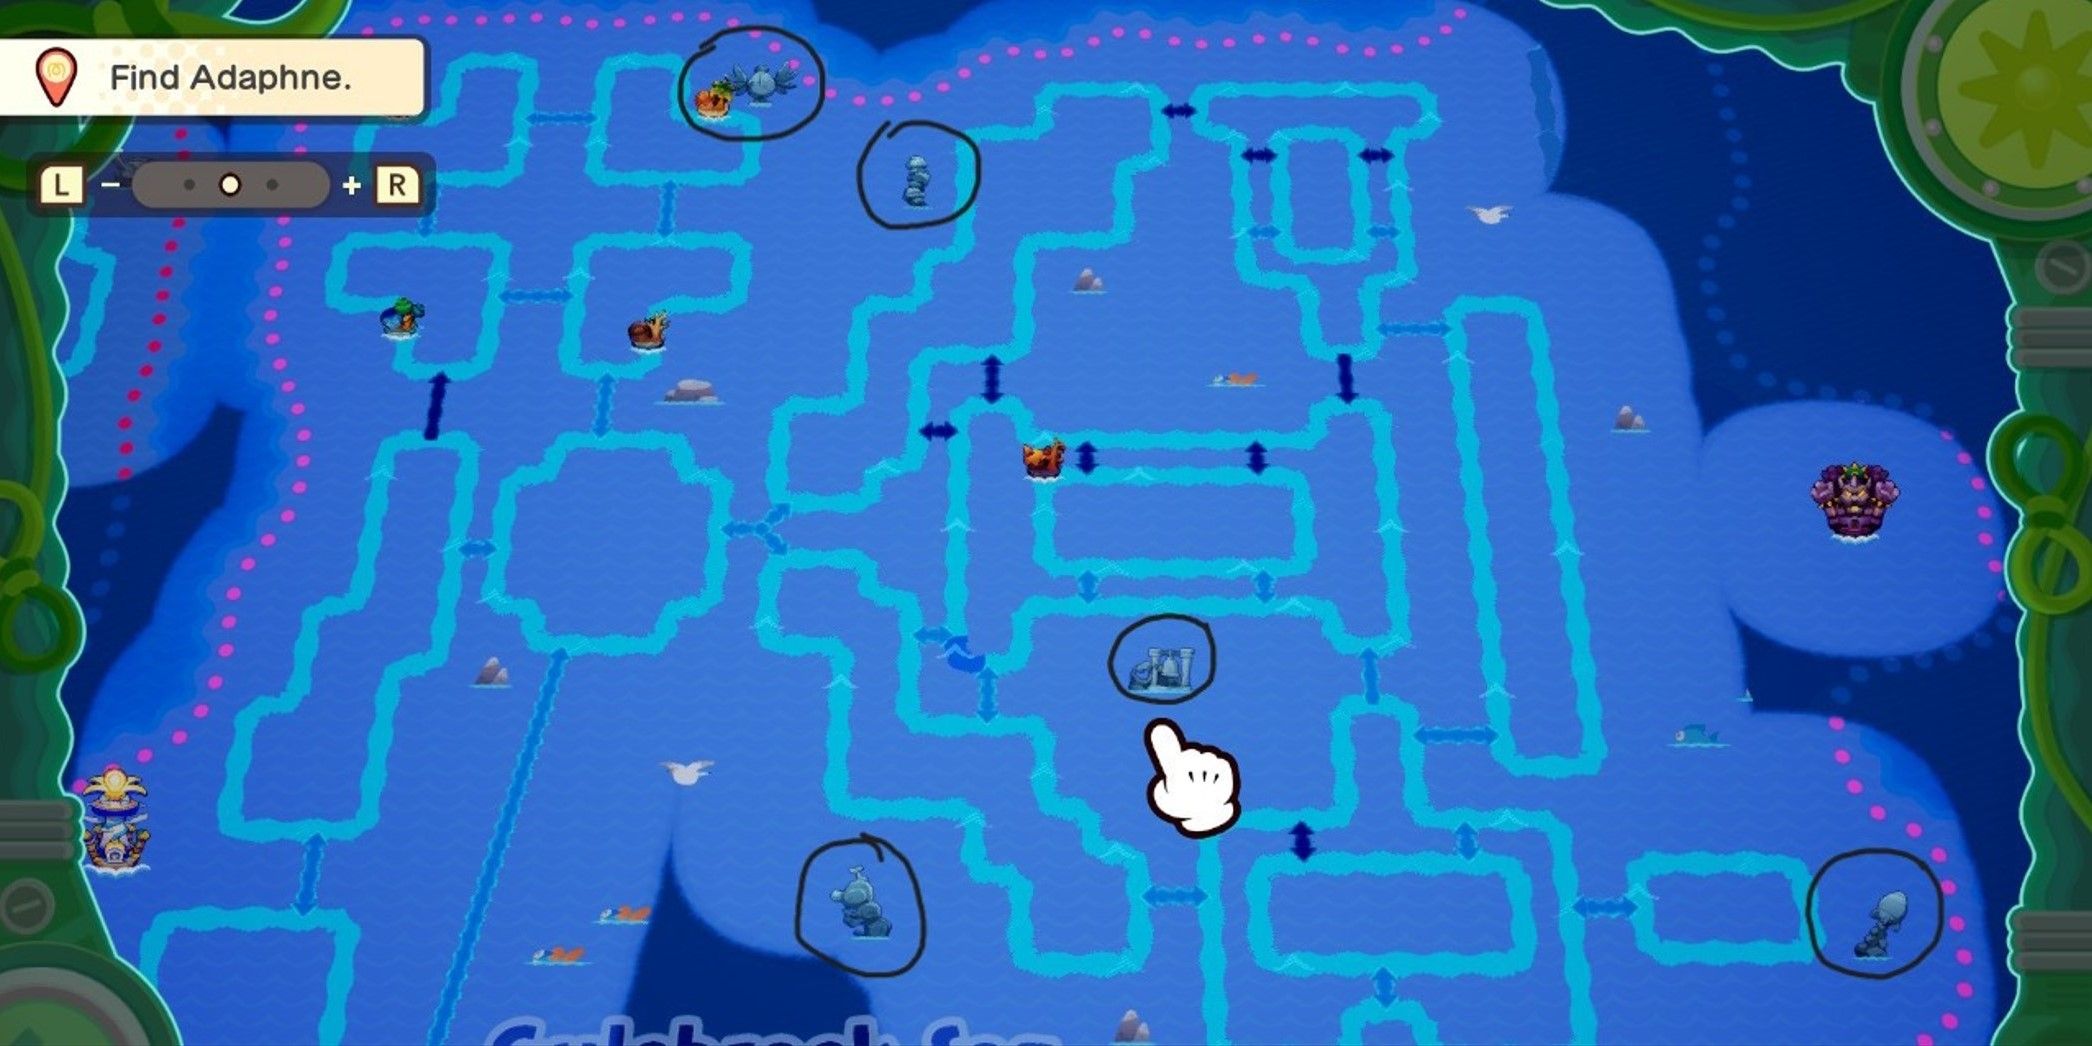
    Map of the Gulchrock Sea in Mario and Luigi: Brothership

    The Gulchrock Sea also contains five Hidden Reefs. Here’s where to find them:

    Reef

    How to Find

    Cater Pillar Reef

    This Wiggler-shaped reef is located in the southwest corner of the region.

    Off-Course Reef

    To find the next reef, take the southernmost path to reach the southeast side of the map.

    Lovestruck Reef

    Located at the center of the Gulchrock Sea’s map

    Tumbling Tower Reef

    Near the Dream Guardian Reef in the northern center of the map.

    Dream Guardian Reef

    Even though it’s close to the Tumbling Tower Reef, you’ll need to head south and west to reach the Dream Guardian Reef.

    You’re nearly finished uncovering all the reefs in Brothership, but two more await you in the Stormstar Sea region.

    Stormstar Sea Reef Locations
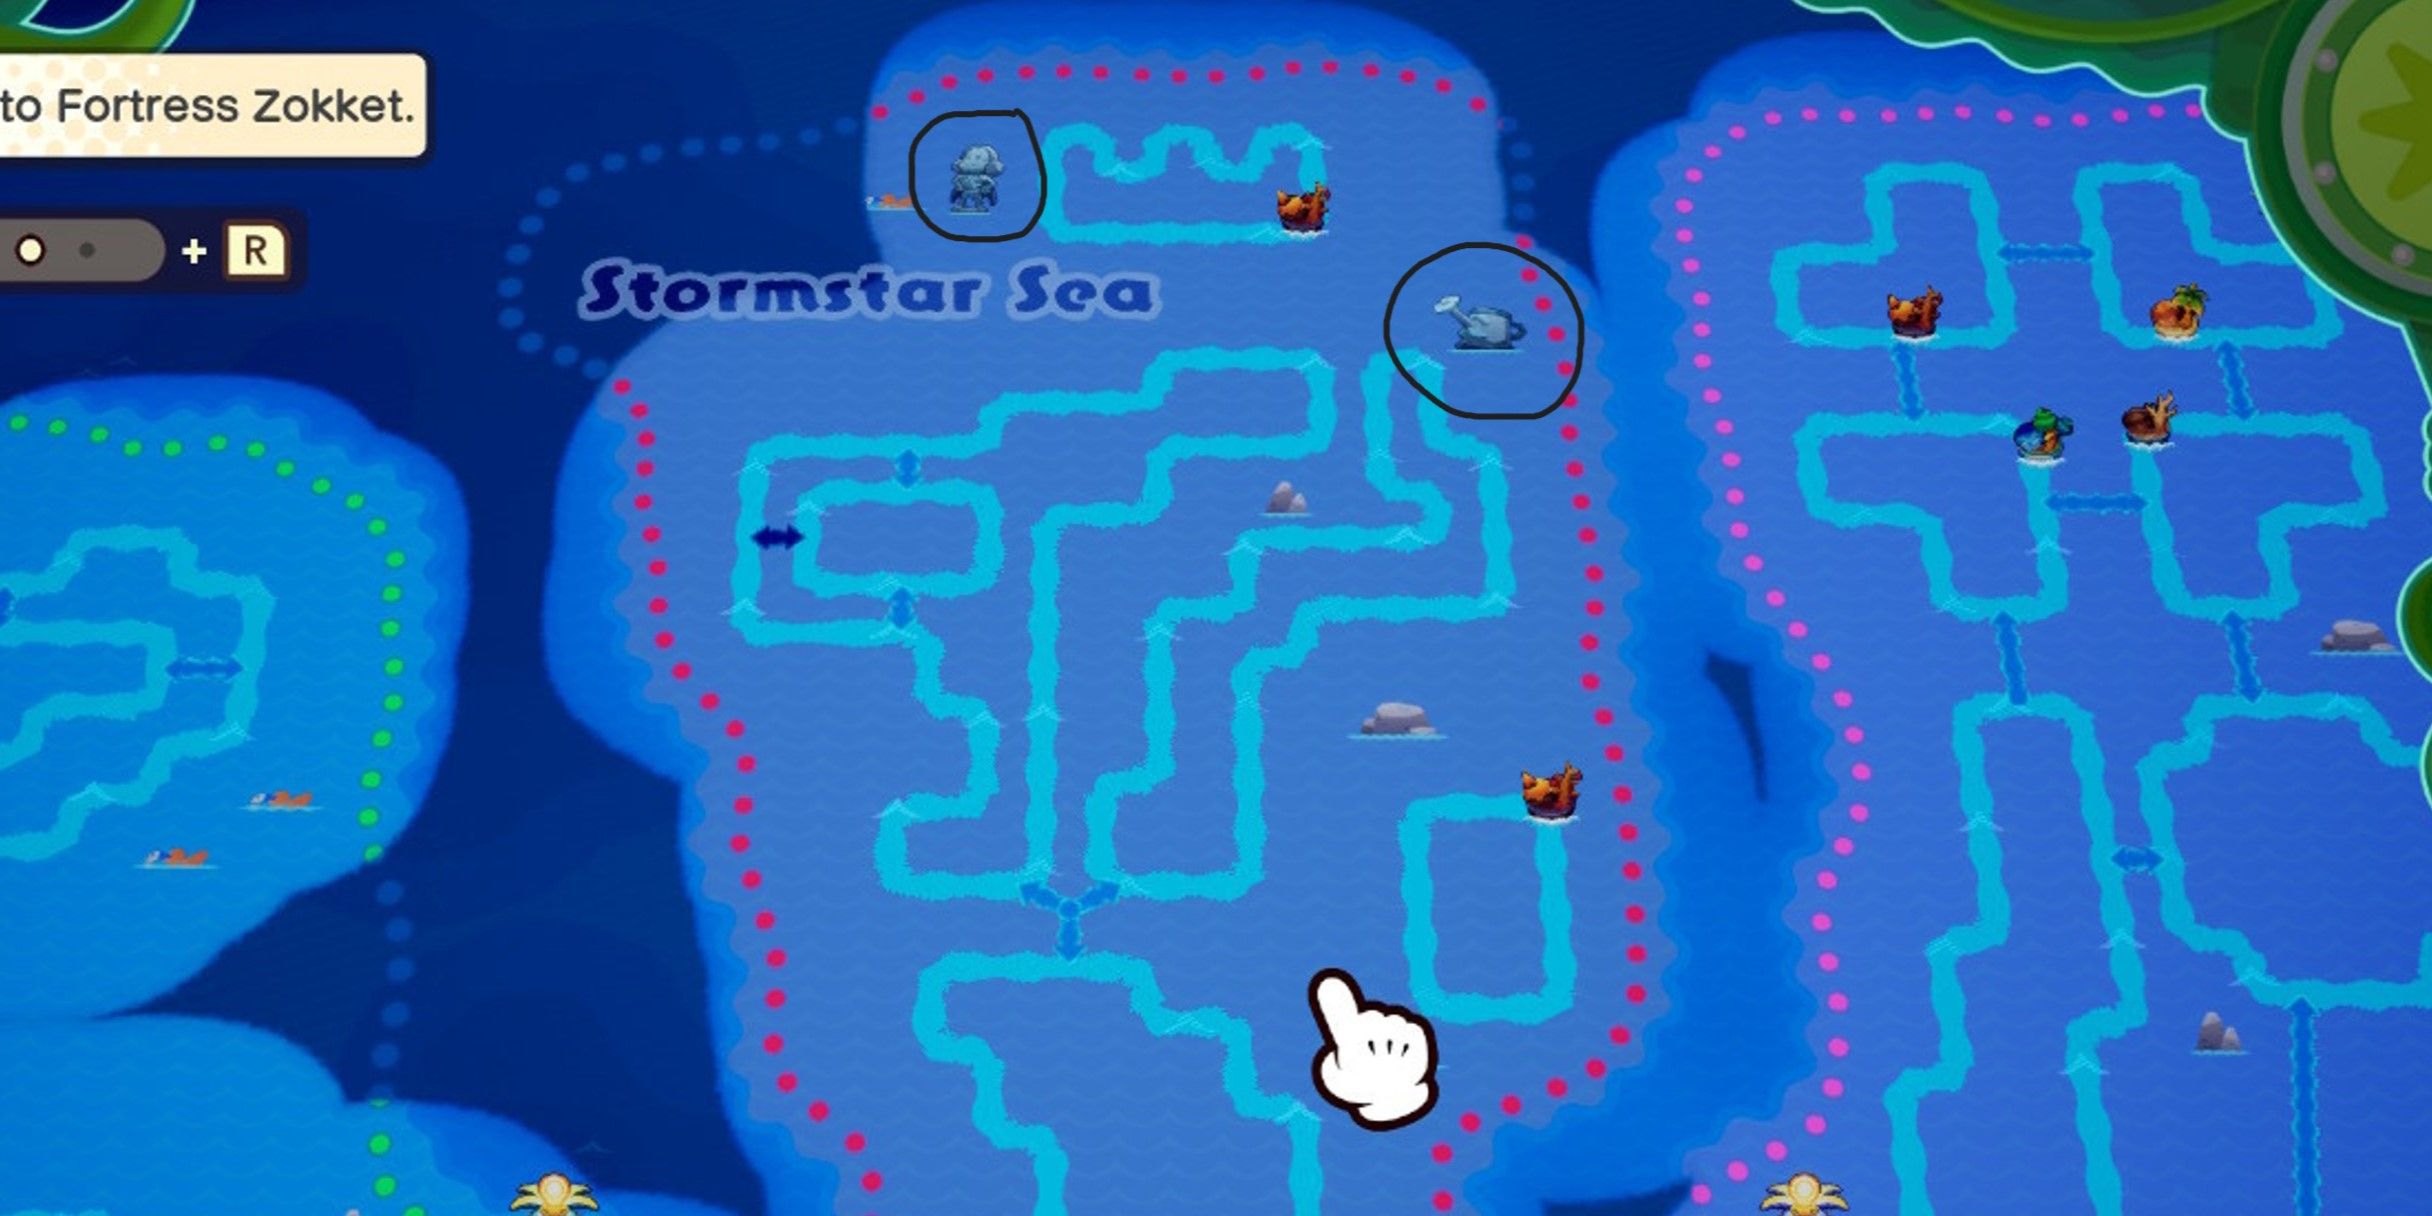
    Stormstar Sea in Mario & Luigi: Brothership

    This smaller region only contains two reefs to find. The paths here are well-connected, making it easy to locate these reefs:

    Reef

    How to Find

    Gardener’s Reef

    This reef is at the northern end of the Stormstar Sea; stick to the eastern paths to find it.

    Princely Reef

    To unlock the Princely Reef, upgrade Shipshape Island enough to enable fast travel. This will provide access to the northern part of Stormstar Sea, where you can discover the last reef.

    After locating all 20 Hidden Reefs, return to Issa Rock on Shipshape Island to claim your reward. You’ll receive an HP+BP Bangle, which regenerates a portion of your maximum HP and BP each turn. Though this quest requires considerable dedication throughout the game, it rewards you with the opportunity to thoroughly explore every part of Concordia’s oceans and conquer bosses in Mario & Luigi: Brothership.

  • Mario & Luigi: Rumbla Island Seesaw Puzzle Solutions Unveiled!

    Mario & Luigi: Rumbla Island Seesaw Puzzle Solutions Unveiled!

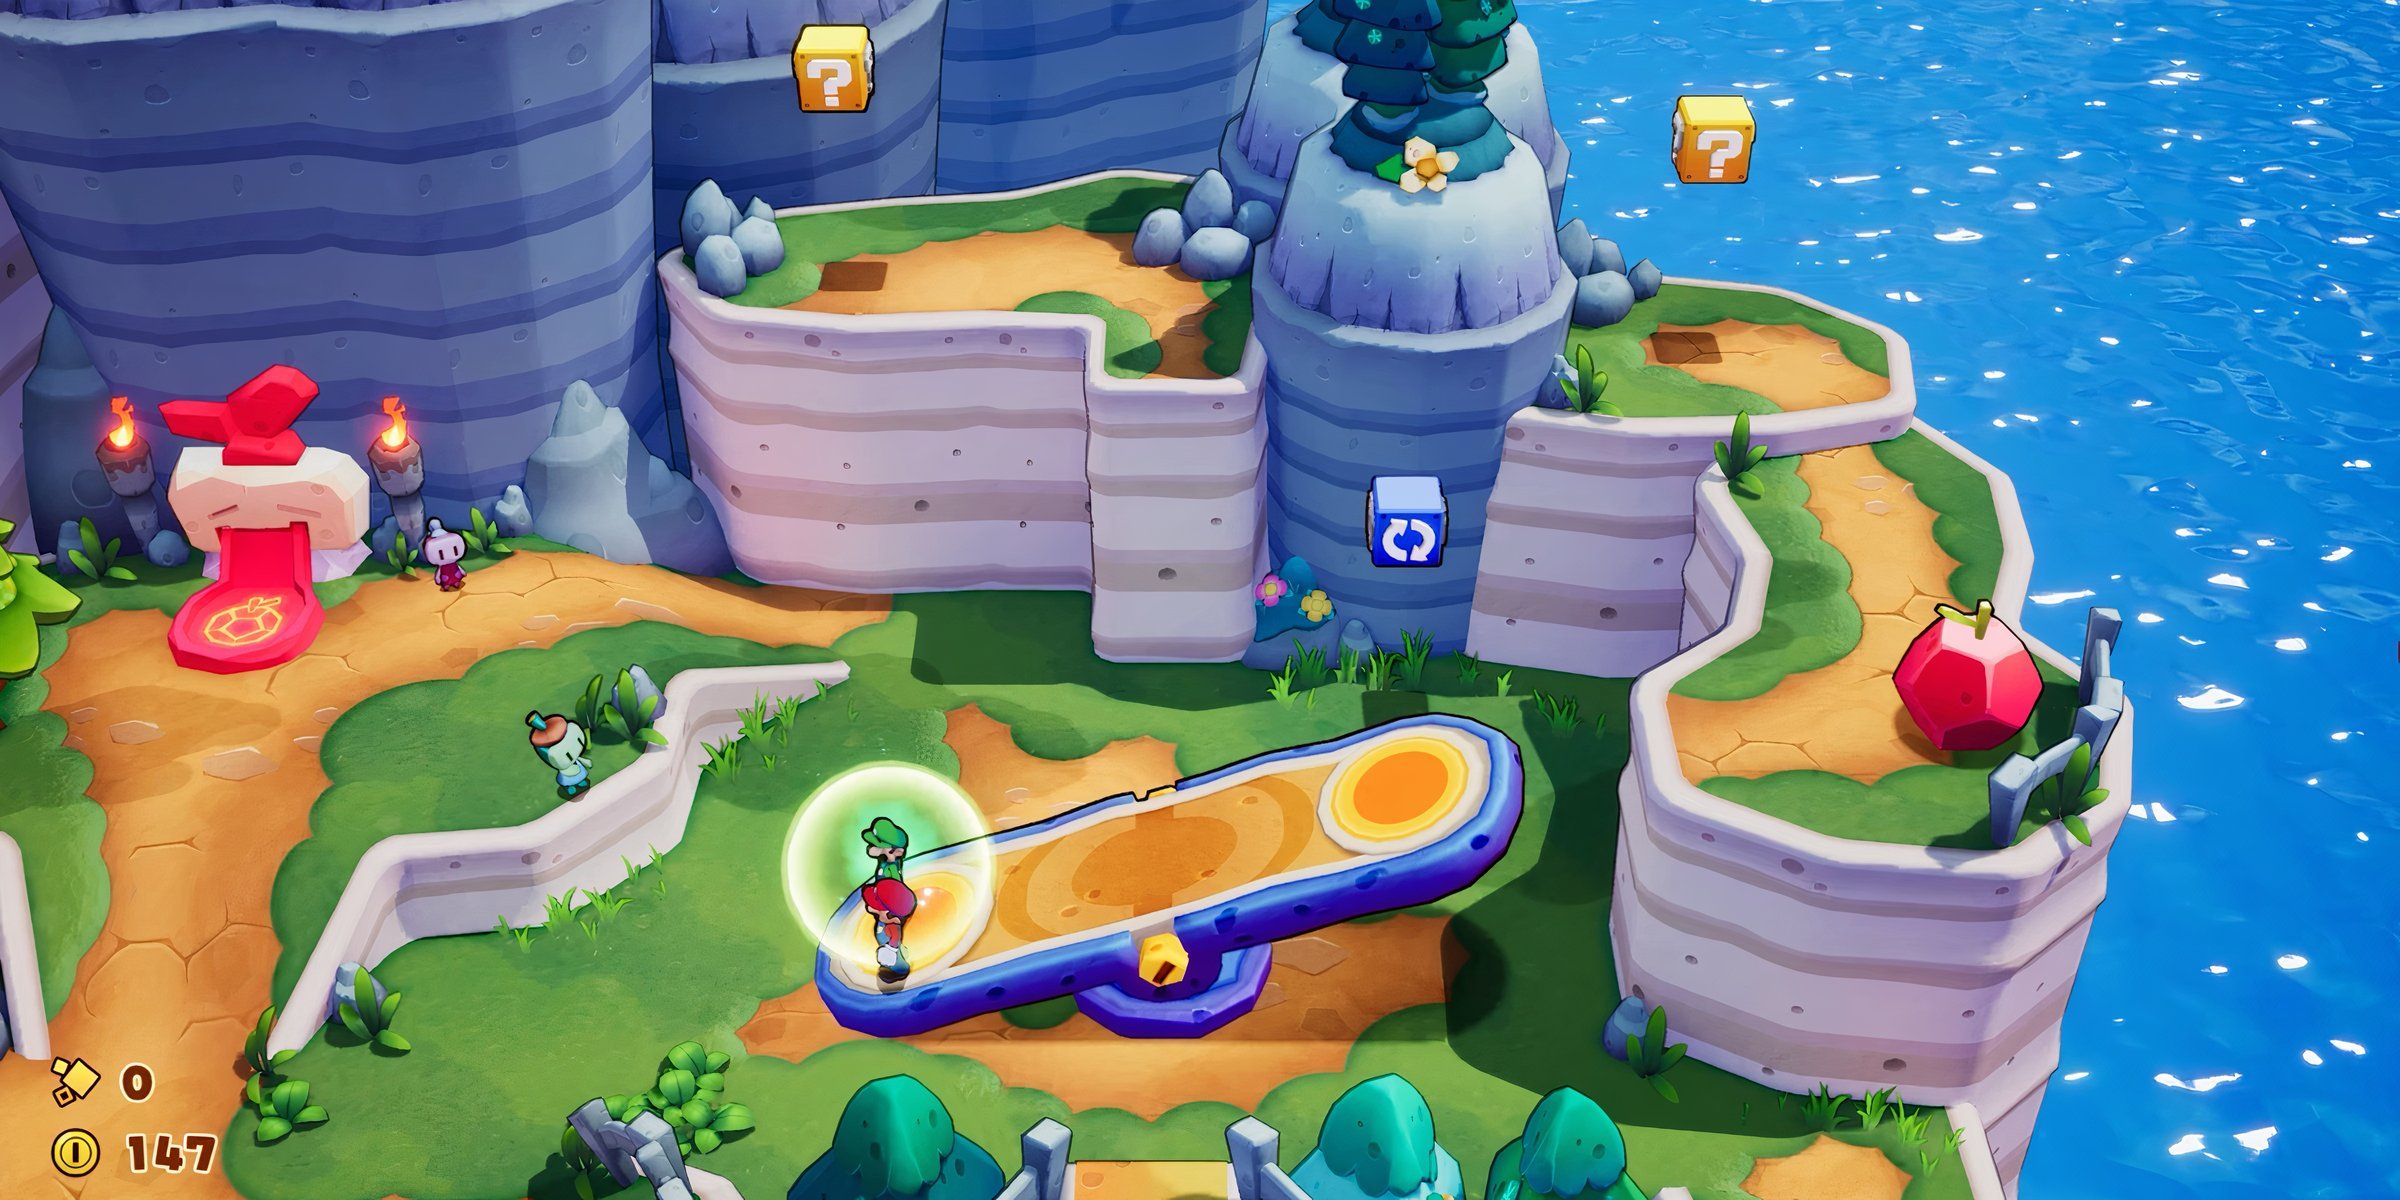
    The Seesaw Puzzle on Rumbla Island challenges players to collect two red berries in Mario & Luigi: The Brothership. To achieve this, you need to carefully adjust the seesaws so Mario and Luigi can reach the berries. This task may sound straightforward, but it requires careful planning and timing; acting too quickly can lead to mistakes.

    This puzzle is a great reminder of why we love having the Mario Brothers back in this fun RPG. Once you complete the task, feel free to experiment with the seesaws. You’ll also spot some boxes around that offer useful bonuses. However, if you prefer to focus solely on solving the puzzle, that’s fine too—you won’t miss out on much.

    All Rumbla Island Seesaw Puzzle Solutions in Mario & Luigi: Brothership

    How to Seesaw Your Way to Success

    To solve the Rumbla Island Seesaw Puzzle effectively, you need to carefully observe your positioning on the seesaw and think about your next move. It’s easy to make mistakes, especially during the second puzzle, as demonstrated in Jumpycode‘s video. However, by staying focused, you can navigate through this puzzle with ease in Mario & Luigi: The Brothership. The key is to strategize before taking action.

    Related

    The Brothers Are Back: The Mario & Luigi: Brothership Launch Trailer Showcases Stunning Gameplay

    Mario and Luigi return as a dynamic duo, introducing more puzzles, enemies, and exciting challenges within the Mario franchise.

    Be prepared to switch between characters multiple times throughout this puzzle. Familiarize yourself with using Luigi, and make sure to read the directions before proceeding. Falling off ledges you need to stay on can be quite frustrating, so double-check that you’re ready before making any jumps. For a visual guide, refer to Jumpycode‘s video link above.

    Solve the First Puzzle

    Mario & Luigi Brothership Rumbla Island Seesaw Puzzles Pair Waiting For Berry.
    Jumpycode/YouTube

    To complete the first puzzle in Mario & Luigi: The Brothership, start by hitting the rotating block until the seesaw points toward the rock on the right. Next, make sure Luigi stays on the left side of the seesaw. This allows Mario to jump to the rock and collect the red berry. After grabbing the berry, don’t jump down right away. Instead, place the berry down and go retrieve the nearby block for more bonuses—always grab these when you can.

    Don’t worry about enemies at this stage; you won’t encounter any during this puzzle.

    After picking up the berry, it’s suggested to rotate the seesaw again so it points at the rock higher up. Position Luigi on the side of the seesaw closest to this rock. Now, run to the hill at the south end and jump to propel Luigi upwards. Switch to Luigi to collect the bonus from the box. Once you’ve done this, you can continue your adventure.

    How to Solve the Second Puzzle

    Mario & Luigi Brothership Rumbla Island Seesaw Puzzles Mario Sent Luigi Flying.
    Jumpycode/YouTube

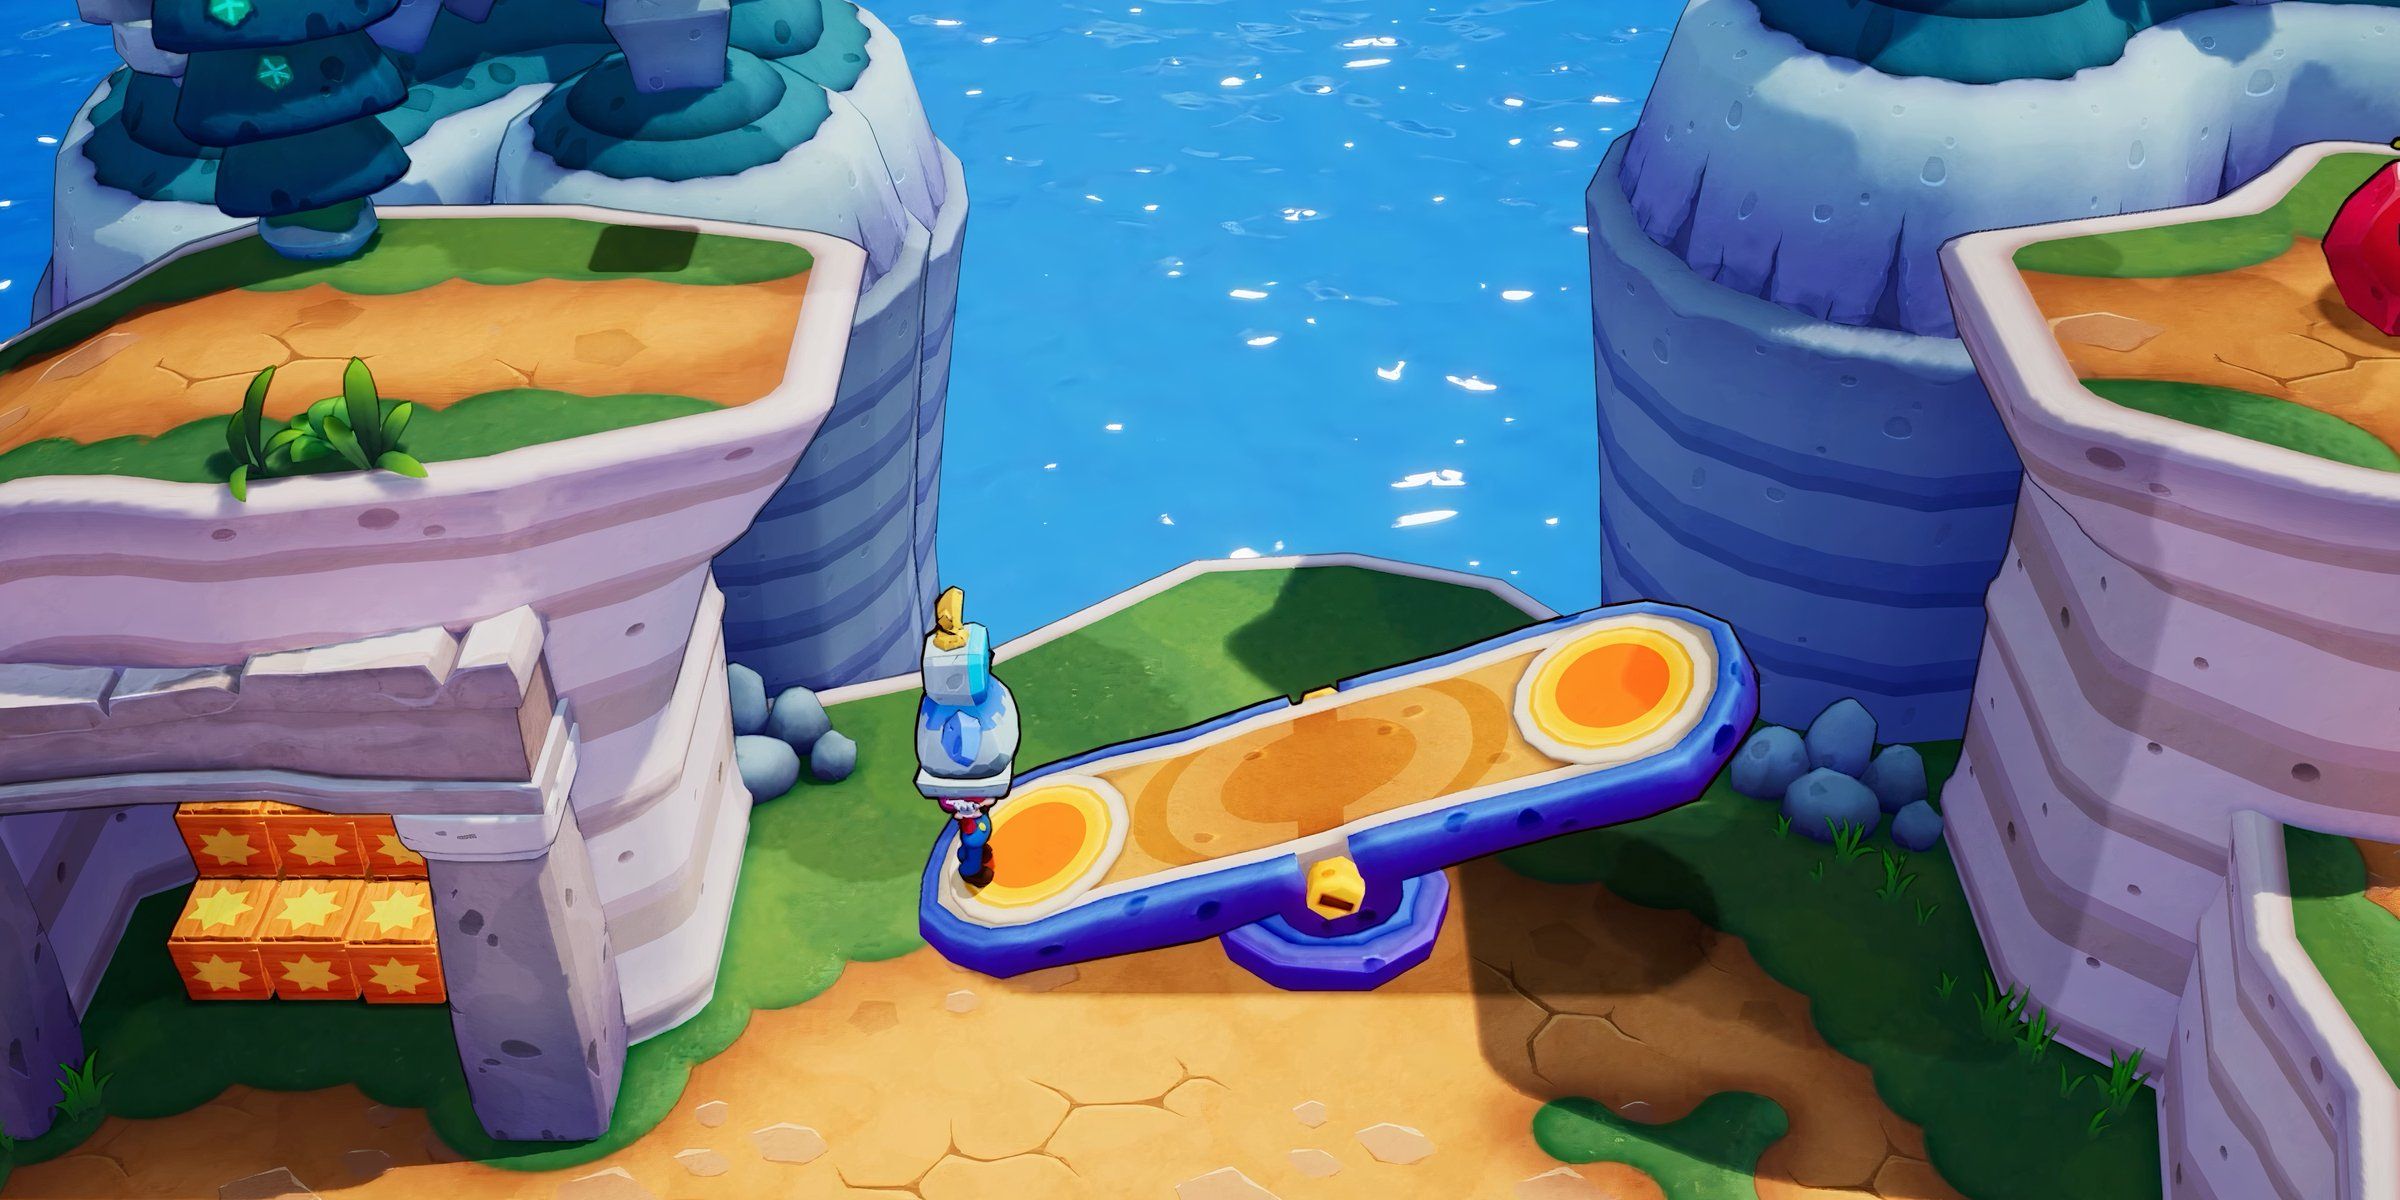
    When you arrive at the next seesaw in Mario & Luigi: The Brothership, position Luigi at the southern end to enable Mario to jump up to the hill with the rotation block. Rotate the seesaw one time and have Luigi stand at the right side. This position will allow Luigi to collect the statue. After picking up the statue, you can move forward from there.

    Hold off on interacting with the statue until it becomes necessary again; it can slow Mario down significantly. Details like this enhance why Mario & Luigi: Brothership is seen as a much-needed revival for the RPG franchise.

    Carefully carry the statue down and have Luigi take position on the next seesaw on the right side. Then, grab the statue and ascend the hill to the left. Jump from the hill onto the seesaw to launch Luigi into the air. The game will hold this position for a moment before Mario finally delivers a comedic pause that leads to Luigi descending, landing by the berry, which is essential for completing this puzzle in Mario & Luigi: The Brothership.

    Video Credit: Jumpycode/YouTube

  • Mario & Luigi: Sibling Rivalry – Defeating Bowser Made Easy

    Mario & Luigi: Sibling Rivalry – Defeating Bowser Made Easy

    Below is a rewritten version of your content in American English, ensuring it’s unique and clearly articulated:


    Bowser stands out as one of the most formidable bosses in Mario & Luigi: Brothership. Defeating him requires not only patience but also a solid strategy. It’s essential to understand his capabilities, including his attack patterns and whether he will summon allies. Below is a comprehensive overview of what to anticipate during this intense encounter.
    In Mario & Luigi: Brothership, you’ll face various bosses, each presenting unique challenges. Bowser, however, is particularly tough because he tries to distract you, limiting the advantages you’d find in other battles. The fight can go long, quickly depleting your Battle Plugs, so balancing your offense and defense is crucial.

    How to Gear Up for the Bowser Battle (Top Battle Plugs, Equipment, and Accessories)

    Choosing the Right Items for This Encounter


    Given Bowser’s fight mechanics, you’ll find yourself relying less on your Hammer and Jump attacks than usual. Many effective Battle Plug combos won’t work well here, making defensive combos more appealing, especially those that work with the Deluxe Auto Battle Plug.

    Healing will likely be a necessity during this battle, and it’s vital to avoid wasting turns on healing. Defensive combos help you heal without losing your attack opportunities. The more you can attack Bowser while minimizing his counterattacks, the better your chances will be.

    If your Auto Mushroom runs out, consider swapping it for other Auto Defense Battle Plugs. The Auto 1-Up is an excellent alternative since it fully restores health if you get knocked out. Although you might deplete these charges, they should last for most of the encounter.

    Other useful Battle Plugs include:

    • Temperature Guard
    • Easy-Peasy Counters
    • Damage Shield
    • Surefooted Guard
    • Charge Bank
    • Performance Bonus

    For gear, the Connie Mittens and IDLE Scarf are your best options. They increase survivability, allowing you more opportunities to land hits on Bowser without getting knocked out.

    The Quick-Charge Brooch may not be beneficial during the fight, but it’s essential for recharging items for the next battle. Fortunately, your larger Battle Plugs should recharge during this encounter since you won’t be using them extensively.

    Boosting your HP or enhancing your defensive stats will also be quite advantageous. After you’ve gathered your gear and accessories, you’re ready to tackle Bowser himself.

    How to Defeat Bowser

    Bowser’s Attack Patterns and How to Evade Them

    Bowser has three primary attacks along with a minion summon and can withstand significant damage, making him quite the resilient opponent. His signature moves are:

    • Flamethrower
    • Mano a Mano
    • Raging Shells
    • Bowser’s Horde

    To your advantage, you can turn his summoned minions against him. If he calls forth Koopas, Paratroopas, or Goombas, send them back his way. This tactic inflicts damage on Bowser while leaving you open to critical hits. However, beware of Bob-ombs and Spinies—they will cause damage if you attempt to send them back.

    His other attacks can be tricky, as not all can be dodged or countered. Below is a breakdown of which moves can be evaded or countered:

    Move Can Be Dodged? Can Be Countered?
    Raging Shells No Yes
    Mano a Mano Yes No
    Flamethrower Yes No

    While dodging the Flamethrower attack is possible, it can be difficult. The best strategy is to jump onto a steel ball thrown in front of you to gain some height and avoid the flames. For the Mano a Mano attack, wait until he spins in the air, releases flames, or twists his body to the left before jumping.

    You’ll need to counter the shell attack by timing your hammer swing just right to deflect the shells and Bowser away from you. If you successfully send him away, he will be stunned for a brief moment.

    Though it might seem intuitive to focus on Bowser’s minions, **you should prioritize single-target Bros. Attacks** to take Bowser down swiftly. Let your Auto Battle Plugs manage healing while you concentrate on hurting Bowser as much as possible. His minions can inadvertently assist in damaging him, so keep them around for additional chaos.

    Use whatever powerful single-target attack you have that maximizes your chances for landing an “EXCELLENT.” If Luigi has the Jump Helmet, it’s particularly effective against Bowser.

    Rewards for Defeating Bowser

    What You Gain from the Battle

    Bowser looking down with Mario & Luigi present in Brothership

    Upon defeating Bowser, you will be rewarded with 11,000 experience points and 1,000 gold. Although there won’t be any specific item drops, the experience gained from this fight greatly outweighs any shortcomings. Be prepared, as you’ll immediately transition into yet another intense boss battle right after!

    Video Credits: Nintendo Unity/YouTube


    This text retains the core information while transforming the language and structure to create a fresh version that avoids plagiarism.

  • Mario & Luigi: Brothership – Complete Guide to Battle Combos

    Mario & Luigi: Brothership – Complete Guide to Battle Combos

    In Mario & Luigi: Brothership, Battle Plugs play an essential role in enhancing your team’s abilities. Combining two Battle Plugs can amplify your effectiveness in battles, which is crucial for overcoming challenges. The game offers a variety of individual plugs, and the more you discover, the wider your options become. Players should aim to collect and craft as many Battle Plugs as possible to bolster their chances of victory in fights.

    The game features an array of unique attacks, each with its advantages and disadvantages. These attacks are useful for most battles, but they may not always suffice. As you progress, it’s vital to equip your Battle Plugs and have potent combinations at your disposal. Unlocking these combinations requires some exploration, so it’s beneficial to have a guide handy to aid your discovery process.

    How to Effectively Utilize Battle Plugs in Mario & Luigi: Brothership

    Crafting and Equipping Battle Plugs

    With nearly forty Battle Plugs available in the game, selecting the best ones can become overwhelming. This decision is further complicated when you’re unsure which plugs will create the desired combos for stronger attacks. As you delve into the details, remember a few key considerations.

    Related

    Mario & Luigi: Brothership Review – The Brothers Are Back In This Light RPG

    In this enjoyable ARPG, Mario and Luigi team up, leveraging shared skills to save the world of Concordia.

    At the outset of the game, you’ll gain access to a few Battle Plugs. However, these will likely lack the most powerful effects. To enhance your abilities, it’s essential to collect Lumenade, which can be obtained from Sprite Bulbs. Once you gather enough, you can craft new Battle Plugs using the Lumenade.

    Keep in mind that Battle Plugs have limited uses. They will gradually lose their effectiveness over time while equipped. Once a plug loses its charge, you’ll need to switch to a different one. However, unequipped Battle Plugs will recharge over time while stored, allowing you to reuse them once they are fully charged.

    Once you have a Battle Plug you wish to use, you can equip it in one of the brothers’ Power Tap sockets. These slots hold Battle Plugs and will expand as you progress through the game. Initially, you will have two sockets, but as you advance, you can unlock more. This will open up additional strategies and potent options for overcoming any bosses in Mario & Luigi: Brothership.

    Every Battle Plug Combo in Mario & Luigi: Brothership

    Powerful Combinations Yielding Devastating Effects

    As you accumulate a variety of Battle Plugs and test different combinations, you will discover Battle Plug combos. These combinations unlock unique effects by pairing specific Battle Plugs together. You won’t learn which plugs work best until you experiment, but once you do, these combos will become essential for completing the game.

    Battle Plug

    Effect

    Charges

    Recharge Time

    Kaboom Attack

    Achieve an EXCELLENT rating with a Jump or Hammer attack to also damage nearby foes (via an impact wave AOE).

    10

    30 Turns

    Surprise Iron Ball

    Getting an EXCELLENT rating with a Jump or Hammer attack releases an iron ball that falls on the target, inflicting more damage.

    10

    30 Turns

    Attack Boost

    Grants an additional Jump or Hammer attack.

    10

    30 Turns

    There are three primary Battle Plugs that form the foundational elements for any combo you’ll create. Refer to the table above for details on each plug’s effects and stats. You can see an example of how these Battle Plug combos work by watching YouTuber Meme Lord‘s video linked above.

    Boosted Kaboom

    • Attack Boost + Kaboom Attack

    This combo is straightforward but effective, as it generates more impact waves when both Battle Plugs are equipped. Impact waves are AOE effects generated by the Kaboom Attack. When used together, they inflict greater damage than either could achieve alone. Additionally, the Attack Boost enhances the Hammer attack from Kaboom, allowing for even greater damage synergy.

    Surprise Iron Boost

    • Attack Boost + Surprise Iron Ball

    The Attack Boost works alongside this combo to deliver extra hits and damage. This pairing allows you to trigger additional iron balls to fall on your opponents. As you gain more sockets, incorporating a third Battle Plug that grants extra critical hits means even greater damage potential.

    Iron Ka-ball

    • Kaboom Attack + Surprise Iron Ball

    This combo is particularly effective when facing multiple enemies, as the AOE from the Kaboom Attack is coupled with a barrage of falling iron balls. Each enemy hit by the Kaboom Attack will also be struck by an iron ball. Adding an Attack Boost when you have more sockets enhances this combo’s damage potential dramatically.

    KaboomBOOM

    • Kaboom Attack + Kaboom Attack

    Equipping two of these Battle Plugs enables an impact wave that hits all enemies, not limited to a defined area. This makes any other combo utilizing Kaboom Attack significantly more impactful. Keep in mind that you’ll unlock the second Kaboom Attack after crafting 17 Battle Plugs. Be sure to craft enough to access this powerful combo.

    Bigger Ball

    • Surprise Iron Ball + Surprise Iron Ball

    Similar to the previous combo, you can access a second Surprise Iron Ball after creating 17 Battle Plugs. This allows you to double the damage from this Battle Plug. If your goal is to maximize the impact of the iron balls, especially in conjunction with the Kaboom Attack, capitalizing on this combo can enhance your attacks significantly.

    Ka-Specialist

    • Kaboom Attack + Any Specialist Plug

    Incorporating a Specialist Battle Plug with the Kaboom Attack allows you to target enemies that fall into the specified category with increased damage. For instance, using the Anti-Flying Specialist Plug will boost damage against flying enemies within the vicinity of the Kaboom Attack. This strategy enables considerable damage amplification when paired with other plugs from earlier combos, potentially clearing the battlefield in one go if the right Specialist Plug is used.

    Specialist Plugs:

    • Anti-Flying Specialist
    • Anti-Spike Specialist
    • Anti-Army Specialist
    • Anti-Zokket Specialist
    • Anti-Glohm Specialist

    Statusplosion

    • Kaboom Attack + Any Status Ailment Plug

    This combination enables you to spread a status ailment from the second plug through the impact wave of the Kaboom Attack. For example, if the plug inflicts fire damage, that fire will propagate to all enemies affected by the impact wave. This approach allows for rapid infliction of various status ailments, enhancing your ability to defeat foes and minimizing the risk of retaliatory damage.

    Status Ailment Plugs:

    • Dizzying Attack
    • Fiery Attack
    • Icy Attack

    Dizzy Burn, Dizzy Ice, & Hot, Cold, and Dizzy

    • Dizzying Attack + Status Ailment Plug

    These three combos yield different variations of the same result. Each will apply the Dizzy status ailment plus an additional effect. The last combination grants all three effects. While these combos do increase damage, they may not be optimal for active fighting situations. Instead, pairing one of these with a Kaboom Attack offers a far more powerful attack sequence.

    Broadly Specialized

    Using any two of the previously mentioned Specialist Plugs together will also enhance their damage. The strength of combinations grows as you layer them, amplifying both damage and effects.

    Defensive Combos

    • Auto Syrup Jar/Auto Mushroom + Deluxe Auto

    Utilizing any of the utility Battle Plugs in conjunction with a Deluxe Auto allows you to automatically use recovery items when needed, selecting the most effective one in your inventory based on your needs. This feature is particularly handy for those who struggle to remember to heal during battles. However, focusing on offensive combos will often provide better results, as you won’t need recovery options if your foes are unable to withstand the initial assault in Mario & Luigi: Brothership.

    Video Credit: Meme Lord/YouTube

  • Mario & Luigi: A Guide to Navigating the Merrygo Island Maze

    Mario & Luigi: A Guide to Navigating the Merrygo Island Maze

    The Merrygo Island Maze in Mario & Luigi: Brothership presents quite a challenge, teeming with puzzles and enemies. This circular labyrinth features two rotating wall circles, which can be manipulated using buttons located at lookout towers. The inner circle is purple and controlled by a button at the Central Lookout Plaza, while the outer circle is red and operated by a switch at the West Lookout Tower.

    To navigate the maze, you’ll need to twist the circles thoughtfully to align pathways and create routes to various areas. You’ll have to make three significant adjustments to the layout to successfully traverse it, which can be tricky since both walls are rotating. Nevertheless, engaging puzzles like these remind us why we’re excited to have the brothers back in this delightful RPG.

    Merrygo Island Maze Solution in Mario & Luigi: Brothership

    How to Navigate the Maze

    Jumpycode/YouTube

    The Merrygo Island Maze is designed for a more thoughtful approach in Mario & Luigi: Brothership. Key considerations include the fact that you can’t solve the maze while directly watching the buttons that move the walls. It’s nearly impossible to do this without some assistance, so you need to climb to the top of the towers. Whenever you get to a tower, direct Luigi to stand by the button by pressing L, and then head up the stairs of the nearby tower to get a clear view of the entire puzzle.

    Related

    New Mario & Luigi: Brothership Videos Hint At Shocking New Mechanic

    Recent media for Mario & Luigi: Brothership reveals new locations and gameplay, sparking curiosity about a specific in-battle mechanic.

    Additionally, while navigating the maze, be prepared to encounter several enemies. Take them seriously, as they’re quick and can attack you with projectiles. Stick close to the walls as much as possible. If an enemy spots you, dash to safety; engaging them is often not worth the effort. Just remember to keep your walls aligned so you can smoothly navigate through the maze.

    First Rotation

    Mario & Luigi The Brothership Merrygo Island labyrinth puzzle first solution with pair at center tower.
    Jumpycode/YouTube

    Go to the top of the Central Lookout Plaza, the main tower. This tower is in charge of the purple walls. Press Y and have Luigi press the button until the green doors are at the top right and bottom right of the circle. This will keep the top left and bottom left openings clear for you to navigate through. Take the opening at the bottom left, pass through the flag passage, and head north. Keep moving until you spot the first opening, which contains an enemy in Mario & Luigi: Brothership.

    You can always confront the enemy, but since the maze is quite narrow, it’s better to just run past it. Fighting can take up a lot of time, which isn’t worth it. Wait for the enemy to move to the other side of the wall before you slip past to complete this part of Mario & Luigi: Brothership.

    Second Rotation

    Mario & Luigi The Brothership Merrygo Island labyrinth puzzle second solution with pair at western tower.
    Jumpycode/YouTube

    Once you finish the cutscene, head to the top of the West Lookout Tower. This tower operates the red walls and is vital for completing the maze in Mario & Luigi: Brothership. Press Y to have Luigi press the button until the green doors are located at the upper left and bottom right corners of the maze. After that, descend the tower and re-enter the maze through the nearest opening. Continue on until you reach the Central Lookout Plaza again.

    Third Rotation

    Mario & Luigi The Brothership Merrygo Island labyrinth puzzle third solution with pair at center tower.
    Jumpycode/YouTube

    Climb back up to the top again to observe the maze layout. Instruct Luigi to press the button until the green doors are at the upper left and lower left sides of the maze. Exit through the top right, going through the flag passage, and turn right. Take the nearest opening, turn right again, and skip the nearby green door. You might see one or two enemies, but try to avoid them by quickly turning right after exiting a passage in Mario & Luigi: Brothership.

    For a visual walkthrough, check out the video linked above by Jumpycode. Keep moving down and beyond the flag passage. Then head south again until you find another opening on your right; this leads to the maze’s conclusion. It’s clever mazes and mechanics like these that give us hope that Mario & Luigi: Brothership is the much-needed revival of this beloved RPG franchise.

    Video Credit: Jumpycode/YouTube

  • Mario & Luigi: Brothership – Mastering the Lottacoins Tube Puzzle

    Mario & Luigi: Brothership – Mastering the Lottacoins Tube Puzzle

    In Mario & Luigi: Brothership, as you progress through the game, you’ll find that Ellow has gone missing, prompting you to track down the Extension Corps. Your adventure begins on Lottacoins Island, specifically on the first floor of a building. To reach the roof, there’s no straightforward access, and you might get stuck searching for the last set of stairs. The key to getting to the roof lies in locating a pipe puzzle room, which will allow you to make your way up.

    This particular puzzle showcases the creators’ dedication to reviving the beloved brother duo in this light role-playing game. The developers clearly wanted to include a variety of puzzles, and navigating to the roof through one is an excellent touch. At first glance, this puzzle can be somewhat perplexing, especially with misleading entrances in the pipe maze. There are many false leads and red herrings, and you might believe you’ve found the right path until you realize which pipe to actually take.

    How to Locate the Lottacoins Island Pipe Puzzle

    One Path to the Roof


    When you learn about Ellow’s disappearance, you’re still quite a distance from where you need to go in Mario & Luigi: Brothership. Start by heading north towards the nearby staircase. Once you reach the third floor, move to the center of the room and head left. Continue to the next set of stairs and go up. Keep walking down the hall and ignore all doors along the way.

    Related

    Mario & Luigi: Brothership Final Boss & Ending Explained (In Detail)

    Mario & Luigi: Brothership features an RPG loaded with twists and surprises, including major revelations and a relentless antagonist.

    Eventually, you’ll notice a bold red pipe on your left. This is the entryway to the puzzle as you pursue the Extension Corps. Team up with Luigi and pick the rolling ball so you can enter the pipe. Once inside, navigate through the pipe to the left, then head into a spacious room filled with a maze that perfectly captures why Mario & Luigi: Brothership is the revival the franchise needed.

    Solution for the Lottacoins Island Pipe Puzzle

    The Correct Way to Solve This Puzzle

    Once you enter the puzzle room in Mario & Luigi: Brothership, you can stop rolling into a ball. Now, you’ll have to rearrange the pipes to move forward. Although it doesn’t appear this way initially, you can jump over any pipes to alter each connection. Activate the turning mechanisms to rotate the pipes in your desired direction before proceeding through them. You’ll find two connection switches, one on the left and one on the right.

    Don’t forget to check for a mystery box on the right side of this map. Jump underneath it before you exit the puzzle!

    Begin by jumping over the pipe and first heading to the left switch. To turn it, merge with Luigi and select the right option to perform a tornado spin. Keep using this method until the pipe in front of you rotates into position. Continue this process until the pipe connects to both the left and the top. The bottom section of the pipe should be left open, as it won’t lead to your desired destination, as showcased in Jumpycode‘s video below.

    Next, navigate to the right side to correctly connect the next pipe. Approach the turner and merge with Luigi again, utilizing the right option to initiate another tornado. From here, rotate the pipe until it links to the top and left pipes. While it may appear daunting at first, remember you’ll need to take the longer path through the pipes.

    Don’t be deceived into thinking that the middle pipe is the correct route. It might seem prominent and enticing at first glance, but the maze’s layout can mislead you. Avoid falling into this trap.

    As you make your way through the maze, resist the temptation to enter the wrong pipes. Although it appears that the middle pipe is the right choice, you should actually take the far-left pipe and follow it all the way. When you reach the second golden pipe, you’ll understand why you chose this path. After that, continue through the pipe and out the door to reach the roof, where your journey in Mario & Luigi: Brothership continues.

    Video Credit: Jumpycode/YouTube

  • All Battle Plug Combos in Mario & Luigi: Brothership Explained

    All Battle Plug Combos in Mario & Luigi: Brothership Explained

    Mario & Luigi: Brothership’s new feature introduces battle plugs—mix-and-match power-ups that enhance your attacks in impressive ways. When used skillfully, these plugs can give you a serious edge in combat.

    Battle plugs not only make your attacks more effective but also interact with one another to form powerful combinations known as battle plug combos. Initially hidden, these combos become apparent as you experiment and discover them throughout the game. Below is a rundown of all the battle plug combos and tips on how to utilize them.

    Boosted Kaboom Battle Plug Combo

    By combining the Attack Boost with the Kaboom Attack, you’ll create extra impact waves.

    This combination merges the bonus hits from Attack Boost with the area-of-effect (AOE) burst from Kaboom, resulting in additional damage waves against multiple foes. This combo exemplifies how certain plugs amplify each other’s effects, creating a robust synergy ideal for complex strategies.

    Surprise Iron Boost Battle Plug Combo

    When you pair Attack Boost with Surprise Iron Ball, you’ll see an increase in the number of falling iron balls.

    Similar to the Boosted Kaboom, this combo takes advantage of extra hits from Attack Boost to drop additional iron balls on your enemies. A jump attack will yield three hits and two iron balls, significantly increasing your damage output.

    Tip: Combining this with a specialist plug, like the Anti-Flying Specialist, can greatly enhance your total damage since each hit will count as a critical hit.

    Iron Ka-Ball Battle Plug Combo

    Utilizing Kaboom Attack alongside Surprise Iron Ball leads to iron balls falling on every enemy affected by the impact wave.

    This combo is particularly useful for crowds, as Iron Ka-Ball benefits from the AOE effect of Kaboom, dropping iron balls on all enemies in range. This strategy allows for widespread damage, especially when paired with specialized plugs.

    Note: Kaboom, Surprise Iron Ball, and Attack Boost are essential for any effective battle plug setup. Mixing these with other elemental or specialist plugs can yield great results, but their combination is notably powerful. A jump attack using all three will create three strikes, followed by AOE waves and multiple falling iron balls on affected enemies.

    KaboomBOOM Battle Plug Combo

    Using two Kaboom Attack plugs results in an impact wave that will affect every enemy present.

    Doubling up on Kaboom amplifies the AOE wave’s reach, enabling it to hit all enemies, transforming standard attacks into formidable Bros. Attacks.

    If you have extra slots, you can upgrade your existing Kaboom combos into KaboomBOOM combos, making previously discussed combinations even more potent.

    Bigger Ball Battle Plug Combo

    Equipping two Surprise Iron Ball plugs will boost their damage output.

    As you progress, you may unlock a second Surprise Iron Ball. Equipping both allows you to create stronger, more impactful attacks while enhancing other synergies.

    Statusplosion Battle Plug Combo

    If you use Kaboom Attack alongside a plug that inflicts status ailments, you’ll be able to spread the ailment to all enemies affected by the impact wave.

    This combo quickly becomes a staple in your rotation. Pairing Kaboom Attack with Fiery, Icy, or Dizzifying Attack allows you to distribute status effects to multiple foes caught in the Kaboom’s AOE wave. Dizzifying Attack is particularly effective, as it leaves opponents incapable of attacking.

    Ka-Specialist Battle Plug Combo

    Combining Ka-Specialist with Kaboom Attack offers a surefire way to dealing with large enemy groups.

    When paired with any Anti-plug like Anti-Flying or Anti-Zokket, the Kaboom Attack’s effectiveness skyrockets, while other plugs like Attack Boost or Surprise Iron Ball can help clear entire areas in one powerful move.

    Mixing and Matching Elemental Battle Plugs

    • Dizzy Burn: Combine Dizzying Attack and Fiery Attack to summon a fiery tornado, boosting your damage.
    • Dizzy Ice: Use Dizzifying Attack together with Icy Attack for an icy tornado that increases your damage.
    • Hot, Cold, and Dizzy: Utilizing Dizzifying Attack, Fiery Attack, and Icy Attack at once results in a bomb tornado that greatly enhances your damage.

    Even though status effects may seem weaker in Brothership, these three combos can significantly amplify your damage while having the added bonus of potential status effects.

    Tip: Utilizing these combos with Kaboom can lead to extensive multi-status effects, cementing your position as a dominant force in battle.

  • Mastering the Slippenglide Island Ice Block Challenge in Mario & Luigi

    Mastering the Slippenglide Island Ice Block Challenge in Mario & Luigi

    Mario & Luigi: Brothership offers a treasure trove of innovative concepts and smart designs that truly enhance the platforming-RPG experience. It introduces a challenging ice block puzzle that requires some finesse. Don’t worry; we’ve gone through the thick of it so you won’t have to.

    If the mere thought of ice puzzles brings back memories of challenging levels in Pokemon Gold & Silver’s Ice Path, there’s no need to stress. We’re here to guide you through the Slippenglide Island ice block puzzle with ease.

    How to Move the First Ice Block into Place


    Your first task is to shift the ice block that’s blocking the entrance to the puzzle. You need to knock three ice blocks into the water to create a bridge and make your way out of the cave. First, stand on the right side of the large ice block and strike it with the hammer. This will send it sliding down and into the water—one down, two to go.

    Remember, ice blocks will keep sliding in the direction they are hit until they hit a wall or fall into a pit of spikes.

    While spikes will break them, if that happens, the block will respawn in its original spot so you can give it another try.


    An ice block platform switch in Mario & Luigi: Brothership.

    To get started, climb the stairs near the entrance and send Luigi to stand on the switch. Mario will work solo for now, while Luigi stays ready to activate the switch that moves platforms and walls within the puzzle.

    Once Luigi activates the switch, it will raise the yellow platform to the top of the steps; Mario should step on it. When he’s on it, Luigi needs to activate the switch again to send the platform back to its original position. Now, Mario can hop across the ice platforms toward the next solid platform.

    The ice platforms have a three-stage life cycle. An intact platform cracks when stepped on, a cracked one falls apart completely, causing Mario to drop through if he steps on it again.

    From the first yellow platform, jump forward, right, and then forward again onto the next yellow platform. Then jump onto the solid platform ahead and hit the large ice block with your hammer to drop it onto the ground.


    Mario standing on a yellow platform in an icy room in Mario & Luigi: Brothership.

    Here’s how to move the block to the exit:

    1. Hit it from above to slide it south.
    2. Hit it from the right to slide it west.
    3. Hit it from below to shift it north by one block.
    4. Hit it from the right to move it west again.
    5. Hit it from above to slide it all the way south, out of the room.
    6. Finally, hit it from the right so it slides left and falls into the water, creating part of the bridge.

    With the second block in position, you should activate the switch above it to create new ice platforms. That’s two blocks down, one left. Return to the main room and go back up the stairs. Have Luigi stand on the switch again to bring the yellow platform back to where it started.

    How to Move the Last Ice Block into Place


    Mario on a yellow platform looking at an ice block on the left in Mario & Luigi: Brothership.

    Once you are on the yellow platform, have Luigi hit the switch. When the platform stops moving, jump forward three times, then jump twice onto the moving yellow platform.

    This platform moves automatically, so timing your jumps is critical to avoid falling through fragile ice platforms.

    Once the platform reaches the other side, leap to the next platform and strike the ice block with your hammer to drop it down onto the ground.

    There’s a tricky diagonal jump you can take to reach an item box in the upper left corner of the room. It may look impossible at first, but with some practice, you will get there!

    Here are the moves needed to finally place the last ice block:

    1. Hit it from the left to slide it east.
    2. Hit it from above to slide it south.
    3. Hit it from the right to move it west.
    4. Have Luigi activate the switch to position the yellow gate, preventing the ice block from falling into spikes below.
    5. Hit it from above to slide it into the yellow gate.
    6. Hit it from the left to shift it one space to the west.
    7. Hit it from above to move it south.
    8. Stand above the spikes on the left and angle yourself diagonally to hit the ice block from the left, moving it west.
    9. Hit it from below to slide it north.
    10. Hit it from the right to move it west.
    11. Hit it from above to slide it south, out of the room.

    When you strike the block from the right, it will slide west, tumble into the water, and complete the ice bridge. Congratulations! You have successfully solved another challenging ice block puzzle.