الوسم: manage

  • How to Effectively Manage Your Camp in Crimson Desert Using Completing and Solving

    How to Effectively Manage Your Camp in Crimson Desert Using Completing and Solving

    The Greymane camp at Howling Hill is one of the most rewarding long-term features in Crimson Desert. It offers many activities that aren’t fully explained at the start. What begins as a few tents on a windy hill gradually becomes an independent settlement. It can produce food, silver, crafting materials, and even rare gear—all while you’re exploring Pywel. If you’ve been using your camp only as a quick stop between story missions, you’re missing out on a lot.

    Here’s everything you need to know about starting and managing your Greymane camp: how to set up Howling Hill, who to recruit first, how to handle dispatches efficiently, and how to keep expansions progressing without running out of resources.

    ### Setting Up the Greymane Camp

    The camp becomes available during Chapter 3: Homestead, after meeting Marius—an old teammate who’s been barely holding things together—and receiving a land grant from Marquis Serkis of House Hernand. From there, you’ll follow a guardsman south of Hernand Town to Howling Hill and complete the “A Fresh Start” quest.

    This process involves moving supply sacks, pushing a wagon, driving stakes into the ground, and raising the Greymane banner. Although it sounds simple and maybe even boring, finishing this officially establishes your camp and unlocks Damiane as a playable character.

    There’s also a quick cooking lesson for Modest Clear Soup at a nearby pot before escorting Marius back. This introduces food mechanics and many recipes you’ll rely on throughout the game.

    Once the camp is set up, your first step should be activating the Abyss Nexus fast travel point in the north part of the settlement. It becomes available after Chapter 4, and having it allows you to quickly return to Howling Hill without interrupting your exploration.

    ### The People Running Your Camp

    After establishing your base, two key characters join immediately: Carl and Ross. They are the most important NPCs you’ll interact with daily.

    Carl manages the provisions. Located near the camp’s supply chest, you can donate resources to him to keep the camp’s supplies topped up. You can also access the provisions system through him, where you’ll manually contribute materials.

    Ross is your Dispatch Coordinator. All missions you send out run through him. As your system becomes fully active, Ross is the NPC you’ll see most often when you return to camp, so check in with him regularly.

    Marius oversees the camp overall and is your main contact for expanding Howling Hill. He gives out new quests for expanding and recruiting as you develop the settlement and is the person to talk to when you’re ready to push the camp further.

    Other NPCs, like Eric the barber and Oliver the dye merchant (who are key for character customization), as well as various faction vendors, become available as you complete faction quests and advance through the main story.

    ### Don’t Skip Greymane Faction Quests

    Although not essential for the main story, the Grounds of the Sunrise quest chain in your Journal—under “Faction Quests” for the Greymanes—is one of the most important. Every building, new recruit slot, and overall camp expansion is locked behind it.

    #### Greymane Commissions

    These are small requests from Greymane members living at camp. They often serve as brief tutorials for new mechanics or merchants. Completing each grants a Medium Bag, increasing your inventory by three slots. There are 27 commissions in total, so finishing them can net you up to 81 extra inventory slots—crucial for managing all your loot in Crimson Desert.

    #### Rumor Missions

    These are recruitment quests that bring new comrades to your camp. You can grow your roster to nearly 40 Greymanes, which unlocks more dispatch missions simultaneously. Always complete these when they become available to strengthen your camp.

    ### Dispatch Missions: The Heart of the Camp’s Growth

    Dispatch missions are how your camp earns resources. Through Ross, you send Greymanes on various missions to gather supplies, generate silver, clear enemies from regions, or advance building projects—all automatically, so you can focus on other things.

    Each mission requires certain conditions like the number of comrades, specific skills, and sometimes resources like food or silver. You’ll mostly run:
    – Production missions: to gather food, timber, ore, and crafting materials.
    – Combat or suppression missions: to reduce enemy activity and unlock trade benefits or new areas.
    – Construction missions: directly related to upgrading your camp.
    – Rumor missions: for recruiting new Greymanes.

    Matching the right skill to the mission increases efficiency and rewards. For example, a Builder is essential for construction tasks, while a Hunter performs best gathering food.

    To manage missions, open the Map, find the camp icon, and select “Inspect” (Y on Xbox, Triangle on PS5, or double-click on PC). From there, go to the Mission tab, assign your Greymanes, and start. Traveling to the mission site allows you to see them in action, which can be useful to check progress.

    ### Expanding Howling Hill

    Expanding the camp isn’t done through a menu but through quests and dispatches linked directly to the story. Progression depends on your current chapter and available resources.

    The key expansion milestones include:

    | Expansion | Requirements | Key Unlocks |
    |———————-|——————————————–|————————————————|
    | 1st (Bustling Hill) | 2 recruits, 100 food, 250 silver | Dispatch system, new recruit slots, Marius unlocks new quests |
    | 2nd | More recruits, increased materials | Farm and Ranch construction unlocked |
    | 3rd | Further recruits and resources | Extra mission slots, facility upgrades |
    | 4th | 10 recruits, heavier material needs | Wagon, Hot Air Balloon, advanced crafting |
    | 5th+ | Late-game chapter unlock | Pailune rebuilds, Council, Institute |

    The first expansion can trigger during Chapter 3, taking about 18 hours once dispatched. Each following tier needs more recruits and materials.

    Once the farm and ranch unlock with the second expansion, build the farm first and start the “Apple Trees” mission. Trees take real time to grow, so plant early, and queue the Ranch tutorial missions to have it ready once the trees mature.

    By the fourth expansion, weapon and armor production slows down compared to raw materials, so funnel armaments into the camp supply early to avoid shortages.

    ### The Supply Chest and Resource Pool

    Behind Carl, inside your camp tent, is the Private Storage supply chest. It receives all loot from missions and camp production. Make it a habit to check it regularly; resources there feed your crafting and cooking systems. Letting it overflow is wasteful.

    If certain resources frequently run low, quick fixes include:
    – Food: Use the Sin Volt Ranch for over 50 pieces of quality meat per cycle—no need to hunt manually.
    – Silver: Locations like Thornbriar Food Storage, Sungrove Manor, Azerian Manor, and later Gorthak Ironworks for armaments.
    – Materials: Regularly convert loot through Carl and donate gear you don’t need instead of hoarding.

    You can also package goods in the Trade Wagon (unlocked at the 4th expansion) to sell at trade posts. Building more wagons and watching the market prices helps maximize profits.

    ### Tips for Efficient Camp Management

    Every time you return to Howling Hill, check your faction journal for new quests. Missing them for a few chapters can slow your progression without notice.

    Be aware that merchants or NPCs can get sent out on dispatch missions accidentally. If an NPC disappears, verify active missions first—they’re likely out gathering resources.

    Donations at church offering boxes can boost mission efficiency in nearby regions. Keep an eye out for these when planning your dispatches.

    When waiting for missions or crafting, use the camp bed. Sleeping advances time by up to twelve hours, allowing you to skip waiting.

    Finally, after Chapter 7, keep an eye on Pailune’s reconstruction. Building the Council and Institute provides your dispatched comrades with meaningful ongoing work and unlocks the most powerful production options. Though resource-heavy, by this stage, your camp should be generating enough resources if you’ve managed it well.

  • Gmail Simplifies Order Updates and Manages Chaos

    Gmail Simplifies Order Updates and Manages Chaos

    In recent years, Google has rolled out a variety of updates to Gmail that simplify managing events, logistics, and travel tasks by automatically extracting relevant information from your emails. Now, the platform is introducing two new features designed to help you effortlessly keep track of recent purchases and stay informed about special deals and ongoing promotions.

    Effortless Order Tracking

    Keeping tabs on your online orders can often feel chaotic. Between order confirmations, shipping notifications, and promotional emails, your inbox can quickly become cluttered. To address this, Gmail now offers a new layout that consolidates all purchase and delivery updates into a single, organized view, making it easier to locate and monitor your orders.

    This streamlined view provides a clear snapshot of upcoming package deliveries, grouping related emails together. Orders scheduled to arrive within the next 24 hours are highlighted at the top, while a more comprehensive list can be accessed within the Purchases section available through a side panel.

    This new display will coexist with existing summary cards, which appear at the top of emails to give quick snapshots of package statuses. The updated design is now available on both mobile and desktop versions of Gmail, accessible globally.

    A Fresh Approach to Finding Deals

    I receive numerous emails daily about special offers and discounts from brands I’ve done business with, along with marketing messages from various sources. This influx of deal emails can be both useful and overwhelming. On one hand, it’s easy to miss out on great sales; on the other, your inbox can become cluttered with promotional clutter.

    To help manage this, Gmail is adding a new “most relevant” sorting option to the Promotions tab. Additionally, it will feature a “nudge” system that alerts you to upcoming deals and discounts scheduled in the coming days.

    The goal is to make it easier for you to see updates from the brands and senders that matter most to you, including those you interact with frequently. If you prefer, you can still switch back to the traditional “most recent” sorting method. This new feature will initially be available on the mobile app in the upcoming weeks, giving users a more tailored and streamlined promotional email experience.

  • Completing Your Economy in Stronghold Crusader: Definitive Edition

    Completing Your Economy in Stronghold Crusader: Definitive Edition

    Managing resources is crucial in the classic strategy game Stronghold Crusader, and gold often determines victory in battles. Key buildings and military units require a significant amount of gold, so if your treasury runs low, you’ll need to find a solution quickly.

    This guide is designed for both newcomers and those returning with the Definitive Edition. It covers everything you need to know about maintaining a steady income, including how to manage workers and production effectively.

    Taxes and Peasants

    Your primary source of gold comes from taxation. You can adjust your tax rate using the slider on your Keep. Every peasant living in your fortress pays taxes each month, regardless of their job status. Thus, the bigger your population, the more gold you collect over time.

    At the start of a new game, your tax rate is set to zero. You won’t earn any income until you change it, but raising taxes can hurt your Popularity. It’s generally best to use your initial funds to build a basic resource economy first.

    Even a small increase in taxes can lower your overall Popularity. If you don’t have other ways to keep your Popularity up, it will gradually decrease each month. This isn’t a concern until it falls below 50, after which recovery becomes challenging. If you raise taxes, make sure you have strategies to keep your citizens satisfied.

    Alms for the Poor

    You can also set your tax rate to negative, which means you’ll distribute gold to the populace rather than collect it. While this approach raises your Popularity, it can also be costly, as the expense scales with your total peasant population.

    Whether you’re taxing or distributing, the effects on Popularity increase with the amounts involved. Higher taxes correspond to lower Popularity, while larger charity payments boost Popularity.

    Popularity and Population

    Your Popularity directly impacts your stronghold’s population. If your Popularity remains above 50, your population will grow steadily until it reaches the maximum housing capacity. Conversely, if it falls to 50 or below, peasants will begin to leave your settlement.

    The extent of your Popularity above or below 50 doesn’t affect the rate of population growth or decline. However, being near 100 gives you more leeway for emergency measures like reducing food rations or raising taxes. Recovering from a Popularity of 10 will take much longer than from 45.

    You can hover over the campfire by the Keep to check population trends. A ring will indicate growth (green) or decline (red). If it’s fully green, new peasants will appear if there is housing available. You can build more Hovels to accommodate them, but be aware this will increase your needs for food, religion, and ale. A fully red ring signifies that a peasant will depart.

    If there are no available workplaces, new peasants will wait at the campfire until one opens up. They will consume food, drink ale, and pay taxes while they wait. You can also recruit peasants at the Barracks, Mercenary Post, or other military buildings. Soldiers do not count toward your population and stop consuming goods once they join the army, making room for new peasants.

    Always keep some idle peasants ready for conscription.

    Popularity Factors

    Popularity Source

    How It Works

    Tip(s)

    Food

    Providing food will keep your people happy. Adjust the ration level at the Granary, but be cautious about running out.

    A Popularity bonus applies if you have multiple types of food stored.

    Fear Factor (Entertainment)

    Keep entertainment structures active to slow down peasants’ work while boosting soldiers’ attack bonuses.

    Religion

    Clerics from religious structures spread blessings. More clerics mean better coverage, while larger churches offer flat Popularity bonuses.

    Place smaller religious buildings strategically so clerics can cover more ground efficiently.

    Ale

    Brew ale from hops and distribute it through Inns. Each Inn serves up to 30 peasants, so expanding access increases your Popularity.

    Each barrel of ale lasts about two-and-a-half minutes once delivered to an Inn.

    Resources and Storage

    Starting the Tyre campaign mission in Stronghold Crusader: Definitive Edition, showing a stronghold with ample supplies.

    A satisfied workforce is essential, but it’s equally important that they can perform their tasks efficiently. This is where resource layout and storage management play a significant role in Stronghold Crusader.

    Workers need to travel to their jobs and deliver goods. The less they have to move around, the more productive your stronghold will be.

    The requirements depend on the specific map; if the closest sources of stone and iron are far from your Keep, adapt accordingly.

    There are three key storage buildings: the granary, stockyard, and armory. Each can be expanded, but only next to the existing structure; these will become central hubs for managing resources during the game.

    • The granary stores finished food items—anything edible goes here.
    • The armory stores weapons, armor, and shields.
    • The stockyard stores everything else, making it the one most likely to fill up and require expansion.

    If possible, spread these three buildings out to create districts within your settlement. This way, industries can grow without congestion. For example, position bowyers, tanners, and blacksmiths near the stockyard and armory to streamline material pick-up and delivery.

    Notable Resources and Buildings

    Multiple bakeries producing bread in Stronghold Crusader: Definitive Edition.

    Most buildings need just one or more workers to produce resources, but some have specific rules. For example:

    • Stone quarries require a nearby ox tether to transport stone to the stockyard. Workers bring the stone to the tether, after which the ox carries it to storage.
    • Hop fields must be harvested quickly; otherwise, they become infested with weevils, necessitating their deletion and rebuilding.
    • Dairy farms generate cows until reaching three, then they produce cheese. If tanners are in operation, they may occasionally take cows for hides, affecting cheese production.
    • A single wheat field can supply a flour mill and two or three bakeries. Although this demands more workers and time, it yields more food overall than other production chains.

    Trading resources at the Market can be a lifesaver, but availability varies by map. It can be a good strategy to produce surplus goods for sale to maintain a steady flow of gold.

  • Hiring and Managing Sims 4 Employees: A Guide to Profits & Fun

    Hiring and Managing Sims 4 Employees: A Guide to Profits & Fun

    Managing a small business in The Sims 4: Businesses & Hobbies involves a lot of responsibilities, so why not lighten the load by hiring some employees? By bringing others onto your team, your Sim can focus on what really needs their attention.

    As the owner, you can hire several employees—anyone your Sim knows in the game. You have the option to bring family and friends on board for a more personal touch or to hire new faces for a professional atmosphere. The choice is entirely yours when starting a new business.

    Hiring and Managing Employees

    To get started with managing employees, navigate to the Owned Businesses tab, which is where you’ll open and close the business each day. Here, you’ll find various employee management options.

    Choosing Employees Based on Skills

    The first step in managing your employees is to hire them. Use the Manage Employees button to access an overview of potential hires, allowing you to bring on any Sim that your character knows. If your Sim is new to the neighborhood, they might need to mingle a bit before building a suitable team. While there’s no perfect candidate, selecting employees that match the requirements of your business is essential for success.

    When hiring, consider each Sim’s relevant skills that can boost your business. For instance, check their cooking or artistic skills for a café or a gallery. This way, you can ensure that you’re making the best hires for your specific needs.

    If you find that you need more qualified Sims, don’t hesitate to interact with new customers who visit your business. You never know when a hidden gem might walk through the door.

    Setting Uniforms and Pay

    After you’ve brought some employees on board, it’s time to choose their uniforms. You can select from a variety of predefined outfits suited for different business types or create custom uniforms in CAS if you have a specific look in mind.

    Once your team is set up, you can adjust their salaries through the Manage Employees menu. Everyone starts at a base rate, but it’s wise to offer higher pay if you want to keep your staff happy. Remember, satisfied employees can significantly contribute to your bottom line, while dissatisfaction over low pay may lead to high turnover. Regular check-ins on employee morale will help you avoid losing valuable team members.

    Delegating Tasks to Employees

    One of the perks of being a business owner is the ability to delegate tasks to your employees, allowing you to focus on strategic decisions. Assigning tasks that match each employee’s skill set can make a noticeable difference in the quality of service. For instance, artistic employees should be assigned creative tasks while charmers excel at customer interactions.

    It’s essential to align your employees’ tasks with your business activities. If your establishment offers food and drinks, make sure tasks related to food preparation are assigned accordingly. Each employee can handle up to five different tasks, giving you flexibility as your team grows.

    Keep in mind customer needs when delegating. Adjust assignments as necessary to meet demand—there’s no shame in reorganizing roles if you notice a shortfall in service.

    Through the tasks menu, you can explore various categories, including Food and Drink, Art and Music, Social interactions, and more, to find the right fit for your staff. By maintaining a keen awareness of your establishment’s needs and your employees’ strengths, you can cultivate a thriving business in The Sims 4!

  • Sonos Introduces Zones For Managing Rooms With Multiple Speakers

    Sonos Introduces Zones For Managing Rooms With Multiple Speakers

    Sonos has announced that the Era 100 Pro, their inaugural speaker specifically designed for the professional installation market, is now available for order and shipping. This innovative speaker utilizes an Ethernet cable for both power and connectivity and is sold exclusively in pairs through select Sonos partners that focus on professional setups. Pricing for the Era 100 Pro is determined by these partners, and Sonos has not disclosed any pricing guidelines. I have contacted a few professional installers to obtain an estimated price range.

    It’s important to note that the Era 100 Pro requires a powered Ethernet connection (PoE), which means it won’t operate on a standard wired home network without additional equipment.

    To coincide with the launch of the Era 100 Pro, designed for commercial environments such as restaurants where numerous speakers may be used in a single area, Sonos has also updated its app, introducing a feature called “zones.”

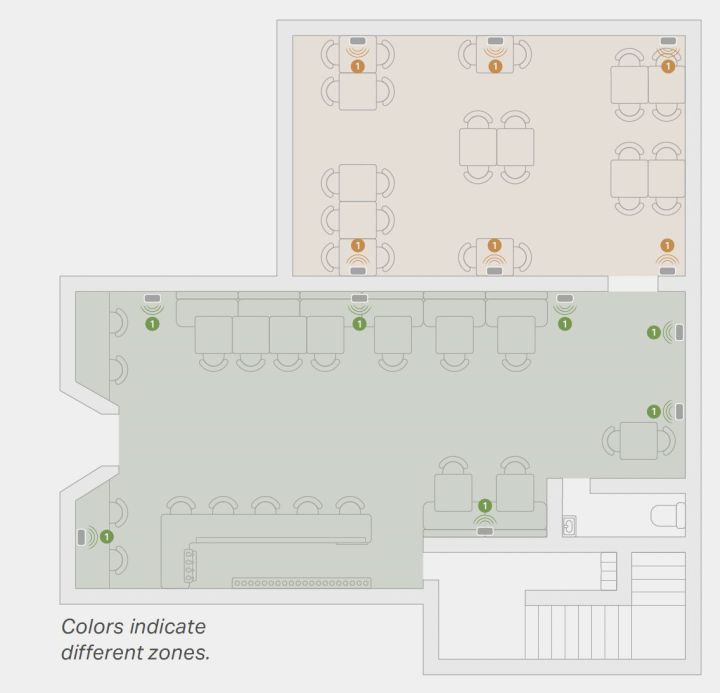
    A diagram of two zones of Sonos products in a commercial space.
    A diagram of two zones of Sonos products in a commercial space. Sonos

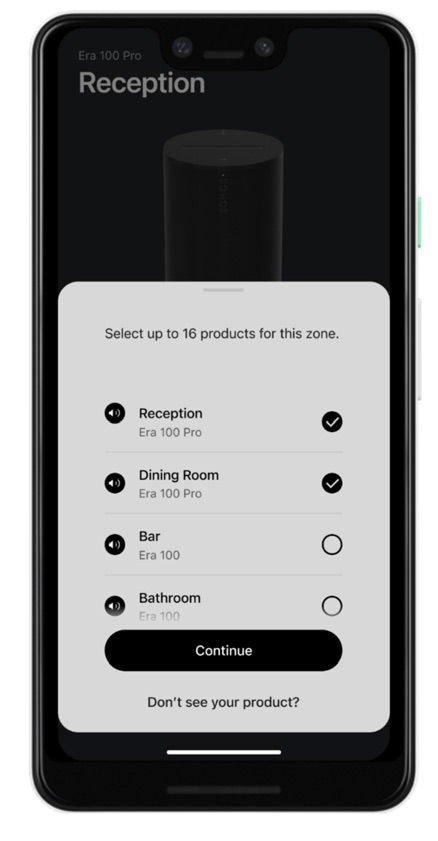
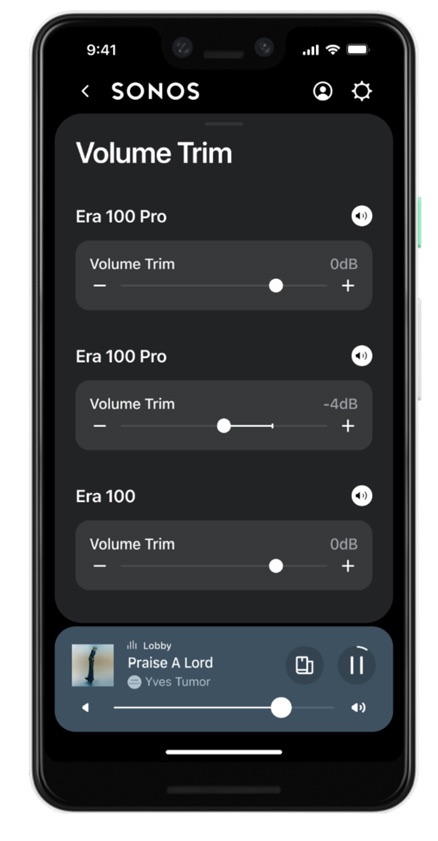
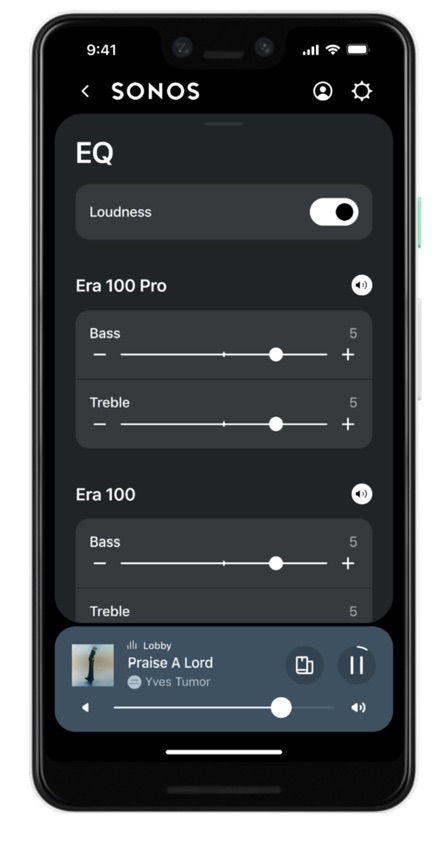
    The new zones feature resembles the existing Groups function, allowing users to add up to 16 compatible Sonos devices to create a “semi-permanent” grouping of speakers. All devices within a zone will play the same audio at the same volume level, unless the “volume trim” settings on individual speakers are adjusted to vary from the zone level. Additionally, users can fine-tune the EQ settings for each speaker individually.

    A key advantage of zones is their ability to combine with other zones or individual Sonos speakers. Since groups can’t be nested inside one another, this feature enables users to manage specific collections of speakers as a cohesive unit, allowing for easy reconfiguration without creating new groups each time.

    Users can add, modify, or remove zones through the Sonos app. There’s also a chime feature to help identify a specific speaker within a zone, which can be useful when the name alone isn’t sufficient to pinpoint its location.

    However, there are certain limitations for the zones feature. Unlike groups, it is only compatible with specific Sonos components, namely the Era 100 Pro, Era 100, Era 300, Sonos One SL, Sonos One (all models), and Sonos Five. Other components such as Sonos soundbars, portable speakers, headphones, and devices like the Port and Amp are not currently compatible with zones.

    Sonos emphasizes the importance of an Ethernet connection for every speaker within a zone. If that’s not feasible, it’s advisable to limit zones to a maximum of six Wi-Fi-connected devices for optimal performance.

    Alongside the Era 100 Pro and the zones update, the Sonos app has received a series of fixes and enhancements as the company works to address issues stemming from the problematic redesign launched in May 2024.

    Notable updates include:

    • New option to snooze alarms directly within the app
    • Changes to System Settings for easier access to key settings
    • Visibility of battery charge percentage in the System view
    • Upgrades to parental controls on iOS
  • Mastering Vampire Energy and Thirst in The Sims 4

    Mastering Vampire Energy and Thirst in The Sims 4

    Your Sim has recently become a vampire in The Sims 4, and this transformation brings about some significant changes, primarily that they no longer require standard food. If you’re navigating the world of vampire Sims for the first time, you’re in the right spot.

    This guide will help you understand how to manage the needs of your vampire Sim in The Sims 4. We’ll explore how their needs differ from those of regular Sims and how you can meet them. Keep in mind that you’ll need the Vampires game pack to create a vampire Sim.

    How Are Vampire Sims Different?

    While vampire Sims share some traits with regular humans, there are key differences. Most notably, vampires don’t need to use the bathroom, eliminating the need to worry about toilets in their homes.

    Additionally, their Energy and Hunger bars are replaced by Thirst and Vampire Energy. The Vampire Energy bar is located at the top of the screen and appears as a deep purple bar. This is a crucial aspect of managing your vampire Sim’s needs.

    Despite these changes, vampires still require Hygiene, Social, and Fun.

    What Drains Vampire Energy?

    Vampire Energy powers your Sim’s special abilities. While this energy drains slowly, using vampire powers, such as transforming into a bat or charming another Sim, consumes it rapidly. Another major factor that depletes Vampire Energy is exposure to sunlight. Vampires will begin to burn in the sun, losing energy, and prolonged exposure can lead to death.

    How Do Vampires Sleep?

    To restore Vampire Energy, a vampire Sim must sleep or meditate. However, instead of using beds, vampires sleep in coffins. You can find various coffin styles in Build/Buy mode. They serve the same purpose as beds; your vampire Sim can even Woohoo in them!

    If your Sim needs a quick energy boost, they can use the Dark Meditation ability. This allows them to meditate briefly, restoring some energy, although it’s not a comprehensive solution.

    How To Fulfill Vampire Thirst

    Vampires must consume Plasma to satiate their Thirst. They can obtain Plasma from three sources: Plasma Fruit, Plasma Packs, and regular human Sims. Let’s break down each option.

    Drinking From Plasma Packs

    Plasma Packs are artificial blood packs that your Sim can purchase from a computer after reaching level three in the Vampire Lore skill. They offer a way for vampires to avoid direct interaction with humans.

    Once your Sim achieves level four in Vampire Lore, they can create Plasma Packs from fish or frogs.

    Drinking From Plasma Fruit

    For those with a green thumb, Plasma Fruit is a great way to replenish Thirst. Vampires can consume the plasma directly from the fruit, but one fruit alone won’t be sufficient. Fortunately, they can eat multiple fruits in succession.

    You can find a Plasma Fruit tree in Forgotten Hollow, located on a slope near a dead tree. This tree is public, so you can easily harvest its fruits.

    At Vampire Lore level eight, your Sim can buy plasma fruit seeds to plant, perfect for those who don’t live in Forgotten Hollow or want to grow their own trees.

    Drinking From Normal Sims

    Your vampire Sim can also consume plasma from regular Sims. This can be done in a couple of ways. If your vampire maintains a good relationship with another Sim, they can politely ask for a drink.

    If there is no relationship, your Sim can compel the other Sim to provide plasma. They can drink a small or large amount of plasma, with larger quantities being an effective way to refill Thirst.

    What Happens If A Sim Is Too Thirsty?

    If a vampire Sim becomes too thirsty, their instincts can take over, making them harder to control. They may randomly attack Sims to drain their plasma. This behavior can be entertaining for a villainous vampire but may damage relationships.

    Low Thirst can trigger significant moodlets, with three notable effects:

    • Need to Feed
    • Parched
    • Irresistible Thirst

    Upon reaching the Irresistible Thirst stage, the vampire will start to attack.