الوسم: Lego

  • How to Complete Gold Skill Bricks in Lego Batman: Legacy of the Dark Knight

    How to Complete Gold Skill Bricks in Lego Batman: Legacy of the Dark Knight

    Lego Batman: Legacy of the Dark Knight offers more collectibles than you can imagine, especially the highly coveted Gold Bricks. These special bricks can be gathered throughout the game and are used to improve your Combat and Exploration skills.

    To defeat enemies easily and glide smoothly through Gotham City, you need to upgrade your skills quickly. Here’s what you should know about collecting and spending Gold Bricks.

    ### How to Obtain Gold Bricks in Lego Batman: Legacy of the Dark Knight

    Gold Bricks serve as skill points in the game. When you find Gold Skill Bricks, you can use them to upgrade your abilities in both fighting and exploring. Each skill costs one Gold Brick, and since there are 30 skills available, you will need to collect all 30 Gold Bricks to unlock everything.

    You can keep track of your Gold Bricks by pausing the game and checking your collectibles tally.

    At the beginning of your adventure, most Gold Bricks come from completing story missions. Each main story mission awards you one Gold Brick. These include:

    1. Infiltration
    2. New Beginnings
    3. Carmine Falcone
    4. The Red Hood Gang
    5. Mimes
    6. The Penguin
    7. Flugelheim
    8. Joker
    9. Two-Face
    10. Kite Man
    11. Poison Ivy
    12. Firefly
    13. Mr. Freeze
    14. The League of Shadows Returns

    Besides story missions, you’ll unlock the remaining Gold Bricks by completing side missions and collections. It becomes easier to find these missions once you unlock Batgirl and start exploring Gotham, hacking into Towers scattered around the city. These Towers mark all side mission locations on the map, helping you finish each one efficiently.

    Once you’ve completed everything, all 30 Gold Bricks will be yours. Use them to upgrade your skills and become the strongest hero Gotham has ever seen.

  • How to Complete Every Radio Tower in Lego Batman: Legacy of the Dark Knight

    How to Complete Every Radio Tower in Lego Batman: Legacy of the Dark Knight

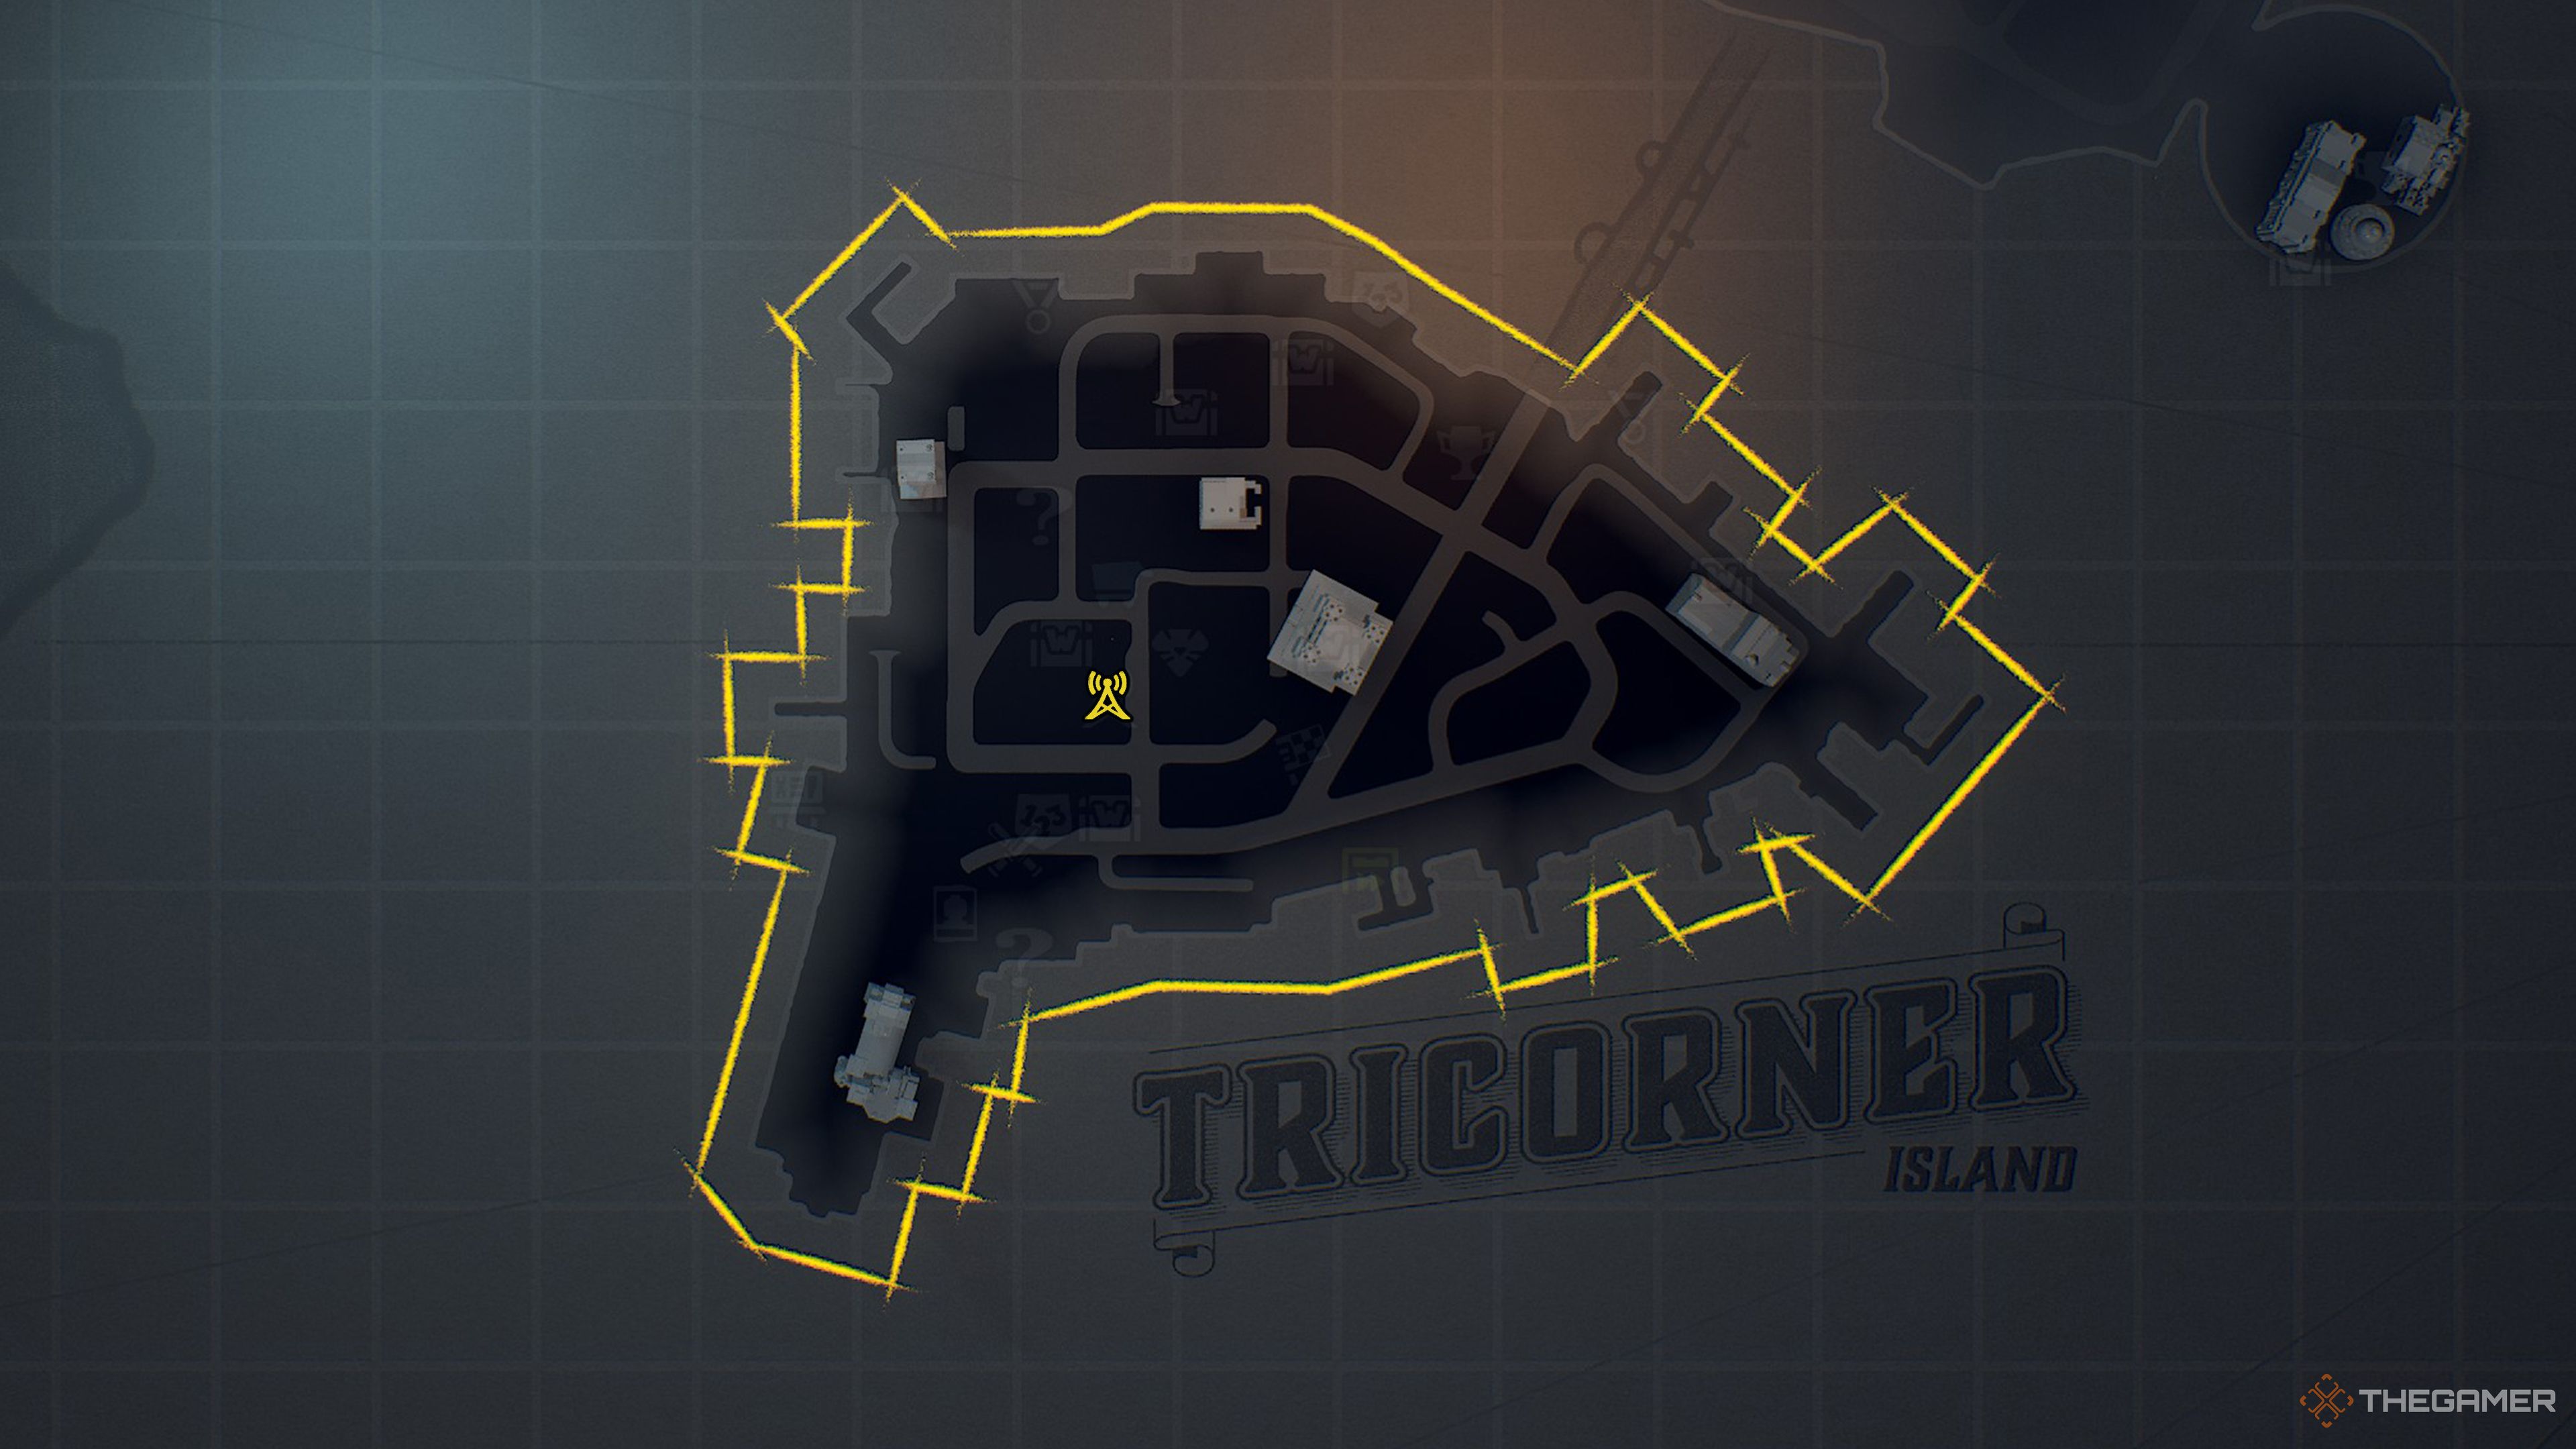
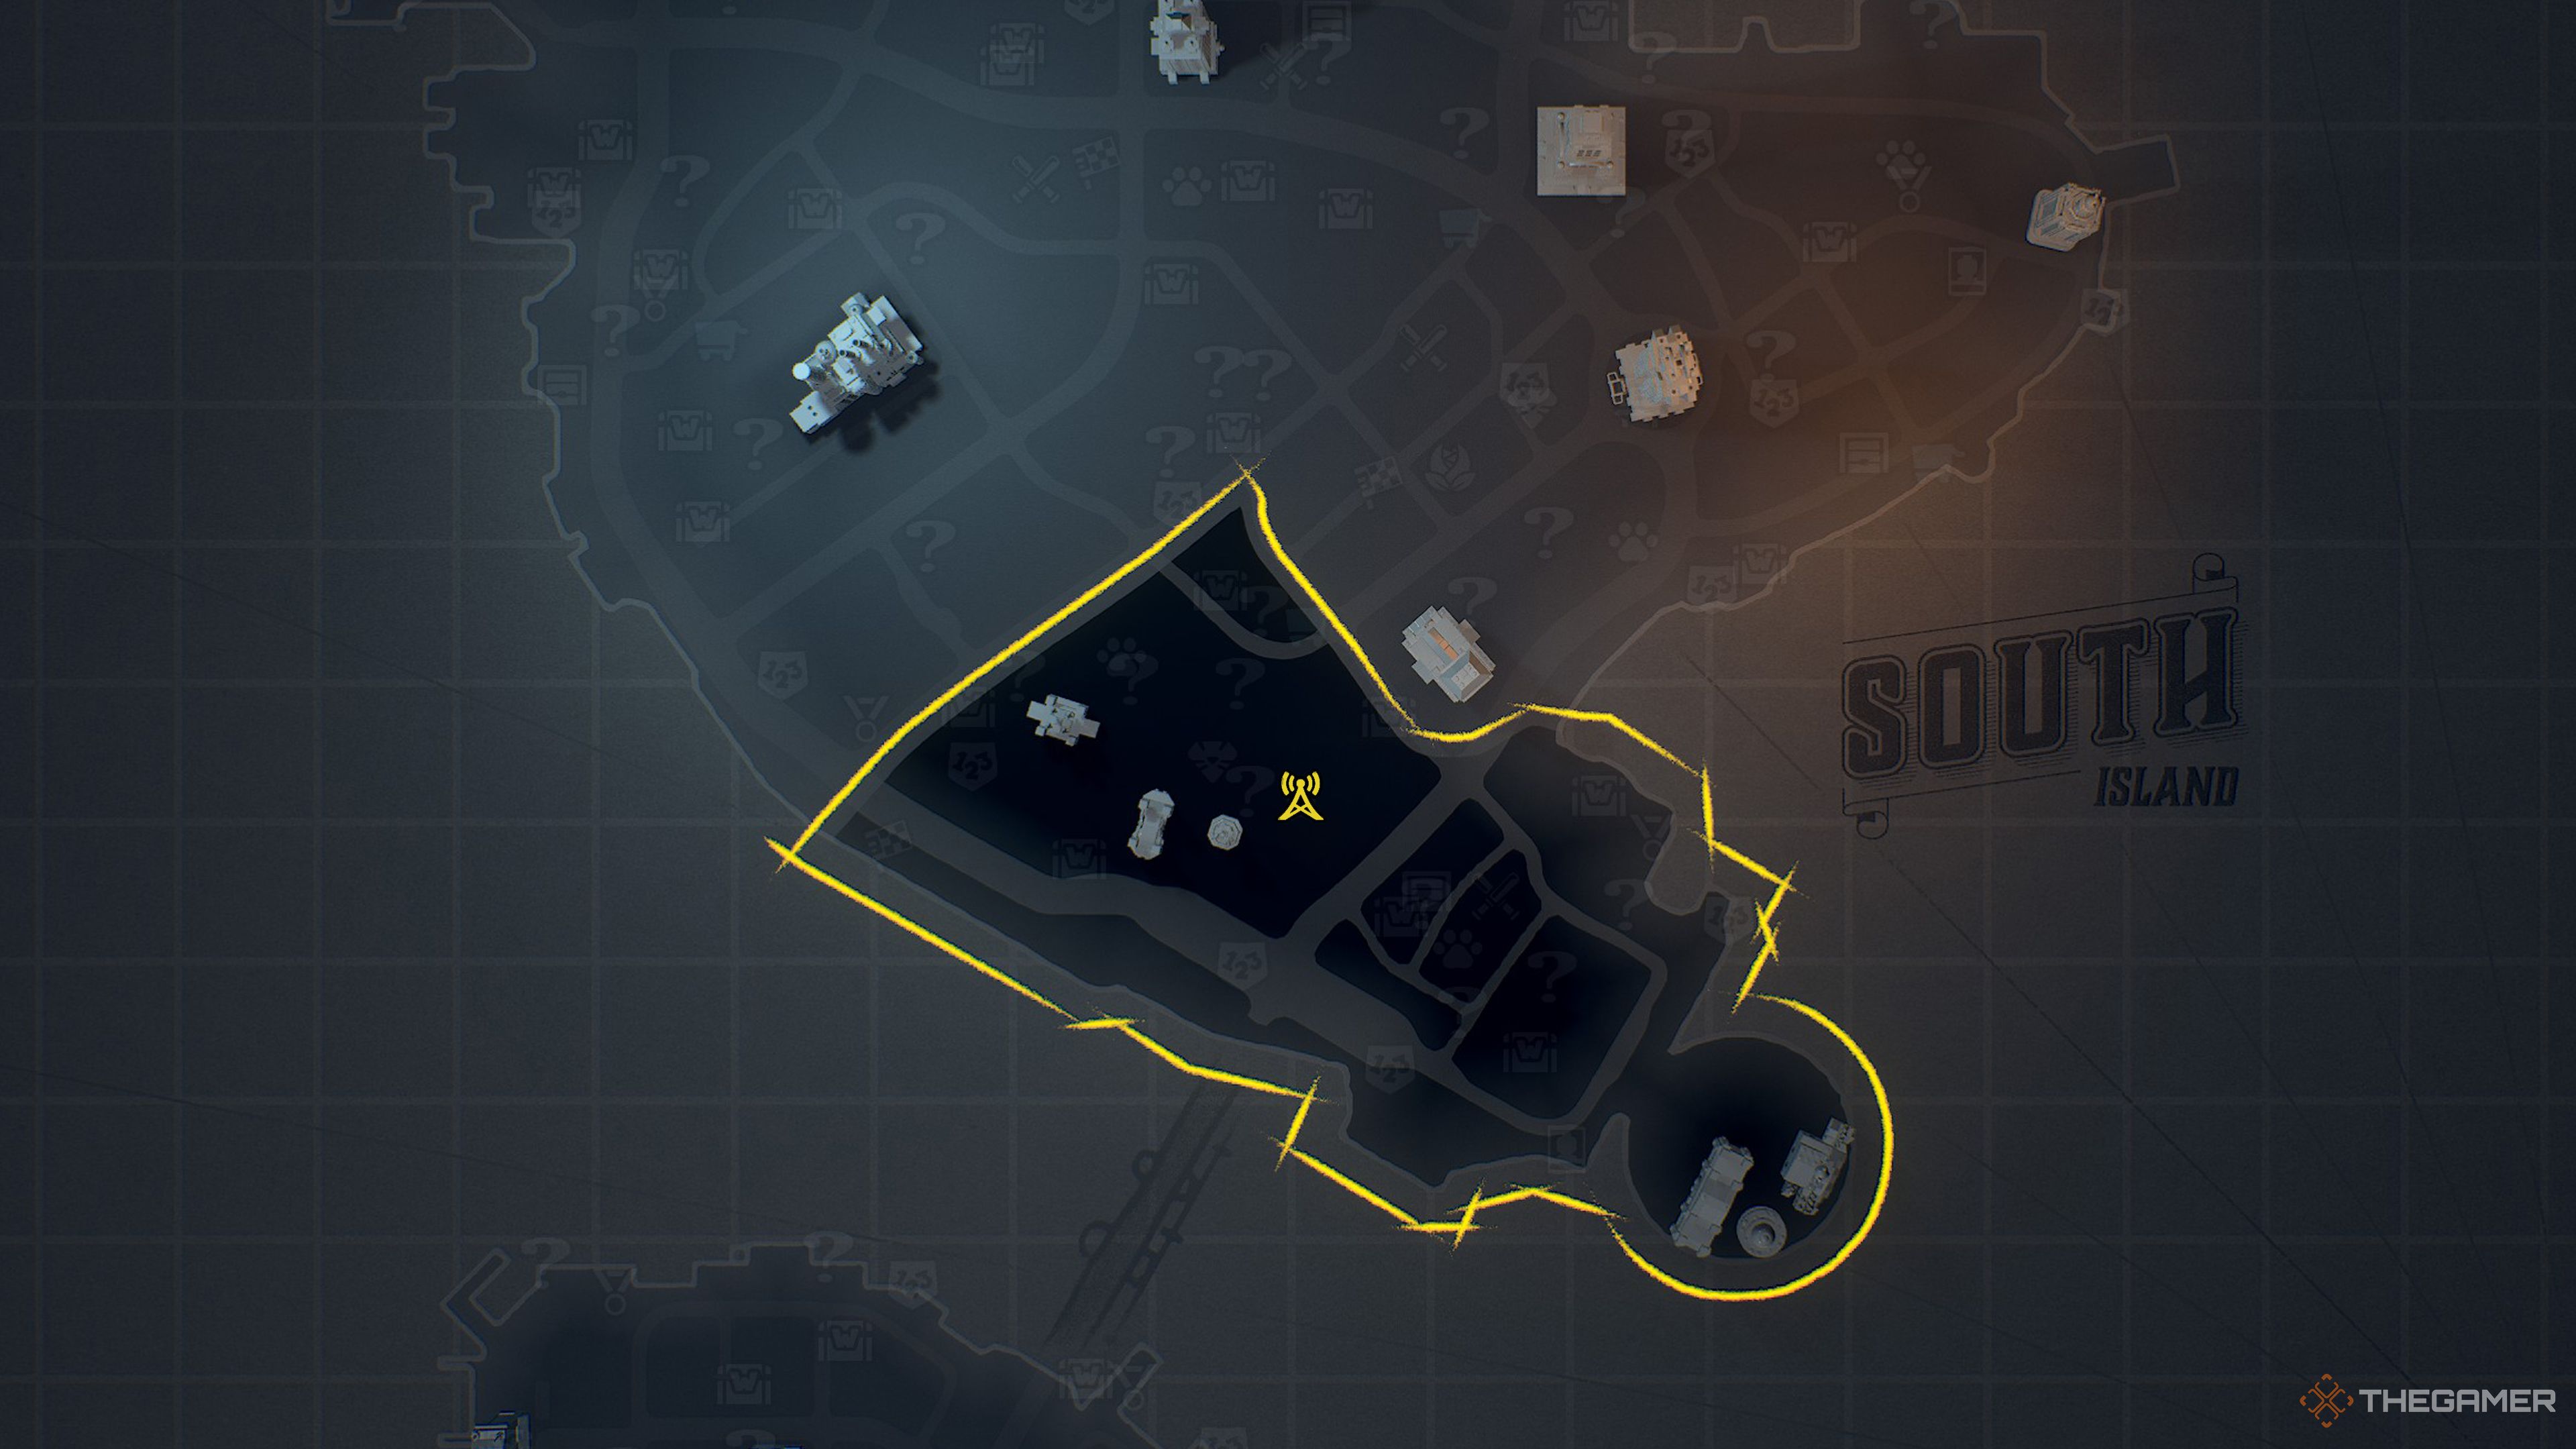
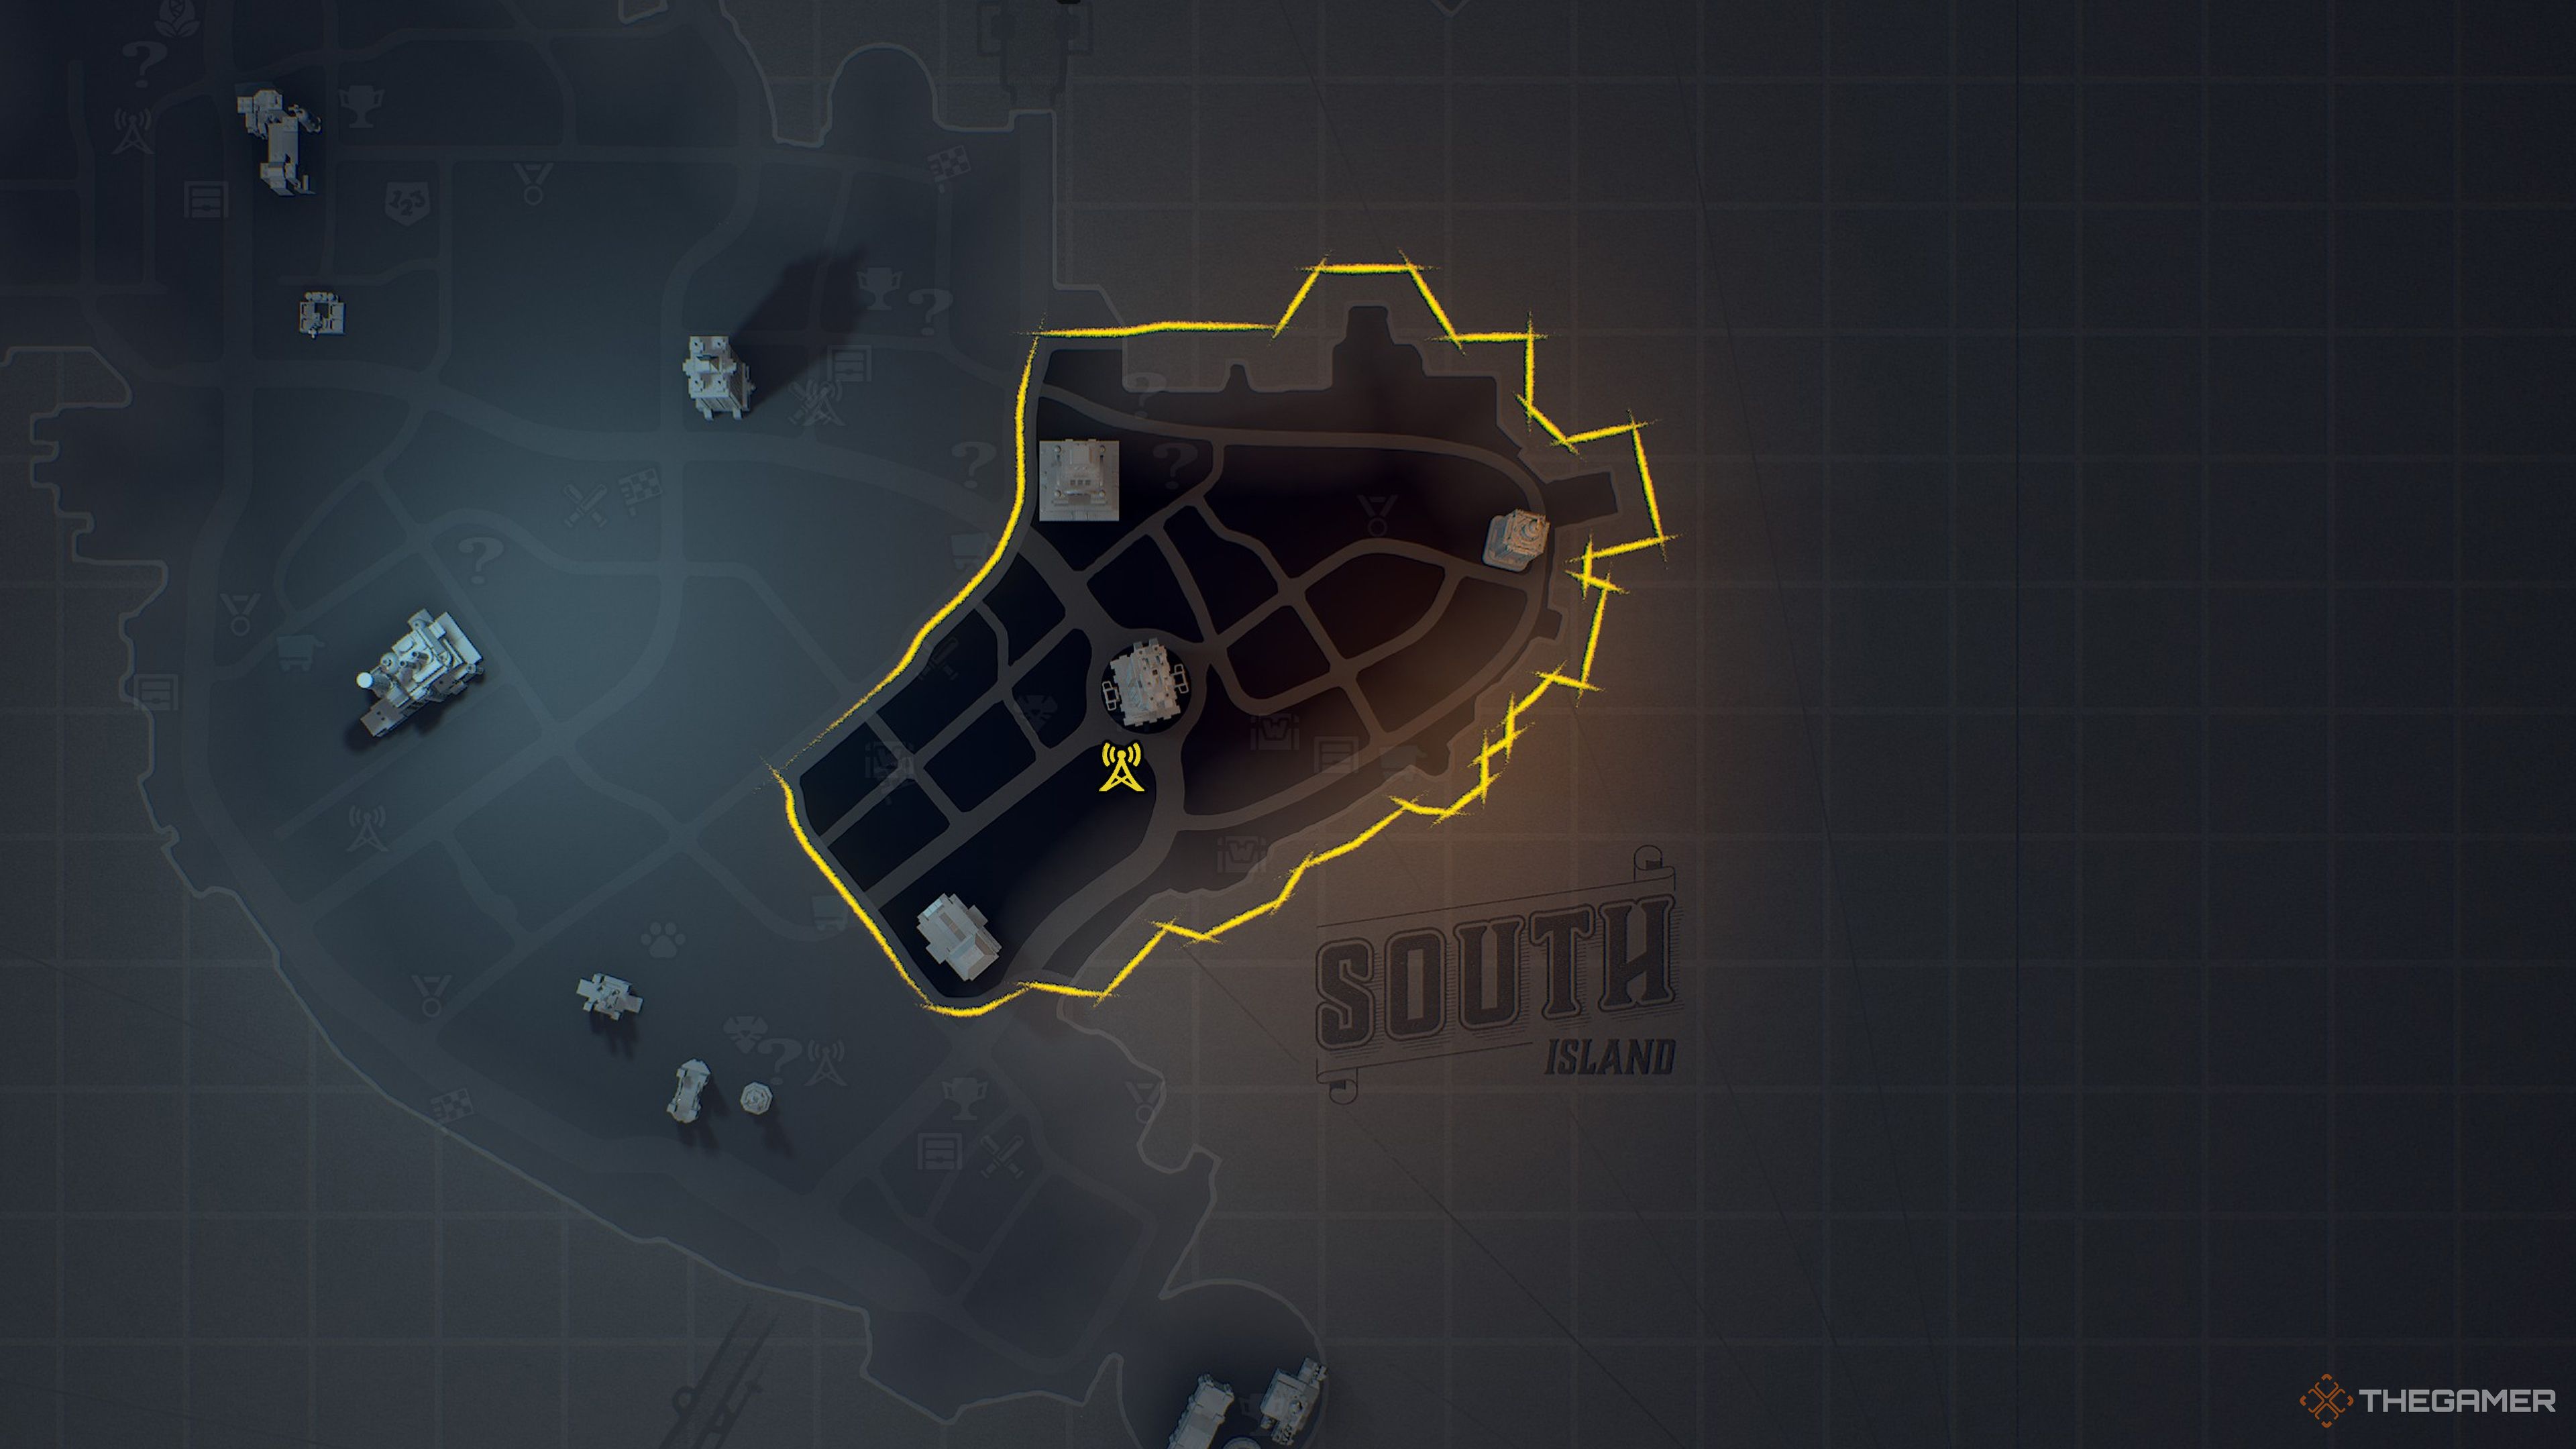
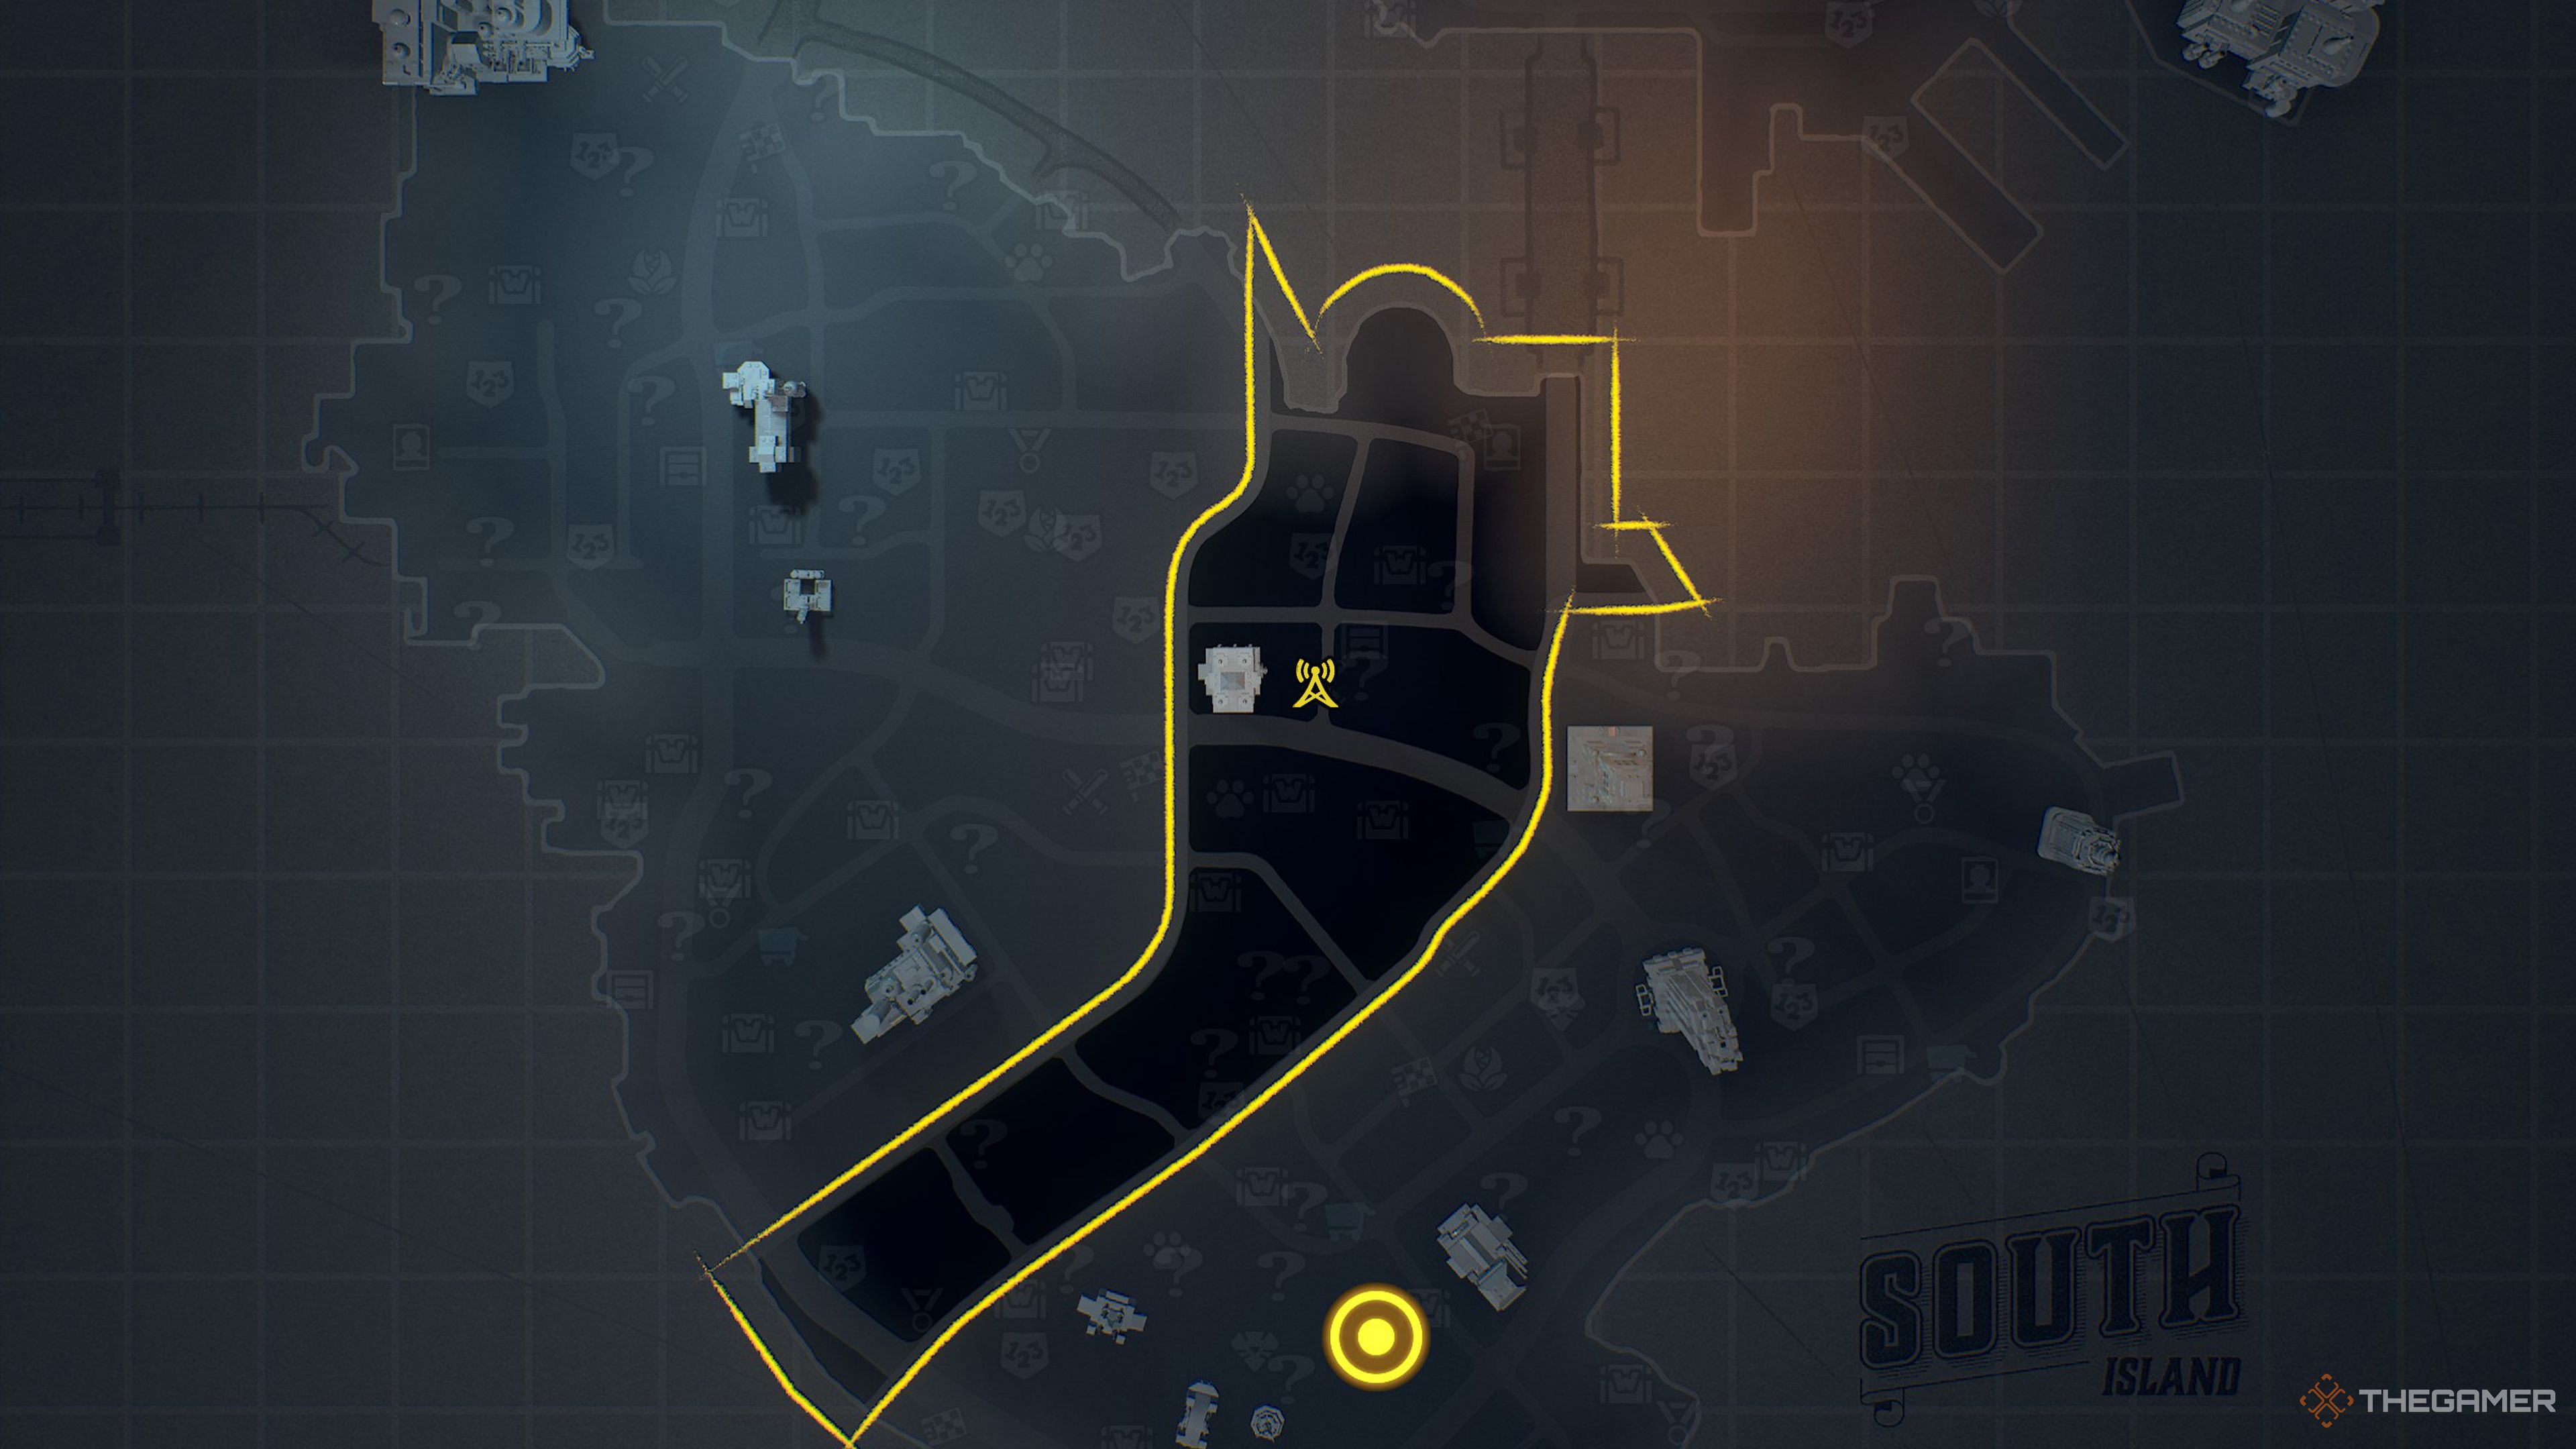
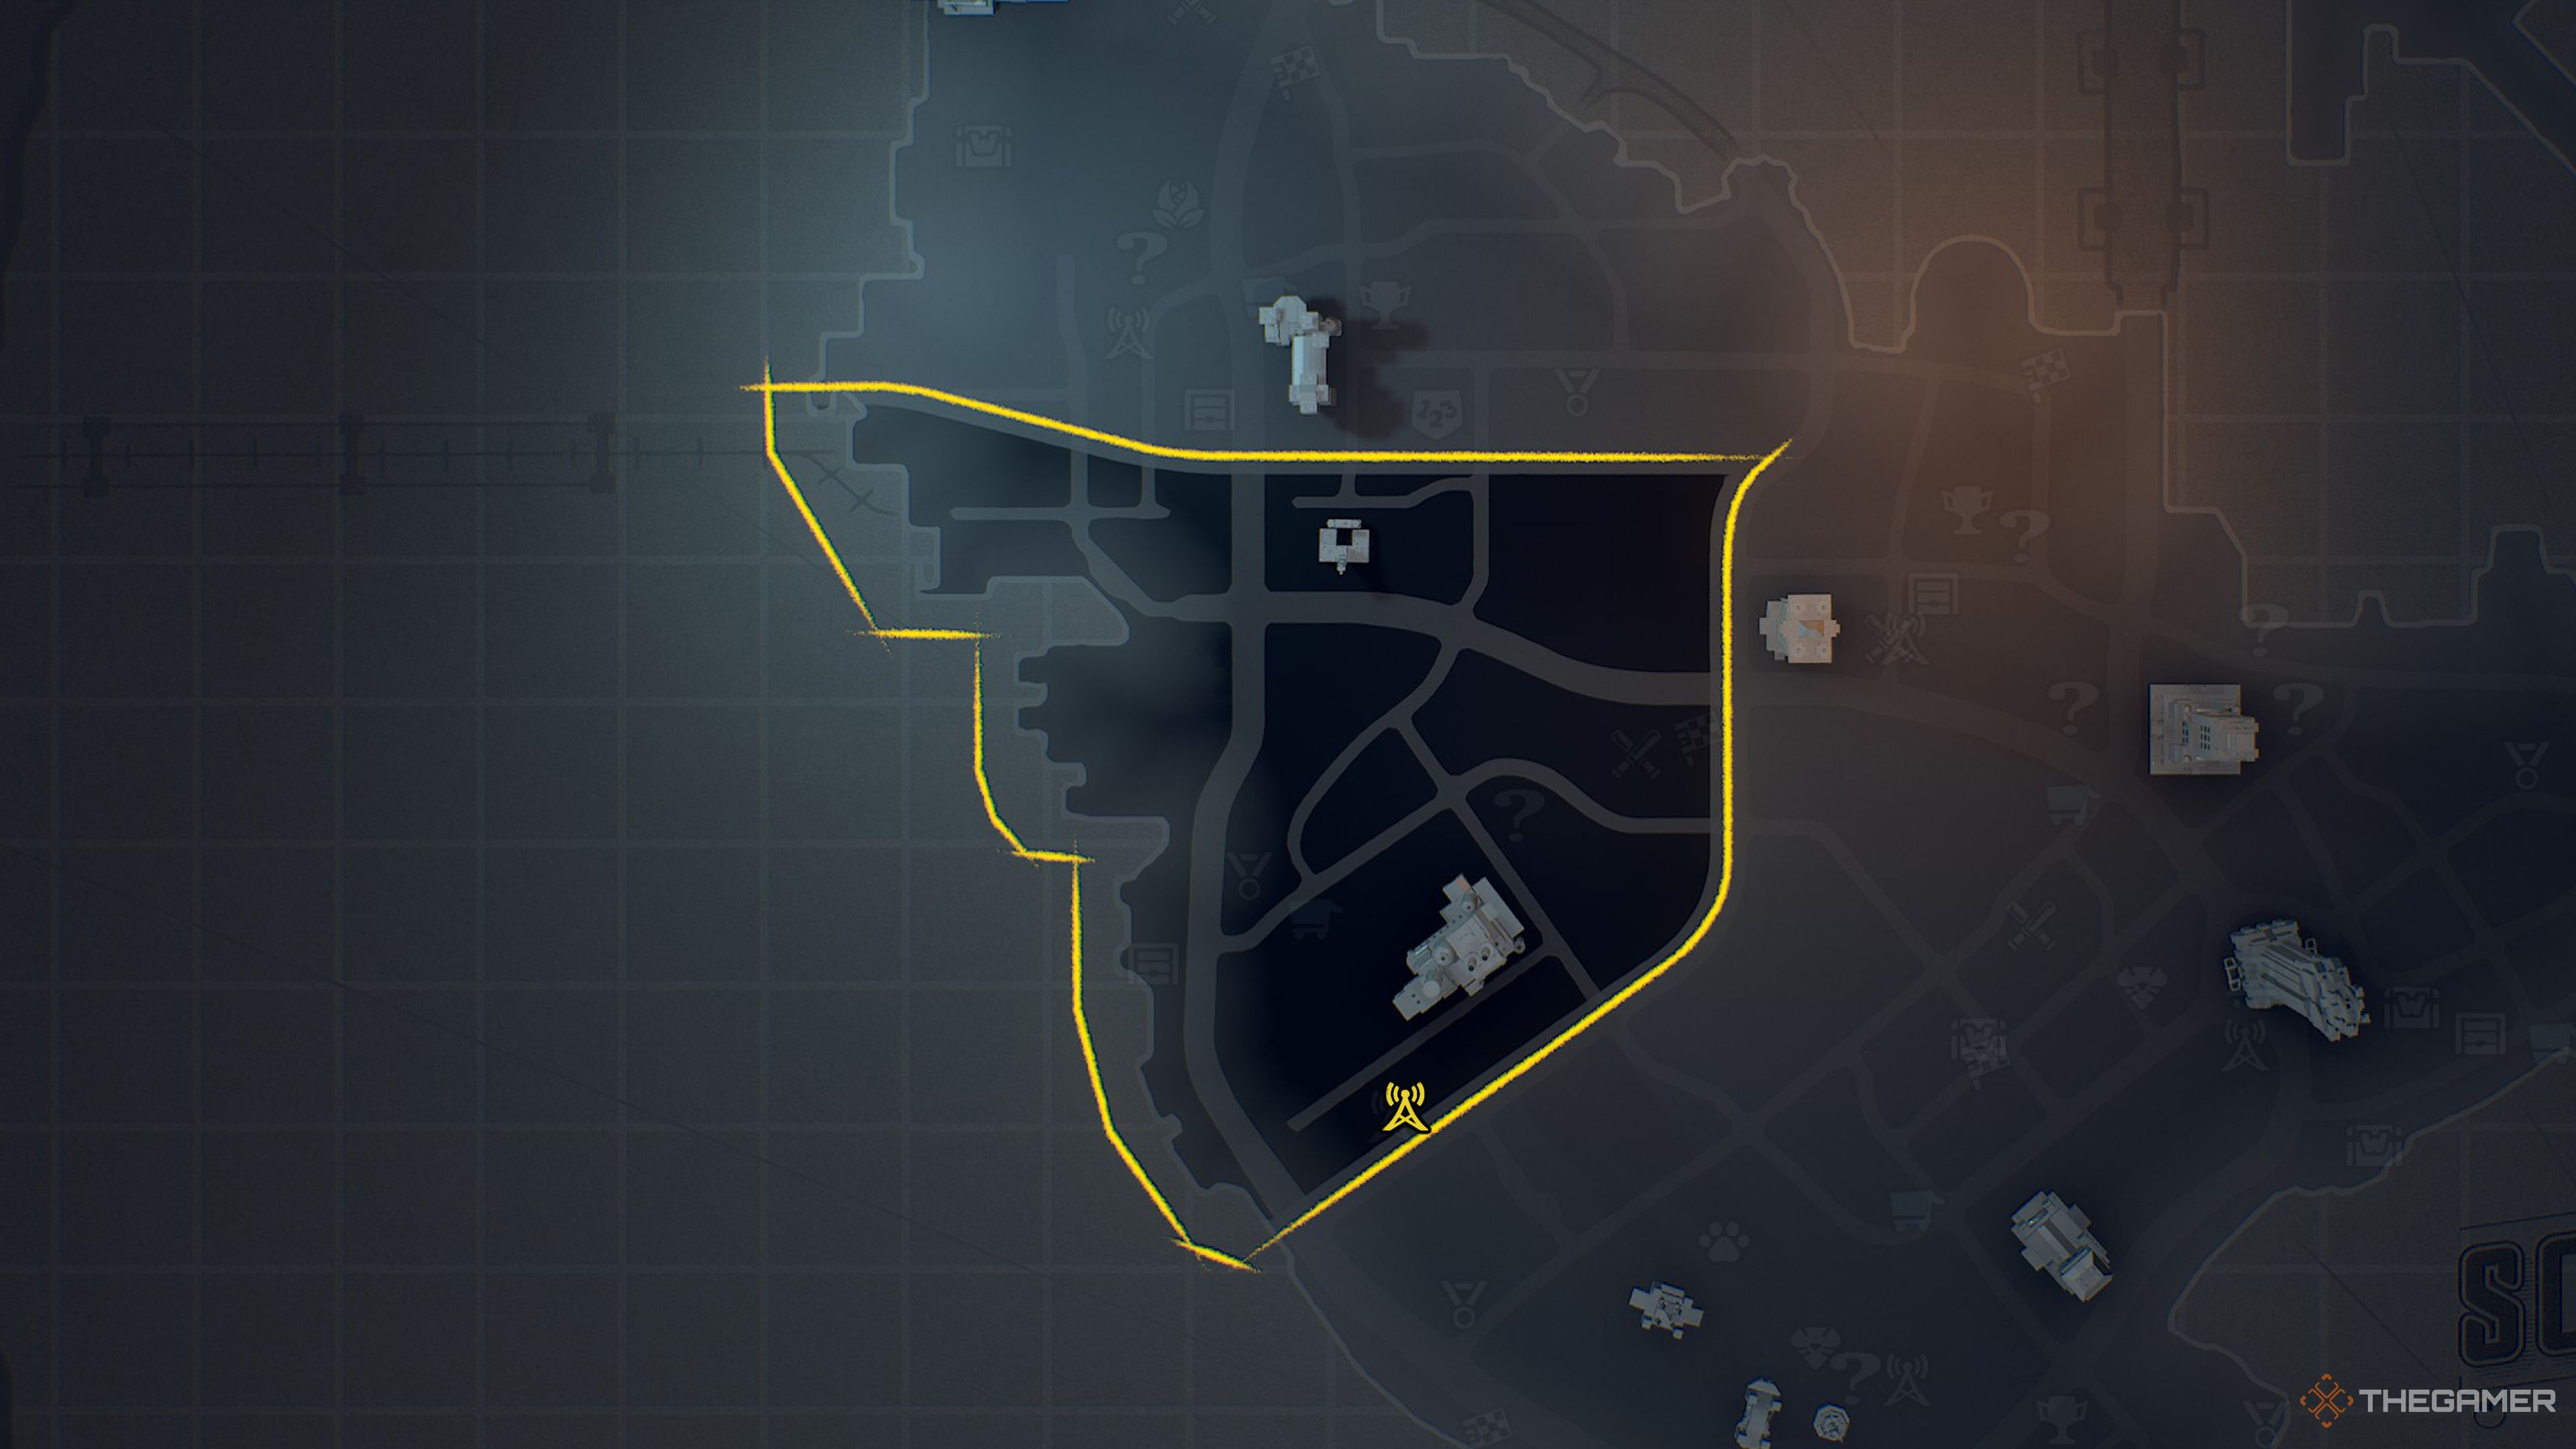
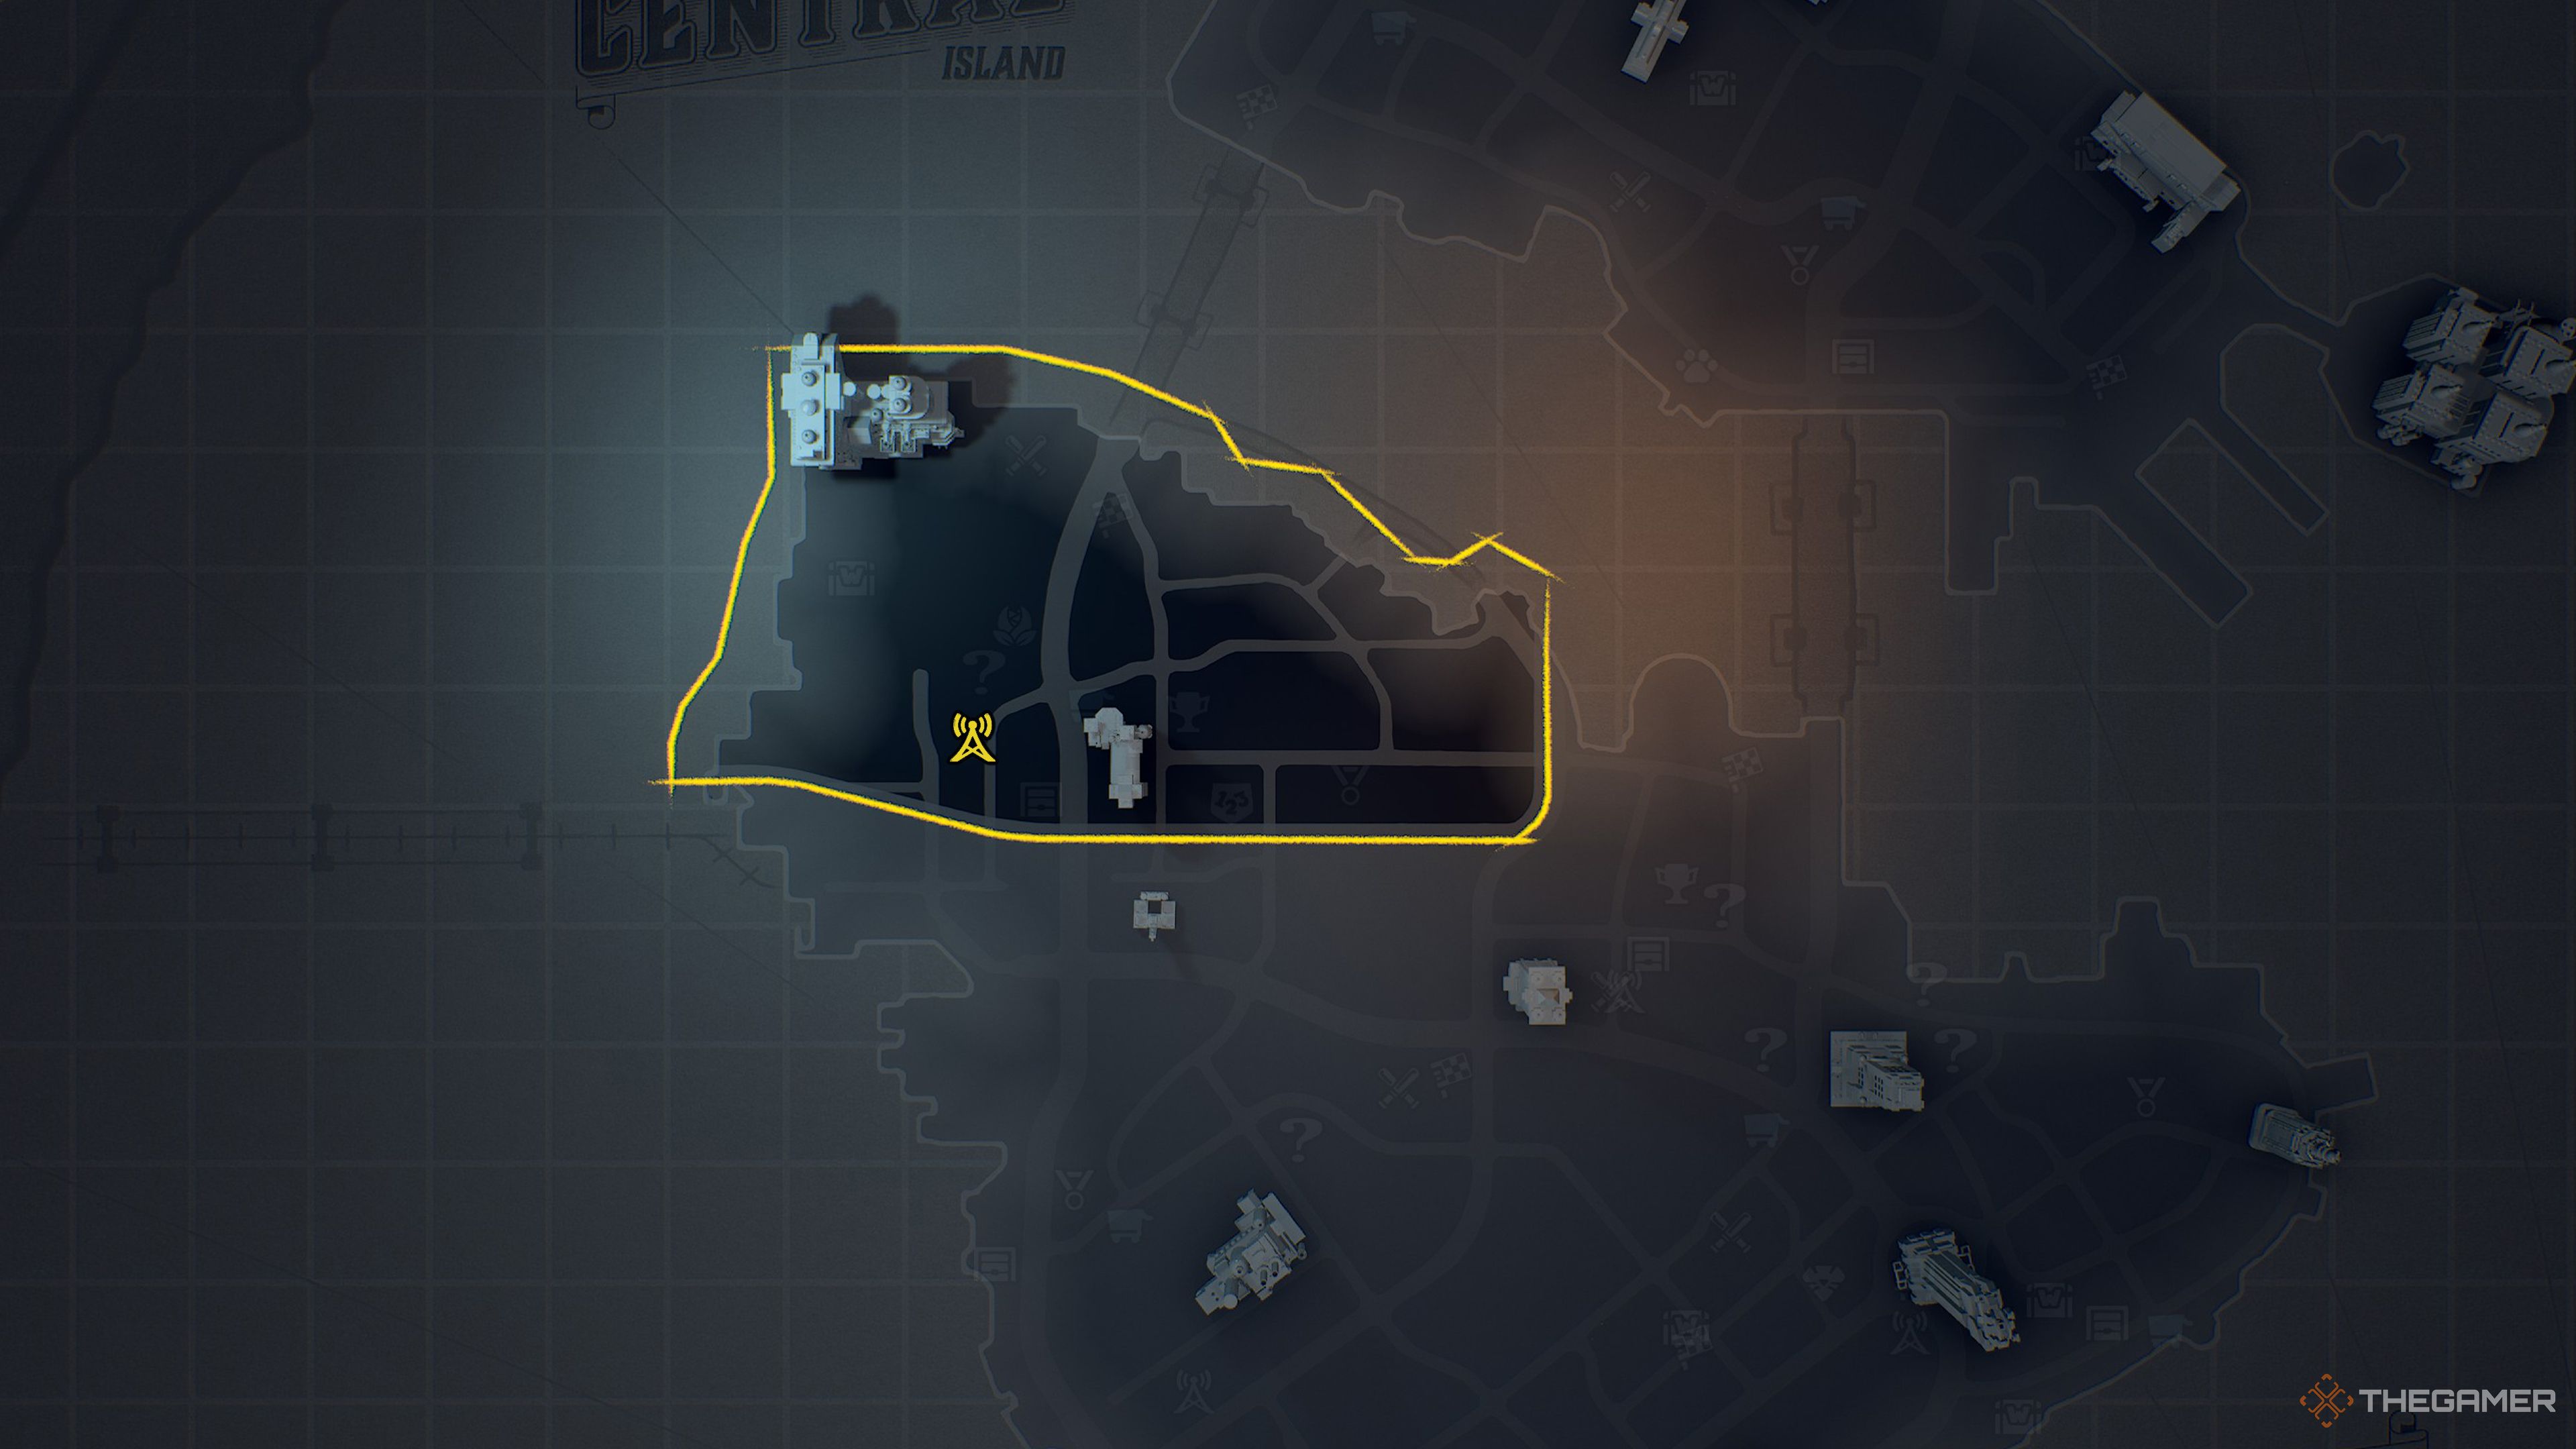
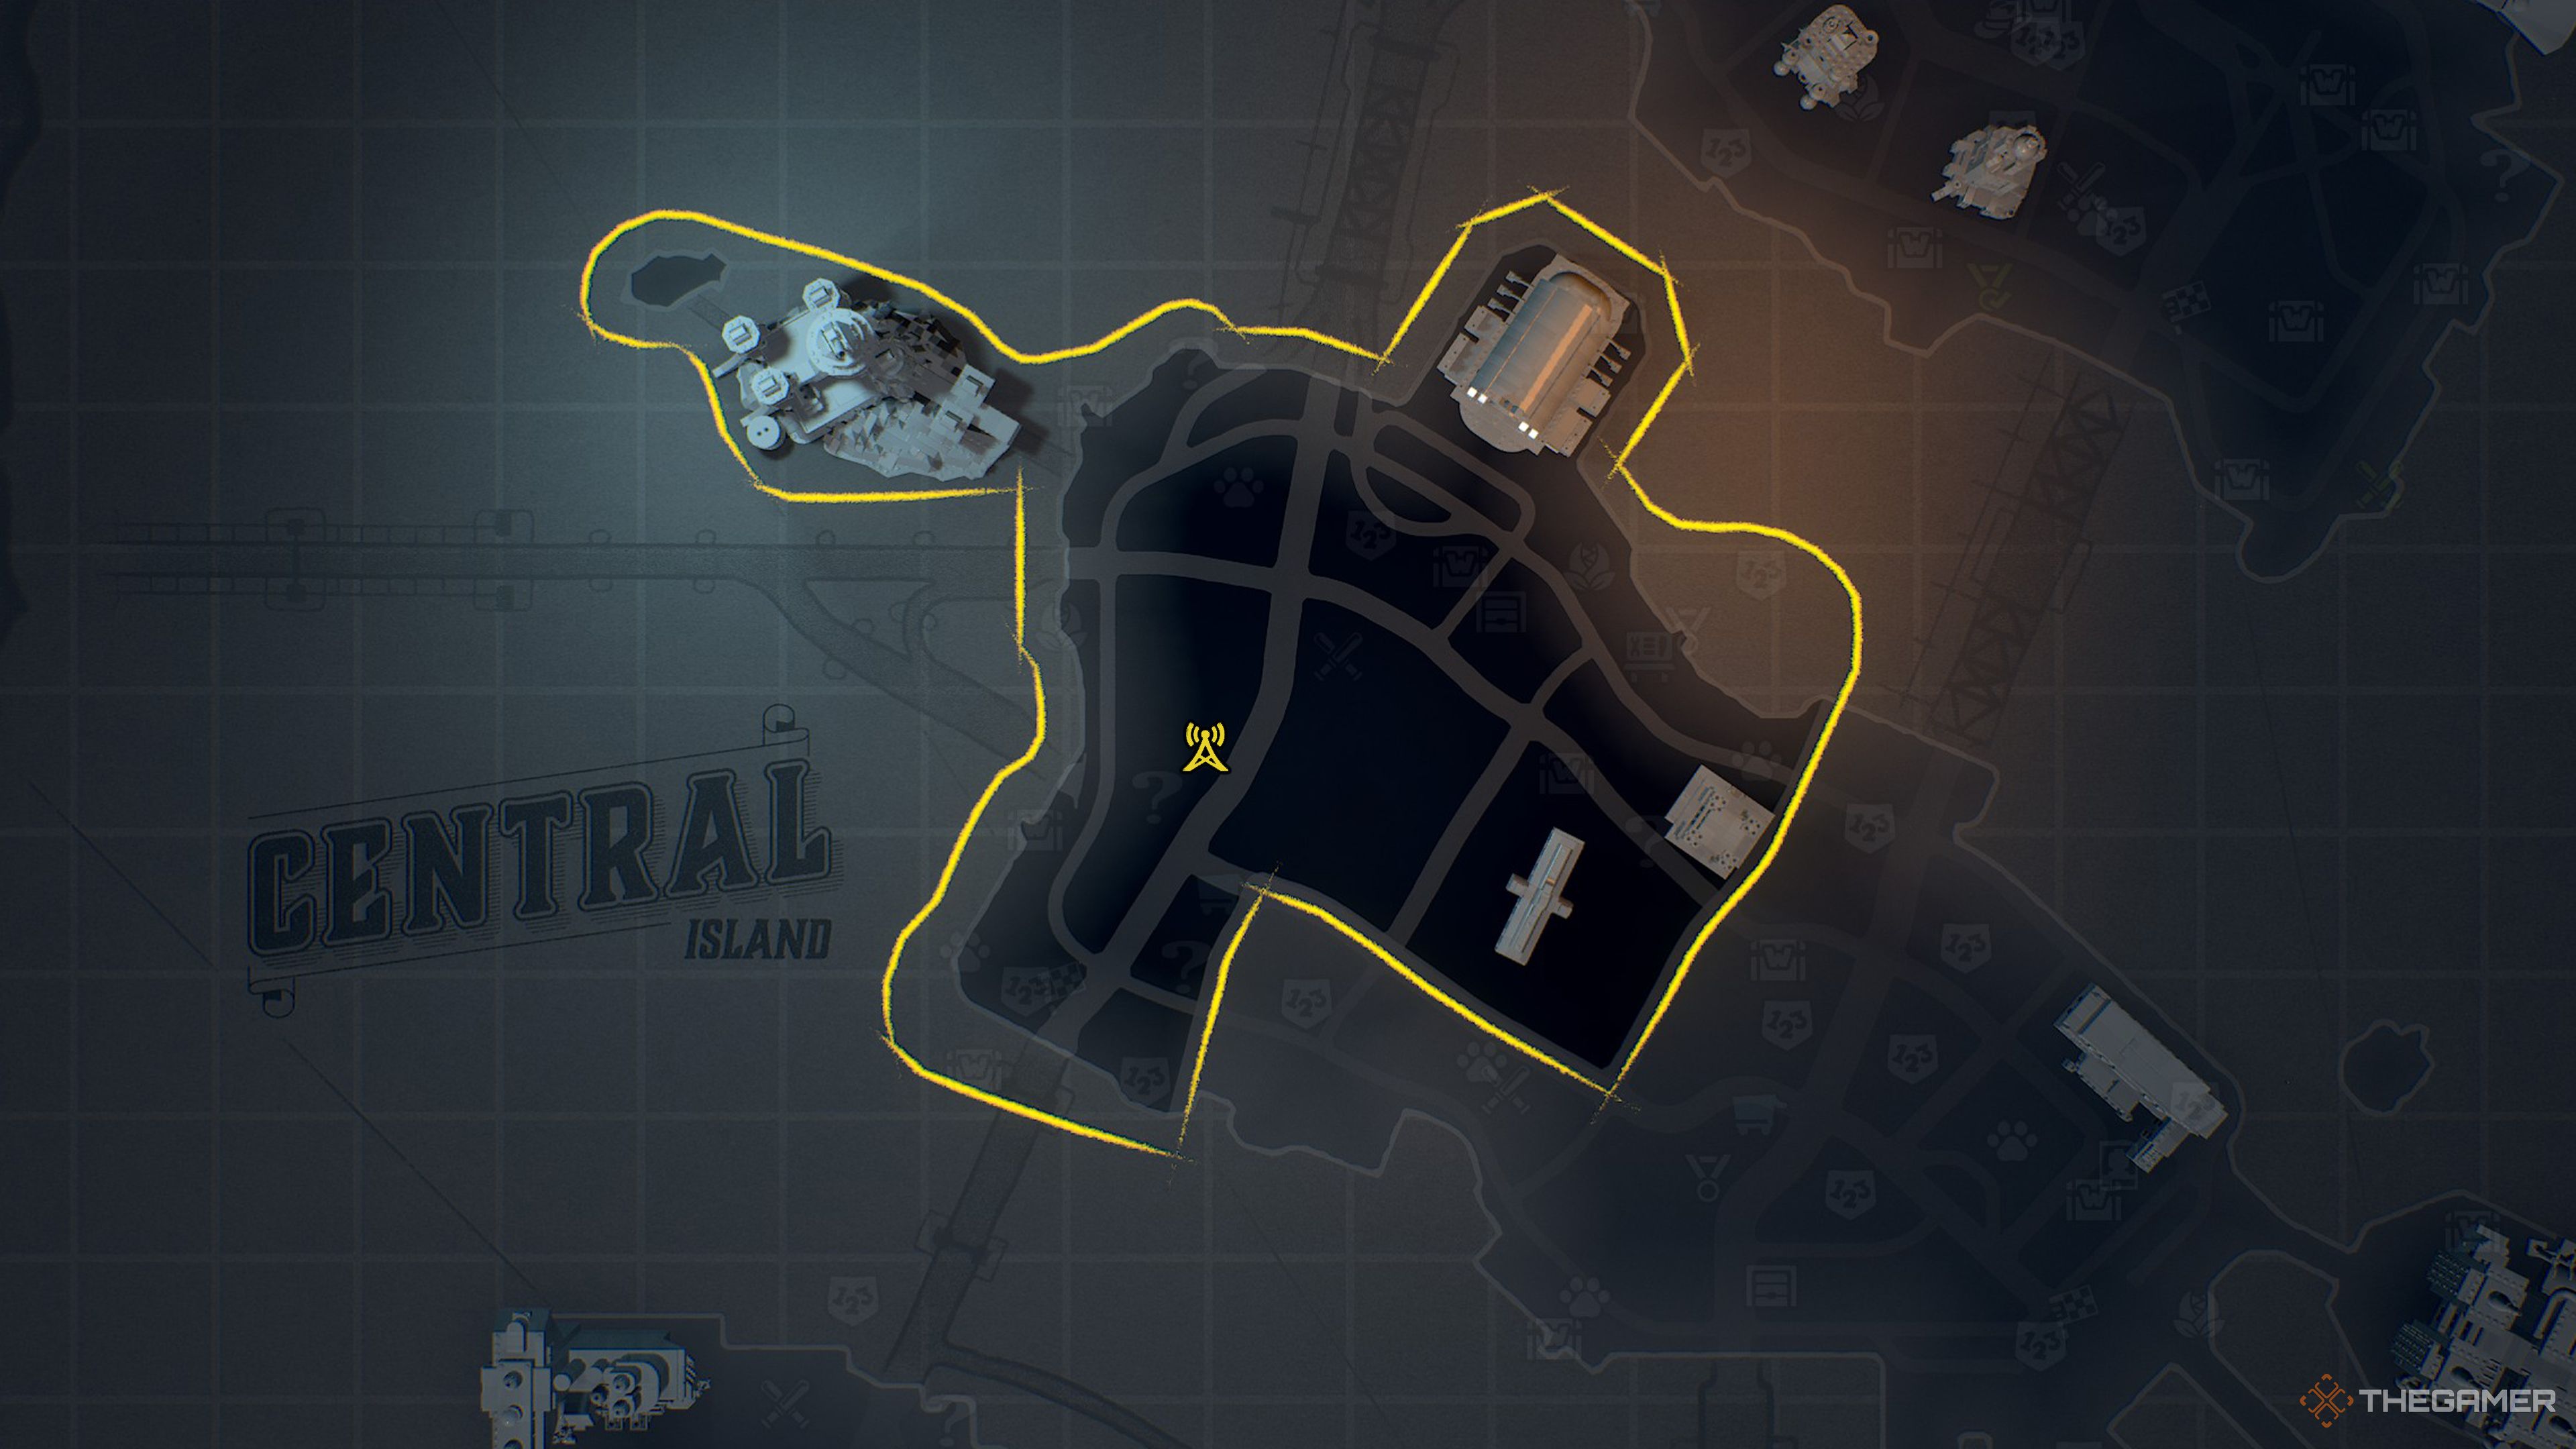
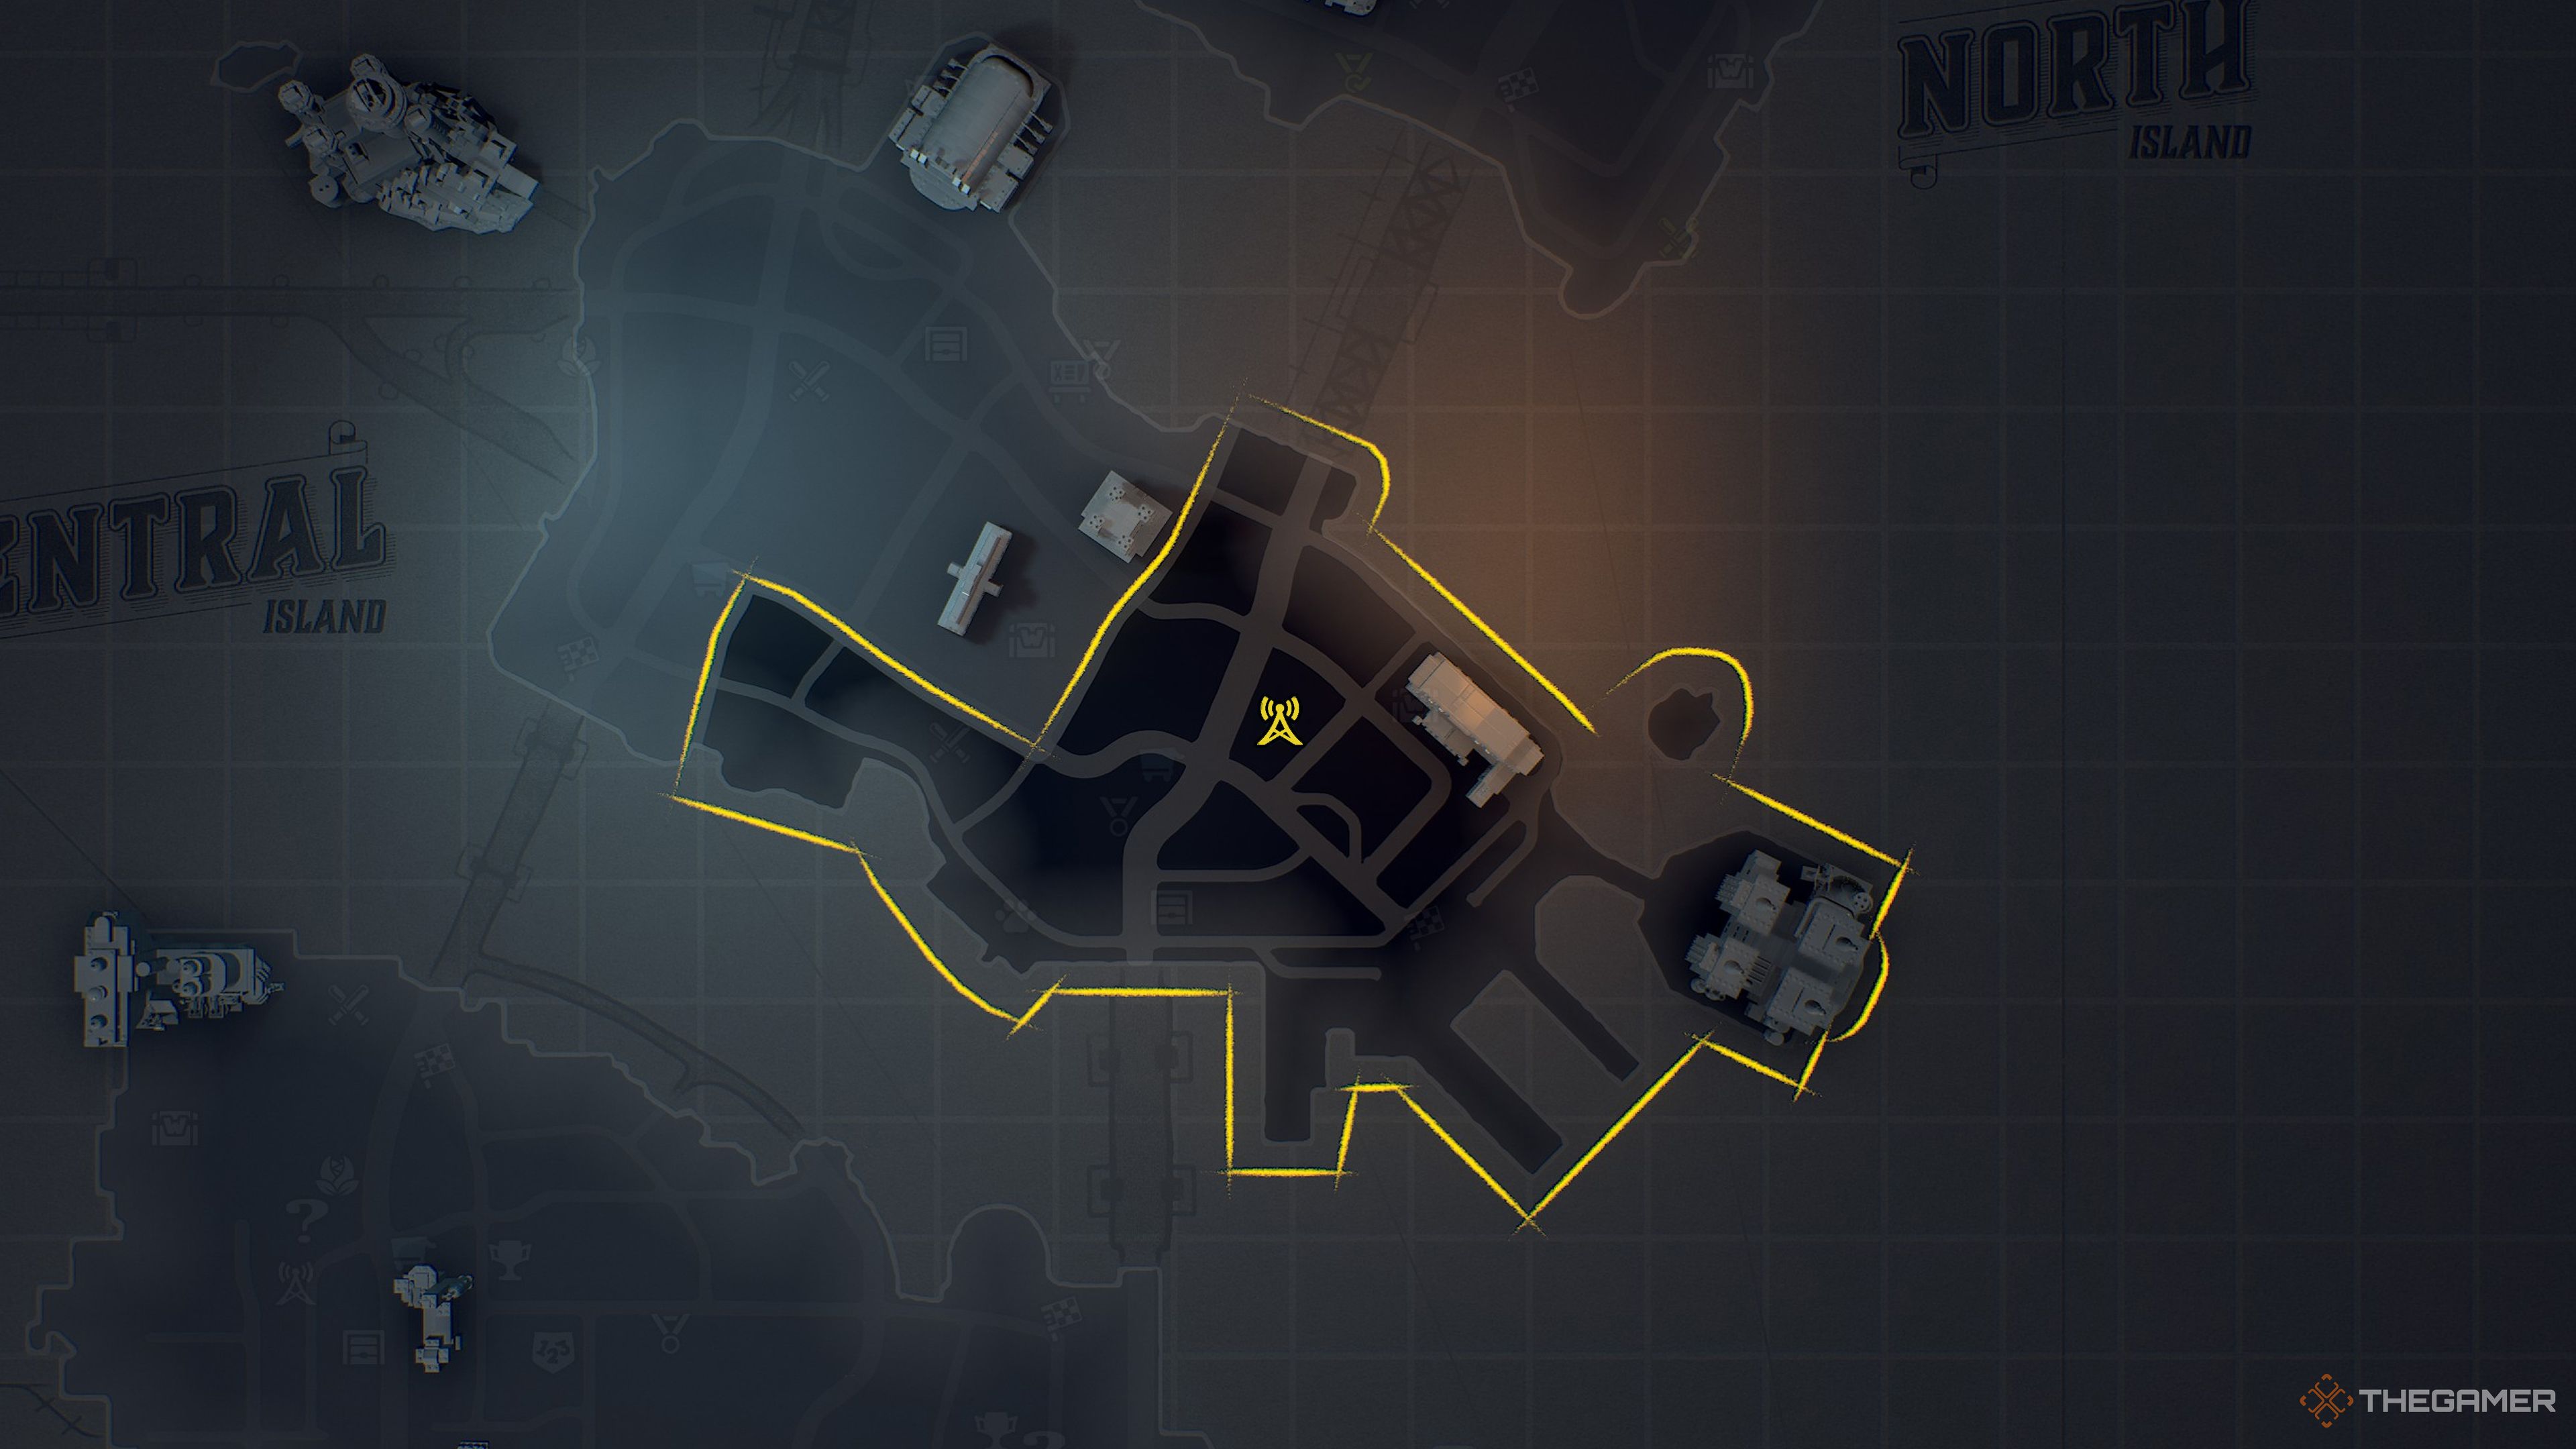
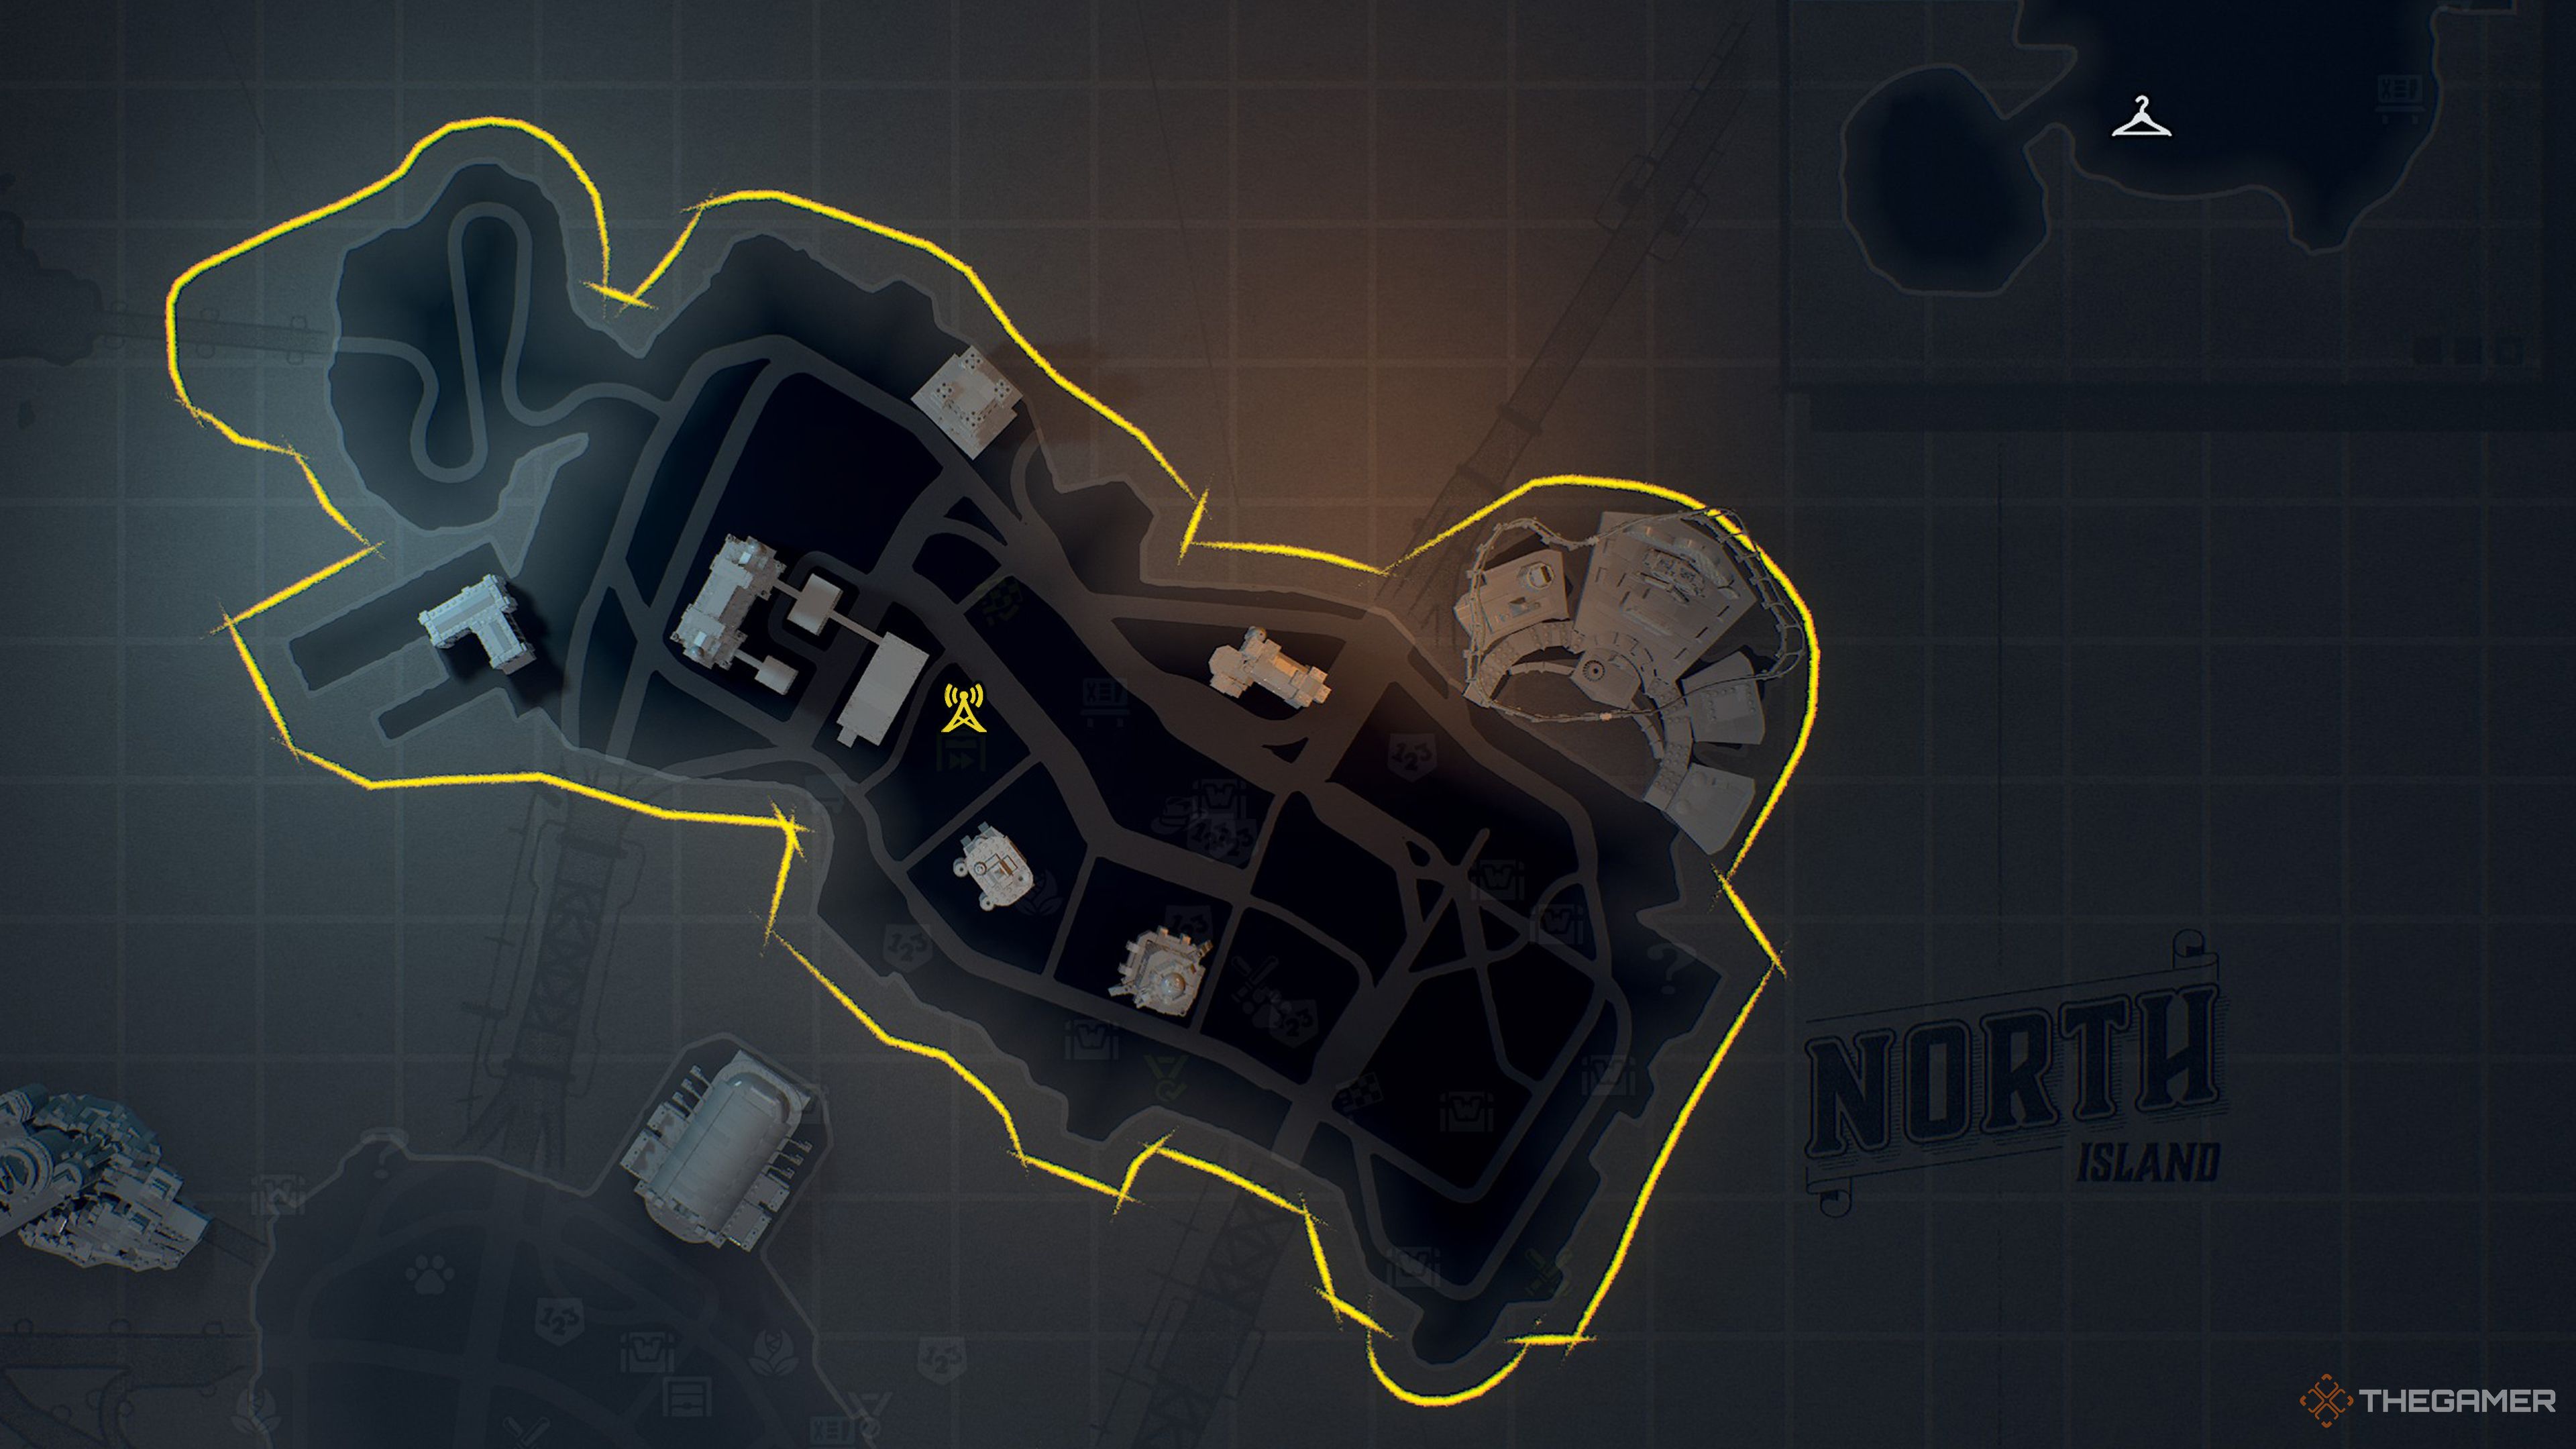
    There are many collectibles hidden throughout Gotham City in LEGO Batman: Legacy of the Dark Knight. But don’t worry, aside from bat symbols, you don’t have to wander around aimlessly looking for Riddler puzzle boxes or Batcave trophies. Once you reach Chapter 4 and unlock Batgirl, you can start hacking radio towers to reveal all points of interest on the map.

    Every district has its own radio tower. To activate one, simply go to the tower and throw a hackarang at the panel on its side. In this guide, we’ll tell you exactly where each tower is located—from Tricorner to Gotham Village and Amusement Mile—so you can unlock them easily. It’s best to do this after finishing the game, because some points of interest need Talia’s help to complete. It’s much easier to collect everything after completing the story mode.

    Tricorner
    Map with radio tower marked

    Old Gotham South
    Map with radio tower marked

    Old Gotham North
    Map with radio tower marked

    Old Gotham West
    Map with radio tower marked

    The Cauldron South
    Map with radio tower marked

    The Cauldron North – Ace Chemicals
    Map with radio tower marked

    Gotham Village – Robinson Park
    Map with radio tower marked

    Newtown
    Map with radio tower marked

    East End – Amusement Mile
    Map with radio tower marked

  • Where to Find All 50 Bat-Symbols in Lego Batman: Legacy of the Dark Knight

    Where to Find All 50 Bat-Symbols in Lego Batman: Legacy of the Dark Knight

    Bat symbols are glowing coins with Batman’s logo hidden throughout Gotham City. They don’t appear on the map, making them a challenge to find. Detective vision doesn’t help much here, so you’ll need to keep a sharp eye. To save time, we’ve spent hours exploring the city to help you locate these symbols more easily.

    This guide is still a work in progress, and we’re missing seven bat symbols so far.

    East End – Amusement Mile
    Map showing bat symbols labeled by numbers. One is located on the water and power rooftop overlooking the bridge, next to where the Kite Man mission is.

    Gotham Village – Robinson Park
    The map highlights bat symbols scattered around the park area.

    Newtown
    One symbol is on the rooftops near the Ace Chemical sign. Look for Batman standing on the sign, gazing at a bat symbol on the ground.

    Old Gotham North
    Symbols are marked on a map of Old Gotham North, spread across the area’s streets and rooftops.

    Old Gotham South
    This section has bat symbols in the southern neighborhoods, marked on the map for easier hunting.

    Old Gotham West
    Symbols in the western side of Gotham, on rooftops and alleyways, are marked on the map provided.

    The Cauldron North – Ace Chemicals
    Bat symbols are scattered across the northern part of Ace Chemicals, shown on the map.

    The Cauldron South
    Symbols appear in the southern industrial district, marked clearly for search.

    Tricorner
    In the Tricorner area, map markers guide you to bat symbols on rooftops and back alleys.

    Reward for Unlocking All Bat Symbols
    Collecting all the symbols unlocks a special reward — a giant T-Rex will start forming in the Batcave, reminiscent of the dinosaur from Batman #35, a gift given to Batman after visiting Dinosaur Island.

    Once you gather 25 bat symbols, you’ll earn the achievement titled “The idea was to be a symbol,” celebrating your detective skills.

  • How to Get Free Lego Batman Drops: Completing & Solving Challenges

    How to Get Free Lego Batman Drops: Completing & Solving Challenges

    To celebrate the release of Lego Batman: Legacy of the Dark Knight, players can receive some free items through Twitch Drops and other sources. These items can be used to decorate your Batcave in the game’s customization areas.

    To get two exclusive new items available only to Twitch viewers and find out what other freebies you can earn—like bonus Studs and new outfits—we have all the details you need.

    All Free Stuff in Lego Batman: Legacy of the Dark Knight

    You can get several free things for the game, including decorations for your Batcave, free Studs, and a few outfits for your characters. Simply pause the game, go to Options, and link your Warner Bros., Twitch, and HBO Max accounts if you have one.

    Tip: When you connect your game account to an HBO Max paid subscription, you can unlock two special Batsuits.

    If you’d like extra Studs (everyone wants those!) and an exclusive Stud Cache design, complete The Lego Group Online Survey. Once finished, you’ll receive a code as a thank you, which you can enter in the Redeem Code section to claim your reward. Remember to restart the game afterward to see the new content, including a colorful Stud Cache in your Batcave.

    To claim your free Twitch Drops, link your Twitch account to your game account by following a link or scanning a QR code with your phone. Then, search for Lego Batman: Legacy of the Dark Knight on Twitch and find a streamer with “DROPS” in their title. Watch for about an hour, and Twitch will notify you when your items are ready. Just click “Claim” to receive them.

    Free in-game items include:

    • Decor items for your Batcave, like the Drinks Fridge and Controller Stand
    • Special Studs and a unique Stud Cache design

    These items will automatically appear the next time you start the game, ready to be placed around the Batcave on the customizable platforms.

  • How to Get Studs Fast in Lego Batman: Legacy of the Dark Knight by Completing and Solving

    How to Get Studs Fast in Lego Batman: Legacy of the Dark Knight by Completing and Solving

    In Lego Batman: Legacy of the Dark Knight, studs are your main currency. You need them to buy costumes, vehicles, Batcave decorations, and more. To unlock everything in the game, you’ll have to gather millions of studs.

    Sounds like a lot, but don’t worry—Batman has some tricks up his cape. There are a few strategies and features to help you collect studs more quickly.

    How to Collect Studs Quickly

    Studs come in different colors, each worth a different amount:

    • Bronze — 1 point
    • Silver — 10 points
    • Gold — 100 points
    • Blue — 1,000 points
    • Purple — 10,000 points

    If a stud has a shiny effect, it’s worth slightly more and usually appears after a stealth takedown.

    The basic rule in any LEGO game is to smash everything you see. Breaking objects during missions or while exploring the open world not only earns you studs but also reveals clues or buildable items. Continually destroying nearby items will boost your studs.

    Some good spots to farm studs are areas packed with breakable objects, like parks, junkyards, or wreck yard sites. In junkyards, you can drive a vehicle and blow up large objects like wrecked cars. Those larger objects can’t be destroyed by hand, but wrecking them with a vehicle’s missile awards studs automatically.

    While smashing is helpful, it’s a slow process by itself. Luckily, you can boost your studs collection by building up a Stud Combo Multiplier. This multiplier increases as you gather lots of studs, doubling, tripling, or even quadrupling your total. Keep collecting quickly to maintain and maximize the multiplier, as it gradually decreases over time.

    You can also earn extra studs by solving crimes across Gotham City. When the police radio alerts you, follow the red icon to catch criminals. Completing these encounters will cause studs to drop from the sky as a reward.

    Additional Stud Earning Tips

    • Stud Caches: Hidden around the map are blue Stud Caches. They don’t show up as icons until you get close. Following beeping sounds helps locate them. When opened, they release a large amount of studs, more than you might expect.

    • Stud Effect and Building: If a stud glows, it’s slightly more valuable, typically after a stealth kill.

    Boosting Stud Collection Skills

    Your ability to gather studs faster can be improved through skills purchased with Gold Bricks. Once you buy all Stud-related skills, your stud collection rate will greatly increase:

    • Stealthy Studs: Take down enemies unseen to raise your Stud Combo Meter.
    • Hyper Combo: Max out your Stud Combo Multiplier.
    • Stud Magnet: Collect studs from further away.
    • Stud Combo Duration: Keep your Stud Combo active longer.
    • Speedy Stud Combo: Fill your Stud Combo Meter more quickly.

    You can spend your collected studs at the Batcave for vehicles or at Batmite’s shop for costumes and decorative items. This makes gathering studs an essential part of progressing and customizing your experience.

  • How to Complete All Achievements in Lego Batman: Legacy of the Dark Knight

    • Beware the Gray Ghost!

      • Complete Bruce’s Gray Ghost costume.
      • Find each item in the gardens using your special tracking ability.
    • “A legend, Mr. Wayne”

      • Finish the prologue.
      • The prologue ends when Bruce and Alfred find the perfect spot for the Bat Cave.
    • A Friend

      • Unlock Jim Gordon.
      • Complete the New Beginnings mission.
    • “This is my city”

      • Place a pin on the map.
      • Open the map and click to set a waypoint marker.
    • “I am the shadows”

      • Perform 100 stealth takedowns.
      • Sneak behind enemies and press the right bumper to silently take them down, for a total of 100 times.
    • One Bad Day

      • Complete Chapter 1.
      • Finish the first chapter of the story.
    • Rebuilding Gotham

      • Cash in a challenge in the Batcave.
      • Complete and redeem one Batcave Challenge to earn your Studs reward.
    • Not Just A Cave

      • Place 5 props or trophies in the Batcave.
      • Decorate your Batcave with buildable props or trophies.
    • Never Do It For Free

      • Collect 30,000 Studs in one Studs combo.
      • Achieve this by completing multiple Batcave Challenges at once.
    • “No, sir. The OTHER car.”

      • Buy 3 vehicles from the Batcave.
      • Spend your earned Studs on your favorite vehicles.
    • “You either buy a hero…”

      • Purchase 5 items from the Batmite Store.
      • Discover the store behind an explosive wall, and buy decor and outfits.
    • “Hear me roar”

      • Unlock Catwoman.
      • Complete Chapter 2 story missions to unlock her.
    • “Do I look like I’m joking?”

      • Finish Chapter 2.
      • Complete all main story missions in Chapter 2.
    • Caped Defender

      • Perform 100 successful counters.
      • Attack enemies by pressing the counter button before they attack.
    • The Boy Wonder

      • Unlock Robin.
      • Complete the Two-Face story mission.
    • “It’s not exactly a normal world.”

      • Visit every district.
      • There are 9 districts to explore.
    • The Dynamic Duo

      • Complete Chapter 3.
      • Finish all Chapter 3 story missions.
    • “Let’s see what Batgirl can do!”

      • Unlock Batgirl.
      • Complete her first mission.
    • Cowardly and Suspicious Lot

      • Defeat every enemy type once.
      • This naturally happens during story missions and battles.
    • “You’re becoming quite the celebrity.”

      • Discover 100 open-world events.
      • Use Batgirl to hack Towers, revealing more map icons like caches and riddles.
    • “Life’s been good to me.”

      • Collect 1,000,000 Studs.
      • Progressively gather this by breaking objects and opening caches.
    • A Grayson Graduation

      • Unlock Nightwing.
      • Complete the Mr. Freeze mission.
    • An Endless Winter

      • Complete Chapter 4.
      • Finish all main story missions in Chapter 4.
    • Out Of The Shadows

      • Unlock Talia.
      • Complete the Tumbler Chase mission.
    • “Lighter, faster, more agile.”

      • Unlock a skill upgrade from each category.
      • Purchase at least one combat and one exploration upgrade.
    • Knightfall

      • Complete Chapter 5.
      • Finish all main missions in Chapter 5.
    • “A Hero Can Be Anyone.”

      • Complete the story mode.
      • Finish Chapter 6.
    • “It’s a big city. I can’t be everywhere.”

      • Unlock all fast travel points.
      • Solve puzzles to unlock shutter icons and travel between districts freely.
    • Theatricality and Deception

      • Buy 3 gadget upgrades.
      • Use WayneTech Coins at the workbench.
    • “I own the place”

      • Purchase all Batcave expansions.
      • Find and buy all available expansions around the Batcave.
    • Out For the Challenge

      • Complete 20 challenges.
      • Find the Challenges Board inside the Batcave.
    • “I’m good with calculation”

      • Maintain the maximum Stud Combo for 60 seconds.
      • Keep collecting Studs continuously after reaching the max combo.
    • Wonderful Toys

      • Purchase all gadget upgrades for one character.
      • Do this on any secondary character first; it will apply to everyone eventually.
    • “You have a name to maintain”

      • Open all WayneTech Caches.
      • Follow a guide to find the 200 caches scattered around the game.
    • “The idea was to be a symbol”

      • Collect 25 Bat-Symbols.
      • Find Bat Symbol coins around Gotham.
    • “Quite the collection, Master Bruce”

      • Collect all Batcave Trophies.
      • Follow a guide to find every trophy and unlock map icons with Batgirl.
    • Too Many Questions

      • Complete every Puzzle Room.
      • Finish all Riddler and Cluemaster Puzzle Rooms.
    • “Hopefully because he’s busy”

      • Complete all side activities in Gotham.
      • Side missions, races, puzzle rooms, and more.
    • “Does it come in black?”

      • Equip a Red Brick.
      • Change your outfit’s color in the wardrobe menu.
    • “Wouldn’t wanna make things too easy.”

      • Achieve 5 gold medals in AR trials.
      • Practice in map locations until you get gold five times.
    • Collecting Evidence

      • Change camera angles over 20 degrees in Photo Mode.
      • Use photo mode with different settings for the best shot.
    • Computer Privileges

      • Change the screensaver on the Batcomputer.
      • Approaching the Batcomputer when prompted allows you to change the screensaver.
    • A Watchful Collector

      • Gather all collectibles.
      • Look for icons while paused; collect every item.
    • “Gotham can feel a little safer.”

      • Prevent 30 crimes.
      • Respond quickly during red alert signals to catch criminals.
    • The Strength To Fight

      • Reach a combat combo of 99 hits.
      • Keep attacking without stopping to build your combo.
    • “Things have improved”

      • Prevent each type of crime once.
      • Respond to police alerts for all crime types.
    • “I’m not wearing hockey pads”

      • Unlock all suits.
      • Complete side quests, visit stores, and find all collectibles.
    • “Is that like parachuting?”

      • Glide in 10 different wind tunnels.
      • Find and enter all wind tunnels marked on the map.
    • “Wanna know how I got these cars?”

      • Unlock all vehicles.
      • Complete quests, find collectibles, and visit shops.
    • “Holy skill upgrades, Batman”

      • Unlock every skill upgrade.
      • Spend your Gold Bricks on all upgrades available.
    • “This is too much power for one person.”

      • Collect all Red Bricks.
      • Find them during missions or in Batmite’s shop.
    • “I am Batman”

      • Unlock all achievements.
      • Achieve 100% completion of the achievement list.
  • Completing Firefly Missions & Solving Collectibles in Lego Batman: Legacy of the Dark Knight

    Completing Firefly Missions & Solving Collectibles in Lego Batman: Legacy of the Dark Knight

    In the upcoming Lego Batman: Legacy of the Dark Knight mission, we’re heading to the museum. It’s a shame we left that old fossil in the Batcave, huh? This time, we’re searching for models of the Space Shuttle Excalibur, and we’re right behind Firefly, which is quite literally on fire.

    There are also five WayneTech Caches to find and another Red Brick, which we’ll guide you through in this instructions. If you miss anything, you can always go back to the Batcave to replay the mission anytime from the computer.

    Every Spaceship Location

    1. In the level’s lobby, grapple to the right balcony. The first spaceship is in front of the burning mammoth display.

    2. During the Firefly fight at the end of the mission, the final spaceship is spinning on the orrery. Throw a Batarang to hit it.

    Every WayneTech Cache Location

    1. At the start of the mission, inside the museum foyer, grapple to the balcony left of the large dinosaur display. You’ll see the first WayneTech Cache in flames. Pull down the pipe with Batman’s grapple to extinguish the fire and access the cache safely.

    2. Use Batgirl’s drone to escape the foyer through the ceiling. Turn right, use the drone again to make a perch, then grapple onto the drone and jump onto the ledge by the window to reach the third cache.

    3. Later, when you arrive at the burning pirate ship, look to the right. You’ll spot the fourth cache hidden behind a crate in an archway.

    Where to Find the Red Brick – Fire Breather Modifier

    • Surrounding the sphere are various planets on the room’s walls, with Mars having a gold ring around it. The puzzle’s solution is to turn valves until all sides show the planet with the gold ring—Mars. When completed, the sphere opens, revealing the Red Brick.

    • The sphere is surrounded by planets, and the key is to rotate valves so that Mars, the planet with the gold ring, is visible from all angles. Once all sides display Mars, the sphere opens, revealing the brick.

    Additional Details

    • At the beginning, grapple to the left of the dinosaur display. Extinguish the flames to access the first WayneTech Cache.

    • Use Batgirl’s drone to reach higher areas and find caches behind structures or in hidden spaces, such as behind archways or within equipment.

    • When on the pirate ship, look for a crate in an archway to find the fourth cache.

    • The final Red Brick is hidden inside a sphere with several planets; rotating the valves correctly reveals Mars, which unlocks the brick.

    This guide should help you find all the models, caches, and the Red Brick efficiently.

  • Lego Batman: The Journey of Completing and Solving the Dark Knight Legacy

    Lego Batman: The Journey of Completing and Solving the Dark Knight Legacy

    Jim Gordon is no longer part of the game, and Catwoman has taken his place. In the new Lego Batman: Legacy of the Dark Knight mission, players get to see Selina Kyle’s masked alter ego. She comes equipped with a handy whip that allows players to grab a new Batcave trophy: a cat’s head.

    Throughout this level, you will find five scary Cheshire cat heads, along with five WayneTech Caches and the usual Red Brick. This guide will explain exactly where to find each of these collectibles. If you happen to miss any, you can replay the mission anytime from the Batcave computer.

    Every Cat Head Location:

    1. [Location details here]
    2. [Location details here]
    3. [Location details here]
    4. [Location details here]
    5. [Location details here]

    Every WayneTech Cache Location:

    1. Later in the level, after crawling through a vent, continue with the objectives. Use Batman’s grapple to open the door.
    2. In the next room, smash the crates to find a key. Head back through the door and use the key on the locked door across from you to access the second cache.
    3. In a room with mime acting as mannequins, find a hidden hole in the wall behind a crate. Smash the crate and crawl through. Send a cat through the flap on the opposite side to open the gate. Return with Batman and Catwoman, push the trolley forward, and climb the ledge to uncover another WayneTech Cache.
    4. In the toy shop, stand on the button to start a game of Simon Says. Repeat the sequence of notes displayed and walk across the piano in the same order to pull back the curtain and reveal the final WayneTech Cache.

    Where to Find the Red Brick – Feline Modifier:

    • Drive the Batmobile with the feline color palette. In the toy shop, as you play the mini-game, a maze appears. Plug in the controller to start, then guide the cat to the red brick by stepping on the directional buttons. Avoid the orange circle, and aim for the blue circles for extra studs. When the cat reaches the end, it will explode, revealing a hidden Red Brick behind the screen.

    This concludes the key collectible locations and tips for this level.

  • Explore October 2025 Lego Releases: Epic Death Star & Gremlins Collectibles

    Explore October 2025 Lego Releases: Epic Death Star & Gremlins Collectibles

    I get a sense of chaos in the Force when I look at this month’s new Lego sets, as if countless bank accounts suddenly shouted in fear before going silent. That’s no moon—it’s October’s top release, the stunning (though very pricey) Death Star.

    It’s large enough to make up for a slow month in terms of new Lego sets. Besides the massive battle station and its 38 minifigures, the focus is on Christmas-themed sets and nostalgic favorites. For example, the Lego Game Boy is hitting shelves in October, followed closely by a Gizmo figure. Both are strong contenders for our list of the best Lego sets, and I feel sorry for our wallets.

    Here’s everything new in Lego for October to keep you in the loop.

    Editor’s Picks

    New Lego Sets for October 2025: Botanicals
    There’s only one floral set coming this month, and it appears to be a rework of an existing one. It looks like the Bouquet of Pink Roses is a new color version of the Bouquet of Roses, with more shades and white baby’s-breath flowers intact. Personally, I prefer the pink version over the classic red because the white and peach centers make the set stand out more.

    Available October 1, 2025

    New Lego Sets for October 2025: BrickHeadz
    Two new BrickHeadz collections are launching, from popular franchises—Stranger Things and Fortnite. For fans of Hawkins, the Mike, Dustin, Lucas, and Will figures from season 1 are a nostalgic treat, recalling the show’s early episodes from a decade ago. Dustin wears his headset used to talk to Lucas during their escape from shady agents, while Mike has a walkie-talkie.

    The Fortnite figures—Drift and Raven—are some of the game’s most recognizable skins, making them great gifts or display pieces for your gaming setup.

    Available October 1, 2025

    New Lego Sets for October 2025: Icons
    The upcoming Icons line is feeling very festive, and I can almost hear sleigh bells. My favorites are the Holiday Express Train, perfect for winding around the Christmas tree, and the Family Christmas Tree, which brings a cozy, nostalgic vibe. The latter even spins open to reveal a tiny house inside—a magical but pricey addition to any holiday Lego collection.

    Available October 4, 2025 (October 1 for Insider members)

    New Lego Sets for October 2025: Star Wars
    While the upcoming kit that really grabs me is a massive Star Wars Death Star, there’s another exciting release—Gizmo from the 1984 movie Gremlins. The Gizmo set features about 1,000 pieces, with a cute, chubby figure that’s about a few inches tall, complete with expressive eyes that could melt anyone’s heart, much like the recent Baby Yoda or Ewok sets.

    The Death Star itself is enormous—over 9,000 pieces—and includes almost 40 minifigures. Unlike a full sphere, this model shows cutaway sections of iconic areas like the Emperor’s throne room and reactor shaft, making it feel like a collection of mini-dioramas rather than a simple model.

    Available October 1, 2025

    New Lego Sets for October 2025: Super Mario
    Even if you’re not a Mario fan, the Lego Game Boy model is a must-see. It’s a super accurate replica of the handheld console from 1989, nearly identical in size.

    It’s more than just a display piece: it features functional pressable buttons, two cartridges (Super Mario Land and The Legend of Zelda: Link’s Awakening) that slot into the back, and cool lenticular screens that give the illusion of gameplay. For anyone who grew up with the original Nintendo, this will be a nostalgic delight.

    Available October 1, 2025

    New Lego Sets for October 2025: Wednesday
    Addams Family fans will love the new Wednesday sets, especially the Thing’s Apartment. It opens up to show a cozy space for everyone’s favorite disembodied hand, complete with nail polish and grooming supplies.

    Another set features Morticia’s Cottage, with a spooky, gothic style that fits well with the theme.

    Available October 1, 2025

    Other New Lego Sets for October 2025
    The month’s other releases are mostly Christmas-themed. I particularly like the cheerful Snowman Ornaments and the impressively oversized Santa minifigure. The Festive Gingerbread House is another highlight—perfect for any Lego holiday village and pretty affordable compared to other seasonal sets.

    Available October 1, 2025

    Gifts with Purchase
    If you buy certain Lego sets and spend a specific amount, you can get free gifts until October 7. Be sure to check which sets they’re bundled with, as most of these offers are only available through the first week of the month.

    For the best deals on new sets, check out our top Lego discounts. And if you’re into toys, don’t miss the top Nerf blasters this season.

  • Solving Lego Voyagers: Completing the Training Room Puzzles

    Solving Lego Voyagers: Completing the Training Room Puzzles

    While the first half of Lego Voyagers eases you into the puzzles and challenges you’ll encounter, things get serious once you reach the training room. This room is designed to take about as long as fixing the railroad tracks in Chapter 29, but there’s one puzzle that stands out as much more difficult than the others.

    You can expect a few easy challenges in the Training Room, but one of them is definitely the hardest. Be patient and work closely with your partner if you want to finish it in a reasonable amount of time.

    ### How to Complete Every Test in the Training Room

    When you start Chapter 33, you’ll come out of the elevator into the Training Floor area. Turn on the lights and unlock the “Welcome To School” achievement. You’ll need to complete six challenges to progress:

    1. The Accelerator
    2. The Gyro Training
    3. The No Friction Lap
    4. The Aerodynamics Test
    5. The Three Platform Landing
    6. The Sea Landing

    —

    ### How to Complete the Gyro Training

    The first task is Gyro Training, located in the bottom left corner of the large training room, near the entrance. The goal is simple: follow the color-coded seating assignments for each brick. The blue brick goes into the training seat, and the red brick controls the machine. Once you’re in position, activate the gyro training machine, let it run for a few seconds until the achievement or trophy pops up, and listen for an audio cue that confirms completion.

    —

    ### How to Complete the No-Friction Lap

    The No-Friction Lap is in the center of the room. To finish this, sit the red brick in the middle seat to start the timer, which begins when you cross the starting line. Each brick then takes its designated seat: the red brick uses steam to control side-to-side movement, helping keep you straight on the slippery floor, while the blue brick manages acceleration.

    —

    ### How to Complete the Aerodynamics Test

    Located in the bottom right corner, this test involves attaching bricks to the base section and then activating the handle on the aerodynamic machine. The machine blows air to check the aerodynamic qualities of the bricks. The key detail is that bricks don’t need to be attached in a specific way; just ensure they are flat and activate the switch to pass.

    —

    ### How to Complete the Accelerator Test

    The Accelerator Test is in the top left area of the room, next to the Three Platform Landing. Like Gyro Training, each brick must be in the correct place: the person pushing the switch needs to launch their partner into the air three times in a row. After the third launch, you can move on to the next challenge.

    —

    ### How to Complete the Three Platform Landing

    This challenge is located in the top central part of the room, behind the racecourse. It’s the hardest of all tests because it requires good teamwork. One brick controls the rocket’s upward thrusters, and the other manages the side stabilizers. To succeed, you’ll need to carefully balance your movements by fluttering the thrusters and holding the stabilizers for several seconds to change direction dramatically.

    Good communication is essential here—react to your partner’s movements and learn how slight adjustments affect the rocket’s flight. The second landing is especially tricky: swerve to the right of the platform directly above the launch pad, then quickly turn back left to gain momentum. You may need a few tries, but with patience, you’ll get it.

    #### How to Cheat the Three Platform Landing in Couch Co-Op

    A useful trick is to use local co-op with one person controlling both controllers. This allows more precise and quick adjustments since one person will be in control of both the rocket’s movements, making it easier to land successfully.

    —

    ### How to Complete the Sea Landing

    The Sea Landing is at the far end of the room, past the red and orange buoys. To complete this, sit in the red brick to reveal a spot where the blue brick can attach. The blue brick is then placed on the far side of the pool to simulate an emergency sea landing.

    As the blue brick, you need to cross between the red buoys connected by orange ones, which are summoned by the red brick. The red brick must place orange bricks on the grid on the ground to summon buoys, creating a path. Reuse buoys already placed and move them around to make the route easier if needed.

    To succeed, attach each brick to every red buoy to count as a landing. Once you reach the final buoy, backtrack to the starting point and return to your aircraft to complete the training. When all six puzzles are solved, the door on the bottom right opens, allowing you to proceed.

  • Completing the First Rotating Panel Puzzle in Lego Voyagers

    Completing the First Rotating Panel Puzzle in Lego Voyagers

    Lego Voyagers challenges your mind with a series of obstacles that get harder as you move through the game. It’s a cooperative game that you can play for free, and you’ll find many puzzles involving bridges. One of the first puzzles in the game helps you learn different ways to cross gaps besides using bridges.

    After the opening scene, as you explore, you’ll come across a multi-step puzzle involving metal panels spread across the game world. These panels can act as bridges or launching pads, and you’ll need to figure out how to use them to progress.

    How to Find the Launching Bridge Puzzle

    Start in Chapter 7, where you will see a large destroyed wall. Passing through it takes you into an area with lots of platforms to jump on. When you reach the tower in the scene, you’ll notice a section where you can attach to a series of spinning panels using yellow bricks at their tips.

    First, one player should tie onto the first yellow brick to flip the panel horizontal. Then, the second player can hop onto the panel, crossing the gap. Once across, they should attach to the other side, giving your partner a safe way to follow.

    Next, go down the path and cross the grassy area until you see a tall panel facing a wall with a ledge. This is part of the Launching Bridge Puzzle. From here, you can attach to a rotating panel by the yellow attachment points on the tips.

    To solve this puzzle, one person needs to stand on the edge of the panel (marked by white and gray bricks), and the other should quickly flick the controller stick to launch them towards a safe ledge on the far wall. Once flung across, you can grab onto another yellow attachment to set up for the next person to cross. Repeat this process to help both players navigate over gaps across the area.

    After launching across, move to the right and upward to find another yellow attachment point. From there, you’ll continue to set up launches and crossings, using the panels and weighted bricks to your advantage. This method allows you to keep crossing gaps safely by launching each other across platforms and through breakable walls to progress further in the game.

  • How to Complete Repairing Railroad Tracks in Lego Voyagers

    How to Complete Repairing Railroad Tracks in Lego Voyagers

    Most of the puzzles in Lego Voyagers are quick and simple, designed to keep the story moving fast. However, the train track puzzle is much bigger and takes a whole chapter to complete. Some chapters may only last a minute or so, but once you reach Chapter 29 and see the scene in front of you, you’ll realize this puzzle will require some effort.

    In this part, the red brick and blue brick each have specific jobs. You need to work together to steer a vehicle and gather the materials needed to rebuild the train tracks so you can keep your train ride going.

    Where to Find Pink Bricks to Repair the Train Tracks

    At the start of Chapter 29, you’ll come to some train tracks that are broken and missing pieces.

    Your task is to gather bricks from the drop sites and take them to the top left section of the map by opening doors and clearing the way for your vehicle. To your immediate left, there’s a two-brick truck you can use as you look for materials to fix the tracks.

    Use the white lever on the left to move the vehicle forward and backward. The back white brick controls the direction of the wheels.

    Follow the road to the right, then down the path until you reach the first drop of materials.

    Next, park the vehicle under the blue conveyor belt. The blue brick needs to connect with the lever to activate it and cause a group of bricks to drop into the truck.

    Collect the pink bricks that fall, then move further east.

    Continue heading east and park your vehicle in a corner below another conveyor belt. Use the lever with the blue brick to grab more pink bricks, then keep moving forward.

    Head north through an open gate, passing through another fence by having one brick hold the lever in place.

    You’ll see a small path blocked with two railings. To cross, align the vehicle so one brick opens the path with the lever. The driver then moves straight over the barrier before rejoining the brick holding the lever.

    Proceed along the path to the southeast and park your vehicle just below another conveyor belt. Activate the lever with the blue brick to gather more pink bricks, then continue.

    Move north through the open gate and pass through the fence by using the lever held by a brick.

    You’ll find an exit door to the left that can be opened by connecting to the console nearby.

    Keep moving east along the path and return up under the final drop zone to the northeast, following the red arrow.

    Once there, take the pink bricks to the very top left where you will see a smelting machine.

    How to Turn the Pink Bricks Into Train Tracks

    Take the pink bricks upward to the smelting machine located at the top left of the area.

    Use the collected bricks to repair the missing pieces of the train tracks at the beginning of the section.

    Bring the bricks back to the starting point and assemble the new segments to complete the track.

    After the tracks are fixed, climb onto the boxes southeast of the train and attach them to the yellow slots on the top to finish Chapter 29.

    How to Repair the Train Tracks

    Once you have the supplies, bring the train tracks back to the missing pieces at the start and repair them. Collect the supplies from the boxes and connect the pieces to rebuild the tracks. When finished, go to the top of the boxes to the southeast of the train and attach them to the yellow slots to conclude the chapter.

  • Completing the Tic-Tac-Toe Puzzle in Lego Voyagers: A Solving Guide

    Completing the Tic-Tac-Toe Puzzle in Lego Voyagers: A Solving Guide

    The Lego Voyagers game might be short, but it’s full of hidden achievements that you can discover while enjoying your adventure to build a rocket. Besides exploring, there are some small side puzzles you can solve to earn extra accomplishments, like playing Tic-Tac-Toe in Chapter 19.

    Playing Tic-Tac-Toe is pretty simple. Once you arrive at the right spot, follow these instructions to find the game and get closer to earning the platinum trophy for the game.

    How to Reach the Tic-Tac-Toe Board in Chapter 19

    Start by opening the door guarded by two cameras at the beginning of Chapter 18. To do this, activate the switch that only uses blue bricks, located to the right of the door. Once the door is open, hop off and continue.

    Next, move forward and cross the set of two spinning fans onto a brown area equipped with another blue brick switch, marking the start of Chapter 19. Use this blue brick to rotate the closest fan by moving the lever to the right. Then, prepare the platforms of the other fan so they aim toward the first fan.

    Positioning the fans this way lets the red brick jump from fan to fan as you adjust the handle. Cross over, then knock down the tower on the other side and continue with your partner across the first fan into the next zone.

    Use the tall blue piece to activate a device that will spit out more bricks, which you can use to build and climb up onto the square blocks marked with orange tiles on top.

    How to Earn the Tic-Tac-Toe Trophy

    Once you reach the top and go a little further, you’ll spot a Tic-Tac-Toe game on the left side, under a tree in this section. The pieces are green and orange. When you line up three of the same color in a row, you’ll earn the Tic-Tac-Toe achievement or trophy.

    You don’t need to actually play a game, taking turns with the pieces. Just make a line of three identical colors, and you’ll get the notification that you completed the objective.

  • All You Need to Know Before Completing Lego Voyagers and Solving Challenges

    All You Need to Know Before Completing Lego Voyagers and Solving Challenges

    Lego Voyagers provides a simple approach to cooperative platformer games, but it adds its own Lego-themed flavor by focusing on two cute characters: a red brick and a blue brick. The game is quick and easy to start, with intuitive controls, but it takes most of its five-hour gameplay to learn all the tools needed to reach your rocket.

    Although the main idea involves building your way across the game using Lego blocks, you’re given little guidance at the beginning of your Lego adventure. To help you out, here are some useful tips for starting in Lego Voyagers.

    ### Use the Attach Ability Freely

    The most important mechanic in the game is that you are a Lego brick that can connect to different pieces in the environment. Attaching yourself to various bricks speeds up puzzle solving and testing solutions. Press B or Circle to attach to another brick—be it the ground, a buildable block, or your co-op partner. This button helps you try different interactions and can lead to successful outcomes in puzzles.

    A handy tip is to use the attach button when jumping from one ledge to another. Attaching to a brick can make your jump more secure, especially if there’s something to latch onto nearby.

    ### Rotate Your Brick Pieces

    When building, don’t forget to rotate your Lego pieces by pressing Y or Triangle. Rotating pieces allows you to fit into tight spaces or stretch your creations to form bridges. This saves time and gives you more control when customizing vehicles or structures.

    ### Recognize When Collaboration Is Needed

    If you’re stuck in a certain part, it probably means you need to work together. Many puzzles require one brick to hold or operate a switch while the other jumps across panels or fans. While early sections can often be completed solo, later stages demand careful teamwork, especially during a mini-game involving rocket landings that needs precise coordination.

    ### Bricks Can Substitute for You

    Sometimes, you might need to replace your character with a brick to help progress. You can grab a brick and place a handle or support to help move other bricks or cross gaps more efficiently. This method allows two bricks to work together in sections designed for a single character, enabling smoother progress.

    ### Speed Is Important When Building

    When constructing, quick action is vital. Once you attach a brick to another, you have only a limited time to lock the pieces together before they disconnect. Move fast to keep your builds stable and to continue building efficiently.

    ### Understand Your Bricks

    Using bricks creatively can help you climb by stacking, cross gaps by building bridges, customize rockets, or weigh down certain segments. Keep these options in mind, as many puzzles can be solved in multiple ways by combining these techniques in inventive ways.

    ### Put Your Platforming Skills to Work

    Jumping and climbing are crucial for navigating the terrain. Walking alone won’t get you very far; expect to jump, climb, and shimmy through tight or awkward spots. Embracing these challenges early on will expand your puzzle-solving options and make exploration more fun.

    ### Look for Designated Jobs

    Throughout the game, you’ll notice red and blue markings next to interactable objects. These indicate which brick should activate or operate the mechanism. Using the wrong brick usually results in a loud beeping sound or no function at all, so pay attention to the color cues to progress smoothly.

    ### Don’t Be Afraid to Improvise

    There’s no single best way to build in Lego Voyagers. Whenever you see an opportunity to cross a gap or climb a cliff, use your imagination. You’re free to create messily or neatly—whatever works as long as it fits within the constraints. Experimenting with different solutions often leads to creative and effective results.

    ### Cheese Some Puzzles

    While the game doesn’t specify how you should approach puzzles, playing cooperatively suggests that solo play might sometimes use “cheesy” tactics. For example, in later, more challenging sections—like the rocket training—letting one person control both characters using two controllers can make tricky puzzles easier to complete. Though unconventional, this method can be a lifesaver when you’re stuck.

    Seizing opportunities to improvise, working together on puzzles, and building efficiently are all key strategies in Lego Voyagers. The game encourages creative problem-solving and offers plenty of freedom to explore different solutions.

  • How to Play With a Friend in Lego Voyagers: Completing and Solving

    How to Play With a Friend in Lego Voyagers: Completing and Solving

    Lego Voyagers is a game that heavily relies on playing with others, as it’s designed for cooperative play only. To enjoy the game with a friend, you’ll need to set up a multiplayer session, which differs slightly depending on whether you’re playing in the same room or over the internet.

    We’ll guide you through how to start both online and local co-op games so you and your friend can have fun arguing about who gets to be the red brick or the blue one.

    ### Do You Need To Buy Two Copies Of Lego Voyagers To Play Together?
    You only need to purchase one copy of Lego Voyagers, whether you’re playing online or locally, to enjoy the multiplayer mode.

    If you want to play online with a friend who doesn’t own the game, they can download the ‘Friend Pass’ version from the Steam, Xbox, or PlayStation store. This version lets them join your game sessions but doesn’t allow them to host their own.

    ### How To Start A Co-Op Session With A Friend
    You have two options for playing Lego Voyagers together:
    1. Local Co-Op (playing on the same couch)
    2. Online Co-Op (playing over the internet)

    Here’s how to set up each:

    #### Playing Couch/Local Co-Op
    To play with a friend sitting next to you, select ‘Play Local Co-Op’ from the menu. Connect two controllers to your console or keyboards to your computer. The first player should join first, then the second. After both are ready, you can choose your character colors—red or blue—by swapping characters using your D-pad or arrow keys. The color you pick doesn’t lock your player slot.

    #### Playing Online Co-Op
    For online play, choose ‘Invite Online Friend.’ A prompt will show up to select someone from your friends list. Once they accept, you’ll both join a lobby where you wait for your friend to connect. When ready, start the session and choose which chapter to play. You can select from chapters your host has already unlocked. The game begins at the chosen chapter, and the story flows seamlessly from one chapter to the next as you play. Keep in mind, the first time you play, you should observe the chapter progress so you know where one ends and the next begins, as the game’s story plays out smoothly without many breaks.

  • Completing All Quests and Rewards in Lego Fortnite Expeditions

    Lego Fortnite Expeditions is now part of the Fortnite world, bringing with it exciting new quests that players can tackle for exclusive rewards. Expeditions let players team up, choose a hero class, harness tools for super abilities, and check off missions on their list.

    If you’re looking to break away from Lego Fortnite Brick Life or Odyssey but still crave that Lego experience, here’s what you need to know about the Expedition quests and the rewards you can earn by completing them.

    Supernova Academy Quests and Rewards

    Supernova Academy Quests in Lego Fortnite Expeditions.

    In addition to gaining XP, you can earn a few bonus rewards by completing Supernova Academy quests.

    • Complete two quests to earn the Supernova Academy Star Decor Bundle.
    • Finish 16 quests to receive the Heroic Triumph Statue Decor Bundle.
    Quest Guide XP
    Supernova Academy
    Collect 21 Intel. Gain Intel by completing main objectives in missions. 30K
    Trade ten Essence for Items at a vendor. Essence drops from enemies during missions and can be traded with vendors at the Supernova Academy. 30K
    Complete a Mission with each Hero Class. You’ll need to finish three missions—one for each of the three Hero Classes. 30K
    Deal Damage with Dual Daggers, Hammer, and Plasma Pistols. Acquire new weapons by trading essence with vendors at Supernova Academy, then deal damage with each to satisfy this requirement. 30K
    In-Spired
    Land the final blow on a Spire. Ensure you score the killing blow on a Spire enemy to complete this task. 30K
    Recycle ten weapons. Recycle weapons from your inventory to fulfill this requirement ten times. 30K
    Gather 1,000 Essence. Defeating enemies will yield Essence, and you need a total of 1,000. 30K
    Dream Team
    Complete a mission as any Level 30 Hero Class. Level up a Hero Class to 30 and complete a mission to satisfy this quest. 30K
    Complete two missions. Finish any two Expedition missions. 30K
    Defeat ten Demon Guard enemies. Simply defeat ten Demon Guard enemies for this quest. 30K

    Dorm Decorations Quests and Rewards

    The Dorm Decoration Quests in Lego Fortnite Expeditions.

    The Dorm Decoration quests are fairly simple but can be time-consuming as they require you to level up all Hero Classes to 49.

    Quest Reward (Decor Bundle)
    Hunter
    Gain four Hunter levels. The Hunter Rookie Cup Decor
    Gain 14 Hunter levels. The Hunter Cadet Dartboard
    Gain 29 Hunter levels. The Hunter Specialist Display
    Gain 49 Hunter levels. The Hunter Hero Trophy
    Rift Ripper
    Gain four Rift Ripper levels. Rift Ripper Rookie Microscope
    Gain 14 Rift Ripper levels. Rift Ripper Cadet Statue
    Gain 29 Rift Ripper levels. Rift Ripper Hero Trophy*


    Note: This might be a telescope instead of a trophy, as it seems to have a name mix-up with the next reward.

    Gain 49 Rift Ripper levels. Rift Ripper Hero Trophy
    Shadow Caller
    Gain four Shadow Caller levels. Shadow Caller Rookie Candles
    Gain 14 Shadow Caller levels. Shadow Caller Specialist Specimen
    Gain 29 Shadow Caller levels. Shadow Caller Cadet Books
    Gain 49 Shadow Caller levels. Shadow Caller Hero Trophy
  • Completing the Brickford Lego Event Quest in Roblox: Fisch’s Guide

    Completing the Brickford Lego Event Quest in Roblox: Fisch’s Guide

    The LEGO Event offers an exciting experience along with a chance to collect exclusive items in Roblox’s Fisch, such as a special fishing rod, unique bait, and an exclusive boat. The primary objective of this quest is to catch rare fish from the event and establish your status as a Master Fisher.

    This guide will provide you with the steps to start the quest, details on how to complete it, and the rewards you can earn. If you want to participate in the LEGO Event before it concludes on May 23, 2025, it’s best to begin the quest as soon as possible.

    Completing the Brickford LEGO Event Quest

    To kick off the Brickford LEGO Event quest, you need to find Brickford Masterson, the main NPC for the event. He can be found on a LEGO ship near Moosewood Island at these coordinates: 412, 132, 365. After speaking with him, you will receive a Brick Built Rod and some Stud Bait for free.

    Both items are crucial, as you won’t be able to catch any fish from the LEGO Event without them. Regular fishing rods will not work in the LEGO Pools.

    The player character shows the LEGO pool notification near Moosewood in Fisch.

    You will also receive a task to catch and return lost fish. Keep in mind that all fish associated with this event can only be found and caught in the First Sea, specifically in designated LEGO Pools. These pools appear every 15 minutes near various islands, and you’ll be notified when a new one appears through the server chat.

    Additionally, there’s the Studolodon, an exclusive event fish that can’t be caught in regular LEGO Pools. To obtain it, you’ll need to participate in the Studolodon Hunt, a server event that may happen during rain.

    You can also start this hunt yourself by using totems such as the Tempest Totem, Windset Totem, and Smokescreen Totem.

    The player character is fishing in a LEGO pool near Moosewood in Fisch.

    Once you’ve caught all the required fish, or at least a handful, return to Brickford to claim your rewards. Here’s what you can earn for your efforts:

    • Brick Built Rod – Provided at the beginning after speaking with Brickford Masterson.
    • Stud Bait – Earned progressively as you turn in unique LEGO Event fish. You’ll receive three pieces for each species, totaling 48.
    • Arctic Explorer Boat – Awarded for submitting all 16 LEGO Event fish.
    • Master Fisher Title – Granted after collecting all 16 LEGO Event fish.

    To successfully finish the event, make sure you’re consistently fishing and targeting every LEGO Pool spawn. Don’t forget to go for the Studolodon as well—it’s essential for the quest and your bestiary, and catching it will be your final significant challenge. Stay alert, gather Stud Bait whenever you can, and complete the event before it wraps up.