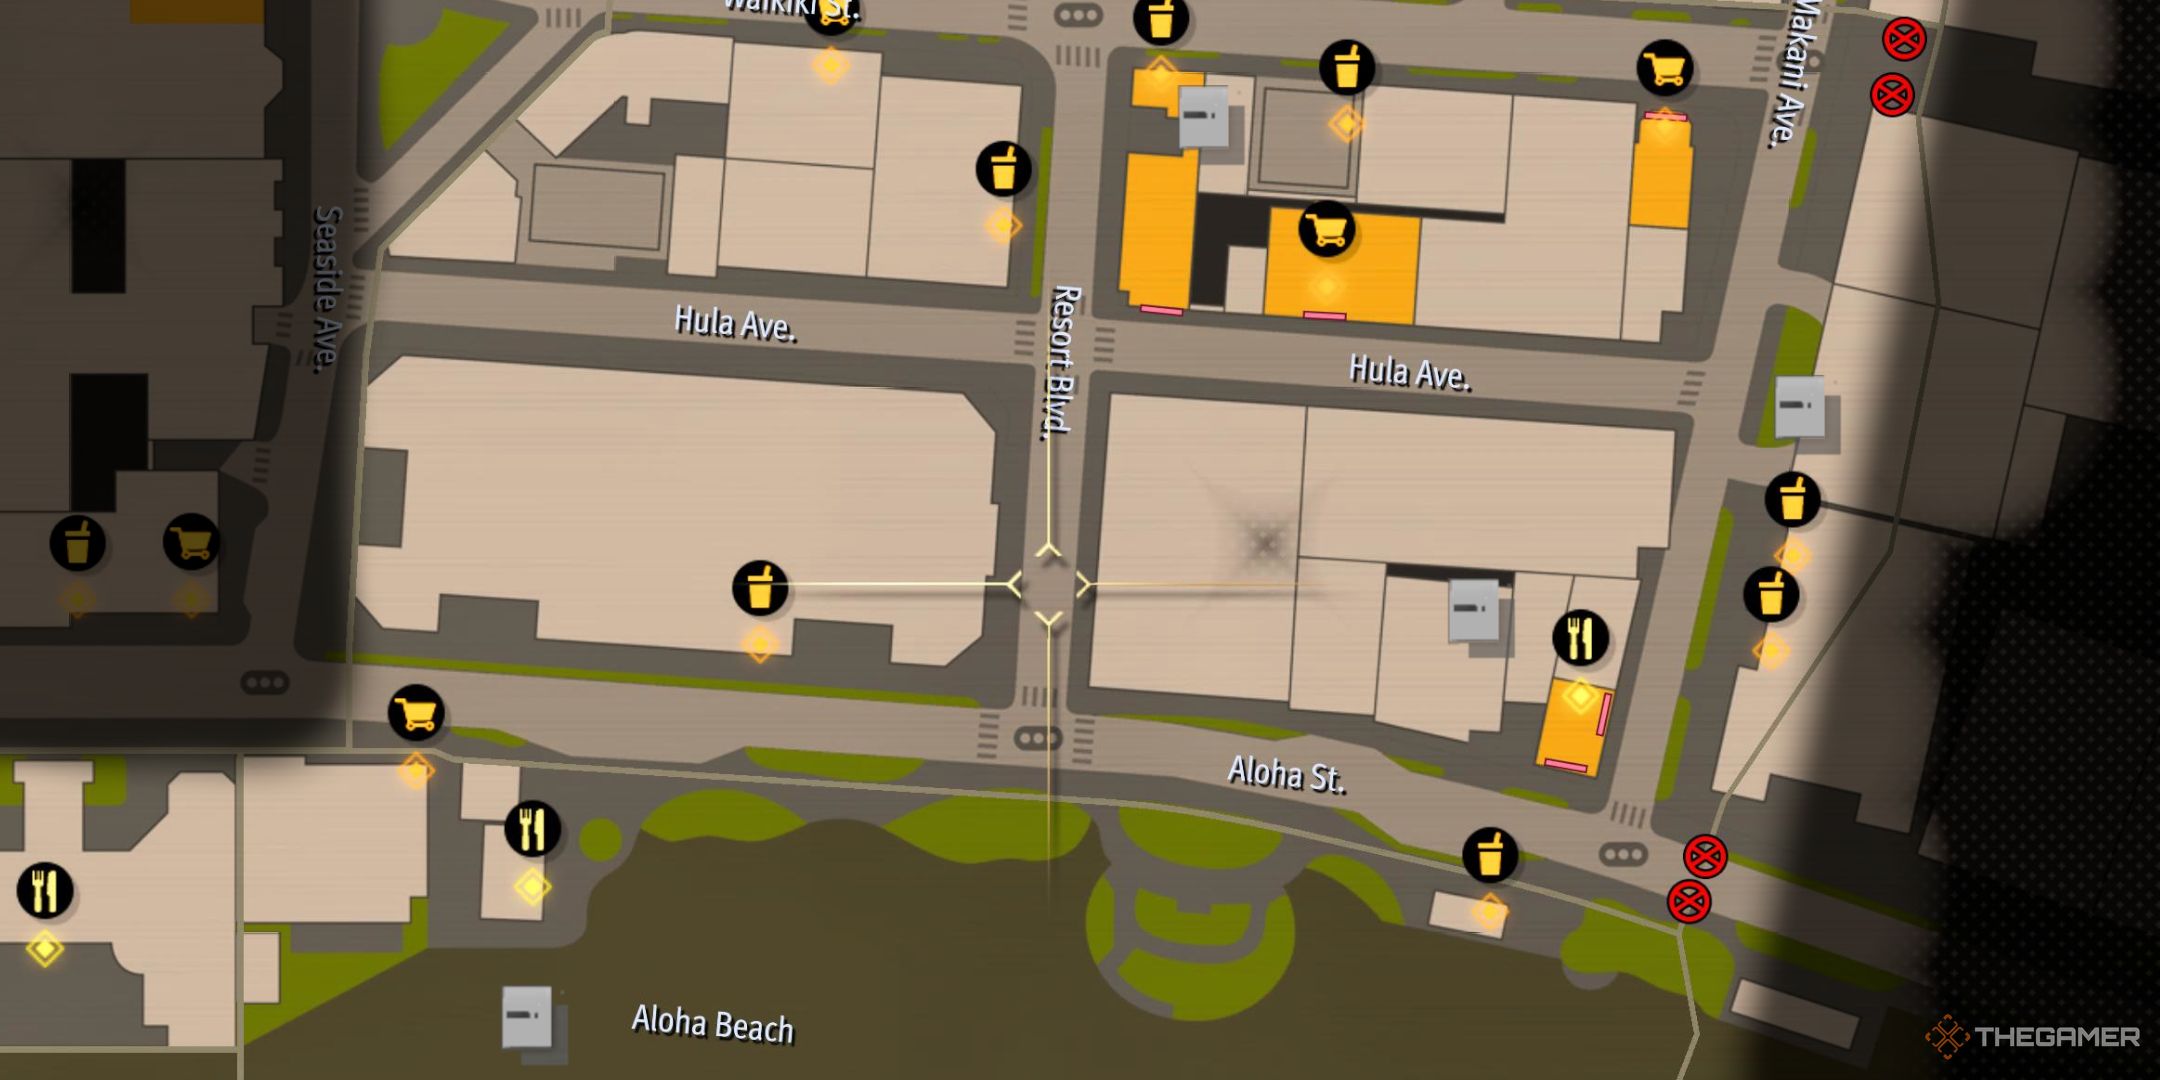
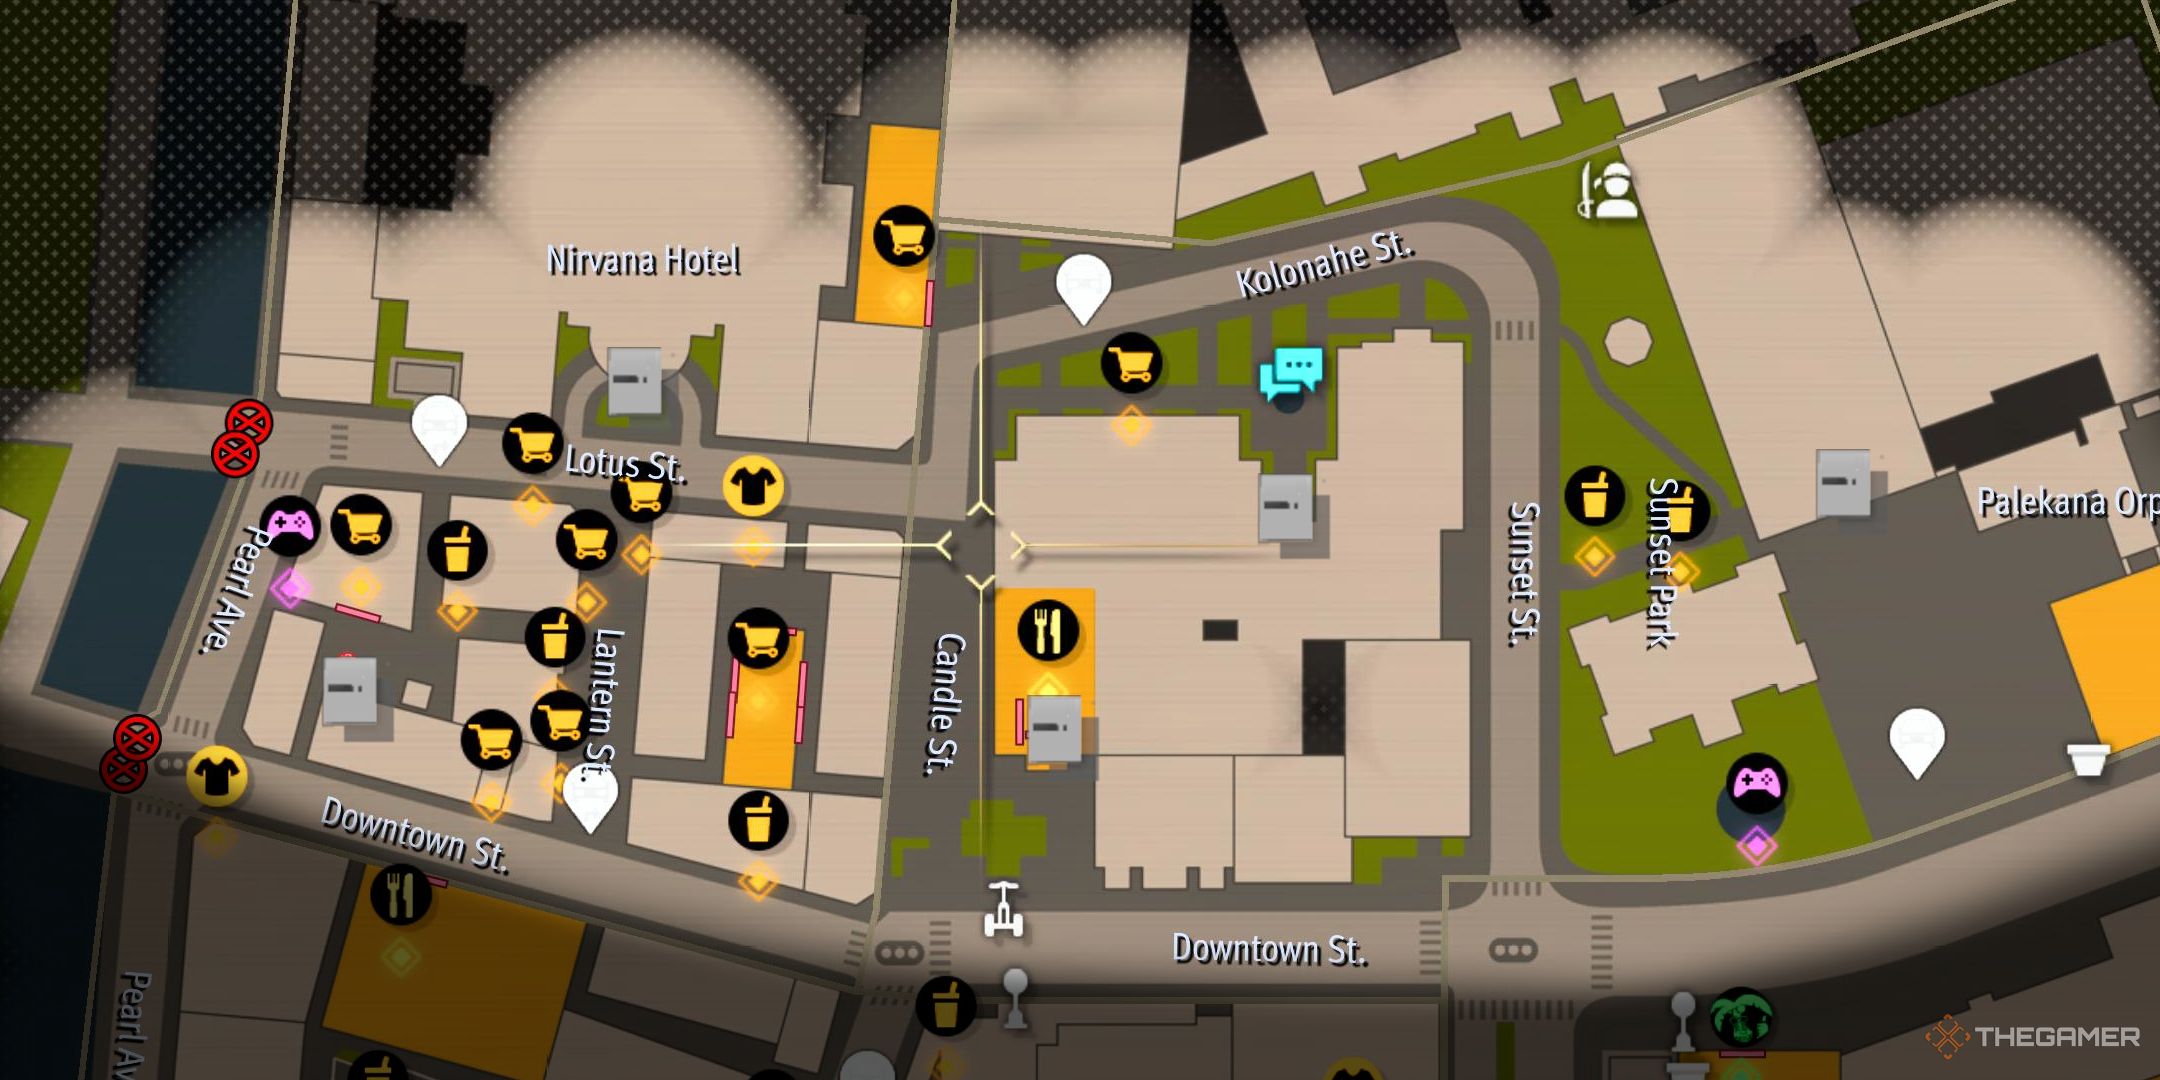
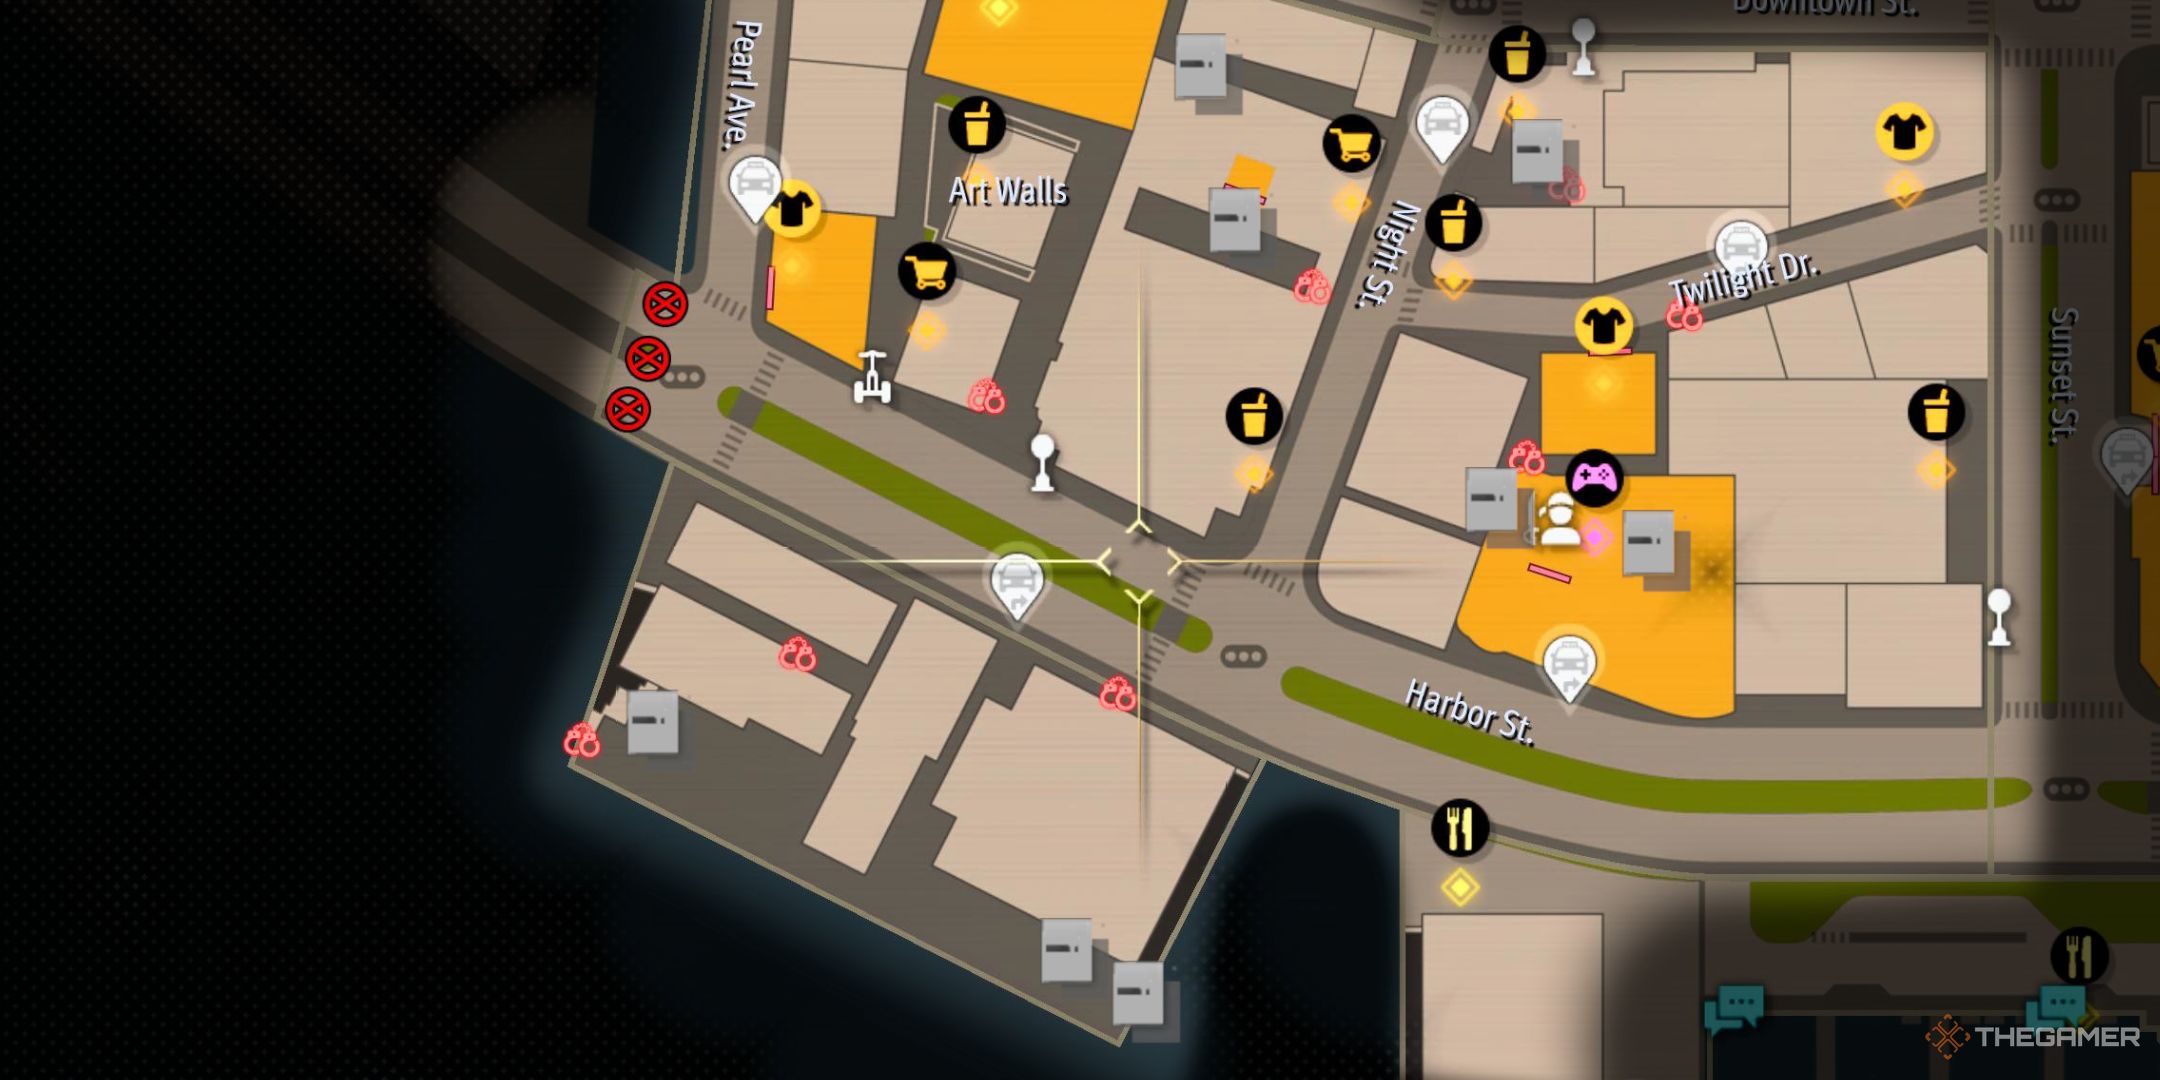
It’s no surprise that darts make a comeback in Like A Dragon: Pirate Yakuza In Hawaii. This enjoyable past-time has been a part of nearly every game in the franchise since Yakuza 3 dropped in 2010. However, this guide isn’t about how to play darts; it’s all about where to find them!
The type of darts you use can greatly affect your performance in the game. The initial darts you receive are quite basic and can make aiming accurately a real challenge. We’re here to help you locate the darts, inform you where to buy them, and assist you in collecting every single one.
Locating All Darts
Most darts can be bought at various stores throughout the game, but they’re not available at mini-game shops. For the elusive Legend Darts, you’ll need to finish a Photo Rally, while the Thunder Darts can be found within a Silver Container.
Darts
Location
Price
Standard Darts
Panthera Sports Kingdom
$50
Silver Darts
$100
Premier Darts
Ben’s Funky Wagon
$300
Gold Darts
Gorgeous Roger’s
$1,000
Legend Darts
Alo-Happy (Worldwide Market)
Complete the Waikiki Photo Rally.
–
Rose
Hyper Ecstasy
$50.00
Pencil
Clean-Clean Household Supplies
$150
Fork
$350
Toy Crow
Bluebird Gallery
$1,500
Thunder Darts
Crystal Aloha Resort
This set is in a silver container.
–
Wind Darts
Ben’s Funky Wagon
$5,500
Finding Ben’s Funky Wagon
You can find both the Premier Darts and Wind Darts at Ben’s Funky Wagon, but this vendor isn’t always easy to spot, as he moves around and isn’t marked on your map. Look for him on the west end of Downtown Street, typically near the southern entrance to Lantern Street.
How to Get the Legend Darts
To get the Legend Darts, you won’t find them in any store. Instead, you must complete the Anaconda Shopping Center Photo Rally. Follow our guide to breeze through it and grab these exclusive darts.
Locating the Thunder Darts
The Thunder Darts are unique as they are found in a Silver Container, conveniently located near the dart mini-game. From the dartboards, head west while sticking close to the resort’s hallway. You’ll discover the Silver Container just a short distance away, positioned between the Resort’s rear doors and the dartboards.
In the game Like A Dragon: Pirate Yakuza In Hawaii, you’ll come across the side quest known as "The Captain’s Return" in the East Waikiki area of Honolulu. Here, you’ll meet an oddly familiar figure—if you have experience with Infinite Wealth, you might recognize him. As usual, he’s in need of your assistance.
This side quest can be easy to navigate if you understand what to do, but it can also be quite frustrating if you miss the hints. This guide will walk you through each trash location, from the obvious to the trickier spots. If you encounter any difficulties, we’re here to help you through them.
How To Start The Captain’s Return Side Quest
You can access this side quest during chapter 2, but it only opens up after you’ve acquired the Chain Hook. Once you have it, head down Resort Blvd. between Hula Ave. and Waikiki St., where you’ll meet Fukuyama, also known as the "Man in Bandana," picking up litter. To initiate the quest, speak with him and select the "Begin collecting trash" option. Your task is to find five pieces of trash scattered around.
Where To Find The Trash
Once you start the quest, your map access will be limited primarily to Hula Ave and a small section of Resort Blvd. Unfortunately, you won’t find any trash along Resort Blvd., but you will have access to part of Seaside Ave.
Piece Of Trash #1
The first piece is located directly south of Fukuyama. Look for it at the southeast corner of the intersection; it should be shining and marked with an arrow.
Piece Of Trash #2
Next, turn right and head down Hula Ave. The second piece of trash can be found on your left, positioned at the edge of a planter.
Piece Of Trash #3
As you continue down the road, the third piece will be a bit further and sitting on your right, hidden behind a red car, which makes it easy to overlook.
Piece Of Trash #4
The fourth piece is located further down Hula Ave, on your left, directly across from the parking lot.
Piece Of Trash #5
The final piece, which is probably the one you’re searching for, is hinted at by Fukuyama mentioning the trash being up above. Head over to the No Surf No Life shop. Turn the corner to face the entrance, then look up to see a hook. Use your Chain Hook to reach the roof, where you’ll find the last piece of trash along with a Silver Container.
The Battle Against the Two Litterers
After you collect all five pieces of trash, you’ll ally with Fukuyama to confront two litterbugs. Don’t worry; they aren’t too difficult to defeat. Once you take them down, Fukuyama will join your crew and adopt the new title of Dread Pirate Hook.
While exploring all the clothing options in Like a Dragon: Pirate Yakuza in Hawaii, you may notice that there are some outfits available through the Darts game. There are four items listed, but you may be wondering how to acquire them since this mini-game doesn’t have a shop like others do.
These rewards aren’t bought with game points; instead, they are earned as you play, and there’s more than just clothing to collect. Here’s all you need to know about the available rewards and how to get them.
Where Can I Find the Darts Mini Game?
The Darts Hall is located just north of West Aloha Beach, next to the Crystal Aloha Resort.
To improve your chances, make sure to line up your shot carefully and release the dart when the indicator is in the yellow zone.
Using higher quality darts can greatly enhance your performance, allowing you to aim more accurately.
You can acquire new darts from various sources, including shops or rewards from other mini-games.
All Dart Rewards
Defeating each of your main crew members will earn you rewards listed below.
As the title suggests, Like A Dragon: Pirate Yakuza In Hawaii is all about pirates, and what do pirates treasure most? That’s right—treasure! One of the prime treasures you’ll come across in Honolulu is the Silver Containers, which are packed with fantastic finds.
These shiny boxes don’t just hold invaluable healing items and consumables that can enhance your gambling game; some of them also contain stylish cosmetic items and whole outfit sets. We’ve divided the Honolulu map into six areas and detailed where you can discover each Silver Container. Think of it as your own treasure-hunting guide!
Little Japan Containers
You’ll spend a lot of time in this area, which is home to Revolve. There are numerous Silver Containers packed into this relatively small spot, including a few costume sets to enhance your character’s style.
Area
Directions
Container Contents
Little Japan
This container is located in the garage directly across from Yamabiko.
Staminan Royale
Look for a Silver Container in the alley east of Ganryujima Armory, connecting Fuji Street and Sakura Street.
Helmet, Armor Set
This container is behind the Gambling Hall, located in the west alley.
Blackjack Amulet
Find this container behind the ABC Store by entering the west alley.
Vintage Luxury Watch
From Revolve, head north on Tsubaki Street, where you’ll find a small set of stairs. Climb up and open the door for a Silver Container!
Idol Bandanna, Cabaret Manager Makeup, Idol Set
East Waikiki And East Aloha Beach
Upon entering Honolulu, your journey will take you through East Waikiki, an area filled with shops and eateries. Silver Containers can be found scattered throughout, offering various costume sets.
Area
Directions
Container Contents
East Aloha Beach
This container is located in the Lifeguard tower south of the Aloha Seaside restaurant.
Bare feet, Bodysuit set
West Waikiki And South Waikiki
The area west of East Waikiki runs alongside the river and marks the farthest point you can reach when you first arrive in Honolulu. You will discover a fair number of containers in this area. However, keep in mind that you won’t be able to access the one atop the No Surf No Life store until you acquire the Chain Hook tool.
Area
Directions
Container Contents
West Waikiki
This container is located right next to Treasure Select Pawn (River St.).
Swiss Watch
On the roof of No Surf No Life. You’ll need to use the Chain Hook to access it.
Street Surfer Flag (Hannya)
South Waikiki
This container is situated north of the Crystal Aloha Resort.
Staminan Spark
Inside the Crystal Aloha Resort.
Platinum Plate
Northeast of the Darts location.
Royal Joker Card
This container is west of the Darts location.
Thunder Dart
Anaconda And District Five
District Five and the Anaconda Shopping Center are located directly west of the Aloha Bridge. Initially, this area will be inaccessible, but you’ll gain entry during the main story quest when you’re directed to explore Diamond Head, which is part of District Five.
Area
Directions
Container Contents
District Five
This container can be found southwest of the Diamond Head bar, next to the large steel doors.
Cowboy Hat, Desperado Set
This Container is located west of Club Guilty (marked on your map), tucked away in an alley.
Blackjack Amulet
Anaconda
Located in the southwest corner of the Anaconda Shopping Center parking lot, next to Julie’s Gearworks.
Swiss Watch
This container is in the northwest corner of the first floor of the Anaconda Shopping Center, next to the escalators.
Vintage Luxury Watch
Find this container by the river, east of the Anaconda Shopping Center, south of Diamond Head.
Street Surfer Flag (Majima Construction)
Downtown And Chinatown
The Downtown and Chinatown areas are in the northwest section of Honolulu. While these locations may not have a significant impact on the main story of Pirate Yakuza, they feature numerous side missions and are where you’ll unlock Crazy Delivery and play Mahjong. You can also find several hidden Silver Containers within this region.
Area
Directions
Container Contents
Downtown
Take the Orphanage Taxi to the Downtown area and travel directly north to find this container in front of a building.
Grass Crown, Pyrodancer Set
You’ll find this container south of the fountain on Kolonahe Street. It’s hidden around the corner, out of view from the street.
Platinum Plate
This container is located inside Polaris’s main entrance area.
Swiss Watch
Located at the corner of Downtown St. and Night St. on top of the awning, requiring the Chain Hook to access.
Staminan Royale
Chinatown
Visit the Wan Shang Tong Herbal Medicine shop, then head up the nearby stairs to the second floor of the adjacent apartment building to find the container.
Tattered Sea Dog Hat, The Tattered Sea Dog Set
This container is positioned in front of the Nirvana Coast Hotel, the large building in the northwest corner of the map.
Staminan Royale
Cultural District And Shippers Wharf
The Cultural District and Shippers Wharf make up the southwest part of Honolulu. This area is filled with Silver Containers, many tucked away in narrow alleys or hidden in corners around the dock.
Area
Directions
Container Contents
Cultural District
East of the Black Hibiscus, travel into the alley leading to Night Street to find this Silver Container.
Black Jack Amulet
Head east of Psychedelic Coffee into the alley that leads to Night St. This container is by the jewelry shop.
Platinum Plate
Find this container in the alley behind The Cabaret Eldorado, across from Loco Fiesta Liquor.
Royal Joker Card
Located beside Liber Tea in the corner of the area filled with plastic chairs.
Goromi Wig, Goromi Makeup, Goromi Earrings, Goromi Set
When you’re not busy sailing the seas of Hawaii as a fearless pirate in Like a Dragon: Pirate Yakuza in Hawaii, take some time to unwind and try out the various mini-games available. Each activity boosts your Pirate Rank, making it a fun way to gain respect, earn some cash, and unlock exclusive rewards.
If you’re curious about the mini-games you can engage in and where to find them, you’re in the right place. The only question remaining is: which mini-game will you try first?
Honolulu
Below is the full list of mini-games available in Honolulu, along with their locations and any additional information you may need.
Anaconda Arcade
Located on the ground floor of the Anaconda Shopping Center, this arcade features UFO machines and a selection of games:
SpikeOut FE
Fighting Vipers 2
The Ocean Hunter
Sega Racing Classic 2: Battle on the Edge
Sega Racing Classic 2: Power Edition
Virtua Fighter 3
Virtua Fighter 3tb
Crazy Delivery
Inspired by Crazy Taxi and a dash of Uber Eats, this mini-game can be unlocked by finishing the ‘Stay Crazy’ substory located near the fountain at the intersection of Sunset Street and Anaconda Boulevard. After unlocking, you can access it from two spots:
Crazy Delivery (Anaconda Boulevard) – Right next to the fountain where the substory begins.
Crazy Delivery (Aloha Street) – Just north of the beach.
A detailed guide on Crazy Delivery is available.
Darts
You can find the Darts hall located east of the Crystal Aloha Resort, just north of the western end of Aloha Beach.
TIP: You can discover and buy better darts in various locations throughout the game.
Dragon Kart
Unlock this Mario Kart-inspired game by completing the ‘Dragon Kart in Paradise’ substory, located in the southeast area of the Honolulu map, just south of Hip Hop Shrimp.
Goro Goro Kitchen
This cooking mini-game appears in several locations, but in Honolulu, you can find it in Anaconda Harbor Park, on the southern side of the western half of the map. For this game, you’ll need cooking ingredients, many of which can be gathered from the environment or bought from local shops.
You can also access it upstairs in Revolve Bar by going out onto the terrace.
Open Road Shogi
Find Open Road Shogi just off Sakura Street, right behind the Fortune Exchange Shrine. In this area, you can participate in:
Ranked Matches
Challenge Matches
Puzzle Shogi
Ounabara Vocational School
Unlock this mini-game by completing the substory ‘The Smartest Pirate Crew!’ at the Ounabara Vocational School building on Harbor Street. A complete guide to test answers is available here.
Sicko Snap
Sicko Snap, inspired by Pokémon Snap, involves taking photos of quirky characters. You can unlock it by finishing the ‘Snap Those Sickos! Again!’ substory while riding the trolley from the Aloha Beach Trolley Stop. A full guide for this mini-game is available.
Madlantis
Madlantis features some truly unique mini-games, with the standout being the Pirates’ Coliseum. Here’s a breakdown of where to find them.
Bang Bang Batting Center
Located in the northeastern part of the Madlantis map, this optional twist on baseball includes exploding barrels. A complete guide is available.
Master System Console
You can find the Master System console in the Pirate Room within the tunnel on the eastern side of Madlantis. Here, you can play any Master System games you have.
Pirates’ Coliseum
The Pirates’ Coliseum is located in the southeastern part of the Madlantis map and offers a variety of modes.
Rich Island
While Rich Island features just a few mini-games, one stands out as exclusive: Goro Kingdom.
Nele Island
There’s not a lot happening on Nele Island, but you can always count on cooking to keep you entertained in the kitchen.
Goromaru
The Goromaru has only two mini-games, both of which can also be found elsewhere. However, if you’re looking to have some fun while out at sea, here’s what you can play.
Like A Dragon: Pirate Yakuza in Hawaii — Swashbuckler Showdown
The Pirates’ Coliseum is an excellent place to train, earn some cash, and work your way up to the Legends of the Sea rank. Just when you start feeling like the ultimate pirate after collecting all four Dark Instruments, you unlock the Swashbuckler Showdown.
This showdown provides a final opportunity to face off against formidable opponents: Captain Yakuza, Captain Ronin, Captain Shinobi, and Captain Zeus of the Devil Flags. In these battles, you’ll encounter 100 of each captain’s most skilled underlings, making it a true test for your entire crew as you battle some of Hawaii’s most dangerous pirates.
Preparing for the Swashbuckler Showdown
The Swashbuckler Showdown is a late-game tournament that becomes available only after you’ve completed the Legend of the Goro Pirates questline by helping Misaki avenge her father’s death. Once you’ve triumphed over the last of the captains, the door to Swashbuckler Showdown swings wide open.
Having conquered many difficult ship battles, your vessel should be in top shape. If you haven’t already, now is the perfect time to finish upgrading the Goromaru.
Even though there’s no cannon component in these battles, your Cannon Squad will join you on land.
Crew Setup:
Here’s how to set up your crew for this challenge:
Cannon Squad:
Port:
Nishida
Julie
Steve
Captain Beef
Machine Guns:
Starboard:
Daisaku Minami
Natasha
Arque Dangerous III
Kamiyama
Boarding Squad:
Squad One:
Taiga Saejima (Leader)
Dread Pirate Hook
Carnal Sister Yoh
Carnal Sister Yuka
Theo
Squad Two:
Jason (Leader)
Rafael
Hattori the Ninja
Human Bronze Statue: Bronson
Amiable Pirate: Leo
Squad Three:
Misaki (Leader)
Swordsman Kengoro
Robson Caetano da Silva
Etsuko
Reliable Pirate: Alaka’i
Squad Four:
Masaru (Leader)
Hammerhead
Lumberjack Hayashida
Elena
Kenzo
The best fighting style for Majima is Sea Dog for its crowd control, quick movements, and impressive damage output.
How To Beat Each Fleet
Duel with the Third Fleet:
Your journey begins against the Third Fleet on an open beach, where you will face 100 enemies. Expect this to be a repeat of past encounters with the Devil Flags, so be ready to face familiar foes. Utilize AoE skills like pistols or spinning attacks to take down multiple enemies simultaneously. The battle shouldn’t pose much of a challenge.
Duel with the Second Fleet:
Next, prepare for the Second Fleet, again facing 100 foes. Ronin may be tougher, but this fight should still be straightforward, especially since you’ve already collected all four Dark Instruments. You should clear this battle in under a minute.
Duel with the First Fleet:
In this battle against the First Fleet, you’ll once again be faced with 100 enemies. This time, however, the opposition will be stronger. Make sure to level up Majima’s Attack and Health to at least level three to keep pace without too much difficulty. Watch out for homing missiles from the enemy Shinobi, and maintain an aggressive approach to defeat them.
Duel with the Strongest Fleet:
The final showdown is against the Devil Flags’ Strongest Fleet, led by Zeus. This battle is the most challenging, with 100 powerful foes ready to ambush you. The pirates here hit harder and can combo you if you’re not careful. Focus on Zeus first with the help of your crew, and avoid the homing missiles appearing on the ground.
Rewards of Victory
Defeating all the competitors in the Coliseum nets you the Earth Stone and a whopping $650,000, along with an impressive 300,000 Pirate Reputation Points. That’s a reward you won’t want to miss!
In Like A Dragon: Pirate Yakuza In Hawaii, you’ll engage in standard naval battles against enemy fleets and rival pirates. However, one of the game’s most thrilling encounters has Majima facing off against a Giant Squid. This epic showdown is teased early in the narrative, hinting at the reason behind Majima’s shipwreck near Rich Island.
As Majima pursues the Esperanza Treasure, he’s finally ready to confront his foe and seek revenge. Get ready for a multi-stage naval battle against one of the game’s strongest bosses: the Giant Squid.
How To Begin The Giant Squid Boss Fight
After defeating Mortimer and rescuing Tucker from his temporary confinement in Madlantis, you can consult him to set your voyage towards the secret site of the Esperanza Treasure.
Upon arriving, Tucker will instruct you to fire your cannons at a specific spot on the edge of the island, which will reveal the hidden entrance.
But beware, this excavation also awakens the formidable guardian of the treasure: the Giant Squid.
This boss is incredibly fast and very dangerous up close. You’ll need to sail with caution and execute precise attacks to overcome this beast.
How To Overcome The Giant Squid
As soon as the battle kicks off, the Giant Squid will dive underwater, changing its position on the battlefield. Once it reemerges, steer your ship directly at it and unleash machine gun fire upon its tentacles while staying clear of its dangerous attack patterns.
How To Strike The Giant Squid
You need to target the tentacles first; otherwise, you won’t deal significant damage to the Giant Squid. Once you take down the first pair of tentacles, focus on the squid’s eyes and unleash your cannon fire to maximize damage.
Speed up the fight by utilizing your boosts and drifting to swiftly reposition, allowing you to fire from your charged cannons on either side for maximum effect.
How To Protect Against The Giant Squid
Continue through a second phase of attacks on the tentacles and eyes while avoiding the squid’s ink attack, which is easily dodged using your Fuel Tank boosts.
For the best chance to succeed, invest in the following Goromaru Ship Upgrades in this order:
Hull Durability Extreme
Laser Cannons (Port and Starboard)
Fuel Tank Enhancements
Extra Repairs
If you get too close to the Giant Squid, its tentacles will swing at you and cause damage to the Goromaru.
The crucial element in this fight is maintaining good positioning.
Keep a safe distance from the Giant Squid’s tentacles while being close enough to land your cannon shots.
As you approach to fire your cannons, dodge the mortar-like strikes by quickly boosting past the marked red spots, and avoid the warning signals in the water.
At medium range, the Giant Squid will launch a four-pronged water attack, which can be challenging to evade unless you boost away well in advance.
The winning strategy is to deal more damage by rapidly circling the squid and drifting to switch sides while your cannons recharge, allowing you to fire both sides in one go.
After about three or four rounds, you will have defeated the Giant Squid, clearing the way into the newly revealed cave entrance and the Esperanza Treasure.
This is the Platinum trophy for PlayStation users, and it won’t be available for Xbox or PC players. It automatically becomes available after you earn every other trophy.
Shipwrecked
Finished Chapter One.
This achievement is related to the story and cannot be missed.
Heart of Darkness
Finished Chapter Two.
This achievement is related to the story and cannot be missed.
The Old Man and the Sea
Finished Chapter Three.
This achievement is related to the story and cannot be missed.
Treasure Island
Finished Chapter Four.
This achievement is related to the story and cannot be missed.
You Gotta Keep Livin’
Completed the final chapter.
This achievement is related to the story and cannot be missed.
Fledgling Mad Dog
Gained ten abilities.
Refer to ‘Legendary Mad Dog’ for more information.
Powerful Mad Dog
Gained 20 abilities.
Refer to ‘Legendary Mad Dog’ for more information.
Ferocious Mad Dog
Gained 40 abilities.
Refer to ‘Legendary Mad Dog’ for more information.
Legendary Mad Dog
Gained 60 abilities.
You can buy and upgrade abilities from the main menu using in-game currency. You need to unlock a total of 60 abilities to achieve all related trophies.
Many abilities require prior purchases of specific skills or sufficient progress in the game, such as leveling up your Pirate Rank.
Boomerang Lover
Used the cutlass boomerang against enemies 100 times.
In Sea Dog style, press X on Xbox/Square on PlayStation/left click on PC to deploy your cutlass boomerang. Using it against enemies 100 times will unlock this.
Chain Hook Expert
Used the chain hook against enemies 50 times.
You gain access to the Chain Hook in Chapter Two. Use it in battle while in Sea Dog style by pressing B on Xbox/Circle on PlayStation/E on PC to pull in enemies. Do this a total of 50 times for the achievement.
Pistol Aficionado
Used the pistol against enemies 50 times.
In Sea Dog style, press Y on Xbox/Triangle on PlayStation/right click on PC to fire with your pistol. Use it against enemies 50 times to earn this achievement.
Majima Everywhere
Created 56 doppelgangers.
While in Mad Dog style, when your Madness Gauge is full, press RT (or Q on PC) to call forth your doppelgangers. Summoning 56 will trigger this achievement.
TIP: Buy the ‘More Majima’ ability to summon more doppelgangers at once.
The Man Who Summoned the Gods
Played all Dark Instruments.
You must collect and play all four Dark Instruments. The first one will unlock as part of the main storyline and cannot be missed.
Divine Intervention
Summoned the gods with Dark Instruments 30 times.
You don’t have to unlock all Dark Instruments to complete this; just use the one obtained through the story repeatedly. Summon the Dark Gods 30 times in Sea Dog style by pressing RT (or Q on PC) once your Madness Gauge is full.
Fashionable Fingers
Equipped rings on all ten fingers simultaneously.
There are various rings to discover throughout the game, but each ring must be equipped on specific fingers. You need a ring on all ten fingers to achieve this. Rings can be collected from:
Silver Treasure Chests
Purchasable in stores
Gained through side stories or content
TIP: For example, you earn one for having 50 Aloha Links friends.
Bounty Hunter
Completed 20 Bounty missions.
See ‘Super Bounty Hunter’ for details.
Super Bounty Hunter
Completed 50 Bounty missions.
Bounty spots are scattered across the map, marked by a handcuffs icon. You must defeat each target to complete a mission. Achieving 50 completions will earn you all the associated trophies.
Sea Legs-Havers
Attained the rank of Sea Legs-Havers.
Refer to ‘Legends of the Sea’ for further information.
Popular Picaroons
Attained the rank of Popular Picaroons.
Refer to ‘Legends of the Sea’ for further information.
Buccaneer Bigshots
Attained the rank of Buccaneer Bigshots.
Refer to ‘Legends of the Sea’ for further information.
Legends of the Sea
Attained the rank of Legends of the Sea.
Your actions in the game contribute to your Pirate Rank. Upon reaching a five-star rank, Legends of the Sea, you’ll unlock the final associated trophy.
Welcome to the Goro Pirates!
Recruited 30 members to the Goro Pirates.
See ‘Go Pirates, Go Go Go!’ for further details.
The Goro Pirates Set Sail!
Recruited 50 members to the Goro Pirates.
See ‘Go Pirates, Go Go Go!’ for further details.
Go Pirates, Go Go Go!
Recruited 80 members to the Goro Pirates.
Crew members can be found throughout the game, marked on your map. Others can be recruited by finishing certain main story or side quests.
Map-based crew members have specific requirements to join your crew, such as achieving a certain Pirate Rank or providing them with a certain item.
Recruiting a total of 80 members unlocks all related achievements.
Bonds Between Boys
Viewed all of Noah’s Drink Links.
To view all Drink Links, you must complete every Bond Chat with Noah. We have guides for that as well.
Bonds Between Men
Viewed every Drink Link with the crew.
To complete their Drink Links, you need to finish all Bond Chats with each crew member before viewing their links. Check our guides for more info.
New Star of the Coliseum
Won ten different matches in the Pirates’ Coliseum.
See ‘Master of the Coliseum’ for more information.
Ace of the Coliseum
Won 20 different matches in the Pirates’ Coliseum.
Refer to ‘Master of the Coliseum’ for more details.
Master of the Coliseum
Won 30 different matches in the Pirates’ Coliseum.
You must achieve victory in 30 Coliseum matches in total to unlock all associated trophies. Check our guides for various modes.
Legend of the Coliseum
Defeated the Amon Pirates.
After finishing all matches in the Coliseum, a new challenge will emerge: the Amon Pirates. Defeating them unlocks this achievement.
Showdown on Rokka Island
Won the battle on Rokka Island.
This achievement is tied to the storyline and cannot be missed.
Showdown on Atali Island
Defeated the first Devil Flags officer.
Refer to ‘Remember the Goro Pirates!’ for further details.
Showdown in Flame Heaven
Defeated the second Devil Flags officer.
See ‘Remember the Goro Pirates!’ for additional information.
Showdown in Frost Heaven
Defeated the third Devil Flags officer.
Refer to ‘Remember the Goro Pirates!’ for more information.
Remember the Goro Pirates!
Defeated the leader of the Devil Flags.
The Devil Flag battles serve as optional bosses marked on your sea maps with a red Devil Flag icon. Advancing through this content and defeating all officers will unlock this achievement.
Island Adventurer
Completed ten different islands.
You can dock at various islands with your crew and battle through enemies for treasure. Conclude ten islands successfully to achieve this.
Novice Treasure Hunter
Collected ten different treasures.
Refer to ‘Expert Treasure Hunter’ for details.
Expert Treasure Hunter
Collected 40 different treasures.
Pirate Yakuza has numerous treasures to discover. To fully complete the Treasury of Treasures, you’ll want to gather them all. You’ll need a total of 40 to unlock the relevant trophies, which can be found through:
Hidden chests on various maps
Treasure islands
Purchases from shops
Trade-ins at minigame stores for points
My Glorious Goromaru
Obtained 50 customization parts for the Goromaru.
You can customize the Goromaru with various components, such as Hull, Sails, Figurehead, and Trimming. Collect 50 parts total, which can be found by:
Purchasing in stores
Trading points at various minigame shops
Rewards from substories or side quests
Julie-chan’s Biggest Fan
Created three different cannons at Julie’s Gearworks.
After unlocking Julie’s Gearworks, you can craft cannons and other items there. Some cannons will only become available once you’ve crafted their basic versions. You must craft three cannons in total to earn this.
Rocket Sniper
Sunk five enemy ships using the rocket launcher.
During sea battles, switch to deck view and use Majima’s Rocket Launcher to target enemy ships. Sink five ships this way to unlock this achievement.
Domestic Pirate
Cooked every recipe available.
The first minigame you’ll unlock is Goro Goro Kitchen which offers a wide variety of recipes. To achieve this, you must prepare each recipe at least once.
Goodbye, Old Me
Collected 20 different clothing items.
Refer to ‘Trendsetter’ for further information.
Fashionista
Collected 50 different clothing items.
Refer to ‘Trendsetter’ for further information.
Trendsetter
Collected 100 different clothing items.
You can customize Majima’s appearance for both Mad Dog and Sea Dog styles. To unlock all related achievements, you need 100 types of clothing items, which can be:
Purchased in stores
Exchanged for points at various minigame shops
Rewards from side quests
Discovered in Silver Containers hidden around the maps
Memories of Honolulu
Took 30 different photos for the Photo Rally.
After unlocking the Photo Rallies in Chapter Two, capturing 30 photos overall will unlock this achievement. Check our guides for each Photo Rally.
Extreme Extrovert
Befriended 50 characters through Aloha Links.
With 200 NPCs to befriend in Honolulu—see our complete list—you’ll unlock this by befriending 50 of them.
By Hook or By Crook
Used the chain hook to travel 20 times.
There are hooks concealed around the map that enable you to climb up to new ledges or discover shortcuts using your Chain Hook. Accomplishing this 20 times unlocks the achievement.
Hooking and Gathering
Captured 30 fish and bugs using the chain hook.
Bugs are often spotted buzzing in the air or scurrying on the ground, while you’ll find fish in the oceans or pools. You just need to use your Chain Hook to catch 30 of them to earn this.
Taking the Scenic Route
Completed ten substories.
See ‘Main Story? What’s That?’ for further details.
Main Story? What’s That?
Completed 20 substories.
Many substories are scattered throughout the Honolulu map, some trigger automatically as you move through the game. Achieving completion on 20 will unlock this.
My Dream Minato Girl
Partied with the Minato Girls and found true love.
Beginning with ‘My Dream Minato Girls’, which unlocks automatically in Chapter Three, you will then engage in various substories about locating and meeting all five Minato girls. Complete this series of quests to earn the achievement.
Party Pirate
Participated in ten different minigames.
The game features various minigames, including those aboard the Goromaru. To qualify for this achievement, you need to play ten unique minigames in total—for example, playing Karaoke in both Revolve Bar and the Goromaru counts as one game, not two.
High-speed Pirate
Won three different cups in Dragon Kart.
You can start playing Dragon Kart from Chapter Two, located in the bottom left corner of the Honolulu map near Harbor Street. Winning three different cups in Dragon Kart unlocks this.
Sea Shanties
Participated in karaoke aboard the Goromaru.
To enjoy karaoke, choose the karaoke minigame from Majima’s captain’s cabin on the Goromaru, and you will perform on deck to unlock this.
Erudite Pirate
Obtained five certificates from the Ounabara Vocational School.
The Ounabara Vocational School is found on Harbor Street on the west side of the Honolulu map. You need to pass five tests to earn five certificates and achieve this.
Crazy Captain
Finished all Crazy Delivery courses.
There are four increasingly challenging courses across two locations—Anaconda Boulevard and Aloha Street—adding up to eight courses total. We offer a detailed guide for Crazy Delivery here.
Barrel Basher
Destroyed a total of 1,500 barrels at the Bang Bang Batting Center.
The Bang Bang Batting Center in Madlantis has you playing baseball, but the target is to smash barrels for high scores. To unlock this achievement, you need to destroy a total of 1,500 barrels. We provide a comprehensive guide for the Bang Bang Batting Center here.
Making a Menagerie
Obtained seven pets.
You need to collect seven pets for Goro Kingdom. The first pet is unlocked through the story, but there are several others hidden around Honolulu. Check our guide for the locations.
Not Counting the Usual Ones
Found two balls.
You will unlock this by discovering two of the seven Golden Balls required for the ‘When You Wish Upon Some Balls’ substory.
Most photo rallies in Like A Dragon: Pirate Yakuza In Hawaii take place in Honolulu, but Madlantis also offers one of these exciting challenges. When you’re not busy with thrilling ship combat or enjoying drinks with fellow pirates, you can explore this incredible fortress in search of important landmarks.
What sets Madlantis apart in terms of photo rallies is that several objectives are locked behind story milestones, meaning you won’t have access until you reach certain points in the game. This guide will outline every location and explain when they become accessible, ensuring you’re equipped with everything you need to transform into a zombie lookalike in no time.
1. Bar District – Big Anchor
“Square In Front Of Bar”
Make your way to the Bar District located in the northeast corner of the Madlantis map. Here, you’ll find a large anchor positioned centrally, nestled between the Batting Center and the Dunghill bar. This is your first landmark!
2. Bar District – A Small Steering Wheel
“Inside The Bar”
The golden ship’s wheel can be found on the left side of the Dunghill bar, also in the northeast corner of Madlantis. After disembarking from your ship, take a left, and you’ll spot it right away.
3. Bar District – Dunghill
“Bar Sign”
The sign for the Dunghill bar is located above its entrance, which is tucked away in the northeastern part of Madlantis.
4. Bar District – Bang Bang Battling Center
“Battling Center Sign”
The Battling Center is in the same area as the Dunghill bar. You’ll find it on your right, just before you reach the anchor.
5. Docks – Traffic Light
“Look Up At The Pier”
This traffic light is located on the main path that connects the Bar District and the Coliseum. It can be found to the east of your ship, the Goromaru.
6. Coliseum Grounds – A Lost Kappa
“The Walls Of The Coliseum”
This photo is definitely one of the trickiest to find. As you enter the coliseum area, look up and to your left. It will be situated just above you as you move from the path into the opening. You’ll see a woman in a pirate hat pulling on a man’s shirt on a balcony nearby, with the Kappa statue located to the right of them.
7. Docks – Signboard
“In Front Of The Pier”
When departing from your ship (the Goromaru), you’ll spot the MCU sign against the wall in front of you but a bit to the left. Just head straight from your ship, and it should be easy to find as you reach the main path that runs around Madlantis.
8. Bar District – A Sexy Signboard
“Bar District Entrance”
This signboard can be found as you enter the Bar District. It’s located on the wall to your right as you ascend the stairs leading into the area. You might have to look up to see it, or you might walk right past it like I did!
9. Coliseum Grounds – Pirate’s Coliseum
“Coliseum Signboard”
Just make your way to the Pirate’s Coliseum reception desk. This sign is positioned above the Coliseum Receptionist’s head.
“Near The Coliseum”
The small figure made of coconuts is located in the same spot as the Coliseum signboard. However, instead of being above the receptionist, this one is to their right.
11. Gaming Hall – Death Wheel
“Gaming Hall Square”
You won’t be able to enter the Gaming Hall until you’ve completed your first coliseum battle. Be sure to do that before you try to locate locations 11, 12, and 13.
This sign is located north of the Golf in Madlantis center. You’ll need to direct your gaze upward to see it. However, a little trick here is that the sign won’t be facing toward the entrance. To get a good look, head as far north as you can (near the Gaming Hall boat), turn around, and then look up.
12. Gaming Hall – Golf In Madlantis
“Logo Of A Golf Center”
Make a beeline for the Golf in Madlantis center. As you walk into the Gaming Hall, you will find this on your left.
13. Gaming Hall – A Lost Ukulele Boy And Ukulele Girl
“Shop At The Gaming Hall”
This pair of ukulele figures is placed beside the clown in the tent located north of the Golf in Madlantis center. Look for the stall directly east of the Gaming Hall sign and right above Bacchus’s Barrel restaurant.
14. The Queen’s Castle – Suspicious Man
“Cache For Cash”
Head to the Wooden Whale, the shop situated near the dock at the northeast corner of The Queen’s Castle. From there, move northwest along the path surrounding The Queen’s Castle. You’ll see the sign hanging above this path.
15. Luxury Palace Hotel – Chimera Statue
“Inside The Hotel”
Upon entering the hotel, this statue will be immediately on your left. It’s very hard to miss. However, the real challenge is that you must clear the first Tournament of Captains before you can enter the hotel.
The Rich Island photo rally is the quickest rally you’ll find in Like A Dragon: Pirate Yakuza In Hawaii. Even though it’s brief, some tasks can still be challenging. Fortunately, we’ve mapped out the locations for all seven photo targets to help you out.
We’ll guide you to each photo target by showing you their locations on the map and pointing out nearby landmarks for better navigation. With our assistance, you’ll breeze through the Rich Island Photo Rally.
Central Plaza – Lost Flamingo
“The Island’s Center”
Make your way to the area east of the Esperanza Bar, where you’ll see a stack of shipping containers. To your left at the eastern entrance, you’ll find a generator and a flamingo. The flamingo is somewhat hidden, so you’ll need to adjust your angle to capture it properly.
Central Plaza – Esperanza
“Bar Sign”
Your next target is the sign next to the Esperanza bar. This sign is located just a bit north of the bar. You can’t access the other half of the island from the beach without passing under this sign.
Central Plaza – Lost Taco Mask
“Look Up From The Container”
This photo target is found in the heart of Central Plaza. Look for a mannequin sitting atop a stack of shipping containers. The tricky part is that you can’t snap a shot from just any angle. You need to be positioned on the west side of the plaza to get the right view of the mannequin.
Residential District – Freshly Caught Fish
“Fishing Village Shop”
The location mentioned here is the general store. You’ll locate this store south of Stella’s Shop. Just snap a picture of the nearby produce, and you’ll complete this photo rally task.
Central Plaza – Figurehead Inside Shop
“Inside The Bar”
The bar referred to here is the Esperanza, situated west of the beach entrance. Simply take a photograph of the statue next to Moana.
Residential District – A Shop With All Sorts Of Things
“Fishing Village Shop”
Head over to Stella’s Shop, located in the northwest corner of the map. All you need is a picture of the crate of fish positioned next to Stella.
Residential District – A Bad Bunny
“Wall of a Fishing Village House”
This spot might require some extra help to find. The house featuring graffiti can only be seen from a specific angle. This house is located south of Stella’s Shop. You’ll clearly see the wall while standing on the dock west of the shop.
Beach – Arrow In A Heart
“Rock On The Coast”
This rock is positioned west of the cooking station on the beach. It’s nestled in a little area at the beginning of the beach.
The Anaconda Shopping Center in Like A Dragon: Pirate Yakuza In Hawaii is packed with rings, clothing, and Aloha Links. It’s also where you’ll find one of the game’s Photo Rallies, which rewards you with one of the top darts available.
As you explore both floors of the Anaconda Shopping Center, keep an eye out for key landmarks and hidden anacondas. It’s easy to get disoriented and overlook your target, but this guide will help you navigate smoothly. You’ll find straightforward instructions and tips on notable nearby shops and attractions. With our help, you’ll snag that dart before you know it.
1. Anaconda – Aloha Sign
“Shopping Center 1F”
Enter the Anaconda Mall from the northeastern entrance and walk straight ahead. You’ll come across a massive sign right away. Alternatively, it is just slightly north of the taxi stand at the Anaconda Shopping Center. Don’t worry if you miss it; even though it’s large, it can be easy to overlook from the south side.
2. Anaconda – Anaconda Arcade
“Shopping Center 1F”
This is the sign located in the arcade section of the Anaconda Shopping Center. The arcade is situated in the southeast corner of the first floor.
3. Anaconda – Face Cutout Board
“Shopping Center 1F”
The cutout board of Anaconda is right next to the arcade. As you round the corner of the arcade heading northeast, you’ll run directly into it.
4. Anaconda – Snake Jar
“Shopping Center 2F”
The large snake in a pot can be spotted in the central courtyard area on the second floor (not the east side). Look for the space with the flamingo statues and ukulele players.
5. Anaconda – Colorful Mannequin
“Shopping Center 1F”
The display case featuring Colorful Mannequins is on the east side of the first floor. While facing the arcade, head northwest. The case is right next to the Anaconda Sports Shop.
6. Anaconda – Anaconda South Entrance
“Shopping Center South Entrance”
You want to capture a photo of the Anaconda sign above, not the one to the left of the entrance. The Anaconda Shopping Center sign at the south entrance can only be seen from the street. Look for the anaconda emblem in the center of the awning.
7. Anaconda – Anaconda West Entrance
“Shopping Center West Entrance”
Unlike the South Entrance, you won’t be photographing the sign above the entrance here. Instead, head inside and check the north wall (it will be on your left). The sign is located east of the Sunset World Market.
8. Anaconda – Hidden Anaconda: Shrubbery
“Shopping Center 2F”
You can find this hidden anaconda on the corner of a planter box on the east side of the shopping center’s second floor. This planter is directly across from the Fiddler Brand store.
9. Anaconda – Hidden Anaconda: Window Display
“Shopping Center 2F”
Look for this hidden Anaconda emblem on the west side of the second floor. It’s located just west of the ABC Store (Anaconda).
10. Anaconda – Hidden Anaconda: Restroom
“Shopping Center Restroom”
You’ll find the hidden restroom anaconda on the east side of the mall. This restroom is tucked away southeast of the arcade.
11. Anaconda – Sujigami PC Shop
“Shopping Center 2F”
This shop is located in the northeast corner of the Anaconda Mall’s second floor, above the escalators. If you’ve played Infinite Wealth, this is where you’d participate in the Sujimon Colosseum battles.
12. Anaconda – Tropical Showcase
“Shopping Center North Entrance”
You’ll spot this display case to your right when you enter the Anaconda Mall from the North Entrance.
13. Anaconda – Big Heart And Message
“Shopping Center 1F”
This heart and message can be found on the northeast section of the Anaconda Mall’s second floor, just north of the escalators. If you’ve played Infinite Wealth, this is the area for the Sujimon Colosseum battles.
14. Anaconda – Big High Heels
“Shopping Center 1F”
From the Hilo Hattie store on the mall’s first floor, head east. The display case featuring this giant shoe is just a few storefronts down.
15. Anaconda – Golden Cow
“Steakhouse Interior”
You will find the Golden Cow right in the center of the Boogie Woogie Steak House. You can’t miss it as you enter the restaurant.
When you’re ready to get the Goromaru into top shape with Julie’s Gearworks in Like a Dragon: Pirate Yakuza in Hawaii, you’ll discover she has an impressive selection of weapons and Rings to craft for you, including the Coconut Machine Gun and Coconut Ring.
The catch? You’ll need a lot of Coconuts to create these items. But where can you find enough? No worries, we’re here to guide you through it.
Where To Find Coconuts
There are a few ways to collect Coconuts, and they may also randomly appear from Merchant Ships at sea.
Growing On Trees
Coconuts are found on palm trees in various places and can be easily collected using your Chain Hook. Keep in mind, each attempt may not yield a Coconut—there’s a chance you could end up with a Quality Mango instead.
While palm trees can be spotted throughout the game, not all bear fruit. Here are some locations where we’ve found palm trees:
Rich Island: Near the steps leading to the Central Plaza.
Anaconda Harbour Park: Particularly close to the water.
Along the shore of Aloha Beach.
Coconuts will eventually respawn, making it possible to return to the same trees for more harvesting later on.
Kau Wela Market
You can also buy Coconuts from Kau Wela Market in Anaconda Harbor Park. However, availability is inconsistent because their supply changes. When they do have Coconuts available, it’s usually five Coconuts priced at $2.00 each.
If you don’t see any Coconuts, you can make the stock change by fast traveling to a different taxi point (avoid the closest ones, like the Anaconda Harbor Park Drop-Off Only), then coming back to the market.
Complete Crafting Recipes That Use Coconuts
Machine Guns
Item
Materials Required
Stats
Coconut Machine Gun
50x Components
30x Quality Components
10x Superb Components
3x Coconuts
Cannon Power: 350
Reload Time: 5
Super Coconut Machine Gun
*This becomes available once you craft the Coconut Machine Gun.
Aloha Links is back in Like a Dragon: Pirate Yakuza in Hawaii, so get ready to make a memorable impression with all the new friends you’re about to meet in Honolulu. If you’re not familiar with this returning feature, it lets you form friendships with area NPCs, and in return, you’ll earn a variety of rewards.
For all the details on Aloha Links, including when it becomes available and the rewards you can earn, we’ve provided a complete guide for you.
How to Unlock Aloha Links
Though you can greet NPCs as soon as you see them, you won’t be able to form friendships until you’re properly introduced to Aloha Links. This occurs in Chapter Two during your second visit to Revolve Bar as part of the main story. Kei assists Majima in navigating the Aloha Links app and demonstrates how to use it—then you can start making connections!
How to Use Aloha Links
Aloha Links acts as a social media app on your phone, serving as a fun way to connect with NPCs throughout Honolulu.
How to Befriend NPCs
As you move through Honolulu, you’ll see various NPCs—humans and animals alike—with a small grey smiley face icon above their heads. This indicates that you can form a friendship with them through Aloha Links.
Here’s how you can befriend NPCs:
Save Them from Thugs
Some NPCs may find themselves cornered by thugs, and you’ll need to defeat the thugs to secure a friendship. You’ll also receive a small item as a reward for your efforts.
Note: These encounters appear random and are not limited to specific NPCs. The same NPC might just be wandering around, allowing you to form a friendship later without engaging in a fight.
Buy Items from Them
Many potential friends run shops or carts. To befriend these NPCs, you can purchase something from them, whether it’s food or a meal in their restaurant.
Give Them Their Requested Items
NPCs with a chat box above their heads will often ask for something when you talk to them—typically food or a drink. Simply provide them with the item they request to befriend them.
Feed Them
Animal NPCs will require you to feed them in order to become friends.
Note: Pet food can be purchased at various stores and found throughout Honolulu by opening containers. For some animals, you may also offer insects or other types of food.
How to Increase Your Bond into Buddies
Each NPC you befriend will have a green gauge below their smiley face icon. You can build your relationship by greeting them or buying from them. Once the gauge is filled, your friendship level will rise from Friends to Buddies.
Having more Buddies will enhance Majima’s reputation.
You also need at least 30 Buddies to recruit Kei as a crew member, while you need 100 Friends for the Revolve Bartender to join your crew.
How to View Your Current Friends and Buddies
To check your progress with Aloha Links, go into the Menu, choose ‘Smartphone’, and tap on the ‘Aloha Links’ app (the icon featuring a hand).
From this app, you can see how many Friends and Buddies you have, along with your current member status.
Aloha Link Rewards
When you reach various milestones regarding the number of friends you’ve made, Kei will send you a message inviting you to return to Revolve for a reward.
If you haven’t claimed your last reward/message from Revolve, Kei won’t message you again until you do.
However, you can continue befriending new NPCs, and whenever you return to Kei, you’ll promptly receive your next message after claiming the previous reward.
Number of Aloha Links
Reward
5
Button-Up (Short Sleeve) – Upper Body Apparel
15
Caro Pants – Lower Body Apparel
25
Sacrifice Ring – Little Finger Ring
50
Hannya Ring – Thumb Ring
100
Heart Earrings – Accessories to customize your outfit