الوسم: knight

  • How to Complete Gold Skill Bricks in Lego Batman: Legacy of the Dark Knight

    How to Complete Gold Skill Bricks in Lego Batman: Legacy of the Dark Knight

    Lego Batman: Legacy of the Dark Knight offers more collectibles than you can imagine, especially the highly coveted Gold Bricks. These special bricks can be gathered throughout the game and are used to improve your Combat and Exploration skills.

    To defeat enemies easily and glide smoothly through Gotham City, you need to upgrade your skills quickly. Here’s what you should know about collecting and spending Gold Bricks.

    ### How to Obtain Gold Bricks in Lego Batman: Legacy of the Dark Knight

    Gold Bricks serve as skill points in the game. When you find Gold Skill Bricks, you can use them to upgrade your abilities in both fighting and exploring. Each skill costs one Gold Brick, and since there are 30 skills available, you will need to collect all 30 Gold Bricks to unlock everything.

    You can keep track of your Gold Bricks by pausing the game and checking your collectibles tally.

    At the beginning of your adventure, most Gold Bricks come from completing story missions. Each main story mission awards you one Gold Brick. These include:

    1. Infiltration
    2. New Beginnings
    3. Carmine Falcone
    4. The Red Hood Gang
    5. Mimes
    6. The Penguin
    7. Flugelheim
    8. Joker
    9. Two-Face
    10. Kite Man
    11. Poison Ivy
    12. Firefly
    13. Mr. Freeze
    14. The League of Shadows Returns

    Besides story missions, you’ll unlock the remaining Gold Bricks by completing side missions and collections. It becomes easier to find these missions once you unlock Batgirl and start exploring Gotham, hacking into Towers scattered around the city. These Towers mark all side mission locations on the map, helping you finish each one efficiently.

    Once you’ve completed everything, all 30 Gold Bricks will be yours. Use them to upgrade your skills and become the strongest hero Gotham has ever seen.

  • How to Get Free Lego Batman Drops: Completing & Solving Challenges

    How to Get Free Lego Batman Drops: Completing & Solving Challenges

    To celebrate the release of Lego Batman: Legacy of the Dark Knight, players can receive some free items through Twitch Drops and other sources. These items can be used to decorate your Batcave in the game’s customization areas.

    To get two exclusive new items available only to Twitch viewers and find out what other freebies you can earn—like bonus Studs and new outfits—we have all the details you need.

    All Free Stuff in Lego Batman: Legacy of the Dark Knight

    You can get several free things for the game, including decorations for your Batcave, free Studs, and a few outfits for your characters. Simply pause the game, go to Options, and link your Warner Bros., Twitch, and HBO Max accounts if you have one.

    Tip: When you connect your game account to an HBO Max paid subscription, you can unlock two special Batsuits.

    If you’d like extra Studs (everyone wants those!) and an exclusive Stud Cache design, complete The Lego Group Online Survey. Once finished, you’ll receive a code as a thank you, which you can enter in the Redeem Code section to claim your reward. Remember to restart the game afterward to see the new content, including a colorful Stud Cache in your Batcave.

    To claim your free Twitch Drops, link your Twitch account to your game account by following a link or scanning a QR code with your phone. Then, search for Lego Batman: Legacy of the Dark Knight on Twitch and find a streamer with “DROPS” in their title. Watch for about an hour, and Twitch will notify you when your items are ready. Just click “Claim” to receive them.

    Free in-game items include:

    • Decor items for your Batcave, like the Drinks Fridge and Controller Stand
    • Special Studs and a unique Stud Cache design

    These items will automatically appear the next time you start the game, ready to be placed around the Batcave on the customizable platforms.

  • Lego Batman: The Journey of Completing and Solving the Dark Knight Legacy

    Lego Batman: The Journey of Completing and Solving the Dark Knight Legacy

    Jim Gordon is no longer part of the game, and Catwoman has taken his place. In the new Lego Batman: Legacy of the Dark Knight mission, players get to see Selina Kyle’s masked alter ego. She comes equipped with a handy whip that allows players to grab a new Batcave trophy: a cat’s head.

    Throughout this level, you will find five scary Cheshire cat heads, along with five WayneTech Caches and the usual Red Brick. This guide will explain exactly where to find each of these collectibles. If you happen to miss any, you can replay the mission anytime from the Batcave computer.

    Every Cat Head Location:

    1. [Location details here]
    2. [Location details here]
    3. [Location details here]
    4. [Location details here]
    5. [Location details here]

    Every WayneTech Cache Location:

    1. Later in the level, after crawling through a vent, continue with the objectives. Use Batman’s grapple to open the door.
    2. In the next room, smash the crates to find a key. Head back through the door and use the key on the locked door across from you to access the second cache.
    3. In a room with mime acting as mannequins, find a hidden hole in the wall behind a crate. Smash the crate and crawl through. Send a cat through the flap on the opposite side to open the gate. Return with Batman and Catwoman, push the trolley forward, and climb the ledge to uncover another WayneTech Cache.
    4. In the toy shop, stand on the button to start a game of Simon Says. Repeat the sequence of notes displayed and walk across the piano in the same order to pull back the curtain and reveal the final WayneTech Cache.

    Where to Find the Red Brick – Feline Modifier:

    • Drive the Batmobile with the feline color palette. In the toy shop, as you play the mini-game, a maze appears. Plug in the controller to start, then guide the cat to the red brick by stepping on the directional buttons. Avoid the orange circle, and aim for the blue circles for extra studs. When the cat reaches the end, it will explode, revealing a hidden Red Brick behind the screen.

    This concludes the key collectible locations and tips for this level.

  • How to Play Onion Knight in Dissidia Duellum: Completing & Solving Tips

    How to Play Onion Knight in Dissidia Duellum: Completing & Solving Tips

    The Onion Knight from Final Fantasy 3 is a character full of surprises: he appears as a young warrior whose seemingly delicate nature hides tremendous strength. This contrast remains true in Dissidia Duellum, where he’s portrayed as a late bloomer who gains power as the fight goes on. Don’t expect to be a champion right from the start. Instead, prepare to become a real challenge by the time the boss shows up.

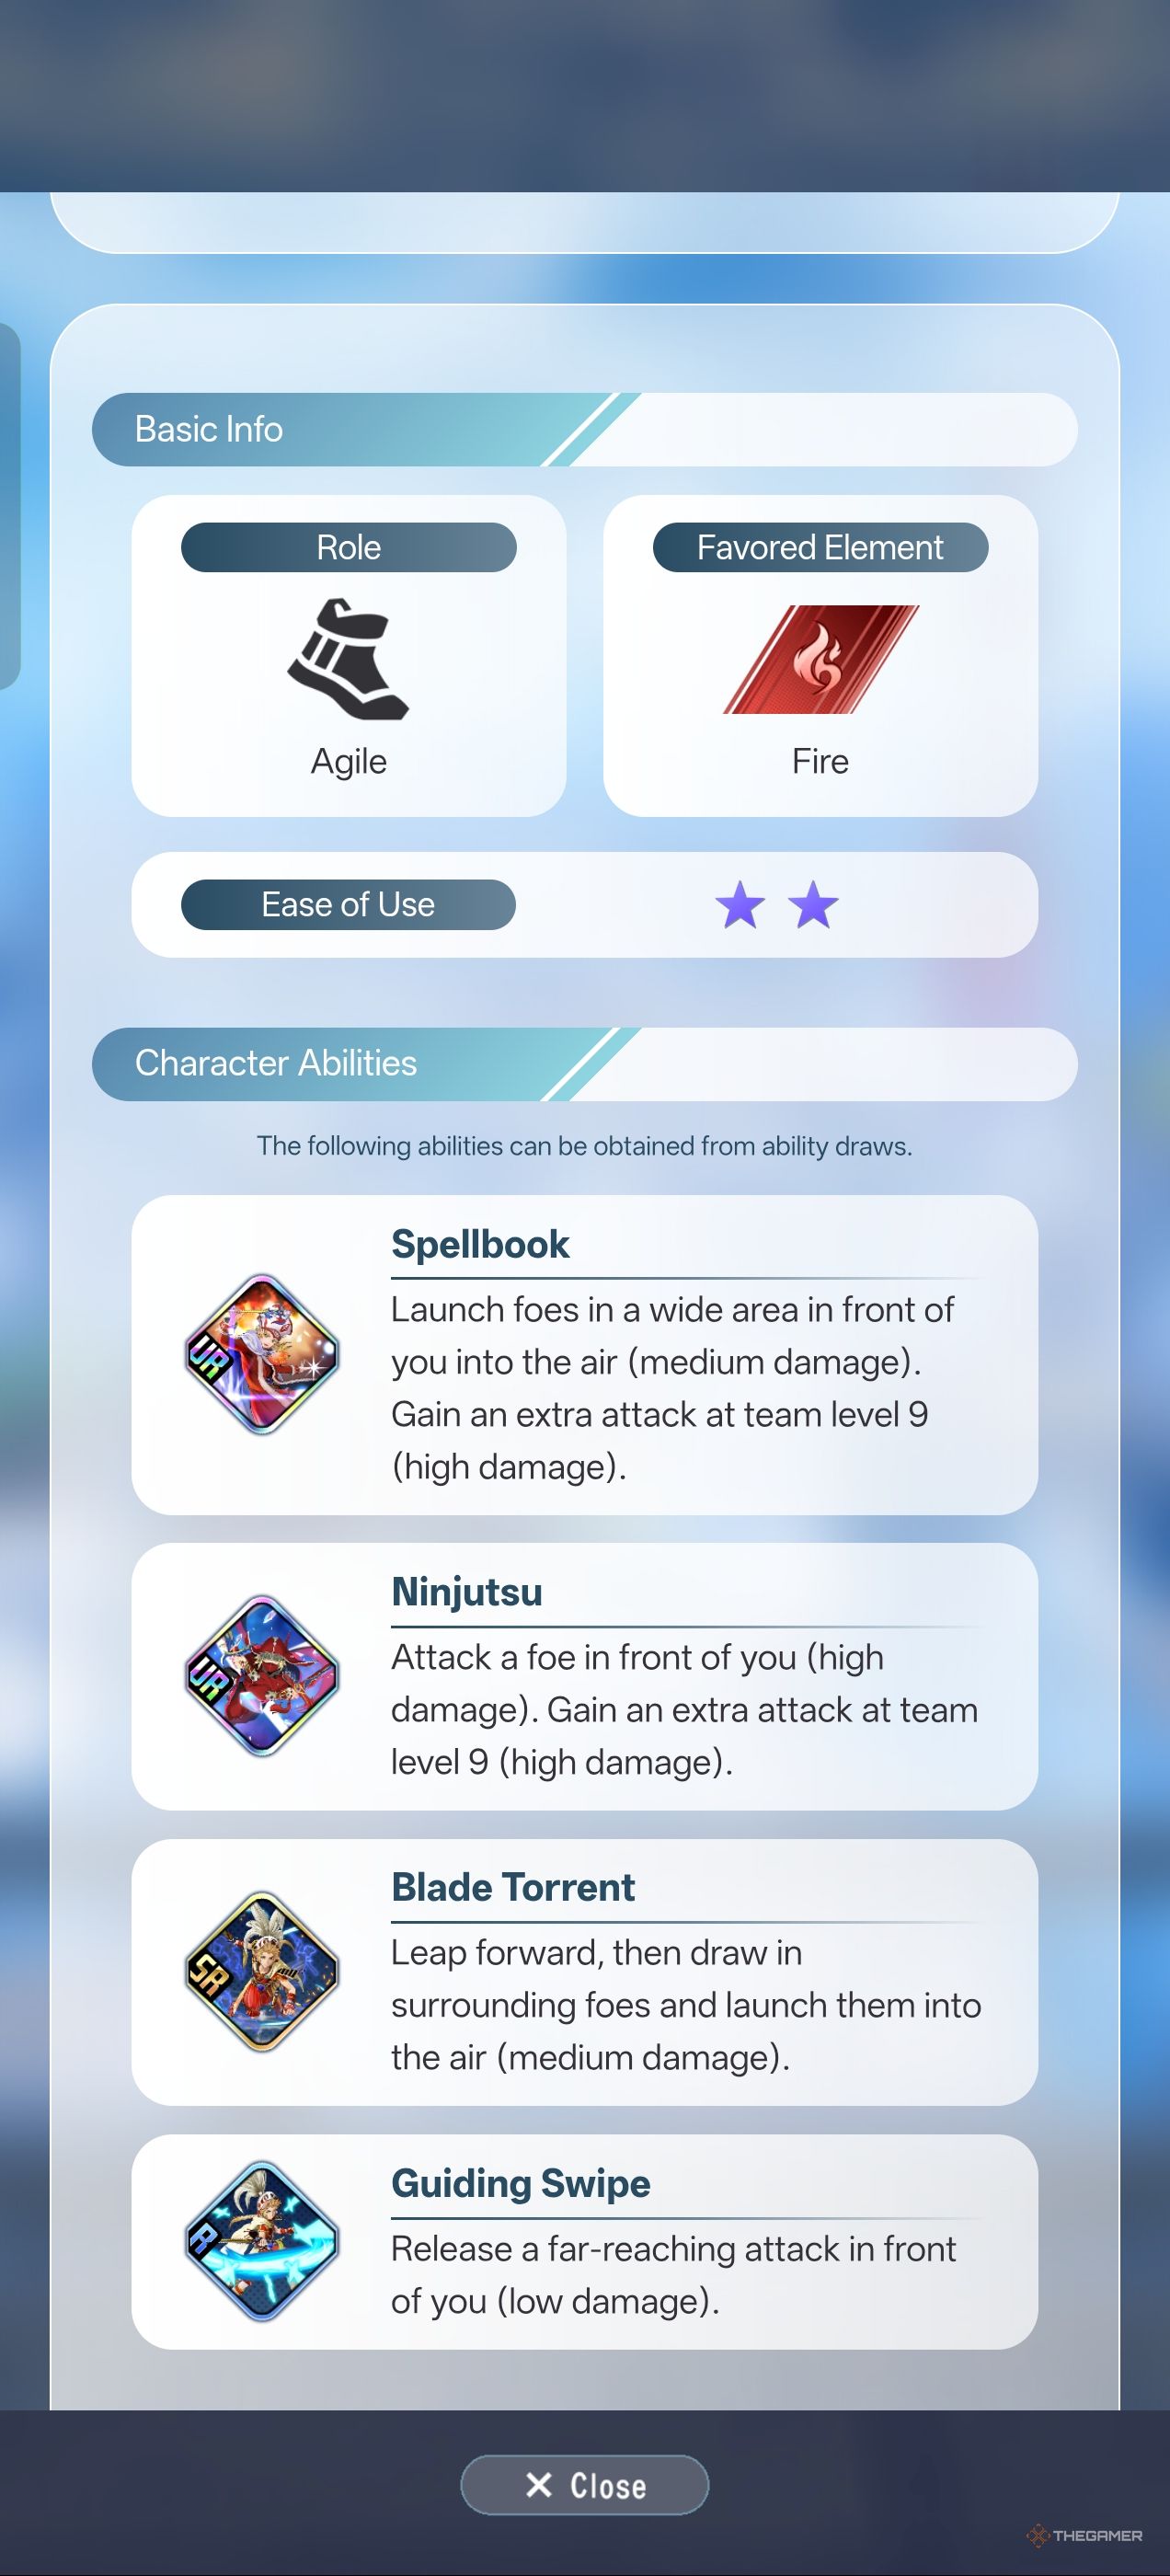
    He belongs to the Agile class, similar to Lightning, meaning he relies on quickness and map control. What sets him apart from simple skirmishers is his unique passive ability — when he reaches Level 9 during a battle, his Attack and Defense stats double. This makes him one of the more technically challenging characters to master but also one of the most satisfying to play.

    Onion Knight Overview

    Visual Description:
    Image of Onion Knight in Dissidia Duellum
    Alt text: Onion Knight’s character description in Dissidia Duellum Final Fantasy.

    Stats and Skills:
    | Name | Role | Passive | Unique Ability |
    |——————|———|————————————————————|————————————–|
    | Onion Knight | Agile | Late Bloomer — Once you hit Level 9, his Attack and Defense double. | Turbo-Hit — Hold to dash and launch an enemy in front of you. |

    Strategic Importance of Level 9:
    The “Late Bloomer” trait influences every move you make with Onion Knight. Early on, your main goals are gathering crystals, safe fighting, and avoiding danger until you’re strong enough. Once you reach Level 9, your Attack and Defense double, allowing you to survive fights that would have been risky before. Your damage output jumps significantly thanks to improved Ninjutsu and Spellbook attacks. The Teleport skill becomes especially useful for quickly farming crystals or escaping danger.

    Best Abilities for Onion Knight

    Visual Aid:
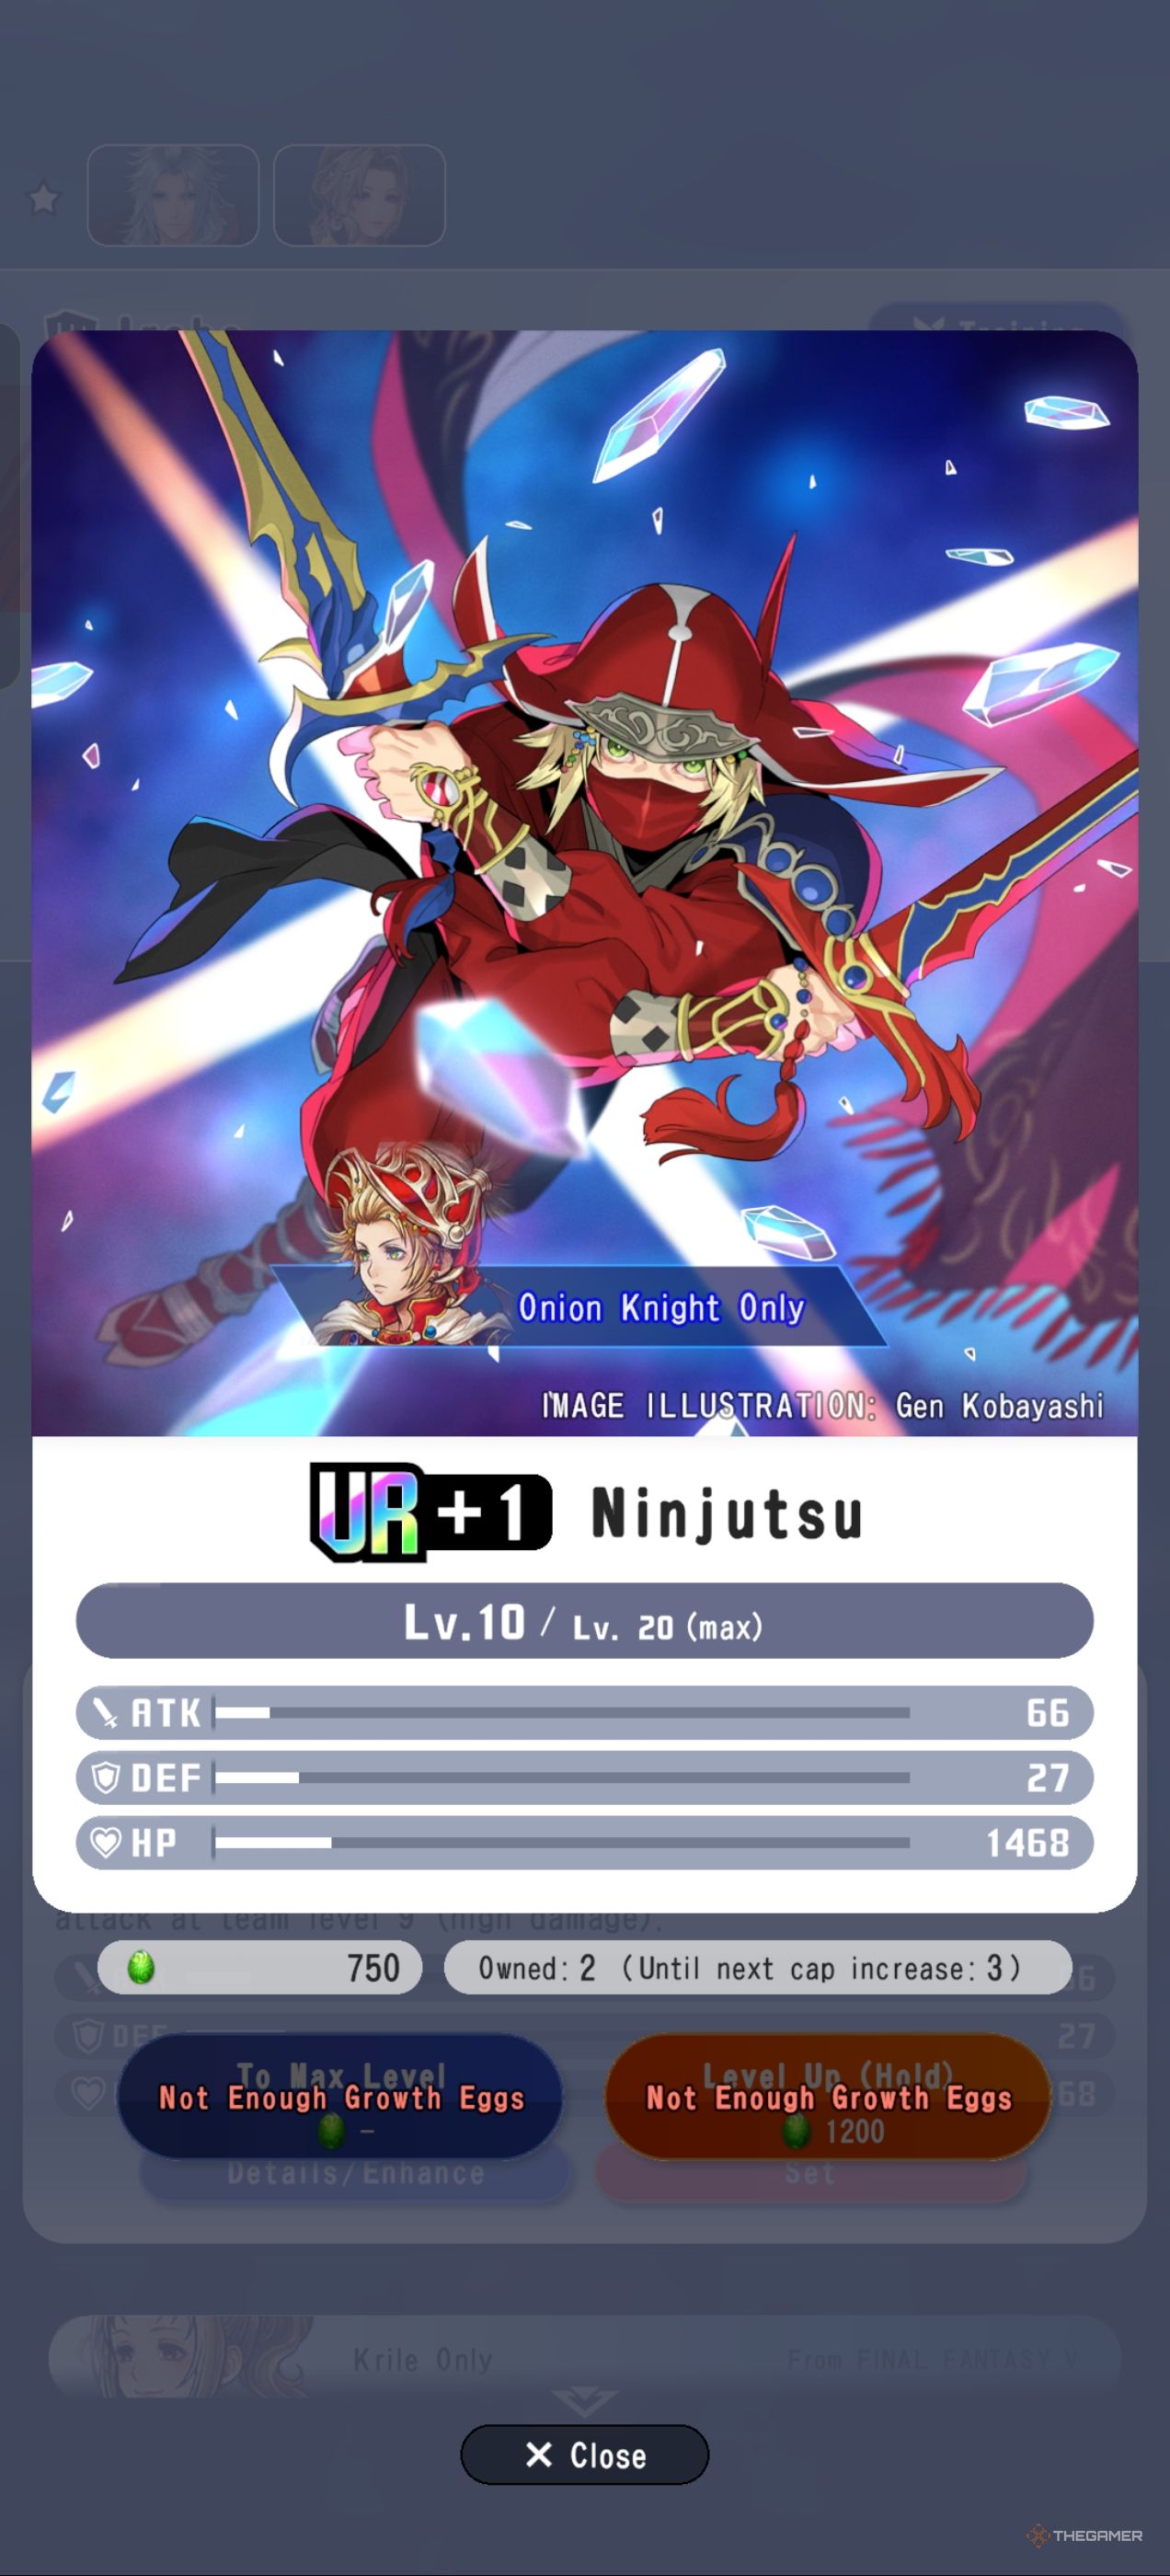
    Image showcasing Onion Knight’s Ninjutsu ability
    Alt text: Onion Knight’s Ninjutsu skill in Dissidia Duellum.

    • Ninjutsu: A high-damage single-target attack. It’s already strong before Level 9, but the extra hit at maximum level makes it much more threatening. It’s the main tool for pressuring opponents once you reach your power spike.
    • Spellbook: An Area of Effect attack that lifts enemies into the air, making them vulnerable. The extra hit at Level 9 turns this into a real threat in group fights and sets up team combos.
    • Blade Torrent: A jumping attack that closes the gap between you and enemies, pulling them in for next-level attacks. It’s perfect for starting fights after Level 9 or disrupting enemy positioning early on.
    • Guiding Swipe: A ranged attack with lower damage, generally less important and can be skipped for the most part.

    Support Abilities:

    • Minwu/Teleport: Great for quick crystal gathering and escaping dangerous situations.
    • Ace/Fire RF: A solid ranged fire-element attack to incorporate into combos, helping you keep pressure without overextending, with additional fire bonuses.

    Tips for Maximizing Effectiveness:
    To maximize Onion Knight’s potential, focus on support slots that boost overall Combat Power, as this enhances his effectiveness. Because his kit is designed to come into full strength later, investing some points into Hit Points can help him survive until he hits Level 9.

    Impact of Level 9 and Beyond:
    Once you hit Level 9, your Attack and Defense are doubled, enabling you to survive fights that previously would have been deadly. The upgraded Ninjutsu and Spellbook wreak havoc, and Teleport helps farm crystals faster and evade threats. This combination transforms your playstyle from cautious to aggressive once your power spike occurs.

    Best Allies for Onion Knight

    Visual Aid:
    Image of Onion Knight on his phone during a cutscene
    Alt text: Onion Knight during a cutscene.

    Key Support Partners:
    | Partner | Role & Benefits | Description |
    |————————|————————————————————————————————|————————————————————————————————-|
    | Krile Mayer Baldesion | Essential partner; passive boosts team crystal earning and she actively heals. | Her passive increase in crystal rewards and Encourage ability speed up Onion Knight’s level growth. Her healing helps him survive early fights. |
    | Warrior of Light | Creates damage zones around allies and boosts Attack, providing resilience. | His buffs and damage reduction allow him to withstand enemy pressure, supporting Onion Knight’s climb to power. |
    | Cloud Strife | A frontline hero with high damage; provides continuous pressure on bosses. | Cloud’s strength lets him pressure enemies independently, so Onion Knight can focus on building up. |
    | Rinoa Heartilly | Ranged damage dealer who pushes enemies away, protecting Onion in early stages. | Her knockback prevents enemies from punishing Onion Knight’s initial farming phase. |

    Conclusion:
    Having strong allies like Krile and Warrior of Light helps Onion Knight reach Level 9 more quickly and survive longer during the early game, setting him up for a devastating late-game presence. Both offense and support partners should complement his evolving power to maximize his effectiveness in battle.

  • How to Complete Knight Artorias in Elden Ring: The Forsaken Hollows

    How to Complete Knight Artorias in Elden Ring: The Forsaken Hollows

    Knight Artorias is one of the most popular and unforgettable bosses in the Souls series. In the Elden Ring: Nightreign expansion, he appears as part of The Forsaken Hollows DLC. If you’ve ever wanted to challenge this legendary boss with friends, now’s your chance. But stay alert—Artorias was always a fierce opponent, and he’s just as tough here.

    He uses many of his signature moves, along with some new variations, to put your team to the test. Expect unpredictable attacks with his large sword, quick jump strikes, and relentless pressure. Here’s what you need to know to defeat Knight Artorias in The Forsaken Hollows.

    ### Where To Find Knight Artorias

    Artorias is a level 2 boss, only available during the Dreglord expedition. To unlock him, you first need to complete the Balancers’ expedition with any character. Once done, you can access the area where Artorias awaits.

    He’s a challenging fight, especially at this stage of the game. Be prepared for tougher bosses toward the end of the second day in Forsaken Hollows, like The Lord of Blood. However, approach Artorias with caution—fighting him face-to-face can be tricky. It’s best to be at least level 10 and have options for attacking from medium to long range.

    ### How To Defeat Knight Artorias

    #### First Phase

    On the initial phase, Artorias begins with a thrust attack delivered in a straight line. Do not dodge backwards, as he will close the distance quickly. He also performs slow, long-range one-hit attacks straight ahead, which are easy to dodge by rolling to either side.

    It gets harder if he moves forward before attacking, as he can reach you quickly. Watch for him holding his sword for a few seconds and then preparing to charge. If he’s chasing you, focus on dodging while your teammates attack him from behind or use projectiles.

    A key moment is when he tilts his head back briefly: he will then unleash a 360° attack covering all directions. Keep your distance during this time to avoid getting hit, and take the chance to hit him with long-range attacks or projectiles. Be aware that after this move, he may jump away, so use that window to heal if needed.

    His jump attack makes a return; he can leap and strike the ground with his sword up to three times in a row. There’s a pause between jumps, giving you time to recover or prepare for the next move. This attack targets a single player, making melee fighters at a disadvantage. Use ranged options to stay safe.

    #### Second Phase

    When his health drops to about 40%, Artorias begins charging energy, leading to a small explosion if you’re nearby. Avoid staying close during this charge. He will also shoot a barrage of black projectiles that can track multiple players, so dodging sideways is best.

    He becomes faster and more aggressive, covering more ground. His attacks repeat but happen more quickly and often. Expect him to execute his thrusts, charges, and jump attacks with increased speed—fighting him requires quick reflexes and smart positioning.

    In this phase, he gains two new moves. Besides his usual three-jump attack, Artorias can now charge energy, visible as flowing energy from his body, before executing a powerful ground slam aimed at one player. When he lands, roll away immediately—this move also has a chance to grab and throw a character, causing additional damage and chaos.

    His other new attack is a series of five rapid blows with erratic timing. You’ll see purple or pink trails on his swords indicating this combo. Dodge the first swipe, wait a couple of seconds, then dodge two more in quick succession, followed by a longer pause before the final, reach-extending strike. During this series, he can interrupt if he kills a teammate, so don’t be close during his combo. Only attack from a safe distance if possible, and avoid being near him during the flurry of strikes.

  • How to Claim All Crests and Their Purpose in Hollow Knight: Silksong

    How to Claim All Crests and Their Purpose in Hollow Knight: Silksong

    In Hollow Knight: Silksong, crests are a key mechanic shaping how you explore, fight, and move around. Each crest provides a different set of moves, tools, and special effects, making them stand out in Pharloom’s most dangerous and isolated regions.

    Every time you find a new crest for the first time, you’re likely to want to try out its unique features. No crest is strictly better than the others, so each one offers something for different playing styles. If one crest doesn’t suit you, trying another might help sharpen your skills and discover what works best for your hunting approach.

    What Are Crests?

    Crests are special templates that influence various game mechanics. Learning what each crest does is vital for your success. Essentially, crests affect:

    • Your moveset
    • Your ability bindings
    • The types and slots of tools you can equip

    You can view and change your crests anytime while sitting on a bench. To do this, access the Tools menu, then press the button indicated on the bottom left of your screen to open the crest menu and switch between them.

    While a crest is active, you can unlock additional tool slots by using Memory Lockets. Hold down the interact button over a locked slot to use a Memory Locket and permanently unlock that slot.

    All Crest Effects

    There are seven crests, each with distinct movesets, load-outs, and effects. Major aspects like binding skills and pogo directions are important considerations when choosing a crest to leave a bench with.

    Crest Red Slots Blue Slots Yellow Slots Silk Skill Slots Charge Attack Damage Flintslate Damage Pogo Direction Moveset Changes Special Effects
    Hunter 2 2 2 1 58/70/76 88 Diagonal N/A Successive attacks boost damage on Needle attacks.
    Beast 2 – 2 1 52 78 Arc (Multi-Hit) Short-range claws, devastating appearance Attack heals with each successful hit during a short window; attacks deal more damage during binding.
    Reaper 2 2 2 1 65 100 Down Wider attack areas Attacks generate more silk after binding.
    Wanderer 1 2 3 1 52 78 Down Faster attacks Shorter nail; critical damage possible with 9+ silk stacks.
    Architect 3 2 2 – 65 100 Down (Multi-Hit) Spinning corkscrew moves Binding creates tools.
    Witch 2 3 – 1 102 156 Down (Multi-Hit) Wide silk arc; charge attacks hit multiple times Binding heal explodes to deal damage and restore health.
    Shaman – 2 – 3 42 N/A Diagonal Generates short-range projectiles Silk Skill damage greatly increased, but binding requires being on the ground.

    How to Obtain Each Crest

    You unlock each crest by completing specific challenges or exploring certain areas. Collecting all seven will earn you the achievement “Consumed,” and provides versatility in handling various challenges.

    • Witch & Shaman crests are ideal for boss fights.
    • Architect is useful against groups or multiple enemies.
    • Wanderer & Reaper are great for widespread exploration and long trips between benches.
    • Hunter serves well as a reliable all-rounder.

    It’s recommended to unlock all crests to see which suits your playstyle best, keeping in mind that flexibility can be a game-changer.

    How to Get the Beast Crest

    Early in the game, in Hunter’s March, on the far right above Deep Docks, you’ll find a hidden chapel. Inside, guarded by the formidable Savage Beastfly, this crest is yours once you defeat it. Be prepared for a tough fight, but winning grants access to the coveted Beast Crest.

    How to Get the Reaper Crest

    Easily located during normal exploration in Greymoor, just above the Moorwing fight on the far left side, this crest requires no fights. A simple platforming ascent will lead you to a chapel. Reaching it before the Moorwing fight is recommended, as its pogo boost makes that fight easier.

    How to Get the Wanderer Crest

    This crest is in a remote part of Bonegrave, away from all fights. After acquiring Cling Grip, head to Bone Bottom, take the elevator up to Moss Home, and follow the route to the Chapel of the Wayfarer:

    1. Head west toward Wormways.
    2. Drop down instead of exiting at the Wormways, use Drifter’s Cloak to glide left across ledges.
    3. Climb the wall and continue west to a lake.
    4. The chapel is on the west side of the lake. Opening the shortcut door on the east side is wise in case of enemies.

    How to Get the Architect Crest

    Found in the Underworks of the Citadel, just above the Cauldron area, the Twelfth Architect sells the Architect’s Key for 110 rosaries, provided you have enough red tools to barter with. Use the key to unlock the door above the Twelfth Architect to claim the crest.

    How to Get the Witch Crest

    This is the most complex crest to obtain, requiring you to finish the Pollip Heart quest in Shellwood. After that, you must locate the Twisted Bud in Bilewater and bring it to Greyroot’s home, infesting you with a parasite. This process prevents healing and may impede Silk Skills, but it unlocks interactions with NPCs and ultimately allows you to access the crest.

    How to Get the Shaman Crest

    Accessible only during Act Three, it requires descending into the Abyss with Silk Soar and reaching the Ruined Chapel where the Snail Shamans are. Use Silk Soar to navigate through hidden paths and find a breakable wall concealed behind what seem to be dead ends. Inside, the crest awaits at the very end.

    Upgrading Your Crests

    Progressively, Eva can enhance your crests, boosting their effects. These upgrades typically require rosaries and are accessible at the Weavenest Atla, located in Moss Grove. You need to disable the Twisted Bud infection first and reach her chamber to gain her blessings, including increased attack power and tool integration.

    Once all crests are gathered and upgraded, you can return to Eva, accept her final wish, and receive the Sylphsong. This ability allows passive Silk regeneration at benches, similar to the Blessing from Salubra in the original game.

  • How to Complete the Clover Dancers Challenge in Hollow Knight: Silksong

    How to Complete the Clover Dancers Challenge in Hollow Knight: Silksong

    The map in Hollow Knight: Silksong features more than 20 different biomes. Most players might only see half of these if they stick to the main path. While many biomes can be accessed directly through specific routes, some are locked behind hidden quests.

    One such secret area is Lost Verdania, which contains the Clover Dancers boss fight at its end. Reaching this boss requires following several steps, but the fight itself may feel quite familiar once you get there.

    How to Reach the Clover Dancers

    The Clover Dancers is probably the boss that takes the longest to find, mainly because of the many steps involved—especially early in the game. Here’s what you need to do:

    • Start by reaching the Sinner’s Road biome from the top of Greymoor and free the Green Prince using a basic key.
    • After freeing him, find the Green Prince above the Citadel Spa in Act Two. If you’re in Act Three or have already seen him near the spa, you can also find him close to the Cogwork Dancers boss fight.
    • Talk to the Green Prince while he’s holding a Cogwork Dancer. Then, head back to Greymoor and follow the path to the right of Crow Lake. Use your Elegy of the Deep, which you get in Act Three, to enter Lost Verdania.
    • Inside Lost Verdania, explore the entire biome and collect all the essences from the statues, flowers, and the shrine on the far right. Once you’ve gathered all of them, you can access another area located at the top middle of the biome.
    • In this new mini-area, climb up through a wall and go left to find the Green Prince again. Talk to him to trigger the Clover Dancers boss fight.

    How to Beat the Clover Dancers

    Once the fight begins, you’ll notice it resembles the Cogwork Dancers’ battle, but with a twist. One of the dancers has a white aura and no body. Attempting to attack this dancer won’t do any damage.

    To defeat the boss, focus only on the Green Prince himself. The fight has two phases, with key differences:

    • In the first phase, both dancers move to specific spots together, with their intended direction shown by a white ray just before they move.
    • In the second phase, the dancers take turns moving, making it harder to target the Green Prince as the shadow dancer can appear between you and your target.

    The hitboxes for these dancers seem slightly larger than those of the Cogwork Dancers, so avoid jumping directly at them to prevent getting hit.

    Apart from these changes, the fight operates similarly to the Cogwork Dancers encounter. You can effectively defeat the boss by hitting it once or twice each time it stops moving.

    Key Attack and Dodge Tips

    When both dancers gather in the middle for a tornado attack, instead of a regular AoE strike, they spawn a spinning tornado around the battlefield. The best way to dodge is to move to one side and react based on the tornado’s direction:

    • If the lower part of the tornado is coming toward you, hop onto an adjacent wall, climb to the top, and use Clawline to quickly cross to the other side, falling down afterward.
    • If the lower part moves away from you, run to the opposite corner, hop on the wall to reach the top, and wait before dropping down.

    Avoid the middle area during this attack, as getting close will cause damage. Later in the fight, dodging becomes trickier because one of the dancers may come to your side right after the tornado ends. You’ll need to time your fall precisely between the tornado’s conclusion and the boss’s arrival.

    Once you defeat the Clover Dancers, you’ll earn the Conjoined Heart, which can replace one of the hearts required for the main story in Act Three. Otherwise, you can keep it as a souvenir in your bellhome.

  • Getting to Act Three in Hollow Knight: Silksong – Solving Tips

    Getting to Act Three in Hollow Knight: Silksong – Solving Tips

    There are three Acts in Hollow Knight: Silksong, and if you want to experience all of them, you’ll have quite a bit of work ahead. While the first two acts are necessary for any complete playthrough, Act Three is completely optional. It’s also the most challenging and intriguing, making it worth the effort.

    To unlock it, you need to become the main problem-solver of Pharloom. Exploring the world is essential, and helping the citizens along your journey is expected. Your quick and casual run through Silksong will be influenced by the choices and interactions with everyone from Bone Bottom to Mt. Atla. Your reward for this effort will be accessing the depths of darkness itself.

    How to Start Silk and Soul

    Silk and Soul is the required quest to make Act Three accessible. There’s often a lot of confusion about what needs to be done to unlock this hidden quest because of its lengthy list of prerequisites.

    Contrary to common belief, you don’t have to complete every single quest in Pharloom to begin. The following quests are what you need to unlock Silk and Soul:

    Quest Name Requirement
    The Lost Fleas Find 5 fleas and report back to Mooshka.
    Flexible Spines Obtain the Drifter’s Cloak.
    Bone Bottom Repairs & Lifesaving Bridge Fully upgrade Bone Bottom.
    The Threadspun Town Save the residents of Bellhart.
    Restoration of Bellhart & Bellhart’s Glory Fully upgrade Bellhart and get the Bellhome Key.
    Building Up The Songclave & Strengthening The Songclave Fully upgrade the Songclave.
    Crawbug Clearing Build the scarecraw on Halfway Home.
    Balm For The Wounded Save Sherma from Whiteward.
    Trail’s End Find Shakra’s master.
    The Threefold Memory Learn all three melodies and play them at Cogwork Core.

    Once these quests are completed, there are additional requirements you must meet before the quest appears:

    1. Climb Mt. Atla to get the Faydown Cloak (double jump).
    2. Move the fleas to the Pale Lake by gathering at least 22 fleas.
    3. Defeat the second Lace fight.

    Note: To reach Lace, you need to finish The Threefold Memory first.

    After completing these tasks, there’s one more crucial step: you must acquire 17 wish points. You can earn one point for each wish you pick up from the wish board or half a point for each courier quest you finish. If you haven’t unlocked the courier service yet, complete My Missing Courier and My Missing Brother to earn two additional points, which also allows farming rosaries and points.

    The quests listed previously don’t count toward your total wish points.

    Once all of these requirements are met, you can talk to the Caretaker at the First Shrine (the Songclave). He will be making a lot of noise to get your attention if he has the quest available. If not, ensure you’ve completed all the required steps, gotten the Bellhome Key, finished merchant quests for Bellhart and Songclave, checked all wish boards, and visited the Wormways to talk to the Alchemist for a point. Also, check in with the fleas — they may need dialogue progression to move.

    How to Complete Silk and Song

    Before starting the quest, you need four items:

    • Maiden’s Soul
    • Hermit’s Soul
    • Seeker’s Soul
    • Snare Setter

    You might already have two of these. Here’s how to find each, starting with those close together in the same region:

    Maiden’s Soul and Snare Setter

    The Maiden’s Soul is straightforward: it’s given for free by the Chapel Maid, who you first meet in Pharloom. Return to Bone Bottom, go left across the shortcut to Moss Grove, and find her inside the far left door, near the lower entrance to the Ruined Chapel. Talk to her to receive it.

    The Snare Setter is nearby. From the Chapel Maid, head directly to the Moss Grove pit, then fall and turn right immediately. Your goal is the Weavenest Atla chamber at the bottom right of Moss Grove. Use Needolin to unlock the chamber if needed, then activate the elevator on the far right, ride down, and climb the first left path. In the next room, use Double-Jump to reach a hidden area above, where the Snare Setter sits on a table to the right.

    Hermit’s Soul

    The Hermit’s Soul is given by the Bell Hermit, which you find in Bellhart. Return there and find a hidden path beneath the first ledge in Bellway Station. Down from there, talk to the Hermit for the soul.

    Seeker’s Soul

    The Seeker’s Soul is obtained by venturing into Bilewater, which requires completing Sinner’s Road or exploiting a specific glitch with the Voltvessel. Use this to break through the wall if necessary. The fight with Groal in Bilewater is very tough, but defeating him is essential to earn the Seeker’s Soul, which is located in a building just left of his arena.

    Entering Act Three

    After collecting all items, challenge Grand Mother Silk—her fight is tough. Use strategies like embracing Maggots, finding the hidden bench, and deploying traps. Defeating her grants you the Seeker’s Soul, located in the building to her left.

    To access Act Three, you need to speak with the Caretaker at the top of the Citadel after turning in the quest items. At this point, ensure you’ve completed all prior steps, received the Bellhome Key, finished merchant quests, checked wish boards, and earned enough wish points.

    Once the quest is handed in, you’ll face a final challenge: challenge Grand Mother Silk. You have the option to bind her or use your Needolin to continue into Act Three. A cutscene will trigger, showing the Abyss unleashing chaos over Pharloom. Despite the credits appearing, you are still headed into Act Three.

    After the credits, reload your save, and you’ll see your game covered in Abyss goo. Spam the start button to re-enter your game until it clears. Once done, you’ll get a message announcing your entry into Act Three. Good luck. Keep Needle close — the Abyss is dangerous.

  • How to Defeat First Sinner in Hollow Knight: Silksong by Completing & Solving

    How to Defeat First Sinner in Hollow Knight: Silksong by Completing & Solving

    One of our favorite battles in Hollow Knight: Silksong is the First Sinner, ranking right up there with Phantom. It’s a quick and fair fight that keeps you constantly alert. To succeed, you’ll need to carefully dodge her punches, carefully walking the thin line of silk exits during the fight.

    It’s unfortunate that this boss is so easy to overlook. But exploring and satisfying curiosity will greatly reward you when you find her. Plus, defeating her adds another powerful Ancestral Art to your collection.

    How to Find the Apostate Key and the First Sinner

    The First Sinner is a secret boss in Act Two, and you probably won’t encounter her unless you explore Pharloom thoroughly. You may come across her map area, called the Slab, earlier in Act One, but you won’t be able to access her door until much later.

    Near the bottom of the Slab, by the Bellway Station, you’ll see a large locked door heading east. To open this, you need the Apostate Key. However, this key isn’t available in the Slab itself.

    Instead, you’ll need to visit the Putrified Ducts. To access this area, you first need the Faydown Cloak, which you get at the top of Mt. Faye. There are two ways into the Putrified Ducts:

    • From Memorium above the Citadel’s Choral Chambers
    • From the top of Bilewater after defeating Groal the Great

    Once inside the Putrified Ducts, head toward the bottom where you will find the NPC Huntress. If you go to the top left corner of the bottom room, navigating past enemies, you can pick up the Apostate Key lying on the ground.

    You can use the Apostate Key in two spots within the Slab: the bottom door east of Bellway, which leads you closer to her, and a second door at the Slab’s top, which contains a platforming segment. Using the key here can also give access to a second chamber with a Mask Shard, making your next fight easier.

    To reach the First Sinner’s prison, use the key on the bottom door, then drop down one ledge to the right. In a room with a Rosary chest and hanging Rosaries, jump onto the wall above the door and from there, double jump onto a barely visible path above the room. Follow this path — there’s some light platforming involved — until you reach a giant, silk-covered bell-shaped container. Strike the embedded pins pinning the chains to open the door.

    Once open, interact with the weaver statue in the center and bind to it to start the fight.

    How to Defeat the First Sinner

    Preparation is key; don’t walk into her fight unready. It’s often necessary to return to the bench and adjust your build for better chances. At minimum, upgrade your Needle to at least +1, ideally to the Hivesteel Blade, which you unlock by completing Pinmaster’s Oil and the Great Taste of Pharloom.

    Make sure your primary combat Crest has all tool slots unlocked with Memory Lockets. Anything less leaves you vulnerable.

    The fight itself isn’t overly complex, but her quick attacks and overlapping move sets demand your focus. Keep centered in the arena and be mindful of dashing, as many of her Silkspears and teleportations are hard to predict. Staying near the middle reduces accidental hits from her ranged silks and teleport strikes.

    Most damage is taken from her Frenzied Strikes and teleports during her Silkspear attack. To minimize harm:

    • Dash toward her last known location rather than away.
    • Jump quickly during Frenzied Strikes or try to parry if possible.

    If you’re using the Beast or Witch Crest, they make healing much easier. They allow you to heal while countering her aggression, giving you extra chances to recover during the fight. For instance, the Witch Crest with the Injector Band speeds up healing animations, and combined with the Claw Mirror, allows for multiple quick heals, even during her aggressive phases.

    There are few opportunities to heal, mostly during staggers or while mid-air during the Frenzied Slashes. Being efficient with healing tools is crucial.

    Final Phase and Victory

    Her second phase begins after a fake-out where she appears to be defeated. She then reemerges, moving faster and using Rune Rage, an even more aggressive attack pattern. Her most common damage sources in this phase are Frenzied Strikes and her teleportation attacks.

    To avoid damage:

    • Dash towards her last known position after she teleports.
    • Jump over her Frenzied Strikes, or parry if you can.

    Patiently observing her attack patterns and slow, deliberate responses work best. Remember, as Hornet, you’re swift and dangerous—sting like one.

    After defeating her, you gain the right to accept the Weaver’s power. Inside her memories, a platforming section requires the Faydown Cloak to reach the end. When you succeed, you leave her prison and the Slab with a new power: Rune Rage. This ability, used by her during the fight, can now be turned against your enemies and those of the weavers.

  • How to Save Sherma in Hollow Knight: Silksong by Completing and Solving

    How to Save Sherma in Hollow Knight: Silksong by Completing and Solving

    Sherma is the most precious and beloved character in Hollow Knight: Silksong. His safety is our top priority, and when he is threatened, we ride out at dawn.

    This time, Sherma has gone on a bit of an adventure into the Whiteward to find balms and bandages for wounded pilgrims of the Songclave. Although his cause is noble, Pharloom’s shadows are not a place for someone as pure as him. It is our responsibility to protect him at all costs.

    How to Start Balms for the Wounded

    Before you can begin the Balms for the Wounded quest, you need to complete two key steps so Sherma will appear at the Songclave:

    1. Open the shortcut gate at Bone Bottom called The Marrow connection.
    2. Defeat the Last Judge and open the Grand Gate in the Blasted Steps.

    Important: If you haven’t done both, Sherma won’t be able to progress further into Pharloom.


    Meeting Sherma in Various Locations

    Along your journey, you may find Sherma at several spots. These aren’t necessarily required to advance his story, but it might be helpful to find him in these places:

    • In front of the Bell Beast (while it’s trapped)
    • Pilgrim’s Rest
    • Bellhart
    • Bench at the Blasted Steps
    • Citadel Spa

    Note: Sherma appears at the Citadel Spa after the Songclave bell rings. He may wait until the Cogwork Dancers are defeated; if he doesn’t show up, try defeating them.


    Entering Whiteward

    To reach Whiteward for the first time, start at the Grand Bellway station. Enter the chamber on the left, take the second exit from the bottom left, and go through the long corridor into the far room. The Whiteward entrance is marked by an upside-down spear sign on the bottom right. Inside, use your key to unlock the elevator to access this area.

    Once inside, take the elevator down to the bottom. Travel left past the key slot, jumping onto platforms to reach a narrow upper tunnel. Ascend as far as possible, navigating through steam vents, then jump up and to the right, avoiding circling fans.

    Tip: There’s a rare Spool Fragment under the elevator shaft. Climb up, hit the lever at the top, and fall to the middle side paths before the elevator arrives to retrieve it.


    Progressing Through Whiteward

    Eventually, you’ll reach a dead end with a lever. Pulling it opens a new path below. Drop into this room and destroy false walls along your route to the right. Pass the elevator shaft, destroy a grate, and fall down to find the Whiteward Map for sale—costs 70 Rosaries—but your goal is further right.

    Following Sherma’s trail from the map area, head past enemies and climb onto a platform to reach the room above. Then, cross spikes and enter a building with bells at the entrance.


    Saving Sherma

    Inside Sherma’s hideout, locate him at the back of the building. He is hiding behind a false wall, which you must destroy to reveal his room. Talk to him, but beware: morticians and surgeons will appear afterward. You need to defeat them all to rescue Sherma. Strategies include:

    • Using traps like Tacks and Sting Shards (preferably with Pollip Pouch)
    • Employing Cross Stitch to punish over-aggressive morticians
    • Listening carefully for unseen movements
    • Staying mobile to avoid being surrounded
    • Prioritizing morticians over surgeons

    Tip: Use Cling Grip to climb the walls and heal if surrounded.

    After defeating all enemies, speak to Sherma again. He will reward you with a Spool Fragment. He will then return to the Songclave on his own; you don’t need to escort him. He’ll stay safe at Songclave with new dialogue about the bandages, and his story concludes for now.


    Finding the White Key in Whiteward

    On the right side of the Songclave, the White Key can be found against the metal fence on the ground. Pick it up, as it’s essential for entering the area to save Sherma.

    Note: If the key isn’t there, it’s possible that story progression has blocked access. Sometimes the key may be purchased from merchant Jubilana at Songclave, who must be unlocked via her Wish quest first.


    Tracking Sherma’s Trail

    Start from the Whiteward map dispenser and follow his trail right through various hazards, past enemies, and up into the building with bells at its entrance. Continue over spikes, ascend to the room above, and then head left over the spikes to find the building with bells.


    This is as far as the current quest details go. Protecting Sherma involves navigating treacherous areas, defeating enemies, and gathering the necessary items to aid him.

  • How to Defeat the Far Fields Savage Beastfly in Hollow Knight: Silksong

    How to Defeat the Far Fields Savage Beastfly in Hollow Knight: Silksong

    The Savage Beastfly is one of the most hated bosses in the Metroidvania genre, especially in Hollow Knight: Silksong. Developers took a boss that players already disliked and made it even worse by placing the rematch above a lava pit with temporary platforms. Luckily, there’s a Mask Shard hidden somewhere in this area for those willing to endure the challenge a second time.

    If you decide to take on this dangerous lava-filled stage, here are some helpful tips. Don’t worry, completing this fight means you probably won’t face this nightmare again — or at least, that’s the hope.

    How to Start the Savage Beastfly Challenge

    It’s not entirely clear what activates this quest, but for us, it appeared after:

    • Getting the Clawline and Faydown Cloak
    • Defeating the original Savage Beastfly in Hunter’s March
    • Starting the tasks to collect three melodies in the Citadel by defeating the Clockwork Dancers

    If this Wish doesn’t show up on the Bellhart Wishboard, make sure you’ve met these minimum requirements. If it still doesn’t appear, you might need to unlock it through other means.

    Warning: Don’t delay fighting the Savage Beastfly! If you wait until Act Three, it will be tougher, with more health and a dangerous projectile attack, making the fight much more difficult.

    Tracking the Savage Beastfly

    Once you accept the quest, go to the Far Fields Bellway Station. From there, track the boss by heading to the top-left corner of the central vertical room near Greymoor. Follow the tracked items, and a translucent path will guide you around the west side of the map. All the locations are near each other along a natural route, so it’s hard to miss the next destination.

    Your trail will eventually lead back to the arena where you fought the Fourth Chorus boss, after getting the Drifter’s Cloak.

    How to Defeat the Savage Beastfly in the Far Fields

    This boss fights just like its first encounter — all moves and combos are the same. If you want a refresher, check out our original guide. The challenge now is fighting on a stage where the platforms can be destroyed. Plus, the boss has swapped its support enemies for a stronger spear-wielding foe that throws fire, limiting your safe zones.

    Before the fight, equip the Magma Bell, which you can buy from Forge Daughter in the Deep Docks nearby. Wearing this reduces fire and magma damage by one mask, which is incredibly useful here.

    The main threat after the Beastfly is a new minion it summons. This enemy throws fire spears that can temporarily block sections of your platforms. Use a combination of a Sting Shard and the Pollip Pouch to eliminate this helper quickly—upgrading your gear can allow a single Sting Shard to wipe it out with ease.

    Strategy for Beating the Savage Beastfly

    When you’re ready to face the boss, follow these tips:

    • Kill the minion ASAP, preferably with a Sting Shard.
    • Avoid excessive pogo-jumping, which can throw off the boss’s movement.
    • When the Beastfly slams downward, stay on one side of the arena.
    • If you run out of space, double jump high and float with the Drifter’s Cloak until more safe ground appears.
    • With the Magma Bell equipped, if an attack seems unavoidable, aim for the lava instead of the boss itself for less damage.

    This fight requires practice and patience. Focus on keeping as much platform space as possible, and don’t let the minions overwhelm you. Remember, if you fail, the boss will be gone for good this time—use that as motivation to give it your best shot.

  • How to defeat Groal the Great in Hollow Knight: Silksong by completing and solving

    How to defeat Groal the Great in Hollow Knight: Silksong by completing and solving

    There are both good bosses and bad bosses in Hollow Knight: Silksong. The main difference depends on how much you need to weaken yourself to succeed. Groal is one of those bosses where your ability to find a good exploit can be more helpful than just relying on skill alone.

    Groal’s fight is a huge challenge. It involves waves of weak enemies that take a long time to clear, a boss that takes up most of the arena and has two masks that deal damage, and a pit of wriggling maggots that make healing nearly impossible. Groal the Great can be incredibly frustrating. If those reasons aren’t enough, the run-back after defeat will test your patience to the limit.

    How to Find and Prepare for Groal the Great

    Groal is found in the Bilewater region, which is one of the toughest places to explore in Pharloom — possibly the worst. The best way to prepare is to wait until you reach the depths of Bilewater and come from the Putrified Ducts. Here’s why:

    1. Entering from the Putrified Ducts saves you from making a long, tedious trek back to Groal after each defeat.
    2. You can get the Wreath of Purity, which provides a temporary shield against the drawbacks of maggot water — very useful during the fight.

    If you’re following this guide, chances are you’ve already gone too far to turn back.

    Reaching Groal and the Hidden Bench

    If you are determined to fight Groal from the south side of Bilewater, you must unlock a hidden bench. To do this:

    • Continue through Bilewater until you find a corridor on the right.
    • Go through the corridor into the next room.
    • On the far right of this room, drop into a corner to find a hidden path that leads into a vat of maggots.
    • Swim right and fall into the narrow tunnel to reach the bench.

    Though you will still need to climb into the arena each time to fight Groal, this shortcut keeps you from restarting the entire Bilewater area repeatedly, saving time and effort.

    Setting Up at the Bench

    Once at the bench, you can improve your strategy for fighting Groal. Here are two top tactics:

    Name Crest Required Strategy Upside Downside
    Rapid-Fire Trap Strategy Architect Fight the mobs normally and bombard Groal with traps from the maggot waters. Nearly immune to damage from Groal. Struggles with mobs; very costly if you fail.
    Pogo Strategy Wanderer (or Witch) Bounce off the mobs and Groal, staying above the water as much as possible, then use traps to finish him off. More cost-effective; easier mobs; works with ancestral arts. Can run out of traps; fight takes longer; risk of dying.

    No matter which method you pick, bring your best traps and the Pollip Pouch because traps are essential. Also, the Ascendant’s Grip from the Songclave merchant is a crucial upgrade for this fight.

    How to Deal with Groal’s Minions

    Before facing Groal, clear out his minions first. There are five waves of enemies plus two traps to deal with. During these waves, save your traps for when Groal enters the arena — wasting them on minor mobs is not efficient.

    If you’ve died during this sequence before, keep your cocoon untouched until it’s truly needed later. It’s best to leave it intact until Groal appears, giving you a quick recovery option when necessary.

    Handling the Waves and Traps

    • The first trap appears between the second and third enemy waves. It swings in an arc from one corner to the other, so stand in a side-platform corner to avoid it.
    • The second trap appears between the fourth and fifth enemy waves and swings twice. Stay in the corner until both swings are over.

    How to Defeat Groal

    The key to winning is understanding Groal’s attack patterns:

    Attack Wind-Up & Description Suggested Counter
    Swallow Groal inhales deeply, pulling Hornet towards his mouth. If caught, he’ll swallow her. Jump, pogo off his head, dash away, or let him catch you and mash attack to break free.
    Spit Groal glows and spits two explosive balls. One short-range and one long-range. Run away if far, or dash under Groal and pogo over when close.
    Dive Groal leaps up then dives into water, reemerging in a pool of maggots. Dash away, sprint to avoid his reemergence.
    Reinforcements During dives, Groal calls up smaller minions that dive or are destroyed by traps. Ignore them; focus on avoiding their attacks.
    Phase Two: Vengeful Toad Groal’s body turns black, firing soul projections. Hug the corners near the maggots, staying out of the path of the projectiles.

    One of the most powerful tricks is to jump into the maggots. Yes, this sounds counterintuitive. The bottom corners of the arena are almost immune to damage, making it possible to stay safe and never heal. Just avoid the smaller reinforcements’ darts by jumping into the corners under the raised platforms.

    Fighting Groal in the Corners

    While tucked away in the corner, you can still damage Groal by:

    • Throwing traps when he reappears, especially after his Dive attack.
    • Occasionally jumping up to land a single hit, particularly after his Swallow attack.

    It’s best to avoid the maggots as much as possible to reduce the damage and trap expenditure. Keep juggling traps and sneaky nail hits until Groal is finally defeated. Once he starts using the Vengeful Toad attack, stay in the water, continue throwing traps, and wait for him to stagger. Afterward, if you’re out of traps, keep persistent until he’s finished.

    The Final Reward

    Once victorious, a bench appears in Groal’s arena. But the real reward is on the left of the bench — the Seeker’s Soul. You may not be able to use it immediately, but it’s a key ingredient for unlocking the Silk and Soul Wish and opening the door to Act Three, expanding your journey and story significantly.

  • How to Defeat Lace in the Cradle by Completing and Solving in Hollow Knight: Silksong

    How to Defeat Lace in the Cradle by Completing and Solving in Hollow Knight: Silksong

    Since the first game in the series, the creators of Hollow Knight: Silksong have shown a fondness for bosses that repeat multiple times. You face these bosses on the main path several times, and each encounter is more difficult, with increased health and new attack patterns.

    Lace is one of these recurring bosses. Although she appears small, she’s quite dangerous. After defeating her in Deep Docks, you’ll see her again in The Cradle, which is the final part of the main story.

    Where to Find Lace in The Cradle

    If you’ve just defeated Lace in Deep Docks and wonder if she will appear again, the answer is yes. But you’ll need to progress quite far in the game first. First, reach the Citadel and go through Choral Chambers to defeat the Cogwork Dancers at the top. Doing so unlocks three new objectives, which involve collecting three melodies from different parts of the Citadel.

    Once you’ve collected all three, play these melodies at the Cogwork Dancers’ arena to activate statues. This will summon a large elevator. Take the elevator to the top, and you’ll immediately face Lace once again.

    How to Defeat Lace in The Cradle

    Most boss fights in Hollow Knight: Silksong require patience as you wait for the right moments to strike. But fighting Lace is the opposite; she attacks so quickly that waiting for her to finish her moves can be deadly. The fight is fast-paced, with her attacking in rapid succession—often just a second apart.

    Besides her standard attacks, Lace has a special mechanic for her idle times, which will be explained below. It’s important to learn what to expect from each attack:

    Attack Wind-Up Tells and Description Recommended Counter
    Slash Attack She charges her needle, barely visible in her hand, then swings three times while moving forward Move backwards if there’s space or jump up to strike downward during her swings
    Jump Attack She crouches slightly with her needle near the ground, then leaps diagonally upward and dashes toward your position Wait for her to jump and walk towards her or dash to her if you’re far away
    Dash Attack She holds her needle horizontally before rushing through the arena, dealing double damage if hit Jump to dodge, and you can strike as she dashes past
    Parry Counter When idle, Lace can parry your attack, triggering an AoE attack either on the ground or in the air Avoid attacking when she’s idle, then immediately jump to dodge her counter
    AoE Attack Last phase move where she forms a big circle around herself and then slams the ground Stay outside the circle and wait for it to end; move far enough away to avoid the second one

    Note: Lace has little time between her attacks, and this short window gets even shorter in later phases.

    The fight has three phases, each starting when she roars, which signals a new phase. Sometimes, she gets stunned at the same time, causing you to miss the cue. Expect her new attack patterns after each stun. Her health at each phase begins as follows:

    Phase Approximate HP Changes from Last Phase
    1 100% Starts with her basic moves
    2 ~60% Jump and Dash attacks become faster and more aggressive
    3 ~20% Unlocks the AoE attack and increased aggression

    In later phases, her Jump and Dash attacks are buffed:

    • During the Jump Attack, she creates three rings around her which explode when she lands, limiting your movement.
    • Her Dash Attack may occur up to three times in a row, instead of just once.

    Tips for the Fight

    Lace’s low health might suggest an easier battle, but her speed makes it challenging. Her attacks happen quickly, and there are gaps of little to no safe space. You must time your own attacks and healing carefully. During her Jump Attack, it’s one of your best chances to land hits.

    Since many of her attacks involve downward strikes, it’s recommended to equip a separate crest specifically for this fight, rather than relying on the default.

    When you’re low on health, wait for her Dash Attack, jump away as she starts to dash, and heal immediately afterward. This timing lets you recover without taking damage. You can also bait her parry stance to land a few hits, as she tends to enter parry mode after certain attacks. Wait for her stance to end before attacking again for the best chance to deal damage.

  • Achieving Fine Pins in Hollow Knight: Silksong Through Completing and Solving

    Achieving Fine Pins in Hollow Knight: Silksong Through Completing and Solving

    Beyond the main storyline of Hollow Knight: Silksong, there are many hidden areas and secret spots that contain rare items. You can discover some of these through side quests called wishes, but some wishes require grinding in specific zones.

    One such wish is called Fine Pins. It spans the Choral Chambers area, but there’s an easy way to complete it if you know what enemies to look for.

    How to Get the Fine Pins Wish

    If you’re after an easy wish that rewards you with a lot of Rosaries, Fine Pins is perfect. However, you’ll need to progress pretty far in the game first. To start this quest, you first have to unlock the Choral Chambers. This requires defeating the Last Judge boss and then proceeding through the Underworks.

    Once you return to the Choral Chambers, head to the right side of the biome and climb upwards to find the next boss fight. Before entering the fight, clear the silk around the bell in the top right section of the biome. Doing this unlocks the Songclave area.

    Tip: Clearing the silk also spawns a bench nearby, giving you a save point.

    After unlocking the Songclave, you can receive the Fine Pins quest from the wish board there.

    Where to Find Fine Pins

    To find Fine Pins, search for two specific enemies in the Choral Chambers area: Reed and Choristor. Both enemies hold a pin in their hands, and they can be found crawling around this zone.

    • The Reed is a flying creature that primarily uses melee attacks but can also throw its pin at you. It can sometimes parry your blows and then counterattack.
    • The Choristor appears more like a knight; it stays on the ground, attacking with both melee and ranged moves. It can also leap at you while spinning to inflict damage.

    If you’re lucky, defeating either of these enemies will cause them to drop a Fine Pin. The item is not guaranteed, but you’ll recognize it when it drops — there will be a bright white glow on the enemy’s body and falling ground particles. Move toward the glow and pick up your shiny new Fine Pin.

    Tip: A good place to farm these enemies is the Grand Bellway, where you can reset them using a nearby bench. Just outside the Bellway, you’ll find a Choristor first, followed by a Reed a little further along.

  • How to Defeat Trobbio in Hollow Knight: Silksong by Completing and Solving

    How to Defeat Trobbio in Hollow Knight: Silksong by Completing and Solving

    As you explore the vast biomes across Pharloom in Hollow Knight: Silksong, you’ll encounter many tough challenges, including dangerous creatures and tricky jumping sections. The hardest moments often come after clearing an area and facing the main boss at the end.

    Trobbio is one of these bosses. Compared to others, this fight might feel a bit easier because its attack pattern stays the same through all phases. Still, you need to be careful about where you step.

    Where to Find Trobbio

    Trobbio can be found in the Whispering Vaults. To get there, you first need to climb on the right side of the Choral Chambers after defeating the Underworks area. While doing this, you’ll pass through a small stage area blocked on the right. This is the Trobbio fight spot. But to reach it, you must enter the Cogwork Core after defeating the Cogwork Dancers, then enter the Whispering Vaults from there. The stage where the fight begins is located in the bottom left corner of the Vaults.

    How to Beat Trobbio

    Trobbio is an interesting boss because it’s teased earlier in the game, but you won’t face it until much later. The fight takes place in a single phase, which is pretty unusual for a boss so far into the game. Even though Trobbio gets stunned after several attacks, it doesn’t gain new moves—just an animation change and a roar later in the fight.

    A key aspect is Trobbio’s ability to go underground. During the battle, you’ll see floors that pop up, and Trobbio moves beneath them. You can track its movement by watching these floors. It reappears where the floors stop moving or performs a move called the Smoke Attack. Here are the main attacks you’ll need to recognize:

    Attack Wind-Up Tells & Description How to Counter
    Smoke Attack Trobbio throws three bombs that release smoke either horizontally or vertically after a short delay. Dodge around since the bombs usually won’t hit you. If hit, they’ll cause damage. You can also hit the bombs to send them back.
    Fireworks Attack Before this, Trobbio jumps and makes a loud fireworks noise. Circular spots appear on the field, then explode when filled. Stay in the clear zones without fireworks or try to jump into the air to avoid damage.
    Tornado Attack Trobbio moves to a corner, then charges with a tornado around it, launching tornadoes in horizontal and diagonal directions. This attack is tough to dodge. Jump to avoid the first, and learn the tornado paths to dodge the second.

    When Trobbio roars and shifts into the second phase, it will launch smoke bombs underground just before spawning. It always reappears from the last smoke bomb.

    Tips for the Fight

    After defeating bosses like Widow, Cogwork Dancers, and the Last Judge, this encounter becomes more straightforward. Focus mainly on dodging because many attacks limit your movement. You can find easy openings to hit Trobbio during the Smoke Attack. During the Tornado Attack, downward strikes work well since Trobbio passes through your position.

    Trobbio moves around unpredictably, so avoid using dashes too much, as this might cause you to get hit. Patience and careful observation are key.

  • How To Defeat The Cogwork Dancers in Hollow Knight: Silksong by Completing and Solving

    How To Defeat The Cogwork Dancers in Hollow Knight: Silksong by Completing and Solving

    The world of Hollow Knight: Silksong is filled with dangerous creatures trying to prevent your progress toward the Citadel. Among these enemies, some stand out because they have unique move sets, known as the main bosses.

    As you travel to the Citadel, you’ll encounter many bosses, with the first being the Cogwork Dancers after you enter the area. These bosses follow a straightforward pattern that you can learn to avoid, but staying patient is key.

    Where to Find the Cogwork Dancers

    To reach the Cogwork Dancers, first enter the Citadel after defeating the Last Judge in Blasted Steps. Just after entering, you’ll need to go through the Underworks, where you’ll face many enemies. Once past it and back in Coral Chambers, head to the top right edge until you reach Songclave. Activate the dormant shrine there. From the bench in Songclave, take the top left exit and navigate the corridor guarded by elite guards. Defeat three guards to open the door to the boss fight room.

    Every time you lose, you’ll need to defeat the three guards again to access the boss room.

    Phase One of the Cogwork Dancers

    The first phase has the bosses charging their attacks simultaneously, dashing in their fixed directions. Their moves involve shining a beam of light towards a target direction and then charging in that direction. If they charge in the air, they simply reach the destination and stop. If they charge to the ground, they stomp in a small area.

    In this phase, the attacks are slow, and you can typically hit them two or three times after each charge. Position yourself close to the boss that will land on the ground after its charge, but keep your distance to avoid stomps.

    Attack Patterns

    • Attack 1: Both dancers dash simultaneously in different directions—either up, down, left, or right.
    • Attack 2: One dancer moves to the middle top and then charges down or sideways; the other moves to the middle sides, charging in the opposite direction.
    • Attack 3: Dancers are diagonally opposite, moving towards each other’s starting points.
    • Attack 4: Both dancers are on the ground on one side, with one charging horizontally and the other bowing.

    Learning these patterns helps you know where to go and when to dodge.

    Phase Two: Increased Speed

    After enough damage, the dancers reset to their slots with cogs turning behind them. The second phase starts, where attacks occur roughly twice as fast, giving you less time to react. The attack patterns are similar, but with shorter charge times, requiring quicker responses.

    Phase Three: Alternating Attacks

    Once the health drops further, the bosses attack separately rather than together. The right dancer charges first, followed by the left one a second later. Attack frequency remains similar to the second phase but feels less intense because they alternate. This phase is simpler—focus on avoiding their attacks and staying safe rather than predicting combined moves.

    Final Phase: A Sad Ending

    When you defeat one dancer, the other tries to continue attacking but less frequently. Its attacks are less aggressive and easier to avoid. After a few more attempts, the second dancer also falls, concluding the fight.

    Mastering these attack patterns and phases is essential for defeating the Cogwork Dancers and progressing in Hollow Knight: Silksong.

  • How to Gather Crawbug Ragpelts in Hollow Knight: Solving and Completing

    How to Gather Crawbug Ragpelts in Hollow Knight: Solving and Completing

    Crawbugs are among the most frustrating enemies early in Hollow Knight: Silksong. It’s understandable that the owner of the Halfway House asked us to help get rid of them. In Crawbug Clearing, your task is to collect supplies needed to put an end to these unwanted pests at the tavern.

    Fortunately, Crawbugs are plentiful in Greymoor. Finding them won’t be difficult, but battling enough of them to build a large enough scarecrow to scare these pests away is quite challenging. Going solo against swarms can quickly become overwhelming, but there’s a simple trick that makes it easier.

    How to Start the Crawbug Clearing Mission

    Clearing Crawbugs is one of the first quests available at the Bellhart board. To unlock it, you must have freed Bellhart from a possession. Once the quest appears, take it from the Wish Board and read the details. Then:

    • Head to the Halfway House in Greymoor.
    • Talk to Creige about the Crawbug problem.

    Creige will ask you to defeat Crawbugs to help craft a scarecrow. You’ll need 25 Ragpelts, which is a tall order.

    How to Collect Ragpelts Quickly

    The key to this quest is that you don’t have to fight only normal craws. Any bird creature in Greymoor will drop Ragpelts. Larger creatures tend to drop more Ragpelts, making them more efficient targets.

    There are two other Crawbug species to look for:

    Species Description
    Squatcraw Throws golden pins shaped like tripods.
    Tallcraw Has a long cane and prefers diving and thrusting attacks.

    Each of these drops about four Ragpelts on average, while standard Crawbugs only drop one.

    Fastest Way to Gather Ragpelts

    The quickest route is to go directly from the Halfway House, heading past the Greymoor-Far Fields exit toward Craw Lake—the large dome area on the map. If you haven’t already, take on the Craw House challenge:

    • Enter the dome on the far right of the map.
    • Proceed into the top right room.
    • Defeat the waves of Crawbug enemies.

    If you’ve completed the challenge before, simply running between Craw Lake and the Halfway House should give you enough Ragpelts to meet your quota.

    Sometimes, a few Crawbugs still spawn near the Halfway House. Exiting and re-entering the exterior room will cause them to respawn, helping you reach 25 Ragpelts faster.

    Additional Tips and Details

    The fastest way to reach your 25 Ragpelt goal is to start right from the Halfway House and make your way toward Craw Lake. Crops like the Craw House challenge can be very useful, and running back and forth in that area ensures consistent drops.

    You can also leave the area momentarily and re-enter the exterior of the Halfway House to respawn Crawbugs, ensuring a steady supply of Ragpelts.

    Completing the Quest

    Once you’ve collected 25 Ragpelts, deliver them to Creige. This will reward you with two significant benefits:

    1. A massive Craw — called a Scarecraw — will appear on top of the Halfway House after your next rest. This giant Craw prevents the Craw on top of the house from spawning again.
    2. You’ll receive an upgraded Crafting Kit, which increases the damage of all your traps by one level.

    This makes clearing Crawbugs easier in the future and is a worthwhile reward for defeating some birds in Greymoor.