Lava streams across the floor of the Halema’uma’u crater, closely accompanied by several active vents, as Kilauea volcano erupts in Hawaii, U.S., on June 7, 2023. — Reuters
LOS ANGELES: On Saturday, spectacular new lava fountains erupted from Hawaii’s Kilauea volcano, according to U.S. volcanologists. This marks nearly a year since one of the world’s most active volcanoes first started erupting.
The Hawaiian Volcano Observatory of the US Geological Survey reported that “sustained lava fountains approximately 50–100 feet (15–30 meters) tall are currently erupting from the northern vent,” and noted that “fountain heights are increasing rapidly.”
This recent activity— the 38th eruption phase spewing molten rock and gases from deep beneath the surface— began at 8:45 a.m. local time (18:45 GMT), USGS said.
Since the initial eruption on December 23, 2024, activity has fluctuated, typically lasting less than a day, the agency added.
All volcanic activity remains confined within the Halema’uma’u crater inside Hawaii Volcanoes National Park, and local airports are not expected to experience disruptions from volcanic gases or ash.
Officials are monitoring high levels of volcanic gases and a phenomenon known as “Pele’s hair”— strands of volcanic glass often produced during lava fountain activity, which can be carried over 10 miles (15 kilometers) from the vent.
Hot, glassy volcanic fragments can fall within 1–2 miles (1–3 kilometers) of erupted vents.
Kilauea has been highly active since 1983, erupting fairly regularly.
It ranks as one of six active volcanoes in Hawaii, including Mauna Loa, the largest volcano on Earth.
While smaller than Mauna Loa, Kilauea is notably more active and attracts many tourists taking helicopter tours to witness its fiery displays.
Understanding today’s business culture can be challenging, especially for a pirate. However, the Corpirate Compliance substory in Like A Dragon: Pirate Yakuza in Hawaii is here to guide you. It will prepare you to regain your crew’s respect and foster a successful pirate operation.
While choices may not drastically impact the game, how you respond will influence your rewards. Your decisions could lead you to receive either a simple Chain Ring or the much-coveted Voyage Ring. Just like in real pirate life, there are no second chances. Fortunately, this guide provides all the answers you need.
Starting the Corpirate Compliance Substory
Once you complete the Coliseum in Chapter 2, the Corpirate Compliance substory will be unlocked. Travel to the Black Hibiscus in Chinatown (via the Lantern St. Entrance taxi), where you’ll find a captain in a heated argument with his disgruntled crew.
Enter the restaurant and speak with the pirate captain, Bryan. White will introduce himself and offer to help both of you become better leaders. You can now find both White and Bryan at the harbor, located northeast of the Dragon Kart mini-game. Talk to them when you’re ready to dive into the substory.
Scenario One
As White begins his presentation, you will face a scenario where a captain speaks to the crew. Your task is to identify what the captain said that was inappropriate. Your options are:
Saying, “Mornin’, lads!”
Saying, “Did you sleep well last night?”
Saying, “Everyone to their posts!”
The correct choice is Saying, “Mornin’, lads!”, as this phrase excludes any pirates who are not male.
Scenario Two
Next, Majima finds himself needing to use the restroom, but it’s currently occupied. You must determine the best course of action. Your choices include:
Relieve yourself outside the restroom door
Knock once
Knock twice
Knock repeatedly
Break down the door
The best choice is to knock twice, as this is generally considered the proper way to check if a restroom is in use.
Scenario Three
In the last scenario, you’ll watch a brave captain vanquish an enemy pirate and celebrate with his crew. However, there’s a mistake he made. Your options are:
Killing the enemy pirate
Saying they’ll never back down
Splitting the treasure evenly
Planning on drinks afterward
The correct answer is Splitting the treasure evenly, as this disregards the expenses of operating a ship and the differing levels of effort each crew member contributes.
Wrapping Up the Corpirate Compliance Substory
After navigating all three scenarios, you’ll earn either a Chain Ring or a Voyage Ring. By following the guidance in this manual, you should walk away with the superior Voyage Ring. Your final task is to confront two disgruntled customers. Don’t worry; they won’t pose a significant threat, and Bryan will lend a hand. As a result, you’ll successfully recruit both White and Bryan into your crew.
It’s no surprise that darts make a comeback in Like A Dragon: Pirate Yakuza In Hawaii. This enjoyable past-time has been a part of nearly every game in the franchise since Yakuza 3 dropped in 2010. However, this guide isn’t about how to play darts; it’s all about where to find them!
The type of darts you use can greatly affect your performance in the game. The initial darts you receive are quite basic and can make aiming accurately a real challenge. We’re here to help you locate the darts, inform you where to buy them, and assist you in collecting every single one.
Locating All Darts
Most darts can be bought at various stores throughout the game, but they’re not available at mini-game shops. For the elusive Legend Darts, you’ll need to finish a Photo Rally, while the Thunder Darts can be found within a Silver Container.
Darts
Location
Price
Standard Darts
Panthera Sports Kingdom
$50
Silver Darts
$100
Premier Darts
Ben’s Funky Wagon
$300
Gold Darts
Gorgeous Roger’s
$1,000
Legend Darts
Alo-Happy (Worldwide Market)
Complete the Waikiki Photo Rally.
–
Rose
Hyper Ecstasy
$50.00
Pencil
Clean-Clean Household Supplies
$150
Fork
$350
Toy Crow
Bluebird Gallery
$1,500
Thunder Darts
Crystal Aloha Resort
This set is in a silver container.
–
Wind Darts
Ben’s Funky Wagon
$5,500
Finding Ben’s Funky Wagon
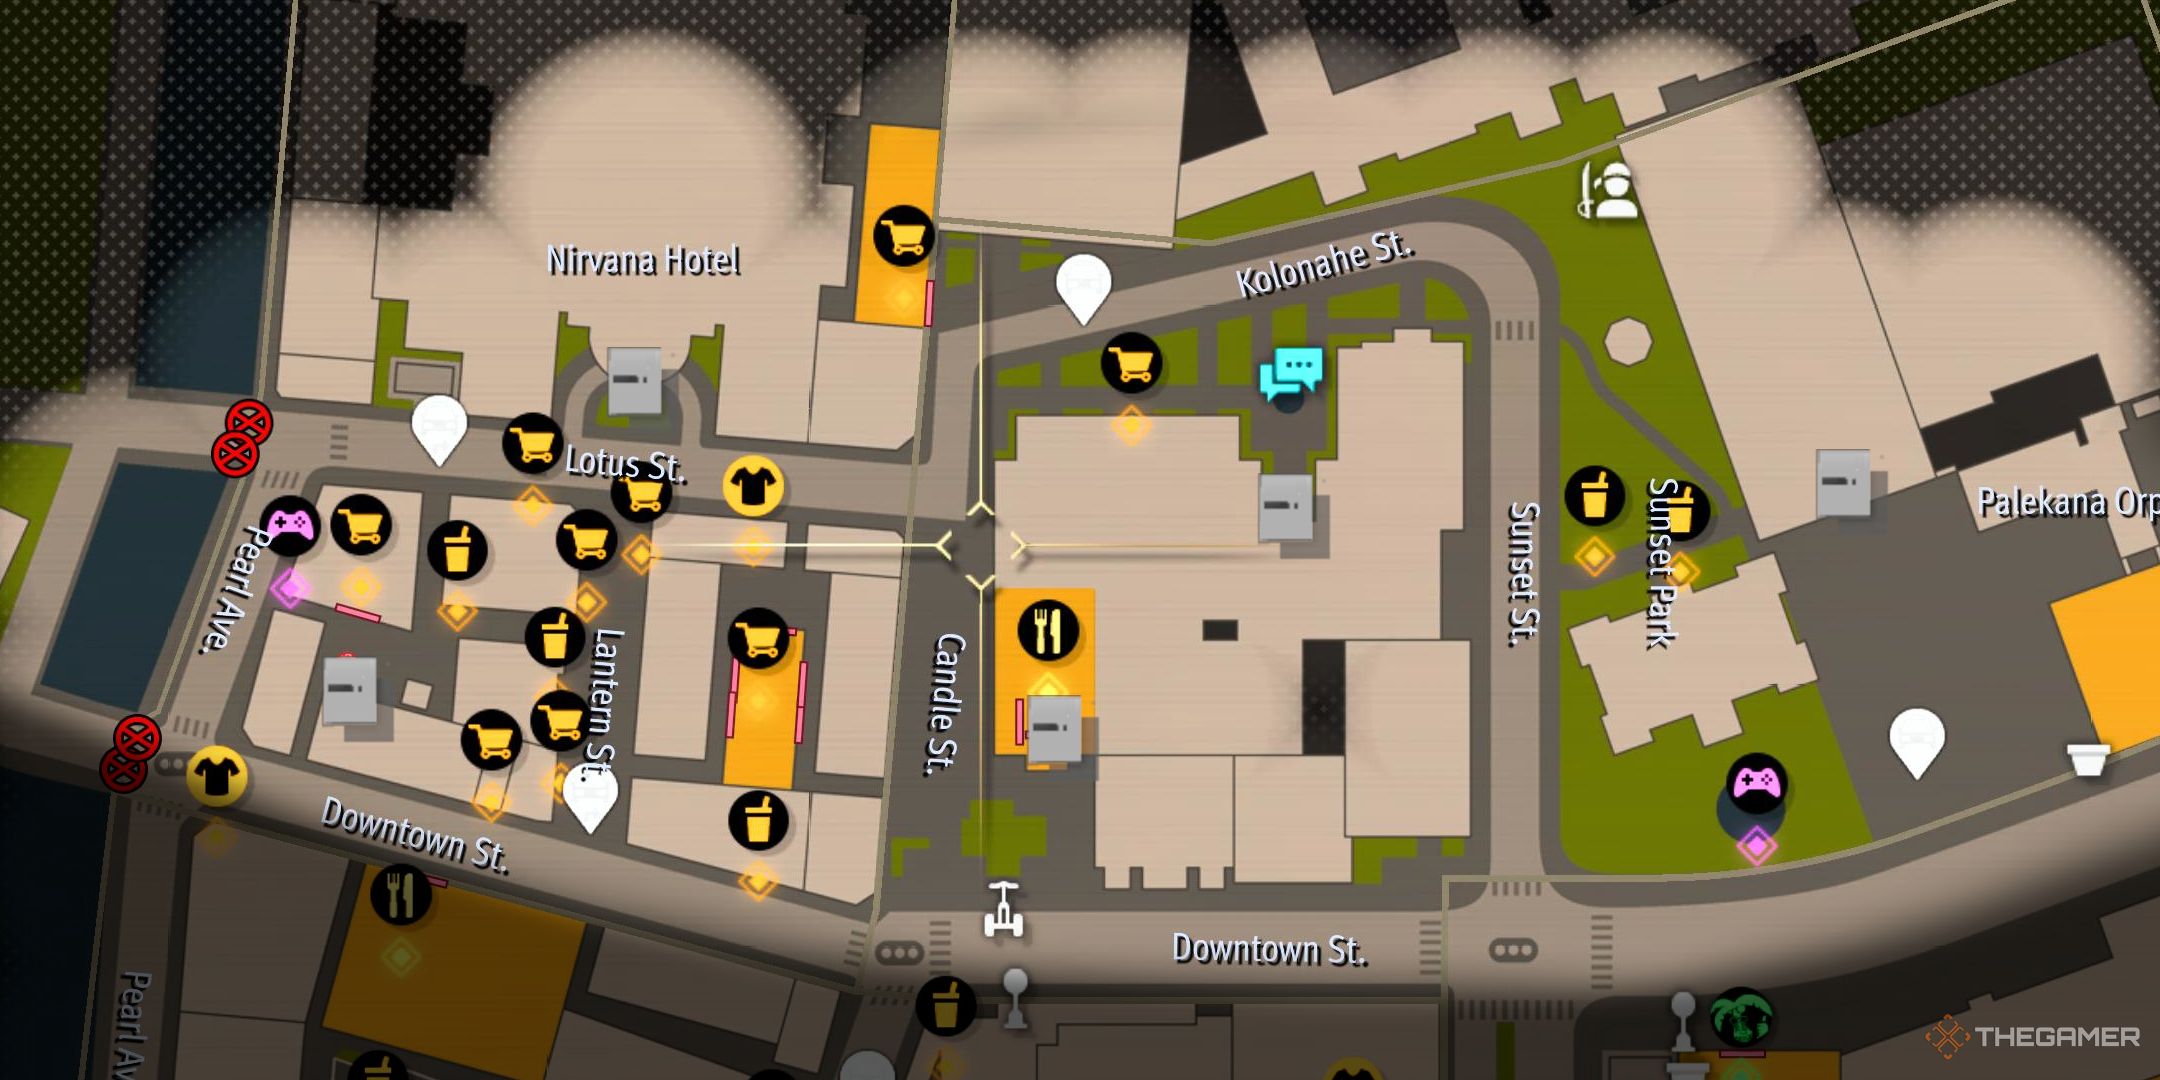
You can find both the Premier Darts and Wind Darts at Ben’s Funky Wagon, but this vendor isn’t always easy to spot, as he moves around and isn’t marked on your map. Look for him on the west end of Downtown Street, typically near the southern entrance to Lantern Street.
How to Get the Legend Darts
To get the Legend Darts, you won’t find them in any store. Instead, you must complete the Anaconda Shopping Center Photo Rally. Follow our guide to breeze through it and grab these exclusive darts.
Locating the Thunder Darts
The Thunder Darts are unique as they are found in a Silver Container, conveniently located near the dart mini-game. From the dartboards, head west while sticking close to the resort’s hallway. You’ll discover the Silver Container just a short distance away, positioned between the Resort’s rear doors and the dartboards.
Like A Dragon: Pirate Yakuza in Hawaii revitalizes the Yakuza fighting mechanics by introducing a dynamic and smooth approach to Majima’s legendary combat style. Renowned for his swift and deadly attacks, the Mad Dog of Shimano brings his trademark blade into action, offering players an agile yet fierce combat experience with his Mad Dog style.
In this narrative, Majima takes on the role of a pirate captain, showcasing a more controlled and intimidating side through the Sea Dog style. This combat style emphasizes Majima’s weaponry skills, effectively utilizing cutlasses, firearms, and the Chain Hook to dispatch enemy pirates with seamless flair.
What Is the Mad Dog Style?
The Mad Dog style spotlights Majima’s reputation as a wild and unhinged dagger-wielding assassin who boasts remarkable speed and lethality. Key attacks include:
Attack Name
Attack Type
Controls
Mad Dog Trick: Serpent
Uppercut
Hold X/Square
Mad Dog Trick: Chomp
Charge/Dash
Hold Y/Triangle
Mad Dog Trick: Frenzy
Spin Splash
Hold B/Circle
Alongside these main attacks, Majima can throw multiple daggers using his Demonfire Rain move by pressing B/Circle while airborne.
The Mad Dog Trick: Savage combo features four slashes followed by a final blow or a Y/Triangle input.
A noteworthy attack in Majima’s Mad Dog Style is called Doppelgangers, where he conjures copies of himself that replicate his movements and assist in overwhelming a shared enemy.
During non-attack moments, Majima can swiftly dodge and maneuver away from opponents with quickstep techniques.
While consecutive dodges aren’t unique to Mad Dog Majima, they are notably faster in this style compared to Sea Dog.
Overall, this style enables players to chain knockouts from one enemy to the next, effectively whittling down a single foe’s health before moving on to others.
When to Use the Mad Dog Style
The Mad Dog style thrives when facing one foe or a small group, making it particularly effective in these situations:
Exploring Honolulu
Confronting boss battles
Wrapping up deck skirmishes
Engaging in tight spaces
Keep these scenarios in mind, as the Mad Dog style is perfect for dodging enemies while being poised to retaliate with powerful strikes.
What Is the Sea Dog Style?
The Sea Dog Style embraces Majima’s untamed nature and revolves around weapon-based combat, leveraging his combat skills and pirate gear.
The key equipment at your disposal includes:
Attack Name
Attack Type
Controls
Sea Dog Trick: Cutlass Heave-Ho
Cutlass Boomerang
Hold X/Square
Sea Dog Trick: Charge ‘n’ Shoot
Pistol Shot
Hold Y/Triangle
Sea Dog Trick: Chain Readiness
Grapple Hook Combo
Hold B/Circle
The Sea Dog Style is effective for inflicting damage on multiple opponents, particularly with Majima’s Madness attack.
This special attack’s effects vary based on which of the four Dark Instruments you choose:
Dark God’s Violin – Calls forth sharks to assault your enemies.
Dark God’s Ocarina – Summons a swarm of jellyfish to shock and harm foes.
Dark God’s Guitar – Summons a massive ape to create havoc.
Dark God’s Saxophone – Calls a large parrot to create a gust of wind and debuff lingering enemies.
With the variety of choices available, the Sea Dog style provides greater flexibility compared to the Mad Dog style.
Once you access all four Dark Instruments, you’ll be equipped to deliver damage to several adversaries simultaneously.
Apart from the Madness attack, Majima’s cutlasses and guns are effective at medium and long ranges, respectively. However, his most adaptable move is the Chain Hook, which is the highlight of the Sea Dog style.
Practice engaging your foes with the Chain Hook, followed by an attack as you approach, and repeat this until victory!
When to Use the Sea Dog Style
With access to the four Dark Instruments, cutlasses, pistols, and the Chain Hook, the Sea Dog style is best suited for:
While it can still be effective against one or two foes, Sea Dog is designed for rapidly moving between groups to unleash area-of-effect (AoE) attacks with your cutlass and firearm.
Alongside the capabilities to handle groups, the Sea Dog’s Chain Hook can also be considered the top single-target weapon in the game, ensuring that this style offers versatility.
You can repeatedly use the Chain Hook to grapple and Run Through (Y or Triangle) enemies in a loop that will keep them trapped and unable to counterattack.
Which is Better: Mad Dog or Sea Dog Style?
Choosing between the two styles in Like A Dragon: Pirate Yakuza in Hawaii can be tricky, as both Mad Dog and Sea Dog have their distinct advantages.
Here’s a breakdown of the key pros and cons of each:
Mad Dog
Pros
Cons
Rapid evasion
Fast attacks
Devastating combos
Doppelgangers help in fights
Great for isolating enemies
Struggles with groups
Best for one-on-one combat
No reliable spam moves
Low effectiveness at range
Sea Dog
Pros
Cons
Effectively handles multiple opponents
Good damage at range
Good defensive options
Flexible in tight spots
Excellent spam combinations
Slower evasion
Difficulty against dispersed enemies
Not great in standard one-on-one fights
While both styles have their unique strengths, the Chain Hook’s effectiveness against challenging bosses like Taiyo Amon often makes Majima’s Sea Dog style the superior choice.
In the game Like A Dragon: Pirate Yakuza In Hawaii, you’ll come across the side quest known as "The Captain’s Return" in the East Waikiki area of Honolulu. Here, you’ll meet an oddly familiar figure—if you have experience with Infinite Wealth, you might recognize him. As usual, he’s in need of your assistance.
This side quest can be easy to navigate if you understand what to do, but it can also be quite frustrating if you miss the hints. This guide will walk you through each trash location, from the obvious to the trickier spots. If you encounter any difficulties, we’re here to help you through them.
How To Start The Captain’s Return Side Quest
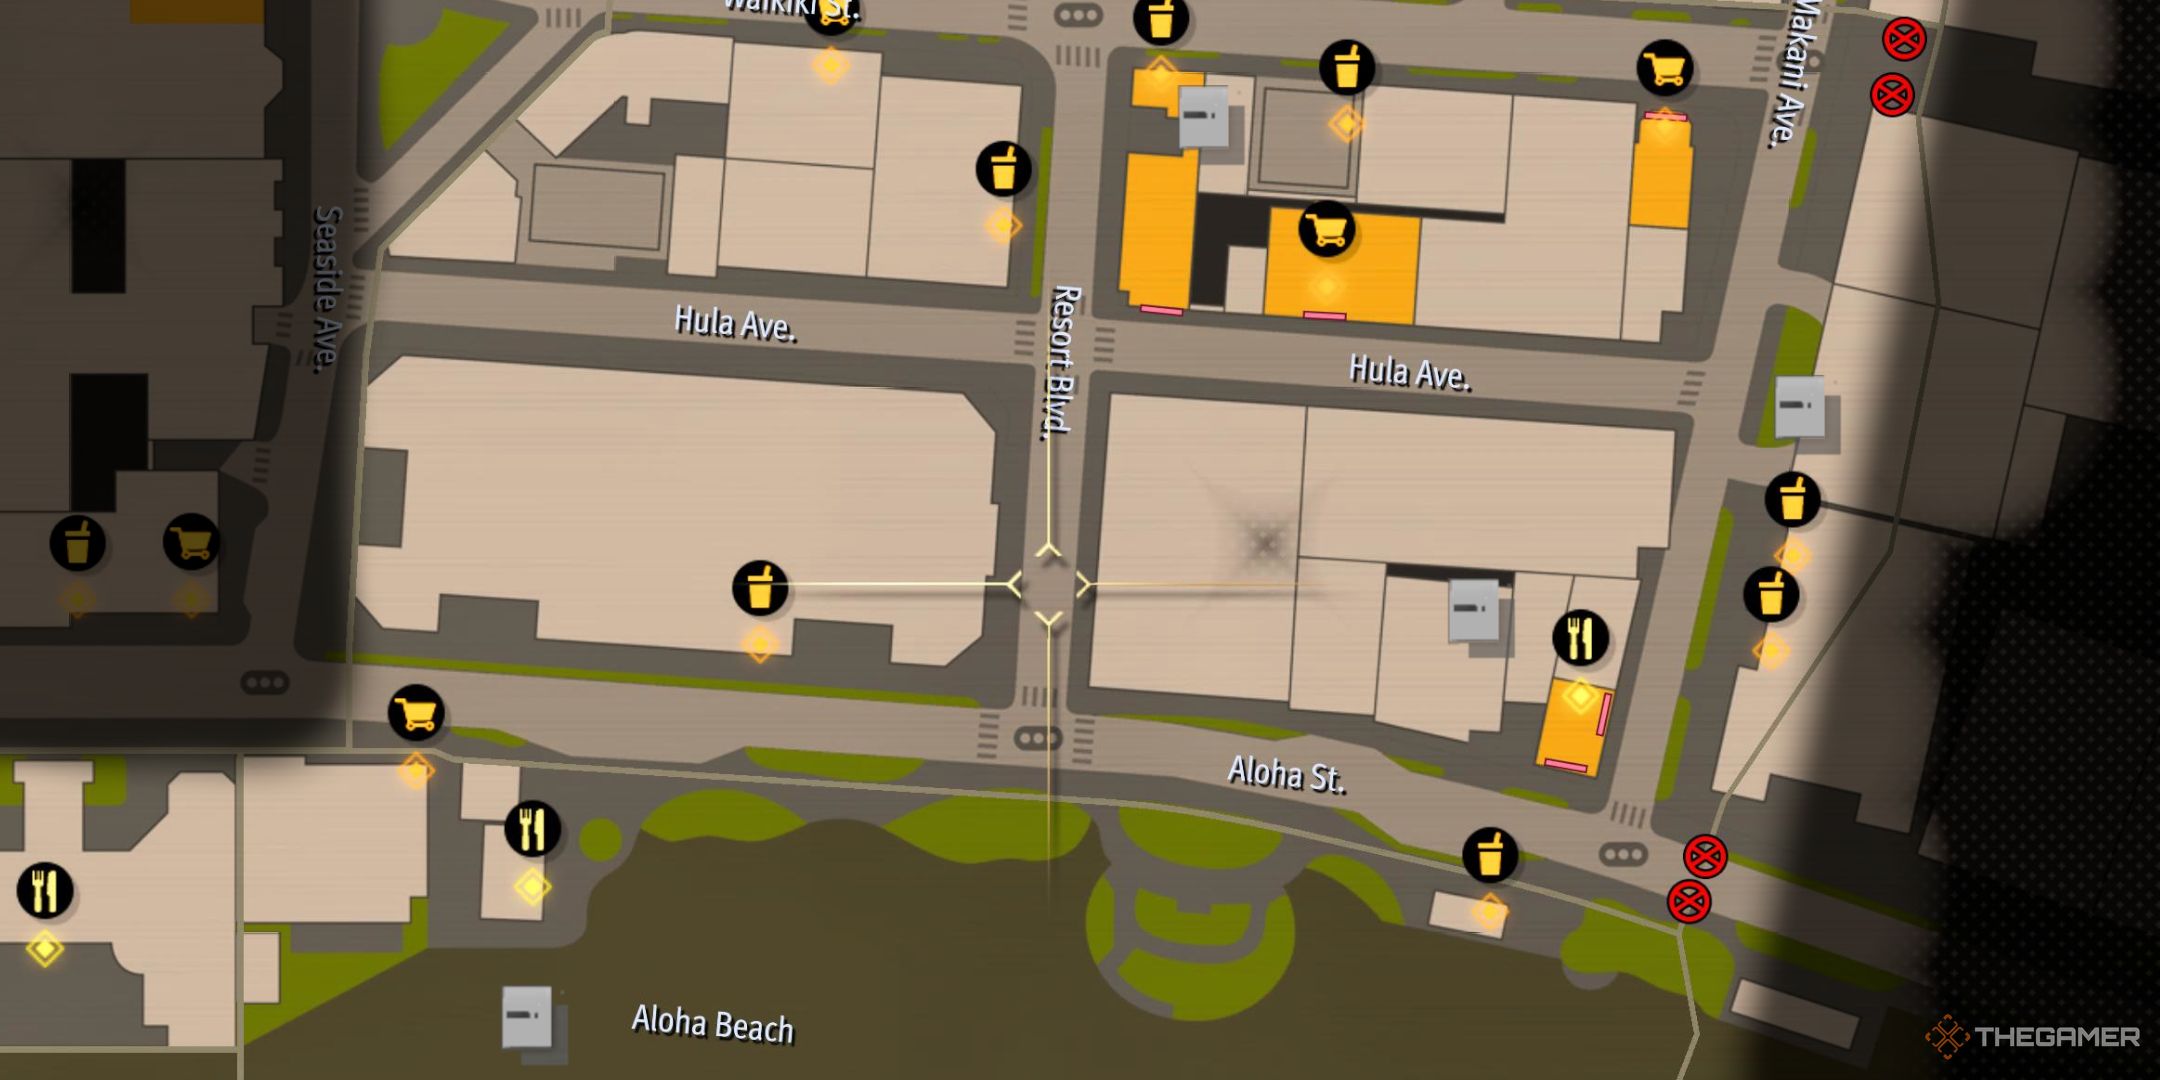
You can access this side quest during chapter 2, but it only opens up after you’ve acquired the Chain Hook. Once you have it, head down Resort Blvd. between Hula Ave. and Waikiki St., where you’ll meet Fukuyama, also known as the "Man in Bandana," picking up litter. To initiate the quest, speak with him and select the "Begin collecting trash" option. Your task is to find five pieces of trash scattered around.
Where To Find The Trash
Once you start the quest, your map access will be limited primarily to Hula Ave and a small section of Resort Blvd. Unfortunately, you won’t find any trash along Resort Blvd., but you will have access to part of Seaside Ave.
Piece Of Trash #1
The first piece is located directly south of Fukuyama. Look for it at the southeast corner of the intersection; it should be shining and marked with an arrow.
Piece Of Trash #2
Next, turn right and head down Hula Ave. The second piece of trash can be found on your left, positioned at the edge of a planter.
Piece Of Trash #3
As you continue down the road, the third piece will be a bit further and sitting on your right, hidden behind a red car, which makes it easy to overlook.
Piece Of Trash #4
The fourth piece is located further down Hula Ave, on your left, directly across from the parking lot.
Piece Of Trash #5
The final piece, which is probably the one you’re searching for, is hinted at by Fukuyama mentioning the trash being up above. Head over to the No Surf No Life shop. Turn the corner to face the entrance, then look up to see a hook. Use your Chain Hook to reach the roof, where you’ll find the last piece of trash along with a Silver Container.
The Battle Against the Two Litterers
After you collect all five pieces of trash, you’ll ally with Fukuyama to confront two litterbugs. Don’t worry; they aren’t too difficult to defeat. Once you take them down, Fukuyama will join your crew and adopt the new title of Dread Pirate Hook.
While exploring all the clothing options in Like a Dragon: Pirate Yakuza in Hawaii, you may notice that there are some outfits available through the Darts game. There are four items listed, but you may be wondering how to acquire them since this mini-game doesn’t have a shop like others do.
These rewards aren’t bought with game points; instead, they are earned as you play, and there’s more than just clothing to collect. Here’s all you need to know about the available rewards and how to get them.
Where Can I Find the Darts Mini Game?
The Darts Hall is located just north of West Aloha Beach, next to the Crystal Aloha Resort.
To improve your chances, make sure to line up your shot carefully and release the dart when the indicator is in the yellow zone.
Using higher quality darts can greatly enhance your performance, allowing you to aim more accurately.
You can acquire new darts from various sources, including shops or rewards from other mini-games.
All Dart Rewards
Defeating each of your main crew members will earn you rewards listed below.
As you venture through Honolulu in Like A Dragon: Pirate Yakuza in Hawaii, you’ll find numerous NPCs eager to join your crew aboard the Goromaru. Some of these potential crewmates can be spotted around the streets and bars, while others may require your assistance through specific side quests before they reveal themselves.
Finding the best crew members in Like A Dragon: Pirate Yakuza in Hawaii involves various approaches. Generally, the top crewmates are unlocked by progressing through the main storyline or meeting certain requirements, such as enhancing your Pirate Rank. One of the easiest roles to fill is the Tank position, as two of the most effective characters become accessible during the first three chapters of the game.
Understanding Crew Tiers
With a limited pool of recruitable characters in Like A Dragon: Pirate Yakuza in Hawaii, it becomes clear which tanks excel based on their abilities. The smaller crew roster allows us to effectively categorize them into three tiers:
S-Tier
A-Tier
Other Crew Members
S-Tier crew members are distinguished by unique Squad Leader Traits, a max level of 50, strong stats, or a combination of these qualities.
A-Tier crew members are solid picks for any formation. Although they might only reach a level cap of 30, or have just one high-tier stat, they are adept at fulfilling their roles.
Other crew members usually have a level cap of 20 and may lack any significant traits. Ideally, they possess at least one specialty and a single A-tier stat to fit into a niche. This category is selective and doesn’t encompass all available crew members.
In general, it’s best to use S or A-Tier crew members when building your team.
Special Recruitment Notes
Most crew members can be added by completing the main storyline or approaching them on the map, with two notable exceptions: Etsuko and Bronson, the Human Bronze Statue.
You can acquire services from Etsuko and Chitose by exchanging points with Kamulop (15 points each), while Bronson becomes available following the "Man of Bronze" substory.
S-Tier Tanks
Here are the top Tanks in the game:
Name
Tier
Explanation
Taiga Saejima
S+
A nearly perfect tank, Taiga impresses with a strong Squad Leader Trait and a top-tier First Mate Trait.
Jason Rich
S+
Also a powerhouse with S-tier stats, Jason complements Taiga with Gun Defense on his Squad Leader Trait.
Chitose Buster Holmes
S+
She excels in both Attack and Defense, making her a premium choice for Boarding Squads.
Robo Michio Mach
S+
Offers outstanding stats and excellent defense with added Shock Resistance from her Squad Leader Trait.
Robson Caetano da Silva
S
A solid early-game tank with the Impenetrable Squad Leader Trait, though slightly below the other top tanks.
Taiga Saejima and Jason Rich are essential choices for any crew.
A-Tier Tanks
The A-Tier Tanks are:
Name
Tier
Explanation
Etsuko
A+
An excellent First Mate and versatile in different roles once unlocked, making her a top pick for any position.
Human Bronze Statue: Bronson
A
A well-rounded tank with strong skills, particularly beneficial in the Boarding Squad.
Steve
A
Proficient on the Cannon Squad, his impressive First Mate Trait makes him a valuable asset.
The A-Tier selection is competitive, with each character offering unique advantages.
All Other Tanks
The remaining tanks include:
Name
Tier
Explanation
Theo
B+
Offers solid Attack and Defense but is best suited for the Boarding Squad.
Arman
B
Best utilized on the Cannon Squad, though he lacks versatility beyond that.
While these members may not provide much adaptability, they can still adequately fill remaining positions in your crew.
In the adventure game Like A Dragon: Pirate Yakuza In Hawaii, you will first unlock the Goro Goro Kitchen minigame. However, this isn’t just a way to pass the time; it becomes essential for gathering recovery items and earning cash early in the game.
As you follow Majima’s journey, your cooking skills will grow. By the time you reach the middle of the game, you’ll be preparing meals not only to boost your crew’s morale but also to level them up, strengthen your friendships with the local residents, and replenish your health and heat bars.
Recipe Difficulty Levels
Each dish you create will come with a difficulty rating. With every additional meal you try to prepare, the difficulty level will increase. There are five levels of difficulty: Easy, Normal, Difficult, Very Difficult, and Insanely Difficult. As the level of difficulty goes up, the margin for error becomes smaller. Nevertheless, using high-quality ingredients helps you craft dishes of maximum quality, which is how you achieve those coveted three-star ratings.
Overview of Goro Goro Kitchen Minigames
Every recipe involves two to three different minigames, depending on what you’re making. As you prepare more dishes, the difficulty of these minigames will rise. Regardless of how many dishes you are attempting or the difficulty level, your goal is to fill as many of the ten circles at the bottom of the screen as possible. If the circles are gray, you gain a slight quality boost; if they are green, the boost is moderate; and filling all the circles grants you a significant quality boost.
Note: If you perform so poorly that you only manage to fill one or fewer circles, you will actually lose a small number of quality points.
Starting the Fire
This minigame is simple: hold the designated button down and let go when you hit the right zone. The zone includes two sections: the orange area gives you a decent result, filling part of a circle, while landing in the red area yields a great result that fills a whole circle. As the difficulty increases, the zone shrinks and the cursor moves faster.
Preparing Ingredients
During the ingredient preparation phase, you’ll go through a series of button combinations. Completing a string nets you two filled circles. Speed is important, but accuracy is even more crucial. If you miss an input, Majima will cut himself, causing a temporary lockout from chopping vegetables. The complexity of these input strings grows with each difficulty level.
Skimming the Scum
You’ll notice scum forming on top of your stew, which needs to be removed. You can either press and hold the ladle to create a vortex that pulls in the scum slowly, or you can repeatedly press and release to quickly scoop it out. However, be careful: if you push scum away from your ladle reticle, it can complicate your job. As levels become more challenging, scum will start moving in circles around the pot, suggesting a more strategic approach to clearing it.
Selecting Your Ingredients
When making a dish, be mindful of the required number and type of ingredients, as well as their star ratings. The quality expectation will increase as you add ingredients. If you start with a three-star base, it’s nearly impossible to end with anything lower unless you drastically mess up the minigames.
Aim to begin with about two-and-a-half stars. You can easily bridge that half-star gap through good performance in the minigames. Early in the game, you might not have top-tier ingredients, so do your best with what you have.
You can gather ingredients by catching bugs in the wild, utilizing planter boxes for growing vegetables, having Goro hunt for meat, or purchasing items from shops. You can fish while sailing or swim to catch fish manually. Once you acquire the Chain Hook, catching bugs will become more manageable, but until then, you’ll need to buy them.
Tip: Building up Goro Kingdom is a reliable way to obtain consistent ingredients, as every animal you care for will provide items after each feeding.
Complete List of Goro Goro Kingdom Recipes
We’ve outlined all the recipes in the game, their ingredient requirements, base difficulty levels, the minigames involved, and the selling prices for each dish. Use this as a handy reference when you’re crafting meals.
Name
Base Difficulty
Ingredients
Cooking Method
Value ($)
Roughly Chopped Stir-Fried Veggie Bento
Easy
3 Vegetables
Fire Starting, Chopping
$78
Fish-Toss Hot Pot Bento
Easy
2 Fish
Chopping, Scum Sifting
$86
Wild Stewed Meat Bento
Easy
1 Meat
Fire Starting, Scum Sifting
$114
Chef’s Whimsy Bento
Normal
1 Meat, 2 Fish
Fire Starting, Chopping, Scum Sifting
$198
Goro Goro Luxury Party Platter
Normal
2 Bugs, 2 Vegetables
Fire Starting, Scum Sifting
$210
Goro Goro Special Hot Pot Meal
Normal
2 Bugs, 2 Fish
Chopping, Scum Sifting
$230
Goro Goro Special Steak Meal
Normal
2 Meat, 3 Vegetables, 3 Eggs
Fire Starting, Scum Sifting
$240
Goro Goro Supreme Pot Luck Hot Pot
Difficult
2 Meat, 3 Bugs, 3 Fish, 3 Vegetables, 3 Eggs
Fire Starting, Chopping, Scum Sifting
$280
Goro Goro Awakening Beer
Difficult
4 Bugs, 4 Eggs
Fire Starting, Chopping, Scum Sifting
$150
Pirate Party Stew
Easy
3 Fish, 3 Vegetables
Fire Starting, Chopping, Scum Sifting
$300
Avast! Pirate Party Hell Stew
Easy
2 Meat, 3 Bugs, 3 Eggs
Fire Starting, Chopping, Scum Sifting
$350
Pirate Meal For Five
Difficult
3 Meat, 5 Bugs, 5 Fish, 5 Vegetables
Fire Starting, Chopping, Scum Sifting
$450
Pirate Meal For Ten
Difficult
5 Meat, 10 Bugs, 10 Fish, 10 Vegetables, 10 Eggs
Fire Starting, Chopping, Scum Sifting
$900
Essence of Pet Snacks
Difficult
3 Meat, 5 Bugs, 5 Fish, 5 Vegetables, 5 Eggs
Fire Starting, Chopping, Scum Sifting
$50
This table provides a useful guide for your cooking adventures in Goro Goro Kitchen. Enjoy the culinary journey that awaits!
Choosing the right crew for your adventure on the Goromaru is one of the key decisions you’ll face in Like A Dragon: Pirate Yakuza In Hawaii. Although the selection of healers isn’t as impressive compared to other classes—like the top-tier shooters—there are still some capable healers you can recruit.
Fortunately, you won’t need to scour every corner of Honolulu to find one of the game’s best healers; he will naturally join your team as you progress through the main story. With over ten healer options available, many may fall short of your expectations, so we’ve compiled a list of the top picks.
Understanding the Tier Levels
Given the limited number of crew options in Like A Dragon: Pirate Yakuza In Hawaii, we’ll categorize the available healers and their skills into a straightforward structure:
First Mate Trait
Squad Leader Trait
Each crew member has four key stats:
Cannon Power
Ship Upkeep
Attack
Defense
With a small roster to choose from, we only need three tiers to classify these crew members accurately:
S-Tier
A-Tier
All Other-Tier
S-Tier crew members are exceptional and often possess unique Squad Leader Traits, can reach a level cap of 50, and maintain a majority of S-Tier stats, or some combination of these traits.
A-Tier crew members are solid team players, capable of performing well in many situations. Although they may top out at level 30 or exhibit mostly A-Tier stats—with possibly one S-Tier—they’re still reliable in battles.
All Other crew members typically have a level cap of 20 and may lack additional traits. Ideally, they have at least one area of expertise, showcasing a single A-Tier stat that allows for easy placement in your strategies. This group is not comprehensive but highlights a few noteworthy members.
Generally, it’s best to focus on using S or A-Tier crew members as you continue to enhance the Goromaru to its full potential.
Special Requirements for Unlocking Crew Members
Some crew members can only be unlocked through specific actions:
Kei: You need to become 30 buddies in Honolulu. You can do this by waving at friends or helping them in tough situations at least three times each.
S-Tier Healers
At the top of the list is Nishida, clearly the strongest healer in Like A Dragon: Pirate Yakuza In Hawaii.
Name
Tier
Explanation
Nishida
S+
Nishida boasts S-ranks in all stats, making him an excellent choice among healers. His boosted health recovery and shock resistance greatly enhance his overall effectiveness, especially during challenging naval skirmishes.
Kei
S
Although Kei may not match Nishida’s Attack and Defense, her impressive 410 Ship Upkeep at max level makes her invaluable to your Cannon Squad.
A-Tier Healers
Carnal Sister Yuka: With three A-Tier stats and the powerful Sink King Kiwami First Mate Trait, Yuka is a top choice for increasing damage against enemy ships.
Natasha: Although her stats are mixed between A and B-Tier, her availability of Squad Leader and First Mate Traits makes her a solid backup option, especially in a leadership role.
Name
Tier
Explanation
Carnal Sister Yuka
A+
Yuka stands out due to her three A-tier stats and helpful First Mate Trait, making her great for dealing damage to opponents.
Natasha
A
Natasha, with mainly A and some B-tier stats, offers flexibility with her role as a Squad Leader or First Mate without significant stat drawbacks.
All Other Healers
Name
Tier
Explanation
Oka
B+
Oka comes out slightly ahead of his peers, thanks to better stats compared to Thomas or Russell, but he generally serves as a temporary option for your Cannon Squad.
Thomas the Engineer
B
Thomas is less impressive than Oka, offering slightly lower stats and lacking any distinct traits.
Russell
B
Russell is nearly identical to Oka but has slightly higher Ship Upkeep, making him less valuable, particularly if you have specialists like Kei or Julie.
Sadly, many of the healer options are lackluster, limiting your choices. If you’re early in the game and struggling to build balanced Boarding Squads, some alternatives might work temporarily.
While not top tier, Legendary Fisher Morishita and Elena could serve as additional healers. However, other characters like Yurina, Hibiki, the 14th Best Host in Kamurocho, Nickelle Kidman, and Obispo are best avoided.
As you explore Like A Dragon: Pirate Yakuza In Hawaii, you’ll encounter various engaging mini-games, with one of the highlights being Dragon Kart. Not only does winning the title of the fastest Dragon Kart racer in Hawaii bring fame, but it also offers exciting rewards, hidden treasures to discover, and the chance to recruit two unique crew members through the races.
Dragon Kart makes a return from the previous two main titles, bringing a simplified and enjoyable experience in Like A Dragon: Pirate Yakuza In Hawaii. Players can compete in three main cups with a more direct and quick narrative progression. Additionally, the game introduces the fresh Elimination Duel mode, adding another layer of excitement beyond traditional racing.
How to Play Dragon Kart
You can find this mini-game in the southwestern corner of the map, specifically at Anaconda Harbor Park. When you first arrive, you’ll meet a young staff member named Ran, who will fill you in on Dragon Kart, the racing phenomenon sweeping Japan.
Dragon Kart is designed to be easy to pick up, requiring only a few basic controls, so you’ll be racing in no time.
Action
Xbox
PlayStation
Accelerate
RT
R2
Reverse/Brake
LT
L2
Drift
A
X
Use Item
B
Circle
Switch Items
X
Square
Before starting your race, keep these tips in mind:
Avoid letting your Hit Points (HP) drop to 0, as this will result in a crash and time loss.
Collect Dragon Rings to replenish your HP and use them for rewards after races.
The first race offers a straightforward yet challenging introduction that requires you to stay sharp and dodge enemy attacks to avoid crashing.
What Game Modes Are Available in Dragon Kart?
Dragon Kart offers several modes, although one remains locked until you complete the Resort Cup. Below are the modes along with their conditions for unlocking.
Grand Prix
Races
Locked/Unlocked
Unlock Conditions
Resort Cup
Unlocked
N/A
Urban Cup
Locked
Win the Resort Cup.
Festival Cup
Locked
Win the Urban Cup.
Time Attack
Races
Locked/Unlocked
Unlock Conditions
Waikiki Circuit
Unlocked
Beach and Market
Colorful Sandy Beach
Wabi-Sabi Street
Locked
Place in the top three of the Resort Cup.
Anaconda Adventure
Angry Waves
Zigzag Riverside Bridge
Place in the top three of the Urban Cup.
Harbor Sunset Tour
Ocean Festival
The second mode, initially marked as ‘???’, unlocks after you win the Resort Cup and speak with your rival next to Ran. In this mode, Duels differ from regular races, featuring a smaller arena filled with Gatling Guns, where the goal is to drain your opponents’ HP and make them crash. The last racer left standing takes the win.
Duel (‘???’)
Races
Locked/Unlocked
Unlock Conditions
Go-Kart Grandpa’s Elimination Duel
Locked
Win the Resort Cup and talk to Ran.
Elelu’s Elimination Duel
Win the Urban Cup and talk to Elelu and Yappi.
Daisy’s Elimination Duel
Ran’s Elimination Duel
Win the Resort, Urban, and Festival Cups, along with the previous duels.
The Michio Army Elimination Duel
Defeat Ran in her Elimination Duel.
While it may seem easy, strategy plays a major role here. You don’t want to speed into enemy fire, as a few targeted shots can take you out, so keep an eye on your mini-map to navigate around rivals and gauge your surroundings effectively.
With some practice and learning to navigate tight corners, you’ll soon be winning duels and overcoming your competitors.
How to Unlock New Dragon Karts
By engaging in Dragon Kart duels, you’ll naturally unlock several karts, providing excellent options that will enhance your performance in Dragon Kart Time Trials as you upgrade your vehicles.
Car
Unlock Condition
Ignition Shadow
Defeat Go-Kart Grandpa’s Elimination Duel
Rapid Phantom
Defeat Elelu and Yappi’s Elimination Duel
Rumble Crasher
Defeat Daisy’s Elimination Duel
Rising Dragon
Defeat Ran’s Elimination Duel
Legend Wave
Defeat The Robo Michio Army’s Elimination Duel
How to Win at Dragon Kart and Complete the Substories
After finishing all three tournaments and their corresponding duel matches, you’ll unlock the substory The Fastest in Hawaii, where you’ll race against Ran, known as Dragon Girl.
Your ultimate challenge is to defeat Ran in an Elimination Duel to determine who truly is the fastest racer in Hawaii. Unlike the earlier duels, Ran’s match resembles a traditional race.
You must avoid crashing during this duel or you will automatically lose, so steer clear of her attacks at all costs.
Success against Ran unlocks the Rising Dragon Kart in the store. After you exit the Dragon Kart menu, enjoy a celebratory scene where Majima relishes his victory as Hawaii’s fastest racer.
But the celebration is short-lived, as five Robo Michio show up, challenging you to another Elimination Duel to prove your strength in Hawaii. Completing the substory, ‘The Fastest in Hawaii’ leads you to the next one, ‘The Path To Speed, along with an additional Duel.
To triumph in the Robo Michio Army Elimination Duel, use skilled driving and clever tactics to outmaneuver the robotic competition. Once they are defeated, you’ll unlock the Legend Wave Kart in the shop.
A dramatic scene follows the victory over the rogue robots, solidifying your position as the ultimate Dragon Kart champion. After this cutscene, you’ll complete the substory ‘The Path To Speed’.
What Rewards Do You Earn From Dragon Kart?
Upon completing everything in the Dragon Kart mini-game, you’ll be rewarded with:
The White Tiger Ring (from Ran)
The Ring Of Blossom (found in the silver chest)
Ran as a crew member (after defeating her in the duel)
Robo Michio Mach as a crew member (after their duel)
The time and effort spent in these races yield valuable loot and crew members, including the sharp shooter Ran and the imposing Robo Michio Mach.
As the title suggests, Like A Dragon: Pirate Yakuza In Hawaii is all about pirates, and what do pirates treasure most? That’s right—treasure! One of the prime treasures you’ll come across in Honolulu is the Silver Containers, which are packed with fantastic finds.
These shiny boxes don’t just hold invaluable healing items and consumables that can enhance your gambling game; some of them also contain stylish cosmetic items and whole outfit sets. We’ve divided the Honolulu map into six areas and detailed where you can discover each Silver Container. Think of it as your own treasure-hunting guide!
Little Japan Containers
You’ll spend a lot of time in this area, which is home to Revolve. There are numerous Silver Containers packed into this relatively small spot, including a few costume sets to enhance your character’s style.
Area
Directions
Container Contents
Little Japan
This container is located in the garage directly across from Yamabiko.
Staminan Royale
Look for a Silver Container in the alley east of Ganryujima Armory, connecting Fuji Street and Sakura Street.
Helmet, Armor Set
This container is behind the Gambling Hall, located in the west alley.
Blackjack Amulet
Find this container behind the ABC Store by entering the west alley.
Vintage Luxury Watch
From Revolve, head north on Tsubaki Street, where you’ll find a small set of stairs. Climb up and open the door for a Silver Container!
Idol Bandanna, Cabaret Manager Makeup, Idol Set
East Waikiki And East Aloha Beach
Upon entering Honolulu, your journey will take you through East Waikiki, an area filled with shops and eateries. Silver Containers can be found scattered throughout, offering various costume sets.
Area
Directions
Container Contents
East Aloha Beach
This container is located in the Lifeguard tower south of the Aloha Seaside restaurant.
Bare feet, Bodysuit set
West Waikiki And South Waikiki
The area west of East Waikiki runs alongside the river and marks the farthest point you can reach when you first arrive in Honolulu. You will discover a fair number of containers in this area. However, keep in mind that you won’t be able to access the one atop the No Surf No Life store until you acquire the Chain Hook tool.
Area
Directions
Container Contents
West Waikiki
This container is located right next to Treasure Select Pawn (River St.).
Swiss Watch
On the roof of No Surf No Life. You’ll need to use the Chain Hook to access it.
Street Surfer Flag (Hannya)
South Waikiki
This container is situated north of the Crystal Aloha Resort.
Staminan Spark
Inside the Crystal Aloha Resort.
Platinum Plate
Northeast of the Darts location.
Royal Joker Card
This container is west of the Darts location.
Thunder Dart
Anaconda And District Five
District Five and the Anaconda Shopping Center are located directly west of the Aloha Bridge. Initially, this area will be inaccessible, but you’ll gain entry during the main story quest when you’re directed to explore Diamond Head, which is part of District Five.
Area
Directions
Container Contents
District Five
This container can be found southwest of the Diamond Head bar, next to the large steel doors.
Cowboy Hat, Desperado Set
This Container is located west of Club Guilty (marked on your map), tucked away in an alley.
Blackjack Amulet
Anaconda
Located in the southwest corner of the Anaconda Shopping Center parking lot, next to Julie’s Gearworks.
Swiss Watch
This container is in the northwest corner of the first floor of the Anaconda Shopping Center, next to the escalators.
Vintage Luxury Watch
Find this container by the river, east of the Anaconda Shopping Center, south of Diamond Head.
Street Surfer Flag (Majima Construction)
Downtown And Chinatown
The Downtown and Chinatown areas are in the northwest section of Honolulu. While these locations may not have a significant impact on the main story of Pirate Yakuza, they feature numerous side missions and are where you’ll unlock Crazy Delivery and play Mahjong. You can also find several hidden Silver Containers within this region.
Area
Directions
Container Contents
Downtown
Take the Orphanage Taxi to the Downtown area and travel directly north to find this container in front of a building.
Grass Crown, Pyrodancer Set
You’ll find this container south of the fountain on Kolonahe Street. It’s hidden around the corner, out of view from the street.
Platinum Plate
This container is located inside Polaris’s main entrance area.
Swiss Watch
Located at the corner of Downtown St. and Night St. on top of the awning, requiring the Chain Hook to access.
Staminan Royale
Chinatown
Visit the Wan Shang Tong Herbal Medicine shop, then head up the nearby stairs to the second floor of the adjacent apartment building to find the container.
Tattered Sea Dog Hat, The Tattered Sea Dog Set
This container is positioned in front of the Nirvana Coast Hotel, the large building in the northwest corner of the map.
Staminan Royale
Cultural District And Shippers Wharf
The Cultural District and Shippers Wharf make up the southwest part of Honolulu. This area is filled with Silver Containers, many tucked away in narrow alleys or hidden in corners around the dock.
Area
Directions
Container Contents
Cultural District
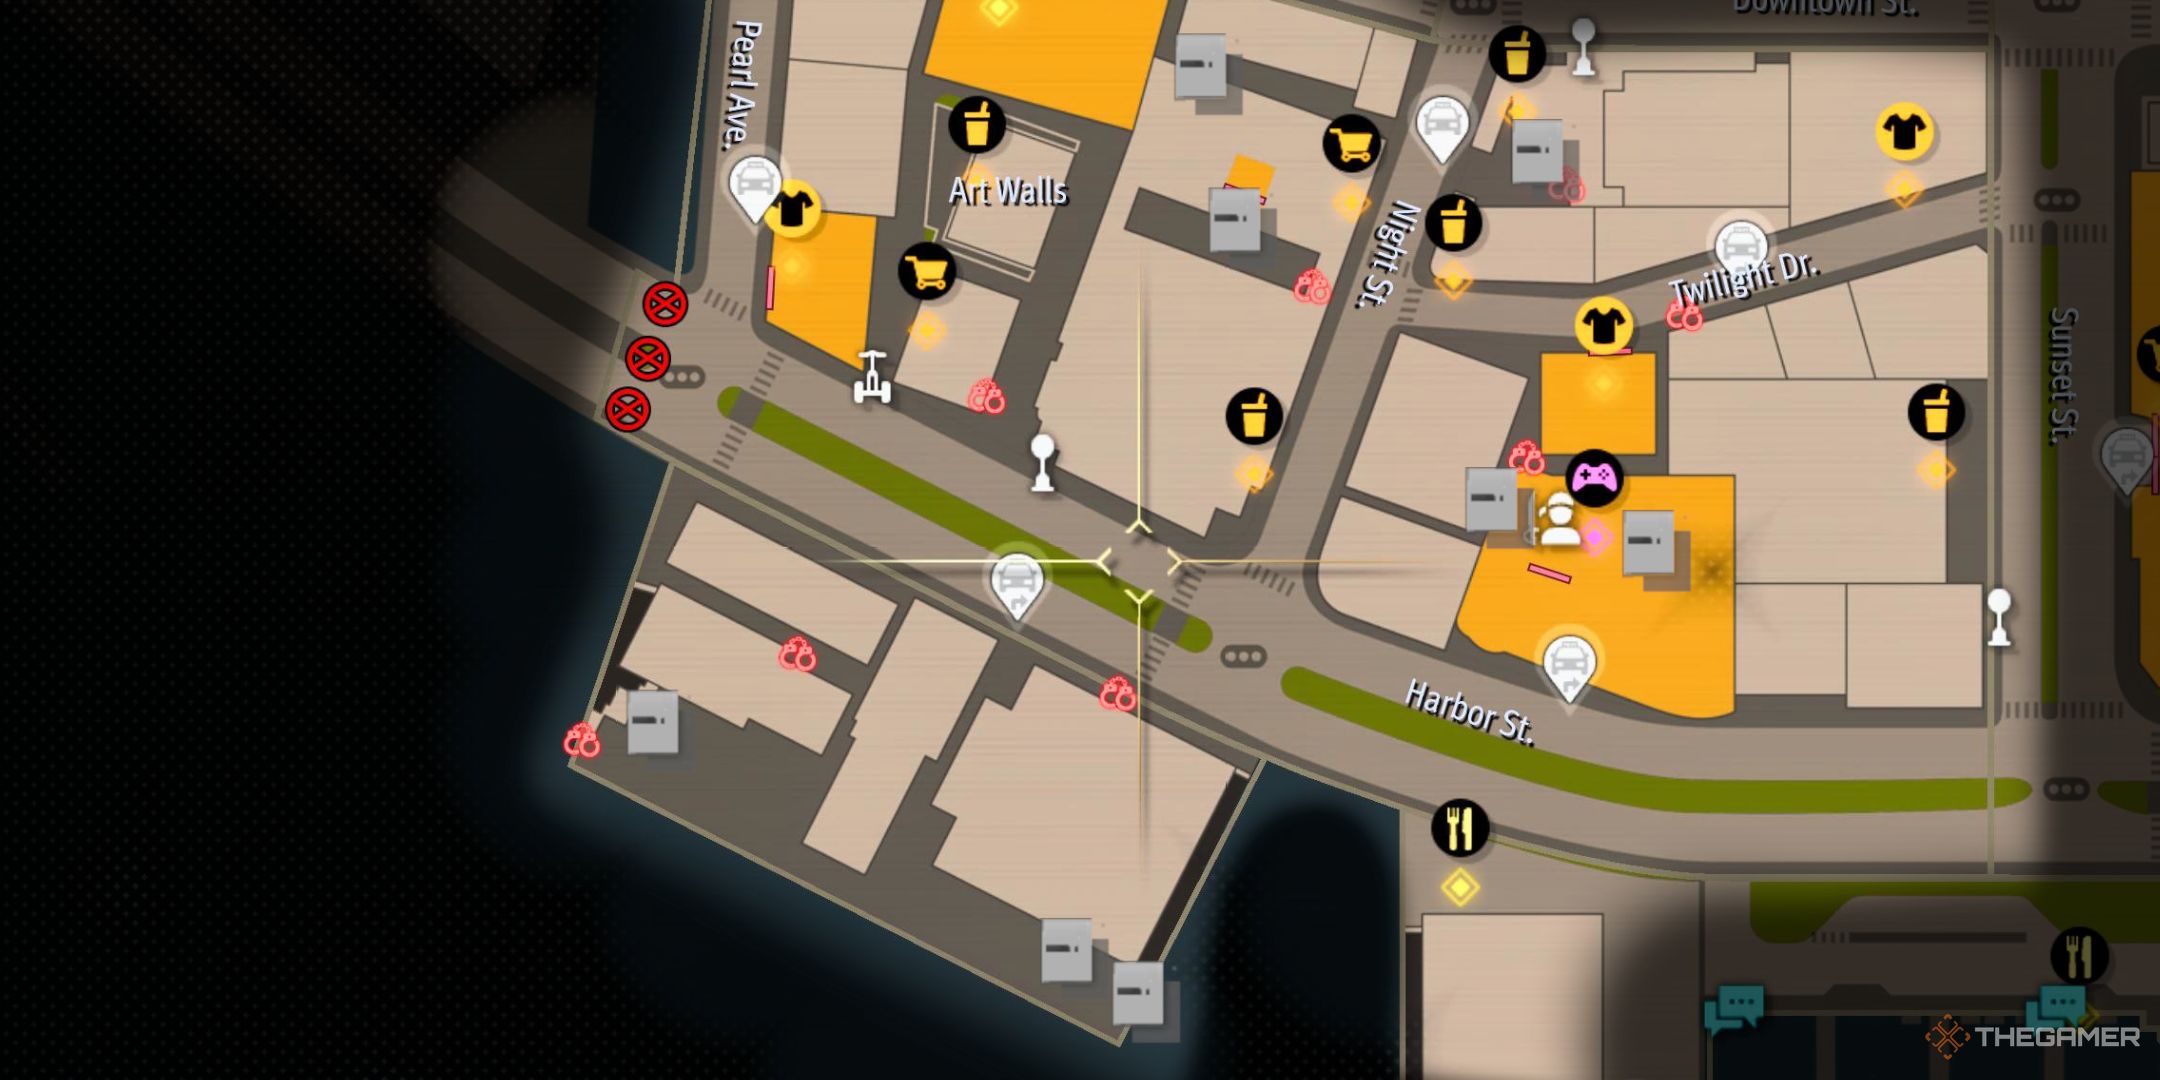
East of the Black Hibiscus, travel into the alley leading to Night Street to find this Silver Container.
Black Jack Amulet
Head east of Psychedelic Coffee into the alley that leads to Night St. This container is by the jewelry shop.
Platinum Plate
Find this container in the alley behind The Cabaret Eldorado, across from Loco Fiesta Liquor.
Royal Joker Card
Located beside Liber Tea in the corner of the area filled with plastic chairs.
Goromi Wig, Goromi Makeup, Goromi Earrings, Goromi Set
When you’re not busy sailing the seas of Hawaii as a fearless pirate in Like a Dragon: Pirate Yakuza in Hawaii, take some time to unwind and try out the various mini-games available. Each activity boosts your Pirate Rank, making it a fun way to gain respect, earn some cash, and unlock exclusive rewards.
If you’re curious about the mini-games you can engage in and where to find them, you’re in the right place. The only question remaining is: which mini-game will you try first?
Honolulu
Below is the full list of mini-games available in Honolulu, along with their locations and any additional information you may need.
Anaconda Arcade
Located on the ground floor of the Anaconda Shopping Center, this arcade features UFO machines and a selection of games:
SpikeOut FE
Fighting Vipers 2
The Ocean Hunter
Sega Racing Classic 2: Battle on the Edge
Sega Racing Classic 2: Power Edition
Virtua Fighter 3
Virtua Fighter 3tb
Crazy Delivery
Inspired by Crazy Taxi and a dash of Uber Eats, this mini-game can be unlocked by finishing the ‘Stay Crazy’ substory located near the fountain at the intersection of Sunset Street and Anaconda Boulevard. After unlocking, you can access it from two spots:
Crazy Delivery (Anaconda Boulevard) – Right next to the fountain where the substory begins.
Crazy Delivery (Aloha Street) – Just north of the beach.
A detailed guide on Crazy Delivery is available.
Darts
You can find the Darts hall located east of the Crystal Aloha Resort, just north of the western end of Aloha Beach.
TIP: You can discover and buy better darts in various locations throughout the game.
Dragon Kart
Unlock this Mario Kart-inspired game by completing the ‘Dragon Kart in Paradise’ substory, located in the southeast area of the Honolulu map, just south of Hip Hop Shrimp.
Goro Goro Kitchen
This cooking mini-game appears in several locations, but in Honolulu, you can find it in Anaconda Harbor Park, on the southern side of the western half of the map. For this game, you’ll need cooking ingredients, many of which can be gathered from the environment or bought from local shops.
You can also access it upstairs in Revolve Bar by going out onto the terrace.
Open Road Shogi
Find Open Road Shogi just off Sakura Street, right behind the Fortune Exchange Shrine. In this area, you can participate in:
Ranked Matches
Challenge Matches
Puzzle Shogi
Ounabara Vocational School
Unlock this mini-game by completing the substory ‘The Smartest Pirate Crew!’ at the Ounabara Vocational School building on Harbor Street. A complete guide to test answers is available here.
Sicko Snap
Sicko Snap, inspired by Pokémon Snap, involves taking photos of quirky characters. You can unlock it by finishing the ‘Snap Those Sickos! Again!’ substory while riding the trolley from the Aloha Beach Trolley Stop. A full guide for this mini-game is available.
Madlantis
Madlantis features some truly unique mini-games, with the standout being the Pirates’ Coliseum. Here’s a breakdown of where to find them.
Bang Bang Batting Center
Located in the northeastern part of the Madlantis map, this optional twist on baseball includes exploding barrels. A complete guide is available.
Master System Console
You can find the Master System console in the Pirate Room within the tunnel on the eastern side of Madlantis. Here, you can play any Master System games you have.
Pirates’ Coliseum
The Pirates’ Coliseum is located in the southeastern part of the Madlantis map and offers a variety of modes.
Rich Island
While Rich Island features just a few mini-games, one stands out as exclusive: Goro Kingdom.
Nele Island
There’s not a lot happening on Nele Island, but you can always count on cooking to keep you entertained in the kitchen.
Goromaru
The Goromaru has only two mini-games, both of which can also be found elsewhere. However, if you’re looking to have some fun while out at sea, here’s what you can play.
Like A Dragon: Pirate Yakuza in Hawaii — Swashbuckler Showdown
The Pirates’ Coliseum is an excellent place to train, earn some cash, and work your way up to the Legends of the Sea rank. Just when you start feeling like the ultimate pirate after collecting all four Dark Instruments, you unlock the Swashbuckler Showdown.
This showdown provides a final opportunity to face off against formidable opponents: Captain Yakuza, Captain Ronin, Captain Shinobi, and Captain Zeus of the Devil Flags. In these battles, you’ll encounter 100 of each captain’s most skilled underlings, making it a true test for your entire crew as you battle some of Hawaii’s most dangerous pirates.
Preparing for the Swashbuckler Showdown
The Swashbuckler Showdown is a late-game tournament that becomes available only after you’ve completed the Legend of the Goro Pirates questline by helping Misaki avenge her father’s death. Once you’ve triumphed over the last of the captains, the door to Swashbuckler Showdown swings wide open.
Having conquered many difficult ship battles, your vessel should be in top shape. If you haven’t already, now is the perfect time to finish upgrading the Goromaru.
Even though there’s no cannon component in these battles, your Cannon Squad will join you on land.
Crew Setup:
Here’s how to set up your crew for this challenge:
Cannon Squad:
Port:
Nishida
Julie
Steve
Captain Beef
Machine Guns:
Starboard:
Daisaku Minami
Natasha
Arque Dangerous III
Kamiyama
Boarding Squad:
Squad One:
Taiga Saejima (Leader)
Dread Pirate Hook
Carnal Sister Yoh
Carnal Sister Yuka
Theo
Squad Two:
Jason (Leader)
Rafael
Hattori the Ninja
Human Bronze Statue: Bronson
Amiable Pirate: Leo
Squad Three:
Misaki (Leader)
Swordsman Kengoro
Robson Caetano da Silva
Etsuko
Reliable Pirate: Alaka’i
Squad Four:
Masaru (Leader)
Hammerhead
Lumberjack Hayashida
Elena
Kenzo
The best fighting style for Majima is Sea Dog for its crowd control, quick movements, and impressive damage output.
How To Beat Each Fleet
Duel with the Third Fleet:
Your journey begins against the Third Fleet on an open beach, where you will face 100 enemies. Expect this to be a repeat of past encounters with the Devil Flags, so be ready to face familiar foes. Utilize AoE skills like pistols or spinning attacks to take down multiple enemies simultaneously. The battle shouldn’t pose much of a challenge.
Duel with the Second Fleet:
Next, prepare for the Second Fleet, again facing 100 foes. Ronin may be tougher, but this fight should still be straightforward, especially since you’ve already collected all four Dark Instruments. You should clear this battle in under a minute.
Duel with the First Fleet:
In this battle against the First Fleet, you’ll once again be faced with 100 enemies. This time, however, the opposition will be stronger. Make sure to level up Majima’s Attack and Health to at least level three to keep pace without too much difficulty. Watch out for homing missiles from the enemy Shinobi, and maintain an aggressive approach to defeat them.
Duel with the Strongest Fleet:
The final showdown is against the Devil Flags’ Strongest Fleet, led by Zeus. This battle is the most challenging, with 100 powerful foes ready to ambush you. The pirates here hit harder and can combo you if you’re not careful. Focus on Zeus first with the help of your crew, and avoid the homing missiles appearing on the ground.
Rewards of Victory
Defeating all the competitors in the Coliseum nets you the Earth Stone and a whopping $650,000, along with an impressive 300,000 Pirate Reputation Points. That’s a reward you won’t want to miss!
In Like A Dragon: Pirate Yakuza In Hawaii, you’ll engage in standard naval battles against enemy fleets and rival pirates. However, one of the game’s most thrilling encounters has Majima facing off against a Giant Squid. This epic showdown is teased early in the narrative, hinting at the reason behind Majima’s shipwreck near Rich Island.
As Majima pursues the Esperanza Treasure, he’s finally ready to confront his foe and seek revenge. Get ready for a multi-stage naval battle against one of the game’s strongest bosses: the Giant Squid.
How To Begin The Giant Squid Boss Fight
After defeating Mortimer and rescuing Tucker from his temporary confinement in Madlantis, you can consult him to set your voyage towards the secret site of the Esperanza Treasure.
Upon arriving, Tucker will instruct you to fire your cannons at a specific spot on the edge of the island, which will reveal the hidden entrance.
But beware, this excavation also awakens the formidable guardian of the treasure: the Giant Squid.
This boss is incredibly fast and very dangerous up close. You’ll need to sail with caution and execute precise attacks to overcome this beast.
How To Overcome The Giant Squid
As soon as the battle kicks off, the Giant Squid will dive underwater, changing its position on the battlefield. Once it reemerges, steer your ship directly at it and unleash machine gun fire upon its tentacles while staying clear of its dangerous attack patterns.
How To Strike The Giant Squid
You need to target the tentacles first; otherwise, you won’t deal significant damage to the Giant Squid. Once you take down the first pair of tentacles, focus on the squid’s eyes and unleash your cannon fire to maximize damage.
Speed up the fight by utilizing your boosts and drifting to swiftly reposition, allowing you to fire from your charged cannons on either side for maximum effect.
How To Protect Against The Giant Squid
Continue through a second phase of attacks on the tentacles and eyes while avoiding the squid’s ink attack, which is easily dodged using your Fuel Tank boosts.
For the best chance to succeed, invest in the following Goromaru Ship Upgrades in this order:
Hull Durability Extreme
Laser Cannons (Port and Starboard)
Fuel Tank Enhancements
Extra Repairs
If you get too close to the Giant Squid, its tentacles will swing at you and cause damage to the Goromaru.
The crucial element in this fight is maintaining good positioning.
Keep a safe distance from the Giant Squid’s tentacles while being close enough to land your cannon shots.
As you approach to fire your cannons, dodge the mortar-like strikes by quickly boosting past the marked red spots, and avoid the warning signals in the water.
At medium range, the Giant Squid will launch a four-pronged water attack, which can be challenging to evade unless you boost away well in advance.
The winning strategy is to deal more damage by rapidly circling the squid and drifting to switch sides while your cannons recharge, allowing you to fire both sides in one go.
After about three or four rounds, you will have defeated the Giant Squid, clearing the way into the newly revealed cave entrance and the Esperanza Treasure.
This is the Platinum trophy for PlayStation users, and it won’t be available for Xbox or PC players. It automatically becomes available after you earn every other trophy.
Shipwrecked
Finished Chapter One.
This achievement is related to the story and cannot be missed.
Heart of Darkness
Finished Chapter Two.
This achievement is related to the story and cannot be missed.
The Old Man and the Sea
Finished Chapter Three.
This achievement is related to the story and cannot be missed.
Treasure Island
Finished Chapter Four.
This achievement is related to the story and cannot be missed.
You Gotta Keep Livin’
Completed the final chapter.
This achievement is related to the story and cannot be missed.
Fledgling Mad Dog
Gained ten abilities.
Refer to ‘Legendary Mad Dog’ for more information.
Powerful Mad Dog
Gained 20 abilities.
Refer to ‘Legendary Mad Dog’ for more information.
Ferocious Mad Dog
Gained 40 abilities.
Refer to ‘Legendary Mad Dog’ for more information.
Legendary Mad Dog
Gained 60 abilities.
You can buy and upgrade abilities from the main menu using in-game currency. You need to unlock a total of 60 abilities to achieve all related trophies.
Many abilities require prior purchases of specific skills or sufficient progress in the game, such as leveling up your Pirate Rank.
Boomerang Lover
Used the cutlass boomerang against enemies 100 times.
In Sea Dog style, press X on Xbox/Square on PlayStation/left click on PC to deploy your cutlass boomerang. Using it against enemies 100 times will unlock this.
Chain Hook Expert
Used the chain hook against enemies 50 times.
You gain access to the Chain Hook in Chapter Two. Use it in battle while in Sea Dog style by pressing B on Xbox/Circle on PlayStation/E on PC to pull in enemies. Do this a total of 50 times for the achievement.
Pistol Aficionado
Used the pistol against enemies 50 times.
In Sea Dog style, press Y on Xbox/Triangle on PlayStation/right click on PC to fire with your pistol. Use it against enemies 50 times to earn this achievement.
Majima Everywhere
Created 56 doppelgangers.
While in Mad Dog style, when your Madness Gauge is full, press RT (or Q on PC) to call forth your doppelgangers. Summoning 56 will trigger this achievement.
TIP: Buy the ‘More Majima’ ability to summon more doppelgangers at once.
The Man Who Summoned the Gods
Played all Dark Instruments.
You must collect and play all four Dark Instruments. The first one will unlock as part of the main storyline and cannot be missed.
Divine Intervention
Summoned the gods with Dark Instruments 30 times.
You don’t have to unlock all Dark Instruments to complete this; just use the one obtained through the story repeatedly. Summon the Dark Gods 30 times in Sea Dog style by pressing RT (or Q on PC) once your Madness Gauge is full.
Fashionable Fingers
Equipped rings on all ten fingers simultaneously.
There are various rings to discover throughout the game, but each ring must be equipped on specific fingers. You need a ring on all ten fingers to achieve this. Rings can be collected from:
Silver Treasure Chests
Purchasable in stores
Gained through side stories or content
TIP: For example, you earn one for having 50 Aloha Links friends.
Bounty Hunter
Completed 20 Bounty missions.
See ‘Super Bounty Hunter’ for details.
Super Bounty Hunter
Completed 50 Bounty missions.
Bounty spots are scattered across the map, marked by a handcuffs icon. You must defeat each target to complete a mission. Achieving 50 completions will earn you all the associated trophies.
Sea Legs-Havers
Attained the rank of Sea Legs-Havers.
Refer to ‘Legends of the Sea’ for further information.
Popular Picaroons
Attained the rank of Popular Picaroons.
Refer to ‘Legends of the Sea’ for further information.
Buccaneer Bigshots
Attained the rank of Buccaneer Bigshots.
Refer to ‘Legends of the Sea’ for further information.
Legends of the Sea
Attained the rank of Legends of the Sea.
Your actions in the game contribute to your Pirate Rank. Upon reaching a five-star rank, Legends of the Sea, you’ll unlock the final associated trophy.
Welcome to the Goro Pirates!
Recruited 30 members to the Goro Pirates.
See ‘Go Pirates, Go Go Go!’ for further details.
The Goro Pirates Set Sail!
Recruited 50 members to the Goro Pirates.
See ‘Go Pirates, Go Go Go!’ for further details.
Go Pirates, Go Go Go!
Recruited 80 members to the Goro Pirates.
Crew members can be found throughout the game, marked on your map. Others can be recruited by finishing certain main story or side quests.
Map-based crew members have specific requirements to join your crew, such as achieving a certain Pirate Rank or providing them with a certain item.
Recruiting a total of 80 members unlocks all related achievements.
Bonds Between Boys
Viewed all of Noah’s Drink Links.
To view all Drink Links, you must complete every Bond Chat with Noah. We have guides for that as well.
Bonds Between Men
Viewed every Drink Link with the crew.
To complete their Drink Links, you need to finish all Bond Chats with each crew member before viewing their links. Check our guides for more info.
New Star of the Coliseum
Won ten different matches in the Pirates’ Coliseum.
See ‘Master of the Coliseum’ for more information.
Ace of the Coliseum
Won 20 different matches in the Pirates’ Coliseum.
Refer to ‘Master of the Coliseum’ for more details.
Master of the Coliseum
Won 30 different matches in the Pirates’ Coliseum.
You must achieve victory in 30 Coliseum matches in total to unlock all associated trophies. Check our guides for various modes.
Legend of the Coliseum
Defeated the Amon Pirates.
After finishing all matches in the Coliseum, a new challenge will emerge: the Amon Pirates. Defeating them unlocks this achievement.
Showdown on Rokka Island
Won the battle on Rokka Island.
This achievement is tied to the storyline and cannot be missed.
Showdown on Atali Island
Defeated the first Devil Flags officer.
Refer to ‘Remember the Goro Pirates!’ for further details.
Showdown in Flame Heaven
Defeated the second Devil Flags officer.
See ‘Remember the Goro Pirates!’ for additional information.
Showdown in Frost Heaven
Defeated the third Devil Flags officer.
Refer to ‘Remember the Goro Pirates!’ for more information.
Remember the Goro Pirates!
Defeated the leader of the Devil Flags.
The Devil Flag battles serve as optional bosses marked on your sea maps with a red Devil Flag icon. Advancing through this content and defeating all officers will unlock this achievement.
Island Adventurer
Completed ten different islands.
You can dock at various islands with your crew and battle through enemies for treasure. Conclude ten islands successfully to achieve this.
Novice Treasure Hunter
Collected ten different treasures.
Refer to ‘Expert Treasure Hunter’ for details.
Expert Treasure Hunter
Collected 40 different treasures.
Pirate Yakuza has numerous treasures to discover. To fully complete the Treasury of Treasures, you’ll want to gather them all. You’ll need a total of 40 to unlock the relevant trophies, which can be found through:
Hidden chests on various maps
Treasure islands
Purchases from shops
Trade-ins at minigame stores for points
My Glorious Goromaru
Obtained 50 customization parts for the Goromaru.
You can customize the Goromaru with various components, such as Hull, Sails, Figurehead, and Trimming. Collect 50 parts total, which can be found by:
Purchasing in stores
Trading points at various minigame shops
Rewards from substories or side quests
Julie-chan’s Biggest Fan
Created three different cannons at Julie’s Gearworks.
After unlocking Julie’s Gearworks, you can craft cannons and other items there. Some cannons will only become available once you’ve crafted their basic versions. You must craft three cannons in total to earn this.
Rocket Sniper
Sunk five enemy ships using the rocket launcher.
During sea battles, switch to deck view and use Majima’s Rocket Launcher to target enemy ships. Sink five ships this way to unlock this achievement.
Domestic Pirate
Cooked every recipe available.
The first minigame you’ll unlock is Goro Goro Kitchen which offers a wide variety of recipes. To achieve this, you must prepare each recipe at least once.
Goodbye, Old Me
Collected 20 different clothing items.
Refer to ‘Trendsetter’ for further information.
Fashionista
Collected 50 different clothing items.
Refer to ‘Trendsetter’ for further information.
Trendsetter
Collected 100 different clothing items.
You can customize Majima’s appearance for both Mad Dog and Sea Dog styles. To unlock all related achievements, you need 100 types of clothing items, which can be:
Purchased in stores
Exchanged for points at various minigame shops
Rewards from side quests
Discovered in Silver Containers hidden around the maps
Memories of Honolulu
Took 30 different photos for the Photo Rally.
After unlocking the Photo Rallies in Chapter Two, capturing 30 photos overall will unlock this achievement. Check our guides for each Photo Rally.
Extreme Extrovert
Befriended 50 characters through Aloha Links.
With 200 NPCs to befriend in Honolulu—see our complete list—you’ll unlock this by befriending 50 of them.
By Hook or By Crook
Used the chain hook to travel 20 times.
There are hooks concealed around the map that enable you to climb up to new ledges or discover shortcuts using your Chain Hook. Accomplishing this 20 times unlocks the achievement.
Hooking and Gathering
Captured 30 fish and bugs using the chain hook.
Bugs are often spotted buzzing in the air or scurrying on the ground, while you’ll find fish in the oceans or pools. You just need to use your Chain Hook to catch 30 of them to earn this.
Taking the Scenic Route
Completed ten substories.
See ‘Main Story? What’s That?’ for further details.
Main Story? What’s That?
Completed 20 substories.
Many substories are scattered throughout the Honolulu map, some trigger automatically as you move through the game. Achieving completion on 20 will unlock this.
My Dream Minato Girl
Partied with the Minato Girls and found true love.
Beginning with ‘My Dream Minato Girls’, which unlocks automatically in Chapter Three, you will then engage in various substories about locating and meeting all five Minato girls. Complete this series of quests to earn the achievement.
Party Pirate
Participated in ten different minigames.
The game features various minigames, including those aboard the Goromaru. To qualify for this achievement, you need to play ten unique minigames in total—for example, playing Karaoke in both Revolve Bar and the Goromaru counts as one game, not two.
High-speed Pirate
Won three different cups in Dragon Kart.
You can start playing Dragon Kart from Chapter Two, located in the bottom left corner of the Honolulu map near Harbor Street. Winning three different cups in Dragon Kart unlocks this.
Sea Shanties
Participated in karaoke aboard the Goromaru.
To enjoy karaoke, choose the karaoke minigame from Majima’s captain’s cabin on the Goromaru, and you will perform on deck to unlock this.
Erudite Pirate
Obtained five certificates from the Ounabara Vocational School.
The Ounabara Vocational School is found on Harbor Street on the west side of the Honolulu map. You need to pass five tests to earn five certificates and achieve this.
Crazy Captain
Finished all Crazy Delivery courses.
There are four increasingly challenging courses across two locations—Anaconda Boulevard and Aloha Street—adding up to eight courses total. We offer a detailed guide for Crazy Delivery here.
Barrel Basher
Destroyed a total of 1,500 barrels at the Bang Bang Batting Center.
The Bang Bang Batting Center in Madlantis has you playing baseball, but the target is to smash barrels for high scores. To unlock this achievement, you need to destroy a total of 1,500 barrels. We provide a comprehensive guide for the Bang Bang Batting Center here.
Making a Menagerie
Obtained seven pets.
You need to collect seven pets for Goro Kingdom. The first pet is unlocked through the story, but there are several others hidden around Honolulu. Check our guide for the locations.
Not Counting the Usual Ones
Found two balls.
You will unlock this by discovering two of the seven Golden Balls required for the ‘When You Wish Upon Some Balls’ substory.
The Tournament of Captains represents the pinnacle of your training at the Pirates’ Coliseum in Like A Dragon: Pirate Yakuza In Hawaii. Once you’ve mastered the Quick Clash and Madlantis Mania modes, it’s time to challenge your skills and your upgraded ship against some of the fiercest pirate captains in Madlantis.
The Tournament of Captains merges the battle mechanics you learned in Quick Clash with the tough series of fights in Madlantis Mania. You’ll face several pirate crews in a row, with tougher battles waiting in the higher ranks. To unlock more challenging fights in Quick Clash and Madlantis Mania, you must progress through the ranks in the Tournament of Captains.
What Is The Tournament Of Captains?
Once you’ve sharpened your skills in Naval and Boarding Battles, you can step into the Tournament of Captains (ToC), which features multiple rounds of fights incorporating both types of combat—cannon and boarding.
In contrast to Quick Clash and Madlantis Mania, there are fewer tournaments to face, and each new challenge becomes available only after you conquer the previous one.
The Tournament of Captains not only tests your skills but also serves as an entry point into the higher tiers of the Quick Clash and Madlantis Mania battles. To unlock the third rank in Madlantis and Quick Clash, you’ll need to reach rank two in the Tournament of Captains.
Moreover, to take on each challenge in the Tournament of Captains, your Pirate Reputation rank must match or exceed the rank required for that challenge.
If you intend to face the Tournament of Captains Rank Three, you must defeat the three prior tournaments and possess a Rank Three Pirate Reputation or higher.
Additionally, the second Rank Three battle in the Tournament of Captains can only be accessed once you’ve caught the interest of Commodore Mortimer by advancing in the main storyline.
If you’re jumping straight into the Tournament of Captains after gaining access to the Pirates’ Coliseum, aim for an S-rank in every battle available in Quick Clash and Madlantis Mania before tackling the third challenge.
Furthermore, you should boost your pirate reputation outside the Coliseum by progressing through the main story and seeking treasures at sea, as reputation points can only be earned the first time you complete a specific battle.
How To Prepare For The Tournament Of Captains
The following crew compositions (once leveled up in Quick Clash and Madlantis Mania) should provide sufficient power to conquer the initial ranks of the Tournament of Captains.
Cannon Squad
First Mate
Etsuko (recruited by exchanging ten points with Kamulop)
Starboard
Reliable Pirate: Alaka’i
Clark
Monica
Machine Guns
Human Bronze Statue: Bronson
Arman
Port
Kamiyama
Captain Beef
Legendary Farmer Morishita
Oka
Boarding Squad
Support Squad
Boarding Squad One
Jason (leader)
Amiable Pirate: Leo
Theo
Hibiki, the 14th Best Host in Kamurocho
Nickelle Kidman
Boarding Squad Two
Masaru (leader)
Elena
Peter
Ranko Sarutobi
Rafael
Boarding Squad Three
Swordsman Kengoro (leader)
Natasha
Lucas
Steve
Hammerhead
Boarding Squad Four
Misaki (leader)
Robson Caetano da Silva
Carnal Sister Yoh
Carnal Sister Yuka
Lumberjack Hayashida
Before jumping into these matches, consider these necessary upgrades to your ship to ensure success in these tough battles:
Expand the size of your boarding squad at least once, and ideally maximize it before tackling rank four and five battles.
Unlock at least one additional rank of Additional Repairs, Fuel Tank Increase, and Additional Smoke Screens.
Upgrade your ship’s durability by achieving the first rank of Durability Boost Plus after maxing out the first Durability Boost. You’ll know you’ve completed this when your next upgrade costs $3,000.
Unlock both Additional Starboard and Port Cannons.
Maximize your Gatling Gun or Frost Machine Gun upgrades based on whether you prefer to ignite enemies or freeze them.
Acquire an Energy Cannon on either your Port or Starboard side as you progress into the later battles.
If two Energy Cannons are out of budget, consider purchasing at least a level one flamethrower or level three cannon on the opposite side.
While optional, Rocket Launchers can deal significant damage.
Although certain upgrades like the Smoke Screen are not mandatory, they greatly ease the difficulty of battles, allowing for a less reliant approach on luck or perfect execution.
If you’re short on crew, you can find a few who will join your team in the Pirates’ Coliseum after you defeat the Tagger Pirates (Monica), Grey Pirates (Steve), and Beginner Mania (Robson Caetano di Sciuva).
These new pirates can help round out your Boarding Squad.
How To Win In The Tournament Of Captains
Unlike Madlantis Mania, the Tournament of Captains levels up all your crew members, from the First Mate to your Boarding Squad.
As such, ensuring your boarding crew is fully manned by Ranks Two and Three is wise to enhance your strength in the more challenging boarding battles.
With your crew ready, your main objective should be to deplete the boss ship’s HP as fast as you can since only the boss ship must be defeated to initiate the boarding phase.
To quickly chip away at a boss ship’s HP, follow this sequence:
Start with direct Machine Gun fire from a distance as you close in.
Ram the boss ship, then dodge its cannon fire using your speed boosts, countering with your own cannon fire if feasible.
Turn and drift to position yourself behind the boss ship.
Continue to deal damage with your Machine Guns while pursuing, and once he’s close, accelerate to pull alongside and fire your powerful cannons.
Repeat until you bring down the boss ship, taking time to repair your vessel if it takes too much damage.
Finishing battles swiftly will grant you substantial pirate reputation with each win, so consider upgrading Majima’s Sea Dog Style to effectively whittle down your foes during demanding boarding encounters.
Completing each battle as quickly as possible not only secures bigger bonuses but rank three can reward around 15 million dollars for an S-Rank completion.
Launch your attacks on large enemy groups to enter the boarding phase, and then prioritize the officers and captains to prevent them from using their special abilities.
Always remember to use the d-pad for your support skills and rely on Majima’s Chain Hook to bridge the gap between you and the enemy crew, helping you attain more consistent S-ranks.
If you fail a run or miss out on an S-rank at your toughest challenge, return to the first one or two ranks to gain extra experience and money to bolster the areas you’re struggling in.
What Rewards Do You Get From The Tournament Of Captains?
Once you reach the fifth rank—Legend of the Sea—you’ll navigate through the Tournament of Captains with ease by following our strategies for success.
Your rewards will include:
Rank
Battle Name
Number Of Cycles (Total Battle Rounds)
Base Rewards
One
Tournament Of Novices
Two (Four)
$2,000
2,000 Pirate Reputation Points
One
Tournament Of Captains One-Star
$2,400
3,000 Pirate Reputation Points
Two
Tournament Of Captains Two-Stars
Three (Six)
$4,200
4,000 Pirate Reputation Points
Three
Tournament Of Captains Three-Stars
$10,000
5,000 Pirate Reputation Points
Three
Tournament Of Captains Contention Qualifier
Two (Four)
$5,000
10,000 Pirate Reputation Points
Four
Tournament Of Captains Four-Stars
Three (Six)
$15,000
8,000 Pirate Reputation Points
Five
Tournament Of Captains Ultimate Tournament
$20,000
20,000 Pirate Reputation Points
Completing these battles is highly rewarding, as you’ll find yourself with plenty of riches and the means to upgrade Majima’s ship and abilities to their fullest after finishing these challenges.