الوسم: guardian

  • How to Play a Heavy Guardian in Blue Protocol: Star Resonance Solving

    How to Play a Heavy Guardian in Blue Protocol: Star Resonance Solving

    Playing as a tank in an MMO often means stepping into the shoes of a strong defender who can soak up damage and control the fight. In Blue Protocol: Star Resonance, the Heavy Guardian class is perfect for that role, regardless of which specialization you pick at level 20.

    Designed to maximize your Rage and withstand as much damage as possible, the Heavy Guardian is the easiest tank class to learn among the game’s options. It relies on increasing your strength, building up Rage, and using your skills to keep enemies at bay and protect your team.

    Class Overview

    If you enjoy controlling close-range battles and being the primary damage absorber, the Heavy Guardian is a solid choice. It’s built to be both offensive and defensive, with abilities that let you hit multiple enemies or focus on a single target. Your main attribute is Strength, which powers most of your skills and buffs.

    Visual: Fighting Caprahorns as a Heavy Guardian in Blue Protocol.

    Playing as a Heavy Guardian

    Do you like to lead the charge, taking hits and positioning yourself to control the battlefield? If so, this class is for you! You’ll focus on building Rage to activate powerful skills and keep enemies busy. Both specializations use the same core skill, Sandshroud, which coats you in sand that damages nearby foes and helps generate Rage and Sand Crystals—keep Sandshroud active during fights for best results.


    Earthfort Specialization

    Overview: Uses shields and damage mitigation. Your main attack is Shield Bash, and you excel at protecting your allies by absorbing incoming damage and staying resilient.

    Main Skills:

    • Star Shatter: Charges forward with force, stunning enemies and gaining Rage and Sand Crystals upon hit. Best for quick Rage buildup.
    • Sandshroud: Creates a sand burst around you, damaging enemies and generating continuous Rage and Sand Crystals.
    • Stoneform: Taunts enemies and counters lethal attacks, increasing armor and reducing damage.
    • Rage Burst: Uses Rage and Sand Crystals to unleash a roar, damaging foes and creating a damage-absorbing shield that stacks up to your max HP.

    Weapon: Shield-based weapons fit this spec, emphasizing protection and control.

    Visual: Heavy Guardian Earthfort Specialization overview.


    Block Specialization

    Overview: Focuses on steady damage reduction and counterattacks, especially against physical attacks. Your special skill is Countercrush, which enhances your blocking ability.

    Main Skills:

    • Granite Fury: Consumes Sand Crystals to deal damage and reduce incoming damage temporarily.
    • Sandshroud: As above, for damage and Rage generation.
    • Brave Bastion: Creates a barrier that counters lethal attacks and taunts enemies, extending its duration with Sand Crystals.
    • Sandgrip: Pulls enemies toward you using Rage, interrupting their actions and slowing their movement.

    Weapon: Likely geared towards melee, with gear optimized for Luck to improve damage mitigation.

    Visual: Heavy Guardian Block Specialization overview.


    Talent Tips

    Rage plays a vital role in both specs. Building up Rage early helps unleash powerful skills and boosts survivability.

    • Rage Awakening: Chance to become Enraged upon consuming Rage, increasing your durability and armor.
    • Weak Point Strike: Basic attacks have a chance to trigger extra damage and generate Sand Crystals.
    • Power Conversion: Boosts your armor and Strength, making you tougher and more offensive.
    • Suppression Skills: Reduce damage taken or increase damage dealt when your HP is higher than the enemy’s, especially useful with the large health pool of the Heavy Guardian.

    Other talents help yank enemies close, increase healing, or extend your Enraged state, further enhancing your tanking prowess.


    Gear Recommendations

    Since Strength is at the heart of the Heavy Guardian, gear should focus on maximizing it.

    • Earthfort: Prioritize increasing Versatility to handle all types of damage effectively.
    • Block: Focus on Luck to improve blocking and mitigate physical damage more reliably.

    Balancing your gear to boost your primary stats ensures you stay resilient and effective throughout battle scenarios.

  • How to Complete the Carcadia Burns Vault Guardian in Borderlands 4

    How to Complete the Carcadia Burns Vault Guardian in Borderlands 4

    Vault hunting remains illegal in Borderlands 4, but most players just ignore the rules when the chance to loot Vaults and gain treasures is so tempting. A new Vault has appeared in the dry region of Carcadia Burns. Whether it’s your first or final Vault, you’ll need to overcome various challenges inside to claim your reward.

    Access to the Vault isn’t free. You must first gather three Vault Key Fragments. To do that, capture the three Silos spread across the region, which reveal the general locations of the fragments on the map. The Silos are:

    • Rustical Hurl, located in the middle of Carcadia Burns.
    • Site Unseen, in the west.
    • Judgement’s Lapse, in the north.

    Silos are special facilities controlled by the Order. They are claimed much like Safehouses, but without the need to find a datapad. Once captured, they act as fast travel points and reveal key locations on your map. After capturing each Silo, head to the indicated area and follow the on-screen indicator in the upper-right corner of your screen to locate the Vault Key Fragments. The closer you get, the more bars fill the indicator, and it emits noise and vibrations.

    Vault Key Fragment One is located in the Lopside region, at the Rustical Hurl Silo in a canyon northeast of the Makeshift Chalet Safehouse. From there, maneuver around the rocks to find the fragment on the roof of small buildings at the western edge of the area.

    Vault Key Fragment Two is in the Tonnage Peel region, near Site Unseen on a cliff at the western edge of the map, close to The Lowrise Safehouse. Access it by following the road south to Wreck of the Last Great Hope. Enter the tunnel beneath the site, which is filled with Creep and nests, and grapple off the red-lit alcove to find the fragment attached to a rock in the cave.

    Vault Key Fragment Three is in the Ruined Sumplands, in mountains northwest of Carcadia, near The Marrow Narrows. From Judgement’s Lapse, head west then north, crossing the land bridge, and go northeast to the area near The Gunkworks. The fragment is in an alcove among gray stones and yellow gems by the riverbank.

    Once all three fragments are collected, the Vault door appears on your map, located roughly in the center of the region. Search for it using the indicator, which vibrates and makes noise as you approach. The Vault is straightforward to find there, near Moxxi’s Bottoms Up! — just head south from the bar, jump onto the road below, and follow it east to the raised bridge. If you haven’t lowered it during the main mission, you can still jump onto the mechanisms and glide over. The Vault door will appear at the water’s edge as you get close.

    Interact with the altar at the door to start the challenge named “Primordial Vault: Carcadia Burns,” then enter the Vault. Inside, you’ll face three combat arenas with checkpoints in between and a final boss fight against the Vault’s Guardian.

    The first challenge involves fighting the Seneschal Order, an upgraded version of enemies from the Order, who are slightly tougher but attack with similar moves. In each arena, you’ll also confront a miniboss with unique abilities:

    • First miniboss: Stochastix, a judge-like Warden capable of spawning minor enemies and the Fabricator Witness.
    • Second miniboss: Crushing Depth, a heavily armored Hammerhead often accompanied by dangerous variants like Warheads.
    • Final miniboss: The Chisel, a powerful Domination Engine with an Ordonite Shield and aggressive leaping attacks. To damage it, shoot the purple-red crystals on its body to release Vile Ordonite Orbs, then destroy them to break the shield.

    During battles, Radix shifts through three modes: Regular, Drill, and Thunderstorm, each with different attack patterns. Regular Mode includes spinning rocks, lightning strikes, metal fling attacks, and shock waves. Drill Mode involves jumping and tunneling underground, sending shock energy waves, and planting shock mines. Thunderstorm Mode unleashes widespread lightning strikes and increased aggression.

    Radix always starts in Regular Mode. Dodge its rocks and energy waves, aiming at its face and legs for critical hits. Jump over energy waves or glide to avoid them. When Radix hits 60% on its shield, it switches to Drill Mode, making it more aggressive—destroy shock mines and use weapons with elemental damage (like Incendiary, Radioactive, or Corrosive) to whittle down its health. When its shield drops to 20%, Radix unleashes a massive energy wave, then reverts to Regular Mode until its shield is depleted. It then swaps to Drill Mode again at 50% health, and this cycle repeats, with Radix alternating modes every 30% loss in shield or health.

    In Thunderstorm Mode, Radix becomes extremely dangerous, unleashing lightning strikes and dealing pure Shock damage. Stay close or just outside the arena’s middle ring to avoid lightning, and clear lingering Shock Mines and Pangolins that may still attack. Destroy shock mines proactively, especially when Radix transitions out of Drill Mode, to prevent devastating chain explosions.

    As Radix nears 20% health, it switches back to Regular Mode, and once defeated, a rift appears. Interact with it to grapple into the final area or to exit the Vault. The victory rewards include an upgraded Glide Pack for reduced stamina use, along with two Red Chests, experience, money, Eridium, and a rare or epic sniper rifle. Completing the side mission unlocks the “Nothing Left To Guard” achievement if the other Guardians, Inceptus and Origo, have also been defeated. Afterward, you can grapple into the next rift to leave or restart the fight with Radix at Moxxi’s Big Encore.

  • Gathering Guardian Seikret Feathers in Monster Hunter Wilds

    Gathering Guardian Seikret Feathers in Monster Hunter Wilds

    In Monster Hunter Wilds, Guardian Seikret Feathers are essential. They play a crucial role in crafting equipment that will make the game’s later stages easier to navigate. Once you know where to find them, obtaining these feathers is quite simple. Since the feathers come from only one creature, farming them can be less time-consuming.

    However, some players might be unsure about where to find these feathers or how to acquire them, especially in High Rank mode. If you’re struggling to farm for Guardian Seikret Feathers or have no idea where to look, this guide will walk you through the necessary steps.

    How to Obtain Guardian Seikret Feathers

    The key to collecting these feathers is hunting Guardian Seikrets. This particular creature is a more aggressive version of the Seikret mounts found in the game. Thankfully, due to their smaller size, similar to Baunons and Harpios, they can be easily defeated, and they often appear in groups.

    Your journey to find Guardian Seikrets begins when you reach Chapter 3 and access the Ruins of Wyveria. This area serves as the last region you’ll unlock before diving into the endgame content.

    Once you’re in the Ruins of Wyveria, direct yourself toward Areas 9 or 10. These locations are known to have a high concentration of Guardian Seikrets. You might also have some luck in Area 8.

    If they aren’t showing up in those areas, simply check your map, where they will appear as distinct icons. Once you’ve located them, set a waypoint to guide you there easily.

    For a faster way to gather these feathers, you can embark on an Optional Quest. Speak to Alma at the Base Camp and choose the “Spread Those Wings” quest. This task requires you to hunt down six Guardian Seikrets. Completing this quest guarantees that you will receive feathers as a reward.

    When hunting and carving Guardian Seikrets out in the wilderness, the drop rate for feathers is not guaranteed. To improve your chances, you can repeatedly tackle the Optional Quest at Alma’s Quest Counter.

    Additionally, taking down Guardian Seikrets will also yield Tough Guardian Bone, which can be beneficial.

    How to Obtain Guardian Seikret Feathers+

    After you progress past the Low Rank section of Monster Hunter Wilds and reach the endgame, you’ll be able to find Guardian Seikret Feathers+. Once you hit Chapter 4 and finish the game’s credits, return to the Ruins of Wyveria and hunt the Guardian Seikrets in the same areas mentioned previously. You should begin to notice Guardian Seikret Feathers+ becoming available.

    Keep in mind that it might take a bit of time for the feathers to drop, as Guardian Seikrets don’t guarantee

    Moreover, if you are in High Rank and need regular Guardian Seikret Feathers, you can still obtain them. Just visit Alma at the Base Camp and select the “Spread Those Wings” Optional Quest. Follow the quest instructions to eliminate six Guardian Seikrets, and you will receive the standard feathers as a reward.

  • Challenging Guardian Bone Farming Spot in Monster Hunter Wilds

    Challenging Guardian Bone Farming Spot in Monster Hunter Wilds

    The Tough Guardian Bone is a rare crafting material in Monster Hunter Wilds, and its availability can be quite limited at times. It tends to appear during specific segments of the game, making it somewhat challenging to locate.

    Among the various crafting resources in Monster Hunter Wilds, the Tough Guardian Bone holds considerable significance. It will help you unlock powerful equipment that is essential for the late stages of the game. Therefore, gathering Tough Guardian Bones is a smart move to prepare yourself for the more challenging monsters you’ll encounter as you progress.

    Where to Locate Tough Guardian Bone

    As you advance to the Ruins of Wyveria during Chapter 3 of the storyline, you will need to battle Zoh Shia and Guardian Arkveld. Both of these formidable foes have a chance to drop the Tough Guardian Bone.

    Please note that during your encounter with Zoh Shia in the main story, you will not find this monster listed in the Optional Quests at Alma’s Quest Counter. This means you cannot repeat this fight to farm for the Tough Guardian Bone.

    In contrast, you can face Guardian Arkveld at least three times throughout your journey. You will encounter it during two missions in Chapter 3—first in Repel the Guardian Arkveld and again at the midway point (3-4) during The Pale Dream of a Lone Shadow.

    For your third battle with Guardian Arkveld, you will face it again in the more difficult endgame chapter during the mission Awakening from a Dream. This encounter will be considerably tougher, so make sure you’re well-equipped before facing it.

    While Guardian Arkveld appears multiple times in Monster Hunter Wilds, it seems that Zoh Shia only makes a single appearance. You will only battle Zoh Shia once throughout the game.

    How to Farm for Tough Guardian Bone

    Fighting these formidable monsters can take time, which might slow your progress in acquiring the Tough Guardian Bone. Thankfully, there are easier methods to gather this resource, such as exploring Bonepiles and battling Guardian Seikrets.

    Bonepiles

    You can find Bonepiles scattered across the Ruins of Wyveria, and they often contain valuable resources. It’s worth seeking them out whenever possible.

    To maximize your efficiency, focus your search in Areas 4 and 5 on the second level of the ruins, as these locations have a higher rate of drops.

    Bonepiles in Areas 4 and 5 can respawn in the same locations. So, keep checking back to loot them again whenever they become available.

    You can also easily view all Bonepiles on your map. This feature helps you navigate effectively while collecting Tough Guardian Bones, as you won’t waste time searching blindly. Simply highlight a Bonepile on the map and set a waypoint to guide you.

    Guardian Seikrets

    The next option for farming Tough Guardian Bones is to hunt Guardian Seikrets. You’ll encounter these creatures during Chapter 3 of the story. They’re smaller and generally easier to defeat.

    The Optional Objective for the Guardian Seikret should be available at Alma’s Quest Counter, allowing you to hunt them without needing to defeat them for a more extensive quest.

    Guardian Seikrets often drop Tough Guardian Bones, and you can check for drops by going to the Quest information panel at Alma’s Quest Counter. If you don’t receive any bones after your initial encounter, continue battling them for a chance to obtain this important material.

    Since Guardian Seikrets are smaller monsters, you may often find groups of them during your hunts, which increases your chances of getting the Tough Guardian Bone from one or more of them.

  • How to Obtain the Guardian’s Swordspear in Elden Ring

    How to Obtain the Guardian’s Swordspear in Elden Ring

    The Guardian’s Swordspear, a weapon that excels with Dexterity, is the favored choice of the Erdtree Guardians in Elden Ring. These skilled combatants roam the Lands Between, particularly around the locations hosting Minor Erdtrees.

    This guide will walk you through the process of obtaining this halberd and provide tips on how to farm it effectively for a Dexterity-focused build.

    Where to Find the Guardian’s Swordspear

    You can acquire the Guardian’s Swordspear as a drop from the Erdtree Guardians, with a low drop rate of just 2% for every 100 discovery points.

    Increase your discovery rate by raising your Vigor stat above 30 or by using a Silver Pickled Fowl Foot.

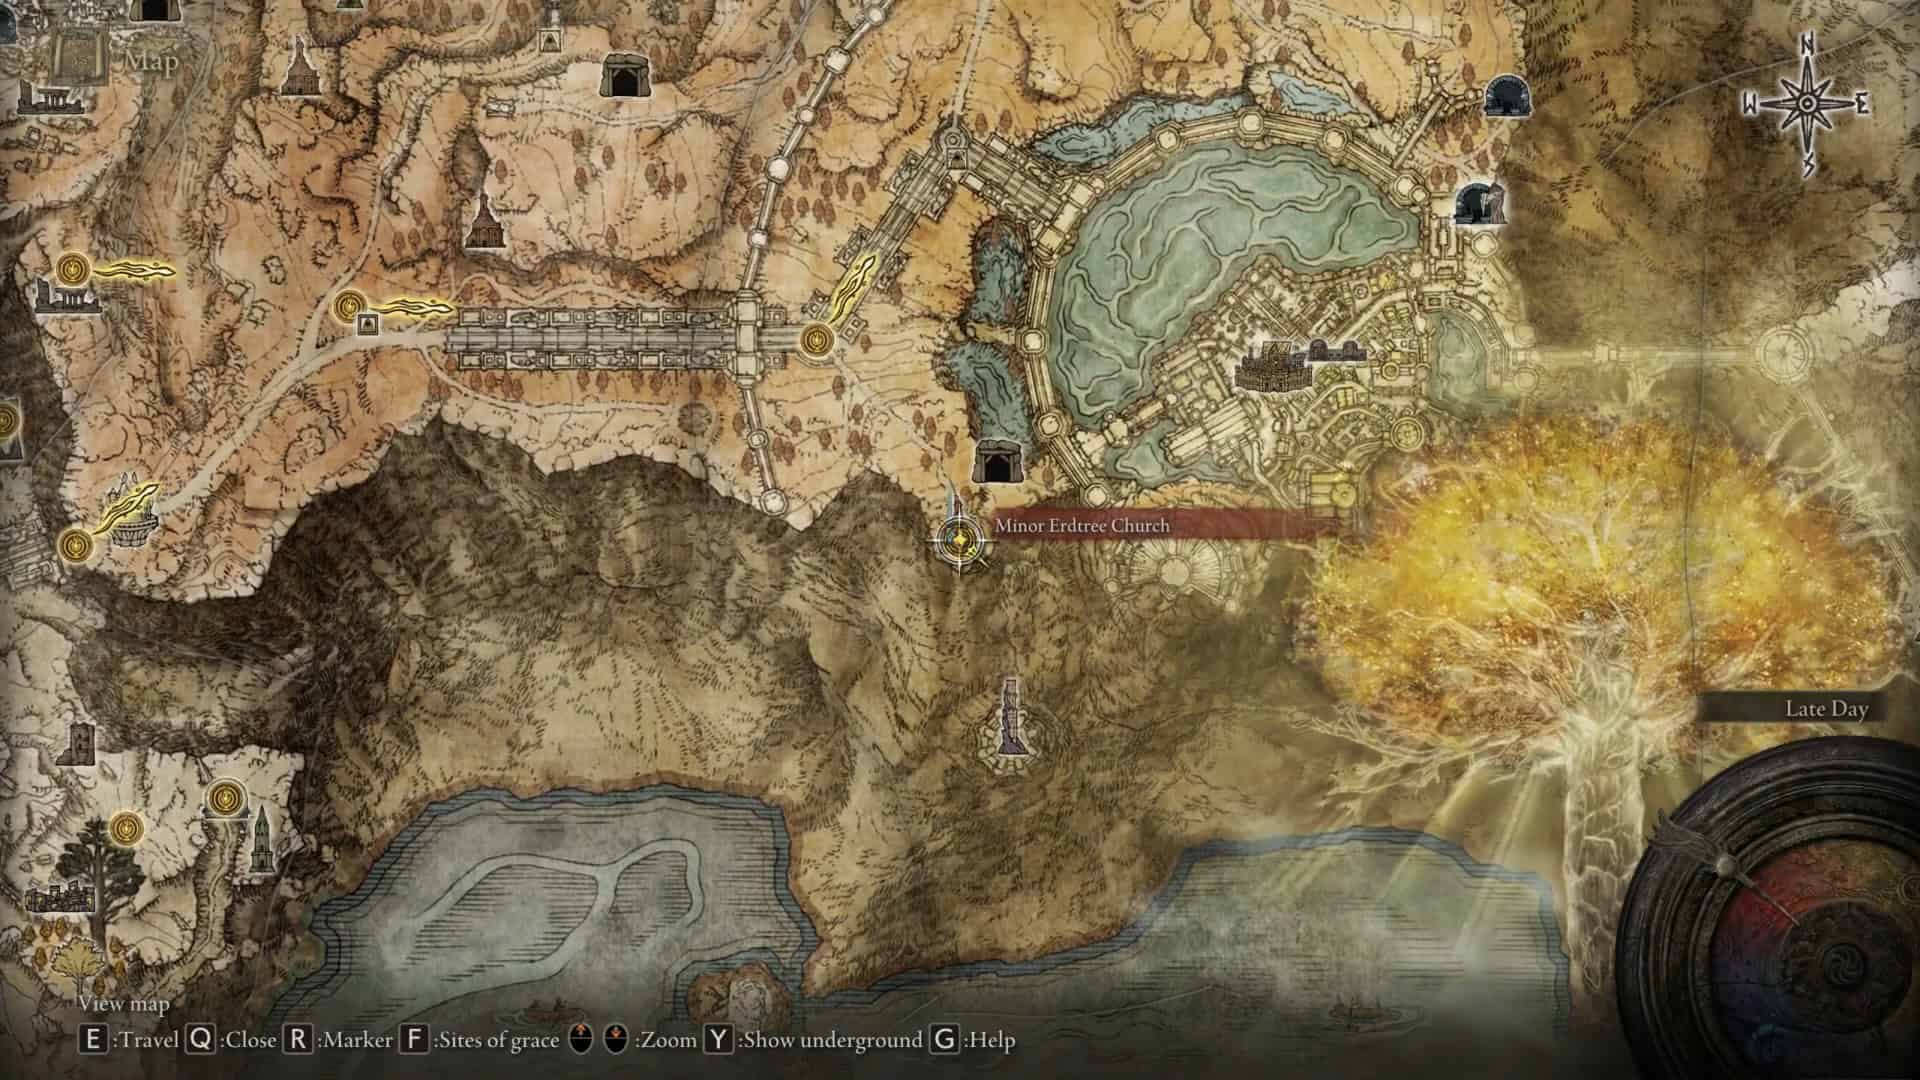
    The guardians are frequently found near the Minor Erdtree in the Weeping Peninsula (eastern Limgrave) and around the Minor Erdtree Church located in the Altus Plateau.

    This church contains six Erdtree Guardians, and you can reach it by heading southeast from Leyndell, the Royal Capital.

    Since the Guardian’s Swordspear is a rare drop, you’ll need to defeat these guardians multiple times and rest at a nearby Site of Grace to respawn them.

    Guardian’s Swordspear: Stats and Requirements

    To wield the Guardian’s Swordspear, you must have at least 17 Strength and 16 Dexterity. The weapon has E scaling for Strength and C scaling for Dexterity.

    This halberd can be enhanced with various Ashes of War and consumables like Grease, and it can also be imbued with magic.

    It can be upgraded to +25 using Smithing Stones, dealing a hefty 340 Physical damage at maximum level, with its scaling becoming A when enhanced with the Keen upgrade.

    The unique skill associated with the Guardian’s Swordspear is Spinning Slash, and you can sell this weapon for 200 Runes to any merchant in the game. The weapon weighs 9 and shares its attack patterns with Loretta’s War Sickle.

    Best Build for Guardian’s Swordspear: Is It Worth It?

    The Guardian’s Swordspear ranks among the top Dexterity weapons in Elden Ring, making it suitable for a range of elemental builds. For this guide, we’ll focus on a Lightning Guardian build.

    For optimal performance, upgrade the Guardian’s Swordspear to +25 with the Keen path. The recommended Ash of War for this build is Thunderbolt.

    This build operates effectively at level 150, and the suggested distribution of your stat points is as follows:

    • Vigor: 50
    • Endurance: 30
    • Dexterity: 50
    • Faith: 60

    For your off-hand, equip the Gravel Stone Seal upgraded to +25. As for armor, consider using the Night’s Cavalry set.

    Here are some Talismans to include in your build:

    • Shard of Alexander (boosts skill attacks)
    • Ritual Sword Talisman (increases attack power when HP is full)
    • Lightning Scorpion Talisman (enhances lightning attack damage)
    • Dragoncrest Greatshield Talisman (increases physical damage reduction)

    For the Flask of Wondrous Physick, mix these cracked tears:

    • Faith Knot Crystal Tear (boosts faith)
    • Lightning Shrouding Crack Tear (boosts lightning damage)

    Take advantage of these spells to enhance your build: