تغيرت خطة Bungie فجأة بشأن إغلاق لعبة Destiny 2، حيث أكد المطورون عودتها من خلال استرجاع حملات، ومناطق، وعمليات غارة أُدرجت سابقًا في اللعبة. في تحديث صدر في 21 سبتمبر 2026، أطلق قياديو Bungie، وهم برويا وجوش، فيديو مدته خمس دقائق ومدونة على موقع Bungie يعتذرون فيها عن فقدان التواصل مع اللاعبين خلال السنوات الماضية. وأوضحوا أن عليهم استعادة ثقة المجتمع عبر تحسين ألعابهم وقراراتهم، ومن بين الأفكار المطروحة هو إعادة إحياء أجزاء من تاريخ Destiny 2 التي لم يتمكن اللاعبون من استكشافها حتى الآن. وأكدوا أن السلسلة لا تزال محورًا رئيسيًا للمستقبل رغم كل التغييرات، وأن العمل على استعادة المحتوى القديم لن يكون مجرد استرجاع بسيط، بل سيتطلب تحديثات شاملة تضمن تحسين الإضاءة، والقتال، وأنظمة أخرى، وسيتم إصدارها عندما تكون جاهزة ومتاحة لجميع اللاعبين. كما أشاروا إلى تقييم لعبة Marathon عند إطلاقها، والذي كان محدودًا، وأعلنوا عن خطط لإطلاق نسخة من نوع إطلاق النار التبادلي. وذكروا أن فريق Marathon يركز على محتوى خاص بتحديث Nightfall في أكتوبر وتحديث Symbiosis في ديسمبر. في مايو، أعلنوا أن التحديث الأخير سيكون في 9 يونيو، تلاه تسريحات من فريق التطوير، وسط مطالبات الجماهير بإصدار لعبة جديدة من السلسلة، حيث تجاوزت توقيعات عريضة لـ Destiny 3 أكثر من 300 ألف توقيع، وظل اللاعبون يطالبون باستخدام هاشتاغات على بث PlayStation يدعون فيه لنسخة جديدة. رغم ذلك، لا تزال مستقبل Destiny 3 غير واضح، لكن إعلان Bungie عن نيتها استعادة المحتوى القديم يمنح الأمل لمجتمع اللاعببن في استمرار السلسلة وتقديم محتوى جديد يضمن استمرار إرث اللعبة.
الوسم: Gaming
-

تحكم في مواعيد إصدار الوصول المبكر إلى رنين وعداد العد التنازلي
تبدأ العد التنازلي للإصدار المرتقب بشدة من لعبة “ريمدي” وتحديدًا الجزء التالي الطموح “السيطرة المتأزرة”، مع استعداداتها للإطلاق في شهر سبتمبر المزدحم بالفعل. وتتناول القصة في هذا الجزء أخو جيسي فادين، دايلان فادين، الذي ينطلق في رحلته عبر منطقة منهاتن المعدلة خارقًا للطبيعة لمواجهة قوى الهييس، والحقوق، وغيرها من الكيانات المتأزرة.
يُوسع هذا الإصدار سلسلة “السيطرة” ليشمل أسلوب لعب أكثر انفتاحًا، حيث يستكشف دايلان المناطق المفتوحة بأسلحته المتغيرة الشكل، مما يضفي جوًا مثيرًا للغاية، ويشجع اللاعبين على الإنتظار بشوق لبدء اللعب. ومن المثير للاهتمام أن مالكي نسخة “ديلوكس الرقمية” على جهاز بلايستيشن 5 قد يتمكنون من الوصول المبكر إلى اللعبة، بفضل نسخة التحكم المتأزرة التي تتيح ذلك قبل الموعد الرسمي، حيث سيكون بإمكانهم التمتع باللعبة قبل يومين من الإصدار الرسمي. إليكم مواعيد صدور اللعبة مع مؤقت العد التنازلي.
وأُطلق رسمياً إصدار “السيطرة المتأزرة” حول العالم في 24 سبتمبر 2026 الساعة السابعة صباحًا بتوقيت المحيط الهادئ/ العاشرة صباحًا بتوقيت شرق الولايات المتحدة. ومن خلال الطلب المسبق لنسخة الديلوكس الرقمية على بلايستيشن 5، يمكن للمشتركين الحصول على وصول مبكر لمدة 48 ساعة، بحيث يتاح لهم اللعب بداية من 22 سبتمبر الساعة السابعة صباحًا بتوقيت المحيط الهادئ/ العاشرة صباحًا بتوقيت شرق الولايات المتحدة.
الوصول المبكر يقتصر على أجهزة بلايستيشن 5، بينما ينتظر مستخدمو الحواسيب الشخصية وأجهزة إكس بوكس سيريس إكس وسلسلة S، حتى الإصدار العالمي في 24 سبتمبر لبدء اللعب. هنا مواعيد الإصدار في المناطق الرئيسية حول العالم:
– غرب الولايات المتحدة: 7 صباحًا بتوقيت PDT في 22 سبتمبر، و 7 صباحًا بتوقيت PDT في 24 سبتمبر.
– شرق الولايات المتحدة: 10 صباحًا بتوقيت EDT في 22 سبتمبر، و 10 صباحًا بتوقيت EDT في 24 سبتمبر.
– البرازيل: 11 صباحًا بتوقيت BRT في 22 و24 سبتمبر.
– المملكة المتحدة: 3 مساءً بتوقيت BST في 22 و24 سبتمبر.
– ألمانيا: 4 مساءً بتوقيت CEST في 22 و24 سبتمبر.
– فرنسا: 4 مساءً بتوقيت CEST في 22 و24 سبتمبر.
– جنوب أفريقيا: 4 مساءً بتوقيت SAST في 22 و24 سبتمبر.
– تركيا: 5 مساءً بتوقيت TRT في 22 و24 سبتمبر.
– روسيا: 5 مساءً بتوقيت MSK في 22 و24 سبتمبر.
– الإمارات: 6 مساءً بتوقيت GST في 22 و24 سبتمبر.
– الهند: 7:30 مساءً بتوقيت IST في 22 و24 سبتمبر.
– سنغافورة: 10 مساءً بتوقيت SGT في 22 و24 سبتمبر.
– الفلبين: 10 مساءً بتوقيت PST في 22 و24 سبتمبر.
– الصين: 10 مساءً بتوقيت CST في 22 و24 سبتمبر.
– كوريا الجنوبية: 11 مساءً بتوقيت KST في 22 و24 سبتمبر.
– اليابان: 11 مساءً بتوقيت JST في 22 و24 سبتمبر.
– أستراليا: 12 صباحًا بتوقيت AEST في 23 سبتمبر و12 صباحًا في 25 سبتمبر.
– نيوزيلندا: 2 صباحًا بتوقيت AEST في 23 و25 سبتمبر.أما الأشخاص الذين يملكون نسخة “ديلوكس الرقمية” على بلايستيشن 5، فبإمكانهم بدء التحميل المسبق الآن، للاستفادة من 48 ساعة من اللعب المبكر، مع مميزات داخل اللعبة عديدة.Sizes التحميل لجميع المنصات تتفاوت، حيث يحتاج PS5 إلى حوالي 89.27 جيجابايت، والحاسوب الشخصي حوالي 85.97 جيجابايت، وأجهزة إكس بوكس سيريس X|S حوالي 106.08 جيجابايت.
يُذكر أن الحجم الكبير للعبة يعكس زمن اللعب المتوقع الذي يصل إلى 30 ساعة تقريباً، مما يجعل حجم التنزيل مبررًا بالكامل. ولمن يرغب في الاطلاع أكثر على متطلبات النظام أو يود قراءة تقييمنا قبل البدء، يمكنه ذلك، مع العلم أن اللعبة جاهزة للاستمتاع بعد الإطلاق، ومتحمّسون لبدء رحلة دايلان فادين. هل أنت متحمس لبدء مغامرة جديدة مع هذا الشخص في “السيطرة المتأزرة”؟ أخبرنا في التعليقات أدناه.
-
عرض أسلوب لعب Rocket League بمحرك Unreal Engine 6 وLauncher جديد لفورتنايت
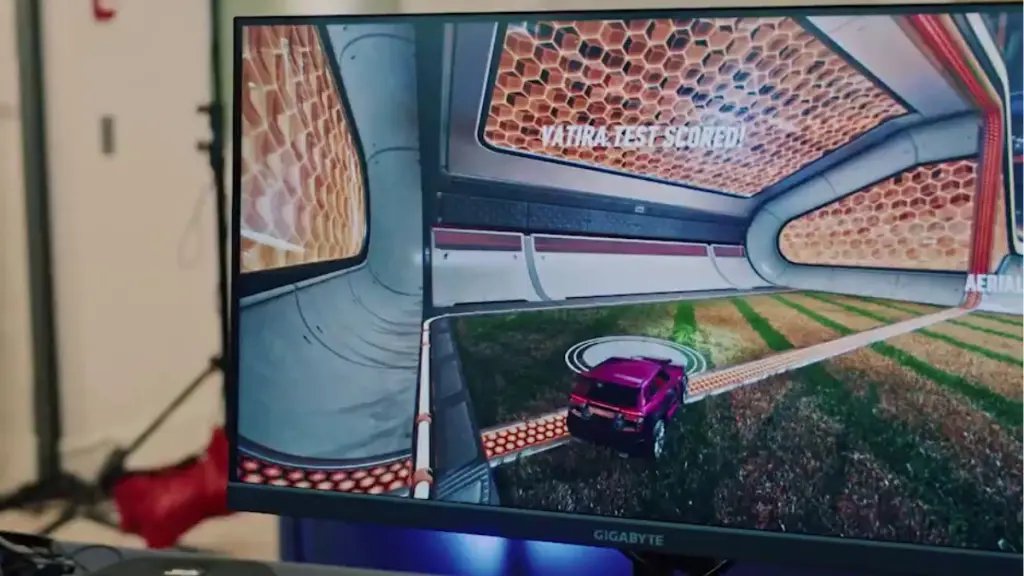
تُعْلَنُ أن شركة Psyonix كانت تعمل على إصدار جديد للعبة Rocket League، وسيكون هذا الإصدار الأول الذي يشغل بمحرك Unreal Engine 6 رسميًا. وقدّم المطورون نظرة أوّلية على طريقة اللعب في نسخة UE6 من Rocket League من خلال مقطع فيديو خلف الكواليس، حيث يمكن ملاحظة تفاعل الشركة مع ملاحظات محترفي البطولات الرسمية للعبة (RLCS) بشكل مباشر.
في المقطع الذي نُشر على صفحة Rocket League X، كشفت Psyonix عن أنها استضافت عدة جلسات اختبارات في شهري يونيو وأغسطس من هذا العام في كاري وباريس، بمشاركة لاعبين محترفين من RLCS مثل JSTN، Firstkiller، Archie وغيرهم. أشار اللاعبون إلى أن بعض الآليات في النسخة الجديدة لمحرك UE6 كانت تبدو غير سليمة بعض الشيء، وتتعرض لتأخير وصعوبة في الأداء، حيث قال أحد المحترفين: “لقد استمع المطورون لنا بشكل كبير، وأخذوا ملاحظاتنا على محمل الجد.”
تصوير السيارة في النسخة الجديدة يوضح نماذج أكثر واقعية وأجواء الملاعب بشكل محسّن، مع تحديثات كبيرة في مؤشر السرعة، حيث أصبح يظهر الآن حلقة تشبه سرعة السيارة بشكل أكثر واقعية، وعندما يتم التدريب، يتحول لون الحلقة إلى الأبيض مع ظهور رمز لا نهائية. كما أُعيد تصميم لوحة النتائج العلوية والنماذج ثلاثية الأبعاد للمركبات، مع إضافة شاشات تسجيل النقاط وتصميمات الملاعب الجديدة.
خلال الاختبار، أظهر المحترفون العديد من اللقطات الجوية والتحكم في الكرة على الأسقف باستخدام عدة أجهزة تحكم، من بينها جهاز PS4 وDualSense الخاص بـ PS5، مع العلم أن Rocket League تدعم اللعب عبر جميع المنصات. نُشاهد أيضًا أن مؤشر السرعة أصبح أكثر واقعية حيث يُحيط به إطار يتغير لونه، ويظهر أثناء التدريب بلون أبيض مع رمز لا نهائية يضيئ عليه.
أكدت Psyonix أن الجلسات المستقبلية ستستمر في مساعدة الفريق على تحسين اللعبة وإعادة بنائها من الصفر، حتى تُصبح جاهزة للموافقة النهائية من قبل المحترفين، مع توقعات بعقد المزيد من الاختبارات حتى نهاية عام 2026، وإصدار النسخة النهائية في أوائل عام 2027، مع إطلاق نسخة Unreal Engine 6 العام المقبل.
وفي نهاية المقطع الدعائي، ت pouvez رؤية منصة Epic Launcher التي كانت قد تم التلميح إليها سابقًا، ولكنها الآن تظهر مع صورة جديدة لـ Fortnite تحمل تصميم Jonesy، حيث تُعرض بواسطة عنوان “Override”. باقي المحتوى يتضمن عروضًا تجريبية لـ Disney’s Fortnite وRocket League ووضعيات مختلفة، مع شائعات تشير إلى إمكانية إطلاق هذا المنصة مع إطلاق Unreal Engine 6 في عام 2027 لدعمه في الألعاب مثل Rocket League وFortnite.
-

أسعار وإصدارات Valor Mortis تُعلن.. والحجز المسبق غير متاح
أعلنت شركة فالور مورتيس أخيراً عن أسعار وإصدارات لعبتها الجديدة. قامت شركة وان مور ليفل بتحديد سعر النسخة الأساسية بـ39.99 دولارًا، أما النسخة المميزة فبلغت 59.99 دولارًا. اللعبة المرتقبة التي يتطلع إليها الكثيرون للعبها، وأُعلن عن أسعارها عبر حسابهم الرسمي على منصة إكس، بينما لم تُدرج بعد على المتاجر الرقمية.
كما أكدوا أنه لن يتم فتح باب الطلبات المسبقة للعبة فالور مورتيس، حيث يفضل المطورون أن يشتري اللاعبون اللعبة مباشرة عند إصدارها، وهو ما يظهر جلياً في شرح أسعارها، حيث أُعلن أن مدة القصة في اللعبة ستصل إلى 20 ساعة تقريباً.
تُظهر الصورة المرفقة أسلوب اللعب في اللعبة، والتي تجمع بين عناصر الأدوار وأسلوب السولس، وتُعرف بأنها مغامرة ذات سياق فرنسي مميز.
يعتقد المطورون أن جودة اللعبة وعمقها والمدة الزمنية المخصصة لها تجعلها تنافس العديد من الألعاب التي تسعر بأثمان عالية، مع وجود خيار في النسخة المميزة يتضمن محتوى إضافياً كبيراً مستقبلاً من خلال تحديثات قابلة للتنزيل.
كما أشاروا إلى خطط لإضافة العديد من التحديثات المجانية الصغيرة خلال الأشهر التالية لإصدار اللعبة، والتي ستحتوي على تحسينات وإضافات جديدة. لعبه فالور مورتيس تأتي كعنوان من نوع الألعاب ذات النظرة الأولى على نمط السولس، وتدور أحداثها في بيئة فرنسية، وقد تم إطلاق نسخة تجريبية منها خلال فعالية Steam Next Fest، واحتلت مكانة مميزة ضمن أفضل ألعاب الحدث.
لديّ آمال كبيرة في فالور مورتيس، فهي تجمع بين ما يعجبني في نوعية ألعاب السولس مع لمسة من الأسلحة، وإذا أُطلقت بدون مشاكل كبيرة، من الممكن أن تحقق نجاحاً مماثلاً للعبة Lies of P. ويؤكد المطورون أن قرار الشراء يجب أن يكون على أساس أدائها عند الإطلاق، بدلاً من الاعتماد على الثقة العمياء.
ما رأيك في فالور مورتيس؟ هل تراها لعبة واعدة أم لا؟ شاركنا أفكارك في قسم التعليقات أدناه.
-

ارتفاع تكاليف الألعاب: إلغاء اشتراكات Xbox، PS Plus، وSwitch Online
تُظهر تقارير حديثة أن خدمات مثل اشتراك Xbox Game Pass، وPlayStation Plus، وخدمة Nintendo Switch Online تتعرض لعمليات إلغاء بسبب ارتفاع التكاليف. حيث شهدت الثلاثة زيادات ملحوظة في الأسعار في الآونة الأخيرة، مما دفع العديد من المستخدمين إلى إلغاء اشتراكاتهم في الألعاب.
تشير البيانات إلى أن ارتفاع التكاليف أصبح عاملاً رئيسياً يدفع المستخدمين إلى إلغاء اشتراكاتهم بشكل متزايد في الولايات المتحدة، حيث بلغ نسبة الإلغاءات خلال الربع الثالث أكثر من 40% مقارنةً بالربع الأول، مع ذكر السعر كعامل رئيسي وراء ذلك. وبينما تسعى المنصات الكبرى إلى تحقيق أرباح أكبر من خلال نماذج اشتراك أكثر ربحية، فإن رفع الأسعار قد يعكس عكس المتوقع ويضر بمصالحها على المدى الطويل.
كما أظهرت تقارير أخرى أن خدمة Xbox Game Pass ستقوم بحذف الألعاب التي تُصدر يوم إطلاقها بداية من العام القادم، بينما من المتوقع أن ترفع PlayStation Plus سعر اشتراكاتها مجددًا قريبًا. كل هذا يشير إلى أن نمط الاشتراك في الألعاب قد يشهد تغييرات جذرية في السنوات القادمة.
شخصياً، لطالما كنت من أنصار شراء الألعاب بشكل فردي بدلاً من الاعتماد على نماذج الاشتراك، إلا أن من يلعب بكثرة خلال الشهر يمكن أن يستفيد بشكل كبير من هذه النماذج. ومع ذلك، فإن النظام الحالي يعاني من نقائص واضحة، سواء للمستهلكين أو للشركات.
أما عن رفع الأسعار، فربما يكون خطوة غير سليمة إلا إذا أُضيفت قيمة فعلية للخدمة، خاصة وأن تقارير سابقة أشارت إلى تدهور مبيعات الألعاب الفيزيائية في السوق الأمريكية، ما أدى إلى توقف شركة سوني عن إصدار الألعاب بشكل مادي.
نأمل أن تبدأ منصات الألعاب في تعديل خططها بناءً على هذه التقارير، من خلال تقديم خيارات اشتراك أرخص، مع تقليل الألعاب المتاحة، ولكن مع زيادة القيمة مقابل السعر. بدلاً من إضافة ألعاب لا يرغب أحد في لعبها، يمكن أن تقدم ألعابًا تجذب قاعدة جماهيرية واسعة وتزيد من إقبال الاشتراكات.
ما رأيك في هذا الموضوع؟ شاركنا رأيك في قسم التعليقات أدناه، هل أنت مشترك في أي من هذه الخدمات؟
-

Housemarque Co-Founder Ilari Kuittinen Leaves After 31 Years
Ilari Kuittinen, a co-founder of Housemarque Studio, has announced his retirement after dedicating 31 years to the company. Housemarque shared a final message from him on their X account today, outlining plans for leadership transition and the studio’s future direction.
Today marks his last day as part of the Housemarque team, as he steps down after three decades. During his time at the studio, he contributed to acclaimed titles including Resogun, Returnal, and the recent Saros. The company publicized his departure in a post on X earlier today.
Kuittinen began his career in game development in 1993 at Terrmarque and later co-founded Housemarque alongside Harri Tikkanen. The studio maintained its independence for over 25 years before joining PlayStation Studios in 2021, fueled by the worldwide success of Returnal, which remains one of the top PlayStation Plus games.
He fostered an environment that encouraged creators to fully express their vision without restrictions. “My main goal as a leader has always been simple: to create an environment where talented creators have the freedom and security to do their best work,” he shared.
Throughout his tenure, Kuittinen reached notable milestones, elevating Finnish game development onto the global stage. His portfolio includes classic arcade titles like Supreme Snowboarding, Super Stardust HD, and Resogun, as well as blockbuster hits like Returnal and Saros, both of which refine what challenging games can achieve.
In summary, Kuittinen played a crucial role in transforming Housemarque into a leading AAA studio while maintaining its distinctive creative spirit. He also expressed heartfelt gratitude to the gaming community:
“Beyond Housemarque and PlayStation, this journey wouldn’t have been possible without the larger gaming community. To all the friends, fellow founders, mentors, and industry peers worldwide who have offered advice, support, or simply listened over the past three decades—thank you,” he said.
In his closing message, he revealed that he has been quietly preparing for the leadership change. He has mentored Sami “Haxu” Hakala, who recently stepped into the role of Managing Director, along with the rest of the leadership team, to ensure smooth operations and stability moving forward.
Kuittinen emphasized that Housemarque’s strategic direction and creative vision are in “excellent hands.” He also shared his plans for the future, stating that after an impressive 33-year career in the industry, he intends to take some time off and is not pursuing any new milestones at the moment.
Despite retiring, he plans to stay engaged with the gaming world by attending trade shows, game showcases, and awards, including The Game Awards. He’s also considering mentorship or consulting roles later on.
[Company logo or signature images omitted for clarity.]
-

Fable’s Female Character Undergoes Fresh Facial Makeover Before Gamescom
Xbox recently shared a short teaser of Fable on their social media platforms ahead of Gamescom, revealing a significantly redesigned female protagonist. This overhaul of the female character is believed to be a response to some of the game’s earlier criticisms.
From the first reveal, gamers expressed concerns about how unusual the initial female character looked. When Fable showcased that players would have the ability to customize their own characters, some of those issues were addressed. However, the original design continued to generate debate and was often cited negatively in discussions about the game’s release.
### Fable Changes Its Female Character to a Softer, More Attractive Look
It appears that Xbox has opted to make a major change and has completely redesigned the female character for the upcoming lineup at Gamescom. The new character, featured in a brief clip released online, quickly caught the community’s attention, and the feedback on her appearance was predominantly positive.
The redesigned female character now sports softer facial features, fewer freckles, and generally looks much more appealing. This change might be part of Xbox’s new strategy to boost the game’s chances of success. Negative marketing has been a significant hurdle for many recent game releases, and Xbox seems keen to avoid similar pitfalls with Fable.
The community’s response to the new design has been very favorable. One user commented that they were planning to pre-order the game just because of this update. Others echoed similar sentiments, indicating that Xbox’s decision to showcase the new look ahead of Gamescom was a smart move to generate positive buzz.
There has been ongoing discussion in the gaming world about whether some developers intentionally design less attractive characters for their games. Sometimes this criticism feels justified, while at other times it seems unwarranted. In the case of Fable, the criticism of the original design appeared justified, but the same cannot be said for other titles like God of War Laufey, where the critique didn’t hold as much weight.
What’s certain is that game developers need to have these conversations early in the development process about character design, especially before public showcases.
What do you think of Fable’s new female character redesign? Let us know your thoughts in the comments below.
-

What Is Included in the GTA 6 $100 Ultimate Edition?
Digital Phablet – As pre-orders for GTA 6 officially go live tomorrow, new reports have revealed that the game will start at $80, with a $100 Ultimate Edition offering exclusive content.
According to Rockstar Games, the Grand Theft Auto VI: Ultimate Edition promises players “the most immersive GTA experience yet,” including premium vehicles, weapons, cosmetics, and access to various activities throughout Jason and Lucia’s storyline. Many fans have criticized the edition as “predatory” for restricting content behind a paywall, especially considering the game’s already steep $80 price point.
What’s included in the $100 GTA 6 Ultimate Edition?
- Exclusive vehicles, weapons, and outfits
- Special car modification shops
- Unique facial hair styles, tattoos, nail art, and makeup customization
- Special locations
- Additional activities integrated throughout Jason and Lucia’s journey
The developer also announced that pre-ordering the digital version of GTA 6 will allow players to preload the game starting November 12, ahead of its official release on November 19. Physical copies will include a download code inside the box and are expected to become available around the same time.
On social media, some users expressed frustration, with one posting, “Rockstar’s ‘Ultimate Edition’ is straight-up predatory bullshit. Paying extra for basic outfits, tattoos, a decent car, and story content that should’ve been in the game at launch? They’re no longer selling a masterpiece—they’re selling a $70 beta and a DLC loot box for whales. GTA died when it became this greedy. Wake up.”
Another user added, “I don’t care about the extra cosmetics. But charging more for exclusive locations and extra activities is just bullshit for preorders. That’s what happened with Star Wars Outlaws, and look how that turned out.”
-

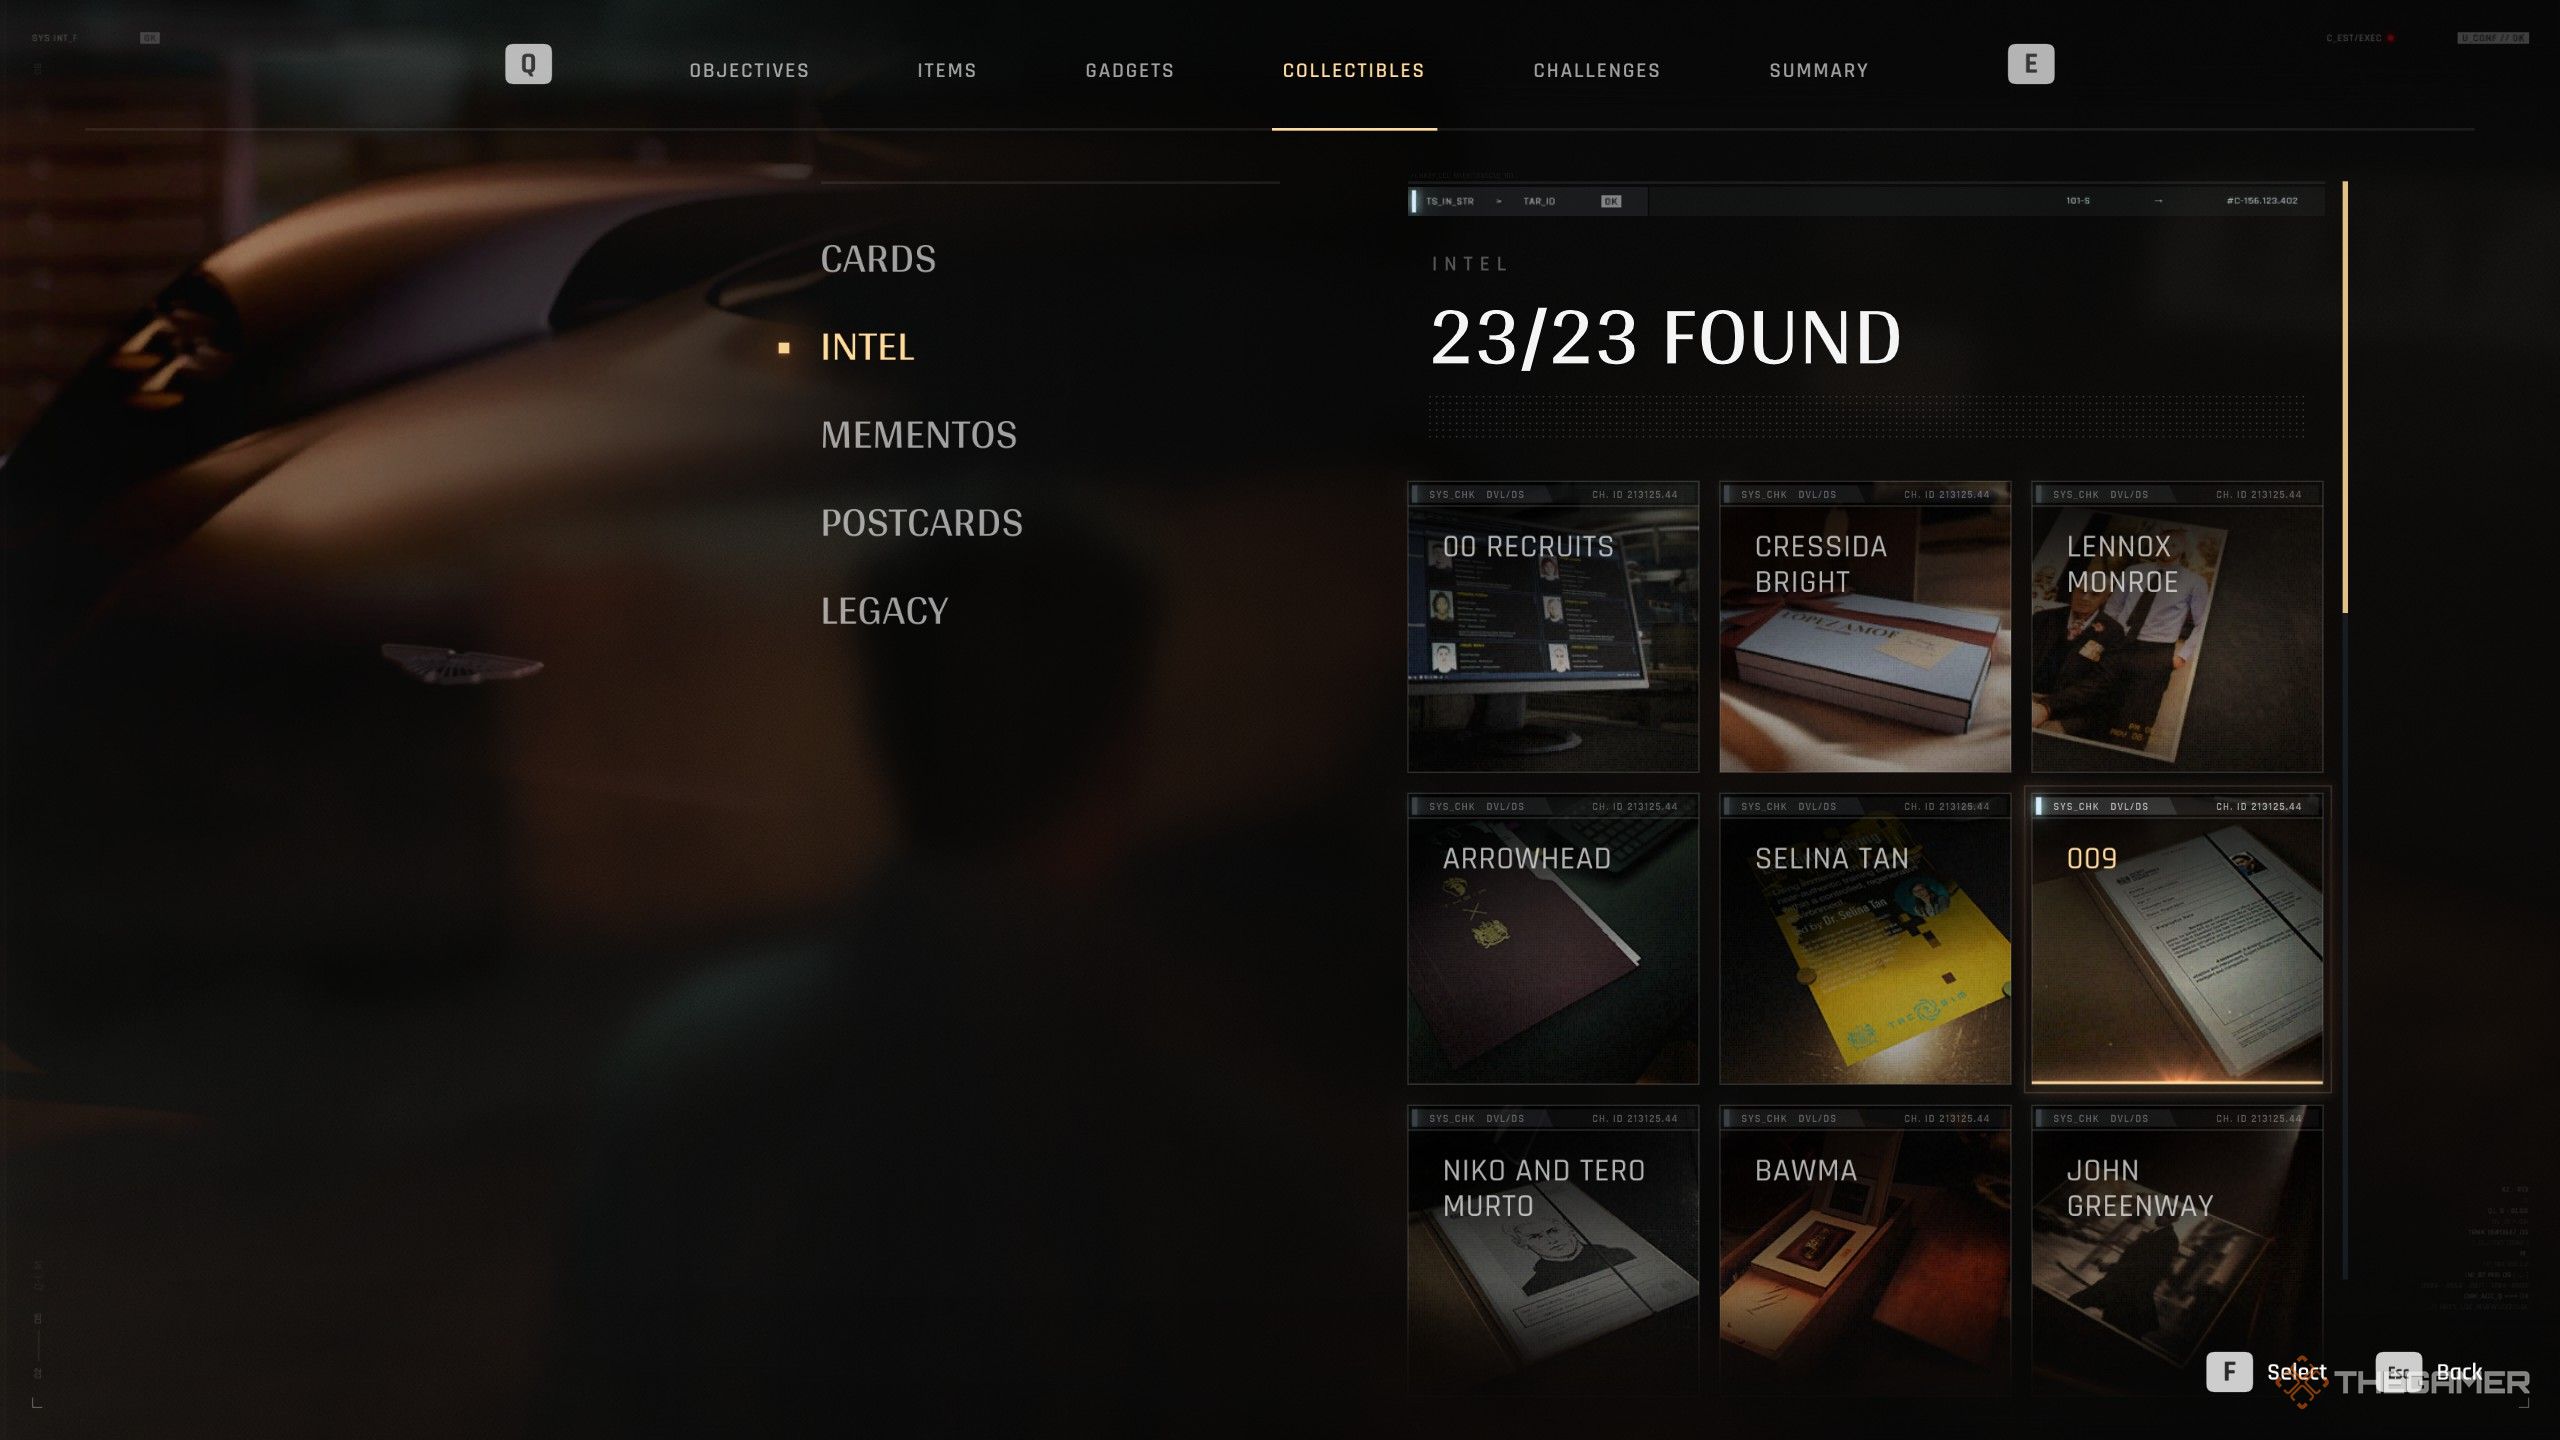
All 23 Intel Locations in 007 First Light: Completing & Solving Guide
007 First Light is now available, so you should gear up with your silenced pistol, put on your laser watch, and get ready to take down enemies in exotic locations. This game follows the early years of James Bond, where you’ll face off against a mysterious enemy worldwide.
During your journey, you’ll find many collectibles, including playing cards and references from previous Bond films. One of the key collectibles are the MI6 Intelligence Files, which reveal important details about the characters you meet. Below is a complete guide to help you find all 23 MI6 Files in the game.
All MI6 Intel Locations
When collecting MI6 Files in 007 First Light, note that they won’t be physically picked up when you interact with them. Instead, they will be marked as collected in your menu without disappearing from the environment. These files don’t have a distinct appearance, so they can look like a computer screen, a folder, or even an unusual object like a giant wooden spoon. It’s best to interact with everything you see to ensure you don’t miss any.
Here is a detailed list of each MI6 File, which mission it belongs to, and a helpful image for locating it:
Heart of the Matter — 00 Recruits
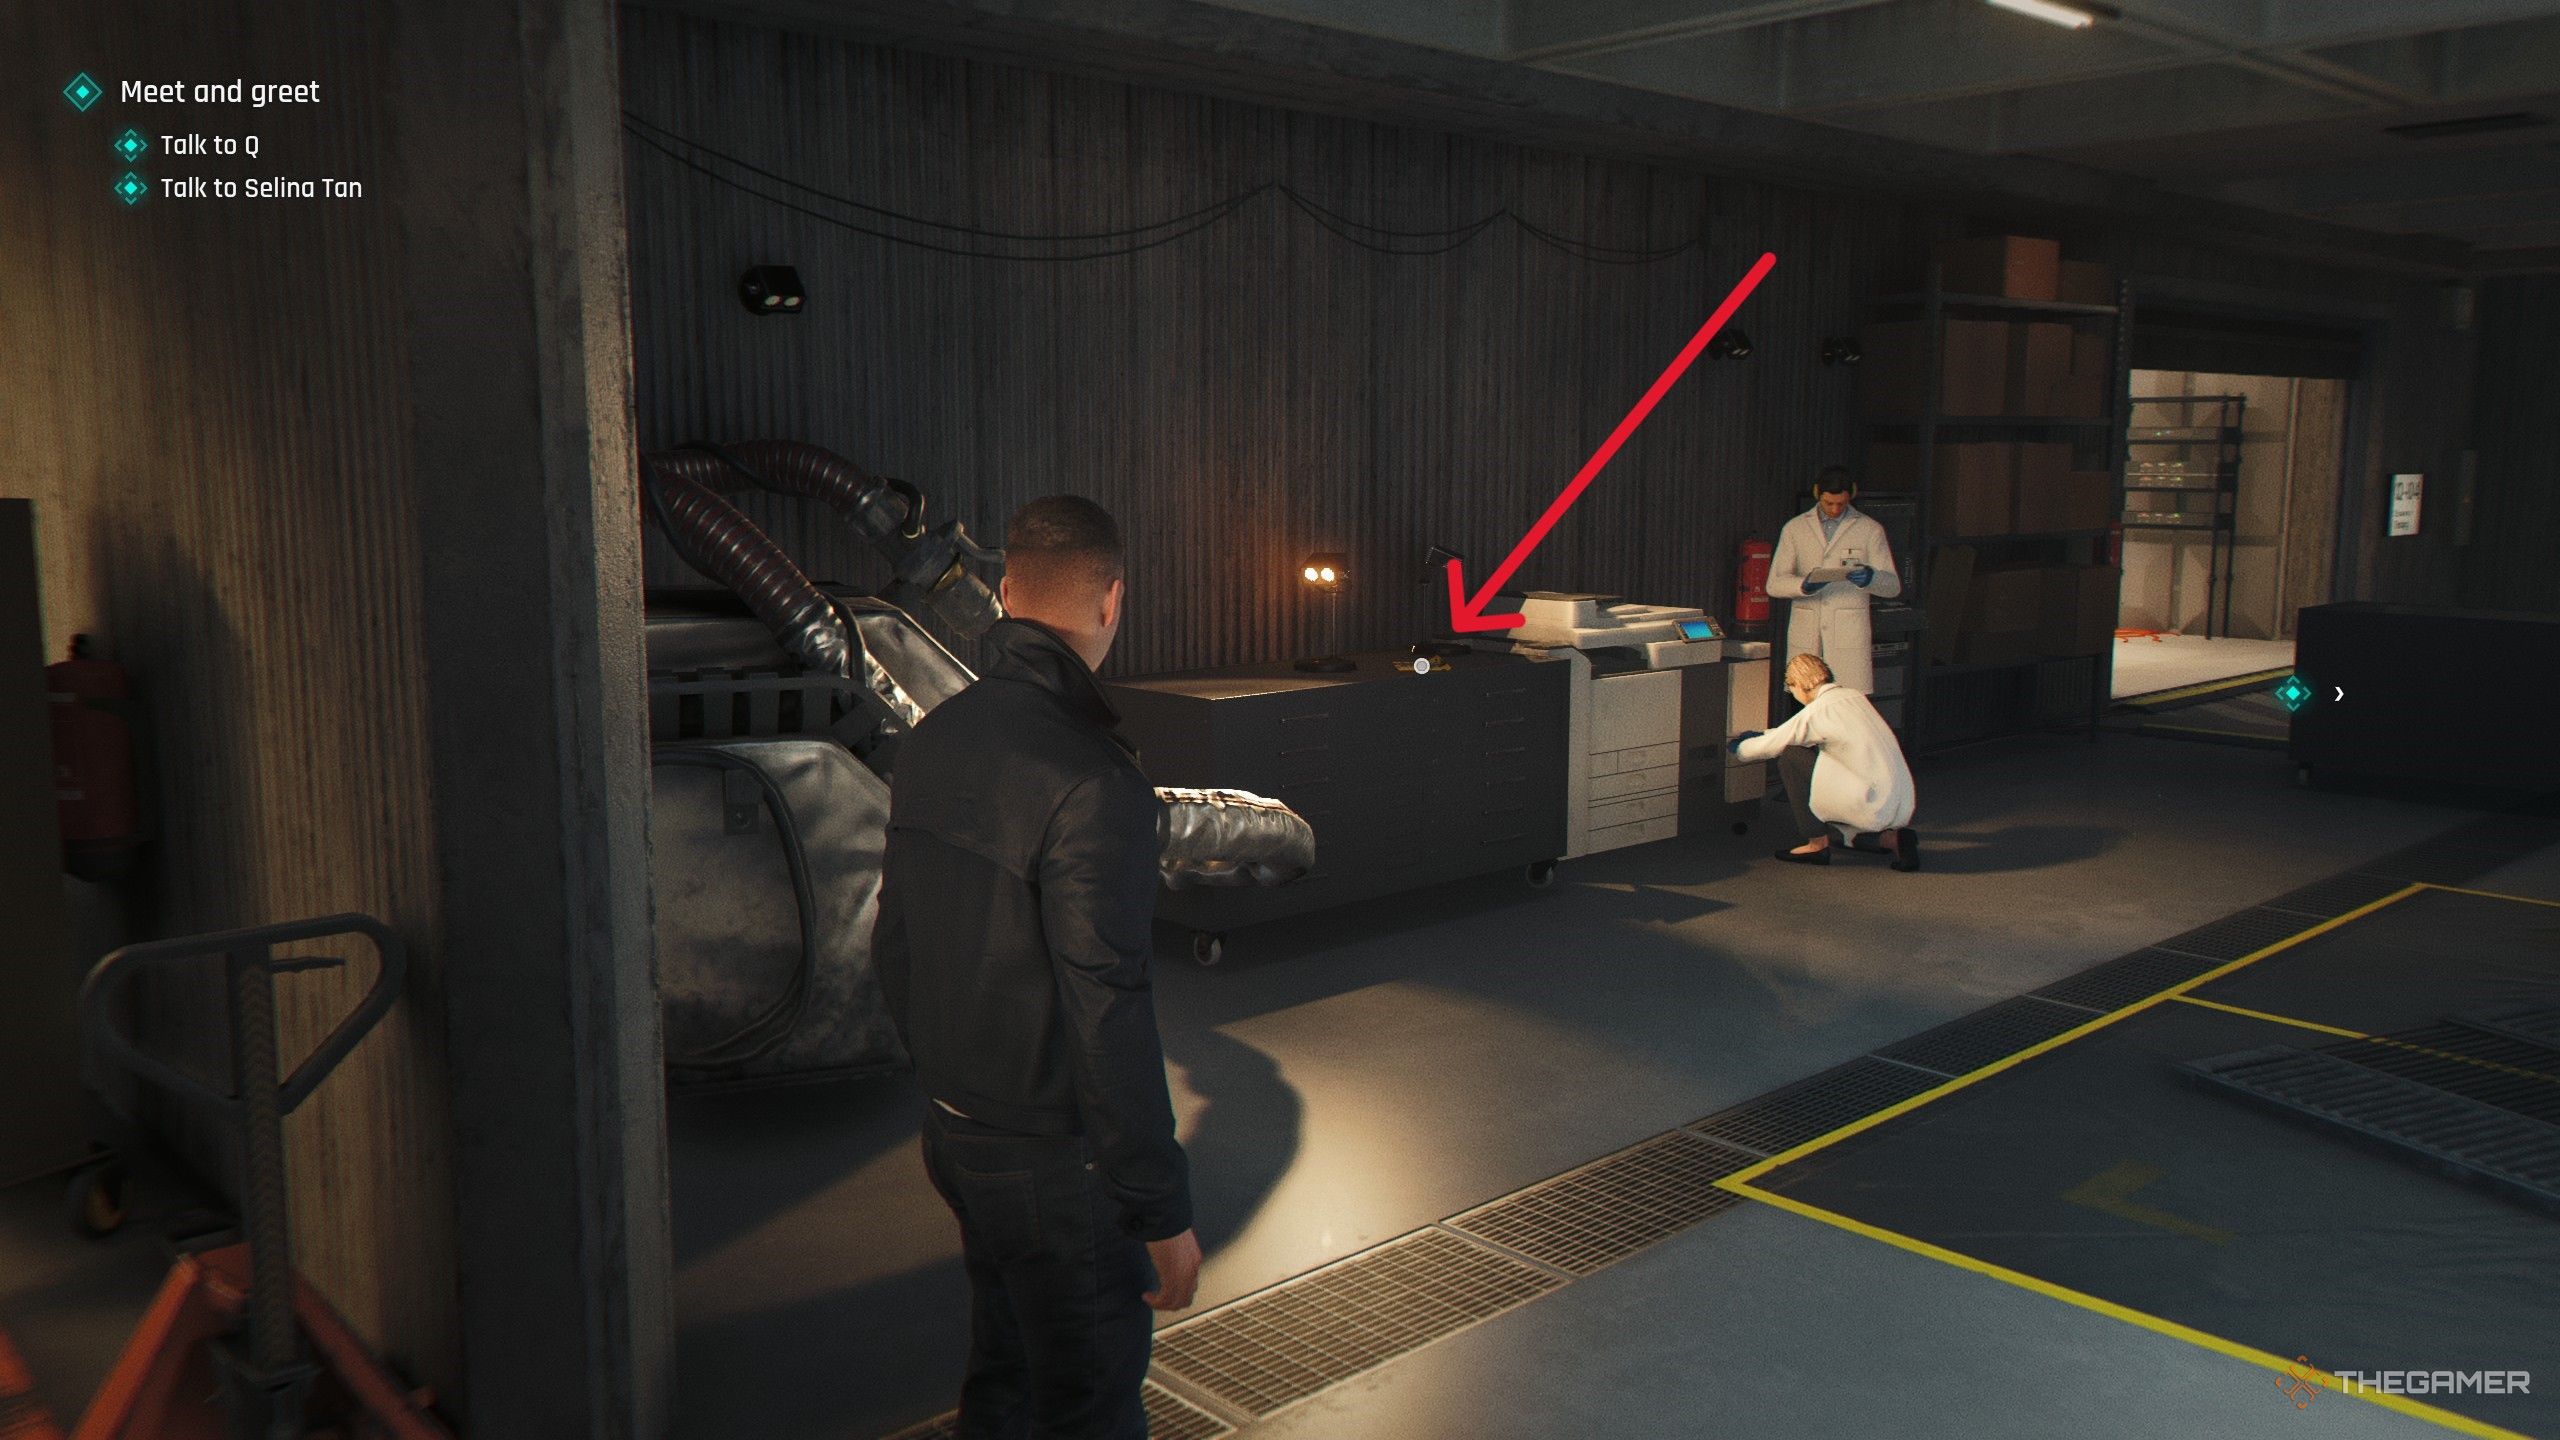
First, play through the “Heart of the Matter” chapter until you can explore Q-Branch. After speaking with Q, go to the central podium and locate a computer terminal to the left of the SUV, on a desk behind the initial Q interaction. Interact with this computer to unlock the 00 Recruits file.Image:
Location of MI6 file in Q-Branch
Note: Interacting with the file logs it as obtained but doesn’t remove it physically.Heart of the Matter — Selina Tan
While exploring the Q-Branch, head to the back right corner of the room. Behind the SUV in the box, find a small table mounted along the wall. Interact with the yellow paper there, which is Selina Tan’s file, and add it to your collection.Image:
Location of Selina Tan’s fileA New Home — Lennox Monroe
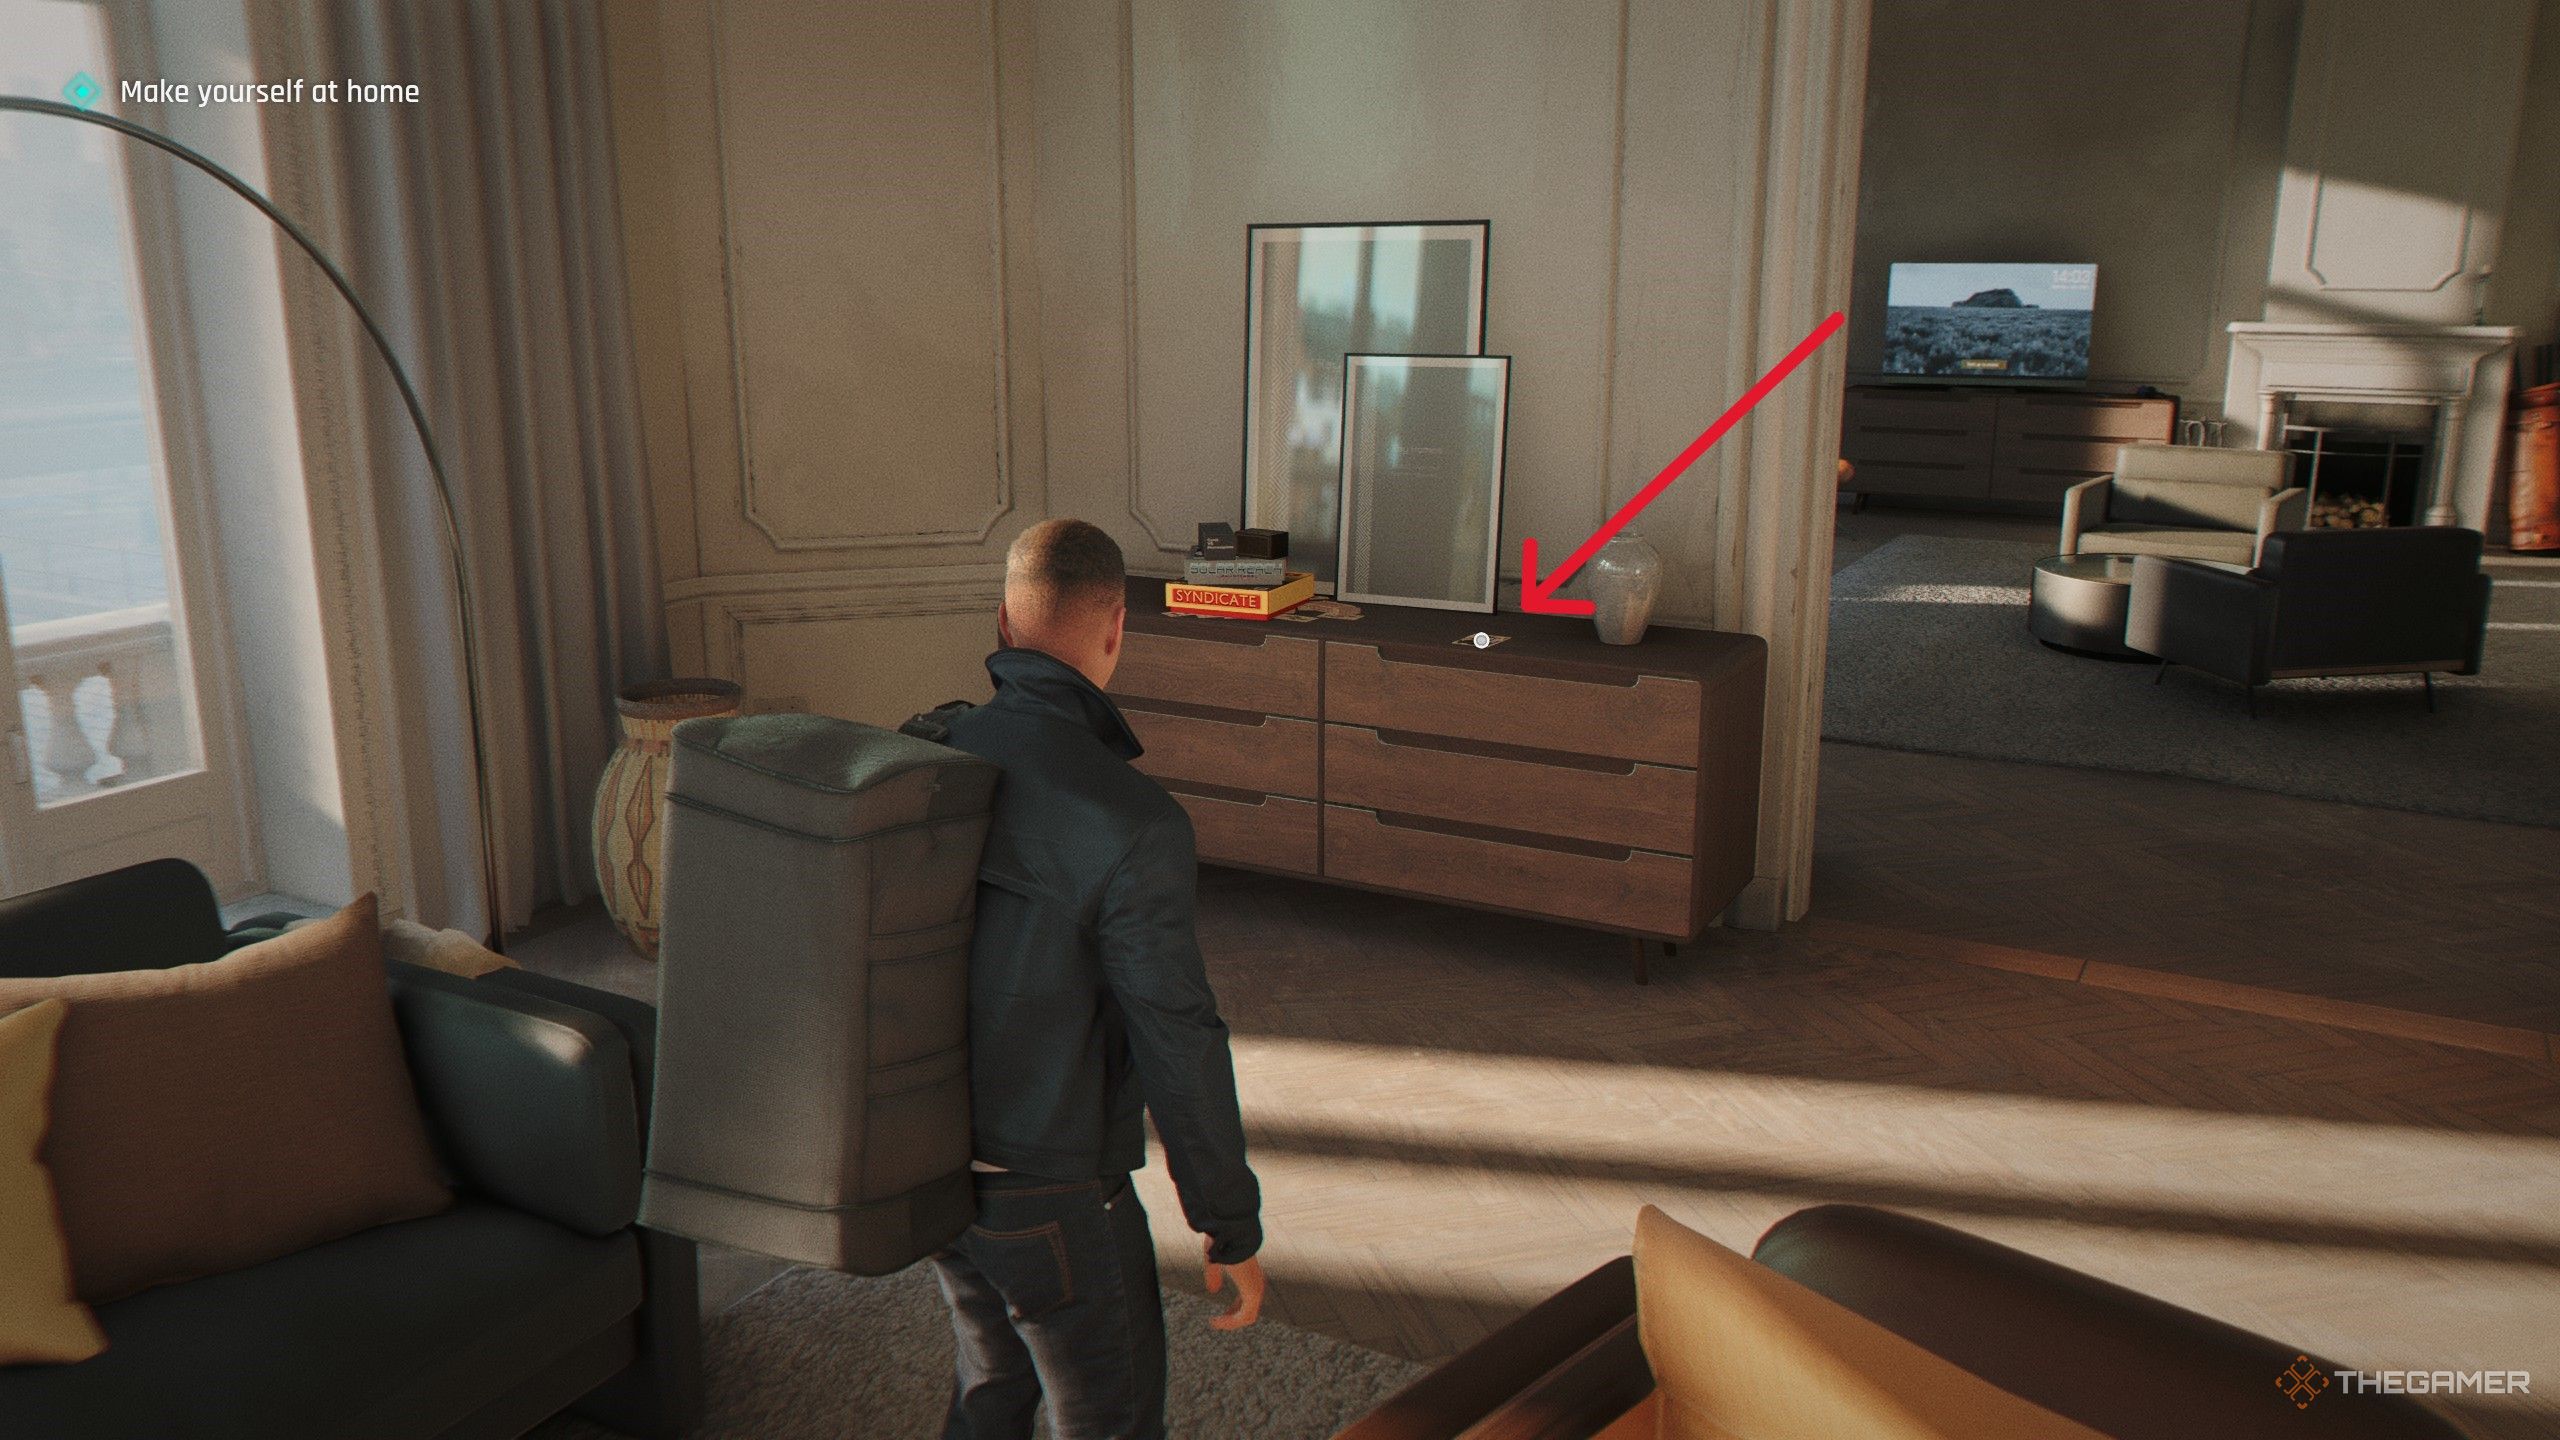
In the “A New Home” chapter, after arriving at your penthouse in London, move through the space to the living room. On a dresser near the door, there’s a family photo of Lennox Monroe. Flip the photo to add it to your MI6 Files.Image:
Location of Lennox Monroe’s fileA New Home — Cressida Bright
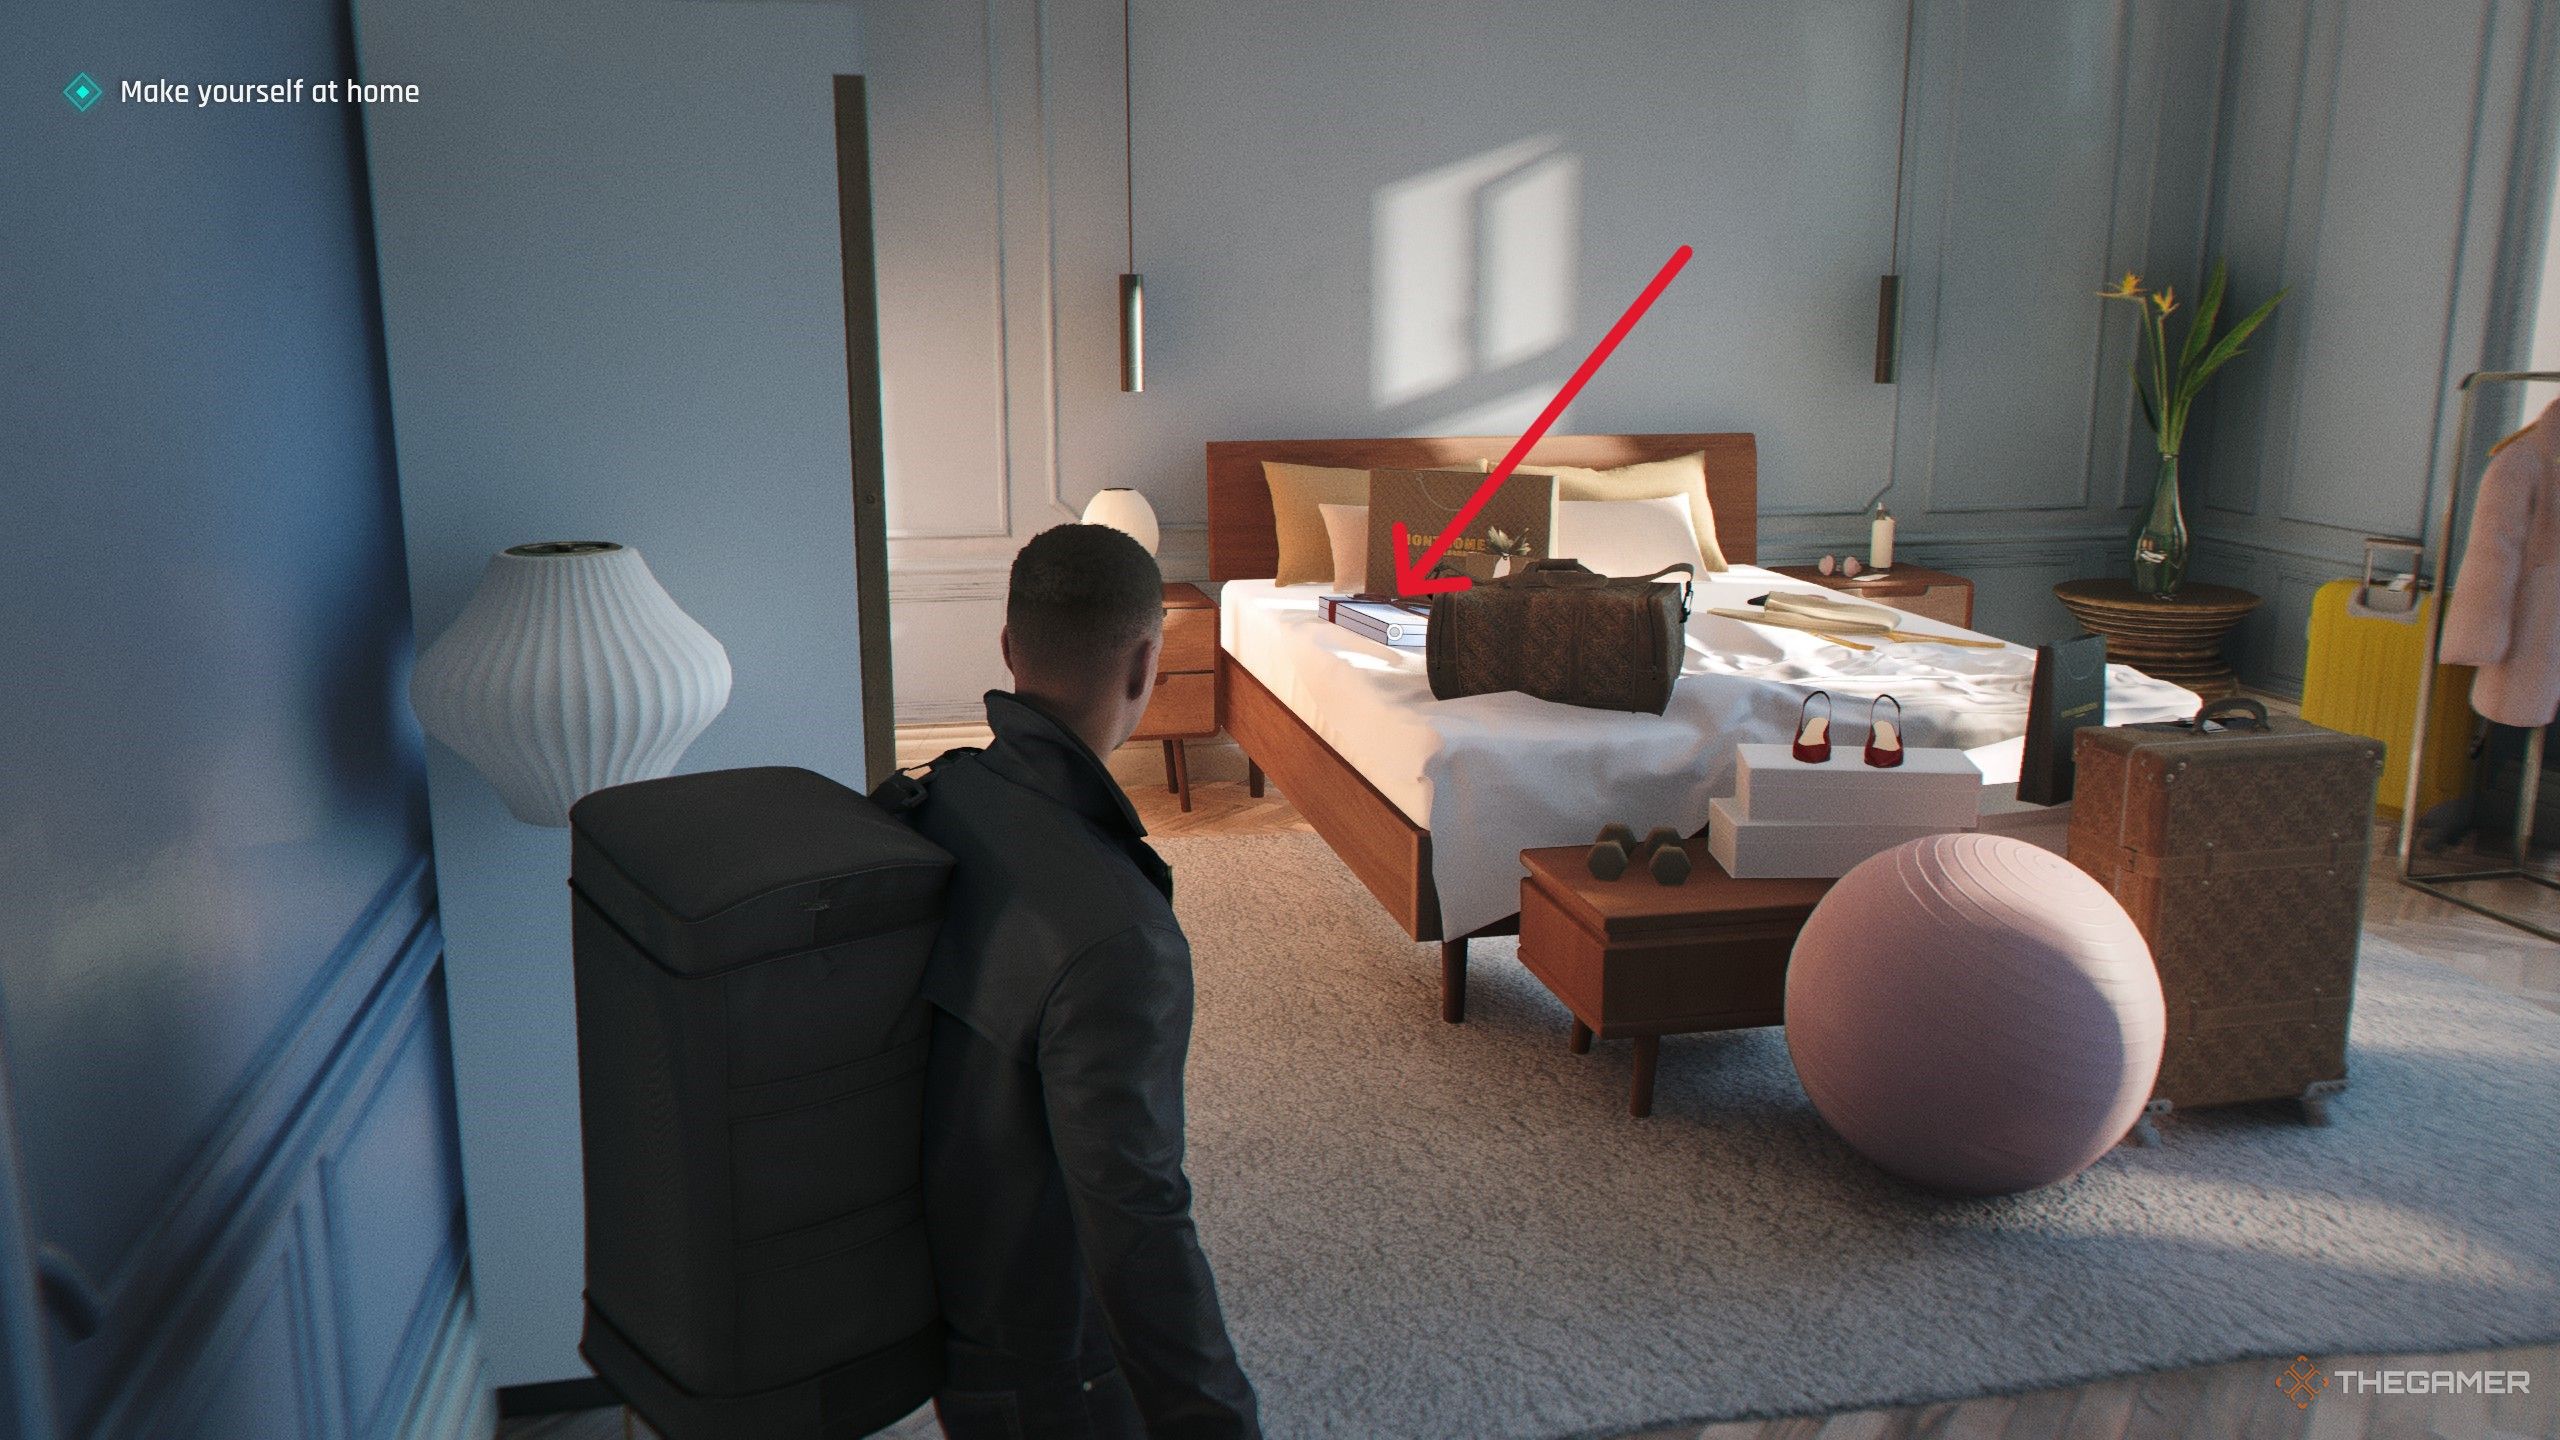
Inside the penthouse, go down the main hall and enter Cressida’s room through the second door on the right. She has a present box on her bed. Interact with the box to acquire her MI6 file.Image:
Location of Cressida Bright’s fileThe Past Never Dies — Niko and Tero Murto
During your third visit to Q-Branch and the Operations floor, after speaking to Q and receiving gadgets, go to the back of the floor. On a desk along the wall, there’s a file about the twins you fought at the hotel. Interact to collect it.Image:
Location of Niko and Tero Murto’s fileThe Past Never Dies — John Greenway
Once on 009’s boat in “The Past Never Dies,” enter the backroom. Inside, on a table, find a photo of John Greenway. Interact with it to add the file to your MI6 collection.Image:
Layout in the boatUninvited — James Bond
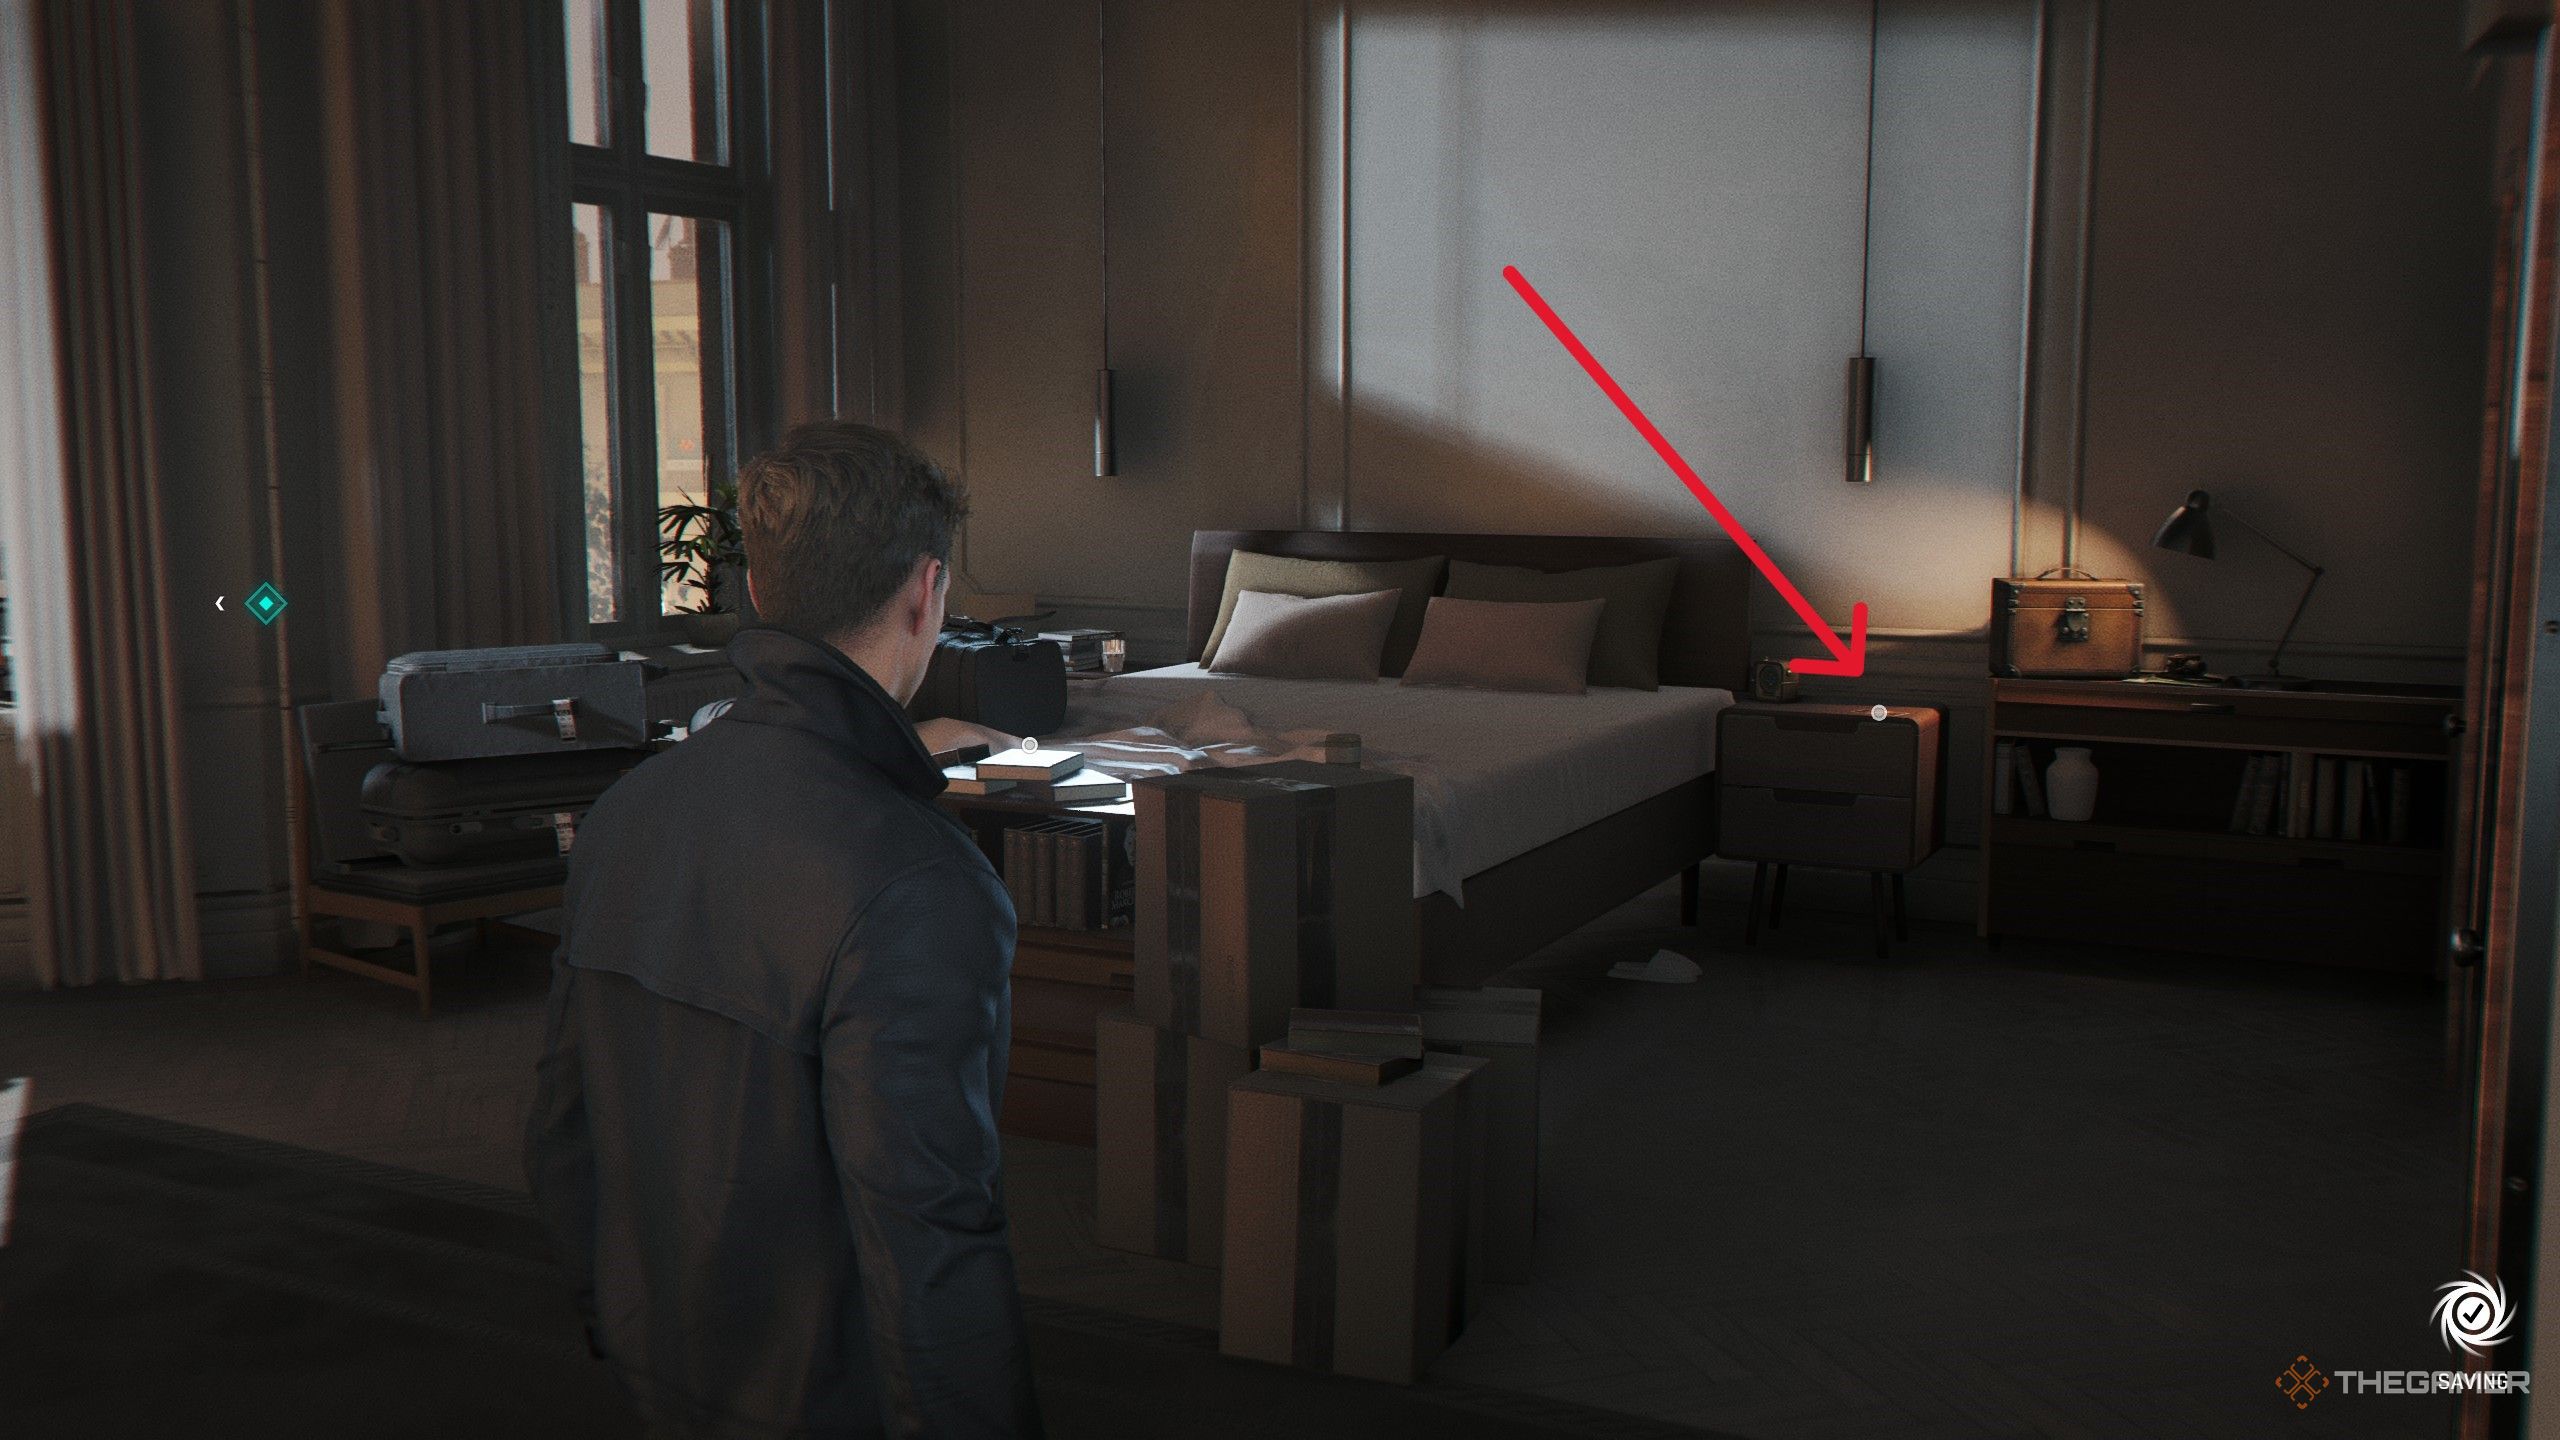
Back at Bond’s penthouse, go to his bedroom and interact with the photo on the nightstand. This will unlock the James Bond MI6 File.Image:
Location in Bond’s bedroomUninvited — Webb Industries
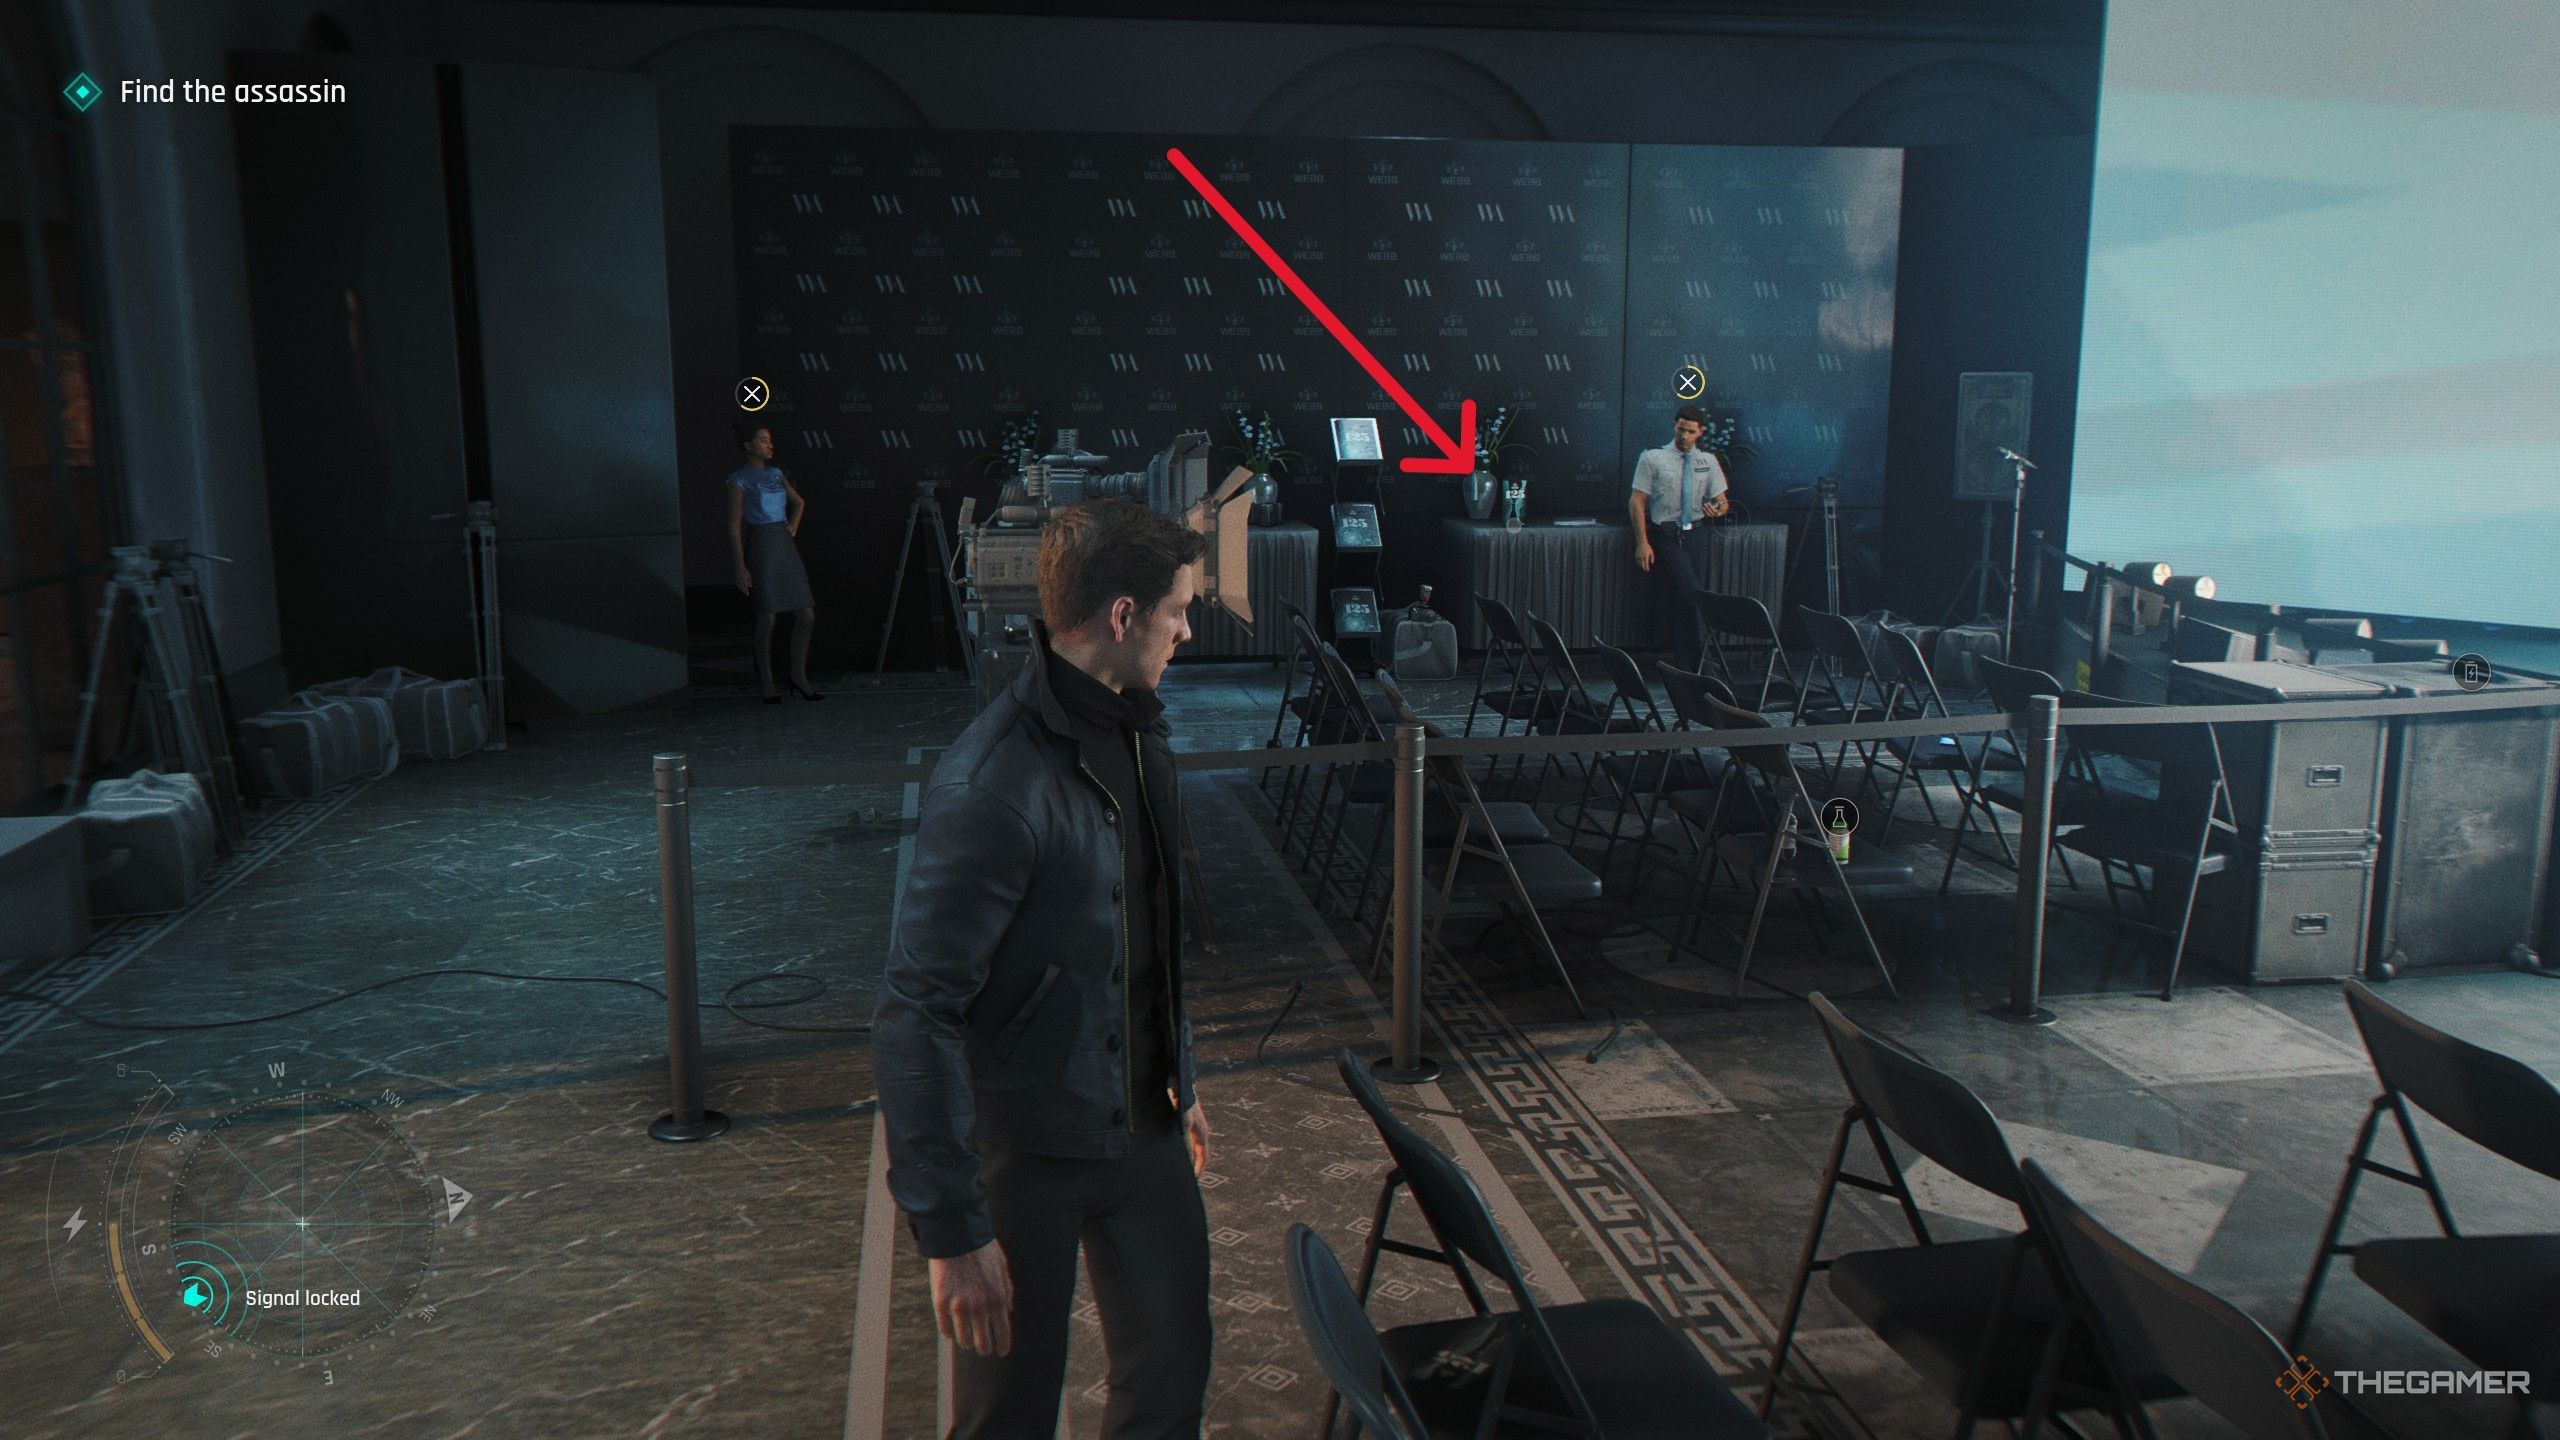
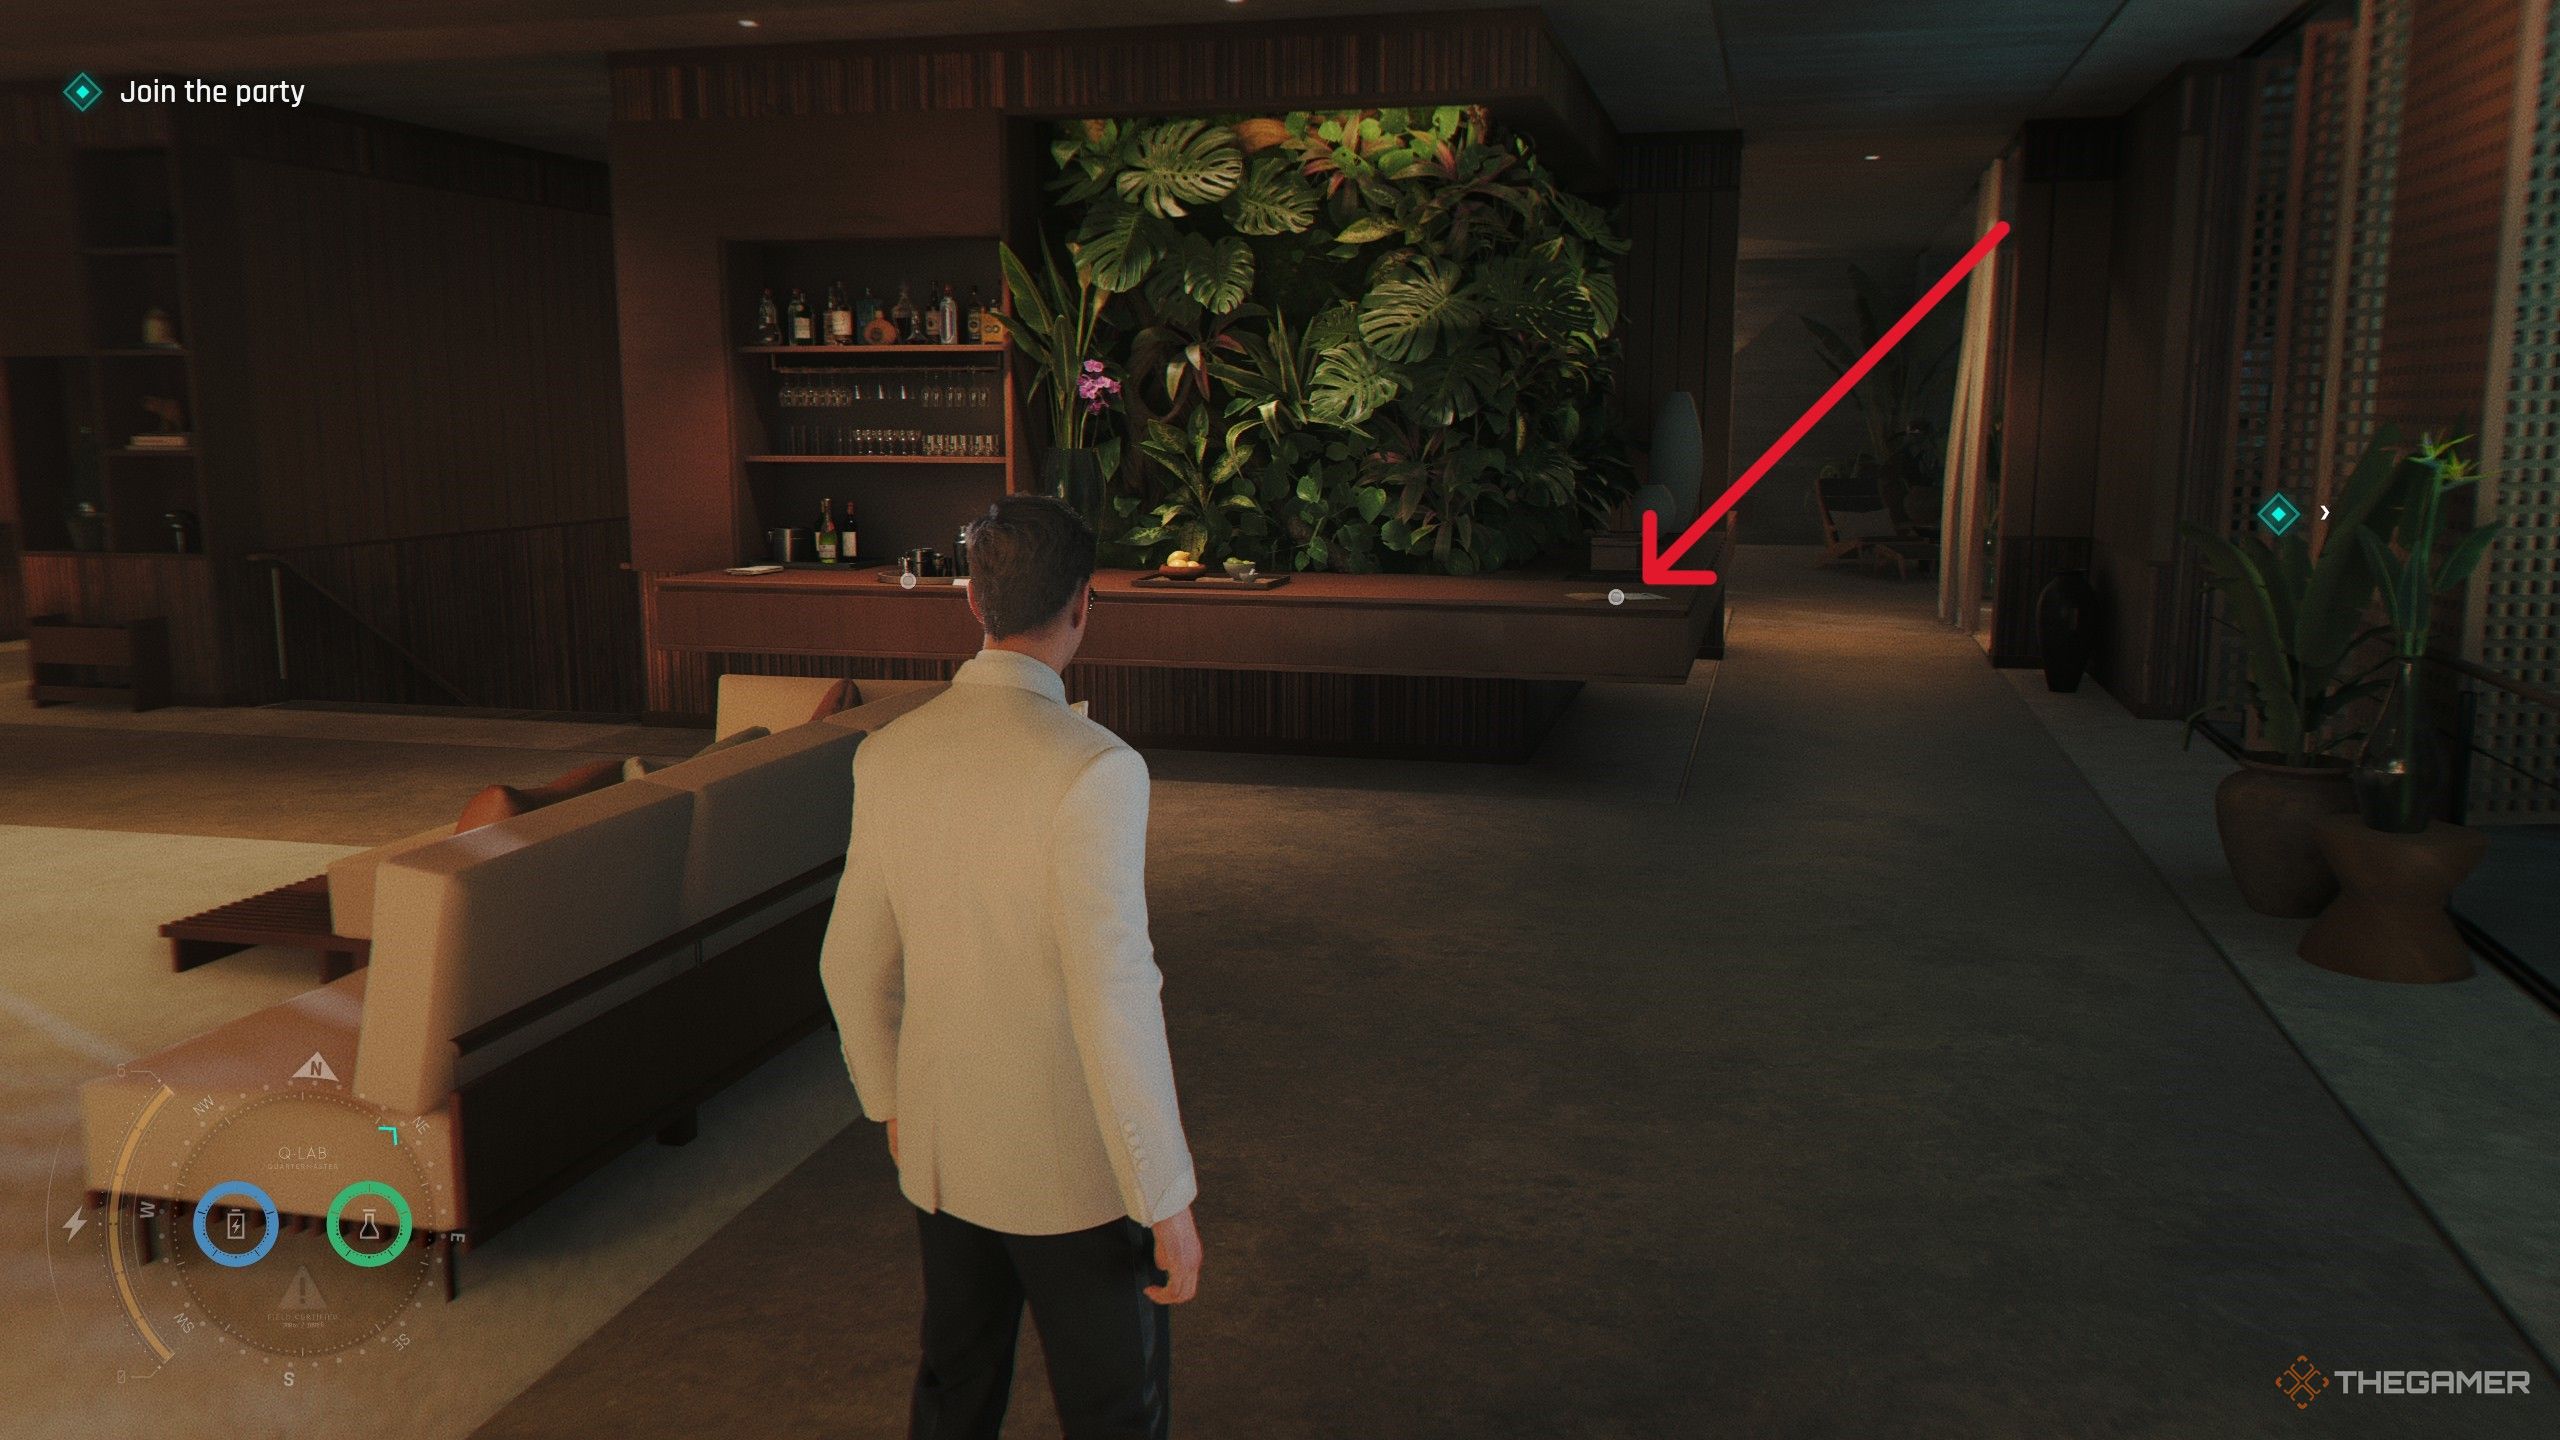
During the infiltration of the gala, after stealing the invite, enter the main room with a large bar. Go left into a room with empty chairs and a stage. Distract the guard at the entrance, then use the Bluff mechanic inside to stealthily grab the Webb Industries flyer from the table.Image:
Interior of the galaUninvited — Stephen Bright
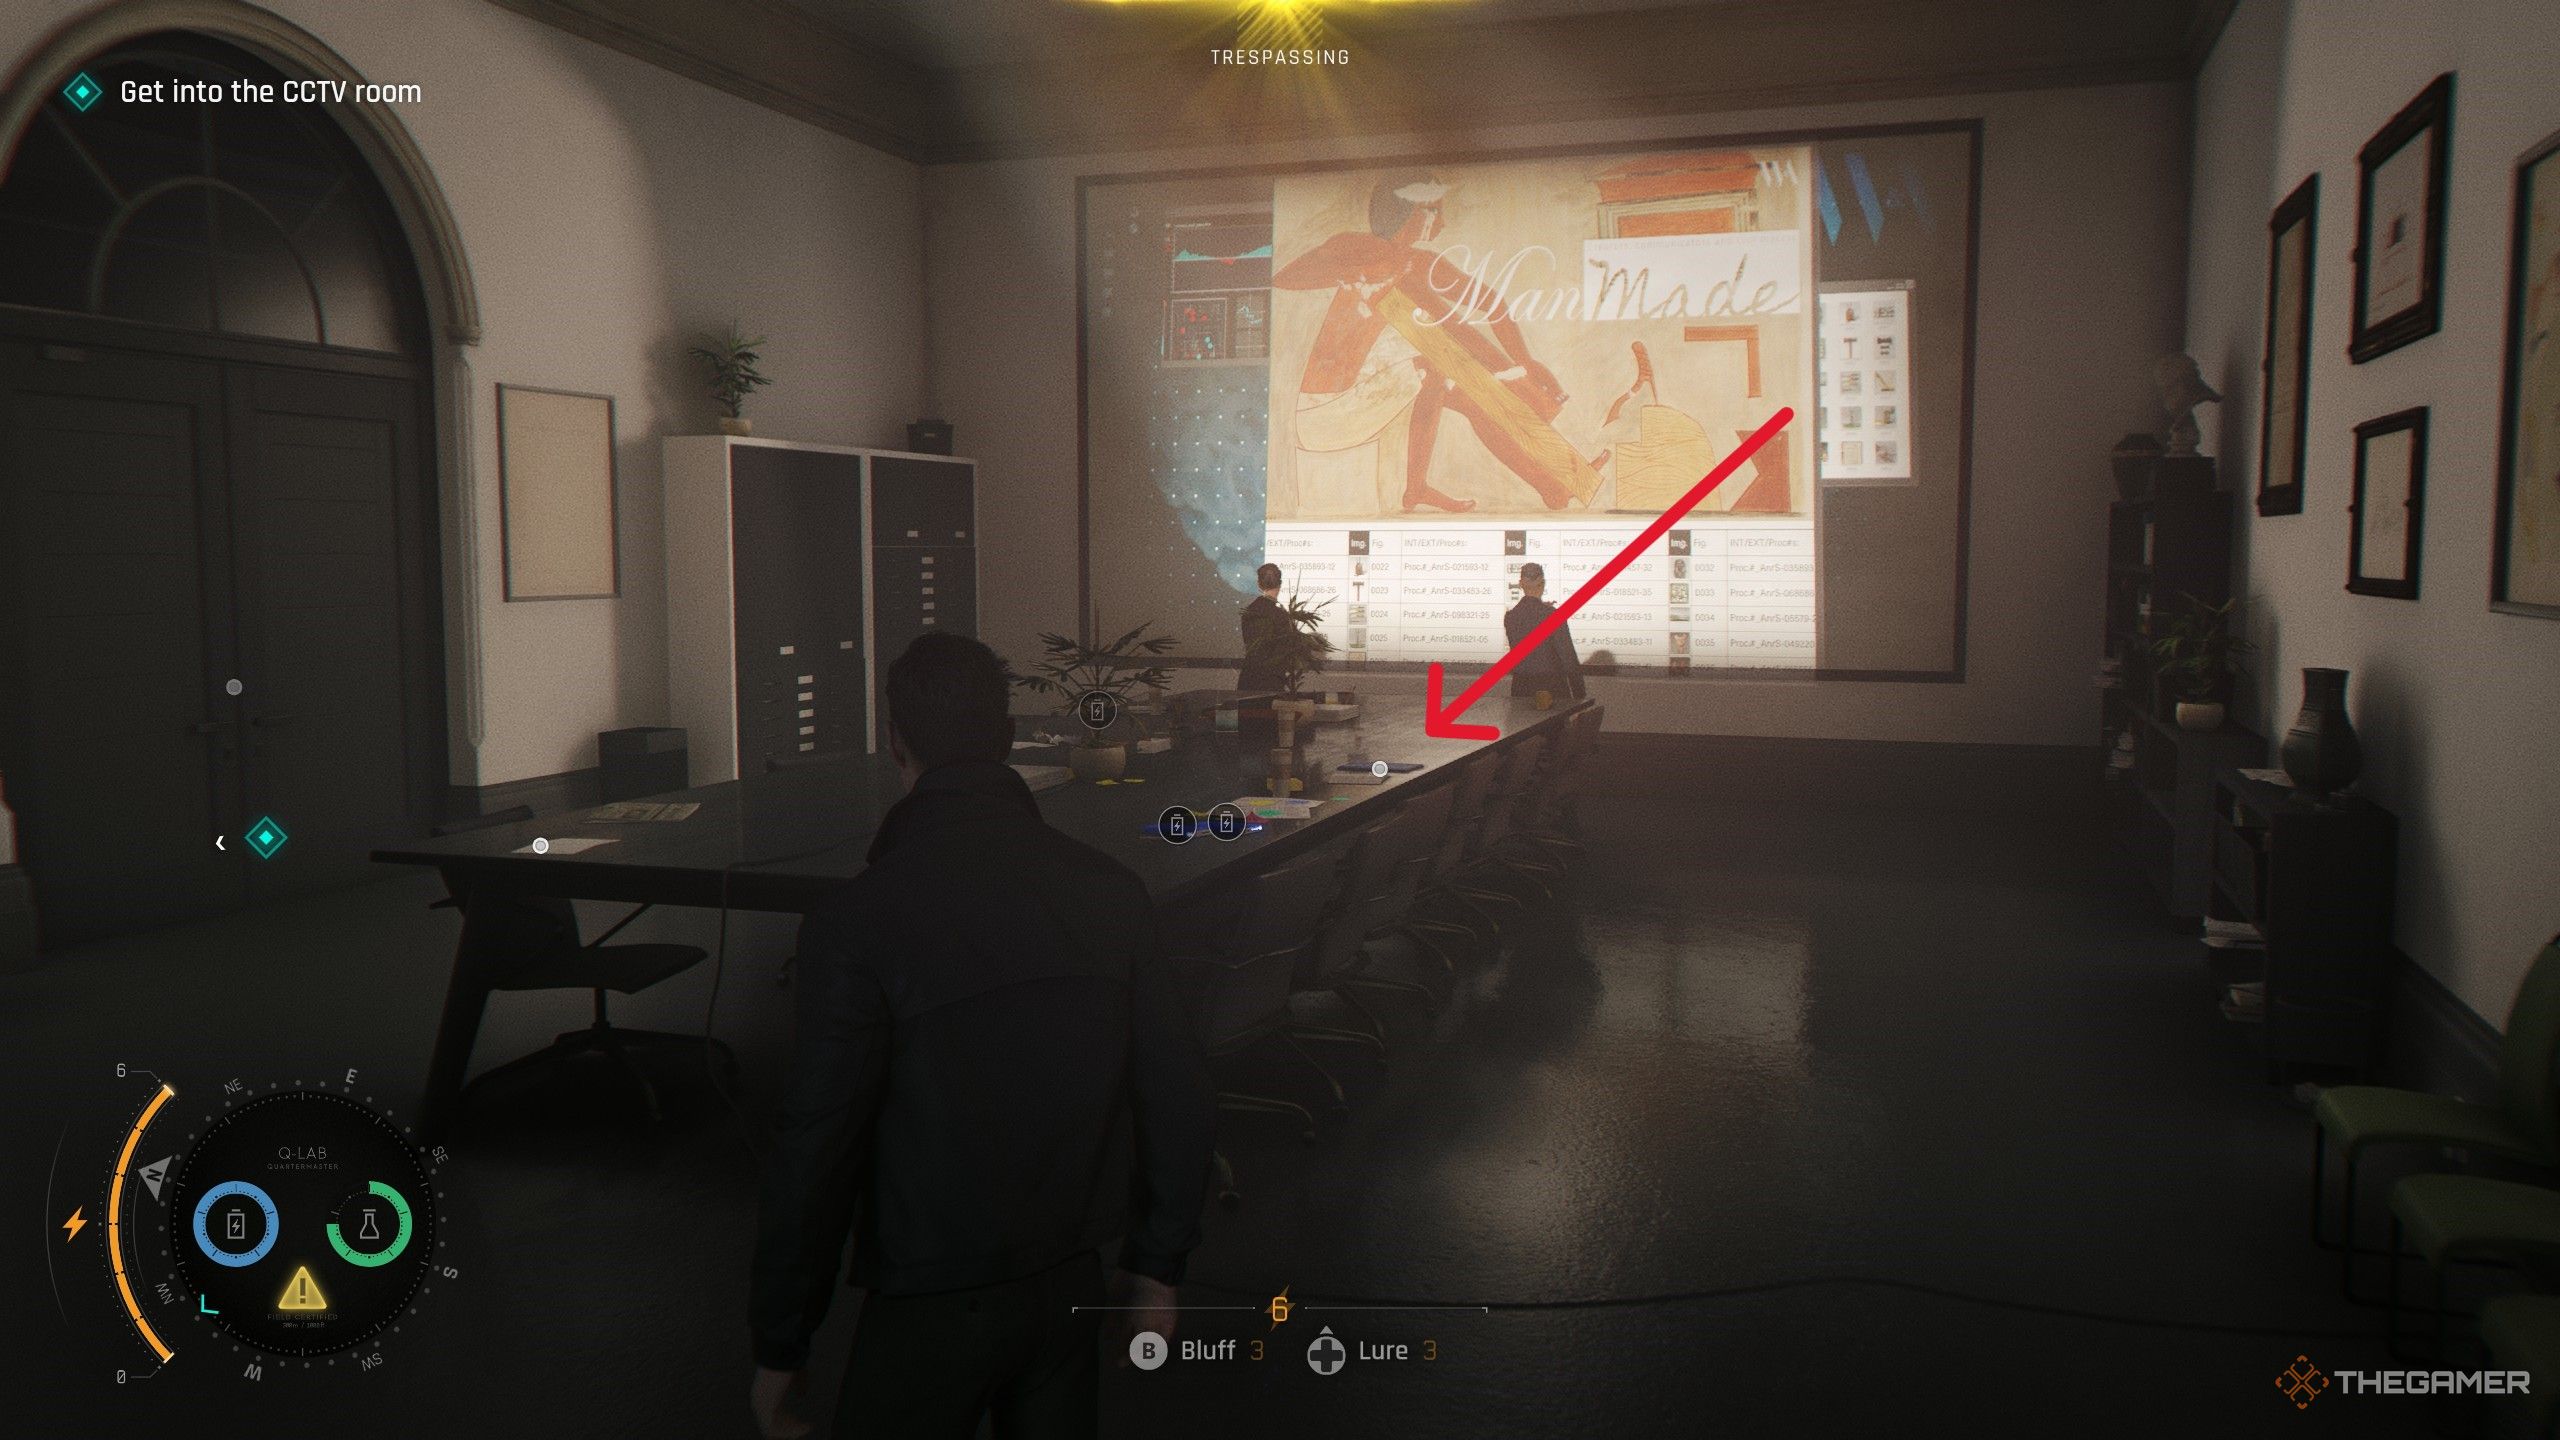
Inside the security room on the second floor, take the second door on the right into a conference room occupied by guards. Bond can convince them he belongs there, after which on the table in the center you’ll find Stephen Bright’s file.Image:
Security room sceneGoing Old School — Q
Near the start of “Going Old School,” visit Q-Branch. To the right of the car being repaired, interact with the driving gloves on a workbench. Picking them up will reveal the Q MI6 File.Image:
Q-Branch workshopTime to Die — Theresa Lorca
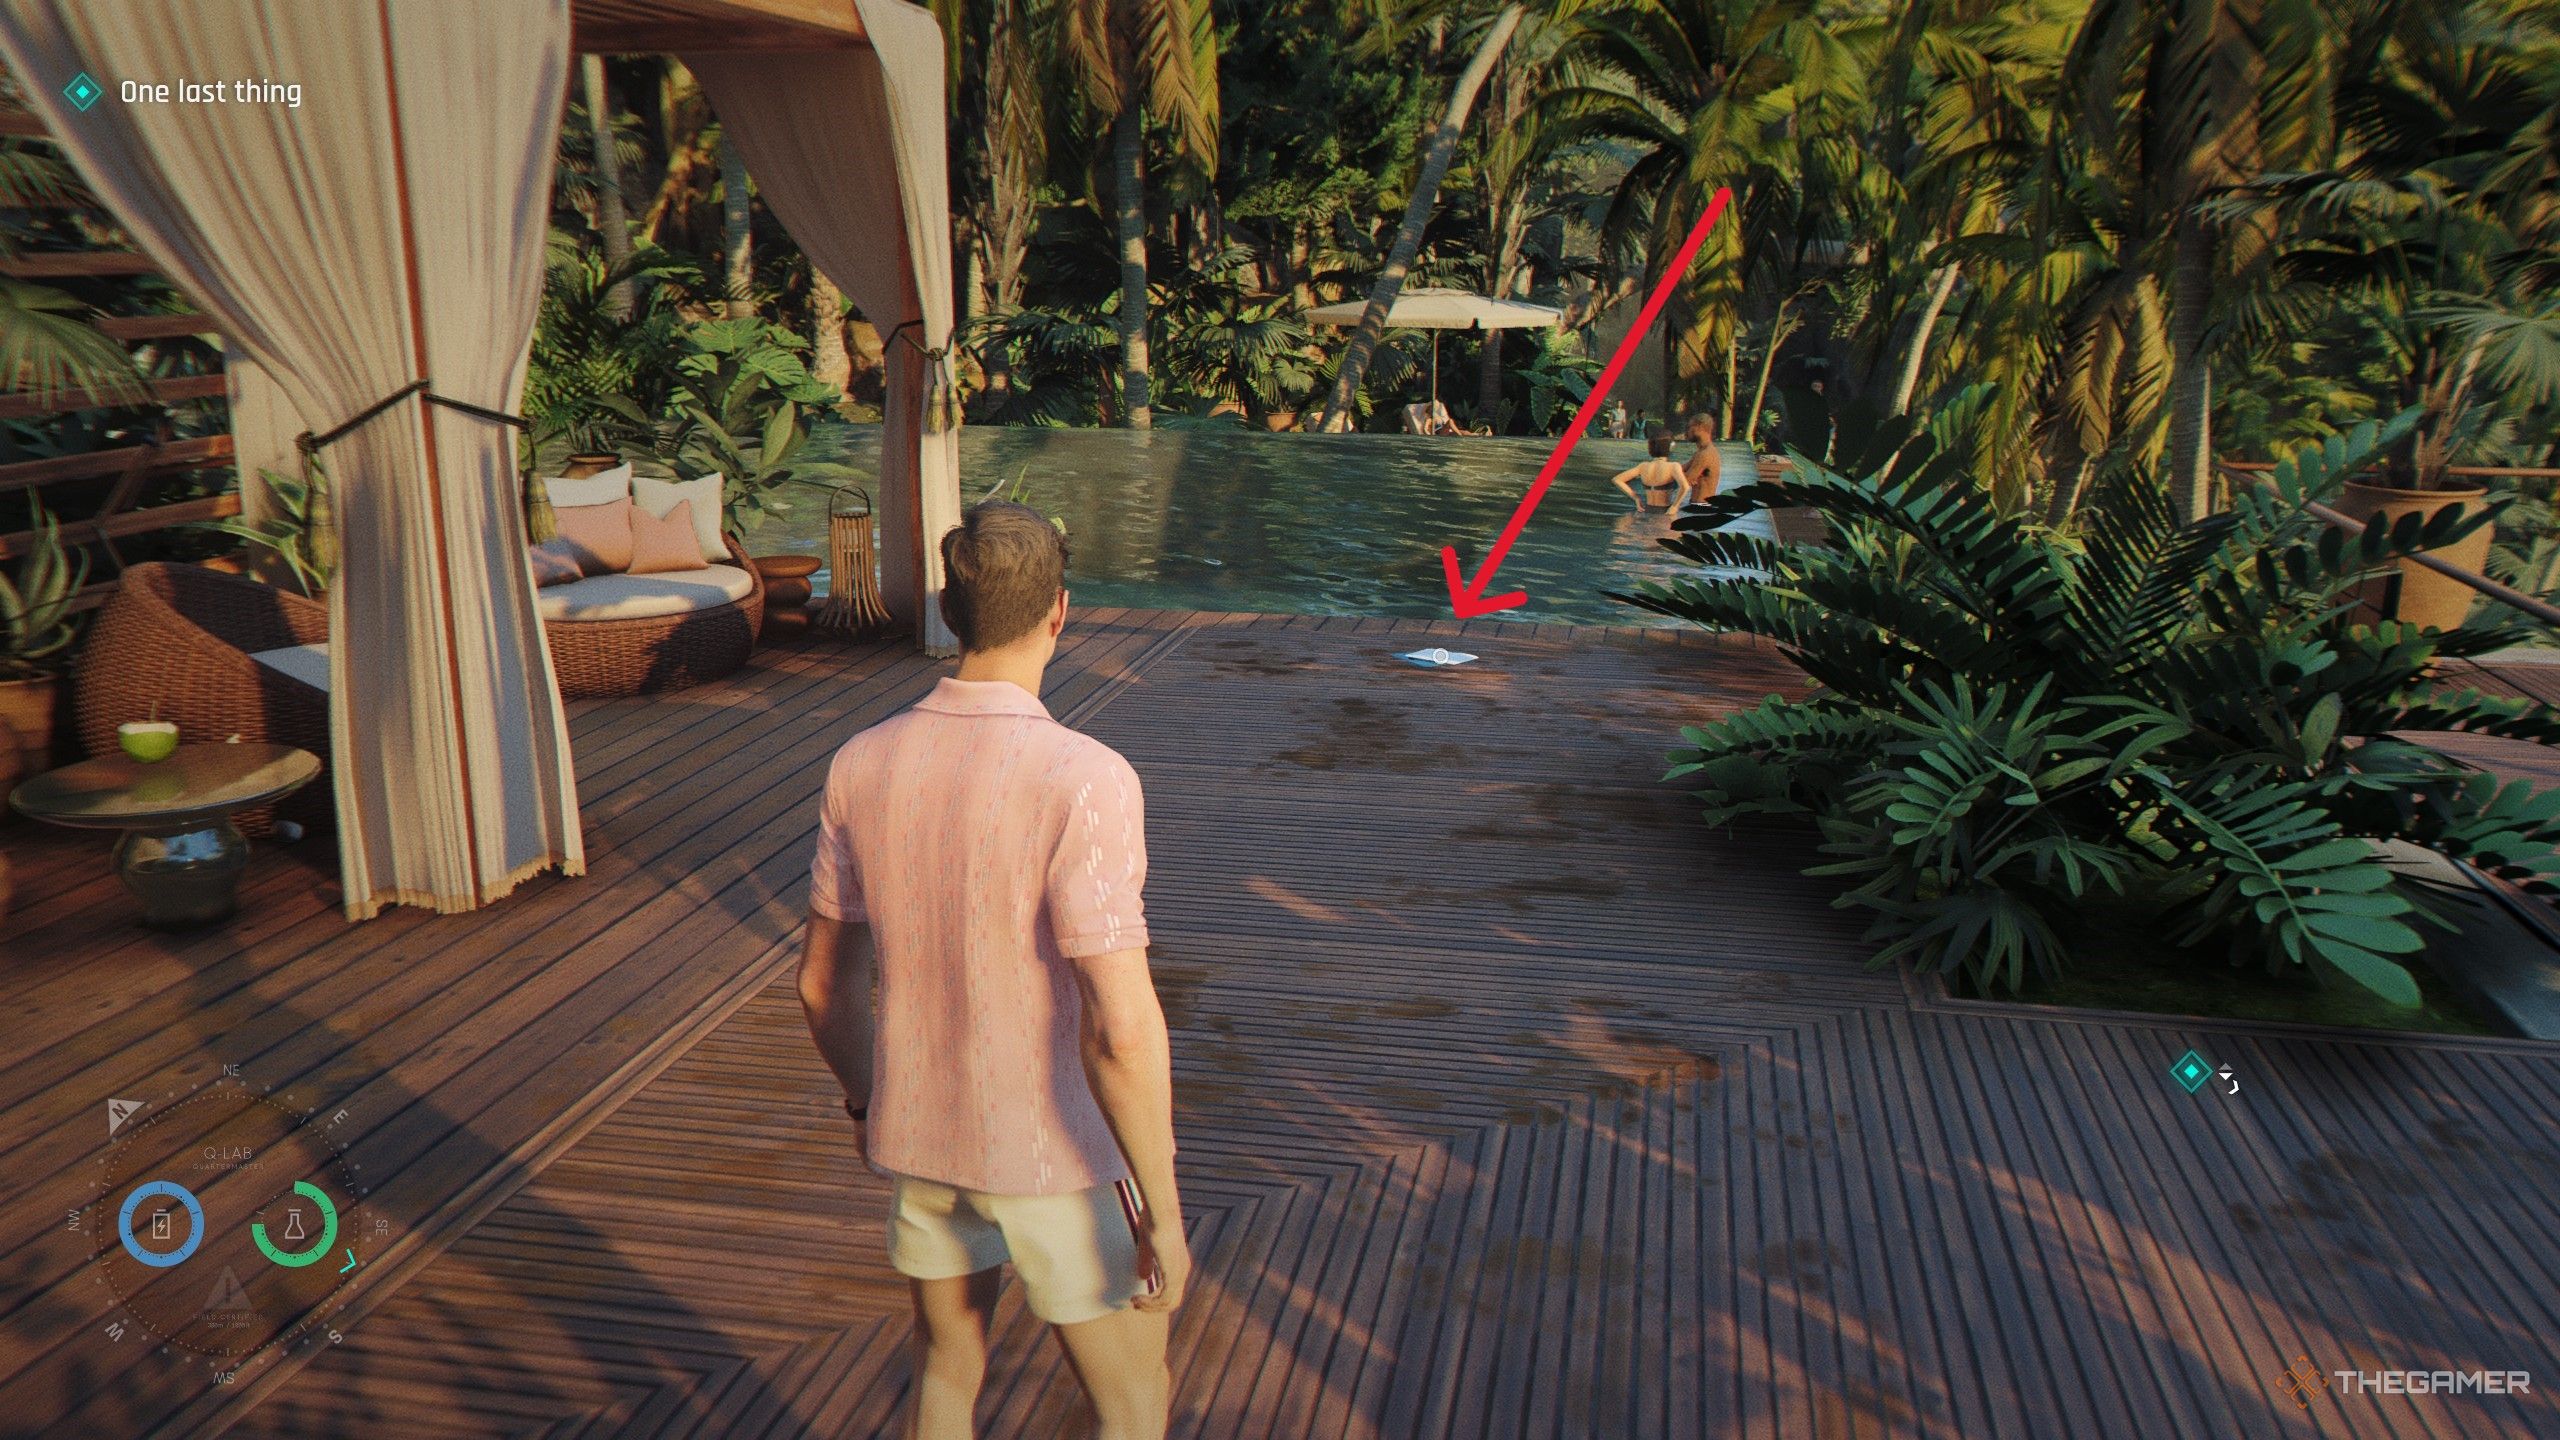
In the “Time to Die” mission, after meeting Lorca to plant a tracker, go to the Serenity Space. The MI6 File is on the ground in front of the loungers, near Lorca herself.Image:
Scene with LorcaTime to Die — Caliban
Post-mini-game where Bond helps put on his bowtie, go into the living room and interact with the file sitting on the desk to unlock this intel.Image:
Living room sceneWave of the Future — M
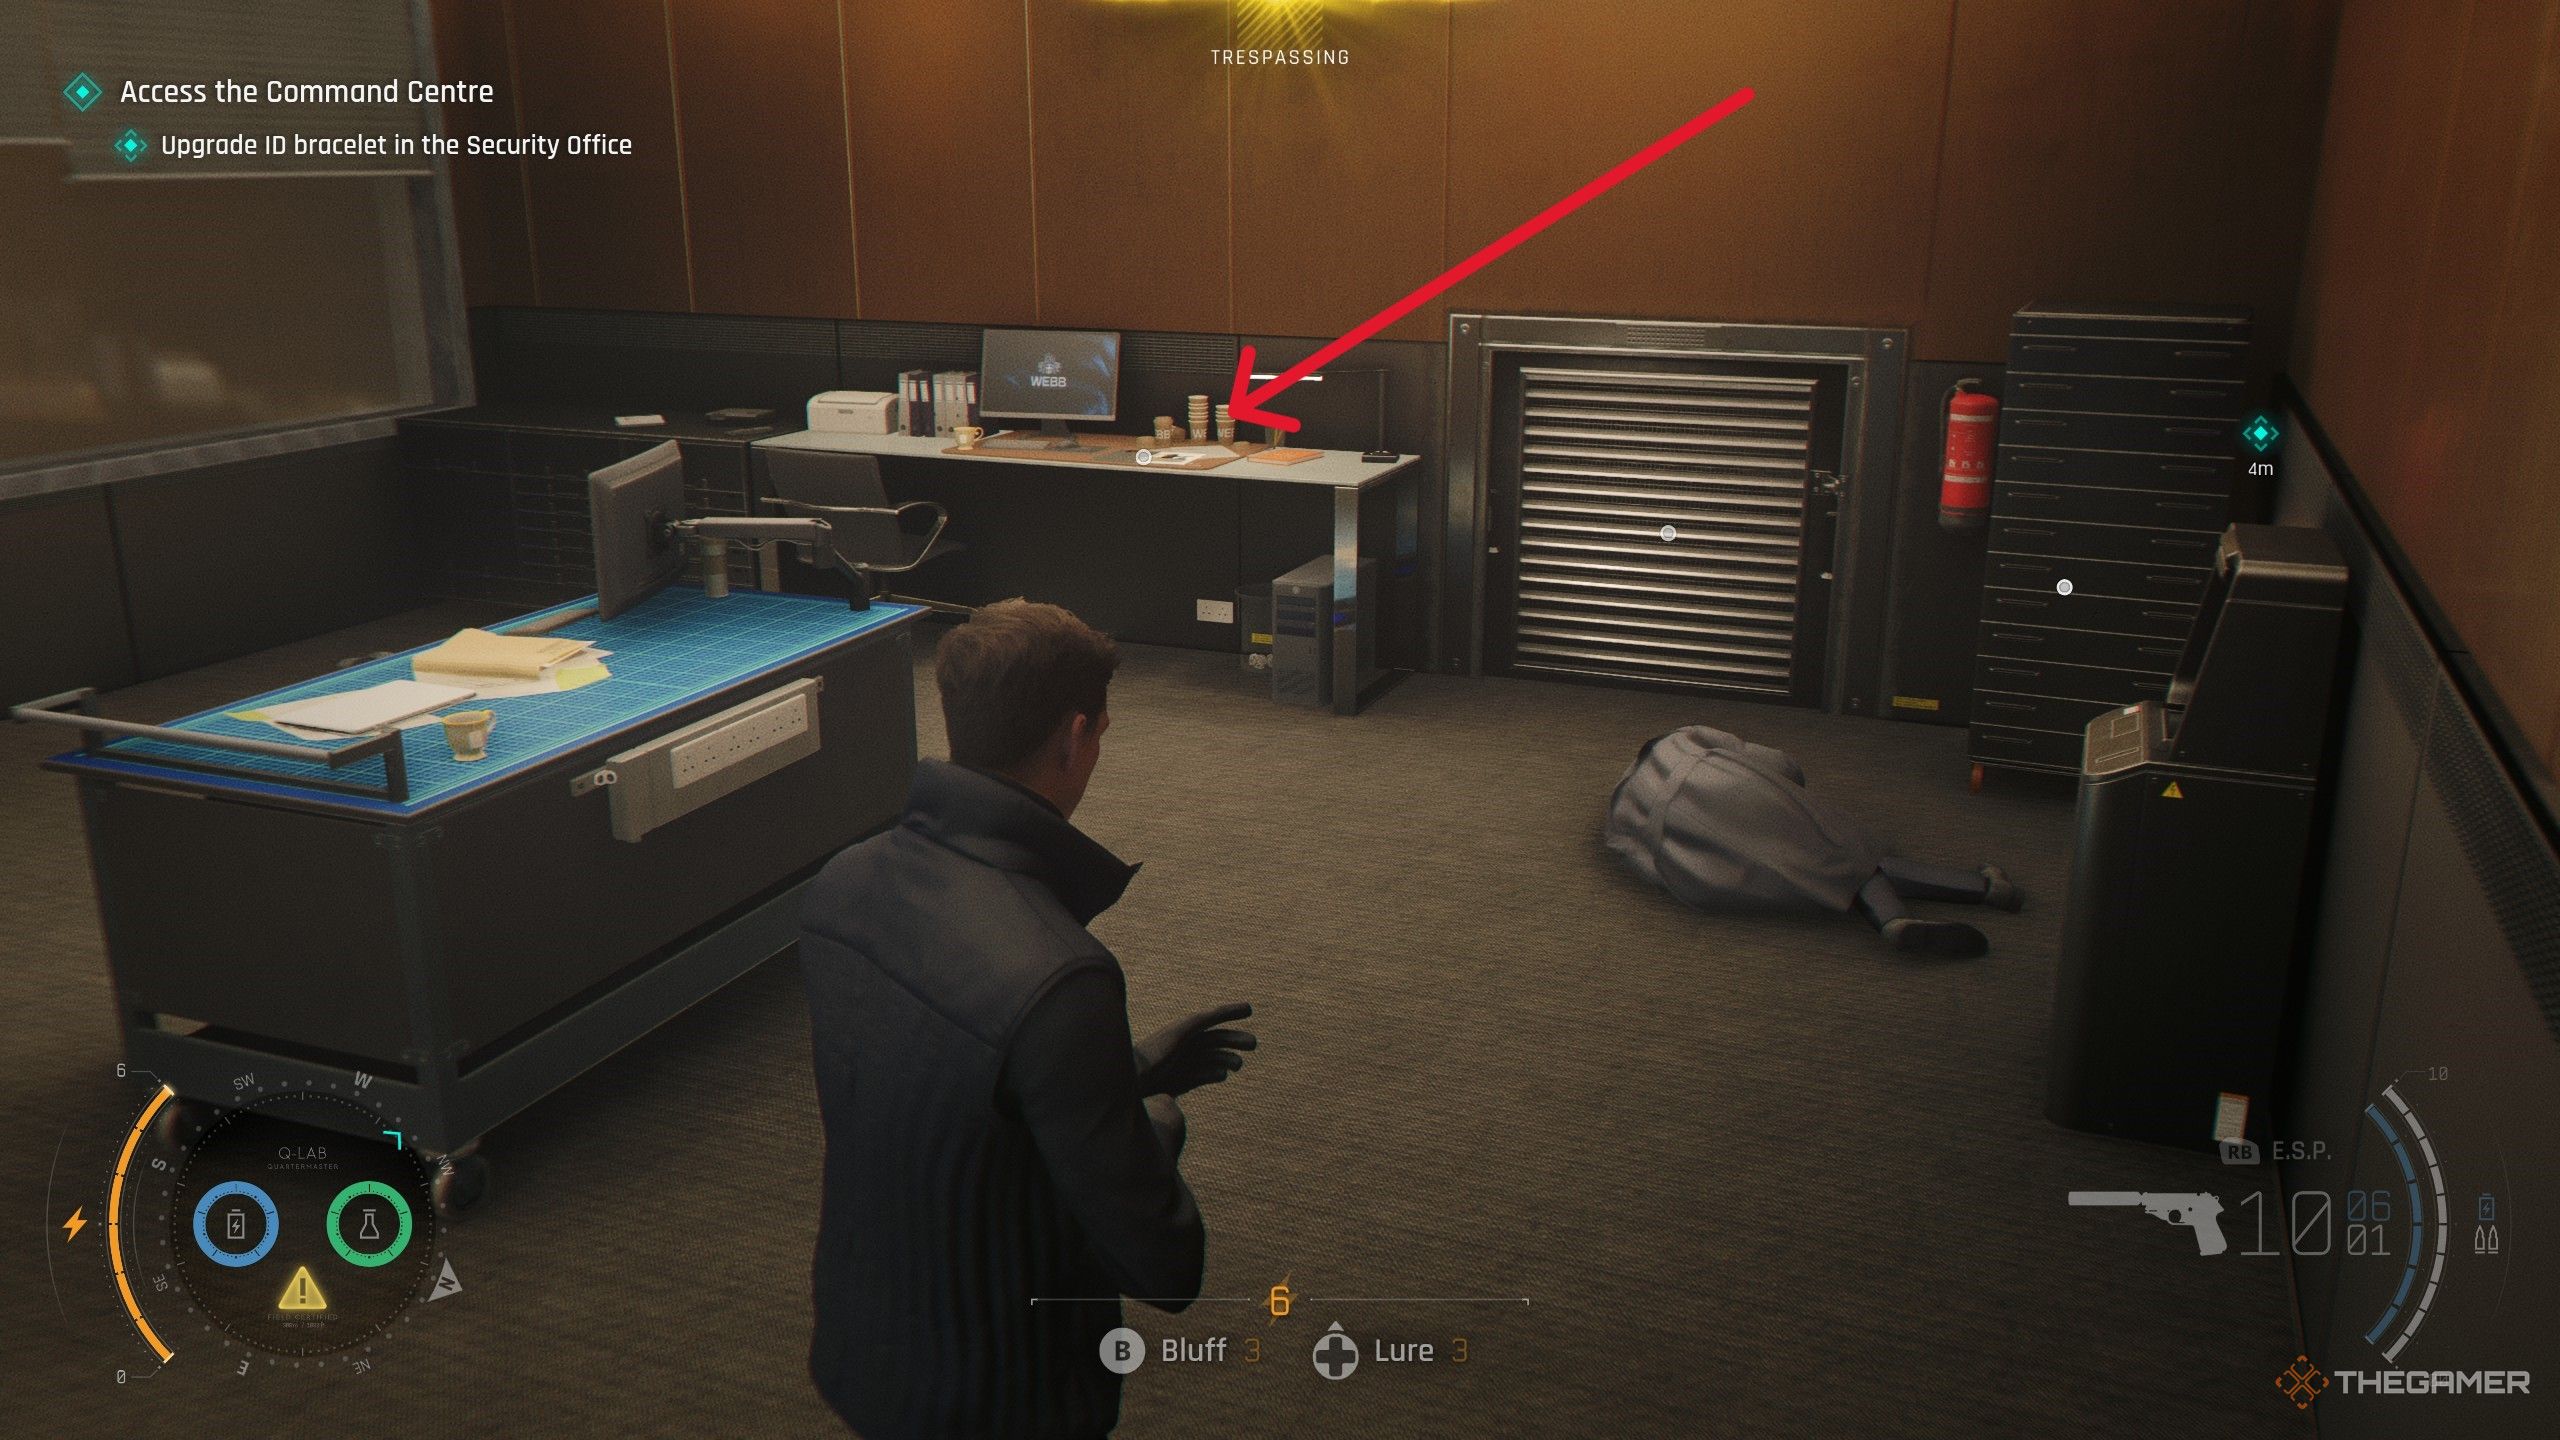
During the “Wave of the Future” mission, when upgrading your ID bracelet, enter the security room to find M’s profile sitting on a desk nearby.Image:
Security roomWave of the Future — Sir Nicholas Webb
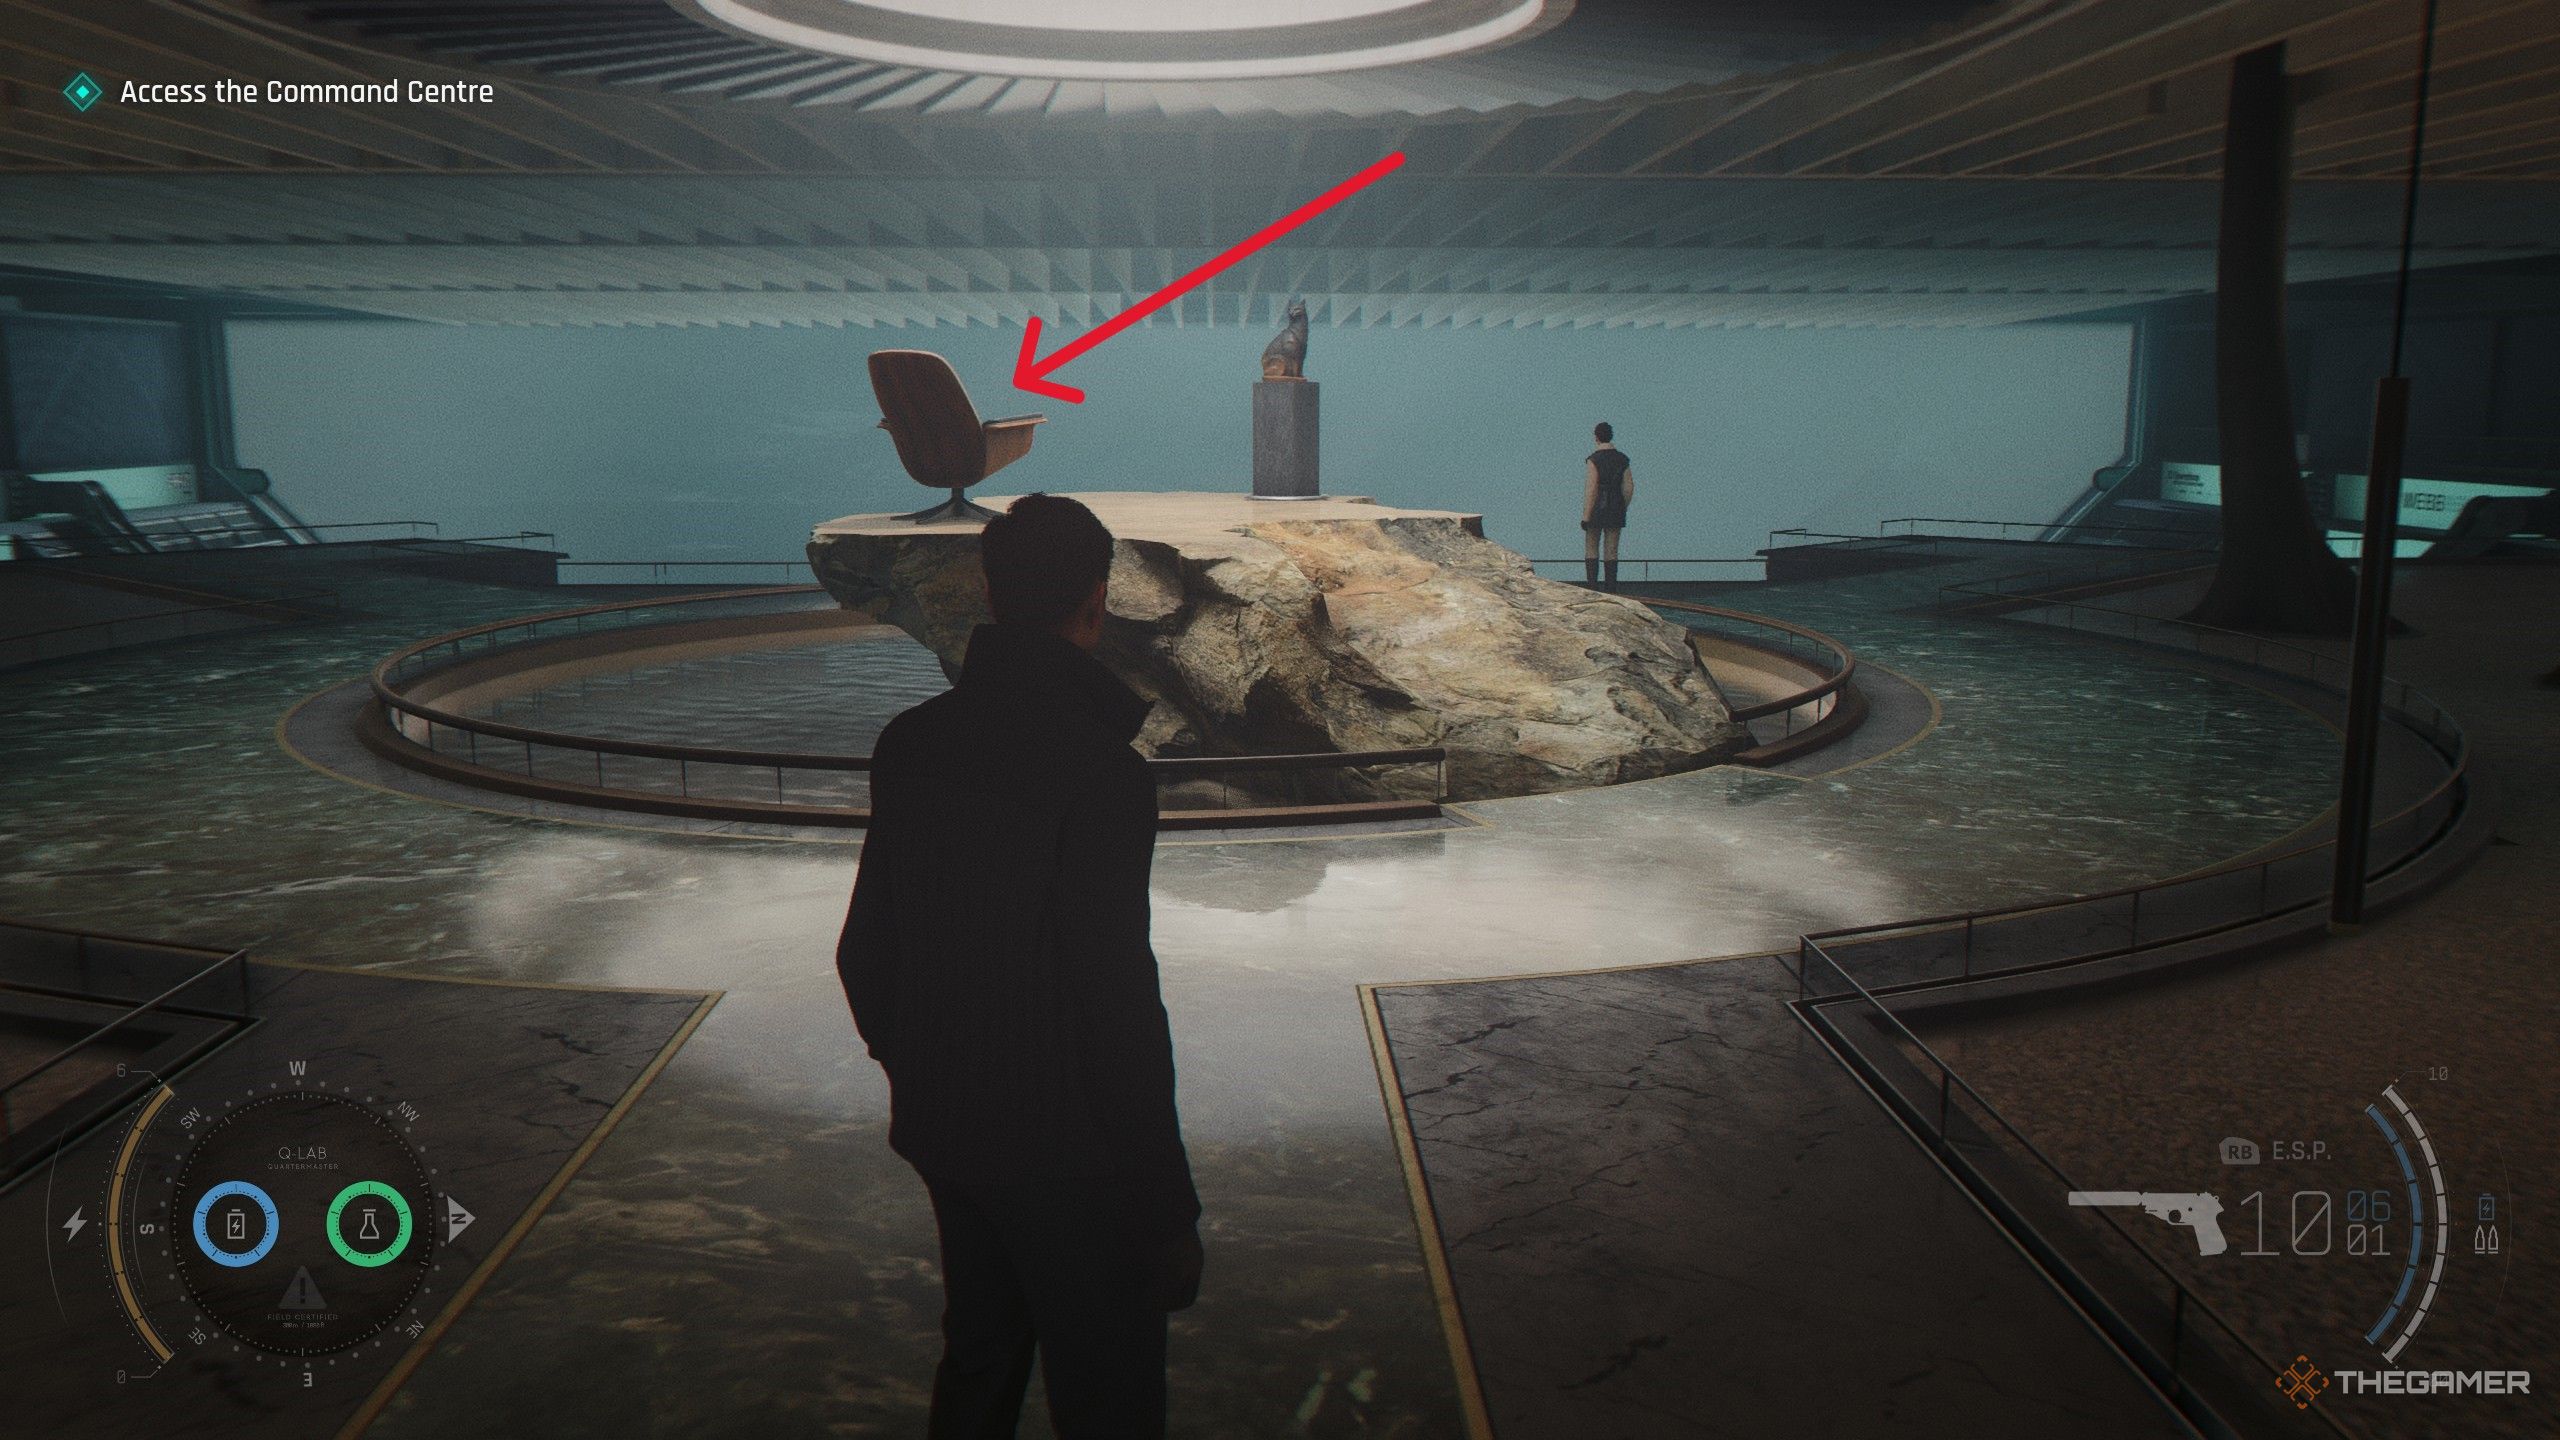
After upgrading your bracelet, follow Isola to an area with a chair and a cat statue. Near the chair, find the profile of Sir Nicholas Webb on a nearby rock.Image:
Nearby areaWave of the Future — Eve Moneypenny
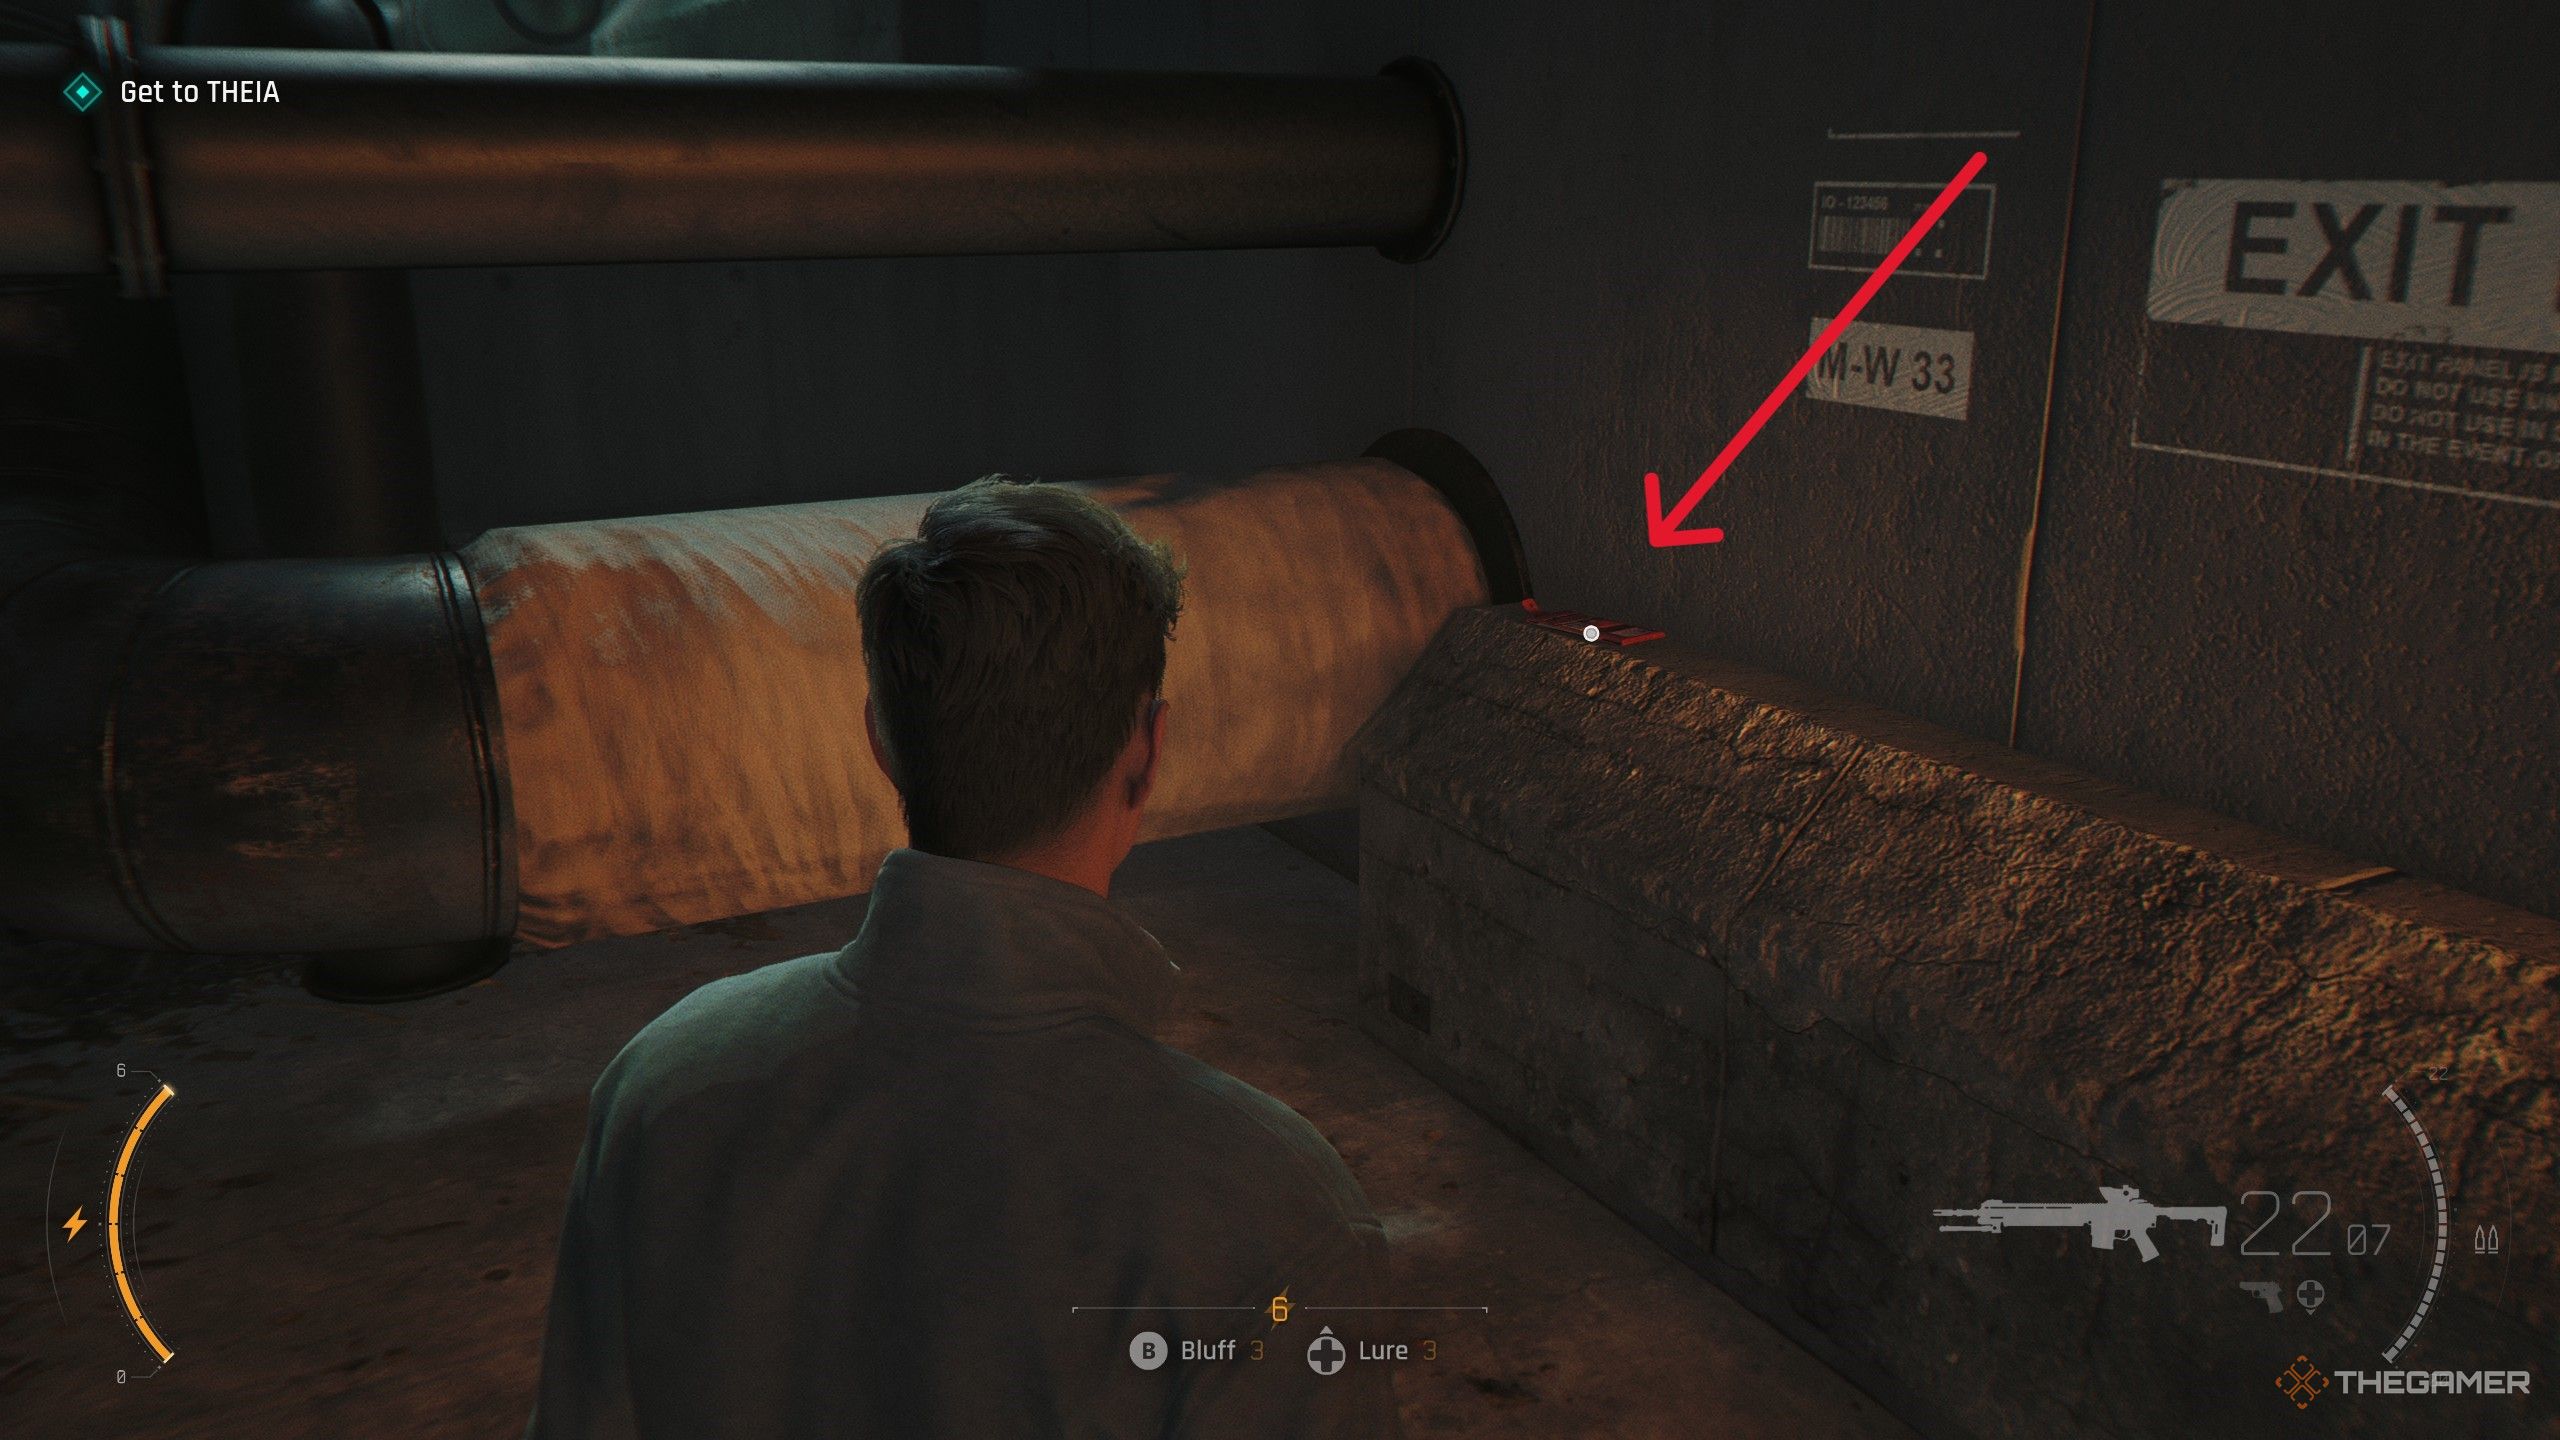
During the “For England” mission, after fighting outside Moneypenny’s office, enter the tunnels. In the maintenance area, her MI6 File is on the ground in the section with the pipes.Image:
Maintenance tunnelWave of the Future — Riptide
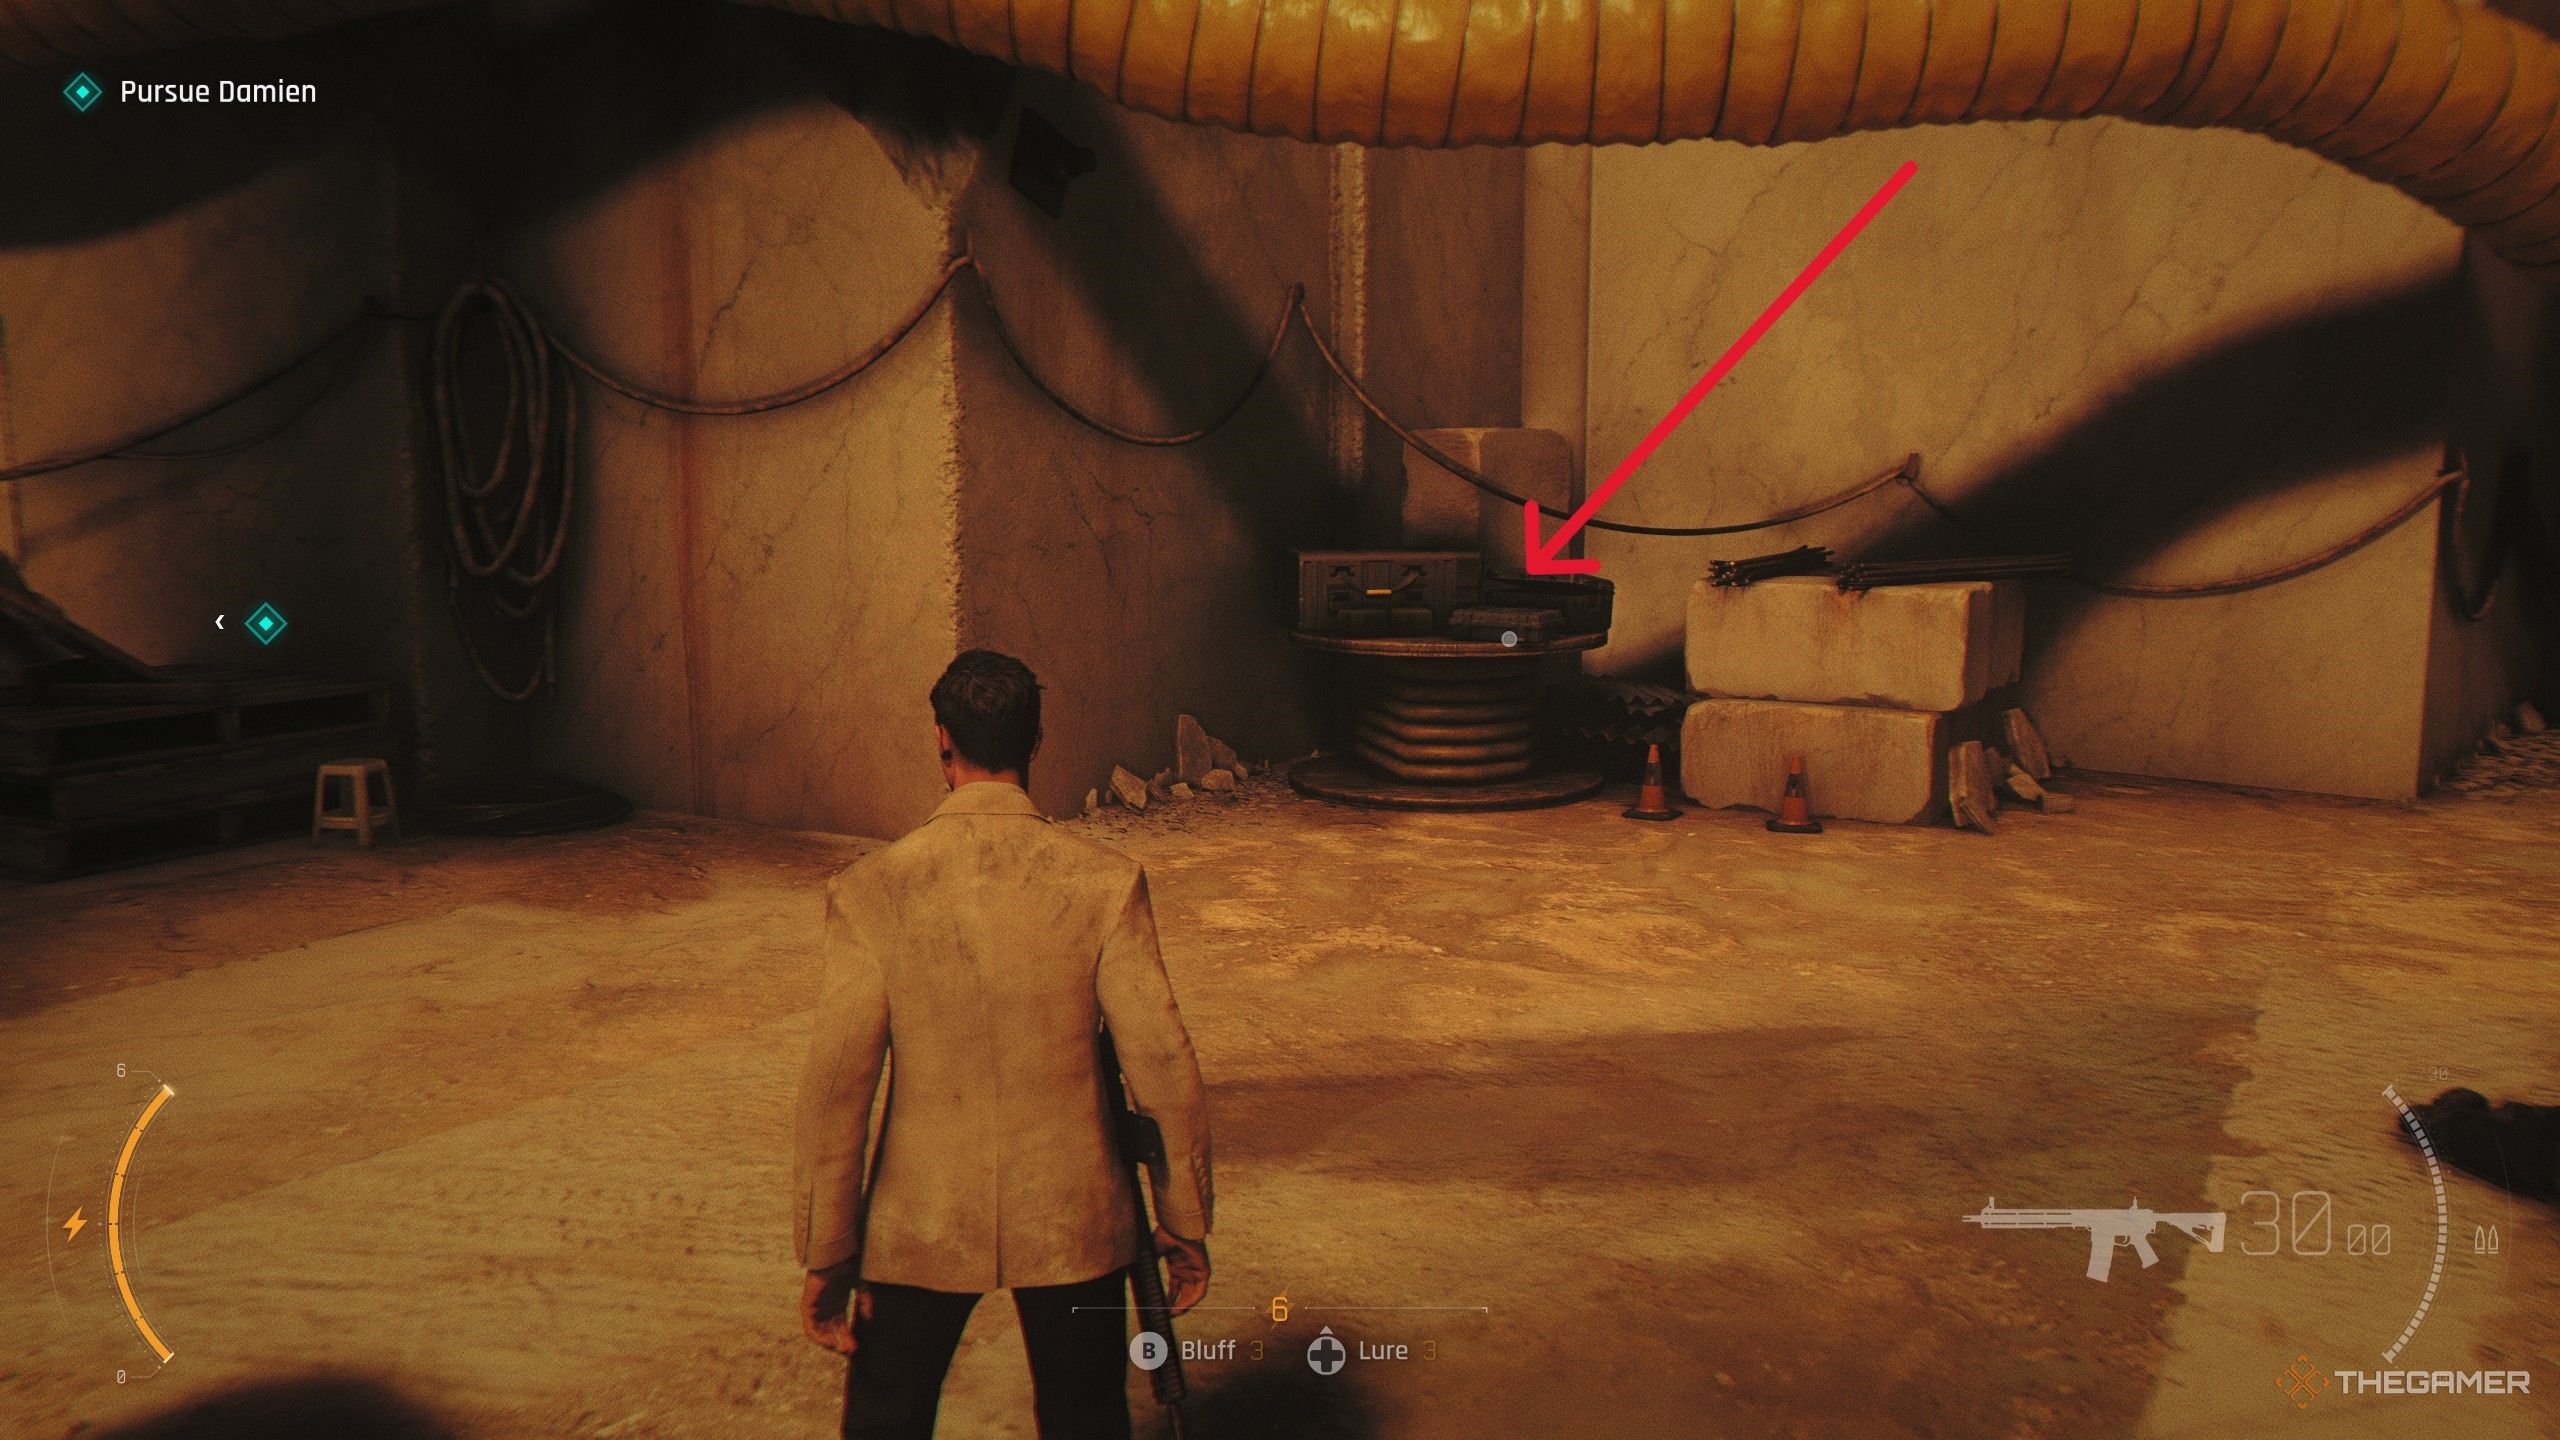
Once reunited with Greenway after the sniper section, before moving on, find a black case on a bundle of cables. Interact with it to obtain the Riptide file.Image:
Scene with cablesWave of the Future — Rhys Beckett
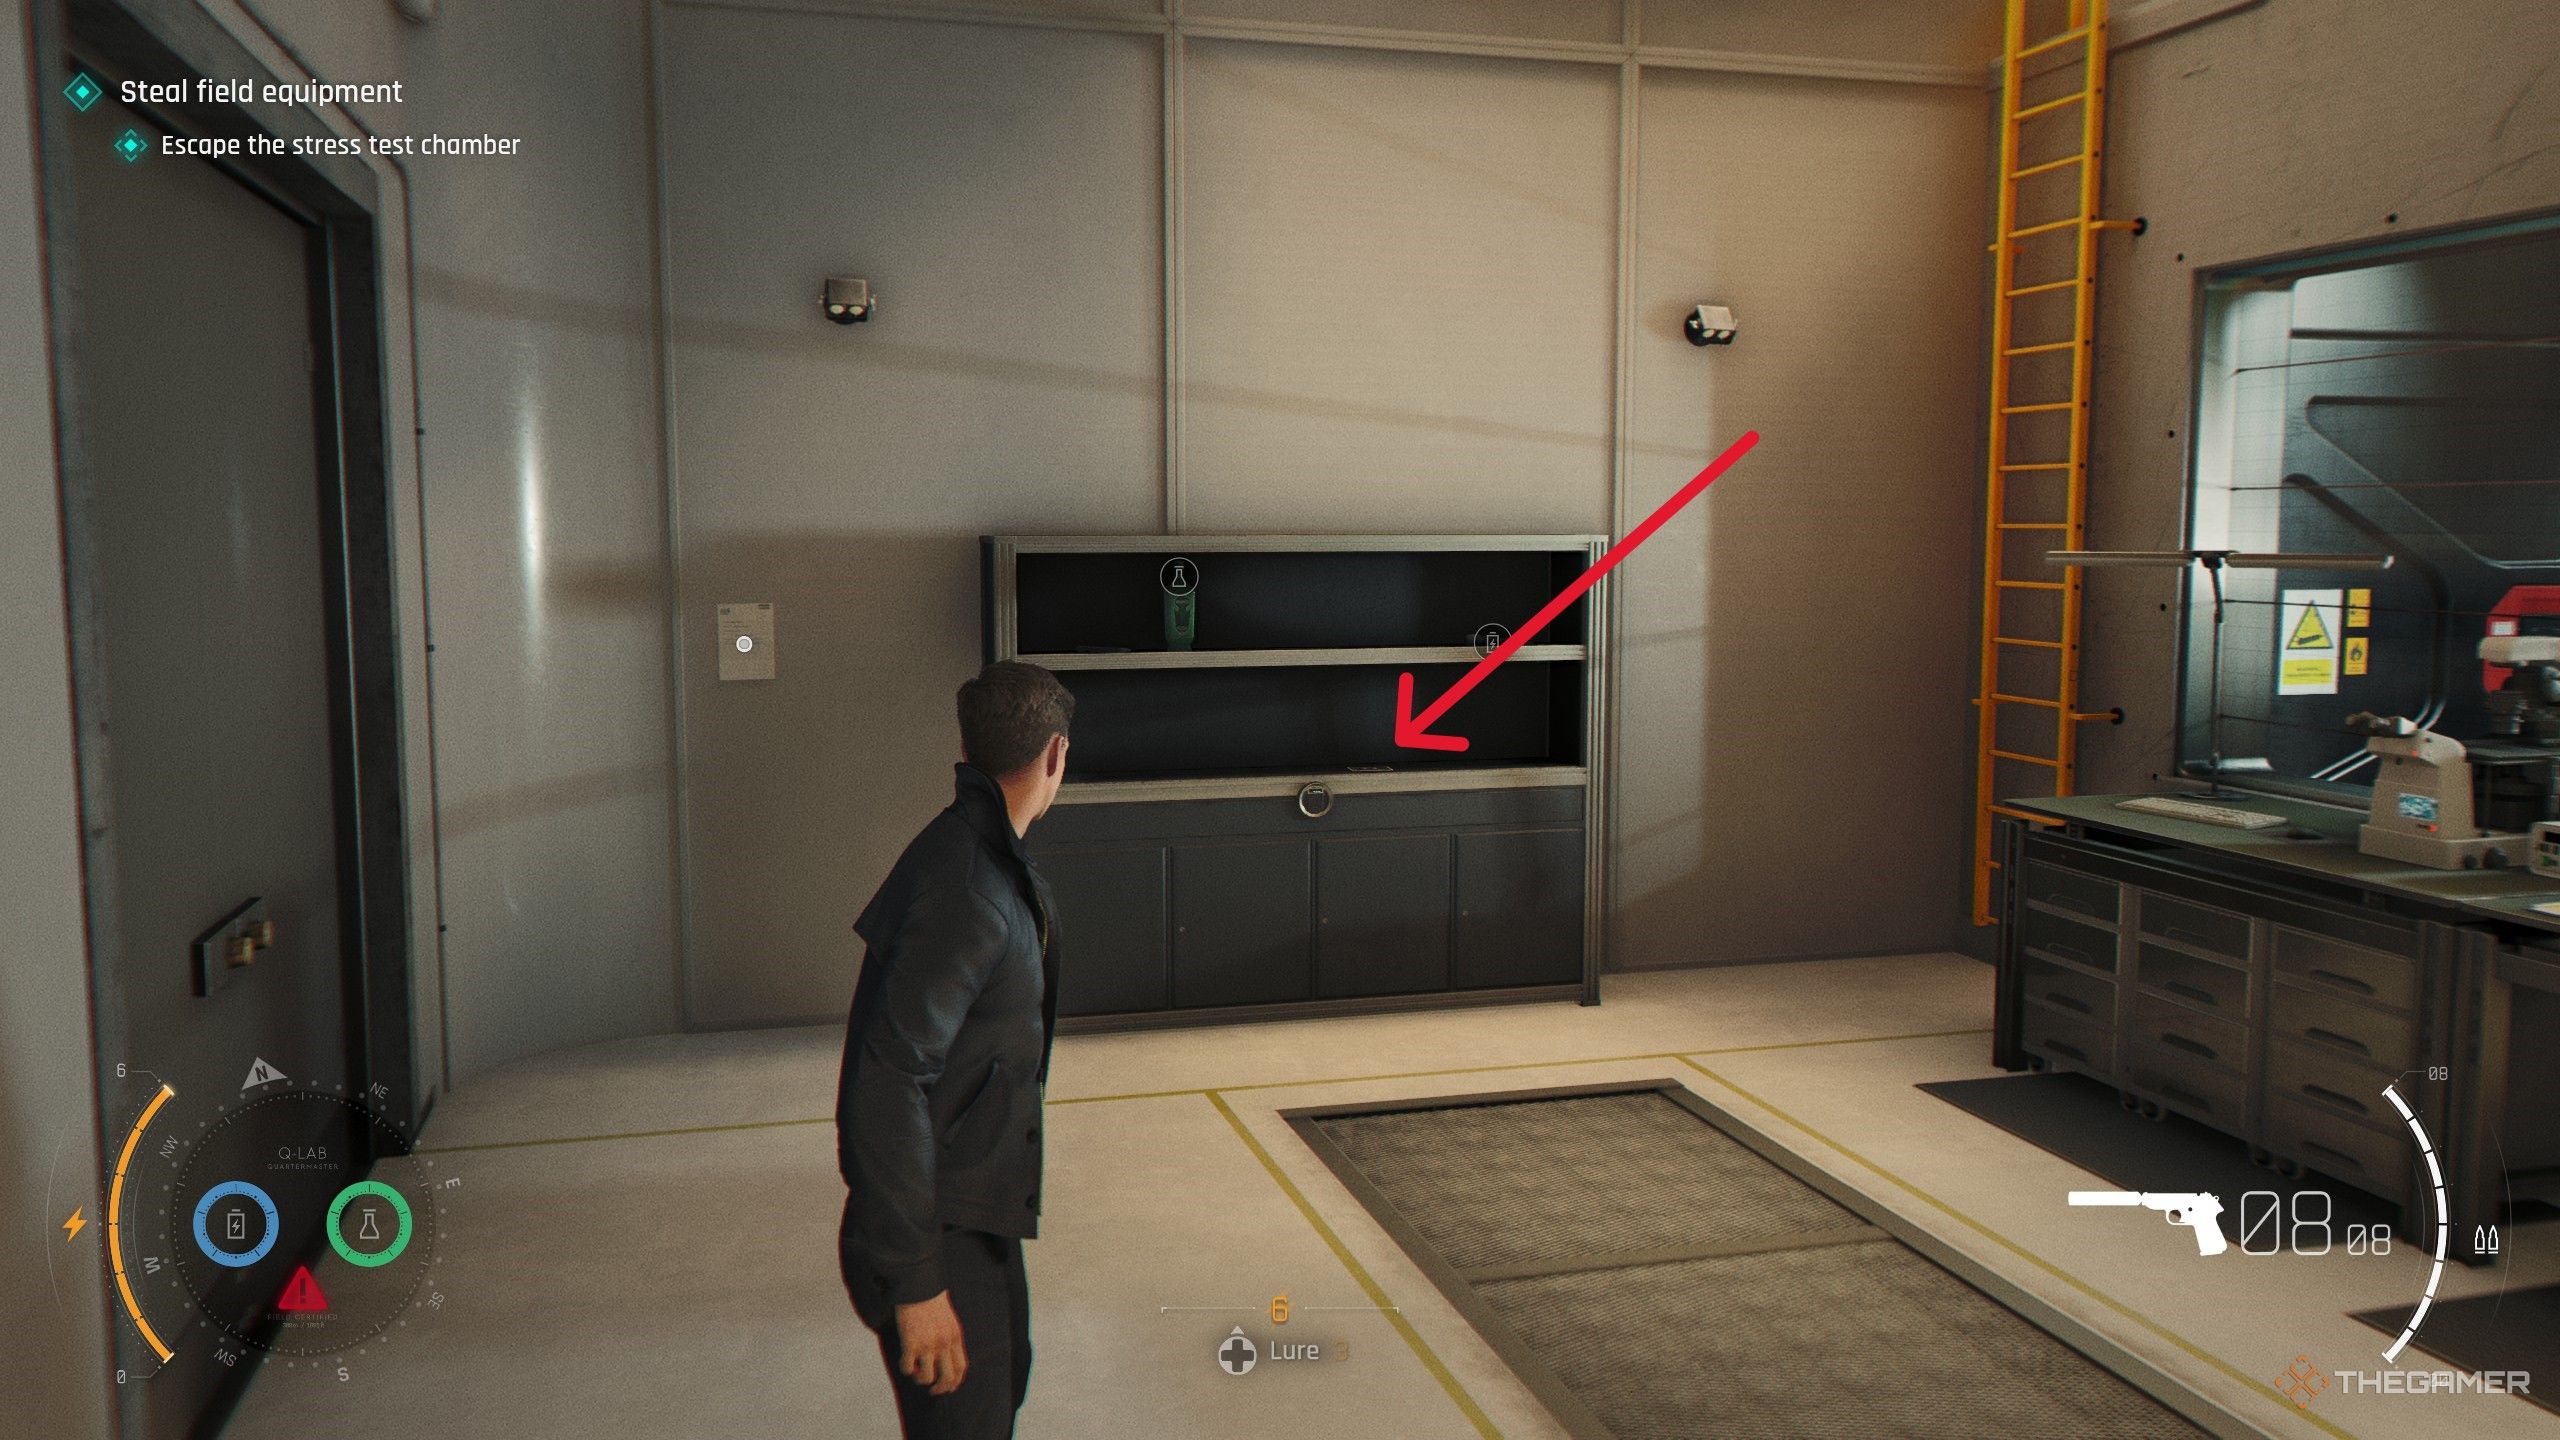
After speaking with Q and entering the furnace room with the armored vehicle, look on the left wall for a locked cabinet. Use the four-digit code 4397, corresponding to the license plate number, then open it and interact with the photo inside.Image:
Furnace room detailWave of the Future — Sir Nicholas Webb (again)
Right after upgrading your ID bracelet, follow Isola to a spot with a chair and statue. Nearby, find the profile of Sir Nicholas Webb sitting on a rock.Image:
Location of Webb’s profileWave of the Future — Eve Moneypenny (again)
In the “For England” mission, after fighting outside her office, proceed into the maintenance tunnels. Her MI6 File is in a room with pipes, on the ground.Image:
Scene with pipesWave of the Future — Caliban
Next, in the same mission, after upgrading your ID bracelet, go into the security room. Look on a desk near the vent for M’s profile.Image:
Security room sceneWave of the Future — Time to Die — Eve Moneypenny
During the final mission, once in her office, interact with her wallet located near some pipes to uncover her MI6 File.Image:
Her wallet scene
Always interact with anything that looks unusual or out of place in the environment to ensure you collect all MI6 files. These files provide a deeper look into the characters and story, enriching your gaming experience.
-

Where to Find Enhanced Fins in Subnautica 2 for Better Solving
While it’s best to use your Tadpole as much as possible in Subnautica 2, there will be times when you’ll need to get out and swim, especially when using tools or reaching places your Tadpole can’t get to. Since you’re more exposed during these moments, upgrading your fins to the Improved Fins should be a top priority. Crafting this upgrade isn’t difficult, but first, you’ll need to scan specific fragments throughout the game to unlock the Fabricator recipe.
All Improved Fins Scan Locations
You need three scans of the Improved Fins to unlock the recipe. Luckily, several scans are located within about 100 meters of each other, making it easier to gather them all quickly. There are more scans out there if you’ve been exploring, but these locations are the easiest and closest for the fastest upgrade.
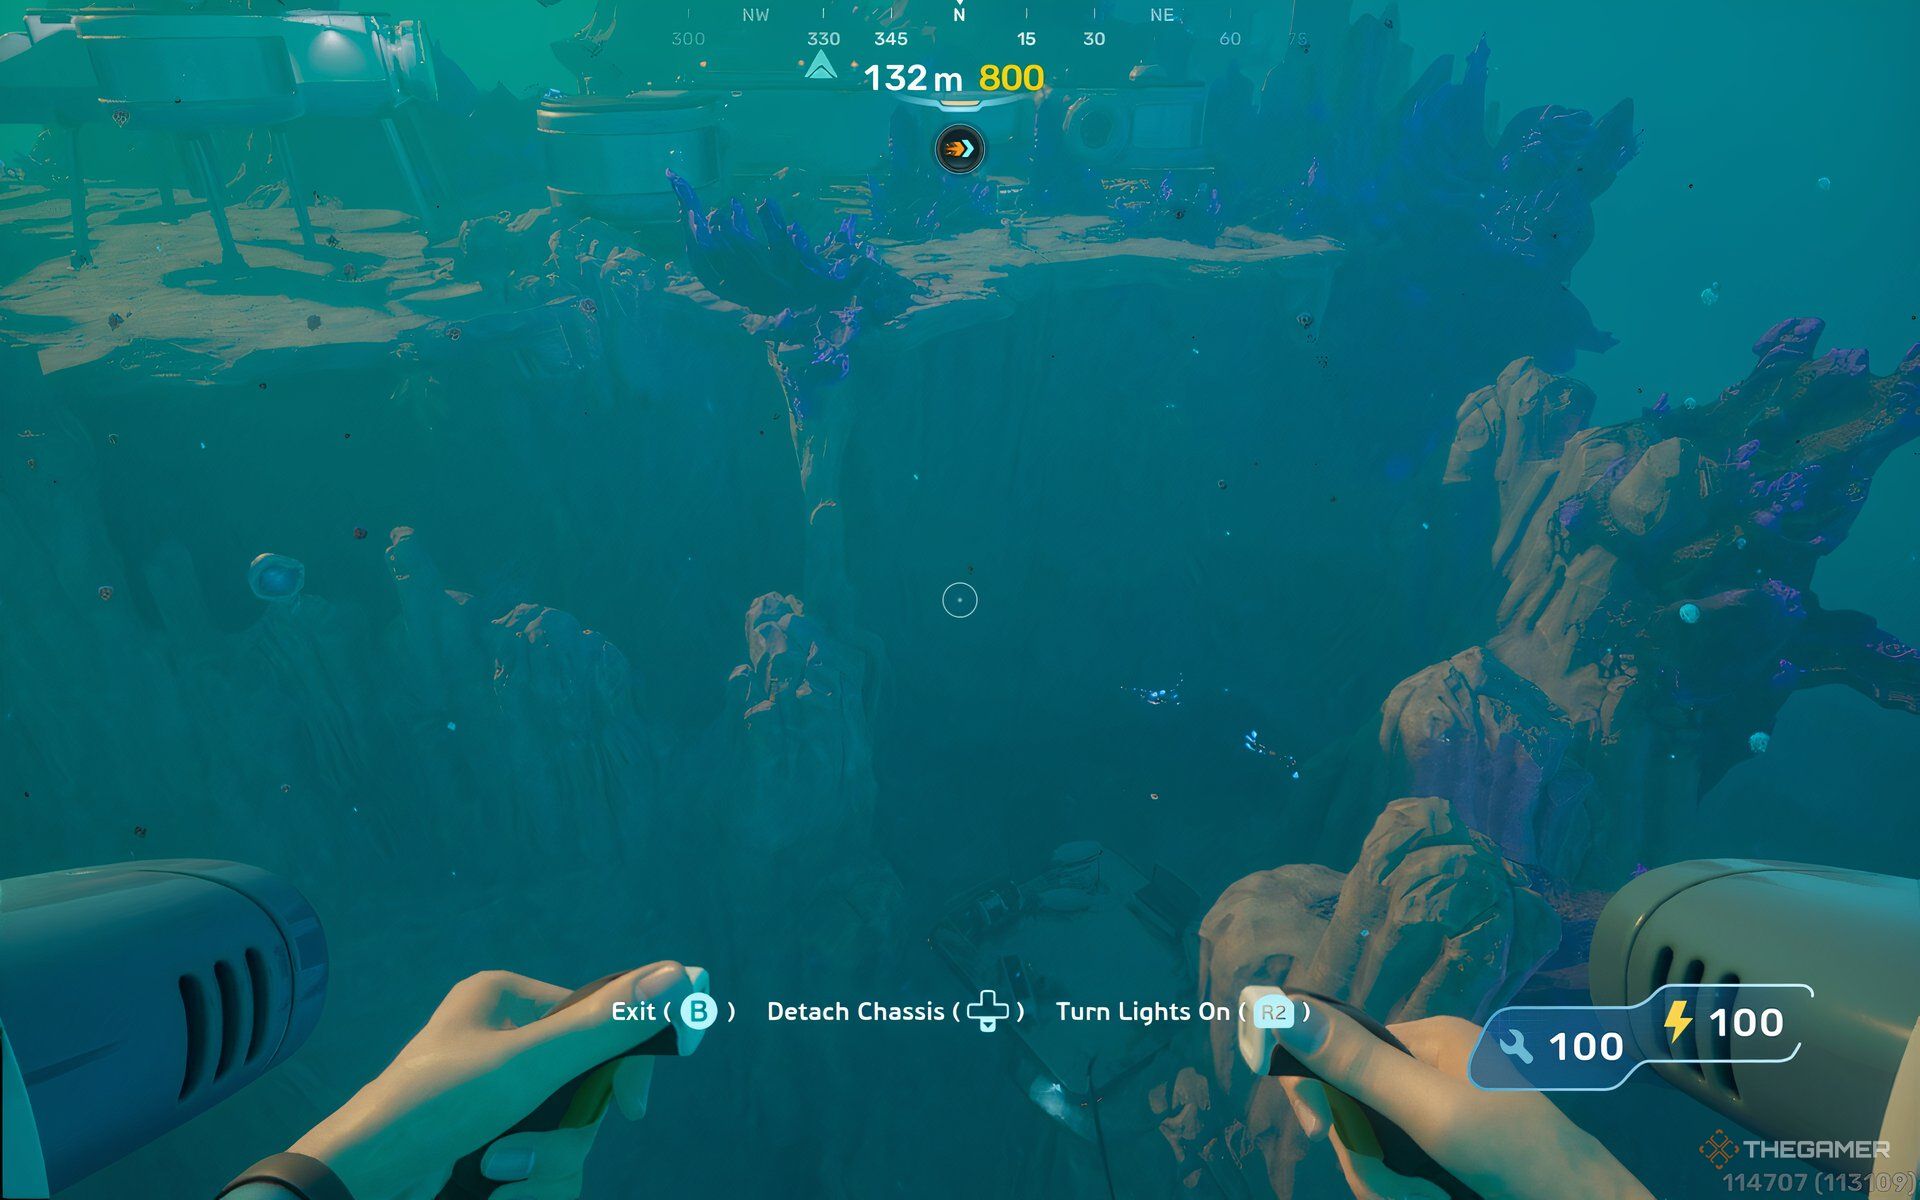
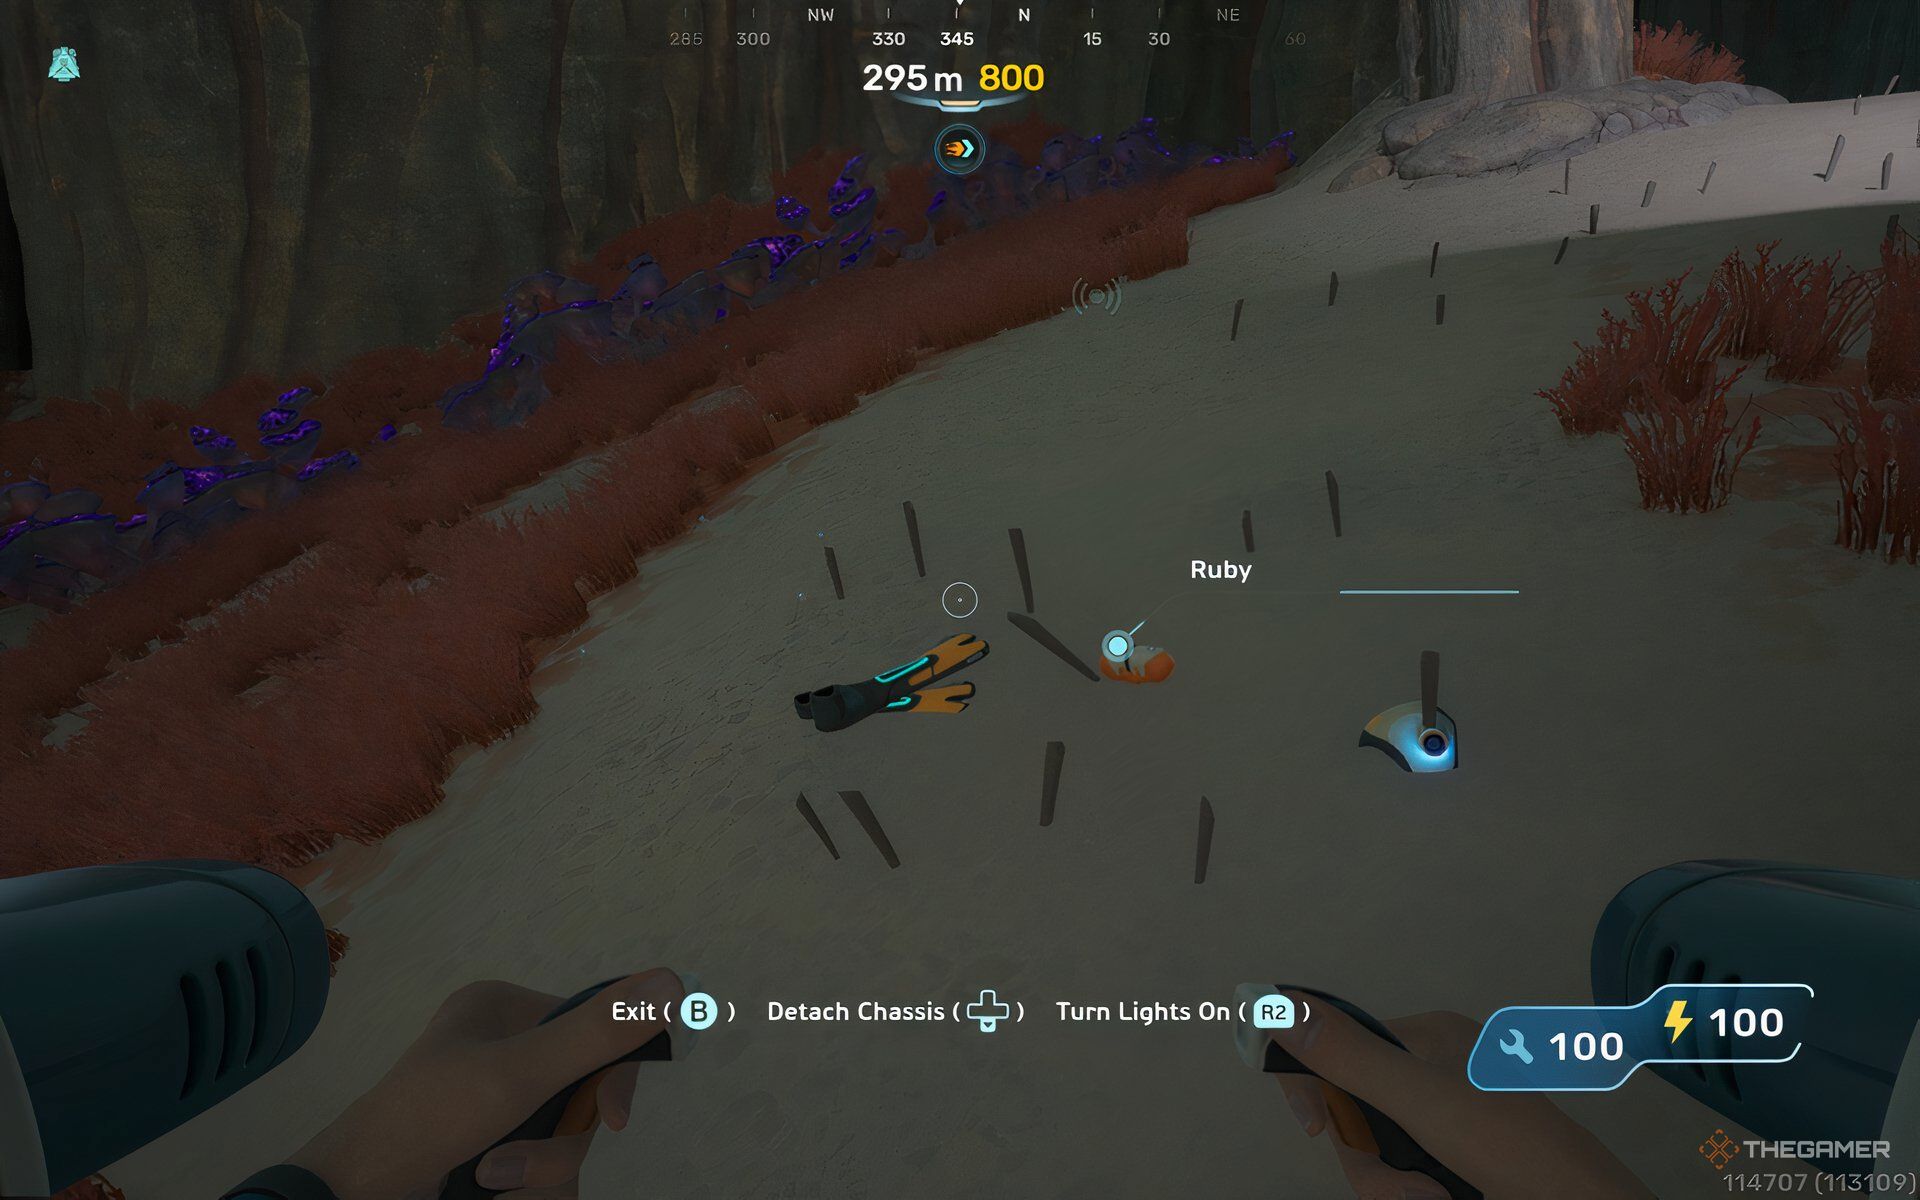
Fragment Location Image Reference 1,300 meters east of the lifepod at around 160 meters deep. If you’ve unlocked the Alien Ruins signal, it’s part of an abandoned base. When you arrive at the Alien Ruins, look for a cable hanging off the side over a cliff leading to research tables. The fins are near those tables. Image 1,416 meters east-southeast (104°) of the lifepod at 295 meters deep. If you’ve unlocked the Alien Ruins point, it’s under a rock structure with needles sticking out, visible south-southeast (160°) from the abandoned base. There’s an open cave here, where you’ll find the fins on the floor next to a rebreather and a Blackbox labeled “Ruby 2.” The game story guides you to this Blackbox, so it should be easy to find. Watch out for Needlers swimming around the area. Image 1,360 meters east-southeast (100°) of the lifepod at 207 meters depth. This scan is directly above the second one. The fins are on a research table on top of the Needler nest, leaning against a storage container. Again, be cautious of Needlers. Image How To Craft Improved Fins
Crafting the Improved Fins depends on your current resources. If you have the necessary materials, it’s a straightforward process, but if you’re missing some, you’ll need to gather more. To craft the fins, you need access to a Fabricator and a Processor for material creation.
Recipe for Improved Fins:
- 1 Basic Fins
- 1 Fiber Mesh
- 2 Conduit Crystals
Basic Fins are early-game equipment you’ve likely already made. Fiber Mesh is created from Fiber, which can be found in various locations around the map. Conduit Crystals are harvested from the Power Plant in the Alien Ruins, a large dome-shaped structure past the Observatory Tower.
Once you’ve collected all the ingredients, you can craft the Improved Fins at a Fabricator, which is fully functional. This upgrade is the best available for fins right now, though future updates might introduce new options, since Subnautica 2 is still in Early Access.
-

How to Use Cheat Commands for Completing and Solving in Paralives
While most players aim to enjoy Paralives in a natural way, gradually building careers, relationships, and homes for their Parafolk, there comes a point when quick results become tempting. This is where cheats come into play.
There are various cheat options available: from boosting wealth rapidly to changing game time, adjusting Parafolk ages, and more. Accessing these cheats is straightforward through the Cheat Commands menu. Here’s what you should know.
Paralives is still in Early Access, so content may change over time. Updates to this guide will be provided as needed.
How To Use Cheats
To open the Cheat Command box, press CTRL + F1 or CTRL + SHIFT + C. On PC, both work; on Mac, only the first may be effective.
Once the box is open, you can type in any cheat command you want to activate.
All Cheat Commands
Aging and Death Cheats
Cheat Effect NEXTLIFESTAGE Advances the selected Para to the next life stage. PREVIOUSLIFESTAGE Sends the selected Para back to the previous stage. NEXTGROWTHSPURT Moves the Para up to the next growth spurt stage (for kids, pre-teens). PREVIOUSGROWTHSPURT Moves the Para down to the previous growth spurt stage. KILLCHARACTER Kills the selected Para. REVIVEALLSELECTEDCHARACTERS Revives the chosen Paras. Build Mode Cheats
Cheat Effect TOGGLEEDITTOWN Lets you edit the entire town, including adding or removing lots. REPAIRALLITEMS Fixes all broken items throughout the town. UNSPOILALLITEMS Removes spoilage from all food items. Character Cheats
Cheat Effect EDITCHARACTER Opens the Paramaker for customizing appearance and personality. SHOWSTATUSEFFECTS Displays current status effects on the Para. CLEARSTATUSEFFECTS Removes all current effects like viruses or emotions. CLEARSTATUSEFFECTSONALLCHARACTERS Clears effects for every Para in the game. CLEARWANTCOOLDOWNS Refreshes emotions to offer new wants immediately. COMPLETECURRENTWANTS Fulfills all the active Para’s wants. GAINSTORYCARD Triggers a Storyteller to present a new Story Card. LEARNALLSKINS Grants all skins of a specific type to the active Para. ADDSELECTEDCHARACTERSTOHOUSEHOLD Adds a NPC to your current household. CLEARALLONSELECTEDCHARACTERS Resets needs and wants for the selected Para. CREATECHARACTER Creates a new Para using a model GUID or name. KICKCURRENTHOUSEHOLDINTONEWHOUSEHOLD Moves the Para to a new household. KICKSELECTEDCHARACTERSFROMHOUSEHOLD Removes Paras from their household. LEVELUPPERSONALITY Improves the Para’s personality traits. LEVELUPSKILL Increases a specific skill (e.g., Piano). PRINTAGE Displays the age of a Para. RESETPERSONALITY Resets personality levels to default. SETAGE Adjusts the age of a Para. SETSKILLLEVEL Sets a skill to a chosen level. SHOWCHARACTERRELATIONSHIPS Shows relationship labels for the Para. Debug Cheats
Cheat Effect ALIASES Lists all cheat aliases. CLEAR Clears the cheat command box. HELP Shows all available cheats. SCHEDULE Schedules commands to run later (e.g., “SCHEDULE FPS”). STOP Stops a scheduled cheat. RESETMUSEUMDONATIONS Clears all museum donations. UNSTUCK Moves a Para to a proper position on the navigation mesh. UNSTUCKALL Moves all Paras into correct positions. SHOWCURRENTCHARACTERGUID Displays each Para’s unique ID. CANCELALLCHARACTERSINTERACTIONS Cancels queued interactions across the town. CANCELALLHOUSEHOLDINTERACTIONS Stops all household interactions. CANCELSELECTEDCHARACTERSINTERACTIONS Cancels actions for selected Para. DELETESELECTEDCHARACTERSINTERACTIONS Removes queued interactions for chosen Para. QUITTOMAINMENU Exits to main menu. RAGEQUIT Closes the game completely. SAVE Saves your game. ZIPSAVEFILE Compresses and saves your current game file to desktop. Fire Cheats
Cheat Effect EXTINGUISHALLFIRES Extinguishes all fires. EXTINGUISHSELECTEDCHARACTERSONFIRE Puts out fire on all characters. SETITEMONFIRE Sets an item on fire. SETITEMSTATE Changes an item state (e.g., “Ison 5”). SETSELECTEDCHARACTERSONFIRE Sets a Para on fire. Mail and Newspaper Cheats
Cheat Effect DELETEALLNEWSPAPERISSUES Deletes all previous newspapers. GENERATENEWSPAPER Creates a new newspaper. GENERATEMAIL Generates a new letter. RESETMAILBOX Clears all messages from your inbox. Miscellaneous Cheats
Cheat Effect BEAR Displays a bear image. EIGHTBALL Provides a magic eight-ball answer. HOTEL Displays “Trivago” in the command box. RANDOMIZEALLDEFORMATIONS Randomly alters the selected Para beyond normal limits. SPIN Gives a chance to succeed or fail on a spin wheel. Money Cheats
Cheat Effect PIGGYBANK Adds 1,000 Paradimes. MAKEITRAIN Adds 10,000 Paradimes. JACKPOT Grants 50,000 Paradimes. LOTTERY Gives a random amount up to 100,000 Paradimes. PAYDAY Mimics daily earnings of the Para. PRINTMONEY Adds a specified amount (e.g., “PRINTMONEY 5000”). SETMONEY Sets household balance to a certain value (e.g., “SETMONEY 100000”). CLEARBILLS Clears pending household bills. Need Cheats
Cheat Effect CHANGENEED Fills a specific need by a set amount. DECAYNEED Lowers a specific need by a set amount. RELIEFALLNEEDS Fully fills all needs of a Para. RELIEFALLNEEDSOFALLCHARACTERS Fills all needs for every Para. RELIEFNEED Completes a specific need (e.g., “RELIEFNEED Sleep”). SETNEED Assigns a certain value to a need (e.g., “SETNEED Sleep 3”). SHOWNEEDS Displays current needs and values. Occupation Cheats
Cheat Effect ADDVACATIONDAY Gives a vacation day to the Para. CLEARALLOCCUPATIONS Makes the Para quit their jobs. ADDSTRIKETOOCCUPATIONS Adds a strike to a Para’s job. CLEARSTRIKES Removes all strikes from a Para. ENDWORKDAY Ends the Para’s workday, earning pay and points. PRINTALLOCCUPATIONS Lists current occupations. PRINTALLPOSSIBLEEXTRASFOROCCUPATION Shows available perks for the job. Performance Cheats
Cheat Effect BENCHMARKFPS (No effect detailed) CAPFPS Limits FPS to a specified value (e.g., “CAPFPS 30”). FPS Shows current FPS. RESOLUTION Displays current screen resolution. SETRESOLUTION Changes game resolution (e.g., “SETRESOLUTION 1920×1080”). SHADOWDISTANCE Shows shadow detail setting. STARTTOWNBENCHMARKSTORYBOARD Runs a town performance test. VSYNC Displays Vsync pass count. WINDOWED Switches to windowed mode. Pregnancy Cheats
Cheat Effect GETPREGNANT Makes the selected Para pregnant. GIVEBIRTH Starts labor if pregnant. MAKEBABIES Causes two Paras to have a baby together. PREGNANTSTATUS Shows pregnancy status. Time Cheats
Cheat Effect ADVANCEDAY Skips forward 24 hours. ADVANCEHOUR Moves time forward by one hour. SETHOUR Sets specific time of day (0-23 hours). SKIPTO5MINUTESBEFOREWORK Advances to five minutes before work time. -

How to Raise Your Art Skill Level in Paralives by Completing and Solving
Paralives allows you to start fresh with a new home and build a family from scratch. You have full control over every choice, from the appearance of your characters to how they behave and interact with their environment. What will you decide to do?
The first step is creating your family, then helping them develop skills to succeed. One of the most fun skills to improve is the art skill, which offers many uses. Here’s what you need to know to boost this skill so your characters can become skilled artists.
Note: Paralives is still in Early Access, so details may change. Updates to this guide may be made as needed.
What Is the Art Skill?
The art skill is the main skill that covers all artistic activities in Paralives. Improving this skill helps your characters learn other art-related skills faster. To get better at art, your characters need to focus, since they won’t gain points when they’re in a bad mood or sick. Practicing related activities can help boost multiple skills at once.
You can also increase your art skill by reading books, studying online, or dreaming about art, provided you have unlocked the relevant perk through your storyteller.
How To Increase the Painting Skill
To improve painting, you need an easel, which can be bought from the build/buy menu under hobby items. Once placed in your home, you can start creating paintings of portraits or abstract art.
Note: Creating art costs money for supplies like canvases. As your skill improves, you’ll unlock the ability to make more types of paintings. Completed artworks can be displayed or sold to earn money.
You can also buy a children’s coloring set for a simpler way to draw, but note that it won’t produce displayable art.
-

How Endless Mode in Coffee Talk Tokyo is Solving Challenges
Coffee Talk Tokyo is more like a visual novel than a typical coffee shop simulation game. During the main storyline, you won’t spend much time making drinks. Instead, you’ll mostly observe interesting conversations between the diverse characters who visit your shop.
If you enjoy making drinks, there’s an Endless Mode available from the main menu. In this mode, there are no storylines or character interactions—just making drinks for an unlimited number of customers. Here’s how it works:
When you start Endless Mode, you’ll be asked whether you want to select Free Brew or Challenge Mode.
Free Brew Mode is a sandbox where you can craft any drinks you want. There’s no timer or customer orders, and all ingredients are unlocked from the start. This mode is perfect for experimenting with different ingredient combinations and discovering new drinks. You can also switch characters sitting at the counter by pressing the icon next to your in-game phone.
Challenge Mode is more demanding. You’ll receive specific orders, and there’s a timer ticking down from 1 minute and 30 seconds. The goal is to prepare the correct drinks before time runs out. Each correct order adds extra seconds back onto the clock. To know which drinks to make, later in the game, you’ll need to use the Brewdog app on your in-game phone, as the customers will only tell you the drink name.
In Challenge Mode, you’ll see on the screen whether you’ve made the right drink. When a customer’s face appears on the screen against a green background, it means you got the order right. If they look shocked and the background turns red, you missed it. You can keep track of your correct orders by the number of smiles in the top right corner.
The drinks you need to make are random. At first, customers will tell you the ingredients they want, and you can add them directly. Later, they will only provide the drink’s name, requiring you to reference the Brewdog app to figure out the recipe.
The main aim of Challenge Mode is to get as many correct orders as possible before the timer runs out. There’s no way to truly win or lose; it’s just about improving your score. Achievements are available for reaching milestones, such as getting 10, 25, or 50 drinks right in a session.
-

How to Complete Every Radio Tower in Lego Batman: Legacy of the Dark Knight
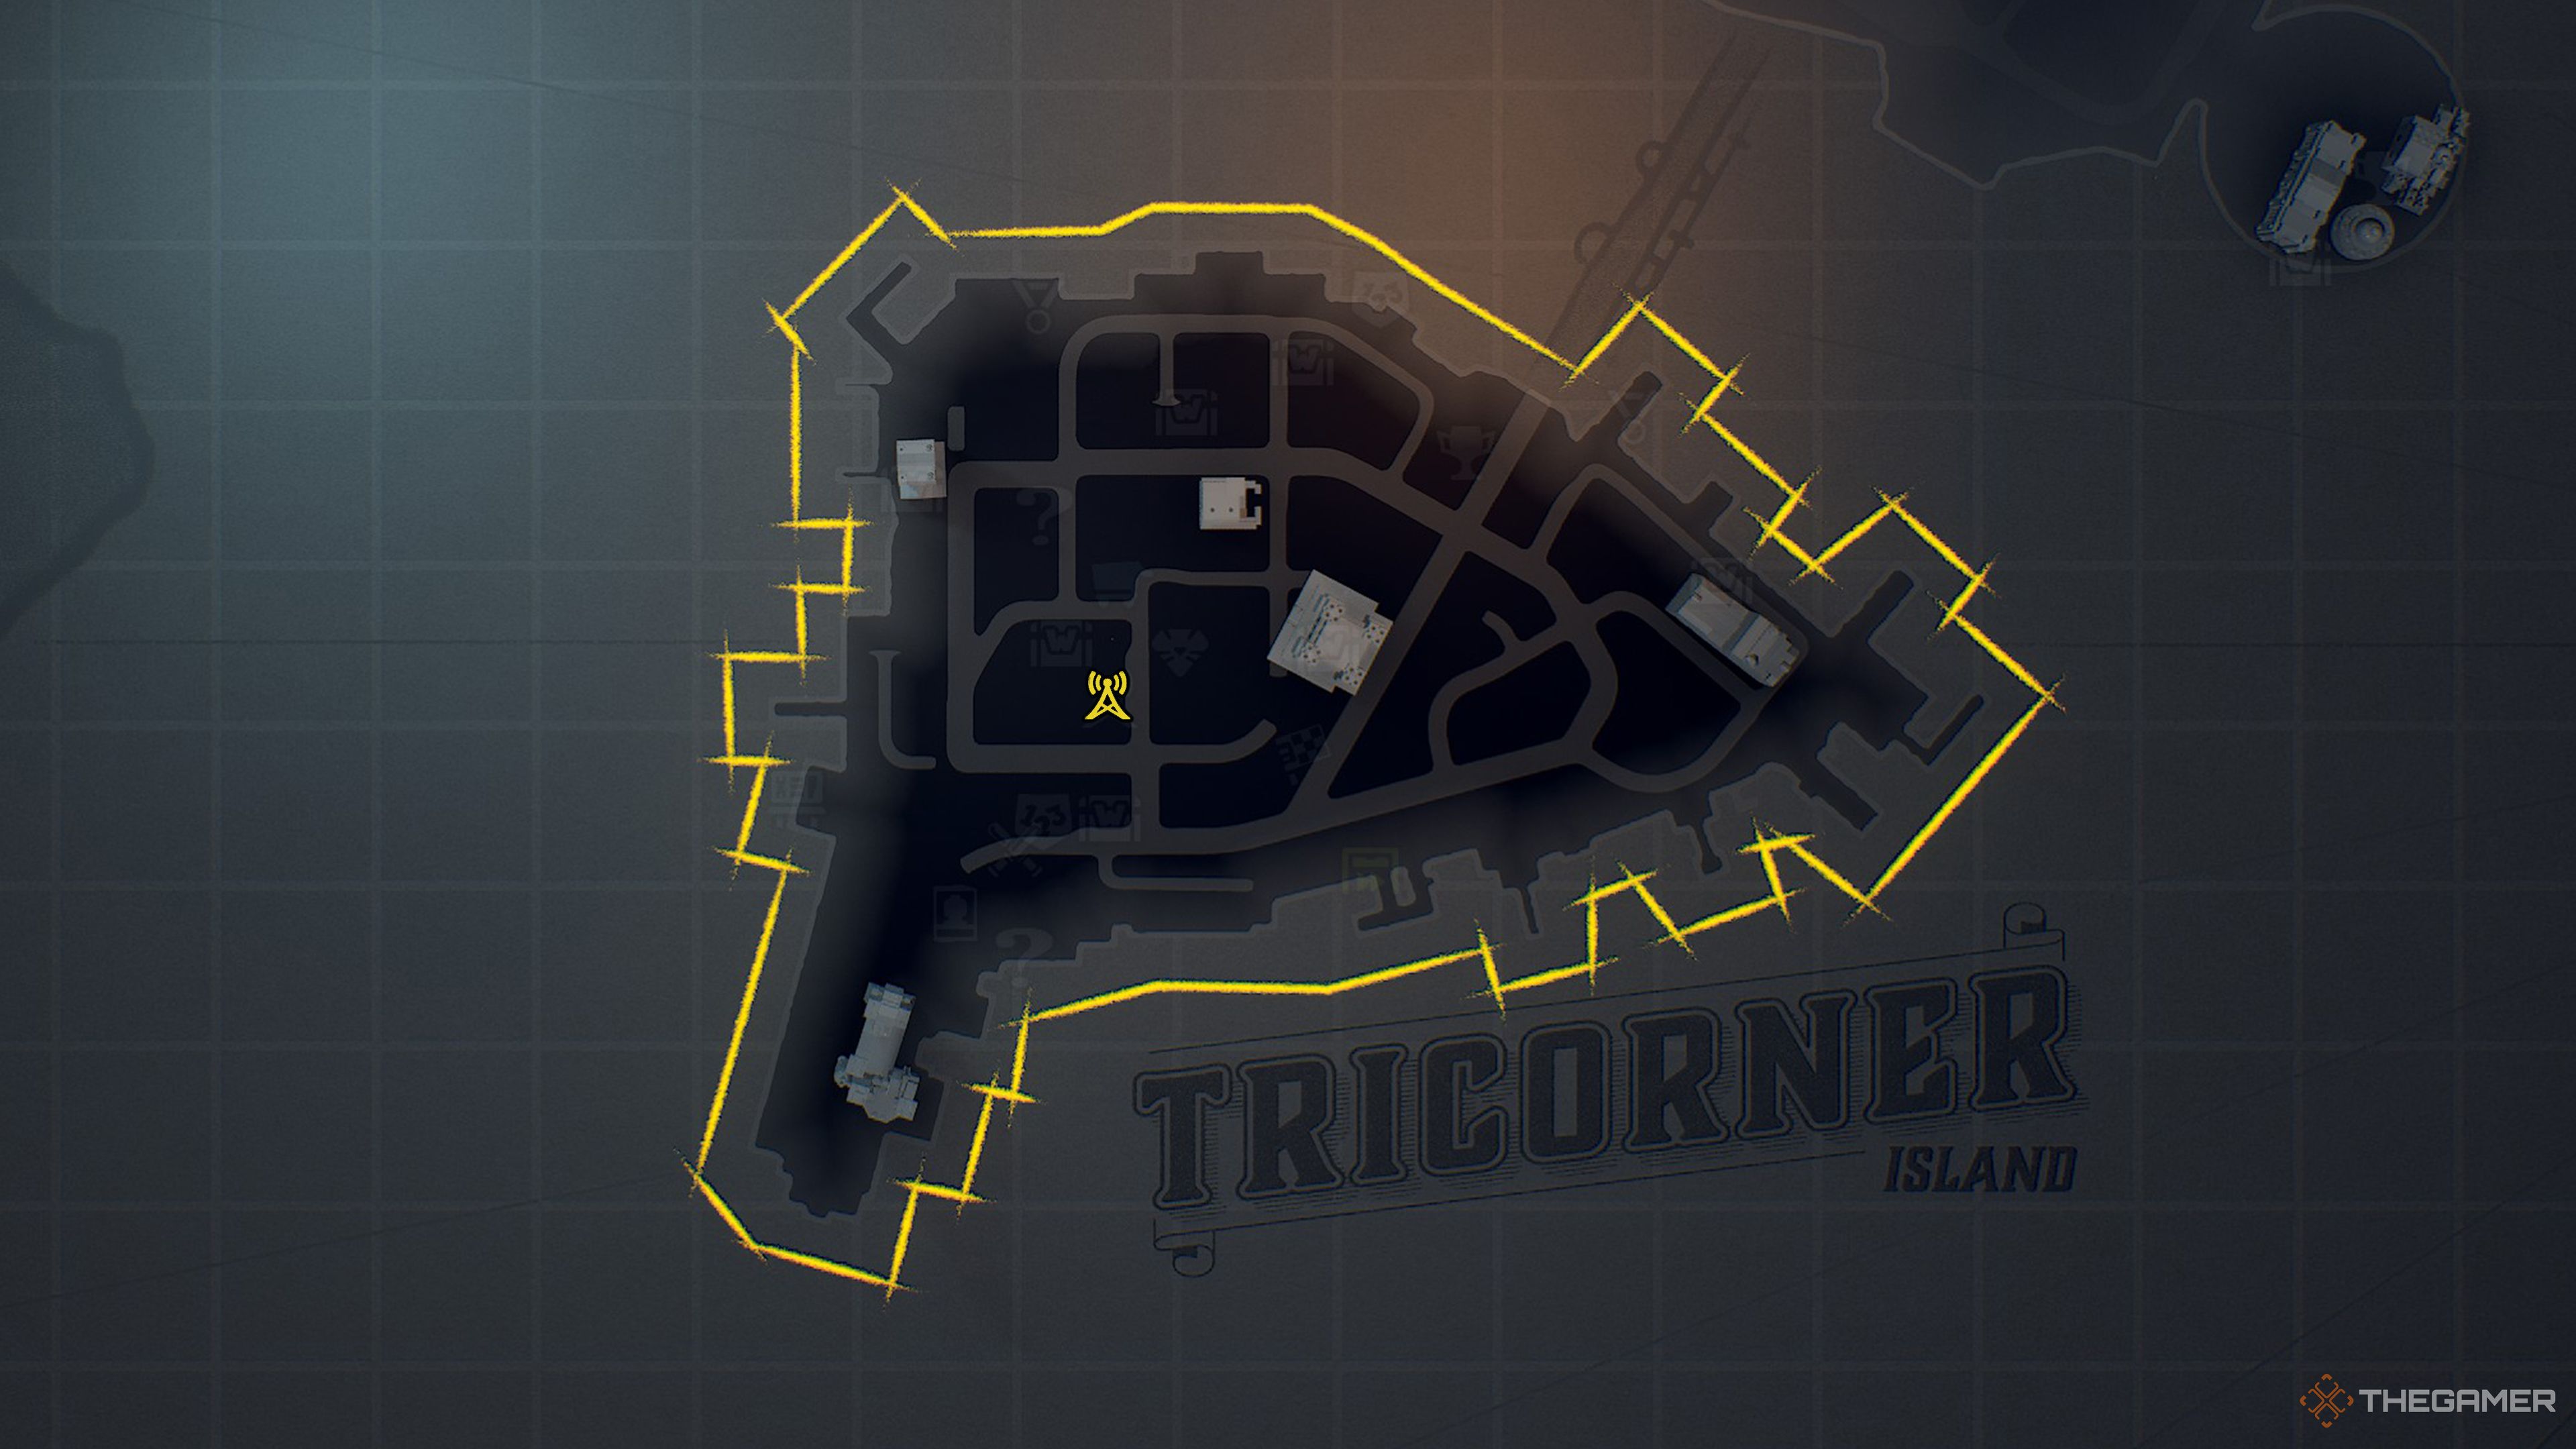
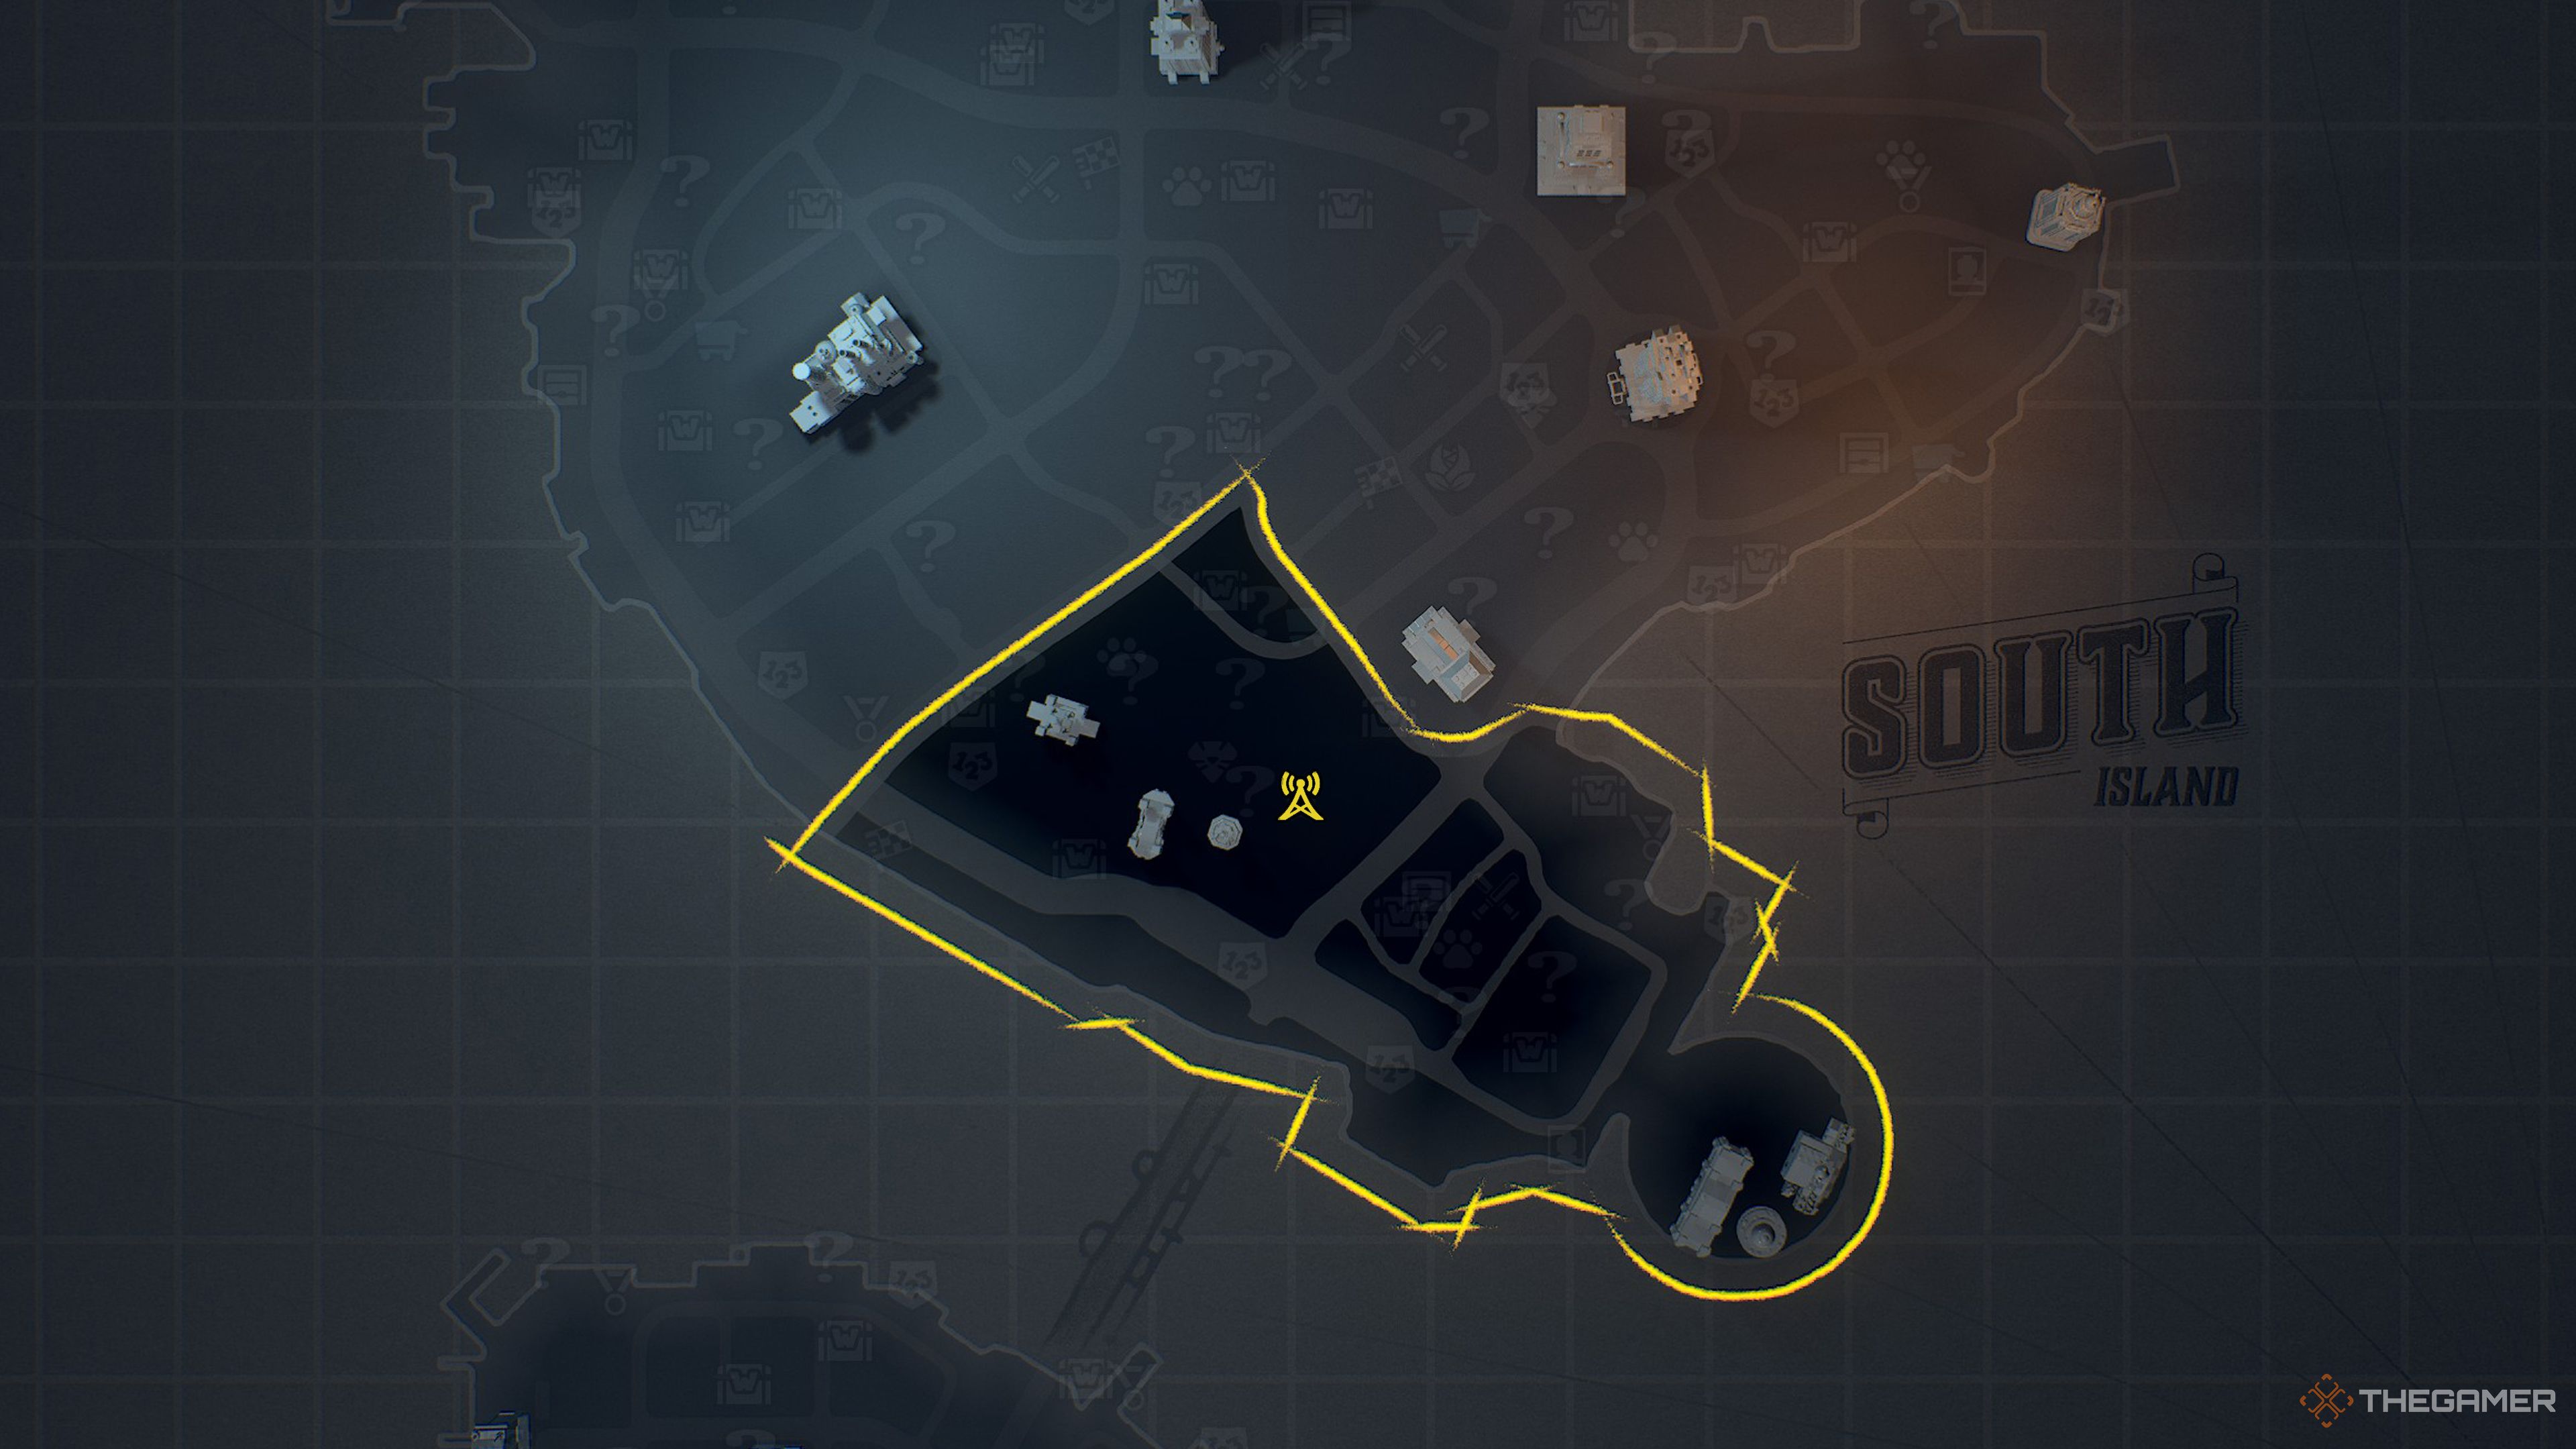
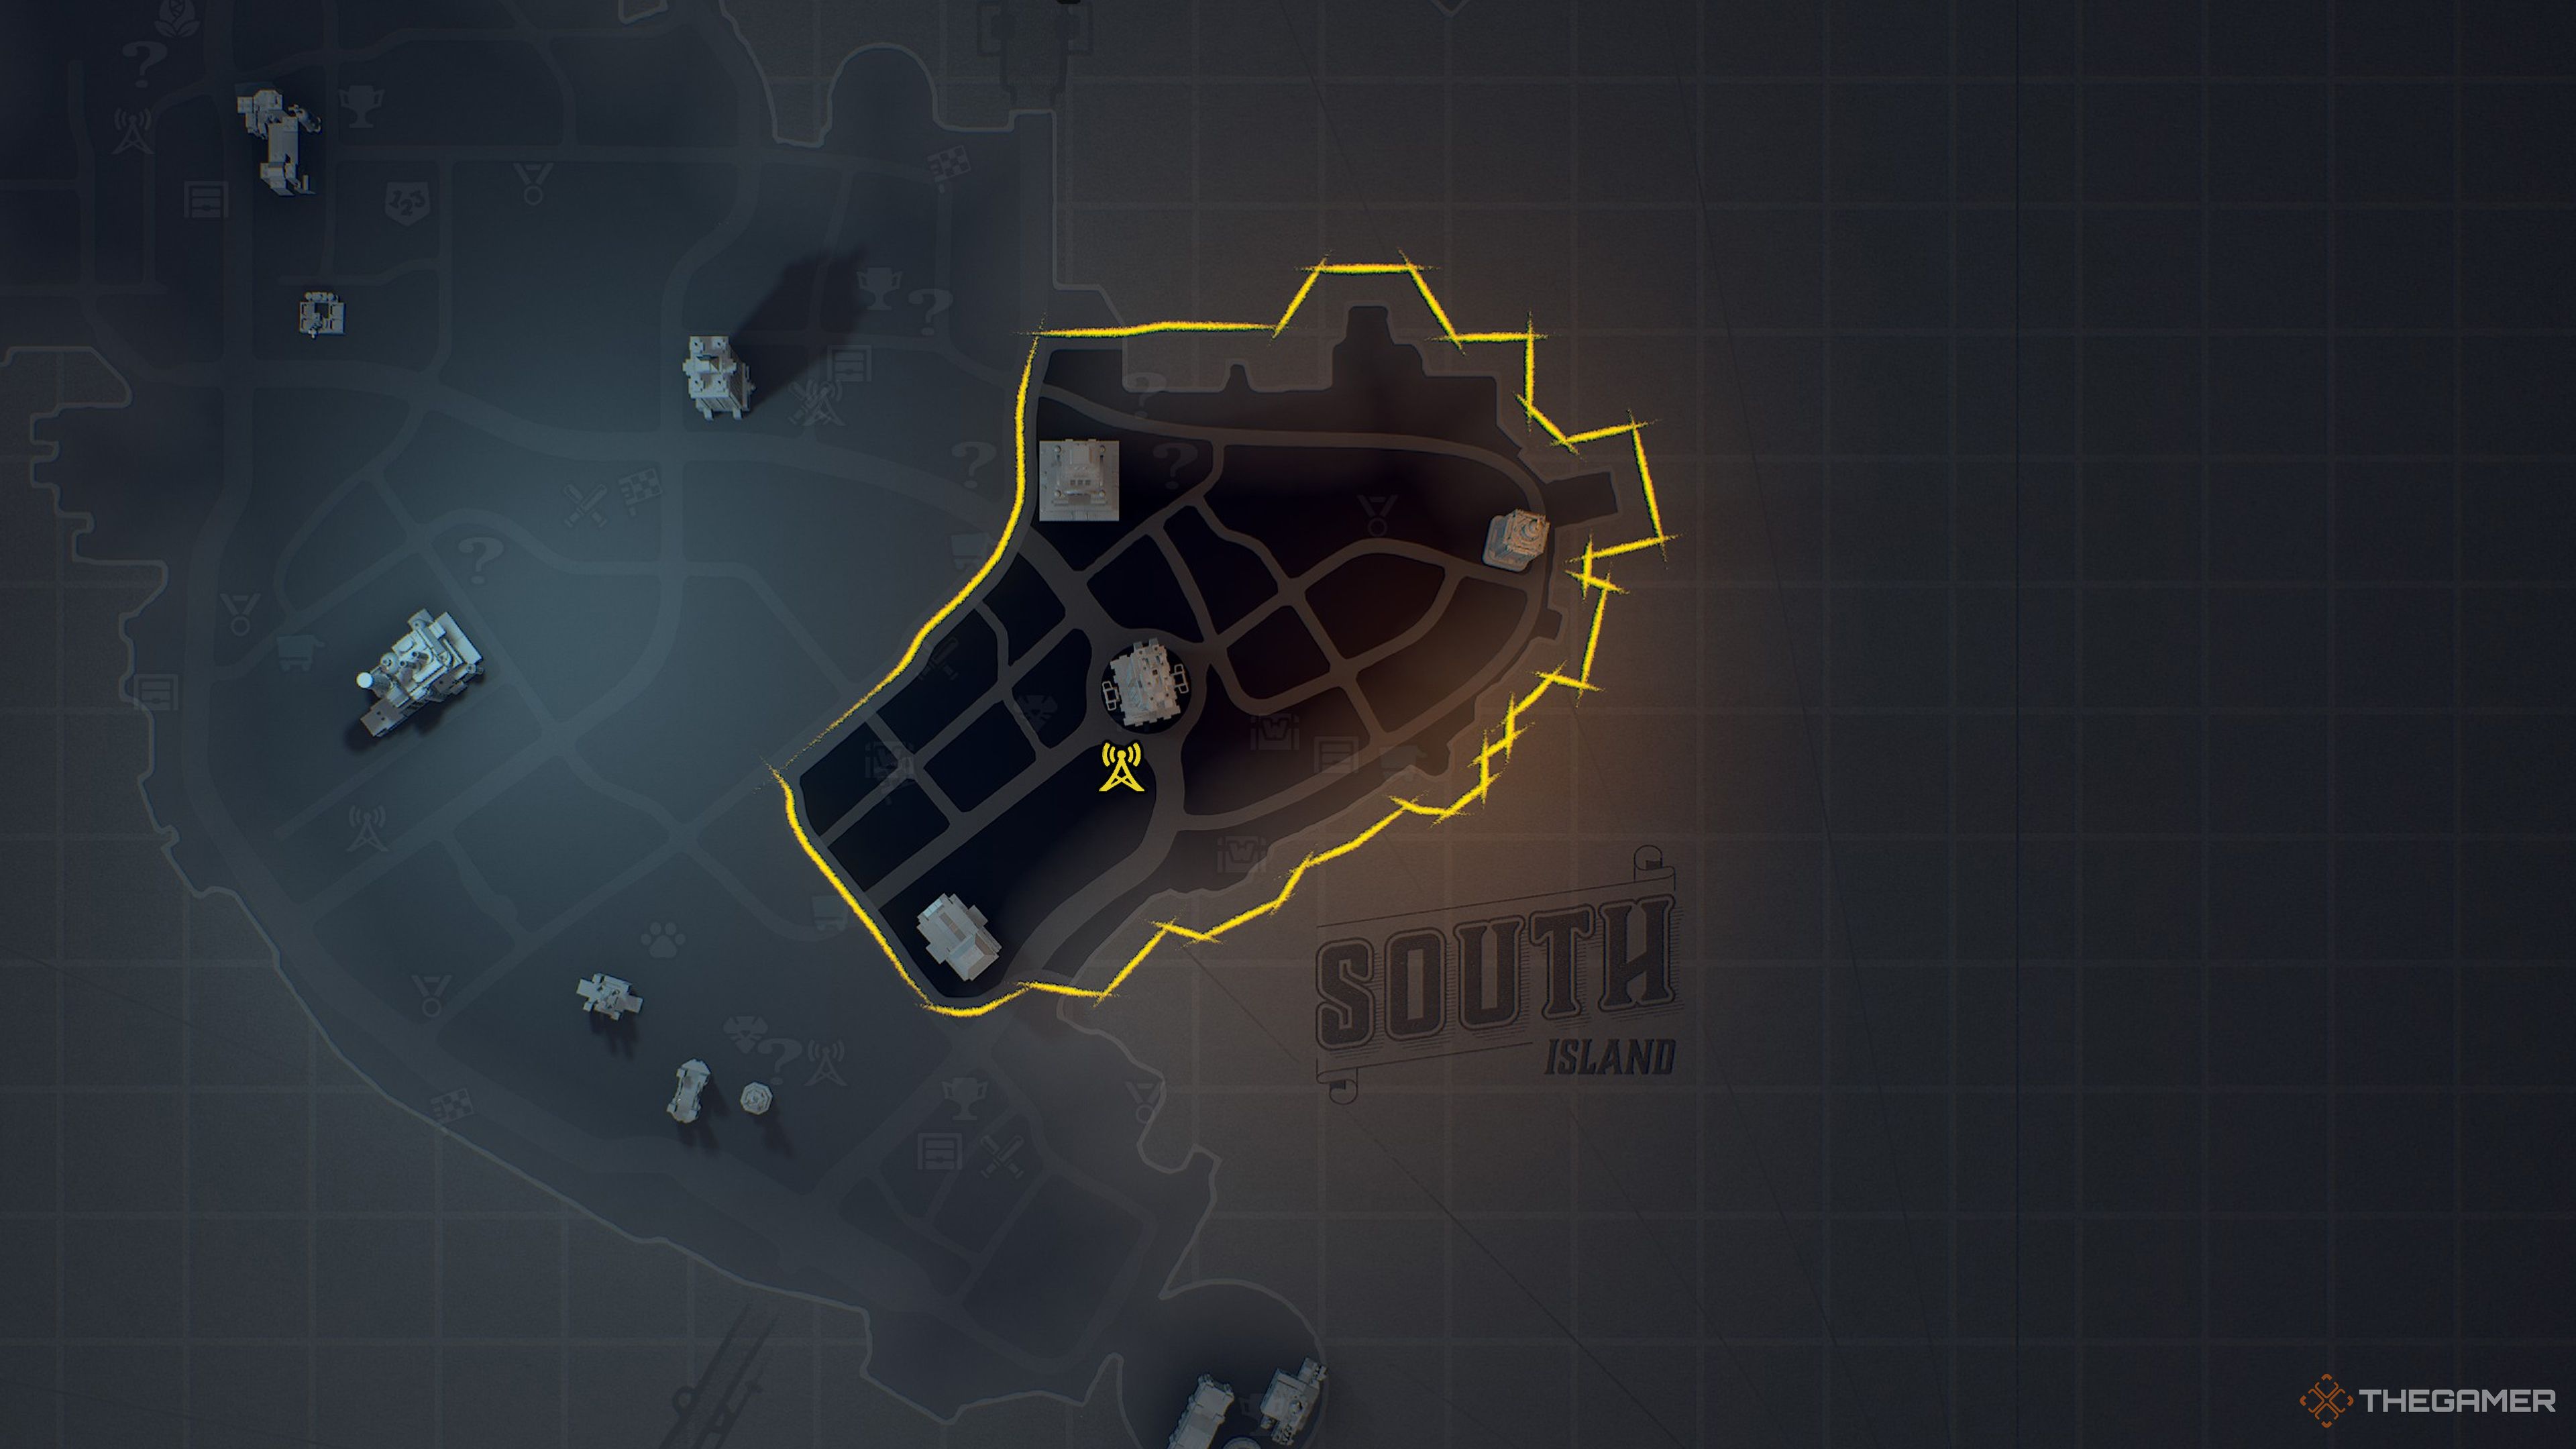
There are many collectibles hidden throughout Gotham City in LEGO Batman: Legacy of the Dark Knight. But don’t worry, aside from bat symbols, you don’t have to wander around aimlessly looking for Riddler puzzle boxes or Batcave trophies. Once you reach Chapter 4 and unlock Batgirl, you can start hacking radio towers to reveal all points of interest on the map.
Every district has its own radio tower. To activate one, simply go to the tower and throw a hackarang at the panel on its side. In this guide, we’ll tell you exactly where each tower is located—from Tricorner to Gotham Village and Amusement Mile—so you can unlock them easily. It’s best to do this after finishing the game, because some points of interest need Talia’s help to complete. It’s much easier to collect everything after completing the story mode.
Tricorner
Map with radio tower markedOld Gotham South
Map with radio tower markedOld Gotham North
Map with radio tower markedOld Gotham West
Map with radio tower markedThe Cauldron South
Map with radio tower markedThe Cauldron North – Ace Chemicals
Map with radio tower markedGotham Village – Robinson Park
Map with radio tower markedNewtown
Map with radio tower markedEast End – Amusement Mile
Map with radio tower marked -

Where to Find the Kuku Watcher Pack Blueprint in Crimson Desert During Completing and Solving
Crimson Desert is packed with armor pieces, weapons, consumables, and important items, many of which can be easily overlooked if you don’t explore thoroughly. While some items require little effort to find, the Kuku Packs are among the top gear and can greatly improve your gameplay experience.
One notable item is the Kuku Watcher Pack, which summons two invincible drones that constantly attack enemies during fights. It’s especially useful when fighting groups or bosses, making combat easier. In my opinion, the Kuku Watcher Pack is essential. Here’s everything you need to know to get your own personal army.
Kuku Watcher Pack Blueprint Location
To unlock the blueprint for the Kuku Watcher Pack, you first need to craft a standard Kuku Pack. This starts with completing “The Witch of Wisdom” quest and cleansing the Sanctum of Penitence. The sanctum is located just southeast of Hernand and northwest of the Willow River. You’ll need to defeat all cultists guarding the area until the progress bar hits zero, then find and insert the reactor core into the machine to activate it. A cutscene will follow, where the witch awards you the blueprint for the Kuku Pack. Afterward, visit Grimnir at the Kilnden Workshop west of Hernand to craft your Kuku Pack.
Unlock The Witch of Kindness Quest
With your Kuku Pack, the next step is to hunt for the blueprint for the Watcher Pack. You must first unlock the “Witch of Kindness” quest in Pailune. Travel southeast of Wayward Woods into the mountains and find a small tent where a freezing woman is located. Approach her and light the nearby brazier to warm her up. She is actually a witch, and she will ask for your help. Accept her invitation, and she will give you a new map marker for her home north of your position. Talk to Bari there to start the “Witch of Kindness” quest, which triggers cultists to attack sanctums throughout Pailune, allowing progress toward the Watcher Pack.
Cleansing the Sanctum of Atonement
Once you have this quest, go to the Sanctum of Atonement, located west of the Hunated Hills and north of Hernand’s letter A on the map. Defeat all cultists in the area; the only challenge is the flying wizards, which can be taken down with a few arrows. When clear, locate the reactor core and the floating pillar piece in the northern part of the sanctum’s main chamber, inside side rooms. Insert both into the machine to cleanse the sanctum. This triggers a cutscene where Bari thanks you and gives you the blueprint for the Kuku Watcher Pack.
Materials Needed for the Kuku Watcher Pack
Gathering the required materials involves finding several specific items:
-
Abyss Cell 0: These large spherical cores are destroyed with Focus Force Palm on Bismuth Ore walls. One good spot is north of the Denn River in northern Demeniss near Hollow Haven; destroy the cores in the wall to collect them.
-
Clockwork Insects: You need 300 of these. Luckily, the Kuku Pack makes collecting them easy. Head to Delesyia, where large swarms of Clockwork Dragonflies and Ants are common, especially near the Gate of Peace. Use your pack to vacuum up dozens at a time by activating it near the swarms.
-
Electrical Components: Found along the main road north of Mount Benus toward Blue Thicket. Defeat the large drill-equipped golems, which have a chance to drop mechanical parts that resemble motors and emit sparks. Use your Sealing ability to store these in your Kuku Pot.
-
Small Batteries: You need 200, obtainable in Delesyia. These drop from smaller robots and golems, especially around Marni Mechworks and Marni’s Masterium. As long as these areas are not fully cleared, patrols keep spawning, making it easy to gather batteries passively over time.
Once you have all the materials, return to Grimnir at Kilnden Workshop and craft the Kuku Watcher Pack. Equip it, and deploy your drones to assist in battles whenever needed.
-
-

How to Complete the Dungeon in HoMM: Olden Era and Solve Its Secrets
The Dungeon is one of the strongest factions in Heroes of Might and Magic: Olden Era. Led by the Triumvirate of Alvar—an underground alliance of dark elves, minotaurs, medusae, and dragons—the faction is known for its tactical flexibility. Every unit can switch between two attack types, making the Dungeon more adaptable in battle than any other town.
Because of this, the faction provides steady power throughout the game. Early on, it features a good ranged core, like Onyx Dancers, for efficient damage. In the middle game, it introduces strong frontline units such as Minotaurs and secondary ranged options like Medusae. Later in the game, Black Dragons become the ultimate finishing units, a strength that many other factions can’t match. This playstyle is ideal for players who want options during fights and a clear power progression to aim for.
Overall Strategy Tips
Dungeon players should focus on controlling the map with aggressive tactics. The early game should establish a ranged damage core capable of clearing easier enemies fast—Onyx Dancers are especially effective. Moving into mid-game, build up frontline depth with Minotaurs and unlock additional ranged units like Medusae, as buildings come online. In late game, aim to get Black Dragons, which serve as the main endgame threat. Every decision about building, resources, and battles should align with your current stage in this plan.
Resources are key, particularly Ore and Gems. Ore is essential early because it unlocks some mid-tier buildings and is the first resource to address. Gems become critical later for high-tier structures and the Black Dragon dwelling. Prioritize claiming Ore outposts first; then switch focus to Gems once the main mid-game buildings are secured.
On maps with poor Gem distribution, the timing of the Black Dragon units can slow down, so plan accordingly rather than ignoring resource scarcity. Morale penalties can negatively affect Dungeon armies, so keep your units on your main hero and avoid adding neutral creatures unless necessary. The early army is potent but fragile; avoid battles that will drain key stacks before reinforcements arrive, as recovery is slow and missing stacks will hinder map control.
First Week Strategy
Dungeon has low Gold needs for Week 1 buildings but requires several rare resources early on. The best initial build is the Amphitheater, the newly unlocked Onyx Dancer dwelling, which produces units weekly from the start.
On Day 1, build the Amphitheater and recruit all available units. On Day 2, upgrade the Byzantine Palace to Tier 2 to boost Gold and Law Points. Day 3’s upgrade to Tier 3 is expensive but crucial for long-term income growth. By Day 4, construct the Labyrinth to unlock your main frontline units. The Day 5 build depends on your resources; options include the Bank if you have stable Gold, the Marketplace if Crystals or Gems are short, or the Mage Guild to secure necessary spells.
Your goal going into Week 2 is to have the Byzantine Palace fully upgraded, all core dwellings active, and enough rare resources saved to advance your mid-game development—especially upgrading the Amphitheater to boost ranged units like the Onyx Dancers to their full potential.
Army Composition Tips
Dungeon’s roster covers every combat role: ranged damage, melee frontline, control, and late-game finishing units. The dual-attack system means most stacks can switch attack types, rewarding players who adapt tactics during battles rather than sticking with a single approach.
Early on, prioritize units like Onyx or Aureate Dancers for ranged damage, as they’re cost-effective and initiate combat well. Minotaurs are vital for frontline defense, absorbing retaliation and protecting ranged units from damage. Maintain enough Minotaurs to hold position for the mid-game.
Maintain secondary stacks like Toxic Troglodytes for their long-range attack, which keeps them alive longer. The melee Troglodyte upgrade isn’t recommended since they compete with Minotaurs in space and lack durability. The Infiltrators are fragile; use them sparingly for minor tasks rather than core combat.
Medusae enter the mix mid-game, providing ranged control and complementing your core units without replacing early investments. Black Dragons are the late-game reward—powerful and expensive, but capable of turning the tide of battles. Securing Mercury outposts during mid-game speeds up their availability.
Single Hero Tips
Dungeon is ideal for a single hero setup. The core ranged units can clear many encounters on their own, and the dual attack types let your hero adapt tactics in difficult fights. Carefully route resources; without a secondary hero, mining and neutral creature control depend on your hero’s movement. Missing key resource nodes early delays your mid-game development. In the first two weeks, avoid taking on fights too far from your town, as losing key stacks leaves no recovery option.
If you choose a hero like Motley, use her Twilight spell proactively to neutralize dangerous enemy ranged threats at the start—keeping fights manageable.
Spells And Magic Priority
Dungeon supports both Warlock and Warlord primary skills. The choice depends on your hero and map conditions.
For Warlocks, focus on Nightshade Magic. It offers powerful disruption and debuffs, especially with heroes like Lodos who lock opponents out of Nightshade spells. Establish the Magic Observatory early to track available spells, which is crucial for maximizing your spell power.
For Warlord-based heroes like Stinger, prioritize combat skills and army-efficient passives over spellcasting. Building a Mage Guild is worthwhile for utility spells—movement, scouting, defense—but avoid investing heavily in magic unless it complements your combat focus.
Remember, resources like Alchemical Dust for spell upgrades are limited. Spend them on spells you are actively casting, and prioritize Nightshade spells on Warlock heroes once resources allow.
-

How The Alan Wake Event Works in Phasmophobia: Completing and Solving
The Alan Wake crossover event in Phasmophobia combines ghost hunting with a bizarre storytelling style, as if a ghost story was written after consuming too much coffee. The usual investigation maps have been transformed into strange, storybook-like versions, featuring shadowy figures, hidden glowing messages, and creepy dolls that make checking every room feel even more unsettling.
Inspired by Alan Wake, the event introduces new gameplay elements centered around Words of Power, Dark Presences, and a multi-stage doll puzzle in the lobby. Whether you’re aiming for Event Points, hunting for cosmetics, or trying to understand why a shadowy whispering figure is lurking in the farmhouse, there’s a lot happening during this crossover.
How the Alan Wake Event Works
The event takes place across themed versions of known investigation maps. Although the layouts mostly stay the same, each location contains unique objects tied to the event, such as Words of Power, Dark Presences, Dolls, and related puzzles.
Event maps include places like Oh Deer Diner, Cauldron Lake, Coffee World, and Elderwood Palace Lodge. These locations are marked on the Contract Voting board in the lobby by small notes on their top right corners of the map images.
During investigations, players can earn Event Points to progress both individually and in the community. Points only count if the contract is played on at least standard difficulty (x1.00 multiplier), meaning lower custom difficulty settings won’t award points.
Correctly identifying the ghost awards ten Event Points. Revealing Words of Power grants two points each, while banishing a Dark Presence awards two points per entity. Increasing difficulty modifiers boosts point gains, so difficult investigations are the fastest way to earn progress.
Rewards include reaching community points goals for a Manifestation ID Card and Badge, earning enough personal points to unlock the Angel Lamp Charm, revealing all 68 Words of Power to unlock Alan Wake’s Suit cosmetic set, and collecting dolls and solving lobby puzzles for Saga Anderson’s Outfit cosmetics.
What Are The Dark Presences?
Dark Presences appear as motionless shadowy figures scattered across the event maps. They emit whispering sounds that make them easier to find in quiet areas. To remove a Dark Presence, players must grab the Angel Lamp from the investigation truck’s monitor, then aim it at the figure. Holding the use button for several seconds causes the entity to be engulfed in a sparkly explosion of light, making it disappear. Maps can have up to about 20 Dark Presence spawns.
How Words Of Power Work
Words of Power are hidden phrases only revealed with a UV Light. While exploring, glowing yellow arrows appear when near a hidden word, leading players toward a spiral of glowing letters somewhere in the environment. Once found, shine the UV light directly onto the word; the darkness around the letters will fade, causing the word to vanish once fully revealed. When playing with friends, each player must reveal their own Word of Power, as progress doesn’t transfer between players. When a word is revealed by one player, it disappears for them but remains visible to others until they reveal it themselves.
How To Solve The Doll Puzzle
Across the themed maps, dolls are scattered, acting as collectibles or puzzle pieces needed for the final lobby challenge. They are usually hidden on shelves, inside tents, on desks, or in small corners, requiring careful exploration. The dolls used in the final puzzle are located near a collection of chalk drawings in the lobby, beside a central desk.
The puzzle involves placing specific dolls on matching chalk symbols across multiple stages:
- First stage: Place the Moose Doll on the Tree symbol, and the Deer Doll on the House symbol.
- Second stage: Place the Child Doll on the Sun, the Father Doll on the House, and the Old Man Doll on the Waves.
- Final stage: Place the Child Doll on the Tree, Princess Doll on the Eye, Father Doll on the Heart, and Jester Doll on the Sun.
Once completed, the puzzle resets with a new arrangement, requiring players to repeat the process for the next stage.