الوسم: Dissidia

  • How to Play Firion in Dissidia Duelum Final Fantasy: Completing the World of Solving

    How to Play Firion in Dissidia Duelum Final Fantasy: Completing the World of Solving

    Firion features as a melee character in Dissidia Duellum Final Fantasy, equipped with a versatile kit. His flashy skills and passive ability to heal himself during combat make him ideal for players wanting a tank in the front lines who can also cause damage.

    Originating from Final Fantasy 2, Firion is known as the Rebel Fighting for Peace. His addition fits well, as he aids the team in battling monsters and corrupted crystals in modern Tokyo. As a three-star character, he’s somewhat harder to master compared to others, but makes up for it with high damage potential.

    Firion Overview

    Firion is designed to be a frontline attacker. His passive ability, Strength of Loyalty, allows him to heal 20% of his HP for damage dealt through his abilities. His Unique Ability, Straightarrow, lets him release a long-range attack when held down. His kit includes several combos that enable quick eliminations and simultaneous healing, although mastering the timing and ability execution is necessary. Despite being a melee fighter, Firion has range capabilities thanks to his Chain Strike and Straightarrow, enabling damage from afar, closing the distance, and attacking until enemies fall—passively healing along the way. Proper rotation is essential since spamming skills can leave him vulnerable.

    Best Abilities for Firion

    • Main Abilities

      • Fervid Blazer: Deals heavy damage in front of Firion and grants temporary invincibility.
      • Vortex of Arms: Launches enemies into the air, dealing high area damage, effective for combos and quickly clearing crystals.
      • Blood Weapon: Restores a significant portion of health (60% of damage dealt) to Firion by hitting an enemy.
      • Chain Strike: Dashes forward to do low damage, useful for gap closing.
      • Surge: Boosts Firion’s attack for 20 seconds.
      • Selphie/Wall or Hope/Renew: Reduces damage taken by 80% and nullifies status effects or fully heals Firion.
      • Auron/Shooting Star: Deals damage directly in front and knocks enemies into the air.
    • Support Abilities

      • Enhance Firion’s overall combat power, focusing on increasing his HP and attack potential.
      • Upgrades like Embolden and Hastera provide increased attack power.
      • Prioritize supporting Firion’s frontline role by boosting his health, since he often takes initial damage.

    Key Abilities Explained

    Vortex of Arms is a top UR choice. It’s broad and versatile—lifting enemies for combos, stopping them temporarily, or swiftly defeating crystals. When used against bosses, it can eliminate a bursting teammate and yield full BP on their demise. It also helps recover health by damaging both the boss and enemies, though not as effectively as dedicated healing abilities.

    Fervid Blazer serves either as a damage dealer or a quick gap closer. Its range allows Firion to dash quickly into enemies, deal significant damage, and follow up with other abilities like Vortex of Arms to finish targets.

    Chain Strike offers longer-range gap closing, dealing less damage but setting up for other combos. Using Blood Weapon during combos is highly recommended, as it heals Firion considerably while inflicting damage. Timing these abilities well—starting with Straightarrow, followed by Chain Strike and Fervid Blazer—optimizes damage and healing.

    Adjustments in execution, such as replacing abilities with elemental attacks like Thundaga or Earth Breaker, can improve performance based on enemy distance. Using support abilities like Selphie/Wall or Hope/Renew during combos enhances survivability.

    Ideal Party Setups

    A balanced team with Firion benefits from support characters like Kain, who can damage and handle air-juggling enemies, and Cloud, who can cover gaps with melee skills and support his allies with knock-up abilities. Balthier offers ranged support and damage, helping to control the battlefield from afar, while Zidane brings speed and BP theft, preventing enemies from unleashing their bursting attacks, enabling combined strikes on the boss.

    By pairing Firion with characters who can complement his strengths—such as creating opportunities for air combos, damage support, and enemy control—players can maximize his potential in battles.

  • All Active Dissidia Duellum Gift Codes for Completing and Solving

    All Active Dissidia Duellum Gift Codes for Completing and Solving

    When playing live-service games like Dissidia Duellum Final Fantasy, it’s important to stay updated on any codes the game offers. These codes can give you extra currency or special options that help enhance your gaming experience. Dissidia Duellum Final Fantasy is no different. There are several gift codes available that can provide you with additional resources and collectibles for your account.

    These codes include options for background music, new player titles, and other rewards. We’ve gathered a list of active codes for you to use in the game, allowing you to make the most of what your account can earn. Below are all the current valid gift codes for Dissidia Duellum Final Fantasy.


    All Active Dissidia Duellum Final Fantasy Gift Codes

    Dissidia Duellum Final Fantasy provides various gift codes for different game currencies. These include Growth Eggs, Mog Points, Gift Tickets, and more.

    To redeem these codes, open the link for each code on the device where you have the game installed, such as your Android phone or iPad/iPhone. Here are the active codes available as of April 2026:

    Growth Eggs

    Gift Tickets

    MogPay Points

    Note: To claim MogPay Points from the web store, you will need to log in to your Square Enix account.

    BGM Soundtracks

    Secret Player Tags


  • Top Job Medals in Dissidia Duellum: Completing & Solving Final Fantasy

    Top Job Medals in Dissidia Duellum: Completing & Solving Final Fantasy

    As you work on developing your favorite characters in Dissidia Final Fantasy, you’ll come across job medals. At first, these medals might seem insignificant, but they are actually important items you can use to boost your characters’ abilities. We’ll explain what these medals do and which ones are best for your team.

    Whether you want to be the tank, support, or damage dealer, there is a job medal suited for that role. Based on the classic Final Fantasy classes, here’s an overview of the job medals in Dissidia Final Fantasy and how they can help you.

    All Job Medals

    Job medals in Dissidia Final Fantasy are designed to improve your character’s natural skills, though their roles can vary randomly. Beyond their role, medals also have star ranks and elements. The star rank makes the medal stronger, while the element offers an extra boost when it matches your character’s element preference. For example, a blue medal will give a boost to the Warrior of Light, while a brown medal favors Cloud Strife.

    Here’s a look at the best medals for each role and how they can work together:

    Support Medals
    You can equip up to three support medals at a time. To stay versatile, create different setups you can switch between. Use these setups to keep key skills ready while you keep rolling for the best medals.

    Best Support Job Medals

    • S Tier: Sage — Boosts team bravery by strengthening crystal purification, making allies more resilient. Characters like Krile excel here, helping your team build bravery faster and share it.

    • A Tier: White Mage — Increases healing power, so you can recover more health during battles. Support characters like White Mage are crucial for keeping everyone alive.

    • B Tier: Thief — Boosts your speed, helping support characters move quickly to avoid danger or help allies faster.

    • C Tier: Bard — Reduces the duration of harmful status effects, making it easier to stay alive and support the team through tough conditions.

    Best Tank Job Medals

    • S Tier: Blue Mage — Reduces damage from bosses and monsters, acting as a sturdy wall to soak up attacks. This is critical for tank roles.

    • A Tier: Warrior — Raises attack and defense stats, helping the tank absorb damage and deal some in return.

    • B Tier: Knight — Focuses on increasing defense alone, making it a solid choice if your priority is durability over offensive power.

    • C Tier: Monk — Boosts HP, providing a larger health pool to withstand hits. While important, this is less impactful compared to other tank medals.

    Best Damage Dealer (DPS) Job Medals

    • S Tier: Time Mage — Cuts down ability cooldowns, enabling constant attack combos and rapid ability use. Essential for melee or ranged damage characters.

    • A Tier: Hunter — Increases damage against bosses and monsters, making your attacks more effective in taking down tough foes.

    • B Tier: Ninja — Boosts attack and movement speed, allowing quick hit-and-run tactics to maximize damage output.

    • C Tier: Black Mage — Raises attack power, providing the basic offensive boost necessary for damage-focused characters.

    Understanding Medals’ Role and Upgrades
    Job medals are meant to improve your character’s inherent skills. However, their effects are somewhat randomized, including their role, star rank, and element. The star rank enhances the medal’s strength, and matching the medal’s element with your character’s element preference grants additional benefits.

    While you can only activate three job medals simultaneously, it’s wise to have multiple setups so you can swap out medals to suit different situations. This flexibility ensures you keep your most important skills ready while you aim for that perfect medal combination.

  • Top Team Party Formations in Dissidia Duellum Final Fantasy: Completing & Solving

    Top Team Party Formations in Dissidia Duellum Final Fantasy: Completing & Solving

    Dissidia Duellum Final Fantasy has you assembling unique teams of characters from the entire Final Fantasy series to help fight off invading monsters. While you’ll primarily be teamed up with others and can’t always choose your teammates, some team setups are better than others for winning.

    In competitive mode, each team can only have one character per role. But if you’re playing casual matches with friends, you’re free to experiment with a wider variety of lineups. Here are some of the top team combos to help you beat your opponents.

    Best Team Compositions to Try

    You can create unbeatable teams by combining characters whose abilities work well together, focusing on synergy, stacking effects, or filling in each other’s weaknesses. These setups are designed to maximize damage output and efficiency, making it easier to rack up kills and defeat bosses.

    Fast-Paced Maximum Damage Team

    This team is all about aggressive offense. It has enough power to deal intense damage to enemies and boss characters simultaneously.

    Kain is great for quick movement, quickly hopping to crystals or directly to the boss with Dragoon’s Pride, increasing range and mobility.
    Terra matches the damage output with powerful attacks that help finish off bosses and stragglers.
    Lightning adds speed to the team, tearing up the battlefield and finishing enemies left behind by others.

    BP Manipulation Team

    This setup focuses on control of bravery points (BP), preventing opponents from reaching 9,999 BP and building a steady supply for your team.

    Krile farms BP behind your base crystal using her unique ability to parse out BP to everyone else, supporting attack bursts against the boss.
    Zidane targets characters close to 9,999 BP, stealing their bravery and keeping enemies from attacking the boss. Once topped off, he deals extra damage while staying agile enough to dodge hits.
    Iroha provides damage and support, protecting teammates and helping burst through defenses with her attacks.

    Difficult-To-Destroy Team

    This team is designed to be very durable, relying on heavy defenses and long attack animations to survive enemy hits, while capable of eliminating opponents with powerful attacks.

    Terra can one-shot enemies after using her Trance to boost her speed and reduce cooldowns, all while fighting from a safe distance.
    Warrior of Light offers high defense, making him tough to kill and providing a damage-boost aura around allies.
    Cloud features one of the highest attack stats. His attacks launch enemies into the air, leaving you safe while finishing off foes with Omnislash or Braver.

    Warp Around the Battlefield

    This team excels at mobility, warping out of danger, quickly reaching the boss, or repositioning anywhere on the field faster than opponents.

    Rinoa can warp around to avoid danger, reach crystals faster, or escape from tough spots. Her ability to fully heal and respawn with extra BP makes her a versatile target.
    Kain has excellent mobility with his leap abilities and Dragoon’s Pride, allowing him to swiftly reposition or launch enemies into the air.
    Krile can warp to critical crystals to farm BP or get out of trouble, sharing BP with teammates and supporting their defense.

    Juggling Act

    Focuses on launching enemies into the air to set up combo attacks and prevent retaliation.

    Onion Knight uses Spellbook, an area attack that launches enemies into the air. Timing follow-up attacks like his other skills can finish stunned foes quickly.
    Kain complements this with his long-range jumps and Firaga to launch enemies from afar, then follow up with high-damage attacks.
    Krile employs Sealed Sacred Light, which also launches foes into the air, creating opportunities for juggling enemies while sharing BP among teammates.

    Stun The Enemy

    This team is built around stunning opponents to prevent them from casting barriers, healing, or attacking back. It bursts down enemies while they’re incapacitated.

    Gaia is ideal here, with follow-up attacks like A Hopeful Dance, Diamond Destroyer, and Fated Moment that cause massive damage. Her abilities can lower enemy SPD, setting them up for further hits.
    Prompto uses Lumne Flare to stun enemies, then follow up with his Crackshot or SMG attacks to finish them off.
    Zidane is perfect for this combo, as he can quickly target and steal BP from enemies close to 9,999, stopping them from reaching enough to attack the boss. His agility allows him to avoid damage and help control the battlefield.


    These setups highlight various strategies—race to damage, control of bravery points, durability, mobility, juggling enemies, or stunning opponents—that can give you an edge in Dissidia Duellum Final Fantasy. Mixing characters with abilities that complement each other will greatly improve your chances of winning.

  • How to Play Onion Knight in Dissidia Duellum: Completing & Solving Tips

    How to Play Onion Knight in Dissidia Duellum: Completing & Solving Tips

    The Onion Knight from Final Fantasy 3 is a character full of surprises: he appears as a young warrior whose seemingly delicate nature hides tremendous strength. This contrast remains true in Dissidia Duellum, where he’s portrayed as a late bloomer who gains power as the fight goes on. Don’t expect to be a champion right from the start. Instead, prepare to become a real challenge by the time the boss shows up.

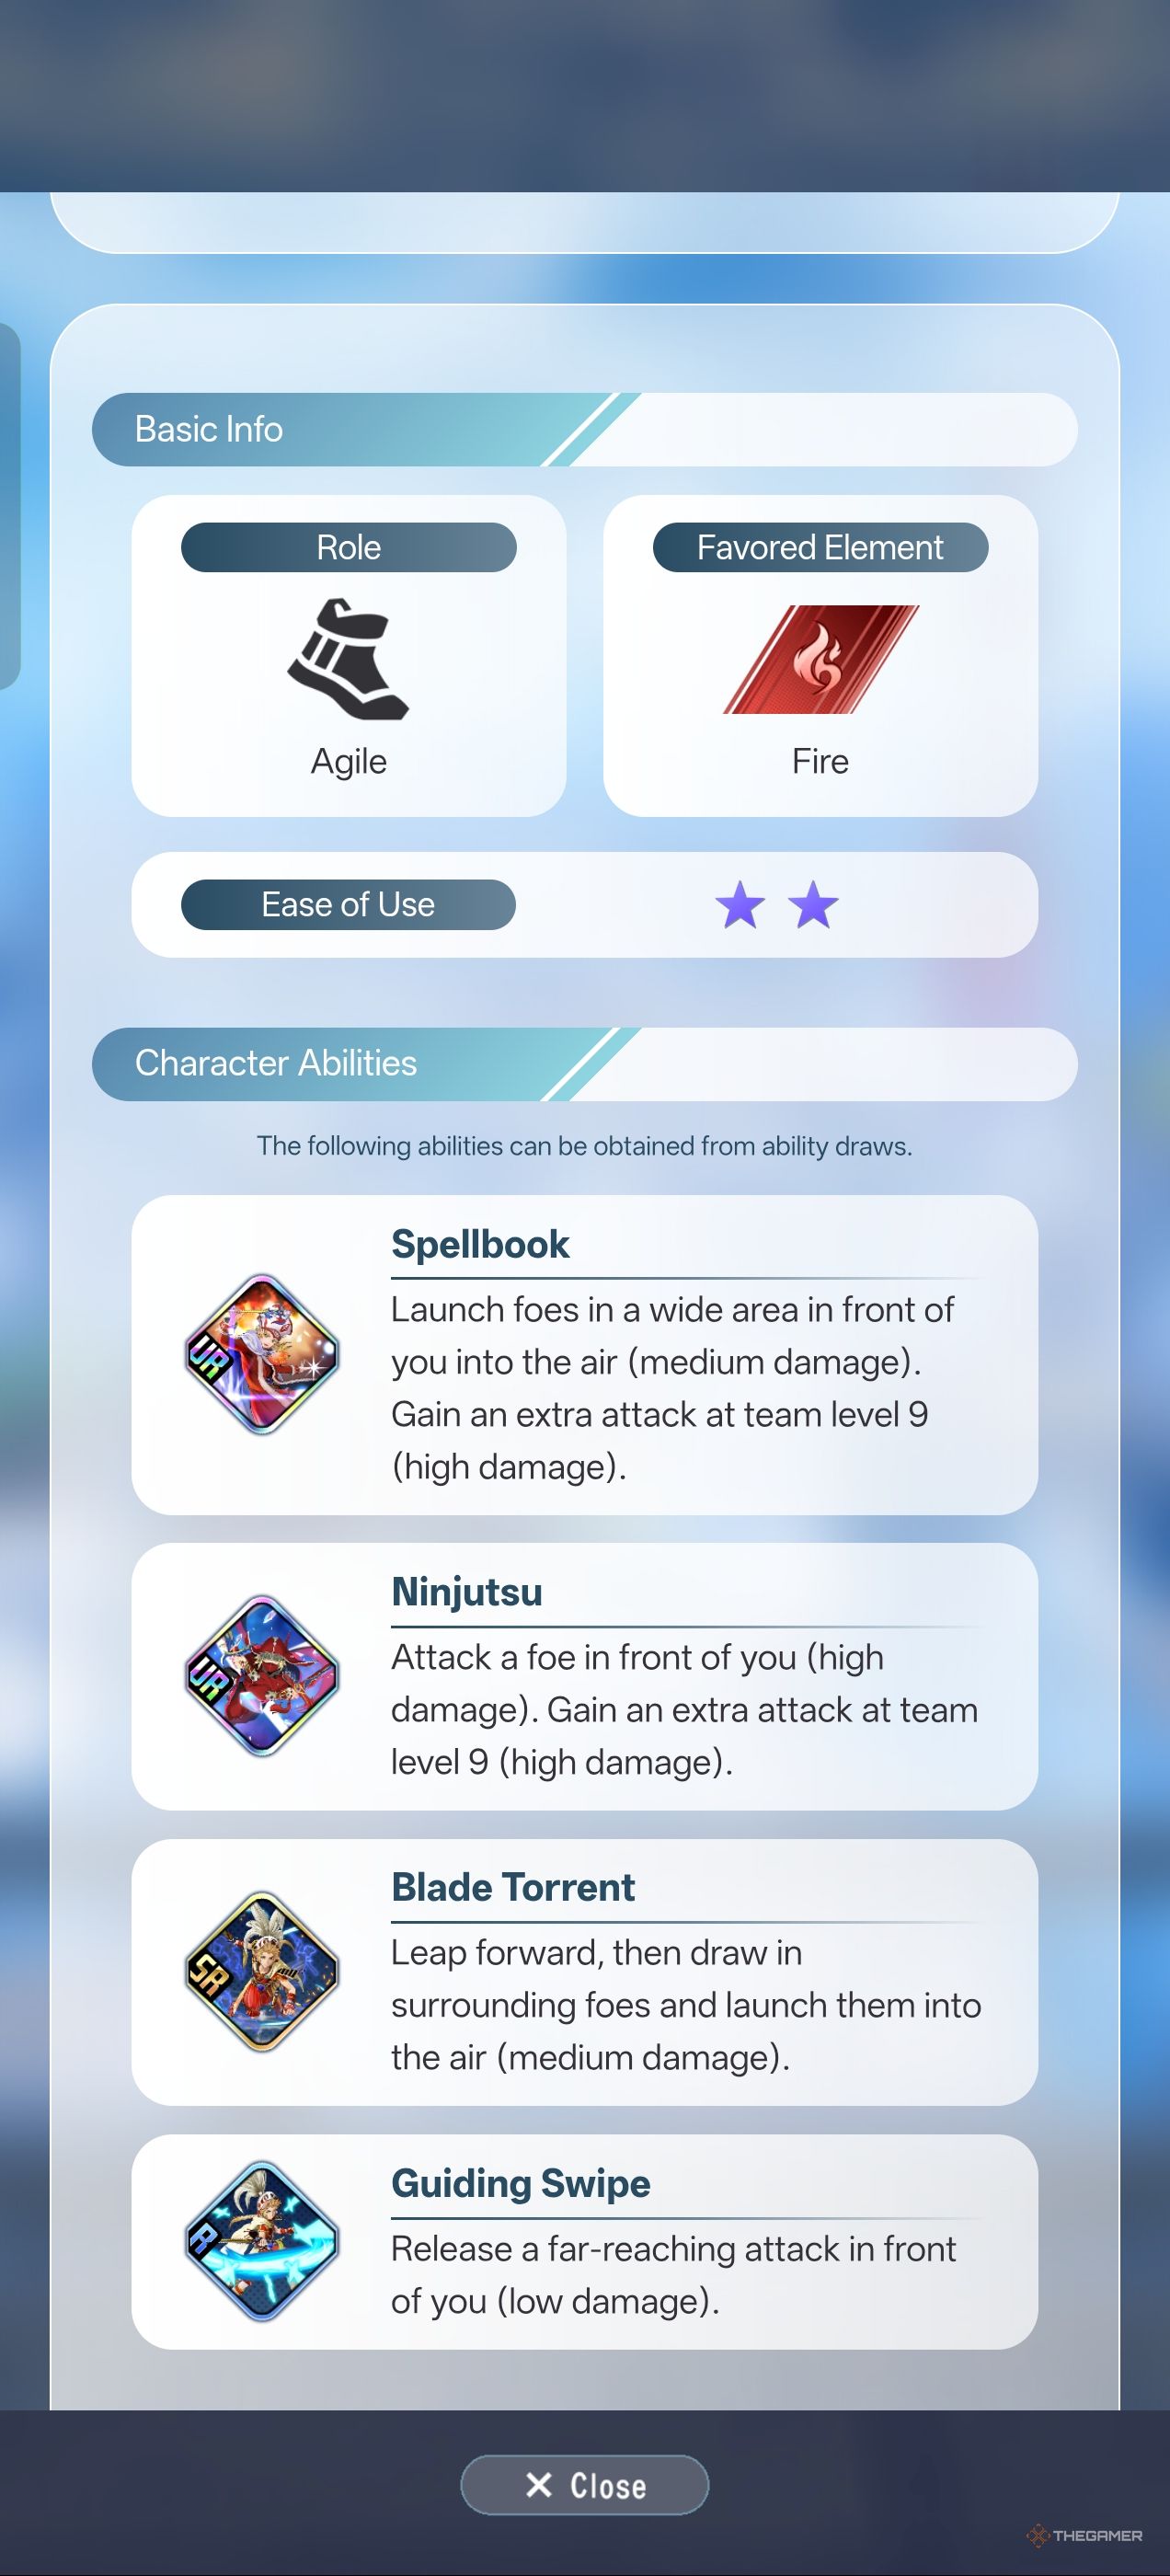
    He belongs to the Agile class, similar to Lightning, meaning he relies on quickness and map control. What sets him apart from simple skirmishers is his unique passive ability — when he reaches Level 9 during a battle, his Attack and Defense stats double. This makes him one of the more technically challenging characters to master but also one of the most satisfying to play.

    Onion Knight Overview

    Visual Description:
    Image of Onion Knight in Dissidia Duellum
    Alt text: Onion Knight’s character description in Dissidia Duellum Final Fantasy.

    Stats and Skills:
    | Name | Role | Passive | Unique Ability |
    |——————|———|————————————————————|————————————–|
    | Onion Knight | Agile | Late Bloomer — Once you hit Level 9, his Attack and Defense double. | Turbo-Hit — Hold to dash and launch an enemy in front of you. |

    Strategic Importance of Level 9:
    The “Late Bloomer” trait influences every move you make with Onion Knight. Early on, your main goals are gathering crystals, safe fighting, and avoiding danger until you’re strong enough. Once you reach Level 9, your Attack and Defense double, allowing you to survive fights that would have been risky before. Your damage output jumps significantly thanks to improved Ninjutsu and Spellbook attacks. The Teleport skill becomes especially useful for quickly farming crystals or escaping danger.

    Best Abilities for Onion Knight

    Visual Aid:
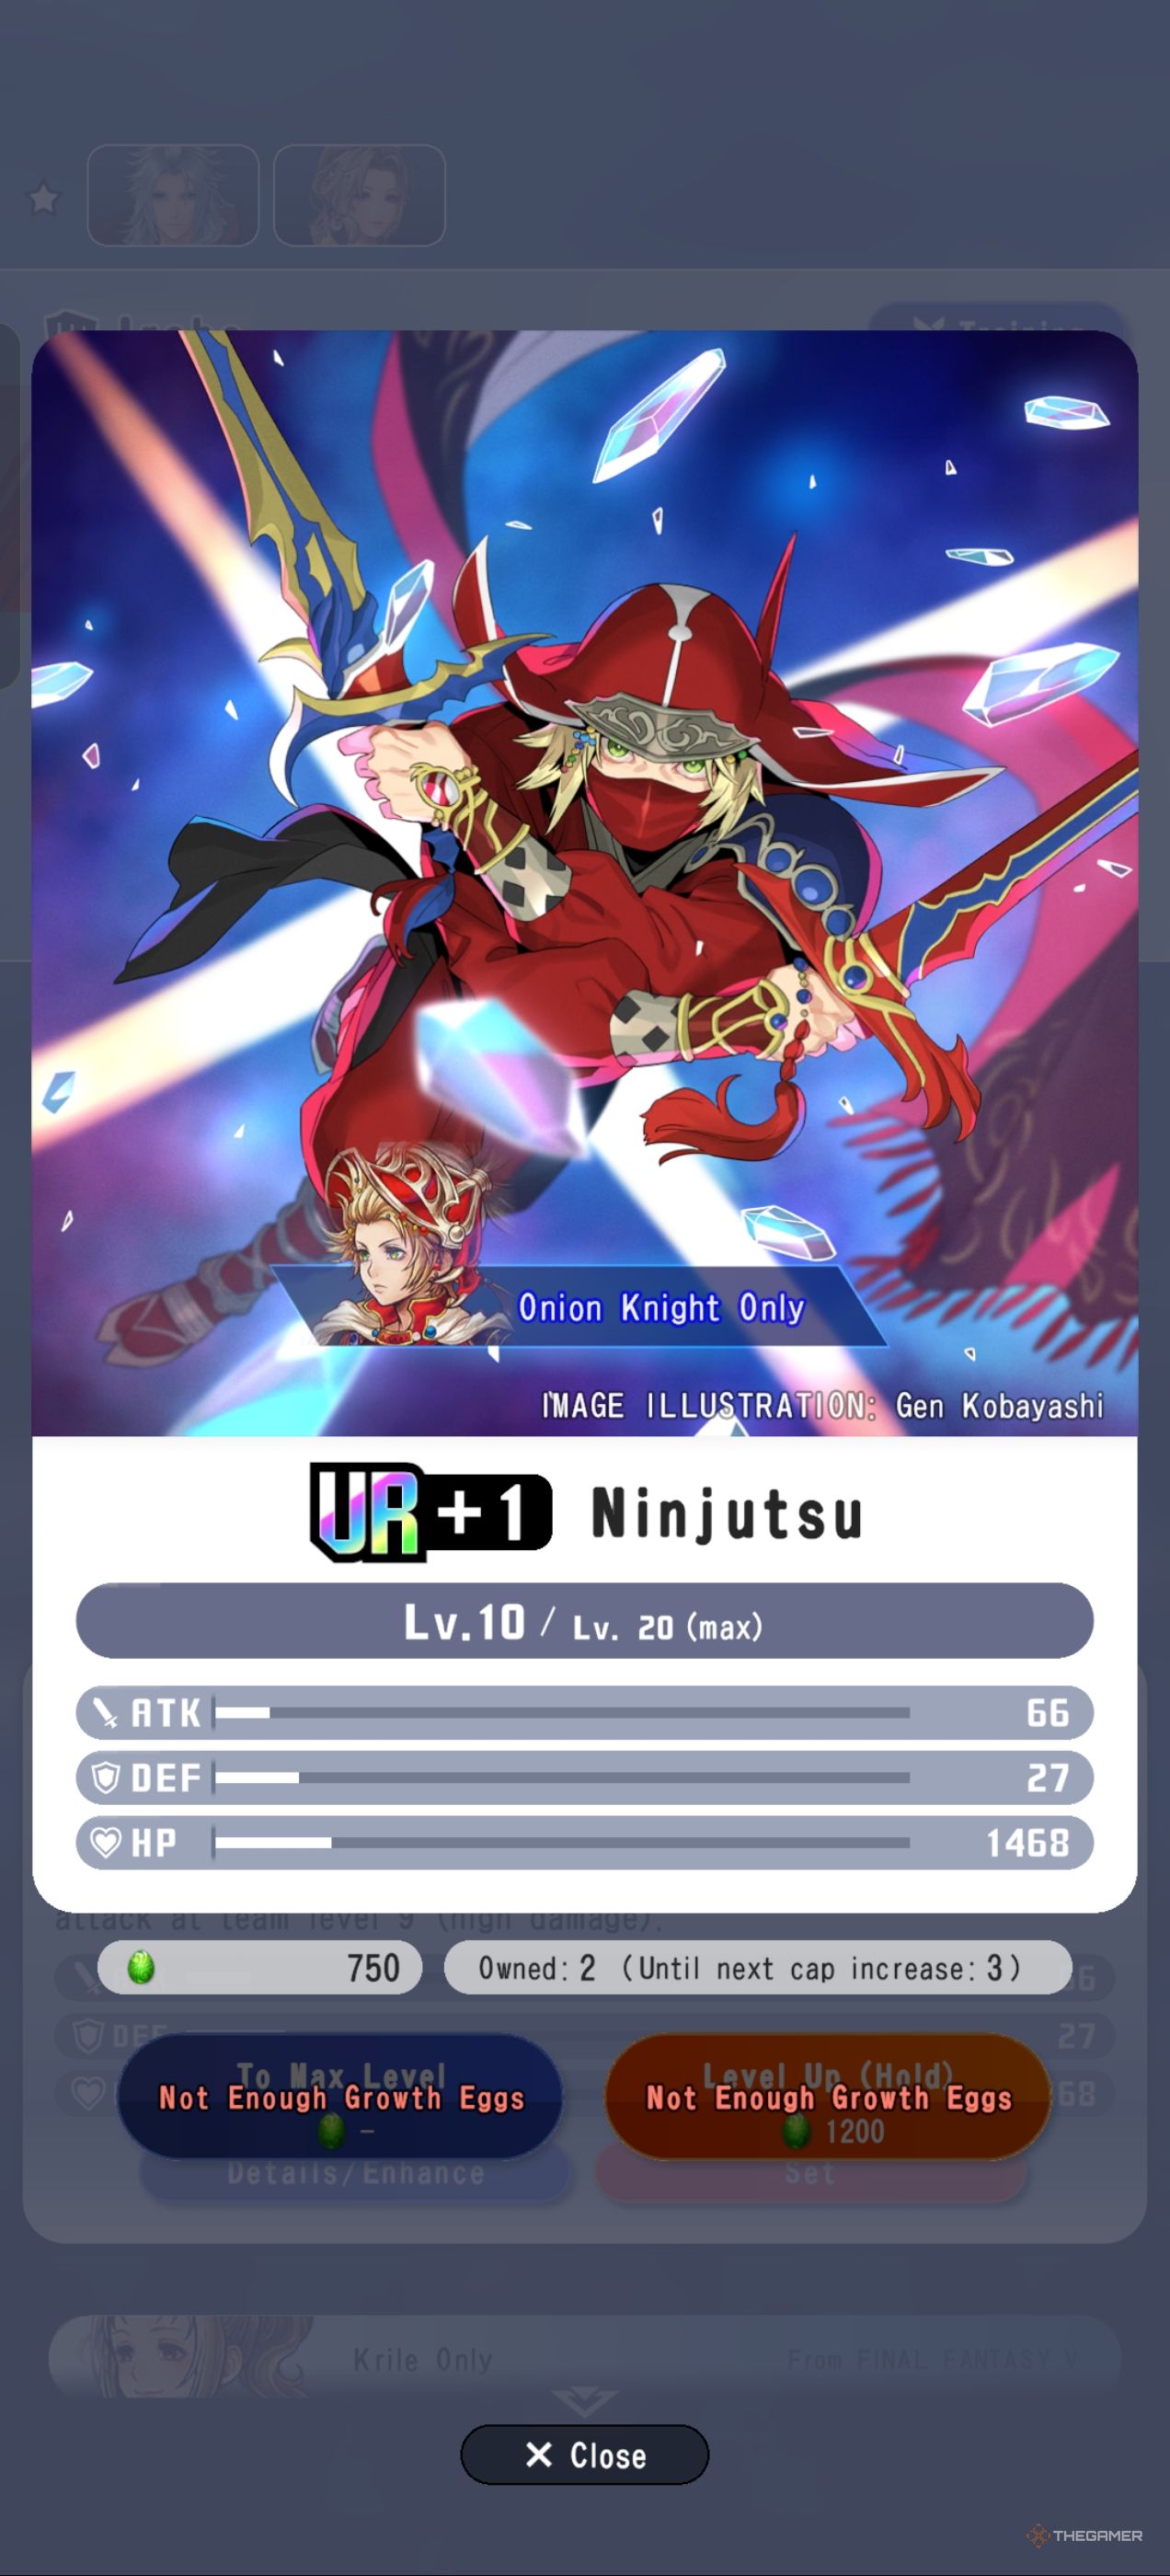
    Image showcasing Onion Knight’s Ninjutsu ability
    Alt text: Onion Knight’s Ninjutsu skill in Dissidia Duellum.

    • Ninjutsu: A high-damage single-target attack. It’s already strong before Level 9, but the extra hit at maximum level makes it much more threatening. It’s the main tool for pressuring opponents once you reach your power spike.
    • Spellbook: An Area of Effect attack that lifts enemies into the air, making them vulnerable. The extra hit at Level 9 turns this into a real threat in group fights and sets up team combos.
    • Blade Torrent: A jumping attack that closes the gap between you and enemies, pulling them in for next-level attacks. It’s perfect for starting fights after Level 9 or disrupting enemy positioning early on.
    • Guiding Swipe: A ranged attack with lower damage, generally less important and can be skipped for the most part.

    Support Abilities:

    • Minwu/Teleport: Great for quick crystal gathering and escaping dangerous situations.
    • Ace/Fire RF: A solid ranged fire-element attack to incorporate into combos, helping you keep pressure without overextending, with additional fire bonuses.

    Tips for Maximizing Effectiveness:
    To maximize Onion Knight’s potential, focus on support slots that boost overall Combat Power, as this enhances his effectiveness. Because his kit is designed to come into full strength later, investing some points into Hit Points can help him survive until he hits Level 9.

    Impact of Level 9 and Beyond:
    Once you hit Level 9, your Attack and Defense are doubled, enabling you to survive fights that previously would have been deadly. The upgraded Ninjutsu and Spellbook wreak havoc, and Teleport helps farm crystals faster and evade threats. This combination transforms your playstyle from cautious to aggressive once your power spike occurs.

    Best Allies for Onion Knight

    Visual Aid:
    Image of Onion Knight on his phone during a cutscene
    Alt text: Onion Knight during a cutscene.

    Key Support Partners:
    | Partner | Role & Benefits | Description |
    |————————|————————————————————————————————|————————————————————————————————-|
    | Krile Mayer Baldesion | Essential partner; passive boosts team crystal earning and she actively heals. | Her passive increase in crystal rewards and Encourage ability speed up Onion Knight’s level growth. Her healing helps him survive early fights. |
    | Warrior of Light | Creates damage zones around allies and boosts Attack, providing resilience. | His buffs and damage reduction allow him to withstand enemy pressure, supporting Onion Knight’s climb to power. |
    | Cloud Strife | A frontline hero with high damage; provides continuous pressure on bosses. | Cloud’s strength lets him pressure enemies independently, so Onion Knight can focus on building up. |
    | Rinoa Heartilly | Ranged damage dealer who pushes enemies away, protecting Onion in early stages. | Her knockback prevents enemies from punishing Onion Knight’s initial farming phase. |

    Conclusion:
    Having strong allies like Krile and Warrior of Light helps Onion Knight reach Level 9 more quickly and survive longer during the early game, setting him up for a devastating late-game presence. Both offense and support partners should complement his evolving power to maximize his effectiveness in battle.

  • How to Obtain and Use Job Medals in Dissidia Duellum Final Fantasy Completing

    How to Obtain and Use Job Medals in Dissidia Duellum Final Fantasy Completing

    While playing Dissidia Duellum Final Fantasy, you’ll come across Job Medals, but these can be easy to miss or forget about because they’re in the character menu, not the abilities menu where you typically upgrade your favorite characters’ skills. Job Medals are a good way to boost your characters, but they’re more unpredictable than just selecting abilities. Here’s what you need to know about earning and using Job Medals in Dissidia Duellum.

    There are two types of Job Medals: silver character-specific Medals and gold Shared Medals.

    Silver Character Job Medals are linked to individual characters, like Rinoa Job Medals, and can only be used for that specific character. You can get these Medals in a few ways:

    • If you get a duplicate during a character draw (an exact duplicate, not a different outfit), you receive ten Medals for that character.
    • Completing challenges for a certain character may reward you with their specific Medals.

    Gold Shared Medals are versatile and can be used for any character. These Medals can be earned through various methods, such as special events or specific gameplay achievements.

    To use Job Medals, head over to the Characters menu and select the Job Medals tab. Here, you can see which Medals you currently have equipped for each character. You can have up to three different loadouts of Medals per character, but note that loadouts are individual—what you set for one character doesn’t transfer to another.

    You can change your Medals anytime by replacing the current ones, but doing so will consume one of your Medals. Keep in mind, there’s no guarantee that the new Medal will be better than the one you’re replacing. Once swapped, you can’t revert to your previous Medal unless you pull the exact same one again later. Also, the game prioritizes using character-specific Medals first when you decide to change Medals.

    Job Medals provide various buffs. For example, the two-star White Mage Job Medal boosts recovery by +2.00%. Each Medallion also has a color bonus: if you equip two Medals of the same color, they each gain a +0.50% stat increase; if all three are the same color, the bonus rises to +1.00%.

    Since Medals are limited and random, managing your collection is essential. You may choose to replace Medals at any time, but success depends on luck, and there’s no way to guarantee an improvement or return to an earlier Medal unless you pull it again.

  • How to Play Zidane in Dissidia Duellum: Completing and Solving Tips

    How to Play Zidane in Dissidia Duellum: Completing and Solving Tips

    Zidane from Final Fantasy IX is known for being a quick and sneaky thief. In Dissidia Duellum Final Fantasy, he uses those skills to help purify crystals and defeat monsters that threaten humanity.

    Zidane returns to Dissidia as a fast and agile fighter, once again battling alongside other Final Fantasy characters in team battles. This time, he joins a 3v3 team focused on stopping villains from destroying the world. So, what can Zidane do in Duellum? Here’s a quick guide to help you start using him effectively.

    Zidane Overview

    [Image: Zidane Tribal’s info card]

    Name Role Passive Unique Ability
    Zidane Agile Master Thief: His movement speed increases when his health drops below 40%. Dash & Steal: Hold to dash forward and steal bravery from enemies in front of him.

    Zidane is a character who needs skill to use well. When mastered, he can perform some impressive maneuvers. His kit mainly revolves around stealing bravery from opponents, making him more of an interrupter in fights. His agility helps him escape dangerous situations, and his ability to steal bravery allows him to share it with his team.

    Important Tip: In tight situations, Zidane can prevent enemies from gaining enough bravery to attack high-value targets, like a boss, while giving your team the bravery they need. His passive activates when his HP is at 40% or less, boosting his movement speed, but staying in that low health state can be risky.

    Using his tricks well, especially combining Trance to boost his attack and bravery stealing, can lead to dealing massive damage with his Grand Lethal attack. This requires careful timing and planning, more so than with simpler characters. Keep a close eye on your rotation to maximize his effectiveness.

    Best Abilities for Zidane

    [Image: Zidane’s UR ability – Grand Lethal]

    Main Abilities:

    • Grand Lethal: Deals heavy damage in a cone ahead.
    • Trance: Boosts Zidane’s attack and increases bravery stolen by his abilities ninefold.
    • Sleight of Hand: Steals bravery from all enemies in front.
    • Swift Strike: Spins around the targeted enemy and appears behind them, dealing minor damage.
    • Cure: Quick earth-elemental healing.
    • Minwu Teleport: Warps to a selected crystal with an earth-element bonus.
    • Earth Breaker: Reaches far to break barriers and stagger enemies, good for extra damage and earth bonus.

    Support Abilities:

    • Focus on items that boost defense, especially earth-elemental defense.
    • Protera: Earth defense.
    • Thundaga: High defense attribute.
    • Cure: Provides a quick attack buff and matches elemental needs.

    Strategic Advice: Zidane needs to move in and out quickly, stealing bravery from enemies to support your team. His passive only activates when his health is at 40% or below, so you’ll often be in danger but also at your most effective. Use Trance to increase your attack and bravery gains before unleashing Grand Lethal for maximum impact.

    Properly managing his abilities, especially combining his Trance and Grand Lethal, is essential. This playstyle involves a specific rhythm, so focus on timing and positioning. His teleport ability, Minwu Teleport, is helpful for getting out of trouble or approaching crystals to steal bravery and pass it to allies.

    Best Party Compositions for Zidane

    Pairing Zidane with characters like Rinoa Heartilly, who can push enemies away and help summon powerful attacks like Meteor, makes him more effective. Combining with Warrior of Light also benefits Zidane by providing damage reduction and additional attack boost, helping him survive longer.

    Other good partners include Krile Mayer Baldesion, who continuously provides bravery to the team, working well with Zidane to expedite boss fights. Cloud Strife can amplify the team’s damage output by quickly gathering bravery from Zidane and Krile, especially since they all share an earth-element affinity.

    Team Strategy: Coordinate with allies who can help keep Zidane alive or amplify his bravery stealing. Rinoa’s ability to reposition and generate bravery combined with Zidane’s stealing skills can quickly turn the tide of battle. Protect Zidane from taking too much damage while he zips around stealing bravery and setting up for heavy attacks.

    Summary: Zidane is a high-skill character that rewards players who can manage quick movements and precise timing. Use his stealth and stealing abilities to manipulate bravery points, and leverage Trance to unleash devastating attacks. Combining him with the right allies and abilities makes him a powerful, if demanding, part of any team.

  • Tips and Tricks for Dissidia Duellum: Completing and Solving Strategies

    Tips and Tricks for Dissidia Duellum: Completing and Solving Strategies

    When it’s time to save the world from monsters and purify crystals, the characters from Final Fantasy are the heroes you need. Dissidia Duellum Final Fantasy brings together characters from various games in the series to defend humans from having their essence stolen for evil plans.

    In the game, you’ll be fighting against shadow teams made up of characters that look just like you. Your goal is to purify the evil and protect humanity. There are many characters with different skills in these 3v3 battles. To get an advantage over your opponents, consider a few key strategies before jumping into fights. Here are some helpful tips to get you started.

    Reroll for Multiple UR Abilities

    When you first begin, you can reroll as many times as you want when drawing abilities. The same goes for getting characters—you can keep rerolling until you get what you want. But early on, aim to reroll until you get more than one UR ability. Ideally, try to obtain two or even three UR abilities in a single pull. The game doesn’t make this clear at first, so don’t settle for just one UR ability at the start.

    Even if a UR ability is linked to a character you don’t have or want, you can use it as a support ability on any character. Reroll until you have multiple UR abilities to strengthen your team from the beginning.

    Equip Support Abilities Based on Your Role

    There are four main roles in Dissidia Duellum: melee, ranged, agile, and support.

    • Melee characters have the highest attack power and fight on the front lines.
    • Ranged characters attack from a distance, with longer reach than usual.
    • Agile characters move quickly and can dash across the battlefield, making them hard to track.
    • Support characters help allies through healing and buffs, boosting their effectiveness.

    Support skills contribute about 50% of their stat bonuses to the character, and there are six support ability slots—more than the five main ability slots. When choosing support abilities, adjust them to fit the role. For example, melee fighters should focus on increasing attack and health stats to deal more damage and stay alive, while support characters might prioritize defense. Agile characters can benefit from improved overall compatibility power.

    Pay Attention to Elemental Bonuses

    Every character is tied to a specific element. Assigning abilities that match their element grants a small bonus—about 5%. This bonus becomes more valuable when you’re trying to fill your main roster with strong abilities but are unsure what to select. Abilities with short cooldowns that match the character’s element are particularly useful because they provide quick bursts of damage, especially against bosses.

    Keep a Low Cooldown Ability in Your Loadout

    When fighting bosses and using Bravery Burst, your boosted state lasts until you run out of burst attacks. To maximize damage, include at least one ability with a cooldown of fewer than 20 seconds. This allows you to reset your cooldowns quickly during fight phases, maintaining continuous pressure. Remember, you can perform basic attacks while waiting for cooldowns; don’t just stand still waiting.

    Use Abilities in Order from Shortest to Longest Cooldown

    The order in which you use your abilities affects your success. Unless you need a specific buff at a particular time, always prioritize casting abilities from the shortest to the longest cooldown. Doing so ensures your quick cooldown abilities are ready by the time your longer cooldown UR skill is finished, helping you set up effective attack loops.

    Don’t Be Afraid to Split Up

    While attacking crystals with your team makes things faster, knowing when to stay together and when to split up is crucial. If your team is focused on enemies but you need more points to activate Bravery Burst, it might be smart to gather points alone by attacking an enemy or going after a crystal. Splitting up to finish off a boss or pick off a stray enemy can be a good strategy, provided you can survive.

    Always consider what your team needs most. Sometimes, helping your allies by stunning enemies or healing boosts your chances of winning the fight overall.

    Equip Job Medals for Bonuses

    Job medals give bonuses to specific stats based on the assigned job. For instance, the Monk medal increases your character’s health points, while the White Mage medal boosts healing power. Incorporate these medals into your setup to enhance your characters’ strengths and compensate for weaknesses. Don’t ignore their potential for boosting key stats.

    Plan for Team Synergy

    Dissidia Duellum is a 3v3 game, where working well with your teammates matters. Build a loadout that not only improves your abilities but also supports your allies. For example, if you have a character with a skill that stuns enemies, coordinate with teammates to follow up with heavy attacks. Including healing skills makes your team more resilient, especially during intense battles.

    Aim for Burst Chains

    Burst chains happen when you and your teammates use your abilities simultaneously against the boss. These chains deal massive damage, helping you defeat bosses faster and gain an edge. If you see a teammate going for the boss, coordinate with them to attack together for a burst chain. This teamwork can quickly turn the tide of the fight, leaving your opponents struggling to keep up.