الوسم: Discovery

  • How To Complete All Shy Guy Discoveries in Yoshi and the Mysterious Book

    How To Complete All Shy Guy Discoveries in Yoshi and the Mysterious Book

    In Yoshi and the Mysterious Book, most creatures you encounter are completely new and add to the game’s unique feel. However, there are a few familiar characters mixed in.

    Most creatures you meet are simple and have limited behaviors, but the Shy Guys stand out because they are intelligent and can act independently. This makes exploring their discoveries quite interesting.

    Where Is Shy Guy Initially Met?

    You first meet Shy Guys in the Settled Valley Chapter. They are one of the initial creatures you encounter there, and this level shows most of their discoveries.
    Because of how they behave, you won’t often meet Shy Guys in later levels, as they tend to be tied to specific habitats within each level.

    Every Shy Guy Discovery

    Most discoveries related to Shy Guys are found in the first level where you see them. Here are all the discoveries you can make:

    Discovery How To Find
    Masks Aren’t Easily Munched Try to eat a Shy Guy.
    Caught One Shy Guy Pick up a Shy Guy running away in their initial level.
    Shy Guy Hidden In The Flowers Find the hidden Shy Guy in the flowers during the first level.
    Played Catch! While holding a Shy Guy, throw them to another Shy Guy to play catch.
    Caught Many Fellows Catch at least four Shy Guys in their first level.
    The Shy Guy Stores Food Here In the first level, give a food item (like an apple or spicy pepper) to a Shy Guy and follow them back to their base.
    Found A Hidden Creature There are four hidden creatures in the initial Shy Guys level; finding any of them unlocks this discovery.
    Found A Smiley Flower After returning the Shy Guys to the square, follow the one looking for a Smiley Flower to find and give it to them.
    The Secret Abode Of The Shy Guy! Find the secret area by crouching and walking through a small opening at the bottom of the level’s right side.
    Found All Hidden Creatures! Locate the Crayzee Dayzee, Peckadee, Plumbrella, and Snurfboard by following Shy Guys’ whims — not necessary to return them, just find them.
    Accommodated The Shy Guy’s Request After they return to the square, fulfill their requests, indicated by symbols above their heads.
    Shy Guy Hidden In The Mud Pound the ground in their house to reveal a hidden Shy Guy.
    Caught Every Shy Guy! Find all Shy Guys in the level to complete it.
    Found All Tokens! Discover all hidden Tokens, often concealed inside trees or under tables in houses. Crouch to access hidden spots.
    Skilled At Playing Music Too! Find the instrument in the level and give it to a Shy Guy for them to start playing music.
    They Collect Bunchabee Hives too! Throw a Shy Guy at a Bunchabee Hive to have them pick it up.
    Grabbed The Pitchfork! On the main house, find the pitchfork, then throw a Shy Guy at it.
    Piked With Pitchfork! Hit a Shy Guy holding a pitchfork into an apple to poke them.

    Once you’ve completed all of these, you’ll have uncovered all the Shy Guy discoveries available in the game!

  • How To Complete Every Billeau Discovery in Yoshi and The Mysterious Book

    How To Complete Every Billeau Discovery in Yoshi and The Mysterious Book

    There are many creatures to encounter in Yoshi and the Mysterious Book, with each chapter revealing more of these strange and wonderful beings. One of the most unusual is Billeau.

    Billeau appears as a toxic cloud of gas. Many of their discoveries involve ways to choke out other creatures. They also move in a very interesting manner, and here’s how to unlock all of their discoveries.

    Where Is Billeau Initially Met?

    You first meet Billeau after completing the game’s credits and unlocking the second half of the chapters. They are specifically found in Chapter Seven, Underground, as one of the last creatures you encounter there.

    Although they have a unique function, they also appear in later chapters. However, most of their discoveries can only be unlocked during their initial stage.

    Every Billeau Discovery

    Billeau has several discoveries associated with them, but nothing overly complicated. Here are all of them and how to unlock each:

    Discovery How To Get
    Cloudy, Bitter, Best Coughed Back Up Try to eat Billeau.
    Dense Gas Makes For Buoyant Bounding Jump into Billeau and float around.
    Gas Follows A Trail! Leap into and out of Billeau to make the gas follow you for a while.
    Doesn’t Like Water Try to lead Billeau towards a body of water.
    Enjoys Spaces That Fit Its Size Bring Billeau into a room that fits them perfectly, like the square cave early in the level.
    Springhopper Group Engulfed Fly Billeau into each Springhopper you see to turn them purple.
    Doesn’t Like Sunlight Take Billeau to the surface. They will refuse to go further.
    Drayzee Dayzee Engulfed Fly Billeau into a Crayzee Dayzee.
    Billeau Gas Is Flammable! Drag Billeau’s gas cloud into a flame to cause it to explode in a chain reaction.
    Scattered The Fallen Leaves Fly through patches of grass to wilt it and spread the leaves around.
    Blew Up A Rock Use Billeau’s gas trail to cause a nearby rock to explode.
    Blew Up The Distant Rock Trigger a chain explosion further away from Billeau’s main body or fire source.
    Engulfed The Golden Butterfly Fly into the Golden Butterfly to turn it purple.
    Golden Bug Engulfed Fly into the Golden Bug to turn it purple.
    Made It Through The Narrow Path Drag Billeau’s gas through a winding passage below the campfire.
    Not Good To Breathe! Stay in narrow passages where Billeau’s gases linger.
    Bunchabee Swarm Engulfed Fly into a swarm of Bunchabee on the surface and turn them purple to pacify them.
    Engulfed Many Types Of Creatures Fly into all creatures in the level to turn them purple—necessary to complete the level.

    You can also use your tokens to unlock extra hints and predictions, giving you more guidance on achieving each discovery with Billeau.

  • How to Find Every Discovery in Darwin’s Paradox By Completing and Solving

    How to Find Every Discovery in Darwin’s Paradox By Completing and Solving

    Darwin’s Paradox features 20 hidden discoveries scattered throughout its chapters — hidden newspaper clippings and posters tucked away in obscure spots that deepen the mysterious world of UFOOD Inc. and the conspiracy lurking behind it. Finding them all needs a keen eye and a readiness to explore every corner Darwin’s tentacles can reach.

    Luckily, none of these discoveries are impossible to find. The game’s Chapter Select menu allows you to revisit any level anytime, so you can go back and complete missed discoveries without losing progress. Use this guide to pinpoint every discovery location without guesswork.


    All Discovery Locations

    The table below lists every discovery in the game. You can check which chapters still have undiscovered items using the Chapter Select menu.

    Chapter Discovery Location
    Down in the Dumps – 1 A shining newspaper board that introduces discoveries.
    Down in the Dumps – 2 After distracting rats with a Ufood can and pushing a Ufood box through a tunnel, use the box to jump left at the tunnel’s exit. Return through the stage, use the swinging claw, and you’ll find the ad in a small zone.
    Down in the Dumps – 5 After the slime section and regaining the ability to stick to surfaces, climb back up the water tunnel. On the left, you’ll find this discovery.
    Things are Heating Up! – 4 During the moving belt challenge, leap to a hidden area at the upper-right using a bucket’s corner. The hot pipe there can be survived for a moment.
    Things are Heating Up! – 6 On reaching the second set of swaying platforms, look inside a small alcove amid the UFOOD boxes to the left; the discovery is inside.
    Hide & Seek – 2 Under the building you crawl under during the camouflage section, you’ll find this discovery.
    Dang! This Stinks and Stings – 4 Reach the mine section and take the pipe on the left.
    Kicking Cans – 1 Early in the level, after escaping the seagull, climb onto the van and enter the building on the right through the open window.
    Kicking Cans – 5 During the vent section, continue until you see a room filled with cardboard cutouts. Enter the ceiling vent on the right to reach a poster.
    Out of the Pot and Into the Fire – 2 At the start of this chapter, run left on the first conveyor belt to find this discovery.
    Getting to the Bottom of Things – 2 Inside the wrecked ship in the ocean area, swim through the chimney stack to find this discovery.
    Getting to the Bottom of Things – 3 To the right of the room with the big red button.
    In Troubled Waters After avoiding the first sonar ship, find this in the mushroom cave that goes downward.
    Into the Abyss – 1 In the caves on the right side of the initial vertical tunnel.
    Suiting Up! – 1 When you enter the robot suit, move all the way left through two doors immediately.
    Suiting Up! – 3 During the sequence with moving platforms and red buttons, find a doorway at the top-left of the screen.
    Training Away – 1 Achieve a top score (less than 3 minutes) on the timed assault course challenge in this chapter. You can restart from checkpoints in the underwater sections, saving time.
    Training Away – 2 In the flooded room where the martial artists train, find this in a small alcove above the right entry.
    Really Weird Science! – 1 In the large early chapter area, climb down the right wall below the slingshot section to find it at the bottom.
    HQ or Bust – 1 This one’s unavoidable — it’s a key discovery in the game.

    As you unlock more discoveries, you will earn achievements and unlock new skins for Darwin! Every five discoveries found grants a new skin, adding fun ways to customize your character.

  • Where Winds Meet: Completing the Treasure Under the General’s Shrine

    Where Winds Meet: Completing the Treasure Under the General’s Shrine

    Exploring Qinghe in Where Winds Meet turns every day into an exciting adventure. You can walk across every part of the map, but there are also many hidden secrets underneath the surface. One of these secrets can be found beneath the General’s Shrine early in the game.

    We’ll help you find this hidden entrance and finish a missing chapter quest that rewards you with useful items for your journey. Be careful, as the path down is long and dark. Here’s everything you need to get started in Where Winds Meet.


    How to Begin the Echoes in the Shrine Lost Chapter Quest

    When you arrive at the General’s Shrine in Qinghe, you’ll see a young child and a dog rummaging through some debris near the entrance. If you jump and land on the debris, it will open a hidden tunnel.

    Once inside, there’s no way back to the surface. You will need to move forward and explore the underground area beneath the shrine. The area is pretty quiet, except for a few Tiger Fort bandits hiding around the corners.


    How to Defeat Zhang Lang and the Tiger Fort Bandits

    When you enter a large chamber, you’ll find several bandits from Tiger Fort along with a man named Zhang Lang, who appears to be the leader. The room is open and has archers and explosive barrels all around. Use your fire arrows to control the crowd and take out multiple enemies at once.

    Zhang Lang is a strong fighter who can attack quickly with several hits in a row. Keep your distance and try to lure him towards the explosive barrels. When he gets close, trigger an explosion to deal heavy damage. After defeating him, loot the area for treasure chests and items left behind by the defeated bandits.


    How to Reach the Top of the General’s Statue

    Your main goal is to find the treasure hidden under the shrine. To do this, investigate the large stone tablet on the left of the statue. It talks about showing respect to the general, and you’ll notice that the big statue is turned away from you.

    Proceed to the mats in the center of the room and bow to the statue three times. Doing this will make the statue turn around, revealing the hidden treasure behind it. The treasure is stored in a small box tucked behind the statue.

    Tip: Climb onto the statue and interact with it to unlock extra rewards!

    Once you’ve collected the treasure, head back upstairs. Push open the large doors and follow the pathway to return to the open world. Here, you’ll want to pay respects at another shrine dedicated to the same general — this completes the quest and earns you plenty of rewards and experience points.

  • Where To Find The Tree’s Eyes In Keeper: Solving The Mystery

    Where To Find The Tree’s Eyes In Keeper: Solving The Mystery

    Once you decide to defeat the Wither in Keeper for good, your adventure begins as a living lighthouse accompanied by your feathered friend, Twig. Throughout your journey, you’ll solve puzzles and explore beautiful scenery, discovering more about the world and the unlikely friendship forming between you and Twig.

    One of your first challenges is a giant tree guardian that appears to be lost or hurt. You need to help it before you can move forward. We’ll explain how to solve the puzzle to progress to the next area and continue your quest with Twig.

    Where to Find the Great Tree

    After navigating through a cave filled with giant bones, you’ll reach a large, confused tree. To wake it up, you must help it recover its missing eyes. But where are these eyes?

    Tip: Even without its eyes, the tree will squint if you shine a focused beam onto its face.

    Where to Find the First Orb

    Send Twig to place the crystal you found earlier into the tree’s missing eye socket at its head. Peck it into place to get a response from the tree. It lifts its limbs, but you still have work to do. The next step is to find the second eye to fully restore the tree.

    Where to Find the Second Orb

    Follow the path to the right toward a frozen pond with dancing rock-like creatures. One of these creatures dances alone in the middle of the pond, while two others are on scaffolding around it. Use your focused beam to shine light on each dancer, which will cause them to drop and break the scaffolding, causing them to slide across the ice. When all three are in position, shine your beam again to make them jump simultaneously. This activity shatters the ice and reveals a shiny crystal orb, which Twig will retrieve.

    Where to Find the Third Orb

    The last orb is along the left path, where several plots of land have vines growing out of them. Use your focused beam to grow a plant into a tree with fruit. Send Twig to shake the fruit, prompting a chicken-like creature to run over and eat it, scattering seeds into a nearby plot. Repeat this process a few times: grow the second tree and get the creature to eat the fruit, then do the same for the final tree, which will drop the last crystal eye. Have Twig retrieve it, return to the tree, and place the final eye in the empty socket.

    With all the eyes in place, the tree expresses gratitude by lowering its limbs and lifting off the ground. This act grants you access to the caves below, marking the end of this part of the puzzle.

  • Completing the Quest for Andraste’s Cargo in Tainted Grail

    Completing the Quest for Andraste’s Cargo in Tainted Grail

    The waters around Avalon are notoriously dangerous, and the inhabitants of Tainted Grail: The Fall Of Avalon are well aware of this fact. Sea creatures lie in wait beneath the surface, eager to snatch unsuspecting travelers, while the unpredictable weather can turn threatening in an instant.

    Such was the case with the Andraste, a ship thought to have sunk in Smuggler’s Bay over a century ago. An old lighthouse keeper mentioned it in his journal, yet the details remain unclear. Lady Elaine is determined to uncover the truth, and she needs your assistance.

    Finding Information About The Andraste

    The Last Voyage quest is given by Elaine. You can find her in the village behind the Horns Of The South Keep. From the entrance, make your way through and up the crumbling path past the large tree. Then, descend the wooden stairs to reach the shorefront village.

    Inside Ron’s Tavern, Elaine is easily spotted sitting on a bench near the hallway that leads to the rooms. Speak with her, and you’ll learn that she’s on the hunt for the wreck of the Andraste but lacks the information needed to proceed.

    Make your way back to the entrance of the keep, then climb the stone stairs up to the castle’s main building. Head into the Captain’s Quarters, where you can find the museum and speak with Rhydderic for crucial details about the last sighting of the Andraste.

    Locating The Andraste’s Wreck

    The best way to find the Andraste’s wreck is to begin at the Horns Of The North Keep. From there, head north toward the center of the region to locate the Archspire. At the Archspire’s Fast Travel point, take the main road heading east until you pass the Ruined Broch, then continue down to the shore known as Smuggler’s Bay.

    You can access the Smuggler’s Bay Dungeon through a doorway in the cliffs, which is useful for a later quest. However, you can sneak in early if you succeed in a Perception Check with the guard.

    Clear out any enemies nearby to avoid distractions. Then, you have two options to reach the island across the water: either swim directly from Smuggler’s Bay or trek north along the shore until you get close to the docks, using the outcroppings until swimming becomes necessary.

    Once in the water, swim past a large rock until you reach the small island beyond it. Here, you’ll find a mix of bodies and chests containing valuable loot, including the Summon Keeper spell on the body of a priest.

    On the right side of the small island, a sack holds a Cloak of Retribution next to other sacks and a pile of bones. You’ll also discover a wreck with a Reinforced Chest inside. Open it for 100 Coins, the Aegis of Retribution shield, and the Personal Diary of Captain Lex.

    Approaching the wall next to the wreck reveals a Meteorite node, which you can mine for Meteorite Ore, useful for upgrading specific armor pieces.

    Examine the Personal Diary of Captain Lex to learn that the cargo was taken nearby, which is your next destination.

    Securing The Andraste’s Findings For Elaine

    Return to the shoreline of Smuggler’s Bay using the same route as before, then go north along the beach to reach the vast rock formation in the northeastern corner of the map, where the All-Mother’s Temple is located.

    Continue east along the shore until reaching the water, where you’ll need to swim around that rock formation. Staying close to the cliffs, look for a small patch of land you can jump onto on the northern side of the rock formation, where the Castaway Cave can be found.

    Inside the cave, you’ll encounter standard Drowner enemies and plenty of crates, barrels, and bodies to loot for cooking supplies and crafting materials.

    Don’t forget to check the chests along the way; one near a lone crate contains Merlin’s Thorn, a powerful early-game Mage spell.

    Follow the path through the cave until you reach a circular chamber with a large stalagmite at its center, triggering a boss fight against the Scourge Of The Seas.

    Defeating The Scourge Of The Seas

    The Scourge Of The Seas presents a decent challenge, capable of inflicting significant damage at close range while also launching long-range attacks.

    He’ll mainly engage with leaping slashes and sword combos but can occasionally fire a water projectile or magical waves from his blade.

    If you’re utilizing magic, the Merlin’s Thorn spell from earlier in the cave deals massive damage, particularly when combined with a wand or staff, and does not require high Spirituality to cast.

    His magic attacks are his weakest, so maintain your distance and try to bait those out, especially if using Magic or Bows. Then strike while he recuperates.

    Keep your health up and sidestep his melee attacks, and you’ll bring down the Scourge Of The Seas quickly. After defeating him, you can loot his body for the one-handed sword Tidepiercer, which unleashes long-range projectiles during a Heavy Attack.

    Finishing The Last Voyage

    Upon defeating the Scourge Of The Seas, you can move into a more expansive cave chamber that contains a lake with a small rock formation, along with the Andraste’s cargo.

    Swim over to the rocks, climb up, and get close enough to the cargo to examine it. This will update your quest, allowing you to return to the entrance of Castaway Cave.

    Since you’ll need to swim back to the main shoreline—there are no safe spots to set a Bonfire nearby—once there, you can set one up and use ten Ethereal Cobwebs to light it and fast travel back to the village.

    Return to Ron’s Tavern and speak to Elaine one last time. As recognition for your efforts, you’ll earn 1,000 EXP along with some Gold. Additionally, if you chat with Elaine again later, you’ll unlock her second quest, As Good As Gold.

  • Your Data May Be Stolen Again: 184 Million Logins Found

    Your Data May Be Stolen Again: 184 Million Logins Found

    A person using a laptop displaying a code.
    Sora Shimazaki / Pexels

    In a significant illustration of the ongoing risks found online, cybersecurity expert Jeremiah Fowler recently identified an enormous, unsecured database that revealed over 184 million login details from major platforms such as Microsoft, Apple, Facebook, Discord, Google, and PayPal. This data haul amounted to roughly 47.42 GB and was uncovered on an improperly configured cloud server. It is suspected that the data was gathered using infostealer malware—a type of malicious software engineered to extract sensitive information from compromised systems.

    A Global Breach with Major Consequences

    Fowler also discovered that the database included over 220 email addresses linked to government domains from at least 29 nations, including the United States, the United Kingdom, Australia, and Canada. This highlights the potential national security threats arising from such security breaches.

    An analysis of a 10,000-record subset revealed that the data encompassed plain text usernames and passwords, with some entries associated with financial terms such as “bank” and “wallet.” This suggests a higher risk of financial fraud. The presence of such sensitive data in an unprotected database raises serious concerns about identity theft, unauthorized access, and other cybercrimes. Additional images from the database provided by Jeremiah can be viewed on Hackread.com.

    The Mechanics of Infostealer Malware

    Infostealer malware typically infiltrates devices through phishing emails, malicious websites, or bundled within pirated software. Once installed, it can collect various data types, including login credentials, cookies, and autofill information, even details related to cryptocurrency wallets. This harvested data is then sent to command-and-control servers run by cybercriminals.

    The existence of this particular database indicates a systematic effort to gather and potentially misuse a massive amount of personal and institutional information. The lack of identifiable ownership or metadata complicates efforts to trace its origins or intended use, and hosting companies may be unaware they are harboring such databases.

    Immediate Responses and Suggested Steps

    After uncovering the database, Fowler quickly informed the hosting provider, World Host Group, which subsequently shut down the server. However, it remains unclear how long the data was exposed and whether unauthorized parties accessed it prior to its removal.

    Recommended Actions for Users

    • Change your passwords: Update your passwords for all online accounts, especially if you’ve reused passwords across multiple platforms.
    • Activate two-factor authentication (2FA): This usually requires a verification text sent to your phone or a secondary email.
    • Monitor your accounts: Keep an eye on your financial and other sensitive accounts for any unusual activity.
    • Utilize dependable security software: Ensure you have updated antivirus and malware protection from reputable sources.
    • Exercise caution with emails and downloads: Avoid clicking on suspicious links or downloading attachments from unknown senders.
  • Complete Guide to Locating Kata Points in AC Shadows

    Complete Guide to Locating Kata Points in AC Shadows

    As you navigate the expansive map of Assassin’s Creed Shadow’s, you’ll often find yourself sidetracked by various side quests and activities. This makes the map feel vibrant and engaging, and one of the standout side activities is Kata, which has numerous benefits.

    By completing Kata challenges, you earn Knowledge Points and experience (EXP), and you also unlock various weapon combinations for your character, Yasuke. Once you gain access to Yasuke in the main storyline, these Kata activities become available, and below is a guide to all their locations.

    Izumi Settsu Kata Locations

    Izumi Settsu contains several Kata locations; however, you won’t be able to find them during your initial exploration since Yasuke won’t be unlocked. Once Yasuke is available, these locations will be visible on your map and include:

    1 The first Kata can be found just above Sakai city in the western Osaka area, on a small secluded island located to the left.
    2 To find the second Kata in Izumi Settsu, head to the northeastern border, where you’ll see it highlighted above Yawata Plains.

    Yamashiro Kata Locations

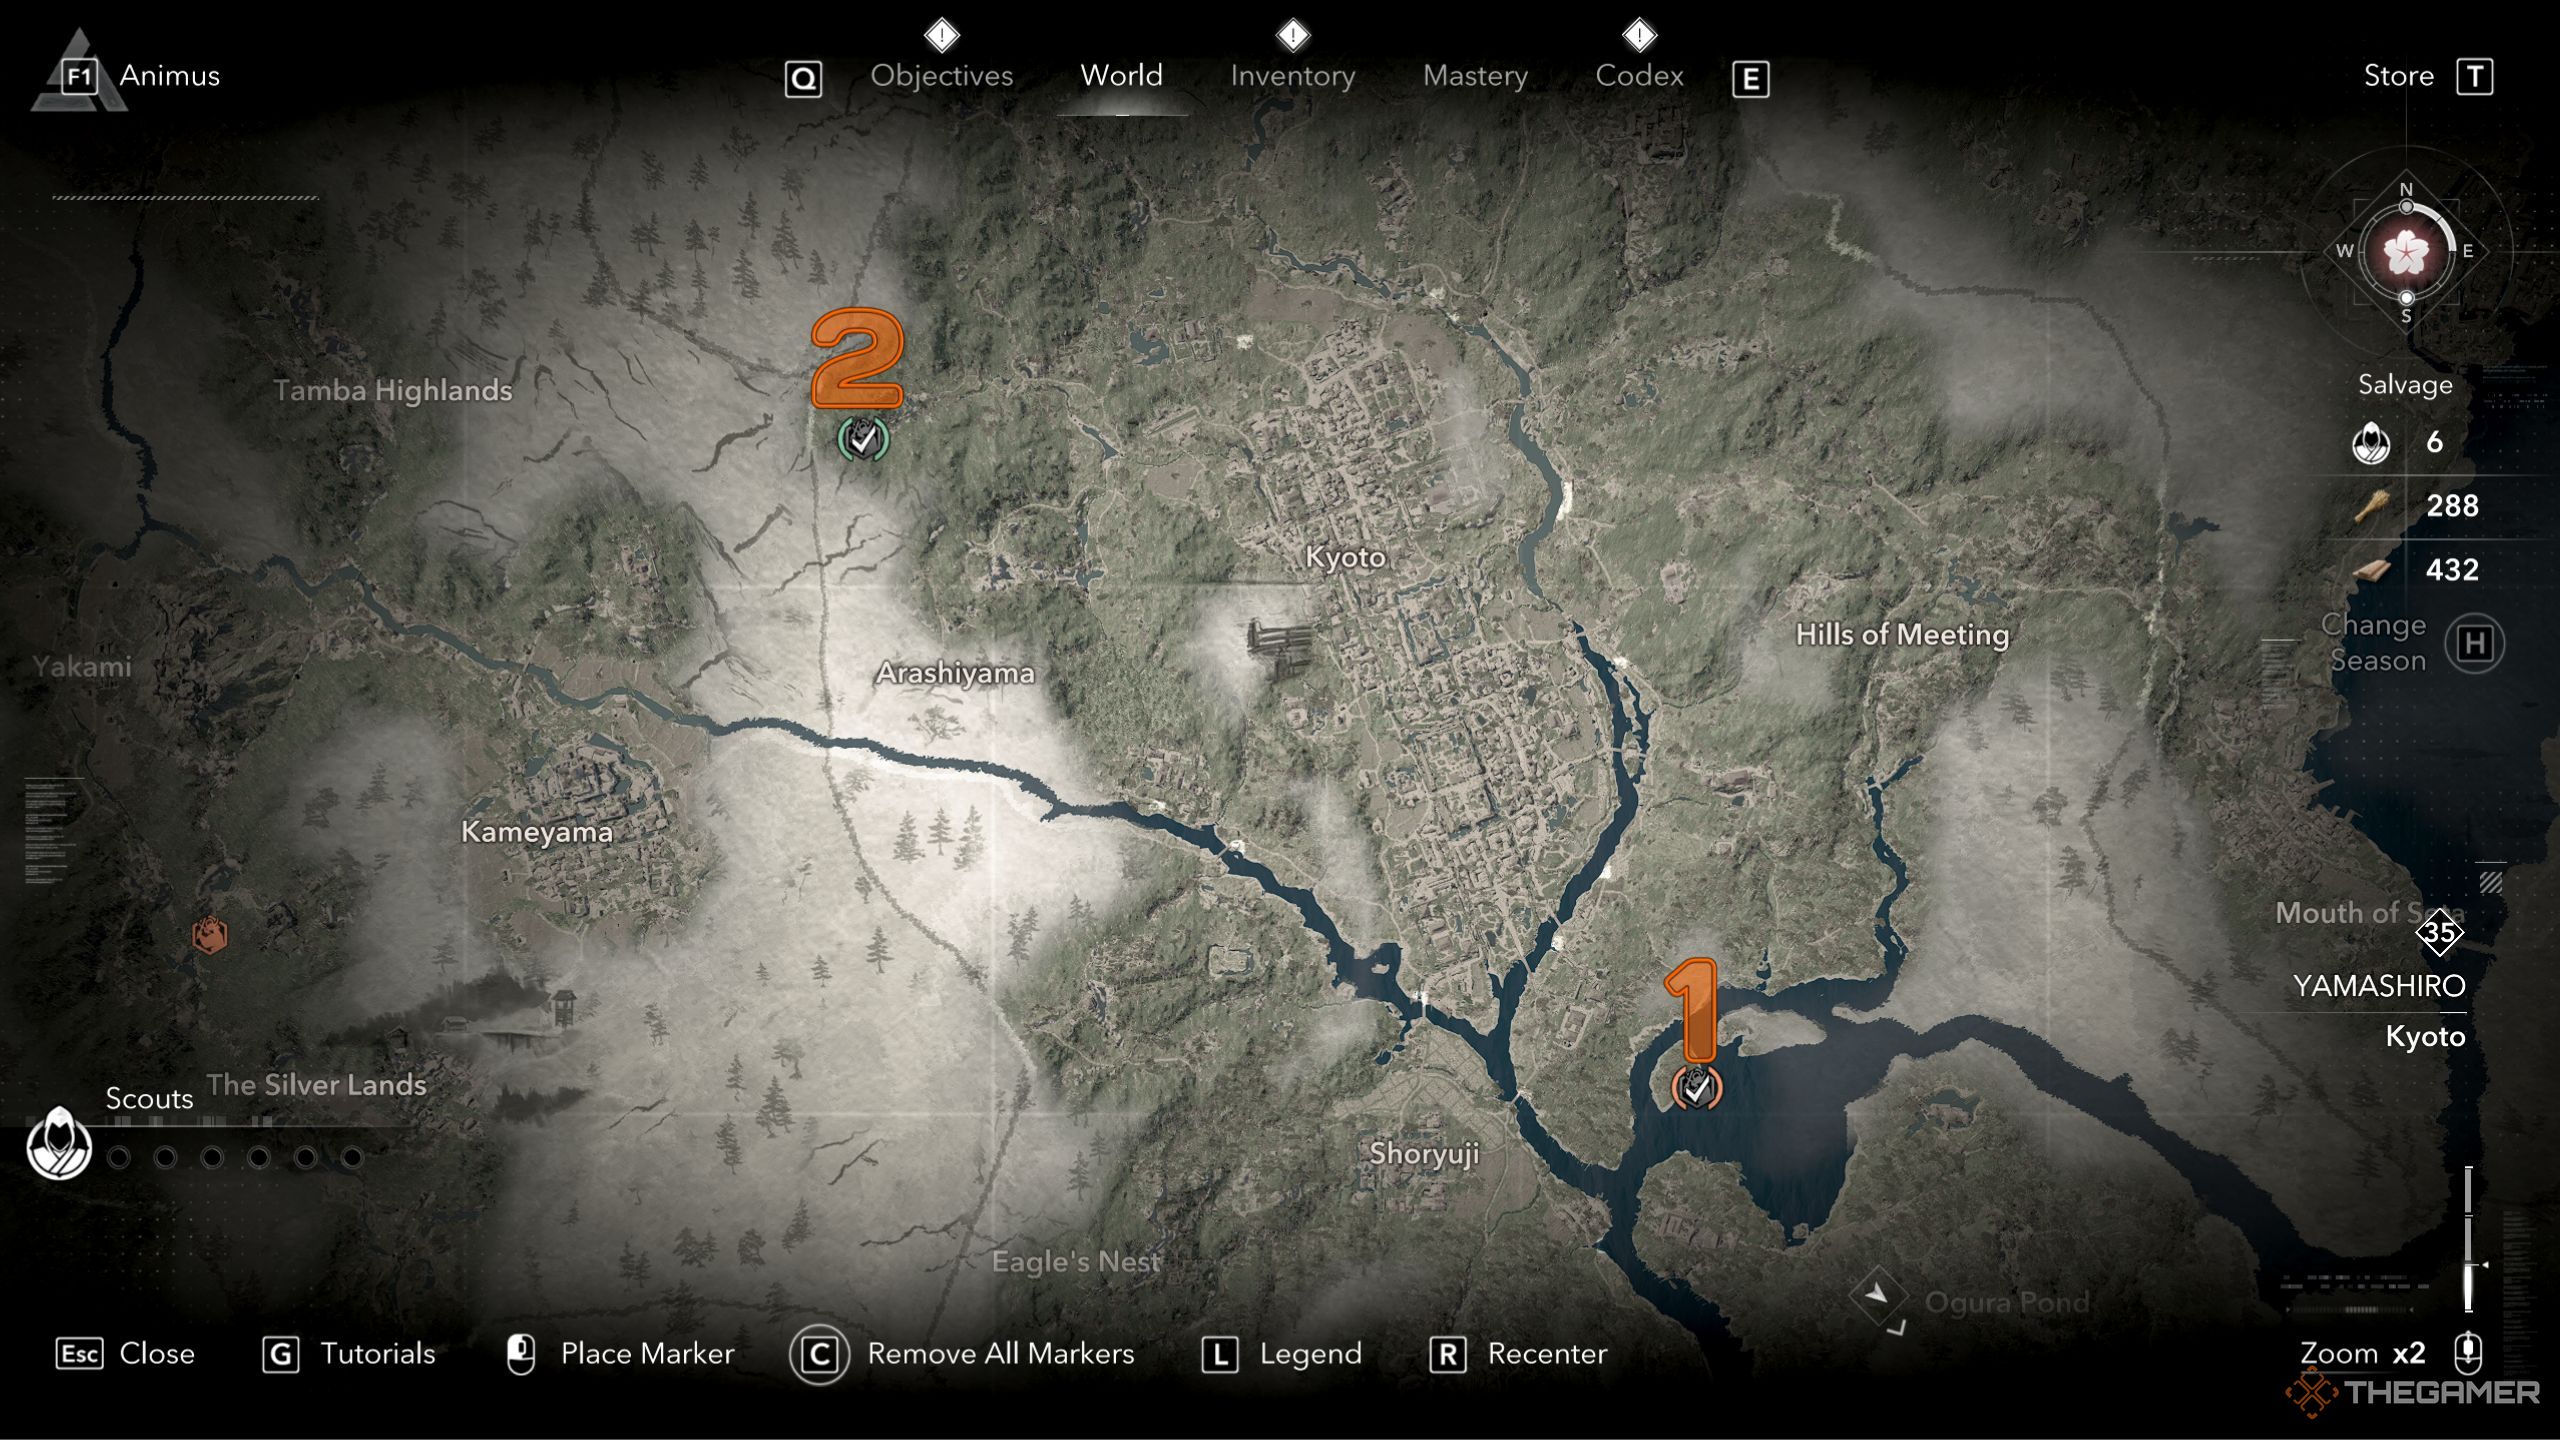
    Kata locations in Yamashiro

    You will unlock Yasuke in this region, where you can also locate two more Kata points:

    1 Upon entering Yamashiro from the south, head northward to find the Shoryuji Castle alongside some islands in the water to its right. This Kata is located on those islands.
    2 To discover the second Kata, make your way to the northwestern boundary of Yamashiro, just above the Arashiyama region. You will find the Kata nestled between some mountains near the edge.

    Omi Kata Locations

    Kata location in Omi

    Omi is the third area you’ll explore in the main story, and it appears quite vast despite being partially covered by water. To locate the Kata here, you’ll need to travel from the south while the Kata is situated in the north.

    As you venture northward, look for the Goshiki Outlands and Shiotsu areas. Between these two locations, you will find a small pond, with the Kata located on its eastern side.

    Harima Kata Locations

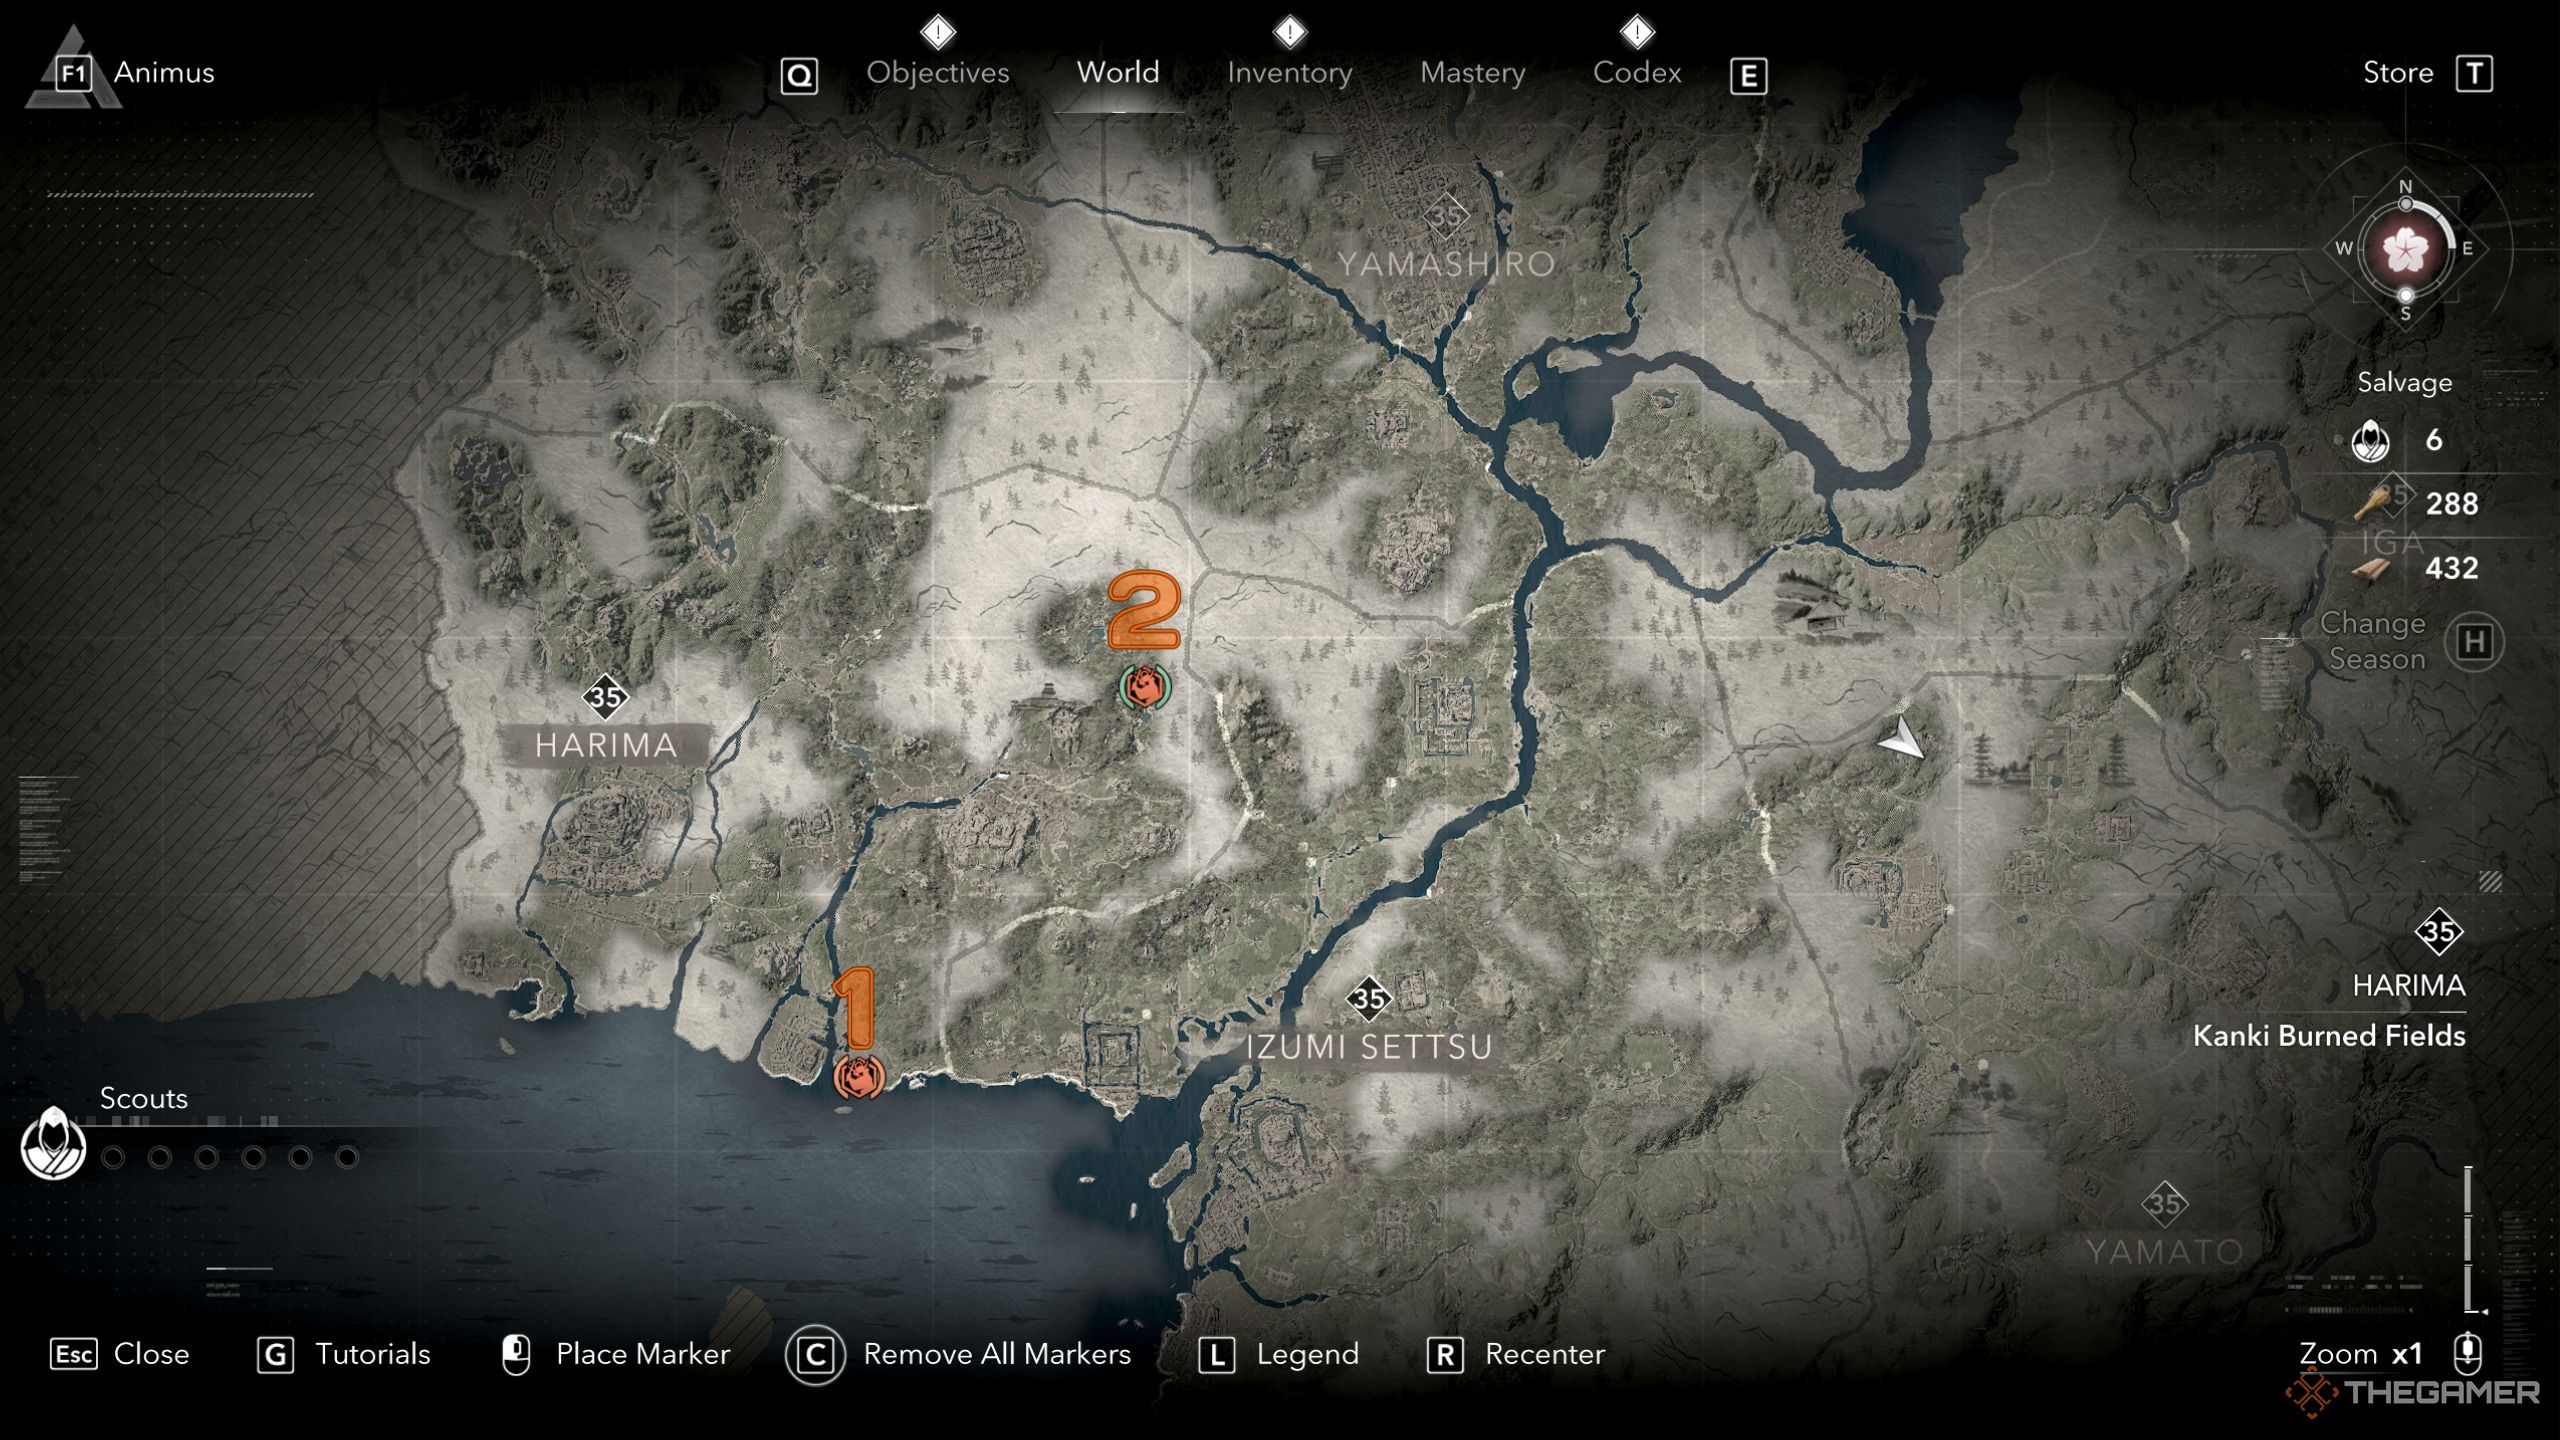
    Kata locations in Harima

    Finding the Kata locations in Harima will be much easier compared to Omi. Here’s where you can find them:

    1 To locate the first Kata, enter Harima via the southern road from Izumi Settsu. You’ll reach Takasago Wetlands, which has several islands in the water. Look for this Kata on the southern end of the largest island.
    2 From the first Kata spot, follow the river northward until it forks. Take the right path and keep going east, then slightly north to reach the second Kata.

    Yamato Kata Locations

    Kata locations in Yamato

    The Yamato area is located on the southeastern side of Izumi Settsu, and here’s where to find the two Kata spots:

    1 For the first location, enter Yamato from the southeastern edge of Settsu and then proceed eastward. You’ll spot it in a pond amid the mountains.
    2 From the first Kata location, move directly south until you cross a river. The second Kata will be on the opposite bank.

    Iga Kata Locations

    Kata locations in Iga

    While Iga is the homeland of Naoe, it also has a couple of Kata locations:

    1 To find the first Kata, head up the mountain to the north of the Hijiyama marker on Iga’s map.
    2 From the first Kata spot, head southeast toward the river running through Iga, where you’ll see a smaller river heading east. Follow this river to find the second Kata.

    Tamba Kata Location

    Kata location in Tamba

    Tamba is situated north of Harima in Assassin’s Creed Shadows. Here are the Kata locations within this region:

    1 To find the first Kata, follow the river north of The Silver Lands, taking the right path when you reach a fork. The Kata will be located in the middle of this river path.
    2 Return to the forked river and take the left path. Continue north until you reach Yakami, then move directly west, where you’ll find the Kata on a mountain near a pond.

    Wakasa Kata Locations

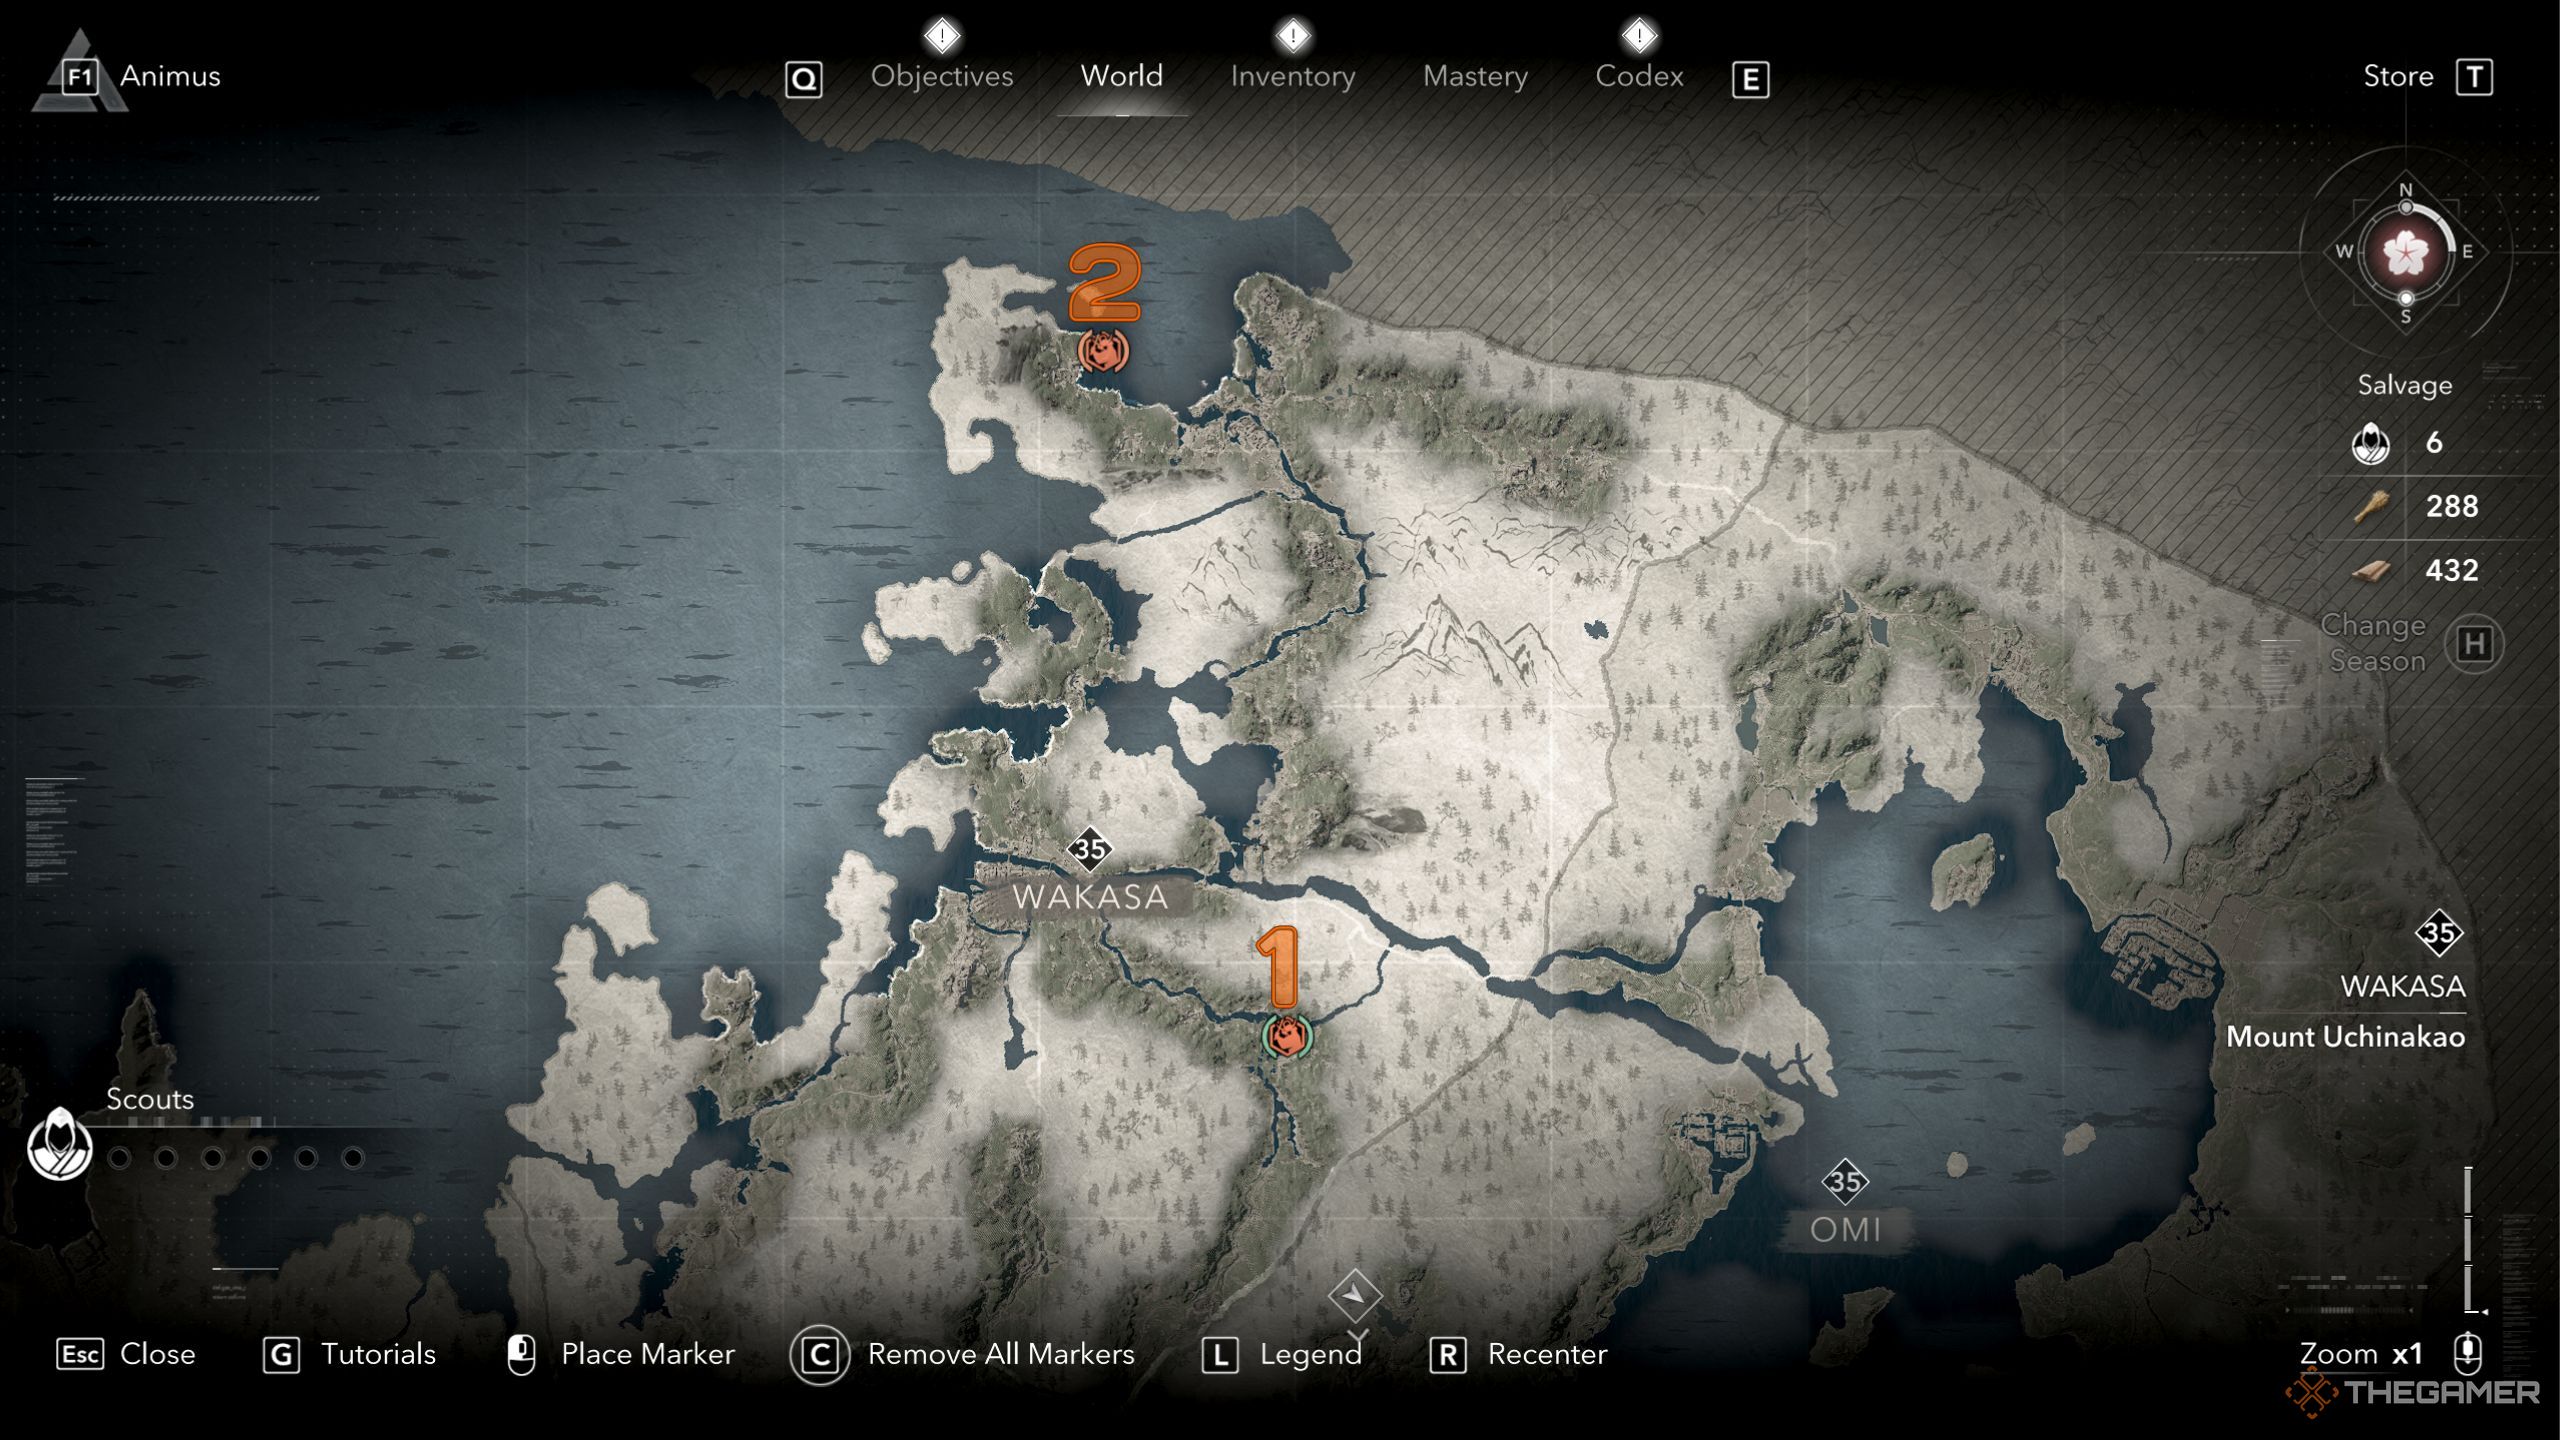
    Kata locations in Wakasa

    Wakasa is an expansive region in the northwest part of the Assassin’s Creed Shadows map, with the Kata locations spread far apart:

    1 The first Kata is found by heading northeast from the Onyu Pass location on the map, amidst some islands surrounded by water.
    2 The second Kata is located on the northwestern edge of the map, just south of a secluded island at the top.

    Kii Kata Locations

    Kata locations in Kii

    Kii is the largest and southernmost region in the game. Here’s how to reach its Kata spots:

    1 For the first Kata location, travel south from the Kinokawa Valley river by following the river that ascends the mountain, finding it at the top.
    2 The second Kata is situated to the southeast of the map, just below where Kumano Sanzan is labeled. Look for a pond to the left where you can find it.

    No matter the platform, each Kata requires you to input button combinations in a specific order during execution.

    How Does Kata Work?

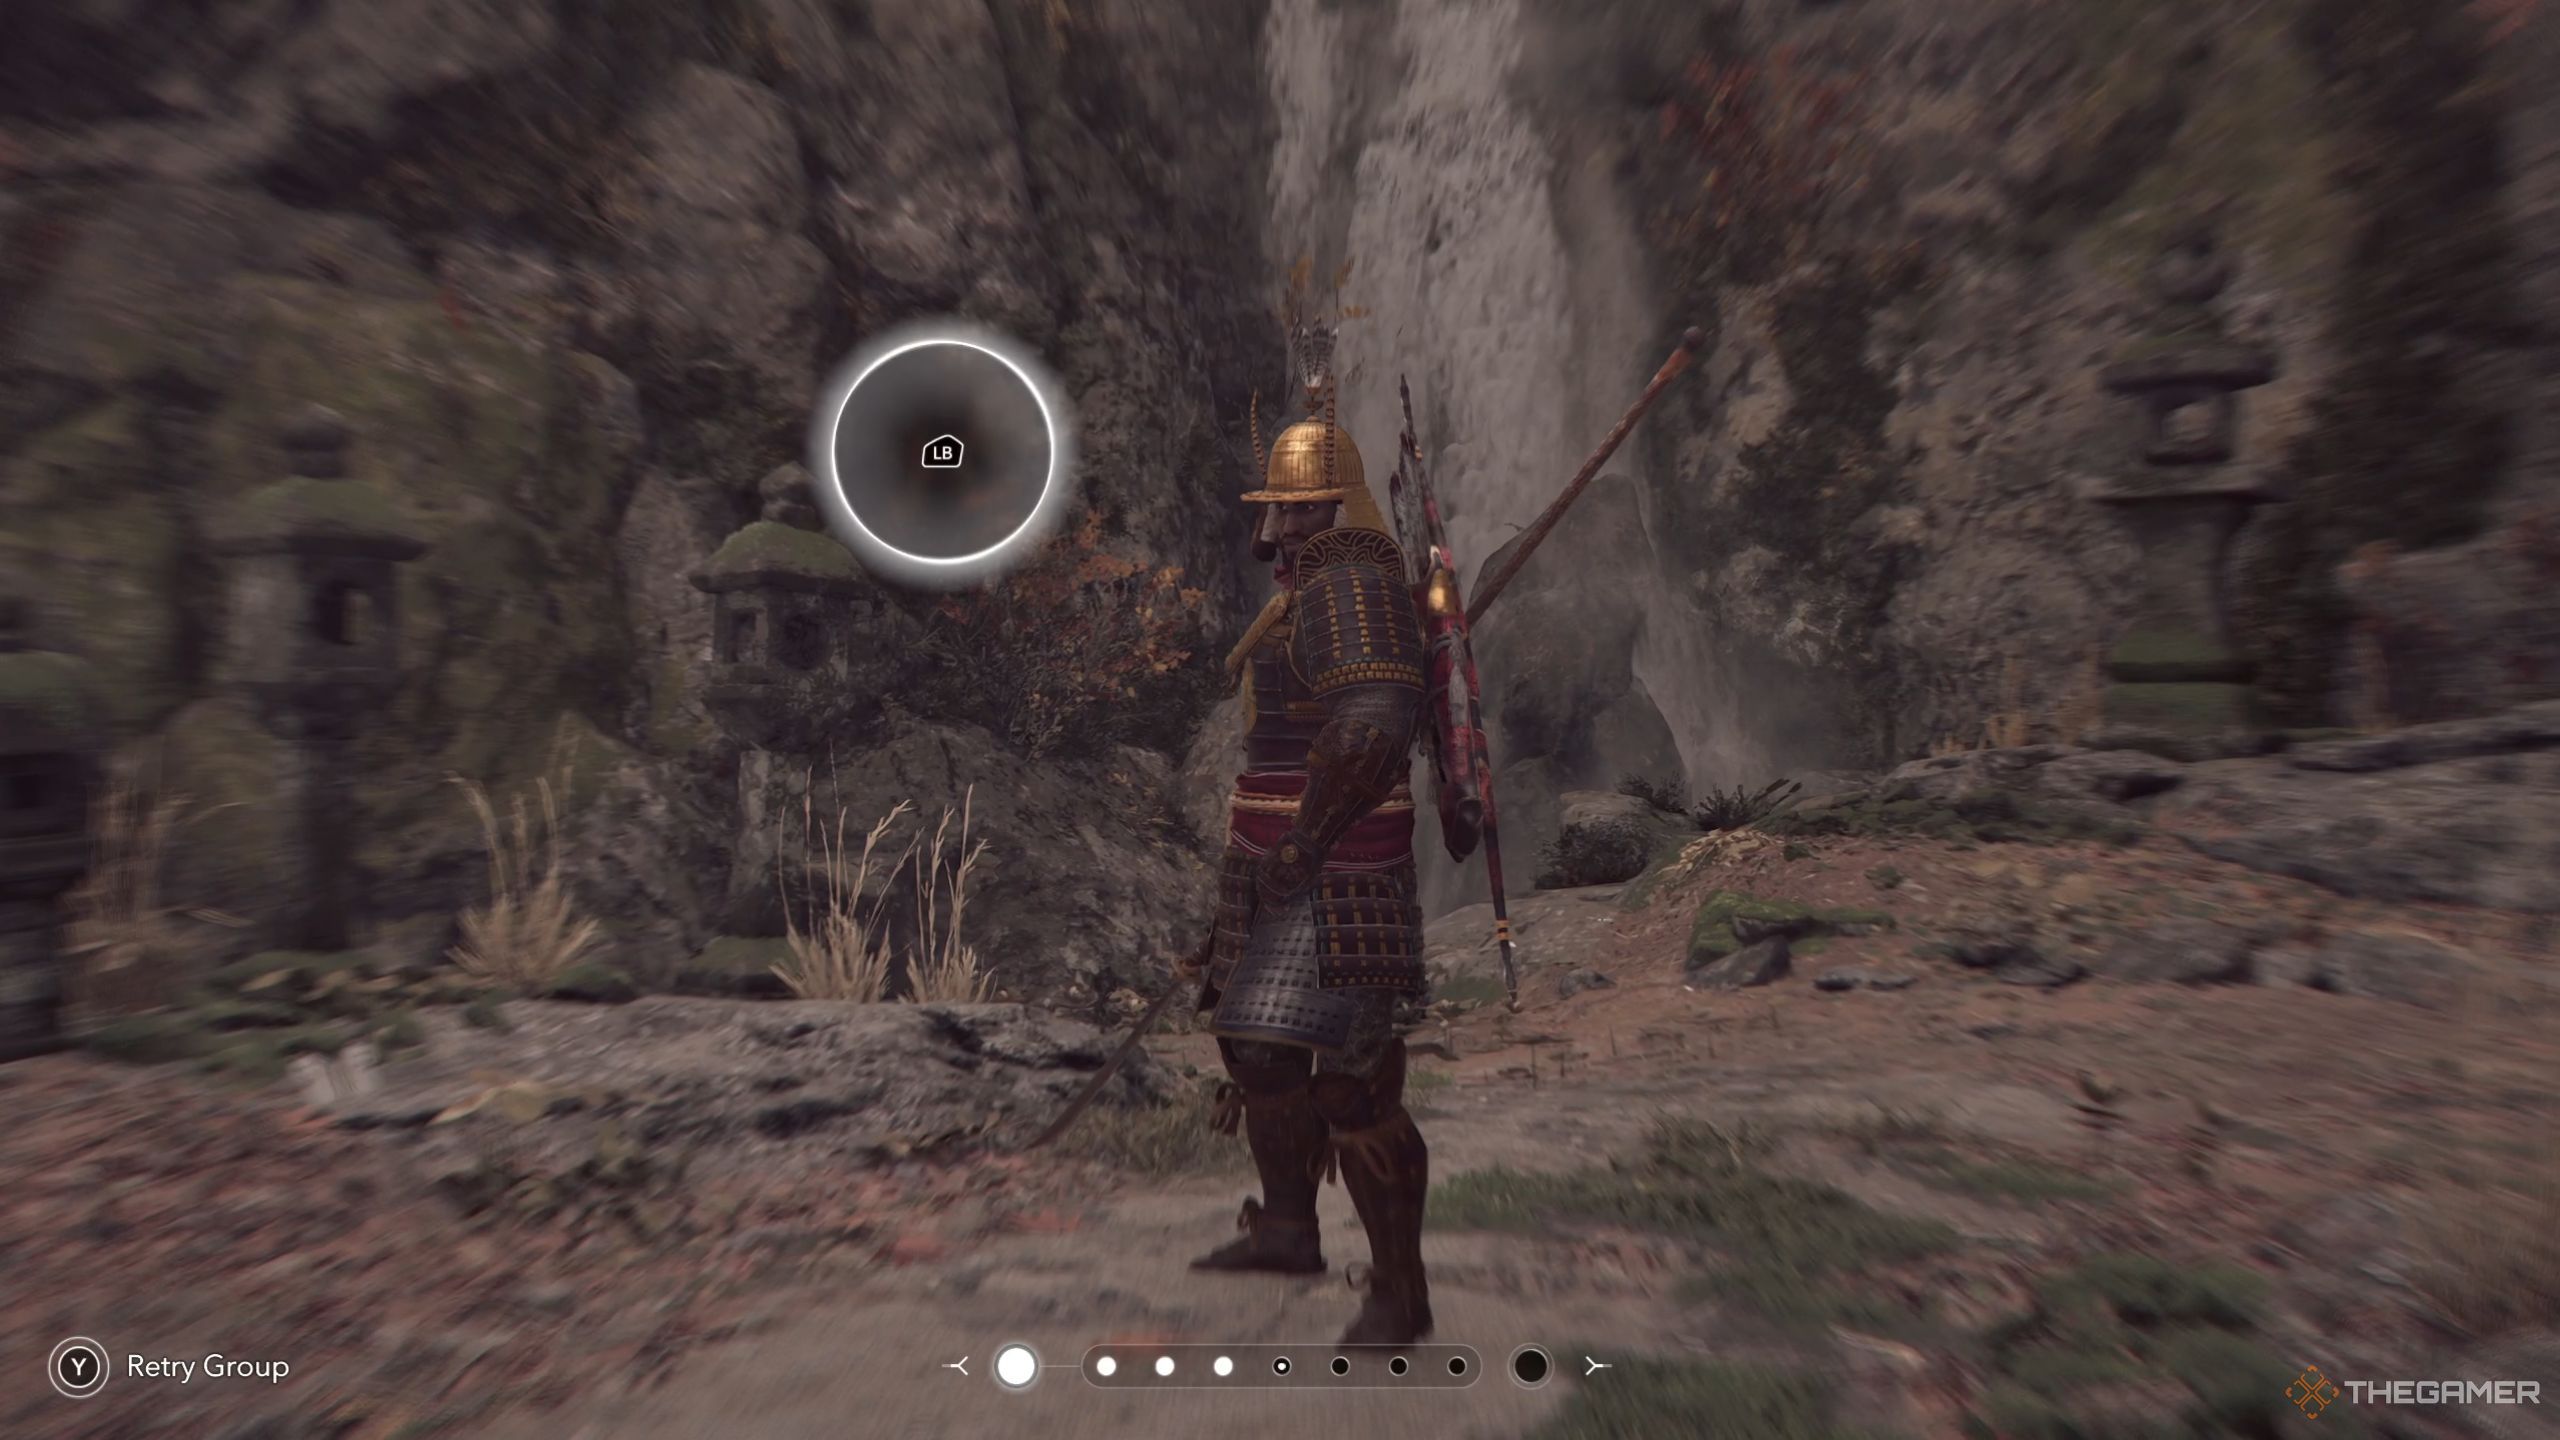
    Performing Kata in Assassin's Creed Shadows

    Each Kata teaches weapon combinations, and there’s no need to equip the weapons beforehand. Once you begin a Kata, the game will automatically equip the necessary weapon for Yasuke and prompt you with commands after a brief bow. The commands are organized into groups.

    Each group contains between three and seven commands, and if you make a mistake, you’ll need to restart that entire group. If you err on one of the initial commands, you can quickly reset the group using the button indicated on the bottom left of the screen.

    The combinations learned through Kata can be particularly beneficial during boss encounters in assassination missions, but they may not be as useful outside those situations.

    The commands during the Kata can consist of the following:

    • Pressing a button as it appears on screen.
    • Timing your button press as a circle closes in. You can hit the button as the circle reaches the highlighted area.
    • Holding down a button for a specified duration.

    Typically, the placement of buttons remains consistent across the screen. For instance, if you’re using a controller, the RB/R1 button will consistently be found in the top-right area, making it easier to determine which command you need to execute just by its position.

  • Threads’ New Tools Calm Commentary Chaos And Enhance Discovery

    Threads’ New Tools Calm Commentary Chaos And Enhance Discovery

    Meta is enhancing its Threads platform, which competes with X, by introducing new features that allow users to increase the visibility of their profiles and content through topics. This update also provides users with greater control over post interactions. A key addition is the inclusion of profile topics.

    With this update, users can now add up to ten topics in their social bios, facilitating easier discovery of accounts that share similar interests. Notably, clicking on a topic in someone else’s bio will direct you to their related posts.

    This feature is supported by a new system that enables users to tag topics in their posts. “While composing posts, you’ll receive prompts to include trending topics or ones connected to your previous content, making it easier for your audience to find your posts,” Meta stated in a blog announcement.

    Adding topics to Threads bio.
    Meta

    According to internal data, Meta reports that posts featuring topic tags tend to attract more views. Furthermore, users now have options to control who is able to reply to or quote-share their posts.

    Threads has introduced four interaction settings for posts: anyone can respond, only followers can engage, just followed profiles, and accounts that were mentioned. Additionally, users can customize their default feed view for when they open the app.

    Adding topics to Threads post.
    Meta

    In an effort to enhance the video playback experience, Meta has revamped the video player on Threads. The updated player now includes pause/play functionality, along with rewind and fast-forward buttons.

    Additionally, an interactive progress bar at the bottom allows users to navigate through the video content easily. A significant new feature implemented this week is the introduction of community notes on Threads, paralleling similar features on Instagram and Facebook.

    Post interaction tool on Threads.
    Meta

    Meta has recently announced the conclusion of its third-party fact-checking initiative, transitioning to a community-sourced system that allows users to flag potentially misleading content. Contributors will collectively determine whether a post is problematic.

    If a consensus is reached, a public note—limited to 500 characters—will be appended to the relevant post, providing additional context through a associated link. Testing of community notes began on March 18 in the U.S., with support for six languages.

    Importantly, adding a community note to a post will not result in any penalties for the post or the user who published it. “We anticipate that Community Notes will be less biased than the previous third-party fact-checking program, and will be capable of operating on a larger scale once fully deployed,” the company stated.

  • All Discovery Locations in Tales of Graces F Remastered

    1. Apple Trees

    Lhant

    Located behind the soldier near the southwest exit of the town. He’ll also hand you the Discovery Book.

    2. Lord Windegarde

    Lhant

    The windmill can be found in the northern section of town. It’s hard to miss! Simply climb the ladder to reach it.

    3. Family Portrait

    Lhant

    Inside the family’s manor, right at the top of the stairs before the next two staircases that split left and right.

    4. Gel Seeds

    West Lhant Road

    Look for the person standing next to a tree.

    5. Cryas Shards

    East Lhant Road

    This spot is not far from the town’s entrance, in a notably charming area along the upper side of the path.

    6. Spring of Healing

    Lhant Hill

    This is the very first location you encounter in the game, which restores HP. You won’t be able to mark it as a Discovery Point until you have the Discovery Book.

    7. Abandoned Nest

    Lhant Hill

    You will find this spot while Asbel and Richard are climbing back up the hill. You can revisit this area later on, but it won’t be for a while.

    8. Friendship Tree

    Lhant Hill

    This is the tree where Asbel, Sophie, and Richard carve their names. You should be able to register it as a Discovery Point right away. If you can’t, come back later!

    9. Windor Cows

    East Lhant Highroad

    A herd of cows can be seen about two-thirds of the way to Barona. You won’t receive the Discovery Point prompt until you approach the cow with the unique appearance.

    10. Gloandi

    Barona

    This is the kingdom’s valkines shard. You’ll first notice it during a story cutscene; after that, just walk up to it for the Discovery prompt.

    11. Water of Absolution

    Barona Catacombs

    As you enter, check out the flowing water on your right.

    12. Morino Flowers

    Orlen Woods

    Look near the merchant for this discovery.

    13. Tea Fields

    North Barona Road

    Investigate the barrels you come across.

    14. Ice Pops

    Barona

    When you revisit Barona as an adult, check out the ice pop shop run by the girl near the entrance of the Knight’s Academy, just as she’d promised seven years ago! Look for the sign by the shop.

    15. Headmaster’s Bust

    Barona

    This is also situated near the entrance to the Knight’s Academy on the left side. You shouldn’t miss it.

    16. Glintsoul Colony

    Seaside Cavern

    Look for the strikingly beautiful tree adorned with glowing bits.

    17. Deathglow Algae

    Seaside Cavern

    Check the shallow pool of water to the left of the save point, just before the boss fight.

    18. Vestiges of War

    North Lhant Road

    After exiting the Seaside Cavern, you’ll find yourself on North Lhant Road. Check the tents, especially at the back of the group.

    19. Massive Skeleton

    Barona Catacombs

    You can access this when you return as an adult. You’ll nearly step over it on your way out.

    20. Puffpetal Down

    South Barona Road

    Explore the patch of flowers in this area.

    21. Projection Device

    Wallbridge Ruins

    This is your destination here, so follow the on-screen indicator to guide you there. Be prepared to face a boss when you arrive, followed by a cutscene. Interact with the device afterward.

    22. Silent Stone

    Wallbridge Ruins

    You will come across it as you make your way toward the dungeon’s exit.

    23. Potatoes

    Gralesyde Road

    This area features a clear patch of potatoes situated on the southern stretch. Follow the lower “wall” while traveling.

    24. Bells of Glory

    Gralesyde

    There’s an exit from the inn that leads to an alley. Interact with the large bells located back here.

    25. Message in a Bottle

    Gralesyde

    Located along the shore of the beach.

    26. Carrots

    Old Grale Highroad

    You’ll find an obvious patch of carrots in this area.

    27. 300-Year-Old Barrel

    Wallbridge

    During the fort infiltration mission, you’ll find a couple of towers with ladders connecting several floors. Climb down the ladder in the northwest tower all the way to the bottom and inspect the barrels.

    28. Graves of the Unsung

    Barona Catacombs

    You’ll find this on your latest visit, during the attempt to access Barona Castle with your party. This is in a separate room from your main route to the destination, near the second stone door.

    29. Twin Vases

    Barona Castle

    Before entering the main part of Barona Castle, look in the underground area.

    30. First Flag

    Barona Castle

    Search for the large flag located in one of the rooms with save points.

    31. Stone of Truth

    Oul Raye

    Located on your way out of town.

    32. Strahtan Cacti

    Strahta Craglands

    Find the cacti near the chasm; the closest cactus will activate it.

    33. Daunting Book

    Sable Izolle

    Inside the research facility, check the area on your right.

    34. Somnosphere

    Sable Izolle

    This large spherical object can also be found inside the one-room facility.

    35. Golden Smile

    Rockgagong

    While inside the creature, explore the western parts until you find it. If you don’t spot it on your first visit, you can come back later.

    36. Enormous Egg

    Rockgagong

    This is located near the save point next to the exit of the dungeon.

    37. Desert Bananas

    East Strahta Desert

    Look for the banana tree.

    38. Great Fountain

    Yu Liberte

    When entering the mansion, there’s a pool of water to your left.

    39. No-Sweat Snowman

    Yu Liberte

    Check inside the inn for this discovery.

    40. Sand People

    West Strahta Desert

    These humanoid statues are located about two-thirds of the way to your destination.

    41. Ancient Embers

    Strahta Desert Ruins

    Look for four torches that are arranged in a square around you, located on one of the bridges.

    42. Duplemar

    Strahta Desert Ruins

    This is Strahta’s valkines shard, but you need to confront a boss first, followed by some cutscenes before you can check it out.

    43. Dried-Up Well

    North Strahta Desert

    You’ll come across this well not far from the entrance.

    44. Annals of Victory

    Warrior’s Roost

    Look for the large gold-colored sign up the central stairway.

    45. Peach Tree

    Fendel Borderlands

    This is found after you’ve left Fendel’s port from Warrior’s Roost.

    46. Kaigar’s Script

    Velanik

    Inside the inn, head to the back area where there’s a stage. You can go through it to find a separate room with a password chest.

    47. Frozen Tree

    Fendel Mountain Pass

    Find the lone snow-white tree shortly after passing the military building.

    48. Cabbages

    Fendel Highlands

    We’ll update this with a clearer description soon, as these are a little easy to overlook.

    49. Bottomless Pipe

    Zavhert

    This is located in the lower-right (southwest) section of the city.

    50. Doll-Within-A-Doll

    Zavhert

    Found inside a house, alongside the far wall. These dolls are similar to Matryoshka dolls.

    51. Radishes

    Mount Zavhert

    This discovery can be found on your way to the research laboratory (follow the destination marker).

    52. Pumpkins

    Mount Zavhert

    Located in the northeastern section of the area.

    53. Chocolate Fountain

    Amarcian Enclave

    This is situated in front of the inn. It’s quite noticeable since it’s a fountain, but with chocolate-colored water…

    54. Robo-Pet

    Amarcian Enclave

    Found in Pascal’s house, situated to the right.

    55. Eleth Recharger

    Fendel Research Lab

    This discovery can be found on Floor B2 within one of the many optional rooms in the dungeon.

    56. Profane Creation

    Fendel Research Lab

    This is located on Floor B3, also found in one of the many similar rooms in the lab.

    57. Frozen Nest

    Fendel Tower

    You’ll need to navigate through the back pathways to reach various floors in Fendel Tower, where the nest is located.

    58. Treasure Trove

    Fendel Tower

    This is also found in the back areas; near the save point; it comprises a collection of mechanical items inside a short metal gate.

    59. Rainbow Ice Pillar

    Fendel Glacier Ruins

    After you reach the area with movable blocks that need to crash into icicles, you’ll find this colorful pillar, which is distinctly different from the icicles.

    60. Forbrannir

    Fendel Glacier Ruins

    This is Fendel’s valkines crystal. You can only find it after a boss battle and some story events. There’s a one-way warp from the dungeon, so while you can come back, you’ll have to navigate through many rooms to do so. Be sure to get it before taking the warp!

    61. Icedrop Flowers

    Untrodden Snowfield

    These can be found along the eastern wall.

    62. Yearning for Home

    Snowshroud Ruins

    Upon entering the dungeon, this can be seen as a red spot on the wall inside the eastern door, which, like many parts of Snowshroud Ruins, only opens once you rotate a beam of light.

    63. Mechanical Scrapyard

    Snowshroud Ruins

    This discovery is in one of the western rooms late in the dungeon, just when you’re first taught about using beams in rooms with multiple devices.

    64. Tempus Aeturnum

    Telos Astue

    Located in the entrance room.

    65. Emerald Hope

    Telos Astue

    This can be found in one of the small buildings; it’s the encapsulated tree.

    66. Giant Tub

    Telos Astue

    This large wooden tub can be found in another small building on Floor B2.

    67. Old Toy Blocks

    Humanoid Research Center

    Details coming soon!

    68. Tarlow-X

    Region 13

    Details coming soon!

    69. Secret Fort

    Region 13

    Details coming soon!

    70. Unsettling Garden

    Region 66

    Details coming soon!

    71. Military Insignia

    Bathus Citadel

    Details coming soon!

    72. Amarcian Key

    Bathus Citadel

    Details coming soon!

    73. Heart of Stone

    World’s Eye

    Details coming soon!

    74. Gigantic Doll

    Ghardia Shaft

    Details coming soon!

    75. The Forgotten Ones

    Ghardia Shaft

    Details coming soon!

    76. Heat Ray Cannon B

    Sandshroud Ruins

    Details coming soon!

    77. Sunscreen Rangers

    Beach Resort

    Details coming soon!

    78. Catnip

    Katz Corner

    Details coming soon!

    79. The Lords’ Memorial

    Lhant

    Details coming soon!

    80. Eloquent Stone

    Gustwork Ruins

    Details coming soon!

    81. Gustworks Core

    Gustwork Ruins

    Details coming soon!

    82. Core-Sample Log

    Eleth Research Laboratory

    Details coming soon!

    83. Eradication Bloom

    Arcadia Garden

    Details coming soon!

    84. Mining Samples

    Lastalia Shaft

    Details coming soon!

    85. Data Transmitter

    Lastalia Shaft

    Details coming soon!