الوسم: dimension

  • Top Leo Skills to Master in Fantasian Neo Dimension

    Top Leo Skills to Master in Fantasian Neo Dimension

    The central figure in the diorama-oriented game Fantasian Neo Dimension, Leo is a character you’ll find at your side throughout the journey. From your first encounter in the Machine World to the climactic showdown at the end, Leo is a consistent member of your party, and you’ll need to get acquainted with his abilities and shortcomings.

    As the main character, Leo is quite adaptable, especially as you progress into Act 2 of the game. However, it’s important to recognize his limits; he isn’t likely to win many battles completely on his own.

    Leo’s Combat Role


    Leo serves as a jack-of-all-trades. Since he’s with you from the start to the finish, he needs to be largely self-sufficient regardless of the roster of characters around him, or even when he’s alone. This means he doesn’t excel in just one area but can adapt to fit nearly any team layout.

    He is the only character with the ability to steal from enemies by default, making him especially valuable for acquiring rare items. While his defense is average, he is capable of inflicting significant damage, especially as many of his weapons enhance his evasion. Essentially, he operates like a thief-type character who dodges attacks while delivering serious hits.

    Leo has both Lightning and Fire capabilities, allowing him to handle various elemental needs without encountering conflicts. With skills like First Aid and Focus, he can sustain himself during fights for an indefinite period. When matched with buffs from allies, Leo can become one of your most formidable attackers, particularly when you incorporate Samidare.

    Leo’s Skills
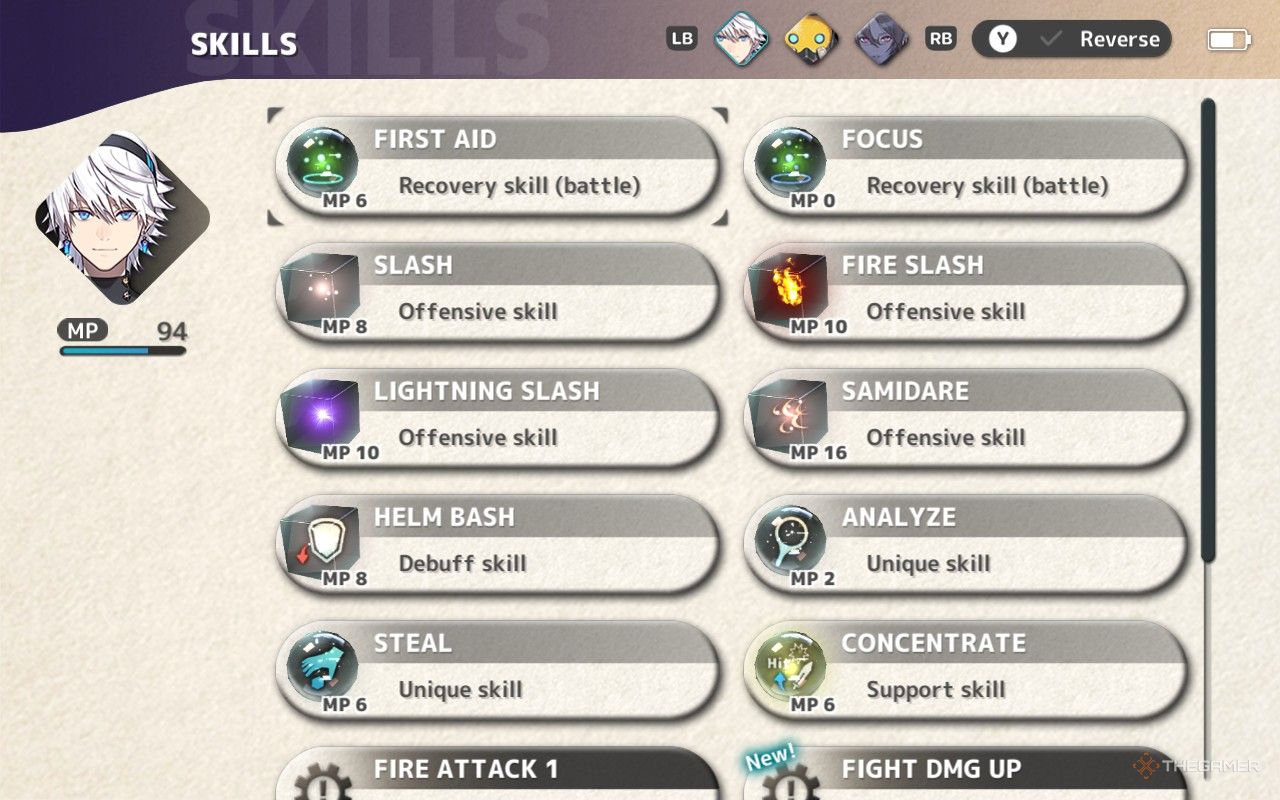
    All of Leo's naturally learned skills in Fantasian Neo Dimension.

    Up until you reach Act 2, Leo learns skills as he levels up. His skill acquisition halts around Level 27, with Act 2 beginning around Level 30. From that point, Leo can select his own Skills.

    Before we delve into Act 2 though, let’s examine the skills Leo possesses in the more straightforward Act 1:

    Skill

    Effect

    Level It’s Unlocked

    Slash

    Deals physical damage in a straight line to enemies.

    Default

    Analyse

    Reveals an enemy’s stats and weaknesses. Only needs to be used once per enemy.

    Level 2

    Steal

    Chance to steal an item from an enemy.

    Level 4

    First Aid

    Restores a small amount of HP to Leo or other allies.

    Level 5

    Fire Slash

    Deals fire damage in a straight line to enemies.

    Level 7

    Samidare

    Inflicts multiple hits on a single enemy for physical damage.

    Level 10

    Helm Bash

    Attacks a single enemy, lowering their defense.

    Level 13

    Concentrate

    Increases Leo’s chance of landing a critical hit for several turns.

    Level 21

    Lightning Slash

    Deals lightning damage in a straight line to enemies.

    Level 24

    Focus

    Allows Leo to regain MP without cost.

    Level 27

    These skills make up the core of Leo’s abilities. The later-unlocked Growth Map allows him to add new skills or enhance existing ones, but you’ll primarily rely on these foundational skills for building Leo.

    Leo’s Growth Map

    At the conclusion of Act 1, Leo receives his Divine Artefact, the Gauntlet, which unlocks the Growth Map. For every level beyond 30, you earn Skill Points that can be utilized to unlock skills from this map. While some nodes are restricted until you find specific items in side quests, most options are available right away.

    As mentioned, many of the skills enhance Leo’s existing abilities, but some new skills can further elevate his strengths. Here are a few examples:

    • Fire and Lightning variations of Samidare can be unlocked, significantly increasing Leo’s damage output against specific foes.
    • The hit count in Samidare can be raised, applying to the elemental variants as well.
    • Phantom is a new skill that greatly boosts Leo’s evasion, making him nearly untouchable.
    • Counter is a strong passive skill that gives Leo a chance to counterattack the last enemy that hit him, without consuming a turn.

    Once a character accesses the Growth Map, they gain the Tension Gauge, enabling them to unleash a powerful move unique to each character. For Leo, this is Solar Flare, which costs 10 SP to use. This move deals fire damage to all enemies and can be upgraded to provide buffs to allies too.

    You can reset the Growth Map for free an unlimited number of times, giving you the flexibility to modify Leo’s build whenever you wish.

  • Conquer the Robo Organizer in Fantasian Neo Dimension!

    Conquer the Robo Organizer in Fantasian Neo Dimension!

    Quick Links

    After the game kicks off and you spend some time as Cheryl and Kina, everyone reunites in the Machine World. It’s reminiscent of when Leo first departed, with many familiar characters making an appearance.

    This marks the beginning of Act 1’s conclusion in Fantasian Neo Dimension. You will encounter tough enemies and get one last opportunity to roam around before continuing your journey, so make sure to thoroughly explore the Machine World upon your return.

    How to Defeat Robo Organizer Complete

    As you re-enter the Machine World, you find yourself in the same spot you left. This is a great opportunity to grab any items you might have missed earlier, like a Heal Stone and a couple of Lightning Fragments. Though basic, it’s worth your while to collect them.

    Keep moving, and you’ll come across a large platform that feels like a boss arena—because it is! You’ll be facing off against the revamped Robo Organizer, Complete.

    When the battle with Robo Organizer Complete begins, focus solely on using Analyse or a Research Lens. The boss heals itself after every turn until a cutscene disables its healing drones, marking the start of the real fight. Using Analyse here saves you a turn during the actual battle.

    Now, let’s break down Robo Organizer’s attack pattern. While it shares some similarities with its initial encounter, the moves have expanded.

    Move Effect
    Regular Attack The boss slams down on a single character, dealing decent damage.
    Elemental Resist Down Missiles Fires missiles that hit all party members, making them weak to a specific element.
    Elemental Laser Prepares a different elemental attack for the next turn.
    Overheat The boss wastes its turn by using Overheat.
    Combination Strike In its second phase, it can strike two party members or hit one member twice.

    There aren’t a lot of moves to worry about, but they hit hard. Make sure to keep Ez boosting your Attack and Defense throughout the fight.

    The real twist in this battle comes after the boss unleashes Elemental Resist Down Missiles. When this happens, all your party members become vulnerable to a specific element. This will be one of the elements the boss uses as a power-up in the next phase.

    At this point, you have the chance to destroy both of its arms. If you’re not confident about taking them both down, focus on the one you are vulnerable to. With Leo’s Fire Slash, Zinikr’s Earth Strike, and Ez’s elemental grenades, you should be able to take out both arms in a single turn.

    Once the boss’s health gets low, it will transition to its second phase and start using Combination Strike. It’s a powerful move on its own, and the boss can combine it with Elemental Resist Down Missiles and Elemental Laser in the same turn. Keep your HP high to ensure you can destroy its arms in time.

    Stick to this strategy, and you’ll bring the boss down before long—hopefully for good this time! Following this victory, you’ll proceed to the Secret Base.

    To the Secret Base

    With Robo Organizer out of the way, you can finally push forward in your quest to find Cheryl and Kina. You’ll be retracing their steps but from a slightly different viewpoint, making it easier to reach the Secret Base since you now know where its entrance is.

    As you travel along the upper walkway, take the platform down to where lots of shipping containers are, the very spot where Cheryl and Kina were hiding. You’ll find a chest containing three Ether Ls. Afterward, return to the walkway and navigate until you arrive at the Secret Base.

    Initially, the party might feel uneasy, but Prickle and Clicker will soon arrive to ease their concerns. They share some lore regarding Vam’s intentions and inform the party that Kina and Cheryl headed into the wormhole, cautioning against following them due to the substantial danger. However, Leo and the group decide to proceed.

    As you approach the exit door, be sure to note that this is the point of no return. You’ll want to level up and gather better gear before facing Vam. A cutscene will play, prompting the appearance of new items throughout the world, so make sure to check your surroundings before leaving.

    Tip: The terminals at the Secret Base are now available, featuring new weapons and jewels that may enhance your current gear.

    For the time being, you can return to the Uzra, where you’ll find chests waiting in the hall by the Engine Room, and more treasures with sailors at the harbor in Vence. Plus, with his memory restored, Leo can revisit the Mini and Midi Toy Boxes to uncover previously forgotten secrets.

    Note: Many of the chests require Mechteria Keys, which can be obtained by farming Orblings in East Vence.

    To the Wormhole

    After exiting the Secret Base, you will begin your journey towards Vam. This path is relatively straightforward, though most of the treasures are tucked away just out of sight. Most of these items are crafting materials for Ez, which are valuable for the upcoming battle.

    Here’s a list of what to look for in the first area:

    • Five Potion Ls located just south of the entrance.
    • Ten Magic Crystals in a short hallway east of the entrance.
    • Five Bomb Kits to the far east, around the corner to the south.
    • Five Ether Ls hidden in a corner just before the next area.

    Once you enter the subsequent area, you’ll find yourself back on the walkway you visited earlier in the Machine Realm but from the opposite side. There are plenty of items to collect here as well:

    • 20 Protein Drinks at the far west of the walkway, on the south side.
    • 20 Clocks of Truth after taking the down elevator platform, to the left.
    • 30 Hard Shells after the elevator to the right.
    • An Elixir can be found by going left while on the walkway; you may have seen it before with Cheryl and Kina.

    After gathering all those items, it’s mostly a straight shot toward Vam. You’ll know you’re in the right area when you start seeing Mechteria. Before you continue, make sure to save at the save point; this is your last opportunity to explore before being locked in.