Tag: collect

  • Discover How to Collect Steel in Dune Awakening: Completing the Quest

    Discover How to Collect Steel in Dune Awakening: Completing the Quest

    To thrive in the challenging environment of Arrakis, constant crafting is essential. As you explore different areas in Dune: Awakening, the difficulties increase, necessitating the creation of more resilient gear. Using Steel allows you to produce equipment that lasts longer and boasts a wider variety of crafting options.

    However, because Steel is so valuable, it can be a bit harder to acquire. This guide will outline the steps needed to quickly gather Steel.

    How to Acquire Steel

    While some materials like Copper and Granite can be found in nature, obtaining Steel involves a specific process. You’ll need the following resources to craft it:

    • 4 Carbon Ore
    • 1 Iron Ingot
    • 50 ml of Water

    Carbon Ore

    You can find Carbon Ore in Carbon stone piles, primarily located in the Eastern Vermillius Gap, north of Hagga Basin South. These piles often have distinctive crystals protruding from them, making them easier to spot.

    To mine Carbon Ore, you’ll need the Cutteray Mk2.

    There may also be Carbon Ore strewn on the ground near the stone piles. You can simply pick these up without needing to mine them, and they will automatically go into your inventory.

    Iron Ingot

    To get an Iron Ingot, you’ll have to refine it from Iron Ore. Look for an Iron stone pile in the Eastern Vermillius Gap; you’ll recognize it by its white rocks.

    Once you locate an Iron stone pile, use the Cutteray Mk 1 to break it down, yielding a significant amount of Iron Ore. Afterward, head back to your base and craft a Small Ore Refinery if you don’t already have one. Put the Iron Ore into the refinery to convert it into an Iron Ingot.

    Don’t forget, you’ll also need Water alongside the Iron Ore to complete the process.

    Water

    One of the best early-game methods to gather a large amount of water in Dune: Awakening is using the Blood Purifier. After defeating an enemy, use their blood in the purifier to efficiently produce Water.

    Once you’ve collected enough, you can drink some, but make sure to keep around 50 ml for making Steel.

    How to Craft Steel

    With all the necessary ingredients on hand, you’re ready to create Steel. This can be done using any refinery, but the Small Ore Refinery is sufficient if you’re still in the early stages of the game.

    You won’t need Literjon to store the Water; the Small Ore Refinery will recognize the Water from the Blood Purifier for the creation of Steel. This means you can use Water from the purifier directly.

    Approach the refinery and select the Steel option on the left. If you have all the necessary ingredients, you can start the refining process for Steel Ingots.

  • Completing the Collection of Blueprints for Hopert in Mudborne

    Completing the Collection of Blueprints for Hopert in Mudborne

    In Mudborne, you’ll leave the Spawning Pools, but you’ll find yourself returning frequently for various reasons. One of the key reasons is to trade with Hopert, who offers a wide range of tools and essential gear to aid you as you delve deeper into the adventures that Mudborne has to offer.

    Throughout the area, there are six blueprints to collect and trade with Hopert. Once you give him these blueprints, he can craft new items that you can purchase at his shop. No matter what you need to improve, Hopert can create it if you bring him the appropriate blueprints.

    Exchange Blueprints with Hopert for New Gear


    Exploring the various maps in Mudborne always leads to exciting discoveries. Make sure to check every accessible building, as you never know what treasures might be hidden inside. Among these treasures, you’ll find blueprints tucked away in stone treasure chests. There are six blueprints to uncover between two locations: the Spawning Pools, where your journey begins, and the Kindergarten, where you assist Ribbert with repairing lift buckets and dive into the mushroom hybridization process for the first time.

    While staying in the Spawning Pools, you encountered Hopert, the local carpenter who provides various items, including crucial tools, frog furniture to pamper your breeding frogs, and extra storage for your resources. Initially, the bottom row of items in Hopert’s shop is locked, but don’t worry—he just needs a couple of blueprints to get started on those six items.

    Whenever you discover new blueprints while navigating through Mudborne, return to Hopert so he can create new items for you. After handing over any blueprints, you’ll gain access to trade for the new items during your next visit.

    If you’ve lost track of where you found a blueprint or would like additional details about it, you can refer to the Scrapbook for information on every device.


    Scrapbook information about the progenitor prototype in Mudborne.

    All Blueprints and Their Locations in Mudborne

    Blueprint

    Location

    Function

    Cost

    Predictor

    Mud Analysis


    Spawning Pools

    Enables you to test mushroom combinations and observe their effects over time, allowing you to refine your recipes before using actual resources.

    Breeder

    Mass Breeding


    Spawning Pools

    Frogs bred in this machine can produce frogspawn eggs or, by adding water, yield tadpoles instantly.

    • 5 Logs
    • 1 Bucket of Water
    • 1 Spawner

    Progenitor

    Ancestry Research


    Spawning Pools

    Displays the last six generations of a frog’s lineage, which can be critical for ensuring you choose the right frog for upcoming challenges.

    • 5 Logs
    • 5 Memory Gel
    • 5 Mirror Shards

    Projector

    Fungal Projection


    Kindergarten

    Provides insights into the trait changes that occur when two basic mushrooms are hybridized, showing up to three mushrooms for crafting recipes.

    Bug Trap

    Bug Farm


    Kindergarten

    Simulates a specific environment to increase the likelihood of bug spawns in typically non-spawning areas.

    • 1 Small Crate
    • 5 Logs
    • 5 Leaves

    Farmer

    Improved Farming


    Kindergarten

    Facilitates plant and tree growth in any location, provided you use a frog with maximum Ribbit energy to power the machines.

    While the items created by Hopert from the blueprints you discover in Mudborne aren’t strictly necessary, they can be quite beneficial as you plan your next breeding endeavors.

  • Collecting Vigorwasps for Your Palico in Monster Hunter Wilds

    Collecting Vigorwasps for Your Palico in Monster Hunter Wilds

    Monster Hunter Wilds offers an array of side missions that Hunters can undertake to earn valuable rewards. Some of these missions involve tasks beyond merely tracking and defeating monsters, which can present a unique challenge at first.

    Your Palico serves as your trusty companion throughout the game, especially in combat situations. It plays a crucial role in battles by healing you and diverting the monster’s attention away from you. You can enhance its effectiveness even further by completing various side quests.

    How to Start the Healing Help Side Quest

    To initiate the Healing Help side quest, talk to your Palico at any base camp after finishing Chapter 3 and defeating Zoh Shia. You’ll find your Palico near your tent in the base camp.

    The quest requires you to capture a Vigorwasp. Just remember that the Vigorwasp is not the same as the Vigormantle bug, which provides immediate healing and can be spotted while clinging to surfaces.

    How to Capture a Vigorwasp for the Healing Help Side Quest

    The map location of Vigorwasp in Monster Hunter Wilds.

    You can find Vigorwasps scattered across the game world, but a reliable spot to locate them is at the Oasis in the Windward Plains. Here, you can easily catch two Vigorwasps. Additionally, you can teleport to the Pop-Up Camp in Area 13, which will place you conveniently close to the Oasis in the Windward Plains.

    Hunter using Capture Net to catch a Vigorwasp in Monster Hunter Wilds.

    To capture a Vigorwasp, you’ll need to switch to a capture net. You can find this tool in the essential items menu. Once equipped, you’ll see a square crosshair when aiming with your Slinger.

    Hunter aiming the Capture Net at a Vigorwasp in Monster Hunter Wilds.

    As you approach the Vigorwasp and aim your capture net, you’ll notice the crosshair darken, indicating you’re in range to capture it. Shoot the net as you would with any Slinger ammo, and the net will launch, capturing the Vigorwasp.

    Rewards for Completing the Healing Help Side Quest

    Rewards from completing the Healing Help side quest in Monster Hunter Wilds.

    After capturing the Vigorwasp, return to your base camp and talk to your Palico to complete the quest. Once the Healing Help quest is finished, your Palico will have the ability to summon a Vigorwasp during battles.

    A Vigorwasp can be extremely beneficial in combat because, unlike Vigormantle Bugs, the wasp generates an area of effect that heals continuously as long as you remain within that area.

  • How to Collect Floof Yarn in Infinity Nikki: A Complete Guide

    How to Collect Floof Yarn in Infinity Nikki: A Complete Guide

    Papergames

    In Infinity Nikki, much like other open-world titles, players can gather a variety of crafting materials. These resources are essential for creating clothing items based on designs you’ve collected, but some can be challenging to find.

    Take the task of obtaining Floof Yarn, for example. One of the initial missions in this gacha-style dress-up adventure requires you to gather Floof Yarn. However, the game offers minimal clues as to where to locate this item or how it appears. If you’re having difficulty collecting Floof Yarn in Infinity Nikki, you’ve come to the right spot.

    Locating Floof Yarn in Infinity Nikki

    The “Land of Wishes” quest instructs you to seek out a piece of Floof Yarn, yet it offers no markers or hints about its whereabouts, which can leave you perplexed. To gather Floof Yarn in Infinity Nikki, look for Floofs—these small, brown canines that roam throughout the game’s world, particularly within Florawish.

    Step 1: First, ensure you have unlocked the Bye-Bye Dust outfit. Prior to this quest, you should have already obtained the sketches for your initial ability outfit named Bye-Bye Dust. This charming outfit allows Nikki to groom animals, enabling her to earn valuable crafting materials in return.

    Bye Bye Dust outfit in Infinity Nikki.
    Papergames

    Step 2: Next, find a Floof. These cute, brown and white fluffballs are among the favorite pets in Miraland. They look similar to a fluffier version of a Shiba Inu puppy, complete with braided fur along their backs. Exploring Florawish is a great way to find plenty of these adorable creatures.

    Floof in Infinity Nikki.
    Papergames

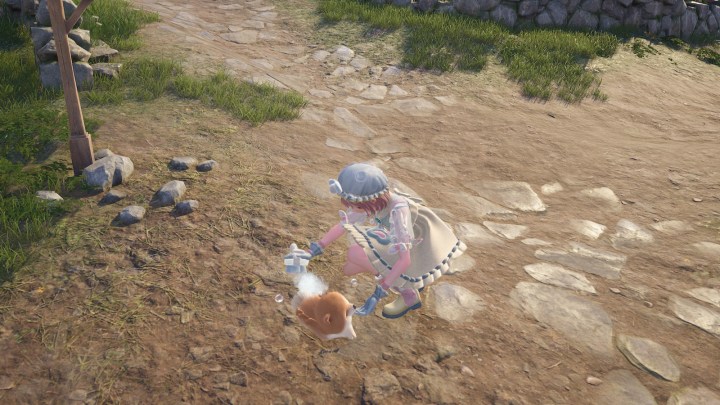
    Step 3: Make sure you are wearing the Bye-Bye Dust outfit (hold Tab to navigate through your ability outfits), then interact with a Floof by right-clicking your mouse. You should see an icon of a grooming brush appear, after which a cutscene will initiate where Nikki brushes the Floof’s fur.

    Grooming an animal in Infinity Nikki.
    Papergames

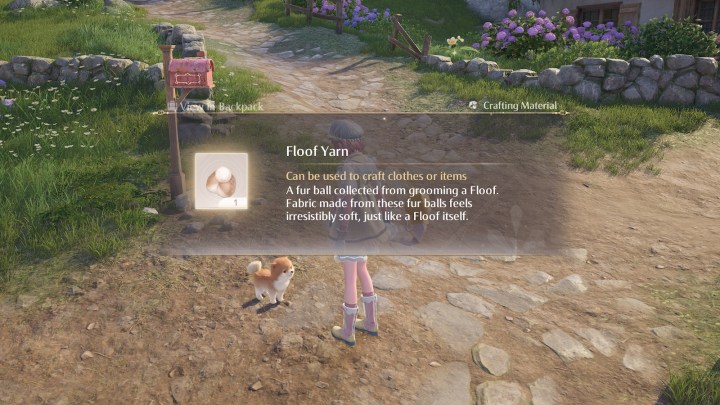
    Step 4: After the cutscene wraps up, you will be awarded your first piece of Floof Yarn! Use it to further your quest and create necessary items. Floof Yarn is a common crafting component in many clothing patterns, so it’s wise to stockpile it.

    Floof Yarn crafting material in Infinity Nikki.
    Papergames

    Shortly after completing this quest, you will unlock the ability to track various insects, creatures, and other sources of crafting materials. To track Floofs, find the book icon on your map in the lower left corner; this will help you locate them instead of searching manually. A yellow circle will appear on your map, highlighting the area where you can find the nearest Floof.