Tag: Code

  • How to Complete All Bequeathed Forma in Code Vein 2

    How to Complete All Bequeathed Forma in Code Vein 2

    Building on the original game’s ideas, Code Vein 2 emphasizes build flexibility, allowing you to easily switch between different Blood Codes. You can change all the skills attached to your weapons at any mistle point.

    Enter Bequeathed Forma. These items are valuable because you can swap them from your inventory anytime. They add extra utility to your builds since they have dedicated slots and specific functions.

    What Are Bequeathed Forma?

    Bequeathed Forma have their own slot in your inventory and are activated with a specific button. All of them are offensive weapons, but each serves unique purposes and can fit into various build types.

    For example, the Statesman’s Longbow lets you aim manually and take out enemies from a distance. Idris’ Conceit deals area damage and applies Slow status to enemies. They aren’t just about raw damage—they also provide additional effects.

    What makes Bequeathed Formae more versatile is that they don’t add any Burden. So even very large weapons can be equipped without negatives, regardless of the weapon’s size. This creates a win-win situation.

    Each Bequeathed Forma has inherent scaling that makes it more effective with certain builds, but their extra effects mean they’re useful no matter what.

    Every Bequeathed Forma And How To Unlock It

    The game features a total of eight Bequeathed Formae, each functioning quite differently. Most need to be purchased, but some are unlocked through other means.

    Here’s the full list:

    Note: The strength of each Forma increases as you upgrade them, and they are listed here in order of their scaling effectiveness at max level.

    Statesman’s Longbow

    A long-range weapon that you can manually aim. You can fire with a quick trigger pull or hold it to charge for more damage—making targeting enemy weak points easier.

    • Scaling: Dexterity, Willpower
    • Ichor Cost: 1
    • Damage Type: Pierce

    Found in MagMell Island, in a chest in the entrance courtyard of the Ruins.

    Battle Axe: Idris’ Conceit

    A heavy weapon with a long attack delay that can’t be charged or shortened. When it hits, it creates a force field that briefly locks enemies and applies Slow.

    • Scaling: Mind, Strength, Dexterity
    • Ichor Cost: 5
    • Damage Type: Strike

    Given by Lou after helping Noah return to Magmell Island.

    Bloodreaver Blade

    This weapon swings across a wide area for big damage and can hit multiple enemies while advancing. Timing the attack right deals even more damage.

    • Scaling: Strength, Dexterity, Mind
    • Ichor Cost: 4
    • Damage Type: Slash

    Available from Jadwiga after defeating Josée the Blind Hero in the Sunken City.

    Absolute Executioner

    The weapon of Lyle, a massive blade that deals significant damage. Holding the attack button makes it linger longer, increasing its damage.

    • Scaling: Strength
    • Ichor Cost: 6
    • Damage Type: Slash, Lightning

    Given by Craig when you face Hero Lyle after altering his story.

    MK Rosenritter

    The weapon of Holly, consisting of massive gatling guns that fire wildly in an arc in the direction you’re facing. They can’t be aimed, and fire continuously until Ichor runs out.

    • Scaling: Willpower, Dexterity
    • Ichor Cost: 1 Ichor every few seconds
    • Damage Type: Strike

    Purchased from Jadwiga after beating Hero Holly.

    Warhammer of the Fool

    The weapon of Zenon, capable of performing a sequence of attacks—by pressing R2/RT, R2+Square/RT+X, and then other button combinations, different finishing moves are triggered. It deals heavy, multi-hit damage.

    • Scaling: Balanced Strength and Dexterity
    • Ichor Cost: 2 per attack, 6 for a full combo
    • Damage Types: Strike, Fire

    Available after defeating Hero Zenon in Insula Carcere.

    Manus Rapacis

    Valentin’s weapon, a giant laser beam that fires straight ahead and can be moved freely to hit targets. It lasts several seconds and cannot be canceled, so use it from a safe distance.

    • Scaling: Willpower
    • Ichor Cost: 6
    • Damage Types: Blood, Fire, Ice, Electric

    Can be purchased from Jadwiga after defeating Hero Valentin. Since it leads to a different ending, you’ll need to load your save afterward to find it in her shop.

    Wings of Eternity

    Valentin’s weapon that lets you hover out of enemy attack range and unleash a wide laser bombardment. Its attack is automatic, so it’s best against large enemies or groups.

    • Scaling: Mind and Willpower (balanced)
    • Ichor Cost: 10
    • Damage Types: Blood, Fire, Ice, Lightning

    Available from Jadwiga after defeating Hero Valentin. After completing the game, reload your save to access the purchase.

    How To Upgrade Bequeathed Formae

    All Forma can be upgraded using the same materials—Heart Remnants and the special Primordial Heart. Heart Remnants are commonly found and sold by Jadwiga’s Minions, but Primordial Hearts are rare, with only about four available per playthrough.

    To upgrade, visit Jadwiga in MagMell’s forge and give her the required Haze. Upgrading increases their base damage and improves their scaling, making them more powerful with the right build.

  • Using Lyle’s Fading Bond to Completing Challenges in Code Vein 2

    Using Lyle’s Fading Bond to Completing Challenges in Code Vein 2

    After defeating the One-Armed Hero Lyle at Forward Base One, you notice that his Fading Bond still exists, showing that you can return to his era and change things. However, this bond is currently too weak to be used. Even a more emotionally-connected item won’t be enough this time. Lou tells you that you need to find Lyle in another era and change history from there. That’s her only hint, but it’s enough to get you moving.

    Travel to the Free Exploration Era. Usually, this time period doesn’t have much story, but this is an exception. After visiting a hero’s era, they usually appear as partners with quests in MagMell, but Lyle hasn’t reached that point yet. Instead, head to Forward Base One. This era is set after Lyle’s era but before the Upheaval, giving a small window before he disappears.

    When you arrive, you’ll see Lyle standing in the ruins, mourning his family. Your return gives him some motivation. He says he’ll build a memorial for his friends before leaving, and he hopes you’ll visit to pay respects. The quest won’t update in your journal now, but it does once you go back to the Present Era and return to Forward Base One. There, a new bond appears, and you can interact with a small memorial for the Dawn Chorus. Interacting with it allows you to go back to Lyle’s era.

    After returning to Lyle’s era, you’re tasked with meeting the Dawn Chorus members, who are still in Pioneer Castle. They have sent Lyle on a mission to the Great Sealed Mine to find the cause of strange happenings in the region. You set out to help him, with Craig insisting on coming along as your partner.

    In this section, Craig can’t be deployed as a partner and remains Assimilated, giving you bonus damage. In the mines, you meet with Lyle, who continues his investigation, while you and Craig do your own exploring. You find letters from the late Queen Imogen—Craig’s mother—which explain her exile and reveal the evil lurking beneath the Corroded Scar.

    Along the way, you experience flashbacks until reaching the end, where you see Queen Imogen, now clearly losing her mind from years of holding back the regional threat. At this point, Lyle joins you as a partner, while Craig returns to Pioneer Castle to help defend it from an ambush by Gobbo and his forces.

    To defeat Pioneer Queen Imogen, if you’ve already fought a version of her during the Free Exploration Era, this battle will feel familiar but more intense. The full version of the fight takes place now. Imogen mostly fights at close range, using some projectiles and circling moves to keep you on your toes, requiring proactive defense.

    For ranged players, the Bayonet can be useful thanks to its long-range attack options and bullets. Lyle is also helpful, dealing significant damage and building up stagger, making it easier to defeat her. Once she’s defeated, Craig returns to say they defended Pioneer Castle successfully, with most of the ambush wiped out thanks to a sudden earthquake.

    As a reward, you get Craig as a summoned partner, the Blood Code of Pioneer Queen Imogen, and the ability to fight Hero Lyle in the Present Era.

  • How to Beat Soul Savior Valentin in Code Vein 2 by Completing and Solving

    How to Beat Soul Savior Valentin in Code Vein 2 by Completing and Solving

    Code Vein 2 guides you through what needs to be done early on. First, remove the heroes holding the Resurgence in place, then destroy the Resurgence forever.

    However, Lavinia had other plans, continuing Valentin’s plan from 100 years ago. Now, you have a chance to go back to the Upheaval and fix things before they go wrong. The only problem is, you’ll have to face Valentin again.

    Where Is Soul Savior Valentin Fought?
    You confront Soul Savior Valentin at the very top of the Sealing Spire, in the Sealed Grounds. This fight isn’t in Luna Rapacis; it’s only available after you go back to the game following the first ending, called “A Hero’s End.” After following the story into the past during the Upheaval, you’ll need to climb all the way through the Sealing Spire before Valentin is sealed away. Defeat him personally to stop his plans from succeeding.

    Soul Savior Valentin’s Moveset
    Valentin has two phases in this fight. He shares some similarities with the previous Valentin hero fight from an earlier ending. While he doesn’t switch masks, he wears all of them at once and still uses moves like the Healing Vortex and Rotating Lasers. The lasers, along with some other moves, cause Luna Rapacis buildup, so having Luna Vaccines ready is helpful.

    Here are his moves across both phases:

    Phase One

    • Leaping Swipe: Valentin leaps toward you and swings wide.
    • Aerial Laser Discs: He hovers and shoots laser discs in bursts, which are tricky to dodge without quick reflexes. Blocking can also work.
    • Forward Laser Slam: He creates a laser bomb in his face, slamming it down. After a few seconds, small lasers shoot up from the ground around him.
    • Tail Spin: Valentin spins quickly to knock you back and change position, often triggered if you stay too close behind him.
    • Slam And Swipe: He slams with one arm, causing a laser burst, then quickly swipes with the other.
    • Double Slam: He hits with one arm, then the other, both releasing small lasers.
    • Healing Vortex: Summons a whirlwind pulling you in. When it burst, it heals him and drains your health.
    • Flying Dash: He hovers briefly, then dashes toward you. Dodge early since it tracks well.

    Phase Two

    • Aerial Laser Bombardment: He floats and fires lasers from rings, targeting you or around the arena, causing Luna Rapacis buildup.
    • Enhanced Slam And Swipe: Similar to before, but now lasers shoot from the ground after the slam, and his arm swipe causes a laser shockwave.
    • Thrown Laser Discs: He throws laser discs from each hand in a line, which can be dodged by moving sideways or back.
    • Laser Carpet: From a distance, he slams down both arms, sending a wave of lasers across the arena.
    • Rotating Laser: He hovers, fires a laser in one spot, then spins, emitting lasers in three directions, followed by an explosion in the last attack line—avoid moving too much afterward.

    The fight transitions smoothly between phases. Valentin glows red and roars when switching, typically around 60% HP remaining. Most attacks stay the same, with added laser attacks in phase two.

    How To Beat Soul Savior Valentin
    In the first phase, Valentin is fairly straightforward. He prefers close combat, so he’ll try to close the gap often, which makes it easier not to chase him across the large arena. Leaving your partner to draw his attention can keep him stationary longer. Aim for his back legs, since most of his moves, except for Tail Spin, can’t hit that spot. Charged heavy attacks are especially effective here, causing big stagger damage and opening him up for a Drain attack. Using Bequeathed Forma like the Bloodreaver Blade works well—its range covers enough ground, especially if activated right after attacking from behind. This allows you to charge it fully and deal heavy damage before he staggers.

    Note: The Bloodreaver Blade takes three seconds to fully charge from the moment it glints. Keep this in mind to maximize your damage.

    In the second phase, Valentin’s attacks become more ranged with laser barrages. Staying close is still the best tactic, but he will try to keep you at a distance for some of these attacks. His back legs remain the safest target since they’re usually unguarded. Many of his most powerful moves happen while he’s hovering in the air, which makes it harder to hit him. Using ranged weapons or magic Forma can be helpful here. Still, patience is key—avoid unnecessary risks by waiting for openings and dodging attacks. Once you defeat him, you’ll receive the Soul Savior Valentin Blood Code and unlock the game’s second ending, Luna Fraterna.

  • Complete Every Blood Code and How to Solve Them

    Lou 1:
    – Strength: 10
    – Dexterity: 10
    – Mind: 14
    – Willpower: 10
    – Vitality: 12
    – Fortitude: 10
    – Bleed Factor: 59
    – Max Ichor: 18
    – Balance: 62

    Features:
    – No Overburden Effect: Charged Drain Attacks cause slow buildup
    – Mind Margin 10: Reduces guard stamina cost
    – Mind Margin 14: Attack power temporarily increases after a drain attack
    – Trait: Mind Booster

    Lou 2:
    – Strength: 12
    – Dexterity: 11
    – Mind: 17
    – Willpower: 12
    – Vitality: 14
    – Fortitude: 10
    – Bleed Factor: 59
    – Max Ichor: 18
    – Balance: 62

    Trait:
    – Ichor Maximizer – Tria

    Lou 3:
    – Strength: 14
    – Dexterity: 12
    – Mind: 20
    – Willpower: 14
    – Vitality: 16
    – Fortitude: 11
    – Bleed Factor: 59
    – Max Ichor: 18
    – Balance: 62

    Trait:
    – Progenitor’s Fang

    Lou 4:
    – Strength: 18
    – Dexterity: 14
    – Mind: 26
    – Willpower: 18
    – Vitality: 20
    – Fortitude: 13
    – Bleed Factor: 59
    – Max Ichor: 18
    – Balance: 62

    Trait:
    – Shield Of Devotion

    Lou 5:
    – Strength: 22
    – Dexterity: 16
    – Mind: 32
    – Willpower: 22
    – Vitality: 24
    – Fortitude: 15
    – Bleed Factor: 59
    – Max Ichor: 18
    – Balance: 62

    Trait:
    – ???

    Noah 1:
    – Strength: 10
    – Dexterity: 13
    – Mind: 7
    – Willpower: 8
    – Vitality: 10
    – Fortitude: 12
    – Bleed Factor: 46
    – Max Ichor: 14
    – Balance: 44

    Features:
    – No Overburden Effect: Back Attack Stagger Power UP
    – No Conditions: Survive a fatal hit with 1 LP while assimilated if LP is above threshold
    – Strength/Dexterity Margin 5: Attack power increases with consecutive hits (resets on being hit or missing)
    – Trait: Fortitude Booster

    Noah 2:
    – Strength: 12
    – Dexterity: 16
    – Mind: 7
    – Willpower: 9
    – Vitality: 12
    – Fortitude: 14
    – Bleed Factor: 46
    – Max Ichor: 14
    – Balance: 44

    Trait:
    – Twin Blade Mastery

    Noah 3:
    – Strength: 14
    – Dexterity: 19
    – Mind: 7
    – Willpower: 10
    – Vitality: 14
    – Fortitude: 16
    – Bleed Factor: 46
    – Max Ichor: 14
    – Balance: 44

    Trait:
    – Back Attacker

    Noah 4:
    – Strength: 22
    – Dexterity: 31
    – Mind: 7
    – Willpower: 14
    – Vitality: 22
    – Fortitude: 24
    – Bleed Factor: 46
    – Max Ichor: 14
    – Balance: 44

    Trait:
    – ???

    Valentin 1:
    – Strength: 14
    – Dexterity: 14
    – Mind: 8
    – Willpower: 15
    – Vitality: 7
    – Fortitude: 14
    – Bleed Factor: 62
    – Max Ichor: 18
    – Balance: 52

    Features:
    – Strength Margin 10: Max stamina increase
    – Dexterity Margin 10: Bleed factor increase
    – Willpower Margin 8: Stamina recovery slower but maximum Ichor increases
    – Trait: Rune Blade Mastery

    Valentin 2:
    – Strength: 19
    – Dexterity: 19
    – Mind: 8
    – Willpower: 23
    – Vitality: 9
    – Fortitude: 16
    – Bleed Factor: 62
    – Max Ichor: 18
    – Balance: 52

    Trait:
    – LP Drain Recovery

    Valentin 3:
    – Strength: 21
    – Dexterity: 21
    – Mind: 8
    – Willpower: 27
    – Vitality: 11
    – Fortitude: 17
    – Bleed Factor: 62
    – Max Ichor: 18
    – Balance: 52

    Trait:
    – ???

    Josée 1:
    – Strength: 13
    – Dexterity: 10
    – Mind: 12
    – Willpower: 8
    – Vitality: 10
    – Fortitude: 12
    – Bleed Factor: 52
    – Max Ichor: 16
    – Balance: 72

    Features:
    – Any Overburden Effect: Charged Drain Attack Damage UP
    – Mind Margin 10: Faster stamina recovery
    – Strength/Mind Margin 12: Ichor gained from weapon attacks
    – Trait: Strength Booster

    Josée 2:
    – Strength: 19
    – Dexterity: 12
    – Mind: 16
    – Willpower: 9
    – Vitality: 15
    – Fortitude: 14
    – Bleed Factor: 52
    – Max Ichor: 16
    – Balance: 72

    Trait:
    – Two-Handed Sword Mastery

    Josée 3:
    – Strength: 22
    – Dexterity: 13
    – Mind: 18
    – Willpower: 9
    – Vitality: 17
    – Fortitude: 15
    – Bleed Factor: 52
    – Max Ichor: 16
    – Balance: 72

    Trait:
    – Glutton

    Josée 4:
    – Strength: 31
    – Dexterity: 16
    – Mind: 24
    – Willpower: 11
    – Vitality: 25
    – Fortitude: 18
    – Bleed Factor: 52
    – Max Ichor: 16
    – Balance: 72

    Trait:
    – ???

    Lise 1:
    – Strength: 12
    – Dexterity: 18
    – Mind: 20
    – Willpower: 14
    – Vitality: 18
    – Fortitude: 8
    – Bleed Factor: 61
    – Max Ichor: 18
    – Balance: 39

    Features:
    – No Overburden Effect: Chance not to consume items when used
    – Mind Margin 8: LP restored upon defeating enemies
    – Mind Margin 12: Spend HP and LP to act without stamina
    – Trait: ???

    Lise 2:
    – Strength: 13
    – Dexterity: 20
    – Mind: 23
    – Willpower: 16
    – Vitality: 19
    – Fortitude: 9
    – Bleed Factor: 61
    – Max Ichor: 18
    – Balance: 39

    Trait:
    – ???

    Lyle 1:
    – Strength: 12
    – Dexterity: 18
    – Mind: 9
    – Willpower: 7
    – Vitality: 9
    – Fortitude: 15
    – Bleed Factor: 44
    – Max Ichor: 15
    – Balance: 41

    Features:
    – No Overburden Effect: Parry Stagger Power UP
    – Dexterity Margin 10: Increased damage to bloodthirsty enemies
    – Dexterity Margin 15: Increased attack power on perfect dodge (resets on hit/miss)
    – Trait: One-Handed Sword Mastery

    Lyle 2:
    – Strength: 14
    – Dexterity: 26
    – Mind: 11
    – Willpower: 7
    – Vitality: 11
    – Fortitude: 21
    – Bleed Factor: 44
    – Max Ichor: 15
    – Balance: 41

    Trait:
    – Powerful Parry

    Lyle 3:
    – Strength: 17
    – Dexterity: 38
    – Mind: 14
    – Willpower: 7
    – Vitality: 14
    – Fortitude: 30
    – Bleed Factor: 44
    – Max Ichor: 15
    – Balance: 41

    Trait:
    – ???

    Craig 1:
    – Strength: 22
    – Dexterity: 10
    – Mind: 9
    – Willpower: 6
    – Vitality: 18
    – Fortitude: 16
    – Bleed Factor: 24
    – Max Ichor: 14
    – Balance: 76

    Features:
    – No Overburden Effect: Damage reduction when damage exceeds LP
    – Vitality Margin 16: Guard success applies bleed
    – Strength Margin 18: Increased attack power when hit/guard (resets on attack)
    – Trait: Steady Guard

    Craig 2:
    – Strength: 34
    – Dexterity: 13
    – Mind: 9
    – Willpower: 6
    – Vitality: 27
    – Fortitude: 22
    – Bleed Factor: 24
    – Max Ichor: 14
    – Balance: 76

    Trait:
    – ???

    Holly 1:
    – Strength: 9
    – Dexterity: 16
    – Mind: 12
    – Willpower: 23
    – Vitality: 8
    – Fortitude: 13
    – Bleed Factor: 55
    – Max Ichor: 24
    – Balance: 28

    Features:
    – No Overburden Effect: HP restored after defeating enemy
    – Dexterity Margin 12: Increased disruption resistance during Forma charge
    – Vitality Margin 8: Spend HP to use Forma when Ichor is insufficient
    – Trait: Bayonet Mastery

    Holly 2:
    – Strength: 10
    – Dexterity: 18
    – Mind: 13
    – Willpower: 27
    – Vitality: 9
    – Fortitude: 14
    – Bleed Factor: 55
    – Max Ichor: 24
    – Balance: 28

    Trait:
    – Revamped Regeneration

    Holly 3:
    – Strength: 13
    – Dexterity: 24
    – Mind: 16
    – Willpower: 39
    – Vitality: 12
    – Fortitude: 17
    – Bleed Factor: 55
    – Max Ichor: 24
    – Balance: 28

    Trait:
    – ???

    Lycoris 1:
    – Strength: 8
    – Dexterity: 17
    – Mind: 12
    – Willpower: 17
    – Vitality: 12
    – Fortitude: 14
    – Bleed Factor: 65
    – Max Ichor: 20
    – Balance: 34

    Features:
    – No Overburden Effect: Picking up dropped haze grants regeneration uses
    – Mind Margin 12: Partner’s attack power boost
    – Trait: Extended Recovery

    Lycoris 2:
    – Strength: 9
    – Dexterity: 20
    – Mind: 13
    – Willpower: 20
    – Vitality: 13
    – Fortitude: 15
    – Bleed Factor: –
    – Max Ichor: –
    – Balance: –

    Trait:
    – High Summoner

    Camilo:
    – Strength: 21
    – Dexterity: 12
    – Mind: 18
    – Willpower: 10
    – Vitality: 19
    – Fortitude: 12
    – Bleed Factor: 41
    – Max Ichor: 16
    – Balance: 55

    Features:
    – No Overburden Effect: Increased disruption resistance during charge attacks
    – Vitality Margin 15: Gain Ichor exceeding max LP
    – Trait: Gain Ichor on Overheal

    Zenon 1:
    – Strength: 20
    – Dexterity: 20
    – Mind: 12
    – Willpower: 12
    – Vitality: 22
    – Fortitude: 15
    – Bleed Factor: 58
    – Max Ichor: 16
    – Balance: 54

    Features:
    – No Overburden Effect: Attack and defense increase in sunny weather
    – Strength/Dexterity Margin 8: Reduced Ichor cost when LP is depleted
    – No Conditions: Burden distribution among attributes
    – Trait: Halberd Mastery

    Zenon 2:
    – Strength: 25
    – Dexterity: 25
    – Mind: 13
    – Willpower: 13
    – Vitality: 26
    – Fortitude: 19
    – Bleed Factor: 58
    – Max Ichor: 16
    – Balance: 54

    Trait:
    – ???

    Iris 1:
    – Strength: 16
    – Dexterity: 6
    – Mind: 6
    – Willpower: 6
    – Vitality: 15
    – Fortitude: 11
    – Bleed Factor: 28
    – Max Ichor: 12
    – Balance: 81

    Features:
    – Vitality Margin 15: Balance increases while buffed
    – No Burden 0: Strength burden -10
    – Overburden effect: Balance increases when combined HP and LP are low
    – Trait: Vitality Booster

    Iris 2:
    – Strength: 20
    – Dexterity: 7
    – Mind: 7
    – Willpower: 6
    – Vitality: 18
    – Fortitude: 12
    – Bleed Factor: 28
    – Max Ichor: 12
    – Balance: 81

    Trait:
    – Hammer Mastery

    Iris 3:
    – Strength: 32
    – Dexterity: 10
    – Mind: 12
    – Willpower: 6
    – Vitality: 27
    – Fortitude: 17
    – Bleed Factor: 28
    – Max Ichor: 12
    – Balance: 81

    Trait:
    – ???

    Jadwiga 1:
    – Strength: 10
    – Dexterity: 13
    – Mind: 10
    – Willpower: 13
    – Vitality: 8
    – Fortitude: 10
    – Bleed Factor: 57
    – Max Ichor: 20
    – Balance: 52

    Features:
    – Willpower Margin 9: Magic Forma attack power increased
    – Dexterity Margin 9: Reload when out of ammo using HP
    – Overburden effect: Ichor gained on dagger hits
    – Trait: Magic Forma Attack Power Up

    Jadwiga 2:
    – Strength: 10
    – Dexterity: 17
    – Mind: 12
    – Willpower: 21
    – Vitality: 11
    – Fortitude: 13
    – Bleed Factor: 57
    – Max Ichor: 20
    – Balance: 52

    Trait:
    – Bloody Dagger

    Jadwiga 3:
    – Strength: 10
    – Dexterity: 23
    – Mind: 15
    – Willpower: 33
    – Vitality: 15
    – Fortitude: 18
    – Bleed Factor: 57
    – Max Ichor: 20
    – Balance: 52

    Trait:
    – ???

    Frantz:
    – Strength: 10
    – Dexterity: 15
    – Mind: 8
    – Willpower: 12
    – Vitality: 10
    – Fortitude: 12
    – Bleed Factor: 68
    – Max Ichor: 18
    – Balance: 59

    Features:
    – No Conditions: Strength/Dexterity burden +2
    – Overburden Effect: Ranged disruption power increases at low LP
    – Dexterity Margin 5: Max ammo increase
    – Trait: Max Ammo Up

    Josée The Blind Hero:
    – Strength: 17
    – Dexterity: 17
    – Mind: 10
    – Willpower: 5
    – Vitality: 14
    – Fortitude: 14
    – Bleed Factor: 43
    – Max Ichor: 16
    – Balance: 68

    Features:
    – No Conditions: Strength/Dexterity burden +4
    – Overburden Effect: Attack power up after perfect dodge
    – No Conditions: Bloodreaver Blade attack power up
    – Trait: Devotion

    Hero Josée:
    – Strength: 20
    – Dexterity: 14
    – Mind: 20
    – Willpower: 12
    – Vitality: 15
    – Fortitude: 15
    – Bleed Factor: 64
    – Max Ichor: 18
    – Balance: 48

    Features:
    – No Conditions: Strength/Mind burden +6
    – Overburden Effect: Charged drain attack power UP
    – No Conditions: Use Forma at higher Ichor cost
    – Trait: ???

    One-Armed Hero Lyle:
    – Strength: 26
    – Dexterity: 10
    – Mind: 6
    – Willpower: 8
    – Vitality: 19
    – Fortitude: 15
    – Bleed Factor: 35
    – Max Ichor: 15
    – Balance: 67

    Features:
    – No Conditions: Burden +8
    – Overburden Effect: Speed up charged actions
    – No Conditions: Reduce Ichor cost for Absolute Executioner
    – Trait: Way of the Executioner

    Hero Lyle:
    – Strength: 10
    – Dexterity: 30
    – Mind: 8
    – Willpower: 12
    – Vitality: 6
    – Fortitude: 18
    – Bleed Factor: 31
    – Max Ichor: 16
    – Balance: 22

    Features:
    – No Conditions: Dexterity burden +10
    – Fortitude Margin 10: Temporary attack boost after parry
    – No Overburden Effect: Consume LP on attack but gain attack power while LP remains
    – Trait: Ceaseless Assault

    Pioneer Queen Imogen:
    – Strength: 19
    – Dexterity: 22
    – Mind: 6
    – Willpower: 12
    – Vitality: 14
    – Fortitude: 11
    – Bleed Factor: 60
    – Max Ichor: 16
    – Balance: 36

    Features:
    – No Conditions: Burden +5
    – Overburden Effect: Damage to enemies with status ailments increases
    – No Conditions: Resistance to all status ailments increases
    – Trait: Resistance Booster

    Hero Holly The Reaper:
    – Strength: 9
    – Dexterity: 20
    – Mind: 12
    – Willpower: 20
    – Vitality: 12
    – Fortitude: 14
    – Bleed Factor: 51
    – Max Ichor: 19
    – Balance: 40

    Features:
    – No Conditions: Burden in Dexterity/Willpower +5
    – Dexterity Margin 10: Increase disruption resistance during Forma charge
    – No Overburden Effect: Attack power up but Forma use speed down
    – Trait: Overheat

    Hero Holly:
    – Strength: 10
    – Dexterity: 22
    – Mind: 11
    – Willpower: 26
    – Vitality: 10
    – Fortitude: 16
    – Bleed Factor: 63
    – Max Ichor: 23
    – Balance: 47

    Features:
    – No Conditions: Burden in Dexterity/Willpower +6
    – Overburden Effect: Ichor cost reduced when LP is depleted
    – No Overburden Effect: MK Rosenritter attack power up
    – Trait: Recoil Control

    Lost Camilo:
    – Strength: 24
    – Dexterity: 10
    – Mind: 12
    – Willpower: 8
    – Vitality: 26
    – Fortitude: 15
    – Bleed Factor: 47
    – Max Ichor: 11
    – Balance: 70

    Features:
    – No Conditions: Burden in Strength/Vitality +6
    – Vitality Margin 15: Increased disruption resistance during charge attacks
    – No Overburden Effect: Balance remains active even when idle
    – Trait: High Spirits

    Zenon:
    – Strength: 18
    – Dexterity: 18
    – Mind: 22
    – Willpower: 12
    – Vitality: 20
    – Fortitude: 15
    – Bleed Factor: 56
    – Max Ichor: 17
    – Balance: 43

    Features:
    – No Conditions: Burden in Strength/Dexterity/Mind +4
    – Margin 4 for each: Reduced Ichor cost when LP is depleted
    – No Overburden Effect: Forma duration extended
    – Trait: ???

    Iris 1:
    – Strength: 16
    – Dexterity: 6
    – Mind: 6
    – Willpower: 6
    – Vitality: 15
    – Fortitude: 11
    – Bleed Factor: 28
    – Max Ichor: 12
    – Balance: 81

    Features:
    – Margin 15: Balance increases when buffed
    – No Burden 0: Strength burden -10
    – Overburden effect: Balance rises when combined HP and LP are low
    – Trait: Vitality Booster

    Iris 2:
    – Strength: 20
    – Dexterity: 7
    – Mind: 7
    – Willpower: 6
    – Vitality: 18
    – Fortitude: 12
    – Bleed Factor: 28
    – Max Ichor: 12
    – Balance: 81

    Trait:
    – Hammer Mastery

    Iris 3:
    – Strength: 32
    – Dexterity: 10
    – Mind: 12
    – Willpower: 6
    – Vitality: 27
    – Fortitude: 17
    – Bleed Factor: 28
    – Max Ichor: 12
    – Balance: 81

    Trait:
    – ???

    Jadwiga 1:
    – Strength: 10
    – Dexterity: 13
    – Mind: 10
    – Willpower: 13
    – Vitality: 8
    – Fortitude: 10
    – Bleed Factor: 57
    – Max Ichor: 20
    – Balance: 52

    Features:
    – Willpower Margin 9: Magic Forma attack power increase
    – Dexterity Margin 9: Reload out of ammo with HP
    – Overburden effect: Ichor gained on dagger hits
    – Trait: Magic Forma Attack Power Up

    Jadwiga 2:
    – Strength: 10
    – Dexterity: 17
    – Mind: 12
    – Willpower: 21
    – Vitality: 11
    – Fortitude: 13
    – Bleed Factor: 57
    – Max Ichor: 20
    – Balance: 52

    Trait:
    – Bloody Dagger

    Jadwiga 3:
    – Strength: 10
    – Dexterity: 23
    – Mind: 15
    – Willpower: 33
    – Vitality: 15
    – Fortitude: 18
    – Bleed Factor: 57
    – Max Ichor: 20
    – Balance: 52

    Trait:
    – ???

    Frantz:
    – Strength: 10
    – Dexterity: 15
    – Mind: 8
    – Willpower: 12
    – Vitality: 10
    – Fortitude: 12
    – Bleed Factor: 68
    – Max Ichor: 18
    – Balance: 59

    Features:
    – No Conditions: Strength/Dexterity burden +2
    – Overburden Effect: Ranged disruption power at low LP
    – Max Ammo Up: Dex margin 5

    Josée The Blind Hero:
    – Strength: 17
    – Dexterity: 17
    – Mind: 10
    – Willpower: 5
    – Vitality: 14
    – Fortitude: 14
    – Bleed Factor: 43
    – Max Ichor: 16
    – Balance: 68

    Features:
    – No Conditions: Strength/Dexterity burden +4
    – Overburden Effect: Attack power after perfect dodge
    – No Conditions: Bloodreaver Blade attack power up
    – Trait: ???

    Hero Josée:
    – Strength: 20
    – Dexterity: 14
    – Mind: 20
    – Willpower: 12
    – Vitality: 15
    – Fortitude: 15
    – Bleed Factor: 64
    – Max Ichor: 18
    – Balance: 48

    Features:
    – No Conditions: Strength/Mind burden +6
    – Overburden Effect: Charged drain attack power UP
    – No Conditions: Higher Ichor cost Forma use
    – Trait: ???

    One-Armed Hero Lyle:
    – Strength: 26
    – Dexterity: 10
    – Mind: 6
    – Willpower: 8
    – Vitality: 19
    – Fortitude: 15
    – Bleed Factor: 35
    – Max Ichor: 15
    – Balance: 67

    Features:
    – No Conditions: Burden +8
    – Overburden Effect: Speed up charged actions
    – No Conditions: Reduce Ichor cost for Absolute Executioner
    – Trait: Way of the Executioner

    Hero Lyle:
    – Strength: 10
    – Dexterity: 30
    – Mind: 8
    – Willpower: 12
    – Vitality: 6
    – Fortitude: 18
    – Bleed Factor: 31
    – Max Ichor: 16
    – Balance: 22

    Features:
    – No Conditions: Dexterity burden +10
    – Fortitude Margin 10: Temporary attack boost after parrying
    – No Overburden Effect: Consume LP on attack but attack increases while LP remains
    – Trait: Ceaseless Assault

    Pioneer Queen Imogen:
    – Strength: 19
    – Dexterity: 22
    – Mind: 6
    – Willpower: 12
    – Vitality: 14
    – Fortitude: 11
    – Bleed Factor: 60
    – Max Ichor: 16
    – Balance: 36

    Features:
    – No Conditions: Burden +5
    – No Overburden Effect: Increase damage to enemies with status ailments
    – No Conditions: Enhance resistance to status ailments
    – Trait: Resistance Booster

    Hero Holly The Reaper:
    – Strength: 9
    – Dexterity: 20
    – Mind: 12
    – Willpower: 20
    – Vitality: 12
    – Fortitude: 14
    – Bleed Factor: 51
    – Max Ichor: 19
    – Balance: 40

    Features:
    – No Conditions: Burden in Dexterity/Willpower +5
    – Dexterity Margin 10: Increased disruption resistance during Forma charge
    – No Overburden Effect: Attack power up but Forma use speed down
    – Trait: Overheat

    Hero Holly:
    – Strength: 10
    – Dexterity: 22
    – Mind: 11
    – Willpower: 26
    – Vitality: 10
    – Fortitude: 16
    – Bleed Factor: 63
    – Max Ichor: 23
    – Balance: 47

    Features:
    – No Conditions: Burden in Dexterity/Willpower +6
    – Overburden Effect: Ichor cost reduced when LP depleted
    – No Overburden Effect: Attack power temporarily increased
    – Trait: Recoil Control

    Lost Camilo:
    – Strength: 24
    – Dexterity: 10
    – Mind: 12
    – Willpower: 8
    – Vitality: 26
    – Fortitude: 15
    – Bleed Factor: 47
    – Max Ichor: 11
    – Balance: 70

    Features:
    – No Conditions: Burden in Strength/Vitality +6
    – Vitality Margin 15: Disruption resistance during charge attacks
    – No Overburden Effect: Balance remains active when idle
    – Trait: High Spirits

    Zenon:
    – Strength: 18
    – Dexterity: 18
    – Mind: 22
    – Willpower: 12
    – Vitality: 20
    – Fortitude: 15
    – Bleed Factor: 56
    – Max Ichor: 17
    – Balance: 43

    Features:
    – No Conditions: Burden in Strength/Dexterity/Mind +4
    – Margin 4 per attribute: Reduced Ichor cost when LP is depleted
    – No Overburden Effect: Forma duration extended
    – Trait: ???

    Iris 1:
    – Strength: 16
    – Dexterity: 6
    – Mind: 6
    – Willpower: 6
    – Vitality: 15
    – Fortitude: 11
    – Bleed Factor: 28
    – Max Ichor: 12
    – Balance: 81

    Features:
    – Margin 15: Balance increases buffed
    – No Burden 0: Strength burden -10
    – Overburden effect: Balance increases when combined HP and LP are low
    – Trait: Vitality Booster

    Iris 2:
    – Strength: 20
    – Dexterity: 7
    – Mind: 7
    – Willpower: 6
    – Vitality: 18
    – Fortitude: 12
    – Bleed Factor: 28
    – Max Ichor: 12
    – Balance: 81

    Trait:
    – Hammer Mastery

    Iris 3:
    – Strength: 32
    – Dexterity: 10
    – Mind: 12
    – Willpower: 6
    – Vitality: 27
    – Fortitude: 17
    – Bleed Factor: 28
    – Max Ichor: 12
    – Balance: 81

    Trait:
    – ???

    Jadwiga 1:
    – Strength: 10
    – Dexterity: 13
    – Mind: 10
    – Willpower: 13
    – Vitality: 8
    – Fortitude: 10
    – Bleed Factor: 57
    – Max Ichor: 20
    – Balance: 52

    Features:
    – Willpower Margin 9: Magic Forma attack increase
    – Dexterity Margin 9: Reload with HP when out of ammo
    – Overburden effect: Ichor gained on dagger hits
    – Trait: Magic Forma Attack Power Up

    Jadwiga 2:
    – Strength: 10
    – Dexterity: 17
    – Mind: 12
    – Willpower: 21
    – Vitality: 11
    – Fortitude: 13
    – Bleed Factor: 57
    – Max Ichor: 20
    – Balance: 52

    Trait:
    – Bloody Dagger

    Jadwiga 3:
    – Strength: 10
    – Dexterity: 23
    – Mind: 15
    – Willpower: 33
    – Vitality: 15
    – Fortitude: 18
    – Bleed Factor: 57
    – Max Ichor: 20
    – Balance: 52

    Trait:
    – ???

    Frantz:
    – Strength: 10
    – Dexterity: 15
    – Mind: 8
    – Willpower: 12
    – Vitality: 10
    – Fortitude: 12
    – Bleed Factor: 68
    – Max Ichor: 18
    – Balance: 59

    Features:
    – No Conditions: Strength/Dexterity burden +2
    – Ranged disruption at low LP
    – Max Ammo increase

    Josée The Blind Hero:
    – Strength: 17
    – Dexterity: 17
    – Mind: 10
    – Willpower: 5
    – Vitality: 14
    – Fortitude: 14
    – Bleed Factor: 43
    – Max Ichor: 16
    – Balance: 68

    Features:
    – No Conditions: Strength/Dexterity burden +4
    – Attack power after perfect dodge
    – Bloodreaver Blade attack power up
    – Trait: ???

    Hero Josée:
    – Strength: 20
    – Dexterity: 14
    – Mind: 20
    – Willpower: 12
    – Vitality: 15
    – Fortitude: 15
    – Bleed Factor: 64
    – Max Ichor: 18
    – Balance: 48

    Features:
    – No Conditions: Strength/Mind burden +6
    – Charged drain attack power UP
    – Higher Ichor cost Forma use
    – Trait: ???

    One-Armed Hero Lyle:
    – Strength: 26
    – Dexterity: 10
    – Mind: 6
    – Willpower: 8
    – Vitality: 19
    – Fortitude: 15
    – Bleed Factor: 35
    – Max Ichor: 15
    – Balance: 67

    Features:
    – No Conditions: Burden +8
    – Faster charged actions
    – Reduced Ichor for Absolute Executioner
    – Trait: Way of the Executioner

    Hero Lyle:
    – Strength: 10
    – Dexterity: 30
    – Mind: 8
    – Willpower: 12
    – Vitality: 6
    – Fortitude: 18
    – Bleed Factor: 31
    – Max Ichor: 16
    – Balance: 22

    Features:
    – No Conditions: Dexterity burden +10
    – Attack after parry (Fortitude Margin 10)
    – Attack increases while LP remains, at LP cost
    – Trait: Ceaseless Assault

    Pioneer Queen Imogen:
    – Strength: 19
    – Dexterity: 22
    – Mind: 6
    – Willpower: 12
    – Vitality: 14
    – Fortitude: 11
    – Bleed Factor: 60
    – Max Ichor: 16
    – Balance: 36

    Features:
    – Burden +5
    – Increased damage to enemies with status ailments
    – Improved resistance to status ailments
    – Trait: Resistance Booster

    Hero Holly The Reaper:
    – Strength: 9
    – Dexterity: 20
    – Mind: 12
    – Willpower: 20
    – Vitality: 12
    – Fortitude: 14
    – Bleed Factor: 51
    – Max Ichor: 19
    – Balance: 40

    Features:
    – Burden +5 in Dexterity/Willpower
    – Disruption resistance increase during Forma charge
    – Attack power up, Forma use slower
    – Trait: Overheat

    Hero Holly:
    – Strength: 10
    – Dexterity: 22
    – Mind: 11
    – Willpower: 26
    – Vitality: 10
    – Fortitude: 16
    – Bleed Factor: 63
    – Max Ichor: 23
    – Balance: 47

    Features:
    – Burden +6 in Dexterity/Willpower
    – Ichor reduction when LP is depleted
    – Attack power increases temporarily
    – Trait: Recoil Control

    Lost Camilo:
    – Strength: 24
    – Dexterity: 10
    – Mind: 12
    – Willpower: 8
    – Vitality: 26
    – Fortitude: 15
    – Bleed Factor: 47
    – Max Ichor: 11
    – Balance: 70

    Features:
    – Burden +6 in Strength/Vitality
    – Disruption resistance during charge attacks
    – Balance persists when idle
    – Trait: High Spirits

    Zenon:
    – Strength: 18
    – Dexterity: 18
    – Mind: 22
    – Willpower: 12
    – Vitality: 20
    – Fortitude: 15
    – Bleed Factor: 56
    – Max Ichor: 17
    – Balance: 43

    Features:
    – Burden +4 across attributes
    – Reduces Ichor cost when LP is depleted
    – Forma duration extended
    – Trait: ???

    Iris 1:
    – Strength: 16
    – Dexterity: 6
    – Mind: 6
    – Willpower: 6
    – Vitality: 15
    – Fortitude: 11
    – Bleed Factor: 28
    – Max Ichor: 12
    – Balance: 81

    Features:
    – Balance increases when buffed
    – Strength burden -10 with no overburden
    – Balance boosts when HP and LP are low
    – Trait: Vitality Booster

    Iris 2:
    – Strength: 20
    – Dexterity: 7
    – Mind: 7
    – Willpower: 6
    – Vitality: 18
    – Fortitude: 12
    – Bleed Factor: 28
    – Max Ichor: 12
    – Balance: 81

    Trait:
    – Hammer Mastery

    Iris 3:
    – Strength: 32
    – Dexterity: 10
    – Mind: 12
    – Willpower: 6
    – Vitality: 27
    – Fortitude: 17
    – Bleed Factor: 28
    – Max Ichor: 12
    – Balance: 81

    Trait:
    – ???

    Jadwiga 1:
    – Strength: 10
    – Dexterity: 13
    – Mind: 10
    – Willpower: 13
    – Vitality: 8
    – Fortitude: 10
    – Bleed Factor: 57
    – Max Ichor: 20
    – Balance: 52

    Features:
    – Willpower Margin 9
    – Dexterity Margin 9
    – Ichor gained on dagger hits
    – Trait: Magic Forma Attack Power Up

  • How to Complete the True Ending in Code Vein 2 with Solving

    How to Complete the True Ending in Code Vein 2 with Solving

    From the beginning of Code Vein 2, your main mission is clear: defeat the heroes protecting the seals on the Resurgence so you can destroy it for good. This will involve quite a bit of time travel along the way.

    The story has some surprises at the end, but it mainly focuses on what will happen to the Resurgence and the Luna Rapacis that contains it. The outcome can develop in several different ways.

    How Many Endings Are There?

    Code Vein 2 features three endings to unlock. These are:

    • A Hero’s End
    • Luna Fraterna
    • Miraculous Bonds

    The default ending is A Hero’s End, which you get by simply playing through the game. Luna Fraterna and Miraculous Bonds are like expansions based on that original ending instead of being completely separate.

    Can You Unlock Every Ending in a Single Playthrough?

    Yes. One of the best parts about Code Vein 2 is that you can unlock all endings in just one run. It’s actually expected that you do so. The process isn’t complicated, even though the game may hint at otherwise.

    After you finish the first ending, you can keep playing and go for the second. Unlocking the third ending takes a bit more effort. Once you beat the second ending and reload your save, you can start New Game Plus. But don’t do this if you haven’t yet met the conditions for the final ending.

    Every Ending and How to Unlock It

    A Hero’s End

    This is what you’ll automatically get first, no matter your choices. It happens in Luna Rapacis after defeating Hero Valentin at the end. Once you finish the fight and cutscenes, the game ends. You can still go back and complete any missed tasks.

    Luna Fraterna

    After finishing A Hero’s End, Zenon appears, hinting there’s more to the story. He replaces Lou on the main menu, pointing at the ‘Continue’ button. You need to press that to progress toward the second ending. Be careful not to overwrite Zenon’s continue save; if that happens, just face Hero Valentin again to fix it.

    Once loaded, you can travel back in time to the start of the Upheaval, climb the Sealing Spire, and fight a unique boss at the top. Afterward, you’ll see the Luna Fraterna ending. You still have the option to go back and do unfinished content even after seeing this ending.

    Miraculous Bonds

    This is the final ending and is not automatically unlocked. After completing Luna Fraterna, you return to the main menu where Lou is once again present. If you meet the right conditions, a new button labeled “Rescue Lou” will appear. Clicking it starts a short, separate campaign that carries over your level and gear from the Luna Fraterna ending.

    To unlock this ending, you must complete all the Timeline Shift Decision quests across the entire game:

    • Noah
    • Josée
    • Holly
    • Lyle

    These quests don’t have time limits, so you can go back and finish them even during the final phase of Luna Fraterna. Having all these completed will open the Rescue Lou campaign and unlock the Miraculous Bonds ending. If you didn’t do all the quests before, just beat the boss the second time to unlock it.

    The Rescue Lou campaign is separate from your main save, so items and Boosters earned there won’t transfer back. However, you can always start a new Game Plus run on your main file as you wish.

  • Strategies for Completing Hero Zenon in Code Vein 2

    Strategies for Completing Hero Zenon in Code Vein 2

    The Hero Zenon is quite different from other bosses you’ve faced in Code Vein 2. He’s less sorrowful, more aware of himself, and very eccentric. When you fight him as a boss, you’ll notice he’s not like the others—he’s unique in many ways.

    He’s also one of the tougher bosses, and reaching him is a bit more challenging than usual. Let’s go over where you can find him and how to defeat him for good.

    Where is Hero Zenon Fought?

    Hero Zenon is located on his own prison island, called Insula Carcere. This island has been his prison since the Resurgence 100 years ago. Unlike other heroes, finding his cocoon is a real challenge. His cocoon is at the very end of Insula Carcere, which is basically a giant dungeon. To make things harder, Lavinia insists on accompanying you, meaning you can’t switch partners. She also can’t be summoned into battle, so you’ll be stuck in a powered-up, individual state without her help.

    Once you reach the end of Insula Carcere and defeat the boss guarding Zenon’s cocoon, you can approach it. However, you don’t have the key yet. You need to travel to Zenon’s era beforehand and help him first to get the key. After completing that, you’ll finally be ready to face Hero Zenon himself.

    Hero Zenon’s Moveset

    Hero Zenon comes in two phases, with the second extending from the first. Most of his attacks involve hammer swings, so once you learn their timing, the fight becomes easier.

    Phase One

    • Hammer Turbo Rush: He rushes across the arena three times with his hammer, trying to crash into you. The final rush includes a spinning attack.
    • Shield Bash: He dashes forward and slams you with his shield.
    • Hammer Swings: Wide swings with his hammer, usually twice.
    • Shield Slam: He pulls back his shield and slams it down, creating a powerful shockwave.
    • Retreating Swing + Follow-Up: Spins backwards with his hammer before lunging with a wide swing or slam that moves him slightly forward.
    • Slam, Swing, Turbo Swing: He slams his hammer, swings wide, then quickly executes a powerful follow-up swing.
    • Leaping Slam: Jumps into the air and crashes down onto you.

    Phase Two

    • Orbiting Sun: At the start of this phase, he plants his hammer and summons a small sun orbiting the arena edges. Touching it causes heavy damage.
    • Turbo Swings: Faster, turbo-charged hammer swings.
    • Foot Slam: He stomps, causing damage in a radius around him.
    • Finger Lasers: Fires targeting beams from his fingers, which can be dodged if timed correctly.
    • Spreading Flame: Slams his hammer into the ground, spreading fire waves outward. He can do this twice for bigger damage.
    • Big Bang: Teleports to the arena’s center, creates a celestial scene, and summons several miniature suns orbiting rapidly. They grow larger, then shoot in four lines from the center. After this, he stands still for a moment, giving you a chance to attack.
    • Fire Swing: Performs a wide swing with his hammer, spreading fire across the area.

    The main damage from his hammer comes from its head, so staying close often avoids damage altogether, though this isn’t guaranteed. His second phase features much quicker turbo swings, making it more difficult to avoid hits—timing your dodges is critical.

    How to Defeat Hero Zenon

    In the first phase, Zenon fights with a hammer and shield, resembling a bull of Minos but with a very Japanese look in his past form. His wide hammer swings can sometimes miss if you’re close, so try to stay near him. His shield bash and charge moves are strong but worth risking to do damage whenever you can.

    When his HP drops to about 60–70%, Zenon switches to his second phase. He drops the shield and replaces his bull head with a golden headpiece adorned with icons of his wife. This phase is tougher. His attacks speed up, and he gains ranged attacks like laser beams from his fingers and the orbiting sun. Charge attacks are gone, but dodging upstairs and around him becomes necessary.

    His attack speed increases, so you’ll need to be constantly dodging. Position yourself carefully—getting close is still good but be ready to retreat quickly, especially when he performs foot slams or Flame Spread attacks. His “Big Bang” attack is particularly dangerous; the best strategy is to stay still and dodge the incoming suns, which move so fast that moving around makes avoiding them harder.

    Be prepared for a tough fight that might take several tries, but defeating him grants you the Hero Zenon Blood Code, a valuable reward.

  • How to Beat One-Armed Hero Lyle in Code Vein 2: Completing & Solving Techniques

    How to Beat One-Armed Hero Lyle in Code Vein 2: Completing & Solving Techniques

    Lyle, one of the heroes from past stories in Code Vein 2, is the most distant and difficult to approach. He owes a debt to the Dawn Chorus, a mercenary group that saved him, but he is determined never to put them at risk. To protect himself and keep others away, he has built a tough exterior. It’s especially painful that by the Present Era, his loneliness prevented him from asking for help, leading to the loss of both the Dawn Chorus and his arm. This results in a very tragic boss fight.

    Where Do You Fight One-Armed Hero Lyle?
    In the Corroded Scar area, you find yourself at Forward Base One, with Lyle’s cocoon sitting right in the middle of the camp. You can come across this very early in the game, but you won’t be able to interact with it until much later. After visiting Lyle’s Era and completing all its objectives, you’re free to unseal his cocoon and lay him to rest after a century of suffering.

    Lyle’s Moveset
    Lyle’s fight style in this form is slow, heavy, and bulky compared to the Lyle you fought alongside before. His strikes are powerful, but he still maintains a surprising speed, along with lightning elements in all of his attacks.

    Phase One Commands:

    • Dragging Slash: He drags his massive sword along the ground and chases you briefly before swinging.
    • Heavy Swing Combo: Slow but strong swings near him.
    • Delayed Swings: Multiple slashes with long delays, but with wider reach.
    • Heavy Overhead Slam: He winds up and slams his sword down in front of him.
    • Stabbing Dash: He points his sword forward and dashes quickly toward you, sometimes followed by a downward slash.

    Phase Two Changes:

    • Leaping Slam: Lyle jumps into the air, then slams down, causing shockwaves and lightning around him.
    • Trio Slash Electric Wave: He slashes with each weapon, sending out electrical waves with each strike.
    • Lightning Bolts: He stabs his sword into the ground, calling down lightning that chases you.
    • Dragging Slash + Downward Slash: Combines his first-phase drag with downward slashes from all his arms—ideally dodged to the sides.
    • Double Swing And Stab: Swings quickly twice with all weapons, then stabs forward with all three.
    • Slam And Outward Slash: Performs a downward slam followed by outward slashes, best avoided by dodging into the attacks.
    • Furious Slashes: Enters a frantic attack mode, wildly hitting with all weapons while following you—hard to dodge or block.
    • Retreating Spin: Spins while slashing, then moves away.

    In his first phase, Lyle isn’t very fast and doesn’t use lightning, making him easier to manage. His biggest challenge is learning the timing of his moves, as some slashes have slight delays. In the second phase, he speeds up, becomes more aggressive, and adds lightning-based attacks to his moves, increasing his threat level significantly. Since many of his strikes are too powerful to block, dodging is essential—preferably with at least a medium-sized dodge for safety, as even high stamina may not be enough to withstand certain attacks. Keeping a companion out helps draw some of his more damaging attacks, and having ranged options like Bayonet or magic spells makes the fight easier. Defeating him rewards you with the One-Armed Hero Lyle Blood Code.

  • How to Beat Holly’s Second Boss Battle in Code Vein 2 by Completing and Solving

    How to Beat Holly’s Second Boss Battle in Code Vein 2 by Completing and Solving

    When you first arrive at the Undead Forest in Code Vein 2, your stay with the doctor and hero Holly is cut short. Her time period is too unstable for you to stay, and you are quickly ordered to eliminate her in the Present Era before you get a chance to truly understand her.

    Luckily, returning to her era later is a straightforward process, allowing you to create a better outcome for her. Eventually, Holly will become a seal to prevent the Resurgence, which means you’ll have to face her again. Just be aware that this second battle will be different from the first.

    Where Do You Fight Hero Holly?

    When Holly’s history changes, her cocoon’s location also shifts. In this altered Present Era, the Sanatorium remains in excellent condition and is inhabited by everyone. No longer isolated in despair, her cocoon appears in a place that is much more meaningful to her.

    Before interacting with her cocoon, visit Camilo to get updates on the changes since you last saw them nearly 100 years ago. Don’t forget to pick up a key item on the desk — Lise’s Hair Ornament. This item is crucial for modifying Josée’s history.

    Once you’ve taken care of these steps, proceed to Holly’s cocoon to complete the mission you came for.

    Hero Holly’s Moveset

    When she emerges from her cocoon, which looks much more elegant than before, Holly appears very different from the reaper you previously fought. The fight is entirely new, and you’ll need to learn her moves all over again, including avoiding a lot of bullets. Here are all of her attack patterns:

    | Move | Description |
    | — | — |
    | Skating Pirouette Dash | Holly dashes toward you with a spinning attack. |
    | Retreating Skate Dash | She does a quick upward kick then skates away from you. |
    | Advancing Skate Bullet Whirlwind | She leaps toward you, spinning while firing bullets in all directions upon landing. |
    | Skates Sweeping Combo | While close, she performs three sweeping attacks with her skates. |
    | Gatling Combo | Holly stands still and fires her gatling guns, either focusing directly or spreading shots in an arc. She can do this up to three times consecutively. |
    | Crouched Bullet Storm | She crouches and shoots forward with both gatling guns, then spreads the shots left and right. Moving in can be dangerous if hit even once; she’s stationary during this attack. |
    | Surrounding Icicle Burst | Holly summons a circle of icicles around her that can knock you back. |
    | Skating Slam Combo | She skates across the arena, dashes toward you, jumps, spins, then slams down, causing an ice burst at impact. This cycle repeats three times, with the last slam combining a spinning bullet attack. |
    | Skating Shots | While skating, she locks onto you and fires while moving around. |
    | Snow Storm Bullet Frenzy | Holly summons a snowstorm while firing her gatling guns in short bursts, locking onto you. Using a shield or good timing to dodge is recommended. |
    | Snow Storm Bullet Gallery | She creates a wider arc of gatling gun fire from a crouched position, covering more area but without locking on. |

    Holly is a very agile boss who doesn’t stay still long, making a ranged weapon like the Bayonet or Formae useful for hitting her from a distance. Parrying isn’t effective here, so bringing a shield for blocking bullets is best. Be careful with heavy rolls, as they can leave you vulnerable to her fast attacks.

    How To Beat Hero Holly

    The advantage in this fight is that Holly has only one phase. Most of her attacks, including the snowstorm, are used mainly when her health dips below 50%. Otherwise, she remains consistent in her behavior.

    She’s very quick and constantly moving, so managing your stamina is crucial; running out will leave you exposed. It’s best to let her come to you so you can land multiple hits with stamina conservation when she is near.

    Holly really favors her gatling guns, and her shots stagger more than expected, often locking you in place if your Balance isn’t high enough. Equipping a shield helps you block her bullets. Fortunately, she doesn’t use any status effects, but she is vulnerable to some, like Slow — making Lou a helpful companion — and Forma like Idris’ Conceit Bequeathed.

    After defeating her, you can purchase the MK Rosenritter Bequeathed Forma from Jadwiga’s shop back in MagMell.

  • How To Beat Metagen Remnant in Code Vein 2 by Completing and Solving

    How To Beat Metagen Remnant in Code Vein 2 by Completing and Solving

    As you progress through Code Vein 2, you’ll see the world on the verge of the Resurgence’s rebirth. You’ll also help past heroes defeat it once and for all, on your own schedule. The first hero you help is Josée. She faces the creature that killed her sister, along with all the emotional pain that comes with it. Here’s how to help Josée defeat her nightmares.

    The first Metagen Remnant you’ll confront appears at the very end of the Sunken Pylon in Josée’s past timeline. This is the final goal in her quest, so you can’t miss it. Even though it’s the key battle, you will face other Metagen Remnants later in different areas, like the Undead Forest. They are all the same fights, just in different locations. The tactics in this guide will work for all of them.

    The fight with the Metagen Remnant only has one phase. It gets a little more aggressive when its health drops, but it mainly keeps the same behaviors and attacks throughout the battle. Here are all of its attacks to help you prepare:

    • Fireballs: When you’re far enough away that its leap attack can’t reach, it spits fireballs at you.
    • Leaping Slam: It jumps high into the air and then crashes down using all four arms.
    • Big Arm Slam: Standing in front, it slams down with one of its large arms. It uses one arm at a time and the hit zone is small.
    • Big Arm Double Swipe: It swings its large arm forward and then backward in a wide arc. You can be hit on the back swing if you dodge into the attack.
    • Four Arm Slam + Follow-up: After a brief pause, it slams down with all four arms. When its health is low, it might then do a quick spread attack with its arms.
    • Continuous Slams: It slams the ground with one big hand, then the other, then repeats with the first hand after a pause.
    • Small Arm Swipes: Rarely, it does quick quick swipes with its small arms. The range is short.
    • Acid Spill: As it moves, acid leaks around it, mostly behind. This causes an acid status effect, so avoid standing in it too long.

    Most of its attacks rely on its large arms. The boss is slow enough that you can usually react to everything. It doesn’t have many attacks that throw you back once you’re close enough, making it fairly straightforward to fight.

    Defeating the Metagen Remnant is actually quite simple. Any weapon works, but heavier weapons like hammers can do extra stagger damage, though this isn’t necessary. Keep your weapons upgraded so you can finish faster, since it has a lot of health. Stay close to the boss; their head is the weak spot and takes the most damage. They tend to face you most of the time, so aiming for the head is the best strategy.

    It’s helpful to team up with Josée to increase your damage. She won’t pull aggro, and she can revive you if you get knocked down, even when you’re allied with her. For almost every attack, dodging into it is the best move. This helps you avoid damage and keeps you close to the head. Be especially wary of the Big Arm Double Swipes and Four Arm Slam with its follow-up. Dodge away from the swinging arms for the first, and for the second, dodge into the attack but be ready for the follow-up, which is sometimes skipped.

    Most importantly, keep attacking the boss and aim for the head. Since its attacks can’t be parried, focus on dodging. If you want to keep some distance, fully charged bow shots to the head do decent damage as well.

  • Solving the Star Puzzle: The Code in No Sleep For Kaname Date

    Solving the Star Puzzle: The Code in No Sleep For Kaname Date

    Ota Is Trapped in the Elevator

    In this part of No Sleep for Kaname Date, Ota is stuck inside an elevator. Iris and Moma, each on different floors, need to figure out how to help him escape from this creepy situation.

    Getting the Code to Open the Elevator

    At the start, you control Ota and need to give Iris a code. This helps her unlock a safety latch on the wall, which might lead to an exit. Before proceeding, make sure to grab an important item that you’ll need later.

    How to Access the Star Puzzle

    Later, after Moma joins the game, you’ll need to have Ota give Moma the Iris card. Then, Moma can go to the vending machine and buy a bottle of rubbing alcohol. Use it to peel off the sticker from the card.

    Keep the Iris sticker. Return to the elevator and give Ota the Strange Code Card through the small crack at the bottom of the doors. Switch to Ota and use this card on the slot at the bottom of the elevator’s number keypad. This reveals the code 1380.

    Use this code to open the safe inside the elevator, where you’ll find a new card and a button labeled “6”. Use that button in place of the sixth-floor button on the keypad, then press it to go to the sixth floor.

    Star Puzzle Code Solution

    When you regain control of Ota, you’ll need to take an item from the puzzle — an ammo magazine for a weapon he doesn’t have. Focus on the star symbol surrounded by six semicircles of different lengths.

    Back on Iris’ floor, she needs a six-digit code to unlock a wall latch with the same star symbol. The numbers on the chart only show one and six, but they actually represent how much each semicircle is filled: one is the shortest, and six is almost a full circle. A big blue arrow points to the sixth line, which is very important for solving the puzzle.

    Assign each semicircle a number between one and five based on how complete the circle is. The outermost circle is the first, and the innermost is the last. The order of these rings gives you the code needed to open the star safe.

    How to Solve the Star Puzzle

    This process can be tricky, as you need to remember the numbers related to each semicircle. Once you’ve assigned numbers, read from left to right along the blue arrow, starting with the outermost circle and ending with the innermost.

    The final solution for the star puzzle, which opens Iris’ safe, is 512436.

  • Half-Life 3 Detectives May Have Found Clues in Steam Code

    Half-Life 3 Detectives May Have Found Clues in Steam Code

    Evidence suggesting the existence of Half-Life 3 continues to mount, with fans claiming to have found indicators of the game’s presence in Steam’s backend code. Recently, numerous hints have arisen that could point towards this much-anticipated sequel. However, after experiencing countless letdowns over the last two decades, we recommend approaching this information with a healthy degree of skepticism.

    A user on the Valve subreddit, u/Relevant_Basis5444, noted that Valve lists two games under Upcoming Releases, yet only Deadlock is currently visible. This observation sparked discussions among users, leading many to confirm the listing, while some indicated that archives show only one upcoming title as of December 29. It’s worth mentioning that this could potentially be a glitch.

    Other forum members speculated that the unannounced game might be In the Valley of the Gods by Campo Santo, the studio behind Firewatch, but it has a separate Steam page that doesn’t tie back to Valve.

    Artwork commemorating the 25th anniversary of the original Half-Life.
    Valve

    The prevailing theory among fans is still the possibility of Half-Life 3, but this time the excitement may be justified. Earlier this year, Mike Shapiro, the voice actor for G-Man in Half-Life 2, posted a cryptic message hinting at an unexpected surprise. In November 2023, Valve addressed the fate of the awaited Half-Life 2: Episode 3, and prior to that, data miners discovered snippets of code that seem connected to a new, yet-to-be-revealed title.

    Another voice actor, Natasha Chandel, made a reference to “Project White Sands,” a codename that fans connected to Black Mesa, the setting of the Half-Life series. Although that mention has since been removed from her credentials, fans cite it as additional evidence that something is brewing behind the scenes.

    Half-Life 2 marked its 20th anniversary last year, and this year sees the fifth anniversary of Half-Life: Alyx. With anticipation and discussions intensifying, it indeed seems like an opportune moment for another release from Valve.

    Stay updated with weekly insights on the technology behind PC gaming


    Check your inbox!

  • Marvel Rivals: Iron Man’s Armor Model 42 Costume Blueprint

    Marvel Rivals: Iron Man’s Armor Model 42 Costume Blueprint

    With the launch of Season 0 in Marvel Rivals, fans of the game can enjoy a host of new features, including heroes, skills, and exciting cosmetic items. Additionally, Iron Man enthusiasts have a special treat waiting for them in the inaugural season.

    After downloading and starting up Marvel Rivals, you can get the Armor Model 42 costume for Iron Man. This outfit is completely free and can be claimed and equipped in just a few minutes.

    How to Get the Iron Man Armor Model 42 Cosmetic


    To claim and put on this outfit for Iron Man, first launch the game and head to the main menu. From the home screen, look for the tab in the top right corner. This area allows you to access settings, exit the game, and reach customer support.

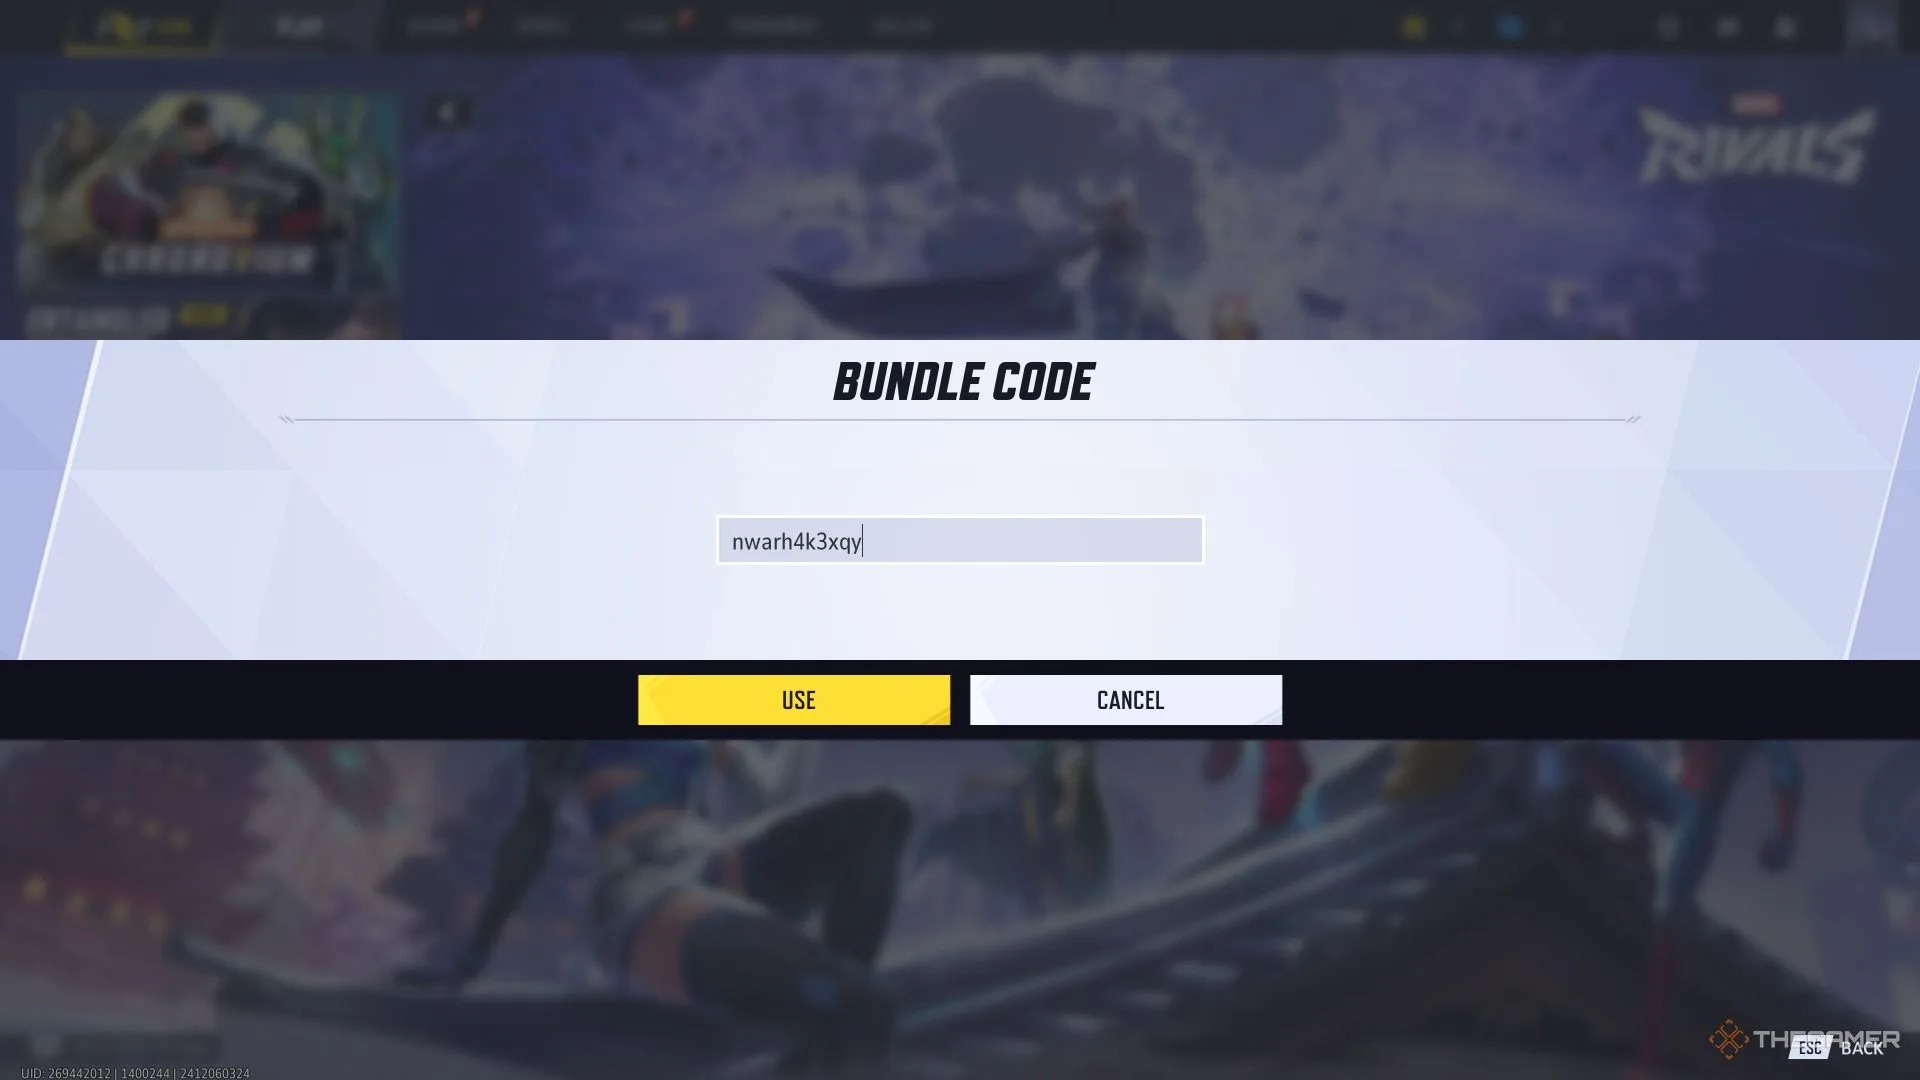
    In this section, find the option labeled “Bundle Code.” When you click on it, an empty box will appear where you can enter the code to claim the outfit. Some players on PC might find that they cannot copy and paste the code, requiring them to type it in manually.

    Steps to Claim and Equip the Costume

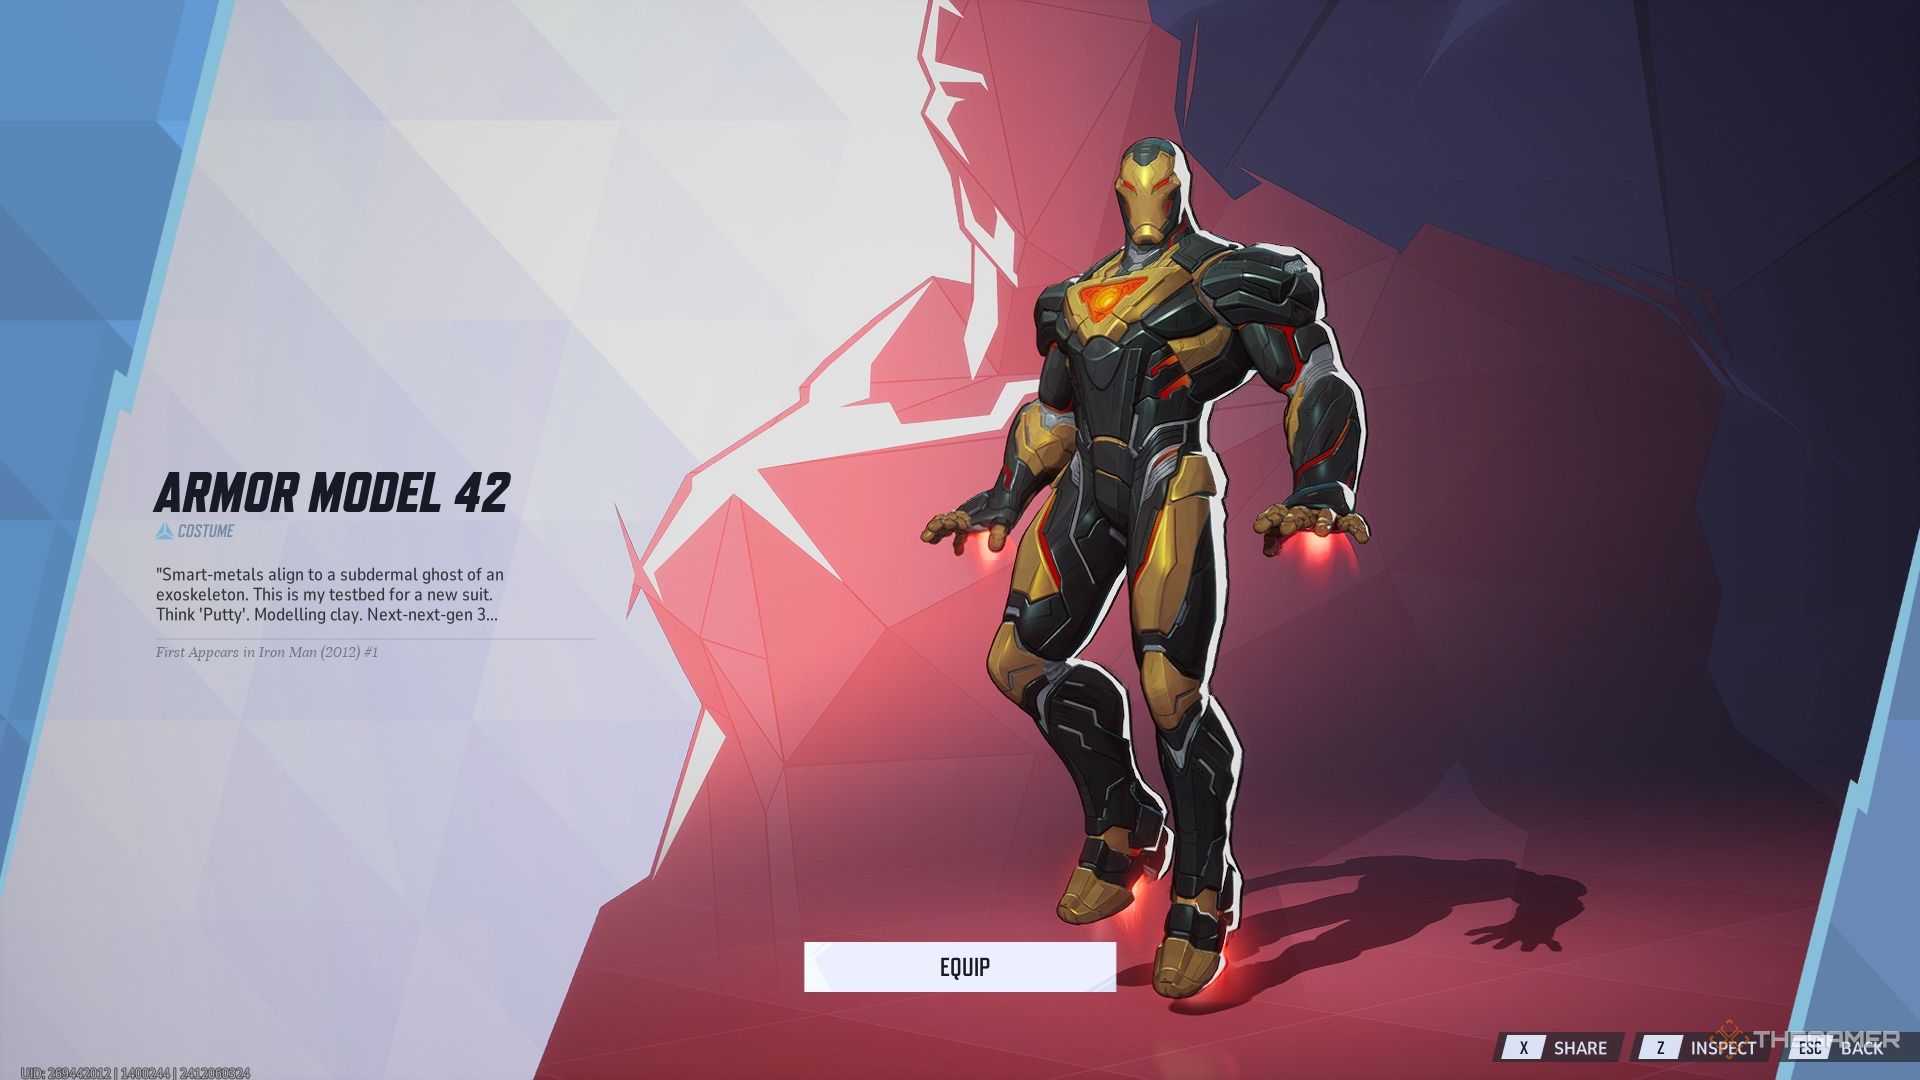
    Iron Man Armor Model 42 in Marvel Rivals.

    Once you’re at the empty box, simply enter the code “nwarh4k3xqy.”

    After a moment, the code will be processed, and you’ll receive a notification about your new skin. Enjoy a cool animation featuring Iron Man as you add the costume to your collection.

    At this point, you’ll have the option to equip the costume right away. If you miss this moment, just navigate to the cosmetics section in the game’s menu to find the Armor Model 42 outfit for Iron Man. It’s a good idea to check this out before hopping into a match. Why not practice with it in training mode first before going head-to-head with other players?

    If the costume doesn’t appear in your first match, don’t panic—the cosmetic should show up after a game or two.