الوسم: answers

  • All Correct Answers for Otto’s Rules of the West Completing Quiz in Far Far West

    All Correct Answers for Otto’s Rules of the West Completing Quiz in Far Far West

    When you arrive at the Canyon in Far Far West and begin your mission, you’ll meet Otto at Otto Ranch & Co. He’ll give you quests for the area. Otto’s main concern is making sure you operate a horse legally, so you’ll need to get a license to avoid riding around in Far Far West without a permit.

    This involves taking a written test, which you must pass by answering Otto’s driving questions. Since Otto wrote the quiz himself, the answers might not be what you’d expect. Here are all the answers to his quiz questions.

    Once you talk to Otto, you’ll be offered a choice of quests. The first one, The Rules of the West, is the written exam for your rider’s license. Select this option, click start, and follow Otto outside. You’ll step onto the side of a building where a screen will lower, displaying multiple-choice questions to answer. To pick an answer, approach the buttons on the platform’s edge and press the one that matches your choice. There are 20 questions in total, and you need to answer at least 15 correctly to pass.

    Below are all the questions and answers from Otto’s quiz:

    | Question | Answer |
    |—|—|
    | A harmless tumbleweed rolls across your path. What do you do? | I spur my horse and ride it down. |
    | A cow stops you and asks for your mount’s papers. What do you do? | No way, I’m going too fast to get caught. |
    | A bandit tries to horse-jack you at a crossroads. What does the code say? | The code requires an official duel, even at 2 a.m. |
    | Wearing a seatbelt is mandatory while riding. How do you strap in? | As long as my hat stays on, nothing else really matters. |
    | How do you make sure you’re on the right path? | I don’t follow paths. I make my own. |
    | 1 in 5 horse accidents is caused by booze. What does that tell you? | 4 out of 5 accidents are caused by sober hunters. |
    | You arrive at an intersection at the same time as another rider. Who has the right of way? | Whoever has the bigger caliber goes first. |
    | Your horse is running low on energy. What do you give it? | The souls you just ripped from your enemies. |
    | Night falls, and you can’t see well. What do you do? | I shoot into the air every 5 seconds to light the way and keep moving. |
    | A man in striped clothes with a ball and chain calls out from the roadside. What do you do? | There’s a bounty on his head, so I take him to the sheriff. 1,000 gold ain’t nothin’. |
    | Which of these road users am I legally allowed to run over? | Cryptids and marauders. What are they even doing on the road anyway? |
    | How do you brake on your robot horse? | I jump off the saddle with style. |
    | A reckless rider passes you on the right. What do you do? | Yeehaw, now that’s a real cowboy! |
    | You see a post with ghostly skulls hanging from it. What does it mean? | Cryptics ahead. Time to start shooting. |
    | You enter town. When are you allowed to “honk” (whistle through your fingers)? | Because you feel like it, it’s stylish, and you want attention. |
    | Your mount’s reverse sensor isn’t working. How do you back up safely? | A real cowboy never backs up. |
    | You arrive at the Tired Horse Saloon. How do you park? | I don’t tie my horse. I trust it. It won’t go anywhere without me. |
    | A convoy moves slowly and blocks the road. Can you lane split with your horse? | Yes, I’m a fearless cowboy. |
    | You accidentally trigger a storm with your horse. What do you do? | I deal with my teammates’ judgment first, then the enemies. |
    | You’re about to pass a Cryptic Grunt. Where are its blind spots? | Why bother? I blow it up. |

    You need to answer at least 15 questions correctly out of the 20. Once you pass, you’ll see a notification that the quest is complete.

  • The Ambition in the Ruins: Completing and Solving in Crimson Desert

    The Ambition in the Ruins: Completing and Solving in Crimson Desert

    If you’ve had trouble leaving Hernand in Crimson Desert, you’re not alone. Many players spend time completing quests in the starting area before moving forward.

    Certain quests in Hernand, like Ambition in the Ruins, require you to progress the story and meet specific conditions before they become available. Here’s how to begin Ambition in the Ruins, so you can catch a thief and make some good silver in the process.

    How to Start Ambition in the Ruins

    To unlock Ambition in the Ruins, you need to have finished the quest “The Weight of Knowledge” under the Hernand Commissions Faction.

    Once that’s done, look for the quest marker to start Ambition in the Ruins. The quest begins near Calphade Castle, northwest of Deepfog Basin. You’ll need to speak to a Calphadean Defender by a checkpoint along the road to start.

    The defender will describe a recent theft and tell you there are five people to question:

    • Robert, the overseer
    • Adeline, the nun
    • Malluk, the military supply officer
    • Helmut, the blacksmith
    • Caspar, the merchant

    This also starts the second quest in the chain, Search for Leads. When you’re ready, head north of Calphade Castle, through a field, to locate and question Robert.

    After speaking to Robert, you’ll learn about Ella, the workers’ representative, who is a sixth person to question. Follow this order for questioning:

    • Head west of Robert to find Caspar.
    • Go to the far east near Deepfog Basin to speak with Malluk.
    • Return to the first defender and speak to Ella near the mill.
    • Head east about 100 meters to question Adeline in the cemetery.
    • Travel 550 meters southeast to question Helmut, the blacksmith.

    Once all suspects have been questioned, the final quest, Deduction and Revelation of the Culprit, begins.

    What Are the Correct Answers?

    Go back to the Calphadean Defender you initially spoke with. The correct responses during the conversation are:

    1. What did the supervisor say?
      Answer: The quartermaster and merchant are suspicious.

    2. About Sister Adeline?
      Answer: The workers and blacksmith are working till dawn.

    3. Regarding the quartermaster?
      Answer: He didn’t look too happy with Caspar.

    4. Leads from Caspar?
      Answer: The lad seemed troubled, with all the iron coming from who knows where.

    5. Have you spoken with Ella?
      Answer: The supplies they received were in poor condition.

    6. What about Helmut?
      Answer: He seems proud of the work he does.

    After giving the correct answers, it will be clear that Helmut is the culprit. You’ll need to head 444 meters south to find and confront him.

    Helmut will be in the middle of a deal. Interrupt him, tie him up, then escape using the eastern road, riding back north past the castle to the gate where Robert will be waiting.

    Rewards for Completing Ambition in the Ruins

    By handing Helmut over, you’ll receive your reward from Robert:

    • Kinetic Dolphin: A piece of furniture valued at 24.70 silver—useful if you like decorating your home but not necessary.

    Perfect investigative work here not only catches the thief but also earns you some Silver and useful items.

  • Crimson Desert: The Complete Guide to Solving the Harvest of Greed

    Crimson Desert: The Complete Guide to Solving the Harvest of Greed

    Crimson Desert mainly emphasizes Kliff’s combat skills, but there are some chances for you to think like a detective and help investigate local crimes. One such case appears in the Harvest of Greed questline, which you can access later in the game when you travel to the northeast part of Pywel.

    When you arrive at the City of Tomasso, you’ll encounter a local guard captain who needs your help finding a thief who stole valuable Desert Melons—an important water source for the town’s residents. Here’s what to say to the guard captain during the Harvest of Greed.

    Starting the Harvest of Greed Questline

    You’ll find this quest along the southern edge of Tomasso, in Tashkalp. The first step is called Missing Desert Melons. To begin, speak to the Tomasso guard captain. He’ll send you to a man named Hajiv, who has more details about the theft.

    Hajiv will then give you a list of people to question:

    • Liam
    • Padir
    • Nasir
    • Marrow
    • Trenton

    This kicks off the next part: Investigate.

    Investigating the Suspects

    • Head to the farm’s eastern side to talk with those involved in the melon theft.
    • Travel north to question Marrow.
    • Then go to the southeast part of town to speak with Trenton.

    Once you’ve spoken with everyone, the final part, Unraveling Clues, begins.

    Correct Answers for Unraveling Clues

    Talk to the guard captain, who will question you about your findings. Here are the best responses to his questions:

    1. What did Hajiv say?
      • The guards never leave the warehouse unprotected.
    2. Did Luan mention anything?
      • Marrow and Padir were often seen talking in front of the warehouse early in the morning.
    3. What about Padir?
      • Recently, Marrow has been coming to the tavern often and buying drinks to thank him.
    4. Did Nasir give you anything?
      • They found wagon wheel tracks, but Padir got drunk on his shift.
    5. What did Marrow say?
      • He leaves late at night to buy alcohol and returns in the morning.
    6. And Trenton?
      • She saw someone pulling a cart in front of the warehouse at dawn, with bottles clinking.

    After collecting all these clues, the guard captain will accuse Marrow of the theft and mark his location on your map.

    Rescuing the Thief and Ending the Quest

    Go to the northeast of Tomasso, where you’ll find Marrow in the middle of a shady deal involving the melons. Finish up by tying him to the crime and bringing him back to Redsand Farm. The guard captain will thank you for catching Marrow in the act.

    Rewards for Completing Harvest of Greed

    Once the scene ends, you’ll get your reward: a decorative furniture piece called a Kinetic Knight, valued at 45.60 silver coins. While decoration might not be essential, this furniture is worth quite a bit if you’re looking to make more money.

  • Solving the Final Flame in Crimson Desert

    Solving the Final Flame in Crimson Desert

    Early in your Crimson Desert journey, you’ll encounter the Goldleaf Merchant Guild, which is struggling with serious corruption issues. Your first task involves helping to overthrow their oppressive leader, the Hornsplitter. Even after removing this corrupt figure, some enemies still remain within the guild.

    Shakatu, now the new head of the Goldleaf Merchant Guild, asks for your help to find a dangerous traitor hiding among the members. Most of the progress depends on questioning guild members and gathering clues. We’ll guide you through how to piece everything together in the “Close Threat” quest.

    ### What to Tell Shakatu About the Evidence

    Before starting the “Close Threat” quest, you need to complete several prerequisite missions. You can get the first of these by listening to Shakatu’s request. The quests are:

    1. Troubled Shakatu
    2. Nogle, The Trade Manager
    3. Skrav, The Trade Manager
    4. Kathan, The Goldleaf Private Soldier
    5. Blique, The Horse Manager
    6. Grimzle, The Ledger Manager

    After completing these six quests, you’ll return to Shakatu at the Goldleaf Merchant Guild camp. He will then ask you questions about the members you’ve questioned. Here’s how to respond:

    – Blique’s Testimony ⇒ Horse Hire Ledger
    – Skrav’s Testimony ⇒ Trade Schedule Log
    – Nogle’s Testimony ⇒ Tavern Ledger
    – Grimzle’s Testimony ⇒ Proof Of Stay
    – Kathan’s/Katnum’s Testimony ⇒ Guard’s Report

    Answering these correctly will help him identify the traitor. Once done, Shakatu will instruct you to catch Grimzle, who is the culprit.

    ### How to Catch the Traitor

    After speaking with Shakatu, the traitor is within your reach. You will find Grimzle in the middle of a shady transaction at a small camp located northeast of the Goldleaf camp, southeast of the Nas River, east of Unicorn Cliff.

    When you arrive, you’ll see Grimzle in the midst of suspicious activity. Interrupt him and tackle him to the ground—you don’t have to fight him, but you can if you want. Then, tie him up and transport him back to the main Goldleaf Guild camp. Take the road along Unicorn Hill and circle around to reach the camp.

    Once you’ve tied up Grimzle, the next step is finding him. From the camp, head northeast and look for the small encampment to the east of Unicorn Cliff, near the Nas River.

    ### Rewards for Completing Close Threat

    Returning the traitor and revealing his treachery earns you rewards. After exposing Grimzle, Shakatu will give you the following items for your efforts:

    [Image shows rewards, including various in-game items]

    By completing this, you finish the “Extinguishing the Last Flames” storyline and conclude the Goldleaf Merchant Guild faction quests.

  • Top Solutions for Miss Match in Like a Dragon: Infinite Wealth

    Top Solutions for Miss Match in Like a Dragon: Infinite Wealth

    “Like A Dragon: Infinite Wealth” includes multiple mini-games, with one new addition called Miss Match. In this mini-game, players use a dating app to interact with women, build connections, and try to meet them in person. But, unlocking every possible date can be tricky without knowing the right approach.

    Fortunately, each match has specific correct responses, and the questions stay the same each time. You can either figure out the best answers through trial and error, since their preferences aren’t shown immediately, or you can use our tips to know exactly what to say to unlock all the dates and finish the mini-game.

    As of February 28, 2026, we’ve updated our guide to include more details about the different tiers and how to progress through each date in Miss Match in Like A Dragon: Infinite Wealth.

    How To Unlock Miss Match

    To access this mini-game, you need to complete Sub-Story 7: Miss Match. You’ll be invited into it after you stay overnight at Revolve Bar with Kiryu in your party. The story event can be found by traveling south from the bar, then heading west until the event triggers. If you need help finding it, it’s located near Seaside Ave. in West Waikiki, close to the Cream & Berry store. Once the story is complete, Miss Match will prompt you to play, and you’ll go through a tutorial on how it works. After finishing this story portion, you can play the mini-game anytime.

    What Are Tiers?

    There are three tiers you can advance through during Miss Match:

    • Basic ($10)
    • Gold ($30)
    • Premium ($50)

    Advancing tiers allows you to meet more women and expand your dating options. However, you need a premium subscription to avoid a 60% compatibility penalty when dating women above your current tier. Succeeding on dates also gives access to live-action dates, where pre-recorded dating scenes are played for you based on your conversation choices.

    If you’re on a basic plan but try to interact with women in higher tiers like Gold, your compatibility will drop to about 60% because of the tier gap. Keep in mind, you cannot edit your profile after you choose “Find a Match,” so it’s best to plan your profile details ahead of time.

    Each woman has four key attributes that matter to her, which become clear as you select the correct responses during chats. To earn the “Don’t Hate The Player” achievement or trophy, you need to meet with five women.

    In the final parts of the mini-game, matching emojis and sending the right texts are crucial. Make sure to answer correctly, select the “I’m in Love” emoji at the right time, and act quickly during the last texting phase to secure the date. The options given are ordered from left to right or highest to lowest match rating, so choose the best fit for the responses.

    Correct responses will guide you on how to set up your profile differently to better match each woman’s preferences. Before deciding, answer five questions, then proceed to the emoji and texting sections.

    Correct Answers for Kinako

    Profile

    • Job: Hero
    • Personality: Upbeat
    • Hobbies: Drinking and Staying In

    Kinako’s Preferences

    • Dumb Stuff: Aspiring Hero
    • Drinking: Upbeat

    Conversation Responses

    • Introductions: Name’s Kasuga! If you’re lookin’ to babble…
    • Occupation: I’m a hero! I’m gonna level up! Be the best that…
    • Hobbies: Does drinking count? LOL!
    • Character: A hero! A character everyone counts on to…
    • Story Time: Well, once I asked for a punch perm and got…

    Correct Answers for Mary

    Profile

    • Job: Entrepreneur
    • Personality: Kind
    • Hobbies: Going Out and Cafe-Hopping

    Mary’s Preferences

    • Wordly: Respects Entrepreneurs
    • Cafe Hopping: Kind

    Conversation Responses

    • Introductions: I’m Kasuga. So, any thoughts on Japan’s future?
    • Occupation: I consider myself a future CEO.
    • Hobbies: Nothing beats curling up with a book.
    • Proposal: Doubt I’ve ever had anything as good as your cooking.
    • Career: I think it’s great you find your job fulfilling.

    Correct Answers for Rinshan

    Profile

    • Job: Model
    • Personality: Unique
    • Hobbies: Going Out and Cooking

    Rinshan’s Preferences

    • Appreciates Sincerity: A Model
    • Cooking: Likes Confidence

    Conversation Responses

    • Introductions: Wow, I can’t believe how lucky I am to match with you…
    • Occupation: Fashion model. Maybe you’ve seen me in magazines?
    • Hobbies: Late nights in the kitchen, cooking.
    • Way to a Man’s Heart: Doubt I’ve ever had anything as good as your cooking.
    • Coming Clean: I think it’s amazing you’ve got a dream you won’t…

    Correct Answers for Naomi

    Profile

    • Job: In Civil Service
    • Personality: Kind
    • Hobbies: Reading and Staying In

    Naomi’s Preferences

    • Wants A Boyfriend: Aspiring Civil Servant
    • Reading: Serious

    Conversation Responses

    • Introductions: Name’s Kasuga and I’m hoping to find a date too!
    • Occupation: I’m pretty dedicated to civil service.
    • Hobbies: Nothing beats curling up with a book.
    • Dating Seriously: Believe me, I’m tired of that game. I want something…
    • Bookworm: From novels to academic papers, if it’s got words I’ll…

    Correct Answers for Etsu

    Profile

    • Job: Still living the music dream, never stop rockin’!
    • Personality: Passionate
    • Hobbies: Going Out and Cooking

    Etsu’s Preferences

    • Sports: Aspiring Athlete
    • Working Out: Likes Confidence

    Conversation Responses

    • Introductions: I’m Kasuga! What a confidence, I wanna meet up…
    • Occupation: Still living the music dream! Never stop rockin’!
    • Hobbies: I’m a master gambler.
    • Type: I’d have to say, my type is exactly someone like you!
    • Destressing: Times like that are the best opportunities for improvement.

    Correct Answers for Saori

    Profile

    • Job: A Gunrunner
    • Personality: Hot-Blooded
    • Hobbies: You-Know-What and Staying In

    Saori’s Preferences

    • Sports: Aspiring Athlete
    • Working Out: Passionate

    Conversation Responses

    • Introductions: YUP! I’m Kasuga! Nice 2 meetcha, mamacita!
    • Occupation: Right now, I’m full-time funemployed!
    • Hobbies: Dancing till the sun comes up!
    • Gyaru: I like anyone with a lot of energy and…
    • Surprise: Kanapoyo-poyo-poyo! Poyo-poyo-poyo! Let’s…

    Correct Answers for Kaoru

    Profile

    • Job: A Gunrunner
    • Personality: Hot-Blooded
    • Hobbies: You-Know-What and Staying In

    Kaoru’s Preferences

    • Romantically Unsatisfied: Likes Bad Boys
    • You-Know-What: Likes Dangerous Men

    Conversation Responses

    • Introductions: Kasuga. I can assure you, I’m up to…
    • Occupation: You’re not a cop, right? I’m a weapon’s dealer…
    • Hobbies: The shared bliss of sensuality.
    • Manhood: I’m a specimen, baby. You won’t find a man with…
    • S to M: Ho ho, you’re insatiable! I’ll teach you some…

    Correct Answers for Kano

    Profile

    • Job: Unemployed
    • Personality: Craaazy
    • Hobbies: Going Out and Drinking

    Kano’s Preferences

    • Energetic: Unemployed
    • Outgoing: Likes Dangerous Men

    Conversation Responses

    • Introductions: YAY! I’m Kasuga! Nice 2 meetcha, mamacita!
    • Occupation: Full-time funemployed!
    • Hobbies: Dancing till dawn!
    • Type: My type is exactly someone like you!
    • Destressing: Times like that are the best opportunities for improvement.

    Correct Answers for Kanspo

    Profile

    • Job: Hero
    • Personality: Upbeat
    • Hobbies: Drinking and Staying In

    Kano’s Preferences

    • Dumb Stuff: Aspiring Hero
    • Drinking: Upbeat

    Conversation Responses

    • Introductions: Kasuga! If you’re lookin’ to babble…
    • Occupation: I’m a hero! Gotta level up!
    • Hobbies: Does drinking count? LOL!
    • Character: A hero! A character everyone counts on…
    • Story Time: Once I asked for a punch perm and got…

    These response guides are essential for maximizing your success in the Miss Match mini-game. Remember to adjust your profile to match the preferences of each woman, answer consistently during chats, and act swiftly in the final texting phase to secure your dates.

  • Complete Every Answer to Every Quiz in Mario Tennis Fever

    Complete Every Answer to Every Quiz in Mario Tennis Fever

    Mario Tennis Fever offers several game modes, but if you aim to finish the game, Adventure Mode is essential. This mode is divided into two parts: the first is training, and the second involves an actual adventure.

    During training, you’ll encounter a series of multiple-choice tennis questions. You can find the correct answers by knowing tennis basics, paying attention during drills, talking to non-player characters (NPCs), or searching online. Now, let’s move on to the quizzes.

    Mario Tennis Fever Rank E Quiz

    This quiz focuses on the different shot types in tennis, aligning with the initial lessons on shot techniques.

    Question 1: Which shot has a high bounce?
    Answer: Topspin

    Question 2: Which shot doesn’t bounce much but curves to the side?
    Answer: Slice

    Question 3: Which shot is fast but doesn’t rotate much?
    Answer: Flat


    Mario Tennis Fever Rank D Quiz

    This quiz covers the various player types in the game, based on broad categories.

    Question 1: Which player type has a powerful shot but is slow?
    Answer: Power

    Question 2: Which player type is confident in their speed?
    Answer: Speedy

    Question 3: Which player type can reach the widest areas?
    Answer: Defensive


    Mario Tennis Fever Rank C Quiz

    This quiz continues to examine player characteristics and skills.

    Question 1: Which player is skilled at hitting curved shots?
    Answer: Tricky

    Question 2: Which player has a good mix of offense and defense?
    Answer: All-Around

    Question 3: Which player excels at hitting the corners?
    Answer: Technical


    Mario Tennis Fever Rank B Quiz

    This segment tests knowledge about different player stats.

    Question 1: What type of player has strong shots but moves slowly?
    Answer: Power

    Question 2: Which player type is confident in their speed?
    Answer: Speedy

    Question 3: Which player covers the widest area on the court?
    Answer: Defensive


    Final Adventure Mode Quiz (Rank A & B)

    The last quiz is divided into two parts, with a break in the middle if you answer incorrectly. Here are the answers to avoid losing progress.

    Question 1: When should you use a slice to return to the center court?
    Answer: Slice

    Question 2: What’s a good shot against an opponent close to the net?
    Answer: Lob

    Question 3: Which shot is best when your opponent pulls back from the net?
    Answer: Drop Shot

    Question 4: On which court is the ball the lowest and fastest?
    Answer: Grass Court

    Question 5: On which court is the ball the slowest, making rallies easier?
    Answer: Clay Court

    Question 6: On which court does the ball have a good balance of speed and bounce?
    Answer: Hard Court

  • All Answers to the Canari Quiz in Pokémon Legends Z-A: Completing & Solving

    All Answers to the Canari Quiz in Pokémon Legends Z-A: Completing & Solving

    Quizzes are a common feature in every Pokémon game, and Pokémon Legends: Z-A is no different. Instead of testing your earned, practice-based knowledge in a fair battle, Canari’s quiz focuses on questions you haven’t had the chance to prepare for. So, like any student, your only option is to cheat a little.

    Naveen will guide you covertly to the Canari quiz. While he offers assistance at times, he still leaves you mostly on your own when facing questions about random topics. You might have picked up some answers through careful reading, but some questions will require extra help.

    All Answers to the Canari Quiz

    The quiz takes place in the old electrical substation located in Magenta District 6. You can enter the power plant and take the quiz only during Main Mission 14: “Reaching Rank E.” To get inside for the first time, speak with the man at the north gate. Naveen will tell you the password, but if you forget, the answer is:

    Let’s Go DYN4MO!

    The man will ask you to say each word of the password separately. Be careful when answering so you don’t accidentally choose the wrong option.

    Once inside, the quiz begins when you join the crowd gathered in front of the stage. The first part is a True-False quiz. You need to stand in the green box for “True” and the red box for “False” for each question. Here are the correct answers:

    Question Answer
    I’m crazy good at falling-block puzzle games! True
    Macarons are my favorite food! False
    Electric type Pokémon are my favorites! True

    If you get a question wrong, Naveen might step in with the correct answer. It doesn’t seem like you can fail this part of the mission.

    After the True-False questions, you’ll need to find the favorite snack of Eelektross. This step is straightforward and guides you to Cafe Gallant. Naveen will give you the answer, so bring back the Super Lumiose Galette to Canari. Speak with Mani, the superfan, when you re-enter the quiz show. After a short chat, choose:

    It’s a Super Lumiose Galette.

    Next, you’ll face Mani in a battle. Mani specializes in Electric Pokémon, so Ground types would normally be effective. However, he has two Pokémon:

    • Helioptile (Normal/Electric)
    • Emolga (Flying/Electric)

    Because Emolga is immune to Ground moves, you’ll need to adapt. Using Pokémon that resist Electric and have at least one Ground or Fighting move, along with a Rock or Ice move, is recommended. Some suitable Pokémon include:

    • Tyrantrum
    • Aurorus
    • Tyranitar
    • Galarian Stunfisk

    At the battle’s end, Canari will ask who gave her her first laptop. The correct answer is:

    My grandpa.

    Answering correctly allows you to say, “I’d like a promotion match.” This advances the quest, giving access to fights with Tarragon and Canari at Racine Construction in Lumiose’s south side. It’s best to bring a strong Ground Pokémon for these matches, as their key Pokémon are weak to Ground attacks. Prepare outside the Racine Construction building, possibly by handing in any Colorful Screws you’ve collected nearby.

    How to Defeat Tarragon

    Tarragon’s team is composed entirely of Ground-type Pokémon. His Mega Excadrill, with Steel typing, provides an advantage over standard Ground counters. To beat Tarragon, a Water-type Pokémon like Feraligatr, Vaporeon, or Blastoise is highly effective. If you don’t have one, stick with your usual counters against Ground types for the first two Pokémon.

    Mega Excadrill gains weaknesses to Ground, Fire, and Fighting moves, but becomes immune to Grass and Ice types. Switch out after defeating Diggersby and defeat Excadrill quickly before he uses Swords Dance to one-shot your team. Pokémon like Greninja, Slowbro/Slowking, or Sharpedo may struggle against Mega Excadrill’s X-Scissor, and Hippowdon’s Crunch can threaten Pokémon like Starmie and Slowbro/Slowking that fail to defeat it in one hit.

    How to Defeat Canari

    After beating Tarragon, you can find Canari in the back of the warehouse behind a closet-like door. Challenge her to a battle there. Her team is mostly Electric types with no major counters to Ground types, so having at least one solid Ground Pokémon makes the fight easier—Krokorok, Diggersby, Hippowdon, or Mega Garchomp are good options.

    Eelektross is the main threat due to Eerie Impulse, which weakens opponents relying on Special Attack. However, most of Canari’s Pokémon are physical attackers, and common Ground counters like Earthquake are physical moves. If you have a good Ground-type counter, Eerie Impulse’s effect is negligible.

    Remaining Pokémon like Stunfisk, Ampharos, and Garchomp are less threatening since Stunfisk’s Mud Shot isn’t powerful, and Ampharos doesn’t Mega Evolve, reducing its Dragon Pulse’s effectiveness. With proper strategy, you can overcome her team.

  • Completing Date Everything: Best Answers for Throwing Shade!

    In Date Everything!, you’ll get two charming characters—Curt and Rod—who are full of fun, cheeky humor. They love to share clever jokes, and the trick to winning them over lies in how you respond to their banter.

    To win the hearts of these stylish drapes, you’ll need to chat with both of them in various spots around your home. Make sure to select the right responses to impress Curt and Rod if you’re aiming for a romantic conclusion!

    Throw Shade with Style

    Meeting Curt and Rod in Date Everything!

    You first meet Curt and Rod by chatting with the curtains on different windows throughout your home. Remember which window you start at. To deepen your relationship with them, you need to visit all the windows to hear their thoughts and sights.

    Each window is its own unique location, even if they’re in the same room. Here’s where you can find Curt and Rod in Date Everything!:

    • Once in the bedroom.
    • Twice in the workout room.
    • Once in the entryway with front Dorian.
    • Three times in your office.
    • Once in the laundry room.
    • Once in the kitchen.
    • Once in the dining room.
    • Once near Back Dorian and Keyes by the dining area.
    • Once in the living room.
    Rod mentioning friendship if you miss a joke in Date Everything!

    Each set of curtains gives a different perspective from where they are in your home, so you’ll need to speak with them in each room, treating every window as its own spot.

    Completing this will take a few days, since talking to any Curt and Rod in a single location counts for that day. For instance, if you’ve already spoken with the pair in the gym, you can’t interact with them in the bedroom on the same day.

    Wyndolyn informing you about Curt and Rod's interest

    While chatting with Curt and Rod in Date Everything!, you’ll engage in the art of shady jokes. They’ll establish some important guidelines for your first interaction: steer clear of joking about strangers and tread carefully with those you know.

    Your ability to follow these rules and how well you throw shade will determine your outcome with them. To achieve the romantic ending, you need to only get positive reactions to your jokes after visiting every window scene around the house.

    Keep in mind that not all locations for Curt and Rod come with a scene. If they express excitement about another window, it counts as checked off the list. Still, ensure you speak with them in all spots!

    How to Win Over Curt and Rod

    Joking with Curt and Rod for a romantic ending

    Choose the Best Replies with Curt and Rod

    If you aim for the romantic ending with Curt and Rod in Date Everything!, you’ll need to demonstrate your sharp wit, ensuring you only receive positive feedback during the exchanges.

    If you misstep with a joke, consider reloading your save, as even one negative reaction can derail the romance.

    When you chat with them around the house, multiple comments will spark reactions, but only one will impact the outcome. If one praises your shading skills, you’re on the right track! However, if they caution you about being too personal, be ready to start fresh if you want to secure the romantic ending.

    Bringing humor to Rod in the kitchen

    Ideal Responses for Curt and Rod’s Romantic Ending

    Curt and Rod’s Location

    Best Responses

    Bedroom

    “Sounds like you need to take some cues from Rod.”

    Dining Room

    “You had feelings, but they didn’t even catch your name.”

    Entryway

    “The D in batteries stands for ‘desperate.’”

    Home Gym

    “You sound a little cowardly, don’t you think?”

    Kitchen

    “I hope your ego isn’t too bruised after that one.”

    Laundry Room

    “It’s okay if you’re quiet; we all have strengths.”

    Living Room

    “You have other skills! Focus on those.”

    Office

    “I don’t know; you seem out of practice to me.”

    If you’ve delivered the right responses for every interaction with Curt and Rod in Date Everything!, go back to chat with them again. Regardless of which one you talk to, they’ll ask about your feelings toward them.

    Once the playful banter wraps up, express your feelings for the one you picked, and they’ll ask you to return later. To finalize the romantic ending, come back another day for a final chat. When offered the choice to date both Curt and Rod, say, “I’d be thrilled to date both of you” to lock in the romantic conclusion.

    Friend and Negative Endings

    Rod suggesting friendship if you miss jokes

    How to Become Friends with Curt and Rod

    If you miss even one chance to throw shade, you’ll only secure a friendship with Curt and Rod.

    After experiencing all the interactions with them, talk to the guys again. If you didn’t manage to deliver the best jokes, they’ll express that they like you, but only as a friend because they doubt you can keep up. When that happens, accept their friendship to lock in that ending.

    How to Achieve Curt and Rod’s Negative Ending

    Similarly, for the other two endings, you’ll need to chat with Curt and Rod in every area of the house and guarantee you see all scenes. However, you must miss at least one chance for a shady comment to avoid them falling for you.

    If you fail to be shady enough, they will approach you about being friends once you’ve covered all encounters in the house. When they suggest staying friends, you can imply they didn’t take your feelings into account when deciding on your relationship’s nature.

    Not taking kindly to the suggestion, they will likely develop negative feelings if you dispute being just friends when they propose it.

  • Completing the Gallery Puzzle Solutions for Blue Prince

    Completing the Gallery Puzzle Solutions for Blue Prince

    Blue Prince is packed with challenging puzzles and hidden secrets, prominently featured in the Gallery room. The abstract artworks in this space have puzzled many players, and while completing this particular challenge isn’t essential to finishing the game, the rewards certainly make it worthwhile.

    This guide will walk you through how to access the Gallery, offer tips for tackling its various puzzles, and provide answers for those who need a little extra assistance.


    The Gallery room is a rare design in Mt. Holly, so you might not see it in every draft. One strategy to increase your chances of encountering it is to select the Library whenever possible, as drafting from the Library raises the likelihood of getting uncommon rooms. This approach increases your chances of drawing the Gallery in your run.

    How to Solve the Puzzles

    Tackling the Gallery’s puzzles involves naming each artwork based on several clues:

    • Each name follows a specific theme.
    • Verbalizing your observations about the paintings can help you find solutions.
    • Keep an eye out for visual hints, though not every detail will be crucial.
    • A thesaurus might be beneficial!
    • If you’ve correctly solved a puzzle, something will trigger in the room. If nothing happens, your answer is incorrect.

    The answers are in expandable sections. Avoid opening them if you prefer to solve on your own!

    Five-Letter Puzzle


    The five letter puzzle in the Gallery.

    • Pay attention to the letters available in the pool.
    • Identify which letter is unlike the rest. What differentiates it?
    • Say it aloud to yourself.

    Six-Letter Puzzle


    The six letter puzzle in the Gallery of Blue Prince.

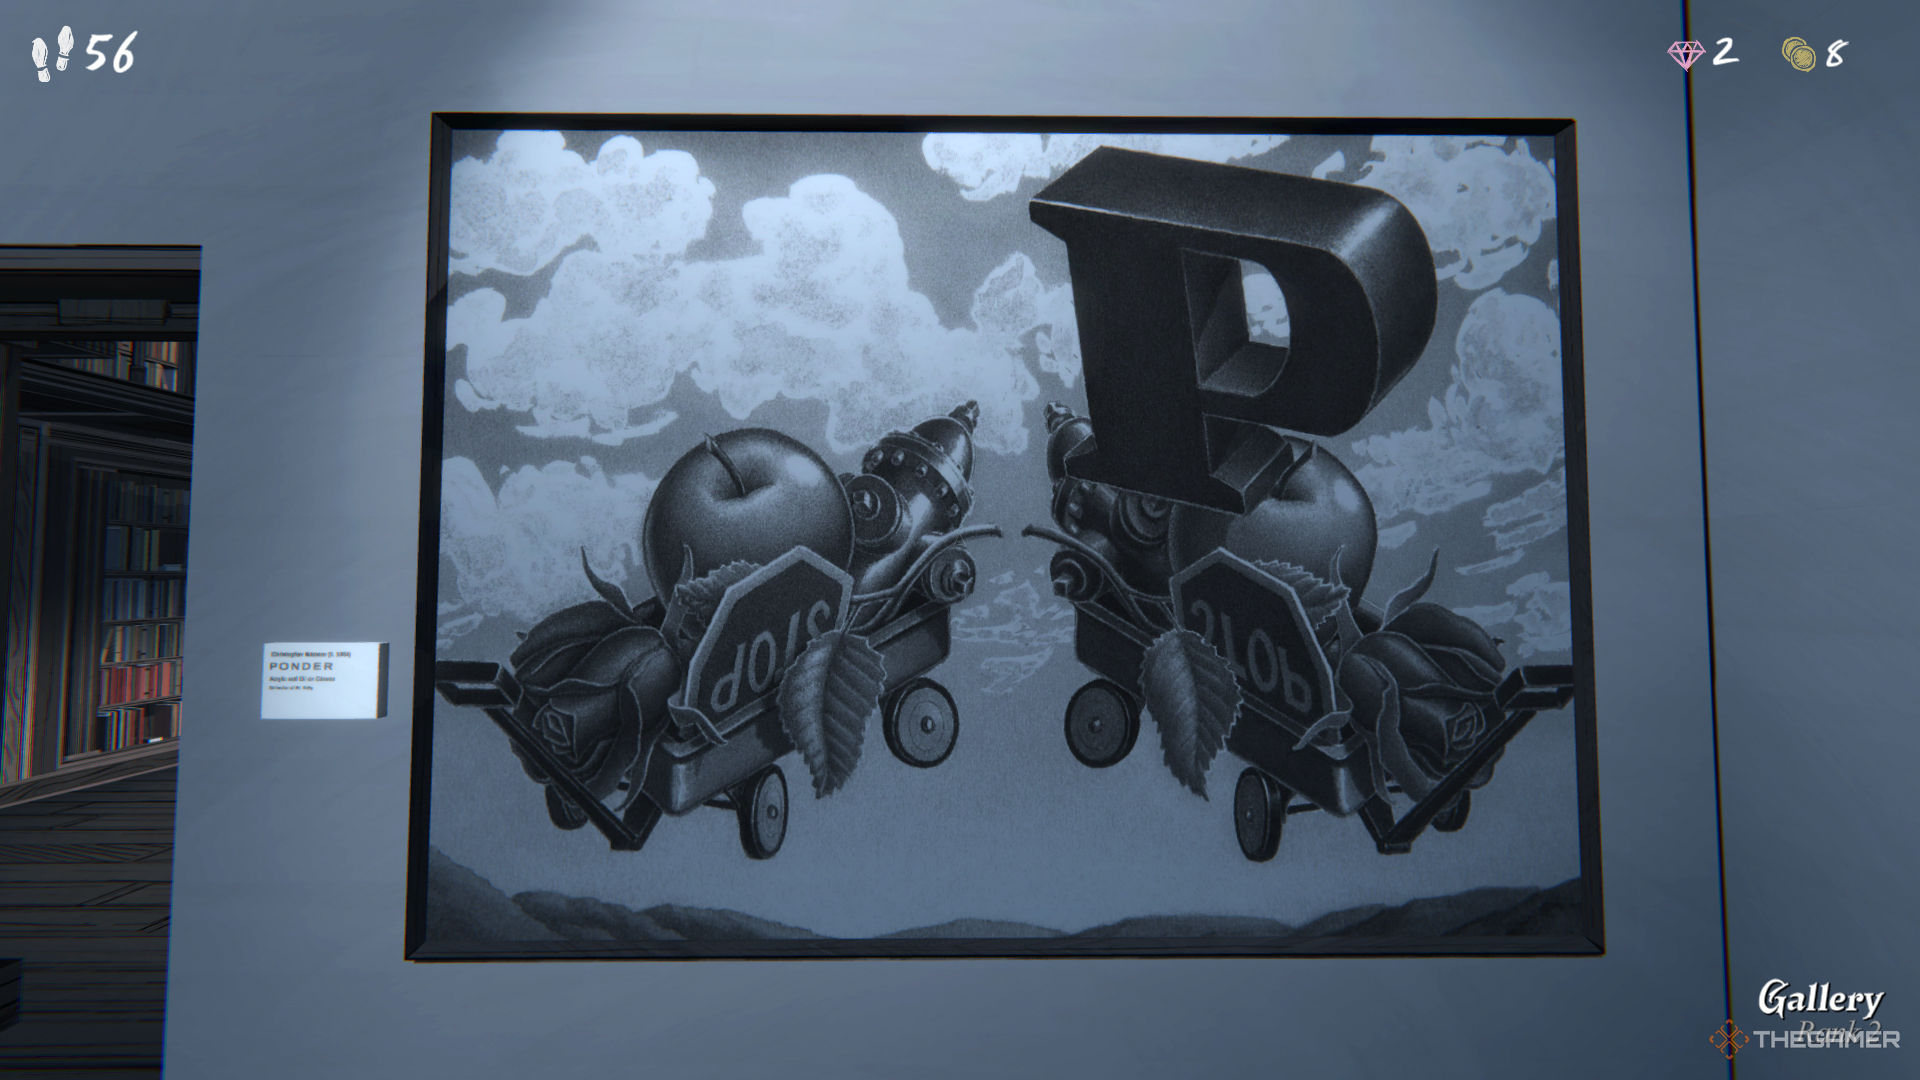
    • Consider what commonality exists among the items in the wagon.
    • Examine the symmetry in the image; it resembles a mirror reflection.
    • Take note of where the letter P is situated.

    Seven-Letter Puzzle


    The seven letter puzzle in the Gallery in Blue Prince.

    • Look at the table and analyze the items. What words can you identify?
    • The answer is intertwined with these words.
    • Consider the other elements in the artwork. How can this and a synonym of the other words be combined?

    Eight-Letter Puzzle


    The eight letter puzzle in the Gallery in Blue Prince.

    • This puzzle is trickier than it appears; not every detail is significant.
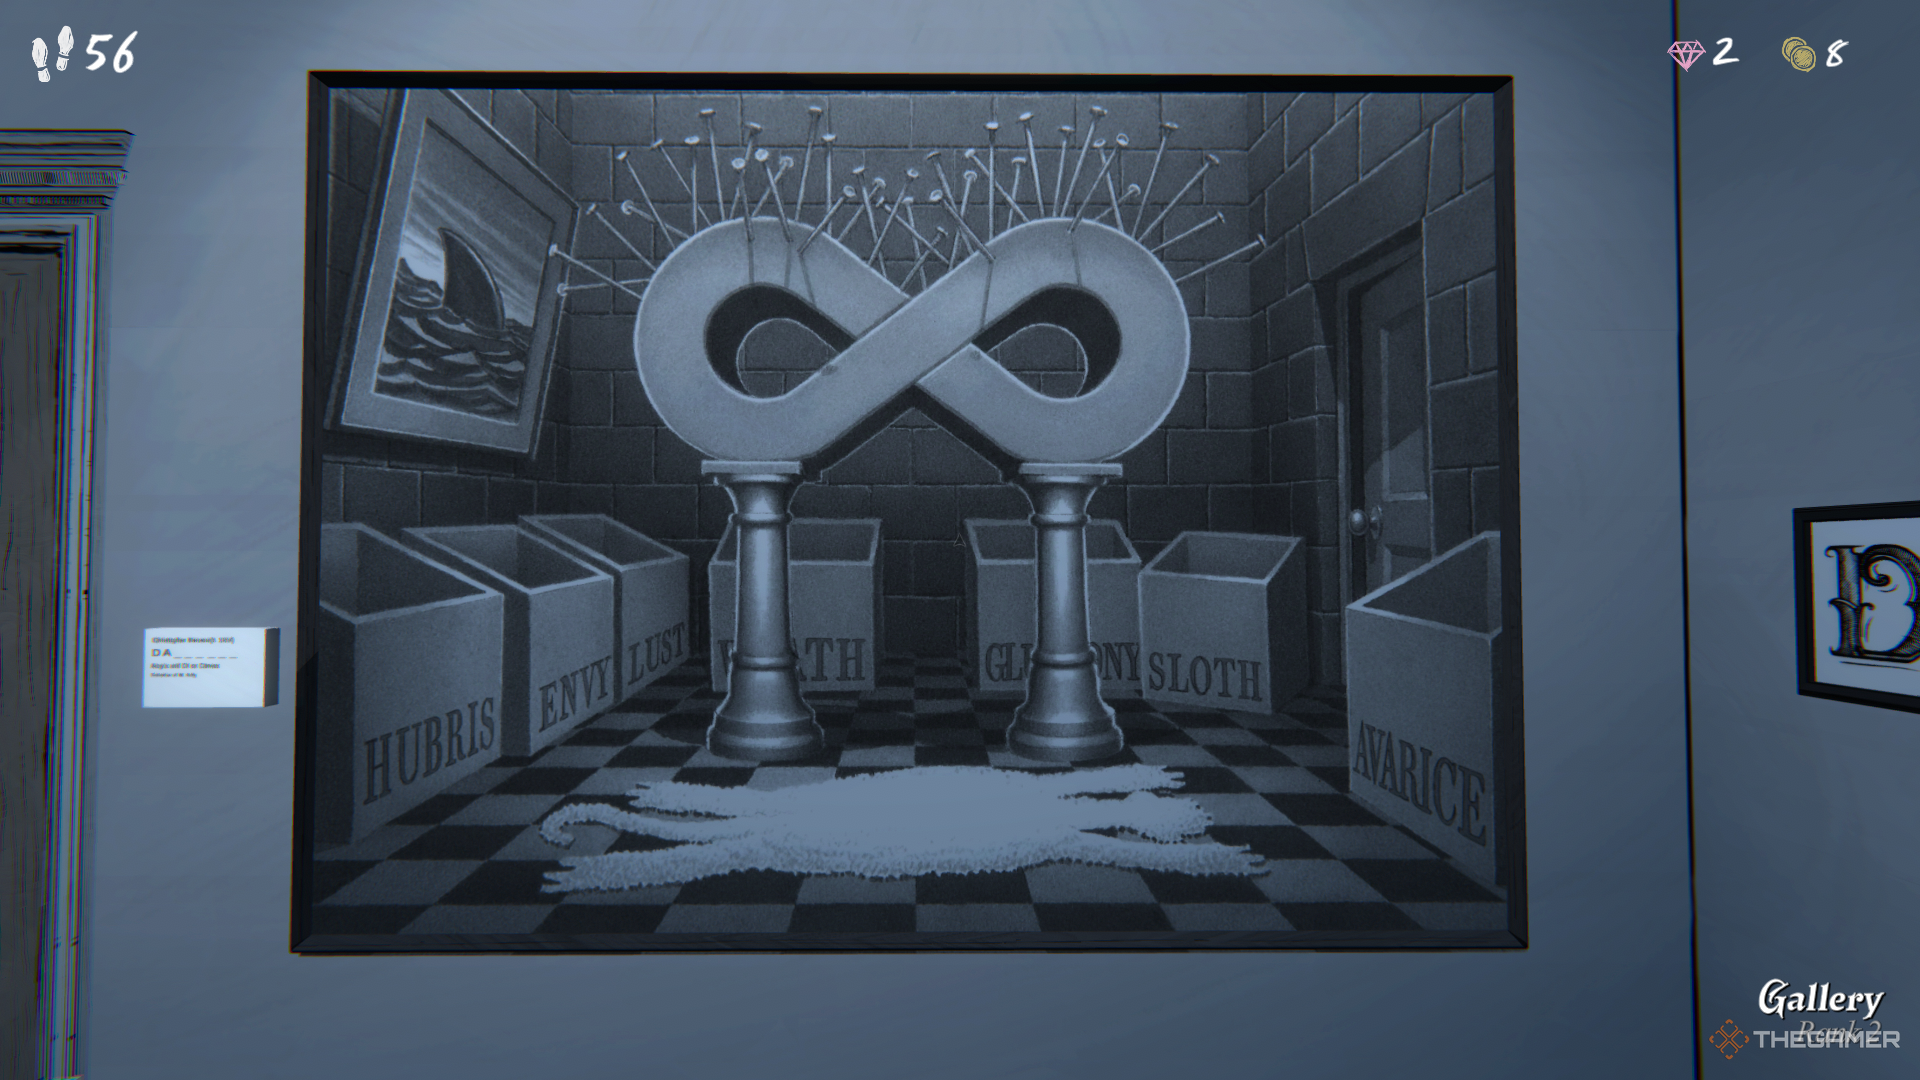
    • Pay attention to the statue depicted in the artwork. Where have you encountered this symbol previously?
    • If it’s not an infinity symbol, what other interpretations can you find?

    Rewards


    One of the rewards for solving the Gallery puzzle in Blue Prince.

    Upon completing the Gallery puzzle, you’ll earn two gems, four coins, and a key to Room 8, where you will encounter yet another puzzle. You can claim these rewards in the Gallery during each run if you manage to draft the room.

  • Chenyek’s Guild Test Solutions for Kingdom Come: Deliverance 2

    Chenyek’s Guild Test Solutions for Kingdom Come: Deliverance 2

    One of the main challenges in Kingdom Come: Deliverance 2 is successfully navigating the conversation skill checks. To persuade certain characters to assist you, you’ll need to have a high charisma level. However, during the quest titled A Feast for the Poor, there are questions you need to answer that don’t depend on your skills or stats.

    As you enter the city of Kuttenberg, you’ll soon encounter Chenyek, a member of a guild looking for your assistance. To join their ranks, you must answer three questions correctly. If you aren’t familiar with the lore of Kingdom Come: Deliverance 2, you might struggle to find the right answers.

    Chenyek Guild Quiz Answers

    Below, we’ll go through each of the three questions and their correct answers. There are no second chances for these questions, so make sure to answer correctly the first time. If you answer incorrectly, Chenyek will inform you of the right answer.

    Question One: What is Wycliffe’s first thesis?

    The correct answer is Repentance.

    Question Two: Which estate has the greatest reformatory potential?

    The answer is The Common People.

    Question Three: Who is the rightful King of Bohemia?

    The correct answer is Wenceslas.

    Although it’s helpful to get all three answers right, missing them doesn’t prevent you from joining the Guild. Chenyek may chuckle at any incorrect answers but will still share the information he sought. In our experience, even when we only got one answer correct, he still provided us with tasks to proceed with. Afterward, you’ll be directed to speak with more individuals at the tavern, which serves as the Guild’s central hub.

  • Perplexity To Add Sneaky Ads With AI Responses

    Perplexity To Add Sneaky Ads With AI Responses

    It was inevitable. Perplexity AI, a startup focused on “answer engine” technology, revealed on Wednesday that it plans to start incorporating advertisements into its chatbot responses beginning next week.

    Instead of conventional advertisements, the platform will feature ads presented to users in the U.S. as “sponsored follow-up questions” and paid media strategically placed alongside answer responses, sourced from its advertising partners, such as Indeed, Whole Foods, Universal McCann, and PMG.

    examples of perplexity's advertising strategy
    Perplexity AI

    “Advertising initiatives like this assist us in generating revenue to share with our publishing partners,” the company stated in their blog post. “Our experiences have shown that subscription fees alone are inadequate to create a viable revenue-sharing model… advertising provides a reliable and scalable source of income.”

    The startup emphasizes that all sponsored content will be distinctly marked, and the responses generated will still come from its technology, rather than being created or altered by the partner companies.

    “We deliberately selected these ad formats because they integrate advertising in a way that upholds the utility, accuracy, and impartiality of our answers,” the company stated. “These advertisements will not undermine our commitment to delivering a trusted service that supplies you with direct, unbiased responses to your inquiries.”

    This new approach comes at a time when Perplexity is confronting mounting competition from OpenAI, which has recently unveiled a comparable SearchGPT tool, as well as facing multiple lawsuits alleging that its data scraping practices constitute widespread copyright infringement.

    Furthermore, Perplexity has received cease-and-desist orders from both The New York Times and Conde Nast regarding its practices. It remains uncertain whether advertisers will be willing to overlook these significant concerns. If they do not, Perplexity may find itself relying solely on its existing income from the $20 monthly Perplexity Pro subscription.

  • Complete Guide to Garden Retreat in The Rise of the Golden Idol

    Complete Guide to Garden Retreat in The Rise of the Golden Idol

    After finishing the first chapter of The Rise of the Golden Idol, you’ll take a step back in time to explore some events that lead up to the secrets you’ve already unraveled. This journey kicks off at Garden Retreat, presenting a beautifully chaotic narrative.

    In this latest chapter, like before, you’re tasked with uncovering the truth behind the events and the individuals involved. The challenge intensifies, requiring deeper logical reasoning to piece together the clues. Fortunately, we’re here to provide hints and solutions along the way!


    All Word Locations

    In this section, there are a total of 47 words to find.

    Location Words
    Left Screen
    Radio Rock, Rug, Hit, Pulled, Kiss, Fell
    The Woman Stolen, Property, Asset, Seizure, Someone’s, Death, Nervous, Breakdown, OPIG, Branch
    Right Screen
    Telephone Ex-husband, Return, Artifact, Exchange, Forgiveness, Auditor, Rob, Colleague, Dragonfly, Inn
    Calendar 1, 2, 3, 4, 5, 6, 7, 8, 9, 0
    Poster Historian, Harmony, Foundation
    Open Drawer Hair, Pepper, Drawer, Spray, Sprayed

    All Overview Solutions

    In this panel, you need to identify three key pieces of information: where the case occurs, the date, and the outcome.

    • The setting provides significant hints regarding the importance of the sole individual present at the location. What does this imply?
    • A particular day of the week appears repeatedly throughout the clues.
    • The calendar features clear indicators that can help pinpoint the date. Look up for additional insights.
    • Consider the woman’s actions during this late hour. There can only be one explanation for her presence.

    The events at the Harmony Foundation on August 17, 1974, led to a fatal incident.


    All Event Solutions

    In this scenario, you’ll need to analyze both dialogue hints and the arrangement of the setting to deduce the sequence of events based on the gathered words.

    • Throughout the clues, four individuals are mentioned. While the woman’s identity is clear, figuring out the other person’s role requires more effort.
    • The woman is in tears, indicating a profound sorrow stemming from the night’s events. Who might she feel such a loss for?
      • Would the death of an ex, an auditor, or a coworker evoke more sadness?
    • Each individual leaves behind a message regarding a specific item. Investigate context clues to discern which items are present and which aren’t.
      • Keep in mind, someone who promises to bring something might not follow through.
    • The safe is wide open, with a suitcase nearby—what is the significance of this?
    • There’s a can on the floor—what role does it play?
    • Reflect on the dots on the rug—what shapes do they remind you of?
    • Carefully consider what types of words fit the various spaces.

    The Colleague visited the Historian to exchange an artifact for money.

    During this transaction, the Colleague attempted to rob the Historian.

    In an unexpected turn, the Historian defended herself by spraying the Colleague with hairspray and then pulled a rug.

    Ultimately, the Colleague fell and struck a rock.

  • Complete Guide to Newsflash: The Golden Idol Case Answers

    Complete Guide to Newsflash: The Golden Idol Case Answers

    The conclusion of Chapter 1 marks a significant turning point in The Rise of the Golden Idol, introducing complexity that challenges players to delve deeper into the narrative. As you navigate the unfolding mystery, you’ll need to unravel not only the events leading to the visible aftermath but also the intricate backgrounds of various characters intertwined in the storyline.

    Fortunately, ample information is available, accompanied by logical clues that guide you through the investigation. Solving this case will demand your full attention and methodical thinking.

    All Word Locations

    In this case, you’ll uncover a total of 47 words across three distinct spots. Each location requires exploration for further examination.

    There are several key areas to investigate:

    1. Outside

      • The man at the podium: "Offered"
      • The man and woman next to the podium: "Jack, Showed"
      • The detectives on the left: "Homicide, Roy, Samson, Sebastian, Possum 13, Beetle 4, Ian, Worth"
      • The camera: "Police, Corruption, Tragic, Accident, Red, Curse, Drug, Connection, Deliberate"
    2. Lower Window

      • The four bodies: "Gecko 71, Tiger 98, Monkey 34, Beetle 4"
      • The file at the back: "Murder, Suicide, A, B, C, D"
    3. Upper Window
      • The drawer in the desk: "Luke, Brown, Benny, Crystal, Hunter, Wolf"
      • The files on the desk: "Dirty, William, Bridge, Case, Isaac, Nowak, Elizabeth, Adam, Jack"
      • The computer: "Walsh, Board, Position"

    All Name Solutions

    Identifying individuals in this case is relatively straightforward, as only five names are crucial.

    • Two of these characters should be familiar from the previous case.
    • The speaker at the podium lacks identification but his first name and job title can be easily derived from the dialogue. His last name will become clear once you understand his role.
    • You’ll also learn about the woman, who is identified as the daughter of a scientist, at which point you can recall the scientist in question.
    • The dialogue and files will further aid in identifying the remaining names.

    All Conference Solutions

    The conference discussion will lead you to significant insights relevant to the case.

    • Pay close attention to the colors of the blank areas, as they help narrow down clues.
    • The specific wording used provides context; phrases like “was a” and “has a strong” can be particularly revealing.
    • By this point, you should have already deduced the speaker’s identity from earlier panels.
    • Carefully review the statements you can access through the camera.
    • A small note found in the speaker’s pocket may provide hints regarding the topics discussed at the conference.
    • Additionally, you’ll encounter three files in the commissioner’s office, one pertaining to a notable figure while the other two do not. Pay particular attention to these files, especially if you can find similar case bundles to help uncover the redacted case file.

    All Victim Solutions

    This panel addresses the man whose image is found in the commissioner’s trash.

    • Four bodies lie on the tables, accompanied by causes of death detailed in a document.
    • Some causes can be deduced through visual clues.
    • You can identify which body corresponds to the man in the photograph simply by matching the visual features.
    • Previous panel insights will be critical to solving these connections.

    In summary, methodically working through the clues and character backgrounds will enhance your understanding of the case, ensuring that you unveil the gripping story within The Rise of the Golden Idol.

  • Complete Guide to Under Construction in The Rise of the Golden Idol

    Complete Guide to Under Construction in The Rise of the Golden Idol

    The intriguing narrative unfolding in Chapter 1 of The Rise of the Golden Idol truly earns the title of a mystery. While it’s easy to assume a connection between the cases, the initial links are not immediately obvious, necessitating some logical reasoning before clarity emerges.

    In this second case, you will uncover the events surrounding a tragic accident at a construction site that resulted in a fatality. This marks the first instance where your investigation extends beyond merely identifying individuals involved and the sequence of events, adding an extra layer of excitement to the gameplay.


    All Word Locations

    There are a total of 32 words to discover in this section.

    Location Words
    The reporter Joel, Gregson, Miranda, Meadows
    The men in suits Jenkins, Roy, Samson, Gun, Ian, Worth
    The body inside the pipe Luke, Brown, Old, Docks, Hunter, Wolf, Benny, Crystal
    The construction workers Ted, Monty
    The man underneath the pipe Sewage, Pipe, Werter, Electric, Cables, Totsky, Garage, Building
    The construction vehicles Demolisher, Excavator, Cutter, Bill

    All Name Solutions

    In this case, you’ll need to identify eight individuals, some of whom are easier to recognize than others:

    • The reporter features easy-to-make connections, and the men in suits present clear clues regarding their identities.
    • For the construction workers, you’ll want to consider any job-related hints and pay attention to their conversations.
    • Determining which worker operates which vehicle is essential for linking the foreman’s job list back to their last names.
    • Don’t overanalyze the man found within the pipe.

    All Vehicle Solutions

    This section is best tackled alongside the name identification, as many clues overlap.

    • One machine displays a photo of its operator, making it simple to identify.
    • Another vehicle has a mug with a name on it, which suggests the operator likely didn’t steal it.
    • With four faces and three vehicles, consider which individual is least likely to operate machinery.
    • One of the vehicles is said to be broken by a construction worker. Which one could that be?
    • To identify the vehicles themselves, closely examine them for distinguishing features.

    All Event Solutions

    The events leading to this scenario are more complex than previous ones, requiring logical deductions about how this scene came to pass.

    • A key point is identifying which vehicle was responsible for the situation at hand.

      • One vehicle is currently not in use, simplifying matters.
      • A segment of the pipe was fracturing upward, not downward. Contemplate how that might have occurred.
    • There are two bodies involved, and you should easily deduce the order in which they were found.

    In summary, Monty Totsky operated the demolisher on the sewage pipe, leading to the death of Joel Gregson. Subsequently, the unexpected discovery of Luke Brown’s body followed.