Tag: Adventure Games

  • Unlocking Manaphy: A Guide for Pokémon Pokopia Players

    Unlocking Manaphy: A Guide for Pokémon Pokopia Players

    Even though there isn’t a Manaphy habitat in Pokopia yet, you can still invite this cute Mythical Pokémon to settle into Bubbly Basin—since it was the first to introduce the area.

    Once you’ve added the Pokopia Bubbly Basin DLC, your focus will shift to an island that suddenly emerged off of Bleak Beach. There, you’ll come across a washed-up Manaphy, which starts the Bubbly Basin storyline before it vanishes, looking for a place to call home. You might think you need to build a habitat for it, but that’s not the case. Still, you can successfully get Manaphy to move into your underwater world.

    I’ve tried to avoid spoilers, but a few details are ahead, so read with caution.

    How to Get Manaphy in Pokopia

    To make Manaphy stay permanently in Bubbly Basin, you just need to complete the area’s storyline by raising the environment level to 3 and building the Ocean Temple, which Popplio, the underwater replacement for Professor Tangrowth, will request.

    I’ll let you watch the story unfold from here, but similar to the main game, completing the storyline will trigger the appearance of a Mythical Pokémon. After that, Manaphy will always be present in its new home, although you won’t be able to move it elsewhere by building a new habitat for now.

    When you’re ready to build the Ocean Temple, you’ll need specific materials like the Pokopia Ocean Door, Seashell Fencing, and Shiny Pearls—our guides can help you find these items.

    That’s the basic process. Remember, working through the main story will unlock Manaphy at Bubbly Basin, and that’s the easiest way to add this special Pokémon to your collection.

  • Guide to Claiming the Pokopia Ocean Pals Rug

    Guide to Claiming the Pokopia Ocean Pals Rug

    During the Bubble Basin storyline, the flat Pokémon Stunfisk will ask you to find a special rug, probably to decorate their home. The only hint provided is that the rug has a design featuring many underwater Pokémon, and it can be found inside a house in the town of Bubbly Basin.

    There isn’t much detail, so if you’re having trouble completing this task, I’ve already located the Ocean Pals rug for myself and can tell you exactly where to find it. Keep reading for the precise location of the Pokopia Ocean Pals rug, plus a bonus rug recommendation.

    Where to Find the Pokopia Ocean Pals Rug

    The Ocean Pals rug is hidden in a Pokéball inside a very rundown and concealed house in the northwest corner of Bubbly Basin, just behind the play area. This house is hard to spot because it’s tucked away in a cave, looks buried under the chaos of Pokopia, and is almost completely hidden.

    Two easy ways to find it:

    1. Cross the bridge to the play zone. The house can be seen through cracks in the cliffs to the left of the slide, behind some Star-Speckled Rocks.
    2. Go above water when you reach the playground. Part of the house will be above ground, and you’ll need to drop down to find the other part submerged in water.

    Once you find the house, the Ocean Pals rug, which is the only one inside a Pokéball, is located there. When you have it in your inventory, return to Stunfisk and give it to complete your mission.

    Another nice fish-themed rug in town is the Swampert Squad rug. If you’re trying to give this one to Stunfisk and it doesn’t work, don’t worry — it’s the wrong rug. Be cautious, though, because this one is also in a Pokéball, just to the right of the bridge before crossing into the main Bubbly Basin area. Keep it safe, as no Pokémon has asked for it yet, but someone might in the future!

  • How to Obtain the Pokopia Windup Inkay Figure

    How to Obtain the Pokopia Windup Inkay Figure

    To find the Pokopia Windup Inkay toy, start at the broken bridge in the Imperial area of Bubbly Basin. From there, go to the big staircase heading down to the east of the bridge and descend. Once you reach the bottom, spin your left stick until you drop into the depths. Turn back toward the stairs and walk beneath them, staying close to the northern wall until you spot a small cave entrance lit up with purple coral, with an orange coral inside. Follow this tunnel until you come to breakable rocks on your right. Break through them to reveal a hidden cave holding a Pokeball. Interact with the Pokeball to claim your Windup Inkay toy!

    You can verify you’re in the correct spot by checking the map in the image above, which marks the location of the Windup Inkay. Keep an eye out while exploring, as you’ll find plenty of other useful resources and items, including Pokopia Grubby Pearls.

    Once you have your toy, you can construct the Muddy Playtime habitat by placing the Windup Inkay along with a Towel Rack and a Floating Log next to some muddy water. I won’t spoil which Pokémon might appear here, but you might be able to figure out at least one.

    For more on unique Pokémon habitats, be sure to check out guides on the Pokopia Jirachi habitat and the Sableye habitat — both of which can only be accessed by collecting special event items.

  • Mastering Shiny Pearls in Pokopia: A Complete Guide

    Mastering Shiny Pearls in Pokopia: A Complete Guide

    If you’re trying to find Shiny Pearls in Pokopia, you’ll first need to locate something less bright—Grubby Pearls. These are the initial item that needs some cleaning. Once you give them a good scrub, you’ll see a shiny pearl appear underneath the grime.

    After cleaning, these pearls can be used in a variety of Bubbly Basin recipes, including marine-themed furniture and seashell fences. Keep reading to learn where to find Grubby Pearls and how to convert them into Shiny Pearls.

    ### How to Get Shiny Pearls in Pokopia

    To obtain shiny pearls, start by finding Grubby Pearls and then take them to a Pokémon that knows the Scrub ability. After a bit of scrubbing, the Pokémon will clean your pearls, turning them into shiny ones.

    Some Pokémon that can learn the Scrub skill include Sharpedo, Stunfisk, Flygon, Trapinch, Tyranitar, Bonsly, Hariyama, Clodsire, Snorlax, and Onix. You can check your Pokédex to see which of your Pokémon already have this ability by filtering for specialties.

    ### Where to Find Pokopia Grubby Pearls

    The best spot to gather Grubby Pearls is in the tunnel on the left side of the Bubbly Basin staircase, across from the Pokémon Center entrance. There are plenty of these pearls here, so collecting enough for your shiny collection shouldn’t take long. Most players find it a reliable area for gathering Grubby Pearls efficiently.

    For other shiny items, take a look at our complete guide on all the Pokopia Mystery Gift Codes available to unlock in-game rewards right now.

  • All 16 Mayan Stone Sites in Black Flag Resynced

    All 16 Mayan Stone Sites in Black Flag Resynced

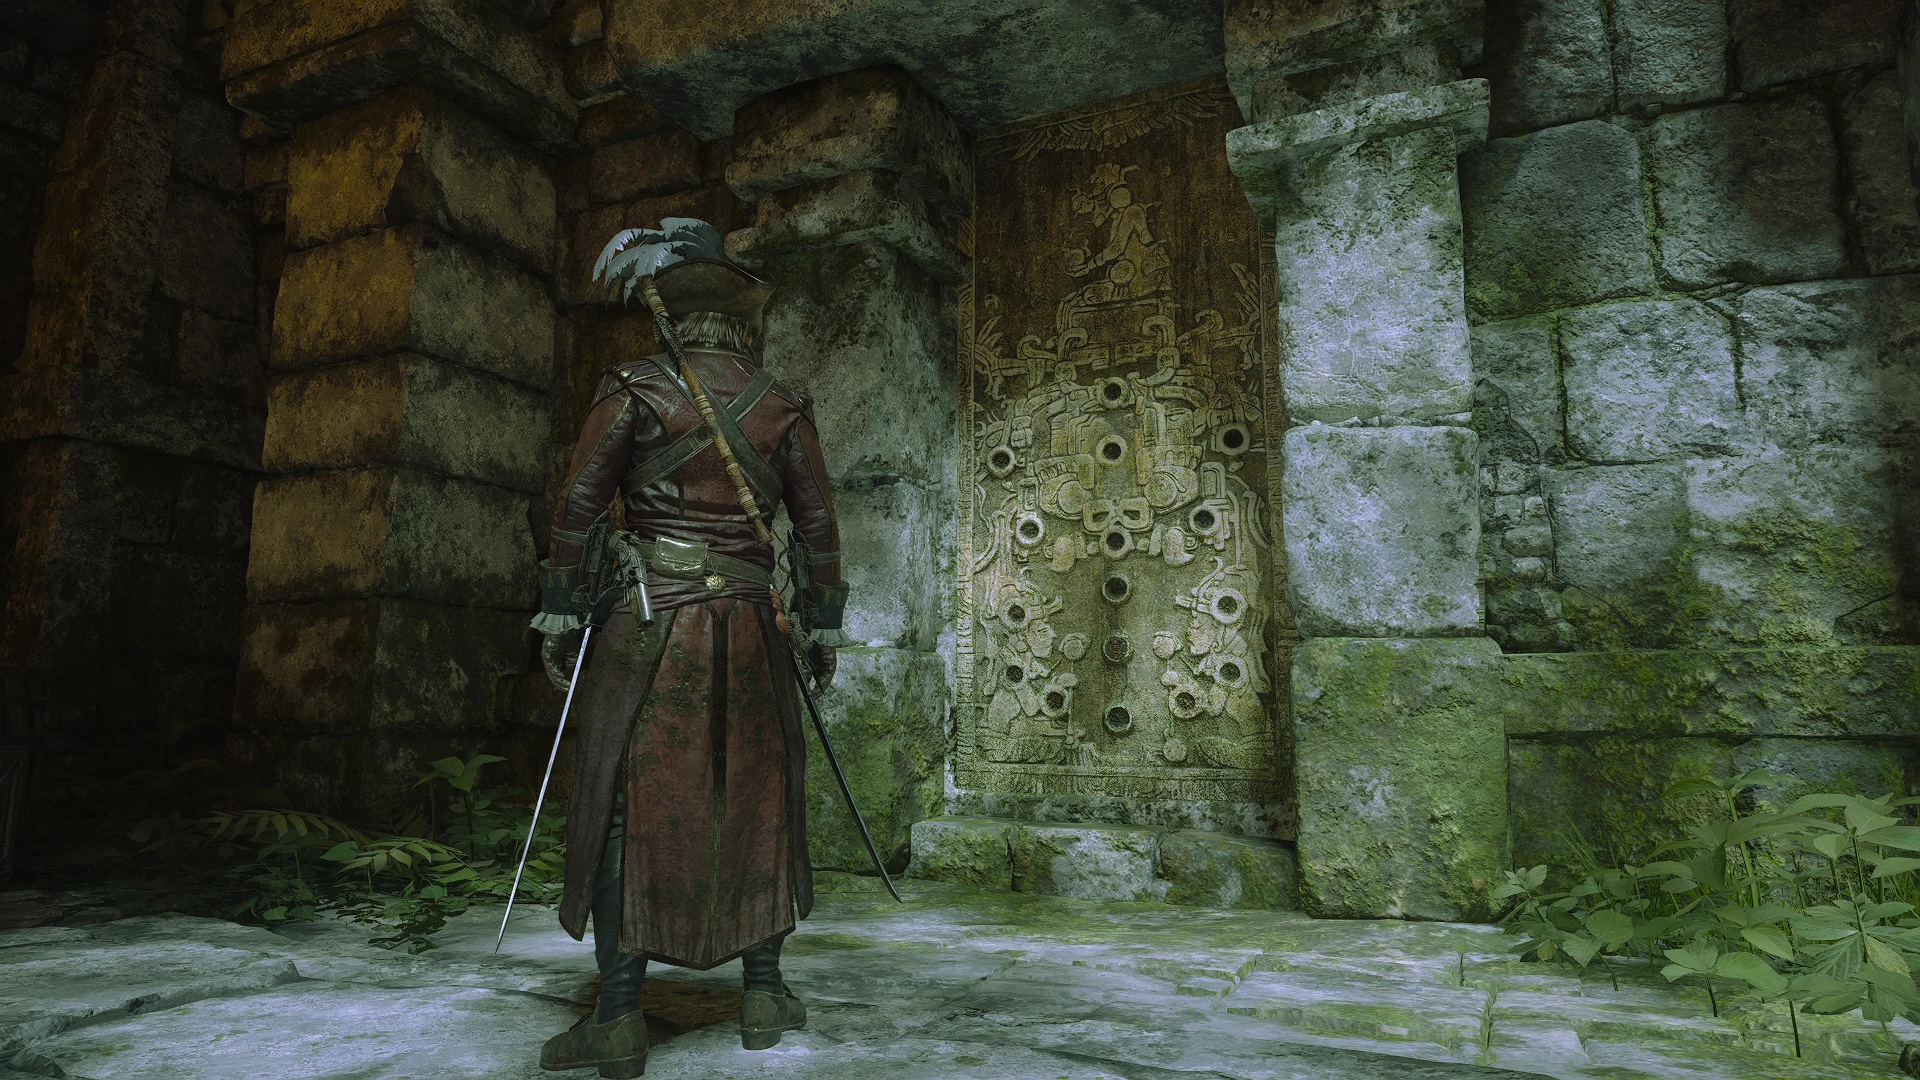
    In Assassin’s Creed Black Flag Resynced, finding all 16 Mayan Stones unlocks a secret door and grants you a special outfit and a unique trinket. This is an optional quest that you won’t be able to finish until you reach a later part of the game, but you can start working on it from the early hours. Collecting all of them and using them to open that door gives you a powerful ability that basically makes you invincible to gunfire. I’ve personally found all the stones and have the map coordinates ready for all sixteen Mayan Stelae, including both the original and the remake versions.

    For additional collectibles, check out where to find all the Black Flag Resynced ship upgrades or learn the locations of the Templar Keys.

    All the Mayan Stones are in the same number for both the original game and Resynced. However, most are in the same spots, except one in the remake that has been moved significantly to Sacrifice Island, and because the map size has changed in the new version, the coordinates are different even if the locations are similar.

    Here’s where to find each stone:

    – Great Inagua (Tutorial): 823, 437 (was 845, 468)
    – Cat Island: 703, 670 (was 734, 694)
    – Cape Bonavista: 159, 584 (was 179, 593)
    – Tulum: 30, 382 (was 70, 405)
    – Tortuga: 846, 352 (was 875, 379)
    – New Bone: 400, 92 (was 431, 116)
    – Sacrifice Island: 18, 548 (no original coordinates)
    – Pinos Isle: 311, 454 (was 342, 478)
    – Pinos Isle: 303, 452 (was 334, 476)
    – Santanillas: 187, 221 (was 221, 242)
    – Santanillas: no new coords (was 217, 245)
    – Misteriosa: 273, 175 (was 303, 199)
    – Misteriosa: 265, 171 (was 296, 196)
    – Matanzas: 311, 617 (was 343, 642)
    – Isla Providencia: 476, 16 (was 502, 44)
    – Isla Providencia: 487, 33 (was 502, 44)
    – Long Bay: 502, 216 (was 525, 253)

    Note that you won’t be able to reach the Long Bay location until you complete a main story mission called “The Observatory.” This is because the area is locked until then. Still, you can start collecting the others right away, and it doesn’t matter what order you tackle them in.

    To solve the Mayan Stone puzzles: climb on top of the Mayan pillar and press the “investigate” button. Edward’s Eagle Vision will activate, highlighting rocks or pillars around you. A set of interconnected shapes will appear, which you can move, rotate, or resize. Your goal is to adjust these shapes to match the outlines on the highlighted stones.

    Once you get the pattern right, the ground will glow, and you can interact with that spot to dig up the Mayan Stone.

    After collecting all the stones, go back to Tulum and interact with the locked door marked for the quest. You’ll go through a short parkour section leading to a small temple, where you’ll earn your reward: The Mayan Outfit, and on the Resynced remake, the Yax Tun Pendant, a legendary trinket. This pendant makes your character immune to gunshots when worn. In the original game, the outfit alone kept you bulletproof without the need for the pendant.

    Outfits in Resynced are just cosmetic; they don’t provide any gameplay advantages. But the Yax Tun Pendant is especially useful because it grants complete immunity from gunfire.

    You can also check out adorable pets for your ship or learn how to recruit officers to the Jackdaw and unlock their special skills.

    Remember, you won’t be able to get all the stones until you finish “The Observatory” quest, but you can gather most as you explore, no matter the order.

  • Squishies Codes Cleanup Guide (July 2026)

    Squishies Codes Cleanup Guide (July 2026)

    Clean the Squishies codes can help you level up in this cleaning game, where your goal is to organize a local squishy shop. Scattered all over the floor are adorable collectibles that need to be returned to their proper shelves. You can work solo or team up with friends to finish the cleanup faster.

    When you use the first code, you get Squishies, which is the in-game money you can use to buy upgrades. With it, you can unlock Trails and Auras that you can put on your character. These add-ons increase the amount of money and Squishies you earn while tidying up in this Roblox game. If you’re ready to start organizing, below are the current codes for Clean the Squishies and instructions on how to use them.

    If you’d rather find more general promo codes that work across multiple games, check out the latest Roblox promo codes.

    All Clean the Squishies codes right now:

    – UPDATE1 — Get 1,000 Squishies

    Since the game just introduced codes recently, there’s only one available. Due to the game’s popularity, more promo codes for Squishies and other items are expected to come soon.

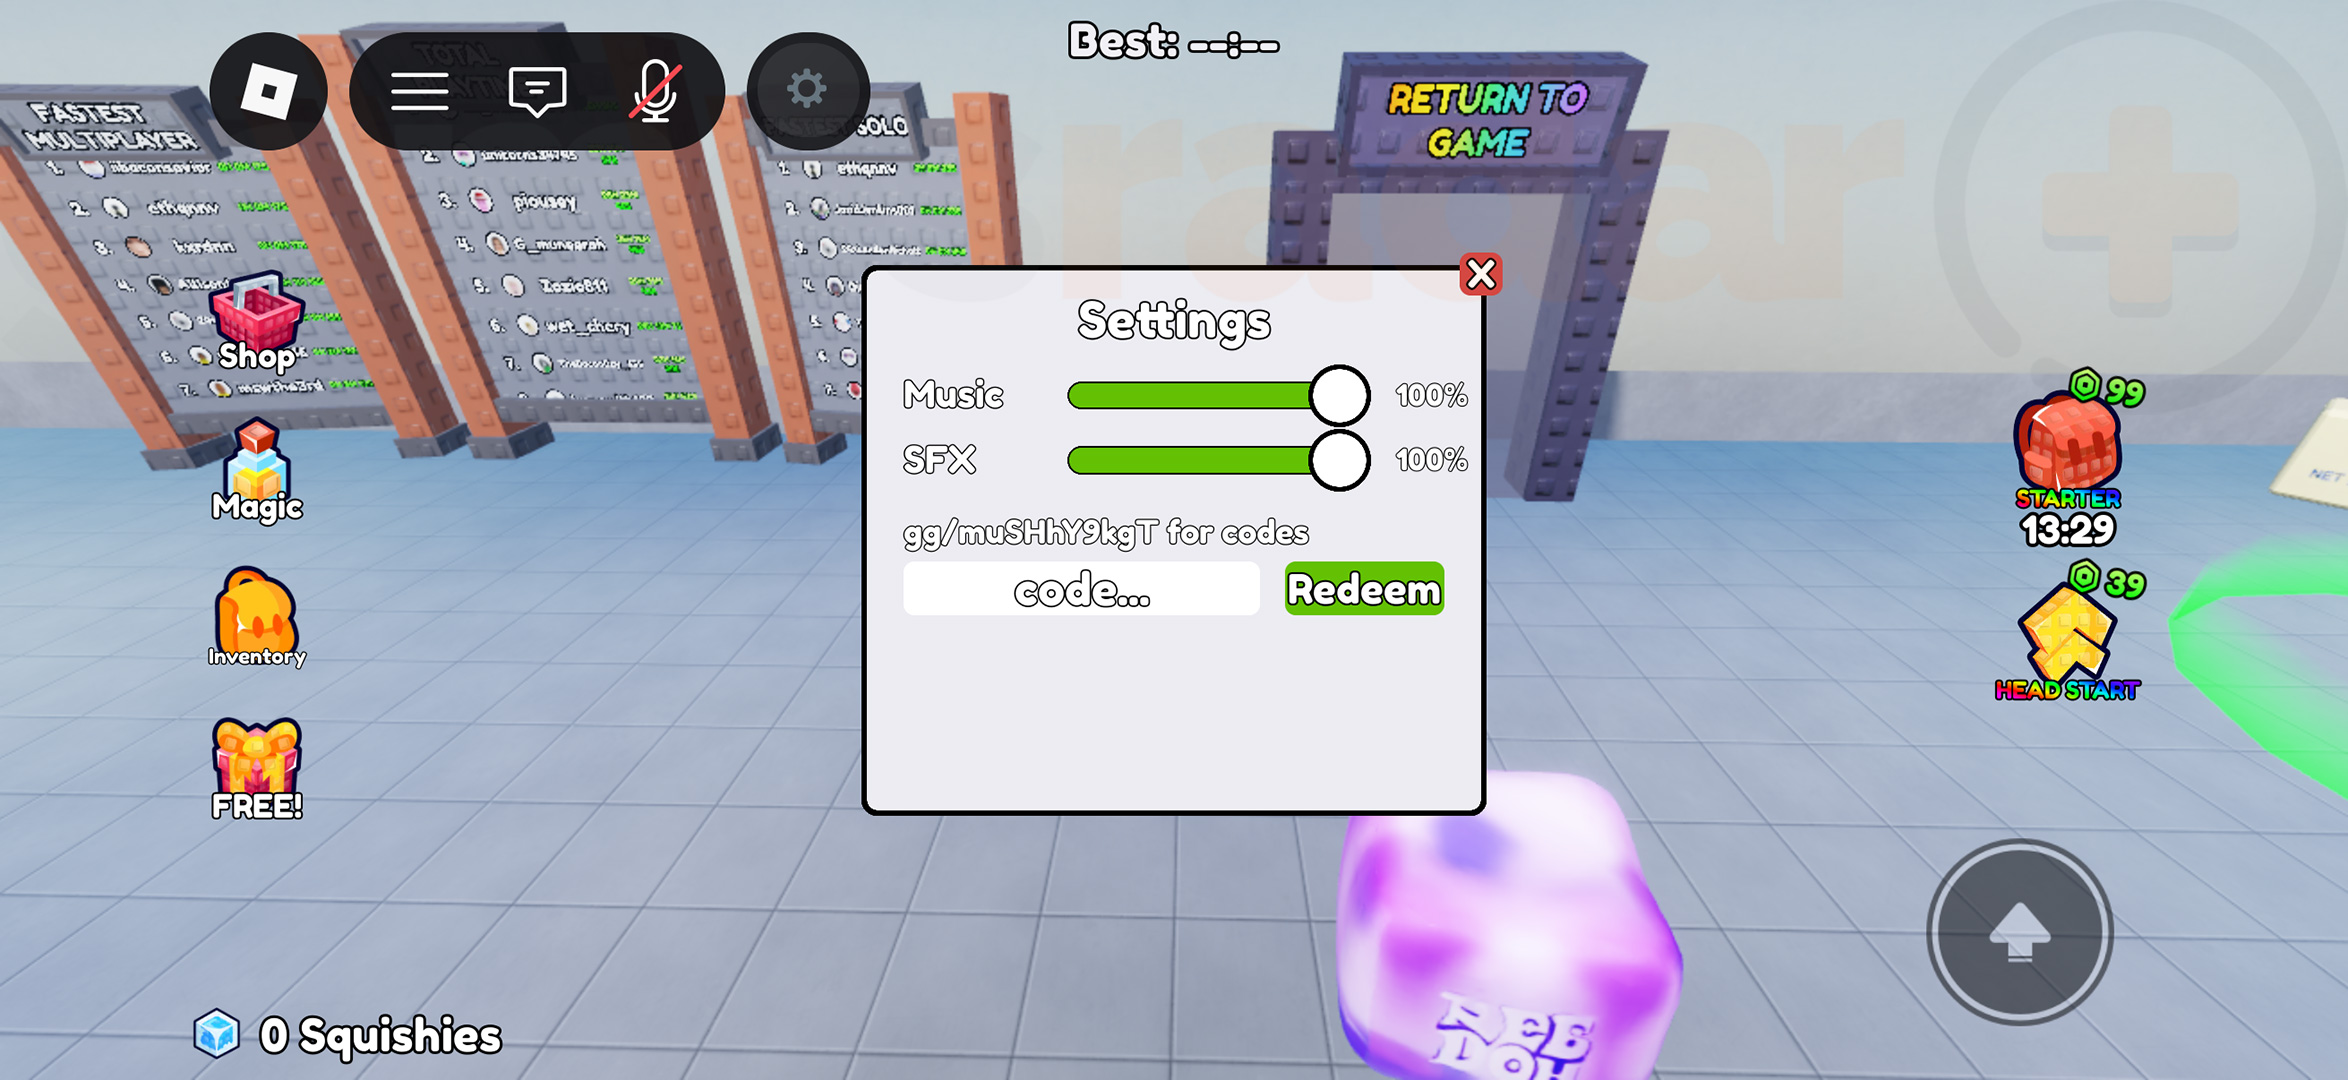
    To claim these codes, tap the gear icon at the top of the screen to open the Settings menu. You’ll see a box labeled “code…” at the bottom—enter the code there and press the Redeem button to get your reward. The codes aren’t case-sensitive, so spelling exactly as shown is all that matters.

    Currently, there are no expired Clean the Squishies codes, as they are new. But they don’t stay active forever, so make sure to use any active codes before they’re gone.

  • Top Minecraft Mods to Try in 2026

    Top Minecraft Mods to Try in 2026

    Minecraft mods encompass a broad spectrum of changes, from complete overhauls that transform the game into something entirely different, to smaller tweaks like new mechanics or individual mods. Whether you love keeping it purely vanilla or want to enhance performance and visuals without altering gameplay, there are some must-have mods for everyone.

    As someone who’s played Minecraft for over ten years and written extensively about it, I always have certain mods installed before I start playing. Especially Optifine, which I believe is essential. Having tried all of the mods listed below, I can confidently say they are top choices. Whether you’re exploring new ways to play or just want your game to run smoother and look better, these are the best mods currently available.

    Keep reading to discover the top mods across different categories, along with step-by-step guides to install them.


    Minecraft Modpacks
    Modpacks bundle many compatible mods into a single download, making it easier to install multiple at once without the hassle of managing each separately. They cover most themes, from performance boosts to new worlds. I recommend a few top ones that combine optimization mods with excellent world enhancements. Recent versions feature hundreds of mods, adding everything from new mobs and magic to enhanced endgames. You can pick which mods to keep or exclude, simplifying the modding process.

    All The Mods 10
    This popular series packs over 500 mods, introducing new dimensions, mobs, magic, and more. Though the latest version is still being polished for Minecraft 1.21.11, it’s worth trying the early alpha. It’s a versatile pack, blending performance improvements with abundant content, making survival, exploration, and building richer and more engaging.

    Quark
    If full modpacks feel overwhelming, Quark offers a nice vanilla+ experience. It adds around 140 mods that subtly enhance gameplay—like new blocks, automatic animal feeding, or quality-of-life tweaks—without straying too far from the original feel. Perfect for those who want a bit of extra polish without major changes.

    BetterMC
    This pack leans closer to vanilla but introduces mods that overhaul structures rather than new mobs or biomes. It includes things like Yung’s Better mods or Twilight Forest, which adds an entirely new dimension—optional, to keep the experience close to vanilla if desired. It’s a great choice if you want familiar gameplay with some exciting new features.


    Performance & Graphics Mods
    These won’t change the core gameplay but dramatically improve how the game runs and looks.

    Optifine
    In my eyes, the must-have performance upgrade for Minecraft. It boosts frame rates, enhances lighting, and adds visual options like dynamic shadows. It’s often required for other mods and offers features like illuminating your surroundings with held items. Just keep in mind that it doesn’t alter in-game light levels, so monsters will still spawn in dark areas.

    Sodium
    This mod optimizes rendering, making Minecraft smoother and faster. It’s known for being compatible with many setups and is praised for its speed, often claiming to be the fastest rendering enhancer out there. Downloads and user feedback back this up.

    Distant Horizons
    Expanding your view distance without sacrificing performance, this mod adds simplified terrain beyond the game’s default limits. You can set a low in-game render distance but still see far into the distance, making worlds look more expansive and beautiful.

    Lithium
    This mod helps Minecraft run more smoothly by improving game physics and AI processes. By simplifying some backend systems, Lithium frees up resources so other parts of the game, like rendering, can run better—resulting in faster gameplay.


    Quality of Life & Inventory Mods
    These mods add small but impactful tweaks to make your life easier, often altering vanilla mechanics.

    Just Enough Items (JEI)
    A classic for inventory management, JEI shows you the recipes and uses of items simply by hovering over them. It’s invaluable for both newcomers trying to learn crafting and veterans who want quick reference.

    Xaero’s Minimap & World Map
    Keep track of your surroundings with Xaero’s Minimap, which can show mobs and waypoints. The World Map adds a full, explorable map to help you navigate and retrace your steps easily.

    Mouse Tweaks
    Adds shortcuts to organize your inventory quickly. Drag items to move stacks or pick up multiple items with a few clicks—saving time and effort.

    AppleSkin
    Provides detailed info about items’ hunger and saturation effects, displayed right on the HUD. It’s handy for managing food and health more effectively.

    Sophisticated Backpacks
    You can carry larger inventories with customizable backpacks that can be placed around your base. Different colors help organize your supplies, making storage more personalized and practical.


    Vanilla+ Mods
    These mods add subtle enhancements that improve the aesthetic or quality of vanilla gameplay without drastic changes.

    Farmer’s Delight
    Expands farming options with new crops and recipes, like tomatoes and onions. It also introduces better farming mechanics, such as improved soil and cooking systems, making farming more rewarding.

    Immersive Portals
    Revolutionizes portal travel by making portals transparent and more realistic, allowing you to see what’s on the other side before stepping through—adding a whole new visual dimension.

    Aquaculture 2
    Enhances fishing, adding new fish, loot, and mechanics like different biomes with unique catches. New fishing rods and loot improve what can be gained from fishing adventures.

    Veinst
    Speeds up mining by allowing you to break entire ore veins with a single action, reducing grind without affecting the core experience.

    Fresh Animations
    Revitalizes mob animations, adding personality and life. From animals to monsters, the subtle movement makes exploring feel more lively—especially noticeable on wolves and dogs.

    Waystones
    Adds teleportation stones to quick-travel between your favorite locations, making exploration and returning home faster and easier.


    World Overhaul Mods
    These mods significantly change the Minecraft world itself, adding whole new biomes, structures, and mobs while maintaining the core adventure essence.

    Artifacts
    Enhances exploration with new relics, including powerful loot, hidden structures, and dangerous mobs guarding treasures. It deepens the sense of discovery beyond vanilla.

    Biomes O’ Plenty
    Features over 50 new biomes, dramatically expanding your exploration options across the overworld, Nether, and the End. It introduces lush forests, deserts, and mysterious new environments.

    The Twilight Forest
    Construct a portal to a new dimension filled with enchanted forests, new mobs, and unique loot. It’s like stepping into a fantasy realm with biomes and structures teeming with secrets and challenges.

    Towns and Towers
    Fills the overworld with over 50 new structures—villages, towers, ships—adding depth, variety, and a touch of vanilla feel to your exploration.

    Alex’s Mobs
    Introduces over 80 new mobs—ranging from real animals like elephants and sharks to mythical creatures—making farms and adventure even more dynamic.


    Adventure Mods & Maps
    Change how you play entirely, often turning the game into a new experience.

    Skyblock
    Transform your world into a floating island with limited resources—mine, farm, build—challenging you to survive and thrive on a tiny piece of land. It’s one of the most iconic mods of all time.

    OneBlock
    Start on a single block that replenishes itself, unlocking new resources and biomes as you progress. It simplifies the survival challenge, offering levels and new areas as rewards.

    The Backrooms
    Set in a eerie liminal space, this mod turns exploration into a horror experience, with maze-like levels, terrifying mobs, and a chance to accidentally enter a haunted dimension—a true test of bravery.


    How to Install Minecraft Mods
    Mods can usually be added by downloading files and placing them into the .minecraft/mods folder. First, open the Minecraft Launcher, go to the Installs tab, create or select an installation, and click the folder icon to locate your game directory. You’ll see a mods folder there—drop your downloaded mods into it. For some mods, like OneBlock, follow the specific instructions on their pages.

    Using a mod manager like CurseForge or Minecraft Forge makes the process even simpler. Always download mods from trusted sources to avoid issues.

    Remember, using mods may affect your game’s stability or compatibility—so keep backups and only install what you genuinely trust.

  • June 2026 Blox Monsters Codes: Unlock Rewards Today

    June 2026 Blox Monsters Codes: Unlock Rewards Today

    Blox Monsters codes can help you progress by unlocking free rerolls, which give you a better chance at winning in the game’s random draw system. They also provide useful items like different fruits to feed your pets, helping you evolve and strengthen your team. These codes are a great way to earn additional resources without spending real money. If you want to catch every creature and build the ultimate team, these current codes for Blox Monsters are what you need, and here’s how to use them.

    Here’s a list of active codes you can claim right now:
    – SkillRefund – 3 Reverie Fruits (new!)
    – 10000CCU – 1 Miracle Birth Fruit
    – NewTrait – 1 Miracle Birth Fruit
    – NewMutation – 1 Gorgeous Fruit
    – Mega – 1 Solitude Crystal
    – BonVoyage – 1 Bloodline Reroll

    There are several codes available at the moment that provide a free reroll, some crystals, and fruits to help your pets grow strong. You can save these codes in your inventory for later use, so there’s no rush to redeem them immediately.

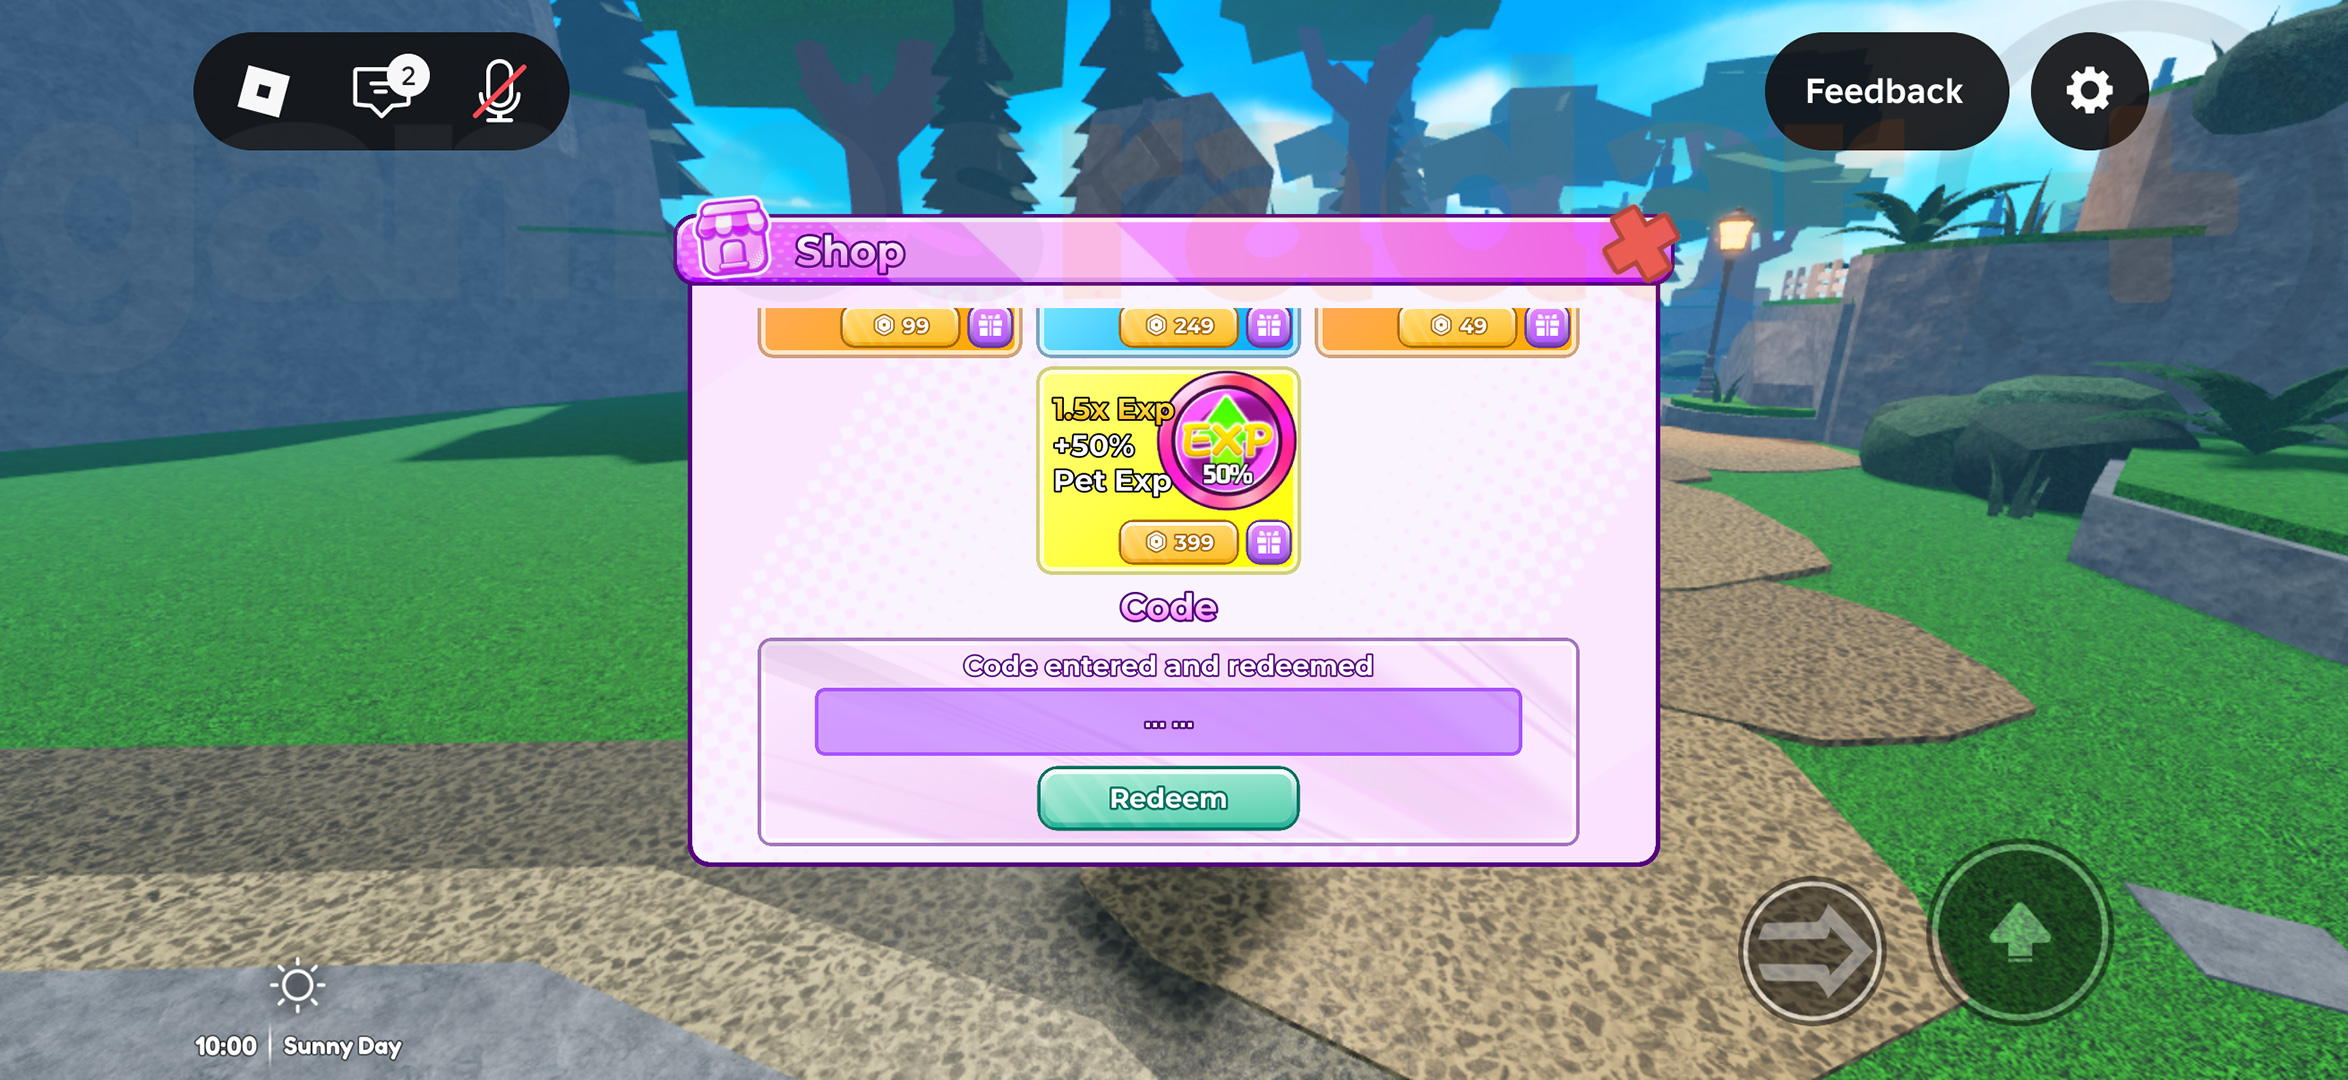
    To redeem a code, tap the Shop icon and scroll to the bottom to find the Code section. Type in the code in the text box, then press Enter or the green Redeem button. Codes aren’t case-sensitive, so spelling is all that matters.

    Right now, there are no expired codes for Blox Monsters, but as the game updates, old codes may stop working. Be sure to redeem any active codes so you don’t miss out on free rewards.

  • June 2026 Pokemon Champions Mystery Gift Codes

    June 2026 Pokemon Champions Mystery Gift Codes

    As of June 17, 2026, there are no new active Pokemon Champions Gift Codes at the moment. However, you can still redeem the Machamp code listed below if you haven’t used it yet!

    Using Pokemon Champions Mystery Gift codes allows you to add new, strong Pokemon to your team. But keep in mind, your Champion box can only hold up to 30 Pokemon, so choose carefully. It seems The Pokemon Works has selected the giveaway fighters thoughtfully, as the first reward is a highly sought-after Pokemon.

    Start by claiming a new Pokemon for your team with this Mystery Gift. If you’re unsure how to redeem it, I’ll guide you through the process.

    All current Pokemon Champions Mystery Gift codes:

    Reward Code Expiration Date
    Machamp CHAMP10N August 31, 2026

    So far, only one Mystery Gift has been released, but more might come in the future. Whether they’ll feature different Pokemon or other items like Battle Points or battle gear remains to be seen. We will update this page as soon as new codes are announced.

    If your bag gets full, you can transfer some Pokemon to the Pokémon Home app to increase your storage. A separate guide on linking Pokemon Champions with Pokémon Home will be available soon.

    How to redeem Pokemon Champions Mystery Gift codes:

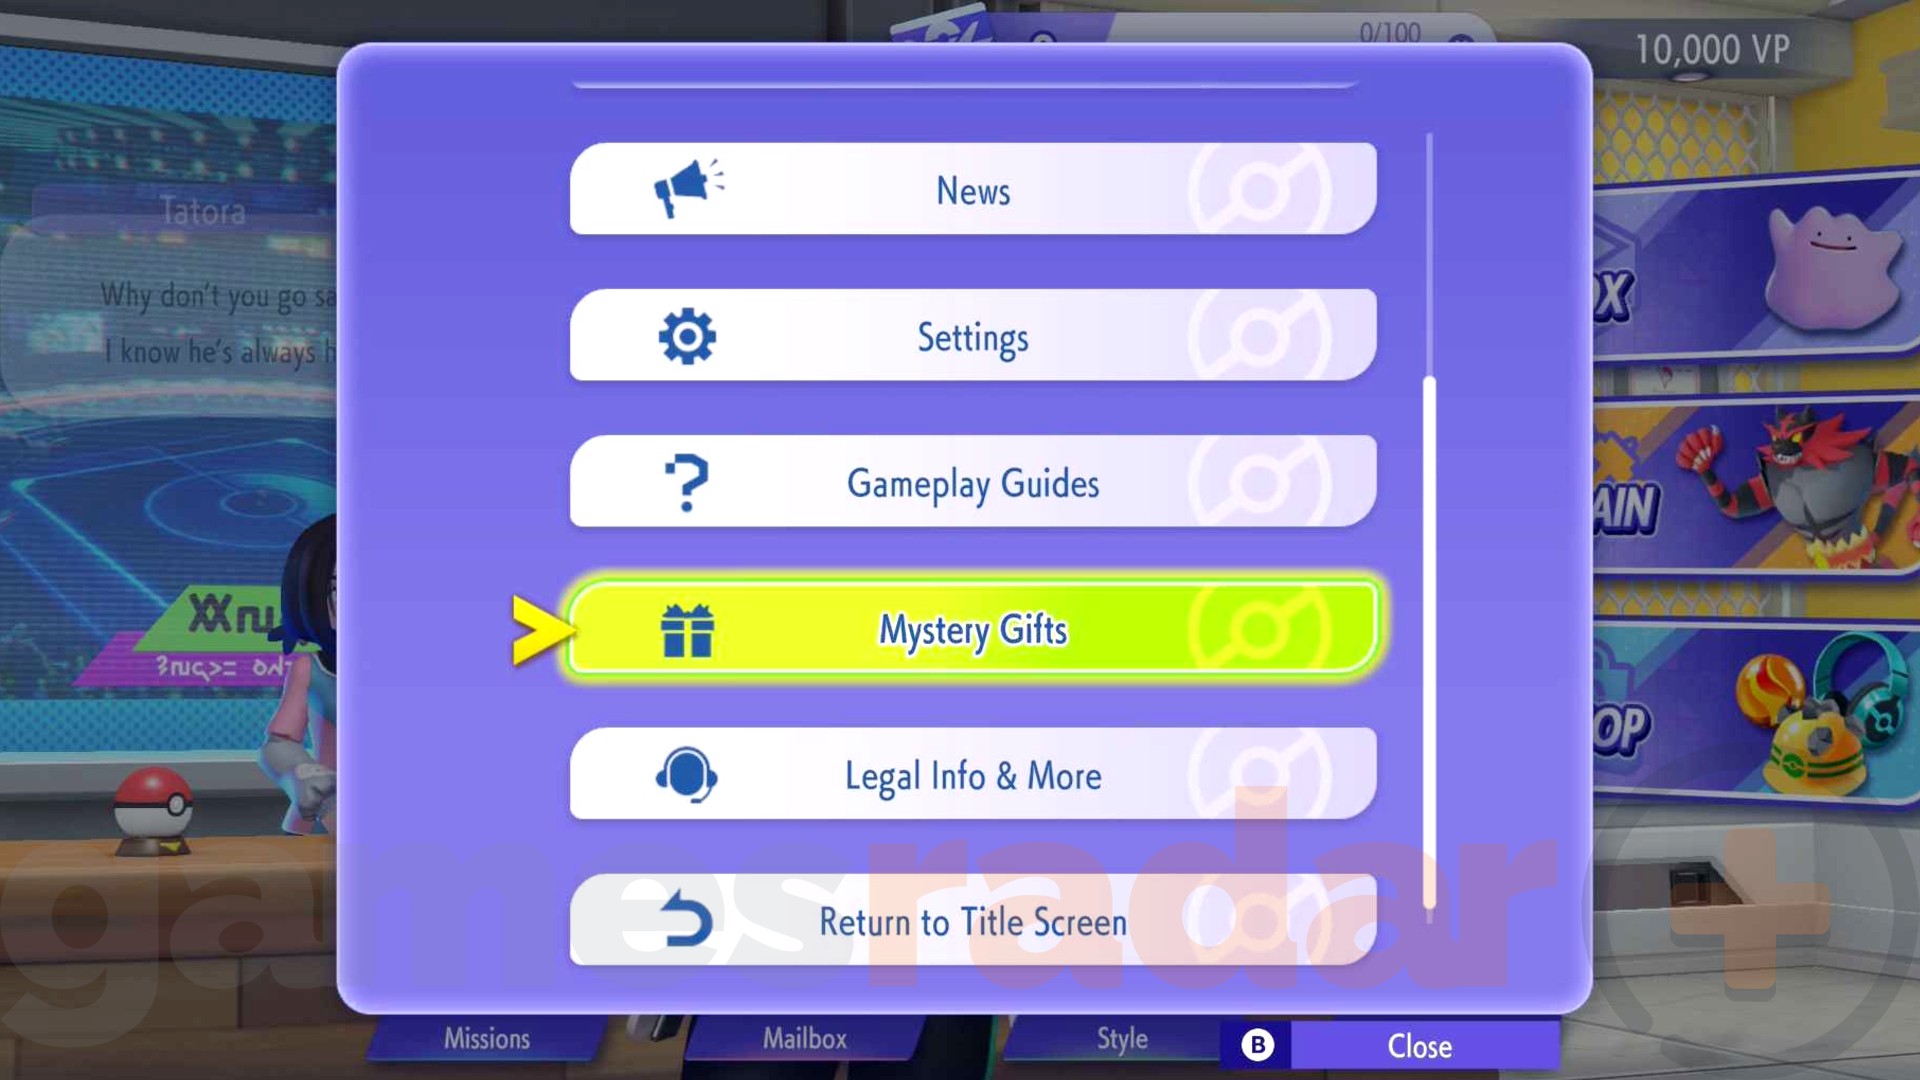
    First, complete the quick tutorial. Then, from the main menu, go to the Submenu and scroll down to Mystery Gifts. Enter your code on the redemption page. Afterward, return to the main menu and open your Mailbox to pick up your gift.

    Expired Codes:
    Unfortunately, the code for Gyarados, DRAGONDANCEPTC26, was only valid for one week and is no longer available.

    If you’re a big fan of Pokemon, you might also want to check out the latest Pokemon Z-A Mystery Gifts and any current Pokopia Mystery Gifts. Also, don’t miss our guides on the best Pokemon to use in Champions and a ranking of all the Champions tiers.

  • Co-op Adventure: Lego Batman’s Dark Knight Legacy

    Co-op Adventure: Lego Batman’s Dark Knight Legacy

    Lego Batman: Legacy of the Dark Knight offers a cooperative multiplayer mode where two players can team up. Each player controls a different character, allowing you to fight Gotham’s villains together as a team. If you’re new to setting up co-op in a Lego game, it can seem a bit confusing, so here’s a simple explanation of how cooperative play works in this game.

    To play with a friend, just connect a second controller to your console. Then, press the Start button on that controller — you should see an option called “Drop In” at the top right of the screen. The second player can then take control of any character, and the game splits into two screens for each player.

    To end the co-op session, simply disconnect the second controller. When you do this, a message will appear indicating the disconnection. The remaining player can then end the co-op by holding down the X or A button, depending on your console.

    It’s important to note that Lego Batman does not support online multiplayer. You cannot play with friends over the internet, and ongoing local co-op requires two controllers, one for each person.

  • Do Pokémon Change Form in Pokopia?

    Do Pokémon Change Form in Pokopia?

    In the Pokemon game series, evolving your creatures is one of the most fun and satisfying features. Naturally, you might wonder if your Pokemon can evolve in Pokopia. You’ve set up a cozy home for Charmander, given it some gifts and tasty food, and treated it like it’s in a Pokemon paradise. But despite all that, Charmander remains unchanged. What’s going on?

    Actually, Pokemon don’t evolve in Pokopia, but you can still find evolved versions of your favorite monsters nearby. Here’s how it works: since you can only catch each Pokemon once in Pokopia, letting them evolve would mean you’d have to pick which form to keep. Unfortunately, you can’t have all the forms in an evolution line living at the same time. Instead, you’ll need to find each form separately. For example, if Charmander is living in Withered Wasteland, you’ll have to explore to discover Charmeleon and Charizard in their preferred habitats.

    Some evolved forms, like Ivysaur, share the same habitat preferences as their previous form, so you can try to find them in the same location. But that’s not always the case, so you might need to wait until you notice the right traces or signs of their presence. If you want to have the whole evolutionary line together, it’s possible to move Pokemon from one region to another, provided they’re not on an active quest. Just keep in mind, you need to rehome them properly in the new region for them to stay there.

    Remember, even if they’re in different areas, you can gradually gather the whole line by searching and relocating your Pokemon as needed.

  • Exclusive Pokémon Pokopia Mystery Gift Codes – March 2026

    Exclusive Pokémon Pokopia Mystery Gift Codes – March 2026

    Good news for Pokémon fans! Pokopia Mystery Gift codes are real and continue the tradition that’s lasted for years. Although the way we get these gifts has changed over time, there’s now an increased chance to receive exciting new items through online codes provided by The Pokémon Company.

    In any new Pokémon game, there are different methods to access Mystery Gifts — and Pokopia is no different. Here’s what you need to know about finding these gifts, redeeming codes, and the current list of available rewards.

    All Mystery Gift Codes in Pokémon Pokopia

    Right now, the only Mystery Gift available for Pokopia is the pre-order bonus Ditto Rug. Since the game was just released, more codes are likely on the way. You can redeem Mystery Gifts through in-game options as well, which suggests Game Freak plans to release additional gifts later.


    (Image credit: The Pokémon Company)

    Current Mystery Gift Rewards

    Gift Reward How to Redeem Expiry Date
    Ditto Rug No code needed if pre-ordered, via Internet Sunday, January 31, 2027

    At this time, the only Mystery Gift is the Ditto Rug — a pre-order bonus. But because the game just launched, more codes are expected. The in-game redemption method makes it easy to claim gifts, and there’s hope that further rewards will be released down the line.

    How to Redeem Mystery Gifts in Pokémon Pokopia

    Here’s how to get your Mystery Gift in the game:

    1. Ensure your Nintendo Switch is connected to the internet.
    2. Go to the Pokémon Center PC in the game.
    3. Interact with the PC and select “Get Items.”
    4. Scroll and tap on “Mystery Gifts.”
    5. Choose “Get Via Internet” or “Get with Code/Password” depending on the gift.
      • For early pre-order bonus, select “Get Via Internet.”
    6. You will receive your gift immediately within the game.
    7. If you want to check which gifts you’ve already received, select “Check Mystery Gifts,” which shows all previous gifts.

    Since Mystery Gift codes are often shared during special events, I’ll be keeping an eye out for announcements and will update this list whenever new rewards appear. Remember, each Mystery Gift can only be redeemed once per account, and you have until January 31, 2027, to claim your Ditto Rug.

  • Getting Tomatoes in Pokémon Pokéopia: A Step-by-Step Guide

    Getting Tomatoes in Pokémon Pokéopia: A Step-by-Step Guide

    In Pokemon Pokopia, finding tomatoes is an important step if you want to do several things. Building small farms in Pokopia adds a charming touch and brings some variety to your town designs. But there are practical reasons too.

    You can grow different crops like tomatoes, wheat, potatoes, and beans. These ingredients are used in recipes you’ll unlock later in the game, such as salads, breads, burgers, and more. Tomatoes are especially crucial for many of these recipes. They also play a key part in the first stage of the Team Initiation Challenges, which happen at the beach lighthouse in the Withered Wasteland.

    How to find tomatoes in Pokemon Pokopia

    To get tomatoes, start by increasing your trainer level to “Great” by completing stories in the Withered Wasteland. Once you reach this level, you’ll gain access to the large, locked doors that scan your Pokedex.

    Next, head to the east side of Withered Wasteland. Look for a broken wall of soil blocks and find a gate nearby, just to the right of the Pokemon Center in that area. Going through the gate, you’ll arrive at Bleak Beach, an oceanfront part of Pokopia. Follow the path down to a lower level, where you’ll see two small houses on each side. In the garden behind the house on the right, you’ll find tomatoes growing in a small patch.

    If you want to grow your own tomatoes, you can buy seeds at the Pokemon Center once you level up Bleak Beach’s environment. Seeds cost 40 coins for five bags. You can also find tomato seeds as gifts from other Pokémon or by seeing water splashes around the area.

  • Pokemon Legends ZA Mystery Gift Codes for January 2026

    Pokemon Legends ZA Mystery Gift Codes for January 2026

    On January 27, 2026, we checked for new Pokemon Legends Z-A Mystery Gift Codes and found that promo B1G0006 has expired.

    Mystery Gifts and codes in Pokemon Legends Z-A are your way to earn special rewards and items. These include Mega Stones like Mewtwonite X and Y, which allow you to add Mewtwo to your team after completing an extra side mission. The game has already released several Mystery Gifts and is expected to offer more over the coming months. Here’s how you can redeem these codes and claim your gifts!

    All Mystery Gift Codes in Pokemon Legends Z-A

    Pokemon Legends Z-A offers various Mystery Gift rewards you can claim.

    Some of the current rewards include:

    • Max Revives x5
    • Full Restores x10
    • Ultra Balls x10
    • Mewtwonite X and Y Mega Stones (via internet, no code needed, after completing the main campaign)
    • Diancite Stone (through an in-game side mission called “Shine Bright like a Gemstone”)
    • Ralts and Gardevoirite Stone (via internet)
    • Special items like a Trench Coat, Trousers, and Scarf (from select retailers)
    • Consumables such as Super Potions, Revives, Full Heals, and Rare Candy (also from select stores)
    • 100 Poke Balls (sent after purchasing the digital edition)
    • Item packs for DLC expansion, including Fast Balls, Heavy Balls, Level Balls, and Lure Balls (via email after purchase)
    • Exclusive gifts like Cherish Ball Audino for visitors during birthday months at Pokemon Center Stores in Japan, Singapore, and Taiwan

    Expired gifts include a Level 36 Alpha Charizard that knows Solar Beam and appears in your PC, as well as a Cherish Ball Slowpoke. Remember, each gift can only be claimed once per account.

    As of now, there are no rewards that have become invalid or out of date, but that could change with time. We’ll keep this page updated with new info.

    How to Redeem Mystery Gifts in Pokemon Legends Z-A

    To claim these gifts, follow these steps:

    1. Make sure your device has an active internet connection (a Switch Online membership isn’t needed).
    2. Open the Link Play menu in Pokemon Legends Z-A.
    3. Select Mystery Gift.
    4. Choose Get Via Internet or Get with Code/Password, based on the gift you want.
    5. If you select Get with Code/Password, input the correct code.
    6. The gift will be sent to your game immediately.

    The difference is that “Get via Internet” gifts are available instantly to all players, while “Get with Code/Password” gifts are locked behind a password, often shared during special events or pre-order bonuses.

    Please note, each Mystery Gift can only be redeemed once per game account.

    Enjoy hunting for the best starters and Mega Evolutions to strengthen your team in Pokemon Legends Z-A!

  • Feebas in Pokémon Legends: Location & Evolution Guide

    Feebas in Pokémon Legends: Location & Evolution Guide

    Feebas is now available in Pokémon Legends ZA with the release of the Mega Dimension DLC. Similar to earlier games, giving Feebas a Prism Scale will allow it to evolve into Milotic, a strong Water-type Pokémon. However, finding Feebas isn’t straightforward at first, and locating a Prism Scale can be even trickier. Thankfully, I’ve tracked down both and will guide you on where to find Feebas and how to evolve it below.

    Where to Find Feebas in Pokémon Legends ZA
    Feebas only appears in the Mega Dimension DLC. You’ll find it in the Water-type Hyperspace Wild Zone Distortions rated two stars or higher. Since Feebas is rare, you should rest at a bench to pass time, then scan all map Distortions for its silhouette—shown on the left above—as you search. Keep checking different Distortions and resting again until Feebas shows up. It may take some time, since the appearance process is random. When you finally encounter one, it’s quite easy to catch because Feebas is a weak Pokémon that won’t fight back much. To make catch easier, use Pokémon Legends ZA Donuts with high calories to give yourself enough time during attempts.

    Evolving Feebas into Milotic
    In Pokémon Legends ZA, evolving Feebas requires trading it while holding a Prism Scale. This is different from older games where evolution depended on beauty stats or specific elements. Now, it’s simply a matter of trading the Pokémon with the Prism Scale attached.

    How to Get a Prism Scale
    You can obtain a Prism Scale in Pokémon Legends ZA by completing Side Mission 160, titled “Feebas’s New Friends.” To start, talk to an NPC named Soucian near the pond left of Wild Zone 2 (Vert Plaza) on the map. The quest is straightforward: just give her a Feebas. If you don’t already have one, take your time catching it—no rush. Once she receives the Feebas, she’ll reward you with $1,600 and one Prism Scale. You can then use this item to evolve any Feebas you have into Milotic.

    Some players suggest Feebas can also be found as a rare drop in Distortions, but this hasn’t been confirmed, and it’s likely very uncommon. Doing the side quest remains the easiest way to get a Prism Scale.

    Once you have the Prism Scale, trade Feebas while holding it to evolve into Milotic, a quite strong Water-type Pokémon with high special defense. It’s a popular choice that can help fill your Pokédex, even though it’s unlikely to match the legendary Pokémon’s power.

    Enjoy your journey in Pokémon Legends ZA!

  • Spooky Cemetery Tale Walkthrough in Pokémon Legends ZA

    Spooky Cemetery Tale Walkthrough in Pokémon Legends ZA

    The “Sorta Scary Cemetery” side quest in Pokémon Legends ZA, part of the Mega Dimension DLC, involves a special event that requires you to input a secret code. You’ll need to remember and correctly enter a series of passwords at the Dormez Bien Cemetery, along with meeting some other conditions. Successfully completing these steps will lead you to encounter a mysterious Pokémon that’s been hiding in the area. However, remembering all the instructions from the quest giver can be tricky, which is why this guide will walk you through exactly what you need to do.

    How to Finish the Sorta Scary Cemetery Side Mission

    1. If it’s not already nighttime in Pokémon Legends: ZA, find a seat and wait until it gets dark.
    2. Place all but one Pokémon into your boxes. You can only trigger the event with a single Pokémon out. It’s best to bring a Pokémon with dark-type moves or a strong dark-type Pokémon, since the encounter features ghost-type Pokémon.
    3. Travel to the North Entrance of Dormez Bien Cemetery, also called Wild Zone 4, and find the spot marked on your map.
    4. Once there, you’ll be asked to speak a specific password phrase provided by the quest giver.
    5. If you say the phrase correctly, a cutscene starts, leading to a battle with five Greavard and a Houndstone. Defeat them to finish the mission.

    Password Phrase and Code for the Cemetery

    When you arrive at Zone 4 Cemetery, you’ll be prompted to say five words, one at a time. These words are:

    • Solitary
    • Solo
    • Cemeteries are
    • Sorta
    • Scary!

    After completing the quest, you’ll earn $1313 and the TM for Ominous Wind, a powerful ghost-type move.

    Interested in more missions and challenges from the DLC? Check out guides on how to evolve Charcadet or beat tough bosses like Mega Crabominable!

  • How to Find the Stray Safe Code in The Slums

    How to Find the Stray Safe Code in The Slums

    The safe code for the lost cat in Stray is something you’ll come across as you explore The Slums. You’ll find an abandoned lockbox in a trash-filled alleyway. Attached to this safe is a mysterious code keypad. While it might seem helpful, you’ll quickly realize that neither B-12 nor the local residents can figure out the code, so you’ll need to find someone who can.

    To make things easier, I’ve put together a step-by-step guide on how to read the code and unlock the safe. Remember, each step is separate, so if you want to skip ahead and just open the safe right away, you can do that. After entering the safe code, the mysterious code item will disappear from your inventory—it’s no longer needed.

    Where to Find the Safe in The Slums
    Once you arrive in The Slums and speak with the Guardian, go to the garage full of meditating robots. Turn left and go down the stairs. Pass by Morusque, the musician, and look for an alley to the left of a sewer entrance shutter. The safe with the code is attached to a unit there. When you examine the mysterious code item, it says “follows the numbers” and displays a binary sequence that looks undecipherable. Don’t forget to check the vending machine opposite this alley for energy drinks—they’re useful for collecting items later.

    Getting the Code Deciphered
    Show the mysterious code item to any robot nearby, and they’ll tell you it’s an old binary code that only a tech expert can understand. Just like the Stray notebooks, you’ll need to find a particular person who knows how to read it.

    How to Read the Safe’s Mysterious Code in Stray

    The person who can decode the safe’s code is inside a building called Elliot Programming. You can identify it by the binary signs around The Slums or a sign with binary strings on it. To get in, knock on the door by interacting with it. After a short “knock,” you’ll be allowed inside. Meet Elliot upstairs and show him the code item. He’ll decode it quickly as “DUFER BAR.” If he looks nervous or shaken, try giving him the Stray Poncho first.

    How to Get the Safe’s Actual Code

    With the decoded password, head to the bar with the glowing red sign straight ahead when you exit Elliot Programming through the window. Inside, find the neon “DUFER BAR” and interact with the picture hanging above the bar. It will fall, revealing the safe code: 1283. While you’re there, pick up one of the Stray Memories by scanning the food bowl on the top of the stairs.

    Now, return to the device in the alleyway and enter the safe code: 1283. Doing so will unlock the safe, and you’ll get one of the eight Stray Sheet Music locations. Hand this over to Morusque, and he’ll perform another song. Plus, you’ll get closer to collecting all the Badges in Stray by adding the music pin to your collection.