الوسم: advanced

  • Completing the Advanced Mentat Quest: A Step-by-Step Guide

    In Dune: Awakening, when you create your character, you’ll begin by selecting a starting class. This initial choice doesn’t limit you; you can still learn skills from other classes and acquire advanced abilities in any skill tree. However, unlocking these skill trees requires you to locate specific trainers. For advanced skills, you’ll need to track down advanced trainers.

    If you’re eager to enhance your Mentat skills, you might be asking where to find the Advanced Mentat Trainer. This guide is here to help you out. Here’s everything you need to know to achieve your Advanced Mentat Training.

    Where to Find the Advanced Mentat Trainer

    Before diving into this quest, ensure you’ve completed the basic Mentat training first. Once that’s done, make your way to Arrakeen.

    This quest requires two visits to Arrakeen, so be sure you have at least 5,000 Solari with you before you head out.

    In Arrakeen, look for Zayn de Witte, a unique Mentat located in a corner of the bar.

    Speak with him to accept your first task.

    Interrogate the Mobula

    After your conversation with Zayn, he’ll assign you to interrogate members of the Mobula gang. You’ll find the first member at the Anvil.

    The dialogue options in this quest are straightforward; just avoid cutting the conversation short by choosing ‘Goodbye.’

    Engage the Mobula and intimidate him into revealing where you can find the second Mobula gang member, who is at the Harkonnen Fortress.

    Interrogate this member and persuade him to disclose where their Mobula base is located.

    Enter the Mobula Base

    Next, you’ll need to infiltrate a couple of Mobula bases and sabotage them for Zayn. Go to the first location marked on your map.

    Enter the base and defeat any enemies inside. Once cleared, you’ll find an open console on the north side of the base. Interact with it to uncover the locations of more bases.

    Before you leave, don’t forget to sabotage a few areas in the base. It’s easier to do this after you’ve eliminated all the enemies, so prioritize that first.

    From there, head to these locations:

    • Generator – Northeast side of the base
    • Vehicle – West side of the base

    Simply interact with each object to sabotage them. Afterward, move on to the next base.

    Chattel Passage

    Your next stop is the point labeled Chattel Passage to the northeast of the first base. This is another significant Intel Base, so be sure to take out the enemies inside before exploring.

    If you have trouble locating a specific area, use your para-compass at the top of your screen to help guide you.

    Once inside, head to the first floor and look for a small black case to collect the Minimic film inside. Then, just like before, go to the Comms Console and sabotage it.

    • Comms Console – Second floor of the base, facing east

    After completing this task, you can return to Arrakeen.

    Delivering to Zayn

    Once back in Arrakeen, find Zayn again. He’ll ask you to deliver the information you’ve gathered to Thufir Hawat, who is also in Arrakeen.

    Make your way to the top-level landing pad at the back of Arrakeen. You’ll find Thufir under a canopy on the north side. Share the information with him, then return to Zayn to finish the quest.

    After you finish this initial quest, you can keep taking contracts from Zayn to gain even more Mentat skills.

  • Completing the Advanced Bene Gesserit Quest in Dune: Awakening

    Completing the Advanced Bene Gesserit Quest in Dune: Awakening

    While exploring Arrakis in Dune: Awakening, you’ll encounter various advanced skill trainers, including a notable one named Jocasta, who specializes in the ways of the Bene Gesserit. If you’re eager to enhance your abilities with the Voice, you might be curious about how to begin.

    This guide will provide you with all the information needed to locate, initiate, and complete the Advanced Bene Gesserit quest line in Dune: Awakening. Here’s how to get started.

    Locating the Advanced Bene Gesserit Trainer

    Before seeking out the Advanced Bene Gesserit Trainer, ensure that you’ve unlocked the primary skill tree.

    Once that’s accomplished, head to Harko Village, where you’ll find Sister Jocasta in a secluded alley near the Vehicle Merchant.

    For this quest line, be prepared to travel frequently between Arrakis and Harko Village.

    Make sure to stock up on Solaris!

    Simply talk to Jocasta to begin your first quest.

    Exploring the Depths of Mirzabah

    Start by visiting Mirzabah, the large hammer-like structure located in the center of the Vermillius Gap.

    Follow the map marker and enter the northern entrance of the cave, engaging any enemies you encounter inside.

    Proceed to the main chamber, defeat the Kirab, and retrieve the Blue ID band found there.

    These quests require significant travel, so ensure your vehicle is well-fueled.

    Next, descend the stairs through the open blue door and scale the small wall on your right.

    In this new room, look for a small urn tucked away in a corner. Collect it to complete this segment of the quest.

    Finding the Path Up the Stone Sentinel

    Your next task is to climb the Stone Sentinel. Follow the map to find a set of footlights and ropes.

    Use these footlights and ropes to navigate your way up the Stone Sentinel.

    It’s advisable to climb at night, as daytime climbing can lead to dehydration.

    Continue following the trail of ropes and lights until you reach the top. Once there, search for another small urn to collect.

    After gathering both urns, return to Jocasta.

    Searching for the Panoplia Propheticus Fragment

    Your next mission is to locate a fragment of a prophecy for Jocasta.

    This segment features difficult enemies, so prepare accordingly.

    Make sure you have a reliable shield, a suspensor belt, and a good sword and gun before you go.

    Head to the designated point on your map and climb the structure to find the entrance to Stonestep Village about halfway up.

    Before entering, set a Respawn Beacon outside to avoid backtracking if you happen to die.

    You can either engage the enemies inside or try to sneak through to the marked point.

    Make sure to bring your Resource Scanner to track the assailant.

    Again, you’ll find a small urn next to some rubble on the second floor of Stonestep Village. However, this urn is broken. Utilize your Resource Scanner to follow the trail of the assailant.

    The House of Ilm

    After scanning the urn, a new point will appear on your map: the House of Ilm.

    The item you seek is located in the first room, making it easy to go in and out of this base.

    Proceed to the first chamber of the House of Ilm, eliminate the enemies inside, and retrieve the urn surrounded by candles at the altar.

    Then, return to Jocasta in Harko Village.

    Imperial Testing Station No. 71

    Your next destination is Imperial Testing Station No. 71 to further investigate Kyne’s impact on the Bene Gesserit and the Fremen.

    Go to the marked point and enter the testing station.

    These stations are plentiful in resources, so exploring other rooms is worthwhile.

    Descend the stairs to the central chamber, where you’ll encounter two locked purple doors.

    First, enter the west chamber and defeat the enemies before heading southwest to the room lit by a red light. Collect the blue ID band from this area to proceed.

    Next, go southeast, following the path up the stairs. Push through the newly opened blue door and defeat any enemies waiting inside.

    Many foes in the Testing Station wield poisoned weapons, so have some medkits ready.

    After clearing the area, search the small room to the east for a purple ID band among some ornamental candles. Retrieve the ID band before heading back to the main chamber.

    Then, go through the north purple door, combat the enemies there, and pick up the book from the northeast alcove.

    Finally, return to Jocasta in Harko Village.

    Head to the Ambush Point

    Upon returning to Harko Village, you’ll find Jocasta is missing.

    Speak with the man nearby (indicated on your map) who will direct you to Hannivar’s.

    Purchase a Mélange Spiced Beer from the bartender, then approach the mercenaries in the back corner to offer the drink in exchange for information.

    Ensure you have at least 1,000 Solari on hand for the Melange Spiced Beer.

    Continue through the dialogue until he reveals the location of Jocasta and their planned ambush.

    Next, head to the ambush point indicated on your map. Be ready for an unexpected wave of enemies; a tough fight awaits you.

    Afterward, you’ll find Jocasta about 200 meters away (also marked on your map). Speak with her and agree to meet back in Harko Village.

    Finally, return to Harko and speak to Jocasta to finish your Advanced Bene Gesserit training.

    You can further unlock Capstone Bene Gesserit skills by finishing more contracts for Jocasta.

  • Gemini Advanced Now Creates Amazing Videos

    Gemini Advanced Now Creates Amazing Videos


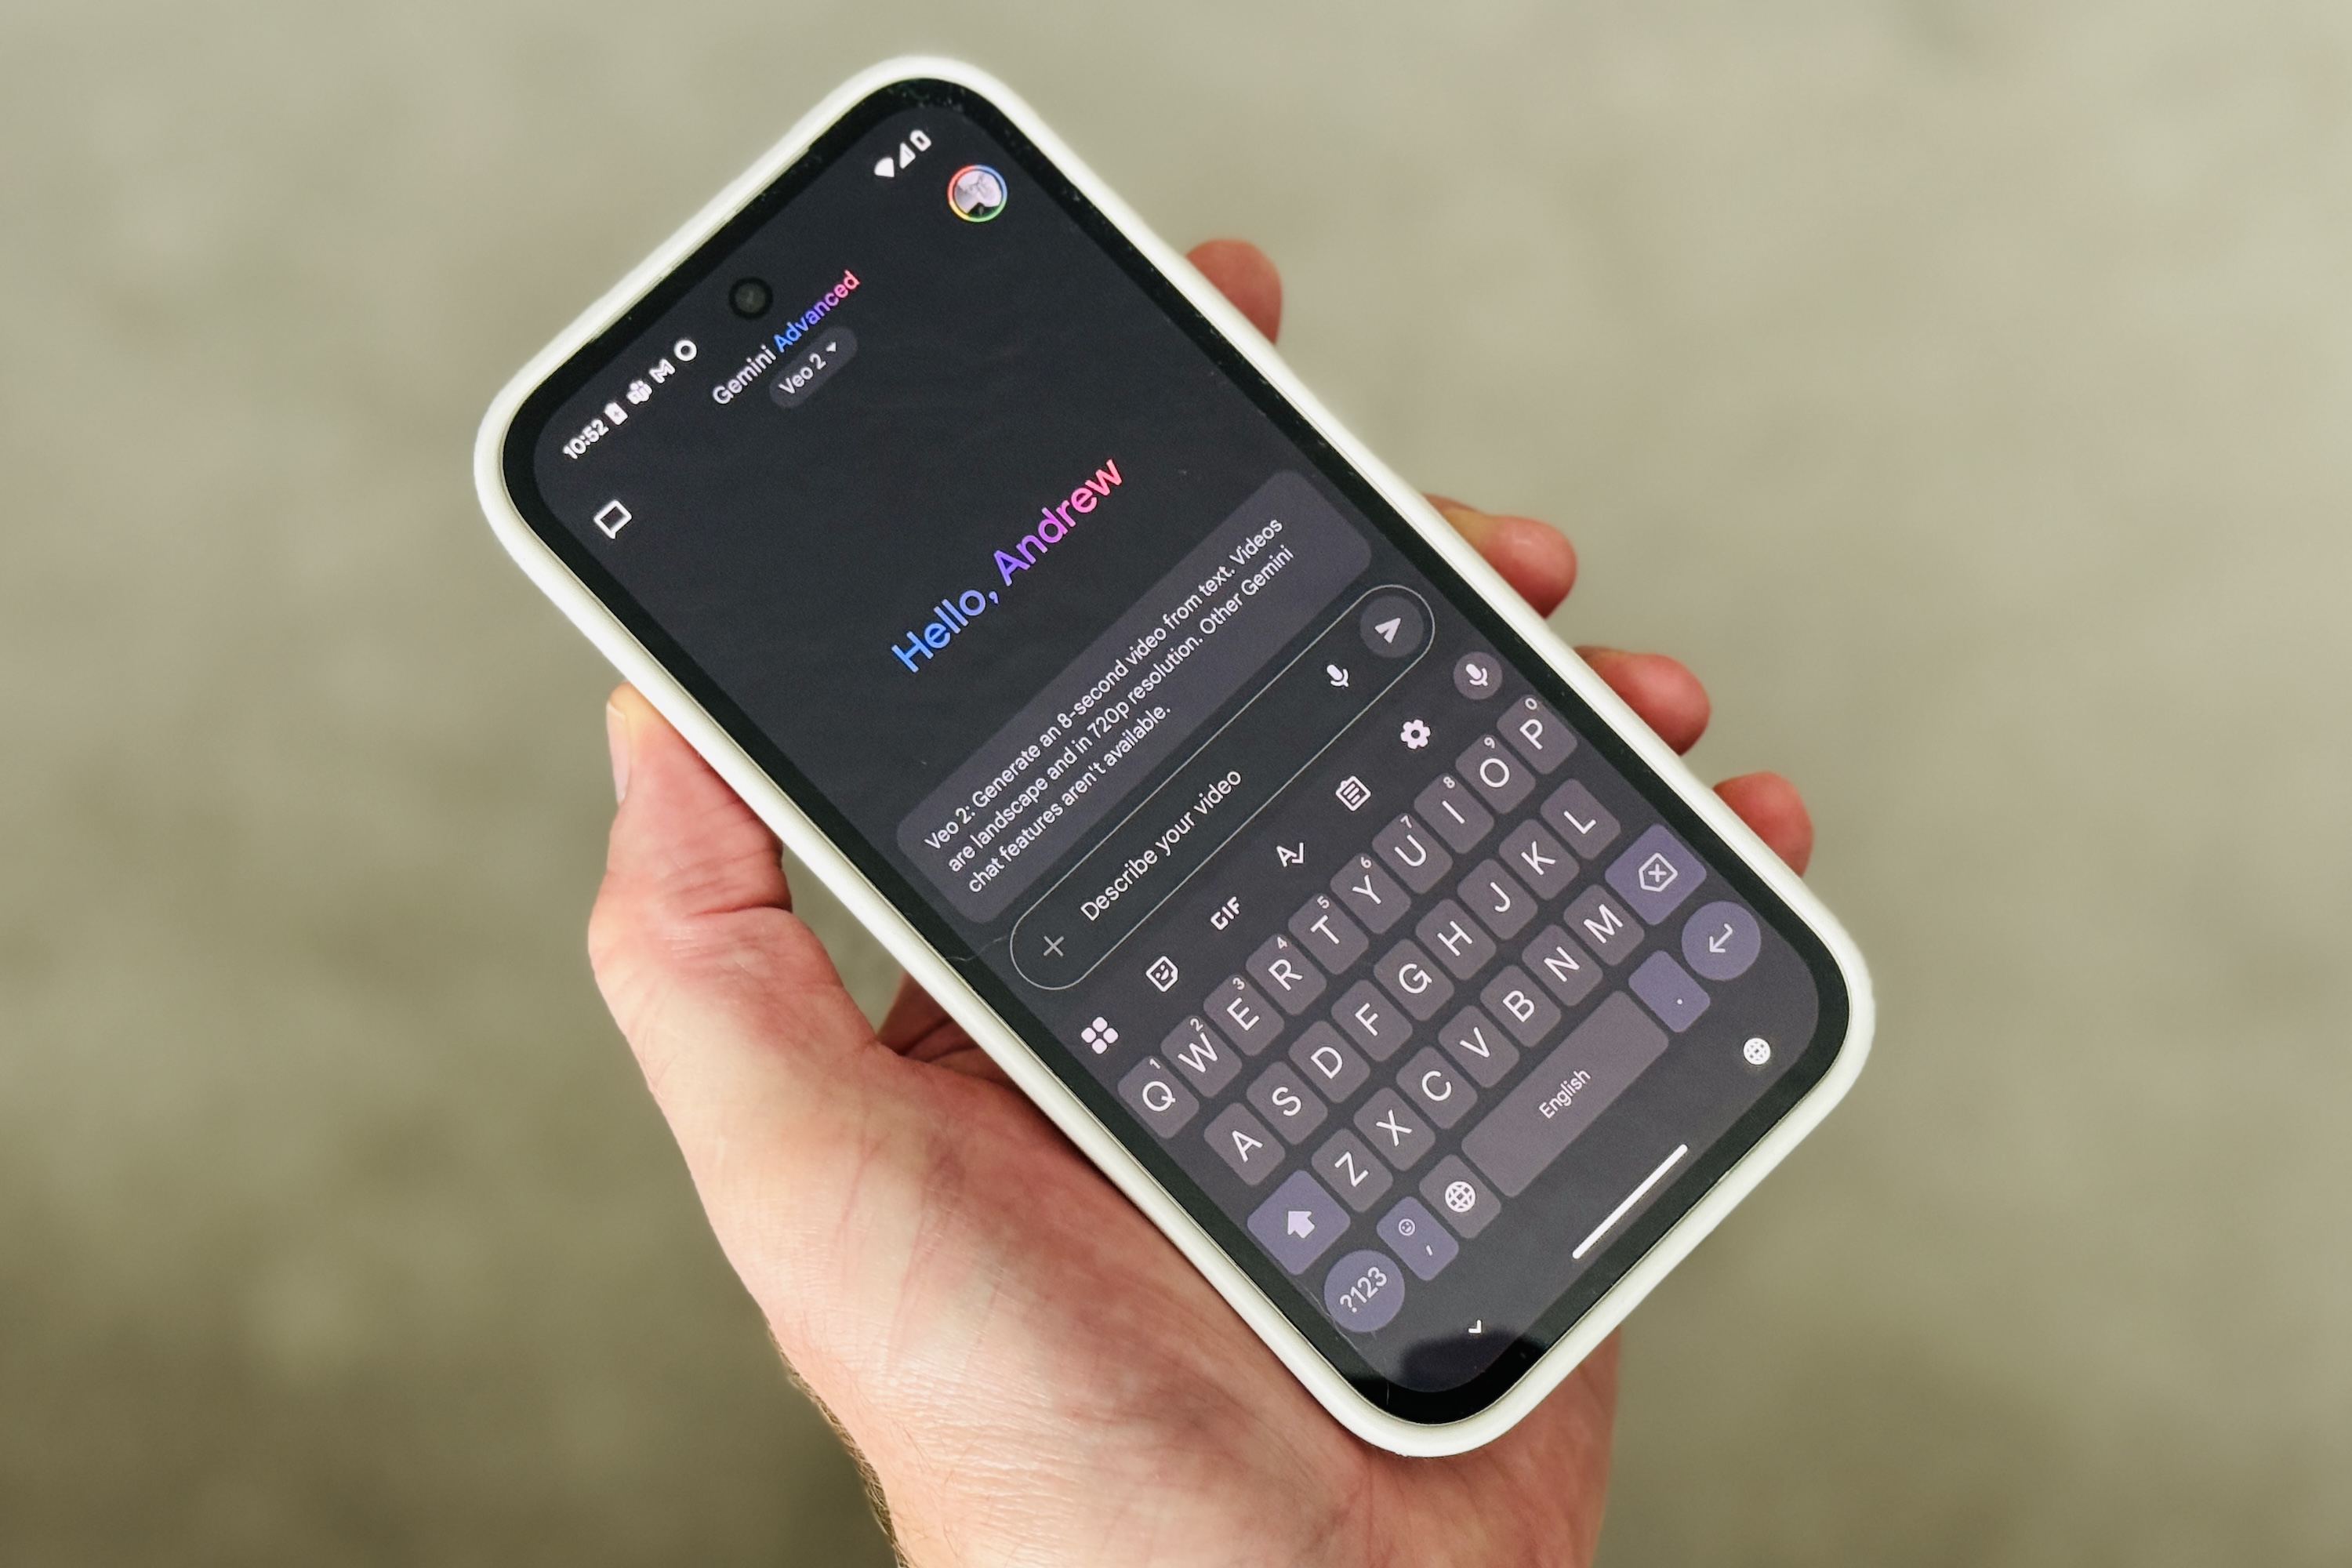
    Google has introduced an exciting feature in Gemini Advanced, its AI personal assistant and chatbot. With just a text prompt, Gemini can generate an 8-second animated video, bringing your ideas to life in an unbelievable way. This capability utilizes Veo 2, a video model launched in late 2024, designed to produce realistic videos that demonstrate an advanced understanding of human movements, real-world environments, and various lens types.

    Google elaborates on how easy it is to create videos with Gemini and Veo 2. “Simply describe the scene you'd like to produce—be it a short narrative, a visual concept, or a particular scenario—and Gemini will realize your ideas. The more elaborate your description, the greater control you have over the finished product. This opens up endless creative avenues, allowing you to blend imaginative elements, experiment with various visual styles, from the realistic to the fantastical, or quickly convey brief visual concepts.”

    The videos generated by Google Gemini are 8 seconds long, produced in 720p quality, and have a 16:9 aspect ratio. You can download MP4 files straight from your chat with Gemini or share them directly on platforms like Facebook, Reddit, LinkedIn, or X. Public links are also available for sharing, and you can explore some of the videos we've created using Veo 2 via the links provided in the next section.

    Exploring Google Gemini’s Video Creation

    If you’ve ever experimented with AI video generation, you likely know that the clearer your description, the more accurately the output reflects your vision. Google Gemini follows this principle but excels at filling in gaps even when prompts are less specific, often coming up with intriguing suggestions of its own.

    For example, I provided a straightforward, concise prompt to create a video featuring “a K-Pop girl group performing on stage in a large stadium, with thousands of fans singing along and waving light sticks.” The resulting video was quite impressive. The lead singer embodied a distinct K-Pop style, and the stadium was attractively crowded. I particularly enjoyed the Korean text at the bottom of the screen, giving it the feel of a live performance broadcast clip.

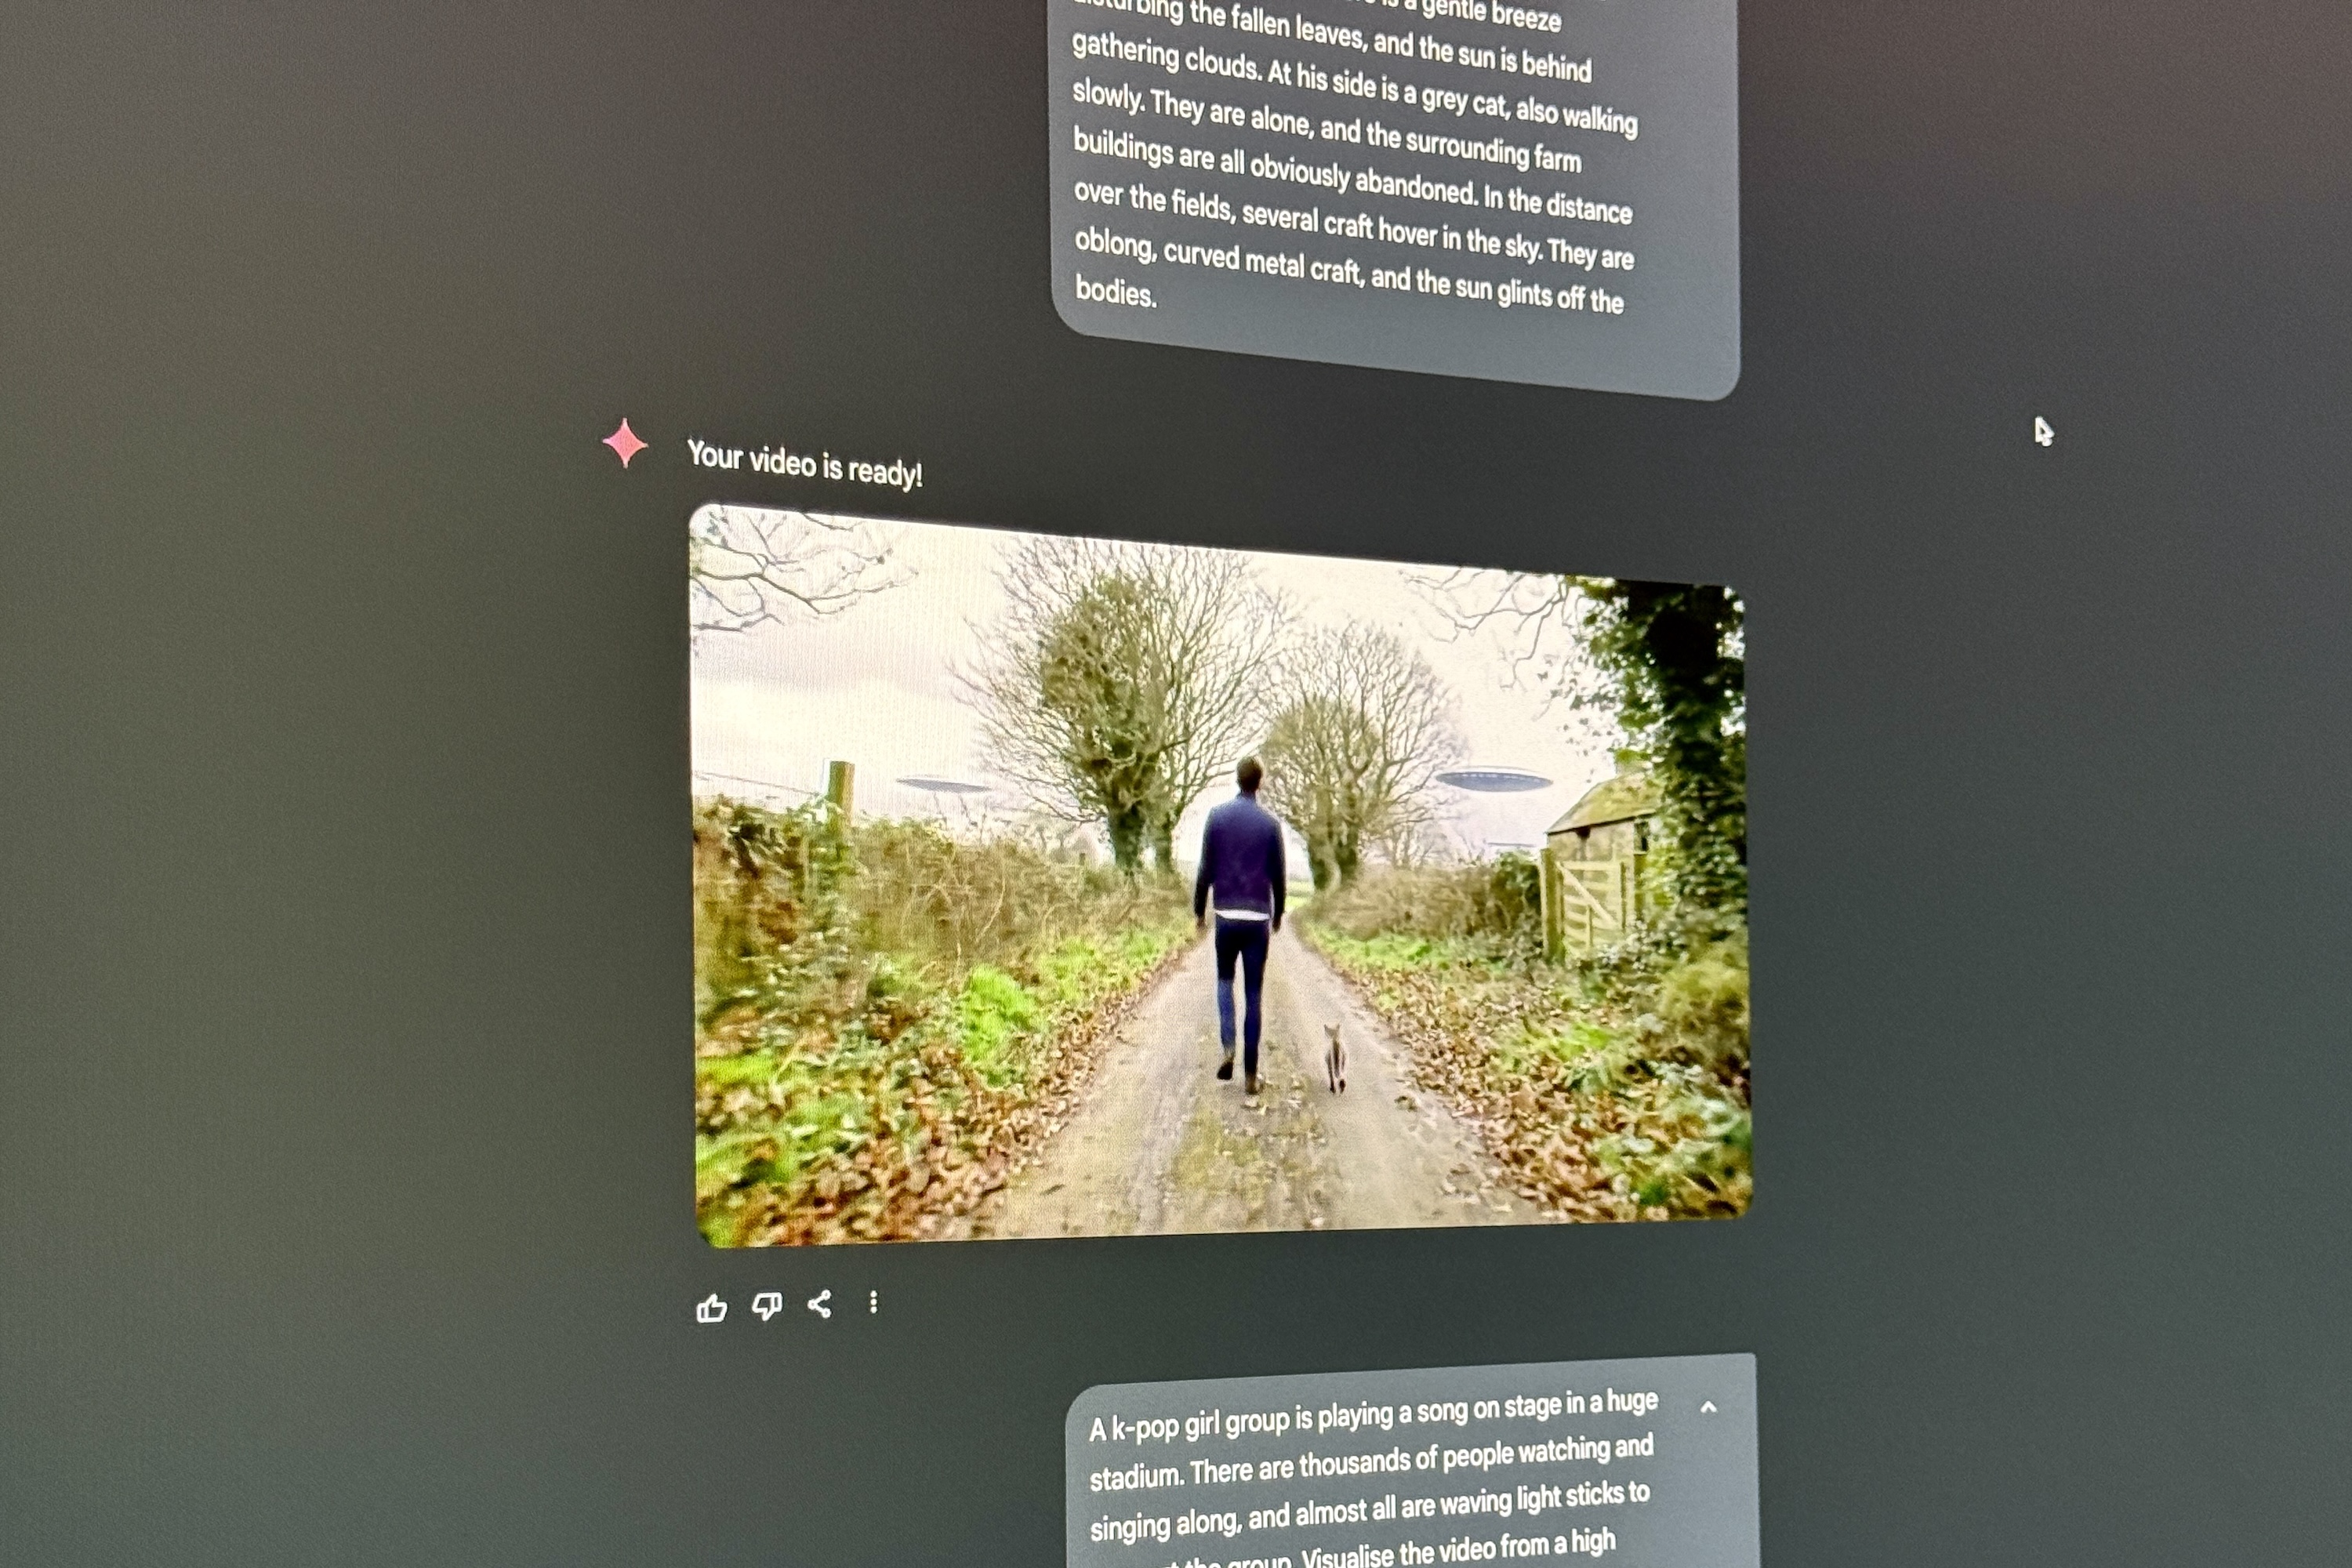
    For another example, I used a more detailed prompt to create a countryside setting, where a man and a cat stroll along a lane lined with abandoned farm structures, while UFOs hover over the distant fields. The completed video is fantastic and beautifully captures the leafy lane I envisioned, the cat’s movements, and the UFOs appearing as the camera sweeps past the trees. These videos were generated from simple prompts in just a few minutes, and it was a delight to see Veo 2 in action. Spending additional time crafting the scene has great potential.

    How to Access Video Creation in Gemini

    The Veo 2 video creation capability in Google Gemini is available to subscribers of Gemini Advanced, which costs $20 per month or £19 per month. This feature is accessed through a new drop-down menu, allowing users to toggle between different models: 2.0 Flash, 2.0 Flash Thinking, 2.5 Pro, and Deep Research with 2.5 Pro. Veo 2 is available on both desktop and mobile platforms, and Google indicated that the feature will be rolling out starting today over the upcoming weeks.

    If you have a Google One AI Premium subscription ($20 per month) and access to Google’s Whisk tool, you can also create videos from images. However, currently, images cannot be incorporated into Veo 2 to influence its style or appearances. Whisk, which was previously limited to specific regions, is now available globally to subscribers.

  • Cleer Arc 3 Could Be The Most Advanced Open-Ear Earbuds

    Cleer Arc 3 Could Be The Most Advanced Open-Ear Earbuds

    Cleer Audio has truly gone all out with its latest open-ear earphones, the Cleer Arc 3. Building upon the features of the previous model, the Cleer Arc II Sport, this newest version includes enhancements like a charging case equipped with its own battery, UV-C lighting for antibacterial properties, and Qualcomm’s Snapdragon Sound technology. Additionally, the Arc 3 boasts improved water resistance, voice control capabilities, and spatial audio featuring Dolby head tracking. A notable upgrade is the charging case, which now includes a colorful touchscreen display. The Cleer Arc 3 can be purchased in black and pink for $220 on amazon.com, starting October 24, with more color options expected soon.

    Cleer Audio Arc 3.
    Cleer Audio

    From a design perspective, the Cleer Arc 3 retains the articulated, spring-loaded earhook seen in previous models, which I find provides a snug and comfortable fit. Cleer has upgraded the earbuds to an IPX7 rating, ensuring they are effectively waterproof, even if fully submerged.

    Battery life has also seen significant enhancement, offering a claimed 10 hours of use per charge, with the charging case providing an additional 40 hours. The case has undergone remarkable transformations; it features UV-C sterilization for the earbuds when not in use, a mirror on the inside of the lid, and a color touchscreen on the outside. It can now be charged wirelessly, as well as through a USB-C connection.

    Cleer Audio Arc 3.
    Cleer Audio

    The Cleer Arc II Sport introduced Snapdragon Sound, which delivered hi-res aptX Adaptive and CD-quality aptX Lossless Bluetooth codecs, but the Arc 3 takes these capabilities a step further. Users now have the option to utilize Sony’s LDAC hi-res codec, compatible with a wider range of Android devices compared to Snapdragon Sound. Cleer claims to have improved bass performance, though the published frequency range for the Arc 3 seems to contradict this assertion. According to its product page, the Arc 3 is capable of reproducing frequencies from 50Hz to 40kHz, while the Arc II Sport offers a range of 20Hz to 20kHz.

    Cleer Audio Arc 3.
    Cleer Audio

    We are starting to see hands-free voice commands appear in newer wireless earbuds. The Bose QuietComfort Earbuds and Sony’s LinkBuds Fit offer a wide range of commands, and the Cleer Arc 3 follows suit, supporting basic functions such as previous/next track, play/pause, volume adjustments, and call management.

    Like the Arc II Sport, the Arc 3 includes six-axis sensors, allowing users to manage phone calls through head gestures, and it also supports Bluetooth Multipoint, enabling simultaneous connections to two devices.