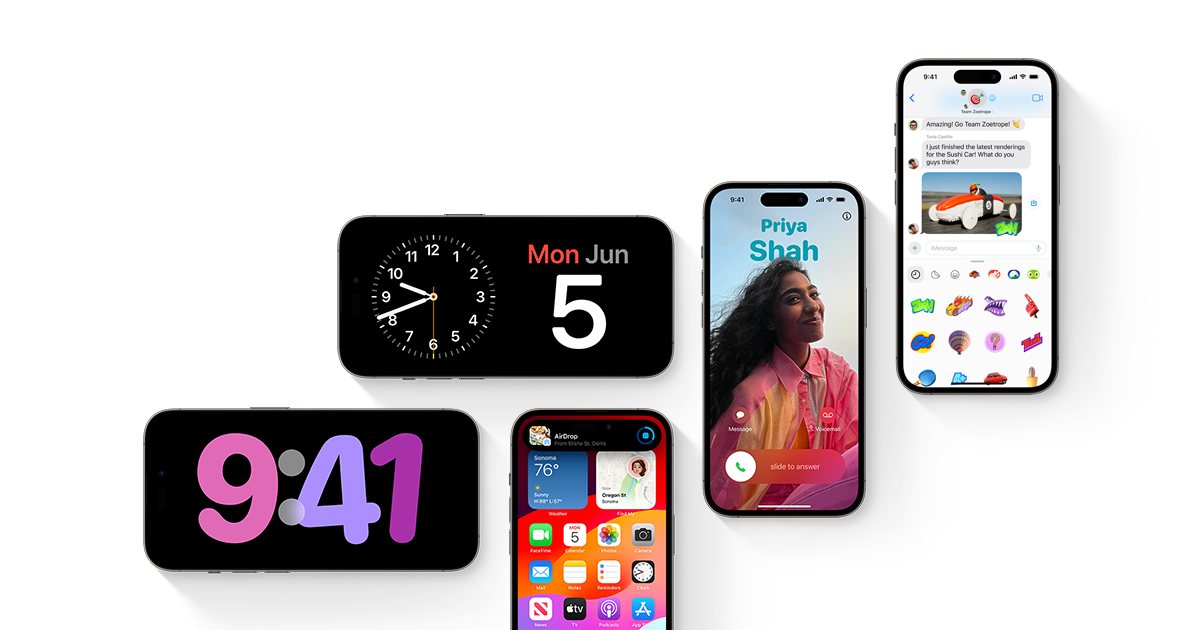
iOS 17, the latest version of Apple’s operating system for iPhones, has arrived with a plethora of new features and enhancements. Among the highlights are:
Table of Contents
- A redesigned lock screen with widgets and customizable notifications.
- New messaging capabilities, such as message editing, unsending messages, creating stickers from photos, and location sharing.
- Enhanced FaceTime features, including the ability to leave audio or video messages, react with hand gestures, and use FaceTime on Apple TV.
- A battery widget that displays the battery status of connected devices.
- Improvements to autocorrect and dictation for smarter input.
- The introduction of StandBy mode, providing glanceable information while your iPhone charges, including weather updates, timers, and live activities.
- The addition of the Journal app, allowing you to capture and organize life’s moments with photos, videos, notes, and more.
If you’re eager to explore these new features and more, you may be wondering how to install iOS 17 on your iPhone. In this comprehensive guide, we’ll walk you through the process step by step, offering tips and tricks to ensure a smooth and secure installation.
Check Your iPhone’s Compatibility
Before embarking on the iOS 17 installation journey, it’s essential to confirm that your iPhone is compatible with the latest operating system. iOS 17 supports the following iPhone models:
- iPhone 14 Plus
- iPhone 14 Pro Max
- iPhone 13 mini
- iPhone 13 Pro
- iPhone 13 Pro Max
- iPhone 12 mini
- iPhone 12 Pro
- iPhone 12 Pro Max
- iPhone 11
- iPhone 11 Pro
- iPhone 11 Pro Max
- iPhone XS
- iPhone XS Max
- iPhone XR
- iPhone SE (2nd generation or later)
If your iPhone model is on this list, you’re in luck and can proceed with the iOS 17 installation. However, if you own an older iPhone model, such as the iPhone 8, iPhone 8 Plus, or iPhone X, iOS 17 won’t be available for your device. Nevertheless, you can continue using your iPhone with iOS 16 or earlier versions.
To confirm your iPhone model, go to Settings > General > About, and check the Model Name. If your model matches one of the devices listed above, your iPhone is ready for iOS 17.
Back Up Your iPhone
Before undertaking any significant software update, it’s a prudent practice to back up your iPhone. This precautionary step ensures that your valuable data is safe in case anything goes awry during the installation process.
There are two methods to back up your iPhone: using iCloud or a computer. Here’s how to execute both:
Using iCloud
iCloud is a cloud-based service that enables you to store your data online, making it accessible from any of your Apple devices. To back up your iPhone via iCloud, follow these steps:
- Connect your iPhone to a Wi-Fi network.
- Go to Settings > [your name] > iCloud.
- Tap on iCloud Backup and ensure it’s switched on.
- Tap Back Up Now and await the completion of the backup process.
You can monitor your backup’s progress and status by navigating to Settings > [your name] > iCloud > iCloud Backup. Here, you can also view the timestamp of your last backup and your remaining iCloud storage space.
Using a Computer
If you prefer to back up your iPhone using a computer, you have two options: iTunes or Finder. The choice depends on your computer’s operating system.
Using iTunes
iTunes is the software for managing media and devices on Windows PCs or Macs running macOS Mojave or earlier. To back up your iPhone using iTunes, follow these steps:
- Connect your iPhone to your computer using a USB cable.
- Open iTunes on your computer and select your device from the upper-left corner of the screen.
- Click on Summary in the left sidebar and then select Back Up Now in the right panel.
- Wait for the backup to complete.
Using Finder
Finder is the software for browsing and organizing files on Macs running macOS Catalina or later. To back up your iPhone using Finder, follow these steps:
- Connect your iPhone to your Mac using a USB cable.
- Open Finder on your Mac and select your device from the left sidebar under Locations.
- Click on General in the top bar and then select Back Up Now in the right panel.
- Wait for the backup to finish.
You can review your backup’s status by clicking on Manage Backups in iTunes or Finder. Additionally, you can check when your last backup was created and the storage space it occupies.
Download and Install iOS 17
With your data backed up, you’re ready to download and install iOS 17 on your iPhone. There are two methods to accomplish this: via Wi-Fi or a computer.
Using Wi-Fi
This is the simplest and most convenient method for installing iOS 17 on your iPhone. All you need is a Wi-Fi connection and sufficient battery life. Here’s how to do it:
- Connect your iPhone to a Wi-Fi network and ensure it has at least 50% battery life. Alternatively, plug it into a power source to prevent any interruptions.
- Navigate to Settings > General > Software Update. If iOS 17 is available for your device, it will be listed here.
- Tap Download and Install to initiate the update process. You may be required to enter your passcode or accept the terms and conditions.
- Wait for the download to conclude, and then tap Install Now to commence the installation. Your iPhone will restart multiple times during this process.
The duration of the process varies depending on your internet speed and device performance. To avoid complications, refrain from turning off your iPhone or disconnecting it from the Wi-Fi network until the update concludes.
Using a Computer
If you lack a reliable Wi-Fi connection or sufficient battery life, you can still install iOS 17 on your iPhone using a computer. Depending on your computer’s operating system, you’ll use either iTunes or Finder. Here’s how to proceed:
Using iTunes (for macOS Mojave or earlier)
- Connect your iPhone to your computer via a USB cable.
- Open iTunes on your computer and choose your device from the upper-left corner of the screen.
- Click on Check for Update in the right panel. If iOS 17 is available for your device, it will be listed here.
- Click Download and Update to commence the update process. You may need to enter your passcode or accept the terms and conditions.
- Wait for the download and installation to finish. Your iPhone will restart multiple times during this process.
Using Finder (for macOS Catalina or later)
- Connect your iPhone to your Mac via a USB cable.
- Open Finder on your Mac and select your device from the left sidebar under Locations.
- Click on General in the top bar and then choose Back Up Now in the right panel.
- Wait for the backup to complete.
Again, the duration of the process depends on your internet speed and device performance. To avoid complications, refrain from turning off your iPhone or disconnecting it from the computer until the update concludes.
Enjoy iOS 17 on Your iPhone
Congratulations! You’ve successfully installed iOS 17 on your iPhone, unlocking a plethora of new features and enhancements.
Now, it’s time to dive in and explore the redesigned lock screen with widgets and customizable notifications, experiment with the new messaging capabilities, enjoy FaceTime calls with audio or video messages and reactions, monitor your connected device’s battery status with the new battery widget, utilize enhanced autocorrect and dictation, stay informed with StandBy mode, and create your own digital journal filled with photos, videos, notes, and more.
To help you make the most of iOS 17, consider exploring our other articles on utilizing its new features:
- How to create stickers from photos on iPhone
- How to share AirTag with someone else on iPhone
- How to use FaceTime on Apple TV
- How to use Live Text and Visual Look Up on iPhone
- How to use NameDrop and Contact Posters on iPhone
We hope this comprehensive guide has made the installation of iOS 17 on your iPhone a smooth and secure process. If you have any questions or feedback, please don’t hesitate to share them in the comments below. Thank you for choosing Bing chat mode! ????????


