Audio Magic Eraser is an innovative feature designed for Android devices that enhances video audio quality by removing unwanted background sounds. By leveraging cutting-edge AI technology, this tool can detect and suppress distracting noises—like wind, conversation, or other sudden sounds—resulting in a clearer, more focused listening experience.
This feature is currently limited to the Google Pixel 8 and Google Pixel 9 series smartphones. If you don’t own a Pixel device, Samsung might be introducing a similar feature in some of its upcoming models. Whether capturing a precious memory or recording an outdoor event, this feature ensures that your audio is maintained with clarity.
What is Audio Magic Eraser?
Audio Magic Eraser is seamlessly integrated into the Google Photos app for straightforward use. This function intelligently assesses videos, recognizing various audio elements such as dialogue, music, and ambient noise. Users can choose to diminish or remove distracting sounds—like noise from the wind or background chatter—while enhancing important sounds, like voices. This results in a significant improvement in audio clarity, streamlining the audio enhancement process without the need for complex software or specialist knowledge.
Ajay Kumar / Digital Trends
Which phones support Audio Magic Eraser?
Currently, Audio Magic Eraser is primarily available on the Pixel 8. While there are indications that it may extend to other devices, like the Galaxy S25, here’s a list of the smartphones that currently have this feature:
- Google Pixel 8
- Google Pixel 8 Pro
- Google Pixel 8a
- Google Pixel 9
- Google Pixel 9 Pro
- Google Pixel 9 Pro Fold
How to Use Audio Magic Eraser
Follow these steps to utilize the Audio Magic Eraser feature:
Step 1: Launch Google Photos and select the desired video you wish to modify.
Step 2: Tap on the Edit button located at the bottom of the interface.
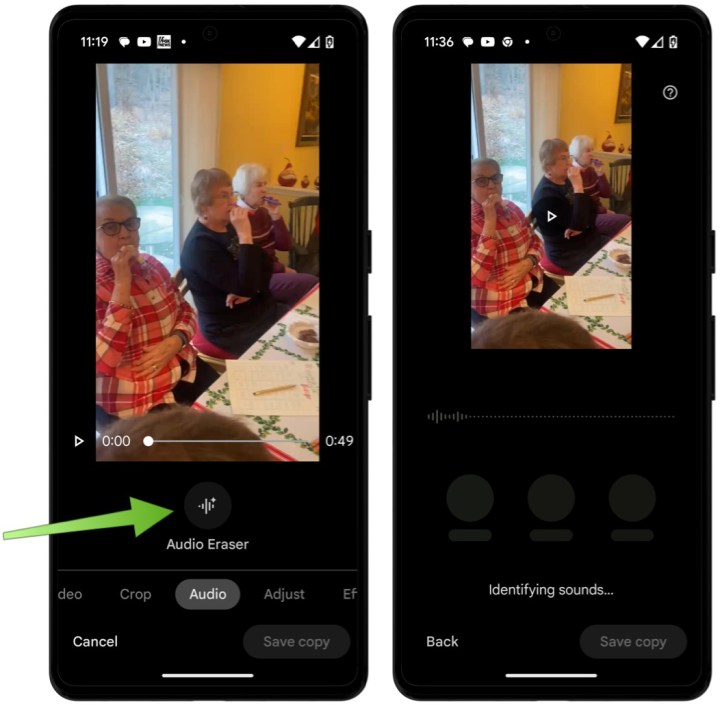
Step 3: Navigate through the editing options horizontally until you find the Audio section. Click on it.

Step 4: Choose the Audio Eraser button. The device will then analyze the audio from your video, which may take a few minutes depending on video length.

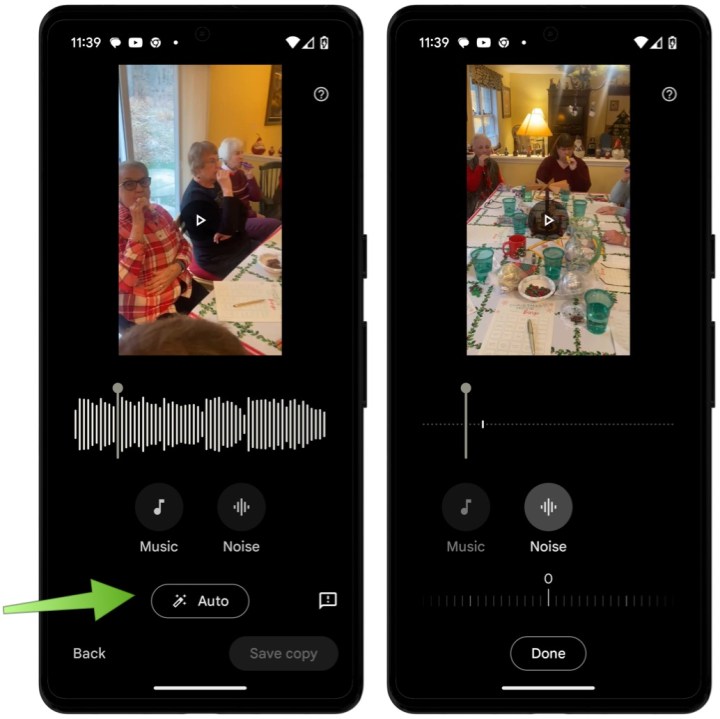
Step 5: Here, you can adjust the audio using either the Auto or Manual setting.
Selecting the Auto option allows Google's AI to handle background noise removal automatically. For more precise control, you can choose either the Music or Noise buttons to make gradual adjustments as preferred. You can also listen to real-time changes by pressing the Play button above the video.

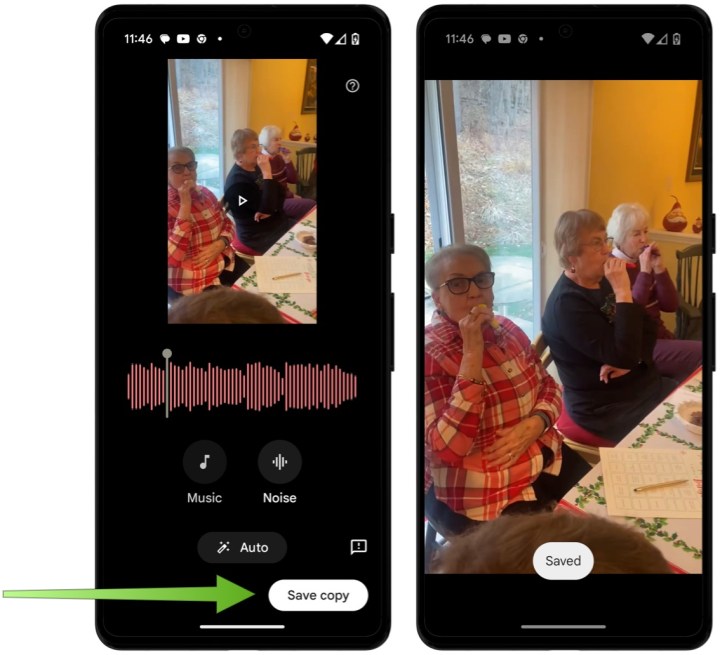
Step 6: Finally, tap on Save copy to save your changes.

An Important Consideration
The performance of the Audio Magic Eraser largely hinges on the initial quality of the video and the variety of sounds it captures. It performs most effectively when there is a clear contrast between the sounds you wish to retain and those you wish to filter out.
It is wise to experiment with different settings and to preview various adjustments before finalizing, as the changes may be subtle.
This feature is still evolving, and Google is expected to enhance its effectiveness and features over time.


