
Windows 10 has garnered a reputation as one of Microsoft’s most reliable operating systems, which is why many users have been hesitant to transition to Windows 11. Even though Windows 11 made its debut in 2021, a considerable number of individuals still prefer to stick with Windows 10.
However, users should be aware that the end is drawing near for Windows 10. Starting in October 2025, the final regular update will roll out, after which Microsoft will limit its support to paying customers enrolled in the Extended Security Update (ESU) program.
Have you found yourself among the many who now realize it’s time to upgrade? You’re not the only one feeling this way, but rest assured, the transition is likely less daunting than you assume. Windows 11 retains much of its predecessor’s functionality, and although there are some design changes that might raise eyebrows, it’s far from the tumultuous experience that was Windows 8.
Join me as we explore how to seamlessly upgrade and begin your journey with Windows 11.
Verify Your Computer’s Compatibility
Before upgrading to Windows 11, it is crucial to ensure that your computer meets the necessary system requirements. A straightforward method to assess your compatibility is by installing all available updates within Windows 10. Once your updates are completed, the system will prompt you to upgrade to Windows 11 if your hardware qualifies.
Foundry
You can also download the PC Health Check tool for a more precise evaluation. If your system doesn’t meet the necessary criteria, the program will indicate what needs addressing. Sometimes, it’s something as simple as enabling the TPM module in the BIOS settings.
The fundamental requirements include a 64-bit processor with a minimum speed of 1 GHz, 4 GB of RAM, 64 GB of storage space, UEFI firmware supporting Secure Boot (though it doesn’t have to be activated), TPM 2.0, a display with at least 720p resolution, and an internet connection.
With the release of version 24H2, the processor requirements have slightly tightened. For Intel users, a processor from the eighth generation or newer is essential, while AMD users need a second-generation Ryzen, third-generation Threadripper, or equivalent Epyc processors. Several Zen-based Athlon chipsets are also supported.
Create a Backup for Safety
Before you proceed with the upgrade to Windows 11, it’s wise to create a complete backup of your current Windows 10 system—a process often referred to as a clone backup. This ensures that you can revert to your previous version should anything go awry during installation or if you find Windows 11 isn’t to your liking.
Many programs are available for cloning your hard drive, including R-Drive Image, which has long been favored for its comprehensive features. Alternatively, EaseUS offers a solid free version.
Some users have reported difficulties in booting from a cloned backup, so ensure you test the backup before moving forward.
Should You Upgrade or Perform a Fresh Installation?

Foundry
Now the pressing question arises: should you simply upgrade from your existing Windows 10 setup or take the opportunity to perform a clean installation? This is a common dilemma whenever a new version of Windows is released.
Some users firmly believe that a fresh installation leads to better performance with fewer errors, while others think that upgrading is quicker and simpler, preventing the need to reinstall all your software and settings.
If you’re uncertain, I recommend ensuring you have a robust backup in place (see above) and trying the update first. If it works smoothly, you’ll transition to Windows 11 much faster. Should any issues arise, you can always revert to a fresh install later. If you start the update and enjoy the process without interruption, you won’t waste much time.
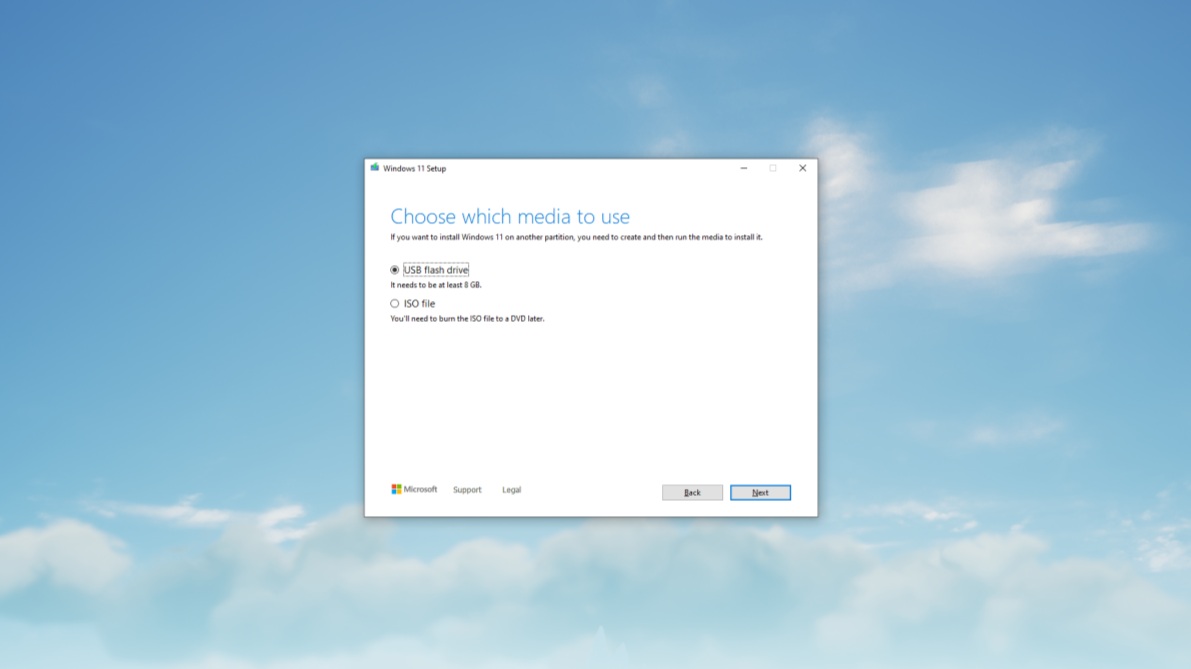
In-Place Upgrade: Retain Your Files, Programs, and Settings
If you prefer to upgrade without losing important data, there are two main methods. The simplest way is to utilize Windows Update from the Settings menu and allow the system to guide you through the upgrade process. This works much like a typical large update—your computer will restart a few times, but you’ll otherwise experience a hassle-free transition.
If you find that Windows Update doesn’t prompt you to upgrade, or if you simply prefer another method, you can download an ISO file for the latest version and execute the setup from there. You don’t need to create installation media; just double-click the ISO file in Explorer, access the mounted drive, and run the Setup.exe program.

Foundry
After a few initial steps where the installer checks your system, you’ll arrive at a dialog allowing you to choose what you wish to retain. The default selection is to keep everything, including files, installed applications, and settings.
You can also opt to keep only your files. However, this will require reinstalling programs and reconfiguring settings, making a fresh install and then transferring files back from your backup a more efficient approach.
Start Fresh with a Clean Slate
Foundry
If you have a weekend free for this update, it could be the perfect occasion for a system maintenance day. Over time, Windows accumulates numerous files and leftover programs, cluttering your disk and potentially affecting performance.
By reformatting your drive and starting anew, you can recover storage space and enhance system stability. If you first remove unnecessary pre-installed applications and only install desired software, you can achieve a more streamlined system.
Before you begin, ensure you have a complete backup, capable of booting successfully, that contains all essential files.
Next, use a Windows 11 ISO and Microsoft’s installation media creation tool on a USB stick. Boot from it, and when prompted during installation, select the option to format the disk.
If your setup has multiple hard drives or SSDs, be cautious to select the correct one for installation, and consider disconnecting others temporarily, as the Windows installer can sometimes be finicky about this.
Your First Encounter with Windows 11
Foundry
Once the update concludes and you log into Windows 11 for the first time, you’ll encounter a welcome dialog guiding you through features like location services and data collection preferences. You can modify these settings later in the Settings app at any time.
Following that, Windows will prompt you to “complete the installation”—essentially a gentle nudge to set Edge as your default browser and enable OneDrive backup among other things. Feel free to navigate through this process, choosing only the options that align with your needs. If you wish to avoid this dialogue in the future, head to Settings > System > Notifications > Additional settings to disable unwanted prompts.
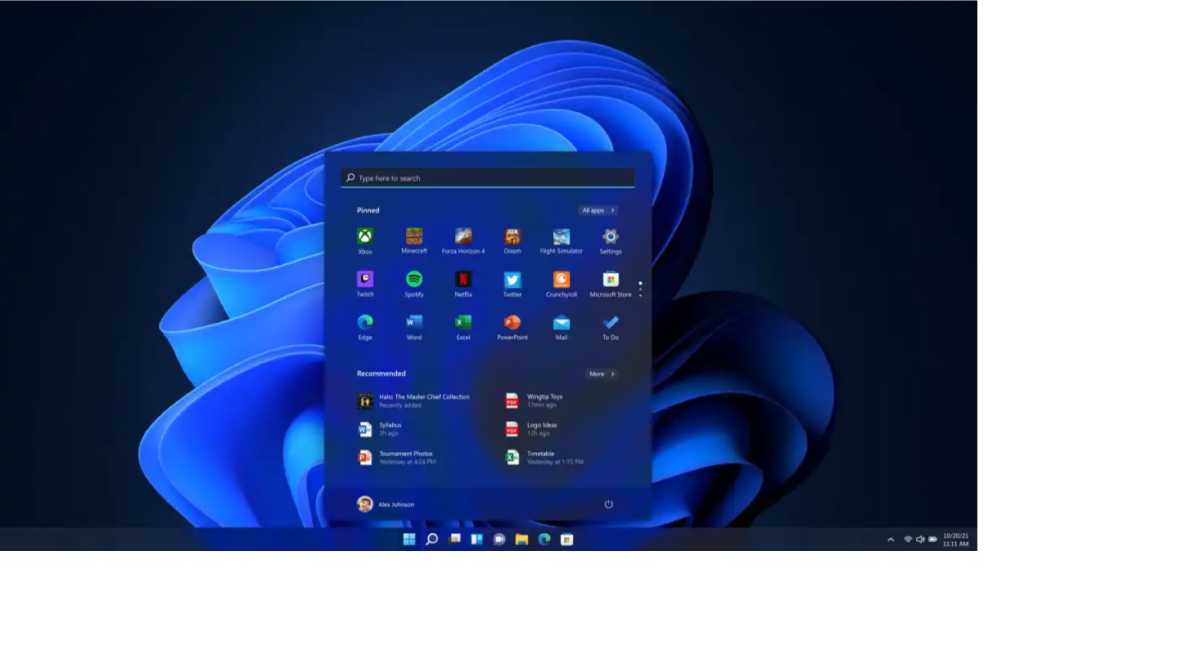
And just like that, your desktop appears, complete with a Taskbar at its familiar position at the bottom. While the Start menu and app icons are centered on the screen by default, you can easily reposition them to the left if that’s your preference.
A significant change is the revamped Start menu, boasting a new look and layout. Microsoft has implemented feedback since Windows 11’s initial launch, and the latest version (24H2) finally allows users to view all installed applications in a list format instead of merely a grid. Just click on the All apps button in the upper right, but note there’s currently no option to set this as the default view.

Foundry
Additionally, the Taskbar functions have changed. When multiple windows of an application are open, they are not displayed as individual icons; instead, users must hover over the app icon to view open windows. If you prefer the previous setup, you can revert this through Settings > Personalization > Taskbar > Taskbar Behaviors by selecting Never for Combine taskbar buttons and hide labels on other taskbars. You can also left-align the Taskbar from this menu.
Expect a few other changes that might require some adjustment:
Updated Copy and Paste Functions
Both the toolbar and context menus in Explorer have received updates; common commands like copy and paste are now represented by icons. Thankfully, Microsoft has responded to user feedback, and the context menu now includes titles alongside every icon.
The Action Center is No More

Joel Lee / IDG
Previously, the far right section of the Taskbar featured the Action Center, which integrated notifications, quick settings, and various shortcuts. This feature has been entirely replaced by a new notification view in Windows 11.
Revised Default Programs Setup

Foundry
The process of selecting default applications for various file types and links has been overhauled. Navigate to Settings > Apps > Default apps, where you’ll find a list of your installed applications. By selecting an app, you can view and modify the default file types associated with it. Additionally, the search bar at the top allows for quick searches of specific file extensions or link types to change defaults as desired.
Improved Microsoft Store Experience

Microsoft
Historically, downloading programs directly from developers was generally preferred due to the limitations of the Microsoft Store. However, Windows 11 has revitalized the store, and you can now find many major programs here. It’s worth checking the Store first before looking to the web for software.
Copilot Takes Over from Cortana
If you are signed into a Microsoft account, you’ll find that the company’s AI Chatbot, Copilot, replaces the previously popular assistant, Cortana, in Windows 11.
Revamped Settings Design

Foundry
Navigating through settings has become more intuitive with the new design. A permanent list of categories is displayed on the left side, and while some settings may still be buried deep, the improved search function enhances the findability of specific configurations.
Restoring Windows 10

Foundry
If you upgraded to Windows 11 via Windows Update, rolling back to Windows 10 is straightforward. Simply navigate to System > Recovery and select Go back, then follow the prompts to complete the process. The rollback may take a similar duration as the initial update installation.
If this option is unavailable, it could be due to not having performed the update via Windows Update, having used System Cleanup since the upgrade, or the rollback files being automatically removed after a certain timeframe.
In such cases, your only solution for restoring Windows 10 will be to clone back the previous installation using the clone backup you created pre-upgrade. Remember, doing so will replace more recent files, so it’s prudent to make an additional backup of the current system to safeguard any new data before proceeding. Naturally, this would necessitate an additional drive with ample storage space.
The ease of rolling back through the Go Back feature further supports the argument for choosing an upgrade over a complete reinstallation.