
Solid State Drives (SSDs) have become the standard storage solution for both laptops and desktop computers. They are small, silent, and significantly outperform traditional hard drives. However, like all technology, they can face issues over time, leading to decreased performance and potential failures.
But don’t worry! There are various strategies you can employ to maintain your SSD’s peak performance. Keep reading to determine if your SSD is experiencing slowdowns and discover ways to enhance its speed.
Related: Our top-rated SSDs tested
Assessing Your SSD’s Performance
There are several factors that could contribute to an SSD running slower than usual: limited storage space, misconfigured Windows settings, or the need for adjustments to the SSD’s configuration.
To check if your SSD is genuinely underperforming or if it’s just a perception, consider using the free benchmark tool, CrystalDiskMark. Regularly running this tool, even once a year, can help you identify potential slowdowns early.
CrystalDiskMark will provide you with your SSD’s sequential read and write speeds, allowing you to compare these numbers with the specifications provided by the manufacturer. If you notice a significant drop in speeds, follow the suggestions outlined below to get back on track. Otherwise, you’re in good shape!
IDG
Additionally, understanding which drives are installed in your computer is pivotal when optimizing SSDs, especially if you’re using multiple drives. The free tool Speccy can quickly provide this information.
Within Speccy, head to the Summary page and locate the Storage section for the necessary details. You’ll also find other relevant information such as interfaces and operational status.
1. Update the Firmware
Just as keeping your Windows operating system updated is essential for resolving issues and enhancing security, SSDs also require firmware updates, albeit less frequently.
These updates mainly address errors, such as miscalculations of the SSD’s lifespan, and can also enhance performance. It’s wise to install any available firmware updates as soon as they are released.
Samsung
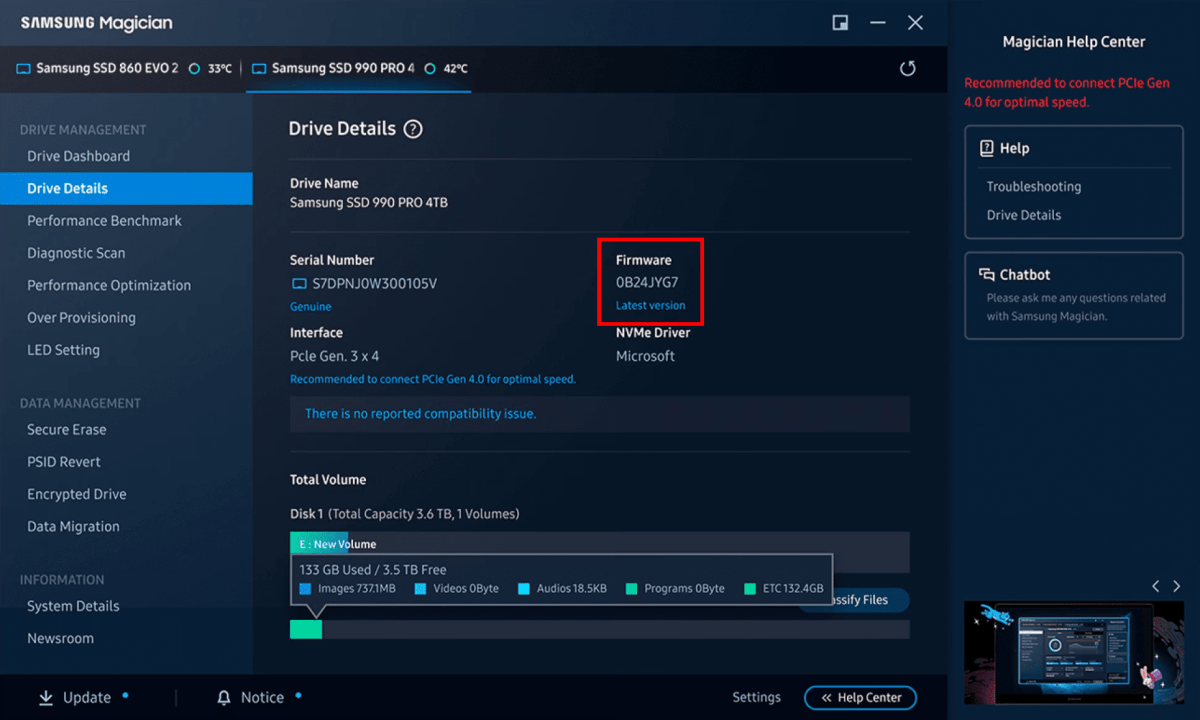
Since you won’t receive notifications for firmware updates, it’s essential to regularly check for them. Utilizing the SSD manufacturer’s support tool—like Crucial Storage Executive, Kingston SSD Manager, or Samsung Magician—can simplify this process.
Installing firmware updates can typically be done within these tools, and the process is usually quick, although it’s advisable to back up any important data beforehand.
2. Enhance the DRAM Cache
SSDs use various types of flash memory. Most are equipped with either TLC (Triple Level Cell) or QLC (Quadruple Level Cell) flash, with the former storing three bits per cell and the latter four bits. Higher storage density can reduce manufacturing costs, but it may adversely impact the speeds of individual cells.
The controller chip plays a crucial role in optimizing these speeds and is sometimes supported by a DRAM cache (Dynamic Random Access Memory). This cache stores management data and mapping tables, significantly speeding up access times.

IDG
The significant speed advantage of DRAM memory over NAND flash can boost your data transfer rate. In contrast, SSDs lacking a DRAM cache must store data mappings directly in NAND cells, which not only slows access but also increases stress on the memory cells.
Although the technical specifications often indicate whether an SSD has a DRAM module, it isn’t always clearly labeled. You can use TechPowerUp’s SSD Specs Database to clarify.
3. Regular Optimizations
To sustain performance over time, SSDs require regular optimization due to their flash-based storage nature.
SSD drives that are near full capacity struggle to function at their best and require periodic cleanup. Unlike traditional hard drives, SSDs cannot simply overwrite data; they must perform a cleanup cycle to free up space.
This cleanup, also known as “garbage collection,” operates in the background and is initiated by the operating system’s trim command. This ensures that SSDs deliver maximum writing speed without needing to empty or clean blocks beforehand.
Joel Lee / IDG
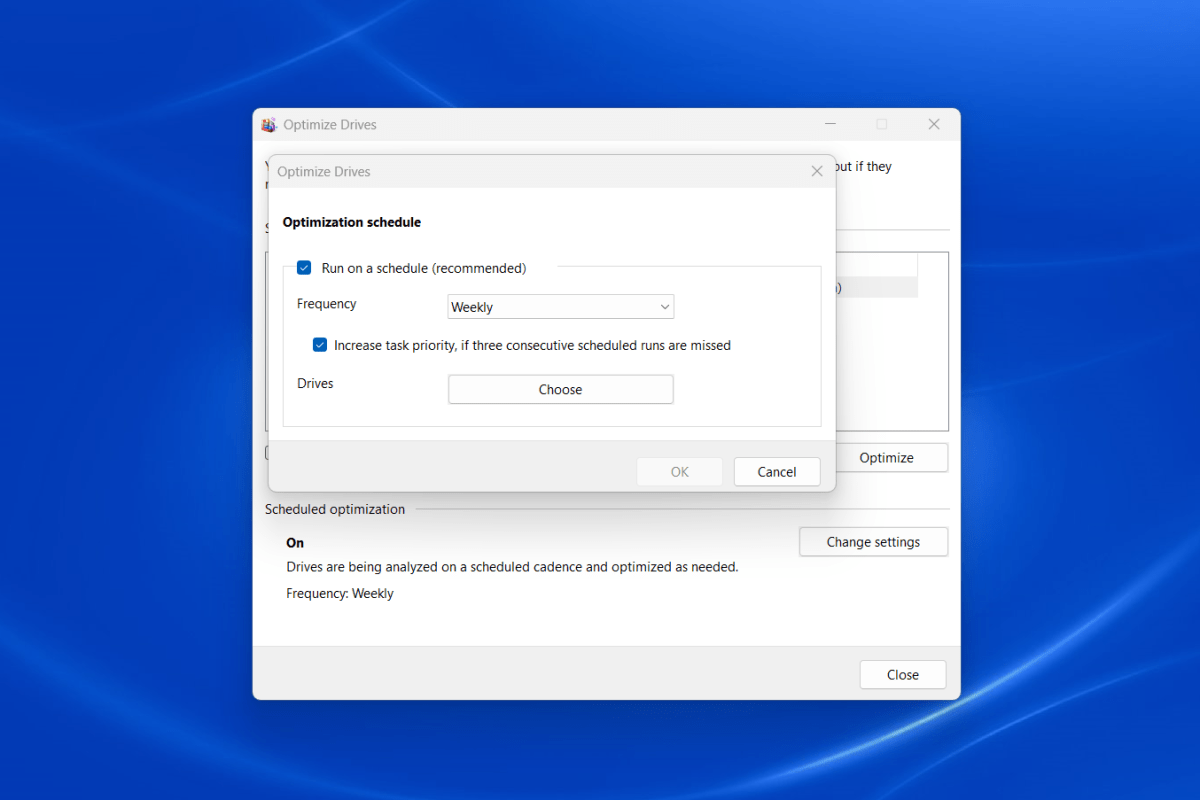
Windows simplifies the scheduling of this optimization process. Open the Start menu, search for Defragment and Optimize Drives, and select it to open the application.
In the Optimize Drives window, all system drives will be displayed under Status. You can set a distinct optimization schedule for each drive.
To configure a schedule, select the desired drive and click on the Change settings button at the bottom right. Ensure the Run on a schedule (recommended) checkbox is checked and choose your preferred frequency (the default is Weekly, but you can opt for Daily or Monthly).
4. Leverage DirectStorage for Gaming
If your Windows 11 system has multiple SSDs, consider utilizing a high-speed NVMe SSD for gaming to boost performance. This technology, named DirectStorage, streamlines data loading during gaming.
Traditionally, game data is loaded into RAM, processed via the CPU, and then transmitted to the GPU. DirectStorage, however, allows the GPU to pull data directly from the NVMe drive and memory, decreasing load times and latency.
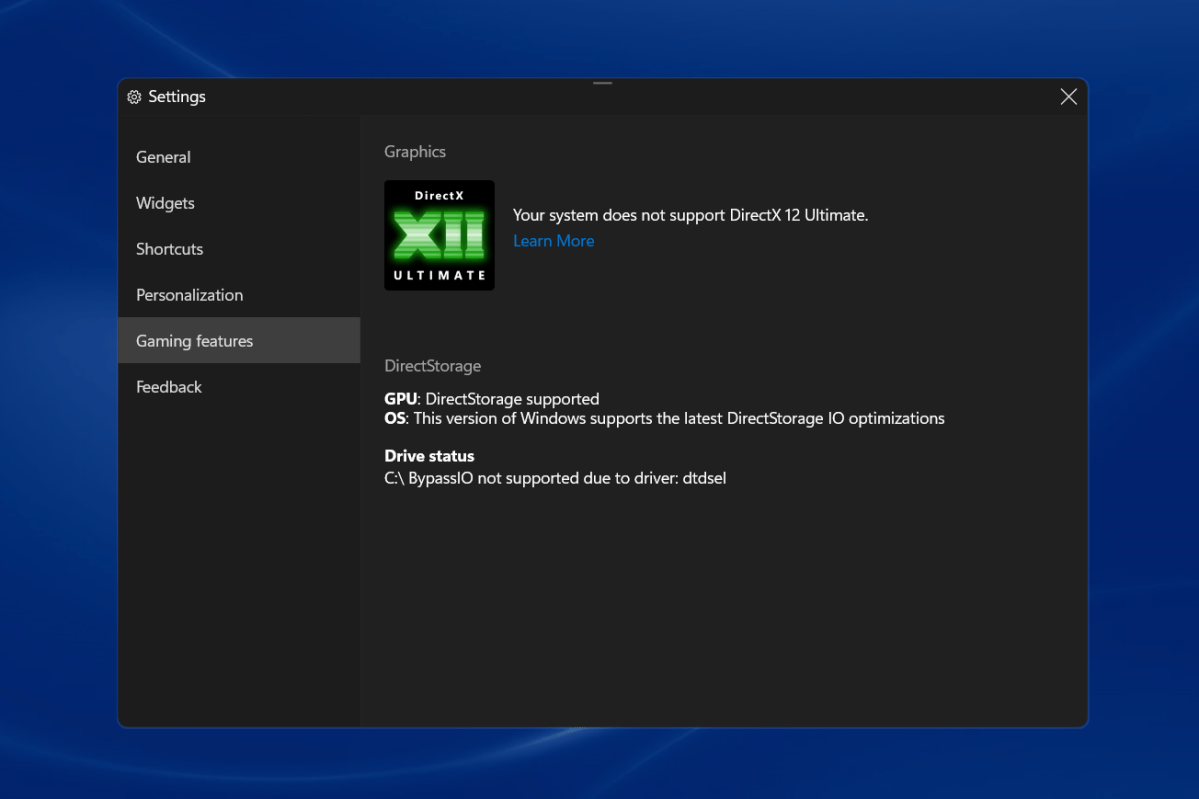
DirectStorage is typically enabled by default if the M.2 module and the SSD support the NVMe protocol, but it’s wise to verify its activation.
Joel Lee / IDG
Once you’re in gaming mode, click the gear icon in the top bar to access settings, then navigate to Gaming features to check DirectStorage compatibility for your GPU and OS.
To maximize gaming performance, ensure your games are installed on an NVMe drive that supports DirectStorage.
Related: Essential settings every PC gamer should optimize
5. Disable Sleep Mode and Power Throttling
When your PC or laptop remains inactive for some time, it will enter energy-saving mode, causing the SSD to go into sleep mode as well.
When resuming activity, the SSD takes a few seconds to wake up. While this may not seem like a long delay, it can accumulate and become bothersome over time.
You can adjust the power plan settings in Windows to keep the SSD from sleeping, but keep in mind that this means the SSD will always consume power.
Joel Lee / IDG
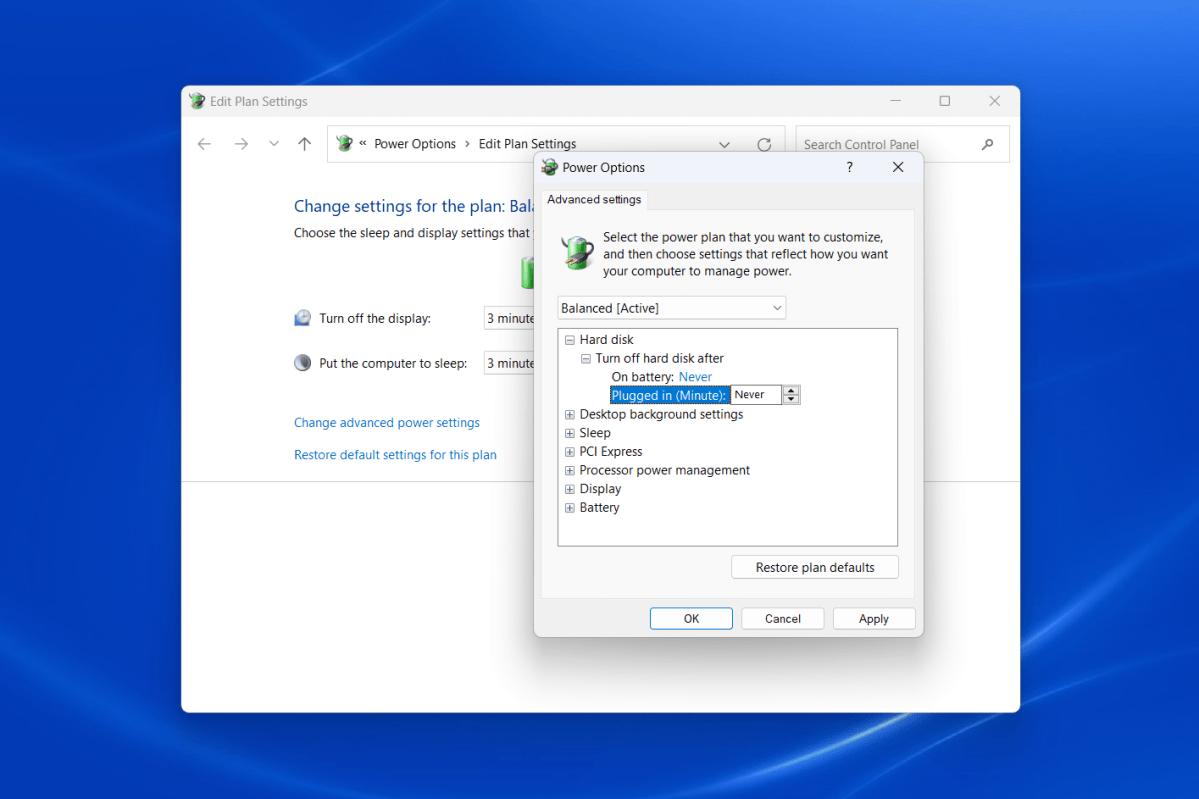
To make the adjustment, open the Start menu and look for Edit power plan to access that page in the Control Panel. Alternatively, navigate through Control Panel > System and Security > Power Options > Change plan settings.
Then click on Change advanced power settings. Open the Hard disk section, expand Turn off hard disk after, and set the value to 0 or Never for battery and plugged-in modes.
You can also adjust the PCI Express settings by expanding the Link State Power Management option and setting it to Off for both battery and plugged-in modes. This prevents throttling of the PCIe bus, thereby optimizing SSD performance, albeit with a slight increase in power consumption. (For laptops, opting for Moderate power savings may be more appropriate.)
Related: Warning signs that your SSD might be on the verge of failure.
6. Enhance Cooling with Heatsinks
Overheating can significantly affect SSD performance, prompting many newer models to include heat sinks, and many motherboards also come with built-in heat sinks for M.2 slots.
If your computer has good airflow, additional cooling might not be necessary. However, if your NVMe SSD frequently exceeds its recommended operating temperature, adding a heatsink could be beneficial.
The suitable operating temperature range for most M.2 SSDs is between 32°F (0°C) and 158°F (70°C). You can refer to your drive manufacturer’s support software to check the specific temperature parameters.
IDG
The need for extra cooling can also depend on the PCIe version. The faster the PCIe version, the greater the heat output. Therefore, manufacturers often recommend heat sinks for the latest PCIe 5.0 SSDs, and these models frequently come pre-installed with thermal protection. Passive cooling solutions typically use aluminum or copper and feature heat-conductive pads that sit atop the flash memory.
These passive heat sinks can be easily added for a modest investment, generally ranging from $5 to $20. Before purchasing, ensure there’s adequate height clearance in your PC case.
Ultimately, your SSD’s cooling needs hinge on how you utilize it daily. Under typical Windows usage, you may not fully engage the SSD’s performance potential since most tasks involve light loads, resulting in minimal input/output operations. Intel’s internal research suggests that most Windows applications operate under a queue depth of three or less, even during boot-up, when many small files are loaded. In contrast, tasks like video editing can push the SSD to its limits, often hitting the performance ceiling in terms of queue depth.