Monster Hunter Wilds has officially launched, bringing a ton of exciting new content for players to explore. With features like the Seikret mount, fresh weapon combos, and a range of new monsters, your initial gameplay hours in Wilds will be packed with exploration and learning. It’s a thrilling adventure out there!
Although much of the content in Monster Hunter Wilds is new, several familiar systems remain for veteran players. One returning feature is the Melding Pot, a tool hunters can utilize to create decorations. If you’re new to the Melding Pot or need a quick overview, read on to discover more about this essential facility.
Where Is The Melding Pot?
If you’re just diving into the Forbidden Lands, don’t expect to find the Melding Pot right away. You will first encounter Vio the Melding Pot Master in Suja, Peaks of Accord, a small camp situated on the eastern edge of the map.
You’ll reach Suja for the first time during Chapter 3-3: Through the Dusk. It’s the camp located along the twisting mountain path where you meet the Allhearken.
Unlike previous Monster Hunter games, Wilds doesn’t feature a central base camp. Most resources can be secured at the Winward Plain’s base camp, but you will need to fast travel to Suja whenever you wish to utilize the Melding Pot. You’ll find it set up in a tent on the left side of the camp, directly across from the Smithy.
Look for the icon on the map that resembles a vase with six dots above it.
How Do You Use The Melding Pot?
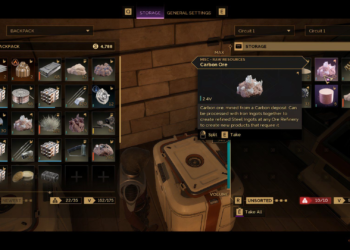
The Melding Pot serves as a vendor that allows you to trade in unwanted decorations and materials to create new ones. Upon your first visit, you’ll have access to two recipes: Mystery Orb – Sword and Mystery Orb – Armor. These decorations provide offensive (weapon) and defensive (armor) bonuses, respectively.
To craft a mystery orb, you’ll need to exchange materials that have equivalent point values. After selecting the orb you want to create, pick the materials you’d like to trade for it.
A meter on the left displays the required melding points and how much more you need to spend to create the selected orb. You can produce as many orbs of the same type as you want, provided you have sufficient materials to trade. Both the Sword and Armor orbs cost four points each.
For instance, if you want to create five Sword mystery orbs, you will need a total of 20 points in exchanged materials. You can mix and match different materials until you reach the required total.
Be mindful to exchange materials that are in multiples of four. Any remaining points will result in wasted materials.
Once you’ve selected your materials, hit Meld, and you’ll receive all your new decorations in one go. The goal here is to clear out excess decorations and hopefully obtain some powerful new ones.
As you progress, you’ll also gain the ability to transform unnecessary Artian materials into random Artian materials using a similar method. Below is a list of Melding Pot recipes along with their unlock criteria.
-
Wyverian Melding
Recipe Cost Unlocks When Mystery Orb – Sword 4pts First visit to Suja Mystery Orb – Armor 4pts First visit to Suja Glowing Orb – Sword 10pts Complete 5-1: Storm-cold Vortex Glowing Orb – Armor 10pts Complete 5-1: Storm-cold Vortex -
Meld Relics
Recipe Cost Unlocks When Damaged Weapon Shard 5pts Complete 5-1: Storm-cold Vortex
Which Decorations Should You Use?
A smart strategy is to only trade decorations when you have more than you actually need. Each skill has a maximum level that can’t be exceeded. For instance, Iron Skin maxes out at level three, meaning you don’t need to keep more than three Def Lock Jewels. If you happen to have five, you can afford to exchange two for new decorations.
In the Melding Pot menu, you can switch between seeing jewel names and the skills they grant. Viewing by skill names can make searching much easier.
It’s generally safe to trade decorations that you’re sure you won’t use. Some decorations are specific to certain weapons, so they may not be of any benefit to you. For example, if you never use guns or bows, you won’t need any Precise Jewels, which enhance Ballistics. Unless there’s a chance you’ll experiment with ranged weapons later on, feel free to offload those decorations.
You can also sell surplus decorations to the Smithy in exchange for Zenny.
Here’s a rundown of materials you can trade at the Melding Pot and their respective values:
-
Wyverian Melding
Material Value One-slot Jewels 1pt Two-slot Jewels 4pts Crushed Crystal 20pts Dalthydon Wool 20pts -
Meld Relics
Material Value Wyverian Bloodstone Shard 1pt Wyverian Bloodstone (S) 5pts Broken Blade 1pt Crushed Tube 1pt Cracked Disc 1pt Rusted Device 1pt
When Should You Start Using The Melding Pot?
When you first stumble upon the Melding Pot in Suja, it’s unlikely you will have many surplus materials to trade. Once you complete the main storyline and start farming monster parts in High Rank, you will start accumulating a wealth of decorations that may not be useful to you.
You won’t need to worry about optimizing the Melding Pot until you have chosen a specific build that relies on particular decorations. It’s important to note that the Melding Pot isn’t as efficient as farming high-ranking monsters, so consider using it as a supplementary means of acquiring additional decorations.
In comparison to earlier Monster Hunter titles, the Melding Pot seems less emphasized now. It’s beneficial to utilize the Melding Pot when you have specific decorations in mind, but otherwise, you won’t miss out if you don’t frequently visit this vendor.
Unless, of course, you’re simply looking for a reason to spend time with Vio!