You’ve set up your router securely and confirmed that all your devices—whether connected via Wi-Fi or Ethernet—are enjoying a stable internet connection. Now that your online issues are behind you, it’s time to maximize your network’s potential beyond just browsing the web.
File Sharing
One of the easiest ways to enhance your network’s utility is to enable file sharing among your various devices. Gone are the days of needing a USB flash drive or external hard drive to transfer files between computers.
However, Microsoft has introduced some complexity into file sharing with Windows 10 and 11. The switch to Microsoft accounts and the use of Windows Hello means that sharing files via the SMB protocol often requires unique usernames and passwords, which many users may not have set up.
Despite this, it is still possible to configure file sharing effectively, especially if you have several computers and want to exchange files across your network without the need for installing any third-party software or if your other computers operate on different operating systems.

Foundry
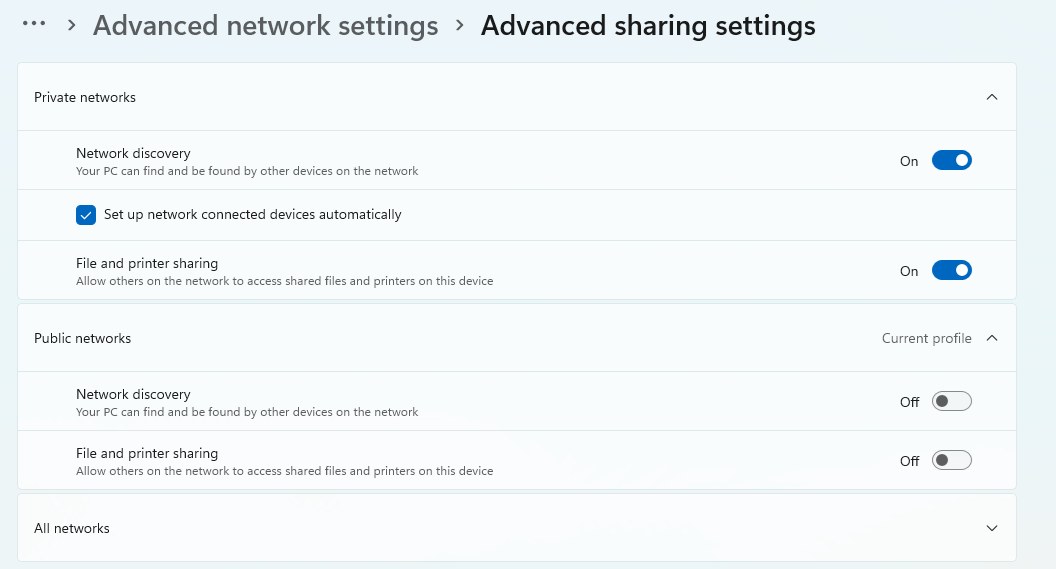
Previously, file sharing settings were located in the Control Panel, but now they can be found in Settings > Network & Internet > Advanced Network Settings > Advanced Sharing Settings. Here you’ll find the new home for these settings.
To activate the feature, expand the Private networks section and toggle on File and Printer Sharing. Below it, you will also see options for Public networks, where you can choose to keep file sharing disabled, particularly for networks like public Wi-Fi.
Remember, Windows treats all networks as public by default, so you must adjust your Ethernet or Wi-Fi settings under Network & Internet to mark your connection as a Private network.
When connecting devices, note that you will require an account with a password. Creating a new local account specifically for file sharing is the simplest approach, found under Settings > Accounts > Other Users. If this account is only used for sharing, it will occupy minimal disk space. Just remember to set this as a standard user and not an administrator.
Once connected, you will default to accessing that user’s home folder. If you wish to share additional folders, right-click on the folder in Explorer, select Properties, navigate to the Sharing tab, click Share, and select the account you’ve created from the dropdown menu before clicking on Add.

Foundry
If you experience issues with connectivity, it’s possible that Windows Firewall is blocking connections that should otherwise be authorized for file sharing. To troubleshoot connection problems, follow these steps:
- Access Windows Security.
- Select Firewall & Network Protection, then proceed to Advanced Settings.
- Click on Inbound Rules, navigate to Ports > Protocol and Ports, and click New Rule in the upper right corner.
- Choose Protocol and Ports, input 445 in the Specific Local Ports textbox, and select TCP.
- After clicking Next, choose Allow the Connection and on the next window, select Private only before naming the rule appropriately.
Share Printers
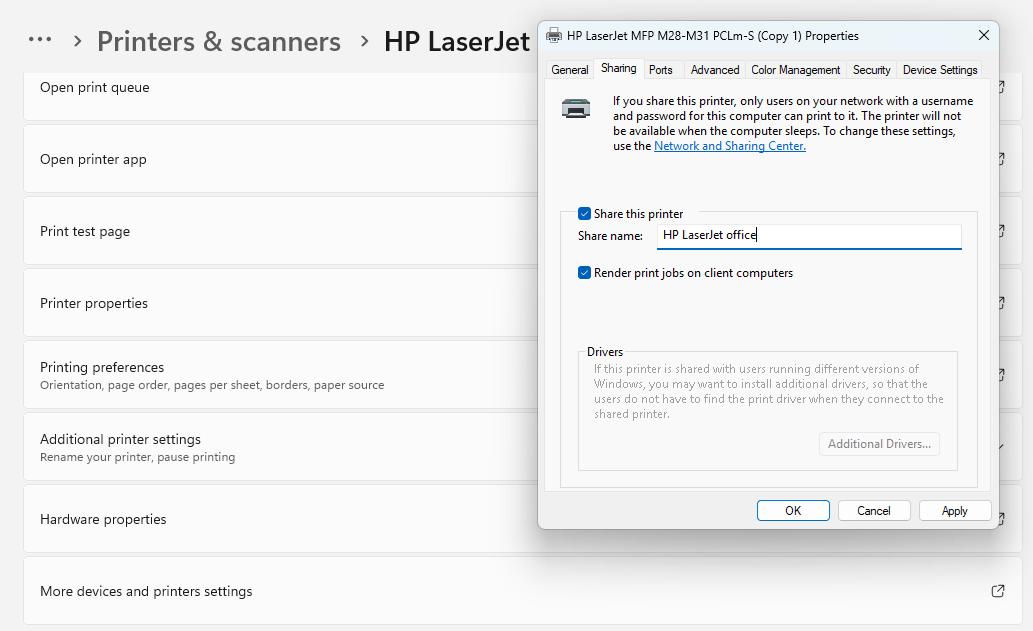
If you have a printer that connects to one of your computers, you can set it up for sharing, allowing other computers on your network to print using that device. To share a printer in Windows 10 or 11, follow these steps:

Foundry
Open Settings, navigate to Bluetooth & devices > Printers & scanners, select the printer you wish to share, then click Printer Properties. A new window will appear where you can click on the Sharing tab and check the box next to Share This Printer. Feel free to rename it to something more descriptive, such as the printer’s brand and room location. This will make it easier to identify in future if you have multiple shared printers.

Foundry
To integrate a shared printer on another device, revisit Settings > Bluetooth & devices > Printers & scanners and click Add a device. The shared printer should appear, and clicking on Add device will complete the connection. On alternative operating systems, the process varies. For Mac users, the steps are located in System Preferences > Printers and Scanners.

Foundry
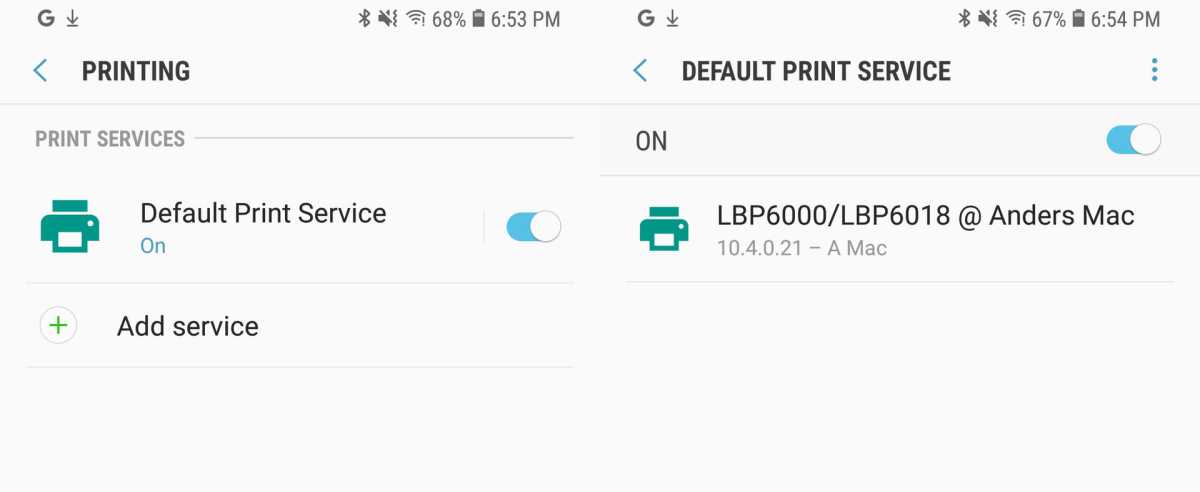
To set up a printer in Android, navigate through Settings > Connected Devices > Connection Options > Printing. Choose the default service, and if none are available, you must first add one before selecting the desired network printer.
For iOS users, the process is a bit trickier as traditional network printing isn’t natively supported. If your printer lacks Apple’s AirPrint capabilities, you may need to install an AirPrint server on your computer.
Consider a NAS Device
If you have multiple computers and devices in your home, investing in a NAS (Network Attached Storage) device can be a wise choice for centralized storage for backups and shared files. Essentially, a NAS serves as a simple server housed within a multi-drive enclosure that runs a specialized operating system.
Synology is a leading manufacturer in the NAS market, offering operating systems with numerous add-ons to run various servers on the device. Additional brands include Asustor, Qnap, and Terramaster.
Typically, a NAS accommodates two or four hard drives, and it is recommended to set them up in RAID configurations which offer redundancy. This means that if one drive fails unexpectedly, data remains safe, allowing for disk replacement while preserving access to other files.
For setups with four drives, RAID 5 is a smart option, allowing 75% of the total storage space to be usable while providing security against a single drive failure. Just remember to act swiftly to replace any failed drives.
Keep in mind that while RAID provides data redundancy, it does not replace the need for backups. It is recommended to have an external hard drive dedicated to periodic backups of the entire NAS, particularly if it holds crucial files.
Three Applications for NAS
1. File Server
Perhaps the most evident use of a NAS is as a file server, offering a reliable storage space for a multitude of files. This is particularly beneficial given that many modern computers come equipped with smaller SSDs, limiting onboard storage capacity. You can utilize your NAS to archive sizable photo and video collections.
If your home includes surveillance cameras, you can often designate your NAS as the storage location for their recordings.
2. Backup Server
The easiest way to implement backups with a NAS is by using software like Arq Backup or Duplicati on each computer you intend to secure. If your NAS supports individual user accounts, setting up separate accounts for family members can be beneficial for managing backups. Utilize SFTP where available; otherwise, SMB is an alternative.

Synology
3. Private Cloud
Instead of relying on third-party services for cloud storage like Dropbox, consider establishing your own private cloud via your NAS. Many Synology devices offer cloud synchronization services, such as Synology Drive, which are straightforward to set up and compatible with most operating systems.
Should you decide to expose any portion of your home network to the internet, ensure you are prioritizing security. Accessing devices remotely, while feasible, can be complex; however, setting up a VPN server, often a feature on modern routers like those from Asus, can simplify the process.
Transform an Old Computer into a Server
You don’t need to invest in new hardware to experiment with running a server at home; an old computer you have lying around can suffice. If you have a retired desktop in storage, consider repurposing it.
Note that larger tower computers often consume more power than compact mini PCs and can occupy excess space. Still, if you have the power supply or space to spare, it’s a cost-effective way to get started.
Utilizing a standard computer allows you to stick with Windows, bypassing the need to learn Linux, which is commonly used for home servers. (Check out the Reddit group r/homelab for ideas from others setting up their home labs).

Screen Capture
1. Media Server with Plex or Jellyfin
If your old computer is equipped with at least a sixth-generation Intel processor, it can function as a media server capable of streaming your movies and TV shows to various devices. The Quick Sync Video feature allows transcoding of video formats, enabling any device or browser to play videos regardless of the original file’s format.
Plex and Jellyfin are the two predominant media server applications. While both are viable for home users, Jellyfin operates on an open-source model, exempting users from the need for developer accounts.

Screen Capture
2. Minecraft Server
If you have kids or grandchildren who enjoy Minecraft, you can easily set up an old computer as a Minecraft server without needing to install complex Linux systems. Simply install a modern version of Java, create a folder for the server, place the server software there, and follow the instructions to get it running.
Numerous online guides, including detailed YouTube tutorials, can assist you in setting up a server, especially if you want to include specific modifications.
3. File Server
If your old computer comes with space for multiple hard drives, it can be transformed into a NAS-like file server for sharing files, backups, and more—essentially replicating the functionality of a dedicated NAS device. A well-configured file server offers enhanced performance and a wider array of features; using an operating system like Linux allows you to work with advanced file systems such as ZFS that improve storage efficiency and security beyond typical RAID setups.

Foundry
4. Smart Home Hub with Home Assistant
While a Raspberry Pi is often the go-to choice for this task, you can also use an existing computer to set up Home Assistant, either as a full operating system or through virtualization software like VirtualBox or VMware Workstation, if you wish to keep Windows running.
Installing directly on your computer might seem excessive since Home Assistant functions as a lightweight server that requires minimal hardware, needing only a network connection and a USB adapter for Zigbee or Z-Wave for integrating smart devices.
The Home Assistant community provides straightforward installation guides for both direct installation and virtual machine setups, complete with pre-configured disc images for easy use.
When employing VirtualBox, the process is relatively simple: create a new virtual machine designated for 64-bit Linux, ensure EFI is selected instead of BIOS, use the downloaded .vdi file for the hard drive, configure it for networking with a Bridged Adapter, and select Intel HD Audio for audio. Ensure your computer is connected via Ethernet for optimal performance.
